

Owner’s Booklet Manual del Usuario
Blood Glucose Monitoring System
Sistema de Control de Glucosa en la Sangre
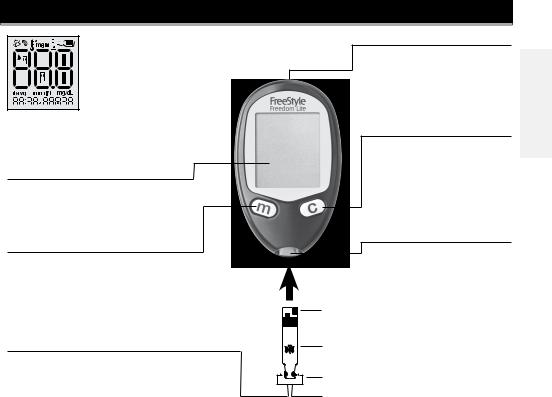
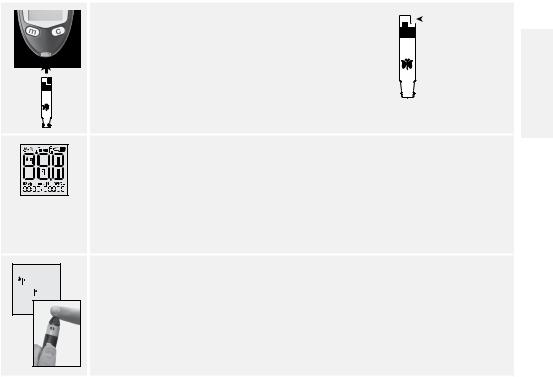
The FreeStyle Freedom Lite® Meter and How It Works
System Check Screen
This display always appears when the meter is
turned on. You should check that your meter
matches the example exactly every time
your meter turns on. Do not use the
meter if the display check screen
does not exactly match the example. If the screen does
not match, the meter may show an incorrect result. Please contact Customer Care.
Display Screen
Displays your test results and other important information.
m (Mode) Button
•Moves to different mode settings
•Scrolls backward
•Silences a reminder alarm
Top
Data Port
Downloads test results. Requires a compatible data management system. For more information, please go to our website or contact Customer Care.
c (Configure) Button
•Marks a control solution test
•Scrolls forward
•Silences a reminder alarm
•Changes the date, time, alarm settings, sound options, and reviews stored readings
Test Strip Port
Insert the Top end of a new FreeStyle Lite® test strip here. The meter powers on when you insert the test strip.
English
|
Sample Areas (dark-colored half-circles on test strip) |
FreeStyle Lite test strip |
||
|
Apply blood or control solution to one sample |
|||
|
area only. Insert strip into the meter printed side |
Bottom |
||
|
up (see image to the right). |
|||
|
Sample area |
i |
||

Table of Contents
English
|
The FreeStyle Freedom Lite® Meter and How It Works.. . . . . . . . . . . . . . . . . . . . . . . . |
i |
|
Important Information About Your Blood Glucose Monitoring System.. .. .. .. .. .. |
1 |
|
Intended Use .. .. .. .. .. .. .. .. .. .. .. .. .. .. .. .. .. .. .. .. .. .. .. .. .. .. .. .. .. .. .. .. .. .. .. .. .. .. .. .. .. .. .. .. .. .. .. .. .. .. .. .. .. .. .. .. .. .. .. .. .. .. .. .. .. |
1 |
Setting Up the Meter .. . . . . . . . . . . . . . . . . . . . . . . . . . . . . . . . . . . . . . . . . . . . . . . . . . . . . . . . 2 Purpose . . . . . . . . . . . . . . . . . . . . . . . . . . . . . . . . . . . . . . . . . . . . . . . . . . . . . . . . . . . . . . . . . . . . . . . 2 Set Sound Volume . . . . . . . . . . . . . . . . . . . . . . . . . . . . . . . . . . . . . . . . . . . . . . . . . . . . . . . . . . . . . 3 Set Time . . . . . . . . . . . . . . . . . . . . . . . . . . . . . . . . . . . . . . . . . . . . . . . . . . . . . . . . . . . . . . . . . . . . . . . 4 Set Date . . . . . . . . . . . . . . . . . . . . . . . . . . . . . . . . . . . . . . . . . . . . . . . . . . . . . . . . . . . . . . . . . . . . . . . 5
Testing Your Blood Glucose .. .. .. .. .. .. .. .. .. .. .. .. .. .. .. .. .. .. .. .. .. .. .. .. .. .. .. .. .. .. .. .. .. .. .. .. .. .. .. .. .. .. .. .. .. .. .. .. .. .. 7 Purpose . . . . . . . . . . . . . . . . . . . . . . . . . . . . . . . . . . . . . . . . . . . . . . . . . . . . . . . . . . . . . . . . . . . . . . . 7 Prepare to Test .. .. .. .. .. .. .. .. .. .. .. .. .. .. .. .. .. .. .. .. .. .. .. .. .. .. .. .. .. .. .. .. .. .. .. .. .. .. .. .. .. .. .. .. .. .. .. .. .. .. .. .. .. .. .. .. .. .. .. .. .. .. .. .. 7 Important Test Strip Information . . . . . . . . . . . . . . . . . . . . . . . . . . . . . . . . . . . . . . . . . . . . . .9. Performing a Blood Glucose Test .. .. .. .. .. .. .. .. .. .. .. .. .. .. .. .. .. .. .. .. .. .. .. .. .. .. .. .. .. .. .. .. .. .. .. .. .. .. .. .. .. .. .. .. .. 10
Understanding Blood Glucose Test Results .. .. .. .. .. .. .. .. .. .. .. .. .. .. .. .. .. .. .. .. .. .. .. .. .. .. .. .. .. .. .. .. .. 12 Low and High Blood Glucose Results . . . . . . . . . . . . . . . . . . . . . . . . . . . . . . . . . . . . . . . . . 13
Error Codes.. . . . . . . . . . . . . . . . . . . . . . . . . . . . . . . . . . . . . . . . . . . . . . . . . . . . . . . . . . . . . . . . . 16 Troubleshooting .. .. .. .. .. .. .. .. .. .. .. .. .. .. .. .. .. .. .. .. .. .. .. .. .. .. .. .. .. .. .. .. .. .. .. .. .. .. .. .. .. .. .. .. .. .. .. .. .. .. .. .. .. .. .. .. .. .. .. .. 19

FreeStyle® Control Solution.. .. .. .. .. .. .. .. .. .. .. .. .. .. .. .. .. .. .. .. .. .. .. .. .. .. .. .. .. .. .. .. .. .. .. .. .. .. .. .. .. .. .. .. .. .. .. .. .. 21
Purpose . . . . . . . . . . . . . . . . . . . . . . . . . . . . . . . . . . . . . . . . . . . . . . . . . . . . . . . . . . . . . . . . . . . . . 21
Control Solution Information .. .. .. .. .. .. .. .. .. .. .. .. .. .. .. .. .. .. .. .. .. .. .. .. .. .. .. .. .. .. .. .. .. .. .. .. .. .. .. .. .. .. .. .. .. .. .. .. 21
Out of Range Control Solution Results . . . . . . . . . . . . . . . . . . . . . . . . . . . . . . . . . . . . . . . . 22
Performing a Control Solution Test . . . . . . . . . . . . . . . . . . . . . . . . . . . . . . . . . . . . . . . . . . . 23
Using Your Meter Memory.. . . . . . . . . . . . . . . . . . . . . . . . . . . . . . . . . . . . . . . . . . . . . . . . . . 26
Purpose . . . . . . . . . . . . . . . . . . . . . . . . . . . . . . . . . . . . . . . . . . . . . . . . . . . . . . . . . . . . . . . . . . . . . 26
Viewing Blood Glucose Averages in Memory . . . . . . . . . . . . . . . . . . . . . . . . . . 26. . . . . . .
Viewing Test Results in Memory . . . . . . . . . . . . . . . . . . . . . . . . . . . . . . . . . . . . . . . . . . . . . . 27
Setting Reminder Alarms (optional) .. .. .. .. .. .. .. .. .. .. .. .. .. .. .. .. .. .. .. .. .. .. .. .. .. .. .. .. .. .. .. .. .. .. .. .. .. .. .. .. 28
Purpose . . . . . . . . . . . . . . . . . . . . . . . . . . . . . . . . . . . . . . . . . . . . . . . . . . . . . . . . . . . . . . . . . . . . . 28
Transferring Test Results To a Computer .. .. .. .. .. .. .. .. .. .. .. .. .. .. .. .. .. .. .. .. .. .. .. .. .. .. .. .. .. .. .. .. .. .. .. .. .. .. 29
|
Maintaining the Meter. . . . . . . . . . . . . . . . . . . . . . . . . . . . . . . . . . . . . . . . . . . . . . . . . . . . . . |
30 |
|
Replacing the Battery . . . . . . . . . . . . . . . . . . . . . . . . . . . . . . . . . . . . . . . . . . . . . . . . . . . . . . . . |
30 |
|
Cleaning the Meter . . . . . . . . . . . . . . . . . . . . . . . . . . . . . . . . . . . . . . . . . . . . . . . . . . . . . . . . . . |
32 |
Specifications.. .. .. .. .. .. .. .. .. .. .. .. .. .. .. .. .. .. .. .. .. .. .. .. .. .. .. .. .. .. .. .. .. .. .. .. .. .. .. .. .. .. .. .. .. .. .. .. .. .. .. .. .. .. .. .. .. .. .. .. .. .. .. 33
Definition of Symbols.. .. .. .. .. .. .. .. .. .. .. .. .. .. .. .. .. .. .. .. .. .. .. .. .. .. .. .. .. .. .. .. .. .. .. .. .. .. .. .. .. .. .. .. .. .. .. .. .. .. .. .. .. .. .. 35
English

Important Information About Your Blood Glucose Monitoring System
Intended Use
Use outside the body only (in vitro diagnostic use)..
The FreeStyle Freedom Lite® Blood Glucose Monitoring System is intended for use in the quantitative measurement of glucose in capillary whole blood from the finger, upper arm and palm and venous whole blood.. It is intended for use by healthcare professionals and people with diabetes mellitus
at home as an aid in monitoring the effectiveness of a diabetes control program.. It is not intended for the diagnosis of or screening for diabetes mellitus, and it is not intended for use on neonates or arterial blood..
IMPORTANT:
The device must not be used on more than one person including other family members due to the risk of spreading infection.. All parts of the device and its accessories are considered biohazardous and can potentially transmit infectious diseases, even after performing the cleaning procedure..1,2 Healthcare professionals handling this system must always wear gloves and should follow the infection control policies and procedures approved by their facility..
Use only FreeStyle Lite® test strips and FreeStyle® control solution with this meter.. Other products can produce inaccurate results..
1“FDA Public Health Notification: Use of Fingerstick Devices on More than One Person Poses Risk for Transmitting Bloodborne Pathogens: Initial Communication” (2010) http://www..fda..gov/MedicalDevices/Safety/AlertsandNotices/ucm224025..htm.. 2“CDC Clinical Reminder: Use of Fingerstick Devices on More than One Person Poses Risk for Transmitting Bloodborne Pathogens” (2010) http://www..cdc..gov/injectionsafety/Fingerstick-DevicesBGM..html
Contact Customer Care Toll Free at 1-888-522-5226 www.MyFreeStyle.com
•The expected glucose level for a non-diabetic, non-pregnant fasting adult is under 100 mg/dL..3
•Two hours after meals, levels should be less than 140 mg/dL..3
•Consult your healthcare professional to determine the range that is appropriate for you..
Warning:
|
• |
Test on your fingers if you are testing for low blood glucose (hypoglycemia) or if you suffer |
English |
|
|
from hypoglycemia unawareness.. |
|||
|
• |
This system contains small parts that may be dangerous if swallowed.. |
||
Caution: Please read all the instructions provided in this owner’s booklet and practice the testing procedures before using the FreeStyle Freedom Lite® system.. Blood glucose monitoring should be done with the guidance of a healthcare professional..
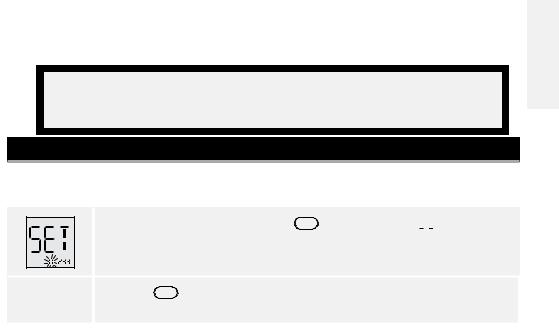
Setting Up the Meter
Purpose
The purpose of this section is to set the meter sound volume, time and date..
1. With the meter off, press and hold m for 3 seconds until 


 appears..
2. Press m to bypass setting the optional reminder alarms.. You may choose to set these later (see Setting Reminder Alarms section)..
|
3American Diabetes Association Clinical Practice Recommendations: Diagnosis and classification of diabetes mellitus.. |
2 |
|
Diabetes Care 2005;28 (Suppl..1):S37-S42 |
English
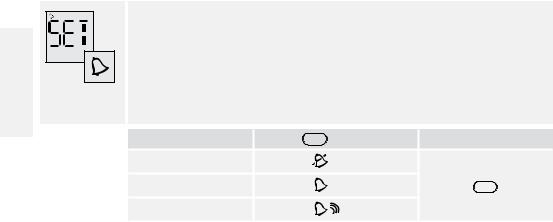
Set Sound Volume
With the sound volume on, your meter will beep when:
• The test strip is full of blood
• The test result appears on the display
• An error occurs
You may also choose to silence your meter.. 3. Set sound volume
|
If you prefer: |
Press c until you see: |
Then |
|
No sound |
||
|
A low beep |
• Press |
m to save |
|
A louder beep |
|
3 |
Contact Customer Care Toll Free at 1-888-522-5226 www.MyFreeStyle.com |
English
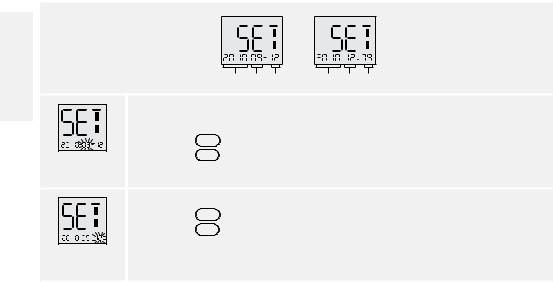
Set Date
Note: The date format can display either:
|
OR |
||||
|
Year Month Day |
Year Day Month |
|||
|
The month will flash first |
||||
|
7. Set month |
||||
|
• |
Press |
c to display correct month |
||
|
Month |
• |
Press |
m to save |
|
|
8. Set day |
c to display correct day |
|||
|
• |
Press |
|||
|
• |
Press |
m to save |
||
|
Day |
|
5 |
Contact Customer Care Toll Free at 1-888-522-5226 www.MyFreeStyle.com |
![]()
English
Testing Your Blood Glucose
Purpose
The purpose of this section is to produce an accurate blood glucose test result..
Prepare to Test
1. Select your test site..
Note: Avoid moles, veins, bones, and tendons.. Bruising may occur at the test site.. If bruising occurs, consider selecting another site..
There are differences in testing on fingers versus alternative sites..
Warning:
Test on your fingers if you are testing for low blood glucose (hypoglycemia) or if you suffer from hypoglycemia unawareness..
Check for low blood glucose when:
•You feel symptoms such as weakness, sweating, shakiness, headache, or confusion
•You eat a delayed meal after taking insulin
•You are following your healthcare professional’s advice
|
7 |
Contact Customer Care Toll Free at 1-888-522-5226 www.MyFreeStyle.com |

IMPORTANT:
2.Wash your hands and the test site with warm water and soap to ensure accurate results..
•Thoroughly dry your hands and the test site..
•Do not use lotion or cream on the test site..
3.Check test strip expiration date..
Do not use expired test strips; they may produce inaccurate results..
IMPORTANT: Use only FreeStyle Lite® test strips.. Other test strips can produce inaccurate results.. The test strips are for single use only..
English
8

Important Test Strip Information
|
Please read the FreeStyle Lite® test strip package insert for more information. |
||
|
• Use the test strips within the meter’s operating range: 40° – 104° F (4° – 40° C).. |
||
|
• |
Store test strips in a cool, dry place between 40° – 86° F (4° – 30° C).. |
|
|
English |
• |
Store test strips away from direct sunlight and heat.. |
|
• |
Clean and dry your hands before removing a strip from the vial.. |
|
|
• |
Store test strips in their original vial only.. |
|
|
• Close the vial cap tightly immediately after removing a test strip.. |
||
|
• |
Do not transfer test strips to another container.. |
|
|
• |
Do not store test strips outside the vial.. |
|
|
• |
Do not bend, cut, or alter test strips.. |
|
|
• |
Do not apply blood to both sides of the test strip.. |
|
|
• |
Do not press the test strip against the test site.. |
|
|
• |
Do not scrape the blood onto the test strip.. |
|
|
• |
Do not apply blood to the flat side of the test strip.. |
|
|
• |
Do not apply blood to the test strip when the test strip is out of the meter.. |
|
|
• |
Do not put blood or foreign objects into the meter.. |
Warning: Drying agents in the test strip vial may be harmful if inhaled or swallowed and may irritate skin and eyes..
|
9 |
Contact Customer Care Toll Free at 1-888-522-5226 www.MyFreeStyle.com |
Performing a Blood Glucose Test
|
1. |
Remove test strip from vial.. |
Top |
|||
|
2. |
Insert test strip to turn meter on.. |
Note: The meter turns off after 2 minutes of inactivity.. Remove and reinsert the unused test strip to restart the meter..
If the meter does not turn on, go to Troubleshooting section..
Printed side up


 Sample areas
3.Confirm System Check Screen..
•This display appears when you turn on the meter.. Do not use the meter if the display check screen does not exactly match the example. Contact Customer Care.
•See The FreeStyle Freedom Lite® Meter and How It Works section for more information..
•If the system check screen does not appear, go to Troubleshooting section..
4.Obtain a blood drop..
When the 
 and
and  appears, use the lancing device to obtain a blood drop.. (See FreeStyle® lancing device insert for instructions..)
The test strip requires only a 0..3 microliter of blood for accurate results..
English
10

English
5.Apply and hold blood to 1 sample area of the test strip until:
•You see short lines moving clockwise on the display or
•You hear a beep
This indicates the test strip obtained enough blood and the meter is checking your glucose level.. If a short line does not appear after 5 seconds, the sample may be too small.. You can add blood to the same side only for up to 60 seconds.. If the test does not start after applying blood drop, go to Troubleshooting section..
|
6. View result |
||
|
The result appears on the display when the test is complete.. The time that the |
||
|
meter takes to display a result depends on your blood glucose level.. Higher |
||
|
(Example only) |
glucose levels require more time.. |
|
|
Note: If you see an “Er1, Er2, Er3, or Er4” on the display, it is an error code.. Go to |
||
|
Error Codes section.. |
7.Remove test strip to turn meter off.. Discard used lancet and test strip properly..
8.Wash your hands and test site thoroughly with warm water and soap after handling the meter, lancing device or test strips..
|
11 |
Contact Customer Care Toll Free at 1-888-522-5226 www.MyFreeStyle.com |
Understanding Blood Glucose Test Results
The meter displays results in mg/dL.. The unit of measurement is preset.. You cannot change this setting..
IMPORTANT: The meter displays results from 20 – 500 mg/dL.. Low or high blood glucose results can indicate a potentially serious medical condition..
English
12

English
Low and High Blood Glucose Results
|
Result |
What It Means |
What To Do |
|
lower than |
Low (hypoglycemic) |
Repeat the test with a new test strip, even if you do |
|
60 mg/dL |
not feel that you have low blood glucose.. |
|
|
If your blood glucose result is still not consistent with |
||
|
your symptoms, contact your healthcare professional |
||
|
and follow his or her treatment advice.. |
||
|
higher than |
High (hyperglycemic) |
Repeat the test with a new test strip, even if you do |
|
240 mg/dL |
not feel that you have high blood glucose.. |
|
|
If your blood glucose result is still not consistent with |
||
|
your symptoms, contact your healthcare professional |
||
|
and follow his or her treatment advice.. |
|
13 |
Contact Customer Care Toll Free at 1-888-522-5226 www.MyFreeStyle.com |

|
Display |
What It Means |
Symptoms |
|
Severe low blood |
Weakness |
|
|
glucose |
Sweating |
|
|
Appears when |
Shakiness |
|
|
Headache |
||
|
result is: |
||
|
Confusion |
||
|
lower than |
||
|
20 mg/dL |
What To Do
Follow your healthcare professional’s advice to treat low blood glucose..
If your blood glucose result does not match how you feel, perform a control solution test to confirm that your meter and strips are working properly..
IMPORTANT:
•Severe dehydration may cause false low results.. If you believe you are suffering from severe dehydration, contact your healthcare professional immediately..
•Contact your healthcare professional if you have symptoms that do not match your test result, and you have followed the instructions in this owner’s booklet..
English
14

English
|
Display |
What It Means |
Symptoms |
|
Severe high blood |
Fatigue |
|
|
glucose |
Thirst |
|
|
Appears when |
Excess Urination |
|
|
Blurry Vision |
||
|
result is: |
||
|
higher than |
||
|
500 mg/dL |
What To Do
Follow your healthcare professional’s advice to treat high blood glucose..
If your blood glucose result does not match how you feel, perform a control solution test to confirm that your meter and strips are working properly..
|
15 |
Contact Customer Care Toll Free at 1-888-522-5226 www.MyFreeStyle.com |
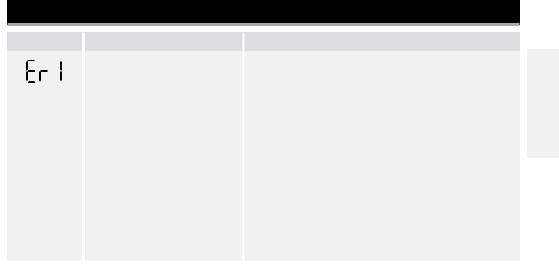
Error Codes
• The sample is too small
•There may be a problem with the test strip
•Meter error
•Very low blood glucose lower than 20 mg/dL
What To Do
1.Follow your healthcare professional’s advice to treat low blood glucose if you have symptoms
such as:
• Weakness • Shakiness
• Sweating • Headache
• Confusion
2.Perform a control solution test using a new test strip.. If the test results are within the range printed on the test strip vial, retest using blood and a new test strip..
3.If the control solution result is out of range or the error reappears, contact Customer Care..
English
16
![]()
English
|
Message |
What It Means |
|
• There may be a problem |
|
|
• |
with the test strip |
|
Meter error |
|
|
• |
Very high blood glucose |
|
• |
higher than 500 mg/dL |
|
HIGH control solution |
|
|
was applied when the |
|
|
temperature was too |
|
|
cold.. (Applies only to |
|
|
control solution labeled |
|
|
as HIGH).. |
What To Do
1.Follow your healthcare professional’s advice to treat high blood glucose if you have symptoms
|
such as: |
• Thirst |
|
• Fatigue |
|
|
• Excess urination |
• Blurry vision |
2.Perform a control solution test using a new test strip.. If the test results are within the range printed on the test strip vial, retest using blood and a new test strip..
3.If the control solution result is out of range or the error reappears, contact Customer Care..
|
17 |
Contact Customer Care Toll Free at 1-888-522-5226 www.MyFreeStyle.com |

English
Troubleshooting
|
What It Means |
What To Do |
|||
|
1.The meter |
• |
Test strip is inserted |
1. |
Insert test strip print side up, top end in.. |
|
does not |
upside down, or bottom |
|||
|
enter test |
end in, or not fully |
|||
|
mode after |
inserted into the meter |
|||
|
inserting a |
||||
|
test strip. |
• |
No battery is installed |
1. |
Install battery with (+) facing up.. |
|
• |
Battery is installed |
|||
|
incorrectly |
||||
|
• |
Dead battery |
1. |
Replace battery.. Reset date and time, if |
|
|
necessary.. |
||||
|
2. |
If meter still does not enter test mode, |
|||
|
contact Customer Care.. |
||||
|
• |
Defective test strip or |
1. |
Contact Customer Care.. |
|
|
meter |
||||
|
• Blood or foreign objects |
||||
|
put in the test strip port |
|
19 |
Contact Customer Care Toll Free at 1-888-522-5226 www.MyFreeStyle.com |
Содержание
- 1 Особенности и характеристики глюкометра FreeStyle Freedom Lite
- 2 Инструкция по применению
- 2.1 Забор крови
- 2.2 Тест-полоски
Компании, выпускающие глюкометры, внедряют больше новых технологий для облегчения измерений. Лидером считается глюкометр FreeStyle Freedom Lite от компании Abbott. Это подходящий выбор как для тех, кто впервые столкнулся с проблемой измерения уровня сахара в крови, так и для людей, болеющих диабетом уже давно. C Freestyle Freedom каждый способен выполнять тест как профессионал.

Сменные элементы: иглы и тест-полоски — одноразовые.
Freestyle LIte — аппарат средней ценовой категории и несмотря на это, качественный и точный. При покупке глюкометра в комплект идет сам аппарат, 10 тест-полосок, инструкции на нескольких языках, аннотации, чехол, ручка-прокалыватель и набор иголок в количестве 10 штук. Производитель указывает следующие особенности аппарата:
- компактный — 4,6×4,1×2 см, его легко носить с собой;
- измеряет уровень сахара и количество кетоновых тел в крови;
- для проверки не требуется много крови;
- если количество крови недостаточно, то прибор сообщает об этом и человек может добавить ее в течение 60 сек;
- на большом дисплее четко видны измерения, а если в помещении темно, то для этого сделала подсветка экрана;
- аппарат автоматически включается, когда вставляется тест-полоска, и выключается после завершения работы;
- имеет встроенную память и функцию передачи показаний на компьютер.
Глюкометр работает на 2-х батарейках, что тоже говорит о его практичности. Благодаря этим особенностям он и приобрел популярность сначала среди пациентов, а потом и в медицинских учреждениях, позволяя сократить время, потраченное на анализ и ожидание результатов. Кроме того, пациенты могут сохранить свои результаты и приносить их лечащему врачу для контроля.
Вернуться к оглавлению
Инструкция по применению

Использование глюкометра условно можно разделить на этап забора крови и тестирования этого образца на тест-полоске. Глюкометр прост в использовании, поэтому даже интуитивно понятно, что и как делать. А если что-то осталось непонятно, то стоит воспользоваться инструкцией или видеопособиями.
Вернуться к оглавлению
Забор крови
Для забора крови используется ручка-прокалыватель, а сам процесс происходит следующим образом:
- Наконечник ручки снимается, и под ним видно отверстие.
- Одноразовая иголка — ланцет, распаковывается и вставляется в это отверстие.
- Чтобы снять колпачок с игры, другой рукой придержать ланцет.
- Затем колпачок ручки ставится на место.
- С помощью регулятора выставляется необходимая глубина прокола.
- Прокалыватель взводится с помощью механизма на обратной стороне — он оттягивается до щелчка и ручка готова к работе.
Перед забором крови, руки обязательно должны быть чистыми, а место прокола желательно продезинфицировать.
Вернуться к оглавлению
Тест-полоски
Чтобы включить прокалыватель нужно вставить новую тестовую полоску в желтый порт глюкометра. После этой манипуляции на экране появляется значок с капелькой крови — это значит, что аппарат готов к тестированию образца. Ручку-прокалыватель необходимо поднести к коже и с помощь кнопки спуска проколоть кожу, если крови мало, то можно слегка надавить рядом с местом прокола. Далее, глюкометр со вставленным тестом-полоской подносится к месту прокола, сам впитывает необходимое количество крови и через 10 сек. на экране высвечивается готовый результат.
Summary
Производитель Freestyle
Категория Blood Glucose Meter
Документы, которые мы получаем от производителя устройства Freestyle Freedom Lite мы можем разделить на несколько групп. Это в частности:
— технические чертежи Freestyle
— инструкции обслуживания Freedom Lite
— паспорта изделия Freestyle
— информационные брошюры
— энергетические этикетки Freestyle Freedom Lite
Все из них важны, однако самую важную информацию с точки зрения пользователя мы найдем в инструкции обслуживания Freestyle Freedom Lite.
Группа документов, определяемая как инструкции обслуживания, делится также на более подробные типы, такие как: Инструкции монтажа Freestyle Freedom Lite, инструкции обслуживания, короткие инструкции или инструкции пользователя Freestyle Freedom Lite. В зависимости от потребностей, Вам необходимо поискать требуемый документ. На нашем сайте Вы можете просмотреть самую популярную инструкцию использования изделия Freestyle Freedom Lite.
Полная инструкция обслуживания устройства Freestyle Freedom Lite, как должна выглядеть?
Инструкция обслуживания, определяемая также как пособие пользователя, или просто «руководство» — это технический документ, цель которого заключается в использовании Freestyle Freedom Lite пользователями. Инструкции пишет, как правило технический писатель, языком, доступным для всех пользователей Freestyle Freedom Lite.
Полная инструкция обслуживания Freestyle, должна заключать несколько основных элементов. Часть из них менее важная, как например: обложка / титульный лист или авторские страницы. Однако остальная часть, должна дать нам важную с точки зрения пользователя информацию.
1. Вступление и рекомендации, как пользоваться инструкцией Freestyle Freedom Lite — В начале каждой инструкции, необходимо найти указания, как пользоваться данным пособием. Здесь должна находится информация, касающаяся местонахождения содержания Freestyle Freedom Lite, FAQ и самых распространенных проблем — то есть мест, которые чаще всего ищут пользователи в каждой инструкции обслуживания
2. Содержание — индекс всех советов, касающихся Freestyle Freedom Lite, которое найдем в данном документе
3. Советы по использованию основных функций устройства Freestyle Freedom Lite — которые должны облегчить нам первые шаги во время использования Freestyle Freedom Lite
4. Troubleshooting — систематизированный ряд действия, который поможет нам диагностировать а в дальнейшем очередность решения важнейших проблем Freestyle Freedom Lite
5. FAQ — чаще всего задаваемые вопросы
6. Контактные данные Информация о том, где искать контактные данные производителя / сервисного центра Freestyle Freedom Lite в данной стране, если самостоятельно не получится решить проблему.
![]()
Русский
- Bedienungsanleitung Freestyle Freedom Lite
- Freestyle Freedom Lite User Manual
- Manual Usuario Freestyle Freedom Lite
- Mode d’emploi Freestyle Freedom Lite
- Istruzioni Freestyle Freedom Lite
- инструкция Freestyle Freedom Lite
- Freestyle Freedom Liteの取扱説明書
- Handleiding Freestyle Freedom Lite
- Manual de uso Freestyle Freedom Lite
Вам нужна инструкция? Мы поможем Вам ее найти и сэкономить Ваше время.
- 36 stron
- 3.98 mb
Изделие Freestyle Freedom Lite, а также другие, которыми Вы пользуетесь ежедневно, наверняка вы получили в комплекте с инструкцией обслуживания. Из опыта наших пользователей мы знаем, что большинство из Вас не уделили этому особого внимания. Большая часть инструкций, сразу же после покупки попадает в корзину для мусора вместе с коробкой — это ошибка. Ознакомьтесь с информацией, касающейся инструкции Freestyle Freedom Lite, которая поможет Вам в будущем сэкономить нервы и избежать головной боли.
Важная подсказка — не забывайте хотя бы раз прочитать инструкцию Freestyle Freedom Lite
Если вы не хотите каждый раз читать информационные брошюры, касающиеся, тех или Freestyle Freedom Lite иных изделий, достаточно, прочитать их раз — сразу же после покупки устройства. Вы получите основное знания, касающиеся поддержания изделия Freestyle Freedom Lite в хорошем эксплуатационном состоянии, так, чтобы без проблем достигнуть его планируемого цикла работы. Затем инструкцию можно отложить на полку и вернуться к ней только в случае, если вы не уверены, правильно ли проводится техобслуживание изделия. Правильный уход является необходимым элементом Вашего удовольствия Freestyle Freedom Lite.
Раз в году пересмотрите шкафчик, в котором держите инструкции для всех устройств, — выбросите те, которыми вы уже не пользуетесься. Это поможет Вам сохранять порядок в своей домашней базе инструкций обслуживания.
Summary of Contents for Freestyle Freedom Lite
Что находится в инструкции Freestyle Freedom Lite? Почему стоит ее прочитать?
- Гарантия и подробности, касающиеся техобслуживания изделия
Хорошей идеей будет прикрепить чек к странице инструкции. Если что-то плохое случится во время использования Freestyle Freedom Lite, у вас будет комплект документов, необходимый для гарантийного ремонта. В этой части инструкции вы найдете информацию об авторизованных сервисных центрахFreestyle Freedom Lite а также, как самостоятельно правильно ухаживать за оборудованием — так, чтобы не потерять гарантийных прав. - Указания по монтажу и Setup
Не терять нервов и времени на самостоятельную попытку установки и первого запуска изделия. Воспользуйтесь рекомендациями производителя Freestyle Freedom Lite чтобы правильно запустить изделие, без лишнего риска повреждения оборудования. - Информация, касающаяся дополнительных запчастей (входящих в комплект а также являющихся опцией)
Пересматривая эту часть документа вы сможете проверить, доставлен ли ваш Freestyle Freedom Lite с полним комплектом аксессуаров. Вы также сможете узнать, какие дополнительные запчасти или аксессуары для Freestyle Freedom Lite Вы сможете найти и докупить к своему устройству. - Troubleshooting
Самые частые проблемы, касающиеся Freestyle Freedom Lite и методы их решения. Это очень полезная часть руководства по обслуживанию — она позволит Вам сэкономить много времени на поиск решений. 90% проблем с Freestyle Freedom Lite повторяется у многих пользователей. - Требования, касающиеся питания и энергетический класс
Информация, касающаяся количества потребляемой энергии, а также рекомендации, касающиеся установки и питания Freestyle Freedom Lite. Прочитайте, чтобы оптимально пользоваться Freestyle Freedom Lite и не использовать большего количества ресурсов, нежели это необходимо для правильной работы изделия. - Специальные функции Freestyle Freedom Lite
Здесь вы можешь узнать, как персонализировать изделие Freestyle Freedom Lite. Вы узнаете, какие дополнительные функции могут помочь Вам удобно использовать продукт Freestyle Freedom Lite а также, какие функции Вашего устройства оптимальны для выполнения конкретной деятельности.
Как видите в инструкции вы найдете информацию, которая реально поможет Вам в использовании Вашего изделия. Стоит с ней ознакомиться, чтобы избежать разочарований, возникающих из более короткого, нежели предусматривалось, периода исправности изделия Freestyle Freedom Lite. Если все же вы не хотите копить инструкции в своем доме, наш сайт поможет Вам в этом — вы должны найти у нас руководство по обслуживанию большинства из своих устройств, а также Freestyle Freedom Lite.
Комментарии (0)
Page 1 — Manual del Usuario
Owner’s BookletManual del UsuarioBlood Glucose Monitoring SystemSistema de Control de Glucosa en la Sangre
Page 2 — Sample area
6Date Format9. Set date format• Press m to accept date format or• Press c to change• Press m to saveYear10. Set year• Press m to accept year o
Page 3 — Table of Contents
7Testing Your Blood GlucosePurposeThe purpose of this section is to produce an accurate blood glucose test result. Prepare to Test1. Select your test
Page 4
8IMPORTANT:2. Wash your hands and the test site with warm water and soap to ensure accurate results. • Thoroughly dry your hands and the test site. •
Page 5 — Intended Use
9Important Test Strip InformationPlease read the FreeStyle Lite® test strip package insert for more information.• Use the test strips within the mete
Page 6 — 2. Press
10Performing a Blood Glucose Test1. Remove test strip from vial.2. Insert test strip to turn meter on.Note: The meter turns o after 2 minutes of inac
Page 7 — • An error occurs
115. Apply and hold blood to 1 sample area of the test strip until: • You see short lines moving clockwise on the display or• You hear a beepThis in
Page 8 — 6. Set time format
12Understanding Blood Glucose Test ResultsThe meter displays results in mg/dL. The unit of measurement is preset. You cannot change this setting.IMPOR
Page 9
13Low and High Blood Glucose ResultsResult What It Means What To Dolower than 60 mg/dLLow (hypoglycemic) Repeat the test with a new test strip, even i
Page 10 — 11. Press and hold
14Display What It Means Symptoms What To DoAppears when result is: lower than 20 mg/dLSevere low blood glucoseWeaknessSweatingShakinessHeadacheConfusi
Page 11 — 1. Select your test site
15Display What It Means Symptoms What To DoAppears when result is:higher than 500 mg/dLSevere high blood glucoseFatigueThirstExcess UrinationBlurry Vi
Page 12
iSample Areas (dark-colored half-circles on test strip)Apply blood or control solution to one sample area only. Insert strip into the meter printed si
Page 13
16Error CodesMessage What It Means What To Do• The sample is too small• There may be a problem with the test strip• Meter error• Very low blood
Page 14 — Printed side up
17Message What It Means What To Do• There may be a problem with the test strip• Meter error• Very high blood glucose higher than 500 mg/dL• HI
Page 15 — • You hear a beep
18Message What It Means What To Do• Incorrect test procedure. For example, putting blood on the test strip before inserting it into the meter or app
Page 16
19TroubleshootingWhat It Means What To Do1. The meter does not enter test mode after inserting a test strip.• Test strip is inserted upside down, o
Page 17
20What It Means What To Do2. The test does not start after applying the blood drop.• Blood drop is too small 1. Add blood to the same sample area
Page 18
21FreeStyle® Control SolutionPurposeFreeStyle control solution is a red liquid that contains a xed amount of glucose. The purpose of doing a control
Page 19
22Out of Range Control Solution Results• Repeat the test if control solution results are outside the range printed on the test strip vial.• Stop u
Page 20 — Error Codes
23Performing a Control Solution Test 1. Check control solution expiration date.2. Remove test strip from vial.3. Insert test strip to turn meter on.
Page 21
244. Conrm System Check Screen.• This display appears when you turn on the meter. Do not use the meter if the display check screen does not exactly
Page 22 — • Meter error
25(Example only)6. View result.The result appears on the display when the test is complete. 7. Compare the control solution result to the range printe
Page 23 — Troubleshooting
Table of ContentsThe FreeStyle Freedom Lite® Meter and How It Works …iImportant Information About Your Blood Glucose Monitoring
Page 24 — • Sample applied after
26Using Your Meter MemoryPurposeThe purpose of this section is to review your stored test results and 7-, 14-, and 30-day averages.Viewing Blood Gluco
Page 26
28Setting Reminder Alarms (optional)PurposeThe purpose of this section is to set up to four reminder alarms to prompt you to test throughout the day.R
Page 27
295. Set alarm sound volumeIf you prefer:Press c until you see:ThenNo sound • Press m to saveA low beep A louder beep6. Press c and repeat 2, 3, 4
Page 28
30Maintaining the MeterReplacing the BatteryThe meter comes with a #2032, 3-volt, lithium battery installed. It provides power for about 1000 tests. •
Page 29 — 8. Press and hold
311. Slide the battery door to the right to open.2. To remove the battery, pull the plastic tab up to release the battery.3. Insert a new battery: (+)
Page 30 — • Press
32Cleaning the MeterAvoid getting dirt, dust, blood, control solution, or liquid in the meter test strip and data ports.Clean the outside of the meter
Page 31
33SpecificationsAssay method Coulometric electrochemical sensorAutomatic shuto 2 minutes of inactivityBattery life 1000 testsCalibration Plasma equiva
Page 32
34Operating relative humidity5% to 90% (non-condensing)Operating temperature40° to 104° F (4° to 40° C)Power source One CR 2032, 3V lithium battery,
Page 33
35Definition of SymbolsConsult instructions for use For in vitro diagnostic medical deviceTemperature limitation Catalog numberManufacturer RecycleBatc
Page 34 — Replacing the Battery
FreeStyle® Control Solution. . . . . . . . . . . . . . . . . . . . . . . . . . . . . . . . . . . . . . . . . . . . . . . . . 21Purpose …
Page 35
iÁreas de la muestra (semicírculos de color oscuro en la tira de prueba)Aplique sangre o solución de control en una sola área de la muestra. Introduzc
Page 37 — Specifications
Solución de Control FreeStyle® …21Propósito . . . . . . . . . . . . . . . . . . . . . . . . . . . . . . .
Page 38
1Información Importante sobre el Sistema de Control de Glucosa en la SangrePropósito de Uso Exclusivamente para uso externo (uso diagnóstico in vitro)
Page 39 — Definition of Symbols
2• El nivel de glucosa esperado en una persona adulta no diabética ni embarazada en ayunas es más bajo que 100 mg/dL.3• Dos horas después de las c
Page 40 — Extremo superior
3Configuración del Volumen de SonidoSi el volumen del sonido está encendido, el medidor emite un pitido cuando:• La tira de prueba está llena de sangr
Page 41
4Configuración de la HoraFormato de la horaNota: El medidor puede mostrar la hora en el formato de 12 horas (1:24P) o en el de 24 horas (13:24). Si eli
Page 42
5Configuración de la FechaNota: El formato de la fecha puede mostrarse de una de las siguientes maneras:AñoOAño Mes Día Día MesMesEl mes parpadea en pr
Page 43 — Propósito de Uso
6Formato de la fecha9. Congure el formato de la fecha• Oprima m para aceptar el formato de la fecha u• Oprima c para cambiarlo• Oprima m para g
Page 44 — 2. Oprima
7Realización de Pruebas de Glucosa en la SangrePropósitoEl propósito de esta sección es producir un resultado exacto de la prueba de glucosa en la san
Page 45 — • Ocurre un error
1Important Information About Your Blood Glucose Monitoring SystemIntended Use Use outside the body only (in vitro diagnostic use).The FreeStyle Freedo
Page 46 — 5. Congure los minutos
8IMPORTANTE:2. Lávese las manos y la zona de prueba con agua tibia y jabón para asegurarse de obtener resultados exactos. • Séquese bien las manos y
Page 47 — • Oprima
9Información Importante sobre la Tira de PruebaLea el prospecto de las tiras de prueba FreeStyle Lite® para obtener más información.• Use las tiras d
Page 48 — 11. Oprima sin soltar
10Cómo Realizar una Prueba de Glucosa en la Sangre1. Extraiga la tira de prueba del vial.2. Introduzca la tira de prueba en el medidor para encenderlo
Page 49 — Preparación para la Prueba
115. Ponga y mantenga en contacto con la sangre un área de la muestra de la tira de prueba hasta que: • Vea unas rayas que se mueven en la pantalla
Page 50
12Significado de los Resultados de las Pruebas de Glucosa en la SangreEl medidor muestra los resultados en mg/dL. La unidad de medida está precongurad
Page 51
13Resultados de Glucosa en la Sangre Alta y BajaResultado Qué Significa Qué HacerMás bajo que 60 mg/dLBaja (hipoglucemia) Repita la prueba con una tira
Page 52 — Áreas de la muestra
14Qué Muestra la PantallaQué Significa Síntomas Qué HacerAparece cuando el resultado es: Más bajo que 20 mg/dLNivel bajo de glucosa en la sangre graveD
Page 53 — • Escuche un pitido
15Qué Muestra la PantallaQué Significa Síntomas Qué HacerAparece cuando el resultado es:Más alto que 500 mg/dLNivel alto de glucosa en la sangre graveC
Page 54
16Códigos de ErrorMensaje Qué Significa Qué Hacer• La muestra es demasiado pequeña• Es posible que haya un problema con la tira de prueba• Error d
Page 55
17Mensaje Qué Significa Qué Hacer• Es posible que haya un problema con la tira de prueba• Error del medidor• Nivel muy alto de glucosa en la sang
Page 56
2• The expected glucose level for a non-diabetic, non-pregnant fasting adult is under 100 mg/dL.3• Two hours after meals, levels should be less tha
Page 57
18Mensaje Qué Significa Qué Hacer• Procedimiento de prueba incorrecto. Por ejemplo, se aplicó sangre en la tira de prueba antes de introducirla en el
Page 58 — Códigos de Error
19Resolución de ProblemasQué Significa Qué Hacer1. El medidor no ingresa en el modo de prueba después de que se introduce una tira de prueba.• La ti
Page 59
20Qué Significa Qué Hacer2. La prueba no comienza después de que se aplica la gota de sangre.• La gota de sangre es demasiado pequeña1. Agregue san
Page 60 — • Error del medidor
21Solución de Control FreeStyle®PropósitoLa solución de control FreeStyle es un líquido de color rojo que contiene una cantidad determinada de glucosa
Page 61 — Resolución de Problemas
22Resultados de la Solución de Control Fuera de Rango• Repita la prueba si los resultados de la solución de control se encuentran fuera del rango im
Page 62 — • La muestra se aplicó
23Cómo Realizar una Prueba de la Solución de Control 1. Verique la fecha de caducidad de la solución de control.2. Extraiga la tira de prueba del vi
Page 63
244. Compruebe la pantalla de vericación del sistema.• Así se ve la pantalla cuando se enciende el medidor. No use el medidor si la pantalla de ver
Page 64
25(Sólo como ejemplo)6. Vea el resultado.El resultado aparece en la pantalla cuando ha nalizado la prueba. 7. Compare el resultado de la prueba de la
Page 65
26Uso de la Memoria del MedidorPropósitoEl propósito de esta sección es revisar los resultados de prueba guardados y los promedios de 7, 14 y 30 días.
Page 66
27Repaso de los Resultados de las Pruebas en la MemoriaEl medidor almacena en su memoria los últimos 400 resultados de pruebas con fecha y hora. Oprim
Page 67 — 8. Oprima sin soltar
3Set Sound VolumeWith the sound volume on, your meter will beep when:• The test strip is full of blood • The test result appears on the display• An
Page 68 — • Oprima
28Configuración de las Alarmas de Recordatorio (opcional)PropósitoEl propósito de esta sección es congurar hasta cuatro alarmas de recordatorio para a
Page 69
295. Congure el volumen del sonido de la alarmaSi prefiere:Oprima c hasta que vea:DespuésSin sonido • Oprima m para guardarUn sonido bajo Un sonido m
Page 70
30Mantenimiento del MedidorCambio de la PilaEl medidor viene con una pila de litio numero 2032, de 3 voltios, previamente instalada. Suministra energí
Page 71
311. Deslice la tapa de la pila hacia la derecha para abrirla.2. Para retirar la pila, jale la lengüeta de plástico hacia arriba para que se libere la
Page 72 — Cambio de la Pila
32Limpieza del MedidorEvite que entre polvo, suciedad, sangre, solución de control o líquido en el puerto de la tira de prueba y el puerto de datos de
Page 73
33EspecificacionesMétodo de ensayo Sensor electroquímico coulométricoApagado automático 2 minutos de inactividadDuración de la pila 1000 pruebasCalibra
Page 74 — Limpieza del Medidor
34Humedad relativa de funcionamientoDel 5% al 90% (sin condensación)Temperatura de funcionamientoEntre 40 °F y 104 °F (4 °C y 40 °C)Fuente de energía
Page 75 — Especificaciones
35Definición de los SímbolosConsultar las instrucciones de usoDispositivo médico para diagnóstico in vitroLimitación de temperatura Número de catálogoF
Page 76
©2010 -2014 Abbott ART22812-001 Rev. D 09/14FreeStyle® and other brand marks are trademarks of Abbott Diabetes Care Inc. in various jurisdictions. Th
Page 77 — Definición de los Símbolos
4Set TimeTime FormatNote: Your meter can display either the 12-hour (1:24P) or the 24-hour (13:24) time formats. If you prefer the 12-hour format, the
Page 78 — 1-888-522-5226
5Set DateNote: The date format can display either:Year Month DayORYear Day MonthMonthThe month will ash rst7. Set month• Press c to display correc