
Как ни странно, автомобиль у меня уже 2 года, а про самую «ГЛАВНУЮ» функцию я не написал! И самое что интересное — не пользовался ей. По порядку… Мне очень тяжело ей пользоваться, потому что грех ездить на авто со 170 лошадками как овощ =)
1) Для кого нужна эта функция?
а) Для тех, кто хочет сэкономить немного наличных.
б) Для тех, кто хочет заработать баллы и похвалиться фоткой продвинутого овощеводителя (Eco-водителя).
2) Для чего она нужна?
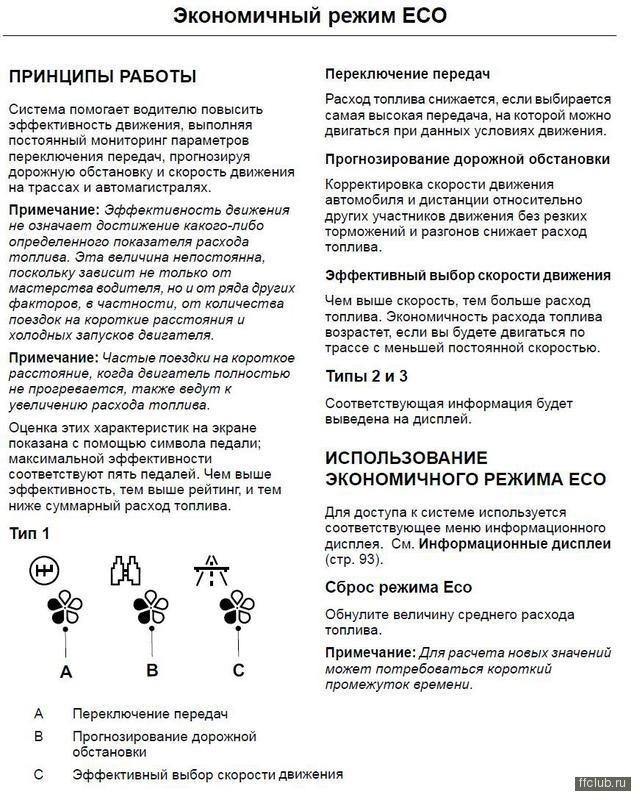
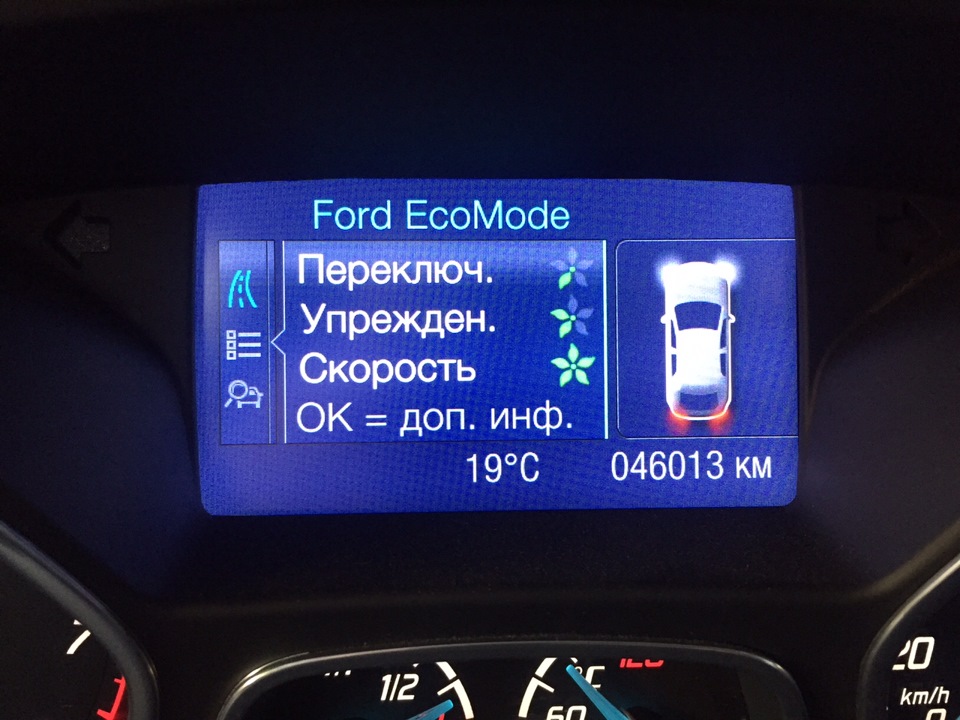
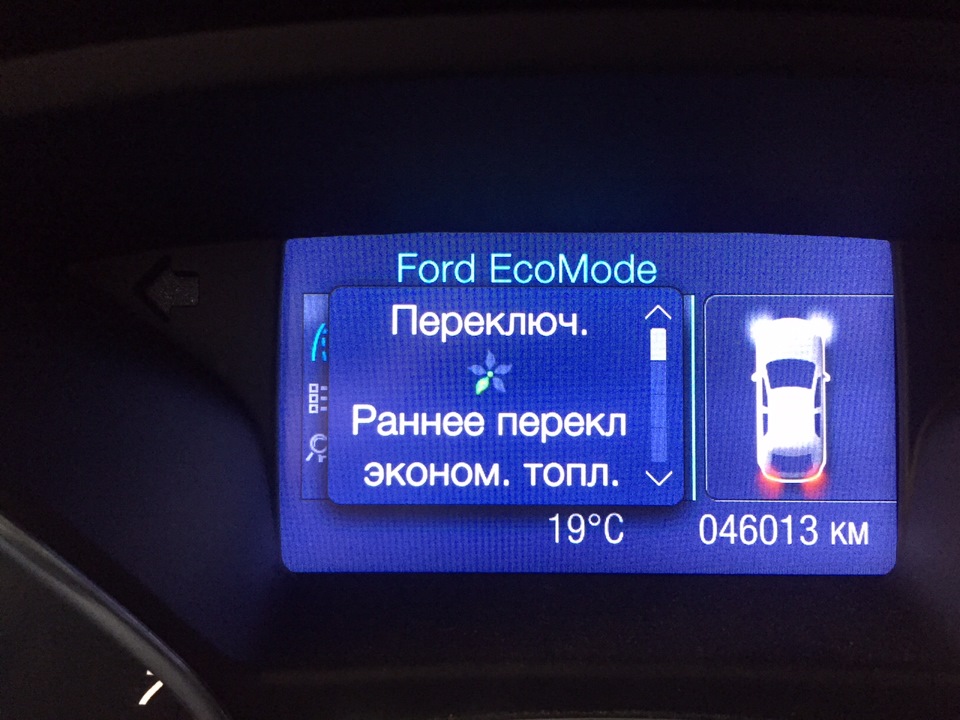
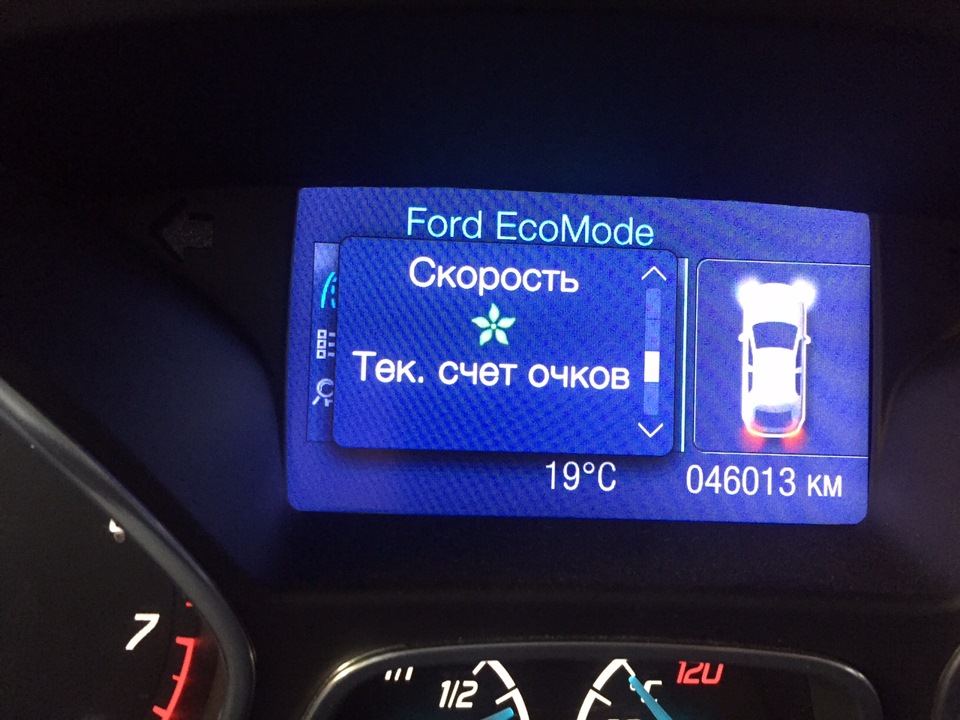
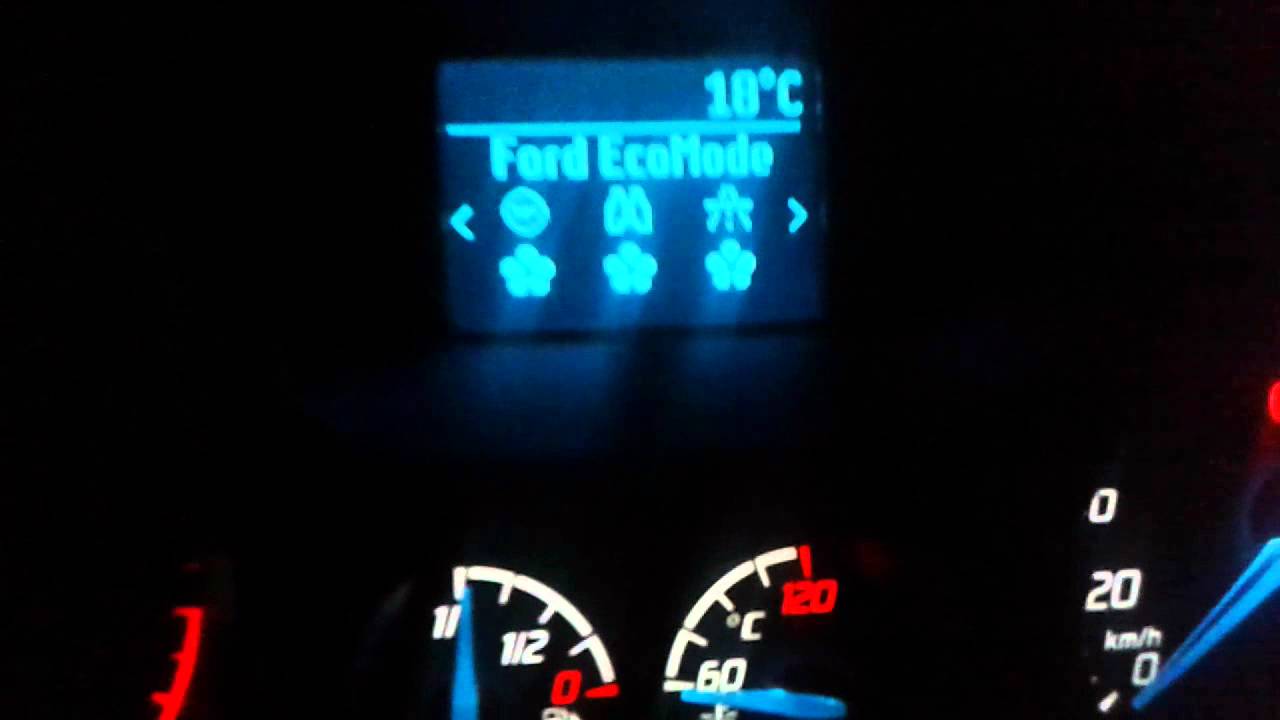
Функция EcoMode позволяет экономить топливо. При включении функции на дисплее бортового компьютера начинает появляться зеленая стрелочка, предлагающая переключать передачи в определенный момент. Естественно, такая функция работает только на автомобилях с механической коробкой передач.…
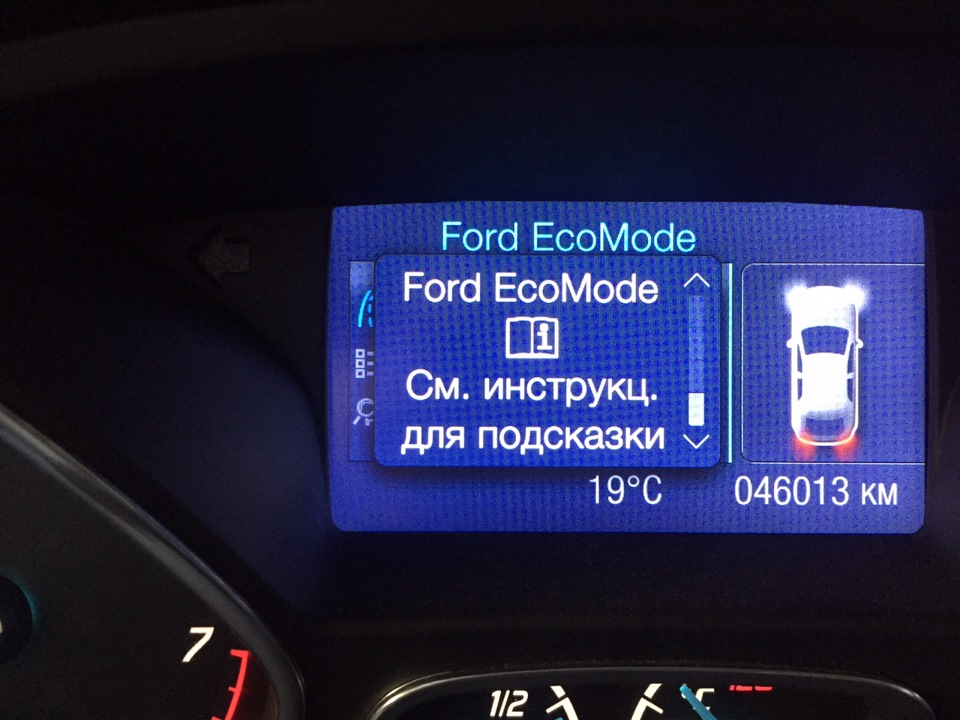
3) Как посмотреть или зайти в меню ECOMODE?
На левом джойстике руля нажимаем кнопки вверх или вниз до надписи «СРЕДНИЙ РАСХОД» — на нем будет видна стрелочка направо — жмем её и попадаем в подменю ECOMODE.
Цена вопроса: 0 ₽
Пробег: 46 000 км
Ford Eco Mode: Максимизируйте эффективность вашего автомобиля
Приветствую всех автомобилистов и любителей Ford! Сегодня я хотел бы поделиться с вами информацией о программе Ford Eco Mode, которая поможет вам максимизировать эффективность вашего автомобиля и сэкономить топливо. В этой статье я расскажу вам, что такое Ford Eco Mode, как он работает и какие преимущества он может принести.
Что такое Ford Eco Mode?
Ford Eco Mode — это интеллектуальная система, разработанная компанией Ford, которая анализирует и оптимизирует работу двигателя и других систем автомобиля для максимальной экономии топлива. Система контролирует и отслеживает различные параметры автомобиля в режиме реального времени, предлагая водителю рекомендации по оптимальному и экономичному стилю вождения.
При активации режима Eco Mode, ваш автомобиль будет адаптироваться под особенности вашего стиля вождения и дорожных условий, а также применять эффективные стратегии экономии топлива. Важно отметить, что Ford Eco Mode не ограничивает мощность или производительность автомобиля, а помогает вам улучшить экономичность его использования.
Как Ford Eco Mode помогает экономить топливо?
Ford Eco Mode обладает несколькими функциональными возможностями, которые позволяют экономить топливо и сокращать затраты на его заправку. Вот некоторые из ключевых возможностей системы:
- Анализ стиля вождения: Ford Eco Mode анализирует ваш стиль вождения и дает рекомендации по оптимальному ускорению и торможению, чтобы минимизировать расход топлива.
- Информативный дисплей: Система отображает информацию об экономичности вашего вождения на информационном дисплее автомобиля, что помогает вам отслеживать и улучшать производительность.
- Эко-подсказки: Ford Eco Mode предоставляет полезные советы и рекомендации, как экономить топливо, такие как выбор оптимальных переключений передач и ограничение использования энергозатратных устройств автомобиля.
Система также обучается вашему стилю вождения со временем и предлагает все более точные рекомендации, чтобы помочь вам достичь максимальной экономии топлива.
Преимущества использования Ford Eco Mode
Использование Ford Eco Mode может принести несколько значительных преимуществ:
- Экономия топлива: Система позволяет вам снизить расход топлива, что приводит к экономии денег и снижению загрязнения окружающей среды.
- Повышение дальности поездок: Благодаря экономическому стилю вождения, обучаемому Ford Eco Mode, вы сможете проехать больше километров на одной заправке.
- Удобство и информативность: Информационный дисплей и рекомендации системы делают использование Ford Eco Mode простым и удобным.
Не забывайте, что использование Ford Eco Mode — это лишь один из аспектов экономичной езды. Также важно следить за состоянием автомобиля, правильно используя переключения передач и выбирая оптимальную скорость движения.
Спасибо, что прочитали мою статью. Надеюсь, что информация о Ford Eco Mode была полезной для вас. Если у вас возникнут вопросы, не стесняйтесь задавать их в комментариях!
Видео ответы
Ford ecomode Focus 1.6 2015
Ford Eco Driving Event — Learning to save fuel | Drive it!
Ford Focus ecoboost eco mode
3.0
Rated 3.0 out of 5
3.0 out of 5 stars (based on 1 review)
Your overall rating
FORD TRANSIT 2020 (02) PDF MANUAL
Click here to download FORD TRANSIT 2020 (02) PDF MANUAL
FORD TRANSIT 2020 (02) PDF MANUAL
FREE ENGLISH PDF
OPERATING INSTRUCTIONS
USER GUIDE – USER MANUAL
OWNER GUIDE – OWNER MANUAL
REFERENCE GUIDE – REFERENCE MANUAL
INSTRUCTION GUIDE – INSTRUCTION MANUAL
Your overall rating
- YouTube
FORD TRANSIT 2020 (02) PDF MANUAL
FORD TRANSIT 2020 (02) PDF MANUAL

FORD TOURNEO CUSTOM /
TRANSIT CUSTOM Owner’s Manual

The information contained in this publication was correct at the time of going to print. In the interest of continuous development, we reserve the right to change specifications, design or equipment at any time without notice or obligation. No part of this publication may be reproduced, transmitted, stored in a retrieval system or translated into any language in any form by any means without our written permission. Errors and omissions excepted.
© Ford Motor Company 2014
All rights reserved.
Part Number: EK2J-19A321-AKA (CG3577en) 05/2014 20140501165133

Table of Contents
|
Introduction |
Manual Liftgate……………………………………….. |
33 |
|
|
About This Manual……………………………………. |
5 |
Security |
|
|
Symbols Glossary……………………………………… |
5 |
||
|
Data Recording………………………………………….. |
7 |
Passive Anti-Theft System……………………. |
34 |
|
Replacement Parts |
8 |
Anti-Theft Alarm…………………………………….. |
34 |
|
Recommendation…………………………………. |
Steering Wheel |
||
|
Special Notices…………………………………………. |
8 |
||
|
Mobile Communications |
Adjusting the Steering Wheel……………….. |
35 |
|
|
Equipment……………………………………………… |
8 |
Audio Control…………………………………………… |
35 |
|
At a Glance |
Voice Control…………………………………………… |
36 |
|
|
10 |
Cruise Control………………………………………….. |
36 |
|
|
At a Glance……………………………………………….. |
Information Display Control |
37 |
|
|
Child Safety |
|
|
Installing Child Seats………………………………. |
15 |
|
Child Seat Positioning…………………………….. |
19 |
|
Child Safety Locks…………………………………… |
22 |
|
Safety Belts |
|
|
Fastening the Safety Belts…………………….. |
23 |
|
Safety Belt Height Adjustment…………….. |
24 |
|
Safety Belt Minder………………………………….. |
24 |
|
Supplementary Restraints |
|
|
System |
|
|
Principle of Operation……………………………. |
26 |
|
Driver Airbag…………………………………………….. |
26 |
|
Passenger Airbag……………………………………. |
26 |
|
Side Airbags…………………………………………….. |
28 |
|
Side Curtain Airbags………………………………. |
28 |
|
Keys and Remote Controls |
|
|
General Information on Radio |
|
|
Frequencies………………………………………….. |
29 |
|
Remote Control………………………………………. |
29 |
|
Replacing a Lost Key or Remote |
|
|
Control………………………………………………….. |
29 |
|
Locks |
|
|
Locking and Unlocking…………………………… |
30 |
|
Wipers and Washers |
|
|
Windshield Wipers…………………………………. |
38 |
|
Autowipers………………………………………………. |
38 |
|
Windshield Washers………………………………. |
39 |
|
Rear Window Wiper and Washers……….. |
39 |
|
Lighting |
|
|
General Information………………………………… |
41 |
|
Lighting Control……………………………………….. |
41 |
|
Autolamps……………………………………………….. |
42 |
|
Instrument Lighting Dimmer………………… |
43 |
|
Headlamp Exit Delay……………………………… |
43 |
|
Daytime Running Lamps……………………….. |
43 |
|
Automatic High Beam Control…………….. |
44 |
|
Front Fog Lamps…………………………………….. |
45 |
|
Rear Fog Lamps……………………………………… |
46 |
|
Headlamp Leveling………………………………… |
46 |
|
Cornering Lamps…………………………………….. |
47 |
|
Direction Indicators…………………………………. |
47 |
|
Interior Lamps…………………………………………. |
48 |
|
Windows and Mirrors |
|
|
Power Windows……………………………………… |
49 |
|
Exterior Mirrors………………………………………… |
50 |
|
Interior Mirror…………………………………………… |
50 |
|
Sun Shades………………………………………………. |
51 |
1
Tourneo Custom/Transit Custom (TTF) Vehicles Built From: 19-06-2014, Vehicles Built Up To: 31-12-2014, EK2J-19A321-AKA (CG3577en) enGBR, Edition date: 05/2014, First Printing

Table of Contents
|
Instrument Cluster |
|
|
Gauges……………………………………………………… |
52 |
|
Warning Lamps and Indicators…………….. |
53 |
|
Audible Warnings and Indicators…………. |
56 |
|
Information Displays |
|
|
General Information……………………………….. |
57 |
|
Clock…………………………………………………………. |
64 |
|
Trip Computer…………………………………………. |
64 |
|
Personalized Settings……………………………. |
64 |
|
Information Messages…………………………… |
64 |
|
Climate Control |
|
|
Principle of Operation……………………………. |
70 |
|
Air Vents……………………………………………………. |
70 |
|
Manual Climate Control………………………….. |
71 |
|
Hints on Controlling the Interior |
|
|
Climate………………………………………………….. |
72 |
|
Heated Windows and Mirrors……………….. |
73 |
|
Auxiliary Heater……………………………………….. |
74 |
|
Seats |
|
|
Sitting in the Correct Position……………….. |
79 |
|
Head Restraints………………………………………. |
79 |
|
Manual Seats………………………………………….. |
80 |
|
Power Seats……………………………………………… |
81 |
|
Rear Seats………………………………………………… |
83 |
|
Heated Seats…………………………………………… |
86 |
|
Glasses Holder…………………………………………. |
91 |
|
Under Seat Storage…………………………………. |
91 |
|
Starting and Stopping the |
|
|
Engine |
|
|
General Information……………………………….. |
93 |
|
Ignition Switch………………………………………… |
93 |
|
Steering Wheel Lock………………………………. |
93 |
|
Starting a Diesel Engine………………………… |
94 |
|
Diesel Particulate Filter…………………………. |
94 |
|
Switching Off the Engine………………………. |
95 |
|
Engine Block Heater……………………………….. |
95 |
|
Unique Driving Character- |
|
|
istics |
|
|
Auto-Start-Stop……………………………………… |
97 |
|
Fuel and Refueling |
|
|
Safety Precautions…………………………………. |
99 |
|
Fuel Quality……………………………………………. |
100 |
|
Running Out of Fuel……………………………… |
100 |
|
Catalytic Converter………………………………… |
101 |
|
Refueling…………………………………………………. |
102 |
|
Fuel Consumption………………………………… |
103 |
|
Technical Specifications……………………… |
105 |
|
Transmission |
|
|
Manual Transmission…………………………… |
106 |
|
Hill Start Assist……………………………………… |
106 |
Auxiliary Power Points
|
Auxiliary Power Points…………………………… |
88 |
Brakes |
||
|
Cigar Lighter…………………………………………….. |
89 |
General Information……………………………… |
107 |
|
|
Storage Compartments |
Hints on Driving With Anti-Lock |
|||
|
Brakes………………………………………………….. |
107 |
|||
|
Cup Holders |
90 |
Parking Brake…………………………………………. |
107 |
|
|
Overhead Console………………………………….. |
90 |
Traction Control |
||
|
Ashtray |
90 |
|||
|
Principle of Operation |
109 |
|||
|
Folding Tray |
90 |
|||
|
Using Traction Control |
109 |
|||
|
Bottle Holder |
90 |
|||
|
2 |
Tourneo Custom/Transit Custom (TTF) Vehicles Built From: 19-06-2014, Vehicles Built Up To: 31-12-2014, EK2J-19A321-AKA (CG3577en) enGBR, Edition date: 05/2014, First Printing

Table of Contents
|
Stability Control |
|
|
Principle of Operation…………………………… |
110 |
|
Using Stability Control………………………….. |
110 |
|
Parking Aids |
|
|
Principle of Operation…………………………….. |
111 |
|
Parking Aid……………………………………………….. |
111 |
|
Rear View Camera………………………………….. |
113 |
|
Cruise Control |
|
|
Principle of Operation……………………………. |
116 |
|
Using Cruise Control………………………………. |
116 |
|
Driving Aids |
|
|
Speed Limiter………………………………………….. |
118 |
|
Driver Alert………………………………………………. |
119 |
|
Lane Keeping System…………………………….. |
121 |
|
Eco Mode………………………………………………… |
122 |
|
Load Carrying |
|
|
General Information……………………………… |
124 |
|
Rear Loadspace Hatches…………………….. |
124 |
|
Roof Racks and Load Carriers…………….. |
124 |
|
Roof Racks and Load Carriers — Vehicles |
|
|
With: Integrated Roof Rack………………. |
125 |
|
Load Retaining Fixtures………………………… |
126 |
|
Towing |
|
|
Towing a Trailer……………………………………… |
129 |
|
Trailer Sway Control……………………………… |
130 |
|
Towing Points………………………………………… |
130 |
|
Towing the Vehicle on Four Wheels……. |
131 |
|
Floor Mats……………………………………………….. |
133 |
|
Roadside Emergencies |
|
|
Hazard Warning Flashers……………………… |
135 |
|
First Aid Kit……………………………………………… |
135 |
|
Warning Triangle……………………………………. |
135 |
|
Fuel Shutoff……………………………………………. |
135 |
|
Jump Starting the Vehicle……………………. |
135 |
|
Fuses |
|
|
Fuse Box Locations……………………………….. |
138 |
|
Fuse Specification Chart……………………… |
139 |
|
Changing a Fuse……………………………………. |
148 |
|
Maintenance |
|
|
General Information……………………………… |
149 |
|
Opening and Closing the Hood…………… |
149 |
|
Under Hood Overview………………………….. |
150 |
|
Engine Oil Dipstick…………………………………. |
151 |
|
Engine Oil Check…………………………………….. |
151 |
|
Engine Coolant Check…………………………… |
152 |
|
Brake and Clutch Fluid Check……………… |
152 |
|
Power Steering Fluid Check…………………. |
153 |
|
Washer Fluid Check………………………………. |
153 |
|
Draining the Fuel Filter Water Trap…….. |
153 |
|
Changing the 12V Battery…………………….. |
154 |
|
Checking the Wiper Blades…………………. |
156 |
|
Changing the Wiper Blades…………………. |
156 |
|
Removing a Headlamp…………………………. |
157 |
|
Changing a Bulb……………………………………. |
158 |
|
Bulb Specification Chart……………………… |
164 |
|
Technical Specifications………………………. |
165 |
|
Driving Hints |
Vehicle Care |
||
|
Breaking-In……………………………………………… |
132 |
Cleaning the Exterior…………………………….. |
166 |
|
Reduced Engine Performance…………….. |
132 |
Cleaning the Interior……………………………… |
166 |
|
Economical Driving……………………………….. |
132 |
Repairing Minor Paint Damage……………. |
167 |
|
Cold Weather Precautions…………………… |
133 |
Cleaning the Alloy Wheels…………………… |
167 |
|
Driving Through Water………………………….. |
133 |
||
|
3 |
Tourneo Custom/Transit Custom (TTF) Vehicles Built From: 19-06-2014, Vehicles Built Up To: 31-12-2014, EK2J-19A321-AKA (CG3577en) enGBR, Edition date: 05/2014, First Printing

Table of Contents
|
Wheels and Tires |
|
|
General Information……………………………… |
168 |
|
Temporary Mobility Kit…………………………. |
168 |
|
Tire Care…………………………………………………… |
171 |
|
Using Snow Chains………………………………… |
172 |
|
Tire Pressure Monitoring System………… |
172 |
|
Changing a Road Wheel………………………. |
176 |
|
Technical Specifications………………………. |
182 |
|
Capacities and Specific- |
|
|
ations |
|
|
Vehicle Identification Plate…………………. |
184 |
|
Vehicle Identification Number…………….. |
185 |
|
Technical Specifications………………………. |
185 |
|
Audio System |
|
|
General Information……………………………… |
189 |
|
Audio Unit — Vehicles With: AM/FM/ |
|
|
CD………………………………………………………… |
190 |
|
Audio Unit — Vehicles With: AM/FM/CD/ |
|
|
Digital Audio Broadcast (DAB) Radio/ |
|
|
SYNC……………………………………………………. |
195 |
|
Audio Unit — Vehicles With: Digital Audio |
|
|
Broadcast (DAB) Radio/Navigation |
|
|
System/SYNC…………………………………… |
200 |
|
Audio Unit — Vehicles With: Digital Audio |
|
|
Broadcast (DAB) Radio…………………… |
206 |
|
Digital Radio…………………………………………… |
215 |
|
Audio Input Jack…………………………………….. |
216 |
|
USB Port………………………………………………….. |
217 |
|
Audio Troubleshooting………………………….. |
217 |
|
Navigation |
|
|
Navigation……………………………………………… |
254 |
|
Appendices |
|
|
Electromagnetic Compatibility………….. |
263 |
|
End User License Agreement…………….. |
264 |
|
SYNC™ |
|
|
General Information……………………………… |
218 |
|
Using Voice Recognition………………………. |
219 |
|
Using SYNC™ With Your Phone………… |
222 |
|
SYNC™ Applications and Services…… |
233 |
|
Using SYNC™ With Your Media |
|
|
Player………………………………………………….. |
240 |
|
SYNC™ Troubleshooting……………………. |
246 |
4
Tourneo Custom/Transit Custom (TTF) Vehicles Built From: 19-06-2014, Vehicles Built Up To: 31-12-2014, EK2J-19A321-AKA (CG3577en) enGBR, Edition date: 05/2014, First Printing

Introduction
ABOUT THIS MANUAL
Thank you for choosing Ford. We recommend that you take some time to get to know your vehicle by reading this manual. The more that you know about it, the greater the safety and pleasure you will get from driving it.
WARNING
Driving while distracted can result in loss of vehicle control, crash and injury. We strongly recommend that
you use extreme caution when using any device that may take your focus off the road. Your primary responsibility is the safe operation of your vehicle. We recommend against the use of any handheld device while driving and encourage the use of voice-operated systems when possible. Make sure you are aware of all applicable local laws that may affect the use of electronic devices while driving.
Note: This manual describes product features and options available throughout the range of available models, sometimes even before they are generally available. It may describe options not fitted to your vehicle.
Note: Some of the illustrations in this manual may show features as used in different models, so may appear different to you on your vehicle. However, the essential information in the illustrations is always correct.
Note: Always use and operate your vehicle in line with all applicable laws and regulations.
Note: Pass on this manual when selling your vehicle. It is an integral part of the vehicle.
5
This manual may qualify the location of a component as left-hand side or right-hand side. The side is determined when facing forward in the seat.
A Right-hand side
BLeft-hand side
Protecting the Environment
You must play your part in protecting the environment. Correct vehicle usage and the authorized disposal of waste, cleaning and lubrication materials are significant steps toward this aim.
SYMBOLS GLOSSARY
These are some of the symbols you may see on your vehicle.
Safety alert
See Owner’s Manual
Air conditioning system
Anti-lock braking system
Tourneo Custom/Transit Custom (TTF) Vehicles Built From: 19-06-2014, Vehicles Built Up To: 31-12-2014, EK2J-19A321-AKA (CG3577en) enGBR, Edition date: 05/2014, First Printing

Introduction
Avoid smoking, flames or sparks
Battery
Battery acid
Brake fluid — non petroleum based
Brake system
Cabin air filter
Check fuel cap
Child safety door lock or unlock
Child seat lower anchor
Child seat tether anchor
Cruise control
Do not open when hot
Engine air filter
Engine coolant
6
Engine coolant temperature
Engine oil
Explosive gas
Fan warning
Fasten safety belt
Front airbag
Front fog lamps
Fuel pump reset
Fuse compartment
Hazard warning flashers
Heated rear window
Heated windshield
Interior luggage compartment release
Jack
Keep out of reach of children
Tourneo Custom/Transit Custom (TTF) Vehicles Built From: 19-06-2014, Vehicles Built Up To: 31-12-2014, EK2J-19A321-AKA (CG3577en) enGBR, Edition date: 05/2014, First Printing

Introduction
Lighting control
Low tire pressure warning
Maintain correct fluid level
Note operating instructions
Panic alarm
Parking aid
Parking brake
Power steering fluid
Power windows front/rear
Power window lockout
Service engine soon
Side airbag
Shield the eyes
Stability control
Windshield wash and wipe
DATA RECORDING
A large number of electronic components of your vehicle contain data storage modules temporarily or permanently storing technical data about the condition of the vehicle, events and errors.
In general, this technical information documents the condition of parts, modules, systems or the environment:
•Operating conditions of system components (e.g. filling levels).
•Status messages of the vehicle and its individual components (e.g. number of wheel revolutions/rotational speed, deceleration, lateral acceleration).
•Malfunction and defects in important system components (e.g. lighting and brake system).
•Vehicle reactions in particular driving situations (e.g. inflation of an airbag, activation of the stability regulation system).
•Environmental conditions (e.g. temperature).
These data are exclusively technical and help identification and correction of errors as well as optimisation of vehicle functions. Motion profiles indicating travelled routes cannot be created with these data.
If services are used (e.g. repair works, service processes, warranty cases, quality assurance), employees of the service network (including manufacturers) are able to read out this technical information from the event and error data storage modules using special diagnostic devices. If required, you will receive further information. After an error has been corrected, these data are deleted from the error storage module or they are constantly overwritten.
7
Tourneo Custom/Transit Custom (TTF) Vehicles Built From: 19-06-2014, Vehicles Built Up To: 31-12-2014, EK2J-19A321-AKA (CG3577en) enGBR, Edition date: 05/2014, First Printing

Introduction
When using the vehicle, situations may occur in which these technical data related to other information (accident report, damages on the vehicle, witness statements etc.) may be associated with a specific person — possibly, with the assistance of an expert.
Additional functions contractually agreed upon with the client (e.g. vehicle location in emergency cases) allow the transmission of particular vehicle data from the vehicle.
REPLACEMENT PARTS
RECOMMENDATION
Your vehicle has been built to the highest standards using quality parts. We recommend that you demand the use of genuine Ford and Motorcraft parts whenever your vehicle requires scheduled maintenance or repair. You can clearly identify genuine Ford and Motorcraft parts by looking for the Ford, FoMoCo or Motorcraft branding on the parts or their packaging.
Scheduled Maintenance and
Mechanical Repairs
One of the best ways for you to make sure that your vehicle provides years of service is to have it maintained in line with our recommendations using parts that conform to the specifications detailed in this Owner’s Manual. Genuine Ford and Motorcraft parts meet or exceed these specifications.
Collision Repairs
We hope that you never experience a collision, but accidents do happen. Genuine Ford replacement collision parts meet our stringent requirements for fit, finish, structural integrity, corrosion protection and dent resistance. During vehicle
8
development we validate these parts deliver the intended level of protection as a whole system. A great way to know for sure you are getting this level of protection is to use genuine Ford replacement collision parts.
Warranty on Replacement Parts
Genuine Ford and Motorcraft replacement parts are the only replacement parts that benefit from a Ford Warranty. Damage caused to your vehicle as a result of the failure of non-Ford parts may not be covered by the Ford Warranty. For additional information, refer to the terms and conditions of the Ford Warranty.
SPECIAL NOTICES
If converting or modifying your vehicle from production specification, refer to the Body and Equipment Mounting Manual at www.etis.ford.com/fordservice.
MOBILE COMMUNICATIONS EQUIPMENT
Using mobile communications equipment is becoming increasingly important in the conduct of business and personal affairs. However, you must not compromise your own or others’ safety when using such equipment. Mobile communications can enhance personal safety and security when appropriately used, particularly in emergency situations. Safety must be paramount when using mobile communications equipment to avoid negating these benefits. Mobile communication equipment includes, but is not limited to, cellular phones, pagers, portable email devices, text messaging devices and portable two-way radios.
Tourneo Custom/Transit Custom (TTF) Vehicles Built From: 19-06-2014, Vehicles Built Up To: 31-12-2014, EK2J-19A321-AKA (CG3577en) enGBR, Edition date: 05/2014, First Printing
![]()
Introduction
WARNING
Driving while distracted can result in loss of vehicle control, crash and injury. We strongly recommend that
you use extreme caution when using any device that may take your focus off the road. Your primary responsibility is the safe operation of your vehicle. We recommend against the use of any hand-held device while driving and encourage the use of voice-operated systems when possible. Make sure you are aware of all applicable local laws that may affect the use of electronic devices while driving.
9
Tourneo Custom/Transit Custom (TTF) Vehicles Built From: 19-06-2014, Vehicles Built Up To: 31-12-2014, EK2J-19A321-AKA (CG3577en) enGBR, Edition date: 05/2014, First Printing

At a Glance
Front Exterior Overview
ASee Maintenance (page 149).
BSee Changing the Wiper Blades (page 156).
C See Driving Aids (page 118). See Automatic High Beam Control (page 44). D See Locking and Unlocking (page 30).
ESee Changing a Road Wheel (page 176).
F Tire pressures. See Technical Specifications (page 182).
G See Changing a Bulb (page 158).
HSee Towing Points (page 130).
10
Tourneo Custom/Transit Custom (TTF) Vehicles Built From: 19-06-2014, Vehicles Built Up To: 31-12-2014, EK2J-19A321-AKA (CG3577en) enGBR, Edition date: 05/2014, First Printing

At a Glance
Vehicle Interior Overview
ASee Transmission (page 106).
B See Locking and Unlocking (page 30).
CSee Power Windows (page 49).
D See Fastening the Safety Belts (page 23). E See Head Restraints (page 79).
FSee Seats (page 79).
GSee Parking Brake (page 107).
11
Tourneo Custom/Transit Custom (TTF) Vehicles Built From: 19-06-2014, Vehicles Built Up To: 31-12-2014, EK2J-19A321-AKA (CG3577en) enGBR, Edition date: 05/2014, First Printing

At a Glance
Instrument Panel Overview
Left-Hand Drive
12
Tourneo Custom/Transit Custom (TTF) Vehicles Built From: 19-06-2014, Vehicles Built Up To: 31-12-2014, EK2J-19A321-AKA (CG3577en) enGBR, Edition date: 05/2014, First Printing

At a Glance
Right-Hand Drive
AAir vents. See Air Vents (page 70).
BHeated rear window switch. Heated windshield switch. See Heated Windows and Mirrors (page 73).
CDirection indicators. See Direction Indicators (page 47). High beam. See
Lighting Control (page 41).
DLeft-hand drive vehicles — Information display control. See Information Displays (page 57).
DRight-hand drive vehicles — Information and entertainment display control. See
Information Displays (page 57). See Audio System (page 189). See Navigation (page 254).
EInstrument cluster. See Gauges (page 52). See Warning Lamps and Indicators (page 53).
FLeft-hand drive vehicles — Information and entertainment display control. See
Information Displays (page 57). See Audio System (page 189). See Navigation (page 254).
13
Tourneo Custom/Transit Custom (TTF) Vehicles Built From: 19-06-2014, Vehicles Built Up To: 31-12-2014, EK2J-19A321-AKA (CG3577en) enGBR, Edition date: 05/2014, First Printing

At a Glance
FRight-hand drive vehicles — Information display control. See Information Displays (page 57).
GWiper lever. See Wipers and Washers (page 38).
HParking aid switch. See Parking Aid (page 111). Start-stop switch. See
Auto-Start-Stop (page 97).
IInformation and entertainment display.
JAudio unit. See Audio System (page 189).
KDoor lock indicator. See Locking and Unlocking (page 30).
L Hazard warning flasher switch. See Hazard Warning Flashers (page 135). M Climate controls. See Climate Control (page 70).
NIgnition switch. See Ignition Switch (page 93).
OVehicles with information and entertainment display control — Audio control. See Audio Control (page 35). Voice control. See Voice Control (page 36).
PSteering wheel adjustment. See Adjusting the Steering Wheel (page 35).
QHorn.
RCruise control switches. See Cruise Control (page 116).
SLighting control. See Lighting Control (page 41). Front fog lamps. See Front Fog Lamps (page 45). Rear fog lamps. See Rear Fog Lamps (page 46). Headlamp leveling control. See Headlamp Leveling (page 46). Instrument lighting dimmer. See Instrument Lighting Dimmer (page 43).
14
Tourneo Custom/Transit Custom (TTF) Vehicles Built From: 19-06-2014, Vehicles Built Up To: 31-12-2014, EK2J-19A321-AKA (CG3577en) enGBR, Edition date: 05/2014, First Printing

Child Safety
INSTALLING CHILD SEATS |
WARNINGS |
WARNINGS
Extreme Hazard! Never use a rearward facing child restraint on a seat protected by an active airbag in
front of it. Death or serious injury to the child can occur.
Your vehicle is equipped with a passenger airbag deactivation switch. See Passenger Airbag
(page 26). You must switch the airbag off when using a rearward facing child seat on the front seat. Make sure you switch the airbag back on following removal of the rearward facing child seat.
Use an approved child seat to secure children less than 60 in (150 cm) tall on the rear seat.
Read and follow the manufacturer’s instructions when you are installing a child seat.
 Do not modify child seats in any way.
Do not hold a child on your lap when your vehicle is moving.
Do not leave unattended children in your vehicle.
If your vehicle has been involved in a crash, have the child seats checked by an authorized dealer.
Only child seats certified to ECE-R44.03 (or later) have been tested and approved for use in your vehicle. A choice of these are available from an authorized dealer.
Note: Mandatory use of child seats varies from country to country.
Child Seats for Different Mass Groups
Use the correct child seat as follows:
15
Tourneo Custom/Transit Custom (TTF) Vehicles Built From: 19-06-2014, Vehicles Built Up To: 31-12-2014, EK2J-19A321-AKA (CG3577en) enGBR, Edition date: 05/2014, First Printing

Child Safety
Rearward Facing Baby Safety Seat
Secure children that weigh less than 29 lb (13 kg) in a rearward facing baby safety seat (Group 0+) on the rear seat.
Child Safety Seat
Secure children that weigh between 29 lb (13 kg) and 40 lb (18 kg) in a child safety seat (Group 1) on the rear seat.
Booster Seats
WARNINGS
Do not install a booster seat or a booster cushion with only the lap strap of the safety belt.
Do not install a booster seat or a booster cushion with a safety belt that is slack or twisted.
Do not put the safety belt under your child’s arm or behind their back.
Do not use pillows, books or towels to boost your child’s height.
Make sure that your children sit in an upright position.
When using a child seat on a rear seat, the child seat must rest tightly against the vehicle seat. It must not
touch the head restraint. If necessary remove the head restraint. See Head Restraints (page 79).
You must reinstall the head restraint following the removal of the child seat. See Head Restraints (page
79).
Secure children that weigh more than 33 lb (15 kg) but are less than 60 in (150 cm) tall in a booster seat or a booster cushion.
16
Tourneo Custom/Transit Custom (TTF) Vehicles Built From: 19-06-2014, Vehicles Built Up To: 31-12-2014, EK2J-19A321-AKA (CG3577en) enGBR, Edition date: 05/2014, First Printing
Child Safety
Booster Seat (Group 2)
We recommend that you use a booster seat that combines a cushion with a backrest instead of a booster cushion only. The raised seating position will allow you to position the shoulder strap of the adult safety belt over the center of your child’s shoulder and the lap strap tightly across their hips.
Booster Cushion (Group 3)
ISOFIX Anchor Points
WARNING
Use an anti-rotation device when using the ISOFIX system. We recommend the use of a top tether
or support leg.
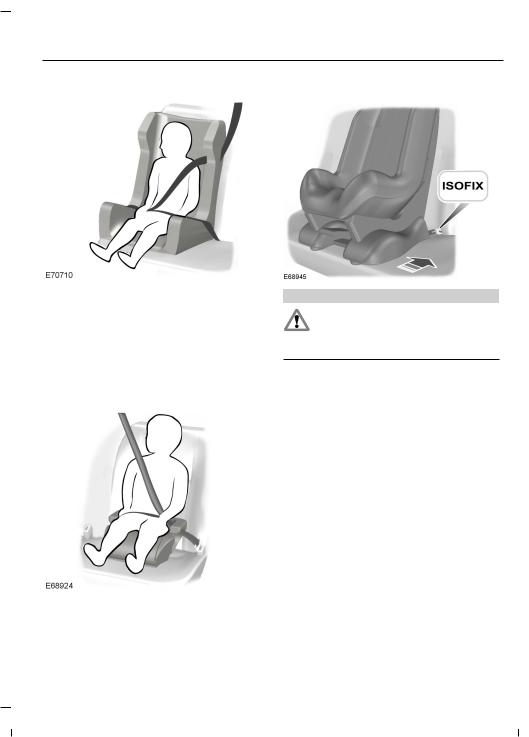
Your vehicle has ISOFIX anchor points that accommodate universally approved ISOFIX child seats.
The ISOFIX system has two rigid attachment arms on the child seat that attach to anchor points on the second row seats, where the cushion and backrest meet. Tether anchor points are fitted to the underside or rear of the second row seats for child seats with a top tether.
Note: When you are purchasing an ISOFIX seat, make sure that you know the correct mass group and ISOFIX size class for the intended seating locations. See Child Seat Positioning (page 19).
17
Tourneo Custom/Transit Custom (TTF) Vehicles Built From: 19-06-2014, Vehicles Built Up To: 31-12-2014, EK2J-19A321-AKA (CG3577en) enGBR, Edition date: 05/2014, First Printing

Child Safety
Attaching a Child Seat with Top Tethers
WARNING
Do not attach the top tether strap to anything other than the correct top tether strap anchor point.
Follow the child seat manufacturer’s instructions for installing a child seat with a top tether.
Type 1
Type 2
Attaching a Child Seat with a Support Leg
WARNINGS
Make sure the support leg is long enough to reach the vehicle floor.
Make sure that the child seat manufacturer lists your vehicle as suitable for use with this type of child
seat.
Follow the child seat manufacturer’s instructions for installing a child seat with a support leg.
18
Tourneo Custom/Transit Custom (TTF) Vehicles Built From: 19-06-2014, Vehicles Built Up To: 31-12-2014, EK2J-19A321-AKA (CG3577en) enGBR, Edition date: 05/2014, First Printing
![]()
Child Safety
CHILD SEAT POSITIONING
WARNINGS
See an authorized dealer for the latest details relating to our recommended child seats.
WARNINGS
Extreme Hazard! Do not use a rearward facing child seat on a seat protected by an air bag in front of it!
When using a child seat with a support leg, the support leg must rest securely on the floor.
When using a child seat with a safety belt, make sure that the safety belt is not slack or twisted.
The child seat must rest tightly against the vehicle seat. Remove the head restraint when using a forward
facing child seat. See Head Restraints (page 79).
You must reinstall the head restraint following the removal of the child seat. See Head Restraints (page
79).
Note: When using a child seat on a front seat, always adjust the front passenger’s seat to its fully rearward position. If it proves difficult to tighten the lap section of the safety belt without slack remaining, adjust the seatback to the fully upright position and raise the height of the seat. See Seats (page 79).
19
Tourneo Custom/Transit Custom (TTF) Vehicles Built From: 19-06-2014, Vehicles Built Up To: 31-12-2014, EK2J-19A321-AKA (CG3577en) enGBR, Edition date: 05/2014, First Printing

Child Safety
|
Mass group categories |
||||||
|
Seating positions |
0 |
0+ |
1 |
2 |
3 |
|
|
Up to 22 |
Up to 29 |
20 — 40 lbs |
33 — 55 lbs |
46 — 79 lbs |
||
|
lbs (10 kg) |
lbs (13 kg) |
(9 — 18 kg) |
(15 — 25 kg) |
(22 — 36 kg) |
||
|
Front passenger’s seat |
X |
X |
UF¹ |
UF¹ |
UF¹ |
|
|
with airbag ON |
||||||
|
Front passenger’s seat |
U¹ |
U¹ |
U¹ |
U¹ |
U¹ |
|
|
with airbag OFF |
||||||
|
Rear seats second and |
U |
U |
U |
U |
U |
|
|
third row |
||||||
|
Rear seats fourth row — |
X |
X |
X |
X |
X |
|
|
bus |
||||||
X Not suitable for children in this mass group.
U Suitable for universal category child seats approved for use in this mass group.
U¹ Suitable for universal category child seats approved for use in this mass group. However, we recommend that you secure children in a government approved child seat, on the rear seat.
UF¹ Suitable for universal category forward facing child seats approved for use in this mass group. However, we recommend that you secure children in a government approved child seat, on the rear seat.
20
Tourneo Custom/Transit Custom (TTF) Vehicles Built From: 19-06-2014, Vehicles Built Up To: 31-12-2014, EK2J-19A321-AKA (CG3577en) enGBR, Edition date: 05/2014, First Printing

Child Safety
ISOFIX Child Seats
Seating positions
 Rear ISOFIX second row
ISOFIX size class — second row*
 Rear ISOFIX third row ISOFIX size class — third row*
Mass group categories
|
0 |
0+ |
I |
|
|
Up to 22 lbs (10 |
Up to 29 lbs (13 |
20 — 40 lbs (9 — |
|
|
kg) |
kg) |
18 kg) |
|
|
Baby safety seat |
Child safety |
||
|
seat |
|||
|
IU |
IU |
IU |
|
|
E |
C, D, E |
A, B, B1, C, D |
|
|
IU |
IU |
IU |
|
|
E |
D, E |
A, B, B1, D |
IU Suitable for universal category ISOFIX child seats approved for use in this mass group.
*As defined by ECE-R16.
Note: When you are purchasing an ISOFIX child seat, make sure that you know the correct mass group and ISOFIX size class for the intended seating locations.
Note: There are no ISOFIX Anchor Points on fourth row seats.
21
Tourneo Custom/Transit Custom (TTF) Vehicles Built From: 19-06-2014, Vehicles Built Up To: 31-12-2014, EK2J-19A321-AKA (CG3577en) enGBR, Edition date: 05/2014, First Printing

Child Safety
CHILD SAFETY LOCKS
WARNING
You cannot open the rear doors from inside if you have put the child safety locks on.
A child safety lock is on the rear edge of each rear door. You must set the child safety lock separately on each door.
Left-Hand Side
Turn it counterclockwise to switch the child lock on and clockwise to switch it off.
Right-Hand Side
Turn it clockwise to switch the child lock on and counterclockwise to switch it off.
22
Tourneo Custom/Transit Custom (TTF) Vehicles Built From: 19-06-2014, Vehicles Built Up To: 31-12-2014, EK2J-19A321-AKA (CG3577en) enGBR, Edition date: 05/2014, First Printing

Safety Belts
FASTENING THE SAFETY
BELTS
WARNINGS
Insert the tongue into the buckle until you hear a distinct click. You have not fastened the safety belt correctly
if you do not hear a distinct click.
Make sure that your safety belt is securely stored away and is not outside your vehicle when closing the
door.
Pull the safety belt out steadily. It may lock if you pull it sharply or if your vehicle is on a slope.
Press the red button on the buckle to release the safety belt. Hold the tongue and let it retract completely and smoothly to its stowed position.
Using Safety Belts During
Pregnancy
WARNING
Position the safety belt correctly for your safety and that of your unborn child. Do not use only the lap strap
or the shoulder strap.
23
Tourneo Custom/Transit Custom (TTF) Vehicles Built From: 19-06-2014, Vehicles Built Up To: 31-12-2014, EK2J-19A321-AKA (CG3577en) enGBR, Edition date: 05/2014, First Printing
Safety Belts
Pregnant women should always wear their safety belt. The lap belt portion of a combination lap and shoulder safety belt should be positioned low across the hips below the stomach and worn as tight as comfort will allow. The shoulder belt should be positioned to cross the middle of the shoulder and the center of the chest.
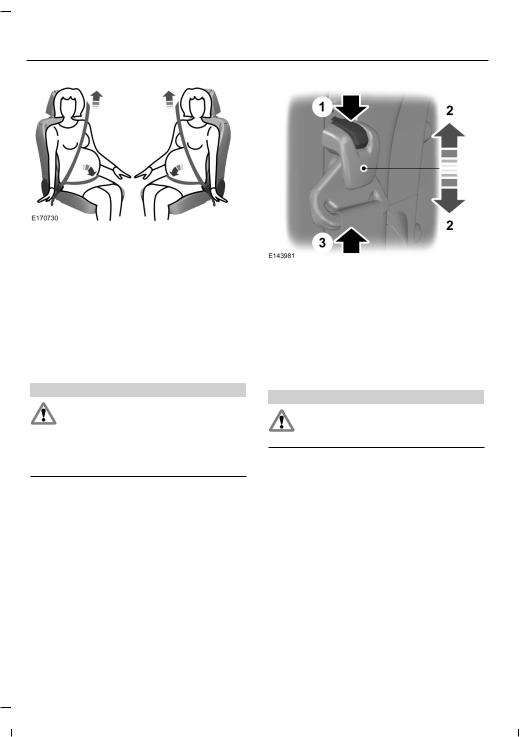
SAFETY BELT HEIGHT
ADJUSTMENT
WARNING
Position the safety belt height adjuster so that the belt rests across the middle of your shoulder. Failure
to adjust the safety belt correctly could reduce the effectiveness of the safety belt and increase the risk of injury in a collision.
1.Support the safety belt loop while pressing the adjuster button.
2.Slide the adjuster to the desired position then release the button.
3.Pull down on the safety belt loop to make sure it is secure in position.
SAFETY BELT MINDER
WARNING
The system will only provide protection when you use the safety belt correctly.
The warning lamp illuminates and an audible warning will sound when the following conditions have been met:
•The driver’s safety belt has not been fastened.
•Your vehicle exceeds a relatively low speed.
It will also illuminate when the driver’s safety belt is unfastened when your vehicle is moving.
If you do not fasten the driver’s safety belt both the audible and visual warnings will switch off automatically after approximately five minutes.
24
Tourneo Custom/Transit Custom (TTF) Vehicles Built From: 19-06-2014, Vehicles Built Up To: 31-12-2014, EK2J-19A321-AKA (CG3577en) enGBR, Edition date: 05/2014, First Printing

Safety Belts
TurningtheSafetyBeltMinderOff
See an authorized dealer.
25
Tourneo Custom/Transit Custom (TTF) Vehicles Built From: 19-06-2014, Vehicles Built Up To: 31-12-2014, EK2J-19A321-AKA (CG3577en) enGBR, Edition date: 05/2014, First Printing

Supplementary Restraints System
PRINCIPLE OF OPERATION
WARNINGS
Extreme Hazard! Do not use a rearward facing child restraint on a seat protected by an airbag in front
of it!
Do not modify the front of your vehicle in any way. This could adversely affect deployment of the
airbags.
Wear a safety belt and keep sufficient distance between yourself and the steering wheel. Only when
you use the safety belt properly, can it hold you in a position that allows the airbag to achieve its optimum effect. See Sitting in the Correct Position (page 79).
Repairs to the steering wheel, steering column, seats, airbags and safety belts must be carried out by
an authorized dealer.
Keep the areas in front of the airbags free from obstruction. Do not affix anything to or over the airbag covers.
Do not puncture the seat with sharp objects. This could damage and adversely affect deployment of the
airbags.
Use seat covers designed for seats with side airbags. Have these fitted by an authorized dealer.
Note: You will hear a loud bang and see a cloud of harmless powdery residue if an airbag deploys. This is normal.
Note: The front passenger airbag protects both positions of a double seat.
Note: Only wipe airbag covers with a damp cloth.
DRIVER AIRBAG
The airbag will deploy during significant frontal collisions or collisions that are up to 30 degrees from the left or the right. The airbag will inflate within a few thousandths of a second and deflate on contact with the occupant, thus cushioning forward body movement. During minor frontal collisions, overturns, rear collisions and side collisions, the airbag will not deploy.
PASSENGER AIRBAG
26
Tourneo Custom/Transit Custom (TTF) Vehicles Built From: 19-06-2014, Vehicles Built Up To: 31-12-2014, EK2J-19A321-AKA (CG3577en) enGBR, Edition date: 05/2014, First Printing

Supplementary Restraints System
The airbag will deploy during significant frontal collisions or collisions that are up to 30 degrees from the left or the right. The airbag will inflate within a few thousandths of a second and deflate on contact with the occupant, thus cushioning forward body movement. During minor frontal collisions, overturns, rear collisions and side collisions, the airbag will not deploy.
Switching the Passenger Airbag
Off
WARNING
You must switch the airbag off when using a rearward facing child seat on the front seat.
The key switch and the airbag deactivation warning lamp are located in the instrument panel.
A Switch off
BSwitch on
Turn the switch to position A.
When you switch the ignition on, check that the airbag deactivation warning lamp illuminates.
Switching the Passenger Airbag
On
WARNING
You must switch the airbag on when you are not using a child seat on the front seat.
27
Tourneo Custom/Transit Custom (TTF) Vehicles Built From: 19-06-2014, Vehicles Built Up To: 31-12-2014, EK2J-19A321-AKA (CG3577en) enGBR, Edition date: 05/2014, First Printing

Supplementary Restraints System
Turn the switch to position B.
SIDE AIRBAGS
WARNING
Use seat covers designed for seats with side airbags. Have these fitted by an authorized dealer.
The airbags are located inside the seatback of the front seats. There is a label attached to the side of the seatback to indicate this.
The airbag will deploy during significant lateral collisions. The airbag will not deploy in minor lateral and frontal collisions, rear collisions, or overturns.
SIDE CURTAIN AIRBAGS
Side curtain airbags are located over all side windows where there are driver and passenger seats. There are molded badges in the headlining above the side windows to indicate this.
The airbags will deploy during significant lateral collisions. They will also deploy during significant frontal angled collisions. The side curtain airbags will not deploy in minor lateral and frontal collisions, rear collisions or overturns.
28
Tourneo Custom/Transit Custom (TTF) Vehicles Built From: 19-06-2014, Vehicles Built Up To: 31-12-2014, EK2J-19A321-AKA (CG3577en) enGBR, Edition date: 05/2014, First Printing
![]()
Keys and Remote Controls
GENERAL INFORMATION ON RADIO FREQUENCIES
Note: Changes or modifications not expressly approved by the party responsible for compliance could void the user’s authority to operate the equipment.
The typical operating range for your transmitter is approximately 33 ft (10 m).
A decrease in operating range could be caused by:
•weather conditions
•nearby radio towers
•structures around your vehicle
•other vehicles parked next to your vehicle.
The radio frequency used by your remote control can also be used by other short distance radio transmissions (e.g. amateur radios, medical equipment, wireless headphones, remote controls and alarm systems). If the frequencies are jammed, you will not be able to use your remote control. You can lock and unlock the doors with the key.
Note: Make sure your vehicle is locked before leaving it unattended.
Note: If you are in range, the remote control will operate if you press any button unintentionally.
REPLACING A LOST KEY OR REMOTE CONTROL
You can purchase replacement keys or remote controls from an authorized dealer. Authorized dealers can program remote controls for your vehicle. See Remote Control (page 29).
To re-program the passive anti-theft system see an authorized dealer.
REMOTE CONTROL
You can program a maximum of eight remote controls to your vehicle. See an authorized dealer.
29
Tourneo Custom/Transit Custom (TTF) Vehicles Built From: 19-06-2014, Vehicles Built Up To: 31-12-2014, EK2J-19A321-AKA (CG3577en) enGBR, Edition date: 05/2014, First Printing

Locks
LOCKING AND UNLOCKING
Note: Check your vehicle is locked before leaving it unattended.
Note: Do not leave your keys in your vehicle.
Locking
Locking with the Key
Turn the top of the key toward the front of your vehicle.
Locking with the Remote Control
Press the button.
Note: You can lock the driver door with the key. Use the key when the remote control is not functioning.
Double Locking(If Equipped)
WARNING
Do not use double locking when passengers or animals are inside your vehicle. You will not be able to
unlock the doors from the inside if you have double locked them.
Double locking is a theft protection feature that prevents someone from opening the doors from the inside.
Note: If you double lock your vehicle while inside, switch the ignition on to return the door locks to a single locked state.
Double Locking with the Key
Turn the key to the lock position twice within three seconds.
Double Locking with the Remote Control
Press the button twice within three seconds.
Unlocking
Unlocking with the Key
Turn the top of the key toward the rear of your vehicle.
Unlocking with the Remote Control
Press the button.
Note: You can unlock the driver door with the key. Use the key when the remote control is not functioning.
Note: When you lock your vehicle for several weeks, the remote control will be switched off. Your vehicle must be unlocked and the engine started using the key. Unlocking and starting your vehicle once will enable the remote control.
Reprogramming the Unlocking
Function
You can reprogram the unlocking function so that only the driver door is unlocked. See Remote Control (page 29).
Locking and Unlocking
Confirmation
When you lock the doors, the direction indicators will flash twice.
When you unlock the doors, the direction indicators will flash once.
Note: If your vehicle has double locking, the direction indicators will flash only when your vehicle has been double locked.
30
Tourneo Custom/Transit Custom (TTF) Vehicles Built From: 19-06-2014, Vehicles Built Up To: 31-12-2014, EK2J-19A321-AKA (CG3577en) enGBR, Edition date: 05/2014, First Printing

Locks
|
Locking and Unlocking the Doors |
Opening the Double Rear Doors |
|
From Inside |
A Lock
BUnlock
You can see the door lock status in the instrument panel. For item location: See At a Glance (page 10). The lamp will illuminate when you lock your vehicle.
Opening the Sliding Door
Slam Locking
Slam locking allows you to lock a door with the door open. The door will be locked when you close it.
Note: Do not leave your keys in your vehicle.
Note: The horn may sound if you try to lock the doors when a door is still open.
31
Tourneo Custom/Transit Custom (TTF) Vehicles Built From: 19-06-2014, Vehicles Built Up To: 31-12-2014, EK2J-19A321-AKA (CG3577en) enGBR, Edition date: 05/2014, First Printing

Locks
Automatic Locking
Your vehicle has the capability for the doors to lock automatically when you exceed 5 mph (8 km/h). You can turn this function on using the information display. See Information Displays (page 57). If you have turned this function on, either use the interior door unlock button or switch the ignition off and use the key or remote control to unlock the rear or sliding door.
Note: When you have double locked your vehicle, the interior unlock button will only work for a period of 20 seconds.
Two-Stage Unlocking
Note: The direction indicators will flash once when you unlock the doors.
You will unlock the front doors when you:
•Pull either interior handle (except if you have double locked the doors).
Automatic Re-Locking
The doors will re-lock automatically if you do not open a door within 45 seconds of unlocking the doors with the remote control. The door locks and the alarm will return to their previous state.
Automatic Unlocking
You can turn this function on using the information display. See Information Displays (page 57). When enabled, the automatic unlocking feature will unlock all doors within 10 minutes of the end of a drive cycle, when the driver door is opened and the ignition is off.
One-Stage Unlocking
You can turn this function on using the information display. See Information Displays (page 57).
When you use this feature, you will unlock all doors including the rear doors or liftgate and the sliding door.
Note: The direction indicators will flash once when you unlock the doors.
You will unlock all of the doors when you:
•Pull either interior handle (except if you have double locked the doors).
•Turn the key in the door lock.
•Press the unlock button on the remote control once.
•Press the interior unlock button once.
32
•Turn the key in the door lock.
•Press the unlock button on the remote control once.
•Press the interior unlock button once.
Note: When you have double locked your vehicle, the interior unlock button will only work for a period of 20 seconds.
You will unlock the front doors and cargo area when you:
•Turn the key in the door lock to the unlock position twice within three seconds.
•Press the unlock button on the remote control twice within three seconds.
•Press the interior unlock button twice within three seconds.
Note: When you have double locked your vehicle, the interior unlock button will only work for a period of 20 seconds.
Zone Re-Locking
If you enable zone re-locking and open one door, this will cause all other doors to remain locked. See an authorized dealer for further information.
The locks on Van, Bus and Kombi are split into two zones, cabin and cargo. For van and kombi vehicles, the cargo area comprises of the rear doors or liftgate and the sliding door. For Bus vehicles, the cargo area comprises of the rear doors or liftgate.
Tourneo Custom/Transit Custom (TTF) Vehicles Built From: 19-06-2014, Vehicles Built Up To: 31-12-2014, EK2J-19A321-AKA (CG3577en) enGBR, Edition date: 05/2014, First Printing

Locks
•Exit your vehicle and press the lock button.
•Press the unlock button or the luggage compartment unlock button once to open the respective zone.
If you now open a door within the unlocked zone, the other doors in that zone will automatically lock.
Configurable Unlocking
Configurable unlocking is set at the time of vehicle purchase. It allows you to select which doors unlock when you press the unlock button or the luggage compartment unlock button on your remote control once or twice. You cannot turn this feature back on if you have had it turned off. See an authorized dealer for further information.
MANUAL LIFTGATE
WARNINGS
It is extremely dangerous to ride in a cargo area, inside or outside of your vehicle. In a crash, people riding in
these areas are more likely to be seriously injured or killed. Do not allow people to ride in any area of your vehicle that is not equipped with seats and safety belts. Make sure everyone in your vehicle is in a seat and properly using a safety belt. Failure to follow this warning could result in serious personal injury or death.
Make sure to close and latch the liftgate to prevent drawing exhaust fumes into your vehicle. This will also
prevent passengers and cargo from falling out. If you must drive with the liftgate open, keep the vents or windows open so outside air comes into your vehicle. Failure to follow this warning could result in serious personal injury.
Note: Be careful when opening or closing the liftgate in a garage or other enclosed area to avoid damaging the liftgate.
Note: Do not hang anything (bike rack, etc.) from the spoiler, glass or liftgate. This could damage the liftgate and its components.
Note: If you leave the liftgate open when driving the tailgate components could be damaged.
Opening and Closing the Liftgate
To Open the Liftgate
Press the button located in the top of the liftgate pull cup handle to unlatch the liftgate, then pull on the outside handle.
To Close the Liftgate
33
Tourneo Custom/Transit Custom (TTF) Vehicles Built From: 19-06-2014, Vehicles Built Up To: 31-12-2014, EK2J-19A321-AKA (CG3577en) enGBR, Edition date: 05/2014, First Printing

Security
PASSIVE ANTI-THEFT
SYSTEM
Principle of Operation
The system prevents someone from starting the engine with an incorrectly coded key.
Coded Keys
If you lose a key, you can obtain a replacement from an authorized dealer. If possible, provide them with the key number from the tag provided with the original keys. You can also obtain extra keys from an authorized dealer.
Note: Have all of your remaining keys erased and recoded if you lose a key. Have replacement keys coded together with recoding your remaining keys. See an authorized dealer for further information.
ANTI-THEFT ALARM
The system will warn you of an unauthorized entry to your vehicle. It will be triggered if any door, the luggage compartment or the hood is opened without using the key or the remote control.
The park and direction indicators will flash and the horn will sound if unauthorized entry is attempted while the alarm is armed.
Take all remote controls to an authorized dealer if there is any potential alarm problem with your vehicle.
Arming the Alarm
The alarm is ready to arm when there is not a key in the ignition. Lock your vehicle to arm the alarm.
Note: Do not shield your keys with metal objects. This may prevent the receiver from recognizing a coded key.
Arming the Engine Immobilizer
When you switch the ignition off the engine immobilizer will arm automatically after a short time.
Disarming the EngineImmobilizer
When you switch the ignition on the engine immobilizer will disarm automatically if a correctly coded key is used.
If you are unable to start the engine with a correctly coded key, have your vehicle checked by an authorized dealer.
34
Disarming the Alarm
Disarm the alarm by:
•Unlocking the doors or luggage compartment with the remote control.
•Switching the ignition on or starting the engine.
•Using a key in the driver’s door to unlock your vehicle, then switching the ignition on within 12 seconds.
Tourneo Custom/Transit Custom (TTF) Vehicles Built From: 19-06-2014, Vehicles Built Up To: 31-12-2014, EK2J-19A321-AKA (CG3577en) enGBR, Edition date: 05/2014, First Printing

Steering Wheel
ADJUSTING THE STEERING WHEEL
WARNING
Do not adjust the steering wheel when your vehicle is moving.
Note: Make sure that you are sitting in the correct position. See Sitting in the Correct Position (page 79).
1.Unlock the steering column.
2.Adjust the steering wheel to the desired position.
3. Lock the steering column.
AUDIO CONTROL
Select the required source on the audio unit.
You can operate the following functions with the control:
Type 1
Use the arrows on the steering wheel to navigate through the menus. Press OK to make a selection.
35
Tourneo Custom/Transit Custom (TTF) Vehicles Built From: 19-06-2014, Vehicles Built Up To: 31-12-2014, EK2J-19A321-AKA (CG3577en) enGBR, Edition date: 05/2014, First Printing

Steering Wheel
AVolume up
B Seek up or next
CVolume down
DSeek down or previous
Seek, Next or Previous
Pull the control to select or deselect voice control. See SYNC™ (page 218).
CRUISE CONTROL
Press the seek button to:
•tune the radio to the next or previous stored preset
•play the next or the previous track.
Press and hold the seek button to:
•tune the radio to the next station up or down the frequency band
•seek through a track.
See Cruise Control (page 116).
36
Tourneo Custom/Transit Custom (TTF) Vehicles Built From: 19-06-2014, Vehicles Built Up To: 31-12-2014, EK2J-19A321-AKA (CG3577en) enGBR, Edition date: 05/2014, First Printing

Steering Wheel
INFORMATION DISPLAY
CONTROL
See Information Displays (page 57).
37
Tourneo Custom/Transit Custom (TTF) Vehicles Built From: 19-06-2014, Vehicles Built Up To: 31-12-2014, EK2J-19A321-AKA (CG3577en) enGBR, Edition date: 05/2014, First Printing

Wipers and Washers
WINDSHIELD WIPERS |
Intermittent Wipe |
Note: Fully defrost the windshield before you switch the windshield wipers on.
Note: Make sure you switch the windshield wipers and ignition off before using an automatic car wash.
Note: If streaks or smears appear on the windshield, clean the windshield and the wiper blades. If that does not resolve the issue, install new wiper blades.
Note: Do not operate the wipers on a dry windshield. This may scratch the glass, damage the wiper blades or cause the wiper motor to burn out. Always use the windshield washers before wiping a dry windshield.
A Short wipe interval
B Intermittent wipe
CLong wipe interval
Use the rotary control to adjust the intermittent wipe interval.
Speed Dependent Wipers(If Equipped)
When your vehicle speed increases, the interval between wipes decreases.
ASingle wipe
B Intermittent wipe
CNormal wipe
DHigh speed wipe
AUTOWIPERS
Note: Fully defrost the windshield before you switch the windshield wipers on.
Note: Make sure you switch the windshield wipers and ignition off before using an automatic car wash.
Note: If streaks or smears appear on the windshield, clean the windshield and the wiper blades. If that does not resolve the issue, install new wiper blades.
Note: If you switch autolamps and autowipers on, the headlamps will automatically turn on when the windshield wipers continuously operate.
38
Tourneo Custom/Transit Custom (TTF) Vehicles Built From: 19-06-2014, Vehicles Built Up To: 31-12-2014, EK2J-19A321-AKA (CG3577en) enGBR, Edition date: 05/2014, First Printing
![]()
Wipers and Washers
Note: During wet or winter driving conditions with ice, snow or a salty road mist, inconsistent or unexpected wiping or smearing may occur.
In these conditions, you can do the following:
•Lower the sensitivity of the autowipers to reduce the amount of smearing on the windshield.
•Switch to normal or high-speed wipe.
•Switch autowipers off.
AHigh sensitivity
BOn
CLow sensitivity
Keep the outside of the windshield clean. The rain sensor is very sensitive and the wipers may operate if dirt, mist or insects hit the windshield.
WINDSHIELD WASHERS
Note: Do not operate the washers when the washer reservoir is empty. This may cause the washer pump to overheat.
Note: Do not operate the washers for more than 10 seconds at a time.
To use the washer, pull the lever toward you.
When you release the lever, wiping will continue for a short period of time.
Autowipers uses a rain sensor located in the area around the interior mirror. The rain sensor monitors the amount of moisture on the windshield and automatically turns the wipers on. It will adjust the wiper speed by the amount of moisture that the sensor detects on the windshield.
Use the rotary control to adjust the sensitivity of the autowipers. When you select low sensitivity, the wipers will operate when the sensor detects a large amount of water on the windshield. When you select high sensitivity, the wipers will operate when the sensor detects a small amount of water on the windshield.
39
REAR WINDOW WIPER AND WASHERS
Rear Window Wiper
Note: Make sure you switch the rear window wiper and ignition off before using an automatic car wash.
Tourneo Custom/Transit Custom (TTF) Vehicles Built From: 19-06-2014, Vehicles Built Up To: 31-12-2014, EK2J-19A321-AKA (CG3577en) enGBR, Edition date: 05/2014, First Printing

Wipers and Washers
A Intermittent wipe
B Low speed wipe
COff
Press the top of the button to switch intermittent wipe on. Press the top of the button again to switch low speed wipe on. Press the bottom of the button to switch the rear window wiper off.
When you switch on the front wipers and move the gearshift lever to reverse (R), rear intermittent wipe will automatically turn on.
Rear Window Washer
Push the lever away from you to operate the rear window washer. The washer will operate for as long as you push the lever away from you. When you release the lever, wiping will continue for a short period of time.
40
Tourneo Custom/Transit Custom (TTF) Vehicles Built From: 19-06-2014, Vehicles Built Up To: 31-12-2014, EK2J-19A321-AKA (CG3577en) enGBR, Edition date: 05/2014, First Printing

Lighting
GENERAL INFORMATION |
LIGHTING CONTROL |
|
CondensationinLampAssemblies |
Lighting Control Positions |
Exterior lamps have vents to accommodate normal changes in air pressure.
Condensation can be a natural by-product of this design. When moist air enters the lamp assembly through the vents, there is a possibility that condensation can occur when the temperature is cold. When normal condensation occurs, a fine mist can form on the interior of the lens. The fine mist eventually clears and exits through the vents during normal operation.
Clearing time may take as long as 48 hours under dry weather conditions.
Examples of acceptable condensation are:
•The presence of a fine mist (no streaks, drip marks or large droplets).
•A fine mist covers less than 50% of the lens.
Examples of unacceptable condensation are:
•A water puddle inside the lamp.
•Streaks, drip marks or large droplets present on the interior of the lens.
If you see any unacceptable condensation, have your vehicle checked by an authorized dealer.
41
AOff
BParking lamps, instrument panel lamps, license plate lamps and tail lamps
CHeadlamps
Parking Lamps
Note: Prolonged use of the parking lamps will cause the battery to run out of charge.
Switch the ignition off.
Both Sides
Set the lighting control to position B.
Tourneo Custom/Transit Custom (TTF) Vehicles Built From: 19-06-2014, Vehicles Built Up To: 31-12-2014, EK2J-19A321-AKA (CG3577en) enGBR, Edition date: 05/2014, First Printing

Lighting
|
One Side |
Headlamp Flasher |
Pull the lever toward you slightly and release it to flash the headlamps.
A Right-hand side
BLeft-hand side
High Beams
Push the lever forward to switch the high beams on.
Push the lever forward again or pull the lever toward you to switch the high beams off.
42
AUTOLAMPS
The headlamps will switch on and off automatically in low light situations or during inclement weather.
The headlamps will remain on for a period of time after you switch the ignition off. Use the information display controls to adjust the period of time that the headlamps will remain on. See
Information Displays (page 57).
Tourneo Custom/Transit Custom (TTF) Vehicles Built From: 19-06-2014, Vehicles Built Up To: 31-12-2014, EK2J-19A321-AKA (CG3577en) enGBR, Edition date: 05/2014, First Printing

Lighting
When the headlamp switch is in the Autolamps position, the windshield wiper activated exterior lamps will turn on within 10 seconds when you switch the windshield wipers on. The exterior lamps will turn off after a short period of time when you switch the windshield wipers off.
This feature does not turn on the exterior lamps:
•During a single wipe.
•While the wipers are on to clear washer fluid during a wash condition.
•If the wipers are in automatic or intermittent modes.
Note: If you have autolamps and autowipers switched on the low beam headlamps will turn on automatically when the windshield wipers operate continuously.
Press it repeatedly or press it and hold it until the desired level is reached.
Note: If you disconnect the battery or it loses charge the instrument lighting will return to its brightest setting.
HEADLAMP EXIT DELAY
After you switch the ignition off, you can switch the headlamps on by pulling the direction indicator lever toward you. You will hear a short tone. The headlamps will switch off automatically after three minutes with any door open or 30 seconds after the last door has been closed. You can cancel this feature by pulling the direction indicator toward you again or switching the ignition on.
Note: You may have to manually switch the headlamps on in severe weather conditions.
Note: If you have autolamps switched on you can only switch the high beam headlamps on once the system has turned the headlamps on.
INSTRUMENT LIGHTING DIMMER
DAYTIME RUNNING LAMPS
Daytime Running Lamps(If Equipped)
WARNING
Always remember to switch the headlamps on in low light situations or during inclement weather. The
system does not turn the rear lamps on and may not provide adequate lighting. Failure to switch the headlamps on under these conditions may result in a crash.
When you switch the ignition on, the system automatically turns on.
To switch the system on:
1.Switch the ignition on.
2.Turn the lighting control switch to the off or autolamp position.
43
Tourneo Custom/Transit Custom (TTF) Vehicles Built From: 19-06-2014, Vehicles Built Up To: 31-12-2014, EK2J-19A321-AKA (CG3577en) enGBR, Edition date: 05/2014, First Printing

Lighting
AUTOMATIC HIGH BEAM CONTROL
WARNINGS
The system does not relieve you of your responsibility to drive with due care and attention. A manual
override may be necessary if the system fails to switch the high beam on or off.
A manual override may be required when approaching other road users such as cyclists.
 Do not use the system in fog.
In cold and severe weather conditions the system may not function. A manual override may be
necessary in these cases.
The system may not deactivate the high beam if the lights of oncoming vehicles are hidden by obstacles (for
example guard rails).
Check and replace wiper blades regularly to ensure the camera sensor has a clear view through the
windscreen. Replacement wiper blades must be the correct length.
The system will automatically switch on high beams if it is dark enough and no other traffic is present. If it detects an approaching vehicle’s headlamps or tail lamps, or street lighting ahead the system will switch off high beam before it can distract other road users. Low beam will remain on.
A camera sensor is centrally mounted behind the windshield of your vehicle. This monitors conditions continuously to decide when to switch the high beams on and off.
Once the system is active the high beam will switch on if:
•It is dark enough to require the use of high beams and
•there is no traffic or street lighting ahead and
•vehicle speed is greater than 25 mph (40 km/h).
The high beam will switch off if:
•The ambient light is high enough that high beam is not required.
•An approaching vehicle’s headlamps or tail lamps are detected.
•Street lighting is detected.
•Vehicle speed falls below 16 mph (25 km/h).
Note: Keep the windscreen free from obstructions such as bird droppings, insects and snow or ice.
Note: Reflective road signs may be detected as oncoming traffic and the headlamps will be switched to low beam.
Note: Always fit Ford Original Parts when replacing headlamp bulbs. Other bulbs may reduce system performance.
44
•The camera sensor is too hot or becomes blocked.
Activating the System
Switch the system on using the information display and autolamps. See Information Displays (page 57). See Autolamps
(page 42).
Tourneo Custom/Transit Custom (TTF) Vehicles Built From: 19-06-2014, Vehicles Built Up To: 31-12-2014, EK2J-19A321-AKA (CG3577en) enGBR, Edition date: 05/2014, First Printing

Lighting
Manually Overriding the System
Turn the switch to the autolamps position. The Automatic High Beam Control indicator will illuminate to confirm when your system is ready to assist.
Note: The indicator will only illuminate when it is dark and headlamps have been switched on.
Note: The system may take a short time to initialize after first switching the ignition on, especially in very dark conditions. The high beam will not automatically switch on during this time.
Setting the System Sensitivity
Push or pull the lever to switch between high and low beam.
Note: This is a temporary override and the system will return to automatic operation after a short period.
To permanently deactivate the system use the information display menu or turn the lighting control switch from autolamps to headlamps.
FRONT FOG LAMPS
The system has three sensitivity levels which can be accessed via the information display. See InformationDisplays (page 57).
The set level determines the speed at which the high beam will be restored after detected traffic leaves the field of view.
Press the control to switch the fog lamps on or off.
You can switch the fog lamps on when the lighting control is in any position except off.
45
Tourneo Custom/Transit Custom (TTF) Vehicles Built From: 19-06-2014, Vehicles Built Up To: 31-12-2014, EK2J-19A321-AKA (CG3577en) enGBR, Edition date: 05/2014, First Printing

Lighting
Note: Only use fog lamps during reduced visibility, for example, fog, snow or heavy rain.
Note: If you switch autolamps on, you can only switch the fog lamps on once autolamps has turned the headlamps on.
REAR FOG LAMPS
Press the control to switch the fog lamps on or off.
You can only switch the rear fog lamps on when either the front fog lamps or low beam headlamps are on.
Note: Only use the rear fog lamps when visibility is less than 164 feet (50 meters).
Note: Do not use the rear fog lamps when it is raining or snowing.
Note: If you switch autolamps on, you can only switch the fog lamps on once autolamps has turned the headlamps on.
HEADLAMP LEVELING
Adjust the level of the headlamp beams according to your vehicle load.
Set the headlamp leveling control to zero when your vehicle is unloaded. Set the headlamp beams to give between 115 feet and 330 feet (35 meters and 100 meters) of road surface illumination when your vehicle is partially or fully loaded.
To adjust the level of the headlamp beams:
1.Press to release the control.
2.Rotate the control to the required setting.
3.Press to close the control.
46
Tourneo Custom/Transit Custom (TTF) Vehicles Built From: 19-06-2014, Vehicles Built Up To: 31-12-2014, EK2J-19A321-AKA (CG3577en) enGBR, Edition date: 05/2014, First Printing

Lighting
CORNERING LAMPS
AHeadlamp beam
BCornering lamp beam
The cornering lamps illuminate the inside of a corner when you are turning.
DIRECTION INDICATORS
Push the lever up or down to use the direction indicators.
Note: Tap the lever up or down to make the direction indicators flash three times to indicate a lane change.
47
Tourneo Custom/Transit Custom (TTF) Vehicles Built From: 19-06-2014, Vehicles Built Up To: 31-12-2014, EK2J-19A321-AKA (CG3577en) enGBR, Edition date: 05/2014, First Printing

Lighting
INTERIOR LAMPS
Courtesy Lamp
AOff
B Door contact
COn
Reading Lamps
If you switch the ignition off, the reading lamps will switch off automatically after a short period of time to prevent your vehicle battery from losing charge. To switch them back on, switch the ignition on for a short period of time.
Entrance Lamps
If you set the switch to position B, the courtesy lamp will switch on when you unlock your vehicle, open a door or the liftgate. If you leave a door open with the ignition switched off, the courtesy lamp will switch off automatically after a short period of time to prevent your vehicle battery from losing charge. To switch it back on, switch the ignition on for a short period of time.
The courtesy lamp will also switch on when you switch the ignition off. It will switch off automatically after a short period of time or when you start the engine.
If you set the switch to position C with the ignition switched off, the courtesy lamp will switch on. It will switch off automatically after a short period of time to prevent your vehicle battery from losing charge. To switch it back on, switch the ignition on for a short period of time.
The lamps are located above the rear doors and sliding door. They will switch on and off automatically when you open and close the doors. If you unlock the doors with the remote control, they will switch on. They will switch off automatically after a short period of time.
48
Tourneo Custom/Transit Custom (TTF) Vehicles Built From: 19-06-2014, Vehicles Built Up To: 31-12-2014, EK2J-19A321-AKA (CG3577en) enGBR, Edition date: 05/2014, First Printing
 Loading…