
Перейти к контенту
![]()
Русские электронные инструкции по эксплуатации
Постоянно обновляемый большой каталог документации по эксплуатации и использованию современных устройств и оборудования на русском языке. Бесплатное скачивание файлов.
Поиск:
Главная
♥ В закладки
Просмотр инструкции в pdf


Инструкция по эксплуатации робота-пылесоса Philips SmartPro Active FC8810-01.
Скачать инструкцию к роботу-пылесосу Philips SmartPro Active FC8810-01 (1,68 МБ)

Инструкции по эксплуатации роботов-пылесосов Philips
« Инструкция к роботу-пылесосу Polaris PVCR 0726W
» Инструкция к роботу-пылесосу iRobot Roomba i3+
Вам также может быть интересно

Инструкция к хлебопечке Philips HD9015-30

Инструкция к ирригатору Philips Sonicare AirFloss Pro-Ultra HX8431-02

Инструкция к фену Philips BHD176-00 DryCare

Инструкция к автоматической кофемашине Philips Series 4000 HD8848-09

Инструкция к беспроводным наушникам Philips TAE4205BK

Инструкция к фену Philips BHD027-00 DryCare Essential

Инструкция к беспроводным наушникам Philips TAT2205WT
.jpg)
Инструкция к беспроводным наушникам Philips Bass+ Blue (SHB3075BL-00)
Добавить комментарий
Имя *
Email *
Сайт
Комментарий


![]()


Сохранить моё имя, email и адрес сайта в этом браузере для последующих моих комментариев.
- Добавить инструкцию
- Заказать инструкцию
- Политика конфиденциальности
-
Инструкции по эксплуатации
1

Philips FC8810/01 инструкция по эксплуатации
(94 страницы)
- Языки:Русский
-
Тип:
PDF -
Размер:
9.04 MB -
Описание:
Робот-пылесос
Просмотр
На NoDevice можно скачать инструкцию по эксплуатации для Philips FC8810/01. Руководство пользователя необходимо для ознакомления с правилами установки и эксплуатации Philips FC8810/01. Инструкции по использованию помогут правильно настроить Philips FC8810/01, исправить ошибки и выявить неполадки.
![]()
FC8820, FC8810

Wheels stuck
 Top cover or dust container not placed properly
 Bumper stuck
 Robot lifted up from floor
 Colour of floor too dark
Battery not inserted properly / Charging error (switch is o )
|
FC8820 |
||
|
26 |
||
|
27 |
25 |
|
|
28 |
29 |
|
|
30 |
24 |
|
|
23 |
||
|
22 |
||
|
21 |
||
|
20 |
||
|
19 |
||
|
18 |
||
|
17 |
||
|
16 |
15 |
|
|
14 |
||
|
13 |
||
|
10 |
||
|
11 |
||
|
12 |


English 6 Čeština 31 Lietuviškai 57 Magyar 83 Polski 109 Română 137 Slovenščina 163

6 English
Introduction
Congratulations on your purchase and welcome to Philips! To fully benefit from the support that Philips offers, register your product at www.philips.com/welcome.
General description
1Handle of dust container lid
2Dust container lid
3Filter
4Dust container
5Top cover
6Error codes table
7Fan
8Bumper
9Docking station sensor
10Power switch (to switch the robot on or off)
11Front wheel
12Side brush shafts
13Drop-off sensors
14Wheels
15Battery cavity
16Suction opening
17Side brushes
18Rechargeable battery
19Battery cavity cover
20Fixation blocks for dry wipes
21Dry wipe holder
22Dry wipes
23Battery holder
24Remote control
25Charging cord
26Pointer
27Virtual wall unit (FC8820)
28Docking station
29Adapter
30Small plug
Display and remote control
Remote control (FC8820)
1 Navigation buttons and start/stop 2 Cleaning time buttons


 1 3 Cleaning mode buttons
4 Fan speed buttons
5 Docking button


 2
2 


 3 5
3 5 


 4
4
English

English 7
Remote control (FC8810)
|
1 |
1 |
Navigation buttons and start/stop |
|
|
2 |
Cleaning time buttons |
||
|
3 |
Cleaning mode buttons |
||
|
4 |
Fan off button |
||
|
2 |
5 |
Fan on button |
|
|
3 |
6 |
Docking button |
|
|
6 |
4 |
||
|
5 |
Control panel of docking station
|
1 |
Display with time, day and programming indications |
||
|
1 |
2 |
Adjusting and setting buttons |
|
2
Pointer (FC8820)
|
1 |
Pointer button |
||
|
2 |
On/off button |
||
|
1 |
3 |
Cleaning mode buttons |
|
|
2 |
4 |
Cleaning time buttons |
|
|
5 |
5 |
Docking button |
|
|
4 |
3 |
How your robot works
What your robot cleans
This robot is equipped with features that make it a suitable cleaner to help you clean the floors in your home.
The robot is especially suitable for cleaning hard floors, such as wooden, tiled or linoleum floors. It may experience problems cleaning soft floors, such as carpet or rugs. If you use the robot on a carpet or rug, please stay close by the first time to see if the robot can deal with this type of floor. The robot also needs supervision when you use it on very dark or shiny hard floors.

8 English
How your robot cleans
Cleaning system
The robot has a 3-stage cleaning system to clean your floors efficiently.
—The two side brushes help the robot clean in corners and along walls. They also help to remove dirt from the floor and move it towards the suction opening.
—The suction power of the robot picks up loose dirt and transports it
through the suction opening into the dust container.
— The robot comes with a dry wipe holder that allows you to clean your hard floor even more thoroughly with dry wipes.
Cleaning patterns
In its auto cleaning mode, the robot uses an automatic sequence of cleaning patterns to clean each area of the room optimally. The cleaning patterns it uses are:
1 Z-pattern or zigzag pattern
2 Random pattern
3 Wall-following pattern
English 9
4 Spiral pattern
In its auto cleaning mode, the robot uses these patterns in a fixed sequence:z-pattern, random pattern, wall-following pattern, and spiral pattern.
When the robot has completed this sequence of patterns, it starts moving in Z-pattern again. The robot continues to use this sequence of patterns to clean the room until the rechargeable battery runs low, or until it is switched off manually.
If the robot detects a particularly dirty area during its cleaning run, it switches to spiral mode and switches to turbo fan speed (FC8820 only) to ensure thorough dirt removal.
Note: You can also select each mode individually by pressing the appropriate button on the remote control or the pointer (FC8820 only). The manually selected modes are only active for a couple of minutes. After that, the robot switches back to auto-cleaning mode.
For more details, see chapter ‘Using your robot’, section ‘Cleaning modes’.
How your robot avoids height differences
The robot has three drop-off sensors in its bottom. It uses these drop-off sensors to detect and avoid height differences such as staircases.
Note: It is normal for the robot to move slightly over the edge of a height difference, as its front drop-off sensor is located behind the bumper.
Caution: In some cases, the drop-off sensors may not detect a staircase or other height difference in time. Therefore monitor the robot carefully the first few times you use it, and when you operate it near a staircase or another height difference. It is important that you clean the drop-off sensors regularly to ensure the robot continues to detect height differences properly (see chapter ‘ Cleaning and maintenance’ for instructions).
Before first use
Mounting the side brushes
1Unpack the side brushes and place the robot upside down on a table or on the floor.
2Push the side brushes onto the shafts on the bottom of the robot.
Note: Make sure you attach the side brushes properly. Press them onto the shaft until you hear them lock into position with a click.
10 English
Inserting the rechargeable battery
You have to insert te rechargeable battery before use.
Note: Please handle the rechargeable battery with care. Avoid dropping the battery. This will ensure maximum lifetime for your battery.
1 Press the ribbed sections on the battery cavity cover to unlock it.
2Slide te battery cavity cover off the robot.
3Remove the plastic from the rechargeable battery.
4Insert the rechargeable battery into the battery cavity.
Note: Make sure that the print on the battery points upwards and that the connectors point in the right direction.
5Slide the battery cavity cover back onto the robot.
Removing the tag from the remote control
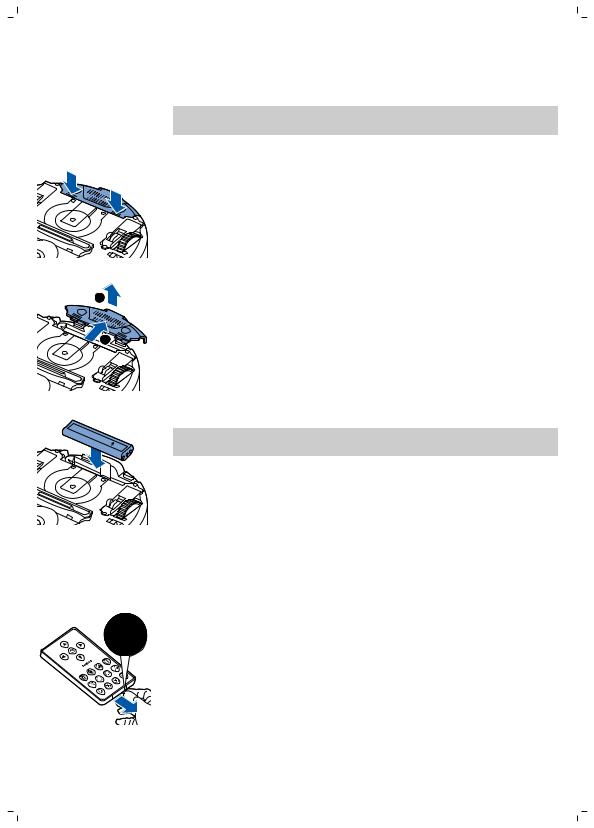
The remote control works on a CR2025 coin-shaped battery. This battery is protected with a protection tag that has to be removed before use.
1 Pull the battery protection tag out of the battery compartment of the remote control. Now the remote control is ready for use.
![]()
English 11
Preparing for use
Installing the docking station
|
2 |
1 |
Insert the small plug of the adapter into the socket on the docking station |
|
(1) and insert the adapter into the wall socket (2). |
||
|
— The display of the docking station comes on. |
||
|
2 |
Place the docking station on a horizontal, level floor against the wall. |
Note: Make sure that there are no obstacles or height differences 80 cm in front, 30 cm to the right and 100 cm to the left of the docking station.
Tip: To ensure the docking station stays firmly in the selected spot, fasten it to the wall with screws or with two strips of double-sided tape.
Charging
When charging for the first time and when the rechargeable battery of the robot is empty, the charging time is four hours.
Your robot can be charged in two ways:
—On the docking station, either manually or automatically during use;
—By connecting the robot directly to the mains.
Note: When the rechargeable battery is fully charged, your robot can clean for up to 120 minutes
Charging on the docking station
1 Press the power switch to switch on the robot.

12 English
2 Place the robot on the plugged-in docking station.
3 The start/stop button starts flashing.
Note: Because this is the first time you charge the robot, the display of the robot shows the booting indicator.
4 When the rechargeable battery is fully charged, the start/stop button lights up continuously.
Charging automatically during use
1 When the robot has finished cleaning or when only 15% of the battery power remains, it automatically searches for the docking station to recharge. When the robot searches for the docking station, the light in the start/stop button turns orange.
2 When the rechargeable battery is fully charged, the start/stop button lights up continuously.
Note: The robot only searches for the docking station automatically when it started cleaning from the docking station.
2 
Charging directly from the mains
1 Press the power switch to switch on the robot.
2 Insert the small plug of the adapter into the socket on the robot (1). Insert the adapter into a wall socket (2).
|
1 |
3 When the robot is connected to the mains correctly, the start/stop button |
|
starts flashing slowly. This indicates that the robot is charging. |
4When the rechargeable battery is fully charged, the start/stop button lights up continuously.

English 13
Preparing the room for a cleaning run
Before you start the robot on its cleaning run, make sure that you remove all loose and fragile objects from the floor. Also remove all cables, wires and cords from the floor.
Using your robot
Starting and stopping
1Set the power switch on the side of the robot to the ‘on’ position.
2Press the start/stop button.
— You can press the start/stop button on the robot.
—You can also press the start/stop button on the remote control or the pointer (FC8820 only)
3 The start/stop button is continuously on and the robot starts cleaning.
4 The robot cleans in the auto-cleaning mode until its battery runs low. In the auto-cleaning mode, it follows repeated sequences of Z-pattern, random, wall-following and spiral patterns.
Note: To select an individual mode, press one of the mode buttons on the remote control. See section ‘Cleaning mode selection’ for more details.

14 English
5When the battery runs low, the start/stop button turns orange and the robot searches for the docking station to recharge.
6 You can also press the start/stop button to interrupt or stop the cleaning run. If you press the start/stop button again and there is still enough energy in the rechargeable battery, the robot continues cleaning in the auto-cleaning mode.
7 To make the robot return to the docking station before the rechargeable battery runs low, press the docking button on the remote control or on the pointer (FC8820 only). The docking indicator on the display of the robot comes on and the robot returns to the docking station.
Note: If you did not start the robot from the docking station, it does not search for the docking station automatically when the rechargeable battery runs low. If there is still enough energy in the rechargeable battery, you can press the docking button on the remote control or on the pointer (FC8820 only) to make the robot return to the docking station. If the rechargeable battery is completely empty, you have to place the robot on the docking station manually.
Cleaning mode selection
Next to the auto-cleaning mode, this robot has four individual cleaning modes that can each be activated by pressing the appropriate button on the remote control.
Note: The manually selected modes are only active for a couple of minutes.
After that, the robot switches back to auto-cleaning mode.
Z-pattern mode
In Z-pattern mode, the robot cleans by making Z-shaped loops through the room to clean large areas.
Random mode
In this mode, the robot cleans the room in a mixed pattern of straight and crisscross movements.

English 15
Wall-following mode
In this mode, the robot follows the walls of the room to give the area alongside the walls an extra clean.
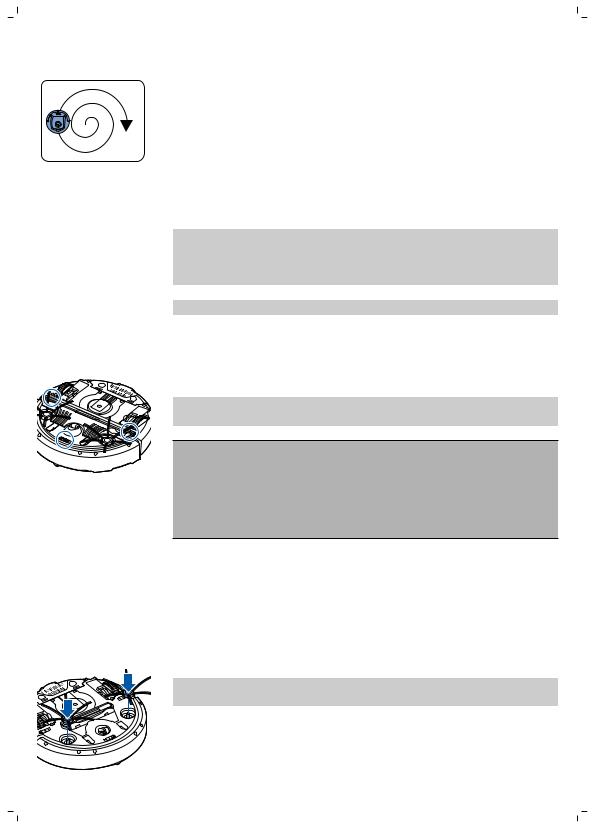
Spiral mode
In this mode, the robot moves in a spiral pattern to clean a small dirty area thoroughly. In spiral mode, the fan operates at turbo speed (FC8820 only).
Manual driving
1 Use the arrow buttons above and below and to the left and right of the start/stop button on the remote control to navigate the robot through the room.
Note: Be careful when you drive the robot manually close to height differences and staircases.
Note: The vacuuming function and the side brushes only work when the robot is driven forward. The left, right or back buttons are only for maneuvering the robot.
Using the cleaning time button
— Press the maximum cleaning time button to make the robot clean in auto cleaning mode until its rechargeable battery runs low. When the robot has finished cleaning, it returns to the docking station automatically if it started from the docking station. If the robot started from another point in the room, press the docking button to send it back to the docking station.
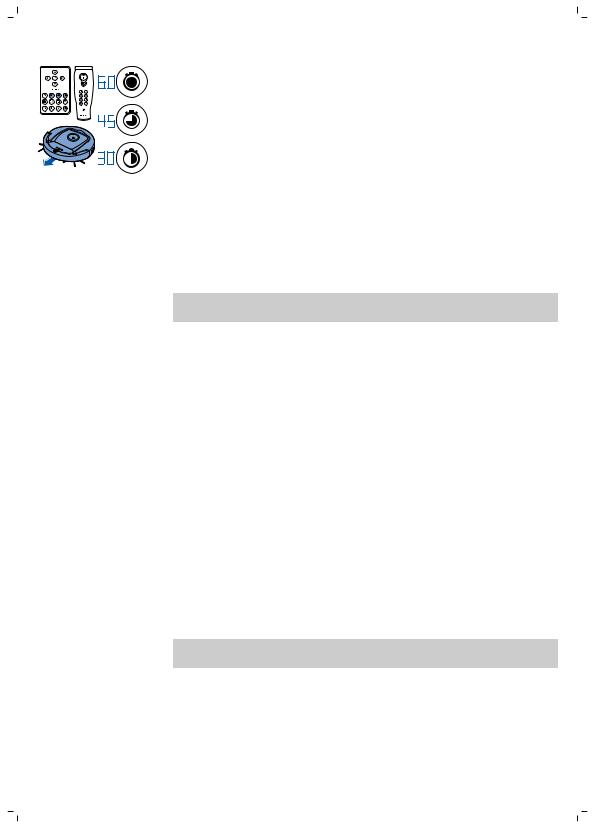
16 English
— The other cleaning time buttons allow you to let the robot operate for 60, 45 and 30 minutes respectively. When the cleaning time is finished, the robot automatically returns to the docking station when it started from the docking station. If the robot started from another point in the room, press the docking button to send it back to the docking station.
Operating the docking station
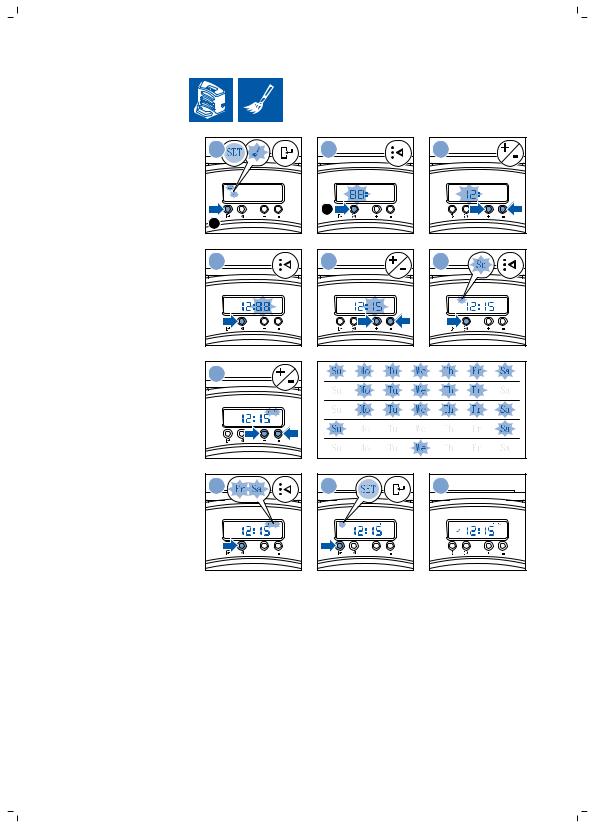
Setting clock time and day
If you want to use cleaning programs, you have to set the clock time and the day of the week on the display of the docking station first.
Note: For the pictures that belong to the steps below, see the pages at the back of this manual.
1Press the set button. The set mode indicator and the clock time indicator start flashing.
2Press the select button once. The hour indication starts flashing.
3Use the + and — buttons on the docking station to set the hour.The set hour appears on the display.
4Press the select button to confirm the hour set. The minutes indication starts flashing.
5Use the + and — buttons on the docking station to set the minutes. The set minutes appear on the display.
6Press the select button to confirm the minutes set. The indication ‘Su’ for Sunday starts flashing.
7Use the + and — buttons on the docking station to set the current day of the week.
8Press the select button to confirm the day of the week.
9Press the set button to confirm the clock time and day of the week setting. Both the set mode indicator and the clock time indicator stop flashing and turn solid.
Programming cleaning times
If you have set the time and the day of the week on the display of the docking station, you can program cleaning times for your robot.
Note: For the pictures that belong to the steps below, see the pages at the back of this manual.
The programming options available are:
|
Program |
Indications on display |
|
Cleaning every day |
All day indications are on |
|
Cleaning on weekdays |
Mo to Fri indications are on |
|
Cleaning on 2 consecutive days |
Indications of 2 days are on, e.g. Fri and Sa |

|
English 17 |
|
|
Program |
Indications on display |
|
Cleaning 1 day a week |
Indication of selected day is on |
|
1 |
Press the set button. The set mode indicator and the cleaning program |
|
indicator start flashing. |
|
|
2 |
Press the select button once. The hour indication starts flashing. |
|
3 |
Use the + and — buttons on the docking station to set the hour. The set |
|
hour appears on the display. |
|
|
4 |
Press the select button to confirm the hour set. The minutes indication |
|
starts flashing. |
|
|
5 |
Use the + and — buttons on the docking stationl to set the minutes. The |
|
set minutes appear on the display. |
|
|
6 |
Press the select button to confirm the minutes set. The indication ‘Su’ for |
|
Sunday starts flashing. |
|
|
7 |
Use the + and — buttons on the docking station to toggle between |
|
cleaning programs (see the table above for the programming options |
|
|
available). |
|
|
8 |
Press the select button to confirm the program selected. |
|
9 |
Press the set button to confirm the programming. Both the set mode |
|
indicator and the cleaning program indicator stop flashing and turn solid. |
|
|
10 |
When you have set a cleaning program, the display shows the cleaning |
|
program indicator and the day or days selected. If you leave the robot on |
|
|
standby and its rechargeable battery is fully charged, it will start cleaning |
|
|
at the programmed time on the programmed day or days. |
Fan speed buttons
1
You can use the fan speed buttons to increase the fan speed to turbo or to switch off the fan. The default setting is normal fan speed.
2  1 Press this button to switch off the fan
2 Press this button to switch on the fan at normal speed.
3 The turbo fan button increases the fan speed (FC8820 only).
3
Clap response
The clap response is enabled when the robot enters sleep mode in the following situations:
—when it stops cleaning due to an error
—when it cannot find its docking station in 20 minutes
If you do not see the robot, you can locate it by clapping your hands once.
The robot will respond by beeping and by lighting up all icons on its display.
Using the dry wipe attachment
The dry wipe attachment is a feature that allows you to clean hard floors with dry wipes.
Note: If you use the dry wipe attachment, the robot may have trouble crossing thresholds or climbing onto rugs.

18 English
Preparing the dry wipe attachment for use
1 Turn the robot upside down and place it on the floor or on a table.
2 Place the dry wipe on a table and place the dry wipe attachment on the wipe with its fixation lugs pointing towards you.
3 Fold both ends of the dry wipe around the dry wipe attachment and fasten the dry wipe onto the attachment by pushing the fixation blocks into the recesses.
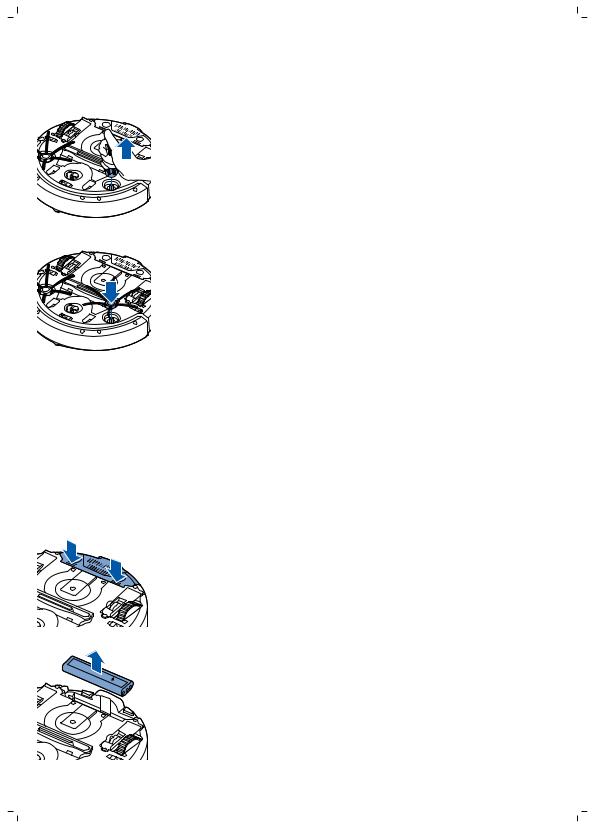
4 Insert the fixation lug of the dry wipe attachment into the opening just behind the wheel on one side of the robot and push until you hear it lock into place with a click. Then repeat these actions on the other side.
5 Turn the robot and place it on the floor on its wheels with the dry wipe attachment touching the floor.
Using the robot with the dry wipe attachment
When the dry wipe attachment is attached, you can use the robot in any mode and on all hard floors. Do not use the dry wipe attachment on carpet or rugs.
|
2 |
Removing the dry wipe attachment |
|
|
1 |
Remove the dry wipe attachment as soon as you have finished wiping |
|
|
the floor. |
||
|
2 |
Turn the robot upside down and place it on the floor or on a table. |
|
|
1 |
3 |
Push one end of the dry wipe attachment towards the wheel on the |
|
other side of the robot to release it. Then pull the attachment off the |
||
|
robot. |
Using the pointer (FC8820)
Charging the pointer
The pointer has a rechargeable battery that can be charged with the USB cable supplied.
1 Insert the micro-USB plug into the socket in the bottom of the pointer.

English 19
2 Insert the USB plug into a USB charger or a USB port on your laptop.
3The charging light on the pointer lights up solid. Charging takes 30 minutes. When the charging light goes off, the rechargeable battery is fully charged.

 5070 CM
Navigating the robot with the pointer
—When you press and hold the pointer button, the pointer emits a beam of infrared light. With this beam you can drag the robot in a particular direction. As long as you keep the button pressed and keep pointing in the direction you want the robot to move, it continues to move in that direction. When you release the pointer button, the robot starts cleaning in auto cleaning mode.
—With the pointer you can send the robot to a specific area in the room to give this area an extra-thorough clean.
Using the virtual wall unit (FC8820)
Placing the batteries in the invisible wall
The invisible wall operates on four AA batteries.
1Push the two release tabs at the bottom of the back cover (1) and slide the back cover upwards and off the invisible wall (2).

20 English
1 Push the two release tabs at the bottom of the back cover (1) and slide
|
2 |
the back cover upwards and off the invisible wall (2). |
1
2 Take four new AA batteries from the pack and insert them into the battery compartment of the invisible wall.
Note: Make sure the + and — poles of the batteries point in the right direction.
3 Slide the back cover onto the invisible wall again.
Positioning the invisible wall to stop the robot
You can use the invisible wall to prevent the robot from entering a room or area that you want to keep it out of.
1 Place the unit at a point you do not want the robot to cross, e.g at an open door to a room that is off-limits to the robot.
2Switch on the invisible wall with the on/off slide on top of the unit.
3Start the robot.
![]()
English 21
4 When the robot comes too close to the invisible wall, the light on the invisible wall starts flashing and the invisible wall emits a beam of infrared light. This beam of infrared light makes the robot change its course and move away from the invisible wall.
Note: If you use the invisible wall, regularly check if the batteries still contain sufficient power. You can check this by switching the virtual wall off and on again. If there is enough energy in the batteries, the LED on the invisible wall will light up briefly.
Cleaning and maintenance
Cleaning the robot
To maintain good cleaning performance, you have to clean the drop-off sensors, the wheels, the side brushes and the suction opening from time to time.
1Make sure that the power switch is in ‘off’ position.
2Place the robot upside down on a flat surface
3Use a brush with soft bristles (e.g. a toothbrush) to remove dust or fluff from the drop-off sensors and to clean the suction opening.
Note: It is important that you clean the drop-off sensors regularly. If the drop-off sensors are dirty, the robot may fail to detect height differences or staircases.
3
2
4 Use a brush with soft bristles (e.g. a toothbrush) to remove dust or fluff from the front wheel and side wheels.


 3
3 


2
1
5 To clean the side brushes, grab them by the bristles and pull them off their shafts.
22 English
6Remove fluff, hairs and threads from the shaft and from the side brush with a soft brush (e.g. a toothbrush) or a cloth.
7 Check the side brushes and the bottom of the robot for any sharp objects that could damage your floor.
Emptying and cleaning the dust container
Empty and clean the dust container when the dust container full indicator lights up continuously.
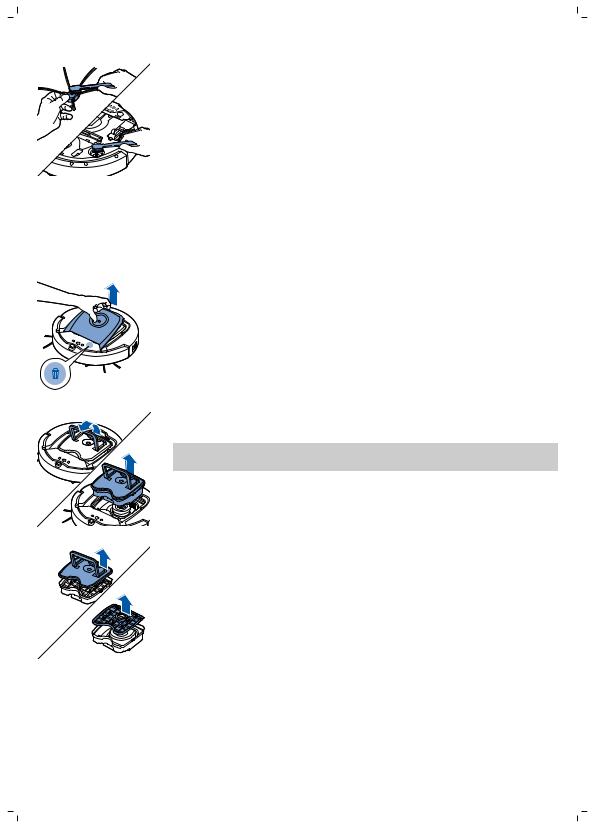
1 Make sure that the power switch is in ‘off’ position. 2 Remove the cover.
3 Pull up the handle of the dust container lid and lift the dust container out of the dust container compartment.
Note: When you remove or reinsert the dust container, take care not to damage the blades of the motor fan.
4 Carefully lift the lid off the dust container (1) and take out the filter (2).

English 23
5 Shake the dust container over a dustbin to empty it. Clean the filter and the inside of the dust container with a cloth or a toothbrush with soft bristles. Also clean the suction opening in the bottom of the dust container.
Caution: Do not clean the dust container and the filter with water or in the dishwasher.
6 Put the filter back into the dust container (1). Then place the lid on the dust container(2).
|
2 |
7 Put the dust container back into the dust container compartment and put |
|
the top cover back on the robot. |
|
|
Caution: Always make sure the filter is present inside the dust |
|
|
1 |
container. If you use the robot without the filter inside the dust |
|
container, the motor will be damaged. |
Replacement
Ordering accessories
To buy accessories or spare parts, visit www.shop.philips.com/service or go to your Philips dealer. You can also contact the Philips Consumer Care Center in your country (see the international warranty leaflet for contact details).
Replacing the filter
Replace the filter if it is very dirty or damaged. You can order a new filter kit under type number FC8066. See ‘Emptying and cleaning the dust container’ in chapter ‘Cleaning and maintenance’ for instructions on how to remove the filter from the dust container and how to place it in the dust container.
Replacing the side brushes
Replace the side brushes after some time to ensure proper cleaning results.
Always replace the side brushes when you notice signs of wear or damage. We also recommend that you replace both side brushes at the same time.
24 English
You can order spare side brushes as part of replacement kit FC8068. This kit also contains two filters and three dry wipes.
1Make sure that the power switch is in ‘off’ position.
2To replace the side brushes, grab the old side brushes by the bristles and
pull them off their shafts.
3 Push the new side brushes onto the shafts.
Replacing the rechargeable battery
Replace the rechargeable battery when you can no longer recharge it or when it runs out of power quickly. You can order a new rechargeable battery under order number CP0113 for FC8820 and CP0112 for FC8810.
1Make sure that the power switch of the robot is in ‘off’ position.
2Let the robot run until the rechargeable battery is empty to make sure that the rechargeable battery is completely discharged before you remove it and dispose of it.
3Push and slide the battery cavity cover off the robot.
4 Remove the old rechargeable battery from the battery cavity.
up

Hold the remote control upside down. Push the release button on the battery holder and at the same time slide the battery holder out of the remote control.
English 25
5Insert the new rechargeable battery into the battery cavity.
6Slide the battery cavity cover back onto the robot.
Replacing dry wipes
You can order new dry wipes. They are part of replacement kit FC8068. This replacement kit also contains two side brushes and two filters.
Replacing the battery of the remote control
The remote control works on a CR2025 coin-shaped battery. Replace the battery when the robot no longer responds when you press the buttons on the remote control.
1
2 Remove the empty battery from the battery holder and place a new
battery in the battery holder. Then slide the battery holder back into the
remote control.
1
Recycling
—This symbol means that this product shall not be disposed of with normal household waste (2012/19/EU).
26 English
— This symbol means that this product contains disposable batteries which shall not be disposed of with normal household waste (2006/66/EC).
— Follow your country’s rules for the separate collection of electrical and electronic products and batteries. Correct disposal helps prevent negative consequences for the environment and human health.
Removing disposable batteries
To remove disposable batteries, see the instructions for placing and/or removing batteries in the user manual.
Troubleshooting
This chapter summarizes the most common problems you could encounter with the machine. If you are unable to solve the problem with the information below, visit www.philips.com/support for a list of frequently asked questions or contact the Consumer Care Center in your country.
|
Problem |
Possible cause |
Solution |
|
|
The robot does not start |
The rechargeable battery is |
Charge the rechargeable battery (see |
|
|
cleaning when I press the |
empty. |
chapter ‘Preparing for use’). |
|
|
start/stop button. |
|||
|
The small plug is still inserted |
The robot does not work on mains power. |
||
|
in the socket on the robot. |
It only works on its rechargeable battery. |
||
|
Therefore, always disconnect the adapter |
|||
|
from the robot and the mains before use. |
|||
|
The power switch is not set to |
Press the power switch. Press the |
||
|
‘on’ (I) position. |
start/stop button on the robot or on the |
||
|
remote control to start cleaning. |
|||
|
The warning indicator |
One or both wheels are stuck. |
Set the power switch to ‘off’. Remove the |
|
|
flashes quickly. |
fluff, hair, thread or wire that is caught |
||
|
around the wheel suspension. |
|||
|
One or both side brushes are |
Clean the side brushes (see chapter |
||
|
stuck. |
‘Cleaning and maintenance’). |
||
|
The top cover is not present |
When the top cover is not present or is not |
||
|
or is not closed properly. |
closed properly, the robot does not work. |
||
|
Place the top cover on the robot properly. |
|||
|
The bumper is stuck. |
Press the start/stop button. Lift the robot |
||
|
so that its bumper comes free. Place the |
|||
|
robot at some distance from the obstacle |
|||
|
and press the start/stop button to make it |
|||
|
resume cleaning. |
The robot was lifted while it was cleaning.
Press the start/stop button. Place the robot on the floor. Then press the start/stop button to make the robot resume cleaning.
English 27
|
Problem |
Possible cause |
Solution |
The robot does not clean properly.
|
The bristles of one or both |
Soak the brush or brushes in warm water |
|
side brushes are crooked or |
for a while. If this does not restore the |
|
bent. |
bristles to their proper shape, replace the |
|
side brushes (see chapter ‘Replacement’). |
|
|
The filter in the dust container |
Clean the filter in the dust container with a |
|
is dirty. |
cloth or a toothbrush with soft bristles.You |
|
can also clean the filter and dust container |
|
|
with a regular vacuum cleaner at a low |
|
|
suction power setting. |
|
|
If brushing or vacuuming does not help to |
|
|
clean the filter, replace the filter with a |
|
|
new one. We advise you to replace the |
|
|
filter at least once a year. |
|
|
The suction opening in the |
Clean the suction opening (see chapter |
|
bottom of the dust container |
‘Cleaning and maintenance’). |
|
is clogged. |
|
|
The front wheel is jammed |
Clean the front wheel (see chapter |
|
with hair or other dirt. |
‘Cleaning and maintenance’). |
|
The robot is cleaning a very |
Press the start/stop button and then move |
|
dark or shiny surface, which |
the robot to a lighter colored piece of the |
|
triggers the drop-off |
floor. If the problem continues to occur on |
|
sensors.This causes the robot |
lighter colored floors, please go to |
|
to move in an unusual |
www.philips.com/support or contact the |
|
pattern. |
Consumer Care Center in your country. |
|
The robot is cleaning a floor |
Close the curtains to block sunlight from |
|
that reflects sunlight quite |
entering the room. You can also start |
|
strongly. This triggers the |
cleaning when the sunlight is less bright. |
|
drop-off sensors and causes |
|
|
the robot to move in an |
|
|
unusual pattern. |
|
The rechargeable battery |
The rechargeable battery has |
Replace the rechargeable battery (see |
|
can no longer be charged |
reached the end of its life. |
chapter ‘Replacement’). |
|
or runs empty very fast. |
||
|
The battery of the remote |
Perhaps you did not insert |
For the remote control, you need a |
|
control runs empty too |
the correct type of battery. |
CR2025 coin-shaped battery. If the |
|
fast. |
problem persists, go to |
|
|
www.philips.com/support or contact the |
||
|
Consumer Care Center in your country. |
||

28 English
|
Problem |
Possible cause |
Solution |
The robot is moving in circles.
The robot is in spot-cleaning mode.
This is normal behavior. The spiral mode can be activated when a lot of dirt is detected on the floor for a thorough clean. It is also part of the auto cleaning mode. After approximately one minute the robot resumes its normal cleaning pattern. You can also stop the spiral mode by selecting a different cleaning mode on the remote control.
|
The robot cannot find the |
There is not enough room for |
Try to find another place for the docking |
|
docking station. |
the robot to navigate towards |
station. See ‘Installing the docking station’ |
|
the docking station. |
in chapter ‘Preparing for use’. |
|
|
The robot is still actively |
Give the robot around 20 minutes to return |
|
|
searching. |
to the docking station. |
|
|
The robot was not started |
If you want the robot to return to the |
|
|
from the docking station. |
docking station after a cleaning run, start it |
|
|
from the docking station. |
||
|
The robot beeps when it |
You try to charge the robot |
Press the power switch to switch on the |
|
is on the docking station. |
with the power switch is in off |
robot. |
|
position. |
||
Error codes
|
Error code |
Possible cause |
Solution |
|
E1 |
Wheels stuck |
Remove robot from the obstacle and press the |
|
starts/stop button to resume cleaning. |
||
|
E2 |
Top cover or dust |
Place the dust container in and the top cover |
|
container not placed |
on the robot properly. The error code |
|
|
properly |
disappears from the display automatically. |
|
|
E3 |
Bumper stuck |
Remove the robot from the obstacle. The error |
|
code disappears from the display |
||
|
automatically. |
||
|
E4 |
Robot lifted from floor |
Put the robot back on the floor to make the |
|
error code disappear. |
||
|
E5 |
Color of floor too dark |
Place robot on a lighter area of the floor. Clean |
|
the drop-off sensors. |
||
|
E6 |
Battery not inserted |
Read the instructions in ‘Inserting the |
|
properly |
rechargeable battery into the robot’ in chapter |
|
|
‘Before first use’. |
||
|
Charging error |
Check if the power switch is in ‘on’ position |
|
|
when the robot is on the docking station |
||

English 29
30 English
![]()
Čeština 31
Úvod
Společnost Philips Vám gratuluje ke koupi a vítá Vás! Chcete-li využívat všech výhod podpory nabízené společností Philips, zaregistrujte svůj výrobek na stránkách www.philips.com/welcome.
Všeobecný popis
1Rukojeť víka nádoby na prach
2Víko nádoby na prach
3filtr
4Nádoba na prach
5horní kryt
6Tabulka chybových kódů
7ventilátor
8nárazník
9čidlo dokovací stanice
10vypínač (pro zapnutí a vypnutí robota)
11Přední kolečko
12hřídele postranních kartáčků
13senzory pádu
14kolečka
15schránka pro baterii
16Sací otvor
17Postranní kartáčky
18nabíjecí baterie
19kryt schránky pro baterii
20Upevňovací bloky na suché utěrky
21Držák na suché utěrky
22Suché utěrky
23držák baterie
24Dálkový ovladač
25Nabíjecí kabel
26Ukazovátko
27Jednotka neviditelné stěny (FC8820)
28Dokovací stanice
29Adaptér
30Malá zástrčka
Displej a dálkový ovladač
Dálkový ovladač (FC8820)
1 navigační tlačítka a spuštění/zastavení 2 Tlačítka doby úklidu


 1 3 Tlačítka režimu čištění
4 Tlačítka rychlosti ventilátoru
5 Tlačítko dokování


 2
2 


 3 5
3 5 


 4
4
Čeština

32 Čeština
Dálkový ovladač (FC8810)
|
1 |
1 |
navigační tlačítka a spuštění/zastavení |
|
|
2 |
Tlačítka doby úklidu |
||
|
3 |
Tlačítka režimu čištění |
||
|
4 |
Tlačítko vypnutí ventilátoru |
||
|
2 |
5 |
Tlačítko zapnutí ventilátoru |
|
|
3 |
6 |
Tlačítko dokování |
|
|
6 |
4 |
||
|
5 |
Ovládací panel dokovací stanice
|
1 |
Displej zobrazující čas, datum a programové indikátory |
||
|
1 |
2 |
Tlačítka úprav a nastavení |
|
2
Ukazovátko (FC8820)
|
1 |
Tlačítko ukazovátka |
||
|
2 |
Vypínač |
||
|
1 |
3 |
Tlačítka režimu čištění |
|
|
2 |
4 |
Tlačítka doby úklidu |
|
|
5 |
5 |
Tlačítko dokování |
|
|
4 |
3 |
Jak robot funguje
Co robot uklízí
Tento robot je vybaven funkcemi, které umožňují, aby se stal vaším praktickým pomocníkem při úklidu podlah.
Robot je vhodný především pro čištění tvrdých podlah ze dřeva, dlaždic, linolea apod. Čištění měkkých podlah, např. koberců, mu může činit potíže. Pokud robota používáte k čištění koberce, zůstaňte při prvním použití poblíž, abyste viděli, zda si dokáže s tímto typem podlahy poradit. Na robota je také třeba dohlížet při používání na velmi tmavých nebo lesklých tvrdých podlahách.

Čeština 33
Jak robot uklízí
Systém čištění
Robot je vybaven třífázovým systémem úklidu, který zajišťuje efektivní úklid podlah.
—Dva postranní kartáčky pomáhají robotovi při čištění dosáhnout do rohů a míst podél zdí. Také pomáhají sbírat špínu ze země a posouvat ji směrem k sacímu otvoru.
—Volnou špínu robot sebere díky dostatečné síle sání a skrze sací otvor ji
přemístí do nádoby na prach.
— Robot je vybaven držákem na suché utěrky, který umožňuje ještě pečlivější úklid podlah stíráním suchou utěrkou.
Schémata čištění
V režimu automatického čištění používá robot automatické pořadí úklidových schémat pro optimální čištění jednotlivých oblastí místnosti. Používaná úklidová schémata jsou:
1 Schéma Z, nebo cikcak
2 Náhodné schéma

34 Čeština
3 Schéma pohybu podél zdi
4 Spirálové schéma
V režimu automatického čištění robot používá tato schémata v pevném pořadí: schéma Z, náhodné schéma, schéma pohybu podél zdi a spirálové schéma.
Když robot dokončí toto pořadí schémat, začne se znovu pohybovat podle schématu Z. Robot bude pokračovat v čištění místnosti pomocí tohoto pořadí schémat, dokud se jeho baterie skoro nevybije nebo dokud ho ručně nevypnete.
Když robot během úklidu najde silně znečištěné místo, přepne se do spirálového režimu a zapne ventilátor na rychlost turbo (jen FC8820), aby nečistoty efektivně odstranil.
Poznámka: Jednotlivé režimy můžete také vybrat ručně stisknutím příslušného tlačítka na dálkovém ovladači nebo ukazovátku (jen FC8820). Ručně vybrané režimy jsou aktivní pouze po několik minut. Poté se robot přepne zpět do režimu automatického čištění.
Podrobnosti najdete v kapitole „Používání robota“ v části „Režimy čištění“.
Jak se robot vyhýbá výškovým předělům
Ve spodní části je robot vybaven třemi senzory pádu. Tyto senzory pádu slouží k tomu, aby robot rozpoznal výškové předěly, například schody.
Poznámka: Pokud se robot dostane mírně nad hranu stupně s výškovým rozdílem, je to normální, protože senzory pádu jsou umístěny až za nárazníkem.
Upozornění: V některých případech senzory pádu nemusí schodiště nebo jiný výškový předěl rozpoznat včas. Proto robota při několika prvních použitích a při provozu v blízkosti schodiště nebo jiného výškového předělu bedlivě sledujte. Senzory pádu je důležité pravidelně čistit, aby si robot zachoval schopnost správně rozpoznat výškové předěly (pokyny naleznete v kapitole „Čištění a údržba“).

Čeština 35
Před prvním použitím
Montáž postranních kartáčků
1Vybalte postranní kartáčky a položte robota vzhůru nohama na stůl nebo na podlahu.
2Nasuňte kolečka na hřídele na spodní části robota.
Poznámka: Ujistěte se, že jste postranní kartáčky upevnili správně.
Nasaďte je na hřídel, až uslyšíte, že s kliknutím zapadly na své místo.
Vložení nabíjecí baterie
Před použitím je nutné vložit nabíjecí baterii.
Poznámka: S nabíjecí baterií zacházejte opatrně. Dejte pozor, abyste ji neupustili na zem. Zajistíte tak maximální životnost baterie.
1 Odblokujte kryt prostoru pro baterii stisknutím jeho vroubkovaných částí.
2Vysuňte kryt prostoru pro baterii ven z robota.
3Sejměte z nabíjecí baterie plastový obal.
4Nabíjecí baterii vložte do prostoru pro baterii.
Poznámka: Baterie musí být umístěna potištěnou stranou nahoru a se správně orientovanými konektory.
5Zasuňte kryt prostoru pro baterii zpět do robota.

36 Čeština
Odebrání štítku z dálkového ovladače
Dálkový ovladač je napájen knoflíkovou baterií CR2025. Baterie je opatřena ochranným štítkem, který je nutné před prvním použitím vyjmout.
1 Vytáhněte ochranný štítek z prostoru pro baterii dálkového ovladače. Dálkový ovladač je připraven k použití.
Příprava k použití
Instalace dokovací stanice
2 
1Zapojte malou zástrčku adaptéru do zásuvky na dokovací stanici (1) a adaptér zapojte do zásuvky ve zdi (2).
— Rozsvítí se displej dokovací stanice.
2Umístěte dokovací stanici na vodorovný povrch ke zdi.
Poznámka: Zkontrolujte, že ve vzdálenosti 80 cm vpředu, 30 cm napravo a 100 cm nalevo od dokovací stanice nejsou žádné překážky ani výškové předěly.
Tip: Aby dokovací stanice zůstala jistě na vybraném místě, připevněte ji ke stěně šrouby nebo dvěma kousky oboustranné lepicí pásky.

Čeština 37
Nabíjení
První nabíjení robota, stejně jako nabíjení zcela vybité baterie, trvá čtyři hodiny.
Robota lze nabíjet dvěma způsoby:
—v dokovací stanici buď ručně nebo automaticky při používání;
—připojením robota přímo do zásuvky.
Poznámka: Na plně nabitou baterii může robot uklízet až 120 minut.
Nabíjení v dokovací stanici
1 Zapněte robota stisknutím vypínače.
2 Vložte robota do dokovací stanice připojené k elektrické zásuvce.
3 Tlačítko spuštění/zastavení začne blikat.
Poznámka: Protože jde o první nabíjení robota, na displeji robota se zobrazí symbol spouštění systému.
4 Když je baterie plně nabita, tlačítko spuštění/zastavení nepřetržitě svítí.
Automatické nabíjení při používání

38 Čeština
1 Když robot dokončí čištění nebo když nabití baterie klesne pod 15 %, robot automaticky vyhledá dokovací stanici, aby dobil baterii. Když robot hledá dokovací stanici, rozsvítí se světlo na tlačítku spuštění/zastavení oranžově.
2 Když je baterie plně nabita, tlačítko spuštění/zastavení nepřetržitě svítí.
Poznámka: Robot dokovací stanici vyhledá pouze v případě, že čištění zahájil z ní.
Nabíjení přímo ze zásuvky
|
1 |
Zapněte robota stisknutím vypínače. |
|
|
2 |
2 |
Zapojte malou zástrčku adaptéru do zdířky na robotovi (1). Adaptér |
|
zapojte do zásuvky ve zdi (2). |
||
|
3 |
Pokud je robot správně připojen k elektrické zásuvce, tlačítko |
|
|
spuštění/zastavení bude pomalu blikat na znamení toho, že robot se |
||
|
nabíjí. |
||
|
4 |
Když je baterie plně nabita, tlačítko spuštění/zastavení nepřetržitě svítí. |
|
|
1 |
Příprava místnosti na úklid
Než pošlete robota na úklid, odeberte z podlahy všechny volné a křehké předměty. Také ze země odstraňte veškeré kabely a dráty.
Používání robota
Spuštění a zastavení
1Nastavte vypínač na straně robota do polohy „zapnuto“.
2Stiskněte tlačítko spuštění/zastavení.
— Můžete stisknout tlačítko spuštění/zastavení na robotovi.

Čeština 39
—Můžete také stisknout tlačítko spuštění/zastavení na dálkovém ovladači nebo ukazovátku (jen FC8820).
3Tlačítko spuštění/zastavení začne nepřetržitě svítit a robot začne uklízet.
4Robot bude uklízet v režimu automatického čištění, dokud se baterie skoro nevybije. V režimu automatického čištění robot opakuje předem dané pořadí schémat pohybu Z, náhodného čištění, pohybu podél stěn a spirály.
Poznámka: Chcete-li vybrat jeden režim, stiskněte příslušné tlačítko režimu čištění na dálkovém ovladači. Další podrobnosti najdete v části „Výběr čisticího režimu“.
5Když se baterie blíží vybití, rozsvítí se tlačítko spuštění/zastavení oranžově a robot vyhledá dokovací stanici, aby se nabil.
6Stisknutím tlačítka spuštění/zastavení lze také čištění přerušit nebo zastavit. Když tlačítko spuštění/zastavení stisknete znovu a baterie je dostatečně nabitá, bude robot pokračovat v režimu automatického čištění.
7Chcete-li, aby se robot vrátil do dokovací stanice dříve, než se mu vybije baterie, stiskněte dokovací tlačítko na dálkovém ovladači nebo na ukazovátku (jen FC8820). Indikátor dokování na displeji robota začne blikat a robot se vrátí do dokovací stanice.
Poznámka: Pokud jste robota nespustili z dokovací stanice, při vybití baterie robot stanici automaticky nevyhledá. Pokud je baterie robota ještě dost nabitá, můžete stisknout dokovací tlačítko na dálkovém ovladači nebo na ukazovátku (jen FC8820), aby se robot vrátil do dokovací stanice. Pokud je baterie zcela vybitá, musíte robota do dokovací stanice umístit ručně.

40 Čeština
Výběr čisticího režimu
Robot má kromě režimu automatického čištění další čtyři režimy čištění, které můžete vybrat stisknutím příslušného tlačítka na dálkovém ovladači.
Poznámka: Ručně vybrané režimy jsou aktivní pouze po několik minut. Poté se robot přepne zpět do režimu automatického čištění.
Schéma Z
Při čištění podle schématu Z čistí robot velké plochy v místnosti pohybem ve smyčkách tvaru písmene Z.
Náhodný režim
V tomto režimu se robot při úklidu místnosti pohybuje střídavě rovnými a křížovými pohyby.
Režim pohybu podél stěn
V tomto režimu se robot pohybuje podél stěn místnosti, aby oblasti podél stěn vyčistil pečlivěji.
Spirálový režim
V tomto režimu se robot pohybuje po spirálové dráze, aby důkladně vyčistil malou oblast. Ve spirálovém režimu běží ventilátor v rychlosti turbo (jen FC8820).
![]()
Čeština 41
Ruční ovládání
1 Pohyb robota po místnosti můžete ovládat tlačítky šipek kolem tlačítka spuštění/zastavení na dálkovém ovladači.
Poznámka: Když robota ovládáte ručně, dávejte pozor na výškové předěly a schody.
Poznámka: Funkce vysávání a postranní kartáčky fungují, pouze když robot jede dopředu. Tlačítka doleva, doprava a dozadu slouží pouze k manévrování s robotem.
Používání tlačítka doby čištění
— Pokud chcete, aby robot uklízel v režimu automatického čištění až do vybití baterie, stiskněte tlačítko maximální doby čištění. Pokud úklid začal z dokovací stanice, vrátí se robot po dokončení úklidu automaticky do dokovací stanice. Pokud byl robot na začátku úklidu jinde v místnosti, odešlete ho zpět do dokovací stanice stisknutím tlačítka dokování.
— Ostatní tlačítka doby úklidu vám umožňují zadat úklid na dobu 60, 45 a 30 minut. Když proběhne zadaná doba, robot se automaticky vrátí do
dokovací stanice, pokud úklid zahájil z dokovací stanice. Pokud byl robot na začátku úklidu jinde v místnosti, odešlete ho zpět do dokovací stanice stisknutím tlačítka dokování.
Ovládání dokovací stanice
Nastavení data a času na hodinách
Chcete-li používat čisticí programy, musíte nejprve na displeji dokovací stanice nastavit datum, čas a den v týdnu.
Poznámka: Obrázky k následujícím pokynům najdete na listech na konci návodu.
1Stiskněte tlačítko SET. Indikátor nastavení a indikátor času hodin začnou blikat.
2Stiskněte jednou tlačítko výběru. Začne blikat údaj hodin.
3Pomocí tlačítek + a — na dokovací stanici nastavte hodinu. Nastavená hodina se zobrazí na displeji.
4Potvrďte nastavenou hodinu stisknutím tlačítka výběru. Začne blikat indikátor času v minutách.
5Tlačítky + nebo — na dokovací stanici nastavte minuty. Nastavené minuty se zobrazí na displeji.

42 Čeština
6 Potvrďte nastavené minuty stisknutím tlačítka výběru. Začne blikat indikátor „Su“ (Sunday, neděle).
7 Pomocí tlačítek + a — na dokovací stanici nastavte dnešní den v týdnu. 8 Stisknutím tlačítka výběru potvrďte nastavený den.
9 Stisknutím tlačítka nastavení potvrďte nastavení času a dne v týdnu. Indikátor nastavení i indikátor času hodin přestanou blikat a rozsvítí se.
Programování doby úklidu
Po nastavení data, času a dne v týdnu na displeji dokovací stanice můžete naprogramovat dobu úklidu robota.
|
Poznámka: Obrázky k následujícím pokynům najdete na listech na konci |
||
|
návodu. |
||
|
Možnosti naprogramování: |
||
|
Program |
Indikace na displeji |
|
|
Každodenní úklid |
Zapnuté indikace celý den |
|
|
Úklid v pracovní dny |
Zapnuté indikace Po – Pá (Mo – Fri) |
|
|
Úklid 2 dny po sobě |
Zapnuté indikace 2 dnů, například Pá a So (Fri a Sa) |
|
|
Úklid jeden den v týdnu |
Zapnutá indikace jednoho dne |
|
|
1 |
Stiskněte tlačítko SET. Indikátor nastavení a indikátor programu úklidu |
|
|
začnou blikat. |
||
|
2 |
Stiskněte jednou tlačítko výběru. Začne blikat údaj hodin. |
|
|
3 |
Tlačítky + nebo — na dokovací stanici nastavte hodiny. Na displeji se |
|
|
zobrazí nastavená hodina. |
||
|
4 |
Potvrďte nastavenou hodinu stisknutím tlačítka výběru. Začne blikat |
|
|
indikátor času v minutách. |
||
|
5 |
Tlačítky + a − na dokovací stanici nastavte minuty. Nastavené minuty se |
|
|
zobrazí na displeji. |
||
|
6 |
Potvrďte nastavené minuty stisknutím tlačítka výběru. Začne blikat |
|
|
indikátor „Su“ (Sunday, neděle). |
||
|
7 |
Pomocí tlačítek + a — na dokovací stanici lze přepínat mezi programy |
|
|
úklidu (možnosti programování najdete v předcházející tabulce). |
||
|
8 |
Stisknutím tlačítka výběru potvrďte vybraný program. |
|
|
9 |
Stisknutím tlačítka nastavení potvrďte naprogramování. Oba indikátory, |
|
|
režimu nastavení i programu úklidu, přestanou blikat a rozsvítí se. |
||
|
10 |
Po nastavení programu úklidu se na displeji zobrazí indikátor |
|
|
naprogramovaného úklidu a indikátory vybraných dnů. Když necháte |
||
|
robota v pohotovostním režimu a s nabitou baterií, robot začne uklízet |
||
|
v naprogramované dny v naprogramovaném čase. |

Čeština 43
|
Tlačítka rychlosti ventilátoru |
|||
|
1 |
Pomocí tlačítek rychlosti ventilátoru můžete zvýšit rychlost ventilátoru na |
||
|
turbo nebo ventilátor vypnout. Ve výchozím nastavení je rychlost ventilátoru |
|||
|
normální. |
|||
|
2 |
1 |
Stisknutím tohoto tlačítka ventilátor vypnete. |
|
|
2 |
Stisknutím tohoto tlačítka přepnete ventilátor do normální rychlosti. |
||
|
3 |
Tlačítko rychlosti turbo zvýší otáčky ventilátoru (jen FC8820). |
3
Reakce na tlesknutí
Reakce na tlesknutí, když se robot nachází v režimu spánku, je aktivní v následujících situacích:
—čištění bylo zastaveno z důvodu chyby,
—naprogramovali jste příliš krátký čas čištění,
—robot nedokázal během 20 minut najít dokovací stanici.
Pokud robota nevidíte, můžete ho najít jedním tlesknutím. Robot zareaguje vydáním zvukového signálu a rozsvícením všech ikon na displeji.
Používání nástavce na suché utěrky
Funkce nástavce na suché utěrky umožňuje vytírat podlahy suchými utěrkami.
Poznámka: Robot s připojeným nástavcem na suché utěrky může mít problémy při přejezdu prahů nebo výstupu na koberce.
Příprava nástavce na suché utěrky k použití
1 Obraťte robota vzhůru nohama a položte ho na stůl nebo na podlahu. 2 Položte suchou utěrku na stůl a přiložte na ni nástavec na suché utěrky
tak, aby upevňovací výstupky směřovaly směrem k vám.
3 Přeložte oba konce suché utěrky přes nástavec a utěrku připevněte k nástavci zatlačením upevňovacích bloků do prohlubní.
4 Vložte nástavec na suché utěrky upevňovacími výstupky do otvoru za kolečkem na straně robota a zatlačte na nástavec, až zaklapne na své místo. Totéž zopakujte na druhé straně.
5 Robota převraťte a postavte ho na kolečka na podlahu. Nástavec na suché utěrky se bude dotýkat podlahy.

44 Čeština
Používání robota s nástavcem na suché utěrky
Robot s připojeným nástavcem na suché utěrky můžete používat
v libovolném režimu na všechny tvrdé povrchy. Nepoužívejte suché utěrky na kobercích.
Odpojení nástavce na suché utěrky
1Po dokončení vytírání ihned nástavec na suché utěrky sejměte.
2Obraťte robota vzhůru nohama a položte ho na stůl nebo na podlahu.
3Zatlačte na jeden konec nástavce na suché utěrky směrem ke kolečku na
|
2 |
druhé straně robota. Nástavec se uvolní. Potom ho vytáhněte z robota. |
1 


Používání ukazovátka (FC8820)
Nabíjení ukazovátka
Ukazovátko má nabíjecí baterii, která se nabíjí dodaným kabelem USB. 1 Zasuňte zástrčku micro-USB do zásuvky ve spodní části ukazovátka.
2 Zapojte zástrčku USB do nabíječky USB nebo do portu USB v notebooku.
3 Kontrolka nabíjení na ukazovátku se rozsvítí. Nabíjení trvá 30 minut. Když kontrolka nabíjení zhasne, je baterie zcela nabitá.
Navigace robota ukazovátkem


 5070 CM
Čeština 45
Navigace robota ukazovátkem
—Když stisknete a přidržíte tlačítko na ukazovátku, ukazovátko začne vysílat paprsek infračerveného světla. Tímto paprskem můžete přesunout robota v daném směru. Dokud budete tlačítko držet a ukazovat směrem, kam chcete robota přesunout, robot pojede daným směrem. Když tlačítko uvolníte, robot zahájí úklid v automatickém režimu.
—Ukazovátkem můžete poslat robota do určité oblasti místnosti, kterou chcete zvláště pečlivě uklidit.
Používání jednotky neviditelné stěny (FC8820)
Vložení baterií do neviditelné stěny
Jednotka neviditelné stěny funguje na čtyři baterie typu AA.
|
1 |
Stiskněte dva uvolňovací jazýčky na spodní straně zadního krytu (1) |
|
2 |
a vysuňte horní kryt nahoru a ven z jednotky neviditelné stěny (2). |
|
1 |
|
|
2 |
Vybalte čtyři nové baterie typu AA a vložte je do prostoru pro baterie |
|
jednotky neviditelné stěny. |
Poznámka: Zkontrolujte správnou orientaci + a − pólů baterií.

46 Čeština
3 Zasuňte zadní kryt na jednotce neviditelné stěny.
Zastavení robota pomocí neviditelné stěny
Neviditelná stěna slouží k tomu, aby robot nevstupoval do oblasti místnosti, do které ho nechcete pustit.
1 Umístěte jednotku do bodu, který robot nesmí překročit (například k otevřeným dveřím místnosti, kterou nechcete robotem uklízet).
2 Posuvným vypínačem na horní straně jednotky zapněte neviditelnou stěnu.
3 Spusťte robota.
4 Když se robot přiblíží k neviditelné stěně, kontrolka na neviditelné stěně začne blikat a neviditelná stěna vyšle paprsek infračerveného světla. Paprsek infračerveného světla přinutí robota změnit trasu a přesunout se směrem pryč od jednotky neviditelné stěny.
Poznámka: Pokud používáte neviditelnou stěnu, pravidelně kontrolujte, zda jsou baterie nabité. Můžete se přesvědčit vypnutím a opětovným zapnutím neviditelné stěny. Jsou-li baterie dostatečně nabité, kontrolka LED na neviditelné stěně se krátce rozsvítí.
Čištění a údržba
Čištění robota
Aby robot mohl stále dobře uklízet, je nutné občas vyčistit senzory pádu, kolečka, postranní kartáčky a sací otvor.
1Zkontrolujte, že je vypínač v poloze „vypnuto“.
2Položte robota vzhůru nohama na rovný povrch.

Čeština 47
3Pomocí kartáčku s měkkými štětinami (např. kartáčku na zuby) odstraňte prach a nečistoty ze senzorů pádu a vyčistěte sací otvor.
Poznámka: Senzory pádu je důležité čistit pravidelně. Se znečištěnými senzory nemusí robot rozpoznat výškový předěl nebo schody.
4 Pomocí kartáčku s měkkými štětinami (např. kartáčku na zuby) odstraňte prach a nečistoty z předního kolečka a bočních koleček.


 3
3 


2
1
5 Postranní kartáčky před čištěním uchopte za štětiny a stáhněte je z hřídelí.
6Pomocí měkkého kartáčku (např. kartáčku na zuby) nebo hadříkem odstraňte z hřídele a z postranního kartáčku nečistoty, vlasy a nitě.
7 Zkontrolujte, zda na postranních kartáčcích nebo na spodní straně robota nejsou nějaké ostré předměty, které by mohly poškodit podlahu.
Vyprazdňování a čištění nádoby na prach
Pokud indikátor naplnění nádoby na prach nepřetržitě svítí, vysypte a vyčistěte nádobu na prach.
1 Zkontrolujte, že je vypínač v poloze „vypnuto“.

48 Čeština
2 Vyjměte kryt.
3 Zatáhněte za rukojeť víka nádoby na prach a vyjměte nádobu na prach z prostoru pro nádobu na prach směrem nahoru.
Poznámka: Když nádobu na prach vyjímáte nebo vracíte na místo, dejte pozor, abyste nepoškodili lopatky ventilátoru.
4 Opatrně zvedněte víko nádoby na prach (1) a vyjměte filtr (2).
5 Vyklepejte nádobou na prach nad odpadkovým košem. Vyčistěte filtr a vnitřek nádoby na prach hadříkem nebo kartáčkem s měkkými štětinami. Vyčistěte i sací otvor v dolní části nádoby na prach.
Upozornění: Nádobu na prach ani filtr nemyjte vodou ani v myčce na nádobí.
6 Vložte filtr zpět do nádoby na prach (1). Poté nádobu na prach (2) přikryjte víkem.

|
Čeština 49 |
|
|
2 |
7 Vraťte nádobu na prach zpět do jejího prostoru a vraťte horní kryt robota |
|
na místo. |
|
|
Upozornění: Vždy se ujistěte, že se v nádobě na prach nachází filtr. |
|
|
1 |
Pokud robota budete používat bez filtru v nádobě na prach, dojde |
|
k poškození motoru. |
Výměna
Objednávání příslušenství
Chcete-li koupit příslušenství nebo náhradní díly, navštivte adresu www.shop.philips.com/service nebo se obraťte na prodejce výrobků Philips. Můžete se také obrátit na středisko péče o zákazníky společnosti Philips ve své zemi (kontaktní údaje naleznete na letáčku s celosvětovou zárukou).
Výměna filtru
Pokud je filtr velmi špinavý nebo poškozený, vyměňte ho. Novou sadu filtrů si můžete objednat pod typovým číslem FC8066. V části „Vyprazdňování a čištění nádoby na prach“ v kapitole „Čištění a údržba“ najdete pokyny, jak filtr vyjmout z nádoby na prach a jak ho vložit zpět.
Výměna postranních kartáčků
Po určité době postranní kartáčky vyměňte, abyste zajistili kvalitní výsledky čištění.
Postranní kartáčky měňte vždy, když si všimnete známek opotřebení nebo poškození. Doporučujeme měnit vždy oba kartáčky najednou. Náhradní postranní kartáčky lze objednat jako součást výměnné soupravy FC8068. Souprava obsahuje dva filtry a tři suché utěrky.
1Zkontrolujte, že je vypínač v poloze „vypnuto“.
2Postranní kartáčky, které chcete vyměnit, uchopte za štětiny a stáhněte je
z hřídelí.

50 Čeština
3 Nasuňte na hřídel nový postranní kartáček.
Výměna nabíjecí baterie
Nabíjecí baterii vyměňte v případě, že ji již není možné znovu nabít nebo pokud se rychle vybíjí. Novou baterii si můžete objednat pod objednacím číslem CP0113 (pro model FC8820) nebo CP0112 (pro model FC8810).
1Zkontrolujte, že vypínač robota je v poloze „vypnuto“.
2Nechte robota zapnutého, dokud se baterie nevybije, abyste se ujistili, že bude baterie zcela vybitá, než ji vyjmete z přístroje a zlikvidujete.
3Stiskněte kryt prostoru pro baterii a vysuňte ho z robota.
4 Z otvoru na baterii vyjměte starou nabíjecí baterii.
up
5Do prostoru na baterii vložte novou nabíjecí baterii.
6Zasuňte kryt prostoru pro baterii zpět do robota.
 Loading…
Ответы на часто задаваемые вопросы
- Может ли робот-пылесос Philips упасть с лестницы?
- Убирает ли робот-пылесос Philips шерсть питомцев?
- Где указана модель и серийный номер пылесоса Philips?
- Совместимы ли аксессуары моего пылесоса Philips с другими моделями?
- Очистка/восстановление формы щеток робота-пылесоса
- Как очищать пылесборник безмешкового пылесоса Philips
Дополнительная информация
-
Руководство пользователя PDF
файл,
15.1 MB
23 апреля 2021 г. -
Руководство пользователя PDF
файл,
15.1 MB
23 апреля 2021 г. -
Руководство пользователя PDF
файл,
15.1 MB
23 апреля 2021 г. -
Руководство пользователя PDF
файл,
15.1 MB
23 апреля 2021 г. -
Руководство пользователя PDF
файл,
15.1 MB
23 апреля 2021 г. -
Руководство пользователя PDF
файл,
15.1 MB
23 апреля 2021 г. -
Руководство пользователя PDF
файл,
15.0 MB
5 мая 2021 г. -
Руководство пользователя PDF
файл,
15.0 MB
5 мая 2021 г. -
Руководство пользователя PDF
файл,
15.0 MB
5 мая 2021 г. -
Руководство пользователя PDF
файл,
15.0 MB
5 мая 2021 г. -
Руководство пользователя PDF
файл,
15.0 MB
5 мая 2021 г. -
Руководство пользователя PDF
файл,
15.0 MB
5 мая 2021 г. -
Руководство пользователя PDF
файл,
15.0 MB
5 мая 2021 г. -
Руководство пользователя PDF
файл,
9.0 MB
5 мая 2021 г. -
Руководство пользователя PDF
файл,
9.0 MB
5 мая 2021 г. -
Руководство пользователя PDF
файл,
9.0 MB
5 мая 2021 г. -
Локализованная торговая брошюра PDF
файл,
337.5 kB
26 апреля 2023 г. -
Краткое руководство PDF
файл,
1.1 MB
2 мая 2021 г. -
Краткое руководство PDF
файл,
1.1 MB
2 мая 2021 г. -
Краткое руководство PDF
файл,
1.1 MB
2 мая 2021 г. -
Краткое руководство PDF
файл,
1.1 MB
2 мая 2021 г. -
Краткое руководство PDF
файл,
1.1 MB
2 мая 2021 г. -
Краткое руководство PDF
файл,
1.1 MB
2 мая 2021 г. -
Краткое руководство PDF
файл,
1.1 MB
2 мая 2021 г. -
Краткое руководство PDF
файл,
1.1 MB
2 мая 2021 г. -
Краткое руководство PDF
файл,
1.1 MB
2 мая 2021 г. -
Краткое руководство PDF
файл,
1.1 MB
2 мая 2021 г. -
Краткое руководство PDF
файл,
1.1 MB
2 мая 2021 г. -
Краткое руководство PDF
файл,
1.1 MB
2 мая 2021 г. -
Краткое руководство PDF
файл,
1.1 MB
2 мая 2021 г. -
Краткое руководство PDF
файл,
1.1 MB
2 мая 2021 г. -
Краткое руководство PDF
файл,
1.1 MB
2 мая 2021 г. -
Краткое руководство PDF
файл,
1.1 MB
2 мая 2021 г. -
Краткое руководство PDF
файл,
1.1 MB
2 мая 2021 г. -
Краткое руководство PDF
файл,
1.1 MB
2 мая 2021 г. -
Краткое руководство PDF
файл,
1.1 MB
2 мая 2021 г. -
Краткое руководство PDF
файл,
1.1 MB
2 мая 2021 г. -
Краткое руководство PDF
файл,
1.1 MB
2 мая 2021 г. -
Краткое руководство PDF
файл,
1.1 MB
2 мая 2021 г. -
Краткое руководство PDF
файл,
1.1 MB
4 мая 2021 г. -
Краткое руководство PDF
файл,
1.1 MB
4 мая 2021 г. -
Краткое руководство PDF
файл,
1.1 MB
4 мая 2021 г. -
Краткое руководство PDF
файл,
1.1 MB
4 мая 2021 г. -
Краткое руководство PDF
файл,
1.1 MB
4 мая 2021 г. -
Краткое руководство PDF
файл,
1.1 MB
4 мая 2021 г. -
Краткое руководство PDF
файл,
1.1 MB
4 мая 2021 г. -
Краткое руководство PDF
файл,
1.1 MB
4 мая 2021 г. -
Краткое руководство PDF
файл,
1.1 MB
4 мая 2021 г. -
Руководство с важными сведениями PDF
файл,
932.3 kB
4 мая 2021 г. -
Руководство с важными сведениями PDF
файл,
932.3 kB
4 мая 2021 г. -
Руководство с важными сведениями PDF
файл,
589.0 kB
4 мая 2021 г. -
Руководство с важными сведениями PDF
файл,
589.0 kB
4 мая 2021 г. -
Руководство с важными сведениями PDF
файл,
589.0 kB
4 мая 2021 г. -
Руководство с важными сведениями PDF
файл,
589.0 kB
4 мая 2021 г. -
Руководство с важными сведениями PDF
файл,
589.0 kB
4 мая 2021 г. -
Руководство с важными сведениями PDF
файл,
589.0 kB
4 мая 2021 г. -
Руководство с важными сведениями PDF
файл,
589.0 kB
4 мая 2021 г. -
Руководство с важными сведениями PDF
файл,
589.0 kB
4 мая 2021 г. -
Руководство с важными сведениями PDF
файл,
589.0 kB
4 мая 2021 г. -
Руководство с важными сведениями PDF
файл,
589.0 kB
4 мая 2021 г. -
Руководство с важными сведениями PDF
файл,
589.0 kB
4 мая 2021 г. -
Руководство с важными сведениями PDF
файл,
589.0 kB
4 мая 2021 г. -
Руководство с важными сведениями PDF
файл,
589.0 kB
4 мая 2021 г. -
Руководство с важными сведениями PDF
файл,
589.0 kB
4 мая 2021 г. -
Руководство с важными сведениями PDF
файл,
589.0 kB
4 мая 2021 г. -
Руководство с важными сведениями PDF
файл,
589.0 kB
4 мая 2021 г. -
Руководство с важными сведениями PDF
файл,
589.0 kB
4 мая 2021 г. -
Руководство с важными сведениями PDF
файл,
589.0 kB
4 мая 2021 г. -
Руководство с важными сведениями PDF
файл,
589.0 kB
4 мая 2021 г. -
Руководство с важными сведениями PDF
файл,
589.0 kB
4 мая 2021 г. -
Руководство с важными сведениями PDF
файл,
589.0 kB
4 мая 2021 г. -
Руководство с важными сведениями PDF
файл,
589.0 kB
4 мая 2021 г. -
Руководство с важными сведениями PDF
файл,
589.0 kB
4 мая 2021 г. -
Руководство с важными сведениями PDF
файл,
589.0 kB
4 мая 2021 г. -
Руководство с важными сведениями PDF
файл,
589.0 kB
4 мая 2021 г. -
Руководство с важными сведениями PDF
файл,
589.0 kB
4 мая 2021 г.
Зарегистрируйте продукт и получите
- Электронную гарантию
- Информацию о скидках и акциях
- Простой доступ к поддержке продуктов