
Barnes & Noble
Nook Simple Touch Краткое руководство
Популярность:
2670 просмотры
Подсчет страниц:
10 страницы
Тип файла:
Размер файла:
449 Kb
ManyManuals
- Categories
- Brands
-
Home
-
Barnes & Noble
-
E-book readers
-
Nook
Owner’s manuals and user’s guides for E-book readers Barnes & Noble Nook.
We providing 2 pdf manuals Barnes & Noble Nook for download free by document types: User’s Guide

Barnes noble Nook User’s Guide (126 pages)
Brand: Barnes-noble | Category: E-book readers | Size: 5.60 MB |

Table of contents
Table of Contents
3
Introduction
7
Touchscreen Display
8
Page-Turn Buttons
8
Power Button
9
Card Slot
9
Registering Your NOOK
12
Tutorial Videos
13
Power and Charging
14
Charging Your NOOK
15
Safety and Care
16
Electricity
17
Airplanes
17
Electronic Equipment
17
Caring for Your NOOK
18
Double Tap
20
Press and Hold
21
The Quick Nav Bar
23
The Status Bar
24
GlowLight™
25
The Quick Settings window
26
The Home Screen
27
The New Reads List
28
The What to Read Next Shelf
28
Returning to the Home Screen
29
Reading Books on Your NOOK
30
The Reading Tools Menu
31
Reading Tools: content
32
The Bookmarks screen
34
Reading Tools: goto
35
The page-number dialog box
36
Reading Tools: find
37
Search results within a book
38
Reading Tools: text
40
Reading Tools: more
41
The Share dialog box
42
Using Bookmarks
44
Removing a Bookmark
45
Clearing All Bookmarks
45
Using Notes
49
Viewing a Note
50
Editing a Note
50
Removing a Note
50
Viewing All Notes
50
Sharing a Quote
51
Reviews and Recommendations
53
Opening DRM-protected Files
53
The Library on Your NOOK
55
The Category Menu
56
The Sync Button
57
Searching Your Library
57
Memory Card
58
Badges on Content
59
Creating a Shelf
59
Adding or Removing Items
60
Renaming a Shelf
60
Removing a Shelf
60
Recommendations for Files
62
Using the LendMe Program
63
Lending a Book
64
Borrowing a Book
64
Noble account
65
Shopping on Your NOOK
66
Browsing Lists and Categories
67
Buying a Book
68
Using Your Wishlist
69
Adding to Your Wishlist
70
Viewing Your Wishlist
70
Buying from Your Wishlist
70
Searching Your NOOK
72
Configuring Your NOOK
73
Configuring GlowLight™
74
The Device Info screen
75
Displaying System Information
76
Erase & Deregister Device
76
Viewing Legal Notices
76
Configuring Wireless Settings
77
Configuring Screen Settings
78
Adjusting the Screen Timeout
79
Selecting a Screensaver
79
Configuring Time Settings
80
Selecting a Time Zone
81
Configuring the Shop
83
Clearing Your Wishlist
84
Configuring Social Features
85
Managing Your Contacts
87
Deleting a Contact
88
Managing Your NOOK Friends™
89
Configuring Search
92
Unsecured Wi-Fi Networks
93
Secured Wi-Fi Networks
93
Using an SD Memory Card
95
7. Turn on your NOOK
96
Removing a Memory Card
97
Tips and Troubleshooting
98
Using Your NOOK Abroad
101
Languages
102
ONE YEAR LIMITED WARRANTY
103
THE RETURN OF MY NOOK?
103
Disclaimer
105
Modification
105
Applicable Law
106
Appendix E: FCC Notices
108
Terms of Service
111
Appendix G: NOOK
111
Privacy Policy
114
General Use Restrictions
114
Software Use Restrictions
114
Submissions
114
Disclaimer of Warranties
115
Indemnity
115
Liability of Customer
115
Local Laws; Export Control
115
U.S. Government Rights
116
AUP Coverage
117
AUP Enforcement and Notice
117
Prohibited Actions
118
Unlawful Activities
118
Intellectual Property
118
Interaction with Minors
119
Spam/E-mail/Usenet Abuse
119
Security Violations
120
Network Usage
121
Customer Responsibilities
121
Incident Reporting
122
Revisions to the AUP
122

Barnes noble Nook User’s Guide (10 pages)
Brand: Barnes-noble | Category: E-book readers | Size: 1.89 MB |
Table of contents
Quick Start Guide
1
Charge your NOOK
2
Get to know your NOOK
3
Set up: turning on your
4
NOOK for the first time
4
Home screen
5
Touch gestures
6
Touch gestures cont
7
Start reading
8
Discover new favorites
9
Learn more
10
More products and manuals for E-book readers Barnes & Noble
| Models | Document Type |
|---|---|
|
Nook BNTV600 |
User’s Guide
10 pages |
|
NOOK BNRB1530 |
User’s Guide
195 pages |
|
NOOK GlowLight |
User’s Guide
124 pages |
|
NOOK Color |
Quick Start Guide
10 pages |
|
Nook HD |
User’s Guide
110 pages |
|
NOOK GlowLight |
Quick Start Guide
10 pages |
|
NOOK Simple Touch |
Quick Start Guide
10 pages |
Barnes & Noble devices
-

Unknown
-
E-book readers
-
Tablets


- Top manuals
- Top Devices
-
Categories
-
Easy-Flo
Crowline
Global Air Products
MinarcMig
Prodeco Technologies -
IOptron Telescopes
Actron Motor vehicle electronics
N-Tron WLAN access points
Avanti Telephones
Sennheiser Coffee making accessories -
Acer Aspire 5810T
Panasonic TXL32EX34
Sony STR-DN1040
Samsung PN64D550C1FXZA
Royal Sovereign RCD-2000 -
Maytag MMW7530WDS User Manual
Asus H81-PLUS User Manual
NEC Express5800/R120d-1E Configuration Guide
Samsung HG55NC890XF Installation Manual
Yamaha XS6 Manual
-
Brands
-
Privacy
-
DCMA
-
Contact Us
-
About Us
-
Easy-Flo
Crowline
Global Air Products
MinarcMig
Prodeco Technologies -
IOptron Telescopes
Actron Motor vehicle electronics
N-Tron WLAN access points
Avanti Telephones
Sennheiser Coffee making accessories -
Acer Aspire 5810T
Panasonic TXL32EX34
Sony STR-DN1040
Samsung PN64D550C1FXZA
Royal Sovereign RCD-2000 -
Maytag MMW7530WDS User Manual
Asus H81-PLUS User Manual
NEC Express5800/R120d-1E Configuration Guide
Samsung HG55NC890XF Installation Manual
Yamaha XS6 Manual
Crowline
Global Air Products
MinarcMig
Prodeco Technologies
Actron Motor vehicle electronics
N-Tron WLAN access points
Avanti Telephones
Sennheiser Coffee making accessories
Panasonic TXL32EX34
Sony STR-DN1040
Samsung PN64D550C1FXZA
Royal Sovereign RCD-2000
Asus H81-PLUS User Manual
NEC Express5800/R120d-1E Configuration Guide
Samsung HG55NC890XF Installation Manual
Yamaha XS6 Manual
© 2020, manymanuals.com. All rights reserved. | 0.034 s |

Manymanuals.com

Manymanuals.de

Manymanuals.fr

Manymanuals.it

Manymanuals.pl

Manymanuals.cz

Manymanuals.es

Manymanuals-pt.com
Nook Digital, LLC. 1166 Avenue of the Americas, 18th Floor, New York, NY 10036.
© 2010-2015 NOOK Digital, LLC. All rights reserved. GlowLight®, LendMe®, Lifetime Library®, More In Store®, NOOK®, NOOK Books®, NOOK Friends®, NOOK GlowLight™, NOOK GlowLight Plus™, NOOK Library®, NOOK Magazine®, NOOK Newspaper®, NOOK Newsstand®, NOOK Store®, Read In Store®, B&N Readouts™, and the NOOK logos are trademarks of NOOK Digital, LLC or its affiliates. Patent Pending. Screenshots and product images are simulated and for instructional purposes only. They may differ from the actual product and are subject
to change without notice. Content shown may vary from actual available content, which may change without notice. Digital content sold separately. Your use of NOOK is subject to the Terms of Service and Privacy Policy located in the Settings section of your device and here: NOOK.com/legal. Contains Reader® Mobile technology by Adobe Systems Incorporated. Adobe®, Reader®, and Reader® Mobile are either registered trademarks or trademarks of Adobe Systems Incorporated in the United States and/or other countries. Wi-Fi® is a registered trademark of the Wi-Fi Alliance. All trademarks or registered trademarks that are not the property of NOOK Digital, LLC or its affiliates are the property of their respective owners.
Model: BNRV510
Version: 1.0.0.F
|
Table of Contents |
|
|
Introduction…………………………………………………………………………………………………………………………………. |
7 |
|
Contact Us………………………………………………………………………………………………………………………………………………………………….. |
7 |
|
Getting to Know Your NOOK …………………………………………………………………………………………………………………………………….. |
7 |
|
Your Barnes & Noble Account……………………………………………………………………………………………………………………………………. |
11 |
|
Registering Your NOOK…………………………………………………………………………………………………………………………………………….. |
12 |
|
Power and Charging…………………………………………………………………………………………………………………………………………………… |
14 |
|
Safety and Care………………………………………………………………………………………………………………………………………………………….. |
17 |
|
Caring for Your NOOK……………………………………………………………………………………………………………………………………………… |
18 |
|
Unlocking Your NOOK………………………………………………………………………………………………………………………………………………. |
19 |
|
Using Gestures to Control Your NOOK……………………………………………………………………………………….. |
20 |
|
Tap……………………………………………………………………………………………………………………………………………………………………………. |
20 |
|
Double Tap……………………………………………………………………………………………………………………………………………………………….. |
20 |
|
Press and Hold ………………………………………………………………………………………………………………………………………………………….. |
21 |
|
Swipe………………………………………………………………………………………………………………………………………………………………………… |
21 |
|
Scroll…………………………………………………………………………………………………………………………………………………………………………. |
21 |
|
The NOOK Navigation Buttons…………………………………………………………………………………………………… |
22 |
|
The Status Bar……………………………………………………………………………………………………………………………. |
23 |
|
The Left Side of the Status Bar……………………………………………………………………………………………………………………………………. |
23 |
|
The Right Side of the Status Bar………………………………………………………………………………………………………………………………….. |
23 |
|
GlowLight…………………………………………………………………………………………………………………………………… |
24 |
|
Turning GlowLight On or Off and Adjusting Its Brightness……………………………………………………………………………………………. |
24 |
|
The Home Screen………………………………………………………………………………………………………………………. |
25 |
|
The New & Recent Shelf ……………………………………………………………………………………………………………………………………………. |
25 |
|
The Picked for You Shelf…………………………………………………………………………………………………………………………………………….. |
25 |
|
Reading Books on Your NOOK……………………………………………………………………………………………………. |
27 |
|
Opening a Book…………………………………………………………………………………………………………………………………………………………. |
27 |
|
Page Layout……………………………………………………………………………………………………………………………………………………………….. |
27 |
|
Turning Pages…………………………………………………………………………………………………………………………………………………………….. |
27 |
|
The Reading Tools Menu…………………………………………………………………………………………………………………………………………….. |
28 |
|
Reading Magazines and Newspapers on Your NOOK…………………………………………………………………… |
51 |
|
The Library on Your NOOK………………………………………………………………………………………………………… |
52 |
|
Pull-down Menus……………………………………………………………………………………………………………………………………………………….. |
53 |
|
The Sync Button………………………………………………………………………………………………………………………………………………………… |
54 |
|
Searching Your Library……………………………………………………………………………………………………………………………………………….. |
54 |
|
Viewing and Sorting the Contents of Your Library……………………………………………………………………………………………………….. |
55 |
|
Organizing Your Library on Shelves……………………………………………………………………………………………………………………………… |
56 |
|
Archiving Books and Periodicals………………………………………………………………………………………………………………………………….. |
58 |
|
Unarchiving Books and Periodicals………………………………………………………………………………………………………………………………. |
58 |
|
Transferring Files from Your Personal Computer to Your NOOK………………………………………………………………………………….. |
59 |
|
Using the LendMe Program………………………………………………………………………………………………………… |
60 |
|
Lending and Borrowing Books…………………………………………………………………………………………………………………………………….. |
60 |
|
Guidelines for Lending and Borrowing Books……………………………………………………………………………………………………………….. |
60 |
|
Determining whether a Book Can Be Lent…………………………………………………………………………………………………………………… |
61 |
|
Lending a Book………………………………………………………………………………………………………………………………………………………….. |
61 |
|
Shopping on Your NOOK…………………………………………………………………………………………………………….. |
62 |
|
Introduction………………………………………………………………………………………………………………………………………………………………. |
62 |
|
Purchasing Books, Newspapers, and Magazines……………………………………………………………………………………………………………. |
63 |
|
Browsing Lists and Categories…………………………………………………………………………………………………………………………………….. |
64 |
|
Searching for Titles, Authors, or Topics……………………………………………………………………………………………………………………….. |
65 |
|
Buying a Book……………………………………………………………………………………………………………………………………………………………. |
65 |
|
Buying a Single Issue of a Magazine or Newspaper……………………………………………………………………………………………………….. |
66 |
|
Buying a Subscription to a Magazine or Newspaper……………………………………………………………………………………………………… |
66 |
|
What Happens When You Buy an Item in the Shop?…………………………………………………………………………………………………….. |
66 |
|
Using Your Wishlist……………………………………………………………………………………………………………………………………………………. |
67 |
|
Using B&N Readouts…………………………………………………………………………………………………………………… |
68 |
|
Buying Books and Sharing Content through B&N Readouts…………………………………………………………………………………………… |
70 |
|
Changing Topics in B&N Readouts………………………………………………………………………………………………………………………………. |
71 |
|
Customizing the My Picks Stream………………………………………………………………………………………………………………………………… |
72 |
|
Using Your NOOK in a Barnes & Noble Store……………………………………………………………………………… |
73 |
|
Read In Store®: Reading Books in a Barnes & Noble Store……………………………………………………………………………………………. |
73 |
|
Searching Your NOOK………………………………………………………………………………………………………………… |
74 |
|
Searching from the NOOK Navigation Menu……………………………………………………………………………………………………………….. |
74 |
|
Searching in Your Library……………………………………………………………………………………………………………………………………………. |
74 |
|
Searching for Words with Accents and Other Diacritical Marks…………………………………………………………………………………….. |
74 |
|
Configuring Your NOOK……………………………………………………………………………………………………………… |
75 |
|
Configuring GlowLight………………………………………………………………………………………………………………………………………………… |
76 |
|
Viewing and Configuring Device Info…………………………………………………………………………………………………………………………… |
77 |
|
Configuring Wireless Settings……………………………………………………………………………………………………………………………………… |
79 |
|
Configuring Screen Settings…………………………………………………………………………………………………………………………………………. |
80 |
|
Configuring Time Settings…………………………………………………………………………………………………………………………………………… |
82 |
|
Displaying Account Settings………………………………………………………………………………………………………………………………………… |
84 |
|
Configuring Profiles……………………………………………………………………………………………………………………………………………………. |
85 |
|
Configuring the Shop and Managing Gift Cards and Credit Cards…………………………………………………………………………………… |
91 |
|
Viewing Legal Notices………………………………………………………………………………………………………………………………………………… |
93 |
|
Using Your NOOK at Wi-Fi Hotspots………………………………………………………………………………………….. |
94 |
|
Wi-Fi Networks in Barnes & Noble Stores…………………………………………………………………………………………………………………… |
94 |
|
AT&T Wi-Fi Hotspots………………………………………………………………………………………………………………………………………………… |
94 |
|
Unsecured Wi-Fi Networks………………………………………………………………………………………………………………………………………… |
94 |
|
Secured Wi-Fi Networks……………………………………………………………………………………………………………………………………………. |
94 |
|
Updating the Software on Your NOOK……………………………………………………………………………………….. |
95 |
|
Tips and Troubleshooting……………………………………………………………………………………………………………. |
98 |
|
Solving Problems………………………………………………………………………………………………………………………………………………………… |
98 |
|
Appendix A: Page Numbering and File Formats………………………………………………………………………… |
100 |
|
Appendix B: International Use and Languages…………………………………………………………………………… |
101 |
|
Appendix C: One Year Limited Warranty…………………………………………………………………………………. |
103 |
|
ONE YEAR LIMITED WARRANTY …………………………………………………………………………………………………………………………. |
103 |
|
Appendix D: Trademarks and Copyrights………………………………………………………………………………….. |
106 |
|
Adobe Reader Mobile Software………………………………………………………………………………………………………………………………… |
106 |
|
AT&T………………………………………………………………………………………………………………………………………………………………………. |
106 |
|
Dictionary……………………………………………………………………………………………………………………………………………………………….. |
106 |
|
Fonts……………………………………………………………………………………………………………………………………………………………………….. |
106 |
|
Google…………………………………………………………………………………………………………………………………………………………………….. |
106 |
|
Wi-Fi……………………………………………………………………………………………………………………………………………………………………….. |
107 |
|
Additional Information……………………………………………………………………………………………………………………………………………… |
107 |
|
Appendix E: FCC Notices………………………………………………………………………………………………………….. |
108 |
|
FCC IDs …………………………………………………………………………………………………………………………………………………………………. |
108 |
|
FEDERAL COMMUNICATIONS COMMISSION (FCC) STATEMENT INFORMATION TO THE USER……………………….. |
108 |
|
FCC/IC Radiation Exposure Statement……………………………………………………………………………………………………………………… |
108 |
|
Other Information Related to the Radio…………………………………………………………………………………………………………………….. |
109 |
|
Appendix F: Industry Canada Notice………………………………………………………………………………………… |
110 |
|
Appendix G: Terms of Service…………………………………………………………………………………………………… |
111 |
|
Appendix H: AT&T Terms of Service & Acceptable Use Policy………………………………………………….. |
112 |
|
Index………………………………………………………………………………………………………………………………………… |
123 |
Introduction
This User Guide is designed to help you get the most enjoyment out of your NOOK GlowLight Plus™.
Contact Us
If you have questions about your NOOK® that this guide doesn’t answer, be sure to visit the NOOK online support center at:
http://www.nook.com/support
The online support center offers additional information about your NOOK, including:
•A PDF version of this NOOK User Guide that you can download to your computer
•Tutorial videos
•Frequently Asked Questions
You can also contact Barnes & Noble Customer Support by sending email to NOOK@barnesandnoble.com or by calling +1-800-843-2665 (1-800-THE-BOOK) and selecting the option for Digital Technical Support. Outside the United States, please call +1-201-438-1834.
Stay in Touch
Follow us on Facebook and Twitter to receive daily reviews, exclusive offers, and free NOOK Books®.
http://www.facebook.com/nookBN
Now, let’s get started with a quick tour of your NOOK and its main features.
Getting to Know Your NOOK
Your NOOK GlowLight Plus is an eReader with a touchscreen grayscale E Ink® display and a case that is waterproof to IP67 standards.
On your NOOK, you can:
•Read books, magazines, and newspapers
•Shop from over four million titles. Buy books, single issues of magazines and newspapers, as well as subscriptions to magazines and newspapers
•Store hundreds of books, along with magazines, newspapers, and personal files
•Sample books for free
•Explore books and articles through B&N Readouts™, Barnes & Noble’s free digital discovery feature, refreshed daily
•Share quotes and book recommendations with friends via Facebook® and read books borrowed using Barnes & Noble’s LendMe® program
•Store and read files, including PDFs
Your NOOK is small enough to hold easily with one hand and to slip into a bag or a purse. When you turn on GlowLight® on your NOOK, you can read your favorite books and periodicals even in the dark.
|
Barnes & Noble NOOK User Guide |
7 |
|
8 |
Barnes & Noble NOOK User Guide |
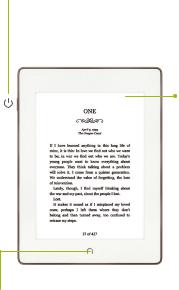
The picture below shows the features on the front of your NOOK.
Power Button
Press and hold the power button on the left side of your
NOOK for about 3 seconds to turn it on or o .
Press the power button to wake the device up.
GlowLight®
Adjustable GlowLight evenly lights your display for reading in the dark or low-light conditions.
 Touchscreen E Ink® Display
Your NOOK features a full touchscreen for easy navigation.
 Waterproof
Your NOOK is waterproof for worry-free reading.
 NOOK Home Icon
When the device is on, tap the NOOK Home Icon at any time to return to your Home screen.
IP67 certified. Waterproof in fresh water for up to 30 minutes at a maximum depth of 1 meter (3.28 feet). Avoid immersion in saltwater or other liquids. The USB port must be completely dry before inserting a USB cable to charge your device or connect it to a computer.
Please refer to Safety & Care section for care instructions.
Note: To wake the device, you must press the
Power Button on the side of the device.
The front of your NOOK.
Power Button
The power button for your NOOK is located on the left edge, near the upper left corner. Press and hold the button for 3 seconds to turn on your NOOK.
If your NOOK is sleeping, press the power button to wake up your NOOK and turn it on.
To learn more about power management for your NOOK, see “Power and Charging”.
Touchscreen E Ink Display
Your NOOK features a high-resolution, 6-inch touchscreen E Ink display for easy navigation and page turns.
NOTE: To ensure the highest quality of reading, your NOOK has an anti-glare film already installed. Please do not install any additional screen protector. To protect your NOOK’s screen from accidental damage, we recommend using a NOOK cover.
NOOK Button
This NOOK symbol  on the lower front of your NOOK is called the NOOK Home button.
If your NOOK is already on, tap this button to display the Home screen, which features navigation controls and your recent reads.
|
Barnes & Noble NOOK User Guide |
9 |
Micro-USB Port
Your NOOK features a micro-USB port for charging and for connecting to a personal computer. The micro-USB port is located on the bottom edge of your NOOK, directly below the NOOK Home button.
|
10 |
Barnes & Noble NOOK User Guide |
Getting Started with Your NOOK
The first time you use your NOOK, you’ll need to go through a short set-up process that will take about 5 to 10 minutes. Make sure that you’re in an area that has a Wi-Fi® connection (a wireless connection to the Internet), because part of the process is registering your NOOK with your Barnes & Noble account on BN.com.
NOTE: You will not be able to set up your NOOK without a Wi-Fi connection.
In the set-up process, you will do the following:
•Turn on your NOOK by pressing the power button on the left edge of the device.
•Set the time zone.
•Connect to a Wi-Fi network.
•Accept the Terms of Service and Privacy Policy.
•Register your NOOK to a Barnes & Noble account.
NOTE: If you don’t already have a Barnes & Noble account, you’ll have an opportunity to create one during the registration step.
Your Barnes & Noble Account
A Barnes & Noble account allows you to purchase and download books, magazines, and newspapers on your NOOK, and from the Barnes & Noble Web site.
The account also allows you to synchronize your NOOK with any other NOOK devices you have, such as other NOOK tablets or eReaders, and with NOOK software apps, such as NOOK® for iOS, NOOK® for Android™, or NOOK® for Web.
If you don’t have a Barnes & Noble account, you can set one up in a few minutes on the NOOK Web site. Just open a browser on your computer, and visit http://MyNOOK.com. You’ll also have the opportunity to set up an account during the registration process for your NOOK.
Your Barnes & Noble account is ready for use once you have set up the following:
•An email address
•A default credit card number
•A valid expiration date for the credit card
•A current U.S. billing address
If you have any questions about setting up an account, please visit NOOK.com/support, or call Customer Service at 1-800-THE-BOOK (1-800-843-2665).
|
Barnes & Noble NOOK User Guide |
11 |
Registering Your NOOK
NOTE: You will need to connect to a Wi-Fi network to complete your registration.
1.Read the Welcome screen. Tap the Let’s Get Started button. Your NOOK displays its Terms of Service.
2.Select your Time Zone by tapping its button. Tap Next.
3.Connect to a Wi-Fi network.
To register your NOOK and to purchase and download books and periodicals, you need to be connected to a Wi-Fi network. If you’re in a Barnes & Noble store, your NOOK will automatically connect to the store’s free Wi-Fi network. If you’re in some other location with Wi-Fi access, your NOOK will list all the networks it finds. Tap on the name of the network you want to connect to. If you see a lock symbol beside the network’s name, it’s a secure network. You’ll need to enter a password to connect to the network. If you do not know the network password, ask for the network administrator for help. If you have problems connecting, visit NOOK.com/ support for more troubleshooting tips.
4.Once you have connected to a network, tap Next (if you are in a Barnes & Noble store and connected to its network) or Continue (if you are connected to any other Wi-Fi network.)
Your NOOK displays a message saying it is registering your device. When the registration has completed, your NOOK displays a Sign In screen with an email field, a password field, and a keyboard at the bottom of the screen.
5.Sign in to your BN.com account.
When you register your NOOK, you link it to your Barnes & Noble account and give it access all the books and periodicals in your Barnes & Noble library. You also make it possible to shop for new books and periodicals on your NOOK.
Note that by signing in, you agree to the Device Terms, Store Terms, and Privacy Policy for your NOOK. Links to these terms appear at the bottom of the screen.
If you already have a Barnes & Noble account, do this:
a.On the Sign In screen, enter the email address and password for your Barnes & Noble account. (As a security precaution, if you enter your password incorrectly five times, you will be locked out of your BN.com account for half an hour. If you like, you can reset your account by visiting BN.com.)
b.Tap the Sign In button below the password field.
c.When a dialog box appears, saying “Registration successful,” tap the OK button.
If you do not already have a Barnes & Noble account, do this:
a.Tap the Create Account button.
Your NOOK displays a form for creating a Barnes & Noble account.
b.Enter the information requested, including your name, password, credit card type, number, and expiration date, and a security question.
c.Tap Submit.
Your NOOK creates your Barnes & Noble account and registers your NOOK to your account.
NOTE: If you had turned GlowLight on, it now automatically turns off.
6.Tap the Next button.
A new screen tells you that you’re ready to get started exploring the features of your NOOK. .
|
12 |
Barnes & Noble NOOK User Guide |
7. Tap the NOOK button (without holding it down) to display the Home screen and begin exploring your NOOK.
That’s it. You’ve registered your NOOK.
You’re ready to read books, magazines, and newspapers, and to shop in the NOOK Store.
Tutorial Videos
The Barnes & Noble Web site offers tutorial videos and other useful information about your NOOK. To watch the videos on your personal computer, visit NOOK.com/support
|
Barnes & Noble NOOK User Guide |
13 |
Power and Charging
Turning Your NOOK On and Off
Turning On Your NOOK
To turn on your NOOK, press the power button on the left side of your NOOK. Hold the button down for 2 seconds and release it.
Your NOOK starts up.
Turning Off Your NOOK
You do not need to turn your NOOK off when you stop using it.
With a fully charged battery and Wi-Fi and GlowLight turned off, your NOOK has enough power to support up to 6 weeks of casual reading. (Based on 30 minutes of reading per day and 1 page refresh per minute, a single charge lasts up to 6 weeks with GlowLight off and wireless off. Battery life tests conducted using specific units; actual results may vary based on device settings, usage, and many other factors.)
If you are carrying your NOOK without a cover in a bag or purse, you might want to turn off your NOOK to avoid it being accidentally turned on from its “sleeping” state. You also might want to turn off your NOOK simply to conserve power.
To turn off your NOOK, do this:
1.Press the power button and hold it down for 2 seconds.
A window appears, asking if you really want to turn your NOOK completely off.
2.Tap the Power off button in the dialog box. Your NOOK turns off.
NOTE: If you ignore the window asking you to confirm that you want to power off your NOOK, after several seconds the window disappears and your NOOK resumes whatever it was doing before you pressed the power button.
|
14 |
Barnes & Noble NOOK User Guide |
Charging Your NOOK
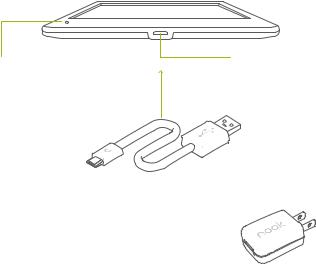
There are two ways to charge your NOOK. You can plug it into your personal computer. Or you can use the optional power adapter and plug it into a wall outlet. (The optional power adapter for your NOOK can be purchased from your local Barnes & Noble bookstore or at BN.com.) The diagram below shows the components available for charging your NOOK.
 Charging Indicator Light will glow orange while charging and turn green when fully charged.
 Micro-USB Port for charging and connecting to a computer.
USB Cable
|
Note: A power adapter is available as an optional |
|
|
accessory for charging your NOOK from a wall outlet. |
|
|
Power adapter shown is a visual only and may di er from what is currently sold in stores or online. |
|
|
Note: This product is intended to be powered by a UL Listed power supply rated at 5 Vdc, 0.85 A. Do not use |
|
|
a power adapter or micro-USB cable that has frayed or otherwise been damaged. When connecting your |
|
|
NOOK to a personal computer, the computer must be a UL listed, approved product. |
|
|
CAUTION: |
If you are using a power adapter, use only a Barnes & Noble power adapter and custom micro-USB |
|
cable intended for your NOOK. Other power adapters might damage your NOOK and its battery. |
|
|
Do not use a power adapter and cable intended for other models of NOOK products. Use only a |
|
|
power adapter and cable intended for use with your NOOK product. Do not use a power adapter |
|
|
or micro-USB cable that has frayed or otherwise been damaged. When connecting your NOOK to |
|
|
a personal computer, the computer must be a UL listed, approved product. |
|
|
ATTENTION : |
Si vous souhaitez charger votre liseuse, utilisez uniquement un adaptateur secteur et cable micro- |
|
USB de Barnes & Noble pour votre NOOK. D’autres adaptateurs secteur pourraient endommager |
|
|
votre NOOK et sa batterie. N’utilisez pas non plus des adaptateurs secteur et cables conçus pour |
|
|
d’autres modèles NOOK. Assurez vous de n’utiliser que des adaptateurs secteur et cables conçus |
|
|
uniquement pour votre modèle NOOK. N’utilisez pas d’adaptateurs secteur ou cables micro-USB |
|
|
qui ont été effilochés ou autrement endommagés. Si vous connectez votre NOOK à un ordinateur, |
|
|
ce dernier doit être certifié UL. |
|
|
CAUTION: |
This product is intended to be supplied by a Listed Direct Plug-In Power Unit marked “Class 2” or |
|
limited power source (LPS) and rated from 5 V dc, 850mA. |
|
|
ATTENTION: |
Cet appareil est conçu pour être alimenté par une source d’alimentation directe certifiée UL de « |
|
Classe 2 » ou par une source d’alimentation à puissance limitée (LPS) avec un courant de sortie de |
|
|
5 VDC, 850 mA. |
To charge your NOOK from your personal computer, do this:
1.Insert the large end of the USB cable into a USB port on your personal computer.
2.Plug the NOOK end of the USB cable into your NOOK. If your NOOK was turned off, it will now turn itself on.
|
Barnes & Noble NOOK User Guide |
15 |
NOTE: Depending on how much power remains in the battery, it might take approximately 4 hours to fully recharge your NOOK through a USB port. Do not turn off your NOOK while it is charging.
NOTE: Once your NOOK has enough power to turn on, you can see how much power remains in the battery by checking the battery charge indicator in the right corner of the Status Bar.
NOTE: Some personal computers must be turned on in order to charge other devices through USB ports. When these computers are asleep or turned off, their USB ports are inactive, and no charging takes place. If you have connected your NOOK to your personal computer and the NOOK does not seem to be charging, check your computer’s documentation to determine what the requirements are for charging devices through USB ports.
3. Once your NOOK has fully charged, unplug the USB cable from your NOOK.
To charge your NOOK from a wall outlet with a power adapter, do this:
1.Assemble the power adapter and micro-USB cable. Insert the large end of the USB cable into the matching slot in the power adapter.
2.Plug the small end of the USB cable into your NOOK.
3.Plug the power adapter into a compatible electrical outlet. If your NOOK was turned off, it will now turn itself on.
NOTE: Depending on how much power remains in the battery, it might take approximately 3 hours to fully recharge your NOOK through an electrical outlet. Do not turn off your NOOK while it is charging.
NOTE: Once your NOOK has enough power to turn on, you can see how much power remains in the battery by checking the battery charge indicator in the right corner of the Status Bar.
4.Once your NOOK has fully charged, unplug the power adapter from the electrical outlet. Unplug the USB cable from your NOOK.
Resetting Your NOOK
Performing a Soft Reset
If for some reason your NOOK becomes unresponsive, you can perform a soft reset to restart the device.
1.Press and hold the power button for 10 seconds, then release the power button.
2.Press the power button again for 2 seconds to turn on your NOOK.
Low Power
You can see how much power remains in your battery by checking the battery icon in the Status Bar, or by checking the Battery indicator on the Device Info settings screen. (To see the Device Info screen, tap Settings in the NOOK Navigation Menu to open the main Settings screen, and then tap Device Info.)
If you turn on your NOOK when its battery charge is almost depleted, a warning appears on the screen, suggesting that you begin charging your NOOK before trying to use it.
If the battery is depleted, your NOOK will shut down until it has been sufficiently recharged.
|
16 |
Barnes & Noble NOOK User Guide |
Charging Recommendations
Your NOOK contains a rechargeable battery. To maximize battery life:
•Avoid fully discharging the battery. Charge your NOOK after several hours of use or when you see the low charge alert, rather than continuing to use it until it turns itself off.
•Avoid high temperatures for charging, use, and storage. For more information, see “Temperature Ranges.”
•Charge the battery half way before storing your NOOK for a week or more.
Safety and Care
This section explains important information about safety and about caring for your NOOK.
Waterproof
IP67 certified. Your NOOK is waterproof in fresh water for up to 30 minutes at a maximum depth of 1 meter (3.28 feet). Avoid immersion in saltwater or other liquids. The USB port must be completely dry before inserting a USB cable to charge your device or connect it to a computer.
1.If the device is exposed to fresh water, shake the device gently with the USB port facing down to remove excess water. Then, using a microfiber cloth, dry the device and the USB port thoroughly. Repeat this procedure until the USB port is completely dry and allow to further air-dry for 24hrs before using the USB port. Never use a hairdryer to dry any wet parts.
2.If the device is exposed to lightly chlorinated water from a swimming pool, first rinse the device and the USB port under fresh water. Then shake the device gently with the USB port facing down to remove excess water. Then, using a microfiber cloth, dry the device and the USB port thoroughly. Repeat this procedure until the USB port is completely dry and allow to further air-dry for 24hrs before using the USB port. Never use a hairdryer to dry any wet parts.
3.Do not expose the device to seawater, salt water, detergent, liquid chemicals or beverages other than fresh water. Use in moist environments with extreme temperatures, such as a hot shower or steam room, is not recommended.
4.Connecting the device while the USB port remains wet or exposing the device to liquids other than fresh water can cause damage to the device and void your warranty. Allow to air-dry 24hrs before connecting the USB port.
Electricity
Your NOOK is an electrical device. Follow the same basic safety procedures you would follow with any electrical device.
When charging your NOOK, use only the custom components included with or sold for your NOOK: either a cus-tom USB cable or a custom USB cable along with a power adapter.
Airplanes
When using your NOOK on an airplane, be sure to follow the instructions of the flight crew.
To turn your NOOK’s wireless networking on or off, do this:
1.Tap on the right end of the Status Bar to open the Quick Settings dialog box.
2.Tap the Wi-Fi checkbox to turn wireless networking on or off.
3.Tap anywhere outside the Quick Settings dialog box to close it.
|
Barnes & Noble NOOK User Guide |
17 |
Electronic Equipment
If you are around sensitive electronic equipment–for example, if you are in a hospital–ask if you may use your NOOK. Settings such as intensive care units might forbid the use of any electronic device, with or without networking turned on.
Battery
Your NOOK includes a non-replaceable, rechargeable battery. Do not attempt to replace the battery. If you suspect your battery is having problems, please contact Customer Service at 1-800-THE-BOOK (1-800-843-2665).
Caring for Your NOOK
To take the best possible care of your NOOK, please follow the recommendations below.
Temperature Ranges
Your NOOK should function as designed in these temperature ranges:
•Operation: 00 C to 350 C, 320 F to 950 F
•Storage: -250 C to 600 C, -130 F to 1400 F
Outside of these ranges, your NOOK might develop power, display, and/or software issues. If temperatures are extremely cold or hot, permanent physical damage can result. Such damage is not covered by the limited warranty. Storage applies to temporary locations like the trunk of your car (or other motor vehicle) as well as long-term storage.
Even on a day that is not very hot, the passenger compartment or trunk of a car can be extremely hot. Do not leave your NOOK in a car.
High storage temperatures reduce battery life. For more information, see “Charging Recommendations”.
Caring for the Touchscreen
You should clean the touchscreen on your NOOK from time to time. Clean the screen with a damp soft cloth, such as a micro-fiber cloth. Micro-fiber cloths are available from Barnes & Noble stores and from partner retailers. Do not use any chemicals to clean the screen.
B&N and Designer Covers
You can purchase an optional B&N or designer cover for your NOOK at your local Barnes & Noble Bookstore, at partner retailers, and online at BN.com. The cover helps protect your NOOK from daily wear and tear. It keeps dust from accumulating on the screen, reducing the need to clean it. The cover also provides some protection against spills.
Limited Warranty Coverage and the B&N Protection Plan
Your NOOK is backed by a one-year manufacturer’s limited warranty against defects in materials and workmanship. For a copy of this limited warranty, see “One Year Limited Warranty”. The limited warranty is also available at:
NOOK.com/warranty
In the event of any changes to the limited warranty, the version in effect on the Web site as of the date of purchase shall apply.
|
18 |
Barnes & Noble NOOK User Guide |
You can extend your NOOK’s coverage by purchasing a two-year B&N Protection Plan to help safeguard NOOK against spills, drops, and other accidents. The B&N Protection Plan can only be purchased together with a NOOK.
Information about the B&N Protection Plan can be found on the Web page listed above.
NOTE: To ensure the highest quality of reading, your NOOK has an anti-glare film already installed. Please don’t use any additional screen protector as it will damage the device. To protect your NOOK’s screen from accidental damage, we recommend using a NOOK cover. Your limited warranty does not cover damage to your NOOK’s screen resulting from use of an additional screen protector.
Unlocking Your NOOK
When your NOOK has been idle, your NOOK goes to “sleep.” Your NOOK displays a screensaver on the screen. It also locks the screen so that accidental touches do not perform actions.
To wake up your NOOK, press the power button on the upper left edge of your device.
|
Barnes & Noble NOOK User Guide |
19 |
Using Gestures to Control Your NOOK
Your NOOK puts great reading material right at your fingertips. To read that material, to share it, to rate it, and so on, you’ll use your fingers in different ways.
Your NOOK recognizes these different gestures:
•Tap
•Double tap
•Press and hold
•Swipe
•Scroll
Tap
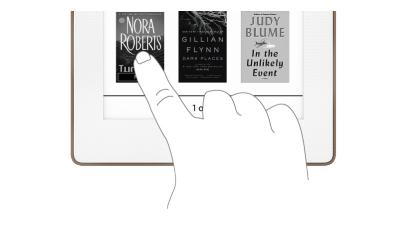
A tap on the screen is a quick touch of your fingertip. It’s the same gesture you use when you tap a key on a computer keyboard.
Tapping on a book cover
Double Tap
Tapping twice quickly on the screen is a useful short-cut for many features.
In the Library or the Shop, double-tapping on the cover of a book or periodical opens a window with details about the item.
|
20 |
Barnes & Noble NOOK User Guide |
Press and Hold
Pressing and holding means touching your finger to the screen and holding it there for 2 seconds.
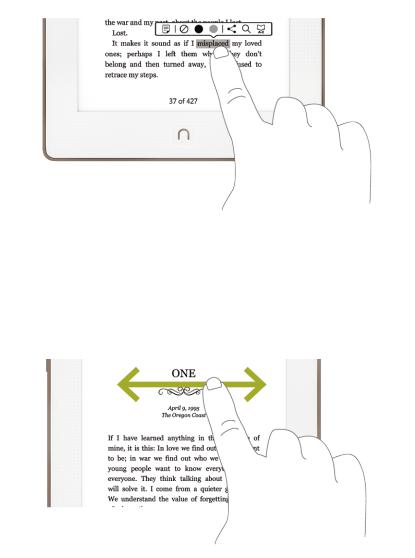
In many situations, pressing and holding causes your NOOK to open menu at the bottom of the screen. The menu offers you choices about the image your finger is resting on.
For example, if you press and hold on a word in a book, your NOOK opens a menu offering you choices of things you can do with that book: highlight the word, write a note, look the word up in a dictionary, and so on.
Pressing and holding on a word in a book and then lifting your finger opens the Text Selection Toolbar.
Swipe
To swipe is to slide your finger across the screen, usually to the left or right.
You can swipe to turn pages in a book you are reading.
Swiping to scroll left and right.
Scroll
Slide your finger up or down the screen to scroll through any list displaying up and down arrows at the bottom of the screen. A scroll gesture is like a vertical swipe.
|
Barnes & Noble NOOK User Guide |
21 |

The NOOK Navigation Buttons
The NOOK Navigation Buttons or Nav Buttons are a row of buttons at the bottom of the Home screen that make it easy to move from one area of your NOOK to another. For example, if you want to move from the Library to the Shop, you can simply tap the NOOK Home button to display the Home screen and tap the Shop button to display the Shop screen.
To open the NOOK Navigation Menu, tap the NOOK button on the front bezel of your NOOK. The Navigation Menu appears on the bottom of the Home screen, as shown below.
Tapping the NOOK Home button displays the Home screen and the NOOK Nav Buttons.
The NOOK Navigation Menu offers these choices for navigation:
•Library
•Shop
•B&N Readouts
•Settings
•Search
|
22 |
Barnes & Noble NOOK User Guide |

The Status Bar
A Status Bar runs along the top of the NOOK touchscreen. The Status Bar looks like this when GlowLight is turned on:
The Status Bar with GlowLight turned on.
The Status Bar appears on the Home Screen, the Library, the Shop, the Search screen, and on Settings screens. A slightly different version appears in books or periodicals when you open the Reading Tools.
The Left Side of the Status Bar
The left side of the Status Bar presents:
•An open book icon that returns you to the book, magazine, or newspaper you were most recently reading.
The Right Side of the Status Bar
The right side of the status bar presents:
•A digital clock showing the current time: 
•A lightbulb icon that indicates whether GlowLight is turned on or off: 
•A wireless connection indicator: 
•A battery charge indicator: 
The lightbulb icon indicates whether GlowLight is turned on or off. If GlowLight is on, an icon representing an illuminated lightbulb icon appears in the Status Bar. If GlowLight is turned off, an icon representing a crossed-out lightbulb appears instead.
The wireless connection indicator displays a stack of concentric curves, indicating the strength of your NOOK’s connection to a local Wi-Fi network. The higher the stack of curves, the stronger the connection. In general, it’s best to have at least 2 or 3 curves showing to have a reliable connection. If no curves are shown, the NOOK is not connected to a network.
By default, the NOOK status bar displays time on a 12-hour clock. To change the time or to switch to a 24-hour clock, set the 24-hour clock option on the Time Settings screen.
|
Barnes & Noble NOOK User Guide |
23 |
GlowLight
Your NOOK includes GlowLight, a built-in light that enables you to read even in dim lighting conditions.
Turning GlowLight On or Off and Adjusting Its Brightness
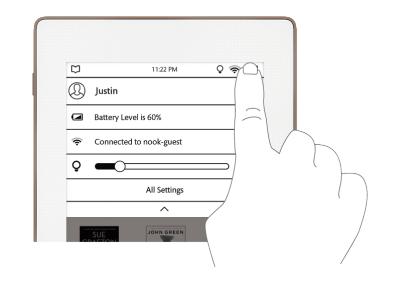
You can also turn GlowLight on or off in the Quick Settings window.
1.On the Home screen, in the Library, in the Shop, on the Search screen, or in Settings, tap the lightbulb icon or Wi-Fi symbol in the Status Bar.
Your NOOK opens the Quick Settings window.
2.Change the GlowLight setting as you like.
•If GlowLight is off, swipe the GlowLight slidebar to turn GlowLight on. Slide the circle on the slidebar to make GlowLight bright or dimmer.
•If GlowLight is on, swipe the GlowLight slidebar all the way to the left to turn GlowLight off.
3.To close the Quick Settings window, tap the dark triangle at the bottom of the window, or tap anywhere outside the window.
|
24 |
Barnes & Noble NOOK User Guide |
The Home Screen
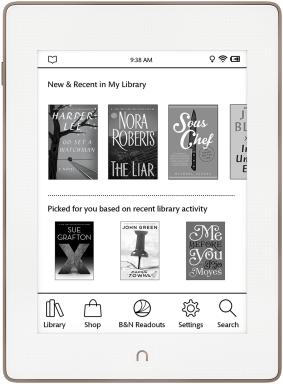
The Home screen gives you easy access to the books and periodicals you have recently read or purchased.
In the top portion of the screen, you’ll see the cover of the most recent books or periodicals you’ve been reading. The New & Recent panel has room for three titles.
Here’s an example of a Home screen:
The Home screen.
The New & Recent Shelf
At the top of the Home screen, the New & Recent panel shows the covers of the books or periodicals you have most recently purchased or were most recently reading. If you have not read a book or periodical yet, the New & Recent panel shows the cover of the NOOK User Guide or NOOK Quick Guide. These two guides are automatically included in your Library.
To open any book or periodical shown in the New & Recent panel, tap on its cover.
The Picked for You Shelf
At the bottom of the screen, you’ll see a shelf with book recommendations for you. The recommendations are based on your recent purchases.
|
Barnes & Noble NOOK User Guide |
25 |
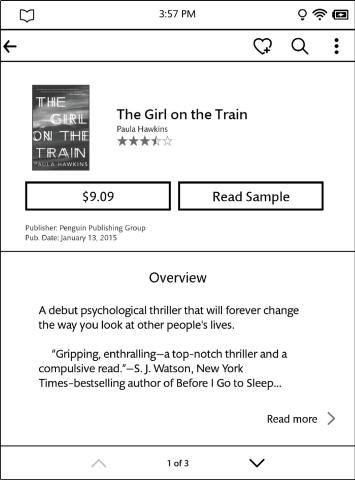
To learn more about a particular book or periodical, tap its cover. Your NOOK opens a detailed description of the book, including an overview, a list of reviews, a list of related titles, and a button for purchasing the book or periodical. The details page of a book might also include a button for downloading a free sample.
The picture below shows an example of a details page about a recommended book.
The Details page for a book.
Returning to the Home Screen
You can return to the Home screen at any time by pressing the NOOK button on the lower front of your NOOK.
|
26 |
Barnes & Noble NOOK User Guide |
Reading Books on Your NOOK
You can read books, magazines, and newspapers on your NOOK. You can make notes about what you’re reading, highlight and annotate favorite passages, and share your thoughts and recommendations with friends on social sites such as Facebook.
Your NOOK makes reading books fun. To start reading, simply tap on a book’s cover. The book opens and fills the page. Then you can use the features described in this section to get the most out of your reading experience.
While you’re reading, you can customize the look of the page. You can switch fonts, make type bigger or smaller, and adjust line-spacing and margins. You can switch between page designs whenever you like.
Opening a Book
To open a book, tap on its cover. Or if you’re displaying a list of titles in the Library, tap on the book’s title.
NOTE: The first time you open a book on your NOOK, you will be presented with a brief tutorial on using gestures to turn pages and to open reading tools.
Page Layout
When you’re reading content on NOOK, the text fills most of the page.
Page numbers appear at the bottom of the screen.
The title of the book you’re reading appears in the upper left when you first open a book.
Turning Pages
Turning to the Next Page
To turn to the next page, either:
•Tap anywhere along the right edge of the page.
•Swipe to the left. (To swipe left, you place your finger on the right side of the page and slide it quickly to the left, as though you were flipping the page of a printed book.)
Turning to the Previous Page
To turn to the previous page, either:
•Tap anywhere along the left edge of the page.
•Swipe to the right. (To swipe right, you place your finger on the left side of the page and slide it quickly to the right, as though you were flipping a page backwards in a printed book.)
|
Barnes & Noble NOOK User Guide |
27 |
The Reading Tools Menu
The Reading Tools menu makes it easy to move through a book, to search for content, share content, and adjust the display of text.
To call up the Reading Tools menu, tap anywhere in the center of the page or tap on the small dark arrow at the bottom of the page.
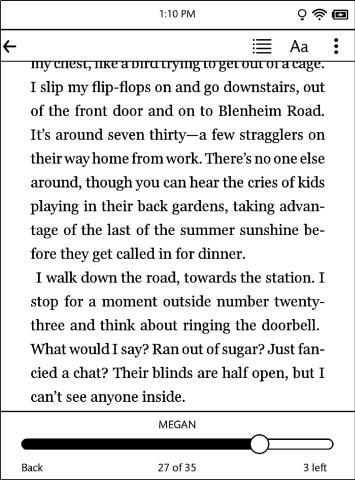
The Reading Tools appear in a horizontal bar just below the Status Bar. When the Reading Tools appear, your NOOK also displays the GlowLight indicator, the battery status indicator, and a digital clock in the upper right corner of the screen, as shown in the figure below.
The Reading Tools menu.
There are three tools on the right side of the Reading Tools menu. Here’s a quick look at what they do.
•Contents (  )- opens a table of contents for the book. Also displays tabs that give you access to Highlights & Notes, Bookmarks, and Lookups
•Text (Aa) — lets you adjust the text size, font style, line spacing, and other stylistic attributes of the page
•More ( ) — opens a menu with options for bookmarks, jumping to a speific page, searching through the book, and viewing the book’s Details page
In addition to these tools, the Reading Tools menu displays a left arrow at left end of the Reading Tools bar. Tap this arrow to return to your previous activity.
|
28 |
Barnes & Noble NOOK User Guide |
Reading Tools: Contents
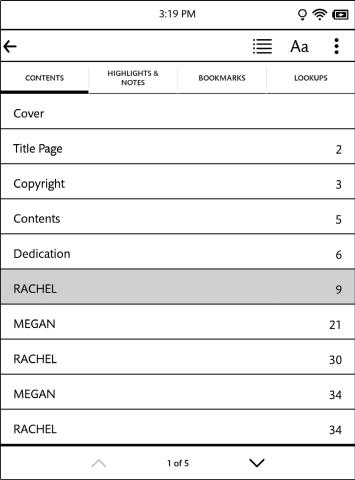
Tap on the Contents icon (  ) in the Reading Tools to open a window with four tabs:
•Contents- a Table of Contents listing chapters or sections
•Highlights & otes — a list of highlights and notes throughout the book
•Bookmarks — a list of all the bookmarks you have set
•Lookups — a list of all the words you have looked up in this book or in all your books
Tap on any title, highlighted passage summary, or bookmark on these tabs to jump to that location in the book.
The Contents tool.
When the Contents tool opens, it displays the Contents tab, which lists all the chapters in the book. If the list of chapters runs longer than one screen, you can tap the arrows at the bottom of the screen to scroll down and up through the list.
Tapping on any chapter number or title closes the dialog box and moves you to the beginning of that chapter in the book.
|
Barnes & Noble NOOK User Guide |
29 |

Tapping on the Highlights & Notes tab displays the Highlights & Notes screen, which looks like this.
The Highlights & Notes screen.
The Highlights & Notes screen lists all the passages you have highlighted or written notes about. Each passage is identified by its page number and opening line. If the list of notes and highlights runs longer than one screen, you can tap the arrows at the bottom of the screen to scroll down and up through the list.
To jump to a particular passage, tap on it.
To erase all the notes and clear all the highlights, tap the Clear all button.
You can control whether or not your NOOK shows highlighted passages and note symbols in the NOOK Book you’re reading. Tap the check box labeled Show Notes & Highlights. Leave the box checked to show Notes & Highlights. Leave it unchecked to hide them.
NOTE: When you hide Notes & Highlights, they are still visible on the Highlights & Notes screen, but in the pages of the NOOK Book, highlighted passages no longer appear with a tinted background, and Note symbols do not appear in the margin.
To close the window without making a selection, tap the left-facing arrow at the top of the screen.
|
30 |
Barnes & Noble NOOK User Guide |

Tapping the Bookmarks tab displays the Bookmarks screen.
Here’s an example of a Bookmarks screen.
The Bookmarks screen.
For each bookmarked page, the screen lists the page number and either the chapter number (if you bookmarked the first page of a chapter) or the first line of text that appears on the page (if you bookmarked any page other than the first page of a chapter).
To clear all the bookmarks, tap the Clear all button.
To clear an individual bookmark, tap the bookmark to visit its page, and then tap the bookmark ribbon in the upper right corner.
|
Barnes & Noble NOOK User Guide |
31 |

Tapping on the Lookups tab displays the Lookups screen, which lists words you have looked up while reading. The Lookups screen looks like this:
The Lookups tab.
Each looked-up word appears with part of text around it from book, along with an indication of when you first looked up the word.
Tap on a word to see its dictionary definition.
To erase the list of lookups, tap the Clear all button. If you are viewing the lookups just for this book, only those lookups are deleted. If you are viewing the lookups across all your books, tapping Clear all deletes all the lookups in all your books.
To delete just a single entry in the list, press and hold on the word until a dialog box opens. The dialog box asks you to confirm that you want to delete the word. To proceed, tap OK. Otherwise, tap Cancel.
|
32 |
Barnes & Noble NOOK User Guide |

Reading Tools: Text
Tap on the Text icon (Aa) in the Reading Tools to open a window for adjusting the font, the font size, line spacing, and margin size.
The Text dialog box.
The Text dialog box lets you pick:
•a text size
•a font style
•line spacing — single, 1.5-line, or double
•margin size — narrow, medium, or wide
NOTE: Some publishers have defined default settings for the display of NOOK Books. This settings specify a specific type font, font size, line spacing, and margin setting. If these defaults have been defined for the NOOK book you are reading, you will be able to check and uncheck a box labeled Publisher Defaults. You need to uncheck this box in order to make any changes to the text settings.
Tap on the settings that you would like to use. As you change settings, you will see the new settings applied to the page behind the text screen.
|
Barnes & Noble NOOK User Guide |
33 |
When you have finished making changes, close the dialog box either by tapping on the X in the upper right corner of the dialog box or by tapping anywhere on the page of the NOOK book you are reading.
Reading Tools: More
Tapping the More icon ( ) opens a menu with four choices:
•Add Bookmark
•Jump to Page
•Find in Book
•View Details
This section tells you how to use these menu choices.
Setting a Bookmark
There are two ways you can set a bookmark in a NOOK Book.
You can simply tap in the upper right corner of the page.
Or you can tap in the center of the page to open the Reading Tools, tap the More icon, and tap the Add Bookmark menu choice.
In either case, your NOOK displays a black bookmark ribbon in the upper right corner of the page and lists the bookmarked page on the Bookmarks tab in Content.
Removing a Bookmark
Once a bookmark is set, the More menu changes its menu choice from Add Bookmark to Remove Bookmark.
To remove a bookmark, tap in the center of the page to open the Reading Tools, tap the More icon, and tap Remove Bookmark.
Or you can simply tap the bookmark ribbon on the page whose bookmark you want to remove. Tapping the ribbon removes the bookmark.
|
34 |
Barnes & Noble NOOK User Guide |

Jumping to Another Page
To move to another page by entering its page number, do this:
1.Tap in the center of the page to open the Reading Tools.
2.Tap the More icon ( ).
).
3.Tap the Jump to Page menu choice..
Your NOOK opens a page-number dialog box with a numerical keyboard.
4.Type the number of the page you want to move to. Then tap the checkmark button.
The page-number dialog box.
Once you have moved to the new page, your NOOK automatically closes the page-number dialog box.
|
Barnes & Noble NOOK User Guide |
35 |

Finding a Word or Phrase in a Book
Tap on the find icon in the Reading Tools to search for a word or phrase in the book you’re reading. To search for a word or phrase in the book you are reading, do this:
1.Tap in the center of the page to open the Reading Tools.
2.Tap the More icon ( ).
).
3.Tap the Find in Book menu choice.
A keyboard appears on the screen. (See the image below.)
4.Type the word or phrase you want to find. Then tap the search button in the lower right corner of the keyboard. (This button shows a magnifying glass.)
The Find screen.
If the word or phrase you searched for appears in the book, your NOOK displays a list of page numbers and passages. To jump to a passage, tap on it.
|
36 |
Barnes & Noble NOOK User Guide |

The image below shows an example of search results.
Search results within a book.
|
Barnes & Noble NOOK User Guide |
37 |

If the word or phrase you searched for appears more than once in the book, your NOOK displays a search navigation tool at the top of the screen when you jump to the location of a search result. This toolbar includes a forward arrow and a backward arrow for moving from one appearance of the word or phrase to another.
Viewing a search result and using the mini toolbar.
To jump to the next appearance of this search term in the book, tap the right arrow
To jump back to the previous appearance of the search term, tap the left arrow.
To start a search for a different word or phrase, tap in the text field. Your NOOK opens a new search screen. Type the word or phrase you want to search for and tap find.
To close the mini toolbar, tap the X symbol in the raised tab by the upper right corner of the toolbar.
|
38 |
Barnes & Noble NOOK User Guide |
 Loading…
Знакомство с NOOK Simple Touch GlowLight
Ваш NOOK является устройством для чтения электронных книг с сенсорным экраном.
При помощи NOOK, Вы можете:
• Читать книги, журналы, и газеты.
• Покупать в онлайн магазине книги, периодические издания, а также осуществлять подписку на периодические издания (при наличии зарегистрированного аккаунта и привязанной к нему банковской карты)
• Хранить сотни книг, журналов, газет и личных файлов.
• Просматривать бесплатные образцы книг.
• Одалживать, брать, предоставлять, и рекомендовать книги друзьям через Facebook®, Twitter®, или Google® используя Barnes &
Noble’s эксклюзивную технологию LendMe® .
• Хранить и просматривать файлы, включая PDF.
Ваш NOOK компактен, его легко держать в руках и переносить в сумочке или кармане.
На картинке внизу указаны органы управления, расположенные на лицевой части NOOK.
Сенсорный экран E-Ink® со встроенной подсветкой.
В NOOK установлен 6-ти дюймовый сенсорный экран высокого разрешения E-Ink , который позволяет легко управлять книгой и переворачивать страницы.
Технология встроенной подсветки GlowLight позволяет вам читать книги не используя источник внешнего освещения.
Кнопки перелистывания страниц
В окантовку экрана E-Ink встроены кнопки для перемещения в книгах и газетах вперед и назад. Также при помощи этих кнопок можно переходить вверх и вниз между страницами и книжными полками в Библиотеке или Магазине.
По умолчанию, верхние кнопки с каждой стороны экрана переворачивают страницы назад, а нижние кнопки переворачивают страницы вперед. Вы можете изменить настройки этих кнопок в меню установок книги, которое доступно по кнопке Settings(Установки) в Панели быстрого перехода на Главной странице.
Также эти кнопки используются для прокрутки страниц в Библиотеке или в Магазине. Для прокрутки вниз – нажмите любую нижнюю кнопку. Для прокрутки вверх – нажмите любую верхнюю кнопку.
Кнопка перехода на Главную страницу
Кнопка с символом NOOK в нижней части окантовки экрана служит для быстрого перехода на Главную страницу.
Если Nook находится в «спящем» режиме, нажмите эту кнопку для выхода из «спящего» режима.
Если NOOK уже включен, нажмите эту кнопку для вызова меню быстрой навигации, это меню появится в нижней части экрана NOOK и обеспечит Вам доступ к дополнительным функциям в Библиотеке или Магазине.
Порт microUSB
В нижнем торце NOOK расположен microUSB порт для зарядки книги и для соединения ее с компьютером.
На картинке внизу показана тыльная сторона NOOK.
Тыльная сторона NOOK.
Кнопка Питания
Кнопка питания NOOK расположена на тыльной стороне книги в верхней части. Нажмите и удерживайте эту кнопку в течении 2 секунд, чтобы включить NOOK. Чтобы узнать больше о включении и зарядке NOOK, смотрите раздел “Питание и зарядка”.
Слот для карты памяти microSD
В NOOK достаточно встроенной памяти для хранения сотен книг, журналов, газет, и персональных файлов таких как PDF.
Вы можете увеличить объем для хранения в NOOK ваших личных файлов установив стандартную карту памяти microSD.
Карта устанавливается в слот в верхнем правом углу корпуса NOOK. Карта microSD может быть емкостью до 32 GB
Примечание: Файлы на карте памяти отображаются в секции My Files(Мои файлы) в Библиотеке(Library). Они не отображаются в секции Книги(Books) или секции Новые поступления(Newsstand).
Чтобы узнать больше об установке карты microSD в NOOK, смотрите раздел “Использование карты памяти SD”.
Приступая к работе
Прежде чем начать пользоваться Вашим NOOK, Вам необходимо пройти процесс первоначальной инициализации, что отнимет у Вас не более 5-10 минут.
Перед началом процесса инициализации убедитесь, что у Вас есть доступ к сети Wi-Fi® (беспроводной доступ в Интернет), потому что часть процесса потребует регистрации Вашего NOOK в аккаунте Barnes & Noble на портале BN.com.
Примечание: Вы не можете инициализировать NOOK без доступа к сети Wi-Fi. (Прим.перев. Инструкция по инициализации NOOK без регистрации приведена ниже)
Во время инициализации, будет необходимо проделать следующие шаги:
• Включить NOOK нажав кнопку питания на тыльной стороне книги.
• Согласиться с условиями производителя.
• Установить часовой пояс.
• Подключиться к сети Wi-Fi.
• Зарегистрировать Ваш NOOK на Barnes & Noble аккаунте.
Примечание: Если у Вас нет аккаунта Barnes & Noble, Вы сможете создать его в процессе регистрации.
Your Donation Will Be Matched 1-to-1! Can You Chip In?
Dear Patron: Please don’t scroll past this. The Internet Archive is a nonprofit fighting for universal access to quality information. We build and maintain all our own systems, but we don’t charge for access, sell user information, or run ads. Instead, we’re powered by online donations averaging about $14. We’d be deeply grateful if you’d join the one in a thousand users that support us financially.
Right now, we have a matching gift campaign that will double the impact of every donation. We understand that not everyone can donate right now, but if you can afford to contribute this Thursday, we promise it will be put to good use. Our resources are crucial for knowledge lovers everywhere—so if you find all these bits and bytes useful, please pitch in.
Your Donation Will Be Matched! Can You Chip In?
Dear Patron: Please don’t scroll past this. Right now we have a matching gift campaign that will double the impact of every donation. We understand that not everyone can give right now, but if you can afford to contribute this Thursday, we promise it will be put to good use. If you find all these bits and bytes useful, please pitch in.
- Инструкции и руководства
- Бренды
- Barnes & Noble
- Nook BNRZ100
- Руководство Пользователя