
Раздел: Бытовая, кухонная техника, электроника и оборудование
Тип: Стиральная Машина
Инструкция к Стиральной Машине Electrolux EW 1063 S
WASHING MACHINE
TVÄTTMASKIN
PYYKINPESUK
ONE
STIRALWNAÅ MAfiINA
INSTRUCTION BOOKLET
BRUKSANVISNING
KÄYTTÖOHJE
RUKOVODSTVO PO ÈKSPLUATACII
EW 1063 S
GB
S
S
FIN
SF
RUS
132 998 631
Dear customer,
Please read these operating instructions carefully
and pay particular attention to the safety notes
indicated in the first pages. We recommend that you
keep this instruction booklet for future reference and
pass it on to any future owners.
Transport damages
When unpacking the appliance, check that it is not
damaged. If in doubt, do not use it and contact the
Service Centre.
The symbols you will see on some paragraphs of this booklet have the following meaning:
The warning triangle and/or the key words (Warning!, Caution!) emphasize information that is particularly
important for your safety or correct functioning of the appliance.
The information marked with this symbol provides additional instructions and practical tips on the use of
the appliance.
Tips and information about economical and ecological use of the machine are marked with this symbol.
Our contribution to the protection of the
environment: we use recycled paper.
2

Contents
Warnings 4-5
Maintenance 18
Bodywork 18
Disposal 5
Detergent dispenser drawer 18
ENGLISH
Drain filter 18
Tips for environmental protection 5
Water inlet filter 18
Emergency emptying out 19
Technical specifications 6
Frost precautions 19
Installation 7
Something not working? 20-21
Unpacking 7
Positioning 7
Water inlet 7
Water drainage 8
Electrical connection 8
Your new washing machine 9
Description of the appliance 9
Detergent dispenser drawer 9
Use 10
Control panel 10
Controls 10
Washing hints 11
Sorting the laundry 11
Temperatures 11
Before loading the laundry 11
Maximum loads 11
Laundry weights 11
Removing stains 11
Detergents and additives 12
International wash code symbols 13
Operating sequence 14-15
Washing programmes 16-17
3
Warnings
The following warnings are provided in the interests of overall safety. You must read them carefully before
installing or using the appliance.
• Leave the porthole door slightly ajar when the
Installation
appliance is not in use. This preserves the door
• All internal packing must be removed before using
seal and prevents the formation of musty smells.
the appliance. Serious damage may be caused to
• Always check that water has emptied out before
the machine or adjacent furniture if the protective
opening the door. If not, drain the water following
transit devices are not removed or are not
the instructions in the instruction book.
completely removed. Refer to the relevant
paragraph in the instruction book.
• Always unplug the appliance and shut the water
tap after use.
• Any electrical work required to install this appliance
must be carried out by a qualified electrician.
• Any plumbing work required to install this
General safety
appliance must be carried out by a qualified
• Repairs to the machine must be carried out only by
plumber.
qualified personnel. Repairs carried out by
• After having installed the machine, check that it is
inexperienced persons could cause serious
not standing on its electrical supply cable.
danger. Contact your local Service Centre.
• If the appliance is placed on a carpeted floor,
• Never pull the power supply cable to remove the
ensure that air can circulate freely between the feet
plug from the socket; always take hold of the plug
and the floor.
itself.
• During high temperature wash programmes the
door glass may get hot. Do not touch it!
Use
• This appliance is designed for domestic use. It
must not be used for purposes other than those for
which it was designed.
• Only wash fabrics which are designed to be
machine washed. Follow the instructions on each
garment label.
• Do not overload the appliance. Follow the
instructions in the instruction book.
• Make sure that all pockets are empty. Objects such
as coins, safety pins, pins and screws can cause
extensive damage.
• Do not machine wash garments saturated with
petroleum, methylated spirits, trichlorethylene, etc.
If such fluids have been used to remove stains
prior to washing, wait until they have completely
evaporated from the fabric before placing garments
in the appliance.
• Place small items such as socks, belts, etc. in a
cloth bag or pillowcase to prevent them getting
trapped between the drum and the tub.
• Use only the recommended quantities of fabric
softener. An excessive amount could damage the
laundry.
4
• Keep all detergents in a safe place out of children’s
Child safety
reach.
• Children are often not aware of how dangerous
• Make sure that children or pets do not climb into
electrical appliances can be. When the machine is
ENGLISH
the drum.
working, children should be carefully supervised
and not be allowed to play with the appliance.
• When the appliance is to be scrapped, cut off the
electrical supply cable and destroy the plug with
• The packaging components (e.g. plastic film,
the remaining cable. Disable the door catch in
polystyrene) can be dangerous to children — danger
order to prevent children from becoming trapped
of suffocation! Keep them out of children’s reach.
inside while playing.
Disposal
Packaging materials
Machine
The materials marked with the symbol are
Use authorised disposal sites for your old appliance.
recyclable.
Help to keep your country tidy!
>PE<=polyethylene
>PS<=polystyrene
>PP<=polypropylene
This means that they can be recycled by disposing of
them properly in appropriate collection containers.
Tips for environmental protection
To save water, energy and to help protect the
• With adequate pre-treatment, stains and limited
environment, we recommend that you follow these
soiling can be removed; the laundry can then be
tips:
washed at a lower temperature.
• Normally soiled laundry may be washed without
• Measure out detergent according to the water
prewashing in order to save detergent, water and
hardness, the degree of soiling and the quantity of
time (the environment is protected too!).
laundry being washed.
• The machine works more economically if it is fully
• Use a short programme for lightly soiled laundry.
loaded.
5
Technical specifications
DIMENSIONS Height 85 cm
Width 60 cm
Depth 45 cm
MAXIMUM LOAD Cotton 4.5 kg
Synthetics 1.5 kg
Delicates 1.5 kg
Woollens 1 kg
SPIN SPEED 1000 rpm max.
POWER SUPPLY VOLTAGE/FREQUENCY 220-230 V/50 Hz
TOTAL POWER ABSORBED 2200 W
MINIMUM FUSE PROTECTION 10 A
WATER PRESSURE Minimum 050 kPa
Maximum 800 kPa
This appliance complies with the following EEC Directives:
73/23/EEC of 19/02/73 relating to low voltage
89/336/EEC of 03/05/89 relating to electromagnetic compatibility.
6
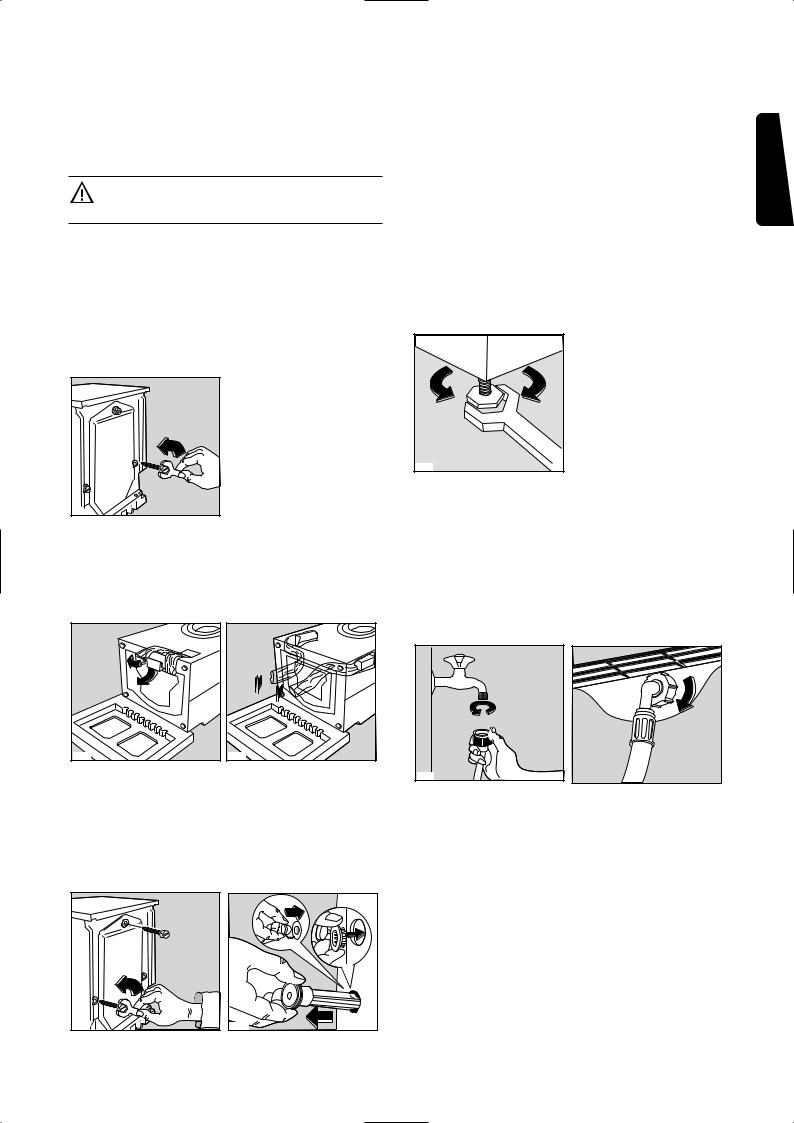
Unpacking
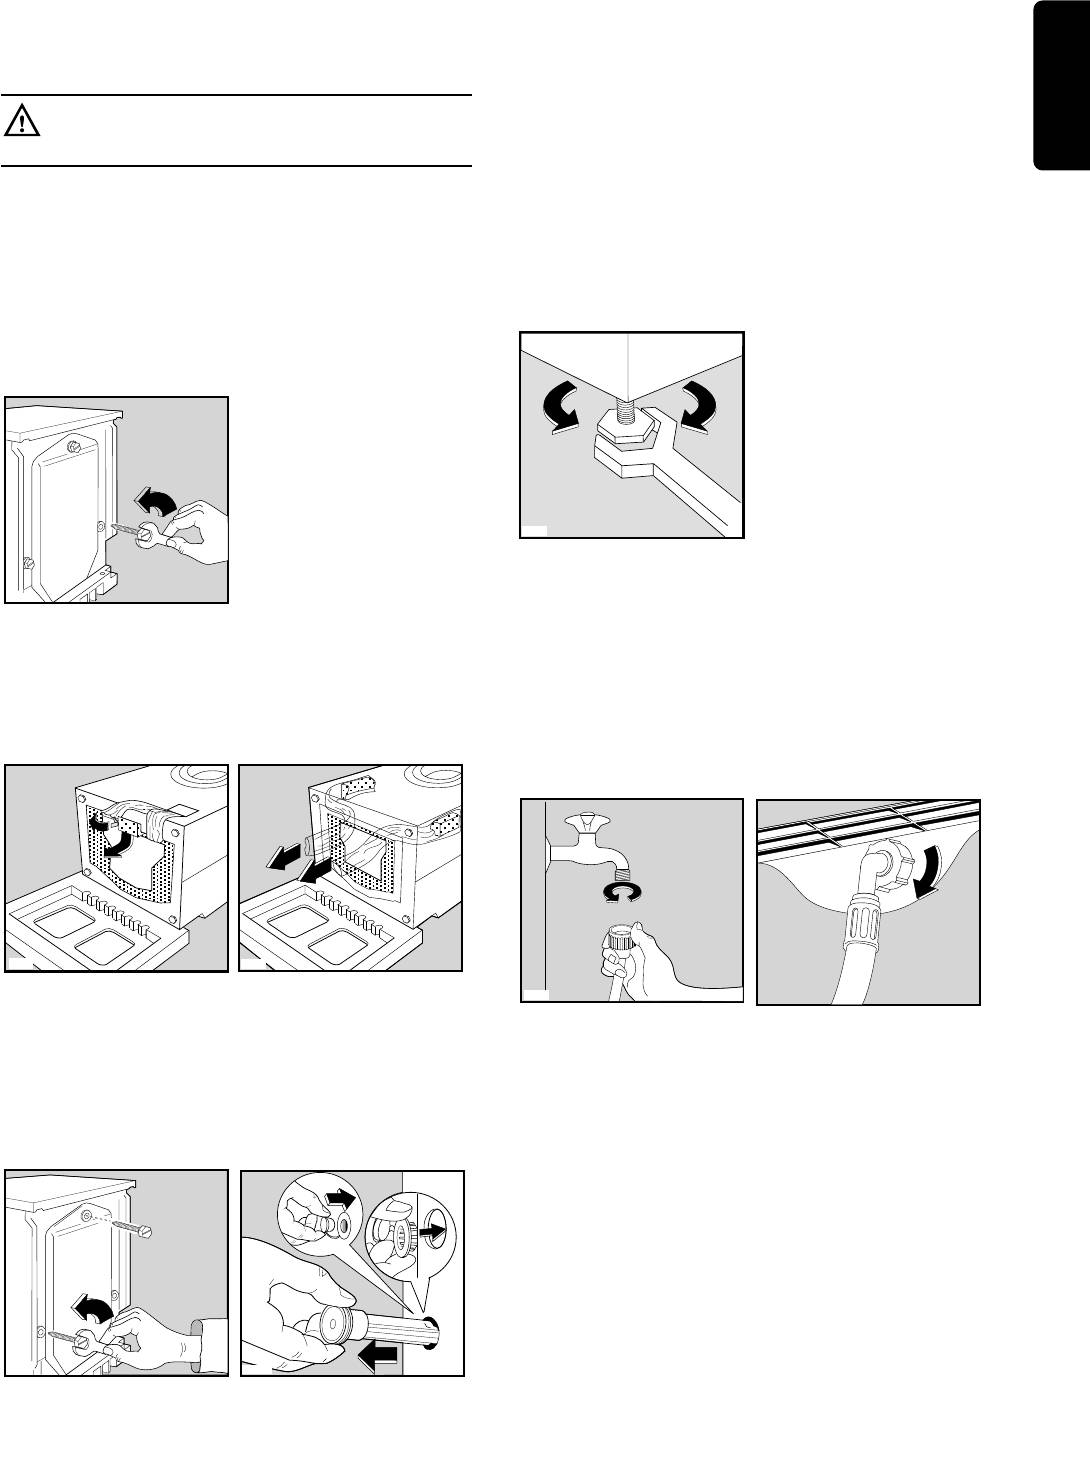
All transit bolts and packing must be removed
ENGLISH
before using the appliance.
You are advised to keep all transit devices so that
they can be refitted if the machine ever has to be
transported again.
1. Using a spanner, unscrew and remove the rear
right-hand bolt and lay the machine on its back,
taking care not to squash the hoses. This can be
avoided by placing one of the corner packing
pieces between the machine and the floor.
2. Remove the polystyrene block from the bottom of
the machine and release the two plastic bags.
3. Carefully remove the right-hand bag (1) then the
left-hand bag (2) by pulling them towards the
centre of the machine.
4. Set the machine upright and remove the two
remaining bolts from the back.
5. Pull out the three plastic spacers from the holes
into which the bolts were fitted.
6. Plug all the holes with the plugs supplied with the
instruction booklet.
7
P0020
P0256
P1068
P0255
Positioning
Install the machine on a flat hard floor.
Make sure that air circulation around the machine is
not impeded by carpets, rugs etc. Check that the
machine does not touch the wall or other kitchen
units.
Carefully level by screwing the adjustable feet in or
out. Never place cardboard, wood or similar
materials under the machine to compensate for any
unevenness in the floor.
Water inlet
Connect the water inlet hose to a tap with a 3/4″
thread.
The other end of the inlet hose which connects to the
machine can be turned in any direction. Simply
loosen the fitting, rotate the hose and retighten the
fitting, making sure there are no water leaks.
The inlet hose must not be lengthened. If it is too
short and you do not wish to move the tap, you will
have to purchase a new, longer hose specially
designed for this type of use.
P0021
P1088
P1051
Installation
Water drainage
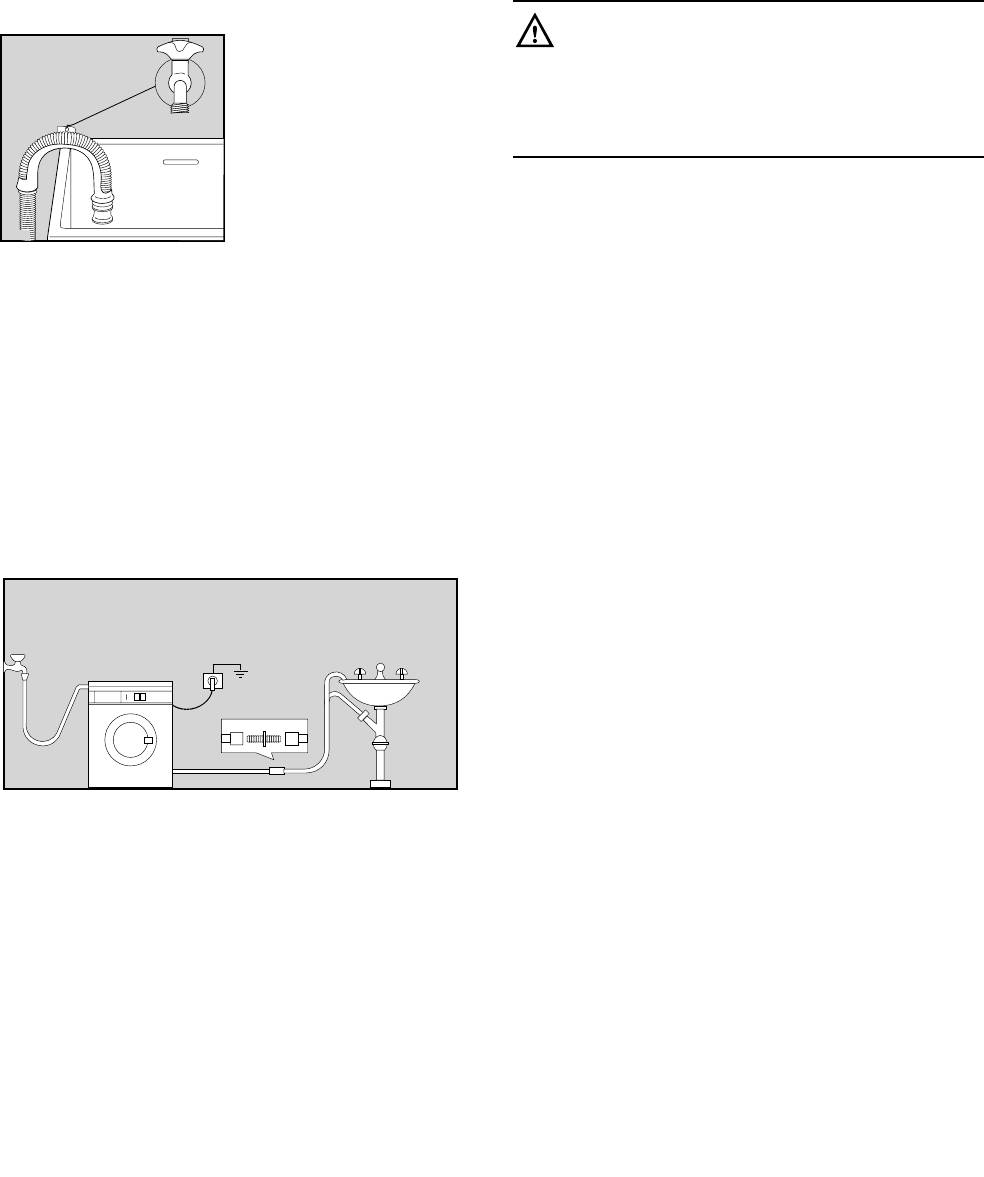
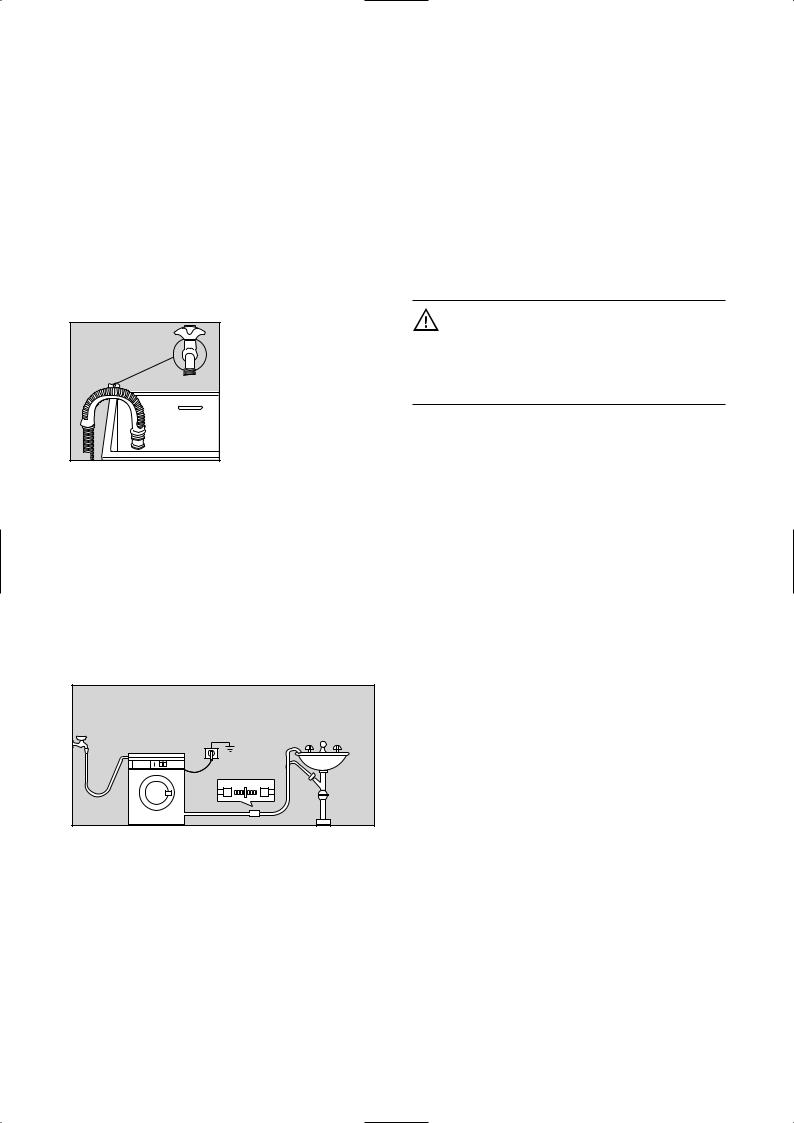
The end of the drain hose can be positioned in three
ways:
Hooked over the edge of a sink using the plastic
hose guide supplied with the machine. In this
case, make sure the end cannot come unhooked
when the machine is emptying.
This could be done by tying it to the tap with a piece
of string or attaching it to the wall.
In a sink drain pipe branch. This branch must be
above the trap so that the bend is at least 60 cm
above the ground.
Directly into a drain pipe at a height of not less
than 60 cm and not more than 90 cm.
The end of the drain hose must always be
ventilated, i.e. the inside diameter of the drain pipe
must be larger than the outside diameter of the drain
hose.
The drain hose must not be kinked. Run it along the
floor; only the part near the drainage point must be
raised.
8
P0023
P0022
Electrical connection
This machine is designed to operate on a 220-230 V,
single-phase, 50 Hz supply.
Check that your domestic electrical installation can
take the maximum load required (2.2 kW), also
taking into account any other appliances in use.
Connect the machine to an earthed socket.
The manufacturer declines any responsibility
for damage or injury through failure to comply
with the above safety precaution.
Should the appliance power supply cable
need to be replaced, this should be carried
out by our Service Centre.
Important!
When the appliance is installed the power supply
cable must be easily accessible.
Your new washing machine
This new machine meets all modern requirements for effective treatment of laundry with low water, energy and
detergent consumption.
• The temperature selector dial will allow you to choose the most suitable temperature for your laundry.
ENGLISH
• The automatic cooling of the washing water from 95° to 60°C before draining reduces thermal shock to
fabrics, helping to prevent creasing.
• The special wool programme with its new delicate wash system treats your woollens with extreme care.
• The balance control device ensures the machine is stable during the spin.
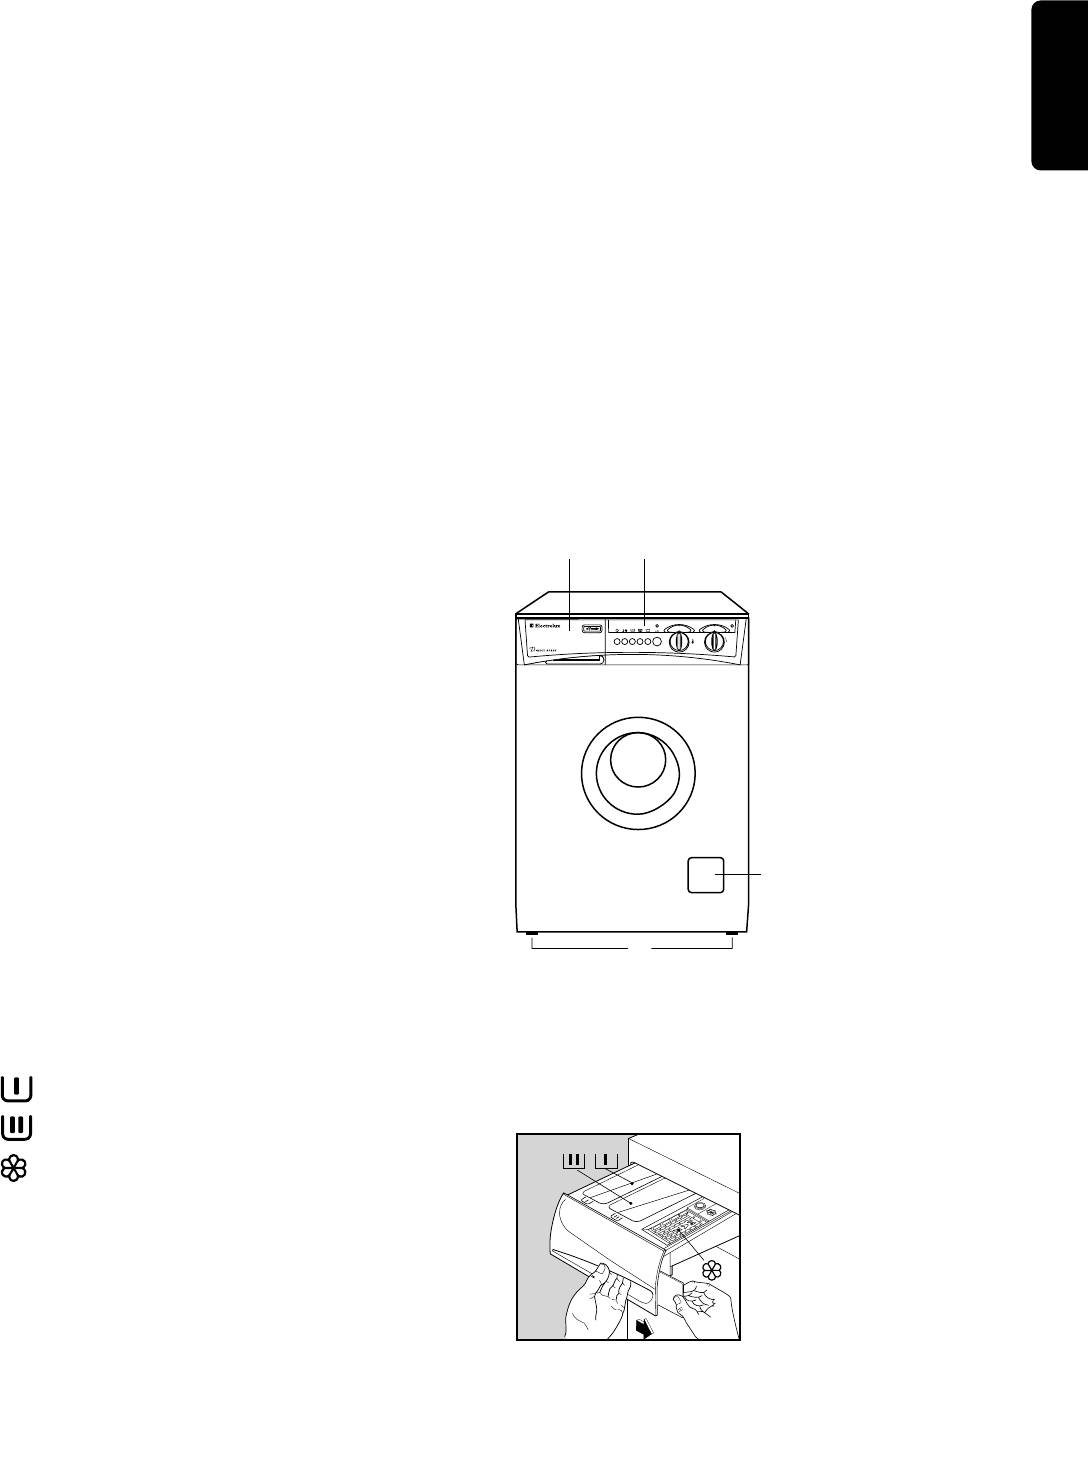
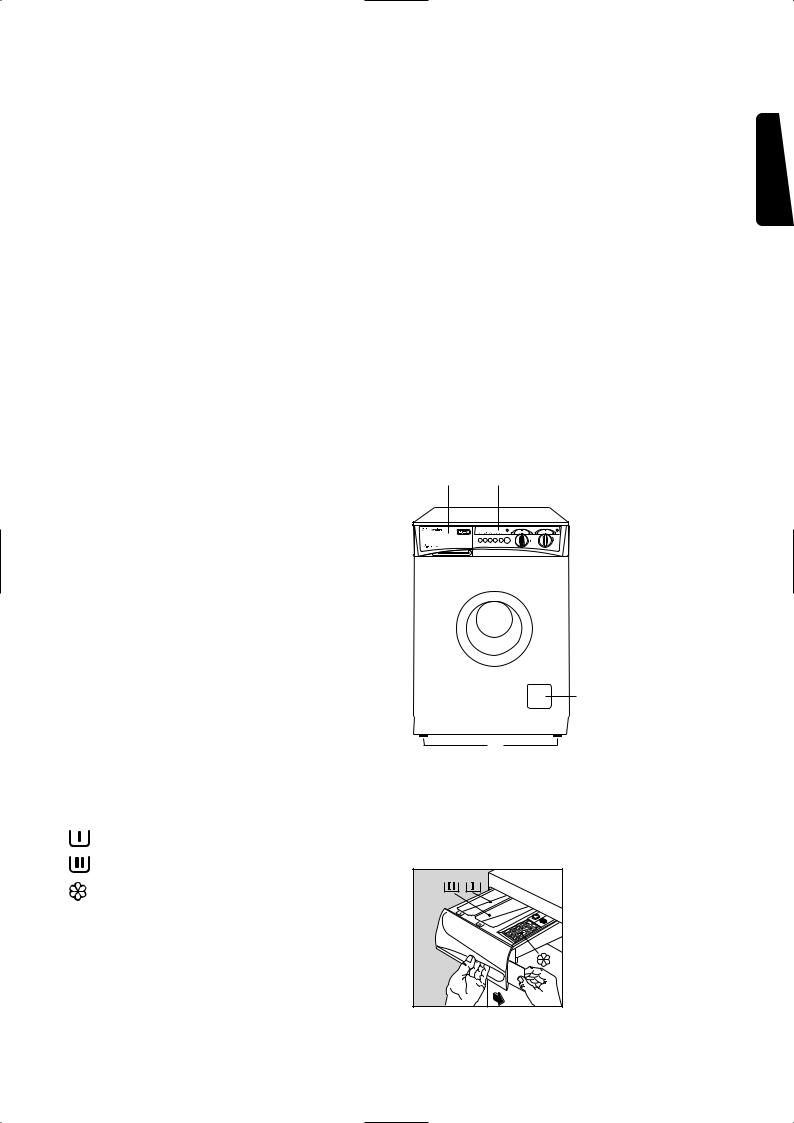
Description of the appliance
1 Detergent dispenser drawer
1
2
2 Control panel
3 Drain filter
4 Adjustable feet
3
4
Detergent dispenser drawer
Prewash
Main wash
Fabric softener, starch
P1017
9
Use
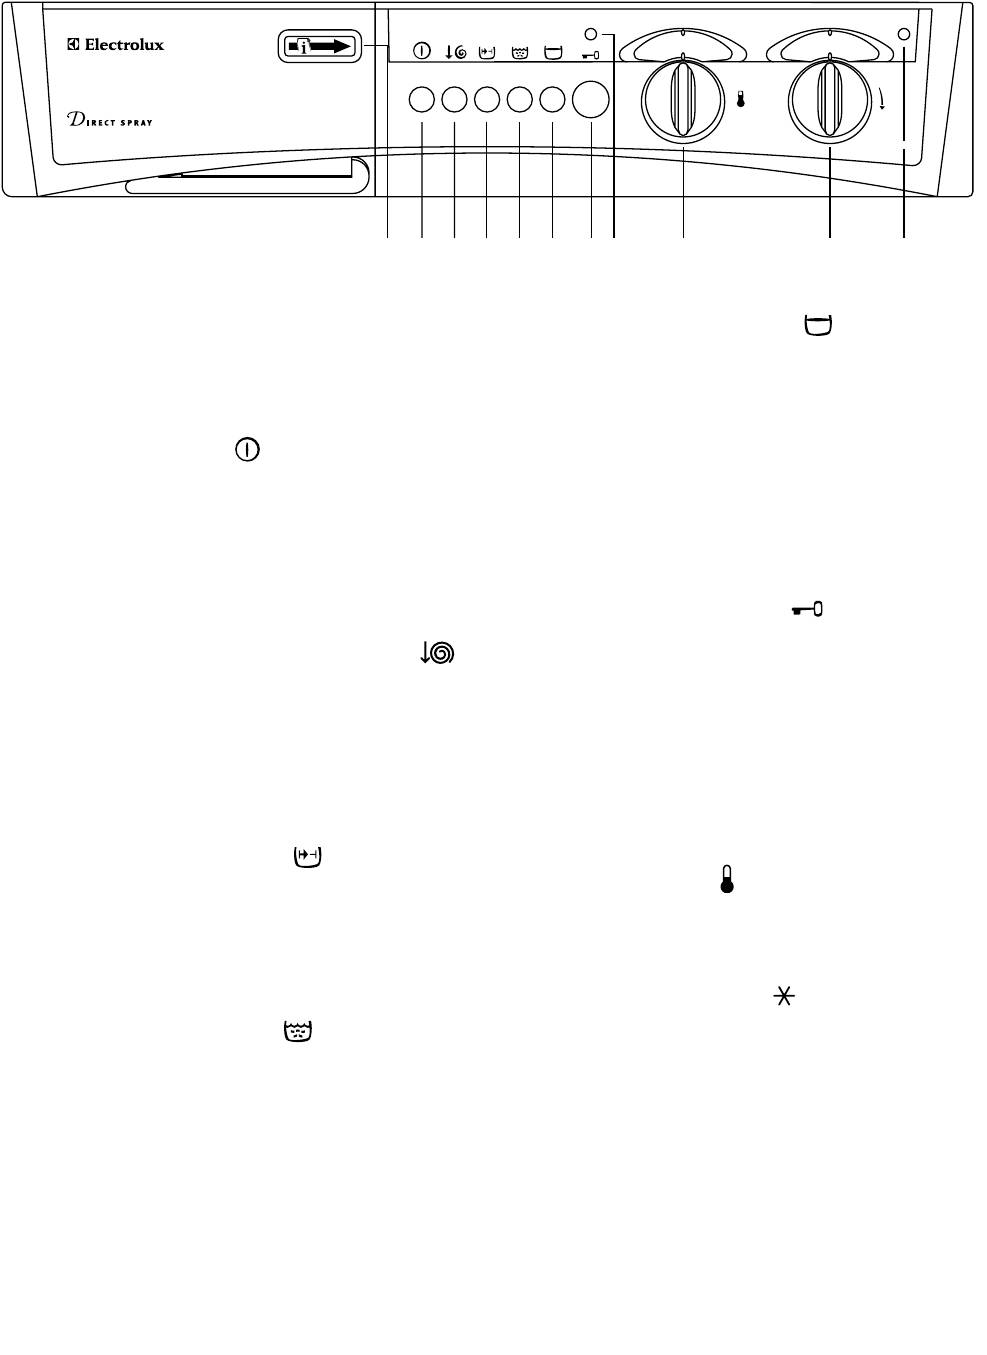
Control panel
EW 1063 S
1234567891011
1
1 Programme chart
6 Anti-crease button
It will help you to choose the most suitable washing
Using this option the last rinse water is not emptied
programme for your laundry.
out, so as to avoid creasing if the laundry is not
removed from the machine immediately after
washing.
2 On/Off button
The water can be emptied out by pressing the button
again (emptying will be followed by a spin) or by
Press this button to start the machine. The same
selecting the drain programme “N”.
button is used to switch the machine off.
If the button is not pressed, the programmes end
Before selecting a programme or changing an
with a spin.
ongoing programme the machine must be
switched off by depressing the On/Off button.
7 Door open button
Press to open the door.
3 Spin speed reduction button
By depressing this button the spin speed is reduced
8 “Door locked” pilot light
as follows:
• cotton and linen: from 1000 to 650 rpm
This light comes on when the programme starts,
• synthetics and delicates: from 900 to 650 rpm
indicating that the door is locked.
• wool: from 1000 to 650 rpm
The door cannot be opened until the light goes out.
4 Quick wash button
9 Temperature selector dial
(thermostat)
By depressing this button on programmes A-B-C-G
and H the washing time will be reduced.
To select the washing temperature turn the dial to
Max. recommended temperature 60°C.
the required value.
To be used for lightly soiled laundry.
When your laundry is only lightly soiled, a cold wash
can be used (dial to position ).
5 Extra rinse button
10 Programme selector dial
By depressing this button on programmes A—B and C
for cotton and linen the machine will perform the
To select the required washing programme turn the
rinses with more water.
dial clockwise.
To be used in areas where the water is very soft or
for people allergic to detergents or who have very
delicate skin.
11 Mains-on light
It comes on when the machine starts operating and
goes out by depressing ON/OFF button to switch the
machine off.
10
Washing hints
Laundry weights
The following weights are indicative:
ENGLISH
Sorting the laundry
bathrobe 1200 g
Follow the wash code symbols on each garment
napkin 100 g
label and the manufacturer’s washing instructions.
quilt cover 700 g
Sort the laundry as follows:
sheet 500 g
whites, coloureds, synthetics, delicates, woollens.
pillow case 200 g
Temperatures
tablecloth 250 g
towelling towel 200 g
95° for normally soiled white cottons and linen
tea cloth 100 g
(e.g. tea cloths, towels, tablecloths,
sheets…)
night dress 200 g
60° for normally soiled, colour fast garments
ladies’ briefs 100 g
(e.g. shirts, night dresses, pyjamas….) in
man’s work shirt 600 g
linen, cotton or synthetic fibres and for
man’s shirt 200 g
lightly soiled white cotton (e.g. underwear).
man’s pyjamas 500 g
(cold)for delicate items (e.g. net curtains), mixed
30°-40° laundry including synthetic fibres and
blouse 100 g
woollens bearing the label «pure new
men’s underpants 100 g
wool, machine washable, non-shrink».
Removing stains
Before loading the laundry
Stubborn stains may not be removed by just water
Never wash whites and coloureds together. Whites
and detergent. It is therefore advisable to treat them
may lose their “whiteness” in the wash.
prior to washing.
New coloured items may run in the first wash; they
Blood: treat fresh stains with cold water. For dried
should therefore be washed separately the first time.
stains, soak overnight in water with a special
Make sure that no metal objects are left in the
detergent then rub in the soap and water.
laundry (e.g. hair clips, safety pins, pins).
Oil based paint: moisten with benzine stain
Button up pillowcases, close zip fasteners, hooks
remover, lay the garment on a soft cloth and dab the
and poppers. Tie any belts or long tapes.
stain; treat several times.
Remove persistent stains before washing. Rub
Dried grease stains: moisten with turpentine, lay
particularly soiled areas with a special detergent or
the garment on a soft surface and dab the stain with
detergent paste.
the fingertips and a cotton cloth.
Treat curtains with special care. Remove hooks or tie
Rust: oxalic acid dissolved in hot water or a rust
them up in a bag or net.
removing product used cold. Be careful with rust
stains which are not recent since the cellulose
Maximum loads
structure will already have been damaged and the
fabric tends to hole.
Recommended loads are indicated in the
Mould stains: treat with bleach, rinse well (whites
programme charts.
and fast coloureds only).
General rules:
Grass: soap lightly and treat with bleach (whites and
Cotton, linen: drum full but not too tightly packed;
fast coloureds only).
Synthetics: drum no more than half full;
Ball point pen and glue: moisten with acetone (*),
Delicate fabrics and woollens: drum no more than
lay the garment on a soft cloth and dab the stain.
one third full.
Lipstick: moisten with acetone as above, then treat
Washing a maximum load makes the most efficient
stains with methylated spirits. Remove any residual
use of water and energy.
marks from white fabrics with bleach.
For heavily soiled laundry, reduce the load size.
11
Red wine: soak in water and detergent, rinse and
Quantity of detergent to be used
treat with acetic or citric acid, then rinse. Treat any
The type and quantity of detergent will depend on
residual marks with bleach.
the type of fabric, load size, degree of soiling and
Ink: depending on the type of ink, moisten the fabric
hardness of the water used.
first with acetone (*), then with acetic acid; treat any
Water hardness is classified in so-called “degrees” of
residual marks on white fabrics with bleach and then
hardness. Information on hardness of the water in
rinse thoroughly.
your area can be obtained from the relevant water
Tar stains: first treat with stain remover, methylated
supply company, or from your local authority.
spirits or benzine, then rub with detergent paste.
Follow the product manufacturers’ instructions on
(*) do not use acetone on artificial silk.
quantities to use.
Use less detergent if:
Detergents and additives
– you are washing a small load,
Good washing results also depend on the choice of
– the laundry is lightly soiled,
detergent and use of the correct quantities to avoid
– large amounts of foam form during washing.
waste and protect the environment. Although
biodegradable, detergents contain substances
which, in large quantities, can upset the delicate
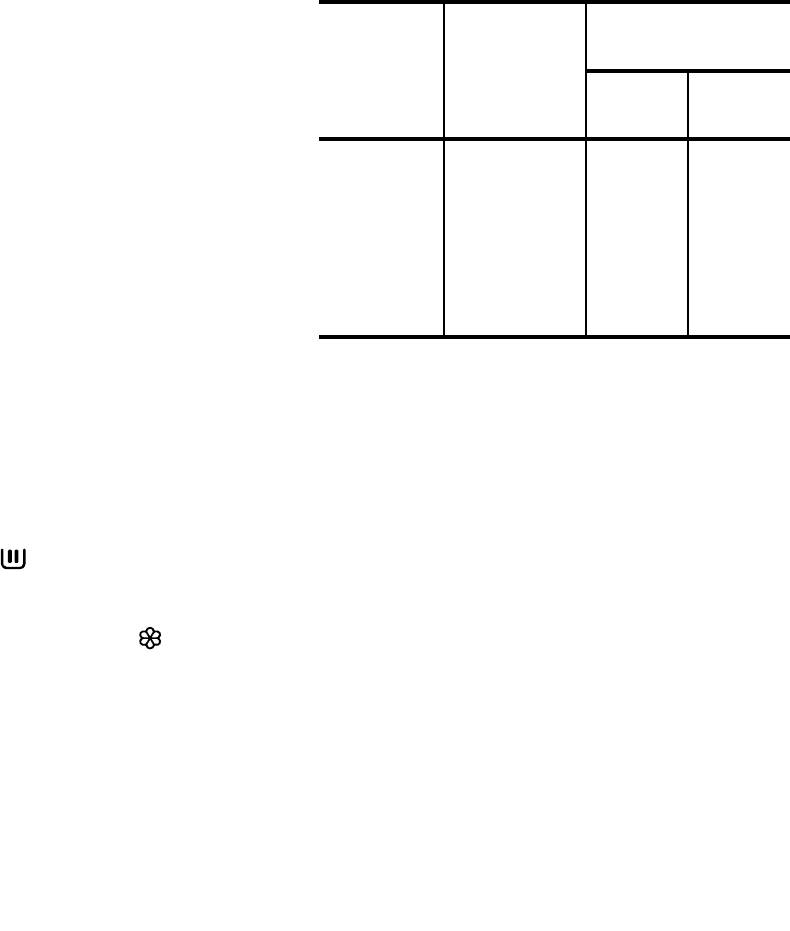
Degrees of water hardness
balance of nature.
The choice of detergent will depend on the type of
Degrees
fabric (delicates, woollens, cottons, etc.), the colour,
Level Characteristic
washing temperature and degree of soiling.
German
French
All commonly available washing machine detergents
°dH
°T.H.
may be used in this appliance:
– powder detergents for all types of fabric,
0- 7
0-15
1
soft
– powder detergents for delicate fabrics (60°C max)
8-14
16-25
and woollens,
2
medium
– liquid detergents, preferably for low temperature
15-21
26-37
3
hard
wash programmes (60°C max) for all types of
more than
more than
fabric, or special for woollens only.
4
very hard
21
37
The detergent and any additives must be placed in
the appropriate compartments of the dispenser
drawer before starting the wash programme.
If using concentrated powder or liquid detergents, a
programme without prewash must be selected.
The washing machine incorporates a recirculation
system which allows an optimal use of the
concentrated detergent.
Pour liquid detergent into the dispenser drawer
compartment marked just before starting the
programme.
Any fabric softener or starching additives must be
poured into the compartment marked before
starting the wash programme.
Follow the product manufacturer’s recommendations
on quantities to use and do not exceed the «MAX»
mark in the detergent dispenser drawer.
12
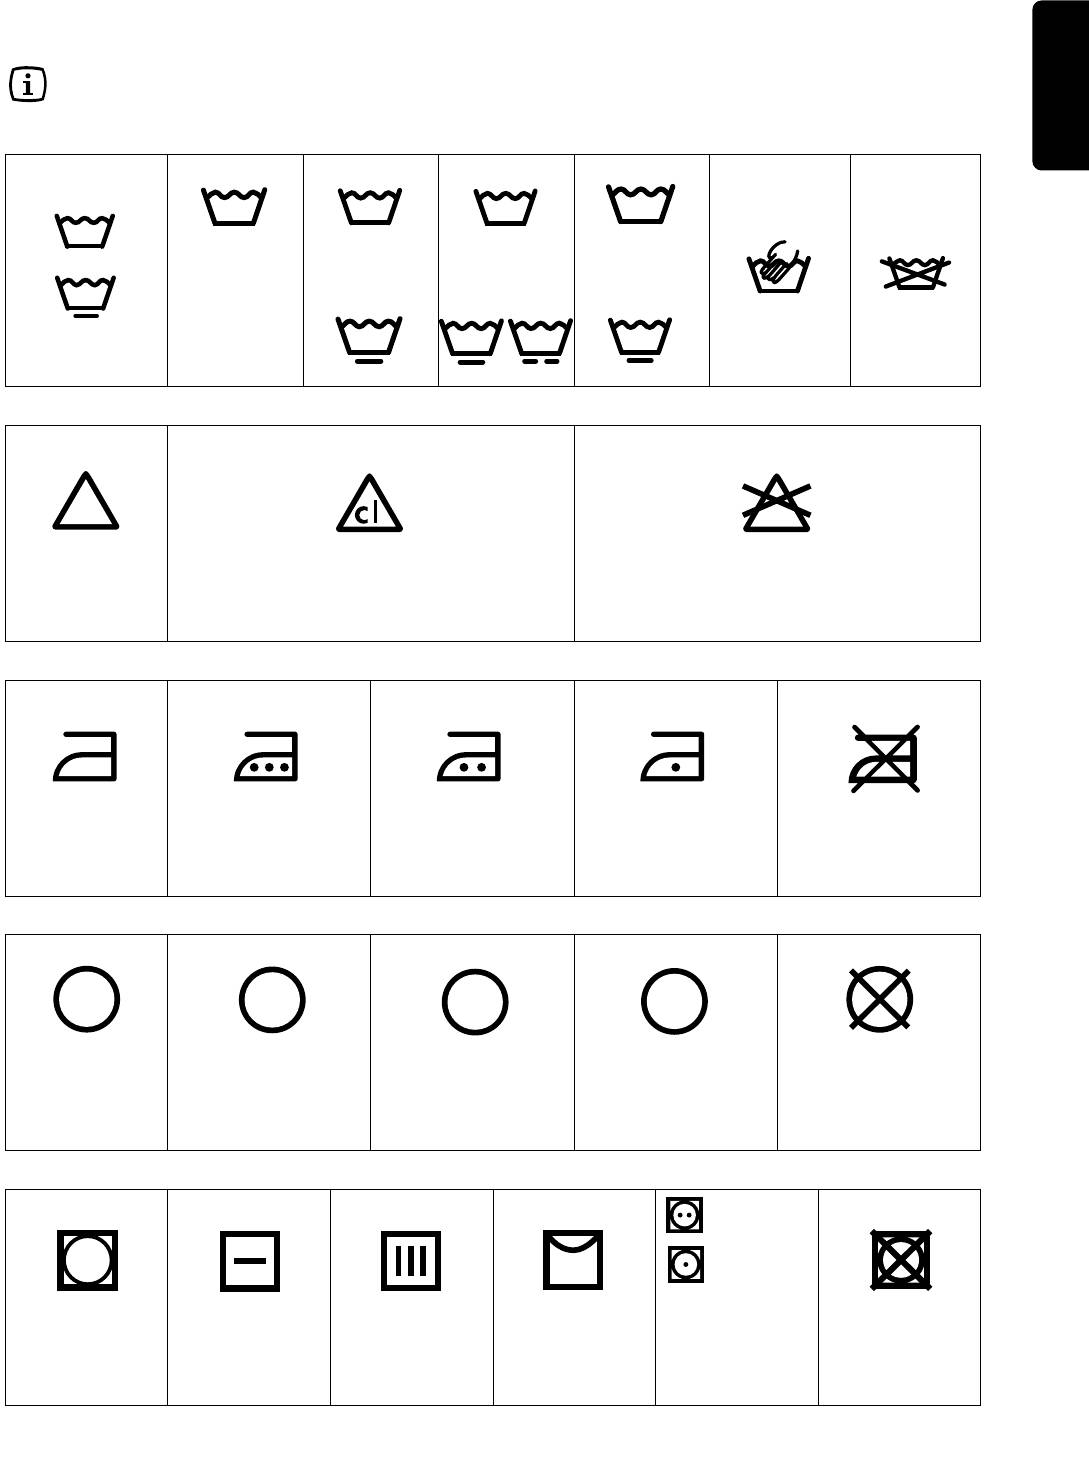
International wash code symbols
These symbols appear on fabric labels, in order to help you choose the best way to treat your laundry.
ENGLISH
Energetic wash
95
60
40
30
Max. wash
Max. wash
Max. wash
Max. wash
temperature
temperature
temperature
temperature
95°C
60°C
40°C
30°C
Hand wash Do not
Delicate wash
60
40
40
30
wash
at all
Bleaching Bleach in cold water Do not bleach
Ironing Hot iron
Warm iron
Lukewarm iron
Do not iron
max 200°C
max 150°C
max 110°C
A
P
F
Dry cleaning Dry cleaning
Dry cleaning in
Dry cleaning
Do not
in all solvents
perchlorethylene,
in petrol,
dry clean
petrol, pure alcohol,
pure alcohol
R 111 & R 113
and R 113
high
temperature
low
temperature
Drying Flat On the line On clothes
Tumble dry
Do not
hanger
tumb
le dr
y
13
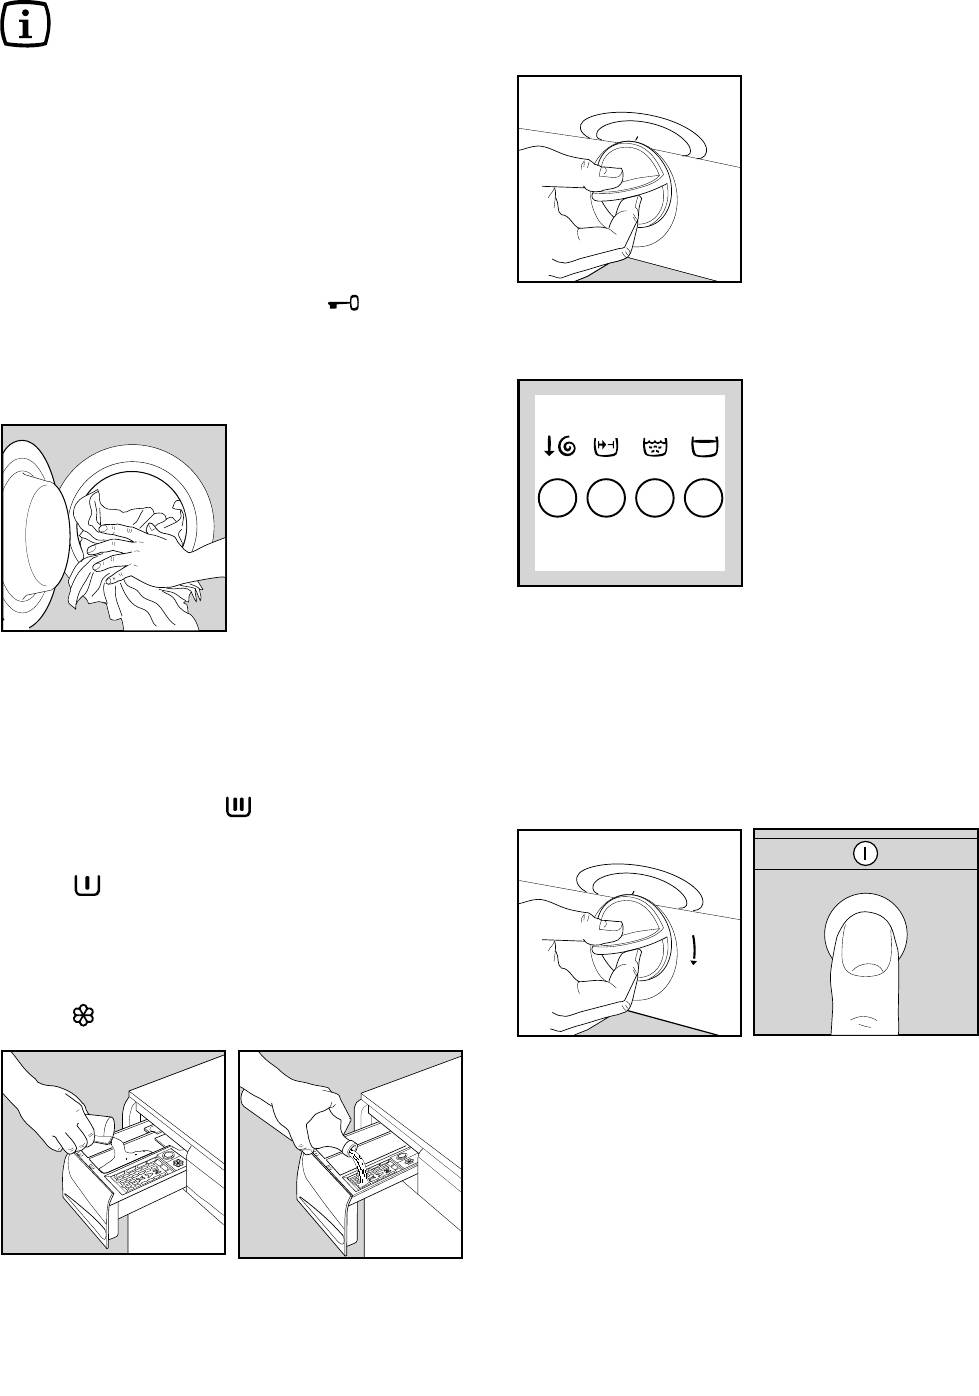
4. Select the temperature
Turn the dial to the required setting.
5. Select the required option(s)
6. Select the programme and start
the machine
Turn the programme selector dial clockwise to the
required programme and press the ON/OFF button:
the mains on light and “door locked” light come on
and the machine starts to operate.
14
P0033
Operating sequence
Before washing your first load of laundry, we
recommend that you run a cotton cycle at 60°C, with
the machine empty, in order to remove any
manufacturing residue from the drum and tub.
Pour half a measure of detergent into the main wash
compartment and start up the machine.
1. Place the laundry in the drum
Open the door by depressing button .
Place the laundry in the drum, one item at a time,
shaking them out as much as possible.
Close the door.
2. Measure out the detergent
Pull out the dispenser drawer until it stops. Measure
out the amount of detergent recommended by the
manufacturer in a graduated cup and pour it into the
main wash compartment .
If you wish to carry out a programme with prewash,
pour detergent into the appropriate compartment
marked .
3. Measure out the additives
If required, pour fabric softener into the compartment
marked , without exceeding the «MAX» mark.
P1019
P1018
P0004

7. At the end of the programme
The machine stops automatically.
If you have selected a programme which ends with
ENGLISH
the water of the last rinse left in the tub (option ),
drain the water before opening the door. Select
programme “N” (drain) or depress again button .
Wait one or two minutes before opening the door to
give the electric locking mechanism time to release
it. The door can be opened when the relevant light
goes out.
Depress the ON/OFF button again to switch the
machine off. The mains on light goes out.
Remove the laundry.
Turn the drum by hand to make sure it is completely
empty, so as to avoid any forgotten items being
damaged in a subsequent wash (e.g. shrinking) or
their colour running into a load of whites.
Release any buttons which have been pressed.
Turn the water tap off and unplug the machine.
Leave the door ajar to air the machine.
15
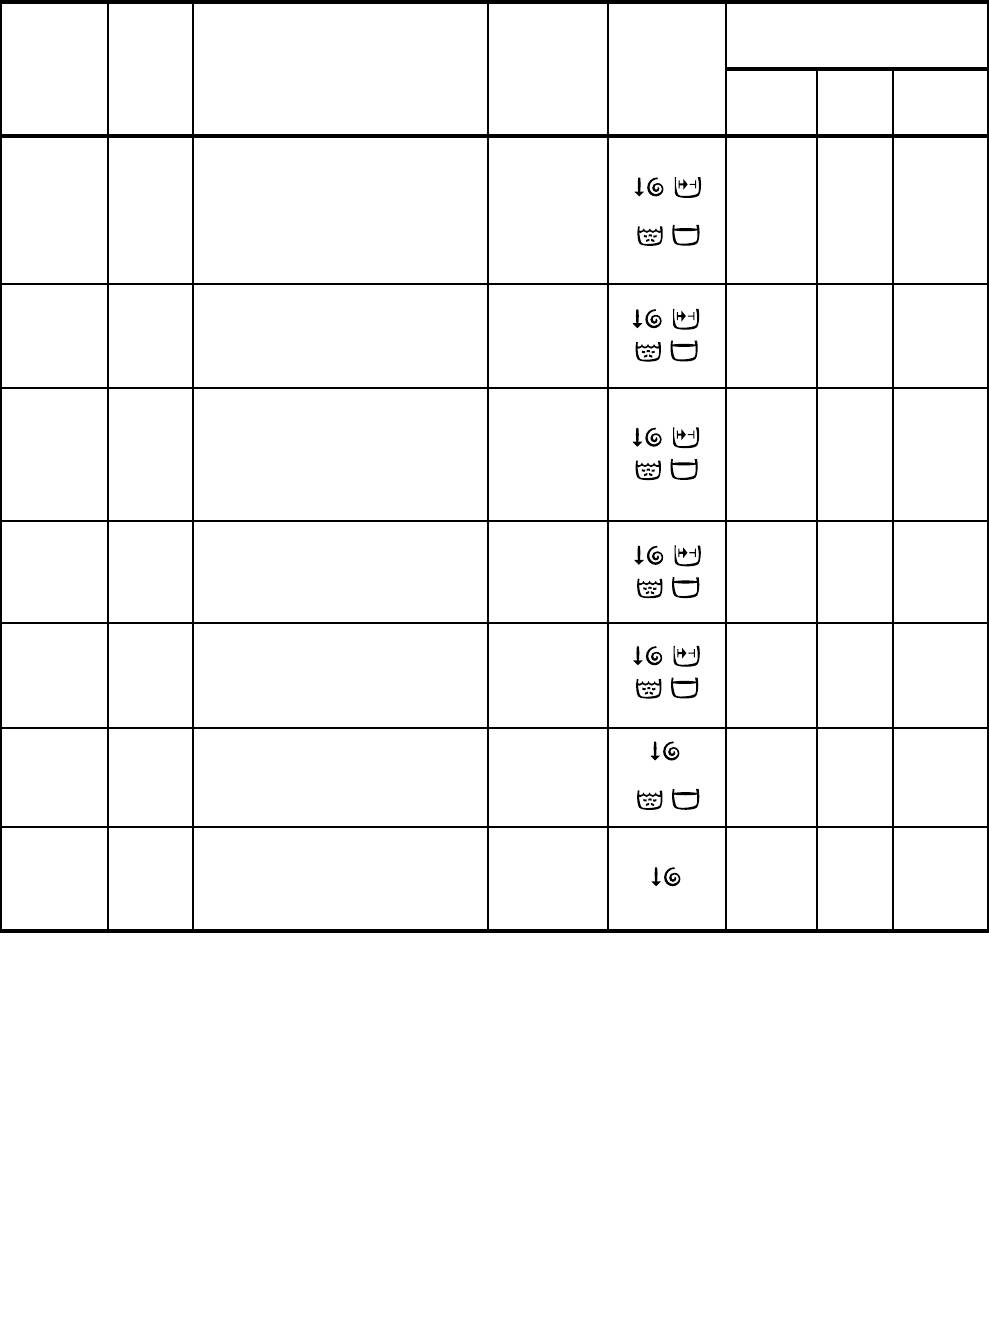
Programme table
Washing programmes for cotton and linen
Max load: 4.5 kg
Consumptions*
Additional
Programme
Temp. Fabrics
Description
functions
Energy
Water
Duration
kWh
lt
min.
Prewash at
WHITES WITH PREWASH, for
40°C
example work garments,
Wash at
A 60°-95°
2.0
57
140
sheets, household linen,
60°-95°C
underwear, towels
3 rinses
Long spin
WHITES WITHOUT
Wash at
PREWASH, for example
60°-95°C
B
60°-95°
1.7
48 125
household linen, sheets, shirts,
3 rinses
Long spin
underwear
Prewash at
COLOUREDS WITH
40°C
PREWASH, for example shirts,
Wash at
A 40°-60°
1.2
54
135
blouses, household linen,
40°-60°C
sheets
3 rinses
Long spin
FAST COLOUREDS WITHOUT
Wash at
PREWASH, for example shirts,
40°-60°C
B
40°-60°
0.9
48
120
blouses, terry cloths,
3 rinses
underwear
Long spin
NON-FAST COLOUREDS
Wash at
WITHOUT PREWASH, for
30°-40°C
C
30°-40°
0.7
48
90
example shirts, blouses,
3 rinses
underwear
Long spin
D
This programme can be used
3 rinses
COLD
for rinsing hand washed
0.1
39
45
Long spin
Rinses
garments
F
Separate spin for cotton and
Long spin
—
—
10
linen
Long spin
In compliance with EC directive 92/75, the consumption figures indicated on the energy label refer to the 60°C
wash programme for cotton (programme “B”).
* The consumption data shown on this chart is to be considered purely indicative, as it may vary depending on
the quantity and type of laundry, on the inlet water temperature and on the ambient temperature. It refers to the
highest temperature for each wash programme.
16
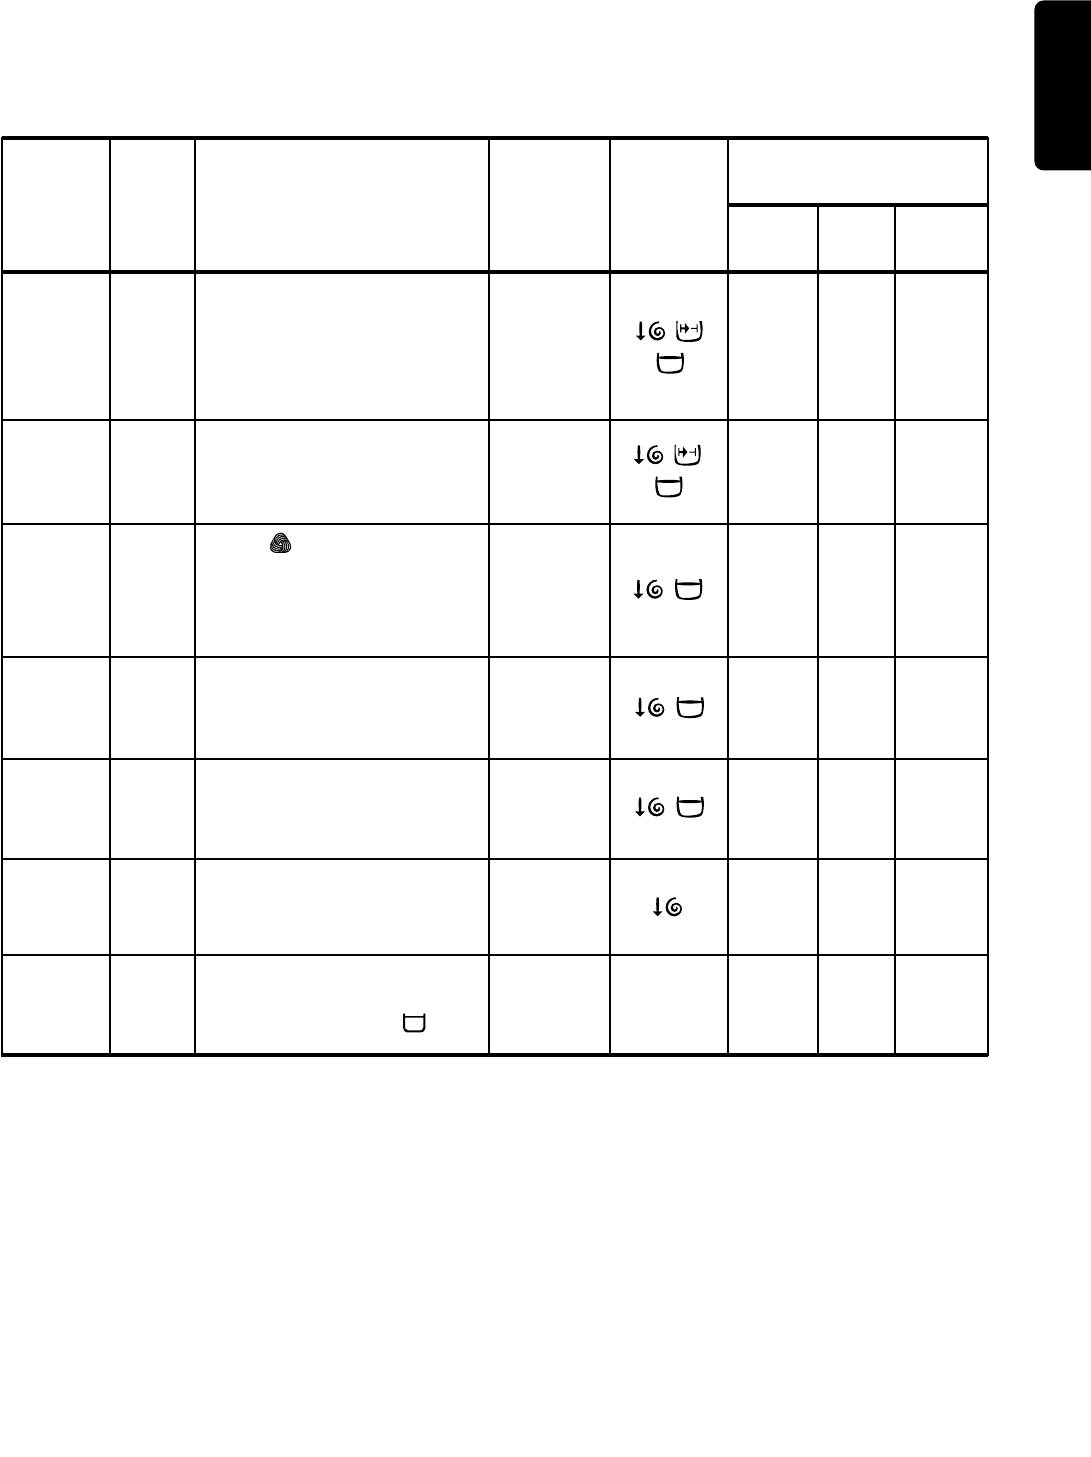
Programme table
Washing programmes for synthetics, mixed fabrics, delicates and wool
Max load: 1.5 kg, wool 1 kg
ENGLISH
Consumptions*
Additional
Programme
Temp. Fabrics
Description
functions
Energy
Water
Duration
kWh
lt
min.
Prewash at
SYNTHETICS WITH
40 °C
PREWASH, for example
G 40°-60°
Wash at
1.0
56
95
underwear, coloured items,
40°-60°C
shirts, blouses
3 rinses
Short spin
Wash at
SYNTHETICS WITHOUT PRE-
40°-60°C
H
40°-60°
WASH, for example shirts,
0.7
50 80
3 rinses
blouses, mixed fabrics
Short spin
WOOL
Wash at
Special programme for
30°-40°C
J 30°-40°
garments bearing the “Pure
0.45
45
55
3 rinses
new wool, non-shrink, machine
Short spin
washable” label
Wash at
DELICATES, for example
30°-40°C
K
30°-40°
0.45
43
50
curtains
3 rinses
Short spin
This programme can be used
L
3 rinses
COLD
for rinsing hand washed
0.02
30
25
Short spin
Rinses
garments
M
Separate spin for hand washed
Drain and
—
—
5
synthetics, delicates and wool
short spin
Short spin
For emptying out the last rinse
N
Draining of
water of the programmes with
—
—
1
water
Drain
the anti-crease option .
* The consumption data shown on this chart is to be considered purely indicative, as it may vary depending on
the quantity and type of laundry, on the inlet water temperature and on the ambient temperature. It refers to the
highest temperature for each wash programme.
17
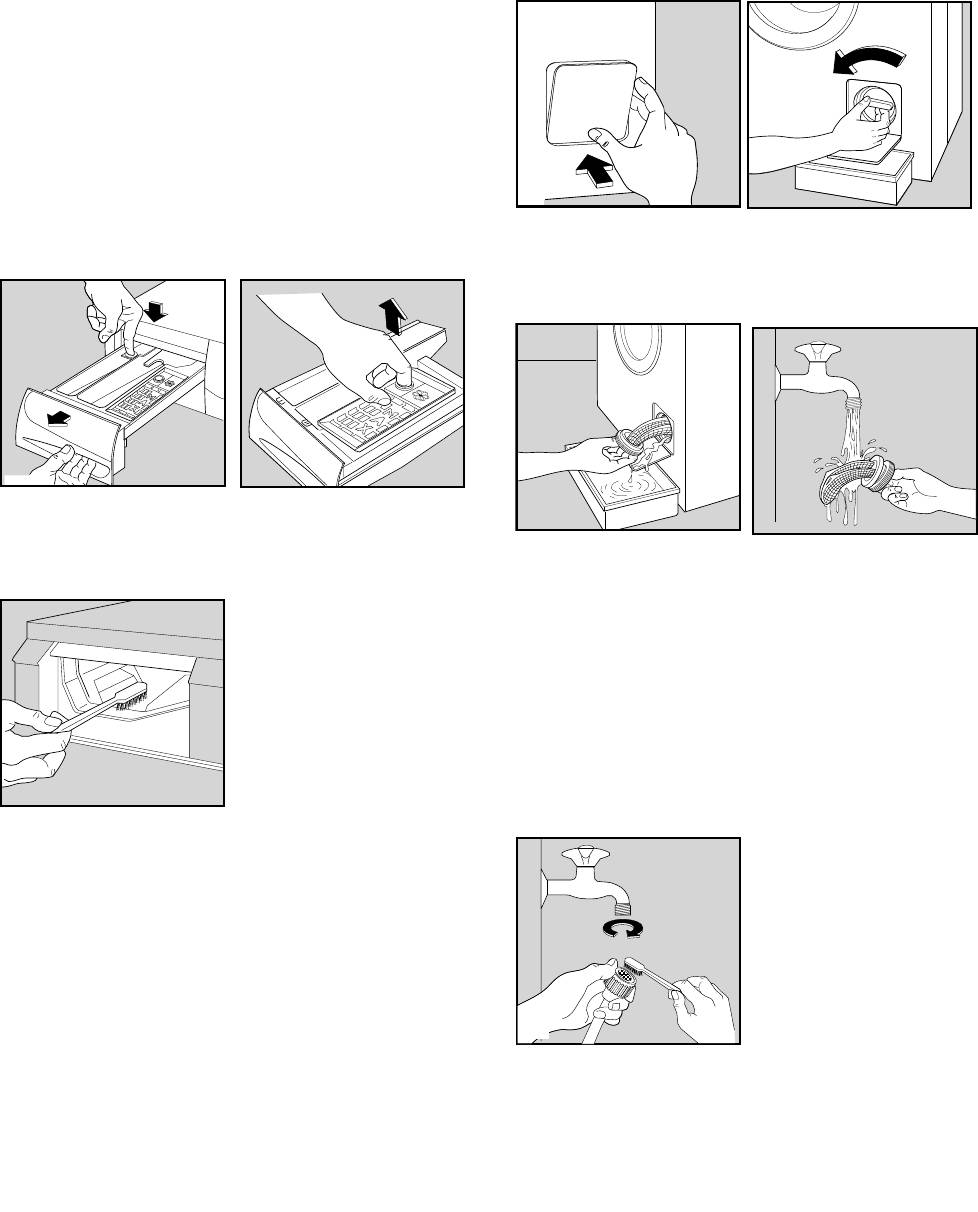
1. Bodywork
Clean the outside of the machine with warm water
and a neutral, non-abrasive household detergent.
Rinse with clean water and dry with a soft cloth.
Important: do not use methylated spirits, solvents or
similar products to clean the bodywork.
2. Detergent dispenser drawer
After a while, detergents and fabric softeners leave
deposits in the drawer.
Clean the drawer from time to time by rinsing it under
a running tap. To remove the drawer from the
machine, press the button in the rear left-hand
corner.
To facilitate cleaning, the top part of the additive
compartment can be removed.
Detergent can also accumulate inside the drawer
recess: clean it with an old toothbrush. Refit the
drawer after cleaning.
18
P0038
P1021
P1020
3. Drain filter
The drain filter collects threads and small objects
inadvertently left in the laundry. Check regularly that
the filter is clean.
Open the filter door.
Place a container under the filter and unscrew it.
Pull out the filter.
Clean the filter under a running tap, then refit it,
screwing it fully in.
4. Water inlet filter
If you notice that the machine is taking longer to fill,
check that the filter in the water inlet hose is not
blocked.
Turn off the water tap.
Unscrew the hose from the tap.
Clean the filter with a stiff brush.
Screw the hose back onto the tap.
P1090
P0040
P0133
P0132
P0011
Maintenance

5. Emergency emptying out
If the water is not discharged (outlet pump is
blocked, filter or drain pipe are clogged), proceed as
ENGLISH
follows to empty out the machine:
• pull out the plug from the power socket;
• close the water tap;
• if necessary, wait until the water has cooled down;
• place a bowl on the floor;
• put the drain hose end into the bowl and let the
water come out.
Should it not be possible to have access to the drain
hose because, for example, the appliance is built in
the kitchen furniture, slightly loosen the drain filter
after placing a bowl on the floor, to let the water
come out slowly.
At the end screw the filter again.
6. Frost precautions
If the machine is installed in a place where the
temperature could drop below 0°C, proceed as
follows:
• Close the water tap and unscrew the water inlet
hose from the tap.
• Place the end of the drain hose and that of the inlet
hose in a bowl placed on the floor.
• Select programme “N” (drain) and run it until the
machine stops.
• Remove the plug from the socket.
• Screw the water inlet hose back on and put the
drain hose back in its place.
By doing this, any water remaining in the machine is
removed, avoiding the formation of ice and,
consequently, breakage of the affected parts.
When you use the machine again, make sure that
the ambient temperature is above 0°C.
19
Something not working?
Problems which you can resolve yourself.
Problem Possible cause
• The door is not firmly closed.
• The machine does not start up:
• The machine is not plugged in or there is no power
at the socket.
• The main fuse has blown.
• The programme selector dial is not positioned correctly
and the ON/OFF button has not been depressed.
• The water tap is closed.
• The machine does not fill:
• The inlet hose is squashed or kinked.
• The filter in the inlet hose is blocked.
• The door is not properly closed.
• The end of the drain hose is too low. Refer to
• The machine fills then empties
relevant paragraph in “water drainage” section.
immediately:
• The drain hose is squashed or kinked.
• The machine does not empty
• The option has been selected.
and/or does not spin:
• The laundry is not evenly distributed in the drum.
• The drain filter is clogged.
• There is water on the floor:
• Too much detergent or unsuitable detergent
(creates too much foam) has been used.
• Check whether there are any leaks from one of the
inlet hose fittings. It is not always easy to see this
as the water runs down the hose; check to see if it
is damp.
• The drain hose is damaged.
• Unsatisfactory washing results:
• Too little detergent or unsuitable detergent has
been used.
• Stubborn stains have not been treated prior to
washing.
• The correct temperature was not selected.
• Excessive laundry load.
• The machine vibrates or is
• The transit bolts and packing have not been
removed.
noisy:
• The support feet have not been adjusted.
• The laundry is not evenly distributed in the drum.
• Maybe there is very little laundry in the drum.
• The programme is still running.
• The door will not open:
• The door lock has not been released. The door
locked light is on.
• There is water in the drum.
20
ENGLISH
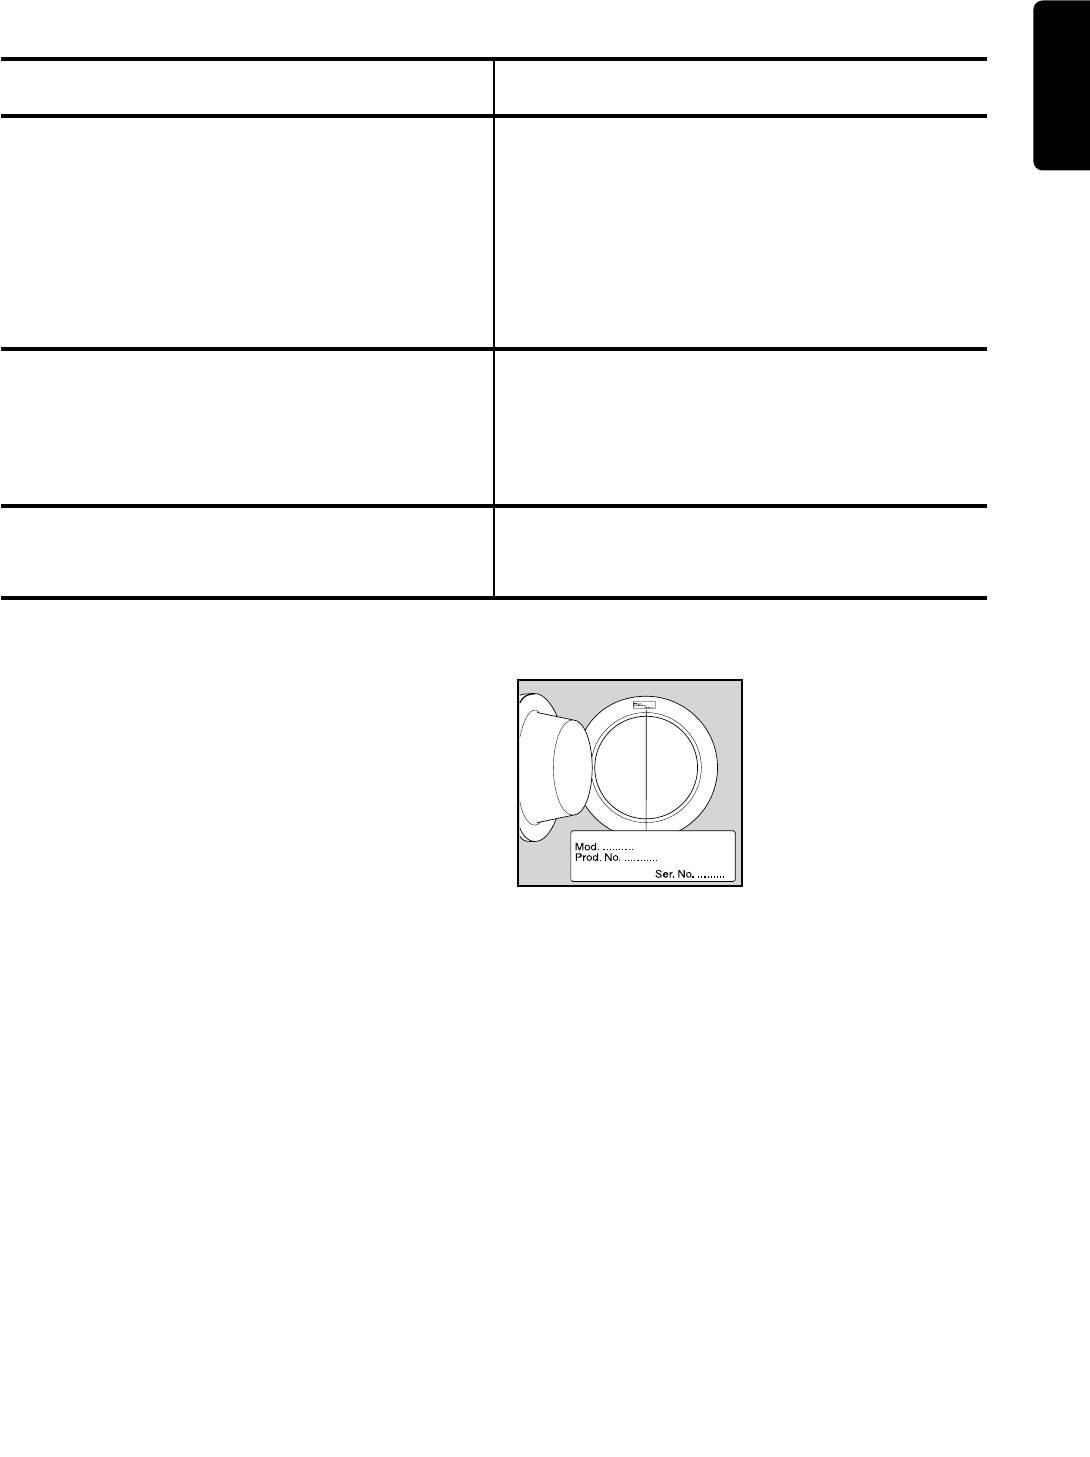
If you are unable to identify or solve the problem,
contact our service centre. Before telephoning, make
a note of the model, serial number and purchase
date of your machine: the Service Centre will require
this information.
21
P0042
Problem Possible cause
• The electronic unbalance detection device has cut
• Spinning starts late or the
in because the laundry is not evenly distributed in
machine does not spin:
the drum. The laundry is redistributed by reverse
rotation of the drum. This may happen several
times before the unbalance disappears and normal
spinning can resume. If, after 10 minutes, the
laundry is still not evenly distributed in the drum,
the machine will not spin. In this case, redistribute
the load manually and select the spin programme.
• The machine is fitted with a type of motor which
• The machine makes an unusual
makes an unusual noise compared with other
noise
traditional motors. This new motor ensures a softer
start and more even distribution of the laundry in
the drum when spinning, as well as increased
stability of the machine.
• Machines based on modem technology operate
• No water is visible in the drum
very economically using very little water without
affecting performance.

Bästa kund,
vi ber dig att läsa igenom den här bruksanvisningen
noggrant.
Framför allt är det viktigt att du läser
säkerhetsinformationen på de första sidorna i
bruksanvisningen. Förvara alltid bruksanvisningen
lättillgänglig, så att du snabbt kan hitta den och slå
upp information i den vid ett senare tillfälle. Om du
säljer maskinen ska bruksanvisningen överlämnas till
nästa ägare.
Transportskador
Kontrollera att maskinen inte är skadad. Eventuella
transportskador skall omedelbart anmälas till den
som ansvarat för transporten. Skador, felaktigheter
och ev. saknade delar skall omedelbart anmälas till
säljaren.
Så här använder du bruksanvisningen
Några stycken i bruksanvisningen är försedda med en symbol. Dessa symboler betyder följande:
Här finns viktig information om olämplig användning av tvättmaskinen som skulle kunna
förorsaka person- och egendomsskada.
Här finns information, som är särskilt viktig för att erhålla bästa möjliga tvättresultat.
Här finns viktiga miljö- och energispartips.
Vårt bidrag till miljöskyddet är att vi använder returpapper.
22

Innehållsförteckning
Avkalkning av maskinen 37
Viktig säkerhetsinformation 24-25
Åtgärd vid frysrisk 37
Bortskaffning/avfallshantering25
Nödtömning 37
Energisparråd 25
Om maskinen inte fungerar 38-39
Service och reservdelar 40
FÖR ANVÄNDAREN
Konsumentköp EHL 40
Garanti (gäller för Finland) 40
Din nya maskin 26
SVENSK
Konsumentkontakt 40
Beskrivning av maskinen 26
FÖR INSTALLATÖREN
Tvättmedelslådan 26
Tekniska data 40
Bruk 27
Kontrollpanel 27
Installation 41
Beskrivning av maskinens panelfunktioner 27-28
Uppackning 41
Tillbehör 41
Viktiga råd och tips
Transportsäkring 41
för dig som tvättar 29
Placering 41
Sortering av tvätt 29
Nivåjustering 41
Temperaturer 29
Vattenanslutning 42
Hur mycket tvätt per omgång? 29
Avloppsanslutning 42
Tvättmedel och tillsatser 29-30
— Över kanten på en vask 42
Tvättmärkning 31
— Anslutning till golvbrunn 42
— Anslutning till vattenlås 42
Så här använder du
Elektrisk anslutning 43
tvättmaskinen 32
Lägg i tvätten 32
Fyll på tvättmedel 32
Tillsätt sköljmedel 32
Tryck på önskad tillvalsknapp 32
Välj önskad temperatur 32
Välj önskat program och starta maskinen 32
Avslutat tvättprogram 33
Programöversikt 34-35
Skötsel och rengöring 36
Rengöring av höljet 36
Rengöring av tvättmedelslådan 36
Rengöring av lådöppningen 36
Rengöring av avloppssilen 36
Rengöring av tilloppsslangens filter 37
Rengöring av maskinen 37
23
Аннотации для Стиральной Машиной Electrolux EW 1063 S в формате PDF
Топ 10 инструкций
Другие инструкции
W A S H I N G M AC H I N E
T V Ä T T M A S K I N
P Y Y K I N P E S U K O N E
STIRALWNAÅ MAfiINA
INSTRUCTION BOOKLET
BRUKSANVISNING
KÄYTTÖOHJE
RUKOVODSTVO PO ÈKSPLUATACII
EW 1063 S
GB
S
FIN
Dear customer,
Please read these operating instructions carefully and pay particular attention to the safety notes indicated in the first pages. We recommend that you keep this instruction booklet for future reference and pass it on to any future owners.
Transport damages
When unpacking the appliance, check that it is not damaged. If in doubt, do not use it and contact the Service Centre.
The symbols you will see on some paragraphs of this booklet have the following meaning:
The warning triangle and/or the key words (Warning!, Caution!) emphasize information that is particularly important for your safety or correct functioning of the appliance.
The information marked with this symbol provides additional instructions and practical tips on the use of the appliance.
Tips and information about economical and ecological use of the machine are marked with this symbol.
Our contribution to the protection of the environment: we use recycled paper.
2

Contents
Tips for environmental protection 5
|
Technical specifications |
6 |
|
Installation |
7 |
|
Unpacking |
7 |
|
Positioning |
7 |
|
Water inlet |
7 |
|
Water drainage |
8 |
|
Electrical connection |
8 |
|
Your new washing machine |
9 |
|
Description of the appliance |
9 |
|
Detergent dispenser drawer |
9 |
|
Use |
10 |
|
Control panel |
10 |
|
Controls |
10 |
|
Washing hints |
11 |
|
Sorting the laundry |
11 |
|
Temperatures |
11 |
|
Before loading the laundry |
11 |
|
Maximum loads |
11 |
|
Laundry weights |
11 |
|
Removing stains |
11 |
|
Detergents and additives |
12 |
|
International wash code symbols |
13 |
|
Operating sequence |
14-15 |
|
Washing programmes |
16-17 |
Maintenance
Bodywork
Detergent dispenser drawer
Drain filter
Water inlet filter
Emergency emptying out
Frost precautions
Something not working?
3

 Warnings
The following warnings are provided in the interests of overall safety. You must read them carefully before installing or using the appliance.
Installation
•All internal packing must be removed before using the appliance. Serious damage may be caused to the machine or adjacent furniture if the protective transit devices are not removed or are not completely removed. Refer to the relevant paragraph in the instruction book.
•Any electrical work required to install this appliance must be carried out by a qualified electrician.
•Any plumbing work required to install this appliance must be carried out by a qualified plumber.
•After having installed the machine, check that it is not standing on its electrical supply cable.
•If the appliance is placed on a carpeted floor, ensure that air can circulate freely between the feet and the floor.
Use
•This appliance is designed for domestic use. It must not be used for purposes other than those for which it was designed.
•Only wash fabrics which are designed to be machine washed. Follow the instructions on each garment label.
•Do not overload the appliance. Follow the instructions in the instruction book.
•Make sure that all pockets are empty. Objects such as coins, safety pins, pins and screws can cause extensive damage.
•Do not machine wash garments saturated with petroleum, methylated spirits, trichlorethylene, etc. If such fluids have been used to remove stains prior to washing, wait until they have completely evaporated from the fabric before placing garments in the appliance.
•Place small items such as socks, belts, etc. in a cloth bag or pillowcase to prevent them getting trapped between the drum and the tub.
•Use only the recommended quantities of fabric softener. An excessive amount could damage the laundry.
•Leave the porthole door slightly ajar when the appliance is not in use. This preserves the door seal and prevents the formation of musty smells.
•Always check that water has emptied out before opening the door. If not, drain the water following the instructions in the instruction book.
•Always unplug the appliance and shut the water tap after use.
General safety
•Repairs to the machine must be carried out only by qualified personnel. Repairs carried out by inexperienced persons could cause serious danger. Contact your local Service Centre.
•Never pull the power supply cable to remove the plug from the socket; always take hold of the plug itself.
•During high temperature wash programmes the door glass may get hot. Do not touch it!
4

Child safety
•Children are often not aware of how dangerous electrical appliances can be. When the machine is working, children should be carefully supervised and not be allowed to play with the appliance.
•The packaging components (e.g. plastic film, polystyrene) can be dangerous to children — danger of suffocation! Keep them out of children’s reach.
•Keep all detergents in a safe place out of children’s reach.
•Make sure that children or pets do not climb into the drum.
•When the appliance is to be scrapped, cut off the electrical supply cable and destroy the plug with the remaining cable. Disable the door catch in order to prevent children from becoming trapped inside while playing.
 Disposal
Packaging materials
The materials marked with the symbol  are recyclable.
>PE<=polyethylene
>PS<=polystyrene
>PP<=polypropylene
This means that they can be recycled by disposing of them properly in appropriate collection containers.
Machine
Use authorised disposal sites for your old appliance. Help to keep your country tidy!
 Tips for environmental protection
To save water, energy and to help protect the environment, we recommend that you follow these tips:
•Normally soiled laundry may be washed without prewashing in order to save detergent, water and time (the environment is protected too!).
•The machine works more economically if it is fully loaded.
•With adequate pre-treatment, stains and limited soiling can be removed; the laundry can then be washed at a lower temperature.
•Measure out detergent according to the water hardness, the degree of soiling and the quantity of laundry being washed.
•Use a short programme for lightly soiled laundry.
ENGLISH
5
Technical specifications
|
DIMENSIONS |
Height |
85 cm |
|
Width |
60 cm |
|
|
Depth |
45 cm |
|
|
MAXIMUM LOAD |
Cotton |
4.5 kg |
|
Synthetics |
1.5 kg |
|
|
Delicates |
1.5 kg |
|
|
Woollens |
1 kg |
|
|
SPIN SPEED |
1000 rpm max. |
|
|
POWER SUPPLY VOLTAGE/FREQUENCY |
220-230 V/50 Hz |
|
|
TOTAL POWER ABSORBED |
2200 W |
|
|
MINIMUM FUSE PROTECTION |
10 A |
|
|
WATER PRESSURE |
Minimum |
050 kPa |
|
Maximum |
800 kPa |
This appliance complies with the following EEC Directives: 73/23/EEC of 19/02/73 relating to low voltage
89/336/EEC of 03/05/89 relating to electromagnetic compatibility.
6
Installation
Unpacking
All transit bolts and packing must be removed before using the appliance.
You are advised to keep all transit devices so that they can be refitted if the machine ever has to be transported again.
1.Using a spanner, unscrew and remove the rear right-hand bolt and lay the machine on its back, taking care not to squash the hoses. This can be avoided by placing one of the corner packing pieces between the machine and the floor.
2.Remove the polystyrene block from the bottom of the machine and release the two plastic bags.
3.Carefully remove the right-hand bag (1) then the left-hand bag (2) by pulling them towards the centre of the machine.
4.Set the machine upright and remove the two remaining bolts from the back.
5.Pull out the three plastic spacers from the holes into which the bolts were fitted.
6.Plug all the holes with the plugs supplied with the instruction booklet.
Positioning
Install the machine on a flat hard floor.
Make sure that air circulation around the machine is not impeded by carpets, rugs etc. Check that the machine does not touch the wall or other kitchen units.
Carefully level by screwing the adjustable feet in or out. Never place cardboard, wood or similar materials under the machine to compensate for any unevenness in the floor.
Water inlet
Connect the water inlet hose to a tap with a 3/4″ thread.
The other end of the inlet hose which connects to the machine can be turned in any direction. Simply loosen the fitting, rotate the hose and retighten the fitting, making sure there are no water leaks.
The inlet hose must not be lengthened. If it is too short and you do not wish to move the tap, you will have to purchase a new, longer hose specially designed for this type of use.
ENGLISH
7
Water drainage
The end of the drain hose can be positioned in three ways:
Hooked over the edge of a sink using the plastic hose guide supplied with the machine. In this case, make sure the end cannot come unhooked when the machine is emptying.
This could be done by tying it to the tap with a piece of string or attaching it to the wall.
In a sink drain pipe branch. This branch must be above the trap so that the bend is at least 60 cm above the ground.
Directly into a drain pipe at a height of not less than 60 cm and not more than 90 cm.
The end of the drain hose must always be ventilated, i.e. the inside diameter of the drain pipe must be larger than the outside diameter of the drain hose.
The drain hose must not be kinked. Run it along the floor; only the part near the drainage point must be raised.
Electrical connection
This machine is designed to operate on a 220-230 V, single-phase, 50 Hz supply.
Check that your domestic electrical installation can take the maximum load required (2.2 kW), also taking into account any other appliances in use.
Connect the machine to an earthed socket.
The manufacturer declines any responsibility for damage or injury through failure to comply with the above safety precaution.
Should the appliance power supply cable need to be replaced, this should be carried out by our Service Centre.
Important!
When the appliance is installed the power supply cable must be easily accessible.
8
Your new washing machine
This new machine meets all modern requirements for effective treatment of laundry with low water, energy and detergent consumption.
•The temperature selector dial will allow you to choose the most suitable temperature for your laundry.
•The automatic cooling of the washing water from 95° to 60°C before draining reduces thermal shock to fabrics, helping to prevent creasing.
•The special wool programme with its new delicate wash system treats your woollens with extreme care.
•The balance control device ensures the machine is stable during the spin.
ENGLISH
Description of the appliance
1 Detergent dispenser drawer
2 Control panel
3 Drain filter
4 Adjustable feet
Detergent dispenser drawer
Prewash
Main wash
Fabric softener, starch
9
Use
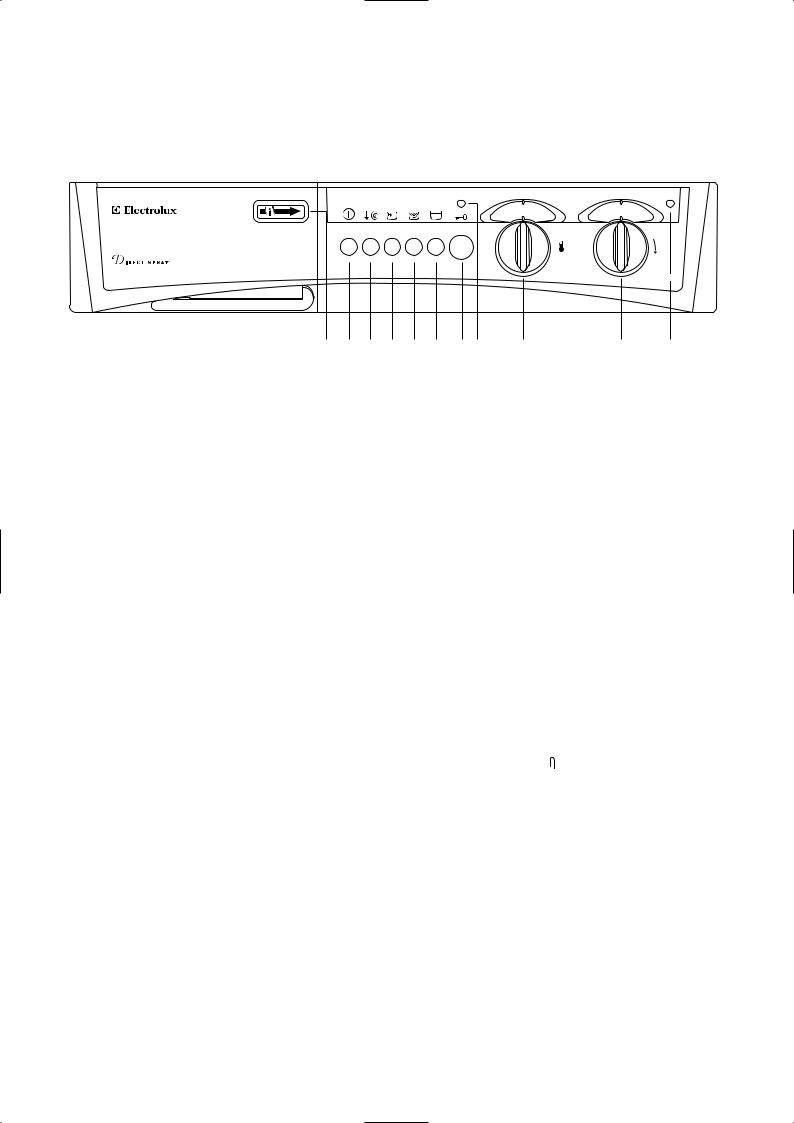
Control panel
EW 1063 S
|
1 |
1 |
2 |
3 |
4 |
5 |
6 |
7 8 |
9 |
10 |
11 |
1 Programme chart
It will help you to choose the most suitable washing programme for your laundry.
2 On/Off button 
Press this button to start the machine. The same button is used to switch the machine off.
Before selecting a programme or changing an ongoing programme the machine must be switched off by depressing the On/Off button.
3 Spin speed reduction button 
By depressing this button the spin speed is reduced as follows:
•cotton and linen: from 1000 to 650 rpm
•synthetics and delicates: from 900 to 650 rpm
•wool: from 1000 to 650 rpm
6 Anti-crease button 
Using this option the last rinse water is not emptied out, so as to avoid creasing if the laundry is not removed from the machine immediately after washing.
The water can be emptied out by pressing the button again (emptying will be followed by a spin) or by selecting the drain programme “N”.
If the button is not pressed, the programmes end with a spin.
7 Door open button 
Press to open the door.
8 “Door locked” pilot light
This light comes on when the programme starts, indicating that the door is locked.
The door cannot be opened until the light goes out.
4 Quick wash button 
By depressing this button on programmes A-B-C-G and H the washing time will be reduced.
Max. recommended temperature 60°C. To be used for lightly soiled laundry.
5 Extra rinse button 
By depressing this button on programmes A—B and C for cotton and linen the machine will perform the rinses with more water.
To be used in areas where the water is very soft or for people allergic to detergents or who have very delicate skin.
9Temperature selector dial (thermostat) 
To select the washing temperature turn the dial to the required value.
When your laundry is only lightly soiled, a cold wash can be used (dial to position  ).
).
10 Programme selector dial
To select the required washing programme turn the dial clockwise.
11 Mains-on light
It comes on when the machine starts operating and goes out by depressing ON/OFF button to switch the machine off.
10
Washing hints
Sorting the laundry
Follow the wash code symbols on each garment label and the manufacturer’s washing instructions. Sort the laundry as follows:
whites, coloureds, synthetics, delicates, woollens.
Temperatures
95° for normally soiled white cottons and linen (e.g. tea cloths, towels, tablecloths, sheets…)
60° for normally soiled, colour fast garments (e.g. shirts, night dresses, pyjamas….) in linen, cotton or synthetic fibres and for lightly soiled white cotton (e.g. underwear).
 (cold)for delicate items (e.g. net curtains), mixed 30°-40° laundry including synthetic fibres and
woollens bearing the label «pure new wool, machine washable, non-shrink».
Before loading the laundry
Never wash whites and coloureds together. Whites may lose their “whiteness” in the wash.
New coloured items may run in the first wash; they should therefore be washed separately the first time.
Make sure that no metal objects are left in the laundry (e.g. hair clips, safety pins, pins).
Button up pillowcases, close zip fasteners, hooks and poppers. Tie any belts or long tapes.
Remove persistent stains before washing. Rub particularly soiled areas with a special detergent or detergent paste.
Treat curtains with special care. Remove hooks or tie them up in a bag or net.
Maximum loads
Recommended loads are indicated in the programme charts.
General rules:
Cotton, linen: drum full but not too tightly packed;
Synthetics: drum no more than half full;
Delicate fabrics and woollens: drum no more than one third full.
Washing a maximum load makes the most efficient use of water and energy.
For heavily soiled laundry, reduce the load size.
Laundry weights
|
The following weights are indicative: |
|
|
bathrobe |
1200 g |
|
napkin |
100 g |
|
quilt cover |
700 g |
|
sheet |
500 g |
|
pillow case |
200 g |
|
tablecloth |
250 g |
|
towelling towel |
200 g |
|
tea cloth |
100 g |
|
night dress |
200 g |
|
ladies’ briefs |
100 g |
|
man’s work shirt |
600 g |
|
man’s shirt |
200 g |
|
man’s pyjamas |
500 g |
|
blouse |
100 g |
|
men’s underpants |
100 g |
Removing stains
Stubborn stains may not be removed by just water and detergent. It is therefore advisable to treat them prior to washing.
Blood: treat fresh stains with cold water. For dried stains, soak overnight in water with a special detergent then rub in the soap and water.
Oil based paint: moisten with benzine stain remover, lay the garment on a soft cloth and dab the stain; treat several times.
Dried grease stains: moisten with turpentine, lay the garment on a soft surface and dab the stain with the fingertips and a cotton cloth.
Rust: oxalic acid dissolved in hot water or a rust removing product used cold. Be careful with rust stains which are not recent since the cellulose structure will already have been damaged and the fabric tends to hole.
Mould stains: treat with bleach, rinse well (whites and fast coloureds only).
Grass: soap lightly and treat with bleach (whites and fast coloureds only).
Ball point pen and glue: moisten with acetone (*), lay the garment on a soft cloth and dab the stain.
Lipstick: moisten with acetone as above, then treat stains with methylated spirits. Remove any residual marks from white fabrics with bleach.
ENGLISH
11

Red wine: soak in water and detergent, rinse and treat with acetic or citric acid, then rinse. Treat any residual marks with bleach.
Ink: depending on the type of ink, moisten the fabric first with acetone (*), then with acetic acid; treat any residual marks on white fabrics with bleach and then rinse thoroughly.
Tar stains: first treat with stain remover, methylated spirits or benzine, then rub with detergent paste.
(*) do not use acetone on artificial silk.
Detergents and additives
Good washing results also depend on the choice of detergent and use of the correct quantities to avoid waste and protect the environment. Although biodegradable, detergents contain substances which, in large quantities, can upset the delicate balance of nature.
The choice of detergent will depend on the type of fabric (delicates, woollens, cottons, etc.), the colour, washing temperature and degree of soiling.
All commonly available washing machine detergents may be used in this appliance:
–powder detergents for all types of fabric,
–powder detergents for delicate fabrics (60°C max) and woollens,
–liquid detergents, preferably for low temperature wash programmes (60°C max) for all types of fabric, or special for woollens only.
The detergent and any additives must be placed in the appropriate compartments of the dispenser drawer before starting the wash programme.
If using concentrated powder or liquid detergents, a programme without prewash must be selected.
The washing machine incorporates a recirculation system which allows an optimal use of the concentrated detergent.
Pour liquid detergent into the dispenser drawer compartment marked  just before starting the programme.
Any fabric softener or starching additives must be poured into the compartment marked  before starting the wash programme.
Follow the product manufacturer’s recommendations on quantities to use and do not exceed the «MAX» mark in the detergent dispenser drawer.
Quantity of detergent to be used
The type and quantity of detergent will depend on the type of fabric, load size, degree of soiling and hardness of the water used.
Water hardness is classified in so-called “degrees” of hardness. Information on hardness of the water in your area can be obtained from the relevant water supply company, or from your local authority.
Follow the product manufacturers’ instructions on quantities to use.
Use less detergent if:
–you are washing a small load,
–the laundry is lightly soiled,
–large amounts of foam form during washing.
Degrees of water hardness
|
Degrees |
||||
|
Level |
Characteristic |
|||
|
German |
French |
|||
|
°dH |
°T.H. |
|||
|
1 |
soft |
0- 7 |
0-15 |
|
|
2 |
medium |
8-14 |
16-25 |
|
|
3 |
hard |
15-21 |
26-37 |
|
|
4 |
very hard |
more than |
more than |
|
|
21 |
37 |
|||
12
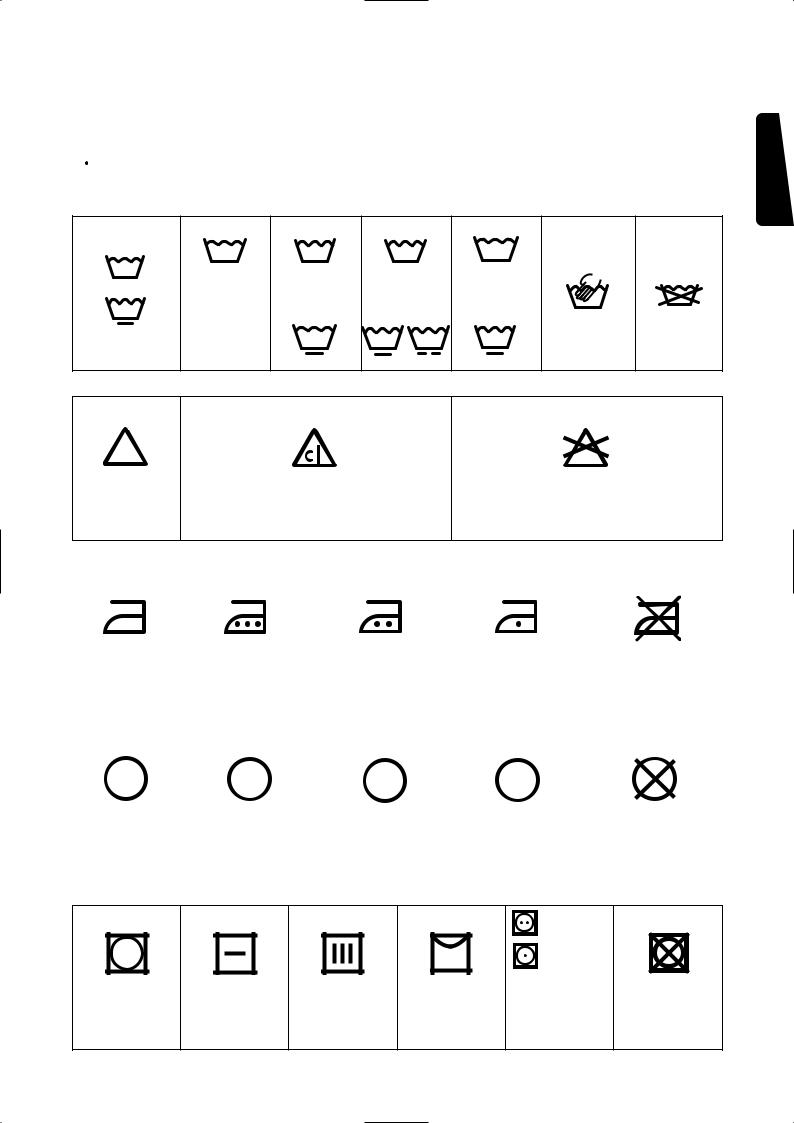
 International wash code symbols
These symbols appear on fabric labels, in order to help you choose the best way to treat your laundry.
|
Energetic wash |
30 |
||||
|
95 |
60 |
40 |
|||
|
Max. wash |
Max. wash |
Max. wash |
Max. wash |
||
|
temperature |
temperature |
temperature |
temperature |
||
|
95° C |
60° C |
40° C |
30° C |
||
|
60 |
Hand wash |
Do not |
|||
|
Delicate wash |
40 |
40 |
30 |
wash |
|
|
at all |
|
Bleaching |
Bleach in cold water |
Do not bleach |
|
Ironing |
Hot iron |
Warm iron |
Lukewarm iron |
Do not iron |
|
max 200° C |
max 150° C |
max 110° C |
||
|
A |
P |
F |
||
|
Dry cleaning |
Dry cleaning |
Dry cleaning in |
Dry cleaning |
Do not |
|
in all solvents |
perchlorethylene, |
in petrol, |
dry clean |
|
|
petrol, pure alcohol, |
pure alcohol |
|||
|
R 111 & R 113 |
and R 113 |
|||
|
high |
|
temperature |
|
low |
|
temperature |
|
Drying |
Flat |
On the line |
On clothes |
Tumble dry |
Do not |
|
hanger |
tumble dry |
ENGLISH
13
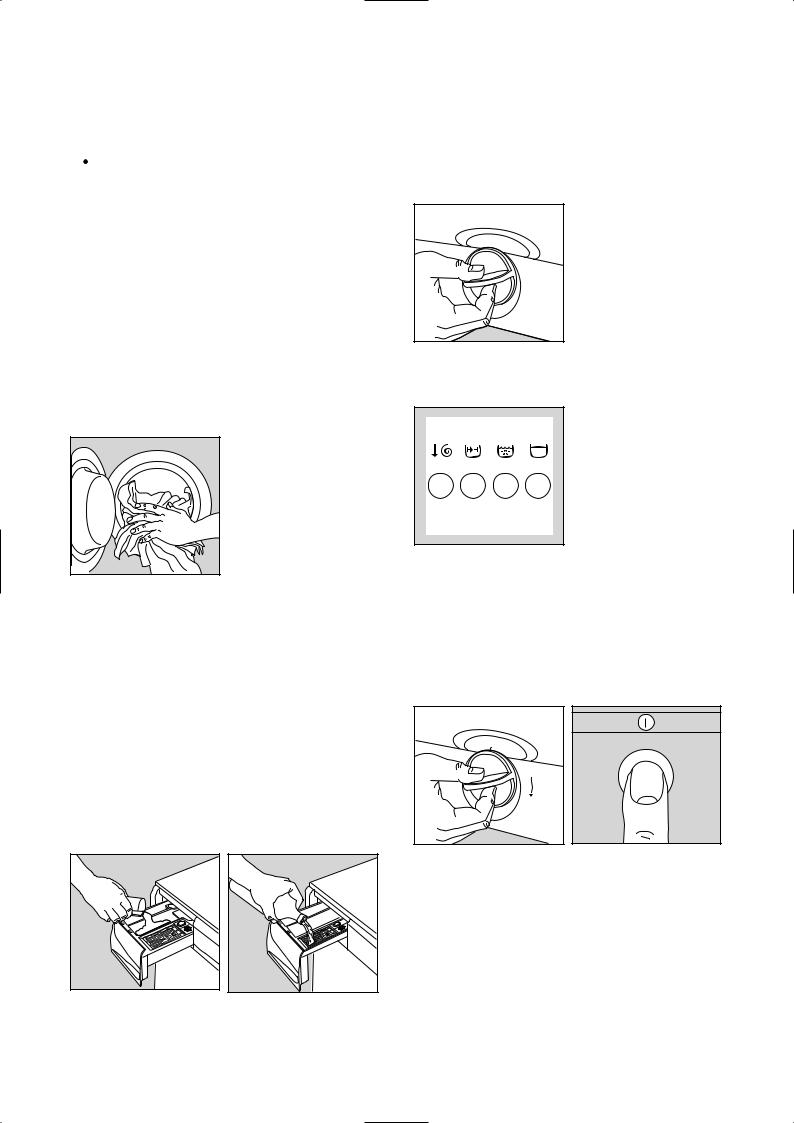
 Operating sequence
Before washing your first load of laundry, we recommend that you run a cotton cycle at 60°C, with the machine empty, in order to remove any manufacturing residue from the drum and tub.
Pour half a measure of detergent into the main wash compartment and start up the machine.
1. Place the laundry in the drum
Open the door by depressing button  .
.
Place the laundry in the drum, one item at a time, shaking them out as much as possible.
Close the door.
4. Select the temperature
Turn the dial to the required setting.
5. Select the required option(s)
P0004
2. Measure out the detergent
Pull out the dispenser drawer until it stops. Measure out the amount of detergent recommended by the manufacturer in a graduated cup and pour it into the main wash compartment  .
.
If you wish to carry out a programme with prewash, pour detergent into the appropriate compartment marked  .
.
3. Measure out the additives
If required, pour fabric softener into the compartment marked  , without exceeding the «MAX» mark.
6.Select the programme and start the machine
Turn the programme selector dial clockwise to the required programme and press the ON/OFF button: the mains on light and “door locked” light come on and the machine starts to operate.
14

7. At the end of the programme
The machine stops automatically.
If you have selected a programme which ends with the water of the last rinse left in the tub (option  ), drain the water before opening the door. Select programme “N” (drain) or depress again button
  .
.
Wait one or two minutes before opening the door to give the electric locking mechanism time to release it. The door can be opened when the relevant light goes out.
Depress the ON/OFF button again to switch the machine off. The mains on light goes out.
Remove the laundry.
Turn the drum by hand to make sure it is completely empty, so as to avoid any forgotten items being damaged in a subsequent wash (e.g. shrinking) or their colour running into a load of whites.
Release any buttons which have been pressed.
Turn the water tap off and unplug the machine.
Leave the door ajar to air the machine.
ENGLISH
15
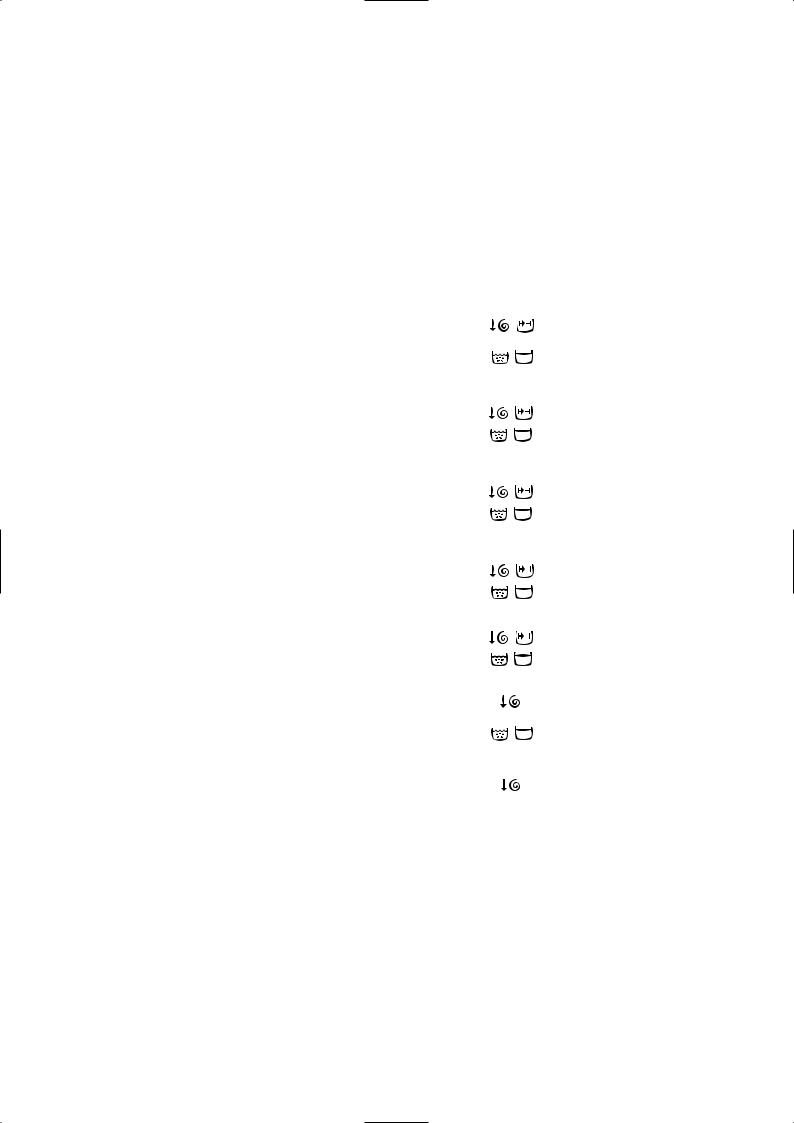
Programme table
Washing programmes for cotton and linen
Max load: 4.5 kg
|
Additional |
Consumptions* |
|||||||||||||||||
|
Programme |
Temp. |
Fabrics |
Description |
|||||||||||||||
|
functions |
Energy |
Water |
Duration |
|||||||||||||||
|
kWh |
lt |
min. |
||||||||||||||||
|
WHITES WITH PREWASH, for |
Prewash at |
|||||||||||||||||
|
40°C |
||||||||||||||||||
|
A |
60°-95° |
example work garments, |
Wash at |
2.0 |
57 |
140 |
||||||||||||
|
sheets, household linen, |
60°-95°C |
|||||||||||||||||
|
underwear, towels |
3 rinses |
|||||||||||||||||
|
Long spin |
||||||||||||||||||
|
WHITES WITHOUT |
Wash at |
|||||||||||||||||
|
B |
60°-95° |
PREWASH, for example |
60°-95°C |
1.7 |
48 |
125 |
||||||||||||
|
3 rinses |
||||||||||||||||||
|
household linen, sheets, shirts, |
||||||||||||||||||
|
underwear |
Long spin |
|||||||||||||||||
|
COLOUREDS WITH |
Prewash at |
|||||||||||||||||
|
40°C |
||||||||||||||||||
|
A |
40°-60° |
PREWASH, for example shirts, |
Wash at |
1.2 |
54 |
135 |
||||||||||||
|
blouses, household linen, |
40°-60°C |
|||||||||||||||||
|
sheets |
3 rinses |
|||||||||||||||||
|
Long spin |
||||||||||||||||||
|
FAST COLOUREDS WITHOUT |
Wash at |
|||||||||||||||||
|
B |
40°-60° |
PREWASH, for example shirts, |
40°-60°C |
0.9 |
48 |
120 |
||||||||||||
|
blouses, terry cloths, |
3 rinses |
|||||||||||||||||
|
underwear |
Long spin |
|||||||||||||||||
|
NON-FAST COLOUREDS |
Wash at |
|||||||||||||||||
|
C |
30°-40° |
WITHOUT PREWASH, for |
30°-40°C |
0.7 |
48 |
90 |
||||||||||||
|
example shirts, blouses, |
3 rinses |
|||||||||||||||||
|
underwear |
Long spin |
|||||||||||||||||
|
D |
COLD |
This programme can be used |
3 rinses |
0.1 |
39 |
45 |
||||||||||||
|
for rinsing hand washed |
||||||||||||||||||
|
Rinses |
Long spin |
|||||||||||||||||
|
garments |
||||||||||||||||||
|
F |
Separate spin for cotton and |
Long spin |
— |
— |
10 |
|||||||||||||
|
Long spin |
linen |
|||||||||||||||||
In compliance with EC directive 92/75, the consumption figures indicated on the energy label refer to the 60°C wash programme for cotton (programme “B”).
* The consumption data shown on this chart is to be considered purely indicative, as it may vary depending on the quantity and type of laundry, on the inlet water temperature and on the ambient temperature. It refers to the highest temperature for each wash programme.
16
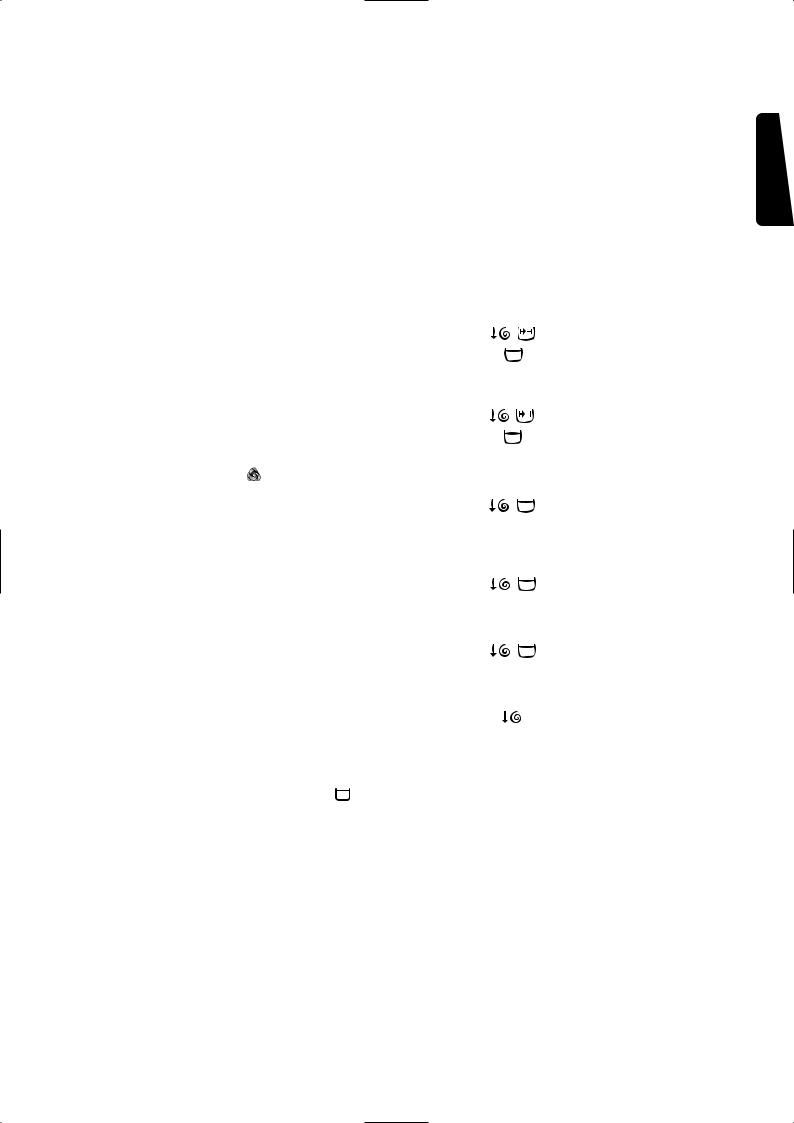
Programme table
Washing programmes for synthetics, mixed fabrics, delicates and wool
Max load: 1.5 kg, wool 1 kg
|
Additional |
Consumptions* |
|||||||||||||||||||
|
Programme |
Temp. |
Fabrics |
Description |
|||||||||||||||||
|
functions |
Energy |
Water |
Duration |
|||||||||||||||||
|
kWh |
lt |
min. |
||||||||||||||||||
|
SYNTHETICS WITH |
Prewash at |
|||||||||||||||||||
|
40 °C |
||||||||||||||||||||
|
PREWASH, for example |
||||||||||||||||||||
|
G |
40°-60° |
Wash at |
1.0 |
56 |
95 |
|||||||||||||||
|
underwear, coloured items, |
||||||||||||||||||||
|
40°-60°C |
||||||||||||||||||||
|
shirts, blouses |
3 rinses |
|||||||||||||||||||
|
Short spin |
||||||||||||||||||||
|
SYNTHETICS WITHOUT PRE- |
Wash at |
|||||||||||||||||||
|
H |
40°-60° |
WASH, for example shirts, |
40°-60°C |
0.7 |
50 |
80 |
||||||||||||||
|
3 rinses |
||||||||||||||||||||
|
blouses, mixed fabrics |
||||||||||||||||||||
|
Short spin |
||||||||||||||||||||
|
WOOL |
Wash at |
|||||||||||||||||||
|
Special programme for |
||||||||||||||||||||
|
J |
30°-40° |
30°-40°C |
0.45 |
45 |
55 |
|||||||||||||||
|
garments bearing the “Pure |
||||||||||||||||||||
|
3 rinses |
||||||||||||||||||||
|
new wool, non-shrink, machine |
||||||||||||||||||||
|
Short spin |
||||||||||||||||||||
|
washable” label |
||||||||||||||||||||
|
DELICATES, for example |
Wash at |
|||||||||||||||||||
|
K |
30°-40° |
30°-40°C |
0.45 |
43 |
50 |
|||||||||||||||
|
curtains |
3 rinses |
|||||||||||||||||||
|
Short spin |
||||||||||||||||||||
|
L |
This programme can be used |
3 rinses |
||||||||||||||||||
|
COLD |
for rinsing hand washed |
0.02 |
30 |
25 |
||||||||||||||||
|
Rinses |
Short spin |
|||||||||||||||||||
|
garments |
||||||||||||||||||||
|
M |
Separate spin for hand washed |
Drain and |
— |
— |
5 |
|||||||||||||||
|
Short spin |
synthetics, delicates and wool |
short spin |
||||||||||||||||||
|
N |
For emptying out the last rinse |
Draining of |
— |
— |
||||||||||||||||
|
water of the programmes with |
1 |
|||||||||||||||||||
|
Drain |
water |
|||||||||||||||||||
|
the anti-crease option . |
||||||||||||||||||||
* The consumption data shown on this chart is to be considered purely indicative, as it may vary depending on the quantity and type of laundry, on the inlet water temperature and on the ambient temperature. It refers to the highest temperature for each wash programme.
ENGLISH
17
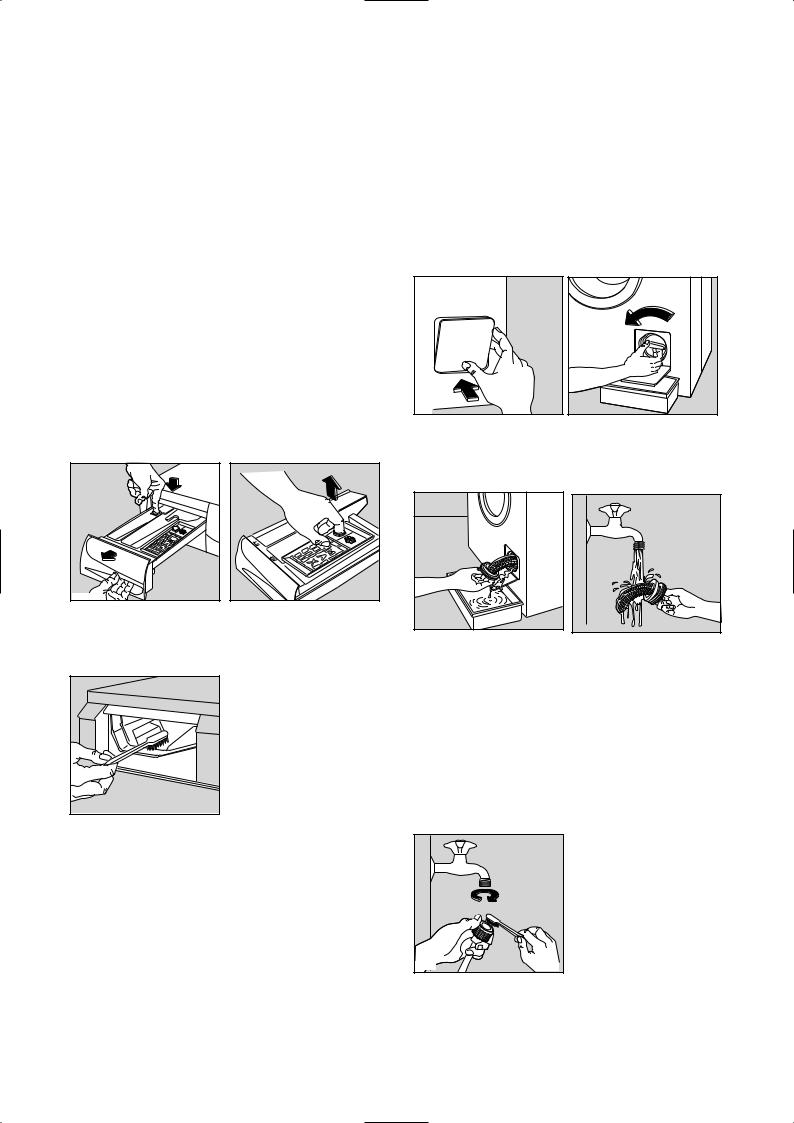
Maintenance
1. Bodywork
Clean the outside of the machine with warm water and a neutral, non-abrasive household detergent. Rinse with clean water and dry with a soft cloth.
Important: do not use methylated spirits, solvents or similar products to clean the bodywork.
2. Detergent dispenser drawer
After a while, detergents and fabric softeners leave deposits in the drawer.
Clean the drawer from time to time by rinsing it under a running tap. To remove the drawer from the machine, press the button in the rear left-hand corner.
To facilitate cleaning, the top part of the additive compartment can be removed.
Detergent can also accumulate inside the drawer recess: clean it with an old toothbrush. Refit the drawer after cleaning.
3. Drain filter
The drain filter collects threads and small objects inadvertently left in the laundry. Check regularly that the filter is clean.
Open the filter door.
Place a container under the filter and unscrew it.
Pull out the filter.
Clean the filter under a running tap, then refit it, screwing it fully in.
4. Water inlet filter
If you notice that the machine is taking longer to fill, check that the filter in the water inlet hose is not blocked.
Turn off the water tap.
Unscrew the hose from the tap.
Clean the filter with a stiff brush.
Screw the hose back onto the tap.
18

5. Emergency emptying out
If the water is not discharged (outlet pump is blocked, filter or drain pipe are clogged), proceed as follows to empty out the machine:
•pull out the plug from the power socket;
•close the water tap;
•if necessary, wait until the water has cooled down;
•place a bowl on the floor;
•put the drain hose end into the bowl and let the water come out.
Should it not be possible to have access to the drain hose because, for example, the appliance is built in the kitchen furniture, slightly loosen the drain filter after placing a bowl on the floor, to let the water come out slowly.
At the end screw the filter again.
6. Frost precautions
If the machine is installed in a place where the temperature could drop below 0°C, proceed as follows:
•Close the water tap and unscrew the water inlet hose from the tap.
•Place the end of the drain hose and that of the inlet hose in a bowl placed on the floor.
•Select programme “N” (drain) and run it until the machine stops.
•Remove the plug from the socket.
•Screw the water inlet hose back on and put the drain hose back in its place.
By doing this, any water remaining in the machine is removed, avoiding the formation of ice and, consequently, breakage of the affected parts.
When you use the machine again, make sure that the ambient temperature is above 0°C.
ENGLISH
19

Something not working?
Problems which you can resolve yourself.
|
Problem |
Possible cause |
||
|
• |
The machine does not start up: |
• |
The door is not firmly closed. |
|
• |
The machine is not plugged in or there is no power |
||
|
at the socket. |
|||
|
• |
The main fuse has blown. |
||
|
• The programme selector dial is not positioned correctly |
|||
|
and the ON/OFF button has not been depressed. |
|||
|
• |
The machine does not fill: |
• |
The water tap is closed. |
|
• |
The inlet hose is squashed or kinked. |
||
|
• |
The filter in the inlet hose is blocked. |
||
|
• |
The door is not properly closed. |
||
|
• |
The machine fills then empties |
• |
The end of the drain hose is too low. Refer to |
|
immediately: |
relevant paragraph in “water drainage” section. |
||
|
• The machine does not empty |
• |
The drain hose is squashed or kinked. |
|
|
and/or does not spin: |
• |
The option has been selected. |
|
|
• |
The laundry is not evenly distributed in the drum. |
||
|
• |
The drain filter is clogged. |
||
|
• There is water on the floor: |
• |
Too much detergent or unsuitable detergent |
|
|
(creates too much foam) has been used. |
|||
|
• |
Check whether there are any leaks from one of the |
||
|
inlet hose fittings. It is not always easy to see this |
|||
|
as the water runs down the hose; check to see if it |
|||
|
is damp. |
|||
|
• |
The drain hose is damaged. |
||
|
• |
Unsatisfactory washing results: |
• |
Too little detergent or unsuitable detergent has |
|
been used. |
|||
|
• |
Stubborn stains have not been treated prior to |
||
|
washing. |
|||
|
• |
The correct temperature was not selected. |
||
|
• |
Excessive laundry load. |
||
|
• |
The machine vibrates or is |
• |
The transit bolts and packing have not been |
|
noisy: |
removed. |
||
|
• |
The support feet have not been adjusted. |
||
|
• |
The laundry is not evenly distributed in the drum. |
||
|
• |
Maybe there is very little laundry in the drum. |
||
|
• |
The door will not open: |
• |
The programme is still running. |
|
• |
The door lock has not been released. The door |
||
|
locked light is on. |
|||
|
• |
There is water in the drum. |
||
20
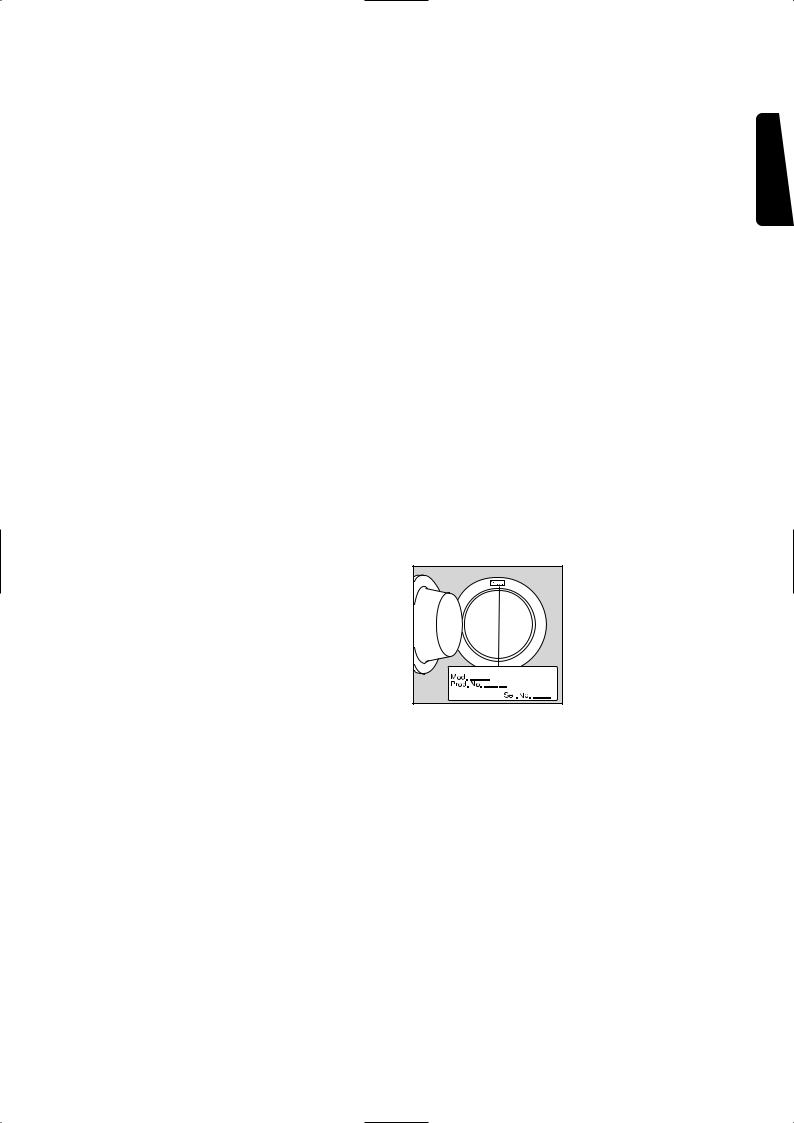
|
Problem |
Possible cause |
||
|
• Spinning starts late or the |
• |
The electronic unbalance detection device has cut |
|
|
machine does not spin: |
in because the laundry is not evenly distributed in |
||
|
the drum. The laundry is redistributed by reverse |
|||
|
rotation of the drum. This may happen several |
|||
|
times before the unbalance disappears and normal |
|||
|
spinning can resume. If, after 10 minutes, the |
|||
|
laundry is still not evenly distributed in the drum, |
|||
|
the machine will not spin. In this case, redistribute |
|||
|
the load manually and select the spin programme. |
|||
|
• |
The machine makes an unusual |
• |
The machine is fitted with a type of motor which |
|
noise |
makes an unusual noise compared with other |
||
|
traditional motors. This new motor ensures a softer |
|||
|
start and more even distribution of the laundry in |
|||
|
the drum when spinning, as well as increased |
|||
|
stability of the machine. |
|||
|
• |
No water is visible in the drum |
• Machines based on modem technology operate |
|
|
very economically using very little water without |
|||
|
affecting performance. |
|||
If you are unable to identify or solve the problem, contact our service centre. Before telephoning, make a note of the model, serial number and purchase date of your machine: the Service Centre will require this information.
ENGLISH
21
Bästa kund,
vi ber dig att läsa igenom den här bruksanvisningen noggrant.
Framför allt är det viktigt att du läser säkerhetsinformationen på de första sidorna i bruksanvisningen. Förvara alltid bruksanvisningen lättillgänglig, så att du snabbt kan hitta den och slå upp information i den vid ett senare tillfälle. Om du säljer maskinen ska bruksanvisningen överlämnas till nästa ägare.
Transportskador
Kontrollera att maskinen inte är skadad. Eventuella transportskador skall omedelbart anmälas till den som ansvarat för transporten. Skador, felaktigheter och ev. saknade delar skall omedelbart anmälas till säljaren.
Så här använder du bruksanvisningen
Några stycken i bruksanvisningen är försedda med en symbol. Dessa symboler betyder följande:
Här finns viktig information om olämplig användning av tvättmaskinen som skulle kunna förorsaka personoch egendomsskada.
Här finns information, som är särskilt viktig för att erhålla bästa möjliga tvättresultat.
Här finns viktiga miljöoch energispartips.
Vårt bidrag till miljöskyddet är att vi använder returpapper.
22

Innehållsförteckning
Viktig säkerhetsinformation 24-25
Bortskaffning/avfallshantering25
|
Avkalkning av maskinen |
37 |
|
Åtgärd vid frysrisk |
37 |
|
Nödtömning |
37 |
Energisparråd
FÖR ANVÄNDAREN
Din nya maskin
Beskrivning av maskinen
Tvättmedelslådan
Bruk
Kontrollpanel
Beskrivning av maskinens panelfunktioner
Viktiga råd och tips för dig som tvättar
Sortering av tvätt
Temperaturer
Hur mycket tvätt per omgång?
Tvättmedel och tillsatser
Tvättmärkning
Så här använder du tvättmaskinen
Lägg i tvätten
Fyll på tvättmedel
Tillsätt sköljmedel
Tryck på önskad tillvalsknapp
Välj önskad temperatur
Välj önskat program och starta maskinen Avslutat tvättprogram
|
25 |
Om maskinen inte fungerar 38-39 |
SVENSK |
|
|
26 |
Service och reservdelar |
40 |
|
|
Konsumentköp EHL |
40 |
||
|
Garanti (gäller för Finland) |
40 |
||
|
Konsumentkontakt |
40 |
||
|
26 |
FÖR INSTALLATÖREN |
||
|
26 |
|||
|
27 |
Tekniska data |
40 |
|
|
27 |
Installation |
41 |
|
|
27-28 |
|||
|
Uppackning |
41 |
||
|
Tillbehör |
41 |
||
|
29 |
Transportsäkring |
41 |
|
|
Placering |
41 |
||
|
29 |
|||
|
Nivåjustering |
41 |
||
|
29 |
|||
|
Vattenanslutning |
42 |
||
|
29 |
|||
|
Avloppsanslutning |
42 |
||
|
29-30 |
|||
|
— Över kanten på en vask |
42 |
||
|
31 |
|||
|
— Anslutning till golvbrunn |
42 |
||
|
— Anslutning till vattenlås |
42 |
||
|
32 |
Elektrisk anslutning |
43 |
|
32
32
32
32
32
32
33
|
Programöversikt |
34-35 |
|
Skötsel och rengöring |
36 |
|
Rengöring av höljet |
36 |
|
Rengöring av tvättmedelslådan |
36 |
|
Rengöring av lådöppningen |
36 |
|
Rengöring av avloppssilen |
36 |
|
Rengöring av tilloppsslangens filter |
37 |
|
Rengöring av maskinen |
37 |
23

 Viktig säkerhetsinformation
Följande varningsuppgifter är till för den allmänna säkerheten. Läs igenom dem noggrant före installation och användning av apparaten.
Installation
•Alla installationsarbeten på och ingrepp i produkten och elanslutningen skall utföras av behörig fackman. Ger du dig på produkten utan behörighet kan du försämra dess funktion och skada person och egendom.
•Se till att maskinen inte står på anslutningssladden och att inte avoch tilloppsslangarna har några veck, samt att underlaget är plant och stabilt.
•Tvättmaskinen får aldrig placeras på sockel, fundament eller liknande, eftersom det då finns risk för tippning under centrifugeringen.
Användning
•Tvättmaskinen är endast avsedd att användas för normal hushållstvätt enligt anvisningarna i denna bruksanvisning. Används den för andra ändamål finns det risk för personoch egendomsskada.
•Lägg aldrig tvättgods i trumman utan att först titta efter om den är tom.
•Överbelasta inte maskinen (se «Tvättkapacitet»).
•En bygelbehå bör inte tvättas i maskinen, då en bygel som lossnat kan förstöra tvätten och fastna i tvättrumman.
•Föremål som t ex mynt, nålar, spikar och skruvar kan skada maskinen allvarligt. Se till att alla fickor är tömda och att knappar är uppknäppta och blixtlås är stängda innan du tvättar ett plagg.
•Små kläder såsom band, skärp och strumpor bör tvättas i en tvättpåse, eftersom de annars kan komma in mellan trumman och behållaren.
•Följ alltid tillverkarens rekommendationer för tvättoch sköljmedelsdosering. Överdosering kan skada maskinen och tvättgodset.
•Använd inte din tvättmaskin för kemtvätt. Undvik att bleka och färga i maskinen. Tvättgods som innehåller starka kemikalier bör först sköljas ur i vatten innan det läggs in i tvättmaskinen.
Skador som uppstår på grund av punkterna ovan täcks inte av konsumentköplagen.
Underhåll/Service
•När du tvättat färdigt, stäng vattenkranen och tryck ut huvudströmbrytaren. Låt luckan stå lite öppen när maskinen inte används så att lucktätningen bibehåller sin smidighet.
•Service och reparationer skall utföras av ett serviceföretag som leverantören godkänt. Använd bara reservdelar som dessa säljer. Försök aldrig reparera maskinen själv.
24

Barnsäkerhet
•Barn förstår oftast inte hur farligt det kan vara att leka med elektriska maskiner. Därför ska du hålla uppsikt över maskinen under drift. Låt inte barnen leka med tvättmaskinen.
•Förpackningsmaterial (t ex plastfolie och frigolit) kan vara farligt för barn. Risk för kvävning! Se till att barnen inte kommer åt att leka med förpackningsmaterialet.
•Under tvätt kan glasluckan bli het. Låt därför inte barn vistas i närheten av maskinen under drift.
•Kontrollera att barn eller små djur inte tar sig in i tvättmaskinens trumma.
•Förvara tvättmedel på säker plats; oåtkomligt för barn.
•När maskinen är uttjänt och ska forslas bort, ska du dra ut stickkontakten och skära av nätkabeln. Stickkontakten och resterna av nätkabeln ska också kastas. Lucklåset ska förstöras. På så sätt kan lekande barn inte bli instängda i tvättmaskinen och försättas i livsfara.

 Bortskaffning/
avfallshantering
Hantering av förpackningsavfall
De material i förpackningen som kan återanvändas är märkta med symbolen 
 och skall i princip återanvändas.
>PE< står för polyeten
>PS< står för polystyrol
>PP< står för polypropylen
Pappemballaget bör läggas i en pappersinsamlingscontainer, om en sådan finns i ert område.
Deponering av uttjänt maskin
Kontakta din kommun för information om var du kan lämna din maskin.

 Energisparråd
Allra sparsammast och miljövänligast tvättar man om man följer dessa tips:
•De bästa förbrukningsvärdena uppnås när maskinen är fylld.
•Dosera tvättmedelsmängden efter vattnets hårdhet, plaggens nedsmutsningsgrad och tvättmängden.
•För normalt smutsad tvätt räcker det med ett tvättprogram utan förtvätt.
•När du tvättar små mängder tvätt ska du bara använda hälften eller upp till två tredjedelar av den rekommenderade doseringen för tvättmedlet.
•Med rätt förbehandling kan fläckar och lätt smuts avlägsnas. Sedan kan tvätten tvättas på en lägre temperatur.
SVENSK
25
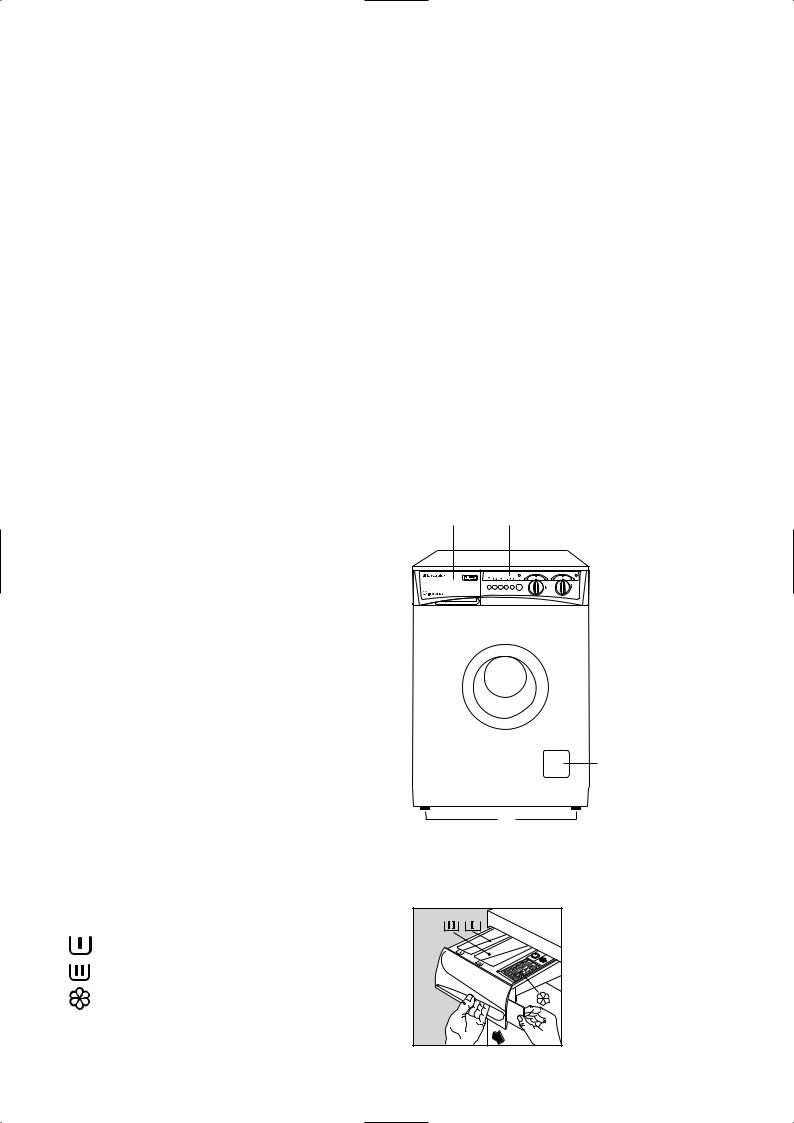
Din nya maskin
Din nya tvättmaskin med Direct Spray System uppfyller alla krav på modern tvättning: Eloch vattenförbrukning anpassas automatiskt till mängd och typ av tvätt.
•Med temperaturväljaren kan du ställa in den mest lämpliga temperaturen för varje tvättprogram.
•Automatisk avkylning av tvättvattnet till 60°C före tömning ingår i 95°C programmet. Det minskar den ”temperaturchock” som tvätten utsätts för, vilket i sin tur motverkar att tvätten blir skrynklig.
•Speciellt program för ylle — behandlar ylleplagg på ett mycket skonsamt sätt.
•Kontroll av obalans: ett kontrollsystem upptäcker ev obalans i tvättens fördelning. Det här systemet ser till att maskinen står stabilt när den centrifugerar.
Beskrivning av maskinen
1Tvättmedelslåda
2Kontrollpanel
3Avloppssil
4Fötter för nivåjustering
Tvättmedelslådan
Fack för förtvättmedel
Fack för huvudtvättmedel
Fack för sköljmedel
26
 Loading…
Страницы и текст этой инструкции
 Инструкция — EW 1063 S
 Информация отображена на картинке
 Информация отображена на картинке
 Информация отображена на картинке
 Информация отображена на картинке
Как использовать наш сайт инструкций OnlineManuals.ru
Наша цель состоит в том, чтобы предоставить вам быстрый доступ к содержанию инструкции для — EW 1063 S.
С помощью онлайн просмотра, Вы можете быстро просмотреть содержимое инструкции и найти решение проблемы с — EW 1063 S.
Для Вашего удобства
Если листать руководство пользователя — EW 1063 S прямо на сайте, не очень удобно для Вас, есть два возможных решения:
• Просмотр в полноэкранном режиме — легко просмотреть руководство пользователя (без загрузки его на свой компьютер), Вы можете использовать режим полноэкранного просмотра.
Для просмотра инструкции пользователя — EW 1063 S на полном экране, используйте кнопку «Открыть в Pdf-viewer».
• Загрузка на компьютер — Вы можете также скачать Инструкция — EW 1063 S на свой компьютер и сохранить его в файлах.
Многие люди предпочитают читать документы не на экране, а в печатной версии.
Возможность печати руководства пользователя также была предусмотрена на нашем сайте,
и вы можете использовать ее, нажав на иконку «печать» в Pdf-viewer.
Нет необходимости печатать все руководство — EW 1063 S, можно выбрать только нужные страницы инструкции.

2
Dear customer,
Please read these operating instructions carefully
and pay particular attention to the safety notes
indicated in the first pages. We recommend that you
keep this instruction booklet for future reference and
pass it on to any future owners.
Transport damages
When unpacking the appliance, check that it is not
damaged. If in doubt, do not use it and contact the
Service Centre.
The symbols you will see on some paragraphs of this booklet have the following meaning:
The warning triangle and/or the key words (Warning!, Caution!) emphasize information that is particularly
important for your safety or correct functioning of the appliance.
The information marked with this symbol provides additional instructions and practical tips on the use of
the appliance.
Tips and information about economical and ecological use of the machine are marked with this symbol.
Our contribution to the protection of the
environment: we use recycled paper.
132998631•gb.qxd 13-06-2001 11:13 Pagina 2