
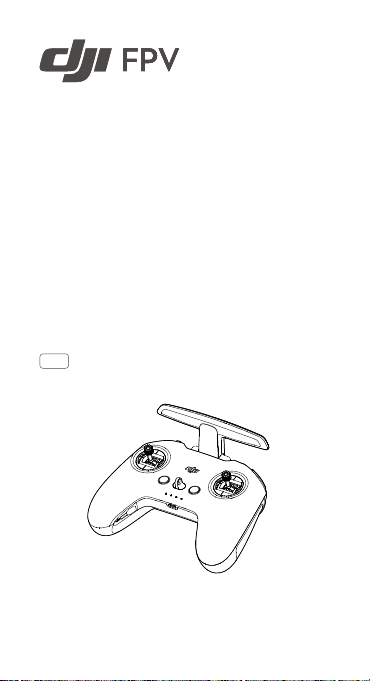
Remote Controller 2
User Guide
使用说明
使用說明
ユーザーガイド
사용자 가이드
Bedienungsanleitung
Guía de usuario
Guide de l’utilisateur
Guida dell’utente
Gebruiksaanwijzing
Manual do utilizador
Guia do usuário
Руководство пользователя
2021.01v1.0
1
1
2
3
www.dji.com/dji-fpv/video
2
1
2
4
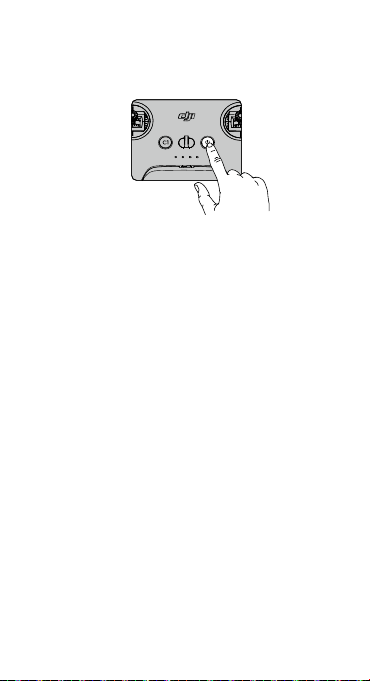
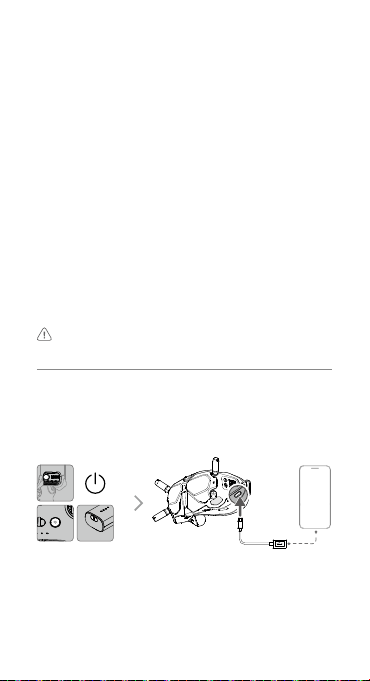
EN Press once to check the battery level.
Press, then press and hold to turn on/off.
CHS 短按一次检查电量。
短按一次,再长按 2 秒可开启、关闭。
CHT 短按一次可檢查電量。
短按一次,再長按
2
秒可開啟、關閉。
JP
ボタンを
1
回押すと、バッテリー残量を確認できま
す。
ボタンを
1
回押した後、長押しすると、電源をオン
/オフにします。
KR
배터리
잔량을
확인하려면
한
번
누릅니다
.
한
번
누른
다음
다시
길게
누르면
켜지거나
꺼집니다
.
DE Drück die Taste einmal, um den Akkustand zu
überprüfen.
Drück die Taste einmal, dann noch einmal und halt
diese gedrückt, um ein- oder auszuschalten.
ES
Pulse una vez para comprobar el nivel de batería.
Pulse, vuelva a pulsar y mantenga pulsado para
encender o apagar.
FR
Appuyez une fois pour vérier le niveau de batterie.
Appuyez une fois, puis une fois de plus et maintenez
le bouton enfoncé pour allumer/éteindre.
IT Premere una volta per vericare il livello di carica
della batteria.

3
Premere, quindi premere e tenere premuto per
accendere/spegnere.
NL Druk eenmaal om het batterijniveau te controleren.
Druk en druk vervolgens en houd vast om aan/uit te
zetten.
PT Prima uma vez para vericar o nível da bateria.
Prima e, em seguida, prima de forma contínua para
ligar/desligar.
PT-BR Pressione uma vez para vericar o nível da bateria.
Pressione uma vez; em seguida, pressione
novamente e segure para ligar/desligar.
RU
Нажмите один раз для проверки уровня заряда
аккумулятора.
Нажмите, затем нажмите и удерживайте для
включения/выключения.
5
a.
b.
4
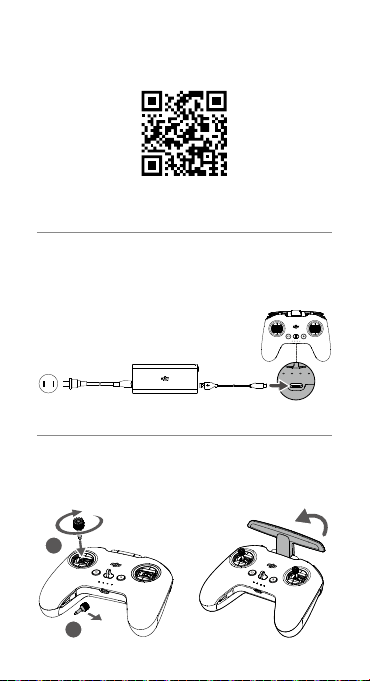
Linking
Ensure that all devices are powered on.
a. Aircraft + Goggles
1) Press the link button on the goggles. The goggles will
beep continually.
2) Press and hold the power button of the aircraft until the
battery level indicator blinks in sequence.
3) The battery level indicator of the aircraft turns solid and
displays the battery level. The goggles stop beeping
when they are successfully linked and the video display
is normal.
b. Aircraft + Remote Controller
1) Press and hold the power button of the aircraft until the
battery level indicator blinks in sequence.
2) Press and hold the power button of the remote controller
until it beeps continually and the battery level indicator
blinks in sequence.
3) The remote controller stops beeping when successfully
linked and both the battery level indicators turn solid and
display the battery level.
The aircraft must be linked with the goggles before the
remote controller.
对 频
对频前请确保所有设备均已开启。
a.
飞行器
+
飞行眼镜
1) 按下飞行眼镜的对频按键,飞行眼镜响起嘀 — 嘀…的
提示音。
2) 长按飞行器的电源按键直至电池电量指示灯循环闪烁。
3) 对频成功后,飞行器的电池电量指示灯常亮显示电量,
飞行眼镜提示音停止并显示图传。
b.
飞行器
+
遥控器
1) 长按飞行器的电源按键直至电池电量指示灯循环闪烁。
2) 长按遥控器的电源按键直至响起嘀 — 嘀…的提示音,且
电池电量指示灯循环闪烁。
3) 对频成功后,飞行器及遥控器的电池电量指示灯均常
亮显示电量,遥控器提示音停止。
飞行器需先完成与飞行眼镜的对频,再进行和遥控器的对频。
5
配 對
配對前請確保所有裝置均已開啟。
a. 航拍機 + 飛行眼鏡
1) 按下飛行眼鏡的配對按鍵,飛行眼鏡響起嘀 — 嘀…的提
示音。
2) 長按航拍機的電源按鍵直至電池電量指示燈循環閃爍。
3) 配對成功後,航拍機的電池電量指示燈恆亮顯示電量,
飛行眼鏡提示音停止並顯示影像傳輸。
b. 航拍機 + 遙控器
1) 長按航拍機的電源按鍵直至電池電量指示燈循環閃爍。
2) 長按遙控器的電源按鍵直至響起嘀 — 嘀…的提示音,且
電池電量指示燈循環閃爍。
3) 配對成功後,航拍機及遙控器的電池電量指示燈均恆
亮顯示電量,遙控器提示音停止。
航拍機需先完成與飛行眼鏡的配對,再進行和遙控器的配對。
リンク
すべての機器の電源が入っていることを確認します。
a. 機体 + ゴーグル
1) ゴーグルのリンクボタンを押します。ゴーグルからビ
ープ音が連続して鳴ります。
2) バッテリー残量インジケーターが順に点滅するまで
機体の電源ボタンを長押しします。
3) 機体のバッテリー残量インジケーターが点灯し、電池
残量を表示します。正常にリンクされ、動画ディスプ
レイが正常になると、ゴーグルのビープ音が止まります。
b. 機体 + 送信機
1) バッテリー残量インジケーターが順に点滅するまで
機体の電源ボタンを長押しします。
2) ビープ音が連続して鳴り、バッテリー残量インジケー
ターが順に点滅するまで、送信機の電源ボタンを長押
しします。
3) リンク作業が正常に終了し、両方のバッテリー残量イ
ンジケーターが点灯してバッテリー残量を表示され
ると、送信機のビープ音は止まります。
機体は送信機より前にゴーグルとリンクしておく必要があ
ります。
6
연동
모든 기기의 전원이 켜졌는지 확인합니다 .
a. 기체 + 고글
1) 고글의 연동 버튼을 누릅니다 . 고글은 계속 신호음 소리를 냅
니다 .
2) 배터리 잔량 표시기가 순차적으로 깜박일 때까지 기체의 전원
버튼을 길게 누릅니다 .
3) 기체의 배터리 잔량 표시기가 켜진 상태로 배터리 잔량을 표시
합니다 . 성공적으로 연동되고 동영상 디스플레이가 정상이면 ,
고글 신호음이 멈춥니다 .
b. 기체 + 조종기
1) 배터리 잔량 표시기가 순차적으로 깜박일 때까지 기체의 전원
버튼을 길게 누릅니다 .
2) 조종기가 계속해서 신호음을 내고 배터리 잔량 표시기가 순차
적으로 깜박일 때까지 조종기의 전원 버튼을 길게 누릅니다 .
3) 성공적으로 연동되면 조종기가 깜박임을 중단하고 두 배터리
잔량 표시기가 모두 켜지며 배터리 잔량을 표시합니다 .
기체를
고글과
먼저
연동한
후
조종기와
연동해야
합니다
.
Koppeln
Stell sicher, dass alle Geräte eingeschaltet sind.
a. Fluggerät + Goggles
1) Drück die Kopplungstaste auf den Goggles. Die
Goggles piepsen kontinuierlich.
2) Halt den Einschaltknopf des Fluggeräts gedrückt, bis
die Akkustandanzeige blinkt.
3) Die Akkustandsanzeige auf dem Fluggerät leuchtet
ständig und zeigt den Akkustand an. Die Goggles hören
auf zu piepen, sobald sie erfolgreich gekoppelt wurden
und die Videowiedergabe normal angezeigt wird.
b. Fluggerät + Fernsteuerung
1) Halt den Einschaltknopf des Fluggeräts gedrückt, bis
die Akkustandanzeige blinkt.
2) Halt den Einschaltknopf der Fernsteuerung
gedrückt, bis diese kontinuierlich piepst und die
Akkustandsanzeige blinkt.
3) Die Fernbedienung hört auf zu piepsen, wenn die
Verbindung erfolgreich hergestellt wurde und die
beiden Akkustandsanzeigen leuchten ständig und

7
zeigen den Akkustand an.
Das Fluggerät muss mit den Goggles vor der Fernsteuerung
verbunden werden.
Vinculación
Asegúrese de que todos los dispositivos estén encendidos.
a. Aeronave + Gafas
1) Presione el botón de enlace en las gafas. Las gafas
emitirán un pitido continuo.
2) Mantenga presionado el botón de encendido de la
aeronave hasta que el indicador del nivel de batería
parpadee en secuencia.
3) El indicador del nivel de batería de la aeronave se
vuelve fijo y muestra el nivel de batería. Las gafas
dejarán de pitar cuando se enlacen correctamente y la
visualización del vídeo sea normal.
b. Aeronave + Control remoto
1) Mantenga presionado el botón de encendido de la
aeronave hasta que el indicador del nivel de batería
parpadee en secuencia.
2) Mantenga presionado el botón de encendido del
control remoto hasta que emita un pitido continuo y el
indicador del nivel de batería parpadee en secuencia.
3) El control remoto deja de pitar cuando se conecta
correctamente y ambos indicadores del nivel de batería
se vuelven jos y muestran el nivel de batería.
La aeronave debe vincularse a las gafas antes que el control
remoto.
Appairage
Assurez-vous que tous les dispositifs sont sous tension.
a. Appareil + Casque
1) Appuyez sur le bouton d’appairage du casque. Le
casque émet alors un bip continu.
2) Maintenez le bouton d’alimentation de l’appareil
enfoncé jusqu’à ce que l’indicateur de niveau de
batterie clignote en séquence.
3) L’indicateur de niveau de batterie de l’appareil brille
de façon continue et affiche le niveau de batterie.
Le casque cessent de biper lorsqu’il est appairé et
8
l’afchage vidéo est normal.
b. Appareil + Radiocommande
1) Maintenez le bouton d’alimentation de l’appareil
enfoncé jusqu’à ce que l’indicateur de niveau de
batterie clignote en séquence.
2) Maintenez le bouton d’alimentation de la
radiocommande enfoncé jusqu’à ce qu’elle émette un
bip continu et que l’indicateur de niveau de batterie
clignote en séquence.
3) La radiocommande arrête de biper quand elle est
correctement appairée et que l’indicateur du niveau de
batterie passe au xe et afche le niveau de batterie.
L’appareil doit être appairé au casque avant la radiocommande.
Collegamento
Accertarsi che tutti i dispositivi siano accesi.
a. Aeromobile + visore
1) Premere il pulsante di collegamento sul visore. Il visore
emetterà un bip continuo.
2) Premere e tenere premuto il pulsante di accensione
dell’aeromobile fino a quando l’indicatore del livello
della batteria lampeggia in sequenza.
3) L’indicatore del livello della batteria dell’aeromobile si
illumina di luce ssa e visualizza il livello della batteria.
Gli occhiali smetteranno di lampeggiare quando
collegati correttamente e la visualizzazione delle
immagini si stabilizza.
b. Aeromobile + radiocomando
1) Premere e tenere premuto il pulsante di accensione
dell’aeromobile fino a quando l’indicatore del livello
della batteria lampeggia in sequenza.
2) Premere e tenere premuto il pulsante di accensione sul
radiocomando no a quando emette un bip continuo
e l’indicatore del livello della batteria lampeggia in
sequenza.
3) Il radiocomando smette di emettere il bip una volta
eseguito il collegamento ed entrambi gli indicatori
del livello della batteria si illuminano di luce fissa e
visualizzano il livello della batteria.
È necessario collegare l’aeromobile al visore prima del
radiocomando.
9
Koppelen
Zorg ervoor dat alle apparaten zijn ingeschakeld.
a. Drone + bril
1) Druk op de verbindingsknop op de bril. De bril piept
continu.
2) Druk en houd de aan-/uitknop van de drone ingedrukt
totdat de indicator van de accu in volgorde knippert.
3) De indicator voor het accuniveau van de drone brandt
constant en geeft het accuniveau weer. De bril stopt
met piepen wanneer deze met succes is gekoppeld en
het videoscherm normaal is.
b. Drone + afstandsbediening
1) Druk en houd de aan-/uitknop van de drone ingedrukt
totdat de indicator van de accu in volgorde knippert.
2) Druk en houd de aan-/uitknop van de afstandsbediening
ingedrukt totdat deze continu piept en de indicator voor
het accuniveau op volgorde knippert.
3) De afstandsbediening stopt met piepen wanneer deze
met succes is gekoppeld. Beide indicatoren voor het
accuniveau worden constant en geven het accuniveau
weer.
De drone moet vóór de afstandsbediening met de bril worden
gekoppeld.
Ligação
Assegure-se de que todos os dispositivos estão ligados.
a. Aeronave + Goggles
1) Prima o botão de ligação nos goggles. Os goggles
emitirão um sinal sonoro contínuo.
2) Prima e mantenha premido o botão de alimentação
da aeronave até que o indicador de nível de bateria
pisque sequencialmente.
3) O indicador de nível da bateria da aeronave ca sólido
e mostra o nível da bateria. Os óculos param de emitir
sinais sonoros quando ligados com êxito e o visor de
vídeo é normal.
b. Aeronave + Telecomando
1) Prima e mantenha premido o botão de alimentação
da aeronave até que o indicador de nível de bateria
pisque sequencialmente.
10
2) Prima e mantenha premido o botão do telecomando
até emitir um sinal sonoro contínuo e o indicador do
nível da bateria piscar em sequência.
3) O telecomando deixa de emitir um sinal sonoro quando
for ligado com êxito e ambos os indicadores do nível de
bateria carem sólidos e mostrarem o nível da bateria.
A aeronave tem de ser ligada aos goggles antes do
telecomando.
Vinculação
Verique se todos os dispositivos estão ligados.
a. Aeronave + óculos
1) Pressione o botão de vinculação nos óculos. Os óculos
emitirão um sinal sonoro contínuo.
2) Mantenha pressionado o botão liga/desliga da
aeronave até que o indicador de nível da bateria pisque
em sequência.
3) O indicador de nível da bateria da aeronave ficará
aceso e exibirá o nível da bateria. Os óculos de
proteção param de emitir sinal sonoro quando forem
vinculados com êxito e a exibição do vídeo for normal.
b. Aeronave + controle remoto
1) Mantenha pressionado o botão liga/desliga da
aeronave até que o indicador de nível da bateria pisque
em sequência.
2) Mantenha pressionado o botão liga/desliga do controle
remoto até ouvir um bipe contínuo e o indicador de
nível da bateria piscar em sequência.
3) O controle remoto vai parar de emitir sinal sonoro
quando vinculado com êxito e os dois indicadores de
nível da bateria carem acesos e exibirem o nível da
bateria.
A aeronave deve ser vinculada aos óculos antes do controle
remoto.
Сопряжение
Убедитесь, что все устройства включены.
а. Дрон + очки
1) Нажмите кнопку сопряжения на очках. Устройство
начнет издавать непрерывный звуковой сигнал.
11
2) Нажмите и удерживайте кнопку питания дрона до тех
пор, пока индикатор уровня заряда аккумулятора не
начнет последовательно мигать.
3) Индикатор уровня заряда аккумулятора дрона
начнет светиться и отобразит его оставшийся заряд.
Очки перестанут издавать звуковой сигнал при
успешном сопряжении, а изображение на экране
нормализуется.
б. Дрон + пульт управления
1) Нажмите и удерживайте кнопку питания дрона, пока
индикатор уровня заряда не начнет последовательно
мигать.
2) Нажмите и удерживайте кнопку питания пульта
управления, пока устройство не начнет издавать
непрерывный звуковой сигнал, а индикатор уровня
заряда аккумулятора – последовательно мигать.
3) Звуковой сигнал пульта управления прекратится
после успешного сопряжения, индикатор уровня
заряда аккумулятора начнет светиться и отобразит
оставшийся заряд.
Дрон сначала должен быть сопряжен сначала с очками,
а затем с пультом управления.
6
DJI Fly
App
Connect the USB-C port of the goggles to the mobile
device, run DJI Fly, and follow the prompt to activate.
 Loading…
Загрузки
Приложения
![]()
DJI Fly
Благодаря интуитивно понятному интерфейсу приложения DJI Fly им легко пользоваться. Приложение совместимо сDJI Mini 4 Pro, DJI Air 3, DJI Mavic 3 Pro, DJI Mini 2 SE, DJI Mini 3, DJI Mavic 3 Classic, DJI Avata, DJI Mini 3 Pro, DJI Mavic 3, DJI Mini SE, DJI Air 2S, DJI FPV, DJI Mini 2, Mavic Air 2 и Mavic Mini.
Версия для iOS V 1.12.3
Требуется iOS 11.0 или более поздняя версия.
Рекомендуемые устройства
Версия для iOS V 1.12.3
Требуется iOS 11.0 или более поздняя версия.
iPhone 14 Pro Max, iPhone 14 Pro, iPhone 14 Plus, iPhone 14, iPhone 13 Pro Max, iPhone 13 Pro, iPhone 13, iPhone 13 mini, iPhone 12 Pro Max, iPhone 12 Pro, iPhone 12, iPhone 12 mini, iPhone 11 Pro Max, iPhone 11 Pro, iPhone 11
Для более старых версий: Нажмите для загрузки.

Версия для Android V 1.12.3
Требуется Android 7.0 или более поздняя версия.
Рекомендуемые устройства
Версия для Android V 1.12.3
Требуется Android 7.0 или более поздняя версия.
Samsung Galaxy S21,Samsung Galaxy S20,Samsung Galaxy S10+,Samsung Galaxy S10,Samsung Galaxy Note20,Samsung Galaxy Note10+ ,Samsung Galaxy Note9,HUAWEI Mate40 Pro,HUAWEI Mate30 Pro,HUAWEI P40 Pro,HUAWEI P30 Pro,HUAWEI P30,Honor 50 Pro,Mi 11,Mi 10,Mi MIX 4,Redmi Note 10,OPPO Find X3,OPPO Reno 4,vivo NEX 3,OnePlus 9 Pro,OnePlus 9,Pixel 6,Pixel 4,Pixel 3 XL

Приложения
![]()
DJI Store
Используйте приложение DJI Store для покупки устройств DJI и получения информации о скидках.
Версия для iOS v6.8.6
Требуется iOS 12.0 или более поздняя версия.
Рекомендуемые устройства
Версия для iOS v6.8.6
Требуется iOS 12.0 или более поздняя версия.
iPhone 14 Pro Max、iPhone 14 Pro、iPhone 14、iPhone 13 Pro Max、iPhone 13 Pro、iPhone 13、iPhone 12 Pro Max、iPhone 12 Pro、iPhone 12、iPhone 11 Pro max、iPhone 11 Pro、iPhone 11、iPhone SE 2020、iPhone XS max、iPhone XS、iPhone XR、iPhone X、iPhone 8 Plus、iPhone 8.
Версия для Android v6.8.5
Требуется Android 7.0 или более поздняя версия.
Рекомендуемые устройства
Версия для Android v6.8.5
Требуется Android 7.0 или более поздняя версия.
Samsung Galaxy S21,Samsung Galaxy S20,Samsung Galaxy S10+,Samsung Galaxy S10,Samsung Galaxy Note20,Samsung Galaxy Note10+ ,Samsung Galaxy Note9,HUAWEI Mate40 Pro,HUAWEI Mate30 Pro,HUAWEI P40 Pro,HUAWEI P30 Pro,HUAWEI P30,Honor 50 Pro,Mi 11,Mi 10,Mi MIX 4,Redmi Note 10,OPPO Find X3,OPPO Reno 4,vivo NEX 3,OnePlus 9 Pro,OnePlus 9,Pixel 6,Pixel 4,Pixel 3 XL
*Поддержка остальных устройств находится в процессе разработки и доступна в тестовом режиме.

Программное обеспечение и драйверы
![]()
DJI Assistant 2 (серия потребительских беспилотных летательных аппаратов)
Поддержка потребления серии беспилотных летательных аппаратов, включая серию mavic.
-
Версия для Mac V2.1.20
2023-09-25
-
Версия для Windows V2.1.20
2023-09-25
-
DJI Assistant 2 (серия потребительских беспилотных летательных аппаратов) Пояснительная записка V2.1.20
2023-09-25
Документация
-
DJI FPV — Пояснительная записка
2022-09-08
-
DJI FPV — Руководство пользователя v1.2
2021-06-15
-
DJI FPV — Краткое руководство v1.2
2021-03-02
-
DJI FPV — Заявление об отказе от ответственности и руководство по технике безопасности v1.2
2021-03-02
-
DJI FPV DJI Motion Controller User Manual v1.0
2021-03-31
-
DJI FPV Drone User Guide
2021-03-02
-
DJI FPV Goggles V2 User Guide
2021-03-02
-
DJI FPV Remote Controller 2 User Guide
2021-03-02
-
DJI FPV DJI Motion Controller User Guide
2021-03-02
-
DJI FPV Руководство пользователя для защиты для пропеллеров
2021-03-02
-
DJI FPV Drone Arm Bracers User Guide
2021-03-02
-
DJI FPV Руководство пользователя для зарядного концентратора
2021-03-02
-
DJI FPV Руководство пользователя для автомобильного зарядного устройства
2021-03-02
dji Remote Controller 2 User Guide


Remote Controller 2


www.dji.com/dji-fpv/video

Figure 1

Figure 3

Figure 4
Press once to check the battery level. Press, then press and hold to turn on/off.

Figure 5

Figure 6
Linking
Ensure that all devices are powered on.
a. Aircraft + Goggles 1)
- Press the link button on the goggles. The goggles will beep continually.
- Press and hold the power button of the aircraft until the battery level indicator blinks in sequence.
- The battery level indicator of the aircraft turns solid and displays the battery level. The goggles stop beeping when they are successfully linked and the video display is normal.
b. Aircraft + Remote Controller 1)
- Press and hold the power button of the aircraft until the battery level indicator blinks in sequence.
- Press and hold the power button of the remote controller until it beeps continually and the battery level indicator blinks in sequence.
- The remote controller stops beeping when successfully linked and both the battery level indicators turn solid and display the battery level.
 The aircraft must be linked with the goggles before the remote controller.

Figure 7
Connect the USB-C port of the goggles to the mobile device, run DJI Fly, and follow the prompt to activate.
Disclaimer and Warning
Please read this entire document and all safe and lawful practices DJITM provided carefully before use. Failure to read and follow instructions and warnings may result in serious injury to yourself or others, damage to your DJI product, or damage to other objects in the vicinity. By using this product, you hereby signify that you have read this disclaimer and warning carefully and that you understand and agree to abide by the terms and conditions herein. You agree that you are solely responsible for your own conduct while using this product, and for any consequences thereof. DJI accepts no liability for damage, injury or any legal responsibility incurred directly or indirectly from the use of this product.
DJI is a trademark of SZ DJI TECHNOLOGY CO., LTD. (abbreviated as «DJI» ) and its affiliated companies. Names of products, brands, etc., appearing in this document are trademarks or registered trademarks of their respective owner companies. This product and document are copyrighted by DJI with all rights reserved. No part of this product or document shall be reproduced in any form without the prior written consent or authorization of DJI.
This document and all other collateral documents are subject to change at the sole discretion of DJI. For up to date product information, visit http://www.dji.com and click on the product page for this product. This disclaimer is available in various languages. In the event of divergence among different versions, the English version shall prevail.
Usage
Visit http://www.dji.com/dji-fpv (User Manual) to learn more about how to use this product.
Specifications
Model FC7BGC
Weight 346 g
Operating Frequency 2.400-2.4835 GHz; 5.725-5.850 GHz
Max Transmission
Distance (unobstructed, free
of interference) 10 km (FCC); 6 km (CE/SRRC/MIC)
Transmitter Power (EIRP)
5.8 GHz: 31.5 dBm (FCC), dBm (SRRC), dBm (CE)
2.4 GHz: 28.5 dBm (FCC), 20 dBm (CE/SRRC/MIC)
Operating Temperature -10° to 40° C (14° to 104° F)
Please refer to http://www.dji.com/service for after-sales service for your product where applicable. DJI shall mean SZ DJI TECHNOLOGY CO., LTD. and/or its affiliated companies where applicable.
Compliance Information
FCC Compliance Notice This device complies with Part 15 of the FCC Rules. Operation is subject to the following two conditions: (1) This device may not cause harmful interference, and (2) This device must accept any interference received, including interference that may cause undesired operation. Any changes or modifications not expressly approved by the party responsible for compliance could void the user’s authority to operate the equipment. This equipment has been tested and found to comply with the limits for a Class B digital device, pursuant to part 15 of the FCC Rules. These limits are designed to provide reasonable protection against harmful interference in a residential installation. This equipment generates, uses and can radiate radio frequency energy and, if not installed and used in accordance with the instructions, may cause harmful interference to radio communications. However, there is no guarantee that interference will not occur in a particular installation. If this equipment does cause harmful interference to radio or television reception, which can be determined by turning the equipment off and on, the user is encouraged to try to correct the interference by one or more of the following measures:
—Reorient or relocate the receiving antenna
. —Increase the separation between the equipment and receiver
. —Connect the equipment into an outlet on a circuit different from that to which the receiver is connected.
—Consult the dealer or an experi+ced radio/TV technician for help. This equipment complies with FCC radiation exposure limits set forth for an uncontrolled environment. End user must follow the specific operating instructions for satisfying RF exposure compliance This transmitter must not be co-located or operating in conjunction with any other antenna or transmitter. The portable device is designed to meet the requirements for exposure to radio waves established by the Federal Communications Commission (USA). These requirements set a SAR limit of 1.6 W/kg averaged over one gram of tissue. The highest SAR value reported under this standard during product certification for use when properly worn on the body. ISED Compliance Notice This device contains licence-exempt transmitter(s)/receiver(s) that comply with Innovation, Science and Economic Development Canada’s licence-exempt RSS(s). Operation is subject to the following two conditions: (1)This device may not cause interference.(2)This device must accept any interference, including interference that may cause undesired operation of the device.
This equipment complies with RSS-102 radiation exposure limits set forth for an uncontrolled environment. This equipment should be installed and operated with minimum distance 20cm between the radiator and your body. This transmitter must not be co-located or operating in conjunction with any other antenna or transmitter.
This equipment complies with RSS-102 radiation exposure limits set forth for an uncontrolled environment. This equipment should be installed and operated with minimum distance 20cm between the radiator and your body. This transmitter must not be co-located or operating in conjunction with any other antenna or transmitter. This equipment complies with ISED radiation exposure limits set forth for an uncontrolled environment. End user must follow the specific operating instructions for satisfying RF exposure compliance This transmitter must not be co-located or operating in conjunction with any other antenna or transmitter.The portable device is designed to meet the requirements for exposure to radio waves established by the ISED. These requirements set a SAR limit of 1.6 W/kg averaged over one gram of tissue. The highest SAR value reported under this standard during product certification for use when properly worn on the body. .

Old electrical appliances must not be disposed of together with the residual waste, but have to be disposed of separately. The disposal at the communal collecting point via private persons is for free. The owner of old appliances is responsible to bring the appliances to these collecting points or to similar collection points. With this little personal effort, you contribute to recycle valuable raw materials and the treatment of toxic substances.
Read More About This Manual & Download PDF:
Documents / Resources
tags: DJI, Remote Controller 2,
dji FPV Remote Controller 2 Руководство пользователя


www.dji.com/dji-fpv/видео


Нажмите один раз, чтобы проверить уровень заряда батареи. Нажмите, затем нажмите и удерживайте для включения / выключения.
Связывающий
Убедитесь, что все устройства включены.
а. Самолет + очки

- Нажмите кнопку ссылки на очках. Очки будут постоянно издавать звуковой сигнал.
- Нажмите и удерживайте кнопку питания коптера, пока индикатор уровня заряда батареи не замигает последовательно.
- Индикатор уровня заряда аккумулятора коптера горит постоянно и отображает уровень заряда аккумулятора. Очки перестают подавать звуковой сигнал, когда они успешно подключены и видео отображается в нормальном состоянии.
б. Самолет + пульт дистанционного управления

- Нажмите и удерживайте кнопку питания коптера, пока индикатор уровня заряда батареи не замигает последовательно.
- Нажмите и удерживайте кнопку питания на пульте дистанционного управления, пока он не подаст непрерывный звуковой сигнал, а индикатор уровня заряда батареи не начнет мигать последовательно.
- После успешного подключения пульт дистанционного управления перестает подавать звуковой сигнал, и оба индикатора уровня заряда батареи горят непрерывно и отображают уровень заряда батареи.
 Дрон должен быть соединен с очками до пульта дистанционного управления.

Подключите порт USB-C очков к мобильному устройству, запустите DJI Fly и следуйте инструкциям для активации.
Заявление об ограничении ответственности и предупреждение
Перед использованием внимательно прочтите этот документ и все безопасные и законные методы, которые предоставляет DJITM. Несоблюдение инструкций и предупреждений и их несоблюдение может привести к серьезным травмам для вас или окружающих, повреждению вашего продукта DJI или повреждению других объектов поблизости. Используя этот продукт, вы тем самым подтверждаете, что внимательно прочитали этот отказ от ответственности и предупреждение, а также что вы понимаете и соглашаетесь соблюдать приведенные здесь положения и условия. Вы соглашаетесь с тем, что несете единоличную ответственность за свое поведение при использовании этого продукта и за любые его последствия. DJI не несет ответственности за ущерб, травмы или любую юридическую ответственность, понесенные прямо или косвенно в результате использования этого продукта.
DJI является товарным знаком SZ DJI TECHNOLOGY CO., LTD. (сокращенно «DJI») и ее дочерних компаний. Названия продуктов, брендов и т. Д., Встречающиеся в этом документе, являются товарными знаками или зарегистрированными товарными знаками соответствующих компаний-владельцев. Авторские права на этот продукт и документ принадлежат DJI, все права защищены. Никакая часть этого продукта или документа не может быть воспроизведена в какой-либо форме без предварительного письменного согласия или разрешения DJI.
Этот документ и все другие дополнительные документы могут быть изменены по усмотрению DJI. Для получения последней информации о продукте посетите http://www.dji.com и щелкните на странице продукта для этого продукта.
Этот отказ от ответственности доступен на разных языках. В случае расхождения между различными версиями, английская версия имеет преимущественную силу.
Применение
Войти http://www.dji.com/dji-fpv (Руководство пользователя), чтобы узнать больше о том, как использовать этот продукт.
Характеристики


Пожалуйста, обратитесь к http://www.dji.com/service для послепродажного обслуживания вашего продукта, если применимо.
DJI означает SZ DJI TECHNOLOGY CO., LTD. и / или его
аффилированные компании, если применимо.
Информация о соответствии
Уведомление о соответствии требованиям FCC
Это устройство соответствует требованиям части 15 правил FCC. Эксплуатация возможна при соблюдении следующих двух условий: (1) это устройство не может создавать вредных помех, и (2) это устройство должно принимать любые принимаемые помехи, включая помехи, которые могут вызвать нежелательную работу. Любые изменения или модификации, прямо не одобренные стороной, ответственной за соответствие, могут лишить пользователя права на эксплуатацию оборудования.
Это оборудование было протестировано и признано соответствующим ограничениям для цифровых устройств класса B в соответствии с частью 15 правил FCC. Эти ограничения разработаны для обеспечения разумной защиты от вредных помех при установке в жилых помещениях. Это оборудование генерирует, использует и может излучать радиочастотную энергию и, если оно установлено и используется не в соответствии с инструкциями, может создавать вредные помехи для радиосвязи. Однако нет гарантии, что помехи не возникнут при конкретной установке. Если это оборудование действительно создает недопустимые помехи для приема радио или телевидения, что можно определить путем включения и выключения оборудования, пользователю рекомендуется попытаться устранить помехи одним или несколькими из следующих способов:
-Изменить ориентацию или местоположение приемной антенны.
-Увеличьте расстояние между оборудованием и приемником.
–Подключить оборудование к розетке в цепи, отличной от той, к которой подключен приемник.
— Обратиться за помощью к дилеру или опытному специалисту по радио / телевидению.
Это оборудование соответствует ограничениям FCC на радиационное воздействие, установленным для неконтролируемой среды. Конечный пользователь должен следовать конкретным инструкциям по эксплуатации, чтобы обеспечить соответствие требованиям по воздействию радиочастотного излучения. Этот передатчик не должен располагаться рядом или работать вместе с какой-либо другой антенной или передатчиком.
Портативное устройство разработано с учетом требований к воздействию радиоволн, установленных Федеральной комиссией по связи (США). Эти требования устанавливают предел SAR в 1.6 Вт / кг, усредненный на один грамм ткани. Наивысшее значение SAR, указанное в соответствии с этим стандартом при сертификации продукта для использования при правильном ношении на теле.
Уведомление о соответствии ISED
Это устройство содержит не требующие лицензии передатчик (и) / приемник (и), которые соответствуют не требующим лицензии RSS Канады в области инноваций, науки и экономического развития. Эксплуатация возможна при соблюдении следующих двух условий: (1) Это устройство не должно вызывать помех. (2) Это устройство должно принимать любые помехи, включая помехи, которые могут вызвать нежелательную работу устройства.
Это оборудование соответствует ограничениям на радиационное воздействие RSS-102, установленным для неконтролируемой среды. Это оборудование следует устанавливать и эксплуатировать на минимальном расстоянии 20 см между радиатором и вашим телом. Этот передатчик не должен располагаться рядом или работать вместе с какой-либо другой антенной или передатчиком.
Это оборудование соответствует ограничениям на радиационное воздействие ISED, установленным для неконтролируемой среды. Конечный пользователь должен следовать конкретным инструкциям по эксплуатации, чтобы обеспечить соответствие требованиям по воздействию радиочастотного излучения. Этот передатчик не должен располагаться рядом или работать вместе с какой-либо другой антенной или передатчиком. Портативное устройство разработано с учетом требований к воздействию радиоволн, установленных ISED.
Эти требования устанавливают предел SAR в 1.6 Вт / кг, усредненный на один грамм ткани. Наивысшее значение SAR, указанное в соответствии с этим стандартом во время сертификации продукта для использования при правильном ношении на теле.
![]()
Заявление о соответствии требованиям ЕС: SZ DJI TECHNOLOGY CO., LTD. настоящим заявляет, что это устройство соответствует основным требованиям и другим соответствующим положениям Директивы 2014/53 / EU. Копия декларации соответствия ЕС доступна на сайте www.dji.com/eurocompliance
Заявление о соответствии требованиям: SZ DJI TECHNOLOGY CO., LTD. настоящим заявляет, что это устройство соответствует основным требованиям и другим соответствующим положениям Регламента по радиооборудованию 2017 года. Копия Декларации соответствия Великобритании доступна в Интернете по адресу www.dji.com/eurocompliance
Экологически чистая утилизация![]() Старые электроприборы нельзя утилизировать вместе с остаточными отходами, их следует утилизировать отдельно. Распоряжение на коммунальном пункте сбора через частных лиц осуществляется бесплатно. Владелец старой бытовой техники несет ответственность за ее доставку в эти или аналогичные пункты сбора. Этим небольшими личными усилиями вы вносите свой вклад в переработку ценного сырья и обработку токсичных веществ.
Старые электроприборы нельзя утилизировать вместе с остаточными отходами, их следует утилизировать отдельно. Распоряжение на коммунальном пункте сбора через частных лиц осуществляется бесплатно. Владелец старой бытовой техники несет ответственность за ее доставку в эти или аналогичные пункты сбора. Этим небольшими личными усилиями вы вносите свой вклад в переработку ценного сырья и обработку токсичных веществ.
![]()
DJI является товарным знаком DJI.
© DJI, 2021.Все права защищены.
Напечатано в Китае
Документы / Ресурсы
Рекомендации
Посмотреть инструкция для DJI FPV Remote Controller 2 бесплатно. Руководство относится к категории контроллеры, 1 человек(а) дали ему среднюю оценку 7.5. Руководство доступно на следующих языках: английский. У вас есть вопрос о DJI FPV Remote Controller 2 или вам нужна помощь? Задайте свой вопрос здесь
Главная
| DJI | |
| FPV Remote Controller 2 | |
| контроллер | |
| английский | |
| Руководство пользователя (PDF) |
Не можете найти ответ на свой вопрос в руководстве? Вы можете найти ответ на свой вопрос ниже, в разделе часто задаваемых вопросов о DJI FPV Remote Controller 2.
Аккумулятор в моем устройстве контроллер начал ржаветь. Безопасно ли пользоваться устройством?
Инструкция DJI FPV Remote Controller 2 доступно в русский?
Не нашли свой вопрос? Задайте свой вопрос здесь
Загрузки
Приложения
![]()
DJI Fly
Благодаря интуитивно понятному интерфейсу приложения DJI Fly им легко пользоваться. Приложение совместимо с DJI Mavic 3 Pro, DJI Mini 2 SE, DJI Mini 3, DJI Mavic 3 Classic, DJI Avata, DJI Mini 3 Pro, DJI Mavic 3, DJI Mini SE, DJI Air 2S, DJI FPV, DJI Mini 2, Mavic Air 2 и Mavic Mini.
Версия для iOS V 1.10.6
Требуется iOS 11.0 или более поздняя версия.
Рекомендуемые устройства
Версия для iOS V 1.10.6
Требуется iOS 11.0 или более поздняя версия.
iPhone 14 Pro Max, iPhone 14 Pro, iPhone 14 Plus, iPhone 14, iPhone 13 Pro Max, iPhone 13 Pro, iPhone 13, iPhone 13 mini, iPhone 12 Pro Max, iPhone 12 Pro, iPhone 12, iPhone 12 mini, iPhone 11 Pro Max, iPhone 11 Pro, iPhone 11
Для более старых версий: Нажмите для загрузки.
Версия для Android V 1.10.6
Требуется Android 7.0 или более поздняя версия.
Рекомендуемые устройства
Версия для Android V 1.10.6
Требуется Android 7.0 или более поздняя версия.
Samsung Galaxy S21,Samsung Galaxy S20,Samsung Galaxy S10+,Samsung Galaxy S10,Samsung Galaxy Note20,Samsung Galaxy Note10+ ,Samsung Galaxy Note9,HUAWEI Mate40 Pro,HUAWEI Mate30 Pro,HUAWEI P40 Pro,HUAWEI P30 Pro,HUAWEI P30,Honor 50 Pro,Mi 11,Mi 10,Mi MIX 4,Redmi Note 10,OPPO Find X3,OPPO Reno 4,vivo NEX 3,OnePlus 9 Pro,OnePlus 9,Pixel 6,Pixel 4,Pixel 3 XL
Программное обеспечение и драйверы
![]()
DJI Assistant 2 (серия потребительских беспилотных летательных аппаратов)
Поддержка потребления серии беспилотных летательных аппаратов, включая серию mavic.
-
Версия для Mac V2.1.18
2023-04-25
-
Версия для Windows V2.1.18
2023-04-25
-
DJI Assistant 2 (серия потребительских беспилотных летательных аппаратов) Пояснительная записка V2.1.18
2023-04-25
Документация
-
DJI FPV — Пояснительная записка
2022-09-08
-
DJI FPV — Руководство пользователя v1.2
2022-01-12
-
DJI FPV — Краткое руководство v1.2
2021-03-02
-
DJI FPV — Заявление об отказе от ответственности и руководство по технике безопасности v1.2
2021-03-02
-
DJI FPV DJI Motion Controller User Manual v1.0
2021-03-31
-
DJI FPV Drone User Guide
2021-03-02
-
DJI FPV Goggles V2 User Guide
2021-03-02
-
DJI FPV Remote Controller 2 User Guide
2021-03-02
-
DJI FPV DJI Motion Controller User Guide
2021-03-02
-
DJI FPV Руководство пользователя для защиты для пропеллеров
2021-03-02
-
DJI FPV Drone Arm Bracers User Guide
2021-03-02
-
DJI FPV Руководство пользователя для зарядного концентратора
2021-03-02
-
DJI FPV Руководство пользователя для автомобильного зарядного устройства
2021-03-02
Similar to dji FPV Remote Controller 2 Manuals, User Guides and Instructions:
-
BroadLink RC10
I. Introduction RC10 is a mini wireless remote control with 4 buttons. As an important part of Kaipule wireless alarm host, it has the functions of panic button & household host remote control. With novel design & unique emitter with 4 buttons, it is convenient to carry and can be regarded as a decoration. …
RC10 Remote Control, 2
-
Meyer Sound Galileo 616
QUICK START GUIDE1INTEGRATION TOOLSGalileo™ 616 Remote Computer ControlTo control the Galileo 616 remotely from a computer:1. Attach the Galileo 616 to the computer’s Ethernet port.2. Configure the computer’s network settings. 3. Configure the Galileo 616’s network settings.4. Launch and configure the Compass c …
Galileo 616 Remote Control, 8
-
DoorHan KEYSWITCH
Ключ-кнопка KEYSWITCH используется для подачи управляющей команды на блок управления приводом. Наличие микропереклю-чателя позволяет посылать один …
KEYSWITCH Remote Control, 2
-
HumanTechnik lisa
DBedienungsanleitungFunk-Türklingelsender galvanischSeite 2GBOperating InstructionsDoorbell transmitter direct connectionPage 8FMode d’emploiÉmetteur galvanique de sonnette de portePage 14NLGebruiksaanwijzingDraadloze galvanische deurbelzenderPagina 20IIstruzioni per l’usoTrasmettitore galvanico del campanello di …
lisa Kitchen Appliances, 40
-
TELECO AUTOMATION TVPRP868A01
DateCode Number: Series Model number DraftTVLink RS868 T246.04 23-02-2011TVPRP868A01 TELECOAUTOMATIONSRL- …
TVPRP868A01 Remote Control, 8
-
Cisco Smart+Connected Remote 250
Americas Headquarters:Cisco Systems, Inc., 170 West Tasman Drive, San Jose, CA 95134-1706 USACisco Smart+Connected Remote 250 Reference GuideThis document includes the following information about the Cisco Smart+Connected Remote 250: • Introduction, page 2 • Install and Maintain the Disposable the Batteries, pag …
Smart+Connected Remote 250 Remote Control, 18

The DJI FPV Drone Combo provides a high-octane and immersive flight experience.
This tutorial blog will teach you about setting up the FPV drone, goggles, and remote controller, and how to work the basic operating functions to get you in the air quickly and safely.
Want to know more about the DJI FPV drone? Then read our hands-on review. To find out more about the DJI Motion Controller, which can be used to control the drone with your hand movements, read our Guide To The Motion Controller.
How To Set Up The DJI FPV Drone
- Open the microSD card cover and insert a microSD card.

TIP: A microSD card is required to save videos in high definition. RockSteady stabilisation is only available for recorded footage, but not for the live view of the goggles.
- Remove the gimbal cover.
- Ensure the propellers are properly attached. Align the propeller on the motor, then press down and rotate to secure them.
TIP: Attach the propellers with red rings in the centre to the motors with red rings, and attach the ones without red rings to the corresponding motors.
- Insert the battery into the battery compartment. Make sure it is secured in place.


How To Set Up The DJI FPV Goggles V2
- The front of the DJI FPV Goggles V2 has four replaceable antennas to ensure optimum signal receiving and communication. Ensure the antennas are properly tightened before flying.
- On the upper right side of the goggles you will find the Shutter/Record button, Back button, and 5D button.
Toggle the 5D button to scroll through the menu and press to confirm a selection.
Toggle up to go back, and toggle down to move to the next option. Toggle right to shift menu options right, toggle left to shift menu options left.
- On the right side of the goggles you will find a Link button, Power Port, and Audio Port.
- The microSD card slot and USB-C port are on the left side. The USB-C port can be used to connect with smartphones via the OTG cable (included in the accessory box).
TIP: The goggles SD card only stores cached videos.
- On the bottom of the goggles you will find the IPD slider. You can adjust the interpupillary distance by moving the slider left or right. You can also purchase and install DJI FPV Goggles Corrective Lenses according to your visual needs.


How To Set Up The DJI FPV Remote Controller 2
- The DJI FPV Remote Controller 2 has a USB-C port in the middle that can be used for charging, or to connect to a computer for firmware updates.
- Control stick slots are located on both sides of the remote controller.
- On the front side of the remote controller you can find the customisable C1 button, Lanyard Attachment, and Power Button.
TIP: In S Mode, press the C1 button once to switch the roll-angle limit for the drone.
- Press the power button once to check the battery level. Press once and then hold for two seconds to power the remote controller on or off.
- The antenna is located on the top of the remote controller. Unfold the antenna during flight for optimum signal transmission.
- You will find the Flight Pause/RTH button, Flight Mode Switch, and Gimbal Dial on the left side.
- Press the Flight Pause/RTH button once while flying and the drone will stop and hover in place. Press the button and hold for two seconds and the drone will automatically return to home.
- The Flight Mode Switch button supports three modes: N (normal) Mode, S (sport) Mode, and M (manual) Mode.
TIP: M Mode is locked by default.
- Toggle the Gimbal Dial to the left and right to adjust the gimbal pitch.
- At the top of the controller you will find the customisable C2 Switch, Shutter/Record button, and Start/Stop button.
- The C2 Switch is set to control gimbal movements by default.
- You can also customise this button’s function by going to Setting->Control->Remote Controller on the goggles interface.
- Press the Shutter/Record button once to take a photo or to start or stop recording.
Press and hold the Shutter/Record button to switch between photo and video modes.


How To Download And Use The DJI Fly App
The DJI Fly app provides a live view of the aircraft camera, allows you to playback and download footage, and provides quick and easy firmware updates.
- Download the DJI Fly app by scanning the QR code on the DJI Fly download page of the official DJI website.
- You can also download DJI Fly on your mobile device’s app store.
- Make sure the goggles, remote controller, and the aircraft are all powered on and make sure all devices are linked successfully. Items in the Combo are linked automatically, but to read about linking, read our DJI FPV linking tutorial.
- Connect your mobile device to the goggles via the OTG cable and data cable.
- Launch the DJI Fly app on your mobile device, tap GO FLY at the bottom right corner…
…and you will be able to see a live view of the aircraft camera.
- Enter Album at the bottom left of the DJI Fly app home screen to view footage captured by the aircraft camera. You can select and download the footage to your mobile device.
Please note that footage from the goggles cannot be downloaded or played back through the DJI Fly app on your mobile device.


How To Activate The DJI FPV Drone
- Before using the battery for the first time, connect it to the charger for at least one minute to complete activation.
- Connect the goggles to the goggles battery.
- Remove the gimbal cover as well as the protective film on the gimbal camera.
- Press the aircraft power button once, then press and hold for two seconds to power on the aircraft.
- Power on the goggles and remote controller the same way.
- Connect the OTG cable via the USB-C port on the goggles and connect to your mobile device using a charging cable.
- After successfully linking the aircraft, goggles, and remote controller, open the DJI Fly App and follow instructions to complete activation.
TIP: The aircraft, goggles, and remote controller in the DJI FPV Combo are linked by default. If you have any linking issues, read our How To Link The DJI FPV Drone With The Goggles And Remote Controller tutorial.
- After activation, make sure you charge the intelligent flight battery, the remote controller, and the goggles battery.
Be sure to read the user manual carefully in order to be fully prepared for your first flight.


How To Update The Firmware On The DJI FPV Drone And Combo
- If one of the DJI FPV devices is not using the latest firmware, a prompt will appear in the top left corner of the DJI Fly app to remind users to update.
- Tap the prompt and the firmware will be updated automatically.
- You can also connect the device to a computer and update the firmware using DJI Assistant 2 (DJI FPV series).
- A complete update requires connecting the goggles, remote controller, and aircraft respectively to the computer.


DJI FPV Drone: Pre-flight Set-up
- For your first flight, we recommend choosing an open and unobstructed area.
- Check the battery level and place the drone on level ground. Remember, the drone should be facing outward with the rear side facing you.
TIP: To ensure safety, remove the drone propellers if you are practising indoors.
- Power on the drone.
- Check the battery level of the remote controller and power on.
- Set the remote controller to N Mode before takeoff.
- Check the battery level of the goggles, and power on.
TIP: Do not use the goggles battery to charge other devices.
- Adjust the headband and interpupillary distance for a clear, comfortable display.
- Check the screen interface and make sure no errors occur and GPS signal is sufficient. When you’re good to go, power on the motors of the drone by pushing the control sticks down and inward, then push the left stick up to ascend.


The RTH (Return to Home point) will be set after takeoff. Please remember the position of your home point.

DJI FPV Drone: Flight Modes and Basic Operation
Ensure the drone, goggles, and remote controller are linked before using the DJI FPV Combo.
N Mode
Ideal for new users, N Mode offers immersive flight with traditional drone flight controls along with DJI safety features like obstacle sensing.
- In N Mode, use the left control stick to adjust flight height and heading.
- Use the right control stick to fly the drone forward, backward, left, and right.
- When pushing the right stick to fly forward you can also push the left stick to the left or right for turning with customisable roll-angle limits.


In N Mode, the drone will only slow down when obstacles are detected. It will not stop and hover automatically. You will need to manually control the drone to stop or to bypass detected obstacles.

S Mode
Hybrid flight mode combining the freedom of flying manually with the simplified controls of previous DJI drones.
- After switching to S Mode, control logic will remain the same but the drone’s maximum flight speed will increase to 27 m/s. In S mode, obstacle sensing is disabled.
- S Mode also supports Cruise Control. Press the Start/Stop button to enter Cruise Control — ‘Cruise Control Enabled’.. Press again to exit — ‘Cruise Control Disabled’.
- Once Cruise Control is enabled, the drone will fly forward at a constant speed without any control stick movements. But you can also move the right control stick forward or backward to accelerate or decelerate.


M Mode
Fly in M (Manual) Mode for complete, limitless control and the full FPV flight experience. Customise parameters and enjoy flight and footage unlike anything else. Experience speeds in excess of 80mph.
- Press the 5D button of the goggles and enter the main menu, go to Setting > Control > Remote Controller > Button Customization > Custom Mode, and set to Manual mode.
- Open the rubber cover on the back of the remote controller behind the throttle stick and adjust the F1 and F2 screws with the screwdriver that comes in the box.
- Tighten the F1 screw to stop the control stick from auto recentering and increase its resistance.
- Tighten the F2 screw to reduce the resistance of the throttle stick.
- For users interested in M Mode flight, make sure you have watched the M Mode tutorial before flying…
…and have adequately practiced in the DJI Virtual Flight app in order to ensure a safe, controlled flight.
Please note that the DJI Virtual Flight app can be used to practice in all three modes. At the time of launch, the Virtual Flight app is only compatible with iOS devices. This may change in the future.


If an emergency occurs or you experience loss of orientation or control during flight in any mode, simply press the Flight Pause/RTH button and the drone will stop and hover in place.

Return to Home and Landing
- Press and hold the Flight Pause/RTH button to make the drone automatically return to home.
When returning to home, set the drone to N Mode and always keep an eye on the Home Point shown on screen.
Pay attention to the surrounding environment when landing. Due to the limitations of GPS precision there may be small deviations between the set home position and the actual landing location.
- You can press the Flight Pause/RTH button again to cancel Return to Home.


In order to avoid any burns caused by overheating, do not detach the propellers immediately after landing.

Safety Precautions
- If the drone is lost during flight but the camera view is still available go to the Find My Drone page and try to locate it on the map using the camera view along with flashes and beeps from the drone.
- If the camera view is not available you can locate your drone by comparing the coordinates on the Find My Drone page with the coordinates in your last flight log.

Click to find out more about the DJI FPV ecosystem, including additional accessories to maximise your flight fun.