


Артикул: YLI-12-638N-2
Посадите семена, идущие в комплекте, в этот яркий и красочный горшочек, не забывайте регулярно поливать и время от времени поглядывайте туда: ведь совсем скоро он жизнерадостно зазеленеет. Цвет: сиреневый. Вес: 47 г. Комплектация: горшок-фигурка — 1, семена — 2. Материал: пластик. Размер: 9x7x6 см. Упаковка: картонная коробка
Этот товар временно недоступен для заказа
Категории:
- Описание
- Отзывы
Обзор
- Посадите семена, идущие в комплекте, в этот яркий и красочный горшочек, не забывайте регулярно поливать и время от времени поглядывайте туда: ведь совсем скоро он жизнерадостно зазеленеет.
- Цвет: сиреневый.
- Вес: 47 г.
- Комплектация: горшок-фигурка — 1, семена — 2.
- Материал: пластик.
- Размер: 9x7x6 см.
- Упаковка: картонная коробка
Цвет или оттенок изделия на фотографии может отличаться от реального.
Магазин не несет ответственности за изменения, внесенные производителем.
Наличие товара может изменятся в течении дня. Информация на сайте имеет ознакомительный характер.
Актуальность наличия товара уточняйте у менеджеров нашего магазина.
С этим товаром также покупают

- Цена: $2.95
- Перейти в магазин
Понравилась мне идея со злой птицей — сразу заказал.
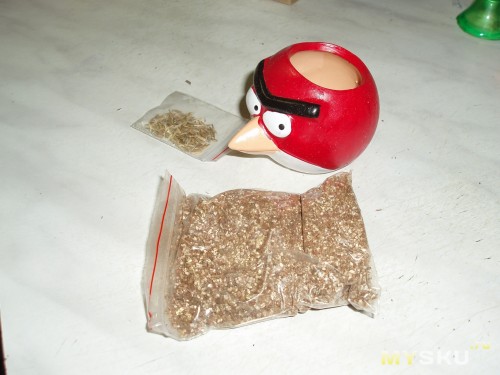
Особо описывать нечего: керамический горшок, пакетик грунта (странного содержания, цвета бронзы) и малюсенький пакетик семян.
Было в картонной коробке, к счастью Почта РФ доставила без ущерба.
Как гласит инструкция на сайте: высыпать грунт, равно распределить семена, полить. В дальнейшем поливать каждые 2 дня.
Не совсем понял для чего на дне присутствует сквозное отверстие, в него вставил кусочек спички (с головкой), но все равно иногда сочиться влага.
Кстати, стенки толщиной примерно 4-5 мм, горшок получается увесистым для его небольших размеров.
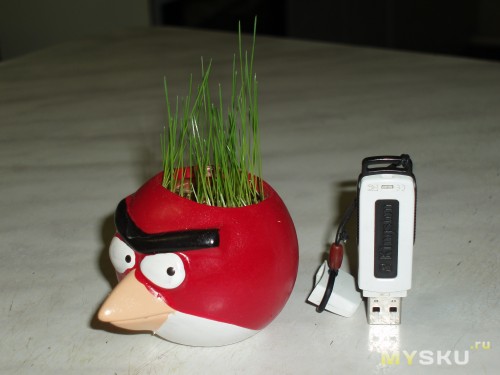
1 фото — комплект при получении, 2 фото — состояние на 7 день после посадки.
P.S. Из этой серии получил детские тапочки, все лень написать обзор…
Планирую купить
+15
Добавить в избранное
Обзор понравился
+5
+17
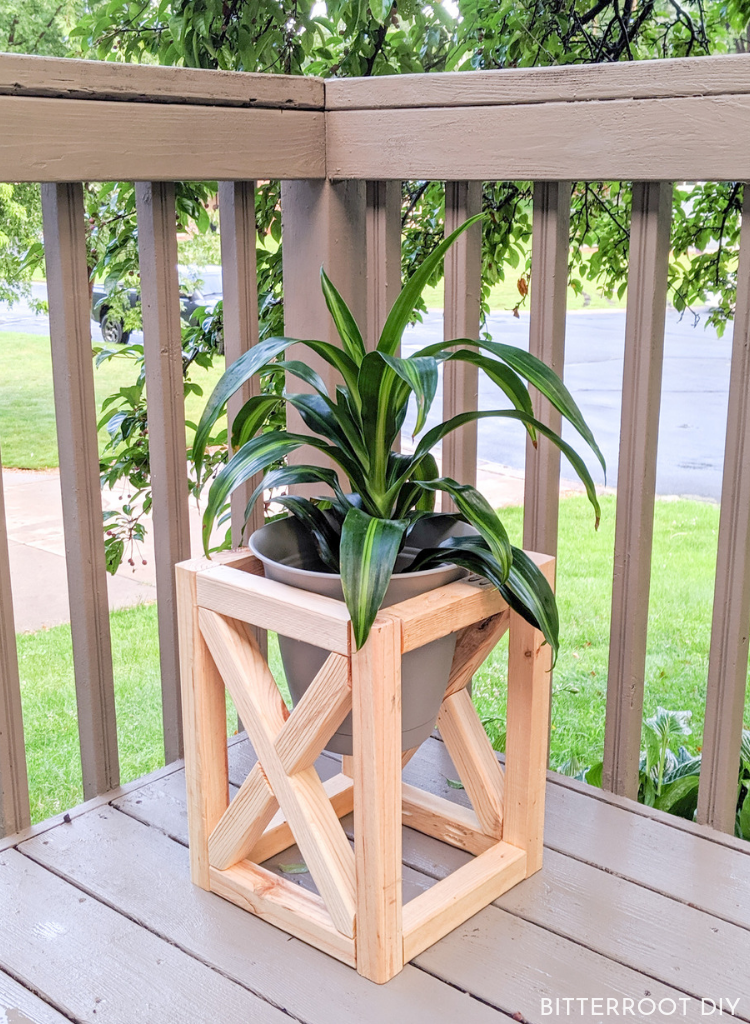
Build this DIY plant stand to showcase your favorite foliage.
This post may contain affiliate links. If you make a purchase from one of the links, I may make a small commission at NO EXTRA COST to you. This helps keep the tutorials and plans free here at Bitterroot DIY. Thank you for your support! See my full disclosure here.
I’m joining up again this month with a group of fellow DIY bloggers to bring you another At Home DIY challenge – this month is all about 2 hour projects! I put this DIY plant stand together during nap time the other day, so I think that qualifies (not including finishing and drying).
I used all “exterior” supplies for this plant stand – exterior poly, screws, and wood glue – so I could put it on our deck. If you plan to put it inside, use interior supplies instead.
This plant stand is 8 1/2″ wide and works with a 10″ planter pot. Adjust dimensions as necessary to fit different sized planters.
Enjoy the plans!
Tools & Supplies
- Miter Saw
- Drill
- Brad Nailer
- Kreg Pocket Hole Jig
- Orbital Sander
- Tape Measure
- Clamps
- Exterior Wood Glue
- Exterior Spar Urethane (I think it’s cheaper at Home Depot than Amazon, but that’s what it looks like)
- 2 1/2” Screws – Exterior Grade
- 2″ Finish Nails
- 1 1/4″ Finish Nails
- Level
- Speed Square
- Pencil
- Safety Glasses
- Ear Protection
Lumber:
- 3 | 2 x 2 @ 8′
Cuts:
- 4 | 2 x 2 @ 15″ (legs)
- 8 | 2 x 2 @ 8 1/2″ (supports)
- 4 | 2 x 2 cut to fit for the Xs (explained below)
Step 1.
Cut the boards to length and drill pocket holes in the ends of the horizontal support pieces
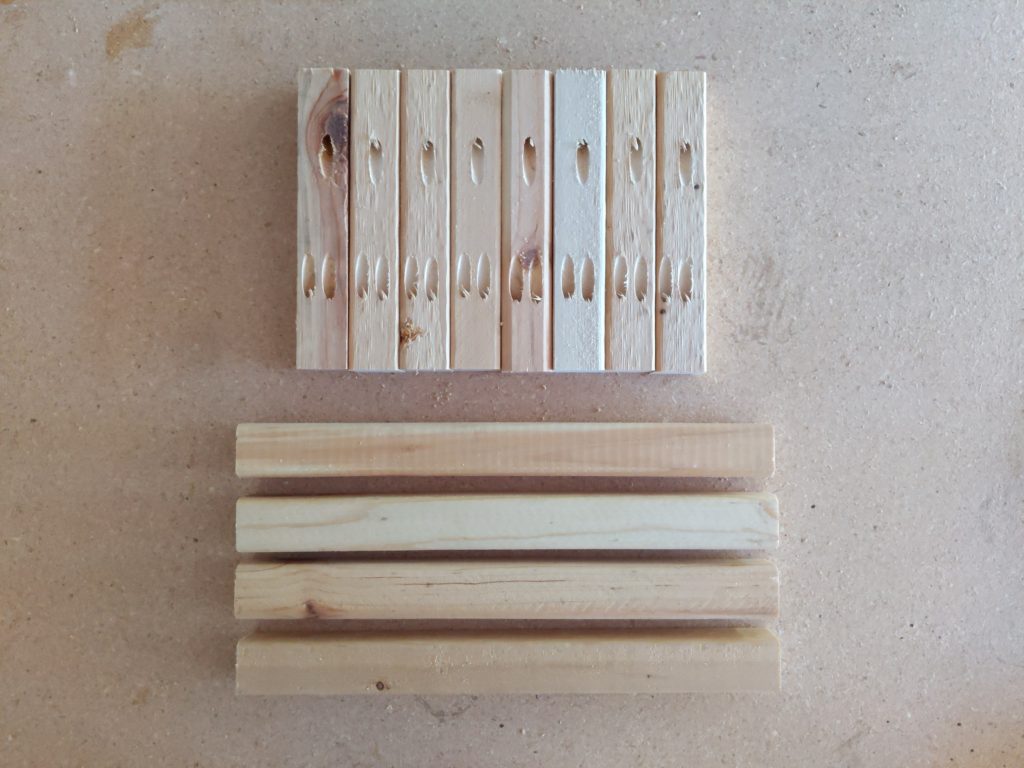
I drilled two pocket holes on one end and one on the other. Two pocket holes on one side prevents the board from twisting and the single just attaches the other side. You can drill two pocket holes in both sides for an extra secure joint, but, with smaller builds like this, I do the single on one side to save screws.
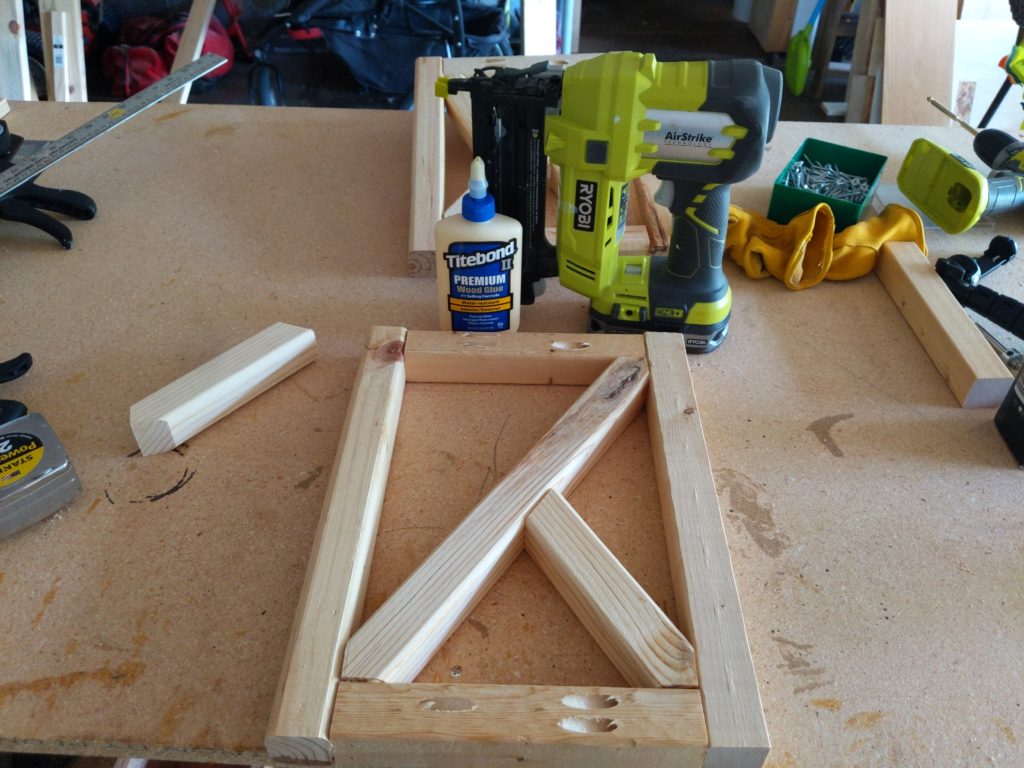
Step 2.
Assemble the two outside frames with wood glue and 2 1/2″ pocket hole screws.

Place pocket holes on the back of the frame to best hide them.

Step 3.
Measure and cut the Xs for both frames.
Start by marking the center-line of the 2×2:

Next, place the 2×2 under the first frame and line the center-line up with the two opposite corners.

Mark the angles in the corners with a pencil and use your miter saw to cut it to fit.

Repeat the same process for the opposing X.
Place the 2×2 under the frame with the first X in place. Align the center of the 2×2 with the opposite corners and mark the angles at both corners. Mark the center of the X intersection as well.

It’s a little difficult to see in the photo since I used a pencil, but there should be four lines to mark your cuts:

Cut the Xs to fit. It’s best to err’ on the side of caution when cutting the angles. You can always trim more off, but it’s difficult to fix things if you cut them too short.

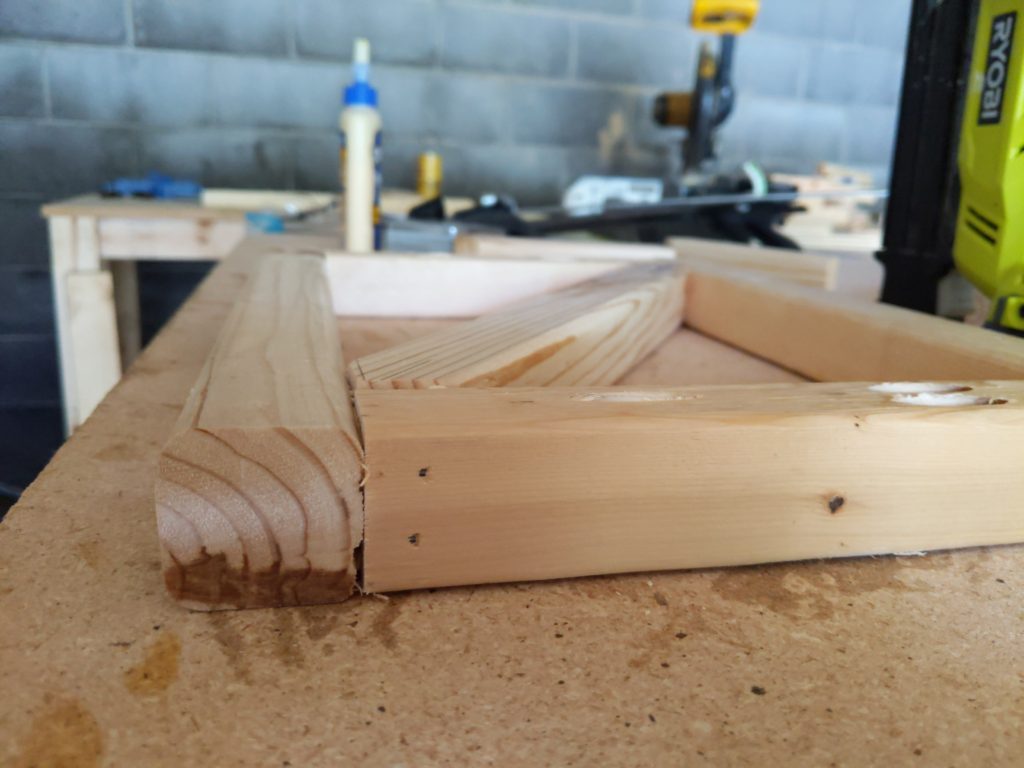
Step 4.
Attach the full-length X with wood glue and 2″ finish nails.
I drove nails into both sides – two through the legs and two through the horizontal supports.

Step 5.
Attach the short Xs with wood glue and finish nails.
Drive 2″ finish nails into the short Xs through the legs and horizontal supports.
Drive 1 1/4″ finish nails at an angle through the ends of the short Xs into the intersection with the full-length X.

Repeat for both frames.

Step 6.
Connect both frames together with the other horizontal supports along the bottom of the plant stand (it’s upside down in the photo).
Face the pocket holes toward the outside of the plant stand so you can get the drill in place to drive the screws.

Repeat for the top of the plant stand.

Once everything is attached, you should have a nice cube:

Fill the pocket holes with wood filler or wood plugs and let the glue (and/or filler) dry.
Sand and finish as desired. I left my plant stand the natural pine color and simply sealed it with exterior spar urethane.
Please let me know if you have any questions and I’ll get back to you as soon as possible!
Don’t forget to check out the rest of the 2-hour DIY ideas:
See more 2-Hour DIY Projects


Thanks for stopping by!
For more project ideas, you can find me on Pinterest. And to stay up to date with the latest shenanigans, follow me on Instagram.

By:
Jennifer Howell![]()
These DIY paper plant pots are inexpensive to make and biodegradable too!
DIY Plant Pots Are Easy to Make!
Trying to use less plastic when starting seeds? Make your own pots. This video shows a couple of DIY plant pots that use paper products you most likely have on hand. It’s a great way to recycle newspaper, bath tissue or paper towel rolls and other papers you might normally throw away. And you can plant your seedlings pot and all — these pots are biodegradable. Here are the instructions for a few different types of DIY paper plant pots.
You Might Also Like:
Roll With It…Or On It
Seed Starting Tips
7 Easy Plants to Start From Seed
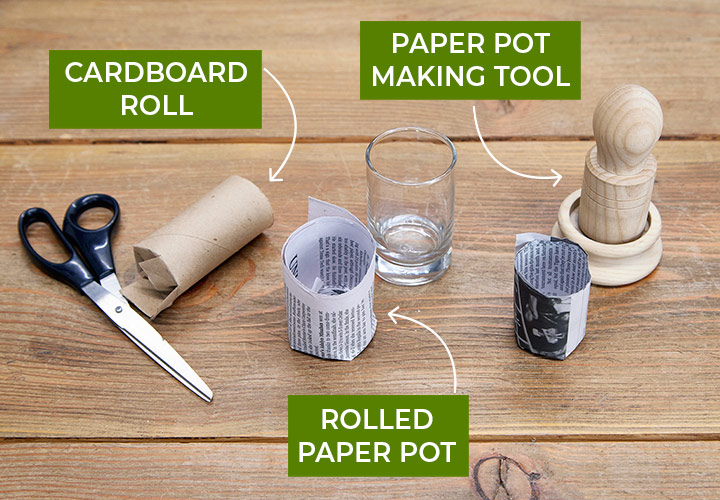
DIY rolled paper pot
1. Choose your paper Newspaper works best, since it will degrade fastest once planted in the ground. Paper sacks, notebook paper, packing paper and non-glossy advertising paper also work. Avoid papers with color printing and glossy finishes in case the inks and glues contain contaminants. Most newspaper print, laser printer and ink jet printer inks are considered garden-safe.
2. Cut paper strips Cut strips of paper about 3 1/2 inches wide. You can make strips wider or narrower, depending on the desired height of your pot. Strips should be at least 12 inches long, which will create a pot with two layers of paper for stability.
3. Choose a rolling form You can use almost anything with a 1- to 1 1/2-inch diameter as a form to roll your DIY paper plant pot. A drinking glass, vase, wooden dowel, spice jar, or pill bottle all work well, just make sure the sides are straight, not flared out.
4. Roll the paper Lay your rolling form down on a strip of paper, leaving about 1/2 to 3/4 inch hanging off the bottom edge. Roll the strip of paper over the form.
5. Fold the bottom Holding the loose end of the paper strip, pleat and fold the bottom of the paper over the flat bottom of the rolling form. This makes the bottom of your pot. Press the form down on a table to crease the folds and help make a flat bottom.
6. Slide out the pot Slide the paper off the form. The folded bottom should hold the layers of paper together in a pot shape.
7. Fill with potting mix Don’t worry if the pot doesn’t stand straight up when empty. Once it’s filled with moist potting mix it will stay upright, ready to plant.
8. Set and plant Set your DIY paper plant pot in a tray and plant your seeds. When seedlings are ready to plant outside, sink the whole pot into the soil, being sure to cover the top edge of the paper so it doesn’t wick moisture out of the pot. You can easily tear the moistened paper pots off the seedlings if you want, but roots will grow through the paper, so it isn’t necessary.
You Might Also Like:
Starting Seeds with Soil Blocking
Easy Setups for Starting Seeds Indoors
When to Start Seeds Indoors
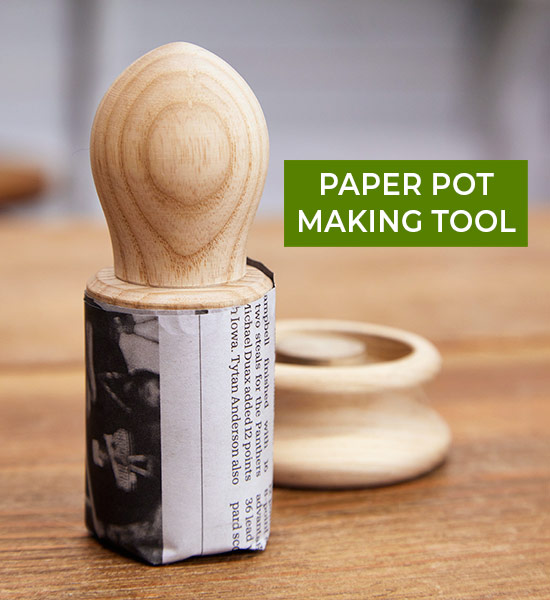
Try a paper pot making tool
Though you can use all kinds of forms to make a DIY paper plant pot, this tool makes it super easy. The sides are etched with lines to make it easy to roll the strips straight. The steps are the same until you get to folding the bottom of the pot. At the bottom of the rolling tool is an indentation that fits into a base, where you can press a better pot bottom that stands more straight than if you just use a glass or vase.
More Helpful Tools for DIY Plant Pots:
Paper pot making tool
Paper cutter
Germination Heat Mat
DIY plant pots from cardboard rolls
1. Collect cardboard rolls Spent paper towel, bath tissue and wrapping paper rolls make great DIY plant pots. The cardboard is durable but light enough to biodegrade.
2. Decide height Decide how tall you want your pots and cut the rolls accordingly. You will need to cut at least 1/2 to 3/4 inch longer than the desired height of your pot.
3. Make cuts Use a scissors to make 5 or 6 vertical cuts on one end of the roll. Cut 1/2 to 3/4 inch into the tube, making a tab. If it helps, draw a line around the roll to make sure you get all the cuts the right length (if they are uneven, the pot may not sit straight).
4. Fold tabs Fold the tabs formed by the cuts to the inside of the roll, overlapping as you go.
5. Press the bottom Press the newly formed pot on a table to flatten the bottom and crease the folds. Don’t worry if it doesn’t stand up perfectly straight, once filled with potting mix and moistened, it can be adjusted to stand better.
6. Plant seeds Plant seeds and water in. Cardboard rolls tend to dry quickly, so check for water daily and water when potting mix is dry.
7. Plant outside When seedlings are ready to move outside, plant pot and all in the ground, making sure to cover the top of the pot with soil. The cardboard pot will biodegrade over the course of the growing season. Moistened cardboard is easy to tear off if you would rather plant without the pot, which can then go in the compost pile.
Product Recommendations
Here are some supplies and tools we find essential in our everyday work in the garden. We may receive a commission from sales referred by our links; however, we
have carefully selected these products for their usefulness and quality.