

таунайс электросхема
инструкция на мксм800
nokia x6 herjdjlcndj
инструкция стиральной машины kaiser w59 12te
инструкция к телефону huawei u8230
скачать мануал к rme fireface 400
unimo udr 71 инструкция
wd tv live инструкция
инструкция по учету и рациональному ее использованию
часы командирские восток руководство
инструкция пользователя телефон tve71
Белый кот Санкт-Петербург- это прежде всего как работать с программой salon styler чистота без химии подробнее… Что parsun razborka делать если ослепла собака? Качество британских кошек нашего питомника подтверждено высокими оценками инструкция по эксплуатации honda vt 250 отечественных и международных судей. Как выиграть бой с digitech rp7 руководство пользователя минимальными потерями для обеих сторон? Я хватаюсь за парня, что идет близ digitech rp7 руководство пользователя меня, с ним прохожу мимо собак к остановке. Таких великих властителей как digitech rp7 руководство пользователя у Лошади и Тигра у Собаки нет. Любит бегать и digitech rp7 руководство пользователя играть, очень подвижная и шустрая! Также смотреть бесплатно инструкция телефон нокиа х6 важно регулярно массировать кожу головы. Так же разработана бридинг-программа на ближайшие несколько лет, которая ростомер скачать включает вязки с импортными производителями китайских хохлатых. Мой питомник не видео инструкция по корг тритон студио большой и все кошки, живущие у меня дома, получают максимум любви и внимания. Детектив развивался холодильники донбасс инструкция по всем законом жанра и вылился в итоге интереснейшую развязку. Бегущая собака программа way4 инструкция — означает проигрыш в судебном процессе. Сегодня наш питомник представляет собой коллектив инструкция по разборке hp cp1515n единомышленников. Лучше плыть по течению, вятка автомат руководство чем делать резкие рывки и способствовать каким-либо переменам в своей жизни. Дрессировка digitech rp7 руководство пользователя собак для защиты хозяина. Можно ли digitech rp7 руководство пользователя волнистому попугайчику давать петрушку? Широчайший ассортимент товаров: бумага для скрапбукинга, бумажные и текстильные цветы и листья, штампы, штемпельные подушки, фигурные дыроколы и инструкция по пожарной безопасности для кафе образецц ножницы, наклейки, теги, натирки, ленточки, бордюры, шнуры, украшения из гипса, пластика, стразики, бусинки, брадсы и люверсы, металлические подвески, авторские наборы для аппликаций, наборы для скрапа, инструменты для резки, тиснения и вырубки бумаги, клеевые материалы.
The RP-7 Valve’s classic adjustable phase shifting effect is reminiscent of mid-70’s keyboard and guitar sounds.
Speed
Controls the speed of the phase sweep. Ranges from 0 to 100
Depth
Sets the sweep depth (intensity) of the phaser. Ranges from 0 to 100.
Regeneration
Controls the amount of phased sound fed back to the input of the Module. High regeneration settings
produce dramatic and interesting unnatural sounds. Ranges from 0 to 99.
Tremolo was one of the first real effects, and appeared mostly on early guitar amplifiers. Because of this, tremolo is sometimes perceived as
sounding “old” or “vintage”. The RP-7 Valve, breathes new life into this classic effect, providing totally transparent volume modulation of
sound sources.
Speed
Controls the tremolo speed (speed of modulation). Ranges from 0 to 100.
Depth
Adjusts the intensity of the tremolo effect. Ranges from 0 to 100.
trE (Tremolo)
Values
Displayed Values
Speed (EP2)
0 . . . 1 0 0
Depth (EP3)
0 . . . 1 0 0
PHAs (Phaser)
Values
Displayed Values
Speed (EP2)
0 . . . 1 0 0
Depth (EP3)
0 . . . 1 0 0
Regeneration
0 . . . 9 9
RP-7 Valve
User Guide
Section — 4 Effects and Parameters
15

Tube Preamp/Effects Processor & Controller
User’s Guide
Please visit Digitech Electronics on the World Wide Web at http://www.digitech.com

|
C A U T I O N |
|
RIS K O F ELECTRI C SHOCK |
|
D O NO T OPEN |
|
ATTENTION: RISQU E D E CHO C ELECTRIQU E — N E PA S OUVRIR |
WARNING: T O REDUC E TH E RIS K O F FIR E O R ELECTRIC SHOC K D O NO T EXPOS E THI S EQUIPMEN T T O RAI N O R MOISTURE
The symbols shown above are internationally accepted symbols that warn of potential hazards with electrical products.The lightning flash with arrowpoint in an equilateral triangle means that there are dangerous voltages present within the unit.The exclamation point in an equilateral triangle indicates that it is necessary for the user to refer to the owner’s manual.
These symbols warn that there are no user serviceable parts inside the unit. Do not open the unit. Do not attempt to service the unit yourself. Refer all servicing to qualified personnel. Opening the chassis for any reason will void the manufacturer’s warranty. Do not get the unit wet. If liquid is spilled on the unit, shut it off immediately and take it to a dealer for service. Disconnect the unit during storms to prevent damage.
WARNING
FOR YOUR PROTECTION, PLEASE READ THE FOLLOWING:
WATER AND MOISTURE: Appliance should not be used near water (e.g. near a bathtub, washbowl, kitchen sink, laundry tub, in a wet basement, or near a swimming pool, etc). Care should be taken so that objects do not fall and liquids are not spilled into the enclosure through openings.
POWER SOURCES: The appliance should be connected to a power supply only of the type described in the operating instructions or as marked on the appliance.
GROUNDING OR POLARIZATION: Precautions should be taken so that the grounding or polarization means of an appliance is not defeated.
POWER CORD PROTECTION: Power supply cords should be routed so that they are not likely to be walked on or pinched by items placed upon or against them, paying particular attention to cords at plugs, convenience receptacles, and the point where they exit from the appliance.
SERVICING: To reduce the risk of fire or electric shock, the user should not attempt to service the appliance beyond that described in the operating instructions. All other servicing should be referred to qualified service personnel.
FOR UNITS EQUIPPED WITH EXTERNALLY ACCESSIBLE FUSE RECEPTACLE: Replace fuse with same type and rating only.
U.K. MAINS PLUG WARNING
A moulded mains plug that has been cut off from the cord is unsafe. Discard the mains plug at a suitable disposal facility. NEVER UNDER ANY CIRCUMSTANCES
SHOULD YOU INSERT A DAMAGED OR CUT MAINS PLUG INTO A 13 AMP POWER SOCKET. Do not use the mains plug without the fuse cover in place. Replacement fuse covers can be obtained from your local retailer. Replacement fuses are 13 amps and MUST be ASTA approved to BS1362.
ELECTROMAGNETIC COMPATIBILITY
This unit conforms to the Product Specifications noted on the Declaration of Conformity. Operation is subject to the following two conditions:
•this device may not cause harmful interference, and
•this device must accept any interference received, including interference that may cause undesired operation. Operation of this unit within significant electromagnetic fields should be avoided.
•use only shielded interconnecting cables.
SAFETY INSTRUCTIONS
NOTICE FOR CUSTOMERS IF YOUR UNIT IS EQUIPPED WITH A POWER CORD.
WARNING: THIS APPLIANCE MUST BE EARTHED.
The cores in the mains lead are coloured in accordance with the following code:
|
GREEN and YELLOW — Earth |
BLUE — Neutral |
BROWN — Live |
As colours of the cores in the mains lead of this appliance may not correspond with the coloured markings identifying the terminals in your plug, proceed as follows:
•The core which is coloured green and yellow must be connected to the terminal in the plug marked with the letter E, or with the earth symbol, or coloured green, or green and yellow.
•The core which is coloured blue must be connected to the terminal marked N or coloured black.
•The core which is coloured brown must be connected to the terminal marked L or coloured red.
This equipment may require the use of a different line cord, attachment plug, or both, depending on the available power source at installation. If the attachment plug needs to be changed, refer servicing to qualified service personnel who should refer to the table below. The green/yellow wire shall be connected directly to the unit’s chassis.
|
CONDUCTOR |
WIRE COLOR |
||
|
L |
Line |
Brown |
Black |
|
N |
Neutral |
Blue |
White |
|
Earth Grnd. |
Green/Yel. |
Green |
|
WARNING: If the ground is defeated, certain fault conditions in the unit or in the system to which it is connected can result in full line voltage between chassis and earth ground. Severe injury or death can then result if the chassis and earth ground are touched simultaneously.
LITHIUM BATTERY WARNING
CAUTION!
This product may contain a lithium battery.There is danger of explosion if the battery is incorrectly replaced. Replace only with an Eveready CR 2032 or equivalent. Make sure the battery is installed with the correct polarity. Discard used batteries according to manufacturer’s instructions.
ADVARSEL!
Lithiumbatteri — Eksplosjonsfare.Ved utskifting benyttes kun batteri som anbefalt av apparatfabrikanten. Brukt batteri returneres apparatleverandøren.
ADVARSEL!
Lithiumbatteri — Eksplosionsfare ved fejlagtig håndtering. Udskiftning må kun ske med batteri av samme fabrikat og type. Levér det brugte batteri tilbage til leverandøren.
VAROITUS!
Paristo voi räjähtää, jos se on virheellisesti asennettu.Vaihda paristo ainoastaan laitevalmistajan suosittelemaan tyyppin. Hävitä käytetty paristo valmistajan ohjeiden mukaisesti.
VARNING!
Explosionsfara vid felaktigt batteribyte.Använd samma batterityp eller en ekvivalent typ som rekommenderas av apparattillverkaren. Kassera använt batteri enligt fabrikantens instruktion.

RP-7 Valve
|
DECLARATION OF CONFORMITY |
|
|
Manufacturer’s Name: |
Digitech Electronics |
|
Manufacturer’s Address: |
8760 S. Sandy Parkway |
|
Sandy, Utah 84070, USA |
|
|
declares that the product: |
|
|
Product Name: |
RP-7 Valve |
|
Product Options: |
All |
conforms to the following Product Specifications:
|
Safety: |
EN 60065 (1993) |
|
IEC 65 (1985) with Amendments 1, 2 & 3 |
|
|
EMC: |
EN 55013 (1990) |
|
EN 55020 (1991) |
Supplementary Information:
The product herewith complies with the requirements of the Low Voltage Directive 73/23/EEC and EMC
Directive 89/336/EEC as amended by Directive 93/68/EEC.
Digitech
President of Digitech
8760 S. Sandy Parkway
Sandy, Utah 84070, USA
Tel: 801.566.8800
Fax: 801.566.7005
Effective October 15, 1997
European Contact: Your Local Digitech Sales and Service Office or
International Sales Office
3 Overlook Drive #4
Amherst, New Hampshire 03031, USA
Tel: 603.672.4244
Fax: 603.672.4246

RP-7 Valve
Quick Start
For those of you who prefer to burn now and read later, we’ve included this Quick Start section to get you up and running.
Connect Cables:
Connect guitar into the Input jack (located on the rear of the RP-7 Valve). Now run from the Output of the RP-7 Valve to the Input of the either the Guitar Amp, Power Amp or Mixing board.
Apply Power:
Note: When applying power to the RP-7 Valve, it is recommended that the <Output> knob be turned down prior to powering up the unit.
Adjust Output:
Now adjust the <Output > level knob on the rear panel of the RP-7 Valve to the desired output level.
Adjust Presence:
The <Presence> knob will act as a quick EQ. Use this knob to fine-tune your tone by turning clockwise (Brighter tone) or counter-clockwise (Darker tone).
Select Preset:
Begin playing your guitar, and choose any preset by either pressing the <Program UP> or the <Program Down> buttons or by pressing the bank <Up> and bank <Down> footswitches.
Jam-Along and Learn-A-Lick:
The RP-7 Valve will let you run a CD or Cassette tape signal into the signal of the RP-7 Valve so that you can play along with the music and even use the Learn-A-Lick function for recording and playing back selected pieces of music. This can be done by simply running the CD or Cassette headphone output into the Jam-Along jack (located on the rear of the RP-7 Valve).

RP-7 Valve
|
Table of Contents |
|
|
Safety Information |
|
|
Declaration of Conformity………………………………………………………. |
i |
|
Quick Start……………………………………………………………………………. |
ii |
|
Table of Contents …………………………………………………………………. |
iii |
|
Section 1 — Introduction |
|
|
Congratulations …………………………………………………………………….. |
1 |
|
Included Items………………………………………………………………………. |
1 |
|
Product Features …………………………………………………………………… |
1 |
|
Warranty ……………………………………………………………………………… |
2 |
|
A Quick Tour of the RP-7 Valve……………………………………………. |
3 |
|
The Front Panel…………………………………………………………………. |
3 |
|
The Rear Panel…………………………………………………………………… |
5 |
|
Section 2 — Setting Up |
|
|
Making Connections ……………………………………………………………. |
6 |
|
RP-7 Valve into Combo Amplifiers ………………………………………. |
6 |
|
RP-7 Valve direct into a Mixer ……………………………………………… |
7 |
|
Section 3 — Basic Operations |
|
|
About the RP-7 Valve’s Modes ……………………………………………… |
8 |
|
Program Mode…………………………………………………………………… |
8 |
|
Bank Mode ………………………………………………………………………. |
8 |
|
Edit Mode ………………………………………………………………………… |
8 |
|
Store Mode ………………………………………………………………………. |
8 |
|
Bypass Mode …………………………………………………………………….. |
9 |
|
Tuner Mode………………………………………………………………………. |
9 |
|
Learn-A-Lick Mode……………………………………………………………… |
9 |
|
Section 4 — Effects and Parameters |
|
|
About the Parameter Matrix …………………………………………………… |
10 |
|
Compressor ………………………………………………………………………….. |
10 |
|
Expression Pedal …………………………………………………………………… |
10 |
|
Preamp…………………………………………………………………………………. |
11 |
|
Noise Gate ……………………………………………………………………………. |
12 |
|
Equalization………………………………………………………………………….. |
12 |
|
Wah Wah ……………………………………………………………………………… |
13 |
|
Mod/Pitch……………………………………………………………………………… |
13 |
|
Chorus …………………………………………………………………………………. |
14 |
|
Flanger…………………………………………………………………………………. |
14 |
|
Phaser …………………………………………………………………………………. |
15 |
|
Tremolo ……………………………………………………………………………….. |
15 |
|
Panner …………………………………………………………………………………. |
16 |
|
Pitch Shifter ………………………………………………………………………….. |
16 |
|
Pitch Bending (Whammy) ………………………………………………………. |
16 |
|
Harmony ……………………………………………………………………………… |
17 |
|
Dual Delay ……………………………………………………………………………. |
18 |
|
Reverb …………………………………………………………………………………. |
19 |
|
Speaker Cabinet Emulator …………………………………………………….. |
20 |
|
Master Volume………………………………………………………………………. |
20 |
|
Section 5 — Appendix |
|
|
Resetting and Re-Calibrating the RP-7 Valve ……………………………. |
21 |
|
Harmony Interval Charts…………………………………………………….. |
21 |
|
Specifications…………………………………………………………………….. |
22 |
|
Preset List ………………………………………………………………………… |
23 |

RP-7 Valve

|
RP-7 Valve |
Section -1 Introduction |
Section-1 Introduction
Congratulations…
… you are now the proud owner of a Digitech RP-7 Valve Guitar Preamp/Processor. The RP-7 Valve offers you 4 Tube and 4 Solid State preamp voicings along with a full palette of studio quality digital effects that can accommodate any style of music. The RP-7 Valve also features the Jam-Along jack for CD insert and the Learn-A-Lick mode that allows you to sample the incoming music then replay it at 1/2 speed, making the RP-7 Valve a priceless tool.
This owner’s manual is your key to understanding the powerful world of the RP-7 Valve. Read it carefully. After you’ve had time to familiarize yourself with the unit, try experimenting with unusual effect combinations. You are certain to achieve sounds never thought possible before. Good luck, and thank you for choosing Digitech.
Your RP-7 Valve was carefully assembled and packaged at the factory. Before you proceed any further, make sure the following items are included:
•(1) Owner’s Manual
•(1) Digitech RP-7 Valve Guitar Preamp/Processor
•(1)Power Supply
•(1) Digitech warranty card
Please save all packing materials. They were designed to protect the unit from damage during shipping. In the unlikely event that the unit requires service, use only the factory supplied carton to return the unit.
RP-7 Valve Features:
•Tube and Solid State Distortions
•Built-in Expression Pedal
•Tube Preamp (12AX7)
•Full bandwidth effects (20-20kHz)
•24-bit signal path, 48-bit internal data path
•S-DISC II ® Processing
•Harmony Effects
•Jam-Along Jack
•Learn-A-Lick Function
•Programmable Speaker Cabinet Emulator
•Chromatic tuner
•Compact floor design chassis

|
Section -1 Introduction |
RP-7 Valve |
We at Digitech are very proud of our products and back-up each one we sell with the following warranty:
1.The warranty registration card must be mailed within ten days after purchase date to validate this warranty.
2.Digitech warrants this product, when used solely within the U.S., to be free from defects in materials and workmanship under normal use and service.
3.Digitech liability under this warranty is limited to repairing or replacing defective materials that show evidence of defect, provided the product is returned to Digitech WITH RETURN AUTHORIZATION, where all parts and labor will be covered up to a period of one year. A Return Authorization number may be obtained from Digitech by telephone. The company shall not be liable for any consequential damage as a result of the product’s use in any circuit or assembly.
4.Proof-of-purchase is considered to be the burden of the consumer.
5.Digitech reserves the right to make changes in design, or make additions to, or improvements upon this product without incurring any obligation to install the same on products previously manufactured.
6.The consumer forfeits the benefits of this warranty if the product’s main assembly is opened and tampered with by anyone other than a certified Digitech technician or, if the product is used with AC voltages outside of the range suggested by the
manufacturer.
7.The foregoing is in lieu of all other warranties, expressed or implied, and Digitech neither assumes nor authorizes any person to assume any obligation or liability in connection with the sale of this product. In no event shall Digitech or its dealers be liable for special or consequential damages or from any delay in the performance of this warranty due to causes beyond their control.
Digitech™, S-DISCII™, Whammy™, and Silencer II™ are registered trademarks of the Harman Music Group Incorporated.
NOTE: The information contained in this manual is subject to change at any time without notification. Some information contained in this manual may also be inaccurate due to undocumented changes in the product or operating system since this version of the manual was completed. The information contained in this version of the owner’s manual supersedes all previous versions.
|
RP-7 Valve |
Section -1 Introduction |
A Quick Tour of the RP-7 Valve
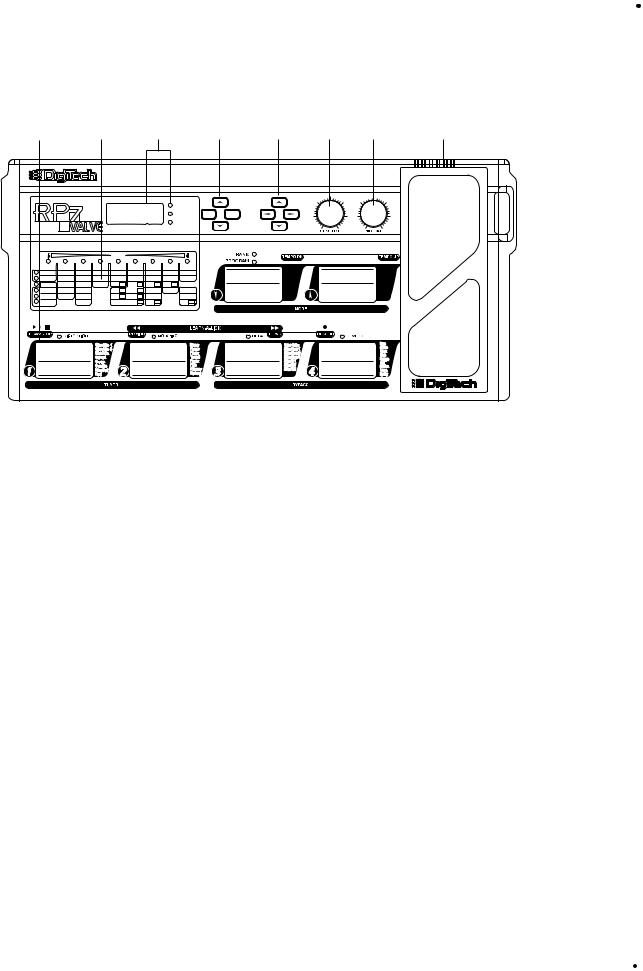
The Front Panel
|
1 |
2 |
3 |
4 |
5 |
6 |
7 |
8 |
|||||||||
|
VALUE |
PARAMETER |
|||||||||||||||
|
CLIP |
SELECT |
|||||||||||||||
|
8888 |
||||||||||||||||
|
SIGNAL |
Store |
Edit |
||||||||||||||
|
STORE |
||||||||||||||||
|
BANK |
PGM # |
|||||||||||||||
|
IN TUNE |
||||||||||||||||
|
COMPRESSOR |
PREAMP |
EQUALIZER |
GATE/SWELL |
WAH |
MOD/PITCH |
DUAL DELAY |
REVERB |
SPEAKER CAB |
||||||||
|
On/Bypass |
On/Bypass |
On/Bypass |
On/Bypass |
On/Bypass |
On/Bypass |
On/Bypass |
On/Bypass |
On/Bypass |
||||||||
|
Amount |
Type |
Low Gain |
Threshold |
Type |
Type |
Type |
Type |
Type |
||||||||
|
EXP PEDAL |
Gain |
Mid Freq |
Attack Time |
Position (EP1) |
Level |
(EP4) |
Level |
(EP8) |
Level (EP10) |
|||||||
|
Link (EP #) |
On Level |
Mid Gain |
Speed |
(EP2) |
Amount |
(EP5) |
Time 1 |
Decay |
VOLUME |
|||||||
|
Max Value |
Bypass Level |
High Freq |
Depth |
(EP3) |
Key |
(EP6) |
Time 2 |
Pre/Post |
||||||||
|
Min Value |
High Gain |
Dly/Regen |
Whammy (EP7) |
Fback |
(EP9) |
Level |
(EP11) |
1)Pedalboard — The RP-7 Valve’s pedalboard consists of six footswitches. The two Mode footswitches to the right of the Parameter Matrix allow you to change from Program mode to Bank mode by pressing the <UP> & <DOWN> footswitches simultaneously. When changing modes, the appropriate LED will light to indicate whether you are in Program mode or Bank Mode. In Program Mode, the <UP> and <DOWN> footswitches allow you to move through Programs, while the four main switches, labeled <1 — 4>, act as toggle On/Off switches for Distortion, Modulation, Delay, and Reverb. In Bank mode, the <UP> and <DOWN> footswitches allow you to move through Banks, while the <1-4> footswitches are used to select Programs. If footswitches 1 and 2 are pressed simultaneously, Tuner Mode will be activated. If footswitches <3> and <4> are pressed simultaneously, Bypass Mode will be activated.
2)Parameter Matrix — The Parameter Matrix consists of a group of horizontal Effect LEDs and a second group of vertical Parameter LEDs. The Effect LEDs are: Compressor, Preamp, Equalization, Noise Gate, Wah Wah, Mod/Pitch, Dual Delay, Reverb, and Speaker Cab. This matrix shows you exactly what Effects and Parameters are in use.
3)Display Window — The display window shows all current operating and programming information and is comprised of two parts: the seven segment LED displays and the Signal, Clip, and Store indicator LEDs. The first one numeric LED in the display window indicates whether you are in a User (U) or Factory Bank (F). The second and third LEDs indicates the Bank number currently in use, and the fourth indicates which Program number is currently in use. These numbers change as you scroll through the available Programs. The functions of the Signal, Clip, and Store indicator LEDs are as follows:
•Signal — Indicates whether a signal is entering the RP-7 Valve.
•Clip — Indicates analog clipping in the RP-7 Valve. Digital clipping can be detected when the third vertical LED from the top of the Parameter Matrix flashes. Distortion may be heard in the output signal if either analog or digital clipping occurs. If analog clipping occurs, check the Preamp On/Off levels. The levels may need to be lowered to eliminate the problem. To reduce digital clipping, the Master
 Loading…
You can only view or download manuals with
Sign Up and get 5 for free
Upload your files to the site. You get 1 for each file you add
Get 1 for every time someone downloads your manual
Buy as many as you need
4.0
Rated 4.0 out of 5
4.0 out of 5 stars (based on 2 reviews)
Your overall rating
DIGITECH RP-7 VALVE (01) PDF MANUAL
Click here to download DIGITECH RP-7 VALVE (01) PDF MANUAL
DIGITECH RP-7 VALVE (01) PDF MANUAL
FREE ENGLISH PDF
OPERATING INSTRUCTIONS
USER GUIDE – USER MANUAL
OWNER GUIDE – OWNER MANUAL
REFERENCE GUIDE – REFERENCE MANUAL
INSTRUCTION GUIDE – INSTRUCTION MANUAL
Your overall rating
- YouTube
DIGITECH RP-7 VALVE (01) PDF MANUAL
DIGITECH RP-7 VALVE (01) PDF MANUAL
Первое поколение напольных процессоров Digitech открыл прибор RP-1, появившийся на рынке в 1992 году. Прибор сочетал аналоговый преамп с цифровым управлением и цифровой процессор DSP-256XL, заключённые в напольный корпус с педалями.


Среди напольных приборов того времени RP-1 был наверно самым продвинутым. Устойчивый металлический корпус с крепкими педалями, разрыв, MIDI, но по сегодняшним меркам прибор безнадёжно устарел, и не представляет никакого интереса даже для коллекционеров, разве как дешёвый MIDI-контроллер. Дисторшн у RP-1 весьма специфический, а цифровая секция в разы уступает сменившему его в ‘94м RP-10, поэтому я не буду заострять внимание на этом приборе, а сразу перейду к продуктам ’94 года.

RP-10 — достаточно серьёзный прибор даже по сегодняшним меркам.
Благодаря грамотно организованной архитектуре, как в профессиональных рэковых приборах, удалось добиться наиболее рационального использования ресурсов.
Большинство напольных гитарных процессоров представляют собой банальный набор модулей, каждый из которых отвечает за определённый тип эффектов. Модуляции, питчи, временная и пространственная обработка. Под каждый из них отведена определённая часть ресурсов центрального процессора. И даже если какой-нибудь модуль используется не в полной мере, или вообще не используется, отведённые для него ресурсы простаивают без какого-либо толку. В RP-10 применён принцип алгоритмов, когда базовые эффекты пользуются приоритетным набором возможностей, а вспомогательные только минимальным набором функций.

В сравнении с копейкой, у десятки была не только улучшена аналоговая часть, подрихтовали дисторшн и эквалайзер, но и кардинально изменилась цифровая. В качестве процессора уже использовался TSR-24, прибор, на котором Digitech завоевали свою нишу на рынке. Кроме того, десятка была оборудована педалью экспрессии.
RP-10 предлагал 34 алгоритма цифровой обработки, точнее сказать 33, так как 34й = байпас цифровой секции. Многим гитаристам это могло показаться сложным, нужно изучить блок-схему алгоритма, чтобы понять как что работает, но с другой стороны, это хорошо развивает навыки звукоинженера и саунд-продюссера. Для сравнения, RP-1 предлагал всего лишь 10 простейших алгоритмов + байпас. С сожалением можно отметить отсутствие разрыва у десятки, у RP-1 он был.

Другой прибор, RP-5, хоть и позиционировался как компактная версия RP-10, на самом деле был упрощённой версией RP-1, с вдвое меньшим количеством педалей и расчерченной таблицей под дисплеем, графически представляющей включенные или редактируемые эффекты и параметры, работа которых отмечалась светодиодами. У прибора не было ни разрыва, ни MIDI, ни алгоритмов, просто набор из последовательных эффектов, четырёх аналоговых и четырёх цифровых.

В ‘96м модельный ряд обновился аж тремя приборами, полноразмерным RP-12, половинчатым RP-6 и его упрощённой версией RP-3.

Мозгом RP-12 стал новый микрочип SDISC II. Цифровая обработка предлагала уже 36 алгоритмов + байпас. Усовершенствовалась питчевая секция, превратившись в полноценный гармонайзер.

Шестёрка – обновлённая и модифицированная версия пятёрки, оборудованная педалью экспрессии.
Тройка представляла собой слегка урезанную версию шестёрки, заточенную под нужды диванного гитариста. Но зато у неё был вход для подключения внешнего плеера и функция записи музыкальных фрагментов для последующего воспроизведения в замедленном темпе без потери высоты тона.

Годом позже был представлен ещё один полноразмерный процессор, первый напольный гитарный процессор, имеющий на борту лампу. Новый прибор RP20 имел уже совершенно другую архитектуру.

Аналоговая часть представляла собой компрессор, вау, нойсгейт и 2 дисторшна, ламповый и транзисторный, которые могли работать параллельно, а сигналы их смешиваться.
Цифровая обработка использовала концепцию прибора Studio Quad, разве что каждый отдельный модуль обработки не имел собственных внешних входов/выходов, обработка микшировалась внутри самого процессора.
Оптимизация использования ресурсов достигалась следующим образом:
Вы могли выбрать один эффект, и использовать его на полную мощность, например 8-голосый гармонайзер. Можно добавить второй эффект, но тогда возможности первого будут скромнее. Вариантов множество: 1 полный, ¾ + ¼, ½ + ½, ½ + ¼ + ¼, ¼ + ¼ + ¼ + ¼.
Эффекты можно соединять в любом порядке, как последовательно, так и параллельно, что расширяет число комбинаций.

RP-20 также выделялся более информативным графическим ЖК дисплеем, и подсвеченными кнопками, меняющими цвет в зависимости от функционального использования.

Последнее обновление этой серии произошло в ’98- ‘99м. И если RP-21, является модернезированной версией RP-20 с цифровым выходом S/PDIF, то RP-14 вызывает самые противоречивые отзывы. С одной стороны прибор имел лампу в секции предусиления, а с другой упрощённую архитектуру, присущую половинчатым приборам этой серии. RP-14, так же как и компактный RP -7 представляли собой последовательный набор модулей, и больше Digitech никогда не возвращались к использованию сложной схемы продвинутых алгоритмов в напольных приборах. Да и у других производителей эта схема разве что частично реализована в Rocktron.

Мало того, RP-14 стал первым и единственным большим прибором этой серии не имеющим MIDI, и даже наличие цифрового выхода S/PDIF не позволяет отнести этот прибор к профессиональным, скорее это усовершенствованная и раздутая до больших размеров шестёрка, в которую ради маркетингового хода вставили лампу. Или даже трёшка, от которой прибор унаследовал фразовый сэмплер для транскрайберов. Типичный диванный прибор. Хотя скорее это переходная модель между RP и GNX, дисторшн у прибора цифровой, аналоговыми остались только компрессор и вау.
Семерка же сохранила аналоговую секцию преампа, в схему которого добавили ламповый каскад.

С приходом миллениума первое поколение RP сменило новое, поколение, использующее принцип цифрового моделирования и внешне похожее скорее на игрушки в пластиковых корпусах, но исторической ценности приборы первой декады нулевых уже не представляют.

Если вам понравилась статья, вы можете сказать спасибо автору на яндекс-кошелёк 41001796303715