
Перейти к контенту
![]()
Русские электронные инструкции по эксплуатации
Постоянно обновляемый большой каталог документации по эксплуатации и использованию современных устройств и оборудования на русском языке. Бесплатное скачивание файлов.
Поиск:
Главная
♥ В закладки
Просмотр инструкции в pdf


Инструкция по эксплуатации автомагнитолы Pioneer DEH-3400UB.
Скачать инструкцию к автомагнитоле Pioneer DEH-3400UB (4,70 МБ)

Автомагнитолы
« Инструкция к автомагнитоле Pioneer AVH-1400DVD
» Инструкция к экшн-камере Lexand LR-40
Вам также может быть интересно

Инструкция к автомагнитоле Pioneer MVH-X460UI

Инструкция к наушникам Pioneer SE-MJ503-K

Инструкция к автомагнитоле Pioneer DMH-G121

Инструкция к автомагнитоле Pioneer MVH-AV180

Инструкция к наушникам Pioneer HDJ-X7-S

Инструкция к автомагнитоле Pioneer DEH-S111UB

Инструкция к автомагнитоле Pioneer DEH-S111UBG

Инструкция к автомагнитоле Pioneer MVH-S510BT
Добавить комментарий
Имя *
Email *
Сайт
Комментарий


![]()


Сохранить моё имя, email и адрес сайта в этом браузере для последующих моих комментариев.
- Добавить инструкцию
- Заказать инструкцию
- Политика конфиденциальности
Support for DEH-3400UB | Pioneer
- Главная
- Продукция
- Автомобильные ресиверы
- Support for DEH-3400UB
Support for DEH-3400UB
CD ресивер с USB на передней панели, прямым управлением iPod/iPhone и 1 RCA выходом предусилителя, пользовательская настройка подсветки RGB для дисплея и кнопок (2012)
- Программное обеспечение
- Назад к обзору
Программное обеспечение
Для данного продукта нет файлов, доступных для загрузки
Руководства
Français Español Deutsch Owner’s Manual Mode d’emploi Manuale d’istruzioni Manual de instrucciones Bedienungsanleitung Handleiding Руководство пользователя Italiano DEH-3400UB DEH-2400UB English CD RDS RECEIVER AUTORADIO CD RDS SINTOLETTORE CD RDS REPRODUCTOR DE CD CON RECEPTOR RDS CD RDS-EMPFÄNGER
Section 01 Before you start Thank you for purchasing this PIONEER product To ensure proper use, please read through this manual before using this product. It is especially important that you read and observe WARNINGs and CAUTIONs in this manual. Please keep the manual in a safe and accessible place
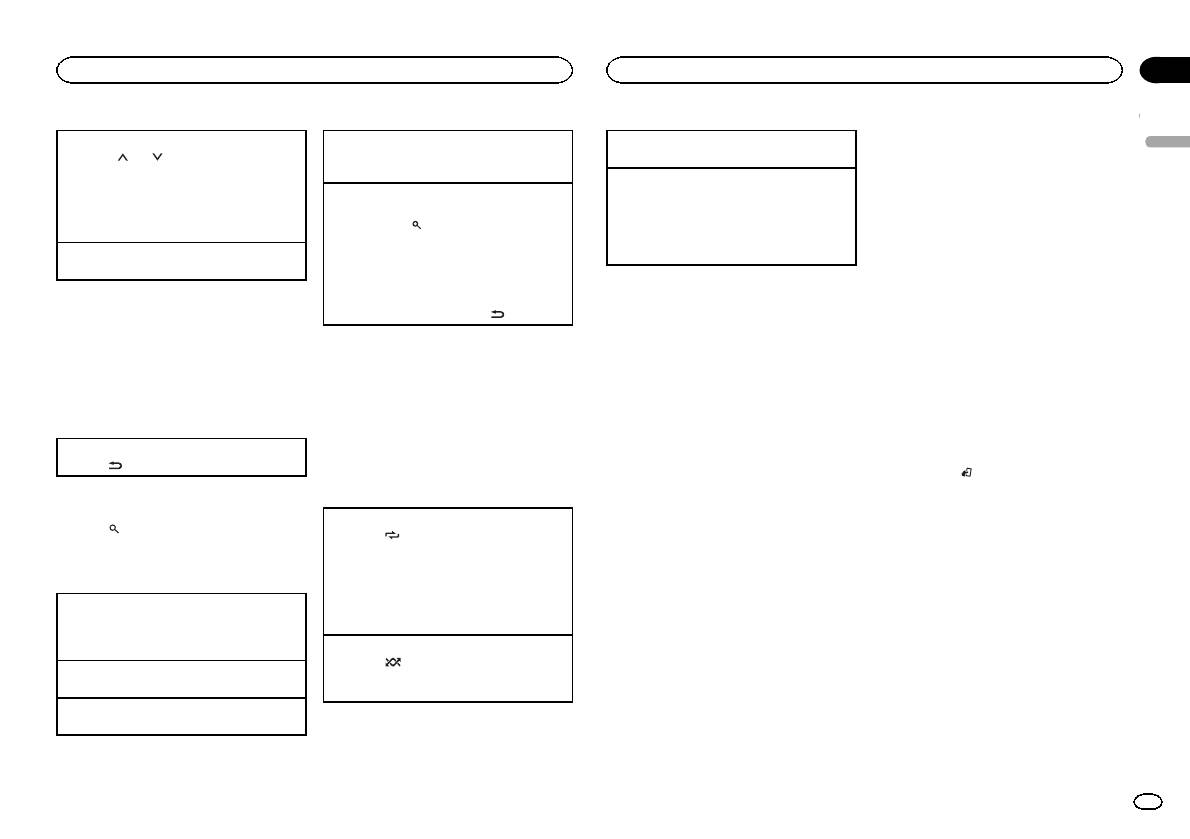
Section Operating this unit Head unit Part 5 78 9 a 3 MULTI-CONTROL (M.C.) a BAND/ (iPod control) 4 SRC/OFF b 1 to 6 5 Disc loading slot c PTY 6 USB port d AUX input jack (3.5 mm stereo jack) e Detach button 6 b Part c de 7 Part 1 2 h (eject) 8 (list) (back/display) 9 c/d MULTI-CONTROL (M.C.) a
Section 02 Operating this unit TITLE (multi-language) This unit can display the text information of a compressed audio file even if they are embedded in a Western European or Russian language. ! If the embedded language and the selected language setting are not the same, text information may not
Section Operating this unit Using preset tuning buttons 1 When you find a station that you want to store in memory, press one of the preset tuning buttons (1 to 6) and hold until the preset number stops flashing. 2 Press one of the preset tuning buttons (1 to 6) to select the desired station.
Section 02 Operating this unit SEEK (left/right key setting) You can assign a function to the left and right keys of the unit. Select MAN (manual tuning) to tune up or down manually or select PCH (preset channel) to switch between preset channels. 1 Press M.C. to select MAN or PCH. CD/CD-R/CD-RW
Section Operating this unit Fast forwarding or reversing 1 Press and hold c or d. Notes ! The iPod cannot be turned on or off when the control mode is set to CTRL AUDIO. ! Disconnect headphones from the iPod before connecting it to this unit. ! The iPod will turn off about two minutes after the
Section 02 Operating this unit — The function settings are not available. — The browse function cannot be operated from this unit. PAUSE (pause) FAD/BAL (fader/balance adjustment) 1 Press M.C. to pause or resume. 1 Press M.C. to display the setting mode. 2 Press M.C. to cycle between fader
Section Operating this unit Initial settings 1 Press and hold SRC/OFF until the unit turns off. 2 Press SRC/OFF and hold until function name appears in the display. 3 Turn M.C. to select the initial setting. After selecting, perform the following procedures to set the initial setting. Normally, the
Section 02 Operating this unit Operating this unit ! CUSTOM (customized illumination color) 2 Turn M.C. to display KEY COLOR and press to select. 4 3 Turn M.C. to select the illumination color. You can select one option from the following list. ! ! ! ! 4 30 preset colors (WHITE to ROSE) SCAN (cycle
Section Installation F O N OF Important ! When installing this unit in a vehicle without an ACC (accessory) position on the ignition switch, failure to connect the red cable to the terminal that detects operation of the ignition key may result in battery drain. STAR T No ACC position ! Use of this
Section 03 Installation Installation Power amp (sold separately) DIN front/rear mount Perform these connections when using the optional amplifier. This unit can be properly installed using either front-mount or rear-mount installation. Use commercially available parts when installing. 3 1 2
Appendix Additional information Troubleshooting Cause Action The display il- Demo mode is lumination on. turns on and off at random. Turn off the demo display setting. The display automatically returns to the ordinary display. You did not perform any operation within about 30 seconds. Perform
Appendix Additional information Additional information Message Cause Action Message Cause CHECK USB The USB connector or USB cable has shortcircuited. Check that the USB connector or USB cable is not caught in something or damaged. ERROR-19 Communication Perform one of failed. the following
Appendix Additional information Depending on the USB storage device, the following problems may occur. ! Operations may vary. ! The storage device may not be recognized. ! Files may not be played back properly. ! The device may generate noise in the radio. iPod Do not leave the iPod in places with
Appendix Additional information iPod compatibility This unit supports only the following iPod models. Supported iPod software versions are shown below. Older versions may not be supported. Made for ! iPhone 4 (software version 4.1) ! iPhone 3GS (software version 3.0.1) ! iPhone 3G (software version
Appendix Additional information Specifications Power source ………………. 14.4 V DC (10.8 V to 15.1 V allowable) Grounding system ………… Negative type Maximum current consumption …………………………….. 10.0 A Dimensions (W × H × D): DIN Chassis ………….. 178 mm × 50 mm
Section 01 Avant de commencer Nous vous remercions d’avoir acheté cet appareil PIONEER Pour garantir une utilisation correcte, lisez bien ce mode d’emploi avant d’utiliser cet appareil. Il est particulièrement important que vous lisiez et respectiez les indications ATTENTION et PRÉCAUTION de ce
Section Utilisation de l’appareil Appareil central Partie Partie DEH-3400UB 1 12 3 4 5 6 h (éjection) 8 (retour/affichage) (liste) c/d a BAND/ (contrôle de l’iPod) 4 SRC/OFF b 1à6 5 Fente de chargement des disques c PTY d Jack d’entrée AUX (jack stéréo 3,5 mm) e Touche de retrait de la face avant 3
Section 02 Utilisation de l’appareil Normalement, l’incrément d’accord FM employé par l’accord automatique est 50 kHz. Quand la fonction AF ou TA est en service, l’incrément d’accord passe automatiquement à 100 kHz. Il peut être préférable de régler l’incrément d’accord à 50 kHz quand la fonction
Section Utilisation de l’appareil Syntoniseur Opérations de base Rappel des fréquences en mémoire 1 Appuyez sur c ou d. ! Si MAN (accord manuel) est sélectionné dans le réglage SEEK, vous ne pouvez pas rappeler les fréquences en mémoire. Vous devez sélectionner PCH (canaux présélectionnés) dans
Section 02 Utilisation de l’appareil REGION (stations régionales) Quand la fonction AF est utilisée, la fonction de recherche des stations régionales limite la sélection aux stations qui diffusent des programmes régionaux. 1 Appuyez sur M.C. pour mettre la fonction de recherche des stations
Section Utilisation de l’appareil Sélection et lecture des fichiers/ plages à partir de la liste des noms 1 Appuyez sur pour passer en mode liste des noms de fichiers/plages. Modification du nom de fichier ou de dossier 1 Tournez M.C. Lecture 1 Lorsqu’un fichier ou une plage est sélectionné(e),
Section 02 Utilisation de l’appareil Recherche d’une plage musicale 1 Appuyez sur pour passer au menu principal de la recherche par liste. 2 Utilisez M.C. pour sélectionner une catégorie/plage musicale. Modification du nom d’une plage musicale/catégorie 1 Tournez M.C. Listes de
Section Utilisation de l’appareil — Pause — Avance/retour rapide — Avance/retour d’une plage musicale ! Lorsque le mode de commande est réglé sur CTRL iPod, les opérations sont limitées comme suit : — Les réglages des fonctions ne sont pas disponibles. — La fonction de recherche ne peut pas être
Section 02 Utilisation de l’appareil SUB.W (réglage en service/hors service du hautparleur d’extrêmes graves) Cet appareil est équipé d’une sortie haut-parleur d’extrêmes graves qui peut être mise en service ou hors service. 1 Appuyez sur M.C. pour choisir le mode désiré. NOR (phase normale)—REV
Section Utilisation de l’appareil PREOUT (réglage du préamp) Les sorties RCA peuvent être utilisées pour la connexion d’un haut-parleur arrière ou d’un hautparleur d’extrêmes graves.. Si vous basculez sur SW, vous pouvez connecter une borne de haut-parleur arrière à un haut-parleur d’extrêmes
Section 02 Utilisation de l’appareil 1 Appuyez sur . 2 Tournez M.C. pour afficher BOTH COLOR, puis appuyez pour sélectionner. 3 Tournez M.C. pour choisir la couleur d’éclairage. Vous pouvez sélectionner une option dans la liste suivante. ! 30 couleurs présélectionnées (WHITE à ROSE) ! SCAN
Section Installation Connexions O N OF F STAR T Sans position ACC ! L’utilisation de cet appareil dans des conditions autres que les conditions suivantes pourrait provoquer un incendie ou un mauvais fonctionnement. — Véhicules avec une batterie 12 volts et mise à la masse du négatif. —
Section 03 Installation Installation Vert/noir : Arrière gauche * ou haut-parleur d’extrêmes graves * Violet : Arrière droite + ou haut-parleur d’extrêmes graves + Violet/noir : Arrière droite * ou haut-parleur d’extrêmes graves * e Connecteur ISO Dans certains véhicules, il est possible que le
Section Installation 2 Insérez les clés d’extraction fournies dans les deux côtés de l’appareil jusqu’à ce qu’elles s’enclenchent en place. Dépannage Symptôme 3 Tirez l’appareil hors du tableau de bord. Causes possibles Vous pouvez retirer la face avant pour protéger l’appareil contre le vol.
Annexe Informations complémentaires Message Causes possibles Action corrective Message Causes possibles FRMT READ Le début de la lecture et le début de l’émission des sons sont parfois décalés. Attendez que le message disparaisse pour entendre les sons. NO AUDIO Absence de pla- Transférez les figes
Annexe Informations complémentaires Informations complémentaires Causes possibles Action corrective Message Causes possibles Action corrective Ne touchez pas la surface enregistrée des disques. ERROR-19 Panne de communication. Effectuez une des opérations suivantes. –Coupez et remettez le contact
Annexe Informations complémentaires Quelques mots sur les réglages de l’iPod ! Lorsqu’un iPod est connecté, cet appareil désactive le réglage EQ (égaliseur) de l’iPod afin d’optimiser l’acoustique. Le réglage EQ original est rétabli lorsque l’iPod est déconnecté. ! Vous ne pouvez pas mettre la
Annexe Informations complémentaires Compatibilité iPod Selon la génération ou la version de l’iPod, certaines fonctions peuvent ne pas être disponibles. Les opérations peuvent différer selon la version du logiciel iPod. Quand vous utilisez un iPod, un câble iPod Dock Connector vers USB est requis.
Annexe Informations complémentaires Caractéristiques techniques Généralités Tension d’alimentation ….. 14,4 V CC (10,8 V à 15,1 V acceptable) Mise à la masse …………… Pôle négatif Consommation maximale …………………………….. 10,0 A Dimensions (L × H × P) : DIN Châssis
37 Fr Français
Sezione 01 Prima di iniziare Prima di iniziare Grazie per aver acquistato questo prodotto PIONEER Leggere attentamente questo manuale prima di utilizzare il prodotto, per assicurarne il corretto utilizzo. È particolarmente importante leggere e osservare le precauzioni contrassegnate da AVVERTENZA e
Sezione Funzionamento dell’unità Unità principale Componente Componente DEH-3400UB 1 12 3 4 5 6 h (espulsione) (lista) b Componente 2 3 4 5 6 7 9 c/d MULTI-CONTROL (M.C.) a BAND/ (controllo iPod) 4 SRC/OFF b 1-6 5 Vano d’inserimento dei dischi c PTY d Connettore di ingresso ausiliario (AUX)
Sezione 02 Funzionamento dell’unità Normalmente il passo per la sintonizzazione in FM impiegata dalla ricerca di sintonia è 50 kHz. Quando sono attivate le funzioni AF o TA il passo di sintonizzazione cambia automaticamente a 100 kHz. Quando è attivata la funzione AF, è preferibile impostare il
Sezione Funzionamento dell’unità Sintonizzatore Funzionamento di base Memorizzazione e richiamo delle stazioni per ciascuna banda Uso dei tasti di preselezione sintonia Selezione di una banda 1 Premere BAND/ fino a quando viene visualizzata la banda desiderata (F1, F2, F3 per FM o MW/LW).
Sezione 02 Funzionamento dell’unità La ricerca di sintonia in modo locale consente di sintonizzare solo le stazioni radio con segnali radio sufficientemente potenti per una buona ricezione. 1 Premere M.C. per selezionare l’impostazione desiderata. FM: OFF—LV1—LV2—LV3—LV4 MW/LW: OFF—LV1—LV2
Sezione Funzionamento dell’unità Operazioni avanzate tramite i tasti speciali Selezione di un intervallo di ripetizione 1 Premere 6/ per alternare: CD/CD-R/CD-RW ! ALL – Ripete tutti i brani ! ONE – Ripete il brano corrente ! FLD – Ripete la cartella corrente Lettore audio USB/memoria USB ! ALL –
Sezione 02 Funzionamento dell’unità Operazioni avanzate tramite i tasti speciali Selezione di un intervallo di ripetizione 1 Premere 6/ per alternare: ! OFF – Ripetizione disattivata ! ONE – Ripete il brano corrente ! ALL – Ripete tutti i brani dell’elenco selezionato ! Non è possibile selezionare
Sezione Funzionamento dell’unità AUDIO BOOK (velocità audiolibri) 1 Premere M.C. per visualizzare la modalità di impostazione. 2 Ruotare M.C. per selezionare l’impostazione preferita. ! FASTER – Riproduzione più veloce del normale ! NORMAL – Riproduzione normale ! SLOWER – Riproduzione più lenta
Sezione 02 Funzionamento dell’unità 3 Ruotare M.C. per selezionare l’impostazione iniziale. Dopo averla selezionata, eseguire la procedura descritta di seguito per impostare l’impostazione iniziale. CLOCK SET (impostazione dell’orologio) 1 Premere M.C. per visualizzare la modalità di impostazione.
Sezione Funzionamento dell’unità 3 Ruotare M.C. per selezionare il colore dell’illuminazione. È possibile selezionare un’opzione dal seguente elenco. ! ! ! ! 3 Ruotare M.C. per selezionare il colore dell’illuminazione. È possibile selezionare un’opzione dal seguente elenco. 30 colori preselezionati
Sezione 03 Installazione Installazione Collegamenti F O N OF Importante ! Quando si installa questa unità in un veicolo che non dispone della posizione ACC (accessoria) per l’interruttore della chiave di avviamento, se non si collega il cavo rosso a un terminale accoppiato al funzionamento
Sezione Installazione e Connettore ISO In alcuni veicoli, il connettore ISO potrebbe essere diviso in due. In questo caso, accertarsi di collegare entrambi i connettori. Amplificatore di potenza (venduto a parte) ! Consultare il rivenditore se l’installazione richiede la trapanatura di fori o altre
Sezione 03 Installazione Informazioni supplementari 2 Inserire le chiavi di estrazione fornite su entrambi i lati dell’unità fino a che non scattano in posizione. Risoluzione dei problemi 3 Il display si La modalità diaccende e si mostrazione è spegne con attiva. pause variabili. Sintomo Estrarre
Appendice Informazioni supplementari Informazioni supplementari Causa Azione Messaggio Causa Il disco inserito è vuoto. Sostituire il disco. FRMT READ ERROR-23 Il formato del CD non è supportato. Sostituire il disco. FRMT READ A volte si verifi- Attendere che il messaggio scomca ritardo tra quando
Appendice Informazioni supplementari Informazioni supplementari Messaggio Causa Azione Messaggio Causa ERROR-19 Errore di comunicazione. Eseguire una delle operazioni riportate di seguito. –Portare l’interruttore della chiave di avviamento in posizione OFF e quindi di nuovo su ON. –Scollegare il
Appendice Informazioni supplementari iPod Non lasciare l’iPod in luoghi soggetti a temperature elevate. Per assicurare il funzionamento corretto, collegare il cavo del connettore dock direttamente dall’iPod a questa unità. Durante la guida fissare saldamente l’iPod. Non lasciar cadere l’iPod sul
Appendice Informazioni supplementari ATTENZIONE ! Pioneer non garantisce la compatibilità con tutti i dispositivi di memoria USB e non si assume alcuna responsabilità per l’eventuale perdita di dati da lettori di file multimediali, smartphone o altri dispositivi anche se i dati vengono persi
Appendice Informazioni supplementari MP3 WMA Windows Media è un marchio di fabbrica o marchio di fabbrica depositato della Microsoft Corporation negli Stati Uniti ed in altri paesi. Questo prodotto include tecnologie di proprietà della Microsoft Corporation e non è utilizzbile senza licenza della
Sección 01 Antes de comenzar Gracias por haber adquirido este producto PIONEER Lea con detenimiento este manual antes de utilizar el producto por primera vez para que pueda darle el mejor uso posible. Es muy importante que lea y cumpla con la información que aparece bajo los mensajes de ADVERTENCIA
Sección Utilización de esta unidad Unidad principal Parte Parte DEH-3400UB 1 12 3 4 5 6 h (expulsar) 8 (parte posterior/display) (lista) 9 c/d 3 MULTI-CONTROL (M.C.) a BAND/ (control de iPod) 4 SRC/OFF b 1a6 5 Ranura de carga de discos c PTY d Conector de entrada AUX (conector estéreo de 3,5 mm) 2
Sección 02 Utilización de esta unidad Normalmente, el paso de sintonía de FM empleado en la sintonización por búsqueda es de 50 kHz. Si la función AF o TA está activada, el paso de sintonía cambia automáticamente a 100 kHz. Puede que sea conveniente ajustar el paso de sintonía a 50 kHz si la
Sección Utilización de esta unidad Sintonizador Funcionamiento básico Selección de una banda 1 Pulse BAND/ hasta que se visualice la banda deseada (F1, F2, F3 para FM o MW/ LW). Recuperación de emisoras prefijadas 1 Pulse c o d. ! Si está seleccionado MAN (sintonización manual) en SEEK, no podrá
Sección 02 Utilización de esta unidad La sintonización por búsqueda local le permite sintonizar sólo las emisoras de radio con señales lo suficientemente intensas como para asegurar una correcta recepción. 1 Pulse M.C. para seleccionar el ajuste deseado. FM: OFF—LV1—LV2—LV3—LV4 MW/LW: OFF—LV1—LV2
Sección Utilización de esta unidad Operaciones avanzadas mediante el uso de botones especiales Selección de una gama de repetición de reproducción 1 Pulse 6/ para desplazarse entre las siguientes opciones: CD/CD-R/CD-RW ! ALL – Repite todas las pistas ! ONE – Repite la pista actual ! FLD – Repite
Sección 02 Utilización de esta unidad Operaciones avanzadas mediante el uso de botones especiales Reproducción de canciones relacionadas con la canción que se está reproduciendo Selección de una gama de repetición de reproducción 1 Pulse 6/ para desplazarse entre las siguientes opciones: ! OFF –
Sección Utilización de esta unidad 1 Pulse M.C. para activar la función de reproducción aleatoria de todas las canciones (shuffle all). Para desactivarla, desactive SHUFFLE en el menú FUNCTION. LINK PLAY (reproducción de enlace) 1 Pulse M.C. para mostrar el modo de ajuste. 2 Haga girar M.C. para
Sección 02 Utilización de esta unidad Ajustes iniciales Utilización de esta unidad La unidad puede buscar automáticamente una emisora diferente con el mismo programa, incluso durante la recuperación de emisoras presintonizadas. 1 Pulse M.C. para activar o desactivar la función de búsqueda PI
Sección Utilización de esta unidad Esta unidad dispone de iluminación multicolor. Puede seleccionar los colores que desee para las teclas y el display de esta unidad. También es posible personalizar los colores que desee aplicar. Selección del color de las teclas de la lista de colores de la
Sección 03 Instalación Instalación Conexiones F O N OF Importante ! Cuando esta unidad se instale en un vehículo sin posición ACC (accesorio) en la llave de encendido, el cable rojo se debe conectar al terminal que pueda detectar la operación de la llave de encendido. De lo contrario, puede
Sección Instalación 03 Instalación Notas ! Cambie la configuración inicial de esta unidad. Consulte REAR-SP (ajuste de la salida posterior) en la página 64 y PREOUT (configuración del preamplificador) en la página 64. La salida de graves de esta unidad es monoaural. ! Al usar un altavoz de
Sección 03 Instalación Retirada y colocación del panel delantero Puede extraer el panel delantero para proteger la unidad contra robo. Pulse el botón de soltar, empuje el panel delantero hacia arriba y tire de él hacia sí. Para obtener más información, consulte Extracción del panel delantero para
Apéndice Información adicional Información adicional Causa Resolución Mensaje Causa Resolución Mensaje Causa Resolución Mensaje Causa Resolución A veces se produce un retraso entre el comienzo de la reproducción y la emisión del sonido. Espere hasta que el mensaje desaparezca y oiga sonido. NO
Apéndice Información adicional Mensaje Causa ERROR-16 Actualice la verLa versión de sión del iPod. firmware del iPod es antigua. Fallo del iPod. Resolución Desconecte el cable del iPod. Una vez que aparezca el menú principal del iPod, vuelva a conectar el iPod y reinícielo. STOP No hay canciones en
Apéndice Información adicional La carga y expulsión frecuente de un disco DualDisc puede producir ralladuras en el disco. Las ralladuras graves pueden producir problemas de reproducción en esta unidad. En algunos casos, un DualDisc puede atascarse en la ranura de carga del disco y no se expulsará.
Apéndice Información adicional Al utilizar un iPod se requiere un conector del Dock del iPod para el cable USB. El cable de la interfaz CD-IU51 de Pioneer también está disponible. Para obtener información, consulte con su proveedor. Si desea más información sobre la compatibilidad de archivos y
Apéndice Información adicional Altavoz de subgraves (mono): Frecuencia ……………. 50 Hz/63 Hz/80 Hz/100 Hz/ 125 Hz Pendiente …………….. –18 dB/oct Ganancia ……………… +6 dB a –24 dB Fase …………………….. Normal/Inversa Reproductor de CD Sistema
Abschnitt 01 Bevor Sie beginnen Vielen Dank, dass Sie sich für dieses PIONEER-Produkt entschieden haben Bitte lesen Sie diese Anleitung vor der Verwendung dieses Produkts zur Gewährleistung seiner ordnungsgemäßen Verwendung durch. Lesen und befolgen Sie dabei insbesondere die Hinweise WARNUNG und
Abschnitt Bedienung des Geräts Hauptgerät Bezeichnung Bezeichnung DEH-3400UB 1 12 3 4 5 6 h (Auswurf) 8 (Zurück/Display) (Liste) 9 c/d 3 MULTI-CONTROL (M.C.) a BAND/ (iPodSteuerung) 4 SRC/OFF b 1 bis 6 c de 5 Disc-Ladeschacht c PTY Bezeichnung 6 USB-Anschluss d AUX-Eingang (3,5-mm-Stereoanschluss)
Abschnitt 02 Bedienung des Geräts Bei der Suchlaufabstimmung wird normalerweise das 50-kHz-UKW-Kanalraster verwendet. Wenn der Alternativfrequenzsuchlauf (AF) oder die Verkehrsmeldungen (TA) eingeschaltet sind, ändert sich das Kanalraster automatisch zu 100 kHz. Es kann jedoch vorteilhaft sein, das
Abschnitt Bedienung des Geräts Tuner Grundlegende Bedienvorgänge Speichern und Abrufen von Radiostationen für jedes Band Verwendung der Stationstasten Wahl eines Bands (Wellenbereich) 1 Drücken Sie BAND/ , bis der gewünschte Wellenbereich angezeigt wird (F1, F2, F3 für UKW bzw. MW/LW). Abrufen von
Abschnitt 02 Bedienung des Geräts Bei Verwendung des Alternativfrequenz-Suchlaufs beschränkt die Regionalfunktion die Auswahl auf Sender, die regionale Programme ausstrahlen. 1 Drücken Sie M.C., um die Regionalfunktion ein- oder auszuschalten. LOCAL (Lokal-Suchlaufabstimmung) Mit der
Abschnitt Bedienung des Geräts Erweiterte Bedienvorgänge mit speziellen Tasten Wählen eines Wiederholbereichs 1 Drücken Sie 6/ , um zwischen den folgenden Optionen umzuschalten: CD/CD-R/CD-RW-Discs ! ALL – Wiederholung aller Titel ! ONE – Wiederholung des momentanen Titels ! FLD – Wiederholung des
Abschnitt 02 Bedienung des Geräts Hinweise ! Sie können Spiellisten wiedergeben, die mit der PC-Anwendung (MusicSphere) erstellt wurden. Diese Anwendung wird auf unserer Website verfügbar sein. ! Die mithilfe dieser PC-Anwendung (MusicSphere) erstellten Spiellisten werden abgekürzt angezeigt.
Abschnitt Bedienung des Geräts SHUFFLE ALL (Zufällige Wiedergabe aller Titel) 1 Drücken Sie M.C., um die Funktion „Shuffle All“ (zufällige Wiedergabe aller Titel) einzuschalten. Um die Funktion abzustellen, schalten Sie SHUFFLE im Menü FUNCTION aus. LINK PLAY (Verknüpfte Wiedergabe) 1 Drücken Sie
Abschnitt 02 Bedienung des Geräts Grundeinstellungen Wichtig PW SAVE (Energiesparmodus) wird deaktiviert, wenn die Fahrzeugbatterie abgeklemmt wird und muss neu aktiviert werden, sobald die Batterie wieder angeschlossen wird. Wenn PW SAVE (Energiesparmodus) deaktiviert ist, kann das Gerät je nach
Abschnitt Bedienung des Geräts Das Gerät kann Textinformationen komprimierter Audiodateien auch dann anzeigen, wenn sie entweder in einer europäischen Sprache oder in Russisch aufgezeichnet wurden. ! Falls die für die Aufzeichnung verwendete Sprache und die gewählte Spracheinstellung nicht
Abschnitt 02 Bedienung des Geräts Installation 03 Hinweise ! Wenn SCAN oder ein Farbbereich (WARM, AMBIENT oder CALM) ausgewählt wurde, kann die Beleuchtungsfarbe nicht individuell angepasst werden. ! Sie können Beleuchtungsfarben für sowohl KEY COLOR als auch DISP COLOR individuell anpassen.
Abschnitt Installation ! Das schwarze Kabel gewährleistet die Erdung. Dieses Kabel wie auch die Erdungskabel anderer Produkte (insbesondere von Hochstromprodukten wie Leistungsverstärker) müssen separat verdrahtet werden. Anderenfalls kann es zu einem Brand oder einer Funktionsstörung kommen, wenn
Abschnitt 03 Installation Installation ! Wenden Sie sich an Ihren Fachhändler, wenn für die Installation Löcher gebohrt oder andere Änderungen am Fahrzeug vorgenommen werden müssen. ! Installieren Sie dieses Gerät keinesfalls an folgenden Orten: 2 Befestigen Sie den Montagerahmen mithilfe eines
Anhang Zusätzliche Informationen Fehlerbehebung Ursache Abhilfemaßnahme Die Bildschirmbeleuchtung schaltet sich zufällig ein und aus. Der DemoModus ist aktiviert. Deaktivieren Sie die DemoanzeigeEinstellung. Das Display schaltet automatisch in die normale Anzeige um. Sie haben keinen Bedienvorgang
Anhang Zusätzliche Informationen Meldung Ursache Abhilfemaßnahme Meldung Ursache Abhilfemaßnahme Meldung Ursache Abhilfemaßnahme Meldung Ursache Abhilfemaßnahme SKIPPED Das angeschlossene USB-Speichermedium enthält Dateien, die mit Windows Mediaä DRM 9/10 geschützt sind. Spielen Sie eine
Anhang Zusätzliche Informationen Zusätzliche Informationen Verwenden Sie ausschließlich herkömmliche, runde Discs. Discs einer anderen Form sollten nicht verwendet werden. Erschütterungen aufgrund von Unebenheiten der Fahrbahn können die Disc-Wiedergabe unterbrechen. In den CD-Ladeschacht darf kein
Anhang Zusätzliche Informationen M3u-Spielliste: Nicht kompatibel MP3i (MP3 interaktiv), mp3 PRO: Nicht kompatibel WAV Dateierweiterung: .wav Quantisierungsbits: 8 und 16 (LPCM), 4 (MS ADPCM) Abtastfrequenz: 16 kHz bis 48 kHz (LPCM); 22,05 kHz und 44,1 kHz (MS ADPCM) Zusätzliche Informationen Von
Anhang Zusätzliche Informationen Das CD-IU51-Schnittstellenkabel von Pioneer ist separat erhältlich. Weitere Einzelheiten erfahren Sie bei Ihrem Fachhändler. Informationen bezüglich der Datei-/Formatkompatibilität finden Sie im Handbuch Ihres iPods. Hörbuch, Podcast: Kompatibel VORSICHT Pioneer
Anhang Zusätzliche Informationen Technische Daten Allgemein Stromversorgung …………. 14,4 V Gleichspannung (Toleranz 10,8 V bis 15,1 V) Erdungssystem ……………. Negativ Maximale Leistungsaufnahme …………………………….. 10,0 A Abmessungen (B × H × T): DIN Einbaugröße ……
93 De Deutsch
Hoofdstuk 01 Vóór u begint Hartelijk dank voor uw vertrouwen in ons bij de aankoop van dit Pioneer-product Lees deze handleiding voordat u het product in gebruik neemt zodat u het goed leert gebruiken. Lees vooral de gedeelten die met WAARSCHUWING en LET OP gemarkeerd zijn aandachtig. Bewaar deze
Hoofdstuk Bediening van het toestel Hoofdtoestel Onderdeel Onderdeel DEH-3400UB 1 12 3 4 5 6 h (uitwerpen) (lijst) 2 78 9 a b Onderdeel 1 2 c de h (uitwerpen) (lijst) 8 9 c/d MULTI-CONTROL (M.C.) a BAND/ (iPodbediening) 4 SRC/OFF b 1 t/m 6 5 Laadsleuf voor disc c PTY d AUX-ingang (3,5mm-stereoplug)
Hoofdstuk 02 Bediening van het toestel TITLE (taalinstelling) Dit toestel kan tekstinformatie bij een gecomprimeerd audiobestand in West-Europese talen en Russisch weergeven. ! Als de gebruikte taal niet overeenkomt met de taalinstelling van dit toestel, wordt tekst wellicht niet correct
Hoofdstuk Bediening van het toestel Handmatig afstemmen (stap voor stap) 1 Druk op c of d. ! Als PCH (voorkeuzezender) is geselecteerd in SEEK kunt u niet handmatig afstemmen. U moet MAN (handmatig afstemmen) selecteren in SEEK. Raadpleeg SEEK (instelling linker/ rechter toets) op de volgende
Hoofdstuk 02 Bediening van het toestel U kunt PTY-informatie (programmatype-informatie) gebruiken om op een bepaalde zender af te stemmen. 1 Druk op M.C. om de instellingenmodus weer te geven. 2 Draai aan M.C. en selecteer de gewenste instelling. NEWS/INFO—POPULAR—CLASSICS— OTHERS 3 Druk op M.C. om
Hoofdstuk Bediening van het toestel Het afspelen onderbreken 1 Druk op 4/PAUSE om het afspelen te onderbreken (pauze) of te hervatten. De geluidskwaliteit van gecomprimeerde audio verbeteren (sound retriever) 1 Druk op 3/S.Rtrv om over te schakelen tussen: 1—2—OFF (uit) 1 heeft effect bij lagere
Hoofdstuk 02 Bediening van het toestel 1 Houd M.C. ingedrukt om naar de gekoppelde weergavemodus over te schakelen. 2 Draai aan M.C. om een andere modus te kiezen; druk erop om een modus te selecteren. ! ARTIST – Een album van de huidige artiest afspelen. ! ALBUM – Een song van het huidige album
Hoofdstuk Bediening van het toestel FAD/BAL (fader/balansinstelling) 1 Druk op M.C. om de instellingenmodus weer te geven. 2 Druk op M.C. om over te schakelen tussen de fader (voor/achter) en de balans (links/rechts). 3 Draai aan M.C. om de luidsprekerbalans te regelen. ! Als de achteruitgang en
Hoofdstuk 02 Bediening van het toestel Deze instelling maakt het mogelijk de bron automatisch naar USB/iPod te laten overschakelen. 1 Druk op M.C. om Plug en Play in of uit te schakelen. ON – Wanneer u een USB-opslagapparaat of iPod aansluit, wordt de bron (afhankelijk van het type apparaat)
Hoofdstuk Bediening van het toestel Opmerking Raadpleeg De toetskleur in de lijst selecteren op de vorige bladzijde voor meer informatie over de kleurenlijst. De toets- en displaykleur in de lijst selecteren Alleen voor DEH-3400UB U kunt zelf de gewenste kleuren selecteren voor de toetsen en het
Hoofdstuk 03 Installatie Installatie — Verwijder nooit de isolatie van de voedingskabel van dit toestel om andere apparaten van stroom te voorzien. De stroomcapaciteit van de voedingskabel is beperkt. — Gebruik een zekering met het voorgeschreven vermogen. — Verbind de negatieve luidsprekerkabel
Hoofdstuk Installatie 03 Installatie ! Als u een subwoofer van 70 W (2 Ω) gebruikt, moet u de subwoofer aansluiten op de violette en zwart-violette draden van dit toestel. Sluit niets aan op de groene en groen-zwarte draden. ! Dit toestel werkt het beste als het wordt geplaatst onder een hoek van
Aanhangsel Aanvullende informatie Problemen verhelpen Symptoom Oorzaak Actie De displayver- De demostand Schakel de demolichting gaat is ingeschakeld. weergave uit. willekeurig aan en uit. Het display keert automatisch terug naar het gewone display. U hebt gedurende ongeveer 30 seconden geen
Aanhangsel Aanvullende informatie Aanvullende informatie Melding Oorzaak Actie Melding Oorzaak Actie Melding Oorzaak CHECK USB Er is kortsluiting opgetreden in de USB-aansluiting of de USBkabel. Controleer of de USB-stekker en de USB-kabel niet ergens ingeklemd zijn of beschadigd zijn. ERROR-19
Aanhangsel Aanvullende informatie Bij het gebruik van discs waarvan de labeloppervlakken geprint kunnen worden, de instructies en waarschuwingen van de discs controleren. Afhankelijk van de disc kan laden en uiterpen niet mogelijk zijn. Het gebruik van deze discs kan deze apparatuur beschadigen.
Aanhangsel Aanvullende informatie USB-opslagapparaat Mappenhiërarchie: maximaal acht niveaus diep (Voor praktisch gebruik kunt u beter niet meer dan twee niveaus gebruiken). Afspeelbare mappen: maximaal 500 Afspeelbare bestanden: maximaal 15 000 Afspelen van auteursrechtelijk beschermde bestanden:
Aanhangsel Aanvullende informatie WMA Windows Media is een gedeponeerd handelsmerk of een handelsmerk van Microsoft Corporation in de Verenigde Staten en/of in andere landen. Dit product bevat technologie die het eigendom is van Microsoft Corporation en die niet gebruikt of gedistribueerd mag
111 Nl Nederlands
Раздел 01 Перед началом эксплуатации Благодарим Вас за покупку этого изделия компании PIONEER Для обеспечения правильности эксплуатации внимательно прочитайте данное руководство перед началом использования изделия. Особенно важно, чтобы Вы прочли и соблюдали инструкции, помеченные в данном
Раздел Управление устройством Основное устройство Элемент Элемент h (извлечение) 8 (назад/дисплей) 9 c/d DEH-3400UB 1 12 3 4 5 6 2 78 9 a b Элемент c de 3 MULTI-CONTROL (M.C.) a BAND/ (управление iPod) 4 SRC/OFF b 1 до 6 5 Щель для загрузки диска c PTY d Вход AUX (стереоразъем 3,5 мм) e Кнопка
Раздел 02 Управление устройством CLOCK SET (установка часов) 1 Установите часы, вращая M.C. 2 Нажмите кнопку M.C., чтобы выбрать минуты. 3 Установите минуты, вращая M.C. 4 Нажмите M.C., чтобы подтвердить выбор. FM STEP (шаг настройки в FM-диапазоне) Обычно шаг настройки в FM-диапазоне, используемый
Раздел Управление устройством Тюнер Основные операции Выбор диапазона 1 Нажимайте кнопку BAND/ , пока на дисплее не отобразится нужный диапазон (F1, F2, F3 для FM или MW/LW). Вызов сохраненных станций 1 Нажимайте кнопку c или d. ! Если для параметра SEEK выбрано значение MAN (настройка вручную),
Раздел 02 Управление устройством BSM (запоминание лучших станций) Функция BSM (запоминание лучших станций) позволяет автоматически сохранять в памяти устройства шесть станций с самым мощным сигналом в порядке убывания его мощности. 1 Нажмите M.C., чтобы включить функцию BSM. Для отмены режима
Раздел Управление устройством Выбор и воспроизведение фалов/дорожек из списка 1 Нажмите кнопку , чтобы отобразить список названий файлов/дорожек. 2 С помощью M.C. выберите нужное имя файла (или папки). Выбор названия файла или папки 1 Вращайте M.C. Воспроизведение 1 Выберите файл или дорожку и
Раздел 02 Управление устройством Примечания ! iPod можно включить или выключить, если выбран режим управления CTRL AUDIO. ! Перед подключением iPod к устройству отключите от него наушники. ! Выключение iPod происходит примерно через две минуты после установки ключа зажигания в положение OFF.
Раздел Управление устройством Управление функциями iPod с устройства iPod Можно вывести звук из приложений iPod на громкоговорители автомобиля, если выбран режим CTRL APP. ! Эта функция несовместима с моделью iPod nano 1 поколения. Режим APP несовместим со следующими моделями iPod. ! iPhone 4
Раздел 02 Управление устройством FAD/BAL (регулировка уровня сигнала/баланса) 1 Для вызова меню настройки нажмите M.C. 2 Нажимайте M.C. для переключения между настройками уровня сигнала (передние/задние) и баланса (правые/левые). 3 Для регулировки баланса громкоговорителей вращайте M.C. ! Если
Раздел Управление устройством Устройство может автоматически искать другую станцию с такой же программой даже во время вызова предварительной настройки. 1 Нажмите M.C., чтобы включить или выключить автоматический поиск по идентификатору программы. AUX (вспомогательный вход) Активируйте эту
Раздел 02 Управление устройством 3 Поворачивайте M.C., чтобы выбрать цвет подсветки. Можно выбрать один из цветов из следующего списка. Управление устройством 3 Поворачивайте M.C., чтобы выбрать цвет подсветки. Можно выбрать один из цветов из следующего списка. ! 30 запрограммированных цветов (от
Раздел Установка Соединения F O N OF Важно ! При установке данного устройства в автомобиле, в котором отсутствует положение ключа зажигания АСС, красный кабель должен быть подключен к клемме, которая определяет рабочее положение ключа зажигания; в противном случае может возникнуть утечка тока
Раздел 03 Установка 9 Синий/белый Расположение штекера разъема ISO на различных автомобилях может отличаться. Если штекер 5 предназначен для управления антенной, подсоедините 9 к b. На других автомобилях подключать 9 к b запрещается. a Синий/белый Подключите к клемме панели управления усилителя
Раздел Установка 5 Винт (M4 ×  # Убедитесь, что устройство надежно закреплено в гнезде. Неустойчивость устройства может привести к его выпадению и неполадкам в работе. Заднее крепление стандарта DIN 1 Совместите отверстия на кронштейне и боковых панелях устройства. 2 Затяните по два винта с
Приложение Дополнительная информация Сообщение Причина Действие Сообщение Причина ERROR-23 Формат диска не поддерживается. Замените диск. FRMT READ FRMT READ Иногда происходит задержка между началом воспроизведения и появлением звука. Звук появится, когда с дисплея исчезнет сообщение. На диске
Приложение Дополнительная информация Сообщение Причина ERROR-19 Сбой связи. Сбой iPod. ERROR-23 Запоминающее устройство USB не отформатировано в системе FAT12, FAT16 или FAT32. Дополнительная информация Действие Сообщение Причина Выполните следующие действия. – Установите ключ зажигания в положение
Приложение Дополнительная информация iPod Не оставляйте iPod в местах с высокой температурой воздуха. Чтобы устройство функционировало надлежащим образом, подключите iPod с помощью кабеля dock connector непосредственно к данному устройству. При движении автомобиля надежно закрепите iPod. Не роняйте
Приложение Дополнительная информация Запоминающее устройство USB, содержащее разделы: воспроизводится только первый раздел. При начале воспроизведения аудиофайлов на запоминающем устройстве USB, содержащем разветвленные иерархии папок, может возникать небольшая задержка. ВНИМАНИЕ ! Компания Pioneer
Приложение Дополнительная информация Д: Б Д: Б Д: Б Д: Б Д: Б :Х :Ц :Ч : Ш, Щ :Ъ :Ы :Ь :Э :Ю :Я Д: Дисплей Б: Буква Авторское право и товарные знаки iTunes Apple и iTunes являются торговыми знаками компании Apple Inc., зарегистрированными в США и других странах. MP3 Поставка этого изделия дает
Приложение Дополнительная информация MW-тюнер Диапазон частот …………. от 531 кГц до 1 602 кГц Полезная чувствительность …………………………….. 25 мкВ (отношение сигнал/ шум: 20 дБ) Отношение сигнал/шум …………………………….. 62 дБ (сеть IEC-A) LW-тюнер Диапазон
PIONEER CORPORATION 1-1, Shin-ogura, Saiwai-ku, Kawasaki-shi, Kanagawa 212-0031, JAPAN Импортер ООО “ПИОНЕР РУС” 125040, Россия, г. Москва, ул. Правды, д.26 Тел.: +7(495) 956-89-01 PIONEER ELECTRONICS (USA) INC. P.O. Box 1540, Long Beach, California 90801-1540, U.S.A. TEL: (800) 421-1404 PIONEER
Раздел: Авто, мото оборудование и транспорт
Тип: Автомобильная магнитола с CD MP3
Характеристики, спецификации
Радиоприемник:
есть, цифровой тюнер
Blu-ray проигрыватель:
нет
Форматы:
CD-Audio, MP3, WMA
Формат дисплея:
монохромный
Инфракрасный пульт дистанционного управления:
нет
Пауза при разговоре по телефону:
есть
USB на передней панели:
есть
Вход аудио на передней панели:
есть
Выходы:
PreAmp тыл, PreAmp сабвуфер
Поддержка технологии «Bluetooth»:
нет
Подсоединение по стандарту ISO:
есть
Поддержка диапазонов:
FM, СВ, ДВ
Поддержка технологии «RDS»:
RDS, RDS/EON, RDS/PTY
Тюнер с дальним приёмом:
есть
Размеры (ШхВхГ):
178x50x160 мм
Инструкция к Автомобильной магнитоле с CD MP3 Pioneer DEH-3400UB

CD RDS RECEIVER
AUTORADIO CD RDS
SINTOLETTORE CD RDS
English NederlandsDeutschEspañolItalianoFrançais Русский
REPRODUCTOR DE CD CON RECEPTOR RDS
CD RDS-EMPFÄNGER
CD RDS-ONTVANGER
CD RDS ПРИЕМНИК
Owner’s Manual
Mode d’emploi
DEH-3400UB
Manuale d’istruzioni
Manual de instrucciones
DEH-2400UB
Bedienungsanleitung
Handleiding
Руководство пользователя
Section
01
Before you start
Before you start
Thank you for purchasing this PIONEER
About this unit
Note
product
Function setting operations are completed even
To ensure proper use, please read through this
The tuner frequencies on this unit are allocated
if the menu is cancelled before the operations
manual before using this product. It is especially
for use in Western Europe, Asia, the Middle
are confirmed.
important that you read and observe WARN-
East, Africa and Oceania. Use in other areas
INGs and CAUTIONs in this manual. Please
may result in poor reception. The RDS (radio
keep the manual in a safe and accessible place for
data system) function only operates in areas
About this manual
future reference.
with broadcasting RDS signals for FM stations.
! In the following instructions, USB memories
and USB audio players are collectively re-
CAUTION
ferred to as “USB storage device”.
! In this manual, iPod and iPhone will be re-
This product is a class 1 laser product classi-
ferred to as “iPod”.
fied under the Safety of laser products, IEC
60825-1:2007, and contains a class 1M laser
module. To ensure continued safety, do not re-
Demo mode
If you want to dispose this product, do not
move any covers or attempt to gain access to
the inside of the product. Refer all servicing to
Important
mix it with general household waste. There is
a separate collection system for used elec-
qualified personnel.
! Failure to connect the red lead (ACC) of this
tronic products in accordance with legislation
unit to a terminal coupled with ignition
that requires proper treatment, recovery and
switch on/off operations may lead to battery
recycling.
drain.
! Remember that if the feature demo contin-
CAUTION—CLASS 1M INVISIBLE LASER
ues operating when the car engine is turned
Private households in the member states of the
RADIATION WHEN OPEN, DO NOT VIEW
off, it may drain battery power.
DIRECTLY WITH OPTICAL INSTRUMENTS.
EU, in Switzerland and Norway may return their
used electronic products free of charge to desig-
The demo starts automatically if you do not oper-
nated collection facilities or to a retailer (if you
ate this unit within about 30 seconds since the
purchase a similar new one).
unit was last operated or if the ignition switch is
For countries not mentioned above, please con-
set to ACC or ON while the unit is turned off. To
CAUTION
tact your local authorities for the correct method
cancel the demo mode, you need to display the
! Do not allow this unit to come into contact
of disposal.
initial settings. Select DEMO (demo display set-
with liquids. Electrical shock could result.
By doing so you will ensure that your disposed
ting) and turn off the demo display. For details,
Also, damage to this unit, smoke, and over-
product undergoes the necessary treatment, re-
refer to Initial settings on page 9.
heating could result from contact with
covery and recycling and thus prevent potential
liquids.
negative effects on the environment and human
! The Pioneer CarStereo-Pass is for use only in
In case of trouble
health.
Germany.
! Always keep the volume low enough to hear
Should this unit fail to operate properly, please
outside sounds.
contact your dealer or nearest authorized
! Avoid exposure to moisture.
PIONEER Service Station.
! If the battery is disconnected or discharged,
any preset memory will be erased.
2
En
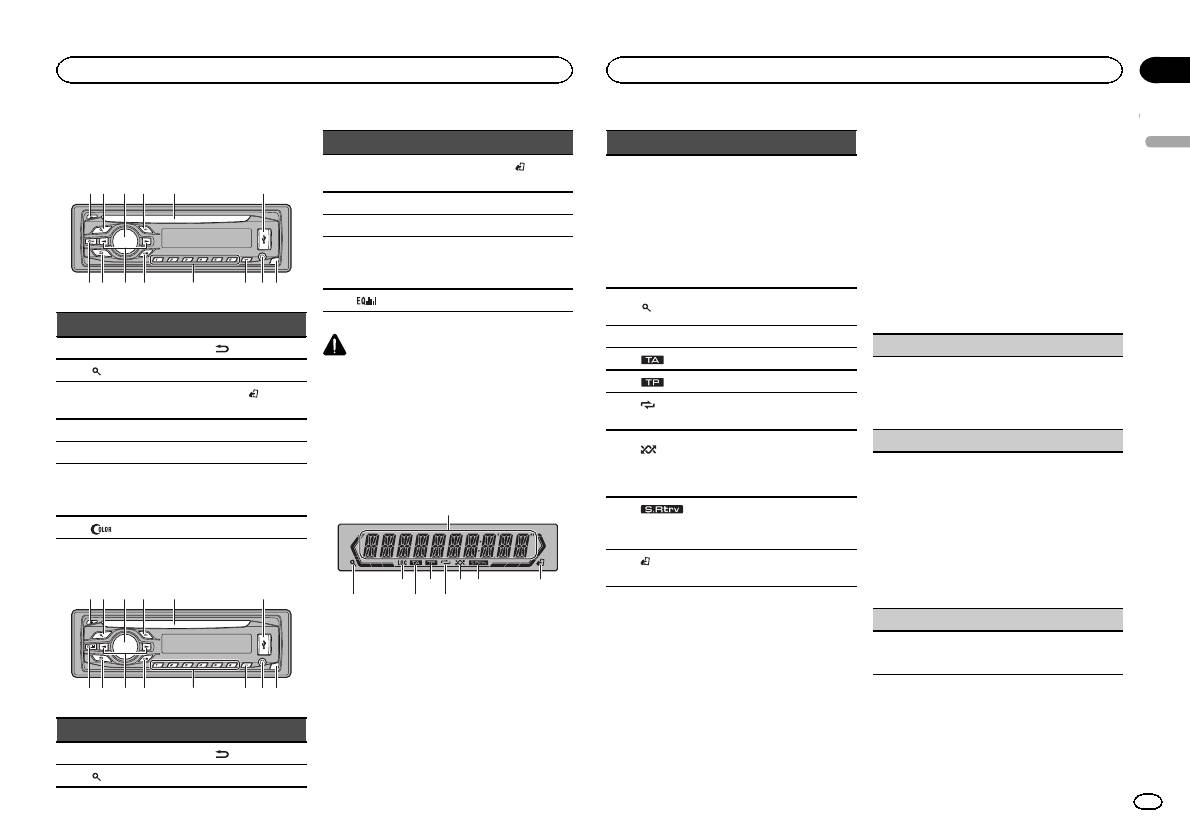
Head unit
DEH-3400UB
b c dea87
12 3 4 5 6
9
Part Part
1 h (eject) 8
(back/display)
2
(list) 9 c/d
MULTI-CONTROL
BAND/
(iPod
3
a
(M.C.)
control)
4 SRC/OFF b 1 to 6
5 Disc loading slot c PTY
AUX input jack
6 USB port d
(3.5 mm stereo
jack)
7
(color) e Detach button
DEH-2400UB
b c dea87
12 3 4 5 6
9
Part Part
MULTI-CONTROL
BAND/
(iPod
3
a
(M.C.)
control)
4 SRC/OFF b 1 to 6
5 Disc loading slot c PTY
AUX input jack
6 USB port d
(3.5 mm stereo
jack)
7
e Detach button
CAUTION
! Use an optional Pioneer USB cable (CD-
U50E) to connect the USB audio player/USB
memory as any device connected directly to
the unit will protrude out from the unit and
may be dangerous.
! Do not use unauthorized products.
Display indication
1
87 93 5
Part Part
1 h (eject) 8
(back/display)
2
(list) 9 c/d
2 4 6
Section
Operating this unit
Operating this unit
02
2 Turn M.C. to switch to YES. Press M.C. to
Indicator State
select.
English
# If you do not operate for 30 seconds, the set up
! Tuner: band and frequency
menu will not be displayed.
! RDS: program service
# If you prefer not to set up at this time, turn M.C.
Main dis-
name, PTY information and
to switch to NO. Press to select.
1
play sec-
other literal information
If you select NO, you cannot set up in the set up
tion
! Built-in CD, USB storage
menu.
device and iPod: elapsed
playback time and text in-
3 Perform the following procedures to set
formation
the menu.
The list function is being oper-
To proceed to the next menu option, you need to
2
(list)
ated.
confirm your selection.
3 LOC Local seek tuning is on.
CLOCK SET (setting the clock)
4
(TA) TA function is on.
1 Turn M.C. to adjust hour.
5
(TP) A TP station is tuned in.
2 Press M.C. to select minute.
(re-
3 Turn M.C. to adjust minute.
6
Track or folder repeat is on.
peat)
4 Press M.C. to confirm the selection.
Random play is on.
FM STEP (FM tuning step)
(ran-
The iPod source is selected
7
dom/shuf-
Normally, the FM tuning step employed by seek
and the shuffle or shuffle all
fle)
tuning is 50 kHz. When AF or TA is on, the tuning
function is on.
step automatically changes to 100 kHz. It may be
preferable to set the tuning step to 50 kHz when
The sound retriever function is
8
(sound re-
AF is on.
on.
triever)
! The tuning step remains at 50 kHz during man-
ual tuning.
(iPod
This unit’s iPod function is op-
9
1 Turn M.C. to select the FM tuning step.
control)
erated from your iPod.
50 (50 kHz)—100 (100 kHz)
2 Press M.C. to confirm the selection.
DEMO (demo display setting)
Set up menu
When you turn the ignition switch to ON after in-
1 Turn M.C. to set the demo display to on or off.
stallation, set up menu appears on the display.
2 Press M.C. to confirm the selection.
You can set up the menu options below.
1 After installation of this unit, turn the
ignition switch to ON.
SET UP appears.
En
3

Section
02
Operating this unit
Operating this unit
TITLE (multi-language)
Removing the front panel to protect your unit from
Selecting a source
Tuner
theft
1 Press SRC/OFF to cycle between:
This unit can display the text information of a com-
Basic operations
1 Press the detach button to release the front
TUNER (tuner)—CD (built-in CD player)—USB
pressed audio file even if they are embedded in a
panel.
(USB)/iPod (iPod)—AUX (AUX)
Western European or Russian language.
2 Push the front panel upward (M) and then pull
Selecting a band
! If the embedded language and the selected
Adjusting the volume
it toward (N) you.
1 Press BAND/
until the desired band (F1, F2,
language setting are not the same, text infor-
1 Turn M.C. to adjust the volume.
F3 for FM or MW/LW) is displayed.
mation may not display properly.
! Some characters may not be displayed prop-
Recalling preset stations
erly.
1 Press c or d.
CAUTION
1 Turn M.C. to select the desired setting.
! If MAN (manual tuning) is selected in SEEK,
For safety reasons, park your vehicle when re-
EUR (European)—RUS (Russian)
you cannot recall preset stations. You need to
moving the front panel.
2 Press M.C. to confirm the selection.
select PCH (preset channel) in SEEK. For de-
QUIT appears.
3 Always keep the detached front panel in a pro-
Note
tails about the settings, refer to SEEK (left/right
tection device such as a protection case.
key setting) on page 6.
When this unit’s blue/white lead is connected to
the vehicle’s auto-antenna relay control termi-
Manual tuning (step by step)
4 To finish your settings, turn M.C. to select
Re-attaching the front panel
1 Slide the front panel to the left.
nal, the vehicle’s antenna extends when this
1 Press c or d.
YES. Press to select.
unit’s source is turned on. To retract the anten-
! If PCH (preset channel) is selected in SEEK,
# If you prefer to change your setting again, turn
Make sure to insert the tabs on the left side of
the head unit into the slots on the front panel.
na, turn the source off.
you cannot tune up or down manually. You
M.C. to switch to NO. Press to select.
need to select MAN (manual tuning) in SEEK.
Notes
For details about the settings, refer to SEEK
Menu operations identical
! You can set up the menu options in the initial
(left/right key setting) on page 6.
settings. For details about the settings, refer
for set up menu/function
Seeking
to Initial settings on page 9.
settings/audio adjustments/
1 Press and hold c or d, and then release.
! You can cancel set up menu by pressing
initial settings/lists
You can cancel seek tuning by briefly pressing
SRC/OFF.
2 Press the right side of the front panel until it is
c or d.
firmly seated.
Returning to the previous display
While pressing and holding c or d, you can
Basic operations
If you cannot attach the front panel to the
Returning to the previous list (the folder one level
skip stations. Seek tuning starts as soon as
head unit successfully, make sure that you are
higher)
you release c or d.
Important
placing the front panel onto the head unit cor-
1 Press
.
! Handle gently when removing or attaching
Note
rectly. Forcing the front panel into place may
the front panel.
Returning to the ordinary display
This unit’s AF (alternative frequencies search)
result in damage to the front panel or head
! Avoid subjecting the front panel to excessive
Canceling the initial setting menu/set up menu
function can be turned on and off. AF should be
unit.
shock.
1 Press BAND/
.
off for normal tuning operation (refer to AF (al-
! Keep the front panel out of direct sunlight
Turning the unit on
ternative frequencies search) on the next page).
Returning to the ordinary display from the list
and high temperatures.
1 Press SRC/OFF to turn the unit on.
1 Press BAND/
.
! To avoid damaging the device or vehicle inte-
Turning the unit off
rior, remove any cables and devices attached
1 Press and hold SRC/OFF until the unit turns
to the front panel before detaching it.
off.
4
En
Section
Operating this unit
Operating this unit
02
Storing and recalling stations
Searching for an RDS station by PTY information
OTHERS
Local seek tuning lets you tune in to only those
English
for each band
You can search for general types of broadcasting
radio stations with sufficiently strong signals for
EDUCATE (Education), DRAMA (Drama), CUL-
programs, such as those listed in the following
good reception.
Using preset tuning buttons
TURE (Culture), SCIENCE (Science), VARIED (Var-
section. Refer to this page.
1 Press M.C. to select the desired setting.
ied), CHILDREN (Children’s), SOCIAL (Social
1 When you find a station that you want
1 Press PTY.
FM: OFF—LV1—LV2—LV3—LV4
affairs), RELIGION (Religion), PHONE IN (Phone
to store in memory, press one of the preset
2 Turn M.C. to select a program type.
MW/LW: OFF—LV1 —LV2
in), TOURING (Travel), LEISURE (Leisure), DOCU-
tuning buttons (1 to 6) and hold until the
NEWS/INFO—POPULAR—CLASSICS—
The highest level setting allows reception of
MENT (Documentaries)
preset number stops flashing.
OTHERS
only the strongest stations, while lower levels
3 Press M.C. to begin the search.
allow the reception of weaker stations.
2 Press one of the preset tuning buttons (1
The unit searches for a station broadcasting
Function settings
PTY SEARCH (program type selection)
to 6) to select the desired station.
that type of program. When a station is found,
its program service name is displayed.
1 Press M.C. to display the main menu.
You can tune in to a station using PTY (program
Switching the RDS display
PTY (program type ID code) information is
type) information.
listed in the following section. Refer to this
2 Turn M.C. to change the menu option
1 Press M.C. to display the setting mode.
% Press
.
page.
and press to select FUNCTION.
2 Turn M.C. to select the desired setting.
Program ser vice name—PTY information—En-
! To cancel the search, press M.C. again.
NEWS/INFO—POPULAR—CLASSICS—
tertainment—Frequency
! The program of some stations may differ
3 Turn M.C. to select the function.
OTHERS
# PTY information and the frequency appear on the
from that indicated by the transmitted PTY.
After selecting, perform the following proce-
3 Press M.C. to begin the search.
display for eight seconds.
! If no station is broadcasting the type of
dures to set the function.
The unit searches for a station broadcasting
# Depending on the band, text information can be
program you searched for, NOT FOUND is
# If MW/LW band is selected, only BSM, LOCAL
that type of program. When a station is found,
changed.
displayed for about two seconds and then
and SEEK are available.
its program service name is displayed.
the tuner returns to the original station.
For PTY (program type ID code) information,
Using PTY functions
BSM (best stations memory)
refer to this page.
You can tune in to a station using PTY (program
BSM (best stations memory) automatically stores
The program of some stations may differ from
type) information.
PTY list
that indicated by the transmitted PTY.
the six strongest stations in the order of their sig-
nal strength.
If no station is broadcasting the type of pro-
NEWS/INFO
1 Press M.C. to turn BSM on.
gram you searched for, NOT FOUND is dis-
played for about two seconds and then the
NEWS (News), AFFAIRS (Current affairs), INFO
To cancel, press M.C. again.
tuner returns to the original station.
(Information), SPORT (Sports), WEATHER (Weath-
REGION (regional)
er), FINANCE (Finance)
TA (traffic announcement standby)
When AF is used, the regional function limits the
POPULAR
selection of stations to those broadcasting region-
1 Press M.C. to turn traffic announcement
POP MUS (Popular music), ROCK MUS (Rock
al programs.
standby on or off.
music), EASY MUS (Easy listening), OTH MUS
1 Press M.C. to turn the regional function on or
AF (alternative frequencies search)
(Other music), JAZZ (Jazz), COUNTRY (Country
off.
music), NAT MUS (National music), OLDIES
LOCAL (local seek tuning)
1 Press M.C. to turn AF on or off.
(Oldies music), FOLK MUS (Folk music)
NEWS (news program interruption)
CLASSICS
1 Press M.C. to turn the NEWS function on or
L. CLASS (Light classical), CLASSIC (Classical)
off.
En
5
Section
02
Operating this unit
Operating this unit
2 Turn M.C. to change the menu option
SEEK (left/right key setting)
Switching between compressed audio and CD-DA
Viewing a list of the files (or folders) in the se-
and press to select FUNCTION.
1 Press BAND/
.
lected folder
You can assign a function to the left and right keys
1 When a folder is selected, press M.C.
of the unit.
Switching between playback memory devices
3 Turn M.C. to select the function.
Select MAN (manual tuning) to tune up or down
You can switch between playback memory devices
Playing a song in the selected folder
After selecting, perform the following proce-
manually or select PCH (preset channel) to switch
on USB storage devices with more than one Mass
1 When a folder is selected, press and hold M.C.
dures to set the function.
between preset channels.
Storage Device-compatible memory device.
1 Press M.C. to select MAN or PCH.
1 Press BAND/
.
REPEAT (repeat play)
! You can switch between up to 32 different
Advanced operations using
memory devices.
special buttons
1 Press M.C. to select a repeat play range.
CD/CD-R/CD-RW and USB
For details, refer to Selecting a repeat play range
Note
Selecting a repeat play range
on this page.
storage devices
Disconnect USB storage devices from the unit
1 Press 6/
to cycle between the following:
RANDOM (random play)
when not in use.
CD/CD-R/CD-RW
Basic operations
! ALL – Repeat all tracks
1 Press M.C. to turn random play on or off.
Displaying text information
! ONE – Repeat the current track
Playing a CD/CD-R/CD-RW
! FLD – Repeat the current folder
PAUSE (pause)
1 Insert the disc into the disc loading slot with
Selecting the desired text information
USB audio player/USB memory
the label side up.
1 Press
.
! ALL – Repeat all files
1 Press M.C. to pause or resume.
Ejecting a CD/CD-R/CD-RW
! Depending on the version of iTunes used to
! ONE – Repeat the current file
S.RTRV (sound retriever)
1 Press h.
write MP3 files to a disc or media file types, in-
! FLD – Repeat the current folder
compatible text stored within an audio file may
Automatically enhances compressed audio and
Playing songs on a USB storage device
Playing tracks in random order
be displayed incorrectly.
restores rich sound.
1 Open the USB port cover.
1 Press 5/
to turn random play on or off.
! Text information items that can be changed
1 Press M.C. to select the desired setting.
2 Plug in the USB storage device using a USB
Tracks in a selected repeat range are played in
depend on the media.
For details, refer to Enhancing compressed
cable.
random order.
audio and restoring rich sound (sound retriever)
A song will be played automatically.
! To change songs during random play, press d
on this page.
Selecting and playing files/
to switch to the next track. Pressing c restarts
Stopping playback of files on a USB storage de-
playback of the current track from the begin-
vice
tracks from the name list
ning of the song.
1 You may disconnect the USB storage device at
iPod
1 Press
to switch to the file/track name
any time.
Pausing playback
list mode.
The unit stops playback.
1 Press 4/PAUSE to pause or resume.
Basic operations
Selecting a folder
2 Use M.C. to select the desired file name
Enhancing compressed audio and restoring rich
Playing songs on an iPod
1 Press 1/
or 2/ .
(or folder name).
sound (sound retriever)
1 Open the USB port cover.
1 Press 3/S.Rtrv to cycle between:
Selecting a track
2 Connect an iPod to the USB cable using an
Changing the file or folder name
1—2—OFF (off)
1 Press c or d.
iPod Dock Connector.
1 Turn M.C.
1 is effective for low compression rates, and 2
A song will be played automatically.
Fast forwarding or reversing
is effective for high compression rates.
Playing
1 Press and hold c or d.
Selecting a song (chapter)
1 When a file or track is selected, press M.C.
! When playing compressed audio, there is no
1 Press c or d.
Function settings
sound during fast forward or reverse.
Returning to root folder
1 Press M.C. to display the main menu.
1 Press and hold BAND/
.
6
En
Section
Operating this unit
Operating this unit
02
Selecting an album
Playing a song in the selected category
Pausing playback
Operating this unit’s iPod
English
1 Press 1/
or 2/ .
1 When a category is selected, press and hold
1 Press 4/PAUSE to pause or resume.
function from your iPod
! The album may not be selected correctly if the
M.C.
You can listen to the sound from your iPod appli-
Enhancing compressed audio and restoring rich
iPod has more than one album with the same
cations using your car’s speakers, when
Searching the list by alphabet
sound (sound retriever)
title on it. Select the album you want to listen
CTRL APP is selected.
1 When a list for the selected category is dis-
1 Press 3/S.Rtrv to cycle between:
to using list search. For details, refer to Brows-
! This function is not compatible with iPod
played, press
to switch to alphabet search
1—2—OFF (off)
ing for a song on this page.
nano 1st generation.
mode.
1 is effective for low compression rates, and 2
APP Mode is compatible with the following iPod
Fast forwarding or reversing
! You also can switch to alphabet search
is effective for high compression rates.
models.
1 Press and hold c or d.
mode by turning M.C. twice.
! iPhone 4 (software version 4.1 or later)
2 Turn M.C. to select a letter.
Notes
! iPhone 3GS (soft ware version 3.0 or later)
3 Press M.C. to display the alphabetical list.
Playing songs related to the
! The iPod cannot be turned on or off when the
! To cancel searching, press
.
currently playing song
! iPhone 3G (software version 3.0 or later)
control mode is set to CTRL AUDIO.
! iPhone (software version 3.0 or later)
You can play songs from the following lists.
! Disconnect headphones from the iPod be-
! iPod touch 4th generation (software version
Notes
• Album list of the currently playing artist
fore connecting it to this unit.
4.1 or later)
! You can play playlists created with the PC ap-
• Song list of the currently playing album
! The iPod will turn off about two minutes after
! iPod touch 3rd generation (software version
plication (MusicSphere). The application will
• Album list of the currently playing genre
the ignition switch is set to OFF.
3.0 or later)
be available on our website.
! iPod touch 2nd generation (software version
! Playlists that you created with the PC appli-
1 Press and hold M.C. to switch to link play
3.0 or later)
Displaying text information
cation (MusicSphere) are displayed in abbre-
mode.
! iPod touch 1st generation (software version
viated form.
3.0 or later)
Selecting the desired text information
2 Turn M.C. to change the mode; press to
1 Press
.
Advanced operations using
select.
% Press BAND/
to switch the control
! ARTIST – Plays an album of the artist cur-
special buttons
mode.
rently being played.
Browsing for a song
! CTRL iPod – This unit’s iPod function can be
! ALBUM – Plays a song from the album cur-
Selecting a repeat play range
operated from the connected iPod.
1 Press
to switch to the top menu of list
rently being played.
1 Press 6/
to cycle between the following:
! CTRL APP – Play back the sound from your
search.
! GENRE – Plays an album from the genre cur-
! OFF – Repeat off
iPod applications.
rently being played.
! ONE – Repeat the current song
! CTRL AUDIO – This unit’s iPod function can
2 Use M.C. to select a category/song.
The selected song/album will be played after the
! ALL – Repeat all songs in the selected list
be operated from this unit.
currently playing song.
! You cannot select OFF when CTRL AUDIO is
Changing the name of the song or category
Notes
selected. Refer to Operating this unit’siPod
Notes
1 Turn M.C.
! Switching the control mode to CTRL iPod/
function from your iPod on this page.
! The selected song/album may be canceled if
Playlists—artists—albums—songs—podcasts
CTRL APP pauses song playback. Operate
you operate functions other than link search
—genres—composers—audiobooks
Playing all songs in random order (shuffle all)
the iPod to resume playback.
(e.g. fast forward and reverse).
1 Press 5/
to turn shuffle all on.
! The following functions are still accessible
Playing
! Depending on the song selected to play, the
! When the control mode is set to CTRL iPod/
from the unit even if the control mode is set
1 When a song is selected, press M.C.
end of the currently playing song and the be-
CTRL APP, shuffle play is on.
to CTRL iPod/CTRL APP.
ginning of the selected song/album may be
Viewing a list of songs in the selected category
— Pausing
cut off.
1 When a category is selected, press M.C.
— Fast forward/reverse
— Song up/down
! When the control mode is set to CTRL iPod,
operations are limited as follows:
En
7

Section
02
Operating this unit
Operating this unit
— The function settings are not available.
PAUSE (pause)
FAD/BAL (fader/balance adjustment)
This unit is equipped with a subwoofer output
— The browse function cannot be operated from
which can be turned on or off.
this unit.
1 Press M.C. to pause or resume.
1 Press M.C. to display the setting mode.
1 Press M.C. to select the desired setting.
2 Press M.C. to cycle between fader (front/rear)
NOR (normal phase)—REV (reverse phase)—
Function settings
AUDIO BOOK (audiobook speed)
and balance (left/right).
OFF (subwoofer off)
1 Press M.C. to display the main menu.
3 Turn M.C. to adjust speaker balance.
1 Press M.C. to display the setting mode.
SUB.W CTRL (subwoofer adjustment)
! When the rear output and RCA output setting
2 Turn M.C. to select your favorite setting.
2 Turn M.C. to change the menu option
are SW, you cannot adjust front/rear speaker
! FASTER – Playback at a speed faster than
The cut-off frequency and output level can be ad-
and press to select FUNCTION.
balance. Refer to REAR-SP (rear output setting)
normal
justed when the subwoofer output is on.
on the next page. Refer to PREOUT (preout set-
! NORMAL – Playback at normal speed
Only frequencies lower than those in the selected
3 Turn M.C. to select the function.
ting) on the next page.
! SLOWER – Playback at a speed slower
range are outputted from the subwoofer.
After selecting, perform the following proce-
than normal
! When you select OFF in SUB.W, you cannot se-
PRESET EQ (equalizer recall)
dures to set the function.
3 Press M.C. to confirm the selection.
lect this function. For details, refer to SUB.W
! When the control mode is set to CTRL iPod/
1 Press M.C. to display the setting mode.
(subwoofer on/off setting) on this page.
CTRL APP, only PAUSE or S.RTRV is avail-
S.RTRV (sound retriever)
2 Turn M.C. to select the equalizer.
1 Press M.C. to display the setting mode.
able.
Automatically enhances compressed audio and
DYNAMIC—VOCAL—NATURAL—CUSTOM
2 Press M.C. to cycle between the cut-off fre-
restores rich sound.
—FLAT—POWERFUL
quency and output level of the subwoofer.
REPEAT (repeat play)
1 Press M.C. to select the desired setting.
3 Press M.C. to confirm the selection.
Cut-off frequency (Cut-off frequency display
For details, refer to Enhancing compressed
! You can also switch the equalizer by pressing
flashes.)—Output level (Output level display
1 Press M.C. to select a repeat play range.
audio and restoring rich sound (sound retriever)
repeatedly (DEH-2400UB).
flashes.)
For details, refer to Selecting a repeat play range
on the previous page.
3 Turn M.C. to select the desired setting.
on the previous page.
TONE CTRL (equalizer adjustment)
Cut-off frequency: 50HZ—63HZ—80HZ—
100HZ—125HZ
SHUFFLE (shuffle)
! Adjusted equalizer curve settings are stored in
Output level: –24 to +6
Audio adjustments
CUSTOM.
1 Press M.C. to select your favorite setting.
1 Press M.C. to display the setting mode.
SLA (source level adjustment)
! SNG – Play back songs in the selected list
1 Press M.C. to display the main menu.
2 Press M.C. to select BASS (bass)/MID (mid)/
SLA (Source level adjustment) lets you adjust the
in random order.
TREBLE (treble).
volume level of each source to prevent radical
! ALB – Play back songs from a randomly se-
2 Turn M.C. to change the menu option
3 Turn M.C. to adjust the level.
changes in volume when switching between sour-
lected album in order.
and press to select AUDIO.
Adjustment range: +6 to –6
ces.
! OFF – Cancel random play.
3 Turn M.C. to select the audio function.
LOUD (loudness)
! Settings are based on the FM volume level,
SHUFFLE ALL (shuffle all)
After selecting, perform the following proce-
which remains unchanged.
Loudness compensates for deficiencies in the low-
dures to set the audio function.
! The MW/LW volume level can also be adjusted
1 Press M.C. to turn shuffle all on.
frequency and high-frequency ranges at low vol-
with this function.
To turn off, set SHUFFLE in the FUNCTION
ume.
! When selecting FM as the source, you cannot
menu to off.
1 Press M.C. to select the desired setting.
switch to SLA.
OFF (off)—LOW(low)—HI (high)
1 Press M.C. to display the setting mode.
LINK PLAY (link play)
SUB.W (subwoofer on/off setting)
2 Turn M.C. to adjust the source volume.
1 Press M.C. to display the setting mode.
Adjustment range: +4 to –4
2 Turn M.C. to change the mode; press to select.
3 Press M.C. to confirm the selection.
For details about the settings, refer to Playing
songs related to the currently playing song on
the previous page.
8
En
Section
Operating this unit
Operating this unit
02
Initial settings
Normally, the FM tuning step employed by seek
The rear speaker leads output can be used for full-
When ever scroll is set to ON, recorded text infor-
English
Important
tuning is 50 kHz. When AF or TA is on, the tuning
range speaker or subwoofer connection.
mation scrolls continuously in the display. Set to
step automatically changes to 100 kHz. It may be
If you switch to SW, you can connect a rear speak-
OFF if you prefer the information to scroll just
PW SAVE (power saving) is cancelled if the ve-
preferable to set the tuning step to 50 kHz when
er lead directly to a subwoofer without using an
once.
hicle battery is disconnected and will need to be
AF is on.
auxiliary amp.
1 Press M.C. to turn the ever scroll on or off.
turned back on once the battery is reconnected.
! The tuning step remains at 50 kHz during man-
Initially, REAR-SP is set for rear full-range speaker
When PW SAVE (power saving) is off, depend-
TITLE (multi-language)
ual tuning.
connection (FUL).
ing on connection methods, the unit may con-
1 Press M.C. to select the FM tuning step.
1 Press M.C. to select the desired setting.
This unit can display the text information of a com-
tinue to draw power from the battery if your
50 (50 kHz)—100 (100 kHz)
FUL—SW
pressed audio file even if they are embedded in a
vehicle’s ignition doesn’t have an ACC (acces-
! Even if you change this setting, there will
Western European or Russian language.
sory) position.
AUTO-PI (auto PI seek)
be no output if you select OFF in SUB.W
! If the embedded language and the selected
The unit can automatically search for a different
(Refer to SUB.W (subwoofer on/off setting)
language setting are not the same, text infor-
1 Press and hold SRC/OFF until the unit
station with the same programming, even during
on the previous page).
mation may not display properly.
turns off.
preset recall.
! If you change this setting, subwoofer out-
! Some characters may not be displayed prop-
1 Press M.C. to turn Auto PI seek on or off.
put in the audio menu will return to the fac-
erly.
2 Press SRC/OFF and hold until function
tory settings.
1 Press M.C. to select the desired setting.
name appears in the display.
AUX (auxiliary input)
EUR (European)—RUS (Russian)
PREOUT (preout setting)
Activate this setting when using an auxiliary de-
3 Turn M.C. to select the initial setting.
PW SAVE (power saving)
vice connected to this unit.
The RCA outputs can be used for rear speaker or
After selecting, perform the following proce-
1 Press M.C. to turn AUX on or off.
subwoofer connection.
Switching this function on enables you to reduce
dures to set the initial setting.
If you switch to SW, you can connect a rear speak-
the consumption of battery power.
USB PNP (plug and play)
er lead directly to a subwoofer without using an
! Turning on the source is the only operation al-
CLOCK SET (setting the clock)
This setting allows you to switch your source to
auxiliary amp.
lowed when this function is on.
USB/iPod automatically.
Initially, PREOUT is set for rear full-range speaker
1 Press M.C. to turn the power save on or off.
1 Press M.C. to display the setting mode.
1 Press M.C. to turn the plug and play function
connection (SW).
2 Press M.C. to select the segment of the clock
on or off.
1 Press M.C. to select the desired setting.
display you wish to set.
ON – When a USB storage device/iPod is con-
SW—REA
Hour—Minute
Selecting the illumination color
nected, depending on the type of device, the
! Even if you change this setting, there will
3 Turn M.C. to adjust the clock.
source is automatically switched to USB/iPod
be no output if you select OFF in SUB.W
Only for DEH-3400UB
CLOCK (clock display)
when you turn on the engine. If you disconnect
(Refer to SUB.W (subwoofer on/off setting)
This unit is equipped with multiple-color illumi-
your USB storage device/iPod, this unit’s
on the previous page).
nation. You can select desired colors for the keys
You can turn the clock display on or off.
source is turned off.
! If you change this setting, subwoofer out-
and display of this unit. You also can customize
The clock display disappears temporarily when
OFF – When a USB storage device/iPod is con-
put in the audio menu will return to the fac-
the colors you want to use.
you perform other operations, but the clock dis-
nected, the source is not switched to USB/
tory settings.
play appears again after 25 seconds.
iPod automatically. Please change the source
Selecting the key color from the
1 Press M.C. to turn the clock display on or off.
DEMO (demo display setting)
to USB/iPod manually.
illumination color list
FM STEP (FM tuning step)
REAR-SP (rear output setting)
1 Press M.C. to turn the demo display on or off.
Only for DEH-3400UB
! If PW SAVE is on, DEMO cannot be selected.
You can select desired colors for the keys of this
unit.
SCROLL (scroll mode setting)
1 Press
.
En
9
Section
02
Operating this unit
Operating this unit
2 Turn M.C. to display KEY COLOR and
! CUSTOM (customized illumination color)
2 Turn M.C. to display KEY COLOR or
Sound muting
press to select.
DISP COLOR. Press to select.
4 Press M.C. to confirm the selection.
Sound is muted automatically when:
3 Turn M.C. to select the illumination color.
3 Press M.C. and hold until the customizing
! A call is made or received using a cell phone
Note
You can select one option from the following list.
illumination color setting appears in the dis-
connected to this unit.
! 30 preset colors (WHITE to ROSE)
For details about colors on the list, refer to Se-
play.
! Voice guidance is output from a connected
! SCAN (cycle through all colors)
lecting the key color from the illumination color
Pioneer navigation unit.
! 3 sets of colors (WARM, AMBIENT, CALM)
list on the previous page.
4 Press M.C. to select the primary color.
The sound is turned off, MUTE is displayed and
! CUSTOM (customized illumination color)
R (red)—G (green)—B (blue)
no audio adjustments, except volume control,
Selecting key and display color
are possible. Operation returns to normal when
4 Press M.C. to confirm the selection.
from the illumination color list
5 Turn M.C. to adjust the brightness level.
the phone connection or the voice guidance is
ended.
Only for DEH-3400UB
Adjustment range: 0 to 60
Notes
You can select the desired colors for the keys
# You cannot select a level below 10 for all three of
! When SCAN is selected, the system auto-
and display of this unit.
R (red), G (green), and B (blue) at the same time.
matically cycles through the 30 preset colors.
# You can also perform the same operation on
! When WARM is selected, the system auto-
1 Press
.
other colors.
matically cycles through the warm colors.
! When AMBIENT is selected, the system au-
Notes
2 Turn M.C. to display BOTH COLOR and
tomatically cycles through the ambient col-
! You cannot create a custom illumination
press to select.
ors.
color when SCAN or a set of colors (WARM,
! When CALM is selected, the system auto-
AMBIENT,orCALM) is selected.
3 Turn M.C. to select the illumination color.
matically cycles through the calm colors.
! You can create custom illumination colors
You can select one option from the following list.
! When CUSTOM is selected, the customized
for both KEY COLOR and DISP COLOR.
! 30 preset colors (WHITE to ROSE)
color saved is selected.
! SCAN (cycle through all colors)
! To cancel selecting the illumination color,
press
.
Switching the dimmer setting
4 Press M.C. to confirm the selection.
You can adjust the brightness of illumination.
Selecting the display color from
Notes
the illumination color list
! You cannot select 3 sets of preset colors and
% Press and hold
.
Only for DEH-3400UB
CUSTOM in this function.
You can select the desired colors for the display
! Once you select a color in this function, col-
ors on the keys and display of this unit auto-
Using an AUX source
of this unit.
matically switch to the color you selected.
1 Insert the stereo mini plug into the AUX
1 Press
.
! For details about colors on the list, refer to
input jack.
Selecting the key color from the illumination
2 Turn M.C. to display DISP COLOR and
color list on the previous page.
2 Press SRC/OFF to select AUX as the
press to select.
source.
Customizing the illumination color
3 Turn M.C. to select the illumination color.
Only for DEH-3400UB
Note
You can select one option from the following list.
AUX cannot be selected unless the auxiliary set-
! 30 preset colors (WHITE to ROSE)
1 Press
.
ting is turned on. For more details, refer to AUX
! SCAN (cycle through all colors)
(auxiliary input) on the previous page.
! 3 sets of colors (WARM, AMBIENT, CALM)
10
En
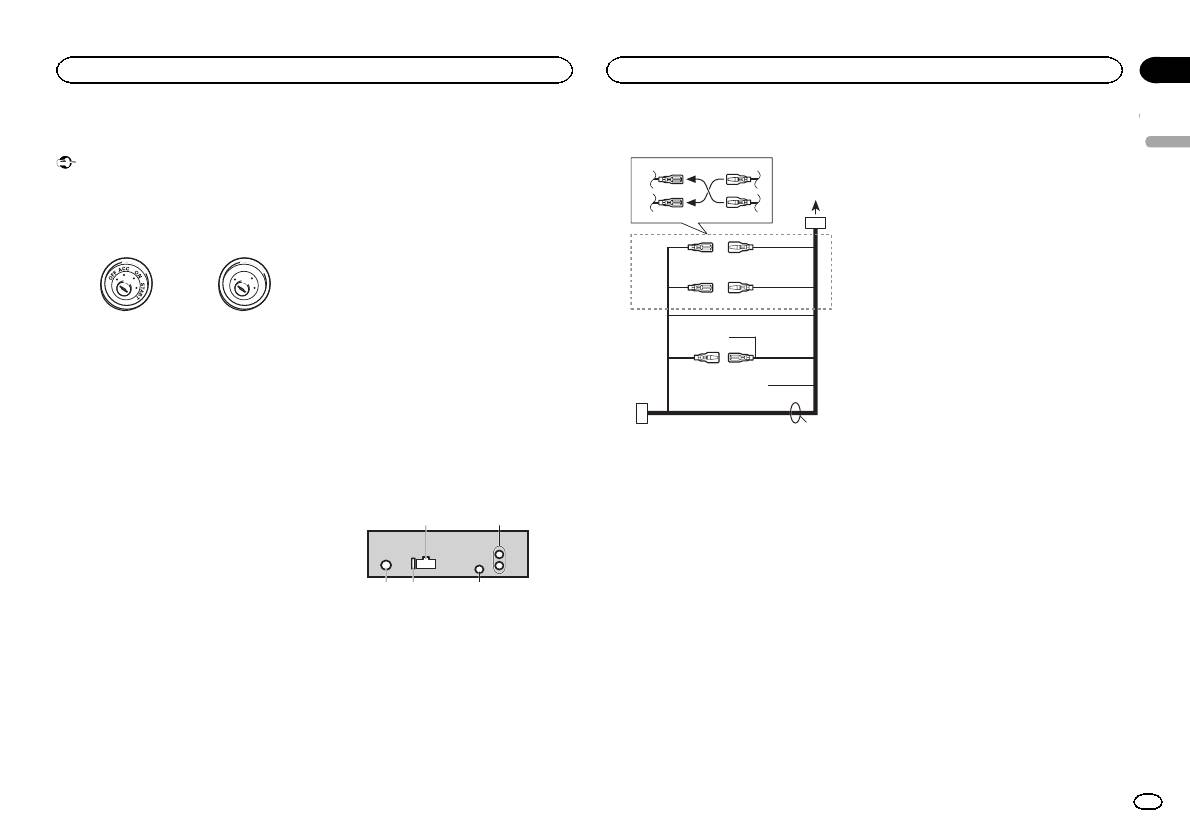
Connections
— Never wire the negative speaker cable directly
to ground.
Important
— Never band together negative cables of multi-
! When installing this unit in a vehicle without
ple speakers.
an ACC (accessory) position on the ignition
! When this unit is on, control signals are sent
switch, failure to connect the red cable to the
through the blue/white cable. Connect this
terminal that detects operation of the ignition
cable to the system remote control of an ex-
key may result in battery drain.
ternal power amp or the vehicle’s auto-anten-
na relay control terminal (max. 300 mA
F
F
O
N
12 V DC). If the vehicle is equipped with a
O
S
A
T
glass antenna, connect it to the antenna
T
R
booster power supply terminal.
! Never connect the blue/white cable to the
ACC position No ACC position
power terminal of an external power amp.
! Use of this unit in conditions other than the
Also, never connect it to the power terminal
following could result in fire or malfunction.
of the auto antenna. Doing so may result in
— Vehicles with a 12-volt battery and negative
battery drain or a malfunction.
grounding.
! The black cable is ground. Ground cables for
— Speakers with 50 W (output value) and 4 ohm
this unit and other equipment (especially,
to 8 ohm (impedance value).
high-current products such as power amps)
! To prevent a short-circuit, overheating or mal-
must be wired separately. If they are not, an
function, be sure to follow the directions
accidental detachment may result in a fire or
below.
malfunction.
— Disconnect the negative terminal of the bat-
tery before installation.
This unit
— Secure the wiring with cable clamps or adhe-
sive tape. Wrap adhesive tape around wiring
1
that comes into contact with metal parts to
protect the wiring.
— Place all cables away from moving parts,
such as the shift lever and seat rails.
— Place all cables away from hot places, such
as near the heater outlet.
— Do not connect the yellow cable to the battery
by passing it through the hole to the engine
compartment.
— Cover any disconnected cable connectors
with insulating tape.
— Do not shorten any cables.
— Never cut the insulation of the power cable of
this unit in order to share the power with
other devices. The current capacity of the
cable is limited.
— Use a fuse of the rating prescribed.
3 45
Power cord
3
4
2
5
6
1
3
4
7
5
6
8
a
9
b
e
2
1 Power cord input
2 Rear output or subwoofer output
3 Antenna input
4 Fuse (10 A)
5 Wired remote input
Hard-wired remote control adaptor can be
connected (sold separately).
d
Section
Installation
Installation
03
9 Blue/white
The pin position of the ISO connector will dif-
English
fer depending on the type of vehicle. Connect
9 and b when Pin 5 is an antenna control
type. In another type of vehicle, never con-
nect 9 and b.
a Blue/white
Connect to system control terminal of the
power amp (max. 300 mA 12 V DC).
b Blue/white
Connect to auto-antenna relay control termi-
nal (max. 300 mA 12 V DC).
c Yellow/black
If you use an equipment with Mute function,
wire this lead to the Audio Mute lead on that
equipment. If not, keep the Audio Mute lead
free of any connections.
c
d Speaker leads
White: Front left +
White/black: Front left *
Gray: Front right +
1 To power cord input
Gray/black: Front right *
2 Depending on the kind of vehicle, the func-
Green: Rear left + or subwoofer +
tion of 3 and 5 may be different. In this
Green/black: Rear left * or subwoofer *
case, be sure to connect 4 to 5 and 6 to
Violet: Rear right + or subwoofer +
3.
Violet/black: Rear right * or subwoofer *
3 Yellow
e ISO connector
Back-up (or accessory)
In some vehicles, the ISO connector may be
4 Yellow
divided into two. In this case, be sure to con-
Connect to the constant 12 V supply termi-
nect to both connectors.
nal.
Notes
5 Red
Accessory (or back-up)
! Change the initial setting of this unit. Refer
6 Red
to REAR-SP (rear output setting) on page 9.
Connect to terminal controlled by ignition
Refer to PREOUT (preout setting) on page 9.
switch (12 V DC).
The subwoofer output of this unit is monau-
7 Connect leads of the same color to each
ral.
other.
! When using a subwoofer of 70 W (2 Ω), be
8 Black (chassis ground)
sure to connect the subwoofer to the violet
and violet/black leads of this unit. Do not
connect anything to the green and green/
black leads.
En
11
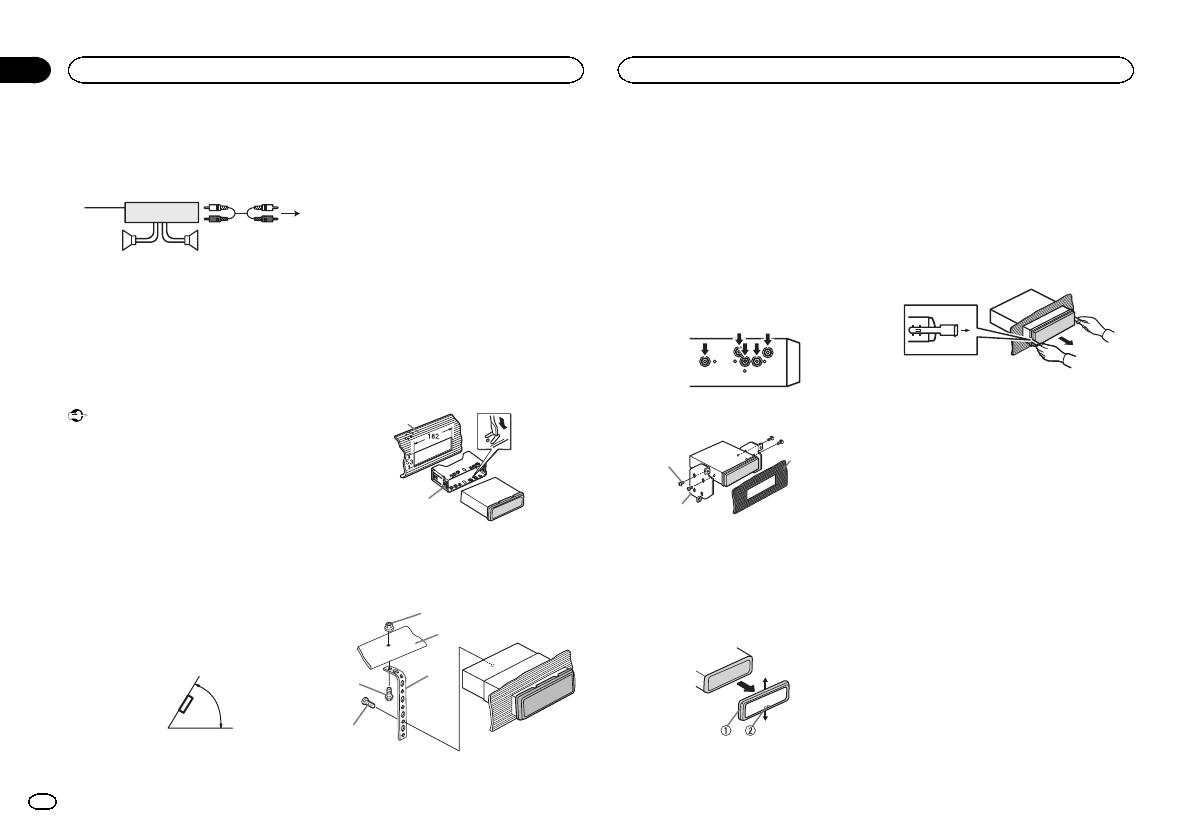
Section
03
Installation
Installation
Power amp (sold separately)
DIN front/rear mount
2 Firewall or metal support
! Releasing the front panel allows easier ac-
3 Metal strap
cess to the trim ring.
Perform these connections when using the op-
This unit can be properly installed using either
4 Screw
! When reattaching the trim ring, point the
tional amplifier.
front-mount or rear-mount installation.
5 Screw (M4 ×
side with the notched tab down.
Use commercially available parts when instal-
1
3
# Make sure that the unit is installed securely in
ling.
2
place. An unstable installation may cause skipping
2 Insert the supplied extraction keys into
or other malfunctions.
both sides of the unit until they click into
4
55
DIN Front-mount
place.
1 Insert the mounting sleeve into the dash-
DIN Rear-mount
3 Pull the unit out of the dashboard.
1 System remote control
board.
1 Determine the appropriate position
Connect to Blue/white cable.
For installation in shallow spaces, use the sup-
where the holes on the bracket and the side
2 Power amp (sold separately)
plied mounting sleeve. If there is enough space,
of the unit match.
3 Connect with RCA cables (sold separately)
use the mounting sleeve that came with the ve-
4 To Rear output or subwoofer output
hicle.
5 Rear speaker or subwoofer
2 Secure the mounting sleeve by using a
screwdriver to bend the metal tabs (90°) into
Installation
place.
Removing and re-attaching the front
Important
2 Tighten two screws on each side.
1
panel
! Check all connections and systems before
You can remove the front panel to protect your
final installation.
unit from theft.
! Do not use unauthorized parts as this may
1
3
Press the detach button and push the front
cause malfunctions.
panel upward and pull it toward you.
! Consult your dealer if installation requires
For details, refer to Removing the front panel to
2
drilling of holes or other modifications to the
2
protect your unit from theft and Re-attaching the
vehicle.
front panel on page 4.
! Do not install this unit where:
1 Dashboard
1 Tapping screw (5 mm × 8 mm)
— it may interfere with operation of the vehicle.
2 Mounting sleeve
2 Mounting bracket
— it may cause injury to a passenger as a result
3 Dashboard or console
of a sudden stop.
3 Install the unit as illustrated.
! The semiconductor laser will be damaged if
Removing the unit
it overheats. Install this unit away from hot
1
places such as near the heater outlet.
1 Remove the trim ring.
2
! Optimum performance is obtained when the
unit is installed at an angle of less than 60°.
3
4
60°
5
1 Trim ring
1 Nut
2 Notched tab
12
En
Appendix
Additional information
Additional information
Troubleshooting
Symptom Cause Action
Message Cause Action
Message Cause Action
English
The unit is
You are using a
Move electrical
NO AUDIO The inserted
Replace the disc.
SKIPPED The connected
Play an audio file
Symptom Cause Action
malfunction-
device, such as
devices that may
disc does not
USB storage de-
not embedded
The display il-
Demo mode is
Turn off the demo
ing.
a cellular
be causing the in-
contain any
vice contains
with Windows
lumination
on.
display setting.
There is inter-
phone, that
terference away
playable files.
files embedded
Media DRM 9/10.
turns on and
ference.
transmits elec-
from the unit.
SKIPPED The inserted
Replace the disc.
with Windows
off at random.
tric waves near
disc contains
Mediaä DRM 9/
the unit.
10.
The display
You did not per-
Perform operation
DRM protected
automatically
form any opera-
again.
files.
PROTECT All the files in
Transfer audio
returns to the
tion within
PROTECT All the files on
Replace the disc.
the USB storage
files not em-
Error messages
ordinary dis-
about 30 sec-
the inserted
device are em-
bedded with
play.
onds.
When you contact your dealer or your nearest
disc are em-
bedded with
Windows Media
Pioneer Service Center, be sure to note the error
DRM 9/10 to the
The repeat
Depending on
bedded with
Windows Media
Select the repeat
message.
USB storage de-
play range
the repeat play
play range again.
DRM.
DRM 9/10.
vice and connect.
changes un-
range, the se-
expectedly.
lected range
Built-in CD Player
N/A USB The USB device
! Connect a USB
USB storage device/iPod
may change
connected to is
Mass Storage
when another
Message Cause Action
not supported
Class compliant
Message Cause Action
folder or track is
by this unit.
device.
ERROR-07,
The disc is dirty. Clean the disc.
NO DEVICE When plug and
! Turn the plug
being selected
! Disconnect
11, 12, 17, 30
The disc is
Replace the disc.
play is off, no
and play on.
or during fast
your device and
scratched.
USB storage de-
! Connect a com-
forwarding/re-
replace it with a
versing.
ERROR-07,
There is an elec-
Turn the ignition
vice or iPod is
patible USB stor-
compatible USB
10, 11, 12,
trical or me-
switch OFF and
connected.
age device/iPod.
storage device.
A subfolder is
Subfolders can-
Select another re-
15, 17, 30,
chanical error.
back ON, or
FRMT READ Sometimes
Wait until the
not played
not be played
peat play range.
A0
switch to a differ-
there is a delay
message disap-
back.
when FLD (fold-
ent source, then
between the
pears and you
er repeat) is se-
back to the CD
start of playback
hear sound.
lected.
player.
and when you
NO XXXX ap-
There is no em-
Switch the display
ERROR-15 The inserted
Replace the disc.
start to hear any
pears when a
bedded text in-
or play another
disc is blank.
sound.
display is
formation.
track/file.
changed (NO
ERROR-23 Unsupported
Replace the disc.
NO AUDIO There are no
Transfer the audio
TITLE, for ex-
CD format.
songs.
files to the USB
storage device
ample).
FRMT READ Sometimes
Wait until the
and connect.
there is a delay
message disap-
between the
pears and you
The connected
Follow the USB
start of playback
hear sound.
USB storage de-
storage device in-
and when you
vice has secur-
structions to dis-
start to hear any
ity enabled.
able the security.
sound.
En
13
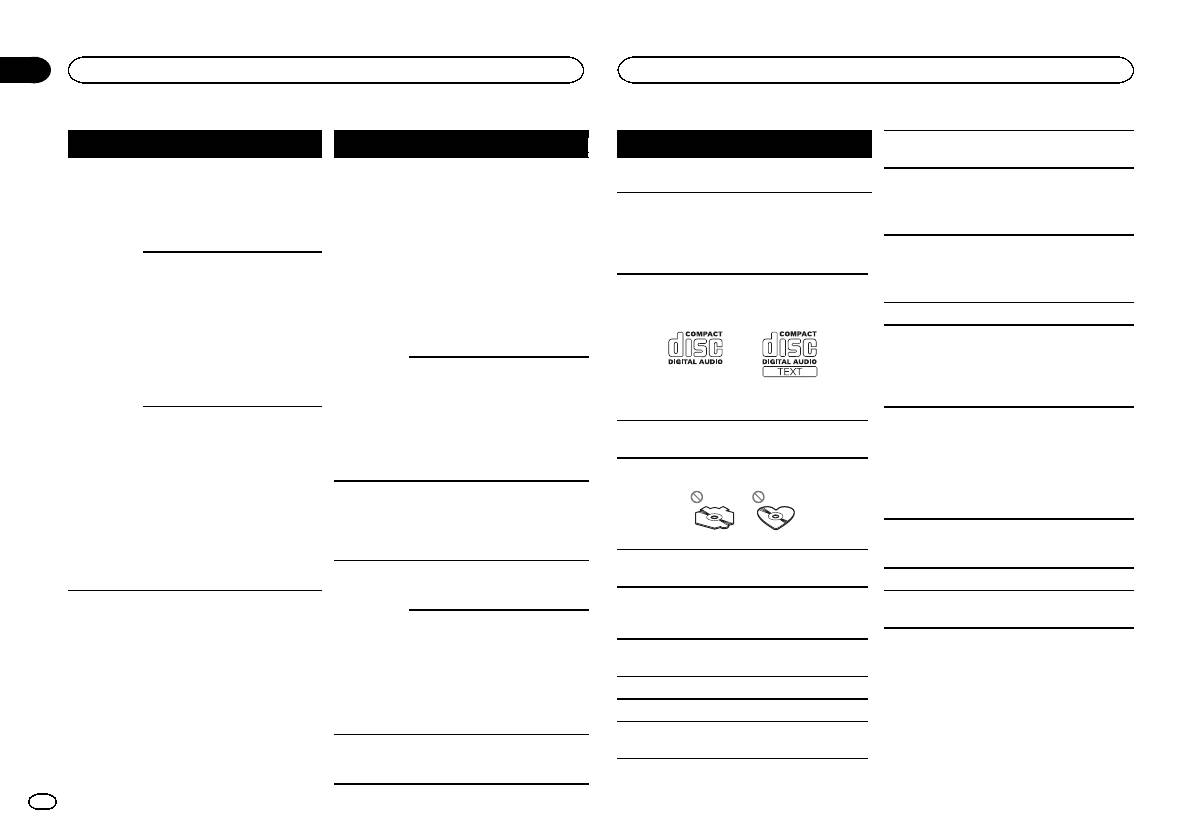
Appendix
Additional information
Additional information
Message Cause Action
Message Cause Action
Message Cause Action
To clean a CD, wipe the disc with a soft cloth out-
ward from the center.
CHECK USB The USB con-
Check that the
ERROR-19 Communication
Perform one of
NOT FOUND No related
Transfer songs to
nector or USB
USB connector or
failed.
the following op-
songs.
the iPod.
Condensation may temporarily impair the player’s
cable has short-
USB cable is not
erations.
performance. Let it rest for about one hour to ad-
circuited.
caught in some-
–Turn the ignition
just to a warmer temperature. Also, wipe any
thing or dam-
switch OFF and
damp discs off with a soft cloth.
Handling guidelines
aged.
back ON.
Playback of discs may not be possible because of
Discs and player
The connected
Disconnect the
–Disconnect the
disc characteristics, disc format, recorded applica-
USB storage de-
USB storage de-
USB storage de-
tion, playback environment, storage conditions,
vice consumes
vice and do not
vice.
Use only discs that feature either of the following
and so on.
–Change to a dif-
two logos.
more than
use it. Turn the
ignition switch to
ferent source.
Road shocks may interrupt disc playback.
500 mA (maxi-
mum allowable
OFF, then to ACC
Then, return to
When using discs that can be printed on label sur-
current).
or ON and then
the USB source.
faces, check the instructions and the warnings of
connect only
iPod failure. Disconnect the
the discs. Depending on the discs, inserting and
compliant USB
cable from the
ejecting may not be possible. Using such discs
storage devices.
iPod. Once the
may result in damage to this equipment.
The iPod oper-
Make sure the
iPod’s main
Do not attach commercially available labels or
ates correctly
connection cable
menu is dis-
Use 12-cm discs. Do not use 8-cm discs or an
other materials to the discs.
but does not
for the iPod has
played, reconnect
adapter for 8-cm discs.
! The discs may warp making the disc unplay-
charge.
not shorted out
the iPod and reset
able.
it.
Use only conventional, fully circular discs. Do not
(e.g., not caught
! The labels may come off during playback and
use shaped discs.
in metal objects).
ERROR-23 USB storage de-
USB storage de-
prevent ejection of the discs, which may result
After checking,
vice was not for-
vice should be for-
in damage to the equipment.
turn the ignition
matted with
matted with
switch OFF and
FAT12, FAT16 or
FAT12, FAT16 or
back ON, or dis-
FAT32.
FAT32.
USB storage device
Do not insert anything other than a CD into the
connect the iPod
ERROR-16 The iPod firm-
Update the iPod
CD loading slot.
and reconnect.
Connections via USB hub are not supported.
ware version is
version.
old.
Do not use cracked, chipped, warped, or other-
Do not connect anything other than a USB stor-
wise damaged discs as they may damage the play-
iPod failure. Disconnect the
age device.
er.
cable from the
iPod. Once the
Unfinalized CD-R/RW discs cannot be played
iPod’s main
back.
menu is dis-
Do not touch the recorded surface of the discs.
played, reconnect
the iPod and reset
Store discs in their cases when not in use.
it.
Do not attach labels, write on or apply chemicals
STOP There are no
Select a list that
to the surface of the discs.
songs in the
contains songs.
current list.
14
En
Appendix
Additional information
Additional information
Firmly secure the USB storage device when driv-
DualDiscs
Compatible ID3 tag version: 1.0, 1.1, 2.2, 2.3, 2.4
Playable files: up to 999
English
ing. Do not let the USB storage device fall onto the
(ID3 tag Version 2.x is given priority over Version
DualDiscs are two-sided discs that have a record-
File system: ISO 9660 Level 1 and 2, Romeo, Joliet
floor, where it may become jammed under the
1.x.)
able CD for audio on one side and a recordable
brake or accelerator pedal.
Multi-session playback: Compatible
DVD for video on the other.
M3u playlist: Not compatible
Depending on the USB storage device, the follow-
Since the CD side of DualDiscs is not physically
Packet write data transfer: Not compatible
MP3i (MP3 interactive), mp3 PRO: Not compatible
ing problems may occur.
compatible with the general CD standard, it may
Regardless of the length of blank sections be-
! Operations may vary.
not be possible to play the CD side with this unit.
tween the songs from the original recording, com-
! The storage device may not be recognized.
Frequent loading and ejecting of a DualDisc may
WAV
pressed audio discs play with a short pause
! Files may not be played back properly.
result in scratches on the disc. Serious scratches
between songs.
! The device may generate noise in the radio.
can lead to playback problems on this unit. In
File extension: .wav
some cases, a DualDisc may become stuck in the
disc loading slot and will not eject. To prevent this,
Quantization bits: 8 and 16 (LPCM), 4 (MS
USB storage device
iPod
we recommend you refrain from using DualDisc
ADPCM)
with this unit.
Sampling frequency: 16 kHz to 48 kHz (LPCM),
Playable folder hierarchy: up to eight tiers (A prac-
Do not leave the iPod in places with high tempera-
Please refer to the information from the disc man-
22.05 kHz and 44.1 kHz (MS ADPCM)
tical hierarchy is less than two tiers).
tures.
ufacturer for more detailed information about
To ensure proper operation, connect the dock con-
DualDiscs.
Playable folders: up to 500
nector cable from the iPod directly to this unit.
Supplemental information
Playable files: up to 15 000
Firmly secure the iPod when driving. Do not let the
Compressed audio
Only the first 32 characters can be displayed as a
Playback of copyright-protected files: Not compati-
iPod fall onto the floor, where it may become
file name (including the file extension) or a folder
ble
jammed under the brake or accelerator pedal.
compatibility (disc, USB)
name.
Partitioned USB storage device: Only the first par-
About iPod settings
WMA
Russian text to be displayed on this unit should be
tition can be played.
! When an iPod is connected, this unit changes
encoded in one of the following character sets:
There may be a slight delay when starting play-
the EQ (equalizer) setting of the iPod to off in
File extension: .wma
! Unicode (UTF-8, UTF-16)
back of audio files on a USB storage device with
order to optimize the acoustics. When you dis-
Bit rate: 48 kbps to 320 kbps (CBR), 48 kbps to
! A character set other than Unicode that is
numerous folder hierarchies.
connect the iPod, the EQ returns to the original
384 kbps (VBR)
used in a Windows environment and is set to
setting.
Russian in the multi-language setting
! You cannot set Repeat to off on the iPod when
Sampling frequency: 32 kHz, 44.1 kHz, 48 kHz
using this unit. Repeat is automatically
This unit may not operate correctly depending on
CAUTION
Windows Media Audio Professional, Lossless,
changed to All when the iPod is connected to
the application used to encode WMA files.
! Pioneer cannot guarantee compatibility with
Voice/DRM Stream/Stream with video: Not com-
this unit.
all USB mass storage devices and assumes
patible
There may be a slight delay at the start of playback
no responsibility for any loss of data on
Incompatible text saved on the iPod will not be dis-
of audio files embedded with image data or audio
media players, smart phones, or other devi-
played by the unit.
files stored on a USB storage device that has nu-
ces while using this product.
MP3
merous folder hierarchies.
! Do not leave discs or a USB storage device
in any place that is subject to high tempera-
File extension: .mp3
Disc
tures.
Bit rate: 8 kbps to 320 kbps (CBR), VBR
Sampling frequency: 8 kHz to 48 kHz (32 kHz,
Playable folder hierarchy: up to eight tiers (A prac-
44.1 kHz, 48 kHz for emphasis)
tical hierarchy is less than two tiers).
Playable folders: up to 99
En
15
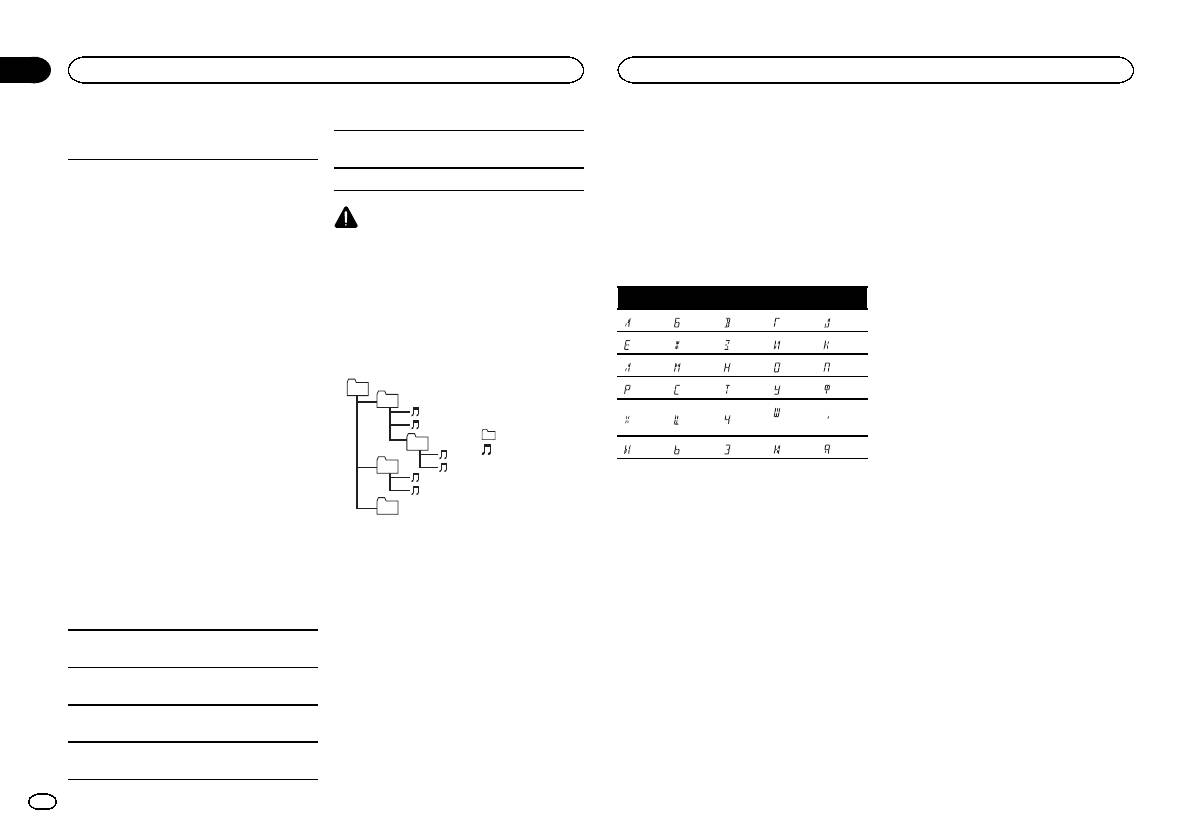
Appendix
Additional information
Additional information
iPod compatibility
3 Save the folder containing files on the USB
streaming via internet, intranets and/or other
About the file/format compatibility, refer to the
storage device.
networks or in other electronic content distribu-
iPod manuals.
This unit supports only the following iPod models.
However, depending on the system environment,
tion systems, such as pay-audio or audio-on-de-
Audiobook, Podcast: Compatible
Supported iPod software versions are shown
you may not be able to specify the playback se-
mand applications. An independent license for
below. Older versions may not be supported.
quence.
such use is required. For details, please visit
Made for
For USB portable audio players, the sequence is
http://www.mp3licensing.com.
CAUTION
! iPhone 4 (software version 4.1)
different and depends on the player.
Pioneer accepts no responsibility for data lost
! iPhone 3GS (software version 3.0.1)
WMA
on the iPod, even if that data is lost while this
! iPhone 3G (software version 2.0)
Windows Media is either a registered trademark
unit is used.
Russian character chart
! iPhone (software version 1.1.1)
or trademark of Microsoft Corporation in the
! iPod nano 6th generation (software version
United States and/or other countries.
D: C D: C D: C D: C D: C
1.0)
This product includes technology owned by
Sequence of audio files
! iPod nano 5th generation (software version
: А : Б : В : Г : Д
Microsoft Corporation and cannot be used or
1.0.1)
The user cannot assign folder numbers and
distributed without a license from Microsoft
! iPod nano 4th generation (software version
specify playback sequences with this unit.
: Е, Ё : Ж : З : И, Й : К
Licensing, Inc.
1.0)
Example of a hierarchy
: Л : М : Н : О : П
! iPod nano 3rd generation (software version
iPod & iPhone
01
: Р : С : Т : У : Ф
1.0)
iPhone, iPod, iPod classic, iPod nano, and iPod
02
! iPod nano 2nd generation (software version
: Ш,
touch are trademarks of Apple Inc., registered in
: Х : Ц : Ч
: Ъ
1.1.2)
Щ
the U.S. and other countries.
: Folder
! iPod nano 1st generation (software version
03
“Made for iPod” and “Made for iPhone” mean
: Compressed
: Ы : Ь : Э : Ю : Я
1.2.0)
that an electronic accessory has been designed
! iPod touch 4th generation (software version
04
audio file
to connect specifically to iPod or iPhone, respec-
01 to 05: Folder
D: Display C: Character
4.1)
tively, and has been certified by the developer to
number
! iPod touch 3rd generation (software version
meet Apple performance standards. Apple is
05
1 to 6: Playback
3.1.1)
not responsible for the operation of this device
Level 1 Level 2 Level 3 Level 4
sequence
Copyright and trademark
! iPod touch 2nd generation (software version
or its compliance with safety and regulator y
2.1.1)
standards. Please note that the use of this ac-
iTunes
! iPod touch 1st generation (software version
Disc
cessory with iPod or iPhone may affect wireless
Apple and iTunes are trademarks of Apple Inc.,
1.1)
Folder selection sequence or other operation
performance.
registered in the U.S. and other countries.
! iPod classic 160GB (software version 2.0.2)
may differ depending on the encoding or writing
! iPod classic 120GB (software version 2.0)
software.
MP3
! iPod classic (software version 1.0)
Supply of this product only conveys a license for
USB storage device
Depending on the generation or version of the
private, non-commercial use and does not con-
Playback sequence is the same as recorded se-
iPod, some functions may not be available.
vey a license nor imply any right to use this prod-
quence in the USB storage device.
uct in any commercial (i.e. revenue-generating)
Operations may vary depending on the software
To specify the playback sequence, the following
real time broadcasting (terrestrial, satellite,
version of iPod.
method is recommended.
cable and/or any other media), broadcasting/
1 Create a file name that includes numbers
When using an iPod, an iPod Dock Connector to
that specify the playback sequence (e.g.,
USB Cable is required.
001xxx.mp3 and 099yyy.mp3).
A Pioneer CD-IU51 interface cable is also avail-
2 Put those files into a folder.
able. For details, consult your dealer.
16
En

Appendix
Additional information
Specifications
CD player
System ………………………. Compact disc audio system
English
General
Usable discs ……………….. Compact disc
Power so urce ………………. 14.4 V DC (10.8 V to 15.1 V al-
Signal-to-noise ratio ……… 94dB (1kHz) (IEC-A network)
lowable)
Number of channels …….. 2 (stereo)
Grounding system ………… Negative type
MP3 decoding format …… MPEG-1 & 2 Audio Layer 3
Maximum current consumption
WMA decoding format ….. Ver. 7, 7.1, 8, 9, 10, 11, 12 (2ch
…………………………….. 10.0 A
audio)
Dimensions (W × H × D):
(Windows Media Player)
DIN
WAV signal format ……….. Linear PCM & MS ADPCM
Chassis ………….. 178mm × 50mm ×
(Non-compressed)
165 mm
Nose ……………… 188 mm × 58mm ×
USB
16 mm
D
USB standard specification
Chassis ………….. 178mm × 50mm ×
…………………………….. USB 2.0 full speed
165 mm
Maximum current supply
Nose ……………… 170 mm × 46mm ×
…………………………….. 500mA
16 mm
USB Class ………………….. MSC (Mass Storage Class)
Weight ……………………….. 1.1 kg
File system ………………….. FAT12, FAT16, FAT32
MP3 decoding format …… MPEG-1 & 2 Audio Layer 3
WMA decoding format ….. Ver. 7, 7.1, 8, 9, 10, 11, 12 (2ch
Audio
audio)
Maximum power output ... 50 W × 4
(Windows Media Player)
70 W × 1/2 W (for subwoofer)
WAV signal format ……….. Linear PCM & MS ADPCM
Continuous power output
(Non-compressed)
…………………………….. 22W × 4 (50 Hz to 15000Hz,
5 % THD, 4 W load, both chan-
FM tuner
nels driven)
Load impedance ………….. 4W (4 W to 8 W allowable)
Frequency range ………….. 87.5 MHz to 108.0 MHz
Preout maximum output level
Usable sensitivity …………. 9 dBf (0.8 µV/75 W, mono, S/N:
…………………………….. 2.0V
30 dB)
Tone controls:
Signal-to-noise ratio ……… 72dB (IEC-A network)
Bass
Frequency ………. 100Hz
MW tuner
Gain ……………… ±12dB
Frequency range ………….. 531 kHz to 1 602kHz
Mid
Usable sensitivity …………. 25µV (S/N: 20 dB)
Frequency ………. 1 kHz
Signal-to-noise ratio ……… 62dB (IEC-A network)
Gain ……………… ±12dB
Treble
Frequency ………. 10kHz
LW tuner
Gain ……………… ±12dB
Frequency range ………….. 153 kHz to 281 kHz
Subwoofer (mono):
Usable sensitivity …………. 28 µV (S/N: 20 dB)
Frequency …………….. 50Hz/63 Hz/80 Hz/100 Hz/
Signal-to-noise ratio ……… 62dB (IEC-A network)
125 Hz
Slope …………………… –18 dB/oct
Note
Gain ……………………. +6dB to –24 dB
Specifications and the design are subject to
Phase ………………….. Normal/Reverse
modifications without notice.
En
17
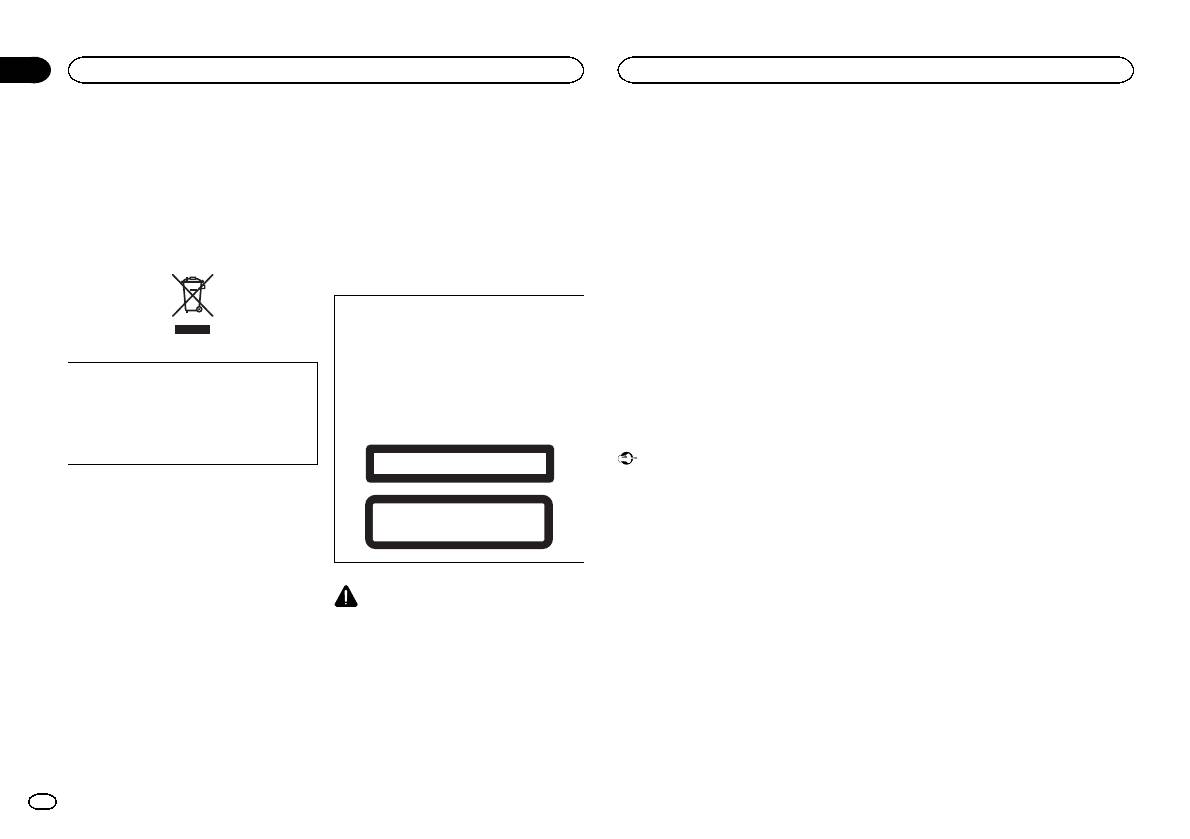
Section
01
Avant de commencer
Avant de commencer
Nous vous remercions d’avoir acheté cet ap-
Quelques mots sur cet appareil
! Évitez tout contact avec l’humidité.
En cas d’anomalie
pareil PIONEER
! Si la batterie est débranchée ou déchargée,
Pour garantir une utilisation correcte, lisez bien
Les fréquences du syntoniseur de cet appareil
le contenu de la mémoire sera effacé.
En cas d’anomalie, veuillez contacter votre re-
ce mode d’emploi avant d’utiliser cet appareil. Il
sont attribuées pour une utilisation en Europe
vendeur ou le centre d’entretien agréé par
Remarque
est particulièrement important que vous lisiez et
de l’Ouest, Asie, Moyen Orient, Afrique et Océ-
PIONEER le plus proche.
respectiez les indications ATTENTION et PRÉ-
anie. Son utilisation dans d’autres régions peut
Les opérations de réglage des fonctions sont va-
CAUTION de ce mode d’emploi. Conservez-le
se traduire par une réception de mauvaise qua-
lidées même si le menu est annulé avant la
dans un endroit sûr et facilement accessible pour
lité. La fonction RDS (radio data system) n’est
confirmation des opérations.
toute consultation ultérieure.
opérationnelle que dans les régions où des si-
gnaux RDS sont diffusés pour les stations FM.
Quelques mots sur ce mode
d’emploi
PRÉCAUTION
! Dans les instructions suivantes, les mémoi-
Ce produit est classifié comme produit laser
res USB et les lecteurs audio USB sont col-
de classe 1 selon la norme IEC 60825-1:2007
lectivement appelés “périphériques de
“Sécurité des appareils à laser” et contient un
stockage USB”.
Si vous souhaitez vous débarrasser de cet ap-
module laser de classe 1M. Pour assurer une
! Dans ce manuel, iPod et iPhone sont dési-
pareil, ne le mettez pas à la poubelle avec vos
sécurité permanente, n’enlevez aucun couver-
gnés par le terme “iPod”.
ordures ménagères. Il existe un système de
cle et n’essayez pas d’accéder à l’intérieur du
collecte séparé pour les appareils électroni-
produit. Faites effectuer l’entretien par du per-
ques usagés, qui doivent être récupérés, trai-
sonnel qualifié.
Mode de démonstration
tés et recyclés conformément à la législation.
Important
APPAREIL À LASER DE CLASSE 1
! La non-connexion du fil rouge (ACC) de cet
Dans les états membres de l’UE, en Suisse et en
appareil à une borne couplée avec les opéra-
Norvège, les foyers domestiques peuvent rap-
tions de mise en/hors service du contact d’al-
ATTENTION—ÉMISSIONS DE RADIATIONS LASER
porter leurs produits électroniques usagés gra-
INVISIBLES DE CLASSE 1M SI OUVERT. NE PAS OBSERVER
lumage peut conduire au déchargement de
DIRECTEMENT AVEC DES INSTRUMENTS OPTIQUES.
tuitement à des points de collecte spécifiés ou à
la batterie.
un revendeur (sous réserve d’achat d’un produit
! Rappelez-vous que si la démonstration des
similaire).
fonctions continue à fonctionner quand le
Dans les pays qui ne sont pas mentionnés ci-
moteur est coupé, cela peut décharger la
dessus, veuillez contacter les autorités locales
batterie.
PRÉCAUTION
pour vous informer de la méthode correcte de
! Ne laissez pas cet appareil entrer en contact
mise au rebut.
La démonstration démarre automatiquement si
avec des liquides. Cela pourrait provoquer
En agissant ainsi vous assurerez que le produit
vous n’utilisez pas cet appareil dans les 30 se-
une électrocution. Tout contact avec des li-
que vous mettez au rebut est soumis au proces-
condes environ depuis la dernière opération ou
quides pourrait aussi provoquer des domma-
sus de traitement, de récupération et de recy-
si le contact est réglé sur ACC ou ON alors que
ges, de la fumée et une surchauffe de
clage nécessaire et éviterez ainsi les effets
l’appareil est hors service. Pour annuler le mode
l’appareil.
négatifs potentiels sur l’environnement et la
de démonstration, vous devez afficher les régla-
! Le Pioneer CarStereo-Pass est utilisable seu-
santé publique.
ges initiaux. Sélectionnez DEMO (réglage de l’af-
lement en Allemagne.
fichage de démonstration) et désactivez
! Maintenez le niveau d’écoute à une valeur
l’affichage de démonstration. Pour les détails,
telle que vous puissiez entendre les sons pro-
reportez-vous à la page 26, Réglages initiaux.
venant de l’extérieur.
18
Fr
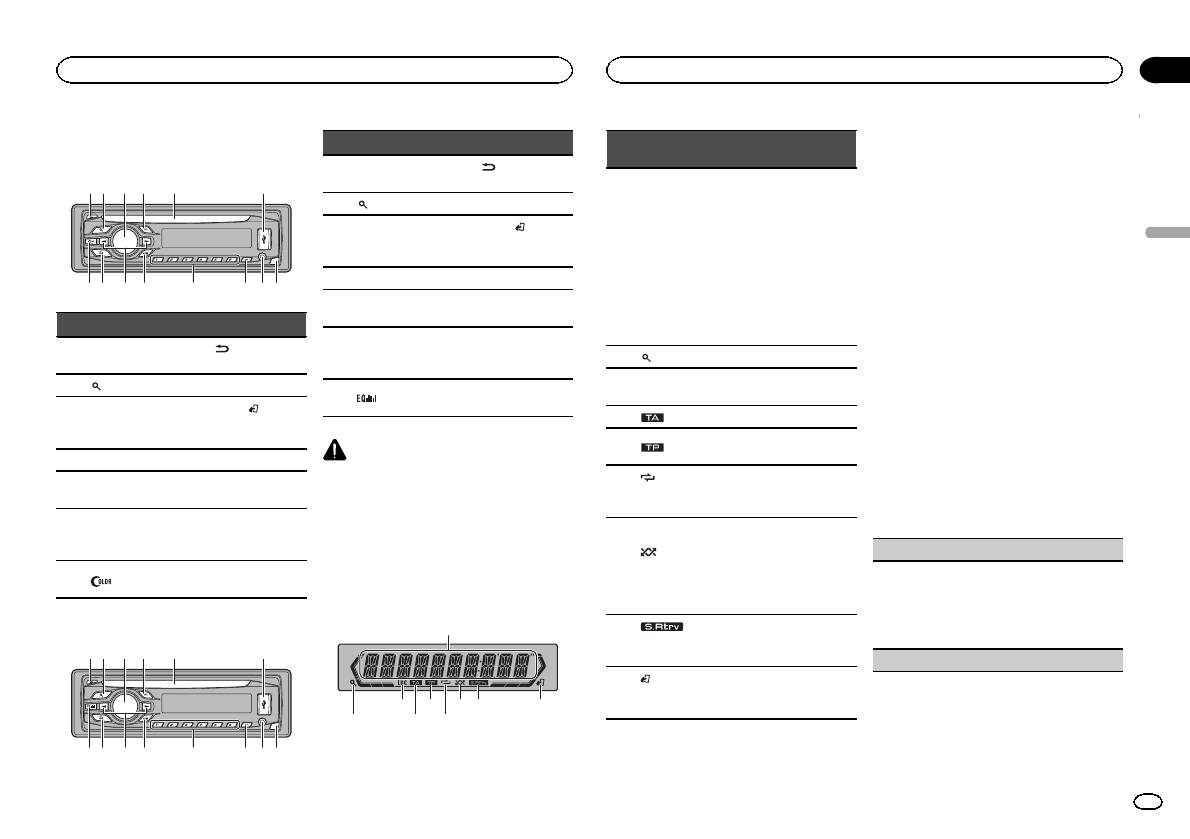
Appareil central
DEH-3400UB
b c dea87
12 3 4 5 6
9
Partie Partie
(retour/affi-
1 h (éjection) 8
chage)
2
(liste) 9 c/d
BAND/
MULTI-CONTROL
3
a
(contrôle de
(M.C.)
l’iPod)
4 SRC/OFF b 1 à 6
Fente de charge-
5
c PTY
ment des disques
Jack d’entrée
6 Port USB d
AUX (jack stéréo
3,5 mm)
Touche de retrait
7
(couleur) e
de la face avant
DEH-2400UB
b c dea87
12 3 4 5 6
9
Partie Partie
(retour/affi-
1 h (éjection) 8
chage)
2
(liste) 9 c/d
BAND/
MULTI-CONTROL
3
a
(contrôle de
(M.C.)
l’iPod)
4 SRC/OFF b 1 à 6
Fente de charge-
5
c PTY
ment des disques
Jack d’entrée
6 Port USB d
AUX (jack stéréo
3,5 mm)
Touche de retrait
7
e
de la face avant
PRÉCAUTION
! Utilisez un câble USB Pioneer optionnel (CD-
U50E) pour connecter le lecteur audio USB/
la mémoire USB, étant donné que n’importe
quel périphérique relié directement à l’appa-
reil dépassera de l’appareil et peut s’avérer
dangereux.
! N’utilisez pas de produits non autorisés.
Indications affichées
1
87 93 5
2 4 6
Section
Utilisation de l’appareil
Utilisation de l’appareil
02
Indica-
Menu de configuration
État
teur
Lorsque vous mettez le contact d’allumage sur
ON après l’installation, le menu de configura-
! Syntoniseur : gamme et fré-
tion s’affiche sur l’écran.
quence
Vous pouvez configurer les options de menu ci-
! RDS : nom du ser vice de
dessous.
Section
programme, informations
Français
d’afficha-
PTY et autres informations
1 Après avoir installé l’appareil, mettez le
1
ge princi-
textuelles
contact d’allumage sur ON.
pal
! Lecteur de CD intégré, péri-
SET UP s’affiche.
phérique de stockage USB
et iPod: temps de lecture
2 Tournez M.C. pour passer à YES. Appuyez
écoulé et informations tex-
sur M.C. pour sélectionner.
tuelles
# Si vous n’effectuez aucune opération dans les
2
(liste) La fonction liste est utilisée.
30 secondes environ, le menu de configuration ne
s’affichera pas.
L’accord automatique sur une
3 LOC
# Si vous préférez ne pas effectuer la configuration
station locale est en service.
pour l’instant, tournez M.C. pour passer à NO. Ap-
4
(TA) La fonction TA est en service.
puyez pour sélectionner.
Si vous sélectionnez NO, vous ne pouvez pas effec-
L’appareil est accordé sur une
5
(TP)
tuer de réglage dans le menu de configuration.
station TP.
(répéti-
La fonction de répétition d’une
3 Effectuez les procédures suivantes pour
6
tion de la
plage ou d’un dossier est acti-
configurer le menu.
lecture)
vée.
Pour passer à la prochaine option de menu,
vous devez confirmer votre sélection.
La lecture aléatoire est activée.
La source iPod est sélection-
(lec-
CLOCK SET (réglage de l’horloge)
née et la fonction de lecture
7
ture aléa-
aléatoire ou lecture aléatoire
toire)
1 Tournez M.C. pour régler l’heure.
de toutes les plages est acti-
2 Appuyez sur M.C. pour sélectionner les minu-
vée.
tes.
3 Tournez M.C. pour régler les minutes.
La fonction Sound Retriever est
8
(sound re-
4 Appuyez sur M.C. pour confirmer la sélection.
activée.
triever)
FM STEP (incrément d’accord FM)
La fonction iPod de cet appa-
9
(contrôle
reil est utilisée à partir de votre
de l’iPod)
iPod.
Fr
19
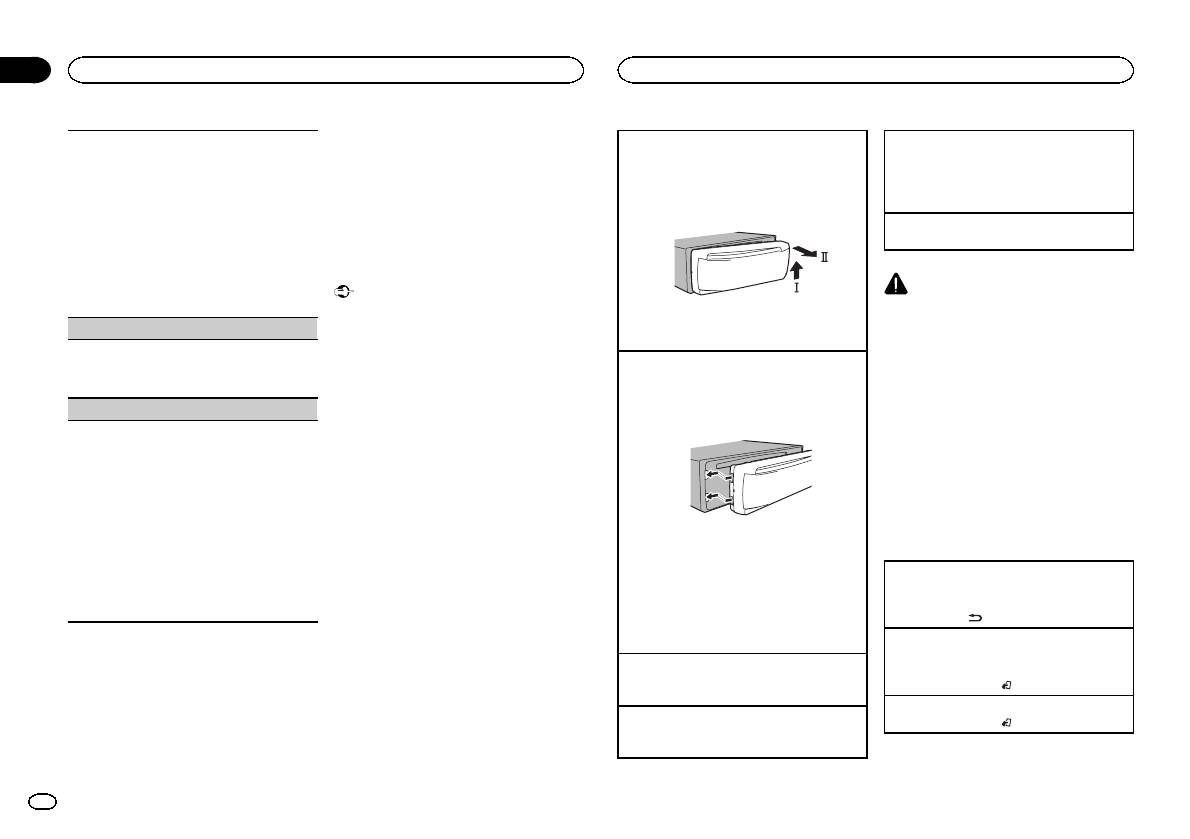
Section
02
Utilisation de l’appareil
Utilisation de l’appareil
Remarques
Normalement, l’incrément d’accord FM employé
Retrait de la face avant pour protéger l’appareil
Choix d’une source
! Vous pouvez configurer les options de menu
par l’accord automatique est 50 kHz. Quand la
contre le vol
1 Appuyez sur SRC/OFF pour parcourir les op-
dans les réglages initiaux. Pour des détails
fonction AF ou TA est en service, l’incrément d’ac-
1 Appuyez sur la touche de retrait pour libérer la
tions disponibles :
sur les réglages, reportez-vous à la page 26,
cord passe automatiquement à 100 kHz. Il peut
face avant.
TUNER (syntoniseur)—CD (lecteur de CD inté-
Réglages initiaux .
être préférable de régler l’incrément d’accord à
2 Poussez la face avant vers le haut (M), puis
gré)—USB (USB)/iPod (iPod)—AUX (AUX)
! Vous pouvez annuler le menu de configura-
50 kHz quand la fonction AF est en service.
tirez-la vers vous (N).
tion en appuyant sur SRC/OFF.
Réglage du volume
! Pendant l’accord manuel, l’incrément d’ac-
1 Tournez M.C. pour régler le volume.
cord est maintenu à 50 kHz.
1 Tournez M.C. pour choisir l’incrément d’accord
Opérations de base
FM.
50 (50 kHz)—100 (100 kHz)
Important
PRÉCAUTION
2 Appuyez sur M.C. pour confirmer la sélection.
! Lorsque vous enlevez ou remontez la face
Pour des raisons de sécurité, garez votre véhi-
avant, manipulez-la doucement.
cule pour retirer la face avant.
DEMO (réglage de l’affichage de démonstration)
3 Conservez toujours la face avant dans un boî-
! Évitez de heurter la face avant.
tier de protection lorsqu’elle est détachée.
Remarque
! Conservez la face avant à l’abri des tempéra-
1 Appuyez sur M.C. pour activer ou désactiver
Remontage de la face avant
Si le fil bleu/blanc de l’appareil est relié à la
tures élevées et de la lumière directe du so-
l’affichage de démonstration.
leil.
1 Faites glisser la face avant vers la gauche.
prise de commande du relais de l’antenne moto-
2 Appuyez sur M.C. pour confirmer la sélection.
risée du véhicule, celle-ci se déploie lorsque la
! Pour éviter d’endommager le périphérique
Assurez-vous d’insérer les encoches sur le
source est mise en service. Pour rétracter l’an-
TITLE (multilingue)
ou l’intérieur du véhicule, retirez tous les câ-
côté gauche de l’appareil central dans les fen-
tes du panneau de commande.
tenne, mettez la source hors service.
bles et périphériques connectés à la face
Cet appareil peut afficher les informations textuel-
avant, avant d’enlever cette dernière.
les d’un fichier audio compressé même si elles
sont incorporées dans une langue d’Europe de
Opérations communes des
l’Ouest ou russe.
menus pour le(s) menu de
! Si la langue incorporée et la langue sélection-
configuration/réglages des
née sont différentes, les informations textuel-
les peuvent ne pas s’afficher correctement.
fonctions/réglages audio/
! Certains caractères peuvent ne pas s’afficher
2 Appuyez sur le côté droit de la face avant jus-
réglages initiaux/listes
correctement.
qu’àcequ’elle soit bien en place.
1 Tournez M.C. pour choisir le réglage désiré.
Si vous ne pouvez pas monter la face avant
Retour à l’affichage précédent
EUR (Langue européenne)—RUS (Russe)
sur l’appareil central, vérifiez que la face avant
Retour à la liste précédente (le dossier de niveau
2 Appuyez sur M.C. pour confirmer la sélection.
est correctement placée sur l’appareil central.
immédiatement supérieur)
QUIT s’affiche.
Forcer la face avant en position risque de l’en-
1 Appuyez sur
.
dommager ou d’endommager l’appareil cen-
tral.
Retour à l’affichage ordinaire
4 Pour terminer la configuration, tournez
Annulation du menu des réglages initiaux/menu
M.C. pour sélectionner YES. Appuyez pour
Mise en service de l’appareil
de configuration
sélectionner.
1 Appuyez sur SRC/OFF pour mettre en service
1 Appuyez sur BAND/
.
# Si vous souhaitez modifier à nouveau vos régla-
l’appareil.
ges, tournez M.C. pour passer à NO. Appuyez pour
Retour à l’affichage ordinaire à partir de la liste
Mise hors service de l’appareil
sélectionner.
1 Appuyez sur BAND/
.
1 Maintenez la pression sur SRC/OFF jusqu’àce
que l’appareil soit mis hors tension.
20
Fr
Аннотации для Автомобильной магнитолы с CD MP3 Pioneer DEH-3400UB в формате PDF
Топ 10 инструкций
Другие инструкции

FAD/BAL (
регулировка уровня сигнала/балан-
са)
1 Для вызова меню настройки нажмите M.C.
2 Нажимайте M.C. для переключения между
настройками уровня сигнала (передние/за-
дние) и баланса (правые/левые).
3 Для регулировки баланса громкоговорите-
лей вращайте M.C.
! Если настройка выхода заднего канала и
выхода RCA находится в режиме SW, то ре-
гулировать баланс передних и задних гром-
коговорителей невозможно. См. раздел
REAR-SP (
настройка выхода заднего кана-
ла) на стр. 121. См. раздел PREOUT (на-
стройка предварительного усилителя) на
стр. 121.
PRESET EQ (
вызов настроек эквалайзера)
1 Для вызова меню настройки нажмите M.C.
2 Нажмите кнопку M.C., чтобы выбрать эква-
лайзер.
DYNAMIC
—VOCAL—NATURAL—CUSTOM
—FLAT—POWERFUL
3 Нажмите M.C., чтобы подтвердить выбор.
! Для переключения режимов эквалайзера
можно нажимать кнопку
(
модель DEH-
2400UB).
TONE CTRL (
регулировка эквалайзера)
! Отрегулированные настройки кривой эква-
лайзера сохраняются в CUSTOM.
1 Для вызова меню настройки нажмите M.C.
2 Нажмите M.C. для выбора BASS (низкие ча-
стоты)/MID (средние частоты)/TREBLE (вы-
сокие частоты).
3 Вращайте M.C., чтобы отрегулировать уро-
вень.
Диапазон настройки: от +6 до –6
LOUD (
тонкомпенсация)
Тонкомпенсация компенсирует недостаточное
звуковое давление в нижнем и верхнем диапа-
зонах частот на низкой громкости.
1 Нажмите M.C. для выбора нужной настрой-
ки.
OFF (
выкл)—LOW (низкий)—HI (высокий)
SUB.W (
включение/выключение сабвуфера)
Это устройство имеет выход канала сабвуфе-
ра, который можно включать и выключать.
1 Нажмите M.C. для выбора нужной настрой-
ки.
NOR (
нормальная фаза)—REV (обратная
фаза)—OFF (сабвуфер выключен)
SUB.W CTRL (
настройка сабвуфер)
Если включён выход канала сабвуфера,
можно настроить частоту среза и уровень
громкости звучания сабвуфера.
На выходе сабвуфера будут воспроизводиться
только те частоты, которые ниже указанных ча-
стот среза.
! Данная функция недоступна для модели
DEH-2400UB.
! Если для параметра SUB.W выбрано зна-
чение OFF, эту функцию выбрать нельзя.
Более подробную информацию см. в раз-
деле SUB.W (
включение/выключение саб-
вуфера) на стр. 120.
1 Для вызова меню настройки нажмите M.C.
2 Нажимайте M.C. для переключения между
частотой среза и уровнем громкости сабву-
фера.
Частота среза (мигает значок частоты
среза)—Уровень громкости (мигает значок
уровня громкости)
3 Для выбора настройки вращайте M.C.
Частота среза: 50HZ—63HZ—80HZ—100HZ
—125HZ
Уровень громкости: от –24 до +6
SLA (
регулировка уровня входного сигнала)
SLA (
функция настройки уровня входного сиг-
нала) позволяет регулировать уровень громко-
сти каждого источника сигнала, чтобы
предотвратить резкие изменения громкости
при переключении источников сигнала.
! Настройки основываются на уровне гром-
кости FM-тюнера, который остается неиз-
менным.
! Регулировку уровня громкости в диапазоне
MW/LW
также можно производить с по-
мощью данной функции.
! При выборе FM-тюнера в качестве источ-
ника сигнала функция SLA недоступна.
1 Для вызова меню настройки нажмите M.C.
2 Вращая M.C., отрегулируйте уровень гром-
кости источника сигнала.
Диапазон настройки: от +4 до –4
3 Нажмите M.C., чтобы подтвердить выбор.
Начальные настройки
Важно
PW SAVE (
режим энергосбережения) выклю-
чается при отключении аккумуляторной ба-
тареи автомобиля; при подключении
батареи его нужно будет включить заново.
При выключенном режиме PW SAVE (режим
энергосбережения) в зависимости от метода
подключения устройство может потреблять
энергию аккумулятора, если зажигание авто-
мобиля не имеет положения АСС.
1
Нажмите и удерживайте кнопку SRC/
OFF, пока устройство не выключится.
2
Нажмите и удерживайте кнопку SRC/
OFF, пока на дисплее не появится назва-
ние функции.
3
Поворачивайте M.C. для выбора на-
чальной настройки.
Затем выполните следующие действия,
чтобы подтвердить выбор начальной на-
стройки.
CLOCK SET (
установка часов)
1 Для вызова меню настройки нажмите M.C.
2 Нажимайте M.C., чтобы выбрать сегмент
дисплея часов, который нужно установить.
Часы—Минуты
3 Вращайте M.C., чтобы отрегулировать
время.
CLOCK (
дисплей часов)
Дисплей часов можно включить или выклю-
чить.
Дисплей часов временно исчезает при выпол-
нении других операций и появляется вновь
через 25 секунд.
1 Нажмите M.C., чтобы включить или выклю-
чить дисплей часов.
FM STEP (
шаг настройки в FM-диапазоне)
Обычно шаг настройки в FM-диапазоне, ис-
пользуемый при настройке с поиском, соста-
вляет 50 кГц. При включении функции AF или
TA
шаг настройки автоматически меняется на
100
кГц. При включенной функции AF предпо-
чтительно установить шаг настройки 50 кГц.
! Во время ручной настройки шаг настройки
составляет 50 кГц.
1 Нажмите M.C., чтобы выбрать шаг настрой-
ки в FM-диапазоне.
50 (50
кГц)—100 (100 кГц)
AUTO-PI (
автоматический поиск по идентифи-
катору программы)
Управление устройством
120
Раздел
Управление устройством
Ru
02
-
Инструкции по эксплуатации
1

Pioneer DEH-3400UB инструкция по эксплуатации
(56 страниц)
- Языки:Английский, Испанский, Французский
-
Тип:
PDF -
Размер:
1.03 MB
Просмотр
На NoDevice можно скачать инструкцию по эксплуатации для Pioneer DEH-3400UB. Руководство пользователя необходимо для ознакомления с правилами установки и эксплуатации Pioneer DEH-3400UB. Инструкции по использованию помогут правильно настроить Pioneer DEH-3400UB, исправить ошибки и выявить неполадки.