
Если вы никогда не работали в программе DaVinci Resolve и не знаете, с чего начать — всё необходимое для новичков вы найдёте в этой статье.
Скачайте DaVinci Resolve
Начните с загрузки и установки бесплатной DaVinci Resolve по этой ссылке: https://www.blackmagicdesign.com/ru/products/davinciresolve/training
Там же найдёте официальные обучающие видео на английском языке и ссылки на исходники для прохождения их курса.
Можете использовать их исходники для прохождения уроков или мини-курсов из этой статьи.
DaVinci Resolve: обучение за час
Познакомьтесь с DaVinci Resolve
Скачайте исходные клипы для прохождения этого урока: https://disk.yandex.ru/d/xaKt8RaOYRNtzA
В этом вводном уроке автор за 45 минут познакомит вас с программой. Вы узнаете, как пользоваться DaVinci Resolve, базовыми инструментами и командами.
Лучший старт для новичка:
Для чего нужна DaVinci Resolve?
Эта программа по праву считается лучшей программой для цветокоррекции видео.
DaVinci Resolve использовалась при создании таких фильмов как «Мстители. Война бесконечности», «Чудо-женщина», «Хан Соло», «Лунный свет» и многих других.
Помимо цветокоррекции в DaVinci Resolve вы также можете монтировать свои проекты, добавлять анимацию и графику, работать со звуком и музыкой.
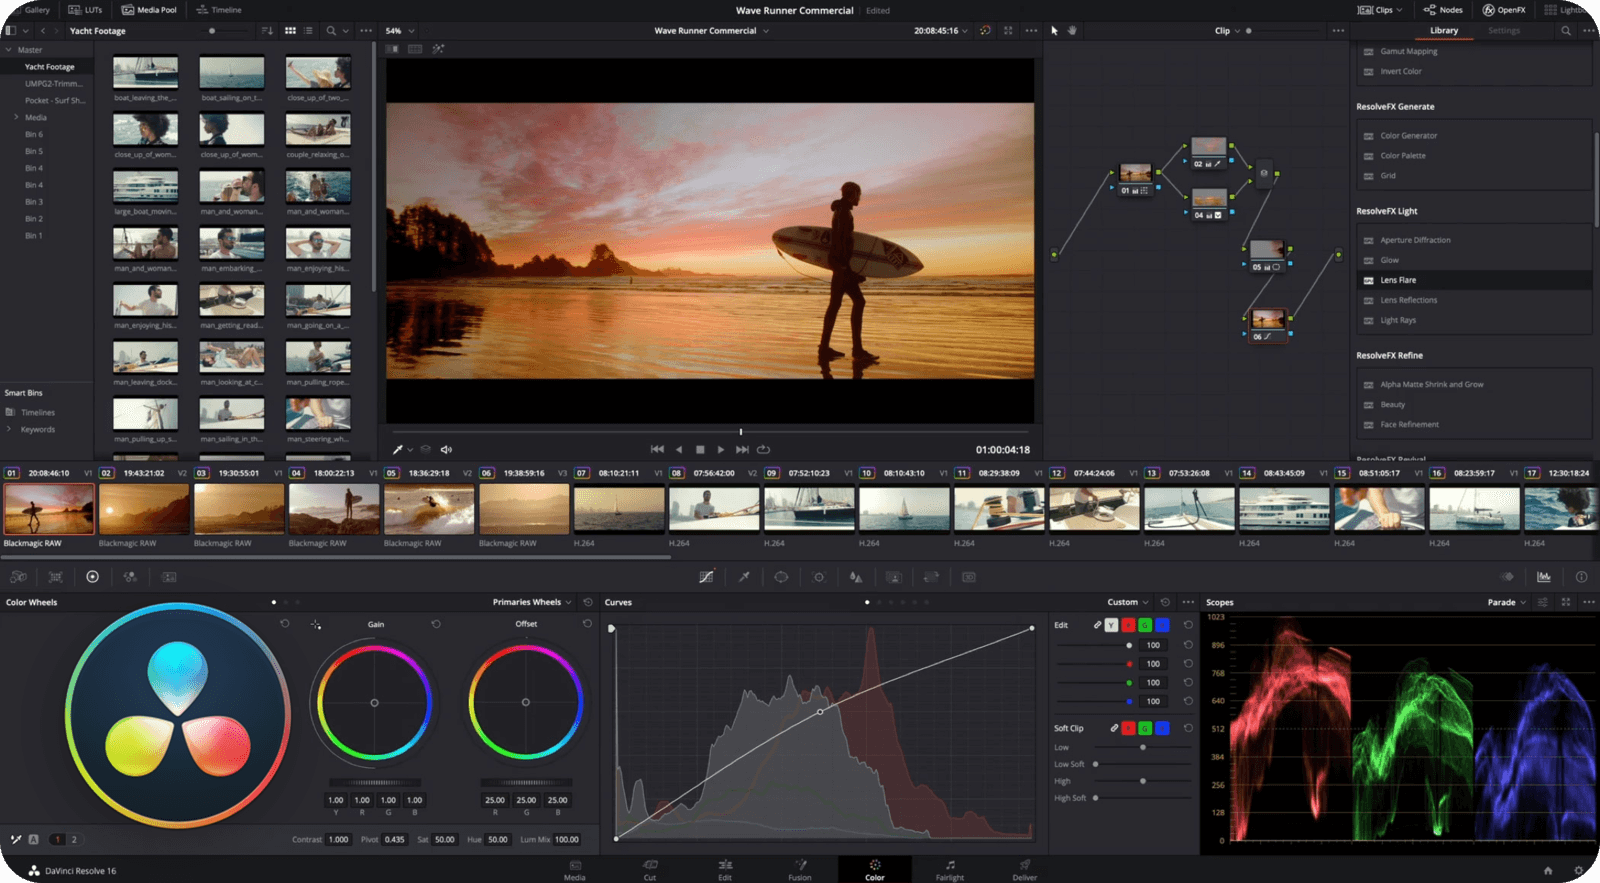
Взгляните, как оживает скучный материал после грейдинга в DaVinci Resolve:
Уроки DaVinci Resolve на русском
Обучающего материала по DaVinci Resolve на русском языке достаточно, в этой статье я привёл самые полезные каналы и плейлисты. Они помогут вам самостоятельно изучить DaVinci Resolve с нуля.
Отдельно также приведу пару англоязычных каналов по другим полезным фишкам программы.
Канал MediaKeller
Отличный русскоязычный канал с уроками по Resolve, автор объяснит всё, — от цветокора до анимации и монтажа. Плюс поделится ценными профессиональными советами в уроках.
Курс Roman Bolharov
Плейлист с уроками по DaVinci Resolve на русском. Автор последовательно обучит вас монтажу, цветокору и созданию переходов. Также даст немало дельных советов по работе в программе.
Всего 10 уроков по 10-20 минут, отличный вариант для начинающих:.
Канал Vasily Kostomarov
Уроки в этом плейлисте расположены в порядке возрастающей сложности.
Вместе с автором вы изучите вкладки программы, базовые инструменты. Затем перейдёте к монтажу и цветокору, например, настройке тона кожи и многому другому.
Плейлист закрывается уроками по крутым эффектам и покраске профессиональных футажей, автор даёт немало полезных советов по грейдингу в DaVinci Resolve.
Серия уроков «Красим видео вместе»
Крутая серия 7 обучающих видео по грейдингу в DaVinci Resolve.
В этих уроках автор учит вас создавать, так называемый, «look» ваших видео, повторяя палитру и стилистику популярных блокбастеров, вроде Мстителей.
Уроки DaVinci Resolve на английском
Уроки JayAreTV по Fusion
Интересует не только монтаж и грейдинг в DaVinci Resolve?
С помощью вкладки Fusion вы можете создавать анимации и накладывать эффекты на видео. Раньше Fusion был отдельной программой, а теперь он — часть Resolve.
В этом плейлисте найдёте кучу уроков по созданию титров, анимаций, различных плашек и эффектов с помощью Fusion.
Плейлист уроков Casey Faris
Уроки в этом плейлисте помогут вам получше разобраться с инструментами монтажа в DaVinci Resolve. Также вы немало узнаете о работе с различными эффектами для ваших видео.
Всего 75 роликов по 5 минут в среднем, автор хорошо раскрывает отдельные темы. Также есть уроки и по Fusion, полезный ресурс для начинающих.
This is a complete beginner tutorial on how to use DaVinci Resolve 18.
In this new guide you’ll learn:
- How to get started.
- How to edit your videos.
- How to export in high-quality.
- Lots more.
Let’s get to it.
How to Get Started with DaVinci Resolve
- Download & Install DaVinci Resolve
- Create a New Project
- General Overview of DaVinci Resolve
- Setup the Timeline in DaVinci Resolve
- How to Import Media to DaVinci Resolve
1. Download & Install DaVinci Resolve
Since this is a complete beginner guide, I decided to include this as one of the steps.
To download DaVinci Resolve, head over to Black Magic Design’s Official Website (opens in a new tab), go to the “Products” page, and locate DaVinci Resolve.
When you get to the download page (it looks like in the image below), choose either the free or paid version of Resolve.
Check out this guide walking you through the download & installation process step-by-step.
2. Create a New Project
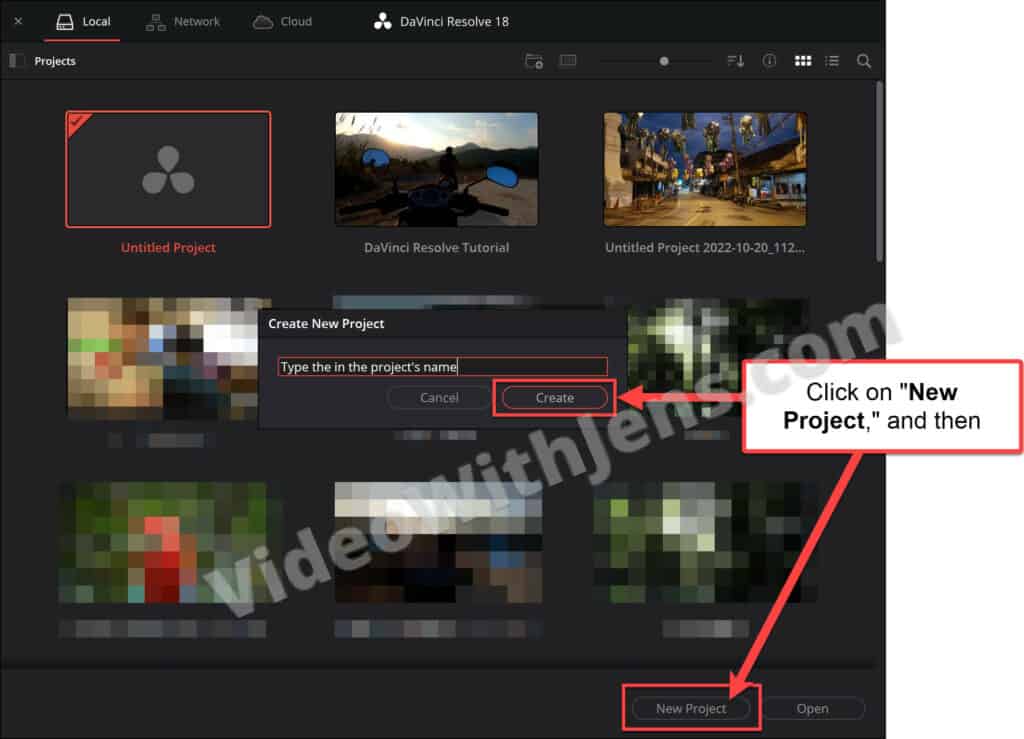
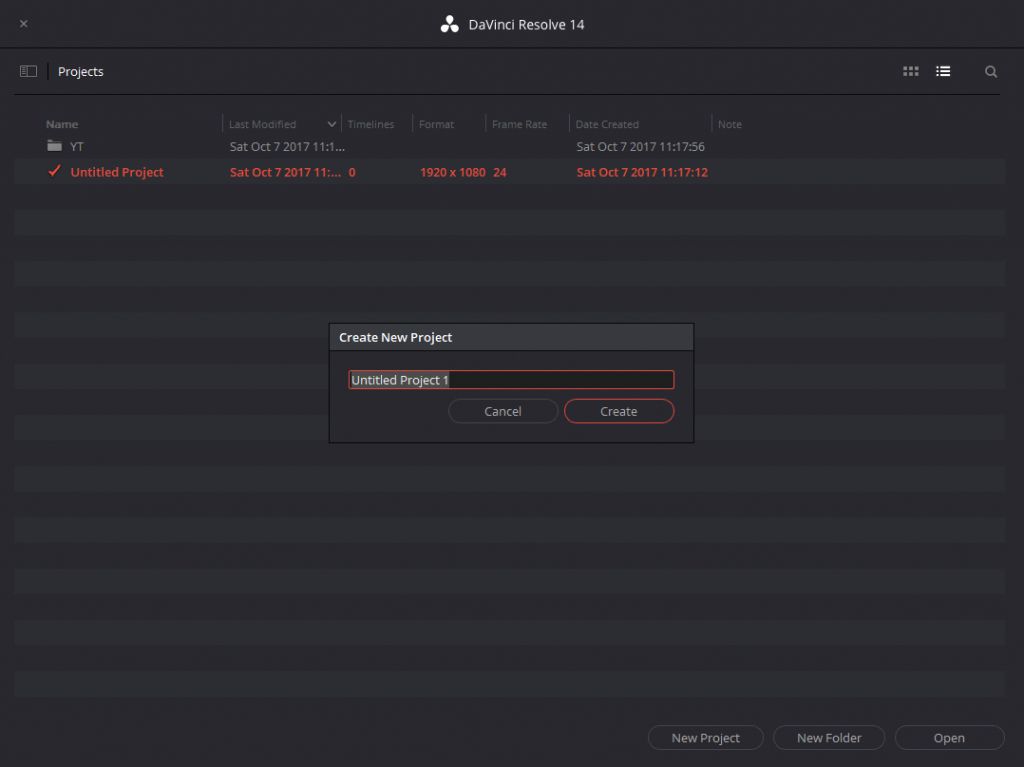
When you launch DaVinci Resolve, you’ll first be met by the “Project Manager.”
- If you get stuck on “Loading Fairlight Engine” when launching Resolve, check out this tutorial on how to fix it.
The “Project Manager” is where you can access all your projects and organize them into different databases, etc.
It’s also where you create a new project; click on “New Project” in the lower right corner, give it a name, and click “Create.”
3. General Overview of DaVinci Resolve
Inside DaVinci Resolve, there are seven different pages, all having their unique purpose.
The different pages are as follows:
- Media: Imports and organize media with direct access to your file system.
- Cut: For editing faster and with rough cuts.
- Edit: Slower editing than the «Cut» page, but easier to manage media.
- Fusion: intended for graphic design.
- Color: color correct, color grading, etc.
- Fairlight: advanced tools for managing your audio.
- Deliver: this is where you export your video.
To open the individual pages, click on the buttons at the bottom of Resolve:

4. Setup the Timeline in DaVinci Resolve
Before importing your media, we will set up the timeline correctly.
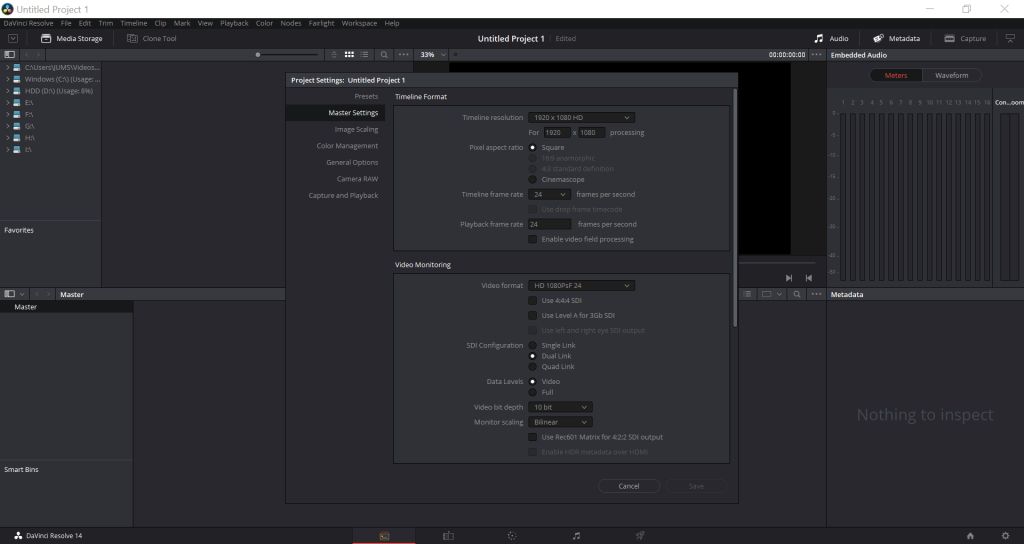
Open the “Project Settings” by either pressing “Shift + 9” or clicking on “File” (top left-hand corner) > “Project Settings.”
- To make videos for TikTok, Instagram, or YouTube Shorts, the resolution (aspect ratio) has to be vertical. Check out this complete tutorial on making vertical videos for social media.
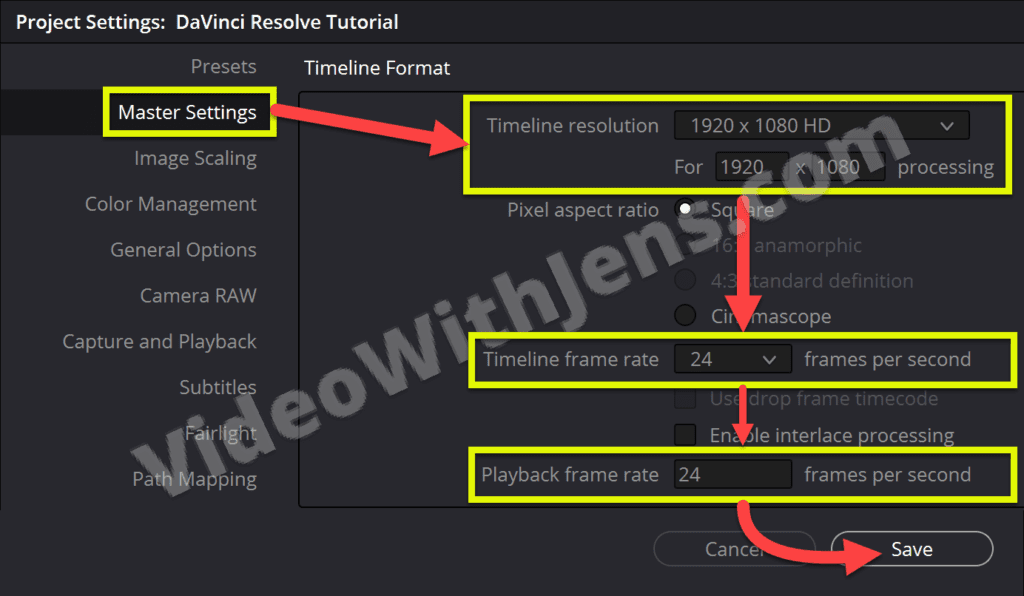
Then, open the “Master Settings” tab, where you set the resolution and frame rate.
Set the “Timeline resolution,” “Timeline framerate,” and “Playback frame rate” to the same as the clips you will import.
Then click on “Save“:
5. How to Import Media to DaVinci Resolve
There are many ways to import media to DaVinci Resolve; I will show you one of them now.
Check out this article to learn about the other ways to import (including the Media page).
We are going to import directly to the “Cut” page:

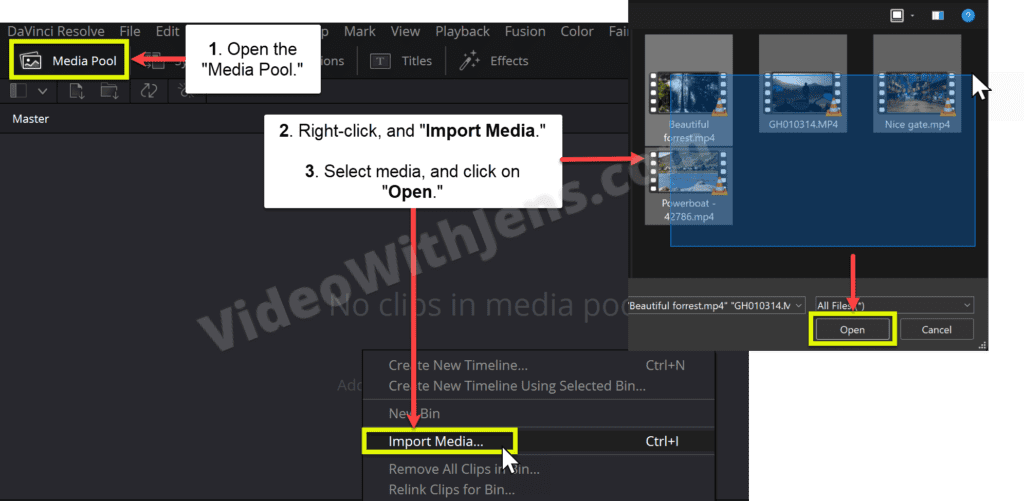
Inside the “Cut” page, open the “Media Pool” (top left-hand corner).
- This is where you’ll find all your source clips once imported.
Right-click on the gray area inside the “Media Pool” and click on “Import Media.”
Then, select the clips in your file system, and click “Open.”
- If you are unable to import or face any issues, read this article on how to fix that.
How to Edit Videos in DaVinci Resolve
In this part of the tutorial, you’ll learn all you need to get started editing videos.
- Adding clips to the timeline (effective method).
- An overview of the “Edit” page.
- How to Trim & Clips.
- How to Move Clips.
- Adjust Audio Levels.
- Add Titles/Text.
- Add Video Transitions.
- Change Clip Speed.
1. How to Add Clips to the Timeline in DaVinci Resolve
The first step is to add the clips to the timeline, where you will cut and compose your video.
To do this, I’ll show you a powerful method that will spare you a lot of unnecessary editing work.
On the “Cut” page next to the “Media Pool” section, click on the button called “Source Tape” (watch the image below showing you what it looks like).
Now, in the video preview, all clips in the “Media Pool” are seen as one:
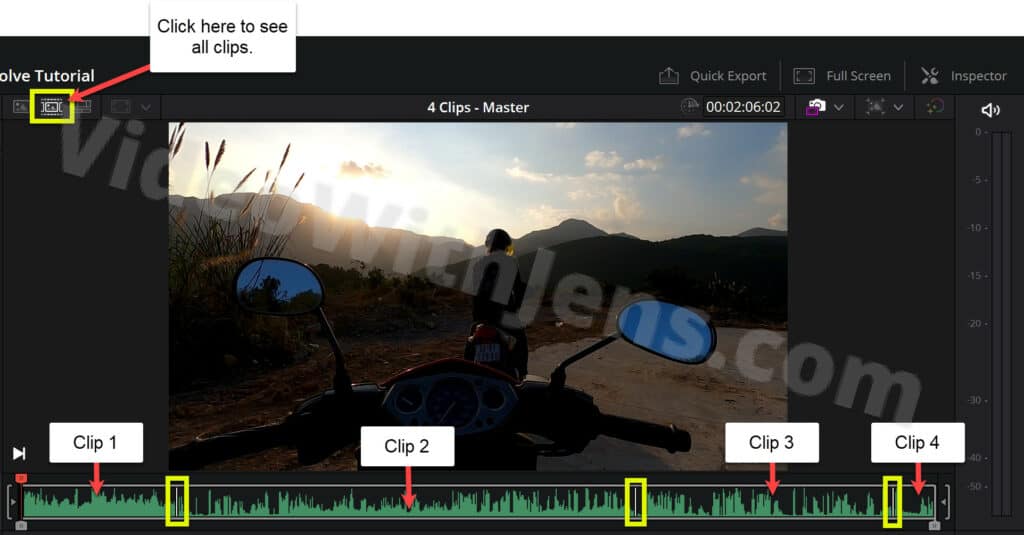
Next, to add the lips to the timeline, use the following keyboard shortcuts:
- Press “L” to play forward (double tap to play faster).
- Press “K” to stop playing.
- Press “J” to play backward (double tap to play faster).
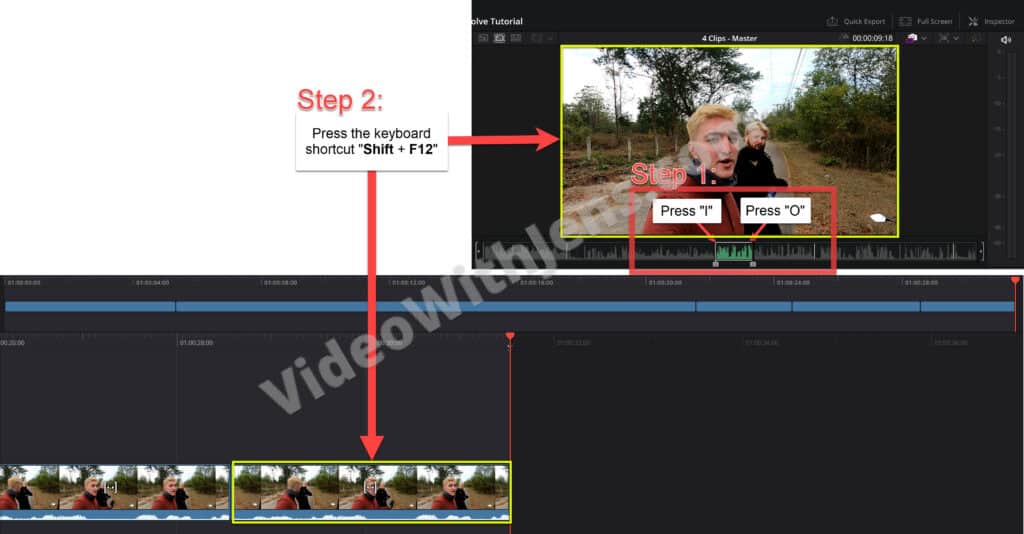
- Press “I” to create an in-point.
- Press “O” to make an out-point.
- Press “Shift + F12” simultaneously to add what is between the in and out-point to the timeline.
Watch the image illustration below on how to do this:
I have written about other useful methods to add clips to the timeline here.
2. Head over to the “Edit” page.
Open the “Edit” page at the bottom of DaVinci Resolve:

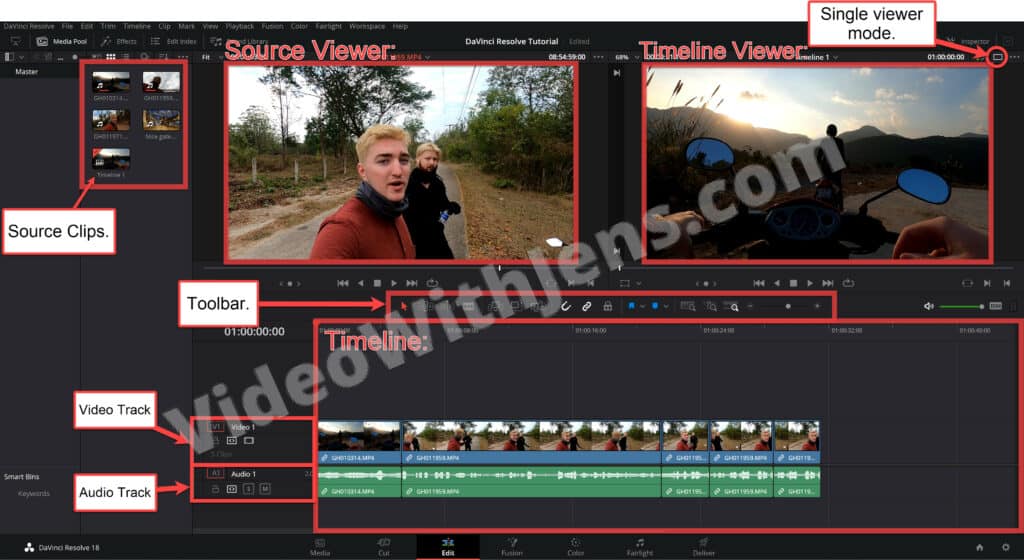
Here is a quick overview of the “Edit” page:
- The “Media Pool” contains the source clips.
- By default, there are two viewers/video previews:
- The “Source Viewer” shows the clips in the “Media Pool.”
- The “Timeline Viewer” shows your project (what’s in the timeline).
- Click on the icon shown in the image below for a single-viewer mode.
- The timeline is where you compose your project.
- Video tracks are where the video part is found.
- Audio tracks are where the audio is found.
- The toolbar contains a bunch of options only affecting the timeline.
3. How to Split, Cut, and Trim Clips in DaVinci Resolve
Knowing how to effectively split, cut, and trim clips is critical if you want to edit your videos fast.
I’m going to show you some basic methods to get started. However, if you want to learn the more advanced techniques right away, you may want to check out this article.
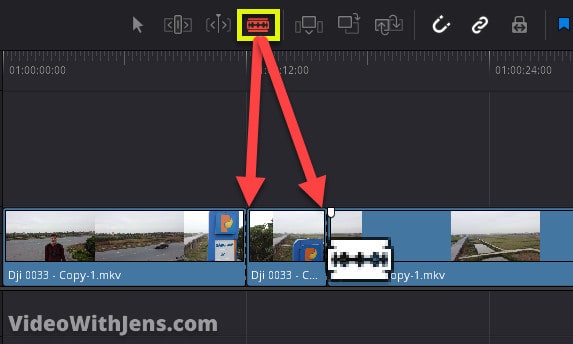
Blade Edit Mode
This is the most basic way of cutting clips.
Click on the razor blade icon in the toolbar, and then click on the clips in the timeline to split them.
- Recommended: Use the keyboard shortcut “B” to enable “Blade Edit Mode.”
To delete the clip, click on the cursor icon in the toolbar (Selection Mode), select the clip in the timeline, and press “Shift + Backspace” (Windows) or “Shift + Delete” (macOS).
- Recommended: Use the keyboard shortcut “A” to enable “Selection Mode.”
Playhead Split
Instead of using the razor blade to cut the clips, you can split the clips where the timeline playhead (red time marker) is positioned.
Good way of using it:
- Press “L” to play forward in the timeline.
- Press “K” to pause.
- Press “Ctrl or Command + B” or “Ctrl or Command + \” to split the clip.
If you want to remove part of your clip, continue by:
- Play forward, pause, and split again.
- Press “J” to move the playhead above the “cutout” part of the clip.
- Press the keyboard shortcut “Shift + V” to select the clip.
- Press “Shift + Backspace” or “Shift + Delete” (macOS) to remove the part..
Step 4-7 is not the most effective way of continuing, yet far more effective than using the razor blade and selecting the clip manually.
- Check out this tutorial, and scroll down to “Ripple trim start/end to playhead” to find the best way to do steps 4-7.
Trim Edit Mode
Another approach to editing is using the trim tools.
To do this, hover over the end of the clips in the timeline, and trim it shorter or stretch it longer.
You can’t stretch the clip more than its original length (then you must change the clip speed).
Trimming your clips will leave a gap in the timeline or overlap the neighbor clip. To prevent this from happening, enable “Trim Edit Mode” (shortcut: “T“) in the toolbar.
In this mode, you will also trim or lengthen the timeline and not leave gaps or overlap other clips.

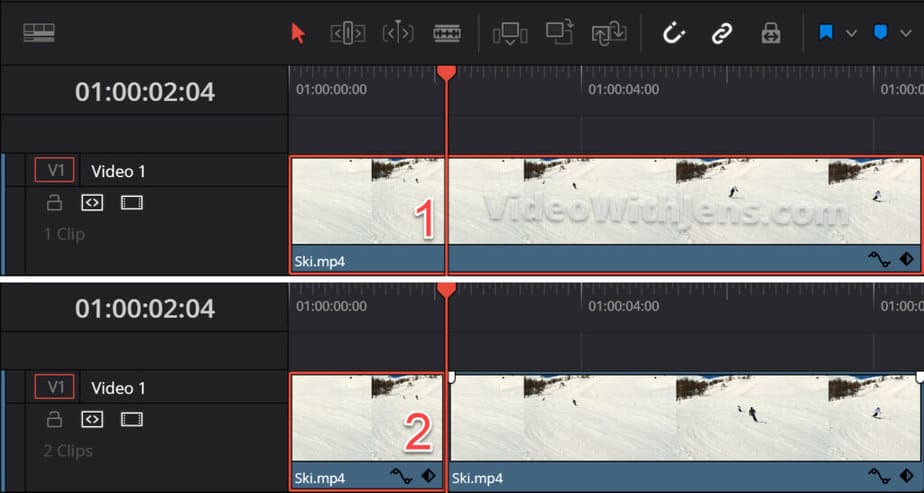
4. How to Move Clips in DaVinci Resolve
To move clips in the timeline, you drag and drop them where you want. However, there are some things you can do to make this a lot more efficient.
One way of moving clips is by pressing “Ctrl/Command + Shift” and then dragging the clip. When doing this, the other clips in the timeline will make room for the clip you are dragging.
Here are 7 more ways to move clips in DaVinci Resolve.
Check out the GIF illustration below on how this works:
5. How to Adjust Audio Levels in DaVinci Resolve
Next, let’s look at ways to adjust the audio levels in DaVinci Resolve.
If you want to add any audio file/melody to the timeline, you can do this like with a regular video clip.
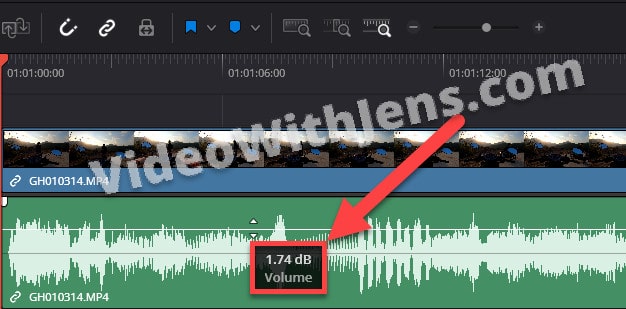
Adjust individual audio clip:
To do this, hover over the white horizontal line on top of the audio clip, and drag it upwards or downwards to increase or decrease the volume.
Check out the image below:
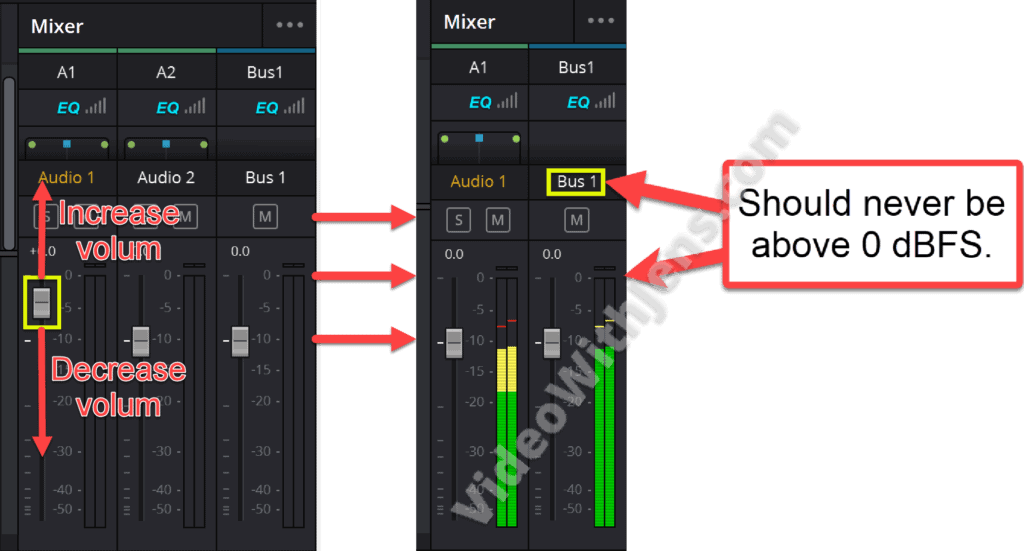
Adjust audio tracks and project volume:
This is done from the “Mixer” tab; you can open it in the top right-hand corner.
Here you can adjust the volume of each audio track, or the whole project, by using the sliders.
- Audio 1 is the first audio track in the timeline.
- Audio 2 is the second audio track in the timeline.
- Bus 1 is the master volume and controls the whole project’s volume.
Make sure that the “Bus 1” never is above 0 dBFS. You can check this when playing through the video.
If you have music, a good benchmark is to set it 20-30 dB lower than the main dialogue. However, there is no exact rule for this.
Here’s an article with some additional ways to change the volume.
6. How to Add Titles/Text in DaVinci Resolve
Now that your video is composed and the audio levels are set, it’s time to add some text and effects to it!
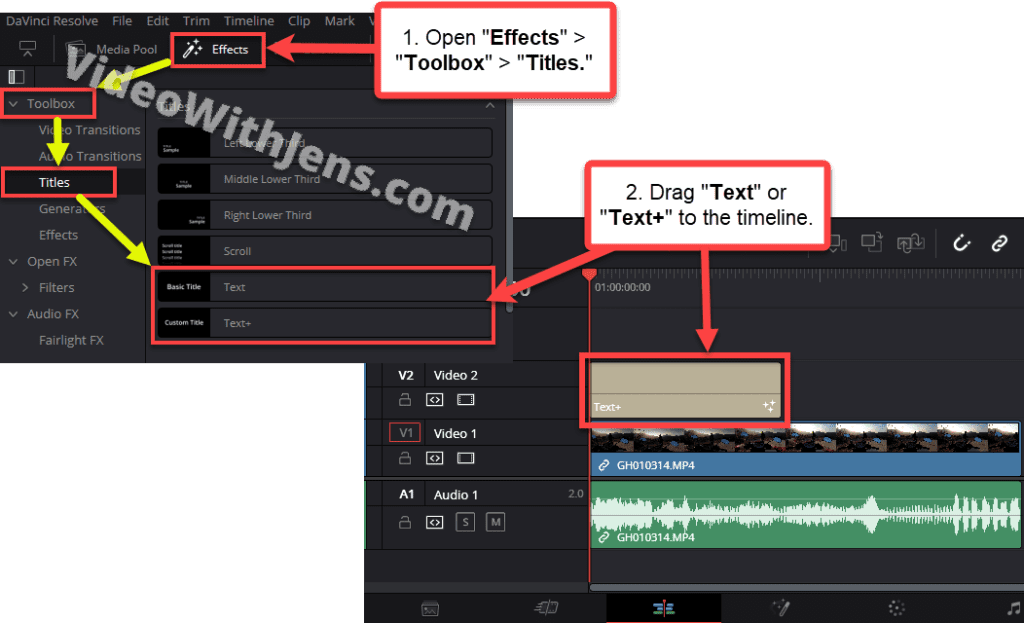
To add text to your video, open the “Effects” library (top left-hand corner), and under “Toolbox,” open the “Titles” tab.
Next, drag one of the “Text” or “Text+” generators to the timeline, and drop it one track above the video.
- Doing this will create a text overlay. Drop the text in the “Video 1” track if you want a black background.
Here’s an illustration showing you how to do this:
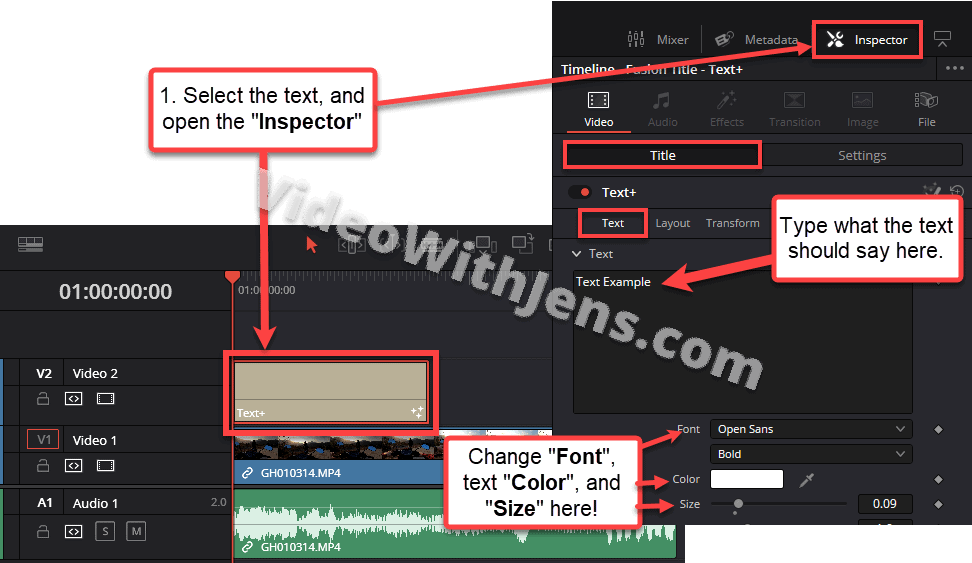
To edit the text, click on the text generator in the timeline, and open the “Inspector” (top right-hand corner).
Make sure to be in the “Title” sub-tab; from here, you can adjust the text how you want it.
Switch the “Title” tab to the “Settings” tab to adjust the position.
Check out this article to learn more about how to customize and create text animation.
7. How to add Video Transitions
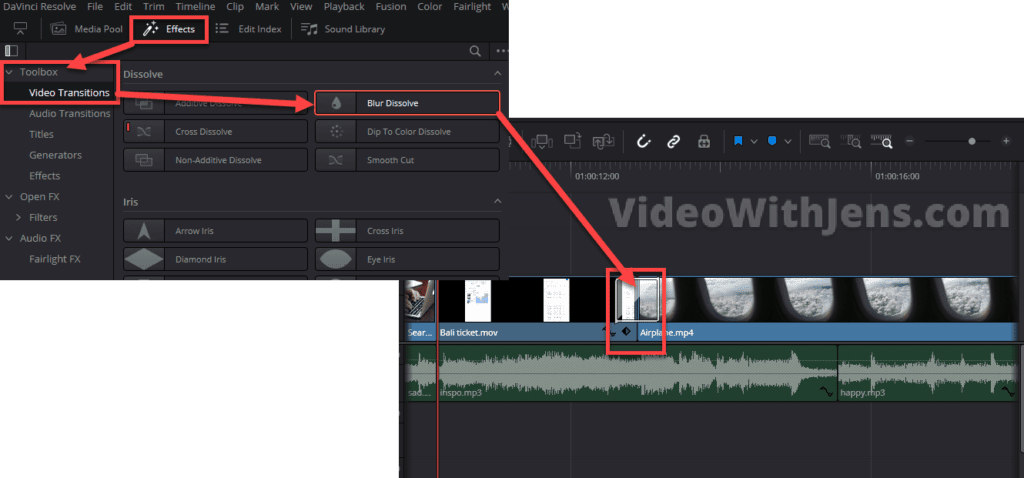
If you want to create a smooth transition from one clip to another, there are many good transitions presets in the “Video Transition” tab inside the “Effects.”
You can preview how they look in your video by hovering your mouse cursor over them.
- If it doesn’t work, click on the three dots in the top right-hand corner of the tab, and enable “Hover Scrub Preview.”
Once you find a transition you like, drag and drop it between two clips like this:
8. How to Change Clip Speed in DaVinci Resolve
Speeding up or creating slow motion is probably one of those things you want to know early on.
Let me show you how it’s done in Resolve:
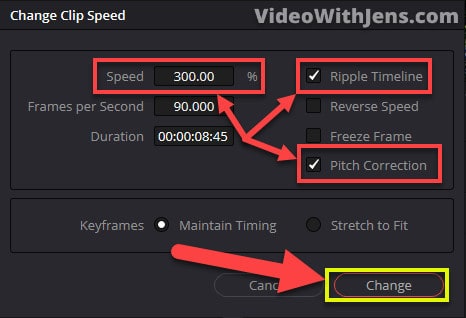
Start by right-clicking the clip in the timeline, and then select “Change Clip Speed.”
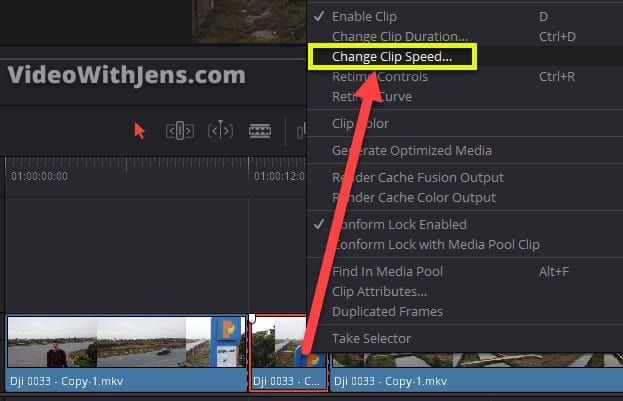
Then this window should pop up.
Adjust the percentage next to “Speed” to change the clip speed.
- 200% is twice the normal speed.
- 50% is half the normal speed.
Tick off the box next to “Ripple Timeline,” or you will probably not get the desired result.
Check off “Pitch Correction” if you want the pitch of the voice to stay the same as usual.
- If you enable it, you will get that high-pitched voice.
Lastly, click on “Change.”
Check out this article to learn more advanced ways of changing clip speed.
How to Export Videos in DaVinci Resolve
Lastly, it’s time to export your video out of Resolve.
I will show you how to export your video to a basic MP4, but I won’t go into detail about the render settings.
Here’s a more in-depth explanation, and how to get high-quality on social media.
Anyways, let’s get to it!
Exporting videos is done using the “Deliver” page:

On the left side of the “Deliver” page, you’ll see the “Render Settings” tab. This is where we give Resolve all the instructions on how we want the video to be encoded.
Start by choosing the “Custom Export” option, then give the video a “File Name,” and click on “Browse” to set the export location in your file system.
Make sure the next option is set to “Single Clip,” meaning all the clips in the timeline will be one video.
Then in the “Video” tab, set…:
- Format against MP4.
- Codec against H.264.
- Resolution to match your timeline resolution.
- As we set above.
- The Frame rate should be correct.
- Quality to Automatic and Best.
- The “Best” option may be overkill, but at least you will unlikely lose any quality; read more about that here.
- You can leave the rest by default.
Once the above is done, click on “Add to Render Queue“:

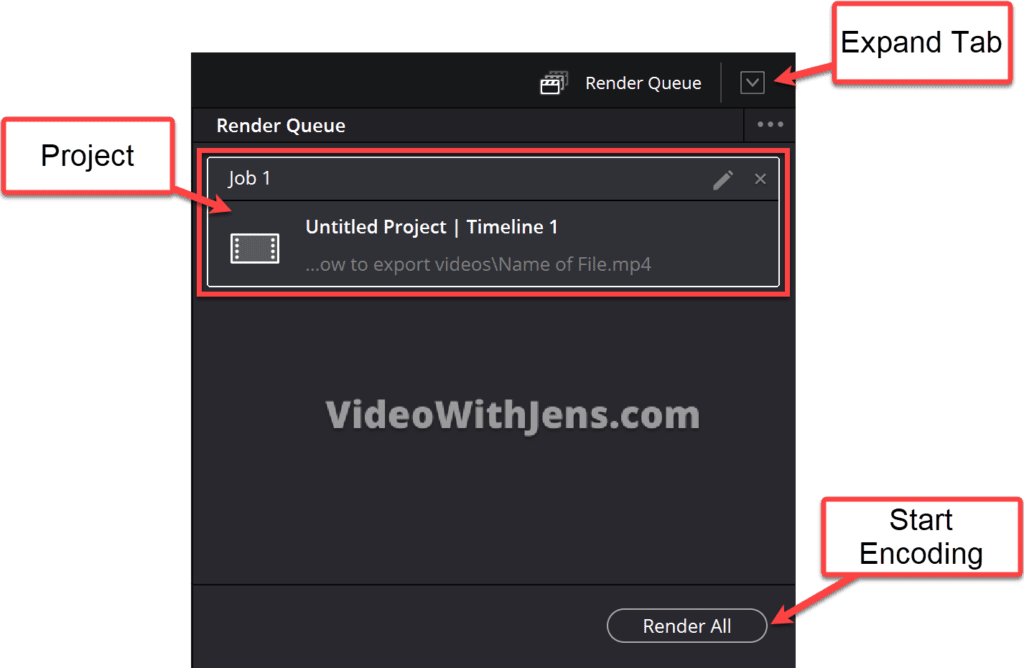
Then the project will appear as a “Job” in the “Render Queue” tab on the right side of the “Deliver” page.
To start the encoding, click on the “Render All” button, and wait.
Once it’s finished, you’ll find the video where you set the “Location” in your file system.
- Alternatively, right-click the finished “Job” and select “Open File Location.”
DaVinci Resolve: менеджер проектов
На официальном сайте проекта DaVinci Resolve доступны две версии пакета: бесплатная и платная. После скачивания и установки программы запустите ее и пройдите регистрацию. Первое, что вы видите при запуске Resolve, — это Менеджер проектов. Здесь вы можете легко создать новый проект за несколько кликов. Для лучшей организации ваших проектов здесь также могут быть созданы папки.
DaVinci Resolve: «Media Pool»
Медиа-пул в первую очередь предназначен для импорта видео- и аудиофайлов. Вы также можете редактировать в этой части программы настройки своего проекта, нажав на значок шестеренки внизу справа. Здесь, например, вы можете отредактировать разрешение и частоту кадров.
DaVinci Resolve: раздел «Edit» или «Изменить»
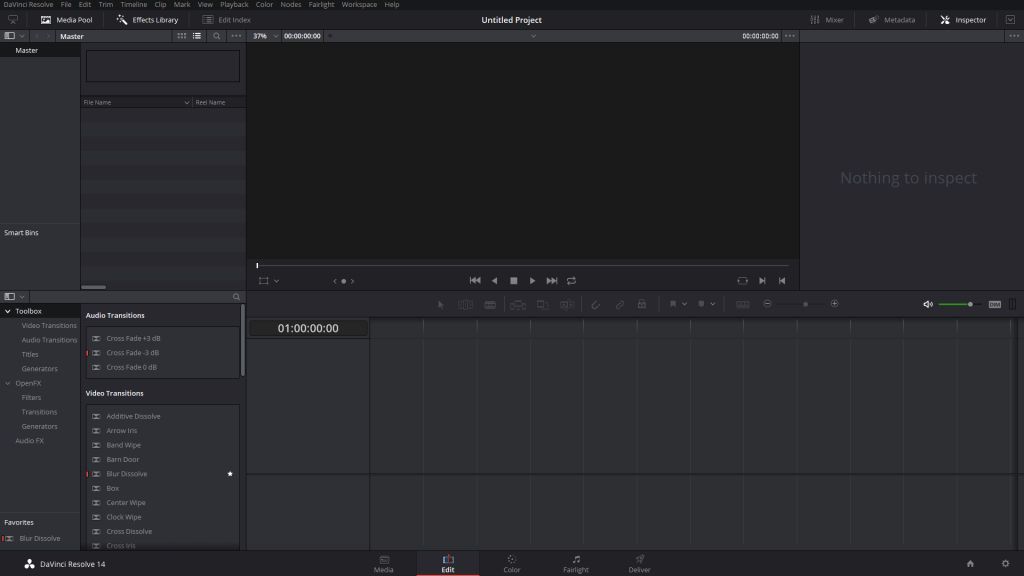
В области редактирования вы найдете все важные инструменты, необходимые для успешного редактирования видео. В крайнем левом углу вы можете найти файлы из медиа-пула, а также некоторые аудио- и видеоэффекты, которые вы можете перетащить в видеодорожку с помощью опции Drag-and-Drop.
С помощью [A] вы можете переключиться на обычный указатель мыши, который можно использовать, например, для перемещения видеодорожек. Используйте [T], чтобы активировать инструмент Trim, который регулирует длину клипов. С помощью [B] вы можете «обрезать» клипы.
DaVinci Resolve: раздел «Color Grading» или «Сортировка цветов»
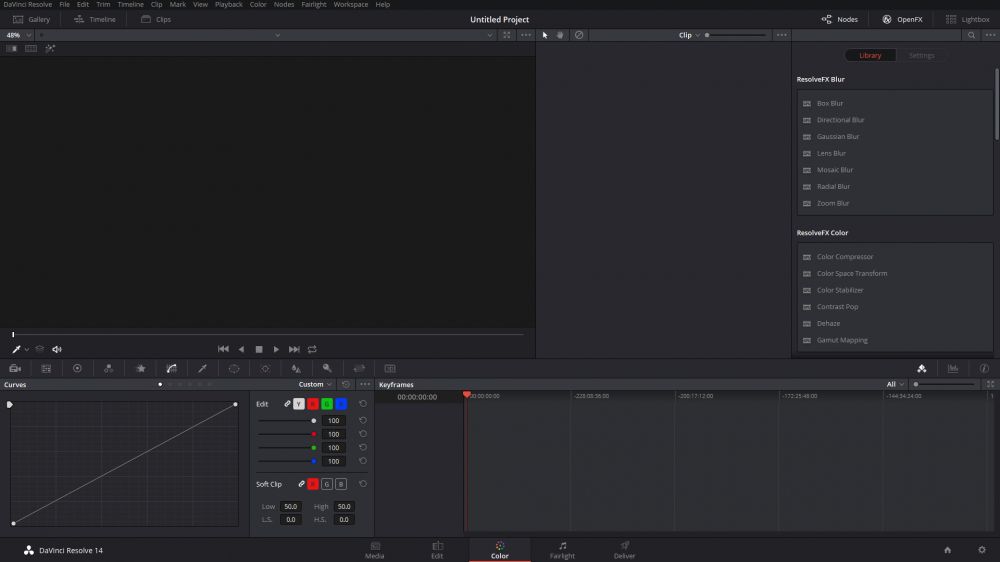
Эта область важна для цветовой коррекции видео. Как цветовая градация работает в DaVinci Resolve, вы можете прочитать здесь.
DaVinci Resolve: «Fairlight»
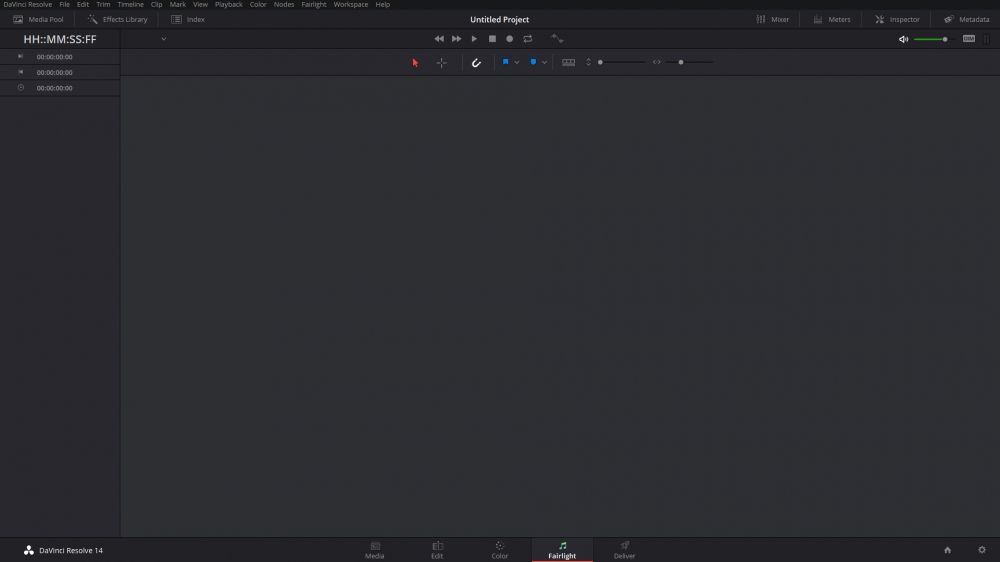
Здесь вы можете выставить все настройки, относящиеся к звуковым дорожкам. Например, вы можете обрезать аудиофайлы по длине. Кроме того, могут быть скорректированы уровень громкости и коэффициент ее усиления.
DaVinci Resolve: «Deliver»
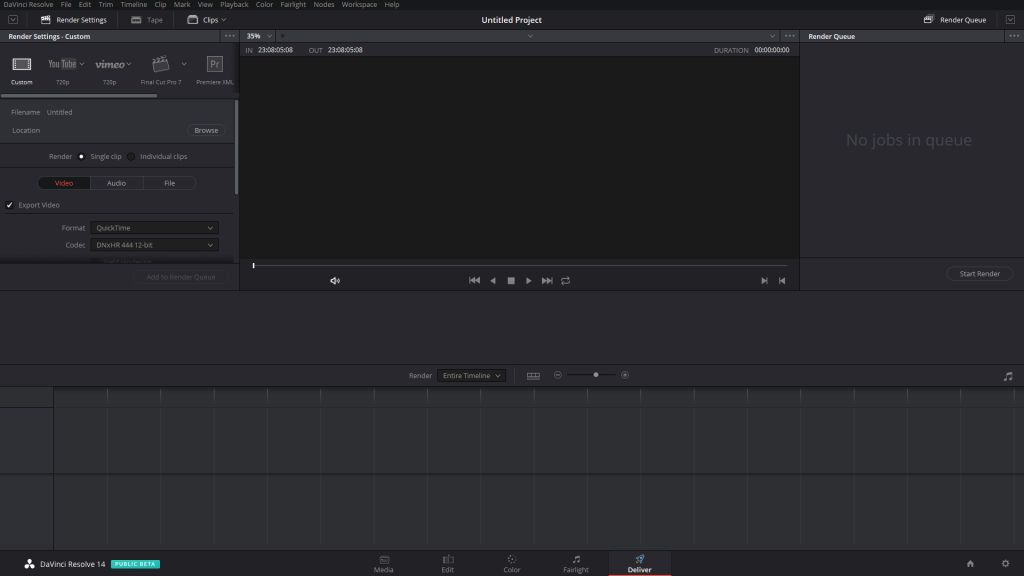
Если вы закончили редактирование своего видео и хотите его отобразить, вы можете сделать это на вкладке «Deliver» или «Доставка». Здесь вы можете выбрать как разрешение, так и биты и частоту кадров для следующего видео. Если вы еще не достаточно хорош разбираетесь в битах и фреймах, вы сможете выбрать шаблон рендеринга.
Если вы закончили редактирование своего видео и хотите его отобразить, вам нужно перейти на вкладку «Deliver». Здесь вы можете выбрать как разрешение, так и биты и частоту кадров для следующего видео. Если вы новичок в битах и фреймах, то можете выбрать шаблон рендеринга.
В менеджере проектов вы можете легко создать новый проект всего за несколько кликов. Медиа-пул в первую очередь предназначен для импорта видео- и аудиофайлов. В области редактирования вы найдете все важные инструменты, необходимые для успешного редактирования видео. Раздел «Сортировка цветов» очень важен для цветовой коррекции видео. В «Fairlight» вы можете выставить все настройки, связанные с аудиодорожками.
Читайте также:
- Топ-18: лучшие бесплатные программы для создания видео
- Обзор Magix Vegas Pro 15: Профессиональная киностудия
Фото: компании-производители

В этом блоке вы ознакомитесь с ключевыми вводными для работы в редакторе DaVinci Resolve 15. Софт условно разделяется на 3 составляющих:
- программный пакет Fusion, используемый для наложения графики;
- визуальных 3D-эффектов;
- функций звуковой обработки Fairlight.

Разработчики предлагают для скачивания 2 пакета – бесплатный и платный. После инсталляции зарегистрируйтесь и подтвердите учётную запись. Это нужно для синхронизации и обновления продукта. В free-версии доступны все функции, но спустя 15 минут она становится не активной.
При запуске Resolve, первое окно – «Менеджер проектов». Создайте проект в несколько кликов либо загрузите имеющийся. Для структуризации доступна работа с папками.
Media Pool

Медиа-пул нужен для импорта файлов. В этой вкладке доступно изменение настроек проектов – кликните на шестерёнку в правом нижнем углу. К примеру, можно изменить разрешение картинки или частоту кадров.
Редактировать

В области редактирования находится весь доступный функционал для работы с видео. Справа выведено окно медиа-пула с клипами и эффектами. Функция Drag&Drop позволяет перетащить элемент оттуда на рабочую область.
Нажмите клавишу «A» для перехода в режим указателя мыши. Нажмите клавишу «T» для перехода в режим Trim – регулирование длины клипа. Нажмите клавишу «B» для обрезки.
Сортировка цветов

Цветокоррекция – неотъемлемая часть редактирования видео. Данная область предназначена для профессионалов, поэтому перед изменением показателей, ознакомьтесь с матчастью.
Fairlight

Обрезка звука, наложение реверберации, выбор каналов, корректировка шума, изменение коэффициента усиления – всё это доступно в Fairlight.
Deliver

Проект готов? Пора рендерить видео. Сделать это можно во вкладке «Доставка». Тут же выбирается конечное разрешение, битрейт, частота кадров и прочее. Если недостаточно разбираетесь в этих понятиях, выберите готовый шаблон.
Итог
Интерфейс DaVinci Resolve интуитивно понятен. Все функции подписаны, как в предыдущих версиях и находятся там, где ожидаешь их увидеть. Горячие клавиши позволяют не рыскать в меню.
Кратко, по пройденным этапам ознакомления:
- Менеджер проектов – быстрое создание и загрузка проекта.
- Медиа-пул – импорт аудио и видео.
- Области редактирования – расположение всех важных инструментов для работы.
- Сортировка цветов – цветокоррекция картинки.
- Fairlight – настройка звука.
Hi, editors! Today we’ll go through the base of DaVinci Resolve and questions beginner editors might have. From running the software to the export of your final video — here are the things you may need to know as a new DaVinci Resolve user.
Preparation
The starting point is to create your project correctly, so you need to organize your space and know what to set in DaVinci Resolve:
Project setup
The best thing before you create a new project is to organize it from the beginning. Open DaVinci Resolve and create a folder in the Project Manager. Now you can create a new video inside of you project. It will be easier to navigate and you may need to duplicate your project or change it in the future.
After creating a project, click on the Settings icon on the bottom-right corner of your screen and go to the Master Settings menu. Here you can set the project resolution, aspect ratio, framerate and all other things you’ll need for your future video.
If you’ll need the same settings over and over, you can click on Presets, save the current settings of your project and right-click on the preset and choose Save As User Default Config.
Timelines
Now you can create a New Timeline. Press cmd+N (Mac)/control+N (Win) or select an option from the menu to create a new timeline.
By default, they will be created with the project settings, but you can create any timeline settings by unchecking the checkbox Use Project Settings:
Set Timeline Proxy Resolution
To speed up the preview, you can lower the quality of the proxy resolution. Go to the Playback menu on the top and select Half or Quarter option in Timeline Proxy Resolution menu.
Render cache
Make sure you regularly clean your cache — it affects the hard drive and computer space. As the result, DaVinci Resolve may work much slower and give unexpected bugs. Go to Delete Render Cache>Unused to delete data you don’t need. Once you’ve finished the project, you can choose All to delete all cache from the project.
Another tip is to turn off Smart Mode — go to Render Cache>None, so your project won’t collect cache during the editing.
Optimised Media
One of the main tips to improve your playback performance or export your project to another device is to Generate Optimised Media. To do it, you need to go to the Edit page, select all files you need to optimize, right-click, and choose Generate Optimised Media. After the progress window disappears, optimized media will be ready.
If you need to make sure you’ve generated your Proxy Media files, you can go the same Edit page, click on the Media Pool and choose the Clip Name. After that, select Proxy Media Path and you’ll see 2 checkboxes — one for Proxy Media resolution, and another for it’s location.
Fonts
Fonts can play tricks on you. If you do not have install the fonts of the project you have purchased, then the project itself may not be displayed correctly or not displayed at all.
In other cases, you may have multiple copies of the same font installed, which can also cause problems when working with templates. To avoid errors before work, make sure that you have installed all the necessary fonts and do not have duplicates. To manage fonts in macOS, use the Font Book app or use the Control Panel in Windows 10 and 11. MacOS have two font folders: User>Library>Fonts and in the mac’s Library>Fonts. Windows — C:\\Windows\FontsAfter installing the fonts, reload DaVinci Resolve to use them.
Before the editing process, you will need to organize your media files:
Folders and bins
If you’ve recorded your footage on several cameras, you can import it to DaVinci Resolve by creating bins. Right-click on your folder and select Add Folders and Subfolders via Media Pool(Create Bins). By doing this, you will get a highly organized workspace, separated into folders by different cameras or types of media.
Media Offline
Another thing beginners can get stuck at is “Media Offline” error. This error can appear if DaVinci can’t locate your media files, though you can quickly fix it. All you need is to go to Relink Media icon (red one) and click Relinkbutton. Now, just locate the folder where your files are placed and click Select Folder.
If you’re not sure where your videos are, just use the Disk Search button and DaVinci will quickly go through all your files.
Editing
Now, when you set everything and know how to organize your space, you can import your media and start editing.
To import videos, images or sound use Media Tab or just drag them directly to Media Pool. After dragging the video from Media Pool to your Timeline, you’ll see your video and audio tracks. Before you edit them, it’s better to click Unlink to be able to edit them separately.
When you add another media file to your timeline and you want to connect it to the previous one, click the Snapping tool to make your tracks snap to each other.
The part some beginners usually skip is using Transitions. You may need to add a basic transition between your videos. Click the Effects Library tab and you’ll see a bunch of effects, separated into Video Transitions, Audio Transitions, Titles, Generators and other effects. Choose Video Effects and preview the Transitions, to pick the one you like. After this, drag the transition between your videos. To lengthen or shorten the effect, just drag it left or right.
You can combine the effects by adding a Title. Pick Titles in Effects Library, which you can also preview. Drag the suitable title to the timeline (over your video) and it will automatically appear. Find Inspector on the right side of your workspace to change the text, font, size of your text and other settings. If your title has a slow playback, right-click on it and pick Render in Place. It will quickly replace your title with quick rendered video and you can preview it in real-time, and select Decompose to Original to edit it further.
DaVinci Resolve has a big choice among effects, though they are very basic. You can change the animation yourself in the Inspector>Settings menu, or use pre-made templates for DaVinci Resolve.
Change Resolution
Some beginners may not see the difference between the Project Timeline Resolution and Timeline Resolution. In the first case, you can set the resolution of all Timelines in your project, in the other — resolution of one particular Timeline.
Suppose you want to change the project resolution or make sure you edit in the resolution you need. In that case, you can click on Project Settings>Master Settings, find the resolution you need under the Timeline Format menu and apply it.
If you want to change the resolution of one particular Timeline, right-click on Timeline and select Timeline Settings, uncheck “Use Project Settings” and pick the resolution you need. Timeline frame rate is parent to project frame rate.
Video Templates
As we said above, standard DaVinci Resolve effects may be too simple or just don’t suit you. As a beginner, you can spend a lot of time creating a decent animation for just one title; and if you want to create a great video quickly, you may choose a different way.
Many editors, from beginners to professionals use pre-made video templates and presets to save time. It will work for you even if you use the same effects over and over again — they will be professionally animated, designed and easy to create.
One of the packs of video templates you will definitely need to have is Luts, Transitions and Titles. We’ve created 1100+ video templates with a great choice of high-quality effects, you can apply in one click. They are easy to customize and will look professional on any video.
Another handy pack of video templates is for YouTubers. YouTube Essential Library has a set of Intros, Next Episodes, Calendars, Subscribes, Lower Thirds and everything YouTubers will possibly need.
We’d also like to mention Titles Pro — the pack with more than 1500 animated title templates that became our bestseller. Here you can find the most trendy title animations among the 23 categories, such as Kinetic, Glitch, Liquid, Cinematic and many other.
Work with Color
Color Correction is an art and requires huge practice and experience that a beginner might not yet have, but the base is very simple and needs you to know these things:
To open the Color Grading tab click on it on the bottom bar.
Saturation & Hue
If you need to edit the saturation and hue level of your image, you can use Vectorscope. The middle point of your Vectorscope stands for 0% saturation and by dragging this point your saturation and hue level will increase.
Make sure you won’t drag the point out of the corner boxes, as they stand for 75% value. Also, each box stands for the color(saturation boxes above and hue boxes below) and increasing this scale too much will make your image look bad.
Nodes
Are the very essential thing in DaVinci Resolve’s workspace. One of the main mistakes beginners make is to put several adjustments on one Node. It makes it harder to compare the result of your work and adjust a particular part of your image. Combining Nodes is a way to see the result of your work and change it any time.
Also, you should plan your editing in advance and pick the Nodes Mode that will suit your needs the most. The Serial Node layers are connected, so every change of the previous Node will affect your next Node. The Parallel Node gives you to Nodes, put on the image at the same time and don’t affect each other. The Splitter Combiner Node is rarely used, but can be used for advanced color correction, denoizing or blurring a particular color channel. You can also use the Layer Node, which combines the results of several Nodes and reflects them on your image.
Another thing to know about Nodes — the connecting lines of the Layer and other types of Nodes refer to the top and bottom adjustment layers of your image. You should make sure you put the layers in the order you intended them to be.
Luts
Can greatly enhance your video without extra work. The purpose of Luts is to change RGB pixel data into another. Some Luts can highly saturate the video, some can soften the colors and make them deeper.
To add your luts, open the project settings, go to Color Management and hit Open LUT folder button. After that, just place your Luts into the folder and refresh the Luts Tab (with right-click). Your Luts will appear in the LUTs window.
To apply your Lut, you’ll need to create a new Node (option+S/alt+S) and, importantly, place it before your image Node. Beginners usually just apply the Luts to their current Node, or add a Node with Luts after the main image Node, which can lead to clipping of the effect, overexposure and other problems you’ll need to fix. If you will create a separate Node for your Lut and drag it in the beginning, you’ll have a correctly looking Lut.
If you want to know more about Luts, check our guide for using Luts in DaVinci Resolve.
Render
Now, it’s time to finally render our video! We made sure we set everything correctly and were satisfied with the result of our editing, so now we can render and export it. What you’ll need to know when you set your render.
Export Settings
You can use Quick Export, which allows you to select a format or web service that you need and make a render of the video. Go to File > Quick Export
To explore advanced export settings use the Deliver tab at the bottom of the DaVinci window. The most important here is that this menu gives you the ability to set the quality of your video, more specifically change it from Automatic to Restrict to mode. Here you can select format and codec, set video bitrate, set audio configs and many more.
Another handy thing beginners don’t know is that you can fix a very common problem — the color and saturation difference before and after export. All you need to do is change your Gamma Tag to Rec. 709-A, because this codec is the best option for social media and web. You will find this setting in the Advanced Settings tab.
Render Formats
DaVinci allows you to export videos in a variety of formats. Also, formats use different codecs.
Choose the format based on your needs:
1. If you will use the finished video in further video production, then choose uncompressed formats (like Quicktime format with Apple ProRes codec or AVI format with Uncompressed codec) that allow you to save quality, but weigh quite a lot
2. If you need a video for social networks or a website, choose MP4 or Quicktime format with h264/h265 codecs. These settings allow you to make lightweight videos and keep good image quality.
Conclusion
We hope this guide was useful, and we’ll definitely continue to complement it with new articles, specifically describing each of your steps. The base of DaVinci Resolve is quite easy and enough to edit your first videos, and with practice, you’ll learn to create complex projects, full of high-quality assets, effects, and animation.
You can also check the article about the main mistakes beginners make in DaVinci Resolve.
Come back to master a new skill in DaVinci Resolve!