
Ручные терминалы сбора данных CASIO серии DT-930.
            Руководство пользователя.
Содержание
Меры предосторожности
Введение
      Обращение с устройством
Распаковка
Модели и опции
Общая информация
Питание
      Установка щелочных батарей типа AA (LR6)
      Установка литиево-ионной аккумуляторной батареи
      Замена литиевой батареи для резервной памяти
Жидкокристаллический монитор
Ремень на запястье
      Крепление ремня
Клавиши и их назначение
Сканер штриховых кодов
      Операция считывания штрихового кода
      Калибровка ширины лазерного луча
Связь
      Инфракрасный порт
      Bluetooth
Технические характеристики терминала
      Литиево-ионная аккумуляторная батарея (DT-923LIB)
Основная подставка HA-E60IO
      Установка подставки HA-E60IO
      Соединение с ПК без использования блока питания от сети переменного тока
      Монтаж на стене
      Снятие настенного крепежа
      Характеристики подставки HA-E60IO
Основная подставка DT-960IOE
      Общая информация
      Использование терминала со сканером, ориентированным вниз
      Установка подставки DT-960IOE
      Последовательное соединение нескольких подставок DT-960IOE
      Установка переключателей конфигуратора
      Характеристики поставки DT-960IOE
Подставка-сателлит DT-964IOE
      Общая информация
      Использование терминала со сканером, ориентированным вниз
      Установка подставки DT-964IOE
      Зарядка аккумуляторной батареи, установленной в терминале
      Зарядка запасной литиево-ионной аккумуляторной батареи
      Последовательное соединение нескольких подставок DT-964IOE
      Установка переключателей конфигуратора
      Характеристики подставки DT-964IOE
Зарядное устройство DT-969CHGE
      Общая информация
      Использование терминала со сканером, ориентированным вниз
      Установка зарядного устройства DT-969CHGE
      Зарядка запасной литиево-ионной батареи
      Характеристики зарядного устройства DT-969CHGE
Монтаж подставок и зарядного устройства
      Монтаж подставок и зарядного устройства на стену
•   Содержимое данного Руководства может изменяться.
•   Термином «ручной терминал сбора данных» ссылается на устройство CASIO DT-930, если другое не
    оговорено.
•   CASIO COMPUTER CO., LTD не отвечает за любые убытки третьей стороны, возникшие по
    причине использования данного руководства.
•   Данное руководство не освещает программирование и обмен данными. Обратитесь к отдельным
    руководствам по этим темам.

Bluetooth – зарегистрированная торговая марка, принадлежащая Bluetooth SIG. Inc., и лицензированная
CASIO COMPUTER CO., LTD.

Меры предосторожности

Поздравляем Вас с выбором продукции CASIO! Прочитайте о мерах предосторожности перед её
первым использованием. Храните это руководство под рукой.

Для того, чтобы в будущем избежать проблем, потратьте немного времени на ознакомление с
пометками и символами, используемыми в этом разделе Руководства, и предупреждающими о
возможных травмах и материальных убытках.

                                 Символ информации, игнорирование или неправильное
       ОПАСНОСТЬ                 использование которой создает серьезную угрозу жизни и
                                 здоровью.

                                 Символ информации, игнорирование или неправильное
       ПРЕДУПРЕЖДЕНИЕ            использование которой может создать угрозу жизни и здоровью.
                                 Символ информации, игнорирование или неправильное
       ОСТОРОЖНО                 использование которой может создать угрозу здоровью или
                                 нанести материальный вред.
                                 Треугольный знак напоминает об осторожности во избежание
                                 поломок.
                                 Круг запрещает какое-либо действие. Данный знак запрещает
                                 разборку.

                                 Черный круг обозначает обязательное действие. Данный знак
                                 требует вытащить шнур питания из розетки.

                                              ОПАСНОСТЬ
                          Литиево-ионная аккумуляторная батарея (Опция)
             •   Не допускайте увлажнения батареи. Влага создает угрозу нагрева, взрыва и пожара.
             •   Не подвергайте батарею воздействию открытого огня и высокой температуры. Это
                 создает опасность взрыва и пожара.
             •   Не используйте батарею с другими устройствами. Это создает опасность взрыва и
                 пожара.
             •   Соблюдайте полярность батареи при установке. Это может привести к течи
                 батареи, нагреву, взрыву и пожару.
             •   Не допускайте короткого замыкания контактов батареи. Это создает опасность
                 взрыва и пожара.
•   Не транспортируйте и не храните батарею вместе с металлическими предметами:
    заколками, ожерельями и т.д. Это может привести к короткому замыканию и
    создает опасность взрыва и пожара. Храните и транспортируйте батарею в футляре.
•   Не бросайте и не подвергайте батарею ударам. Это создает угрозу нагрева, взрыва и
    пожара.
•   Не протыкайте батарею гвоздями, не ударяйте молотком и не наступайте на нее.
    Это создает угрозу нагрева, взрыва и пожара.
•   Не пытайтесь разобрать батарею или переделать ее. Это создает угрозу нагрева,
    взрыва и пожара.
•   Используйте только специализированные зарядные устройства для зарядки
    батареи. Использование других типов зарядных устройств создает угрозу нагрева,
    взрыва и пожара.
                   Обращение с щелочными батареями
•   В случае попадания жидкости из щелочных батарей в глаза, возникает угроза
    потери зрения. Не трите глаза, промойте их чистой водой и немедленно обратитесь
    к врачу.

                            ПРЕДУПРЕЖДЕНИЕ
                        Разборка и модификация
•   Не пытайтесь разобрать или переделать устройство. Существует опасность
    поражения током высокого напряжения.

                        Внутренние компоненты
•   Не прикасайтесь к внутренним компонентам, находящимся под напряжением. Это
    создает опасность поражения током.
                   Нестандартные условия эксплуатации
•   Если устройство нагревается или испускает дым или странный запах, немедленно
    выключите питание и свяжитесь с дилером или авторизованным сервис-центром
    CASIO. Дальнейшее использование устройства создает опасность пожара и
    поражения электротоком.
                         Посторонние предметы
•   Если в устройство попали посторонние предметы, немедленно выключите питание
    и свяжитесь с дилером или авторизованным сервис-центром CASIO. Дальнейшее
    использование устройства создает опасность пожара и поражения электротоком.
                         Падение и повреждение
•   В случае падения устройства и его повреждения, немедленно выключите питание и
    свяжитесь с дилером или авторизованным сервис-центром CASIO. Дальнейшее
    использование устройства создает опасность пожара и поражения электротоком.
                                  Влага
•   Храните устройство вдали от ваз, цветочных горшков, стаканов и других емкостей
    с жидкостью, а также вдали от металлических предметов. Вода и металл могут
    создать опасность поражения электротоком и пожара.
                             Лазерный луч
•   Не направляйте луч лазера в глаза. Это может нанести серьезную травму.

          Помехи при использовании беспроводного соединения
•   Людям, носящим ритмизатор сердца, не следует приближаться ближе 22 см к
    ручному терминалу сбора данных. Радиоизлучение терминала может повлиять на
    ритмизатор. Во избежание помех работе таких приборов выключайте терминал,
    входя в помещение с большим количеством людей.
                   Обращение с щелочными батареями
•   Не подвергайте батареи воздействию огня, высокой температуры, не разбирайте и
    не переделывайте их. В случае повреждения изоляции возможна течь, перегрев или
    взрыв батареи.
•   Соблюдайте полярность батарей при установке. Возможны некорректная работа
    устройства, замыкание, течь, перегрев и взрыв.
•   Храните батареи в недоступном для детей месте. В случае глотания батареи
    немедленно обратитесь к врачу.
•   Если щелочь попала в рот, прополощите водой и немедленно обратитесь к врачу.
•   При попадании щелочи на кожу или одежду возможны ожоги, тщательно
    прополощите место поражения чистой водой.
•   Не храните батареи вместе с металлическими предметами, это может вызвать
    замыкание полюсов.
•   Не смешивайте старые и новые батареи или разные батареи. Это может вызвать их
    течь, перегрев или взрыв.
•   Батареи не подлежат перезарядке. Перезарядка может вызвать нарушение изоляции
    или внутренней структуры, а, следовательно, течь, перегрев и взрыв.
•   Не повреждайте и не снимайте обертку с батареи. Это может вызвать замыкание,
    течь, перегрев и взрыв.
•   Не бросайте и не подвергайте батарею ударам. Это может вызвать течь, перегрев и
    взрыв.
•   Не изменяйте форму батареи. Нарушение изоляции может вызвать течь, перегрев и
    взрыв.
                 Обращение с литиевой круглой батареей
•   Не перезаряжайте литиевую батарею. Это может вызвать течь, перегрев, взрыв или
    возгорание.
•   Не подвергайте литиевую батарею воздействию открытого огня или спаивания. Это
    может вызвать течь, перегрев, взрыв или возгорание.
•   Соблюдайте полярность при установке. Не храните батарею вместе с
    металлическими предметами, это может вызвать замыкание полюсов.
•   Храните батареи в недоступном для детей месте. В случае глотания батареи
    немедленно обратитесь к врачу.
•   При попадании щелочи в рот, глаза, на кожу тщательно промойте место поражения
    водой и немедленно обратитесь к врачу.
•   Если литиевая батарея течет или испускает странный запах, немедленно удалите ее
    от источника тепла. Нагрев может вызвать взрыв или возгорание.
•   При хранении батареи изолируйте ее контакты. Хранение с другими батареями или
    металлическими предметами может привести к замыканию контактов, течи,
    перегреву, взрыву и возгоранию.
                 Литиево-ионная аккумуляторная батарея
•   Не кладите аккумуляторную батарею в микроволновую печь или под пресс. Это
    может вызвать течь, перегрев, взрыв или возгорание.
•   Не используйте аккумуляторную батарею, если она странно пахнет, нагревается,
    необычного цвета или формы. Это может вызвать течь, перегрев, взрыв или
    возгорание.
•   Если значительно сокращается срок службы аккумуляторной батареи, прекратите
    ее использование. Это может быть признаком ее неисправности. Дальнейшая
    зарядка батареи может вызвать течь, перегрев, взрыв или возгорание.
•   Не превышайте рекомендуемое время зарядки аккумуляторной батареи, даже если
    она не полностью заряжена. Это может вызвать течь, перегрев, взрыв или
    возгорание.
•   При попадании жидкости из батареи в глаза, не трите их. Немедленно промойте
    глаза чистой водой и обратитесь к врачу.
                     Подставки и зарядные устройства
•   Подключайте подставки и зарядные устройства только к сети переменного тока,
    удовлетворяющей требованиям производителя. При несовпадении напряжения в
    сети и требований к потребляемому току возможны пожар и поражение током.
•   Не допускайте повреждения или разрыва шнура питания, не ставьте на него
    тяжелые предметы, держите их подальше от источников тепла. Иначе, возможна
    опасность пожара или поражения током.
•   Не переделывайте, не сгибайте, не скручивайте и не тяните за шнур питания.
    Возможна опасность пожара или поражения током.
•   Используйте только рекомендуемые адаптеры сети переменного тока.
    Использование других моделей адаптеров или зарядных устройств может привести
    к пожару или поражению током.
•   При серьезном повреждении шнура питания обратитесь к дилеру или
    авторизованному сервис-центру CASIO за ремонтом или заменой. Использование
    поврежденного шнура питания может привести к пожару или поражению током.

                                ОСТОРОЖНО
                        Посторонние предметы
•   Не допускайте попадания в открытые части устройства металлических предметов,
    которые могут вызвать пожар или привести к поражению током.

                                Хранение
•   Не храните устройство на неровной или неустойчивой поверхности. Это создает
    опасность падения и причинения травм.
•   Не храните устройство во влажных и пыльных помещениях. Это создает опасность
    пожара и поражения током.
•   Не подвергайте устройство длительному воздействию солнечного света (например,
    не оставляйте в машине на парковке).
                           Тяжелые предметы
•   Не ставьте на устройство тяжелые предметы. Это создает опасность падения и
    нанесения травм.

                               ЖК-монитор
•   Избегайте сильного давления на экран монитора и не подвергайте его ударам.
    Стекло ЖК-монитора может треснуть и нанести травму.
•   Если стекло треснуло, не прикасайтесь к вытекающей жидкости. Возможны
    возгорание и повреждение кожи.
•   При попадании жидкости из ЖК-монитора в рот прополощите рот и немедленно
    обратитесь к врачу.
•   При попадании жидкости из ЖК-монитора в глаза промойте их чистой водой в
    течение 15 минут и немедленно обратитесь к врачу.
                 Литиево-ионная аккумуляторная батарея
•   Не подвергайте батарею длительному воздействию солнечного света или тепла
    (например, не оставляйте в машине на парковке). Это может вызвать пожар или
    сокращение срока службы батареи.
•   Не используйте батарею в местах с большим статическим электричеством. Это
    может вызвать нагрев, взрыв и пожар.
•   Температурный режим работы аккумуляторной батареи, используемой в терминале
    сбора данных:
       o Функционирование: от -20 до +50°C
       o Зарядка: от 0 до +40°C
       o Хранение: от -20 до +60°C
       Несоответствие температурного режима описанным диапазонам может
       привести к сокращению срока службы аккумуляторной батареи, ухудшению ее
       работы, а также к течи и перегреву.
•   При попадании щелочи в рот, глаза, на кожу тщательно промойте место поражения
    водой и немедленно обратитесь к врачу. Длительный контакт с жидкостью из
    батареи может вызвать повреждение кожи.
•   Храните батарею в местах, недоступных для детей.
                   Обращение с щелочными батареями
•   Храните батареи в сухом, прохладном и темном месте. В противном случае
    возможны течь, перегрев и взрыв. Также возможны сокращение срока или
    ухудшение качества службы батарей.
•   Батареи утилизируются как обычный мусор. Однако, необходимо следовать
    требованиям местных властей по утилизации мусора.
•   После полной разрядки выньте батареи. Длительное хранение батарей в устройстве
    может привести к их течи, перегреву или взрыву из-за выделяющегося газа.
•   Если устройство длительное время не используется, выньте из него батареи во
    избежание течи, перегрева и взрыва.
•   Не пытайтесь припаять что-либо к батареи. Нагрев может вызвать течь или взрыв.
•   Не подвергайте батареи длительному воздействию солнечного света (например, не
    оставляйте в машине на парковке). Это может вызвать нагрев, течь или взрыв.
•   При хранении батареи изолируйте ее контакты. Хранение с другими батареями или
    металлическими предметами может привести к замыканию контактов, течи,
    перегреву, взрыву и возгоранию
•   Не подвергайте батареи воздействию влаги. Это может вызвать перегрев батареи.

                 Обращение с литиевой круглой батареей
•   Не бросайте и не подвергайте ударам, изменению формы литиевую батарею.
    Берегите от влаги. В противном случае возможны течь, нагрев и взрыв.
•   Берегите литиевую батарею от солнечного света. Возможны течь, нагрев и взрыв.

•   Храните батареи в сухом, прохладном и темном месте. В противном случае
    возможны течь, перегрев и взрыв. Также возможны сокращение срока или
    ухудшение качества службы батарей.
•   Батареи утилизируются как обычный мусор. Однако, необходимо следовать
    регламентам требованиям властей по утилизации мусора.
                     Подставки и зарядные устройства
•   Держите шнур питания подальше от нагревателей и других источников тепла,
    способных расплавить изоляцию и создать опасность пожара и поражения током.
•   Не тяните за шнур, когда отключаете устройство от сети. Это может повредить
    шнур и создать опасность травмы, пожара или поражения током. Всегда держитесь
    за вилку, когда вынимаете ее из розетки.
•   Не касайтесь вилки влажными руками. Это может привести к поражению током.
•   Перед перемещением подставок и зарядных устройств отключайте их от сети
    переменного тока. В противном случае возможно повреждение шнура питания,
    пожар или поражение током.
•   Перед чисткой подставок и зарядных устройств, вынимайте вилку из розетки.
•   После использования устройства не забывайте выключать кнопкой питание и
    вынимать вилку из розетки.
•   Вынимайте шнур питания из розетки и чистите места вокруг розеток как минимум
    раз в год. Набившаяся в адаптеры пыль, влага могут вызвать нарушение изоляции,
    что приведет к пожару.
•   Корпус адаптера сети переменного тока может нагреваться во время работы.

•   Следуйте предупреждениям во избежание поражения электрическим током.
Делайте резервные копии важных данных!

                                              ОСТОРОЖНО
             •   CASIO Computer Co., Ltd. не отвечает за ущерб, вызванный потерей данных из-за
                 использования или неисправности данного устройства или из-за разряда батарей.
             •   Данное устройство использует электронную память для хранения данных, что
                 означает существование возможности потери памяти вследствие прерывания
                 питания от разряженных батарей или из-за некорректно проведенной процедуры
                 замены батарей. Данные не могут быть восстановлены, если они утеряны. Делайте
                 резервные копии всех важных данных, например, с помощью переноса данных
                 через подставку на компьютер.

Введение

Внимательно прочитайте следующую информацию, если Вы хотите, чтобы Ваш терминал
соответствовал своему уровню функциональности и качеству исполнения.

Обращение с устройством

•   Не бросайте и не подвергайте ударам терминал, это может повредить его ЖК-монитор, прервать
    выполнение программ, разрушить данные в памяти или иным способом нарушить нормальное его
    функционирование.
•   Нажимайте на клавиши только пальцами или тупыми предметами. Использование острых предметов
    может вызвать замыкание цепей или разрушение клавиш.
•   Для чистки терминала используйте мягкую сухую тряпку. Не протирайте влажной тканью. Не
    используйте бензин, растворитель или другие химические вещества, способные деформировать
    материалы, из которых изготовлены клавиатура и корпус.
•   Не кладите терминал клавиатурой вниз. Это может вызвать случайное нажатие клавиш, что
    приведет к неправильному функционированию устройства.
•   Не вынимайте основную батарею при включенном питании. Это может вызвать потерю данных в
    памяти
•   Резкие перепады температуры могут вызвать конденсацию влаги в корпусе терминала, что приведет
    к некорректной работе устройства. Избегайте таких условий эксплуатации, а если конденсат все же
    образовался, подождите, пока он не испарится, прежде чем снова использовать терминал.

Описание продукта и его назначение

Предназначен для использования в странах          Евросоюза:
                                                  Австрия, Бельгия, Дания, Финляндия,
                                                  Франция, Германия, Греция, Ирландия, Италия,
                                                  Люксембург, Нидерланды, Португалия,
                                                  Испания, Швеция, Великобритания, Чехия,
                                                  Венгрия, Польша, Словения, Словакия,
                                                  Эстония, Латвия, Литва, Кипр, Мальта.

                                                  Европейской ассоциации свободной торговли:
                                                  Швейцария, Исландия, Лихтенштейн,
                                                  Норвегия.
Производитель                                     CASIO COMPUTER CO.,LTD
Марка                                             CASIO
Модель                                            DT-930M50E, DT-930M51E

Продукт протестирован и удовлетворяет требованиям по безопасности и защите здоровья, а также
требованиям по электромагнитной совместимости, перечисленным в стандартах:

Стандарт                                              Дата вступления в действие
EN 60950-1                                            2001 г.
EN301 489-1 v1.4.1                                    Август 2002 г.
EN301 489-17 v1.2.1                                   Август 2002 г.

Продукт протестирован и удовлетворяет требованиям стандартов по недопущению интерференции
при использовании радиочастотного спектра, выделенного для наземной и космической связи:

Стандарт                                              Дата вступления в действие
EN300 328 v1.6.1                                      Ноябрь 2004 г.

и потому отвечает требованиям директивы Парламента Евросоюза 1999/5/EC и постановлению
Совещания по радио и пользовательскому телекоммуникационному оборудованию от 9 марта 1999
и дополнению III (ст. 10, «Оценка соответствия требованиям»). Техническая документация согласно
процедуре «Оценка соответствия требованиям» хранится по адресу:

Компания                                              CASIO Europe GmbH
Адрес                                                 City Bornbarch 10, D-22848 Norderstedt
Страна                                                Germany
Телефон                                               +49(0)40-528-65-0
Факс                                                  +49(0)40-528-65-424

Распаковка

При распаковке ручного терминала сбора данных (DT-930M50E или DT-930M51E) внимательно
проверьте комплектацию в соответствии с рисунком. Если что-то отсутствует или неисправно,
свяжитесь с Вашим дилером или с ближайшим сервисным центром CASIO.

   •   Ручной терминал со сканером, ориентированным вниз (DT-930 M50E), или со сканером,
       ориентированным вперед (DT-930 M51E)

   •   Щелочные батареи AA(LR-6), резервная литиевая батарея

   •   Ремень на запястье, руководство пользователя

   •   Направляющие для настольной и настенной конфигурации.
* Перед использованием терминалов DT-930 убедитесь в том, что на подставку или зарядное
устройство установлены прилагаемые направляющие для соответствующей настольной или настенной
конфигурации

Модели и опции

Модели

Опции

Подставка HA-E60IO         Основная подставка DT- Подставка-сателлит     Зарядное
                           960IOE                 DT-964IOE              устройство DT-
                                                                         969CHGE

Литиево-ионная             Кронштейн для          Блок питания для       Блок питания для
аккумуляторная батарея     крепления подставки    подставки HA-E60IO     основной
DT-923LIB                  HA-E60IO на стене                             подставки T-
                                                                         960IOE
Блок питания для          Блок питания для          Кросс-Кабель DT-        Кросс-Кабель
подставки-сателлита DT-   зарядного устройства      782RSC для основной     DT-783RSC для
964IOE                    DT-969CHGE                подставки (RS-232       основной
                                                    14Pin-25Pin Male)       подставки (RS-
                                                                            232 14Pin-25Pin
                                                                            Female)

Кросс-Кабель DT-787AX     Кабель DT-881RSC для      Кросс-Кабель DT-        Кросс-Кабель
для основной подставки    подставки-сателлита для   882RSC для              DT-883RSC для
(RS-232 14Pin-9Pin        модемного соединения      соединения подставки-   соединения
Female)                   (RS-232)                  сателлита и ПК (RS-     подставки-
                                                    232 25Pin Male)         сателлита и ПК
                                                                            (RS-232 25Pin
                                                                            Female)

Кросс-Кабель DT-          Кабель DT-788RSC для      Кабель DT-888RSC для    Кабель DT-
887AX/AXA для             последовательного         последовательного       380USB для
соединения подставки-     подключения основных      подключения             соединения
сателлита и ПК (RS-232    подставок (RS-485 6-6     подставок-сателлитов    подставки HA-
9Pin Female)              pin)                      (RS-422)                E60IO и ПК
                                                                            (USB)

Общая информация
1.  Лазерный сканер штрих-кодов.
2.  Индикатор сканирования. Зеленый – успешное чтение штрих-кода, красный – неудачная попытка.
3.  Жидкокристаллический монитор.
4.  Клавиши включения сканера.
5.  Клавиатура из 26 клавиш, в т.ч. клавиши включения и выключения устройства.
6.  Кнопка сброса (в углублении). Используйте скрепку или другой тонкий предмет для нажатия.
7.  Место крепления ремешка для запястья.
8.  Предупреждающая надпись с классификацией лазерного устройства.
9.  Зуммер. Выдает сигналы при запросе подтверждения операции. Не закрывайте отверстие зуммера и
    не вставляйте в него острые предметы – это может вывести зуммер из строя.
10. Отсек литиевой батареи для резервной памяти.
11. Отсек основной батареи.
12. Замок отсека основной батареи. Питание терминала автоматически отключается при снятой крышке
    отсека.
13. Контакты питания от подставок и зарядных устройств.
14. Инфракрасный порт. Используется для связи с другим устройством DT-930 или подставкой.

Питание

Ручные терминалы сбора данных имеют два источника питания:
   • две щелочных батареи размера AA(LR-6) или литиево-ионная аккумуляторная батарея;
   • литиевая батарея для резервной памяти.

Далее в руководстве под основной батареей подразумеваются щелочные батареи или литиево-ионный
аккумулятор.
О низком заряде основной батареи пользователь оповещается специальным значком на ЖК-мониторе.
При появлении такого значка необходимо как можно скорее заменить основную батарею.

ВНИМАНИЕ!
  • Никогда не извлекайте одновременно обе батареи: основную и батарею резервной памяти.
    Это может вызвать потерю данных и настроек программ терминала. Создавайте резервные
    копии всех важных данных, например, перенося данные в компьютер через одну из
    подставок.
  • Никогда не вынимайте основную батарею при включенном терминале – это может
    привести к потере данных. Перед извлечением батареи убедитесь в том, что терминал
    выключен.
•    Используйте только щелочные батареи типа AA (LR-6) или специальный литиево-ионный
         аккумулятор.
    •    Литиево-ионный аккумулятор разряжается естественным образом при транспортировке с
         завода. Перед первым использованием терминала зарядите аккумулятор.
    •    Во избежание вывода из строя не допускайте короткого замыкания контактов литиево-
         ионной аккумуляторной батареи. Храните и транспортируйте аккумуляторную батарею в
         футляре.
    •    Повторная зарядка литиево-ионной аккумуляторной батареи постепенно снижает ее
         способность к перезарядке. Если полностью заряженная батарея стала служить меньше по
         времени, возможно, она требует замены.
    •    Если Вы не планируете использовать терминал в течение длительного периода времени,
         вставьте две новые щелочные батареи или полностью заряженный аккумулятор для того,
         чтобы предотвратить сбой питания в период простоя. То же самое рекомендуется сделать
         после длительного периода бездействия.
    •    Если аккумуляторная батарея длительное время не используется, то остаточная емкость
         уменьшается из-за самопроизвольного разряда или химического разложения батареи.
         Если время работы батареи после полной зарядки значительно сократилось, замените ее
         новой. Не забывайте, что батарея имеет ограниченный срок службы.

Установка щелочных батарей типа AA (LR6)

ВАЖНО!
При установке щелочных батарей AA (LR-6) проверяйте правильность расположения их полюсов
(“+” и “-“).

Установка литиево-ионной аккумуляторной батареи

1       Переместите замок крышки отсека для основной батареи в
        положение «FREE» и снимите крышку

2       Вставьте две новые щелочные батареи AA (LR6) в отсек,
        убедившись в правильном направлении полюсов согласно
        рисунку

3       Установите крышку отсека основной батареи на место и
        переместите замок в положение “LOCK”.
Замена литиево-ионной аккумуляторной батареи
Замена литиево-ионной аккумуляторной батареи осуществляется в порядке, обратном установке. Перед
заменой аккумулятора выключите терминал.

Замена литиевой батареи для резервной памяти

Когда на ЖК-мониторе появится сообщение о низком заряде литиевой батареи резервной памяти,
немедленно замените ее. Для замены используйте литиевую батарею CR2032. Перед заменой батареи
выключайте терминал.

ВНИМАНИЕ!
Замена батареи резервной памяти при вынутой или разряженной основной батарее может
привести к безвозвратной потере данных. Создавайте резервные копии всех важных данных,
например, перенося данные в компьютер через одну из подставок.

ВАЖНО!
Соблюдайте полярность при установке батареи.

1   Вращая отвертку против часовой стрелки, выверните
    шурупы, удерживающие крышку.

2   Откройте крышку отсека батареи резервной памяти.

3   Перед установкой батареи аккуратно протрите ее сухой
    тряпкой. Батарея располагается знаком «+» кверху, как
    показано на рисунке.

4   Надавите на батарею в направлении, указанном стрелкой до
    ее закрепления.
5   Закройте крышку и закрутите шурупы.

Извлечение батареи резервной памяти

1   Откройте крышку отсека батареи резервной памяти и
    используя кончик шариковой ручки или любой другой
    острый предмет, достаньте батарею.

2   Закройте крышку и закрутите шурупы.

Жидкокристаллический монитор

Жидкокристаллический монитор ручного терминала сбора данных служит для отображения
программных настроек, рабочих процедур, результатов вычислений и другой информации

Область видимого               64 x 128 точек
изображения
Отображение символов           Режимы 6-, 8- и 10-точечных символов.
                               Reduced ANK: 21 колонка x 10 линий, 16 колонок x 8 линий, 12
                               колонок x 6 линий.
                               ANK: 21 колонка x 5 линий, 16 колонок x 4 линий, 12 колонок x 3
                               линий.
Типы символов                  Буквы, цифры, символы
Эффекты отображения текста     Жирный шрифт, подсвечивание и другие эффекты для всех
                               символов
Встроенные часы                Терминал имеет встроенные часы, отображаемые на экране:
                               2006 / 1 / 11
                               Год/Месяц/День
                               14 : 25
                               Час : Минута

Ремень на запястье

Ремень на запястье защищает терминал от повреждений, вызываемых падением. Следуйте инструкции
по закреплению ремня.
Крепление ремня

1    Пропустите тонкий конец ремешка через металлическое
     ушко в нижней части терминала.

2    Проденьте ремешок через петлю и потяните.

Важно!
Не размахивайте терминалом, висящим на ремешке!

Клавиши и их назначение

1. Клавиши включения сканера
   Запуск процедуры считывания штрих-кода
2. Управляющие клавиши
   CLR: Отмена ввода (Clear).
   BS: Стирание одного символа (Backspace)
   S: Переключение между текстовым и цифровым режимами ввода (Switch). Буква S на ЖК-мониторе
   означает текстовый режим ввода, когда S не горит – терминал в цифровом режиме ввода.
3. Многофункциональные клавиши (L/R)
   Этим клавишам назначаются любые функции
4. 10-кнопочная клавиатура
   Назначение этих клавиш зависит от режима ввода: текстового или цифрового.Текстовый режим
   ввода: Буквы, цифры и символы. Цифровой режим ввода: ввод чисел 0-9 и десятичной точки.
5. Клавиша питания.
   Включение/выключение терминала.
6. Клавиша ввода (Enter)
   Регистрация ввода.
7. Функциональные клавиши.
   Клавишам могут быть назначены любые функции, за исключением запуска процедуры
   сканирования
   По умолчанию назначены следующие функции:
   F1 (–): Ввод знака «минус» (–) .
   F2 (←): Перемещение курсора влево.
   F3 (→):Перемещение курсора вправо.
   F4 (DEL): Удаление символа.
   F5 (SP): Ввод пробела.
   F6 (▲): Увеличение контраста дисплея.
   F7 (▼):Уменьшение контраста дисплея.
   F8 (BL): Включение/выключение подсветки дисплея и клавиш.

Сканер штриховых кодов

Операция считывания штрихового кода

1   Включите терминал нажатием клавиши [PW]. Удерживая
    терминал рядом со штриховым кодом, нажмите клавишу
    включения сканера (Trigger key).

2   Сканер излучает лазерный луч и считывает штриховой код.
    Зеленый цвет индикатора (read indicator) сканера говорит об
    успешном чтении штрихового кода.

ВАЖНО!
  • Если Вы испытываете затруднения с чтением штрихового кода, измените угол между
    кодом и сканером или приблизьте сканер к штриховому коду.
  • Если ширина штрихового кода больше ширины сканера, попробуйте увеличить расстояние
    между ярлыком и сканером.
  • Ручной терминал способен считывать штриховой код на расстоянии до 45 см сканером с
    лучом, направленным вперед и до 40 см сканером с лучом, направленным вниз, при
    следующих условиях:
       o Освещенность: 500~900 люкс
       o Минимальная толщина линии штрихового кода: 1.0 мм (CODE-39)
       o Длина волны лазера: 650 нм, Максимальная мощность: 1.0 мВт
При считывании небольшого по размеру штрихового кода уменьшите расстояние между сканером и
штриховым кодом, для больших кодов – увеличьте расстояние таким образом, чтобы штриховой код
соответствовал по ширине лазерному лучу.

ПРЕДУПРЕЖДЕНИЕ!
Не направляйте лазерный луч в глаза – это может привести к травме!

Образцы штриховых кодов:

Калибровка ширины лазерного луча

Ширина луча, испускаемого лазером ручного терминала, может быть настроена на соответствие
считываемым штриховым кодам.

Перед настройкой ширины луча сначала необходимо выбрать эталонный штриховой код.

1   Включите терминал, нажав при этом клавиши     и    для входа
    в системное меню.
2   Для запуска процедуры настройки лазерного луча нажмите в
    следующем порядке клавиши:

3   На экране отобразится надпись:

4   Нажмите клавишу включения сканера и откалибруйте ширину
    лазерного луча по эталонному штриховому коду. На экране
    отобразится надпись:

5   Калибруйте луч по штриховому коду, имеющему по краям
    тонкие линии. Пример:

6   После корректного расположения луча удерживайте клавишу
    включения сканера не менее одной секунды. Калибровка луча
    закончится после того, как Вы отпустите клавишу.

    На экране отобразится надпись:

Эталонные штриховые коды для калибровки ширины лазерного луча

Для модели с лучом, направленным вниз:

Для модели с лучом, направленным вперед:

Предосторожности при обращении с терминалом:
•   Ручной терминал оснащается откалиброванным лазером. Калибровка требуется только в случае,
       когда изменена ширина луча, и луч не соответствует размеру штрихового кода.
   •   Результаты калибровки хранятся в памяти.
   •   Заводские установки восстанавливаются при нажатии на кнопку сброса или при замене всех
       батарей без создания резервной копии данных и настроек.
   •   Если калибровка не выполнена до конца, на дисплее появляется предупреждающее сообщение. В
       таком случае необходимо заново откалибровать лазер.

Связь

Инфракрасный порт

Обмен программным обеспечением и вводимыми данными между двумя терминалами серии DT-930
может осуществляться через инфракрасный порт, расположенный в нижней части устройства.
Расположите неподвижно два терминала DT-930, как показано на рисунке, на расстоянии до 30 см. (В
соответствии со стандартом IrDA версии 1.1)

Bluetooth

Интерфейс Bluetooth может быть использован для обмена данными с принтерами, поддерживающими
Bluetooth. Передача возможна на расстоянии до трех метров до устройства-получателя при условии
отсутствия помех сигналу.

ВАЖНО!
Ознакомьтесь со следующими предупреждениями:
   • Терминал и Bluetooth-устройство, с которым устанавливается соединение, должны
     находиться в прямой видимости на расстоянии около 3 м. Максимально возможная для
     коммуникации дистанция зависит от наличия препятствий распространению сигнала.
   • Между терминалом и любым электрооборудованием (аудио-видео, цифровые беспроводные
     телефоны, факсы и т.д.) должно быть не менее двух метров дистанции. Это необходимо,
чтобы избежать наложения помех на сигнал соединения. Особенно обратите внимание на
      микроволновые печи. Расстояние между терминалом и микроволновой печью должно быть
      не менее 3м, когда используется беспроводное соединение с Bluetooth-устройствами.
      Использование Bluetooth может создавать помехи теле- и радио-сигналу в диапазоне УКВ и
      спутниковой трансляции.
  •   В областях распространения сильных радиоволн, вблизи источников широковещательного
      сигнала или трансмиттера беспроводной связи невозможно установление нормального
      соединения. Необходимо выбрать другое место для организации Bluetooth-соединения.
  •   Интерференция с беспроводными сетями. Из-за того, что Bluetooth и WLAN используют
      один и тот же частотный диапазон (2,4 ГГц), может возникнуть явление интерференции
      при близком расположении WLAN-устройства. Это может привести к снижению скорости
      соединения или даже к невозможности установления Bluetooth-соединения. В таком случае
      примите следующие меры:
         o Удалитесь от WLAN-устройства как минимум на 10 метров.
         o Если Вы не можете выдержать дистанцию в 10 метров между терминалом и WLAN-
            устройством, выключите либо терминал, либо WLAN.

Технические характеристики терминала

Общие              Процессор: 32-разрядный RISC
                   ОЗУ: 4Мб (Пользовательских 1.6 Мб)
                   ПЗУ: 16MB (Пользовательских 12.5 Мб)
Дисплей            ЖК STN-типа с коррекцией фаз
                   Разрешение: 128 x 64 точек
                   Контраст: Ручная настройка
                   Подсветка: светодиодная
Лазерный сканер    Распознаваемые системы штрихового кодирования:
                   EAN, JAN, UPC, NW-7, CODE39, ITF, CODE93, CODE128, MSI,
                   Industrial 2 of 5, IATA
                   Максимальное расстояние:
                   Около 450 мм
                   (DT-930M51E)
                   Около 400 мм
                   (DT-930M50E)
Клавиатура         Клавиш: 26
Инфракрасный       Интерфейс: IrDA версии 1.1, original
порт               Протокол: Полу-дуплекс
                   Синхронизация: Асинхронный, синхронизация кадров
                   Скорость: от 2400 до 115200 бит/с, 4 Мбит/с
                   Дистанция: до 30 см
Bluetooth®         Интерфейс: Bluetooth® Specification Ver 1.2
                   Дистанция: Около 3 метров (зависит от среды распространения и мощности
                   сигнала)
                   Мощность излучения: Максимум 3 dBm (Класс мощности 2)
Питание            Основное: Две щелочные батареи размера AA (LR6)или один литиево-ионный
                   аккумулятор

                   Срок службы щелочных батарей:
                      • Приблизительно 200 часов (новый комплект батарей AA, при
                         нормальной температуре, при сканировании штриховых кодов дважды
                         каждые 10 секунд)
                      • Приблизительно 175 часов (новый комплект батарей AA, при
                         нормальной температуре, при выполнении операций
                         ожидания/вычисления/чтения в соотношении 20:1:1)
                      • Приблизительно 50 часов (новая полностью заряженная
аккумуляторная батарея, при нормальной температуре, при
                               сканировании штриховых кодов дважды каждые 10 секунд)
                         •     Приблизительно 30 часов (новая полностью заряженная литиево-ионная
                               аккумуляторная батарея при выполнении операций
                               ожидания/вычисления/чтения в соотношении 20:1:1)

                     Резервной памяти: Одна литиевая батарея типа CR2032
                     Срок службы батареи: Приблизительно один месяц (при условии
                     использования только батареи резервной памяти)

 Размеры и вес       Размеры:
                     DT-930M51E
                     Приблизительно. 69,4 x 173 x 31,6 мм - Дисплей
                     Приблизительно 57,4 x 173 x 21,9 мм - Рукоять
                     DT-930M50E
                     Приблизительно 69,4 x 180 x 40,2 мм - Дисплей
                     Приблизительно 57,4 x 180 x 21,9 мм - Рукоять

                     Вес:
                     Приблизительно 210 г (DT-930M51E)
                     Приблизительно 225 г (DT-930M50E)
                     (С учетом установленных батарей AA (LR6))
 Условия             Температура воздуха: от -20 до 50° C
 эксплуатации        Влажность воздуха: от 10% до 80%
                     Защита от пыли и влаги: удовлетворяет требованиям JIS waterproofing и
                     IEC529 IP54
                     Выдерживает падение с высоты: 180 см
                     Часы: Год, месяц, день, час, минута, автоматический календарь и будильник
                     Виброзвонок: Может быть использован при установке соответствующего
                     программного обеспечения

Литиево-ионная аккумуляторная батарея (DT-923LIB)

Емкость: 540 мА/ч
Напряжение: 3.6 В
Размеры: 29 x 50.2 x 14.5 мм
Вес: около 20 г
Основная подставка HA-E60IO

1. Светодиодный индикатор питания, показывающий статус заряда батареи и установлен ли DT-930.
    Не горит: питание выключено. Зеленый: питание включено и DT-930 установлен в подставку.
    Красный: питание включено, DT-930 неправильно установлен в подставку.
2. Индикатор соединения USB.Не горит: нет соединения USB. Зеленый: соединение USB в норме.
3. Разъем питания для DT-930. (Для использования с адаптерами сети переменного тока).
4. Инфракрасный порт для связи с DT-930.
5. Кнопка обнаружения терминала для проверки правильности установки DT-930.
6. Выключатель питания.
7. Разъем для адаптера сети переменного тока (AD-S15050AE).
8. Разъем USB для соединения с ПК и обмена данными. Возможно питание через соединение USB c
    ПК. Требуется установка специальных драйверов на ПК перед соединением с терминалом.
9. Место соединения с настенным крепежом..
10. Настольное основание. Снимается при монтаже на стену.

Установка подставки HA-E60IO

1   Убедитесь, что кнопка питания находится в положении
    «Выключено», и подсоедините шнур адаптера сети
    переменного тока (AD-S15050AE) к разъему питания,
    расположенному на задней стороне подставки.
2
    Подключите шнур питания до включения адаптера в розетку
    сети переменного тока.
3
    Подключите USB-кабель (DT-380USB) к порту USB на
    задней стороне подставки и к персональному компьютеру.
4   При установке DT-930 следите за тем чтобы инфракрасные
    порт терминала, расположенный в его нижней части, и порт
    подставки были расположены на одной линии.

5   Включите питание подставки. Индикатор питания на
    лицевой стороне подставки загорится зеленым светом, если
    терминал DT-930 расположен в подставке.

Соединение с ПК без использования блока питания от сети переменного тока

    •   Существует возможность запитать подставку от ПК через USB-кабель. Таким образом, можно
        использовать подставку без питания от адаптера сети переменного тока.
    •   При питании подставки от ПК через USB-кабель терминал DT-930 питается от своих батарей.
        Поэтому при разряде батарей и появлении соответствующего сообщения на дисплее терминала
        DT-930 замените батареи - это обеспечит надежную передачу данных. Используйте ПК,
        поддерживающие USB-соединение с мощными устройствами.
    •   Некоторые компьютеры не могут обеспечить устойчивое питание, в таком случае используйте
        адаптер сети переменного тока.

ВАЖНО!
  • Вставляйте терминал DT-930 в подставку HA-E60IO аккуратно, пока не загорится зеленый
    светодиод на лицевой панели подставки, иначе будет невозможно установить соединение с
    ПК.
  • Не допускайте короткого замыкания контактов питания для терминала.
  • Для бесперебойной связи не допускайте тряски и ударов по подставке или терминалу при
    передаче данных через интерфейс USB.
  • Инфракрасный порт – высокочувствительное коммуникационное устройство. Для
    корректной работы во время передачи данных избегайте использования поблизости от
    терминала устройств, излучающих радиоволны (например, сотовых телефонов).
    Переместите такие устройства подальше от терминала DT-930 (сотовые телефоны должны
    располагаться не ближе 30 см)
  • Подставка HA-E60IO не обладает функцией подзарядки аккумуляторной батареи,
    устанавливаемой в DT-930
  • Подставка HA-E60IO не поддерживает терминалы серии DT-900

Монтаж на стене

1   Открутите шурупы и снимите настольное основание,
    закрепленное с нижней стороны подставки.
2   Прикрутите кронштейн к терминалу шурупами.

3   Для верхнего отверстия кронштейна прикрутите на стене
    прилагаемый шуруп. Не закручивайте шуруп полностью,
    оставьте выступ в 2мм.

4   Закрепите кронштейн на стене с помощью ввернутого
    шурупа.

5   Вкрутите шуруп в верхнюю часть нижнего отверстия
    кронштейна.

6   Затяните оба шурупа.

Снятие настенного крепежа

1. Ослабьте оба верхний и нижний шурупы.
2. Движением вверх снимите кронштейн.

Важно! Проверьте прочность крепления кронштейна после установки подставки на стену.

Характеристики подставки HA-E60IO

Инфракрасный порт          Интерфейс: IrDA версии 1.1
                           Синхронизация: Асинхронный, синхронизация кадров
                           Скорость: до 4 Мбит/с

Интерфейс USB              Стандарт: USB версии 1.1.
                           Скорость: до 12 Мбит/с
Питание                    Источники:
                           Адаптер сети переменного тока AD-S15050AE
                           USB
Потребляемая мощность:
                          При использовании адаптера сети переменного тока: 1.0 A
                          При питании от USB: 0.4 A
Адаптер сети              Модель: AD-S15050AE
переменного тока          Потребляемый переменный ток: 100-240 В, 50/60 Гц, 0.36-0.2 A
                          Ток на выходе: постоянный 5 В, 3.0 A
Размеры и вес             Размеры
                          Настольное исполнение: Приблизительно 110 x 125 x 128 мм
                          Настенное исполнение: Приблизительно 110 x 148 x 154 мм
                          Вес
                          Настольное исполнение: Приблизительно 510 г
                          Настенное исполнение: Приблизительно 590 г
Условия эксплуатации      Температура воздуха: от 0 до 40°C
                          Влажность воздуха: от 30 до 80% (при отсутствии конденсата)

Основная подставка DT-960IOE

Основная подставка DT-960IOE предоставляет возможность обмена данными между терминалом и
персональным компьютером. С помощью кабеля DT-788RSC (6-6 pin) можно объединить до 16
подставок DT-960IOE . А одним из кабелей DT-782RSC/DT-783RSC/DT-787AX (RS-232C) можно
соединить подставку с персональным компьютером. Основная подставка DT-960IOE может
располагаться как на столе, так и на стене. Для крепления на стене используйте специальный
кронштейн, поставляемый с подставкой.

Общая информация
Аксессуары:

 Уплотнители     Направляющие     Шурупы             Фиксатор для
                 для настенного                      настенного
                 исполнения                          исполнения

1.  Интерфейс RS-232C. Для соединения с ПК и обмена данными.
2.  Интерфейс RS-485. Для объединения нескольких основных подставок.
3.  Разъем шнура питания от адаптера сети переменного тока.
4.  Передние направляющие для терминала со сканером, направленным вперед. Следует снять при
    использовании терминала со сканером, направленным вниз.
5. Кнопка обнаружения терминала для проверки правильности установки DT-930.
6. Индикатор соединения. Не горит: соединения нет. Мигает зеленым светом – осуществляется
    соединение.
7. Индикатор питания и установки терминала. Не горит – нет питания, красный – питание включено,
    но терминал не установлен, зеленый – питание включено, терминал установлен.
8. Направляющие для установки терминала на подставку в настольном исполнении.
9. Разъем питания для терминала.
10. Инфракрасный порт.
11. Выключатель питания подставки.
12. Основание для подставки. При монтаже на стену следует перевернуть.
13. Переключатели конфигуратора подставки.
14. Углубления для монтажа на стену.

Использование терминала со сканером, ориентированным вниз

 При использовании терминала со сканером, направленным
 вниз, следует снять передние направляющие (п. 4 на
 предыдущем рисунке). Для этого отверткой открутите два
 шурупа:

Установка подставки DT-960IOE

Перед установлением связи с терминалом необходимо включить подставку DT-960IOE в электросеть,
используя адаптер сети переменного тока, затем нажать кнопку включения. Терминал запитывается от
подставки, в которую установлен.

 1 Удалите две направляющие для терминала, установленные
   на подставке, как показано на рисунке.
2 Установите направляющие для настольной конфигурации,
  идущие в комплекте с терминалом, как показано на
  рисунке.

3 Воткните адаптер сети переменного тока в розетку.

4 Убедившись, что кнопка питания подставки находится в
  положении «Выключено», воткните шнур питания от
  адаптера в разъем, расположенный в верхней части
  подставки.
5
  При выключенном питании подставки и персонального
  компьютера присоедините один из кабелей RS-232C (DT-
  782RSC, DT-783RSC, DT-787AX) к разъему RS-232C в
  верхней части подставки. Другой конец кабеля воткните в
  разъем RS-232C персонального компьютера. Если разъем
  RS-232C терминала не используется, закройте его
  крышкой.

6 Включите питание подставки. Индикатор питания
  загорится красным светом.

7 Установите терминал на подставку, убедившись, что
  инфракрасные порты терминала и подставки находятся
  напротив друг друга. Цвет индикатора питания подставки
  изменится на зеленый, если соединение будет установлено.
  Индикатор соединения замигает зеленым светом во время
  передачи данных.

ВАЖНО!

•   Инфракрасный порт – высокочувствительное коммуникационное устройство. Для корректной
    работы во время передачи данных избегайте использования поблизости от терминала
    устройств, излучающих радиоволны (например, сотовых телефонов). Переместите такие
    устройства подальше от терминала DT-930 (сотовые телефоны должны располагаться не
    ближе 30 см).
•   Устанавливайте направляющие терминала для настольной и настенной конфигурации
    правильно. На каждой направляющей, идущей в комплекте с терминалом, напечатана литера,
    соответствующая расположению (“L” - левая, “R” - правая). Направляющие для настольной и
    для настенной конфигурации отличаются, устанавливайте их по назначению. Использование
    подставки со стандартными предустановленными направляющими с терминалом DT-930
    может привести к сбою связи или отсутствию подзарядки аккумуляторной батареи
    терминала.
•   Направляющие для терминалов серии DT-900 подходят и для DT-930.
Последовательное соединение нескольких подставок DT-960IOE

Используя кабель DT-788RSC (6-6 pin), можно объединить до 16 основных подставок DT-960IOE в
последовательную конфигурацию, позволяющую осуществлять обмен данными между несколькими
терминалами и персональным компьютером.

Соедините кабелем DT-788RSC разъем RS-485-1 на
одной подставке и разъем RS- 485-2 на другой
подставке, с которой устанавливается
последовательное соединение.

Установка переключателей конфигуратора

Следующая таблица содержит различные настройки, осуществляемые с помощью переключателей
конфигуратора, расположенного на задней панели подставки DT-960IOE.

Переключатели 1,2,3 – скорость соединения между терминалом и подставкой.
4,5 – Настройка контрольного сигнала
6,7 – Тип соединения
8 – Не используется

Скорость      1        2           3
2400 Бит/с    OFF      OFF         OFF
9600 Бит/с    ON       OFF         OFF
19200 Бит/с   OFF      ON          OFF
38400 Бит/с   ON       ON          OFF
57600 Бит/с   OFF      OFF         ON
115200       ON        OFF         ON
Бит/с

Тип соединения         6           7
С ПК                   ON          ON
Промежуточное          OFF         OFF
устройство в
последовательном
соединении
Последнее устройство   ON          OFF
в последовательном
соединении

Важно!
Другие настройки, не показанные здесь, предназначены для специальных режимов и не должны Вами
использоваться.

Характеристики подставки DT-960IOE

Инфракрасный порт           Стандарт: CASIO original
                            Протокол управления : Полу-дуплекс
                            Синхронизация: Асинхронный
                            Скорость: 2,400 - 115,200 Бит/с
RS-232C                     Протокол управления : Полу-дуплекс
                            Синхронизация: Асинхронный
                            Скорость: 2,400 - 115,200 Бит/с
RS-485                      Протокол управления : Полу-дуплекс
                            Синхронизация: Асинхронный
                            Скорость: 2,400 - 115,200 Бит/с
Питание                     Источник питания: Адаптер сети переменного тока (DT-9020ADP-
                            GS или DT-9020ADP-US)
                            Требования к сети:
                            переменный ток 230 В для адаптера DT-9020ADP-GS
                            переменный ток 120 В для адаптера DT-9020ADP-US
                            Потребляемый ток для подставки: постоянный, 9.5 В, около 1,000
                            мA
Функции                     Инфракрасный порт
                            Интерфейс RS-232C
                            Интерфейс RS-485
Последовательное соединение До 16 устройств
Размеры и вес               Настольная конфигурация: 110 x 220 x 100 мм
                            400 г
                            Настенная конфигурация: 110 x 220 x 100 мм
                            410 г

Подставка-сателлит DT-964IOE

Подставка-сателлит DT-964IOE предоставляет возможность обмена данными между терминалом и ПК,
а также может использоваться как зарядное устройство для литиево-ионного аккумулятора терминала.
Для соединения подставки-сателлита DT-964IOE с ПК используется один из кабелей DT-881RSC/DT-
882RSC/DT-883RSC/DT-887AX/AXA (RS-232C). Подставка может быть как в настольном, так и в
настенном варианте исполнения. В настенном исполнении применяется кронштейн, которым
комплектуется подставка.
Общая информация

 Уплотнители Направляющие       Шурупы            Фиксатор для
             для настенного                       настенного
             исполнения                           исполнения

1.  Интерфейс RS-232C для соединения с ПК.
2.  Интерфейс RS-422 для соединения с несколькими подставками-сателлитами.
3.  Разъем для подключения адаптера сети переменного тока.
4.  Передние направляющие для терминала со сканером, направленным вперед. Следует снять при
    использовании терминала со сканером, направленным вниз.
5. Кнопка обнаружения терминала для проверки правильности установки DT-930.
6. Индикатор рабочего состояния. Не горит – все терминалы, установленные на подставки-сателлиты
    лишены связи. Зеленый – нормальное функционирование всех терминалов.
7. Индикатор соединения. Не горит: соединения нет. Мигает зеленым светом – осуществляется
    соединение. Красный – ошибка связи с подставкой-сателлитом.
8. Индикатор заряда запасной аккумуляторной батареи. Не горит - батарея не заряжается или
    неисправность батареи. Красный – зарядка аккумуляторной батареи терминала. Зеленый – батарея
    заряжена полностью.
9. Индикатор заряда литиево-ионной аккумуляторной батареи, установленной в терминале. Не горит –
    батарея не заряжается или неисправность или отсутствие аккумуляторной батареи в терминале.
    Красный – идет зарядка. Зеленый – батарея заряжена полностью.
10. Индикатор питания и установки терминала. Не горит – нет питания, красный – питание включено,
    но терминал не установлен, зеленый – питание включено, терминал установлен.
11. Направляющие для установки терминала на подставку в настольном исполнении.
12. Контакты питания/заряда для терминала
13. Контакты для заряда запасной аккумуляторной батареи.
14. Инфракрасный порт для связи с терминалом.
15. Выключатель питания подставки.
16. Основание для подставки. При монтаже на стену следует перевернуть.
17. Переключатели конфигуратора подставки.
18. Углубления для монтажа на стену.

Использование терминала со сканером, ориентированным вниз

При использовании терминала со сканером, направленным
вниз, следует снять передние направляющие (п. 4 на
предыдущем рисунке). Для этого отверткой открутите два
шурупа:

Установка подставки DT-964IOE

Перед установлением связи с терминалом необходимо включить подставку-сателлит DT-964IOE в
электросеть, используя адаптер сети переменного тока, затем нажать кнопку включения. Терминал
запитывается от подставки, в которую установлен.

1   Удалите две направляющие для терминала, установленные
    на подставке, как показано на рисунке.

2   Установите направляющие для настольной конфигурации,
    идущие в комплекте с терминалом, как показано на
    рисунке.

3   Воткните адаптер сети переменного тока в розетку.

4   Убедившись, что кнопка питания подставки находится в
    положении «Выключено», воткните шнур питания от
    адаптера в разъем, расположенный в верхней части
    подставки.
5
    При выключенном питании подставки и персонального
    компьютера присоедините один из кабелей RS-232C (DT-
    881RSC, DT-882RSC, DT-883RSC, DT- 887AX/AXA) к
    разъему RS-232C в верхней части подставки. Другой конец
    кабеля воткните в разъем RS-232C персонального
    компьютера. Если разъем RS-232C терминала не
6   используется, закройте его крышкой.
Включите питание подставки. Индикатор питания
    загорится красным светом.

7   Установите терминал на подставку, убедившись, что
    инфракрасные порты терминала и подставки находятся
    напротив друг друга. Цвет индикатора питания подставки
    изменится на зеленый, если соединение будет установлено.
    Индикатор соединения замигает зеленым светом во время
    передачи данных.

ВАЖНО!

•   Инфракрасный порт – высокочувствительное коммуникационное устройство. Для корректной
    работы во время передачи данных избегайте использования поблизости от терминала
    устройств, излучающих радиоволны (например, сотовых телефонов). Переместите такие
    устройства подальше от терминала DT-930 (сотовые телефоны должны располагаться не
    ближе 30 см).
•   Устанавливайте направляющие терминала для настольной и настенной конфигурации
    правильно. На каждой направляющей, идущей в комплекте с терминалом, напечатана литера,
    соответствующая расположению (“L” - левая, “R” - правая). Направляющие для настольной и
    для настенной конфигурации отличаются, устанавливайте их по назначению. Использование
    подставки со стандартными предустановленными направляющими с терминалом DT-930
    может привести к сбою связи или отсутствию подзарядки аккумуляторной батареи
    терминала.
•   Направляющие для терминалов серии DT-900 подходят и для DT-930.

Зарядка аккумуляторной батареи, установленной в терминале

Данная процедура проводится, когда в терминале установлена литиево-ионная аккумуляторная батарея.
1     Включите питание подставки и убедитесь, что её
      индикатор питания горит красным светом.

2     Установите терминал на подставку, совместив контакты
      в нижней части терминала и контакты на подставке.
      Индикатор питания на подставке загорится зеленым
      светом, если терминал правильно установлен. Индикатор
      зарядки “CHG 1” загорится красным светом, когда
      начнется процесс зарядки аккумулятора.

      Индикатор зарядки батареи (“CHG 1”).

      Красный свет: идет зарядка аккумулятора
      Зеленый: аккумулятор заряжен
      Когда индикатор загорается красным светом, а через
      несколько секунд гаснет, это означает неисправность
      батареи.

      Время зарядки: приблизительно 6 часов

Внимание!

Температурный режим работы аккумуляторной батареи, используемой в терминале сбора
данных:
Функционирование: от -20 до +50°C
Зарядка: от 0 до +40°C
Хранение: от -20 до +60°C

Несоответствие температурного режима описанным диапазонам может привести к сокращению
срока службы аккумуляторной батареи, ухудшению ее работы, а также к течи и перегреву.

Важно!

•   Если индикатор зарядки не загорается, выньте батарею и вставьте вновь. Если это не решит
    проблему, то, значит, батарея неисправна и требует замены.
•   Используйте только рекомендуемые аккумуляторные батареи.
•   Аккумуляторы разряжаются естественным образом, даже если они не установлены в
    терминал. Используйте аккумуляторную батарею сразу после зарядки.
•   Содержите контакты подставки, терминала и аккумуляторной батареи в чистоте,
    периодически протирая их сухой тряпкой или ватой, это улучшит качество процесса зарядки.
Зарядка запасной литиево-ионной аккумуляторной батареи

1   Включите питание подставки-сателлита. Индикатор
    питания загорится красным.

2   Вставьте аккумуляторную батарею в гнездо подставки для
    зарядки запасной батареи, точно сопоставив контакты с
    боковой и тыльной сторон батареи с контактами в гнезде.
    Индикатор зарядки запасной аккумуляторной батареи
    (“CHG 2”) загорится красным – зарядка началась.

    Индикатор зарядки запасной аккумуляторной батареи
    (“CHG 2”):

    Красный свет: идет зарядка (или ожидание зарядки, если
    батарея в терминале заряжается)
    Зеленый свет: зарядка выполнена

•   Когда индикатор загорается красным светом, а через несколько секунд гаснет, это означает
    неисправность батареи.
•   Одновременная зарядка батареи, установленной в терминале, и запасной батареи невозможна. В
    первую очередь заряжается батарея терминала.

ВНИМАНИЕ!

Температурный режим работы аккумуляторной батареи, используемой в терминале сбора
данных:
Функционирование: от -20 до +50°C
Зарядка: от 0 до +40°C
Хранение: от -20 до +60°C

Несоответствие температурного режима описанным диапазонам может привести к сокращению
срока службы аккумуляторной батареи, ухудшению ее работы, а также к течи и перегреву.

ВАЖНО!

•   Если индикатор зарядки не загорается, выньте батарею и вставьте вновь. Если это не решит
    проблему, то, значит, батарея неисправна и требует замены.
•   Используйте только рекомендуемые аккумуляторные батареи.
•   Аккумуляторы разряжаются естественным образом, даже если они не установлены в
    терминал. Используйте аккумуляторную батарею сразу после зарядки.
•   Содержите контакты подставки, терминала и аккумуляторной батареи в чистоте,
    периодически протирая их сухой тряпкой или ватой, это улучшит качество процесса зарядки.

Последовательное соединение нескольких подставок DT-964IOE

Используя кабель DT-888RSC 6-6 pin, Вы можете объединить 7 подставок-сателлитов в
последовательную конфигурацию, что позволит осуществлять обмен данными между несколькими
терминалами и ПК через подставки.

Summary of Content for Casio DT-930 Terminal User’s Guide PDF
Data Collection Terminal
Handheld Terminal
Users Guide
Series
Be sure to read «Safety Precautions» inside this guide before trying to use your Handheld Terminal. After reading this guide, keep it in a safe place for future reference.
Data Collection Terminal
Printed in China AB0302-046021D
CASIO COMPUTER CO., LTD. 6-2, Hon-machi 1-chome
Shibuya-ku, Tokyo 151-8543, Japan PN430041-001
C-2 E-2
BLUETOOTH is a registered trademark owned by Bluetooth SIG. Inc. and licensed to CASIO COMPUTER CO., LTD.
_irbqllqe !»#$_=pfdK=fK !»#$%&'()*+, !»#$%
E-3
Congratulations upon your selection of this CASIO Product. Be sure to read the following Safety Precautions before trying to use it for the first time. Keep this manual in a handy place for future reference.
Safety Precautions
The following are the meanings of the markings and symbols used in these Safety Precautions to warn you against the possibility of personal injury and/or material damage or loss to you and others. Take a few moments to become familiar with these markings and symbols so you can avoid future problems.
This symbol indicates information that, if ignored or applied incorrectly, creates the danger of death or serious personal injury.
This symbol indicates information that, if ignored or applied incorrectly, can create the possibility of death or serious personal injury.
This symbol indicates information that, if ignored or applied incorrectly, can create the possibility of personal injury or material damage.
A triangular shape indicates you should exercise caution. The symbol shown here indicates you should take care to avoid breakage.
A circle indicates something you should not do. This symbol indicates you should not try to take something apart.
A black circle indicates something you must do. This symbol indicates you should unplug power cord.
Danger!
Warning!
Caution!
Marking examples
Markings and Symbols
E-4
Danger! Lithium-ion Battery Pack
The Lithium-ion Battery Pack is available as an option. Never allow the battery pack to become wet. Water can create the danger of
battery pack heat emission, explosion, and fire. Never use or leave the battery pack next to open flame, near a stove, or any
other area exposed to high heat. Doing so creates the danger of battery pack heat emission, explosion, and fire.
Never use the battery pack with any device other than this unit. Doing so can creates the danger of battery pack heat emission, explosion, and fire.
Note that the battery packs positive (+) and negative () terminals must be oriented correctly when it is loaded into the charger unit or the Data Collector. Connecting the battery pack with its terminals reversed creates the danger of battery pack fluid leakage, heat emission, explosion, and fire.
Never dispose of the battery pack by incinerating it or otherwise expose it to heat. Doing so creates the danger of battery pack heat emission, explosion, and fire.
Never allow the positive (+) and negative () terminals of the battery pack to become connected (shorted) by metal. Doing so creates the danger of battery pack heat emission, explosion, and fire.
Never transport or store the battery pack together with a necklace, hair pins or other metal objects. Doing so can short battery pack terminals, creating the danger of battery pack heat emission, explosion, and fire. Be sure to place the battery pack in its case whenever transporting or storing it.
Never throw the battery pack or otherwise subject it to strong impact. Doing so creates the danger of battery pack heat emission, explosion, and fire.
Never pierce the battery pack with nails, hit it with a hammer, or step on it. Doing so can create the danger of battery pack heat emission, explosion, and fire.
Never try to take apart the battery pack or modify it in any way. Doing so creates the danger of battery pack heat emission, explosion, and fire.
Use only the specified charger unit to charge the battery pack. Use of other types of charger units creates the danger of battery pack heat emission, explosion, and fire.
Handling Alkaline Batteries Should fluid from the alkaline batteries accidentally get into your eyes, there
is a threat of loss of eyesight, do not rub them. Immediately rinse your eyes with clean tap water and then consult a physician immediately.
E-5
Warning! Disassembly and Modification
Never try to disassemble or modify the unit in any way. High voltage inside creates the danger of electrical shock.
Interior Parts and Components Never touch interior high-voltage parts or components. Doing so creates the
danger of electrical shock.
Abnormal Conditions Should the unit become hot or start to emit smoke or a strange odor,
immediately turn off the power and contact your original dealer or an authorized CASIO service provider. Continued use creates the danger of fire and electrical shock.
Foreign Objects Should any foreign matter ever get into the unit, immediately turn off the
power and contact your original dealer or an authorized CASIO service provider. Continued use creates the danger of fire and electrical shock.
Dropping and Damage Should you drop the unit and damage it, immediately turn off the power and
contact your original dealer or an authorized CASIO service provider. Continued use creates the danger of fire and electrical shock.
Moisture Keep the unit away from vases, planters, cups, glasses and other containers
of liquid. Also keep it away from metal. Water and metal getting into the unit creates the danger of fire and electrical shock.
Laser Beam Never look directly into the laser beam. Doing so can cause serious eye
damage.
E-6
Warning! Interference with the Operation of Other Equipment
(Using Wireless Communication) Keep your Handheld Terminal at least 22 centimeters (8′ 1/10″) away from
anyone wearing a pacemaker. Radio waves emitted by the Handheld Terminal can affect the operation of a pacemaker.
In order to protect someone wearing a pacemaker from the risk of unintentional interference, turn off the Handheld Terminal before boarding a crowded train or entering any other crowded area.
Handling Alkaline Batteries Do not put the battery in a fire, expose it to heat, dismantle or modify it. If the
insulation or safety valve is damaged, the battery may leak fluid, overheat or explode.
Do not insert the battery with the poles reversed. Doing so may cause some abnormality or a short and the battery may leak fluid, overheat or explode.
Keep the battery out of the reach of children. If the battery is swallowed, contact a physician immediately.
If the alkali fluid gets in your mouth, rinse your mouth with water and contact a physician immediately.
If the alkali fluid gets on your skin or clothes, it may burn your skin, thoroughly rinse the affected area with tap water.
Do not store batteries with metal objects such as necklaces or hairpins, doing so may cause the positive and negative poles to be shorted.
Do not mix new and old batteries or other makes of batteries. The different attributes may cause the battery to leak fluid, overheat or explode.
This battery was not made to be recharged. Recharging this battery may damage the insulation or internal structure and may cause the battery to leak fluid, overheat or explode.
Do not damage or remove the label on the exterior of the battery. Doing so may cause the battery to short, leak fluid, overheat or explode.
Do not drop, throw or expose the battery to extreme impact. Doing so may cause the battery to leak fluid, overheat or explode.
Do not alter the shape of the battery. If the insulation or safety valve is damaged, the battery may leak fluid, overheat or explode.
E-7
Warning! Handling the Coin Type Lithium Battery
Do not recharge coin type lithium battery. Doing so may cause it to leak fluid, overheat, explode or burst into flames.
Do not put the coin type lithium battery in open flame, or apply solder directly to the coin type lithium battery. Doing so may cause it to leak fluid, overheat, explode or burst into flames.
Do not use the coin type lithium battery with the positive and negative poles reversed. Do not store it with metal objects such as necklaces or hairpins, doing so may cause the positive and negative poles to be shorted.
Keep the coin type lithium battery out of the reach of children. If it is swallowed, contact a physician immediately.
If the alkali fluid gets in your eye, rinse the eye with water and contact a physician immediately.
If the alkali fluid gets in your mouth, rinse your mouth with water and contact a physician immediately.
If the coin type lithium battery leaks fluid or emits a strange smell, immediately remove it from near heat or flames. Burning may cause it to explode or burst into flames.
When storing or disposing of the coin type lithium battery, cover the terminals with tape to insulate them. Mixing them with other batteries or metal objects may cause the coin type lithium battery to short, leak fluid, overheat, explode or burst into flames.
Lithium-ion Battery Pack Do not put a battery pack in microwave ovens or pressure cookers. Doing so
may cause the battery pack to overheat, explode or burst into flames. Do not use a battery pack that smells strange, is overheating, is a strange
color, or is a strange shape. Doing so may cause the battery pack to overheat, explode or burst into flames.
If the amount of time period the battery pack can serve becomes considerably short, stop using it. It may indicate the possibility of a malfunction in the battery pack. Continued charging the battery pack creates the danger of heat emission, explosion, and fire.
Stop charging the battery pack after the recommended time even if it is not fully charged. Continuing to charge the battery may cause the battery pack to overheat, explode or burst into flames.
If the battery pack leaks fluid or emits a strange smell, remove it from near heat or flames. Burning may cause the battery pack to explode or burst into flames.
Should fluid from the battery pack accidentally get into your eyes, do not rub them. Immediately rinse your eyes with clean water such as tap water and then consult a physician immediately.
E-8
Warning! Optional Bridge Basic Cradle, Basic Cradle, Satellite Cradle
and Cradle-type Battery Charger Power these cradles and Cradle-type battery charger only with a power
outlet whose voltage matches that marked on the rating plate of each option. Do not plug these options into an extension shared by other appliances. Doing so creates the danger of fire and electrical shock.
Avoid conditions that can cause damage or breaks in the power cord. Do not place heavy objects on the power cord. Keep it away from sources of heat. Any of these conditions can damage the power cord, creating the danger of fire and electrical shock.
Never modify, sharply bend, twist, or pull on the power cord. Doing so creates the danger of fire and electrical shock.
Use only the AC adaptors and chargers specified in this manual. Use of other AC adaptor models or chargers creates the danger of fire and electrical shock.
Should the power cord ever become severely damaged (to the point that wires are exposed or broken), contact your original dealer or CASIO service provider for repair or replacement. Use of a damaged electrical cord creates the danger of fire and electrical shock.
Caution! Foreign Objects
Take care to ensure that metal or combustible objects are not inserted into the openings of the unit. Such objects create the danger of fire and electrical shock.
Location Do not locate the unit on a surface that is unstable or uneven. Doing so
creates the danger of the unit falling, which can cause personal injury. Do not locate the unit in an area subjected to large amounts of humidity or
dust. Doing so creates the danger of fire and electrical shock. Do not leave the unit for long periods in a car parked in direct sunlight.
Heavy Objects Never place heavy objects on top of the unit. Doing so creates the risk of a
loss of balance and the object falling, which can cause personal injury.
E-9
Caution! LCD Screen
Never apply strong pressure to the screen or subject it to strong impact. Doing so can crack the LCD panel glass and create the danger of personal injury.
Should the LCD panel glass ever break, never touch the liquid inside. Doing so can cause skin irritation and inflammation.
Should liquid from the LCD panel accidentally get into your mouth, immediately wash your mouth with water and then consult a physician.
Should liquid from the LCD panel accidentally get into your eyes or onto your skin, immediately rinse for at least 15 minutes with clean tap water and then consult a physician.
Lithium-ion Battery Pack Never leave the battery pack in an area expose to direct sunlight, in a car
parked in direct sunlight, or any other very hot area. Doing so creates the danger of heat emission and fire, as well as deterioration of battery pack performance and shortening of its service life.
Do not use the battery pack in areas where static electricity is being generated. Doing so creates the danger of battery pack heat emission, explosion, and fire.
Temperature ranges for battery pack use, charging, and storage are specified below. Temperatures outside these ranges create the danger of deterioration of battery pack performance and shortening of its service life, as well as fluid leakage and heat generation.
Operating Temperature: 20C to 50C Charging Temperature: 0C to 40C Storage Temperature: 20C to 60C
Should fluid from the battery pack accidentally get onto clothing or your skin, immediately rinse it off with clean tap water. Prolonged contact with battery pack fluid can cause skin irritation.
Keep the battery pack out of the reach of small children. Do not let small children remove the battery pack from the charger unit or the unit it is powering.
E-10
Caution! Handling Alkaline Batteries
Store batteries someplace out of direct sunlight where the temperature and humidity are not high. Not doing so may cause the batteries to leak fluid, overheat or explode. Also, it may cause the life and performance of the batteries to decline.
These batteries can be disposed of as regular garbage, however, if applicable, follow the regulations of the local government when disposing of these batteries.
Immediately remove batteries when they have lost all power. Leaving the batteries in the unit for a long time may cause the batteries to leak fluid, overheat or explode due to gas that is generated by the batteries.
Remove the batteries from the unit when not using the unit for an extended period of time. The batteries may leak fluid, overheat or explode due to gas that is generated by the batteries.
Do not apply solder directly to the batteries. The heat may cause the batteries to leak fluid, overheat or explode.
Do not store the batteries in the direct sunlight or in a car on a sunny day when it is very hot. The batteries may leak fluid, overheat or explode.
When storing or disposing of the batteries, cover the terminals with tape to insulate them. Mixing them with other batteries or metal objects may cause the batteries to leak fluid, overheat or explode.
Do not get the batteries wet. Doing so may cause the batteries to overheat.
Handling the Coin Type Lithium Battery Do not drop, expose to severe impact or alter the shape of the coin type
lithium battery. Also, do not get the battery wet. Doing so may cause it to leak fluid, overheat or explode.
Do not store the coin type lithium battery in the direct sunlight or in a car on a sunny day when it is very hot. It may leak fluid, overheat or explode.
Store the coin type lithium battery someplace out of direct sunlight where the temperature and humidity are not high. Not doing so may cause it to leak fluid, overheat or explode. Also, it may cause the life and performance of the battery to decline.
The coin type lithium battery can be disposed of following the instruction or guide issued by your municipal office.
E-11
Make back-up copies of all important data
Caution! Optional Bridge Basic Cradle, Basic Cradle, Satellite Cradle
and Cradle-type Battery Charger Keep the power cord away from stoves and other sources of extreme heat.
Heat can melt the insulation of the power cord and create the danger of fire and electrical shock.
Never pull on the power cord when unplugging it. Doing so can damage the cord and create the danger of personal injury, fire and electrical shock. Always hold onto the plug when unplugging it from the wall outlet.
Never touch the plug while your hands are wet. Doing so can create the danger of electrical shock.
Be sure to unplug the power cord from the wall outlet before moving the optional cradles and Cradle-type Battery Charger. Failure to do so can result in damage to the power cord caused by pulling it, which creates the danger of fire and electrical shock.
Be sure to unplug the power cord from the wall outlet before cleaning the optional cradles and Cradle-type Battery Charger.
Be sure to turn the power OFF and unplug the power cord after use. Unplug the power cord from the wall outlet and clean the area around the
plugs at least once a year. If dust collects on the AC adaptor, humidity or moisture may cause a fault in the insulation, which may result in a fire.
The housing of the AC adaptor can become warm during normal use.
Take normal precautions against electric shock.
Caution! Note that CASIO Computer Co., Ltd. shall not be liable to you or any third
party for any damages or loss caused by deletion or corruption of data due to use of this, malfunction or repair of this unit or its peripherals, or due to batteries going dead.
This unit employs electronic memory to store data, which means that memory contents can be corrupted or deleted if the power is interrupted due to batteries going dead or incorrect battery replacement procedures. Data cannot be recovered once it is lost or corrupted. Be sure to make back-up copies of all important data. One way to do this is to use either one of the Bridge Basic Cradle, Basic Cradle and Satellite Cradle to transfer data to a computer.
E-12
Introduction Make sure you carefully read the following information to ensure that your Handheld Terminal is able to perform at the level for which it is designed.
Handling Precautions
Do not throw or drop the Handheld Terminal or otherwise subject it to strong impact, which can damage the LCD screen, interrupt program execution, corrupt memory contents, or otherwise interfere with proper operation.
Use only your finger or a blunt object to operate the stroke keys. Use of a sharp pointed object can damage stroke keys and cause shorting of internal circuitry.
Use a soft, dry cloth when cleaning the Handheld Terminal. Do not wipe with a wet cloth. Do not use benzine, thinner, or other volatile chemicals, which can result in deformation and deterioration of the materials used in the keys and case.
Do not lay the Handheld Terminal down with its key panel downwards. Doing so runs the risk of accidental key operation, which can cause malfunction.
Never remove the main battery while Handheld Terminal power is turned ON. Doing so can cause all data in memory to be lost.
Sudden temperature changes can cause condensation to form on the Handheld Terminals case. Operating the Handheld Terminal while condensation is present can interfere with proper operation. Take care to avoid conditions that cause the formation of condensation. If condensation does form, wait until it dries completely before using the Handheld Terminal.
E-13
Product description/Intended use
EU/EFTA member states intended EU: Austria, Belgium, Denmark, Finland, France, Germany, Greece, Ireland, Italy, Luxembourg, The Netherlands, Portugal, Spain, Sweden, United Kingdom, Czech Republic, Hungary, Poland, Slovenia, Slovakia, Estonia, Latvia, Lithuania, Cyprus, Malta EFTA: Switzerland, Iceland, Lichtenstein, Norway
Member states with restrictive use NONE
Manufacturer CASIO COMPUTER CO.,LTD.
Brand CASIO
Type DT-930M50E, DT-930M51E
are tested and found to conform with the essential requirements for protection of health and the safety of the user and any other persons and Electromagnetic Compatibility, as included in following standards:
Standard Issue date
EN 60950-1 2001
EN301 489-1 v1.4.1 2002-08
EN301 489-17 v1.2.1 2002-08
and are tested and found to conform with the essential radio test suites so that they effectively use the frequency spectrum allocated to terrestrial/space radio communication and orbital resources so to as to avoid harmful interference, as included in following standards:
Standard Issue date
EN300 328 v1.6.1 2004-11
and therefore comply with the essential requirements and provisions of the Directive 1999/5/ EC of the European Parliament and of the council of March 9, 1999 on Radio Equipment and Telecommunications Terminal Equipment and the mutual recognition of their conformity and with the provisions of Annex III (Conformity Assessment procedure referred to in article 10).
The technical documentation as required by the Conformity Assessment procedure is kept at the following address:
Company CASIO Europe GmbH
Address, City Bornbarch 10, D-22848 Norderstedt
Country Germany
Phone number +49(0)40-528-65-0
Fax number +49(0)40-528-65-424
Products are for distribution within all member states of the EU.
for use
E-14
The contents of this manual are subject to change without notice. The term Handheld Terminal as used in this Users Guide refers to the CASIO DT-930
Handheld Terminal unless otherwise noted. CASIO COMPUTER CO., LTD. assumes no responsibility for any loss or claims by third
parties which may arise from the use of this manual. This manual does not cover programming and the uploading of data. See the separate
manuals for details of these procedures.
Contents Safety Precautions ……………………………………….. E-3
Introduction ………………………………………………… E-12 Handling Precautions ………………………………………………….. E-12
Unpacking ………………………………………………….. E-16
Available Models and Options ……………………… E-17
General Guide …………………………………………….. E-19
Power Supply ……………………………………………… E-20 Loading and Removing the AA (LR6)-size alkaline batteries … E-21 Loading and Removing the Lithium-ion Battery Pack ………. E-22 Replacing the Backup Lithium Battery …………………………… E-23
About the LCD Screen…………………………………. E-25
Attaching the Wrist Strap …………………………….. E-26 To attach the wrist strap ………………………………………………. E-26
Keys and Their Functions ……………………………. E-27
Using the Bar Code Reader …………………………. E-28 Performing a Bar Code Read Operation………………………… E-28 Adjusting the Laser Beam Width ………………………………….. E-30
Communications …………………………………………. E-32 IR Communication ……………………………………………………… E-32 Bluetooth Communication ………………………………………….. E-33
Specifications …………………………………………….. E-34 Lithium-Ion Battery Pack (DT-923LIB) …………………………… E-35
Using the Bridge Basic Cradle …………………….. E-36
Setting up the Bridge Basic Cradle………………. E-37 Connecting without Using the AC Adaptor ……………………… E-38 Mounting on a Wall …………………………………………………….. E-39 Removing the Wall Mount Unit …………………………………….. E-40 HA-E60IO Bridge Basic Cradle specifications ………………… E-41
E-15
Using the Basic Cradle………………………………… E-42 General Guide …………………………………………………………… E-42 When You Are Using the Down-facing Reader Port Model .. E-44 Setting up the Basic Cradle …………………………………………. E-44 Serial Connection of Multiple Basic Cradles …………………… E-46 DIP Switch Settings ……………………………………………………. E-46 DT-960IOE Basic Cradle Specifications ………………………… E-47
Using the Satellite Cradle ……………………………. E-48 General Guide …………………………………………………………… E-48 When You Are Using the Down-facing Reader Port Model .. E-50 Setting up the Satellite Cradle ……………………………………… E-50 Charging the Battery Pack …………………………………………… E-53 Charging the Battery Pack
(charging the lithium-ion battery pack separately) ………. E-54 Serial Connection of Multiple Satellite Cradles ……………….. E-55 DIP Switch Settings ……………………………………………………. E-56 DT-964IOE Satellite Cradle Specifications …………………….. E-57
Using the Cradle-type Battery Charger ………… E-58 General Guide …………………………………………………………… E-59 When You Are Using the Down-facing Reader Port Model .. E-60 Setting up the Cradle-type Battery Charger ……………………. E-60 Charging the Battery Pack
(charging the lithium-ion battery pack separately) ………. E-63 DT-969CHGE Cradle-type Battery Charger Specifications . E-65
Installing Cradles and Cradle-type Battery Charger … E-66 To hang the cradles and charger on a wall …………………….. E-66
CASIO Europe GmbH Bornbarch 10, D-22848 Norderstedt, Germany
This mark applies in EU countries only.
E-16
Unpacking When unpacking the Handheld Terminal (either DT-930M50E or DT-930M51E), check carefully that all of the items shown below are included. If anything is missing or damaged, contact your original dealer or your nearest CASIO Service Provider.
Handheld Terminal (down-facing reader port) (forward-facing reader port)
DT-930 M50E DT-930 M51E
Wrist Strap
Back-up battery (lithium) AA (LR6)-size alkaline batteries
User’s Guide (this guide)
Desktop guides L and R for desktop configuration
Wall mount guides L and R for wall mount configuration
* Be sure to remove the original guides come installed on Basic Cradle, Satellite Cradle and Cradle-type battery Charger prior to the use with DT-930, and then install either one of the new guides accompanied in the package, the desktop guides for desktop configuration or the wall mount guides for wall mount configuration.
Handheld Terminal
Users Guide
P
Series
Be sure to read «Safety Precautions» inside this guide before trying to your Handheld Terminal. After reading this guide, keep it in a safe place future reference
E-17
Available Models and Options Options
Basic Cradle
DT-960IOE
Cradle-type Battery Charger
DT-969CHGE
Satellite Cradle
DT-964IOE
Lithium-ion Battery Pack
DT-923LIB
DT-930 M50E
DT-930 M51E Cables Wall Mount Unit for Bridge Basic Cradle
Bridge Basic Cradle
HA-E60IO
E-18
RS-232Ccable DT-782RSC Cross-cable for Basic Cradle 14Pin-25Pin (Male)
RS-232Ccable DT-783RSC Cross-cable for Basic Cradle 14Pin-25Pin (female)
RS-232Ccable DT-787AX Cross-cable for Basic Cradle 14Pin-9Pin (female)
RS-232Ccable DT-881RSC Straight cable for Satellite Cradle For modem connection
RS-232Ccable DT-882RSC Cross-cable for connecting Satellite Cradle 25Pin (male) to personal computer
RS-232Ccable DT-883RSC Cross-cable for connecting Satellite Cradle 25Pin to personal computer (female)
RS-232Ccable DT-887AX/AXA Cross-cable for connecting Satellite Cradle 9Pin to personal computer (female)
RS-485cable DT-788RSC 6-6 pin modular cable or daisy-chaining Basic Cradle
RS-422cable DT-888RSC For daisy-chaining Satellite Cradle
USB Cable DT-380USB Bridge Basic Cradle to personal computer
AC Adaptor for Bridge Basic Cradle
AD-S15050AE
AC Adaptor for Basic Cradle
DT-9020 ADP-GS DT-9020ADP-US
AC adaptor for Satellite Cradle
AD-S42120AE
AC adaptor for Cradle-type Battery Charger
DT-9020 ADP-GS DT-9020ADP-US
E-19
4
7
7
3
1
2
4
7
5
12
7
1
9
8
10
6
11
13
14
General Guide
1 Reader port Emits a laser for bar code reading.
2 Read indicator Indicates the status of the read operation: green for a successful read, red when the read is no good.
3 LCD screen Displays various data when a program is being run.
4 Trigger keys Executes the bar code read operation.
5 Stroke keys A total of 26 keys are provided to turn power ON and OFF and for other operations.
6 Reset switch (inside the hole) Use a paper clip or other thin object to press the RESET switch located inside the hole.
7 Wrist strap hook Used to install the wrist strap.
8 Laser warning label Class 2 laser warning label.
9 Buzzer Outputs operation confirmation tones. Take care to avoid blocking the buzzer holes and reducing output sound volume. Never insert any thin, pointed object into the buzzer holes. Doing so can cause malfunction.
10 Back-up battery compartment Holds memory backup lithium battery.
11 Main battery compartment Holds main batteries.
12 Main battery compartment lock Locks the main battery compartment cover in place. Handheld Terminal power is automatically cut if the cover is removed.
13 Power Contacts These terminals are used to supply power from either Bridge Basic Cradle, Basic Cradle, Satellite Cradle, or Cradle-type Battery Charger.
14 IR port This port is for IR communication with another DT-930 unit or with one of the optional cradles.
Left side Front Right side Back
Bottom
E-20
Power Supply The Handheld Terminal has both operating power supply provided by either two
AA (LR6)-size alkaline batteries or lithium-ion battery pack, and memory backup
power supply provided by lithium battery. In this manual, the words «main battery»
refer to both alkaline batteries and the lithium-ion battery pack, unless otherwise
noted. Low main battery power is indicated when the low voltage message appears on the LCD screen. Replace the main battery or charge the battery pack as soon as possible after the low voltage message appears.
[Caution] For Important Data
Never remove both the main battery and backup battery at the same time. Doing so causes all program settings and data in Handheld Terminal memory to be lost or changed. Data cannot be recovered once it is lost or corrupted. Be sure to make back-up copies of all important data. One way to do this is to use one of the optional cradles to transfer data to a computer.
Important! Never remove the main battery from the Handheld Terminal while the power is turned ON. Doing so can cause data in Handheld Terminal memory to be lost. Before you remove the battery, be sure to turn the Handheld Terminal OFF.
Use only two AA (LR6)-size alkaline batteries or the dedicated lithium- ion battery pack.
The lithium-ion battery pack discharges naturally during its transportation from the factory to an end-user. Be sure to charge the battery pack before you use it for the first time.
Never allow the terminals of the lithium-ion battery to become shorted. Doing so creates the danger of malfunction. Be sure to keep the battery pack in its case when transporting or storing it.
Repeat charging of the lithium-ion battery pack gradually shortens its ability to recharge. If you find that a fully charged battery pack provides only little operation time, it probably means you need a new battery pack.
Whenever you do not plan to use the Handheld Terminal for a long time, load two new alkaline batteries or a fully charged battery pack into the Handheld Terminal to protect against power failure during non- use. Also, load new batteries or a fully charged battery pack before using the Handheld Terminal after a long period of non-use.
If the battery pack has been left over unused for a long period of time, the capacity remained decreases due to spontaneous discharge or chemical decomposition by the battery pack itself. If the battery pack fails to hold its operating duration after it has been fully charged, replace it with a new one. The battery pack may reach the end of its service life.
E-21
Loading and Removing the AA (LR6)-size alkaline batteries
Important! When you load the AA (LR6)-size alkaline batteries, make sure that their positive (+) and negative () ends are facing the correct directions.
Loading the alkaline batteries
1 Slide the main battery compartment cover lock to the FREE position and remove the cover.
2 Load two new AA (LR6)-size alkaline batteries into the main battery compartment, making sure that they face the directions shown in the figure.
3 Attach the battery compartment cover to the Handheld Terminal and slide the main battery compartment cover lock to the LOCK position.
Removing the alkaline batteries
Remove the alkaline batteries following the loading procedure in reverse. Be sure to turn the Handheld Terminal OFF before you do this.
E-22
Power Supply
Loading and Removing the Lithium-ion Battery Pack
Loading the Lithium-ion Battery Pack
1 Slide the main battery compartment cover lock to the FREE position and remove the cover.
2 Load a lithium-ion battery pack into the main battery compartment in the direction shown in the figure. Load the battery while sliding it in with the mark on the lithium-ion battery pack aligned with the mark in the main battery compartment.
3 Attach the battery compartment cover to the Handheld Terminal and slide the main battery compartment cover lock to the LOCK position.
Removing the Lithium-ion Battery Pack
Remove the lithium-ion battery pack following the loading procedure in reverse. Be sure to turn the Handheld Terminal OFF before you do this.
E-23
Replacing the Backup Lithium Battery
When the backup lithium battery low voltage message appears on the LCD screen, immediately replace the backup battery (lithium). Use a CR2032 lithium battery as the replacement battery. Be sure to turn the Handheld Terminal OFF before you do this.
[Caution] For Important Data
When you remove the backup battery with the main battery removed or in a low-power state, data may be lost or may change. Data cannot be recovered once it is lost or corrupted. Be sure to make back-up copies of all important data. One way to do this is to use one of the optional cradles to transfer data to a computer.
Important! Make sure that the positive (+) and negative () ends of the battery are facing the correct directions.
1 Use a screwdriver to rotate the screw that secures the backup battery holder in place counterclockwise to loosen it.
2 Open the backup battery compartment cover.
E-24
3 Carefully wipe the backup battery (lithium battery) with a dry cloth before inserting it with the plus (+) side up as shown in the diagram.
4 Push the lithium battery in the direction shown by the arrow to hook it.
5 Close the backup battery cover and tighten the screws.
Removing the battery
1 Open the backup battery cover and use a ballpoint pen or other sharp object to remove the backup battery (lithium battery).
2 Close the backup battery cover and tighten the screws.
Hook
Power Supply
E-25
About the LCD Screen The LCD screen of the Handheld Terminal shows program settings, operational procedures, calculation results and other information.
Display Area 64 dots (V) x 128 dots (H)
Display Characters 6-dot, 8-dot and 10-dot mode Reduced ANK 21 columns x 10 lines, 16 columns x 8 lines, 12 columns x 6 lines ANK 21 columns x 5 lines, 16 columns x 4 lines, 12 columns x 3 lines
Character Types Alphanumeric, symbols
Text Effects Bolding, highlighting, and other effects can be used with alphanumeric and symbols.
Built-in Clock The Handheld Terminal has a built-in clock, so programs can be written to perform operations at certain times.
Example Display
2006 / 1 / 11
Year Month Day
14 : 25
Hour Minute
E-26
The wrist strap protects the Handheld Terminal from being damaged as a result of it being dropped by mistake during movement. Follow the procedure below to attach the wrist strap.
To attach the wrist strap
1 Pass the thin end of the wrist strap through the metal hand strap mount (two possible locations) on the bottom side of the Handheld Terminal.
2 Double the strap back through its own loop, and pull it tight.
Important! Never swing the Handheld Terminal around by its wrist strap.
Attaching the Wrist Strap
E-27
1 2 3
1 5
4
6
7
Keys and Their Functions Keys available on the Handheld Terminal and their functions are as follows.
1 Trigger keys Trigger a bar code read operation.
2 Control keys CLR key: Cancels input. BS key: Backspaces and deletes one
character. S key: Switches between the character
input mode and the number input mode.
lit on the LCD screen indicates the character input mode. When is not lit, the Handheld Terminal is in the number input mode.
3 Multi-function (L/R) keys Keys that can be assigned any function.
4 10-key pad The function of these keys depends on whether the Handheld Terminal is in the character input mode or the number input mode. Character input mode: Input alphanumeric and
symbols. Number input mode: Inputs the numbers 0 to 9
and the decimal point. 5 Power key Turns power ON and OFF.
6 Enter key Registers input.
7 Function keys Keys that can be assigned any function except for the trigger key function. The following are the initial functions assigned to these keys. F1 (): Inputs the minus () sign. F2 (): Moves the cursor left. F3 (): Moves the cursor right. F4 (DEL): Deletes a character. F5 (SP): Inputs a space. F6 (): Increases display contrast. F7 (): Decreases display contrast. F8 (BL): Turns the display backlight and the key
lights ON and OFF.
E-28
Performing a Bar Code Read Operation
1 Press the [PW] key to turn power on. Hold the Handheld Terminal close to the bar code and press the trigger key.
2 The reader port emits a laser to read the bar code. The read indicator lights green when the read is successful.
Important! If you have problems with the read operation, change the angle between the label and Handheld Terminal or move closer and then try again.
If the bar code is wider than the width of the Handheld Terminals reader port, try moving the Handheld Terminal a bit farther away from the bar code.
The Handheld Terminal should be able to read a bar code from the maximum distance of 45 centimeters on the forward-facing reader port model and about 40 centimeters on the down-facing reader port model under the following conditions.
Ambient Light: 500~900 lux (fluorescent) PCS: 0.9 min. Minimum Bar Width: 1.0 mm CODE-39 ITF (extended version)
Wavelength: 650 nm Maximum output: 1.0 mW
CAUTION Use of controls or adjustments or performance of procedures other than those specified herein may result in hazardous radiation exposure.
Using the Bar Code Reader
Reader port Read indicator
Trigger key Power key
Maximum distance: Approx. 45 cm (forward-facing reader port model) and approx. 40 cm (down-facing reader port model)
EXPLANATORY LABEL
E-29
When reading a small bar code, decrease the distance between the Handheld Terminal and the bar code. For larger bar codes, position the Handheld Terminal so that the bar code fits into the laser beam.
Sample Bar Codes
Warning! Laser Beam
Never look directly into the laser beam. Doing so can cause serious eye damage.
L* *
E-30
Using the Bar Code Reader
Adjusting the Laser Beam Width
The width of the laser beam emitted from the Handheld Terminal can be adjusted to match the width of the bar code that is being read. When you switch the laser beam width, you must set the beams reference point beforehand.
1 Turn the Handheld Terminal ON with the and keys held down to start up the system menu.
2 Press the following keys in order to start up laser beam adjustment:
Mode Set Bar Code Laser Beam Adjustment
3 Press the trigger key to emit the laser beam, and align the laser beam with the beam width adjustment bar code.
* Align the laser beam with the fine bars on both sides of the adjustment bar code.
(Example)
After first making sure that the laser beam is emitted at the correct position, hold down the trigger key for at least one second.
Laser beam adjustment is completed when you release the trigger key.
Startup Screen
Calibration Completed
Screen
Adjustment Screen
OBR CALIBRATION
PLEASE PUSH TRG KEY
TRG :START CLR :EXIT
OBR CALIBRATION
EXECUTING…..
TRG :STOP
OBR CALIBRATION
FINISHED
COMPLETE
TRG :RETRY CLR :EXIT
E-31
Beam Width Adjustment Bar Code
For down-facing reader port model
For forward-facing reader port model
[Handling Precautions] The Handheld Terminal is shipped with the laser beam width already
adjusted. So, the laser beam width need not be adjusted. Adjustment is necessary only when the laser beam does not switch to the correct position when the beam width is switched.
* Adjustment results are stored in memory. * Factory settings are resumed if the Handheld Terminal is reset or
all installed batteries are removed causing memory backup not to be performed.
If adjustment is not successful, an error message is displayed. If this happens, retry adjustment.
E-32
IR Communication
Application software and input data can be transferred between two DT-930 units using the infrared ports on the bottom of the units. Position the two DT-930 units so they will not accidently move during communication. The orientation of the two units depends on the type of communication you plan to perform. Conformed IrDA Version 1.1:
0 (contact) to 30 centimeters or less enables communication
Communications
E-33
Bluetooth Communication
The Bluetooth interface can be used to transfer data to and from a Bluetooth compatible printer. Data can be transferred if the Handheld Terminal is located within three meters of the target device (and nothing is blocking the signal).
Important! Observe the following precautions to help ensure that Bluetooth communication is successful. Make sure the Handheld Terminal is visible from and within about 3
meters of the other Bluetooth devices. The possible communication distance may be shorter depending on the surrounding environment (such as obstructions).
Make sure there is at least two meters (6′ 7″) between the Handheld Termianal and other equipment (electrical appliances, audio-visual equipment, OA equipment, and digital cordless telephones, facsimile machines, etc.). (Take special care with microwave ovens. Allow at least three meters (9′ 10 3/4″) between the Handheld Terminals in wireless operation and a microwave oven.) When approaching such a device when its power is turned on, proper communication may prove impossible while this may also cause interference with TV and radio reception (images produced by certain UHF and broadcast satellite channels may become blurry).
Normal communication may not be possible in an area near a broadcast transmitter or wireless transmitter. If this happens, move to a different location. Normal communication may not be possible in areas exposed to strong radio waves.
RF Wireless LAN Interference Because Bluetooth and RF wireless LAN use the same frequency band (2.4GHz), radio interference can occur if there is a wireless LAN device nearby. This can result in lower communication speeds, or even make it impossible to establish a connection. If this happens, try the following countermeasures. Move at least 10 meters (32′ 10 3/4″) away from the wireless LAN
device. If you cannot keep the distance at least 10 meters (32′ 10 3/4″) or
more between the Handheld Terminal and a wireless LAN device, turn off the power of either the Handheld terminal or the wireless LAN device.
E-34
Specifications General
CPU: 32-bit RISC Type Memory: RAM : 4MB (User area 1.6 MB)
FROM : 16MB (User area 12.5 MB)
Display Type: STN LCD with phase correction film Capacity: 128 x 64 dots Display contrast: Manually adjustable Backlight: LED
Laser Scanner Readable Symbologies:
EAN, JAN, UPC, NW-7, CODE39, ITF, CODE93, CODE128, MSI, Industrial 2 of 5, IATA
Maximum Non-contact Distance: Approx. 450 mm max. (DT-930M51E) Approx. 400 mm max. (DT-930M50E)
Input Stroke Keys: 26
Infrared Communications Interface: Conforms to IrDA Ver. 1.1, original Control Protocol: Half-duplex Synchronization: Asynchronous, frame synchronization Speed: 2,400 to 115,200 bps, 4 Mbps Communication Range:
Conforms to IrDA Version 1.1: 0 (contact) to 30 centimeters or less Original Communication: Contact
Bluetooth Communications Interface: Bluetooth Specification Ver 1.2 Communication Range:
Approx. 3 meters (varies according to signal strength and environment)
Output: Maximum 3 dBm (Power Class 2)
E-35
Power Supply Main: Two AA (LR6)-size alkaline dry cells or one lithium-ion battery pack
Alkaline Battery life: — Approx. 200 hours (using a new set of AA(LR6)-size alkaline
batteries, at normal temperature, and in scanning bar code twice per 10 seconds)
— Approx. 175 hours (using a new set of AA (LR6)-size alkaline batteries at normal temperature at a key standby/calculation/read operation ratio of 20:1:1)
— Approx. 50 hours (using a new fully charged battery pack, at normal temperature, and in scanning bar code twice per 10 seconds)
— Approx. 30 hours (using a new fully charged lithium-ion battery pack at normal temperature at a key standby/calculation/read operation ratio of 20:1:1)
Backup: One CR2032 lithium battery Battery life: Approx. one month (when only the backup battery is supplying
backup power)
Dimensions and Weight Dimensions: DT-930M51E
Approx. 69.4 (W) x 173 (D) x 31.6 (H) Dont include protrusions Approx. 57.4 (W) x 173 (D) x 21.9 (H) Dont include protrusions DT-930M50E Approx. 69.4 (W) x 180 (D) x 40.2 (H) Dont include protrusions Approx. 57.4 (W) x 180 (D) x 21.9 (H) Dont include protrusions
Weight: Approx. 210 g (DT-930M51E) Approx. 225 g (DT-930M50E) (When AA (LR6)-size alkaline batteries are inserted)
Operating Environment Operating temperature: -20 to 50 C Operating humidity: 10% to 80% RH Dust and Water Splash Proof:
Conforms to JIS waterproofing and IEC529 IP54 Drop Durability: 180 cm Clock functions: Year, month, date, hour, minute, fully automatic calendar and alarm Vibration function: Can be used if the software is set.
Lithium-Ion Battery Pack (DT-923LIB)
Power Supply: Rated Capacitance: 540 mAh Rated Voltage: 3.6 V Dimensions: Approx. 29 (W) x 50.2 (D) x 14.5 (H) mm Weight: Approx. 20 g
E-36
Using the Bridge Basic Cradle
1 LED power indicator Indicates the charge status of the battery and whether the DT-930 is mounted. Off: Power OFF Lit Green: Power is ON and the DT-930 is correctly mounted. Lit Red: Power is ON and the DT-930 is not correctly mounted.
2 USB connection status Indicates that the USB connection is normal. Off: USB connection is not normal. Lit Green: USB connection is normal.
3 Power supply terminal Supplies power to the DT-930. (For use with AC adaptor only)
4 Infrared Interface Non-contact infrared interface. Used to communicate with the DT- 930.
5 Terminal detection switch Detects whether or not the DT-930 is mounted correctly.
6 Power switch Turns power ON and OFF.
7 AC adaptor jack For connection of the AC adaptor (AD-S15050AE) to supply power.
8 USB interface For connection to a PC and uploading/downloading of system data and file data. Also to draw power through the connection to the PC. A special driver needs to be installed in the PC before connecting the Handheld Terminal to the PC.
9 Wall mount unit attachment Install the wall-mount unit with the wall mounting screws.
10 Desktop unit Stand for using the Handheld Terminal on a desktop. Remove it when mounting the cradle to a wall.
Top
Front Right side Back
POWER LINE
POWER LINE
6
35 4
1 2 10 7 9 8
E-37
Setting up the Bridge Basic Cradle 1 Make sure that the Bridge Basic Cradles
power switch is turned off and then plug the optional AC adaptor (AD-S15050AE) into the AC adaptor jack on the back of the Bridge Basic Cradle.
2 Connect the power cord to the AC adaptor before connecting the power cord to the electrical outlet.
3 Connect the USB cable (DT-380USB) to the USB port on the back of the Bridge Basic Cradle and then connect it to the personal computer.
4 Line up the infrared interface on the bottom of the DT-930 and the infrared interface on the Bridge Basic Cradle to mount the DT-930.
5 Turn on the power switch. The power indicator LED on the front of the Bridge Basic Cradle lights green if the DT-930 is correctly mounted.
E-38
Setting up the Bridge Basic Cradle
Connecting without Using the AC Adaptor
It is possible to draw power from the personal computer in the bus power mode. This makes it possible to operate the Bridge Basic Cradle without using the AC adaptor.
Power is not supplied to the DT-930 when the USB connection is used to supply power. Replace the batteries to transfer data if the low voltage message is displayed on the DT- 930. Also, use a personal computer that has USB connectivity that supports high-power devices.
Some personal computers cannot provide a stable power supply, confirm whether your computer can provide a stable power supply. If it is unstable use the optional AC adaptor.
Important! Mount the DT-930 firmly and make sure that the LED power indicator on the front of the Bridge Basic Cradle lights green. If it is not correctly mounted communication cannot be done.
Do not allow the supply contacts in the Bridge Basic Cradle to short circuit. If they short circuit it may cause a malfunction.
Do not shake or hit the Bridge Basic Cradle or DT-930 during communications over the USB interface. Doing so may interrupt communications.
The infrared communication function uses a high-sensitivity communication element. To ensure proper communication, avoid using devices that generate radio waves (for example; cell phones, etc.) in the vicinity of the DT-930 while communication is in progress. Move these devices away from the DT-930 to use them (cell phones should be moved more than 30 cm away).
The cradle does not have the capability of charging battery pack installed in DT-930.
The cradle (HA-E60IO) is not operable with DT-900.
E-39
Mounting on a Wall
1 Remove the screws on the bottom of the desktop unit to remove it.
2 Attach the wall mount unit and tighten the screws for the wall mount unit.
3 Insert the screw provided into the location where the hole on the top of the wall mount unit is to be fixed. Do not screw the screw all the way in. Leave about 2 mm between the wall and the head of the screw.
Screws
Screws
2mm
E-40
4 Hang the wall mount unit from the screw through the hole on its top.
5 Insert the screw provided into the top part of the lower hole of the wall mount unit.
6 Tighten both the upper and lower screws.
Removing the Wall Mount Unit
1 Loosen both the upper and lower screws.
2 Slide the wall mount unit up to remove it.
Important! Check the tightness of the screws after mounting the Bridge Basic Cradle to the wall.
POWER LINE
POWER LINE
Setting up the Bridge Basic Cradle
E-41
HA-E60IO Bridge Basic Cradle specifications
1. Infrared Interface: Infrared interface Standard: Conforms to IrDA Ver 1.1 Synchronization: Asynchronous, frame synchronizing Speed: 4 Mbps (MAX)
2. USB Standard: Conforms to USB Ver 1.1 Speed: 12 Mbps (MAX)
3. Power supply Power Source: AC adaptor (AD-S15050AE)
USB bus power Rated input: When using the AC adaptor: 1.0 A (max.)
When using USB bus power: 0.4 A (max.)
4. AC adaptor Model no.: AD-S15050AE Input: AC 100 V to 240 V, 50/60 Hz, 0.36 A to 0.2 A Output: DC 5 V, 3.0 A
5. Dimensions and Weight Dimensions
Desktop: Approx. 110 (W) x 125 (D) x 128 (H) mm Wall mount: Approx. 110 (W) x 148 (D) x 154 (H) mm
Weight Desktop: Approx. 510 g Wall mounted: Approx. 590 g
6. Operating environment Operating temperature: 0 to 40C Operating humidity: 30 to 80% RH (without condensation)
E-42
CASIO
DATA
POWER
O F
F
P O
W E
R
O N
RS-232CRS-485-1 RS-485-2
AC ADAPTOR
CASIO
4
5
8
11 14
13
14
10
12
8
6
7
1
3 2
9
Using the Basic Cradle Basic Cradle (DT-960IOE) makes it possible to upload system data and file data between the Handheld Terminal and a personal computer. You can use optional 6-6 pin Modular Cables (DT-788RSC) to connect up to 16 Basic Cradles. Use the RS-232C cable (DT-782RSC/DT-783RSC/DT-787AX) for connecting the Cradle to a personal computer. The Basic Cradle can be located on a desk or table top, or mounted on a wall. When the Basic Cradle is mounted on a wall, be sure to use the wall mount unit (supplied).
General Guide
Accessories Spacers
Wall unit screwsWood screws
Wall mount guides
E-43
1 RS-232C Interface For connection of a PC and uploading/downloading of system data and file data.
2 RS-485 Interface For connection of multiple optional Basic Cradles.
3 AC adaptor jack For connection of the dedicated AC adaptor to supply power.
4 Nose Guide Remove this guide when you are using the down-facing reader port model.
5 Terminal detection switch Detects whether or not the Handheld Terminal is mounted correctly on the Basic Cradle.
6 Communication indicator Indicates the status of communication operations. Off: Not communicating Flashing Green: Communication in progress
7 Power indicator Indicate whether power is ON or OFF, and if the Handheld Terminal is mounted. Off: Power OFF Lit Red: Power ON, Handheld Terminal not mounted Lit Green: Power ON, Handheld Terminal mounted
8 Desktop guides (L, R) Holds down the Handheld Terminal on the Basic Cradle that is placed on a flat surface in desktop configuration.
9 Charge/Power supply terminal Supplies power to the Handheld Terminal mounted on the Basic Cradle.
10 Infrared port This port provides contact-less infrared communication capability with the Handheld Terminal.
11 Power switch Turns power ON and OFF.
12 Base Reverse the position of the base when wall-mounting the Basic Cradle.
13 DIP switches Use these switches to set the operational configuration of the Basic Cradle.
14 Wall mounting holes Use these holes to attach the Basic Cradle to a hook on a wall.
E-44
Using the Basic Cradle
When You Are Using the Down-facing Reader Port Model
When you are using a down-facing reader port model, remove the nose guide before use. To remove the nose guide, remove the two screws using a screwdriver.
Setting up the Basic Cradle
Use only the dedicated AC adaptor for Basic Cradle to connect to an electrical outlet. Be sure to connect the AC adaptor and then turn on the power on the Basic Cradle before performing any communication with the Handheld Terminal. Power is supplied to the Handheld Terminal by the cradle.
1 Remove the two desktop guides, L and R, installed on the cradle by sliding them toward the rear side as shown in the illustration.
2 Insert the desktop guides, L and R, one at a time that were accompanied with DT-930 into each slit and then slide them toward the front side as shown in the illustration.
E-45
3 Plug the AC adaptor into an electrical outlet.
4 After making sure that the power switch of the Basic Cradle is in the OFF position, plug the other end of the AC adaptor into the AC terminal at the top of the Basic Cradle.
5 After making sure that the power of the Basic Cradle and personal computer is OFF, remove the cover and connect one end of the optional RS-232C cable (DT-782RSC, DT-783RSC, DT-787AX) to the RS-232C connector at the top of the Basic Cradle. Connect the other end of the cable to the computers RS-232C connector. When the RS-232C connector is not used, attach the cover.
6 Turn on the Basic Cradle. The power indicator on the Basic Cradle lights red.
7 Attach the Handheld Terminal to the Basic Cradle, making sure their infrared ports come into close contact with each other. The color of the Basic Cradle power supply indicator changes to green when proper connection is achieved. The data communication indicator flashes green when communication starts.
Important! High-sensitivity communications devices are used for the IrDA communications function. Avoid using units or equipment such as a cellular phone emits radio waves during communication. To ensure uninterrupted communication, keep the Basic Cradle away from the equipment (at least 30 centimeters from a cellular phone).
L (for left) or R (for right) marking is imprinted on the back of each desktop guide and wall mount guide both accompanied with DT-930. Be sure to install the new guides properly on the Basic Cradle, the desktop guides for desktop configuration or the wall mount guides for wall mount configuration. The use of the cradle with DT-930 without replacing the original guides come installed on it with the new guides will result in either communication error or improper charging battery pack.
However, the use of the cradle with the new guides installed for DT-900 does not result in the errors.
Power switch (OFF)
To electrical outlet
Communication indicator
Power indicator
Infrared port
Power switch (ON)
E-46
Using the Basic Cradle
1 2 3 4 5 6 7 8
Serial Connection of Multiple Basic Cradles
You can use optional 6-6 pin Modular Cables (DT-788RSC) to connect up to 16 Basic Cradles in a serial configuration. This configuration makes it possible to exchange data between multiple Handheld Terminals and a personal computer.
Connections First connect Basic Cradle RS- 485-1 and then the RS- 485-2 of the Basic Cradle that you want to connect to.
DIP Switch Settings
The following table shows the various settings that are available with the DIP switches located on the back of the Basic Cradle.
Important! Other settings not shown here are for special-purpose modes, and should not be used.
Handheld Terminal — Basic Cradle Communication Speed
1 2 3
2,400bps OFF OFF OFF
9,600bps ON OFF OFF
19,200bps OFF ON OFF
38,400bps ON ON OFF
57,600bps OFF OFF ON
115,200bps ON OFF ON
Connection Type 6 7
Host Computer Connection ON ON (no linking)
Intermediate Unit OFF OFF in Linked Chain
Terminator Unit ON OFF in Linked Chain
RS-232C Control Signal Setting 4 5
RS enabled ON
ER enabled ON
Unused
RS-232C cable To host computer
6-6 pin Modular Cable (DT-788RSC)
E-47
DT-960IOE Basic Cradle Specifications
Infrared Interface: Infrared Standard: CASIO original Control Protocol: Half-duplex Synchronization: Asynchronous Speed: 2,400 to 115,200 bps
RS-232C Control Protocol: Half-duplex Synchronization: Asynchronous Speed: 2,400 to 115,200 bps
RS-485 Control Protocol: Half-duplex Synchronization: Asynchronous Speed: 2,400 to 115,200 bps
Power Supply Power Source: AC adaptor (DT-9020ADP-GS or DT-9020ADP-US) Power Requirements: AC 230 V (DT-9020ADP-GS)
AC 120 V (DT-9020ADP-US) Rated Input: DC 9.5 V, approx. 1,000 mA
Functions Infrared interface RS-232C interface RS-485 interface
Serial Connection Up to 16 units
Dimensions and Weight Desktop: Approx. 110 (W) x 220 (D) x 100 (H) mm
Approx. 400 g Wall Mounted (with wall mount unit attached):
Approx. 110 (W) x 220 (D) x 110 (H) mm Approx. 410 g
E-48
Using the Satellite Cradle Satellite Cradle (DT-964IOE) makes it possible to upload system data and file data between the Handheld Terminal and a personal computer. It can also be used as the charger for the lithium-ion battery pack. Use the RS-232C cable (DT-881RSC/DT-882RSC/DT-883RSC/DT-887AX/AXA) for connecting the Satellite Cradle to a personal computer. The Satellite Cradle can be located on a desk or table top, or mounted on a wall. When the Satellite Cradle is mounted on a wall, be sure to use the wall mount unit (supplied).
General Guide
CASIO
LINE
DATA
CHG2
CHG1
POWER
O F
F
P O
W E
R
O N
CASIO
RS-232CC-OUT C-IN
AC ADAPTOR
4
5
11
15 18
17
1812
13 14
16
11
6 7 8 9 10
1
3 2
Accessories Spacers
Wall unit screwsWood screws
Wall mount guides
E-49
1 RS-232C Interface For connection to a PC and uploading/downloading of system data and file data.
2 RS-422 Interface For connection of multiple Satellite Cradles.
3 AC adaptor jack For connection of the AC adaptor to supply power.
4 Nose Guide Remove this guide when you are using the down-facing reader port model.
5 Terminal detection switch Detects whether or not the Handheld Terminal is mounted correctly on the Satellite Cradle.
6 System operation indicator Indicates whether or not system operation is normal. A system operation problem is indicated when this indicator does not light up green shortly after the Handheld Terminal is mounted onto the Satellite Cradle. Off: All Handheld Terminals mounted on the Satellite Cradle
are unable to communicate, or there is a system problem.
Lit Green: Normal system operation. One or more of the Handheld Terminals mounted on the Satellite Cradles are communicating.
7 Communication indicator Indicates the status of communication operations. Off: Not communicating Flashing Green: Communication in progress Lit Red: Satellite Cradle connection problem
8 Spare battery pack charge Indicates the charge status of the spare battery pack. Off: Not charging, or a battery pack problem Lit Red: Charging (charging standing by when the battery in the
Handheld Terminal is charging) Lit Green: Charging complete
9 Battery pack charge indicator Indicates the charge status of the lithium-ion battery pack in the Handheld Terminal. Off: Not charging (e.g. lithium-ion battery not loaded in
Handheld Terminal) or a battery pack problem Lit Red: Charging Lit Green: Charging complete
10 Power indicator Indicates whether power is ON or OFF, and if the Handheld Terminal is mounted. Off: Power OFF Lit Red: Power ON, Handheld Terminal not mounted Lit Green: Power ON, Handheld Terminal mounted
11 Desktop guides (L, R) Holds down the Handheld Terminal on the Satellite Cradle that is placed on a flat surface in desktop configuration.
12 Charge/Power supply terminals Supplies power to the Handheld Terminal mounted on the Satellite Cradle.
13 Battery pack charge terminals Charges the spare battery pack separately.
14 Infrared port This port provides IR communication capabilities with a Handheld Terminal.
15 Power switch Turns power ON and OFF.
16 Base Reverses the position of the base when wall-mounting the Satellite Cradle.
17 DIP switches Use these switches to set the operational configuration of the Satellite Cradle.
18 Wall mounting holes Use these holes to attach the Satellite Cradle to a hook on a wall.
indicator (CHG 2)
(CHG 1)
(READY/POWER)
E-50
Using the Satellite Cradle
When You Are Using the Down-facing Reader Port Model
When you are using a down-facing reader port model, remove the nose guide before use. To remove the nose guide, remove the two screws using a screwdriver.
Setting up the Satellite Cradle
Use only the dedicated AC adaptor for Satellite Cradle to connect to an electrical outlet. Be sure to connect the AC adaptor and turn on Satellite Cradle power before performing any communication with the Handheld Terminal. Power is supplied to the Handheld Terminal by the Satellite Cradle.
1 Remove the two desktop guides, L and R, installed on the cradle by sliding them toward the rear side as shown in the illustration.
2 Insert the desktop guides, L and R, one at a time that were accompanied with DT-930 into each slit and then slide them toward the front side as shown in the illustration.
E-51
3 Connect the power cord to the AC adaptor before connecting the power cord to the power outlet.
4 After making sure that the power switch of the Satellite Cradle is in the OFF position, plug the other end of the AC adaptor into the AC terminal at the top of the Satellite Cradle.
5 After making sure that the power of the Satellite Cradle and personal computer is OFF, remove the cover and connect one end of the optional RS-232C cable (DT- 881RSC, DT-882RSC, DT-883RSC, DT- 887AX/AXA) to the RS-232C connector at the top of the Satellite Cradle. Connect the other end of the cable to the computers RS- 232C connector. When the RS-232C connector is not used, attach the cover.
6 Turn on the Satellite Cradle. The power indicator on the Satellite Cradle lights red.
7 Attach the Handheld Terminal to the communication port, making sure that the infrared ports on its base come into close contact with each other. The color of the Satellite Cradle power indicator changes to green when a proper connection is made. The system operation indicator lights green
when system operation is normal and the Satellite Cradle is performing or standing by for the communication with another Handheld Terminal connected to a Satellite Cradle.
The communication indicator flashes green when communication starts.
Infrared port
Power switch (ON)
System operation indicator Communication indicator
Power indicator
Spare battery pack charge indicator (CHG 2)
Power switch (OFF)
To electrical outlet
Battery pack charge indicator (CHG 1)
E-52
Using the Satellite Cradle
Important! High-sensitivity communications devices are used for the IrDA communications function. Avoid using units or equipment such as a cellular phone emits radio waves during communication. To ensure uninterrupted communication, keep the Satellite Cradle away from the equipment (at least 30 centimeters from a cellular phone).
L (for left) or R (for right) marking is imprinted on the back of each desktop guide and wall mount guide both accompanied with DT-930. Be sure to install the new guides properly on the Satellite Cradle, the desktop guides for desktop configuration or the wall mount guides for wall mount configuration. The use of the cradle with DT-930 without replacing the original guides come installed on it with the new guides will result in either communication error or improper charging battery pack.
However, the use of the cradle with the new guides installed for DT-900 does not result in the errors.
E-53
Charging the Battery Pack
The following procedure can be used only when a lithium-ion battery pack is loaded in the Handheld Terminal.
1 Turn on the power of the Satellite Cradle, and confirm that its power indicator lights up red.
2 Attach the Handheld Terminal to the Satellite Cradle, making sure that the charge terminals on the bottom of the Handheld Terminal come into contact with the charge terminals on the Satellite Cradle. The color of the Satellite Cradle power indicator changes to green when proper connection is achieved. The charge indicator (CHG 1) lights up red when charging starts.
Battery Pack Charge Indicator (CHG 1) Lit Red: Charging Lit Green: Charging complete
When the charge indicator lights red and then goes out after several seconds, this indicates a battery problem.
Charging Time Approx. 6 hours
[Caution] Ambient Temperature Ranges for the Battery Pack
Temperature ranges for battery pack use in the Handheld Terminal, charging, and storage are specified below. Temperatures outside these ranges create the danger of deterioration of battery pack performance and shortening of its service life, as well as fluid leakage and heat generation.
Operating Temperature: 20C to 50C Charging Temperature: 0C to 40C Storage Temperature: 20C to 60C
Important! If the charge indicator does not light during charging, remove the battery pack and then re-attach it. If this does not solve the problem, it means that the battery pack is defective and needs to be replaced.
Use only the specified battery pack. Battery packs naturally discharge even when they are not loaded in the
Handheld Terminal. Use a battery pack as soon as possible after charging it.
For best charging results, keep the Satellite Cradle, Handheld Terminal and battery pack contacts clean by periodically wiping them off with a cotton swab or dry cloth.
Charge terminals
Power switch (ON)
System operation indicator
Battery pack charge indicator (CHG 1)
Data communication indicator Spare battery pack charge indicator (CHG 2)
Power indicator
E-54
Using the Satellite Cradle
Charging the Battery Pack (charging the lithium-ion battery pack separately)
1 Set the power switch of the Satellite Cradle to the ON position. The power indicator of the Satellite Cradle lights red.
2 Load the battery pack in the spare battery compartment on the Satellite Cradle, making sure that the terminals on the side and rear of the battery pack come into close contact with the battery pack charge terminals. The battery pack charge indicator (CHG 2) lights red, and charging is started.
Spare Battery Pack Charge Indicator (CHG 2) Lit Red: Charging (charging
standing by when the battery in the Handheld Terminal is charging)
Lit Green: Charging complete
When the battery pack charging indicator lights red and then goes out after several seconds, this indicates a battery pack problem.
Charging of the battery in the Handheld Terminal is given precedence. Separate charging of the battery pack cannot be performed simultaneously while charging of the battery in the Handheld Terminal.
[Caution] Ambient Temperature Ranges for the Battery Pack
Temperature ranges for battery pack use in the Handheld Terminal, charging, and storage are specified below. Temperatures outside these ranges create the danger of deterioration of battery pack performance and shortening of its service life, as well as fluid leakage and heat generation.
Operating Temperature: 20C to 50C Charging Temperature: 0C to 40C Storage Temperature: 20C to 60C
Important! If the battery pack charge indicator does not light during charging, remove the battery pack and then re-attach it. If this does not solve the problem, it means that the battery pack is defective and needs to be replaced.
Use only the specified battery pack. Battery packs naturally discharge even when they are not loaded in the
Handheld Terminal. Use a battery pack as soon as possible after charging it.
For best charging results, keep the Satellite Cradle, Handheld Terminal and battery pack contacts clean by periodically wiping them off with a cotton swab or dry cloth.
Battery pack
Power switch (ON)
System operation indicator
Battery Pack Charge Indicator (CHG 1)
Communication indicator Spare Battery Pack Charge Indicator (CHG 2)
Power indicator
E-55
Serial Connection of Multiple Satellite Cradles
You can use optional 6-6 pin Modular Cables (DT-888RSC) to connect up to 7 Satellite Cradles in a serial configuration. This configuration makes it possible to exchange data between multiple Handheld Terminals and a personal computer via the cradles.
Connections Connect C-OUT on the Satellite Cradle nearest the host computer to C-IN on the next Satellite Cradle that you next want to connect to.
RS-232C cable
To host computer
6-6 pin Modular Cable (DT-888RSC)
E-56
Using the Satellite Cradle
1 2 3 4 5 6 7 8 9 10
DIP Switch Settings
The following table shows the various settings that are available with the DIP switches located on the back of the Satellite Cradle.
Important! Other settings not shown here are used for special-purpose modes, and should not be used.
Handheld Terminal — Satellite Cradle Communication Speed
1 2
38,400bps OFF OFF
115,200bps ON OFF
Connection Type 3 4 5
Host Computer OFF OFF ON (No linking) Connection OFF (Linking)
Intermediate Unit ON OFF OFF in Linked Chain
Terminator Unit ON OFF ON in Linked Chain
Satellite Cradle — Host Computer Communication speed
6 7 8
2,400bps OFF OFF OFF
4,800bps ON OFF OFF
9,600bps OFF ON OFF
19,200bps ON ON OFF
38,400bps OFF OFF ON
57,600bps ON OFF ON
115,200bps OFF ON ON
* Communication speed can be set by Handheld Terminal overrides this setting.
Flow Control 9 10
Off OFF OFF
X ON/X OFF ON OFF
RS/CS OFF ON
Use Special Software ON ON
E-57
DT-964IOE Satellite Cradle Specifications
Infrared Interface: Infrared Standard: Conforms to IrDA Ver. 1.2 Original Synchronization: Asynchronous Speed: 9,600/38,400/115,200bps
RS-232C Control Protocol: Full-duplex Synchronization: Asynchronous Speed: 1,200 to 115,200bps
RS-422 Control Protocol: Full-duplex Synchronization: Asynchronous Speed: 9,600/38,400/115,200bps
Charger Charge Method: Fixed voltage (with current limiter) Charge Time: Approx. 6 hours
Power Supply Power Source: AC adaptor (AD-S42120AE) Power Requirements: AC100 to 240V Rated Input: DC 12 V, approx. 3,500 mA (during charging)
Functions Infrared interface RS-232C interface RS-422 interface
Dimensions and Weight Desktop: Approx. 110 (W) x 220 (D) x 100 (H) mm
Approx. 470 g Wall Mounted (with wall mount unit attached):
Approx. 110 (W) x 220 (D) x 110 (H) mm Approx. 480 g
E-58
CHG2
CHG1
CASIO
POWER
O F
F
P O
W E
R
O N
AC ADAPTOR
CASIO
2
3
7
10 12
128
9
11
7
4 5 6
1
Using the Cradle-type Battery Charger The Cradle-type Battery Charger (DT-969CHGE) makes it possible to separately charge battery pack installed in the Handheld Terminal and a spare battery pack (DT-923LIB) installed in the spare battery compartment on the charger. The Cradle-type Battery Charger can be located on a desk or table top, or mounted on a wall. When the Cradle-type Battery Charger is mounted on a wall, be sure to use the wall mount unit (supplied).
General Guide
Accessories Spacers
Wall unit screwsWood screws
Wall mount guides
E-59
1 AC adaptor jack For connection of the AC adaptor to supply power
2 Nose Guide Remove this guide when you are using the down-facing reader port model.
3 Terminal detection switch Detects whether or not the Handheld Terminal is mounted correctly on the Cradle-type Battery Charger
4 Spare battery pack charge Indicates the charge status of a spare battery pack installed in the indicator («CHG 2») spare battery compartment.
Off: Not charging, or a battery pack problem Lit Red: Charging (charging standing by when the battery in the
Handheld Terminal is charging) Lit Green: Charging complete
5 Battery pack charge indicator Indicates the charge status of the lithium-ion battery pack in the («CHG 1») Handheld Terminal.
Off: Not charging (e.g. lithium-ion battery not loaded in Handheld Terminal) or a battery pack problem
Lit Red: Charging Lit Green: Charging complete
6 Power indicator Indicates whether power is ON or OFF, and if the Handheld («READY/POWER») Terminal is mounted.
Off: Power OFF Lit Red: Power ON, Handheld Terminal not mounted Lit Green: Power ON, Handheld Terminal mounted
7 Desktop guides (L, R) Holds down the Handheld Terminal on the Cradle-type Battery Charger that is placed on a flat surface in desktop configuration.
8 Charge/Power supply terminals Supplies power to the Handheld Terminal mounted on the Cradle- type Battery Charger.
9 Battery pack charge terminals Charges the spare battery pack separately.
10 Power switch Turns power ON and OFF.
11 Base Reverses the position of the base when wall-mounting the Cradle- type Battery Charger.
12 Wall mounting holes Use these holes to attach the Cradle-type Battery Charger to hook on a wall.
E-60
Using the Cradle-type Battery Charger
When You Are Using the Down-facing Reader Port Model
When you are using a down-facing reader port model, remove the nose guide before use. To remove the nose guide, remove the two screws using a screwdriver.
Setting up the Cradle-type Battery Charger
Use only the AC adaptor specified for use with the Handheld Terminal to connect to an electrical outlet. Be sure to connect the AC adaptor and turn Handheld Terminal power on before attempting to charge battery pack.
1 Remove the two desktop guides, L and R, installed on the charger by sliding them toward the rear side as shown in the illustration.
2 Insert the desktop guides, L and R, one at a time that were accompanied with DT-930 into each slit and then slide them toward the front side as shown in the illustration.
E-61
Charge terminals
Power switch (ON)
Power indicator
Spare Battery Pack Charge Indicator (CHG 2) Battery Pack Charge Indicator (CHG 1)
3 Plug the AC adaptor into an electrical outlet.
4 After making sure that the power switch of the Cradle-type Battery Charger is at the OFF position, plug the other end of the AC adaptor into the AC adaptor jack at the rear side of the charger.
5 Turn on the Cradle-type Battery Charger. The power indicator on the Cradle-type Battery Charger lights red.
6 Attach the Handheld Terminal to the Cradle- type Battery Charger, making sure the charge terminals on the back of the Handheld Terminal come into contact with the terminals of the Cradle-type Battery Charger. If the Handheld Terminal is attached properly, the power indicator lights green. Start of charging is indicated by the charge indicator («CHG 1») lighting red.
Charge Indicator («CHG 1») Lit Red: Charging Lit Green: Charge complete OFF: No battery pack
(DT-923LIB) installed.
Charging Time Approx. 6 hours
Power switch (OFF)
To electrical outlet
E-62
Using the Cradle-type Battery Charger
[Caution] Ambient Temperature Ranges for the Battery Pack
Temperature ranges for battery pack use in the Handheld Terminal, charging, and storage are specified below. Temperatures outside these ranges create the danger of deterioration of battery pack performance and shortening of its service life, as well as fluid leakage and heat generation.
Operating Temperature: 20C to 50C Charging Temperature: 0C to 40C Storage Temperature: 20C to 60C
Important! If the charge indicator does not light during charging, remove the battery pack and then re-attach it. If this does not solve the problem, it means that the battery pack is defective and needs to be replaced.
Use only the specified battery pack. Battery packs naturally discharge even when they are not loaded in the
Handheld Terminal. Use a battery pack as soon as possible after charging it.
For best charging results, keep the Cradle-type Battery Charger, Handheld Terminal and battery pack contacts clean by periodically wiping them off with a cotton swab or dry cloth.
L (for left) or R (for right) marking is imprinted on the back of each desktop guide and wall mount guide both accompanied with DT-930. Be sure to install the new guides properly on the Cradle-type Battery Charger, the desktop guides for desktop configuration or the wall mount guides for wall mount configuration. The use of the charger with DT-930 without replacing the original guides come installed on it with the new guides will result in improper charging battery pack.
However, the use of the charger with the new guides installed for DT- 900 does not result in the error.
E-63
Charging the Battery Pack (charging the lithium-ion battery pack separately)
1 Set the power switch of the Cradle-type Battery Charger to the ON position. The power indicator of the Cradle-type Battery Charger lights red.
2 Load a battery pack in the spare battery compartment on the charger, making sure that the terminals on the side and rear of the battery pack come into close contact with the battery pack charge terminals. The battery pack charge indicator («CHG 2») lights red, and charging is started.
Battery Pack Charge Indicator («CHG 2») Lit Red: Charging (charging
standing by when the battery in the Handheld Terminal is charging)
OFF: No battery pack (DT-923LIB) installed.
Lit Green: Charging complete
When the battery pack charge indicator lights red and then goes out after several seconds, this indicates a battery pack problem.
Charging simultaneously both the battery packs in the Handheld Terminal and in the spare battery compartment cannot be performed. Charging the battery pack in the Handheld Terminal is given its precedence.
Battery pack
Power switch (ON)
Battery Pack Charge Indicator (CHG 1)
Spare Battery Pack Charge Indicator (CHG 2)
Power indicator
E-64
Using the Cradle-type Battery Charger
[Caution] Ambient Temperature Ranges for the Battery Pack
Temperature ranges for battery pack use in the Handheld Terminal, charging, and storage are specified below. Temperatures outside these ranges create the danger of deterioration of battery pack performance and shortening of its service life, as well as fluid leakage and heat generation.
Operating Temperature: 20C to 50C Charging Temperature: 0C to 40C Storage Temperature: 20C to 60C
Important! If the battery pack charge indicator does not light during charging, remove the battery pack and then re-attach it. If this does not solve the problem, it means that the battery pack is defective and needs to be replaced.
Use only the specified battery pack. Battery packs naturally discharge even when they are not loaded in the
Handheld Terminal. Use a battery pack as soon as possible after charging it.
For best charging results, keep the Cradle-type Battery Charger, Handheld Terminal and battery pack contacts clean by periodically wiping them off with a cotton swab or dry cloth.
E-65
DT-969CHGE Cradle-type Battery Charger Specifications
Charger Charge Method: Fixed voltage (with current limiter) Charge Time: Approx. 6 hours
Power Supply Power Source: AC adaptor (DT-9020ADP-GS or DT-9020ADP-US) Power Requirements: 230 VAC (DT-9020ADP-GS)
120 VAC (DT-9020ADP-US) Rated Input: DC 9.5 V, approx. 1,000 mA
Dimensions and Weight Desktop: Approx. 110 (W) x 220 (D) x 100 (H) mm
Approx. 420 g Wall Mounted (with wall mount unit attached):
Approx. 110 (W) x 220 (D) x 110 (H) mm Approx. 430 g
E-66
CA
L
D
P
H
P
A B
The following installation methods describe how to install the Basic Cradle, Satellite Cradle and Cradle-type Battery charger either on a flat surface place or on a wall.
To hang the cradles and charger on a wall
The following installation method is described with the Satellite Cradle as its reference.
1 Attach the wall unit screw. When you are using the down-facing reader port model, remove the nose guide attached to the Handheld Terminal, and attach the wall unit screw to A using the screws (supplied). When you are using the forward-facing reader port model, attach the wall unit screw to B using the screws (supplied) with the nose guide still attached.
Installing Cradles and Cradle-type Battery Charger
Down-facing reader port model
Forward-facing reader port model
E-67
2 Remove the desktop guides (L, R).
3 Attach the wall mount guides provided with the DT-930. Insert the wall mount guides into the slits, and then fix them in place by sliding them downwards.
4 Remove the two screws (one each at the top and bottom) that secure the base to the Satellite Cradle.
5 Pressing down on the four corners of the Satellite Cradle base, unhook the tabs, and remove the base from the unit.
E-68
6 Position the base on the wall where you want to hang the Satellite Cradle, and use an awl or some other sharp object to mark the positions of the two wood screws.
7 Slip a spacer over each of the wood screws and then drive the screws into the wall at the positions you marked in the previous step. Make sure that the spacers are oriented correctly. You will not be able to hook the Satellite Cradle onto the screws if the spacers are backwards.
8 Re-attach the base to the Satellite Cradle, orienting it upside-down from its original mounting position when you removed it, and secure it in place with the two screws.
9 Hook the Satellite Cradle onto the wall unit screws in the wall, and slide it down to lock in place.
Important! Be sure to check
Manualsnet FAQs
If you want to find out how the DT-930 Casio works, you can view and download the Casio DT-930 Terminal User’s Guide on the Manualsnet website.
Yes, we have the User’s Guide for Casio DT-930 as well as other Casio manuals. All you need to do is to use our search bar and find the user manual that you are looking for.
The User’s Guide should include all the details that are needed to use a Casio DT-930. Full manuals and user guide PDFs can be downloaded from Manualsnet.com.
The best way to navigate the Casio DT-930 Terminal User’s Guide is by checking the Table of Contents at the top of the page where available. This allows you to navigate a manual by jumping to the section you are looking for.
This Casio DT-930 Terminal User’s Guide consists of sections like Table of Contents, to name a few. For easier navigation, use the Table of Contents in the upper left corner.
You can download Casio DT-930 Terminal User’s Guide free of charge simply by clicking the “download” button in the upper right corner of any manuals page. This feature allows you to download any manual in a couple of seconds and is generally in PDF format. You can also save a manual for later by adding it to your saved documents in the user profile.
To be able to print Casio DT-930 Terminal User’s Guide, simply download the document to your computer. Once downloaded, open the PDF file and print the Casio DT-930 Terminal User’s Guide as you would any other document. This can usually be achieved by clicking on “File” and then “Print” from the menu bar.
![]()
Handheld Terminal
Series
User’s Guide
Data Collection Terminal
•Be sure to read «Safety Precautions» inside this guide before trying to use your Handheld Terminal. After reading this guide, keep it in a safe place for future reference.
PN430041-001
BLUETOOTH is a registered trademark owned by Bluetooth SIG. Inc. and licensed to CASIO COMPUTER CO., LTD.
E-2
Safety Precautions
Congratulations upon your selection of this CASIO Product. Be sure to read the following Safety Precautions before trying to use it for the first time. Keep this manual in a handy place for future reference.
|
Markings and Symbols |
The following are the meanings of the markings and symbols |
|
|
used in these Safety Precautions to warn you against the |
||
|
possibility of personal injury and/or material damage or loss |
||
|
to you and others. Take a few moments to become familiar |
||
|
with these markings and symbols so you can avoid future |
||
|
problems. |
 Danger!
 Warning!
 Caution!
Marking examples
This symbol indicates information that, if ignored or applied incorrectly, creates the danger of death or serious personal injury.
This symbol indicates information that, if ignored or applied incorrectly, can create the possibility of death or serious personal injury.
This symbol indicates information that, if ignored or applied incorrectly, can create the possibility of personal injury or material damage.
A triangular shape indicates you should exercise caution. The symbol shown here indicates you should take care to avoid breakage.
A circle indicates something you should not do. This symbol indicates you should not try to take something apart.
A black circle indicates something you must do. This symbol indicates you should unplug power cord.
E-3
 Danger!
■Lithium-ion Battery Pack
The Lithium-ion Battery Pack is available as an option.
●Never allow the battery pack to become wet. Water can create the danger of battery pack heat emission, explosion, and fire.
●Never use or leave the battery pack next to open flame, near a stove, or any other area exposed to high heat. Doing so creates the danger of battery pack heat emission, explosion, and fire.
●Never use the battery pack with any device other than this unit. Doing so can creates the danger of battery pack heat emission, explosion, and fire.
●Note that the battery pack’s positive (+) and negative (–) terminals must be oriented correctly when it is loaded into the charger unit or the Data Collector. Connecting the battery pack with its terminals reversed creates the danger of battery pack fluid leakage, heat emission, explosion, and fire.
●Never dispose of the battery pack by incinerating it or otherwise expose it to heat. Doing so creates the danger of battery pack heat emission, explosion, and fire.
●Never allow the positive (+) and negative (–) terminals of the battery pack to become connected (shorted) by metal. Doing so creates the danger of battery pack heat emission, explosion, and fire.
●Never transport or store the battery pack together with a necklace, hair pins or other metal objects. Doing so can short battery pack terminals, creating the danger of battery pack heat emission, explosion, and fire. Be sure to place the battery pack in its case whenever transporting or storing it.
●Never throw the battery pack or otherwise subject it to strong impact. Doing so creates the danger of battery pack heat emission, explosion, and fire.
●Never pierce the battery pack with nails, hit it with a hammer, or step on it. Doing so can create the danger of battery pack heat emission, explosion, and fire.
●Never try to take apart the battery pack or modify it in any way. Doing so creates the danger of battery pack heat emission, explosion, and fire.
●Use only the specified charger unit to charge the battery pack. Use of other types of charger units creates the danger of battery pack heat emission,
explosion, and fire.
■ Handling Alkaline Batteries
●Should fluid from the alkaline batteries accidentally get into your eyes, there is a threat of loss of eyesight, do not rub them. Immediately rinse your eyes
with clean tap water and then consult a physician immediately.
E-4
 Warning!
■ Disassembly and Modification
● Never try to disassemble or modify the unit in any way. High voltage inside creates the danger of electrical shock.
■Interior Parts and Components
●Never touch interior high-voltage parts or components. Doing so creates the danger of electrical shock.
■Abnormal Conditions
●Should the unit become hot or start to emit smoke or a strange odor, immediately turn off the power and contact your original dealer or an
authorized CASIO service provider. Continued use creates the danger of fire and electrical shock.
■ Foreign Objects
●Should any foreign matter ever get into the unit, immediately turn off the power and contact your original dealer or an authorized CASIO service
provider. Continued use creates the danger of fire and electrical shock.
■Dropping and Damage
●Should you drop the unit and damage it, immediately turn off the power and
contact your original dealer or an authorized CASIO service provider. Continued use creates the danger of fire and electrical shock.
■Moisture
●Keep the unit away from vases, planters, cups, glasses and other containers of liquid. Also keep it away from metal. Water and metal getting into the unit creates the danger of fire and electrical shock.
■Laser Beam
●Never look directly into the laser beam. Doing so can cause serious eye damage.
E-5
 Warning!
■Interference with the Operation of Other Equipment (Using Wireless Communication)
●Keep your Handheld Terminal at least 22 centimeters (8′ 1/10″) away from
anyone wearing a pacemaker. Radio waves emitted by the Handheld Terminal can affect the operation of a pacemaker.
●In order to protect someone wearing a pacemaker from the risk of unintentional interference, turn off the Handheld Terminal before boarding a crowded train or entering any other crowded area.
■Handling Alkaline Batteries
●Do not put the battery in a fire, expose it to heat, dismantle or modify it. If the insulation or safety valve is damaged, the battery may leak fluid, overheat or explode.
●Do not insert the battery with the poles reversed. Doing so may cause some abnormality or a short and the battery may leak fluid, overheat or explode.
●Keep the battery out of the reach of children. If the battery is swallowed, contact a physician immediately.
●If the alkali fluid gets in your mouth, rinse your mouth with water and contact a physician immediately.
●If the alkali fluid gets on your skin or clothes, it may burn your skin, thoroughly rinse the affected area with tap water.
●Do not store batteries with metal objects such as necklaces or hairpins, doing so may cause the positive and negative poles to be shorted.
●Do not mix new and old batteries or other makes of batteries. The different attributes may cause the battery to leak fluid, overheat or explode.
●This battery was not made to be recharged. Recharging this battery may damage the insulation or internal structure and may cause the battery to leak fluid, overheat or explode.
●Do not damage or remove the label on the exterior of the battery. Doing so may cause the battery to short, leak fluid, overheat or explode.
●Do not drop, throw or expose the battery to extreme impact. Doing so may cause the battery to leak fluid, overheat or explode.
●Do not alter the shape of the battery. If the insulation or safety valve is damaged, the battery may leak fluid, overheat or explode.
E-6
 Warning!
■Handling the Coin Type Lithium Battery
●Do not recharge coin type lithium battery. Doing so may cause it to leak fluid, overheat, explode or burst into flames.
●Do not put the coin type lithium battery in open flame, or apply solder directly to the coin type lithium battery. Doing so may cause it to leak fluid, overheat, explode or burst into flames.
●Do not use the coin type lithium battery with the positive and negative poles reversed. Do not store it with metal objects such as necklaces or hairpins, doing so may cause the positive and negative poles to be shorted.
●Keep the coin type lithium battery out of the reach of children. If it is
swallowed, contact a physician immediately.
●If the alkali fluid gets in your eye, rinse the eye with water and contact a physician immediately.
●If the alkali fluid gets in your mouth, rinse your mouth with water and contact a physician immediately.
●If the coin type lithium battery leaks fluid or emits a strange smell, immediately remove it from near heat or flames. Burning may cause it to explode or burst into flames.
●When storing or disposing of the coin type lithium battery, cover the terminals with tape to insulate them. Mixing them with other batteries or metal objects may cause the coin type lithium battery to short, leak fluid, overheat, explode or burst into flames.
■Lithium-ion Battery Pack
●Do not put a battery pack in microwave ovens or pressure cookers. Doing so may cause the battery pack to overheat, explode or burst into flames.
●Do not use a battery pack that smells strange, is overheating, is a strange color, or is a strange shape. Doing so may cause the battery pack to overheat, explode or burst into flames.
●If the amount of time period the battery pack can serve becomes considerably short, stop using it. It may indicate the possibility of a
malfunction in the battery pack. Continued charging the battery pack creates the danger of heat emission, explosion, and fire.
●Stop charging the battery pack after the recommended time even if it is not fully charged. Continuing to charge the battery may cause the battery pack to overheat, explode or burst into flames.
●If the battery pack leaks fluid or emits a strange smell, remove it from near heat or flames. Burning may cause the battery pack to explode or burst into flames.
●Should fluid from the battery pack accidentally get into your eyes, do not rub them. Immediately rinse your eyes with clean water such as tap water and then consult a physician immediately.
E-7

 Warning!
■Optional Bridge Basic Cradle, Basic Cradle, Satellite Cradle and Cradle-type Battery Charger
●Power these cradles and Cradle-type battery charger only with a power outlet whose voltage matches that marked on the rating plate of each option. Do not plug these options into an extension shared by other appliances. Doing so creates the danger of fire and electrical shock.
●Avoid conditions that can cause damage or breaks in the power cord. Do not place heavy objects on the power cord. Keep it away from sources of heat. Any of these conditions can damage the power cord, creating the danger of fire and electrical shock.
●Never modify, sharply bend, twist, or pull on the power cord. Doing so creates the danger of fire and electrical shock.
●Use only the AC adaptors and chargers specified in this manual. Use of other AC adaptor models or chargers creates the danger of fire and electrical
shock.
●Should the power cord ever become severely damaged (to the point that wires are exposed or broken), contact your original dealer or CASIO service provider for repair or replacement. Use of a damaged electrical cord creates the danger of fire and electrical shock.
 Caution!
■Foreign Objects
●Take care to ensure that metal or combustible objects are not inserted into the openings of the unit. Such objects create the danger of fire and electrical shock.
■Location
●Do not locate the unit on a surface that is unstable or uneven. Doing so creates the danger of the unit falling, which can cause personal injury.
●Do not locate the unit in an area subjected to large amounts of humidity or dust. Doing so creates the danger of fire and electrical shock.
●Do not leave the unit for long periods in a car parked in direct sunlight.
■Heavy Objects
●Never place heavy objects on top of the unit. Doing so creates the risk of a loss of balance and the object falling, which can cause personal injury.
E-8
 Caution!
■LCD Screen
●Never apply strong pressure to the screen or subject it to strong impact. Doing so can crack the LCD panel glass and create the danger of personal injury.
●Should the LCD panel glass ever break, never touch the liquid inside. Doing so can cause skin irritation and inflammation.
•Should liquid from the LCD panel accidentally get into your mouth, immediately wash your mouth with water and then consult a physician.
•Should liquid from the LCD panel accidentally get into your eyes or onto your skin, immediately rinse for at least 15 minutes with clean tap water and then consult a physician.
■Lithium-ion Battery Pack
●Never leave the battery pack in an area expose to direct sunlight, in a car parked in direct sunlight, or any other very hot area. Doing so creates the danger of heat emission and fire, as well as deterioration of battery pack performance and shortening of its service life.
●Do not use the battery pack in areas where static electricity is being generated. Doing so creates the danger of battery pack heat emission, explosion, and fire.
●Temperature ranges for battery pack use, charging, and storage are
specified below. Temperatures outside these ranges create the danger of deterioration of battery pack performance and shortening of its service life, as well as fluid leakage and heat generation.
Operating Temperature: –20°C to 50°C Charging Temperature: 0°C to 40°C Storage Temperature: –20°C to 60°C
●Should fluid from the battery pack accidentally get onto clothing or your skin, immediately rinse it off with clean tap water. Prolonged contact with battery pack fluid can cause skin irritation.
●Keep the battery pack out of the reach of small children. Do not let small children remove the battery pack from the charger unit or the unit it is powering.
E-9
 Caution!
■Handling Alkaline Batteries
●Store batteries someplace out of direct sunlight where the temperature and
humidity are not high. Not doing so may cause the batteries to leak fluid, overheat or explode. Also, it may cause the life and performance of the batteries to decline.
●These batteries can be disposed of as regular garbage, however, if applicable, follow the regulations of the local government when disposing of these batteries.
●Immediately remove batteries when they have lost all power. Leaving the batteries in the unit for a long time may cause the batteries to leak fluid,
overheat or explode due to gas that is generated by the batteries.
●Remove the batteries from the unit when not using the unit for an extended period of time. The batteries may leak fluid, overheat or explode due to gas that is generated by the batteries.
●Do not apply solder directly to the batteries. The heat may cause the batteries to leak fluid, overheat or explode.
●Do not store the batteries in the direct sunlight or in a car on a sunny day when it is very hot. The batteries may leak fluid, overheat or explode.
●When storing or disposing of the batteries, cover the terminals with tape to insulate them. Mixing them with other batteries or metal objects may cause
the batteries to leak fluid, overheat or explode.
●Do not get the batteries wet. Doing so may cause the batteries to overheat.
■Handling the Coin Type Lithium Battery
●Do not drop, expose to severe impact or alter the shape of the coin type lithium battery. Also, do not get the battery wet. Doing so may cause it to leak fluid, overheat or explode.
●Do not store the coin type lithium battery in the direct sunlight or in a car on a sunny day when it is very hot. It may leak fluid, overheat or explode.
●Store the coin type lithium battery someplace out of direct sunlight where the temperature and humidity are not high. Not doing so may cause it to leak
fluid, overheat or explode. Also, it may cause the life and performance of the battery to decline.
●The coin type lithium battery can be disposed of following the instruction or guide issued by your municipal office.
E-10
![]()
 Caution!
■Optional Bridge Basic Cradle, Basic Cradle, Satellite Cradle and Cradle-type Battery Charger
●Keep the power cord away from stoves and other sources of extreme heat. Heat can melt the insulation of the power cord and create the danger of fire and electrical shock.
●Never pull on the power cord when unplugging it. Doing so can damage the cord and create the danger of personal injury, fire and electrical shock. Always hold onto the plug when unplugging it from the wall outlet.
●Never touch the plug while your hands are wet. Doing so can create the danger of electrical shock.
●Be sure to unplug the power cord from the wall outlet before moving the
optional cradles and Cradle-type Battery Charger. Failure to do so can result in damage to the power cord caused by pulling it, which creates the danger of fire and electrical shock.
●Be sure to unplug the power cord from the wall outlet before cleaning the optional cradles and Cradle-type Battery Charger.
●Be sure to turn the power OFF and unplug the power cord after use.
●Unplug the power cord from the wall outlet and clean the area around the plugs at least once a year. If dust collects on the AC adaptor, humidity or moisture may cause a fault in the insulation, which may result in a fire.
●The housing of the AC adaptor can become warm during normal use.
●Take normal precautions against electric shock.
Make back-up copies of all important data
 Caution!
●Note that CASIO Computer Co., Ltd. shall not be liable to you or any third party for any damages or loss caused by deletion or corruption of data due
to use of this, malfunction or repair of this unit or its peripherals, or due to batteries going dead.
●This unit employs electronic memory to store data, which means that memory contents can be corrupted or deleted if the power is interrupted due to batteries going dead or incorrect battery replacement procedures. Data cannot be recovered once it is lost or corrupted. Be sure to make back-up copies of all important data. One way to do this is to use either one of the Bridge Basic Cradle, Basic Cradle and Satellite Cradle to transfer data to a computer.
E-11

 Introduction
Make sure you carefully read the following information to ensure that your Handheld Terminal is able to perform at the level for which it is designed.
Handling Precautions
•Do not throw or drop the Handheld Terminal or otherwise subject it to strong impact, which can damage the LCD screen, interrupt program execution, corrupt memory contents, or otherwise interfere with proper operation.
•Use only your finger or a blunt object to operate the stroke keys. Use of a sharp pointed object can damage stroke keys and cause shorting of internal circuitry.
•Use a soft, dry cloth when cleaning the Handheld Terminal. Do not wipe with a wet cloth. Do not use benzine, thinner, or other volatile chemicals, which can result in deformation and deterioration of the materials used in the keys and case.
•Do not lay the Handheld Terminal down with its key panel downwards. Doing so runs the risk of accidental key operation, which can cause malfunction.
•Never remove the main battery while Handheld Terminal power is turned ON. Doing so can cause all data in memory to be lost.
•Sudden temperature changes can cause condensation to form on the Handheld Terminal’s case. Operating the Handheld Terminal while condensation is present can interfere with proper operation. Take care to avoid conditions that cause the formation of condensation. If condensation does form, wait until it dries completely before using the Handheld Terminal.
E-12

|
Product description/Intended use |
|
|
EU/EFTA member states intended |
EU: Austria, Belgium, Denmark, Finland, France, Germany, |
|
for use |
Greece, Ireland, Italy, Luxembourg, The Netherlands, Portugal, |
|
Spain, Sweden, United Kingdom, Czech Republic, Hungary, |
|
|
Poland, Slovenia, Slovakia, Estonia, Latvia, Lithuania, Cyprus, |
|
|
Malta |
|
|
EFTA: Switzerland, Iceland, Lichtenstein, Norway |
|
|
Member states with restrictive use |
NONE |
|
Manufacturer |
CASIO COMPUTER CO.,LTD. |
|
Brand |
CASIO |
|
Type |
DT-930M50E, DT-930M51E |
are tested and found to conform with the essential requirements for protection of health and the safety of the user and any other persons and Electromagnetic Compatibility, as included in following standards:
|
Standard |
Issue date |
|
|
EN 60950-1 |
2001 |
|
|
EN301 |
489-1 v1.4.1 |
2002-08 |
|
EN301 |
489-17 v1.2.1 |
2002-08 |
and are tested and found to conform with the essential radio test suites so that they effectively use the frequency spectrum allocated to terrestrial/space radio communication and orbital resources so to as to avoid harmful interference, as included in following standards:
|
Standard |
Issue date |
|
EN300 328 v1.6.1 |
2004-11 |
and therefore comply with the essential requirements and provisions of the Directive 1999/5/ EC of the European Parliament and of the council of March 9, 1999 on Radio Equipment and Telecommunications Terminal Equipment and the mutual recognition of their conformity and with the provisions of Annex III (Conformity Assessment procedure referred to in article 10).
The technical documentation as required by the Conformity Assessment procedure is kept at the following address:
|
Company |
CASIO Europe GmbH |
|
Address, City |
Bornbarch 10, D-22848 Norderstedt |
|
Country |
Germany |
|
Phone number |
+49(0)40-528-65-0 |
|
Fax number |
+49(0)40-528-65-424 |
Products are for distribution within all member states of the EU.
E-13

•The contents of this manual are subject to change without notice.
•The term “Handheld Terminal” as used in this User’s Guide refers to the CASIO DT-930 Handheld Terminal unless otherwise noted.
•CASIO COMPUTER CO., LTD. assumes no responsibility for any loss or claims by third parties which may arise from the use of this manual.
•This manual does not cover programming and the uploading of data. See the separate manuals for details of these procedures.
 Contents
|
Safety Precautions ……………………………………….. |
E-3 |
|
Introduction ………………………………………………… |
E-12 |
|
Handling Precautions ………………………………………………….. |
E-12 |
|
Unpacking ………………………………………………….. |
E-16 |
|
Available Models and Options ……………………… |
E-17 |
|
General Guide …………………………………………….. |
E-19 |
|
Power Supply ……………………………………………… |
E-20 |
|
Loading and Removing the AA (LR6)-size alkaline batteries … |
E-21 |
|
Loading and Removing the Lithium-ion Battery Pack ………. |
E-22 |
|
Replacing the Backup Lithium Battery …………………………… |
E-23 |
|
About the LCD Screen …………………………………. |
E-25 |
|
Attaching the Wrist Strap …………………………….. |
E-26 |
|
To attach the wrist strap ………………………………………………. |
E-26 |
|
Keys and Their Functions ……………………………. |
E-27 |
|
Using the Bar Code Reader …………………………. |
E-28 |
|
Performing a Bar Code Read Operation ………………………… |
E-28 |
|
Adjusting the Laser Beam Width ………………………………….. |
E-30 |
|
Communications …………………………………………. |
E-32 |
|
IR Communication ……………………………………………………… |
E-32 |
|
Bluetooth® Communication ………………………………………….. |
E-33 |
|
Specifications …………………………………………….. |
E-34 |
|
Lithium-Ion Battery Pack (DT-923LIB) …………………………… |
E-35 |
|
Using the Bridge Basic Cradle …………………….. |
E-36 |
|
Setting up the Bridge Basic Cradle………………. |
E-37 |
|
Connecting without Using the AC Adaptor ……………………… |
E-38 |
|
Mounting on a Wall …………………………………………………….. |
E-39 |
|
Removing the Wall Mount Unit …………………………………….. |
E-40 |
|
HA-E60IO Bridge Basic Cradle specifications ………………… |
E-41 |
E-14
|
Using the Basic Cradle………………………………… |
E-42 |
|
General Guide …………………………………………………………… |
E-42 |
|
When You Are Using the Down-facing Reader Port Model .. |
E-44 |
|
Setting up the Basic Cradle …………………………………………. |
E-44 |
|
Serial Connection of Multiple Basic Cradles …………………… |
E-46 |
|
DIP Switch Settings ……………………………………………………. |
E-46 |
|
DT-960IOE Basic Cradle Specifications ………………………… |
E-47 |
|
Using the Satellite Cradle ……………………………. |
E-48 |
|
General Guide …………………………………………………………… |
E-48 |
|
When You Are Using the Down-facing Reader Port Model .. |
E-50 |
|
Setting up the Satellite Cradle ……………………………………… |
E-50 |
|
Charging the Battery Pack …………………………………………… |
E-53 |
|
Charging the Battery Pack |
|
|
(charging the lithium-ion battery pack separately) ………. |
E-54 |
|
Serial Connection of Multiple Satellite Cradles ……………….. |
E-55 |
|
DIP Switch Settings ……………………………………………………. |
E-56 |
|
DT-964IOE Satellite Cradle Specifications …………………….. |
E-57 |
|
Using the Cradle-type Battery Charger ………… |
E-58 |
|
General Guide …………………………………………………………… |
E-59 |
|
When You Are Using the Down-facing Reader Port Model .. |
E-60 |
|
Setting up the Cradle-type Battery Charger ……………………. |
E-60 |
|
Charging the Battery Pack |
|
|
(charging the lithium-ion battery pack separately) ………. |
E-63 |
|
DT-969CHGE Cradle-type Battery Charger Specifications . E-65 |
|
Installing Cradles and Cradle-type Battery Charger … |
E-66 |
|
To hang the cradles and charger on a wall …………………….. |
E-66 |
This mark applies in EU countries only.
CASIO Europe GmbH
Bornbarch 10, D-22848
Norderstedt, Germany
E-15
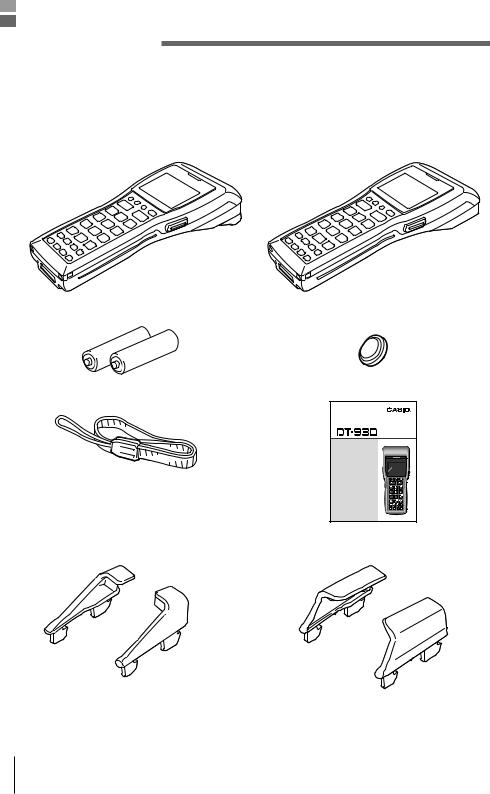
 Unpacking
When unpacking the Handheld Terminal (either DT-930M50E or DT-930M51E), check carefully that all of the items shown below are included. If anything is missing or damaged, contact your original dealer or your nearest CASIO Service Provider.
|
• Handheld Terminal |
|
|
(down-facing reader port) |
(forward-facing reader port) |
|
DT-930 M50E |
DT-930 M51E |
|
• AA (LR6)-size alkaline batteries |
• Back-up battery (lithium) |
|
• Wrist Strap |
• User’s Guide (this guide) |
|
HandheldTerminal |
|
|
Series |
|
|
User’s Guide |
• Be sure to read «Safety Precautions» inside this guide before trying to your Handheld Terminal. After reading this guide, keep it in a safe place future reference
P
•Desktop guides L and R for desktop configuration
•Wall mount guides L and R for wall mount configuration
*Be sure to remove the original guides come installed on Basic Cradle, Satellite Cradle and Cradle-type battery Charger prior to the use with DT-930, and then install either one of the new guides accompanied in the package, the desktop guides for desktop configuration or the wall mount guides for wall mount configuration.
E-16

 Available Models and Options
Options
Bridge Basic Cradle
HA-E60IO
|
Basic Cradle |
Satellite Cradle |
|
|
DT-960IOE |
DT-964IOE |
DT-930 M50E
Cradle-type Battery Charger
DT-969CHGE
Lithium-ion Battery Pack
DT-923LIB
|
Cables |
Wall Mount Unit for Bridge Basic Cradle |
DT-930 M51E
E-17
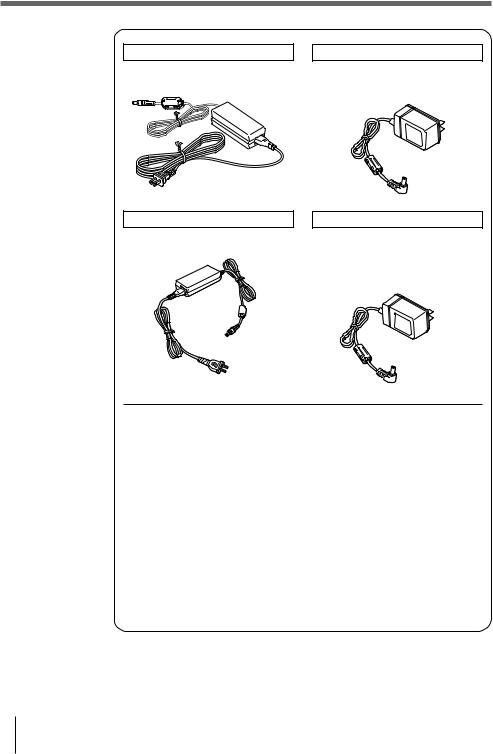
AC Adaptor for Bridge Basic Cradle
AD-S15050AE
AC adaptor for Satellite Cradle
AD-S42120AE
AC Adaptor for Basic Cradle
DT-9020 ADP-GS
DT-9020ADP-US
AC adaptor for Cradle-type Battery Charger
DT-9020 ADP-GS
DT-9020ADP-US
|
RS-232Ccable |
DT-782RSC |
Cross-cable for Basic Cradle |
14Pin-25Pin |
|
(Male) |
|||
|
RS-232Ccable |
DT-783RSC |
Cross-cable for Basic Cradle |
14Pin-25Pin |
|
(female) |
|||
|
RS-232Ccable |
DT-787AX |
Cross-cable for Basic Cradle |
14Pin-9Pin |
|
(female) |
|||
|
RS-232Ccable |
DT-881RSC |
Straight cable for Satellite Cradle |
For modem |
|
connection |
|||
|
RS-232Ccable |
DT-882RSC |
Cross-cable for connecting Satellite Cradle |
25Pin (male) |
|
to personal computer |
|||
|
RS-232Ccable |
DT-883RSC |
Cross-cable for connecting Satellite Cradle |
25Pin |
|
to personal computer |
(female) |
||
|
RS-232Ccable |
DT-887AX/AXA |
Cross-cable for connecting Satellite Cradle |
9Pin |
|
to personal computer |
(female) |
||
|
RS-485cable |
DT-788RSC |
6-6 pin modular cable or daisy-chaining |
|
|
Basic Cradle |
|||
|
RS-422cable |
DT-888RSC |
For daisy-chaining Satellite Cradle |
|
|
USB Cable |
DT-380USB |
Bridge Basic Cradle to personal computer |
|
E-18
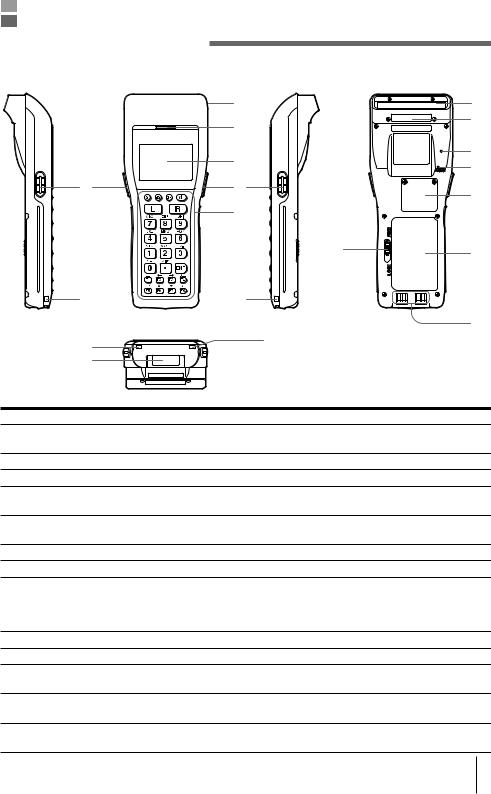
 General Guide
|
Left side |
Front |
Right side |
Back |
||
|
1 |
1 |
||||
|
2 |
8 |
||||
|
3 |
9 |
||||
|
6 |
|||||
|
4 |
4 |
10 |
|||
|
5 |
|||||
|
12 |
11 |
||||
|
7 |
7 |
||||
|
Bottom |
7 |
13 |
|||
|
7 |
|||||
|
14 |
|||||
|
1 |
Reader port |
Emits a laser for bar code reading. |
|||
|
2 |
Read indicator |
Indicates the status of the read operation: green for a successful |
|||
|
read, red when the read is no good. |
|||||
|
3 |
LCD screen |
Displays various data when a program is being run. |
|||
|
4 |
Trigger keys |
Executes the bar code read operation. |
|||
|
5 |
Stroke keys |
A total of 26 keys are provided to turn power ON and OFF and for |
|||
|
other operations. |
|||||
|
6 |
Reset switch (inside the hole) |
Use a paper clip or other thin object to press the RESET switch |
|||
|
located inside the hole. |
|||||
|
7 |
Wrist strap hook |
Used to install the wrist strap. |
|||
|
8 |
Laser warning label |
Class 2 laser warning label. |
|||
|
9 |
Buzzer |
Outputs operation confirmation tones. Take care to avoid blocking |
|||
|
the buzzer holes and reducing output sound volume. Never insert |
|||||
|
any thin, pointed object into the buzzer holes. Doing so can cause |
|||||
|
malfunction. |
|||||
|
10 |
Back-up battery compartment |
Holds memory backup lithium battery. |
|||
|
11 |
Main battery compartment |
Holds main batteries. |
|||
|
12 |
Main battery compartment lock |
Locks the main battery compartment cover in place. Handheld |
|||
|
Terminal power is automatically cut if the cover is removed. |
|||||
|
13 |
Power Contacts |
These terminals are used to supply power from either Bridge Basic |
|||
|
Cradle, Basic Cradle, Satellite Cradle, or Cradle-type Battery Charger. |
|||||
|
14 |
IR port |
This port is for IR communication with another DT-930 unit or with |
|||
|
one of the optional cradles. |
E-19
 Power Supply
The Handheld Terminal has both operating power supply provided by either two AA (LR6)-size alkaline batteries or lithium-ion battery pack, and memory backup power supply provided by lithium battery. In this manual, the words «main battery» refer to both alkaline batteries and the lithium-ion battery pack, unless otherwise noted.
Low main battery power is indicated when the low voltage message appears on the LCD screen. Replace the main battery or charge the battery pack as soon as possible after the low voltage message appears.
[Caution]
■For Important Data
•Never remove both the main battery and backup battery at the same time. Doing so causes all program settings and data in Handheld Terminal memory to be lost or changed. Data cannot be recovered once it is lost or corrupted. Be sure to make back-up copies of all important data. One way to do this is to use one of the optional cradles to transfer data to a computer.
•Never remove the main battery from the Handheld Terminal while the power is turned ON. Doing so can cause data in Handheld Terminal memory to be lost. Before you remove the battery, be sure to turn the Handheld Terminal OFF.
•Use only two AA (LR6)-size alkaline batteries or the dedicated lithiumion battery pack.
•The lithium-ion battery pack discharges naturally during its transportation from the factory to an end-user. Be sure to charge the battery pack before you use it for the first time.
•Never allow the terminals of the lithium-ion battery to become shorted. Doing so creates the danger of malfunction. Be sure to keep the battery pack in its case when transporting or storing it.
•Repeat charging of the lithium-ion battery pack gradually shortens its ability to recharge. If you find that a fully charged battery pack provides only little operation time, it probably means you need a new battery pack.
•Whenever you do not plan to use the Handheld Terminal for a long time, load two new alkaline batteries or a fully charged battery pack into the Handheld Terminal to protect against power failure during nonuse. Also, load new batteries or a fully charged battery pack before using the Handheld Terminal after a long period of non-use.
•If the battery pack has been left over unused for a long period of time, the capacity remained decreases due to spontaneous discharge or
chemical decomposition by the battery pack itself. If the battery pack fails to hold its operating duration after it has been fully charged, replace it with a new one. The battery pack may reach the end of its service life.
![]()
Loading and Removing the AA (LR6)-size alkaline batteries
|
Important! |
When you load the AA (LR6)-size alkaline batteries, make sure that |
|
their positive (+) and negative (–) ends are facing the correct |
|
|
directions. |
Loading the alkaline batteries
1 Slide the main battery compartment cover lock to the FREE position and remove the cover.
2 Load two new AA (LR6)-size alkaline batteries into the main battery compartment, making sure that they face the directions shown in the figure.
3 Attach the battery compartment cover to the Handheld Terminal and slide the main battery compartment cover lock to the LOCK position.
Removing the alkaline batteries
Remove the alkaline batteries following the loading procedure in reverse.
Be sure to turn the Handheld Terminal OFF before you do this.
E-21
 Loading…
-
Страница 1
Data Collection Terminal Handheld T erminal User’ s Guide Series • Be sure to read «Safety Precautions» inside this guide before trying to use your Handheld T erminal. After reading this guide, keep it in a safe place for future reference. Data Collection Terminal Printed in China AB0302-046021D CASIO COMPUTER CO., L TD. 6-2, Hon-mach[…]
-
Страница 2
C-2 E-2 BLUETOOTH is a registered trademark owned by Bluetooth SIG. Inc. and licensed to CASIO COMPUTER CO., L TD. _irbqllqe !»#$ _äìÉíççíÜ=pfdK=fåÅK !»#$%&'()*+, !»#$%[…]
-
Страница 3
E-3 Congratulations upon your selection of this CASIO Product. Be sure to read the following Safety Precautions before trying to use it for the first time. Keep this manual in a handy place for future reference. Safety Precautions The following are the meanings of the markings and symbols used in these Safety Precautions to warn you against the pos[…]
-
Страница 4
E-4 Danger! ■ Lithium-ion Battery Pack The Lithium-ion Battery Pack is available as an option. ● Never allow the battery pack to become wet. W ater can create the danger of battery pack heat emission, explosion, and fire. ● Never use or leave the battery pack next to open flame, near a stove, or any other area exposed to high heat. Doing so c[…]
-
Страница 5
E-5 W arning! ■ Disassembly and Modification ● Never try to disassemble or modify the unit in any way . High voltage inside creates the danger of electrical shock. ■ Interior Parts and Components ● Never touch interior high-voltage parts or components. Doing so creates the danger of electrical shock. ■ Abnormal Conditions ● Should the u[…]
-
Страница 6
E-6 W arning! ■ Interference with the Operation of Other Equipment (Using Wireless Communication) ● Keep your Handheld T erminal at least 22 centimeters (8′ 1/10″) away from anyone wearing a pacemaker . Radio waves emitted by the Handheld T erminal can affect the operation of a pacemaker . ● In order to protect someone wearing a pac[…]
-
Страница 7
E-7 W arning! ■ Handling the Coin T ype Lithium Battery ● Do not recharge coin type lithium battery . Doing so may cause it to leak fluid, overheat, explode or burst into flames. ● Do not put the coin type lithium battery in open flame, or apply solder directly to the coin type lithium battery . Doing so may cause it to leak fluid, overheat, […]
-
Страница 8
E-8 W arning! ■ Optional Bridge Basic Cradle, Basic Cradle, Satellite Cradle and Cradle-type Battery Charger ● Power these cradles and Cradle-type battery charger only with a power outlet whose voltage matches that marked on the rating plate of each option. Do not plug these options into an extension shared by other appliances. Doing so creates[…]
-
Страница 9
E-9 Caution! ■ LCD Screen ● Never apply strong pressure to the screen or subject it to strong impact. Doing so can crack the LCD panel glass and create the danger of personal injury. ● Should the LCD panel glass ever break, never touch the liquid inside. Doing so can cause skin irritation and inflammation. • Should liquid from the LCD panel[…]
-
Страница 10
E-10 Caution! ■ Handling Alkaline Batteries ● Store batteries someplace out of direct sunlight where the temperature and humidity are not high. Not doing so may cause the batteries to leak fluid, overheat or explode. Also, it may cause the life and performance of the batteries to decline. ● These batteries can be disposed of as regular garbag[…]
-
Страница 11
E-11 Make back-up copies of all important data Caution! ■ Optional Bridge Basic Cradle, Basic Cradle, Satellite Cradle and Cradle-type Battery Charger ● Keep the power cord away from stoves and other sources of extreme heat. Heat can melt the insulation of the power cord and create the danger of fire and electrical shock. ● Never pull on the […]
-
Страница 12
E-12 Introduction Make sure you carefully read the following information to ensure that your Handheld T erminal is able to perform at the level for which it is designed. Handling Precautions • Do not throw or drop the Handheld T erminal or otherwise subject it to strong impact, which can damage the LCD screen, interrupt program execution, corrupt[…]
-
Страница 13
E-13 Product description/Intended use EU/EFT A member states intended EU: Austria, Belgium, Denmark, Finland, France, Germany , Greece, Ireland, Italy , Luxembourg, The Netherlands, Portugal, Spain, Sweden, United Kingdom, Czech Republic, Hungary , Poland, Slovenia, Slovakia, Estonia, Latvia, Lithuania, Cyprus, Malta EFT A: Switzerland, Iceland, Li[…]
-
Страница 14
E-14 • The contents of this manual are subject to change without notice. • The term “Handheld T erminal” as used in this User ’ s Guide refers to the CASIO DT -930 Handheld T erminal unless otherwise noted. • CASIO COMPUTER CO., L TD. assumes no responsibility for any loss or claims by third parties which may arise from the use of this […]
-
Страница 15
E-15 Using the Basic Cradle ………………………………… E-42 General Guide …………………………………………………………… E-42 When Y ou Are Using the Down-facing Reader Port Model .. E-44 Setting up the Basic Cradle …………………………………………. E-44 Serial Connection of Multiple Basic Cradles[…]
-
Страница 16
E-16 Unpacking When unpacking the Handheld T erminal (either DT -930M50E or DT -930M51E), check carefully that all of the items shown belo w are included. If an ything is missing or damaged, contact your original dealer or y our nearest CASIO Ser vice Pro vider . • Handheld Terminal (down-facing reader port) (forward-facing reader port) DT -930 M[…]
-
Страница 17
E-17 A v ailab le Models and Options Options Basic Cradle DT -960IOE Cradle-type Battery Charger DT -969CHGE Satellite Cradle DT -964IOE Lithium-ion Battery Pack DT -923LIB DT -930 M50E DT -930 M51E Cables W all Mount Unit f or Bridge Basic Cradle Bridge Basic Cradle HA-E60IO[…]
-
Страница 18
E-18 RS-232Ccable DT -782RSC Cross-cable for Basic Cradle 14Pin-25Pin (Male) RS-232Ccable DT -783RSC Cross-cable for Basic Cradle 14Pin-25Pin (female) RS-232Ccable DT -787AX Cross-cable for Basic Cradle 14Pin-9Pin (female) RS-232Ccable DT -881RSC Straight cable for Satellite Cradle For modem connection RS-232Ccable DT -882RSC Cross-cable for connec[…]
-
Страница 19
E-19 4 7 7 3 1 2 4 7 5 12 7 1 9 8 10 6 11 13 14 General Guide 1 Reader port Emits a laser for bar code reading. 2 Read indicator Indicates the status of the read operation: green for a successful read, red when the read is no good. 3 LCD screen Displays various data when a program is being run. 4 Trigger keys Executes the bar code read operation. 5[…]
-
Страница 20
E-20 Power Supply The Handheld T erminal has both operating power supply provided by either two AA (LR6)-size alkaline batteries or lithium-ion battery pack, and memory backup power supply provided by lithium battery . In this manual, the words «main battery» refer to both alkaline batteries and the lithium-ion battery pack, unless otherw[…]
-
Страница 21
E-21 Loading and Removing the AA (LR6)-size alkaline batteries Important! When you load the AA (LR6)-size alkaline batteries, make sure that their positive (+) and negative (–) ends are facing the correct directions. Loading the alkaline batteries 1 Slide the main battery compartment cover lock to the FREE position and remove the cover . 2 Load t[…]
-
Страница 22
E-22 Power Supply Loading and Removing the Lithium-ion Battery Pack Loading the Lithium-ion Battery Pack 1 Slide the main battery compartment cover lock to the FREE position and remove the cover . 2 Load a lithium-ion battery pack into the main battery compartment in the direction shown in the figure. Load the battery while sliding it in with the ?[…]
-
Страница 23
E-23 Replacing the Backup Lithium Battery When the backup lithium battery low voltage message appears on the LCD screen, immediately replace the backup battery (lithium). Use a CR2032 lithium battery as the replacement battery . Be sure to turn the Handheld T erminal OFF before you do this. [Caution] ■ For Important Data • When you remove the b[…]
-
Страница 24
E-24 3 Carefully wipe the backup battery (lithium battery) with a dry cloth before inserting it with the plus (+) side up as shown in the diagram. 4 Push the lithium battery in the direction shown by the arrow to hook it. 5 Close the backup battery cover and tighten the screws. Removing the battery 1 Open the backup battery cover and use a ballpoin[…]
-
Страница 25
E-25 About the LCD Screen The LCD screen of the Handheld T erminal shows program settings, operational procedures, calculation results and other information. • Display Area 64 dots (V) x 128 dots (H) • Display Characters 6-dot, 8-dot and 10-dot mode Reduced ANK 21 columns x 10 lines, 16 columns x 8 lines, 12 columns x 6 lines ANK 21 columns x 5[…]
-
Страница 26
E-26 The wrist strap protects the Handheld T erminal from being damaged as a result of it being dropped by mistake during movement. Follow the procedure below to attach the wrist strap. T o attach the wrist strap 1 Pass the thin end of the wrist strap through the metal hand strap mount (two possible locations) on the bottom side of the Handheld T e[…]
-
Страница 27
E-27 1 2 3 1 5 4 6 7 Keys and Their Functions Keys available on the Handheld T erminal and their functions are as follows. 1 T rigger keys T rigger a bar code read operation. 2 Control keys CLR key: Cancels input. BS key: Backspaces and deletes one character . S key: Switches between the character input mode and the number input mode. lit on the LC[…]
-
Страница 28
E-28 Performing a Bar Code Read Operation 1 Press the [PW] key to turn power on. Hold the Handheld T erminal close to the bar code and press the trigger key . 2 The reader port emits a laser to read the bar code. The read indicator lights green when the read is successful. Important! • If you have problems with the read operation, change the angl[…]
-
Страница 29
E-29 When reading a small bar code, decrease the distance between the Handheld T erminal and the bar code. For larger bar codes, position the Handheld T erminal so that the bar code fits into the laser beam. Sample Bar Codes W arning! ■ Laser Beam ● Never look directly into the laser beam. Doing so can cause serious eye damage. L **[…]
-
Страница 30
E-30 Using the Bar Code Reader Adjusting the Laser Beam Width The width of the laser beam emitted from the Handheld T erminal can be adjusted to match the width of the bar code that is being read. When you switch the laser beam width, you must set the beam’s reference point beforehand. 1 T urn the Handheld T erminal ON with the and keys held down[…]
-
Страница 31
E-31 Beam Width Adjustment Bar Code For down-facing reader port model For forward-facing reader port model [Handling Precautions] • The Handheld T erminal is shipped with the laser beam width already adjusted. So, the laser beam width need not be adjusted. Adjustment is necessary only when the laser beam does not switch to the correct position wh[…]
-
Страница 32
E-32 IR Communication Application software and input data can be transferred between two DT -930 units using the infrared ports on the bottom of the units. Position the two DT -930 units so they will not accidently move during communication. The orientation of the two units depends on the type of communication you plan to perform. • Conformed IrD[…]
-
Страница 33
E-33 Bluetooth ® Comm unication The Bluetooth ® interf ace can be used to transf er data to and from a Bluetooth ® compatible printer . Data can be transf erred if the Handheld T erminal is located within three meters of the target de vice (and nothing is bloc king the signal). Important! Observe the following precautions to help ensure that Blu[…]
-
Страница 34
E-34 Specifications • General CPU: 32-bit RISC T ype Memory: RAM : 4MB (User area 1.6 MB) FROM : 16MB (User area 12.5 MB) • Display T ype: STN LCD with phase correction film Capacity: 128 x 64 dots Display contrast: Manually adjustable Backlight: LED • Laser Scanner Readable Symbologies: EAN, JAN, UPC, NW -7, CODE39, ITF , CODE93, CODE128, MS[…]
-
Страница 35
E-35 • Power Supply Main: T wo AA (LR6)-size alkaline dry cells or one lithium-ion battery pack Alkaline Battery life: — Approx. 200 hours (using a new set of AA(LR6)-size alkaline batteries, at normal temperature, and in scanning bar code twice per 10 seconds) — Approx. 175 hours (using a new set of AA (LR6)-size alkaline batteries at normal tem[…]
-
Страница 36
E-36 Using the Bridge Basic Cradle 1 LED power indicator Indicates the charge status of the battery and whether the DT -930 is mounted. Off: Power OFF Lit Green: Power is ON and the DT -930 is correctly mounted. Lit Red: Power is ON and the DT -930 is not correctly mounted. 2 USB connection status Indicates that the USB connection is normal. Off: U[…]
-
Страница 37
E-37 Setting up the Bridge Basic Cradle 1 Make sure that the Bridge Basic Cradle’s power switch is turned off and then plug the optional AC adaptor (AD-S15050AE) into the AC adaptor jack on the back of the Bridge Basic Cradle. 2 Connect the power cord to the AC adaptor before connecting the power cord to the electrical outlet. 3 Connect the USB c[…]
-
Страница 38
E-38 Setting up the Bridge Basic Cradle Connecting without Using the AC Adaptor • It is possible to draw power from the personal computer in the bus power mode. This makes it possible to operate the Bridge Basic Cradle without using the AC adaptor. • Power is not supplied to the DT -930 when the USB connection is used to supply power. Replace t[…]
-
Страница 39
E-39 Mounting on a W all 1 Remove the screws on the bottom of the desktop unit to remove it. 2 Attach the wall mount unit and tighten the screws for the wall mount unit. 3 Insert the screw provided into the location where the hole on the top of the wall mount unit is to be fixed. Do not screw the screw all the way in. Leave about 2 mm between the w[…]
-
Страница 40
E-40 4 Hang the wall mount unit from the screw through the hole on its top. 5 Insert the screw provided into the top part of the lower hole of the wall mount unit. 6 T ighten both the upper and lower screws. Removing the W all Mount Unit 1 Loosen both the upper and lower screws. 2 Slide the wall mount unit up to remove it. Important! • Check the […]
-
Страница 41
E-41 HA-E60IO Bridge Basic Cradle specifications 1. Infrared Inte rfac e: Infrared interface Standard: Conforms to IrDA Ver 1.1 Synchronization: Asynchronous, frame synchronizing Speed: 4 Mbps (MAX) 2. USB Standard: Conforms to USB V er 1.1 Speed: 12 Mbps (MAX) 3. Power supply Power Source: AC adaptor (AD-S15050AE) USB bus power Rated input: When u[…]
-
Страница 42
E-42 CASIO DATA POWER OFF POWER ON RS-232C RS-485-1 RS-485-2 AC ADAPTOR CASIO 4 5 8 11 14 13 14 10 12 8 6 7 1 3 2 9 Using the Basic Cradle Basic Cradle (DT -960IOE) makes it possible to upload system data and file data between the Handheld T erminal and a personal computer . Y ou can use optional 6-6 pin Modular Cables (DT -788RSC) to connect up to[…]
-
Страница 43
E-43 1 RS-232C Interface For connection of a PC and uploading/downloading of system data and file data. 2 RS-485 Interface For connection of multiple optional Basic Cradles. 3 AC adaptor jack For connection of the dedicated AC adaptor to supply power . 4 Nose Guide Remove this guide when you are using the down-facing reader port model. 5 T erminal […]
-
Страница 44
E-44 Using the Basic Cradle When Y ou Are Using the Down-facing Reader Port Model When you are using a down-facing reader port model, remove the nose guide before use. T o remove the nose guide, remove the two screws using a screwdriver . Setting up the Basic Cradle Use only the dedicated AC adaptor for Basic Cradle to connect to an electrical outl[…]
-
Страница 45
E-45 3 Plug the AC adaptor into an electrical outlet. 4 After making sure that the pow er switch of the Basic Cradle is in the OFF position, plug the other end of the A C adaptor into the A C terminal at the top of the Basic Cradle. 5 After making sure that the power of the Basic Cradle and personal computer is OFF , remov e the cov er and connect […]
-
Страница 46
E-46 Using the Basic Cradle 12345678 Serial Connection of Multiple Basic Cradles Y ou can use optional 6-6 pin Modular Cables (DT -788RSC) to connect up to 16 Basic Cradles in a serial configuration. This configuration makes it possible to exchange data between multiple Handheld T erminals and a personal computer . Connections First connect Basic C[…]
-
Страница 47
E-47 DT -960IOE Basic Cradle Specifications Infrared Interface: Infrared Standard: CASIO original Control Protocol: Half-duplex Synchronization: Asynchronous Speed: 2,400 to 1 15,200 bps RS-232C Control Protocol: Half-duplex Synchronization: Asynchronous Speed: 2,400 to 1 15,200 bps RS-485 Control Protocol: Half-duplex Synchronization: Asynchronous[…]
-
Страница 48
E-48 Using the Satellite Cradle Satellite Cradle (DT -964IOE) makes it possible to upload system data and file data between the Handheld T erminal and a personal computer . It can also be used as the charger for the lithium-ion battery pack. Use the RS-232C cable (DT -881RSC/DT -882RSC/DT -883RSC/DT -887AX/AXA) for connecting the Satellite Cradle t[…]
-
Страница 49
E-49 1 RS-232C Interface For connection to a PC and uploading/downloading of system data and file data. 2 RS-422 Interface For connection of multiple Satellite Cradles. 3 AC adaptor jack For connection of the AC adaptor to supply power . 4 Nose Guide Remove this guide when you are using the down-facing reader port model. 5 T erminal detection switc[…]
-
Страница 50
E-50 Using the Satellite Cradle When Y ou Are Using the Down-facing Reader Port Model When you are using a down-facing reader port model, remove the nose guide before use. T o remove the nose guide, remove the two screws using a screwdriver . Setting up the Satellite Cradle Use only the dedicated AC adaptor for Satellite Cradle to connect to an ele[…]
-
Страница 51
E-51 3 Connect the power cord to the AC adaptor before connecting the power cord to the power outlet. 4 After making sure that the power switch of the Satellite Cradle is in the OFF position, plug the other end of the AC adaptor into the AC terminal at the top of the Satellite Cradle. 5 After making sure that the power of the Satellite Cradle and p[…]
-
Страница 52
E-52 Using the Satellite Cradle Important! • High-sensitivity communications devices are used for the IrDA communications function. A void using units or equipment such as a cellular phone emits radio waves during communication. T o ensure uninterrupted communication, keep the Satellite Cradle away from the equipment (at least 30 centimeters from[…]
-
Страница 53
E-53 Charging the Battery Pack The follo wing procedure can be used only when a lithium-ion battery pack is loaded in the Handheld T er minal. 1 T ur n on the pow er of the Satellite Cradle, and confirm that its power indicator lights up red. 2 Attach the Handheld T er minal to the Satellite Cradle, making sure that the charge terminals on the bott[…]
-
Страница 54
E-54 Using the Satellite Cradle Charging the Battery Pack (charging the lithium-ion battery pack separately) 1 Set the power switch of the Satellite Cradle to the ON position. The power indicator of the Satellite Cradle lights red. 2 Load the battery pack in the spare battery compartment on the Satellite Cradle, making sure that the terminals on th[…]
-
Страница 55
E-55 Serial Connection of Multiple Satellite Cradles Y ou can use optional 6-6 pin Modular Cables (DT -888RSC) to connect up to 7 Satellite Cradles in a serial configuration. This configuration makes it possible to exchange data between multiple Handheld T erminals and a personal computer via the cradles. Connections Connect C-OUT on the Satellite […]
-
Страница 56
E-56 Using the Satellite Cradle 123 45678 9 1 0 DIP Switch Settings The following table shows the various settings that are available with the DIP switches located on the back of the Satellite Cradle. Important! • Other settings not shown here are used for special-purpose modes, and should not be used. Handheld T erminal — Satellite Cradle Commun[…]
-
Страница 57
E-57 DT -964IOE Satellite Cradle Specifications Infrared Interface: Infrared Standard: Conforms to IrDA V er . 1.2 Original Synchronization: Asynchronous Speed: 9,600/38,400/1 15,200bps RS-232C Control Protocol: Full-duplex Synchronization: Asynchronous Speed: 1,200 to 1 15,200bps RS-422 Control Protocol: Full-duplex Synchronization: Asynchronous S[…]
-
Страница 58
E-58 CHG2 CHG1 CASIO POWER OFF POWER ON AC ADAPTOR CASIO 2 3 7 10 12 12 8 9 11 7 4 5 6 1 Using the Cradle-type Battery Charger The Cradle-type Battery Charger (DT -969CHGE) makes it possible to separately charge battery pack installed in the Handheld T erminal and a spare battery pack (DT -923LIB) installed in the spare battery compartment on the c[…]
-
Страница 59
E-59 1 AC adaptor jack For connection of the AC adaptor to supply power 2 Nose Guide Remove this guide when you are using the down-facing reader port model. 3 T erminal detection switch Detects whether or not the Handheld T erminal is mounted correctly on the Cradle-type Battery Charger 4 Spare battery pack charge Indicates the charge status of a s[…]
-
Страница 60
E-60 Using the Cradle-type Battery Charger When Y ou Are Using the Down-facing Reader Port Model When you are using a down-facing reader port model, remove the nose guide before use. T o remove the nose guide, remove the two screws using a screwdriver . Setting up the Cradle-type Battery Charger Use only the AC adaptor specified for use with the Ha[…]
-
Страница 61
E-61 Charge terminals Power switch (ON) Power indicator Spare Battery Pack Charge Indicator (“CHG 2”) Battery Pack Charge Indicator (“CHG 1”) 3 Plug the AC adaptor into an electrical outlet. 4 After making sure that the power switch of the Cradle-type Battery Charger is at the OFF position, plug the other end of the AC adaptor into the AC a[…]
-
Страница 62
E-62 Using the Cradle-type Battery Charger [Caution] ■ Ambient T emperature Ranges for the Battery Pack • T emperature ranges for battery pack use in the Handheld T erminal, charging, and storage are specified below . T emperatures outside these ranges create the danger of deterioration of battery pack performance and shortening of its service […]
-
Страница 63
E-63 Charging the Battery Pack (charging the lithium-ion battery pack separately) 1 Set the power switch of the Cradle-type Battery Charger to the ON position. The power indicator of the Cradle-type Battery Charger lights red. 2 Load a battery pack in the spare battery compartment on the charger , making sure that the terminals on the side and rear[…]
-
Страница 64
E-64 Using the Cradle-type Battery Charger [Caution] ■ Ambient T emperature Ranges for the Battery Pack • T emperature ranges for battery pack use in the Handheld T erminal, charging, and storage are specified below . T emperatures outside these ranges create the danger of deterioration of battery pack performance and shortening of its service […]
-
Страница 65
E-65 DT -969CHGE Cradle-type Battery Charger Specifications Charger Charge Method: Fixed voltage (with current limiter) Charge T ime: Approx. 6 hours Power Supply Power Source: AC adaptor (DT -9020ADP-GS or DT -9020ADP-US) Power Requirements: 230 V AC (DT -9020ADP-GS) 120 V AC (DT -9020ADP-US) Rated Input: DC 9.5 V , approx. 1,000 mA Dimensions and[…]
-
Страница 66
E-66 CA L D P H P A B The following installation methods describe how to install the Basic Cradle, Satellite Cradle and Cradle-type Battery charger either on a flat surface place or on a wall. T o hang the cradles and charger on a wall The following installation method is described with the Satellite Cradle as its reference. 1 Attach the wall unit […]
-
Страница 67
E-67 2 Remove the desktop guides (L, R). 3 Attach the wall mount guides provided with the DT -930. Insert the wall mount guides into the slits, and then fix them in place by sliding them downwards. 4 Remove the two screws (one each at the top and bottom) that secure the base to the Satellite Cradle. 5 Pressing down on the four corners of the Satell[…]
-
Страница 68
E-68 6 Position the base on the wall where you want to hang the Satellite Cradle, and use an awl or some other sharp object to mark the positions of the two wood screws. 7 Slip a spacer over each of the wood screws and then drive the screws into the wall at the positions you marked in the previous step. Make sure that the spacers are oriented corre[…]
E-16
Unpacking
When unpacking the Handheld Terminal (either DT-930M50E or DT-930M51E), check
carefully that all of the items shown below are included. If anything is missing or damaged,
contact your original dealer or your nearest CASIO Service Provider.
• Handheld Terminal
(down-facing reader port)
(forward-facing reader port)
DT-930 M50E
DT-930 M51E
• Wrist Strap
• Back-up battery (lithium)
• AA (LR6)-size alkaline batteries
• User’s Guide (this guide)
• Desktop guides L and R for
desktop configuration
• Wall mount guides L and R for
wall mount configuration
* Be sure to remove the original guides come installed on Basic Cradle, Satellite Cradle and
Cradle-type battery Charger prior to the use with DT-930, and then install either one of the
new guides accompanied in the package, the desktop guides for desktop configuration or
the wall mount guides for wall mount configuration.
Handheld Terminal
User’s Guide
P
Series
• Be sure to read «Safety Precautions»
inside this guide before trying to
your Handheld Terminal. After reading
this guide, keep it in a safe place
future reference
Терминал сбора данных Casio DT-930 может использоваться для решения учетных задач как в обычных, так и в промышленных условиях. От терминалов подобного класса его отличает высокий объем памяти, встроенный беспроводной интерфейс Bluetooth, большой дисплей, возможность выбора между пальчиковыми батареями и аккумулятором, удобная клавиатура, малый вес при высокой ударопрочности. Синхронизация терминала с ПК производится через инфракрасный порт: с помощью коммуникационной подставки или любого другого инфракрасного порта, подключенного к ПК. В целом можно сказать, что общая функциональность модели превышает функциональность любого другого терминала его ценовой категории.
Коммуникационные подставки
• Коммуникационная/зарядная подставка (RS-232). Позволяет синхронизировать терминал с ПК и одновременно производить зарядку аккумулятора без извлечения его из корпуса терминала. Подключается к COM порту ПК.
• Коммуникационная/зарядная подставка (USB). Позволяет синхронизировать терминал с ПК и одновременно производить зарядку аккумулятора без извлечения его из корпуса терминала..
• Коммуникационная подставка (RS-232). Позволяет синхронизировать терминал с ПК. Подключается к COM порту ПК.
Аккумулятор
• Аккумулятор Li-Ion, 600 мА*ч. В зависимости от режима эксплуатации обеспечивает работу терминала в течение 30 часов.
Зарядные устройства
• Зарядная подставка. Позволяет выполнять зарядку аккумулятора без извлечения его из корпуса терминала.
Адаптер
• Зарядная подставка. Позволяет выполнять зарядку аккумулятора без извлечения его из корпуса терминала.
Кабели
• Модемный кабель коммуникационной/зарядной подставки.
• Кабель для соединения коммуникационных/зарядных подставок. Позволяет последовательно соединять до 8 подставок по интерфейсу RS-422.
ПОДКЛЮЧЕНИЕ ТЕРМИНАЛА
Подключение по интерфейсу RS-232C
Использование подставки обеспечивает возможность передачи данных из ТСД в ПК. Для подключения подставки к персональному компьютеру используется кабель RS-232С. Подставка может размещаться на столе или крепиться к стене.
Для подключения подставки к электрической сети используйте только специальный адаптер переменного тока. Перед выполнением любой операции по обмену данными убедитесь, что адаптер подключен к сети и подставка включена, поскольку в момент передачи данных терминал получает питание от подставки.
1. Вставьте вилку адаптера в розетку.
2. Убедившись, что выключатель питания подставки находится в положении OFF, вставьте другой конец провода адаптера в разъем для адаптера в верхней части подставки.
3. Убедившись, что подставка и ПК отключены, снимите крышку и подсоедините один конец кабеля RS-232С к разъему в верхней части подставки, а другой к последовательному порту ПК.
4. Включите подставку, индикатор питания загорится красным цветом.
5. Установите ТСД в подставку, обеспечив прямой контакт инфракрасных портов. В случае надлежащего соединения цвет индикатора подставки изменится на зеленый. Когда начнется обмен данными, индикатор передачи данных начнет мигать зеленым цветом.
Подключение по интерфейсу USB
Для подключения подставки к электрической сети используйте только специальный адаптер переменного тока. Перед выполнением любой операции по обмену данными убедитесь, что адаптер подключен к сети и подставка включена, поскольку в момент передачи данных терминал получает питание от подставки.
1. Убедившись, что выключатель питания подставки находится в положении OFF, вставьте провод адаптера в разъем питания в нижней части подставки и подключите адаптер к источнику питания.
2. Убедившись, что подставка и ПК отключены, подсоедините один конец USB кабеля к разъему в верхней части подставки, а другой к USB порту ПК.
3. Включите подставку, индикатор питания загорится красным цветом.
4. Установите ТСД в подставку, обеспечив прямой контакт инфракрасных портов. В случае надлежащего соединения цвет индикатора подставки изменится на зеленый..
Включение терминала
Для включения терминала необходимо установить в него элементы питания и нажать в течение 1.5 с кнопку [PW]. Установка элементов питания описана в подразделе «Установка элементов питания». После включения терминал издаст короткий звуковой сигнал.
Сканирование штрих кодов
Выполнение операции считывания
1. Нажмите клавишу включения питания [PW] для включения терминала.
2. Поднесите терминал сбора данных к штрих-коду и нажмите на кнопку считывания.
3. Сканер излучает лазерный луч для считывания штрихового кода. В случае успешного считывания индикатор загорается зеленым цветом.
Примечание: если в процессе считывания возникнут проблемы, измените угол между кодом и терминалом или поднесите его ближе и повторите попытку.
При считывании штриховых кодов небольших размеров необходимо сократить расстояние между терминалом сбора данных и штрихкодом. При больших размерах кода необходимо удерживать терминал сбора данных на расстоянии, при котором код не будет выходить за границы лазерного луча.
Обмен данными между двумя терминалами
Обмен по инфракрасному каналу.
Обмен данными между двумя терминалами DT-930 возможен с помощью инфракрасного порта, расположенного в нижней части устройства. Расположите терминалы на одной линии, так чтобы их положение не менялось во время передачи данных, на расстоянии до 30 см.
Обмен по интерфейсу Bluetooth
Терминал DT-930 может обмениваться данными с помощью интерфейса Bluetooth. Для этого необходимо расположить терминал и устройство с Bluetooth интерфейсом на расстоянии не более 3 метров друг от друга.
Купить терминал сбора данных Casio DT-930 вы можете в нашем интернет-магазине