
manualCasio Privia PX-120

PX120ES1A
ES
USER’S GUIDE
GUÍA DEL USUARIO
Please keep all information for future reference.
Guarde toda información para tener como referencia futura.
Safety Precautions
Before trying to use the piano, be sure to read
the separate “Safety Precautions”.
Precauciones de seguridad
Antes de intentar usar el piano, asegúrese de
leer las “Precauciones de seguridad” separadas.
View the manual for the Casio Privia PX-120 here, for free. This manual comes under the category piano’s and has been rated by 3 people with an average of a 8.2. This manual is available in the following languages: English. Do you have a question about the Casio Privia PX-120 or do you need help? Ask your question here
The Casio Privia PX-120 is a digital piano that offers a high-quality sound and a realistic playing experience. It features 88 weighted keys, providing a similar feel to that of an acoustic piano. The PX-120 is equipped with the Acoustic and Intelligent Resonator (AiR) sound source, which produces dynamic and expressive tones. The piano also offers various instrument sounds, including electric piano, strings, and organs.
Featuring a compact and lightweight design, the PX-120 is portable and easy to transport. It also comes with a built-in speaker system, eliminating the need for additional amplification. The piano offers a headphone jack for private practicing, as well as USB connectivity for connecting to a computer or MIDI device.
In terms of functionality, the PX-120 includes features such as transpose, metronome, and split/layer functions to enhance versatility during performances. The piano also offers three pedals — damper, soft, and sostenuto — for added control over sustain and expression.
With regards to durability, the PX-120 is built with high-quality materials to ensure long-lasting performance. The piano is designed to withstand frequent use and is suitable for both home and stage use.
Overall, the Casio Privia PX-120 is a reliable and versatile digital piano that offers a realistic playing experience, a wide range of instrument sounds, and convenient functionality. Its compact design and durability make it a suitable choice for both beginners and experienced pianists.
General
| Casio | |
| Privia PX-120 | |
| piano | |
| English | |
| User manual (PDF), Safety instructions (PDF) |
Can’t find the answer to your question in the manual? You may find the answer to your question in the FAQs about the Casio Privia PX-120 below.
Why is my Casio Privia PX-120 not turning on?
Please ensure that the power cord is securely plugged into the piano and the power outlet. Also, check if the power outlet is providing electricity by testing it with another device.
How can I adjust the touch sensitivity of the keys on my PX-120?
You can adjust the touch sensitivity by accessing the Function menu, then navigating to the Keyboard Touch Response setting. Increase or decrease the value to your desired touch sensitivity.
Why is there no sound coming from my PX-120 when I play the keys?
First, make sure the volume is turned up on both the piano and any connected external speakers or headphones. If the volume is fine, check the headphone output to see if anything is plugged in, as it may cut off the sound to the speakers.
How do I record and playback my performances on the PX-120?
To record your performance, press the Function button followed by the Rec (Record) button. To playback, press the Function button again and select the Song Playback option. Navigate through the recorded songs and choose the desired one to listen.
Can I connect my PX-120 to a computer for music production purposes?
Yes, you can connect your PX-120 to a computer using a USB cable. Install the necessary drivers on your computer, and then you can use MIDI software to record, edit, and produce music directly from your piano.
Is the manual of the Casio Privia PX-120 available in English?
Yes, the manual of the Casio Privia PX-120 is available in English .
Is your question not listed? Ask your question here
![]()
Ch
PX120CH1A
EU
Manufacturer:
CASIO COMPUTER CO.,LTD.
6-2, Hon-machi 1-chome, Shibuya-ku, Tokyo 151-8543, Japan Responsible within the European Union:
CASIO EUROPE GmbH
Bornbarch 10, 22848 Norderstedt, Germany


|
………………………………………………….. |
Ch-2 |
|
…………………………………………………………………………. |
Ch-2 |
|
TONE/SETTING ………………………………………………………………. |
Ch-3 |
|
………………………………………………. |
Ch-3 |
|
………………………………………………….. |
Ch-4 |
|
……………………………………………………………. |
Ch-4 |
|
………………………………………………………….. |
Ch-5 |
|
……………………………………………………………………………… |
Ch-5 |
|
…………………………………………………… |
Ch-5 |
|
……………………………………………………………………………… |
Ch-6 |
|
…………………………………………………………………………. |
Ch-6 |
|
……………………………. |
Ch-7 |
|
………………………………………………………………… |
Ch-7 |
|
…………………………………………………………………….. |
Ch-9 |
|
…………………………………………………………………….. |
Ch-9 |
|
…………………………………………………………………………… |
Ch-10 |
|
………………………………………………………………………. |
Ch-10 |
|
……………………………………………………………… |
Ch-11 |
|
………………………………….. |
Ch-13 |
|
…………………………………………………………. |
Ch-13 |
|
…………………………………………………….. |
Ch-13 |
|
…………………………………………………….. |
Ch-14 |
|
…………………………………………… |
Ch-15 |
|
…………………………………………………………………………… |
Ch-15 |
|
………………………………………………………………….. |
Ch-16 |
|
…………………………………………… |
Ch-20 |
|
………………………………………………………………………………………… |
Ch-20 |
|
………………………………………………………………….. |
Ch-21 |
|
………………………………………………… |
Ch-22 |
|
………………………………………………………………….. |
Ch-23 |
|
………………………………….. |
Ch-24 |
|
…………………………………………………………. |
Ch-24 |
|
………………………………………………… |
Ch-25 |
|
……………………………………………………………………………………. |
Ch-26 |
|
…………………………………………………………………………… |
Ch-26 |
|
(BRILLIANCE)……………………………………………………….. |
Ch-26 |
|
REVERB ………………………………………………………….. |
Ch-26 |
|
CHORUS …………………………………………………………. |
Ch-26 |
|
/ SONG/RHYTHM SELECT ……Ch-26 |
|
|
TEMPO ……………………………………………………………. |
Ch-26 |
|
METRONOME BEAT ………………… |
Ch-26 |
|
………………………………………………… |
Ch-26 |
|
………………………………………………………………….. |
Ch-26 |
|
MODE …………………………………………….. |
Ch-26 |
|
TOUCH RESPONSE ……………………………. |
Ch-27 |
|
…………………………………………………….. |
Ch-27 |
|
…………………………………………………….. |
Ch-27 |
|
…………………………………………………………………………… |
Ch-28 |
|
…………………………………………………………………………… |
Ch-28 |
|
……………………………………………………………………………….. |
Ch-28 |
|
……………………………………………………………………………………. |
Ch-28 |
|
…………………………………………………………………………… |
Ch-28 |
|
MIDI …………………………………………………………… |
Ch-29 |
|
……………………………………………….. |
Ch-30 |
|
……………………………………………………………………………….. |
Ch-30 |
|
……………………………………………………………………………….. |
Ch-31 |
|
……………………………………………………………………………….. |
Ch-32 |
|
……………………………………………………………. |
A-1 |
|
………………………………………………………………………………………… |
A-1 |
|
………………………………………………………………………………………… |
A-1 |
|
………………………………………………………………………………………… |
A-1 |
|
……………………………………………………………………………….. |
A-2 |
MIDI Implementation Chart
Ch-1


|
1 |
2 |
3 |
4 |
5 |
6 |
7 |
8 |
9 |
bk |
||||||||||||||||||||||||||||||||||||||||||||||||||||||||||||||||
|
*2 |
*3 |
||
|
bm bn |
bo |
bp |
bq |
*4
Ch-2


|
• |
||
|
1 |
VOLUME |
9 GRAND PIANO (CLASSIC) |
|
2 |
SYNCHRO/FILL-IN |
bk TONE/SETTING |
|
3 |
X/ |
bl |
|
4 |
MUSIC LIBRARY, RHYTHM |
bm DC 12V |
|
5 |
LR |
bn DAMPER PEDAL |
|
6 |
RECORDER |
bo MIDI OUT/IN |
|
7 |
METRONOME |
bp POWER |
|
8 |
GRAND PIANO (MODERN) |
bq PHONES |
TONE/SETTING
TONE/SETTING TONE/SETTING
z TONE/SETTING
: Ch-8 “
z Ch-24 “
Ch-26 “
Ch-3


AD-12
DC 12V
AD-12
• 壓器。
• 壓器上。
«
• 電源。
• 不表示發生了故障。
Ch-4


»
VOLUME
|
AUX IN |
|||
|
PHONES |
|||||
|
PHONES |
|||||
|
INPUT 1 |
|||||
|
INPUT 2 |
|||||
|
PHONES PHONES |
1) |
||||
|
×1 ×2 |
|||||
|
1 |
|||||
|
• PHONES |
AUX IN VOLUME |
||||
2
* 2VOLUME
*
Ch-5


DAMPER PEDAL
DAMPER PEDAL (SP-3)
•GRAND PIANO MODERN CLASSIC VARIATION
DAMPER PEDAL
SP-3
3SP-30
SP-30
SP-30
•SP-30 CS-65P CS-66P
Ch-6


|
/ |
METRONOME |
||||||||||
TONE/SETTING
|
POWER |
VOLUME |
GRAND PIANO |
||
11
Ch-8 “
1. POWER
POWER
«
•LR
2.
•GRAND PIANO
MODERN CLASSIC
•Ch-8 “
3.VOLUME
•MODERN, CLASSIC
11 MODERN CLASSIC GRAND PIANOGRAND PIANO
|
MODERN |
|
|
CLASSIC |
|
Ch-7


|
MODERN CLASSIC VARIATION |
± |
² |
|
1 |
2 |
|
|
GRAND PIANO |
ELEC PIANO |
1. TONE/SETTING
:
|
VIBRAPHONE |
STRINGS |
± |
² |
|
|
1 |
2 |
|||
|
BASS (LOWER) |
||||
|
HARPSICHORD |
PIPE ORGAN |
|||
|
TONE/SETTING |
BASS 1, BASS 2
1 BASS 1, BASS 2BASS 1 BASS 2
• BASS 1 BASS 2
•BASS 1 BASS 2
•2 BASS 1 BASS 2
Ch-8
![]()


1. TONE/SETTING BRILLIANCE –3 3
• T S
1. TONE/SETTING
: HARPSICHORD STRINGS
HARPSICHORD
STRINGS
2. GRAND PIANO “Ch-8
•BASS 1 BASS 2
•2
Ch-9


. . . . . .. . . . . .
1. TONE/SETTING REVERB CHORUS
: 4
•
OFF
1:
2: 3: 4:
•
OFF
1:
2: 3:
4:
1. METRONOME
•X/
2.TONE/SETTING
METRONOME BEAT
•0 2 3 4 6 0
3.TONE/SETTING TEMPO 20 255
•+ – 1
•0 9
: “96 0 9 6
Ch-10
 Loading…
Your Donation Will Be Matched 1-to-1! Can You Chip In?
Dear Patron: Please don’t scroll past this. The Internet Archive is a nonprofit fighting for universal access to quality information. We build and maintain all our own systems, but we don’t charge for access, sell user information, or run ads. Instead, we’re powered by online donations averaging about $14. We’d be deeply grateful if you’d join the one in a thousand users that support us financially.
Right now, we have a matching gift campaign that will double the impact of every donation. We understand that not everyone can donate right now, but if you can afford to contribute this Monday, we promise it will be put to good use. Our resources are crucial for knowledge lovers everywhere—so if you find all these bits and bytes useful, please pitch in.
Your Donation Will Be Matched! Can You Chip In?
Dear Patron: Please don’t scroll past this. Right now we have a matching gift campaign that will double the impact of every donation. We understand that not everyone can give right now, but if you can afford to contribute this Monday, we promise it will be put to good use. If you find all these bits and bytes useful, please pitch in.
More products and manuals for Musical Instruments Casio
| Models | Document Type |
|---|---|
|
WK-1630 |
User Manual
96 pages |
|
LK-220 |
User Manual
45 pages |
|
LK50 |
User Manual
7 pages |
|
PRIVIA PX130 |
User Manual
36 pages |
|
PS-20 |
User Manual
40 pages |
|
LD50 |
User Manual
32 pages |
|
LK210/215ES1A |
User Manual
59 pages |
|
WK1630 |
User Manual
96 pages |
|
wk 200 |
User Manual
80 pages |
|
PX-800 |
User Manual
53 pages |
|
CTK720 |
User Manual
48 pages |
|
LK92TV |
User Manual
81 pages |
|
PX200 |
User Manual
50 pages |
|
AP-24 |
User Manual
36 pages |
|
keyboard PX-320 |
User Manual
62 pages |
|
CT-636 |
User Manual
10 pages |
|
cdp_100 |
User Manual
16 pages |
|
ap_24 |
User Manual
36 pages |
|
ap-45 |
User Manual
52 pages |
|
AP-500 |
User Manual
58 pages |


-
Страница 1
PX120ES1A ES USER’S GUIDE GUÍA DEL USUARIO Please keep all information for future reference. Guarde toda información para tener como referencia futura. Safety Precautions Bef ore tr ying to use the piano , be sure to read the separate “Saf ety Precautions”. Precauciones de seguridad Antes de intentar usar el piano, asegúrese de leer las ?[…]
-
Страница 2
T O REDUCE THE RISK OF FIRE OR ELECTRIC SHOCK, REFER SER VICING T O QU ALIFI ED SER VICE PERSONNEL. Impor tant! Please note the f ollowing important information before using this p roduct. • Before using the AD-12 A daptor to power the unit, be sure t o check the AC Adaptor for any damage first. Carefully c heck the po wer cord f or breakage, cut[…]
-
Страница 3
E-1 Contents General Guide ………………………….. … E-2 Installi ng the Music Stand ……….. …………….. ……….. …. E-2 TONE/SETTING Butto n ………….. …………….. ……….. …. E-3 Saving Set tings and Using Op eration Lo ck …… ………. E-3 Power Outlet ………………….. …………… E-4 Using[…]
-
Страница 4
E-2 General Guide ∗ 1 ∗ 3 ∗ 2 ∗ 4 bl 1 2 3 4 5 6 7 8 9 bk bm bn bo bp bq * 3 Left Side * 1 Bottom * 2 Back * 4 Installi ng the Music Stand Insert the bottom of the musi c stand into the groove on the top of the digital piano ’s console. PX120_e.book 2 ページ 2007年 6月26日 火曜日 午前11時 36分[…]
-
Страница 5
General Gu ide E-3 NO TE • The na mes show n here ar e always indicat ed in bold when they appear within the text of th is manual . The TONE/SETTIN G button is used when configuring a variety of different digital piano settings. The following are TONE/SETT ING button basics. z To change a setting, h old down the TONE/SETT ING button as you press […]
-
Страница 6
E-4 Po w e r O u t l e t Your di gital p iano runs on standa rd h ousehol d powe r. Be s ure to t ur n off pow er w he nev er y ou a re n ot u si ng the digital piano. Use only the AC ad aptor that is specified for use with this digital pia no. Specified AC Adaptor: AD -12 Back Note the foll owing important pr ecautions to a void damage to the powe[…]
-
Страница 7
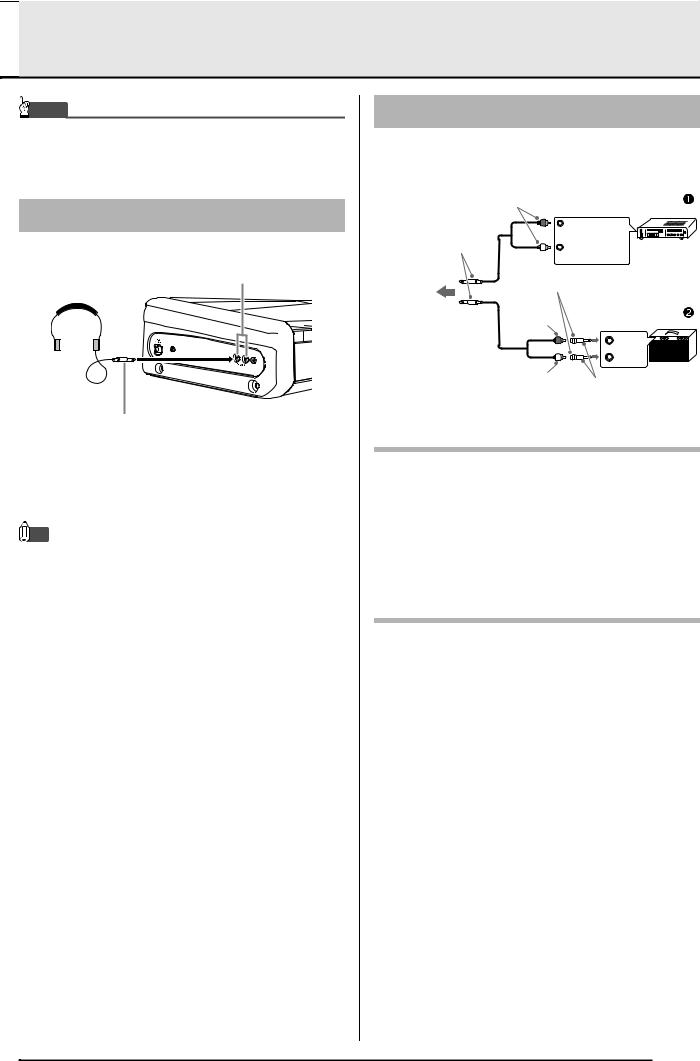
E-5 Connections IMPORT ANT! • Whe nev er con nec ting some thin g to the digit al piano , fir st use the VOLUME controller to set the volume t o a low level. After con necting, you can adjust the volume to the leve l you w ant. Left Side Connect comm ercially available hea dphones to the PHONES jack. Connecting headphones to the PHONES jack cuts […]
-
Страница 8
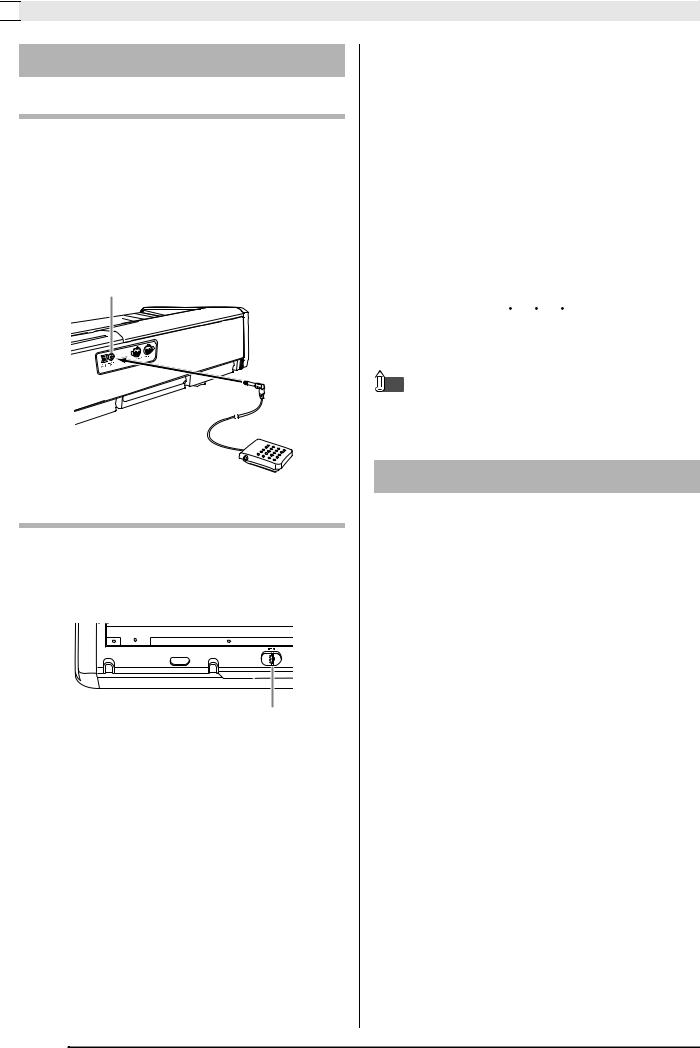
E-6 Conne ction s DAMPER PEDAL jack Connecting the supplied pedal (SP-3) to the DAMPER PEDAL jack makes it pos sible to use the pedal as a damper pedal. Pressing t he damper pedal w hile playing will cause the notes you play to reverberate for a very long time. • When a G RAN D PIANO tone (M ODERN , CLASSIC, VARIATION) is selected as the tone, pr[…]
-
Страница 9
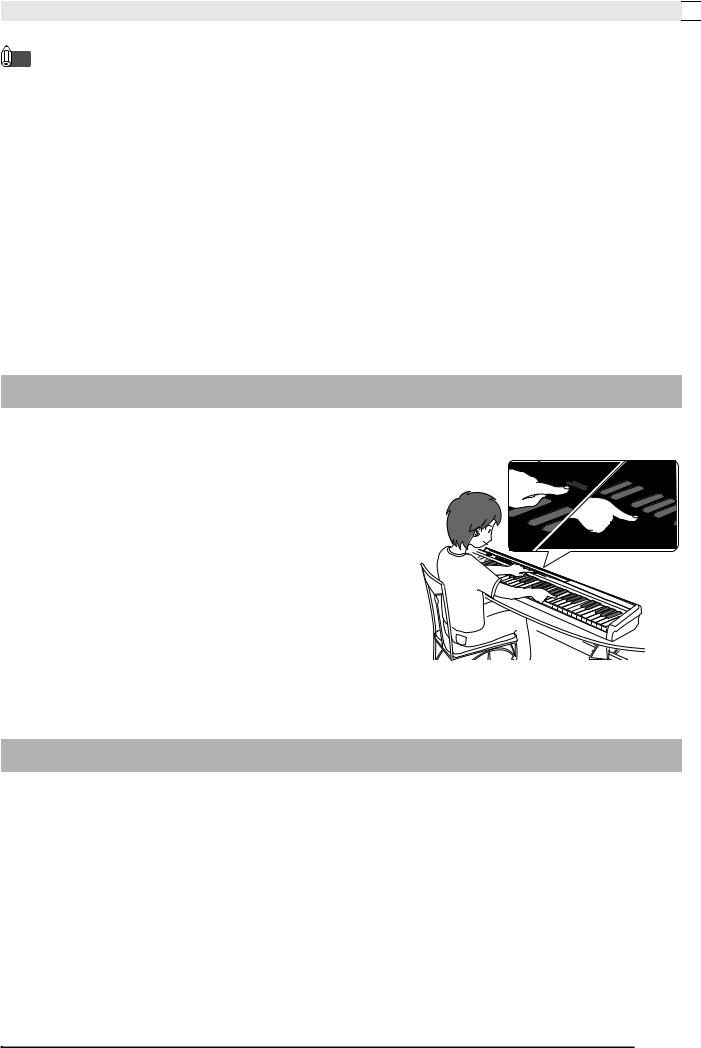
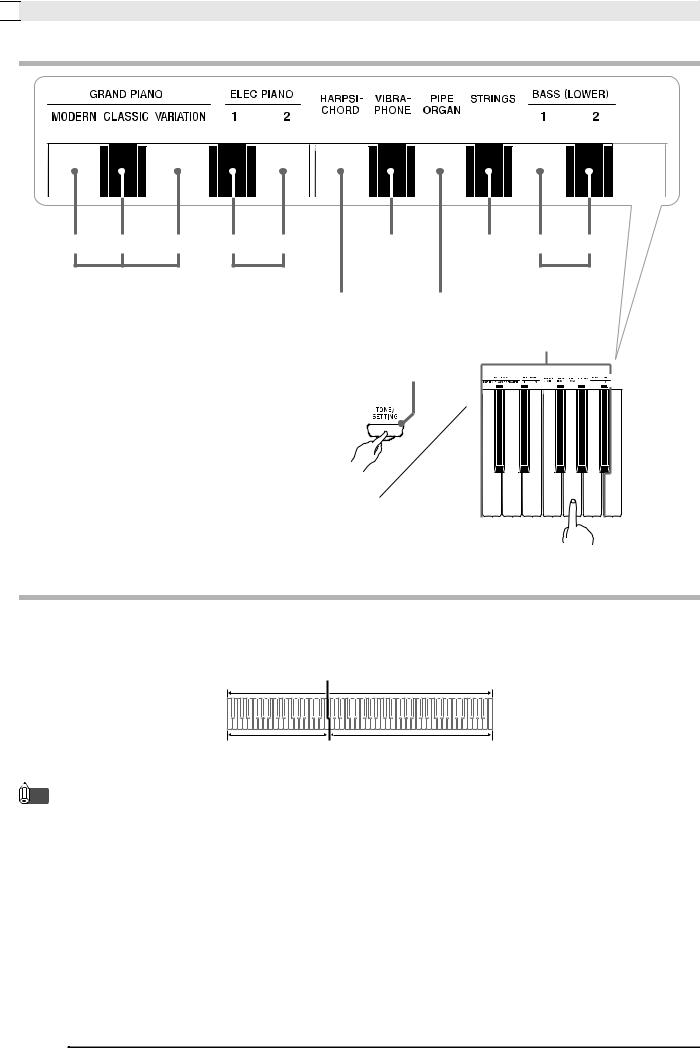
E-7 Pla y ing with Diff erent T ones This digi tal piano h as 11 built -in tones. * You can select these tones usi ng keyboard keys. The name of the tones assign ed to each keyboard key is marked above the keys . For details about selecting these tones, see “Sele cting a Tone Using the Keyboard Keys” on pa ge E-8. 1. Press the POWER bu tton to […]
-
Страница 10
E-8 Playin g with D ifferent To nes Selecting a Tone Using the Keyboar d Keys Bass Tones (BASS 1, BASS 2) Selecting ei ther of the two bass to nes (BASS 1, BASS 2) on the right side of the tone setting keys in step 1 of the above procedure will assi gn the selected bass tone to the low ra nge (left side) of the keyboard. The hig h range (right side[…]
-
Страница 11
Playing wit h Differe nt Tones E-9 1. While hold ing down the TONE/SETTING button, u se the BRILLI ANCE keys to specify a brilliance val ue in the range of –3 to 3. NO TE • To retu rn a ton e to its in itial defa ult set ting, pres s T and S at the same time. Use the followin g procedure to laye r two tones, so th ey sound a t the same tim e. 1[…]
-
Страница 12
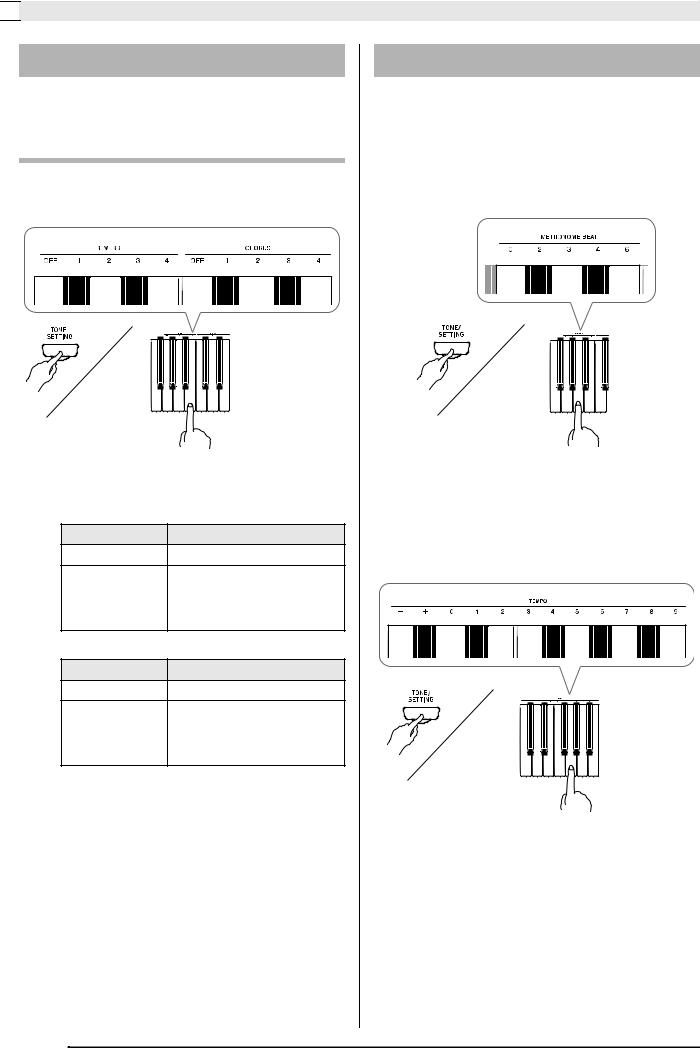
E-10 Playin g with D ifferent To nes Reverb . . . . Makes your notes resonate. Chorus . . . Adds more breadth to your notes. To configure reverb and chorus effect settings 1. While hold ing down the TONE/SETTING button, p ress the REVERB or CHORUS keyboard key. Example: Selectin g Reverb 4 • Reverb Value •C h o r u s V a l u e 1. Press the METR[…]
-
Страница 13
Playing wit h Differe nt Tones E-11 4. Press the METRONOME button or X / button to turn of f the metronome. NO TE • To retur n the tempo s etting to the default te mpo of the current ly selected Musi c Library tun e or the tempo recommended for the rh ythm you ar e using, pres s the + and – keys at the same time in ste p 3. To adjust the me[…]
-
Страница 14
E-12 Playin g with D ifferent To nes 3. To exit the Duet Mode, press either the MODERN or CLASS IC GRAND PIANO button. IMPORT ANT! • The d igital pi ano also will ex it the Duet Mo de if you use the TONE/SET TING button and to ne set ting key board keys to sel ect a t one in step 3 . • You cann ot use the Duet M ode whil e using Auto Accomp ani[…]
-
Страница 15
E-13 Pla ying Bac k Built-in Songs IMPORT ANT! • After y ou selec t a built-i n song, i t can t ake a numbe r of second s for the son g data t o be loaded . While t he data is being l oaded, the keyb oard ke ys and b utton opera tions will b e disabl ed. If you are playi ng somet hing o n the keyboa rd, the foll owing o peratio n will cause ou tp[…]
-
Страница 16
E-14 Playin g Back Bui lt-in Songs IMPORT ANT! • Be su re to allow a bit of time betw een + an d – ke y operatio ns. Perform ing a serie s of + and – key opera tions too quic kly can caus e some o f the opera tions to be skippe d. When s electing a song , use the number in put keys i nstead of the + a nd – key s if the s ong numb er you wan[…]
-
Страница 17
E-15 Pla y ing a Rh ythm You can select from a mong 20 built-in rhythms . 1. Press the RHYTHM button so the lamp below it is lit. • Eac h press of the b utton tog gles be tween the up per lamp an d lower la mp. 2. Find the rhythm number of the rhythm you want to use in the Rhythm List on page A-1. 3. To change to another rhyt hm, hold down the TO[…]
-
Страница 18
E-16 Play ing a R hythm To adjust playback tempo 1. While hold ing down the TONE/SETTING button, use the TEMPO keys to specify a tempo value in the range of 20 to 255 beats per minute. • Each press of the + or – key raise s or lowers the tempo val ue by 1. • You can use the va lue in put keys (0 to 9) to ent er a specific va lue. Be sur e to […]
-
Страница 19
Playing a Rhyth m E-17 To play with Auto Accompaniment PREP ARA TION • Use the proced ures under “Select ing a Rhythm” to select the rhy thm you want to use and ad just the tempo. 1. While hold ing down the TONE/SETTING button, press a MODE ke yboard key t o select a chord mode. Example: Fingered • See “How to Play Cho rds” on pag e E-1[…]
-
Страница 20
E-18 Play ing a R hythm NO TE • When pla ying a mi nor, sevent h, or minor seventh c hord, it makes no differ ent whet her the a dditional key s you press are black or white. FINGERED In the FINGERED mode, you play stan dard chord fingerings in th e accompaniment k eyboard range to play chords. To finger a C chord, for example, you would pres[…]
-
Страница 21
Playing a Rhyth m E-19 Fingered C hord Note s • Except for the chords whose names have * 1 afte r them in the abo ve examples, you also can use inverted fingerings. This means that fingering either E-G-C or G-C-E will produces a C chord. • Except for the chords whose names have * 2 afte r them in the above examples, you need to press all of the[…]
-
Страница 22
E-20 Recor ding and Pla y Bac k You can store the no tes you play in digital piano memory for later playback. A track i s a con tainer of recorded data, and a song consist s of two t racks: Track 1 and Track 2. You can record each track separately and then com bine them so they play back together as a single song. Memory Capacity • You ca n recor[…]
-
Страница 23
Recording and Play Back E-21 After recording to eith er of the tracks o f a song, you ca n record to the other track while listening to playback what you recorded in the first track. To record to a specific tr ack of a song 1. Press the RECORDER bu tton twice so i ts lamp is flashing. • At th is time the L lamp w ill flash t o indicate th at the […]
-
Страница 24
E-22 Reco rding and Play Back To record to one track of a song while listening to the playback of the other trac k 1. Press the RECORDER button so its la mp is lit. 2. Press th e LR button until the la mp of only the track to which you want to play back is lit. 3. Press the RECORDER button so its la mp is flashing. • This will c ause the L lamp t[…]
-
Страница 25
Recording and Play Back E-23 The following procedure dele tes a specific track of a song. IMPORT ANT! • The p rocedure b elow de letes all of the data of the select ed track. Note t hat the delete operation cannot be undone. Check to make s ure you re ally do not nee d the data in digital piano m emory bef ore you pe rform the follow ing steps . […]
-
Страница 26
E-24 Configuring Settings with the K eyboar d In addition to sel ecting tones and Music Li brary tunes, you also can use the TONE/SETTING button in combination with the keyboard keys to configure effect, keyboard touch, and other settings. 1. Use the “Parameter List” on page E-26 to find the setting you want to configure, and note its details. […]
-
Страница 27
Configurin g Settings with the Keyboard E-25 • The numbers 1 through bs correspon d to the sam e numbers in th e “Parameter List ” on page E-26. K eybo ar d Ke ys Use d f or Confi gurin g Sett ings − + OFF ON OFF ON OFF ON OFF ON [Overall] [Center keyboard] [Right keyboa rd] bk Auto Acco mpanim ent mode 6 Temp o 2 Brilliance b[…]
-
Страница 28
E-26 Configuring Settings with th e Keyboard ■ Tones ■ Song/Rhythm/Metronome P arameter List Parameter Settings Operation Type (page E-24) Description Remarks 1 Tone selection See page E-7. Default: GRAND PIANO (MODERN) A Assigns a tone to the keyboard. (page E-7) 2 Brilliance (BRILLI ANCE) –3 to 0 to 3 Default: 0 B Specifies the bril liance […]
-
Страница 29
Configurin g Settings with the Keyboard E-27 ■ Keyboard Parameter S ettings Operation Type (pag e E-24) Description Remarks bl Touch Response (TOUCH RESPONSE ) Off (OFF), 1 to 3 Default: 2 A Specifies the relative touch of the ke yboard keys. Setting a smaller value ca uses lig hter touch to produce more powerful sou nd. bm Keybo ard K ey (TRANSP[…]
-
Страница 30
E-28 Confi guring Setti ngs with th e Keyboard ■ MIDI and Other Setting s Parameter S ettings Operation Type (pag e E-24) Description Remarks bo Send Ch annel 01 to 16 Default: 01 B Specifies one of the MIDI channe ls (1 thr ough 16) as the Sen d Channel, which is used for sen ding MIDI messa ges to an ex ternal dev ice . bp Local Control Off, On[…]
-
Страница 31
Configurin g Settings with the Keyboard E-29 What is MIDI? MIDI i s a stan dard f or digit al signal s and c onnect ors that allows musical instruments, comp uters, and other devices, regardless of manufacturer, to exchange data with each oth er. NO TE • For deta ils about MIDI impl ementa tion, vis it: http:/ /world.c asio.com / MIDI Connections[…]
-
Страница 32
E-30 Ref erence T roub leshooting Problem Cause Action See Page No sound is produced when I press a keyboard key. 1. The VOLUME controller is set to “MIN”. 2. Headphones are conn ected to the digital piano. 3. MIDI Local Control is turned off. 4. Check the current accompaniment mode setting. Normally, the accompaniment keyboard range will not p[…]
-
Страница 33
Reference E-31 • Specifications and designs are subject to change without notice. Pr oduct Specifications Model PX-120 Keyboard 88-key piano keyboar d, with Touch Response Maximum Polyphony 128 notes Tones 11 • Layer (excluding bass tones) • Split (Low-range bass tones only) Effects Brilliance (–3 to 3), Reverb (4 ty pes), chorus (4 type s)[…]
-
Страница 34
E-32 Reference Be sure to read and observe the fo llowing operating precautions. ■ Location Avoid the follow ing locatio ns for this product. • Areas exposed to direct sunlight an d high humidit y • Areas subjected to temper ature extremes • Near a radio, TV, video deck, or tuner The above devices will not cause malfunction of the product, […]
-
Страница 35
A-1 Appendix/Apéndice T one List /Lista de ton os Tone Na me/ Nombre de to nos Program Change/ Cambio de progra ma Bank Selec t MSB/ MSB de selec ción de banc o Maximum Polyph ony/ Polifo nía máxima GRAND P IANO (MODE RN) 04 8 6 4 GRAND P IANO (CLASSI C) 0 49 64 GRAND P IANO (VARI ATI ON) 0 50 128 ELEC PI ANO 1 4 48 128 ELEC PIANO 2 5 48 64 HAR[…]
-
Страница 36
A-2 Appe ndix/Apén dice Fing ered Chord Char t/Cuadr o de acordes digitados (Fing ered) dim m7 b 5 M7 M m 7 m 7 dim7 Chord Type Root C D E F G A B C /(D ) b # (D )/E b # F /(G ) b # (G )/A b # (A )/B b # aug sus4 C D E F G A B C /(D ) b # (D )/E b # F /(G ) b # (G )/A b # (A )/B b # m add9 7sus4 mM7 7 b 5 add9 Chord Type Root PX120_e.book 2 ペー[…]
-
Страница 37
Function… T ransmitted Recognized Remarks Basic Channel 1 — 16 1 — 16 1 — 16 1 — 16 Def ault Changed Note Number 21 — 108 0 — 127 0 — 127 * 1 T rue v oice Program Change O 0 — 127 O 0 — 127 :T rue # After To u c h Control Change X X X O Pitch Bender XO System Exclusive OO K ey’s Ch’s V elocity O 9nH v = 1 — 127 X 8nH v = 64 O 9nH v = 1 — 127 […]
-
Страница 38
This recycle mark indicates that the packaging conforms to the environmental protection legislation in Germany. Esta marca de reciclaje indica que el empaquetado se ajusta a la legislación de protección ambiental en Alemania. MA0707-A Printed in China PX120ES1A C[…]
Как использовать наш сайт инструкций OnlineManuals.ru
Наша цель состоит в том, чтобы предоставить вам быстрый доступ к содержанию инструкции для синтезатора, цифрового пианино Casio PX-120.
С помощью онлайн просмотра, Вы можете быстро просмотреть содержимое инструкции и найти решение проблемы с синтезатора, цифрового пианино Casio PX-120.
Для Вашего удобства
Если листать руководство пользователя синтезатора, цифрового пианино Casio PX-120 прямо на сайте, не очень удобно для Вас, есть два возможных решения:
• Просмотр в полноэкранном режиме — легко просмотреть руководство пользователя (без загрузки его на свой компьютер), Вы можете использовать режим полноэкранного просмотра.
Для просмотра инструкции пользователя синтезатора, цифрового пианино Casio PX-120 на полном экране, используйте кнопку «Открыть в Pdf-viewer».
• Загрузка на компьютер — Вы можете также скачать Инструкция синтезатора, цифрового пианино Casio PX-120 на свой компьютер и сохранить его в файлах.
Многие люди предпочитают читать документы не на экране, а в печатной версии.
Возможность печати руководства пользователя также была предусмотрена на нашем сайте,
и вы можете использовать ее, нажав на иконку «печать» в Pdf-viewer.
Нет необходимости печатать все руководство синтезатора, цифрового пианино Casio PX-120, можно выбрать только нужные страницы инструкции.