
Guida all’uso 3502
I-9
3. Mentre l’impostazione che si desidera cambiare lampeggia, premere
D
per farla
cambiare come descritto di seguito.
Per cambiare questa impostazione
Eseguire questa operazione di pulsante
Secondi
Premere
D
per riportare a
00
.
Ore, Minuti, Anno, Mese, Giorno
del mese
Premere
D
per far aumentare l’impostazione.
x
Se si preme
D
mentre il conteggio dei secondi è tra 30 e 59, i secondi vengono
riportati a
00
e 1 viene aggiunto ai minuti. Se il conteggio dei secondi è tra 00
e 29, il conteggio dei minuti rimane invariato.
4. Premere
A
per lasciare la schermata di impostazione.
x
Il giorno della settimana viene visualizzato automaticamente conformemente
alle impostazioni della data (anno, mese e giorno del mese).
x
L’anno può essere impostato per il periodo compreso fra il 2000 e il 2099.
x
Il calendario automatico completo incorporato nell’orologio tiene conto
automaticamente della differente durata dei mesi e degli anni bisestili. Una volta
impostata la data, non c’è bisogno di cambiarla, tranne dopo che si è fatta
sostituire la pila dell’orologio.
I-8
Indicazione dell’ora
Usare il modo di indicazione dell’ora per impostare e per
vedere l’ora e la data attuali.
Per impostare l’ora e la data
1. Nel modo di indicazione dell’ora, tenere premuto
A
finché i secondi iniziano a lampeggiare, condizione che
indica la schermata di impostazione.
2. Premere
C
per spostare il lampeggiamento nell’ordine
indicato di seguito per selezionare altre impostazioni.
C
C
C
Secondi
Ore
Minuti
Giorno del
mese
Anno
Mese
C
C
C
Ore : Minuti
Secondi
Mese – Giorno del mese
Giorno della
settimana
Indicatore di pomeridiane
I-7
Modo di timer per
il conto alla rovescia
C
C
C
Modo di cronometro
Modo di ora
del secondo fuso orario
x
In un modo di funzionamento qualsiasi, tenere premuto
C
per un secondo
circa per ritornare al modo di indicazione dell’ora.
I-6
Guida generale
x
Premere
C
per passare da un modo di funzionamento ad un altro.
x
In un modo di funzionamento qualsiasi, premere
B
per far illuminare il display.
Modo di indicazione
dell’ora
Modo di suoneria
C
C
I-5
I-4
Per impostare l’ora del secondo fuso orario ……………………………………………….. I-27
Per accendere la retroilluminazione …………………………………………………………… I-29
I-3
Elenco dei procedimenti
La seguente è un’utile lista di riferimento di tutti i procedimenti operativi descritti in
questo manuale.
Per impostare l’ora e la data ……………………………………………………………………….. I-8
Per passare dall’indicazione dell’ora di 12 ore a quella di 24 ore e viceversa …. I-10
Per impostare l’ora per una suoneria …………………………………………………………. I-13
Per provare il suono della suoneria ……………………………………………………………. I-16
Per attivare e disattivare
le Suonerie da
2
a
5
e il segnale orario di ora esatta ……………………………….. I-17
Per selezionare il funzionamento della Suoneria
1 ……………………………………… I-18
Per usare il timer per il conto alla rovescia …………………………………………………. I-20
Per impostare il tempo di inizio del conto alla rovescia ………………………………. I-22
Per attivare e disattivare la ripetizione automatica …………………………………….. I-23
Per misurare i tempi con il cronometro………………………………………………………. I-25
I-2
Indice
Guida generale ……………………………………………………………………………………………. I-6
Indicazione dell’ora …………………………………………………………………………………….. I-8
Suonerie …………………………………………………………………………………………………… I-11
Timer per il conto alla rovescia ………………………………………………………………….. I-20
Cronometro ………………………………………………………………………………………………. I-24
Ora del secondo fuso orario ………………………………………………………………………. I-27
Retroilluminazione…………………………………………………………………………………….. I-29
Riferimento……………………………………………………………………………………………….. I-30
Caratteristiche tecniche ……………………………………………………………………………. I-32
Avvertenze sull’uso …………………………………………………………………………………… I-34
Manutenzione …………………………………………………………………………………………… I-46
I-1
x
Per far sì che questo orologio fornisca la durata di servizio di molti anni per cui
è stato progettato, leggere con attenzione e seguire le istruzioni descritte in
“Avvertenze sull’uso” e “Manutenzione”.
x
Conservare l’intera documentazione dell’utente a portata di mano per riferimenti
futuri.
I
Cenni su questo manuale
x
A seconda del modello di orologio, la visualizzazione
del testo appare sotto forma di caratteri scuri su sfondo
chiaro o sotto forma di caratteri chiari su sfondo scuro.
Tutte le visualizzazioni di esempio in questo manuale
sono mostrate usando caratteri scuri su sfondo chiaro.
x
Le operazioni di pulsante sono indicate mediante le
lettere mostrate nell’illustrazione.
x
Ciascuna sezione di questo manuale fornisce le
informazioni necessarie per poter eseguire le operazioni
in ciascun modo di funzionamento. Ulteriori dettagli
e informazioni tecniche si trovano nella sezione
“Riferimento”.
MA2008-IA
© 2021 CASIO COMPUTER CO., LTD.

Operation Guide 3502
E-9
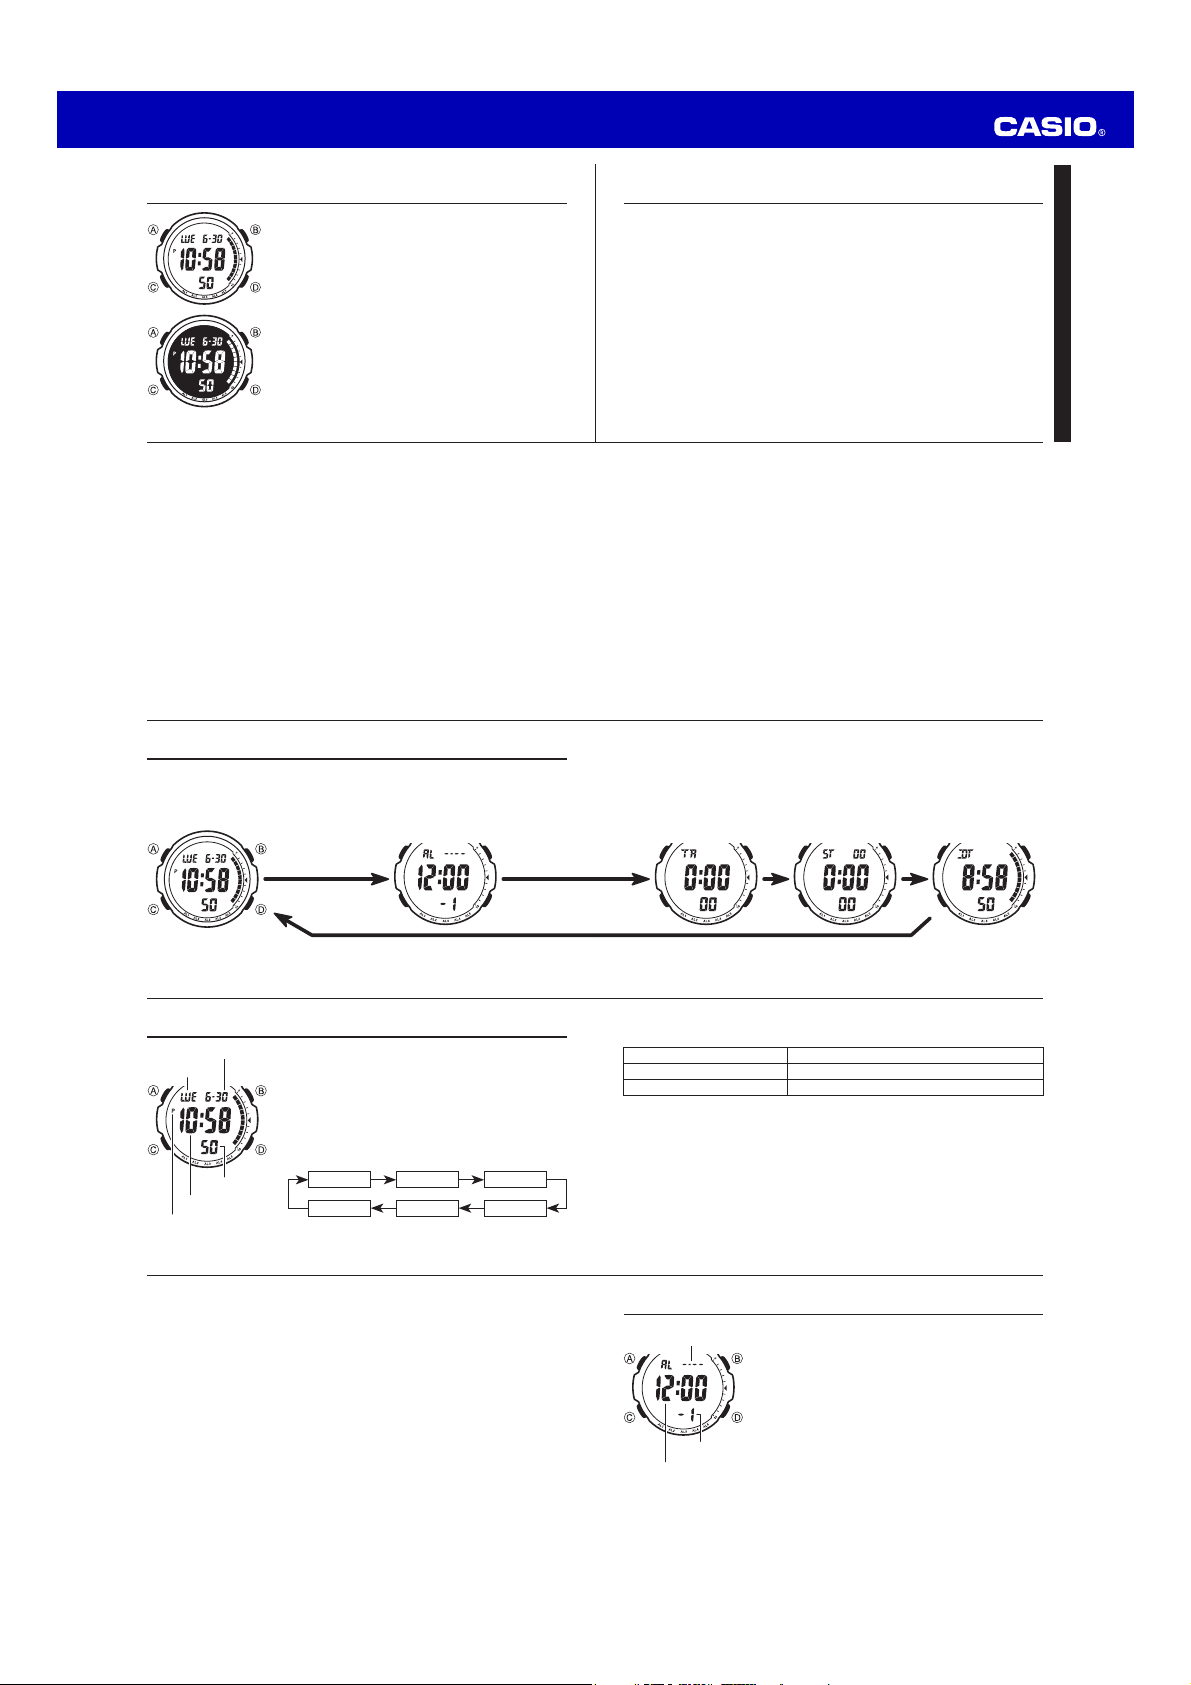
Alarms
You can set up to five independent multi-function alarms
with hour, minutes, month, and day. When an alarm is
turned on, the alarm tone sounds when the alarm time is
reached. One of the alarms has a snooze feature.
You can also turn on an Hourly Time Signal that causes
the watch to beep every hour on the hour.
x There are five alarms numbered 1 through 5. The
Hourly Time Signal screen is indicated by :00.
x All of the operations in this section are performed
in the Alarm Mode, which you enter by pressing C
(page E-4).
Alarm date
(Month – Day)
Alarm time
(Hour : Minutes)
Alarm number
E-8
To toggle between 12-hour and 24-hour timekeeping
In the Timekeeping Mode, press D to toggle between 12-hour timekeeping and
24-hour timekeeping.
x With the 12-hour format, the P (PM) indicator appears to the left of the hour
digits for times in the range of noon to 11:59 p.m. and no indicator appears to
the left of the hour digits for times in the range of midnight to 11:59 a.m.
x With the 24-hour format, times are displayed in the range of 0:00 to 23:59,
without any indicator.
x The 12-hour/24-hour timekeeping format you select in the Timekeeping Mode is
applied in all other modes.
E-7
3. When the setting you want to change is flashing, press D to change it as
described below.
To change this setting Perform this button operation
Seconds
Press D to reset to 00.
Hour, Minutes, Year, Month, Day
Press D to increase the setting.
x Pressing D while the seconds are in the range of 30 to 59 resets them to 00
and adds 1 to the minutes. In the range of 00 to 29, the minutes are unchanged.
4. Press A to exit the setting screen.
x The day of the week is automatically displayed in accordance with the date
(year, month, and day) settings.
x The year can be set in the range of 2000 to 2099.
x The watch’s built-in full automatic calendar automatically makes allowances for
different month lengths and leap years. Once you set the date, there should be
no reason to change it except after you have the watch’s battery replaced.
E-6
Timekeeping
Use the Timekeeping Mode to set and view the current
time and date.
To set the time and date
1. In the Timekeeping Mode, hold down A until the
seconds start to flash, which indicates the setting
screen.
2. Press C to move the flashing in the sequence shown
below to select other settings.
CC
C
Seconds Hour Minutes
Day YearMonth
CC
C
Hour : Minutes
Seconds
Month – Day
Day of week
PM indicator
E-5
Countdown Timer
Mode
CC
C
Stopwatch Mode Dual Time Mode
x In any mode, hold down C for about one second to return to the Timekeeping
Mode.
E-4
General Guide
x Press C to change from mode to mode.
x In any mode, press B to illuminate the display.
Timekeeping Mode Alarm Mode
C
C
E-3
To set the Dual Time …………………………………………………………………………………E-21
To turn on the backlight ……………………………………………………………………………E-22
E-2
Procedure Lookup
The following is a handy reference list of all the operational procedures contained in
this manual.
To set the time and date …………………………………………………………………………….. E-6
To toggle between 12-hour and 24-hour timekeeping ………………………………….E-8
To set an alarm time …………………………………………………………………………………E-11
To test the alarm ………………………………………………………………………………………E-13
To turn Alarms 2 through 5 and the Hourly Time Signal on and off ……………..E-14
To select the operation of Alarm 1 …………………………………………………………….E-15
To use the countdown timer …………………………………………………………………….. E-16
To set the countdown start time ……………………………………………………………….E-17
To turn auto-repeat on and off ………………………………………………………………….E-18
To measure times with the stopwatch ……………………………………………………….E-20
E-1
Contents
General Guide ……………………………………………………………………………………………. E-4
Timekeeping ………………………………………………………………………………………………E-6
Alarms………………………………………………………………………………………………………..E-9
Countdown Timer …………………………………………………………………………………….. E-16
Stopwatch ……………………………………………………………………………………………….. E-19
Dual Time …………………………………………………………………………………………………E-21
Backlight ………………………………………………………………………………………………….E-22
Reference ………………………………………………………………………………………………… E-23
Specifications …………………………………………………………………………………………..E-25
Operating Precautions ……………………………………………………………………………… E-27
User Maintenance …………………………………………………………………………………….E-37
E
About This Manual
x Depending on the model of your watch, display text
appears either as dark figures on a light background, or
light figures on a dark background. All sample displays
in this manual are shown using dark figures on a light
background.
x Button operations are indicated using the letters shown
in the illustration.
x Each section of this manual provides you with the
information you need to perform operations in each
mode. Further details and technical information can be
found in the “Reference” section.
x To ensure that this watch provides you with the years
of service for which it is designed, carefully read and
follow the instructions under “Operating Precautions”
and “User Maintenance”.
x Be sure to keep all user documentation handy for future
reference.
MA2008-EA
© 2021 CASIO COMPUTER CO., LTD.
Need a manual for your Casio Collection AE-1500WH-8BVEF Watch? Below you can view and download the PDF manual for free. There are also frequently asked questions, a product rating and feedback from users to enable you to optimally use your product. If this is not the manual you want, please contact us.
Is your product defective and the manual offers no solution? Go to a Repair Café for free repair services.
Manual

Rating
Let us know what you think about the Casio Collection AE-1500WH-8BVEF Watch by leaving a product rating. Want to share your experiences with this product or ask a question? Please leave a comment at the bottom of the page.
Are you satisfied with this Casio product?
Yes No
5 votes
Frequently Asked Questions
Our support team searches for useful product information and answers to frequently asked questions. If you find an inaccuracy in our frequently asked questions, please let us know by using our contact form.
My mechanical watch runs fast, what can I do? Verified
This might be caused by exposure to a magnetic field. It can be solved by a demagnetisation process performed by a professional watchmaker.
This was helpful (612)
A battery in my device is oxidized, can I still safely use it? Verified
Ja, the device can still be safely used. Firstly, remove the oxidizd battery. Never use bare hands to do this. Then clean the battery compartment with a cotton swab dipped in vinegar or lemon juice. Let it dry and insert new batteries.
This was helpful (583)
What do AM and PM stand for? Verified
AM stands for Ante Meridiem and indicates that the time is before midday. PM stands for Post Meridiem and indicates that the time is past midday.
This was helpful (540)
What is a ‘Chronograph’? Verified
A ‘Chronograph’ is literally a ‘writer of time’. The term is used to describe clocks and watches that tell the time of day as well as measure a certain period of time, like a stopwatch.
This was helpful (473)
What is a quartz movement? Verified
Watches and clocks with a quartz movement are driven by a battery. This sends an electric current through quartz crystals that will vibrate. These vibrations are passed on to the movement. Because the vibrations have a fixed frequency, watches and clocks with a quartz movement are extremely precise.
This was helpful (319)
What is GMT? Verified
GMT stands for Greenwich Mean Time (sometimes called UTC, standing for Coordinated Universal Time). It is the time for the longitude 0, that passes through Greenwich near London.
This was helpful (318)
There is moisture on the inside of the glass of my Casio watch, what should I do? Verified
Casio states that if the moisture appeared after an extreme change in temperature and disappears relatively quickly afterwards, there is probably nothing wrong. If the moisture does not disappear, you should have your watch repaired as soon as possible.
This was helpful (41)
- Светодиодная подсветка
Для подсветки дисплея используется светодиод. - Функция секундомера- 1/100 сек. — 24 часа
Прошедшее время измеряется с точностью в 1/100 секунды. Пределы измерения достигают 24 часов. - Таймер — 1/1 мин. — 24 часа (с автоматическим повтором)
Для поклонников точности: таймеры обратного отсчета напомнят Вам о текущих или особенных событиях, издав звуковой сигнал в установленное время. Время можно предварительно настроить от 1 минуты и до 24 часов. Часы могут затем автоматически начать отсчет в обратного времени в установленное время. Идеальное решение для людей, которым необходимо ежедневно принимать лекарства или выполнять промежуточные упражнения (тренировки). - Будильник с пятью многофункциональными звуковыми сигналами
Эта модель оснащена пятью многофункциональными будильниками. Один из будильников имеет функцию повтора. Эти часы оснащены будильниками, которые индеально подходят для напоминания о любом типе важных событий. Модель оснащена четырьмя повторяющимися звуковыми сигналами: 1. Ежедневный будильник, звучит в одно и тоже время каждый день, 2. Датированный будильник, то есть сигнал, помогающий Вам вспомнить, например, о своем дне рождения, 3. Ежемесячный будильник, звучит в один и тот же день, в одно и то же время каждый месяц, 4. Будильник для каждого дня определенного месяца. - Функция повтора будильника
Каждый раз, когда Вы выключаете звуковой сигнал, он прозвучит повторно спустя несколько минут. - Автоматический календарь
После настройки автоматический календарь всегда отображает точную дату. - 12/24-часовое отображение времени
Отображение времени можно в 12-часовом или 24-часовом формате. - акриловое стекло
Акриловый легко и относительно нерушимой. - Корпус из полимерного пластика
Корпус смолы является идеальным компаньоном каждого дня. Это прочное, легкое и относительно нечувствительно к холоду, жаре или другим внешним воздействиям. - Ремешок из полимерного материала.
Натуральный полимерный материал является идеальным для изготовления ремешка благодаря своей чрезвычайной прочности и гибкости. - пряжка
Браслет оснащен застежкой. - Продолжительное время работы аккумулятора
Десять лет — один аккумулятор. Новые разработки в электронике обеспечивают значительно более низкое потребление энергии. - Водонепроницаемость (10 Бар)
Идеально подходит для плавания с маской и трубкой: часы являются водонепроницаемыми до 10 Бар (ISO 2281). - Габариты (Ш x В x Г)
54,4мм x 51,21мм x 15,73мм - Вес
Примерно 57 гр
Возможны технические изменения и ошибки.
Размеры изображения не соответствуют натуральной величине. Цвета могут отличаться от цветов оригинала.
Operation Guide 3502
E-9
Alarms
You can set up to five independent multi-function alarms
with hour, minutes, month, and day. When an alarm is
turned on, the alarm tone sounds when the alarm time is
reached. One of the alarms has a snooze feature.
You can also turn on an Hourly Time Signal that causes
the watch to beep every hour on the hour.
x There are five alarms numbered 1 through 5. The
Hourly Time Signal screen is indicated by :00.
x All of the operations in this section are performed
in the Alarm Mode, which you enter by pressing C
(page E-4).
Alarm date
(Month – Day)
Alarm time
(Hour : Minutes)
Alarm number
E-8
To toggle between 12-hour and 24-hour timekeeping
In the Timekeeping Mode, press D to toggle between 12-hour timekeeping and
24-hour timekeeping.
x With the 12-hour format, the P (PM) indicator appears to the left of the hour
digits for times in the range of noon to 11:59 p.m. and no indicator appears to
the left of the hour digits for times in the range of midnight to 11:59 a.m.
x With the 24-hour format, times are displayed in the range of 0:00 to 23:59,
without any indicator.
x The 12-hour/24-hour timekeeping format you select in the Timekeeping Mode is
applied in all other modes.
E-7
3. When the setting you want to change is flashing, press D to change it as
described below.
To change this setting Perform this button operation
Seconds
Press D to reset to 00.
Hour, Minutes, Year, Month, Day
Press D to increase the setting.
x Pressing D while the seconds are in the range of 30 to 59 resets them to 00
and adds 1 to the minutes. In the range of 00 to 29, the minutes are unchanged.
4. Press A to exit the setting screen.
x The day of the week is automatically displayed in accordance with the date
(year, month, and day) settings.
x The year can be set in the range of 2000 to 2099.
x The watch’s built-in full automatic calendar automatically makes allowances for
different month lengths and leap years. Once you set the date, there should be
no reason to change it except after you have the watch’s battery replaced.
E-6
Timekeeping
Use the Timekeeping Mode to set and view the current
time and date.
To set the time and date
1. In the Timekeeping Mode, hold down A until the
seconds start to flash, which indicates the setting
screen.
2. Press C to move the flashing in the sequence shown
below to select other settings.
CC
C
Seconds Hour Minutes
Day YearMonth
CC
C
Hour : Minutes
Seconds
Month – Day
Day of week
PM indicator
E-5
Countdown Timer
Mode
CC
C
Stopwatch Mode Dual Time Mode
x In any mode, hold down C for about one second to return to the Timekeeping
Mode.
E-4
General Guide
x Press C to change from mode to mode.
x In any mode, press B to illuminate the display.
Timekeeping Mode Alarm Mode
C
C
E-3
To set the Dual Time …………………………………………………………………………………E-21
To turn on the backlight ……………………………………………………………………………E-22
E-2
Procedure Lookup
The following is a handy reference list of all the operational procedures contained in
this manual.
To set the time and date …………………………………………………………………………….. E-6
To toggle between 12-hour and 24-hour timekeeping ………………………………….E-8
To set an alarm time …………………………………………………………………………………E-11
To test the alarm ………………………………………………………………………………………E-13
To turn Alarms 2 through 5 and the Hourly Time Signal on and off ……………..E-14
To select the operation of Alarm 1 …………………………………………………………….E-15
To use the countdown timer …………………………………………………………………….. E-16
To set the countdown start time ……………………………………………………………….E-17
To turn auto-repeat on and off ………………………………………………………………….E-18
To measure times with the stopwatch ……………………………………………………….E-20
E-1
Contents
General Guide ……………………………………………………………………………………………. E-4
Timekeeping ………………………………………………………………………………………………E-6
Alarms………………………………………………………………………………………………………..E-9
Countdown Timer …………………………………………………………………………………….. E-16
Stopwatch ……………………………………………………………………………………………….. E-19
Dual Time …………………………………………………………………………………………………E-21
Backlight ………………………………………………………………………………………………….E-22
Reference ………………………………………………………………………………………………… E-23
Specifications …………………………………………………………………………………………..E-25
Operating Precautions ……………………………………………………………………………… E-27
User Maintenance …………………………………………………………………………………….E-37
E
About This Manual
x Depending on the model of your watch, display text
appears either as dark figures on a light background, or
light figures on a dark background. All sample displays
in this manual are shown using dark figures on a light
background.
x Button operations are indicated using the letters shown
in the illustration.
x Each section of this manual provides you with the
information you need to perform operations in each
mode. Further details and technical information can be
found in the “Reference” section.
x To ensure that this watch provides you with the years
of service for which it is designed, carefully read and
follow the instructions under “Operating Precautions”
and “User Maintenance”.
x Be sure to keep all user documentation handy for future
reference.
MA2008-EA
© 2021 CASIO COMPUTER CO., LTD.
File type: PDF
File name: 19436220_ae-1500wh.pdf
File size: 149.84 KB
File Language: English
Pages: 3
Author: Casio