

Operation Guide 2747/5574
E-19
(space)
A to Z
@
to —
0 to 9
DDD
B
D
BBB
x You can input spaces, alpha characters, symbols, and numbers in a name. For
details, see the “Character List” at the back of this manual.
4. When the character you want is at the cursor position, press C to move the
cursor to the right.
5. Repeat steps 3 and 4 until the name is complete.
x You can input up to eight characters for the name.
6. After you input the name, press C as many times as
necessary to move the cursor to the number field.
x You can tell when you are in the name field because
of the long cursor (
—
). The number field has a short
cursor (
–
).
E-18
To create a new Telememo record
1. In the Telememo Mode, press B and D at the same
time to display the new data screen.
x The new data screen shows ———, which indicates
that there is no text in the name field.
x If the new data screen does not appear, it means that
memory is full. To store another record, you will first
have to delete some of the records stored in memory.
2. Hold down A until the flashing cursor (
—
) appears
in the name field of the display, which indicates the
setting screen.
3. Use D and B to change the character at the cursor
position in the name field. The character changes in
the following sequence.
New Data Screen
E-17
Telememo
Telememo lets you store up to 30records, each
containing name and telephone number data.
Records are automatically sorted based on the
characters of the name. You can recall records by
scrolling through them on the display.
x A Telememo Mode record has a name field and a
number field.
x See “Character List” at the back of this manual for
details on how the watch sorts records.
x All of the operations in this section are performed in
the Telememo Mode, which you enter by pressing
C (page E-6).
Remaining memory
Record numberName
Number
E-16
To adjust the analog time
1. In the Timekeeping Mode, press C six times to enter
the Hand Setting Mode (page E-7).
2. Hold down A until the current digital time starts to
flash, which indicates the analog setting screen.
3. Press D to advance the analog time setting by
20seconds.
x Holding down D advances the analog time setting
at high speed.
x If you need to advance the analog time a long way, press D and B at the
same time. This locks the high speed hand movement, so you can release the
two buttons. High-speed hand movement continues until you press any button.
It will also stop automatically after the time advances 12hours or if an alarm
(daily alarm, Hourly Time Signal, or countdown alarm) starts to sound.
4. Press A to exit the setting screen.
x To return to the Timekeeping Mode, press C.
E-15
To toggle the Timekeeping Mode digital time between DST and Standard Time
1. In the Timekeeping Mode, hold down A until the
seconds start to flash, which indicates the setting
screen.
2. Press C once to display the DST setting screen.
3. Press D to toggle between Daylight Saving Time
(ONdisplayed) and Standard Time (OFF displayed).
4. Press A to exit the setting screen.
x The DST indicator appears on the Timekeeping, Alarm, and Hand Setting Mode
to indicate that Daylight Saving Time is turned on.
Setting the Analog Time
Perform the procedure below when the time indicated by the analog hands does
not match the time of the digital display.
E-14
To toggle between 12-hour and 24-hour timekeeping
In the Timekeeping Mode, press D to toggle between 12-hour timekeeping
(indicated by A or P on the display), or 24-hour timekeeping.
x With the 12-hour format, the P (PM) indicator appears on the display for times in
the range of noon to 11:59 p.m. and the A (AM) indicator appears for times in the
range of midnight to 11:59 a.m.
x With the 24-hour format, times are displayed in the range of 0:00 to 23:59, without
any indicator.
x The 12-hour/24-hour timekeeping format you select in the Timekeeping Mode is
applied in all modes.
Digital Time Daylight Saving Time (DST) Setting
Daylight Saving Time (summer time) advances the digital time setting by one hour
from Standard Time. Remember that not all countries or even local areas use
Daylight Saving Time.
E-13
4. Press A to exit the setting screen.
x Resetting the seconds only (without changing the hour, minute, or DST setting)
causes the analog minute hand setting to be adjusted automatically. If you
change the hour, minute, or DST setting, you should also use the procedure
under “To adjust the analog time” (page E-16) to adjust the analog hands
accordingly.
x See “Digital Time Daylight Saving Time (DST) Setting” (page E-14) for details about
the DST setting.
x Resetting the seconds to 00 while the current count is in the range of 30 to
59causes the minutes to be increased by 1. In the range of 00 to 29, the
seconds are reset to 00 without changing the minutes.
x The day of the week is automatically displayed in accordance with the date
(year, month, and day) settings.
x The year can be set in the range of 2000 to 2099.
x The watch’s built-in full automatic calendar makes allowances for different
month lengths and leap years. Once you set the date, there should be no reason
to change it except after you have the watch’s battery replaced.
E-12
3. When the setting you want to change is flashing, use B and D to change it as
described below.
Screen To do this: Do this:
Reset the seconds to 00.
Press D.
Toggle between Daylight Saving Time (ON)
and Standard Time (OFF).
Press D.
Change the hour or minute.
Use D (+) and B (–).
Change the year.
Change the month or day.
E-11
Digital Time and Date
Use the Timekeeping Mode to set and view a digital display of the current time and
date. When setting the digital time, you can also configure settings for summer time
(Daylight Saving time or DST).
To set the digital time and date
1. In the Timekeeping Mode, hold down A until the
seconds start to flash, which indicates the setting
screen.
2. Press C to move the flashing in the sequence shown
below to select the other settings.
C
C
Seconds
DST
Day
Hour
Month
Minutes
Year
C C C
CC
E-10
Timekeeping
This watch features separate digital and analog timekeeping. The procedures for
setting the digital time (page E-11) and analog time (page E-15) are different.
x In the Timekeeping Mode, press A to toggle the display between the date screen
and the time screen.
Date Screen Time Screen
A
Day of week
Month – Day
Hour : Minutes
Minutes PM indicator
Seconds
Hour
3.0
Rated 3.0 out of 5
3.0 out of 5 stars (based on 1 review)
Your overall rating
CASIO 5574 (01) PDF MANUAL
Click here to download CASIO 5574 (01) PDF MANUAL
CASIO 5574 (01) PDF MANUAL
FREE ENGLISH PDF
OPERATING INSTRUCTIONS
USER GUIDE – USER MANUAL
OWNER GUIDE – OWNER MANUAL
REFERENCE GUIDE – REFERENCE MANUAL
INSTRUCTION GUIDE – INSTRUCTION MANUAL
Your overall rating
- YouTube
CASIO 5574 (01) PDF MANUAL
CASIO 5574 (01) PDF MANUAL
РЕЖИМ ТЕКУЩЕГО ВРЕМЕНИ
• Ваши часы показывают цифровое и аналоговое время отдельно Процедура установки для этих значений различна
• Нажатие кнопки «А» в режиме Текущего времени переключает экран между показом даты и времени
Установка цифровых значений времени и даты 1 Нажмите и удержите кнопку “А” в Режиме Текущего времени до тех пока значение секунд не замигает на дисплее так как этот разряд выбран для установки 2 Нажмите кнопку “С” для перехода мигающего значения из разряда в разряд в следующей последовательности: Секунды Вкл выкл Летнего времени Часы
Дата Месяц Год Минуты 3 Когда разряд секунд находится в мигающем состоянии нажмите на кнопку «D» для сброса их в 00
• Если Вы нажали кнопку в тот момент когда значение секунд находилось в диапазоне от 30 до 59 к значению минут прибавится 1 если значение секунд находилось в диапазоне от 00 до 29 значение минут останется без изменений
• Когда для установки выбран разряд «включение выключение Летнего времени» нажмите кнопку «D» для переключения между Летним и Стандартным временем Если Летнее время включено в режимах Текущего времени Отсчета дней и Звуковых сигналов на экране показан индикатор DST 4 В то время когда часы минуты год месяц или дата будут находиться в мигающем состоянии нажмите “D” для увеличения их значение или «В» для уменьшения Длительное нажатие кнопок изменяет показания в ускоренном режиме 5 Установив желаемые значения для всех разрядов нажмите кнопку “А” чтобы вернуться к показу текущего времени
• Только при сбросе секунд (без изменения значений часов минут или Летнего времени) приводит к автоматической регулировке минутной стрелки Если Вы хотите изменить часы минуты или переключить Летнее Стандартное время Вы должны выполнить процедуру описанную в разделе «Как установить стрелки»
• День недели устанавливается автоматически в соответствии с датой
• Дата может быть установлена в пределах от 1 января 2000 г до 31 декабря 2099 г
• Часы содержат автоматический встроенный календарь с соответствующим количеством дней в месяцах и поправкой на високосный год Установив дату и время Вы можете больше не регулировать их исключая случай замены батареи
Переключение между 12 и 24-часовым форматом представления времени
Переключения между этими форматами осуществляется при нажатии кнопки «D» в режиме Текущего времени
• При использовании 12-часового формата слева от значения часа в диапазоне от полудня до 11:59 вечера на экране появляется индикатор Р От полуночи до 11:59 утра на экране находится индикатор А
• При использовании 24-часового формата время отображается в диапазоне от 0:00 до 23:59 без индикатора
• Выбранный формат представления времени распространяется на все режимы
Летнее время
Летом часы переводятся на час вперед для того чтобы полнее использовать дневной свет так как день летом становится длиннее Установка или отмена поправки на летнее время зависит от страны в которой Вы находитесь.
Индикатор Летнего времени (DST) появляется в режимах
Текущего времени Звуковых сигналов и Установки стрелок
РЕЖИМ УСТАНОВКИ СТРЕЛОК
Когда цифровое значение времени не совпадает с аналоговым Вы можете скорректировать положение стрелок в этом режиме
Установка стрелок 1 Для того чтобы часы перешли в режим Установки стрелок из режима Текущего времени необходимо нажать кнопку «С» 6 раз 2 В режиме Установки стрелок нажмите и удержите кнопку «А» до тех пор пока на экране не начнет мигать цифровое значение времени 3 Каждое нажатие кнопки «D» продвигает стрелки на 20 секунд вперед.
— Длительное нажатие кнопки «D» продвигает стрелки в ускоренном режиме.
— Если удерживая нажатой кнопку «D» нажать на кнопку «В» стрелки будут продвигаться в ускоренном режиме даже если Вы отпустите кнопки Для того чтобы остановить продвижение стрелок нажмите на любую кнопку Стрелки остановятся автоматически пройдя положение 12 часов или при звуковом сигнале Будильника Начала часа или Таймера 4 После того как Вы установите стрелки в нужное положение нажмите кнопку «А» для того чтобы выйти из режима установки
• Для того чтобы вернуть часы в режим Текущего времени нажмите на кнопку «С»
РЕЖИМ ЗАПИСНОЙ КНИЖКИ
В этом режиме Вы можете ввести 30 записей каждая из которых содержит имя (до 8 символов) и номер телефона (до 12 символов) Имена автоматически сортируются в алфавитном порядке Вы можете прочитать нужную запись прокрутив данные через экран.
Каждая запись содержит поле имени и поле номера
• В конце данного руководства находится таблица
Ввод новых данных 1 В Режиме Записной книжки нажимайте кнопку «В» или «D» до тех пор пока не появится пустая строка
-page-1.jpg)
MA1211-ED
Operation Guide 10B+7L(Ver.C)
Reading the display Stopwatch operation
[Regular timekeeping [Daily alarm mode] [Stopwatch mode] [Time/calendar A signal confirms start/stop operation.
mode] setting mod…
Brands:CASIO

SERVICE MANUAL (with price)
ELECTRONIC CASH REGISTER
110CR/PCR250 (EX-266)
150CR (EX-267)
JAN. 1995
Printer Model : M42V
INDEX
…
Brands:CASIO

SERVICE MANUAL (with price)
ELECTRONIC CASH REGISTER
110CR/PCR250 (EX-266)
150CR (EX-267)
JAN. 1995
Printer Model : M42V
INDEX
…
Brands:CASIO
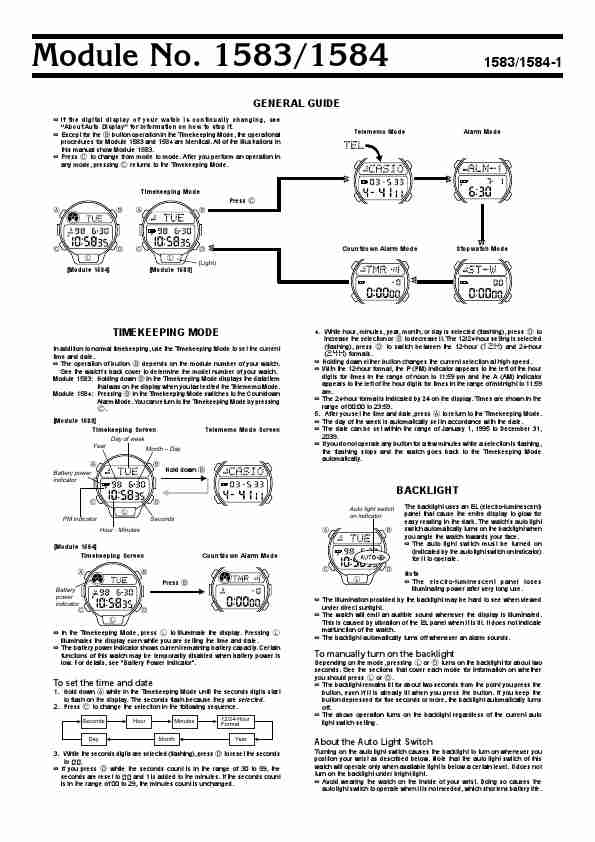
Module No. 1583/1584 1583/1584-1
GENERAL GUIDE
If the digital display of your watch is continually changing, see
«About Auto Display» for information on how to stop it.
Except for the B button operation in the Timekeeping Mode, the operational …
Brands:CASIO

Module No. 1583/1584 1583/1584-1
GENERAL GUIDE
If the digital display of your watch is continually changing, see
«About Auto Display» for information on how to stop it.
Except for the B button operation in the Timekeeping Mode, the operational …
Brands:CASIO

Module No.1627/2023
GENERAL GUIDE
Press C to change from mode to mode.
In the Timekeeping Mode and Alarm Mode, press D to illuminate the display for about two seconds. In the Countdown Alarm Mode and Stopwatch Mode, press E to illuminate the
display. The watch can be set so that the backlight flashes whenever an alarm sounds.
Timekeeping Mode …
Brands:CASIO

Module No. 1633/1814 1633/1814-1
GENERAL GUIDE
If the contents of the upper part of the display seem to be continually When …
Brands:CASIO
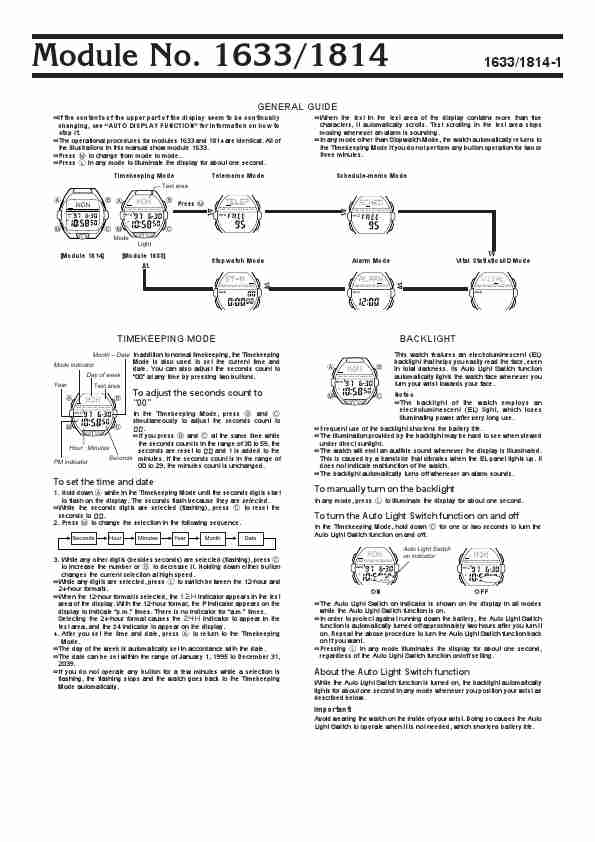
Module No. 1633/1814 1633/1814-1
GENERAL GUIDE
If the contents of the upper part of the display seem to be continually When …
Brands:CASIO
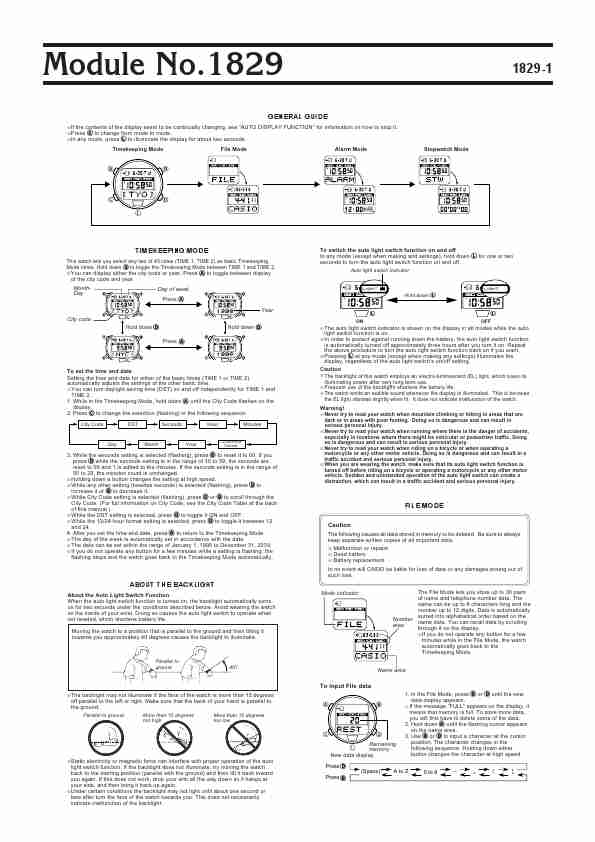
Module No.1829 1829-1
GENERAL GUIDE
If the contents of the display seem to be continually changing, see «AUTO DISPLAY FUNCTION» for information on how to stop it.
Press C to change from mode to mode.
In any mode, press L to i…
Brands:CASIO
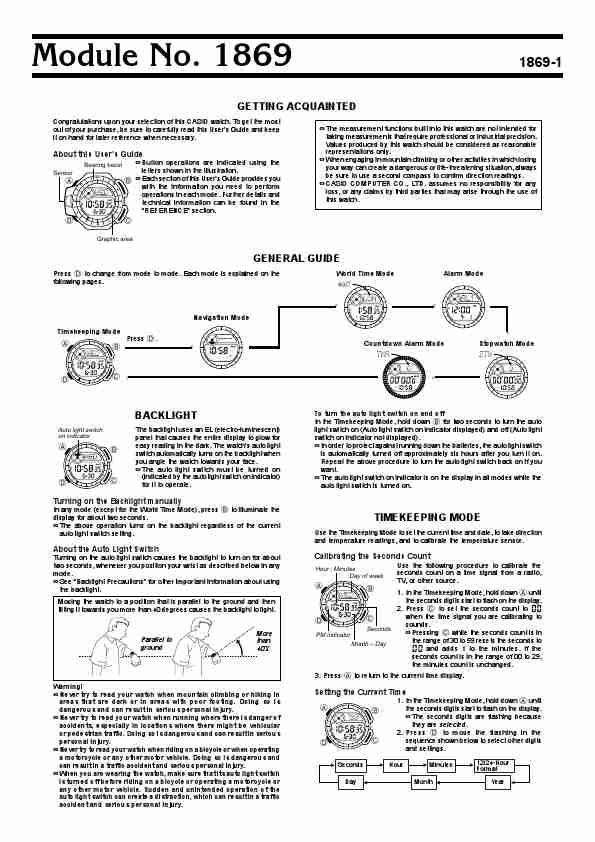
Module No. 1869 1869-1
GETTING ACQUAINTED
Congratulations upon your selection of this CASIO watch. To get the most
out of your purchase, be sure to carefully read this User’s Guide and keep The measurement functions buil…
Brands:CASIO

Module No.1922 1922-1
GENERAL GUIDE
Press C to change from mode to mode.
After you perform an operation in any mode, pressing C returns to the Timekeeping Mode.
If you do not press any button for a few minutes while making se…
Brands:CASIO
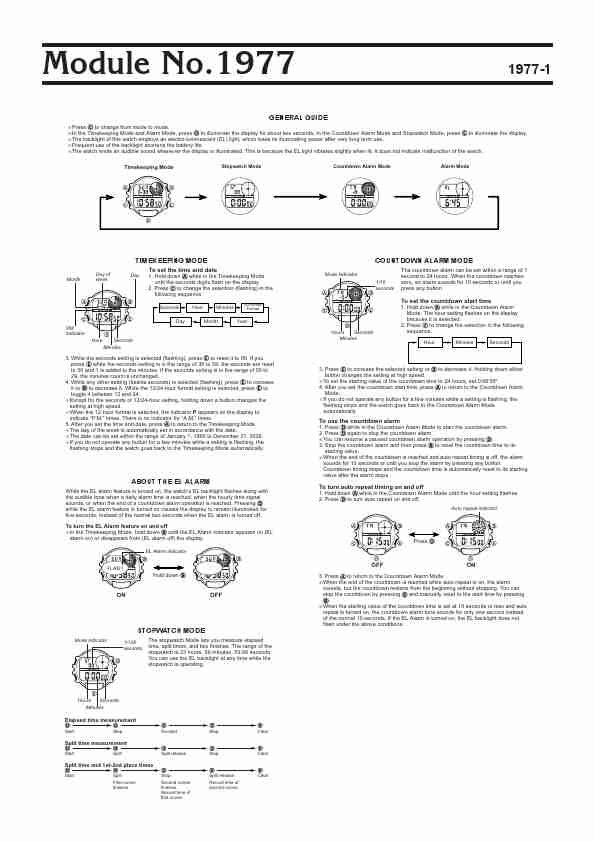
Module No.1977 1977-1
GENERAL GUIDE
Press C to change from mode to mode.
In the Timekeeping Mode and Alarm Mode, press D to illuminate the display for about two seconds. In the Countdown A…
Brands:CASIO
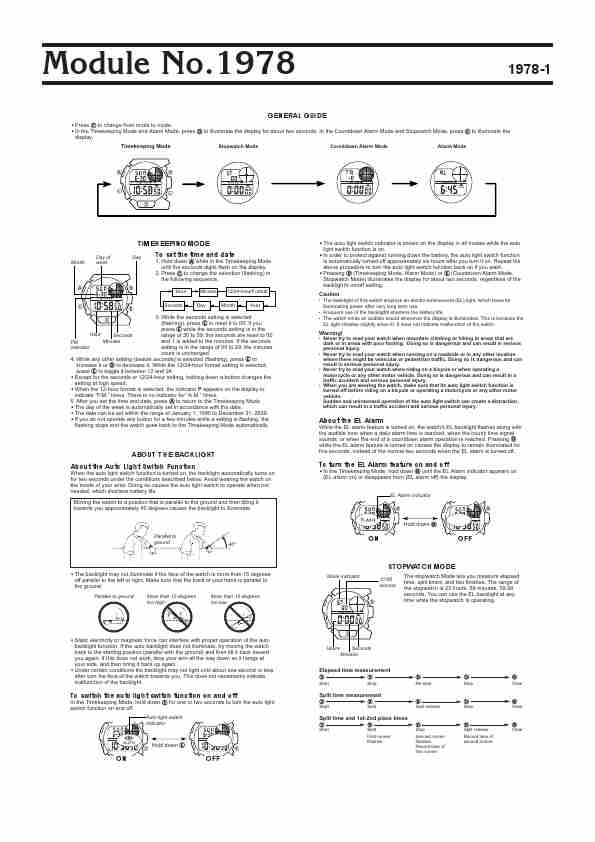
Module No.1978 1978-1
GENERAL GUIDE
Press C to change from mode to mode.
In the Timekeeping Mode and Alarm Mode, press D to illuminate the display for about two seconds. In the Countdown Alarm Mode and Stopwatch Mode, press E t…
Brands:CASIO
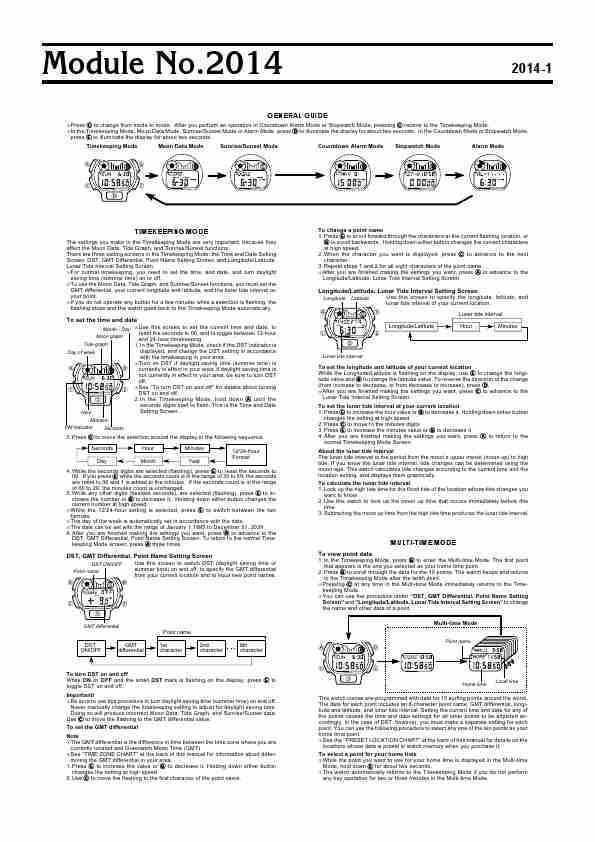
Module No.2014 2014-1
GENERAL GUIDE
Press C to change from mode to mode. After you perform an operation in Countdown Alarm Mode or Stopwatch Mode, pressing C returns to the Timekeeping Mode.
In the Timekeeping Mode, Moon Data Mode, …
Brands:CASIO
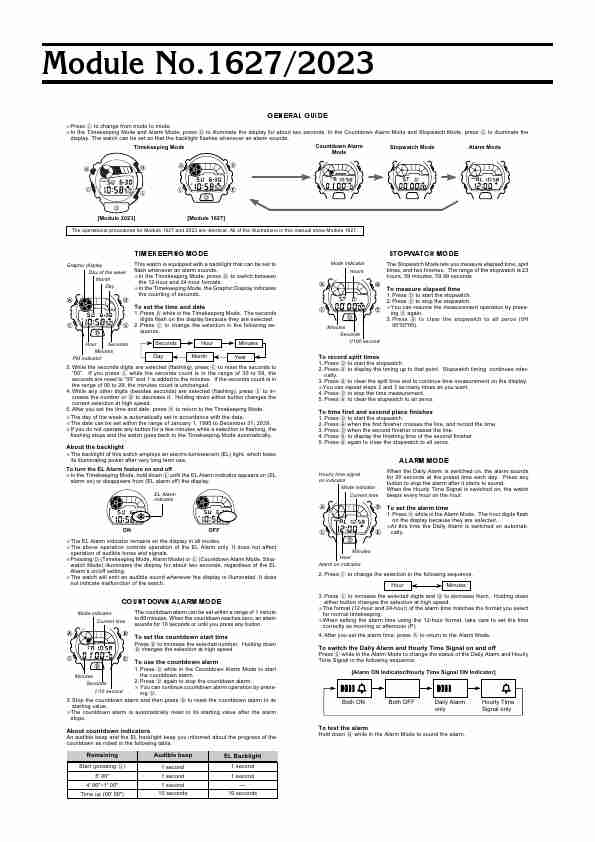
Module No.1627/2023
GENERAL GUIDE
Press C to change from mode to mode.
In the Timekeeping Mode and Alarm Mode, press D to illuminate the display for about two seconds. In the Countdown Alarm Mode and Stopwatch Mode, press E to illuminate the
display. The watch can be set so that the backlight flashes whenever an alarm sounds.
Timekeeping Mode …
Brands:CASIO
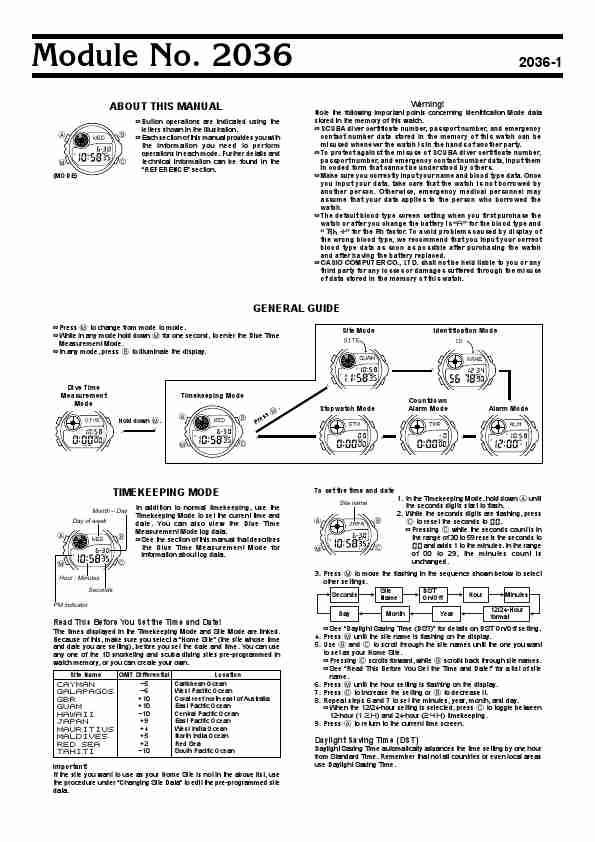
Module No. 2036 2036-1
ABOUT THIS MANUAL Warning!
Note the following important points concerning Identification Mode data
…
Brands:CASIO

Module No.2039 2039-1
ABOUT THIS USER’S GUIDE
Congratulations upon your selection of this CASIO watch. To get the most out of your purchase, be sure to carefully read this User’s Guide and keep it on hand for later reference when
necessary.
…
Brands:CASIO
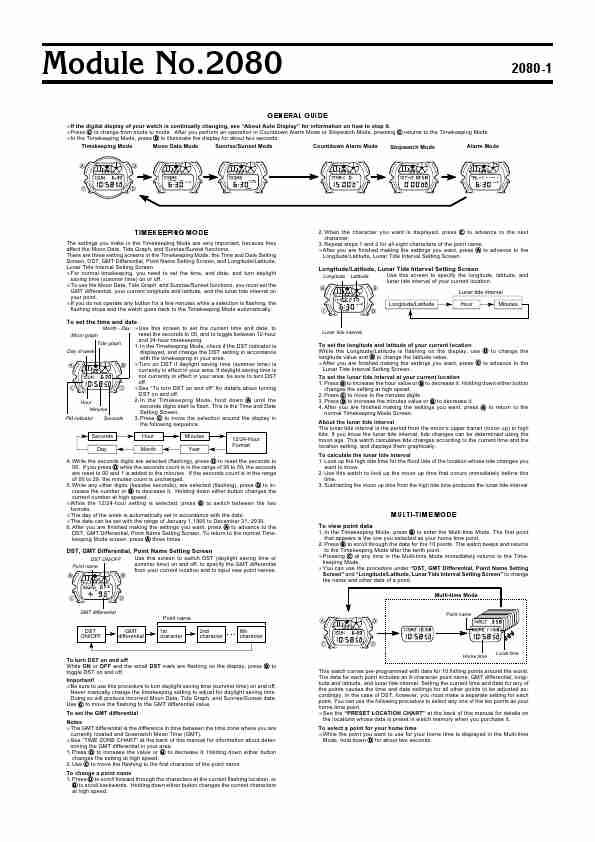
Module No.2080 2080-1
GENERAL GUIDE
If the digital display of your watch is continually changing, see «About Auto Display» for information on how to stop it.
Press C to change from mode to mode. After you perform an operation i…
Brands:CASIO
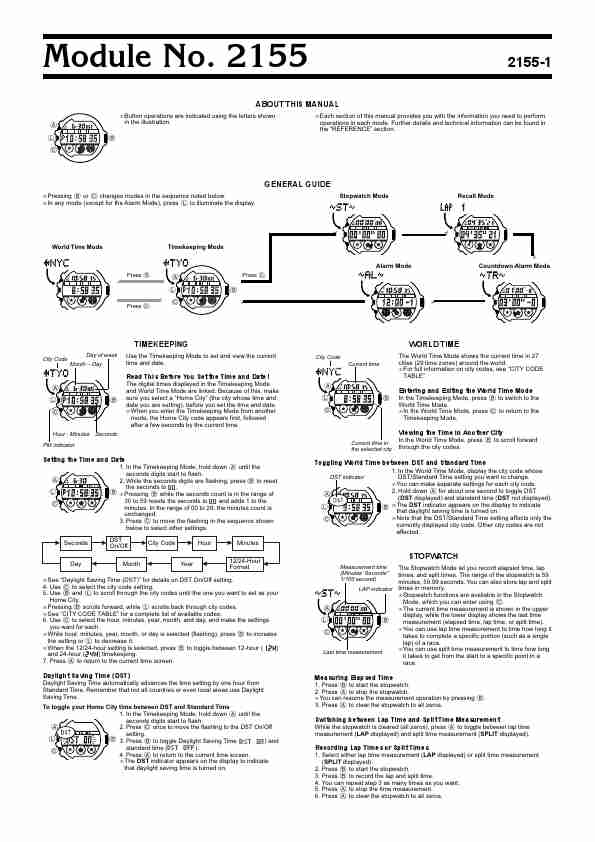
Module No. 2155 2155-1
ABOUT THIS MANUAL
Button operations are indicated using the letters shown Each section of this manual provides you with the information you need to perform
A in the i…
Brands:CASIO
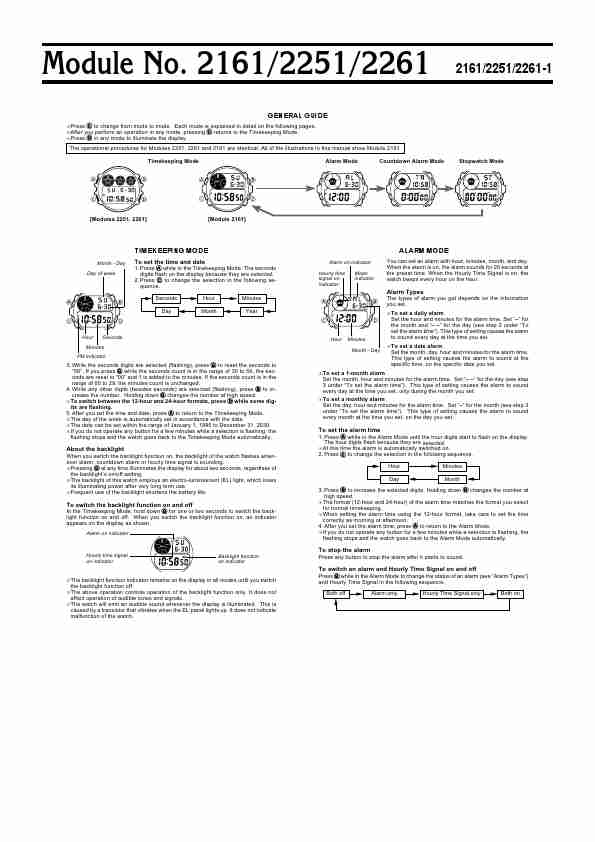
Module No. 2161/2251/2261 2161/2251/2261-1
GENERAL GUIDE
Press C to change from mode to mode. Each mode is explained in detail on the following pages.
After you perform an operation in any mode, pressing C returns to the Timekeeping Mode.
Press D in any mode to il…
Brands:CASIO

USER’S GUIDE 2164
General Guide
If the contents of the display seem to be continually changing, see «Auto Display Press C to change from mode to mode.
Function» for information on how to stop it. In any mode, press L to illuminate the display for about two seconds.
Timekeeping Mode File Mode …
Brands:CASIO
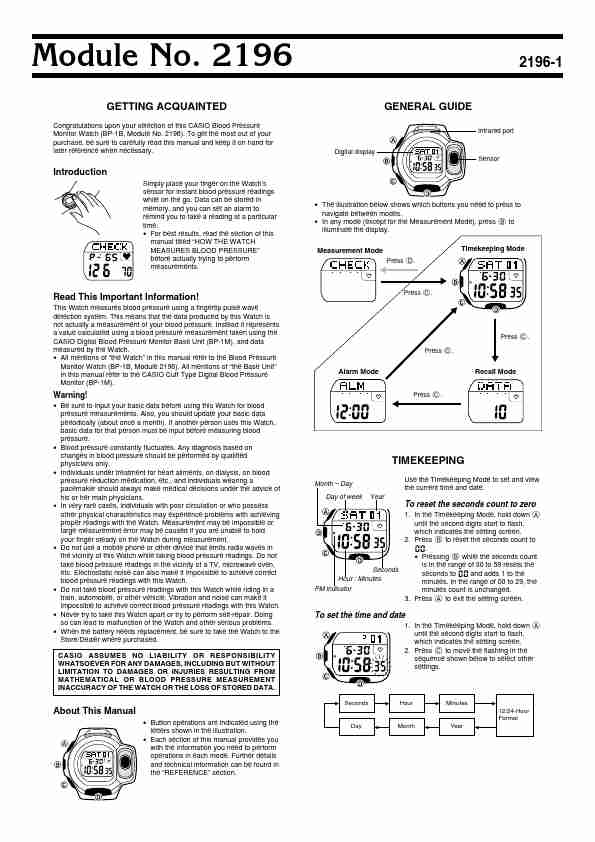
Module No. 2196 2196-1
GETTING ACQUAINTED GENERAL GUIDE
Congratulations upon your selection of this CASIO Blood Pressure
Infrared port
Mon…
Brands:CASIO

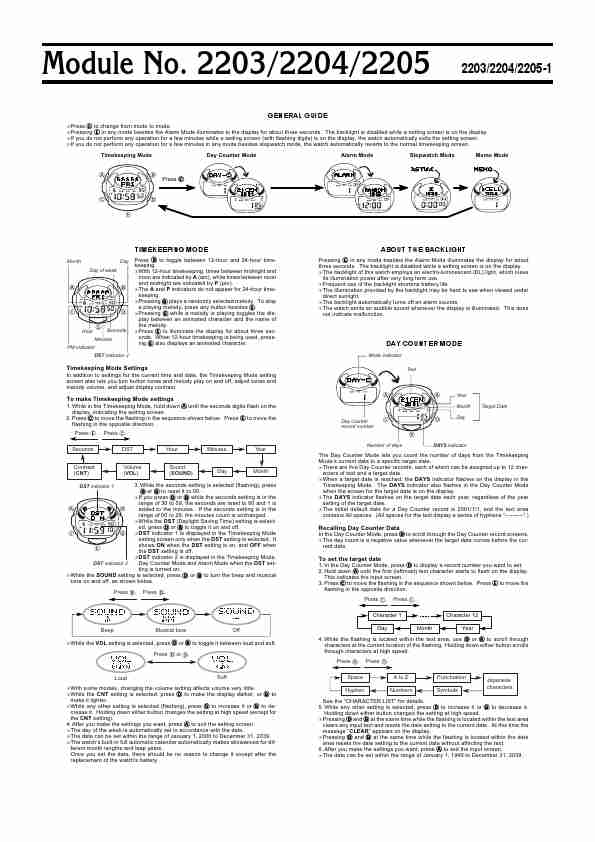
Module No. 2203/2204/2205 2203/2204/2205-1
GENERAL GUIDE
Press C to change from mode to mode.
Pressing E in any mode besides the Alarm Mode illuminates to the display for about three seconds. The backlight is disabled while a setting screen is on t…
Brands:CASIO

Module No. 2203/2204/2205 2203/2204/2205-1
GENERAL GUIDE
Press C to change from mode to mode.
Pressing E in any mode besides the Alarm Mode illuminates to the display for about three seconds. The backlight is disabled while a setting screen is on t…
Brands:CASIO
Module No. 2203/2204/2205 2203/2204/2205-1
GENERAL GUIDE
Press C to change from mode to mode.
Pressing E in any mode besides the Alarm Mode illuminates to the display for about three seconds. The backlight is disabled while a setting screen is on t…
Brands:CASIO
перейти к содержанию
CASIO ER-557 5547 Smartwatch Руководство пользователя
Ваши часы могут несколько отличаться от показанных на рисунке.
Продукт закончилсяview

Функции секундомера
Чтобы отрегулировать настройку времени
- Когда секундная стрелка окажется в положении «12 часов», потяните за Корона до Щелчка 2.
- Поверните Корона , чтобы изменить настройку времени.
- Нажмите Корона вернитесь к сигналу времени, чтобы возобновить отсчет времени.
Внимание
- Позаботьтесь, чтобы вы установили правильное время AM или PM.
- При изменении времени переместите минутную стрелку на четыре или пять минут после окончательной настройки, а затем верните ее обратно на желаемую настройку.
Чтобы изменить настройку индикатора дня
- Потяните Корона до Щелчка 1.
- Поверните Корона к вам, чтобы установить день.
- Нажмите Корона назад.
Внимание
- В настройке индикатора дня используется 31-дневный месяц. Сделайте поправки на месяцы более короткой продолжительности.
- Старайтесь не менять настройку индикатора дня в промежутке с 9:1 до XNUMX:XNUMX. В противном случае индикатор дня может измениться неправильно в полночь.
Корона Операции
Некоторые водонепроницаемые модели (100 метров, 200 метров) имеют заводную головку. Если вам нужно выполнить операцию с коронкой, поверните ее на себя, чтобы открутить. Затем вытяните корону.
Избегайте приложения чрезмерной силы при вытягивании. Пока заводная головка откручена, часы теряют водонепроницаемость. После выполнения операции с заводной головкой полностью закрутите заводную головку.

Если у ваших часов вращающийся безель…
Вы можете повернуть безель, чтобы совместить его метку ▼ с минутной стрелкой. Тогда вы сможете узнать, сколько времени прошло с момента совмещения метки ▼.

Предупреждение о низком заряде батареи
- Секундная стрелка будет прыгать с интервалом в две секунды, чтобы предупредить вас о низком уровне заряда.
- При появлении предупреждения о низком заряде батареи как можно скорее замените батарею.
- Во время предупреждения о низком заряде батареи работа секундомера отключена.
- Если во время работы секундомера возникает предупреждение о низком заряде батареи, секундомер автоматически сбрасывается на все нули и останавливается.
Использование секундомера
Секундомер измеряет прошедшее время с шагом в 1 секунду до 9 минут 59 секунд.

Важно!
- Не используйте секундомер с вытянутой заводной головкой.
Внимание
- По истечении 10 минут операция автоматически остановится.
Исправление 0 положений рук
Выполните следующую процедуру, если стрелки секундомера не возвращаются в свое 0 (нулевое) положение при сбросе секундомера.
- Потяните Корона до Щелчка 2.
- Используйте A (по часовой стрелке) и B (против часовой стрелки), чтобы переместить секундную стрелку секундомера на 12 часов, а минутную стрелку секундомера на 0.
- Удерживая нажатой любую кнопку, секундная стрелка будет перемещаться с высокой скоростью, пока вы не отпустите кнопку.
- Минутная стрелка секундомера синхронизируется с секундной стрелкой секундомера.
- После того, как все руки будут такими, как вы хотите, нажмите Корона назад.
Важно!
- При вытянутой заводной головке хронометр останавливается. Исправьте текущую настройку времени после выполнения вышеуказанной операции.
Характеристики
- точность при нормальной температуре: ± 20 секунд в месяц
- Секундомер: Пределы измерения: 9’59 дюймов (10 минут)
- Измерительный блок: 1 второй
- Размеры: Пройденное время; промежуточное время; две отделки
- Дополнительно : Предупреждение о низкой батарее
- Батарея: Одна серебряно-оксидная батарея (тип: SR920SW)
- Батарея Срок службы: около 3 лет
Технические характеристики могут быть изменены без предварительного уведомления.
Документы / Ресурсы
Представляем вам инструкцию к часам Casio 5547, которую можно посмотреть не скачивая и даже с мобильного телефона. 5547 — это не название часов, а название модуля. Индексы модуля находятся на задней крышке часов. Предупреждаем, русская инструкция не такая информативная как английская, поэтому советуем смотреть и в сторону английского варианта. Если увеличивать не очень удобно, лучше нажмите на правый верхний угол инструкции — тогда она откроется полностью.
[embeddoc url=”https://casioblog.com/manuals/ru/5547.pdf” height=”1000px” download=”all”]
А еще у нас есть полный каталог инструкций Casio, где делим все инструкции по моделям и направлениям часов Casio.