
У вас уже есть продукция Canon? Зарегистрируйте свои продукты для доступа к программному обеспечению и обновлениям встроенного ПО, а также подпишитесь на рассылку, чтобы получать персонализированные советы и эксклюзивные предложения
Поддержка
Canon IXUS 220 HS
Загружайте ПО, встроенное ПО и руководства, а также получите доступ к материалам поддержки для вашего продукта серии IXUS.
Драйверы
Для выполнения подключения некоторых устройств к компьютеру может потребоваться драйвер. На этой вкладке вы найдете соответствующие драйверы для своего устройства или, в случае отсутствия драйверов, описание совместимости устройства с каждой операционной системой.
Полезная информация. Доступ к программному обеспечению, руководствам и другим материалам можно получить с помощью вкладок, расположенных выше.
Операционная система Обнаруженная операционная система
Программное обеспечение
Программное обеспечение загружать необязательно, но оно обеспечивает дополнительные функции и позволяет максимально эффективно пользоваться возможностями устройства. На этой вкладке можно просмотреть и загрузить доступное программное обеспечение для вашего устройства.
Операционная система Обнаруженная операционная система
Руководства пользователя
Руководства для вашего устройства или программного обеспечения перечислены ниже.
Приложения и функции
На этой вкладке можно посмотреть доступные приложения и функции, совместимые с вашим устройством.
Встроенное ПО
Встроенное ПО — это постоянное программное обеспечение, установленное на устройстве и обеспечивающее его корректную работу. Canon может периодически выпускать обновления для этого встроенного ПО, и если обновление доступно, его можно загрузить ниже.
FAQs
На этой вкладке вы найдете ответы на часто задаваемые вопросы и другую полезную информацию, которая поможет вам в решении вопросов и проблем.
Важная информация
На этой вкладке вы найдете подборку часто задаваемых вопросов, которые, на наш взгляд, будут вам интересны.
Коды ошибок
Код ошибки или сообщение об ошибке может появиться на устройстве по различным причинам. С помощью поля поиска можно найти полезную информацию о конкретном коде ошибки, где будут указаны причина ошибки и необходимые действия по ее устранению.
Технические характеристики
Ниже приведены все технические характеристики данного продукта.
Полезные ссылки
-
-
Ремонт
Поиск центров по ремонту оборудования, полезная информация по процессу ремонта
-
Переработка
Узнайте больше о программе утилизации картриджей Canon
-
Canon ID
Регистрация продукта и управление аккаунтом Canon ID
-
Драйверы
2
-
Инструкции по эксплуатации
15
Языки:

Canon IXUS 220 HS инструкция по эксплуатации
(98 страниц)
- Языки:Английский, Испанский, Итальянский, Немецкий, Русский, Французский
-
Тип:
PDF -
Размер:
6.15 MB
Просмотр

Canon IXUS 220 HS инструкция по эксплуатации
(2 страницы)
- Языки:Английский, Испанский, Итальянский, Немецкий, Русский, Французский
-
Тип:
PDF -
Размер:
713.51 KB
Просмотр

Canon IXUS 220 HS инструкция по эксплуатации
(105 страниц)
- Языки:Казахский, Русский, Украинский
-
Тип:
PDF -
Размер:
3.21 MB -
Описание:
Цифровая фотокамера
Просмотр

Canon IXUS 220 HS инструкция по эксплуатации
(209 страниц)
- Языки:Русский
-
Тип:
PDF -
Размер:
7.18 MB -
Описание:
The file is an electronic user guide (PDF file) for the IXUS 220 HS.
Просмотр

Canon IXUS 220 HS инструкция по эксплуатации
(36 страниц)
- Языки:Русский
-
Тип:
PDF -
Размер:
1.43 MB -
Описание:
The file is an electronic guide (PDF file) for the IXUS 220 HS Getting Started V1.0
Просмотр

Canon IXUS 220 HS инструкция по эксплуатации
(108 страниц)
- Языки:Английский, Испанский, Португальский
-
Тип:
PDF -
Размер:
3.22 MB -
Описание:
The file is an electronic guide (PDF file) for the IXUS 220 HS.
Просмотр

Canon IXUS 220 HS инструкция по эксплуатации
(209 страниц)
- Языки:Английский
-
Тип:
PDF -
Размер:
7.24 MB -
Описание:
The file is an electronic user guide (PDF file) for the IXUS 220 HS.
Просмотр

Canon IXUS 220 HS инструкция по эксплуатации
(209 страниц)
- Языки:Шведский
-
Тип:
PDF -
Размер:
7.27 MB -
Описание:
The file is an electronic user guide (PDF file) for the IXUS 220 HS.
Просмотр

Canon IXUS 220 HS инструкция по эксплуатации
(211 страниц)
- Языки:Нидерландский
-
Тип:
PDF -
Размер:
7.41 MB -
Описание:
The file is an electronic user guide (PDF file) for the IXUS 220 HS.
Просмотр

Canon IXUS 220 HS инструкция по эксплуатации
(70 страниц)
- Языки:Нидерландский, Французский
-
Тип:
PDF -
Размер:
2.21 MB -
Описание:
The file is an electronic guide (PDF file) for the IXUS 220 HS Getting Started V1.0
Просмотр

Canon IXUS 220 HS инструкция по эксплуатации
(209 страниц)
- Языки:Французский
-
Тип:
PDF -
Размер:
7.33 MB -
Описание:
The file is an electronic user guide (PDF file) for the IXUS 220 HS.
Просмотр

Canon IXUS 220 HS инструкция по эксплуатации
(209 страниц)
- Языки:Испанский
-
Тип:
PDF -
Размер:
7.38 MB -
Описание:
The file is an electronic user guide (PDF file) for the IXUS 220 HS.
Просмотр

Canon IXUS 220 HS инструкция по эксплуатации
(70 страниц)
- Языки:Итальянский, Немецкий
-
Тип:
PDF -
Размер:
2.22 MB -
Описание:
The file is an electronic guide (PDF file) for the IXUS 220 HS Getting Started V1.0
Просмотр

Canon IXUS 220 HS инструкция по эксплуатации
(209 страниц)
- Языки:Немецкий
-
Тип:
PDF -
Размер:
7.32 MB
Просмотр

Canon IXUS 220 HS инструкция по эксплуатации
(209 страниц)
- Языки:Чешский
-
Тип:
PDF -
Размер:
7.52 MB -
Описание:
The file is an electronic user guide (PDF file) for the IXUS 220 HS.
Просмотр
На NoDevice можно скачать инструкцию по эксплуатации для Canon IXUS 220 HS. Руководство пользователя необходимо для ознакомления с правилами установки и эксплуатации Canon IXUS 220 HS. Инструкции по использованию помогут правильно настроить Canon IXUS 220 HS, исправить ошибки и выявить неполадки.
 Модель: Компактная фотокамера Canon IXUS 220 HS
Год выпуска: 2011
Количество страниц: 209
Язык: русский
Формат: pdf
Размер: 13,3 Mb
Описание:
Превосходное сочетание производительности на основе системы HS System с классическим дизайном IXUS. Canon IXUS 220 HS совмещает сверхширокоугольный объектив с 5-кратным зумом, возможность видеосъемки в формате Full HD и непревзойденную способность делать снимки при слабом освещении в элегантном тонком корпусе из нержавеющей стали.
Содержание
- Проверка комплектности.
- Прочитайте это в первую очередь.
- Что требуется сделать.
- Содержание.
- Условные обозначения.
- Меры предосторожности.
- 1. Начало работы.
- Зарядка аккумулятора.
- Поддерживаемые карты памяти (продаются отдельно).
- Установка аккумулятора и карты памяти.
- Установка даты и времени.
- Установка языка.
- Форматирование карт памяти.
- Нажатие кнопки спуска затвора.
- Съемка фотографий (Smart Auto).
- Просмотр изображений.
- Стирание изображений.
- Съемка видеофильмов.
- Просмотр видеофильмов.
- Передача изображений в компьютер для просмотра.
- Принадлежности.
- Отдельно продаваемые принадлежности.
- 2. Дополнительные сведения.
- Элементы камеры и их назначение.
- Индикация на экране.
- Индикатор.
- Меню FUNC. – Основные операции.
- MENU – Основные операции.
- Изменение режима звуковых сигналов.
- Настройка яркости экрана.
- Восстановление в камере настроек по умолчанию.
- Функция экономии энергии (Автовыключение).
- Функции часов.
- 3. Съемка с часто используемыми функциями.
- Выключение вспышки.
- Дополнительное увеличение объектов (Цифровой зум).
- Вставка даты и времени.
- Использование таймера автоспуска.
- Изменение значения разрешения (размер изображения).
- Изменение коэффициента компрессии (качество изображения).
- 4. Добавление эффектов и съемка в различных условиях.
- Съемка в различных условиях.
- Автоматическая съемка коротких видеофильмов (Подборка видео).
- Съемка с добавлением эффектов.
- Съемка с обнаружением лица (Интеллектуальный затвор).
- Съемка с длительной выдержкой.
- Высокоскоростная серийная съемка (Скоростная серийная съемка).
- Съемка с наилучшим выражением лица (Выбор лучшего изображения).
- Съемка панорам.
- 5. Выбираем настройки самостоятельно.
- Съемка в режиме программной AE.
- Настройка яркости (компенсация экспозиции).
- Включение вспышки.
- Настройка баланса белого.
- Изменение числа ISO.
- Коррекция яркости и съемка (i-Contrast).
- Изменение формата кадра.
- Серийная съемка.
- Изменение цветового оттенка изображения (Мои цвета).
- Съемка с близкого расстояния (Макро).
- Съемка удаленных объектов (Бесконечность).
- Изменение режима рамки автофокусировки.
- Выбор объекта для фокусировки (Сопровождающая АФ).
- Увеличение точки фокусировки.
- Съемка с фиксацией автофокусировки.
- Съемка в режиме следящей автофокусировки.
- Изменение способа экспозамера.
- Съемка с фиксацией AE.
- Съемка с фиксацией FE.
- Съемка с синхронизацией при длительной выдержке.
- Коррекция «красных глаз».
- Проверка наличия закрытых глаз.
- Съемка с использованием телевизора в качестве дисплея.
- 6. Использование различных функций для съемки видеофильмов.
- Съемка видеофильмов различных типов.
- Съемка видеофильмов, выглядящих как изображение миниатюрной модели (Эффект миниатюры).
- Сверхскоростная съемка видеофильмов для сверхзамедленного воспроизведения.
- Изменение качества изображения.
- Прочие функции съемки.
- Редактирование.
- 7. Использование различных функций воспроизведения и редактирования.
- Быстрый поиск изображений.
- Просмотр изображений при воспроизведении с фильтром.
- Просмотр слайд-шоу.
- Проверка фокусировки.
- Увеличение изображений.
- Просмотр каждого изображения из группы.
- Отображение различных изображений (Умное отображение).
- Изменение эффекта перехода между изображениями.
- Просмотр изображений на экране телевизора.
- Защита изображений.
- Стирание изображений.
- Пометка изображений как избранных.
- Систематизация изображений по категориям (Моя категория).
- Поворот изображений.
- Изменение размера изображений.
- Кадрировка.
- Добавление эффектов с помощью функции «Мои цвета».
- Коррекция яркости (i-Contrast).
- Коррекция эффекта «красных глаз».
- 8. Печать.
- Печать изображений.
- Выбор изображений для печати (DPOF).
- 9. Настройка параметров камеры.
- Изменение параметров камеры.
- Изменение параметров функций съемки.
- Изменение параметров функций воспроизведения.
- 10. Полезная информация.
- Питание от бытовой электросети.
- Использование карты Eye-Fi.
- Устранение неполадок.
- Список сообщений, отображаемых на экране.
- Информация, отображаемая на экране.
- Функции, доступные в различных режимах съемки.
- Меню.
- Меню FUNC. в режиме воспроизведения.
- Правила обращения.
- Технические характеристики.
- Алфавитный указатель.
Скачать: disk.yandex.ru | mega.co.nz
![]()
Camera User Guide
•Make sure you read this guide, including the “Safety Precautions” section, before using the camera.
•Reading this guide will help you learn to use the camera properly.
•Store this guide safely so that you can use it in the future.
ENGLISH

Checking the Package Contents
Check if the following items are included in your camera package.
If anything is missing, contact the retailer where you purchased the camera.
|
Camera |
Battery Pack NB-4L |
Battery Charger |
|
|
(with Terminal Cover) |
CB-2LV/CB-2LVE |
||
|
Interface Cable |
Stereo AV Cable |
Wrist Strap |
|
|
IFC-400PCU |
AVC-DC400ST |
WS-DC11 |
|
|
Getting Started |
DIGITAL CAMERA |
Warranty System |
|
|
Solution Disk |
Booklet |
||
Using the Manuals
Also refer to the manuals on the DIGITAL CAMERA Manuals Disk.
•Camera User Guide (This Guide)
Once you have mastered the basics, use the camera’s many features to shoot more challenging photos.
• Software Guide
Read when you want to use the included software.
• A memory card is not included.
• Adobe Reader is required to view the PDF manuals. Microsoft Word/ Word Viewer can be installed to view the Word manuals (required only for manuals for the Middle East).
2

Read This First
Test Shots and Disclaimer
Take some initial test shots and play them back to make sure the images were recorded correctly. Please note that Canon Inc., its subsidiaries and affiliates, and its distributors are not liable for any consequential damages arising from any malfunction of a camera or accessory, including memory cards, that results in the failure of an image to be recorded or to be recorded in a way that is machine readable.
Warning Against Copyright Infringement
The images recorded with this camera are intended for personal use. Do not record images that infringe upon copyright laws without the prior permission of the copyright holder. Please be advised that in certain cases the copying of images from performances, exhibitions, or commercial properties by means of a camera or other device may contravene copyright or other legal rights even if the image was shot for personal use.
Warranty Limitations
For information on your camera’s warranty, please refer to the Canon Warranty System Booklet supplied with your camera.
For Canon Customer Support contacts, please see the Warranty System Booklet.
LCD Monitor (Screen)
•The LCD monitor is produced with extremely high-precision manufacturing techniques. More than 99.99% of the pixels operate to specification, but occasionally non-performing pixels may appear as bright or dark dots. This is not a malfunction and has no effect on the recorded image.
•The LCD monitor may be covered with a thin plastic film for protection against scratches during shipment. If so, remove the film before using the camera.
Camera Body Temperature
Please take care when operating the camera for an extended period as the camera body may become warm. This is not a malfunction.
3

What Do You Want to Do?
|
4 |
||||||
|
Shoot |
||||||
|
z Shoot, leaving it to the camera to make settings ……………………. |
24 |
|||||
|
Take good people shots |
||||||
|
Portraits |
Kids and pets |
w |
P |
|||
|
I V |
Facial expressions |
At the beach Against snow |
||||
|
(p. 64) |
(p. 64) |
(p. 81) |
(p. 65) |
(p. 66) |
||
|
Shoot various other scenes |
||||||
|
NightScene |
Low Light |
UnderwaterS |
OFoliage |
|||
|
(p. 65) |
(p. 65) |
(p. 65) |
(p. 65) |
|||
|
Shoot with special effects |
||||||
|
Fish-eye Effect |
Miniature Effect |
Toy Camera Effect |
||||
|
(p. 69) |
(p. 70) |
(p. 74) |
||||
|
Monochrome |
Super vivid colors |
Poster Effect |
||||
|
(p. 73) |
(p. 68) |
(p. 68) |
||||
|
z Focus on faces ………………………………………………………… |
24, 65, 95 |
|||||
|
z Shoot in places where I cannot use the flash |
||||||
|
(turn off the flash)………………………………………………………………. |
54 |
|||||
|
z Take pictures with me in them too (self-timer) …………….. |
58, 59, 77 |
|||||
|
z Insert the date and time into my shots ………………………………….. |
57 |
|||||
|
z Take a picture while shooting a movie ………………………………….. |
67 |
4

|
What Do You Want to Do? |
|
|
View |
|
|
z Look at my pictures……………………………………………………………. |
27 |
|
z Automatically play back pictures (slideshow)……………………….. |
|
|
1122 |
|
|
z Look at my pictures on a TV ……………………………………………… |
130 |
|
z Look at my pictures on a computer………………………………………. |
32 |
|
z Quickly search pictures …………………………………………………….. |
118 |
|
z Erase pictures ……………………………………………………………. |
28, 138 |
|
Shoot/View Movies |
|
|
z Shoot movies …………………………………………………………….. |
29, 107 |
|
z View movies ……………………………………………………………………… |
E31 |
|
z Shoot fast moving subjects and play them back |
|
|
in slow motion …………………………………………………………………. |
110 |
|
|
|
|
z Easily print pictures………………………………………………………….. |
152 |
|
2 |
|
Save |
|
z Save images to a computer …………………………………………………32 |
|
Other |
|
|
z Turn off sounds …………………………………………………………………. |
48 |
|
z Use the camera abroad……………………………………………….. |
315, 171 |
|
z Understand what is displayed on the screen ……………………….. |
186 |
5

Table of Contents
Chapters 1 – 3 explain the basic operations and frequently used functions of this camera. Chapters 4 onward explain the advanced functions, letting you learn more as you read each chapter.
|
Checking the Package Contents ……. |
2 |
|
Read This First ……………………………. |
3 |
|
What Do You Want to Do? ……………. |
4 |
|
Table of Contents ………………………… |
6 |
|
Conventions Used in This Guide ……. |
9 |
|
Safety Precautions……………………… |
10 |
|
1 Getting Started………………. |
13 |
|
Charging the Battery…………………… |
14 |
|
Compatible Memory Cards |
|
|
(Sold Separately)……………………… |
16 |
|
Inserting the Battery and |
|
|
Memory Card…………………………… |
16 |
|
Setting the Date and Time …………… |
19 |
|
Setting the Display Language………. |
21 |
|
Formatting Memory Cards …………… |
22 |
|
Pressing the Shutter Button…………. |
23 |
|
Taking Pictures (Smart Auto)……….. |
24 |
|
Viewing Images …………………………. |
27 |
|
Erasing Images………………………….. |
28 |
|
Shooting Movies ………………………… |
29 |
|
Viewing Movies………………………….. |
31 |
|
Transferring Images to |
|
|
a Computer for Viewing …………….. |
32 |
|
Accessories ………………………………. |
37 |
|
Separately Sold Accessories ……….. |
38 |
|
2 Learning More……………….. |
41 |
|
Components Guide…………………….. |
42 |
|
Screen Display…………………………… |
44 |
|
Indicator ……………………………………. |
45 |
|
FUNC. Menu – Basic Operations …. |
46 |
|
MENU – Basic Operations…………… |
47 |
|
Changing the Sound Settings ……… |
48 |
|
Adjusting the Screen Brightness ….. |
50 |
|
Returning the Camera to Default |
|
|
Settings ………………………………….. |
51 |
|
Power Saving Function |
|
|
(Auto Power Down)………………….. |
52 |
|
Clock Functions…………………………. |
52 |
|
3 Shooting with Commonly |
|
|
Used Functions……………… |
53 |
|
Turning the Flash Off …………………. |
54 |
|
Zooming in More Closely on |
|
|
Subjects (Digital Zoom)…………….. |
55 |
|
Inserting the Date and Time………… |
57 |
|
Using the Self-Timer ………………….. |
58 |
|
Changing the Recording Pixel |
|
|
Setting (Image Size) ………………… |
61 |
|
Changing the Compression Ratio |
|
|
(Image Quality) ……………………….. |
61 |
|
4 Adding Effects and Shooting |
|
|
in Various Conditions…….. |
63 |
|
Shooting in Various Conditions ……. |
64 |
|
Making Short Movies Automatically |
|
|
(Movie Digest)…………………………. |
67 |
|
Adding Effects and Shooting……….. |
68 |
|
Detecting a Face and Shooting |
|
|
(Smart Shutter) ……………………….. |
75 |
|
Shooting Long Exposures …………… |
79 |
|
High-Speed Continuous Shooting |
|
|
(High-speed Burst)…………………… |
80 |
|
Capturing the Best Facial |
|
|
Expressions (Best Image |
|
|
Selection) ……………………………….. |
81 |
6

|
Table of Contents |
|||||||
|
……..Shooting Stitch Assist Images |
82 |
Shoot Movies That Look Like a |
|||||
|
Miniature Model (Miniature |
|||||||
|
5 Choosing Settings |
Effect)…………………………………… |
109 |
|||||
|
Yourself…………………………. |
83 |
Shooting Super Slow Motion |
|||||
|
Shooting in Program AE …………….. |
84 |
…………………………………..Movies |
110 |
||||
|
Adjusting the Brightness |
Changing the Image Quality………. |
112 |
|||||
|
(Exposure Compensation) ………… |
85 |
Other Shooting Functions………….. |
113 |
||||
|
Turning the Flash On …………………. |
85 |
Editing ……………………………………. |
114 |
||||
|
Adjusting the White Balance……….. |
86 |
||||||
|
7 Using Various Playback and |
|||||||
|
Changing the ISO Speed |
88 |
||||||
|
Editing Functions |
117 |
||||||
|
Correcting the Brightness and |
|||||||
|
Quickly Searching Images |
118 |
||||||
|
Shooting (i-Contrast)………………… |
89 |
||||||
|
Changing the Aspect Ratio …………. |
90 |
Viewing Images in Filtered |
120 |
||||
|
Continuous Shooting |
91 |
Playback……………………………….. |
|||||
|
Viewing Slideshows |
122 |
||||||
|
Changing the Tone of an Image |
|||||||
|
Checking the Focus |
124 |
||||||
|
(My Colors) …………………………….. |
92 |
||||||
|
Shooting Close-ups (Macro) ……….. |
94 |
Magnifying Images …………………… |
125 |
||||
|
Shooting Far Away Subjects |
Viewing Each Image in a Group…. |
126 |
|||||
|
(Infinity) ………………………………….. |
94 |
Displaying Various Images |
|||||
|
Changing the AF Frame Mode…….. |
95 |
(Smart Shuffle) ………………………. |
128 |
||||
|
Choosing the Subject to |
Changing Image Transitions ……… |
129 |
|||||
|
Focus On (Tracking AF) …………… |
97 |
Viewing Images on a TV …………… |
130 |
||||
|
Magnifying the Focal Point………….. |
98 |
Protecting Images ……………………. |
134 |
||||
|
Shooting with the AF Lock ………….. |
99 |
Erasing Images ……………………….. |
138 |
||||
|
Shooting with Servo AF ……………. |
100 |
Tagging Images as Favorites …….. |
140 |
||||
|
Changing the Metering Method….. |
101 |
Organizing Images by Category |
|||||
|
Shooting with the AE Lock………… |
102 |
(My Category) ……………………….. |
142 |
|
Shooting with the FE Lock ………… |
102 |
|
Shooting with Slow Synchro ……… |
103 |
|
Red-Eye Correction …………………. |
104 |
|
Checking for Shut Eyes ……………. |
105 |
|
Shooting Using a TV |
|
|
as the Display ……………………….. |
105 |
|
6 Using Various Functions for |
|
|
Shooting Movies ………….. |
107 |
|
Shooting Various Kinds of |
|
|
Movies …………………………………. |
108 |
|
Rotating Images ………………………. |
145 |
|
Resizing Images………………………. |
146 |
|
Trimming ………………………………… |
147 |
|
Adding Effects with the My Colors |
|
|
Function ……………………………….. |
148 |
|
Correcting the Brightness |
|
|
(i-Contrast) ……………………………. |
149 |
|
Correcting the Red-Eye Effect……. |
150 |
|
8 Printing……………………….. |
151 |
|
Printing Images ……………………….. |
152 |
7

|
Table of Contents |
||||||
|
Choosing Images for Printing |
………………..Using an Eye-Fi Card |
179 |
||||
|
(DPOF) …………………………………. |
159 |
Troubleshooting ………………………. |
181 |
|||
|
List of Messages That Appear |
||||||
|
9 Customizing Camera |
||||||
|
on the Screen |
184 |
|||||
|
Settings |
165 |
|||||
|
Information Displayed |
||||||
|
Changing Camera Settings |
166 |
|||||
|
on the Screen………………………… |
186 |
|||||
|
Changing Shooting Function |
Functions Available in Each |
|||||
|
Settings…………………………………. |
173 |
Shooting Mode………………………. |
190 |
|||
|
Changing Playback Function |
176 |
Menus ……………………………………. |
196 |
|||
|
Settings…………………………………. |
Playback Mode FUNC. Menu |
200 |
||||
|
Handling Precautions |
201 |
|||||
|
10 Useful Information………. |
177 |
|||||
|
Using Household Power |
178 |
…………………………..Specifications |
202 |
|||
|
Index |
206 |
|||||
8
Conventions Used in This Guide
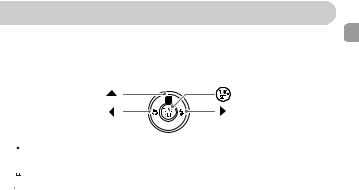
• Icons are used in the text to represent the camera buttons and switches.
•Language that displays on the screen appears inside [ ] (square brackets).
•The directional buttons and FUNC./SET button are represented by the following icons.
|
Up button |
FUNC./SET button |
|
Left button |
Right button |


 Down button
• : Things you should be careful about
• : Troubleshooting tips
• : Hints for getting more out of your camera
• : Supplemental information
•(p. xx): Reference pages (“xx” stands for a page number)
•This guide assumes all functions are at their default settings.
•The various types of memory cards that can be used in this camera are collectively referred to as memory cards in this guide.
9

Safety Precautions
•Before using the product, please ensure that you read the safety precautions described below. Always ensure that the product is used correctly.
•The safety precautions noted on the following pages are intended to prevent injuries to yourself and other persons, or damage to the equipment.
•Be sure to also check the guides included with any separately sold accessories you use.
Warning Denotes the possibility of serious injury or death.
• Do not trigger the flash in close proximity to people’s eyes.
Exposure to the intense light produced by the flash could damage eyesight. In particular, remain at least one meter (39 inches) away from infants when using the flash.
•Store this equipment out of the reach of children and infants.
Strap: Putting the strap around a child’s neck could result in asphyxiation.
•Use only recommended power sources.
•Do not attempt to disassemble, alter or apply heat to the product.
•Avoid dropping or subjecting the product to severe impacts.
•To avoid the risk of injury, do not touch the interior of the product if it has been dropped or otherwise damaged.
•Stop using the product immediately if it emits smoke, a strange smell, or otherwise behaves abnormally.
•Do not use organic solvents such as alcohol, benzine, or thinner to clean the equipment.
•Do not let the product come into contact with water (e.g. sea water) or other liquids.
•Do not allow liquids or foreign objects to enter the camera.
This could result in electrical shock or fire.
If liquids or foreign objects come into contact with the camera interior, immediately turn the camera power off and remove the battery.
If the battery charger becomes wet, unplug it from the outlet and consult your camera distributor or a Canon Customer Support Help Desk.
•Use only the recommended battery.
•Do not place the battery near or in direct flame.
•Unplug the power cord periodically, and using a dry cloth, wipe away any dust and dirt that has collected on the plug, the exterior of the power outlet, and the surrounding area.
•Do not handle the power cord with wet hands.
•Do not use the equipment in a manner that exceeds the rated capacity of the electrical outlet or wiring accessories. Do not use if the power cord or plug are damaged, or not fully plugged into the outlet.
•Do not allow dirt or metal objects (such as pins or keys) to contact the terminals
or plug.
The battery may explode or leak, resulting in electrical shock or fire. This could cause injury and damage the surroundings. In the event that a battery leaks and the battery acid contacts eyes, mouth, skin or clothing, immediately flush with water.
10
![]()
Safety Precautions
• Turn the camera off in places where camera use is prohibited.
The electromagnetic waves emitted by the camera may interfere with the operation of electronic instruments and other devices. Exercise adequate caution when using the camera in places where use of electronic devices is restricted, such as inside airplanes and medical facilities.
•Do not play the supplied CD-ROM(s) in any CD player that does not support data CD-ROMs.
It is possible to suffer hearing loss from listening with headphones to the loud sounds of a CD-ROM played on a music CD player. Additionally, playing the CD-ROM(s) in an audio CD player (music player) could damage the speakers.
Caution Denotes the possibility of injury.
•Be careful not to bang the camera or subject it to strong impacts or shocks when hanging it by the strap.
•Be careful not to bump or push strongly on the lens.
This could lead to injury or damage the camera.
• Be careful not to subject the screen to strong impacts.
If the screen cracks, injury may result from the broken fragments.
•When using the flash, be careful not to cover it with your fingers or clothing.
This could result in burns or damage to the flash.
•Avoid using, placing or storing the product in the following places:
—Places subject to strong sunlight
—Places subject to temperatures above 40 °C (104 °F)
—Humid or dusty areas
These could cause leakage, overheating or an explosion of the battery, resulting in electrical shock, fire, burns or other injuries.
High temperatures may cause deformation of the camera or battery charger casing.
•The slideshow transition effects may cause discomfort when viewed for prolonged periods.
Caution Denotes the possibility of damage to the equipment.
•Do not aim the camera at bright light sources (such as the sun on a clear day).
Doing so may damage the image sensor.
•When using the camera on a beach or at a windy location, be careful not to allow
dust or sand to enter the camera.
This may cause the product to malfunction.
11

Safety Precautions
• In regular use, small amounts of smoke may be emitted from the flash.
This is due to the high intensity of the flash burning dust and foreign materials stuck to the front of the unit. Please use a cotton swab to remove dirt, dust or other foreign matter from the flash to prevent heat build-up and damage to the unit.
• Remove and store the battery when you are not using the camera.
If the battery is left inside the camera, damage caused by leakage may occur.
•Before you discard the battery, cover the terminals with tape or other insulators.
Contacting other metal materials may lead to fire or explosions.
•Unplug the battery charger from the power outlet after charging is complete, or when you are not using it.
•Do not place anything, such as cloth on top of the battery charger while it is
charging.
Leaving the unit plugged in for a long period of time may cause it to overheat and distort, resulting in fire.
• Do not place the battery near pets.
Pets biting the battery could cause leakage, overheating or explosion, resulting in fire or damage.
•Do not sit down with the camera in your pocket.
Doing so may cause malfunctions or damage the screen.
•When putting the camera in your bag, ensure that hard objects do not come into contact with the screen.
•Do not attach any hard objects to the camera.
Doing so may cause malfunctions or damage the screen.
12

1 
Getting Started
This chapter explains preparations before shooting, how to shoot in Amode, and then how to view and erase the images you take. The latter part of this chapter explains how to shoot and view movies and transfer images to a computer.
Attaching the Strap/Holding the Camera
•Attach the included strap and wrap it around your wrist to avoid dropping the camera during use.
•Keep your arms tight against your body while holding the camera firmly by the sides when shooting. Be sure that your fingers do not block the flash.
Strap
13
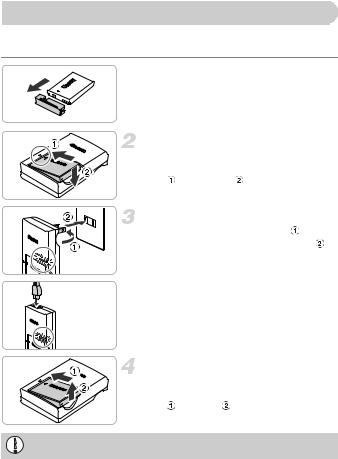
Charging the Battery
Use the included charger to charge the battery. Be sure to charge the battery as it is not charged at the time of purchase.
 Remove the cover.
Insert the battery.
zAlign the o marks on the battery and charger, then insert the battery by sliding it in ( ) and down ( ).
Charge the battery.
z For CB-2LV: Flip out the plug ( ) and plug the charger into a power outlet ( ).
zFor CB-2LVE: Plug the power cord into the charger, then plug the other end into a power outlet.
XThe charge lamp lights orange and charging starts.
XThe charge lamp will light green when charging has finished. Charging takes approx. 1 hour and 30 minutes.
Remove the battery.
z Unplug the battery charger from the power outlet, then remove the battery by sliding it in ( ) and up ( ).
To protect the battery and prolong its life, do not charge it for longer than 24 hours continuously.
14

|
Charging the Battery |
|||
|
Number of Possible Shots |
|||
|
Number of Shots |
Approx. 220 |
||
|
Playback Time |
Approx. 5 hours |
•The number of shots that can be taken is based on the Camera & Imaging Products Association (CIPA) measurement standard.
•Under some shooting conditions, the number of shots that can be taken may be less than mentioned above.
Battery Charge Indicator
An icon or message will appear on the screen indicating the battery’s charge state.
|
Display |
Summary |
|
Sufficient charge. |
|
|
Slightly depleted, but sufficient. |
|
|
(Blinking red) |
Nearly depleted. Charge the battery. |
|
“Change the battery pack.” |
Depleted. Recharge the battery. |
Using the battery and charger effectively
•Charge the battery on the day, or the day before, it will be used.
Charged batteries continue to discharge naturally even if they are not used.
Attach the cover to a charged battery so that the o mark is visible.
•How to store the battery for long periods:
Deplete and remove the battery from the camera. Attach the terminal cover and store the battery. Storing a battery for long periods of time (about a year) without depleting it may shorten its life span or affect its performance.
•The battery charger can also be used when abroad.
The charger can be used in regions that have 100 – 240 V (50/60 Hz) AC power. If the plug does not fit the outlet, use a commercially available plug adapter. Do not use electrical transformers for foreign travel as they will cause damage.
•The battery may develop a bulge.
This is a normal characteristic of the battery and does not indicate a problem. However, if the battery bulges to the point where it will no longer fit into the camera, please contact a Canon Customer Support Help Desk.
•If the battery is quickly depleted even after charging, it has reached the end of its life span. Purchase a new battery.
15

Compatible Memory Cards (Sold Separately)
The cards below can be used without restrictions on their capacities.
•SD memory cards*
•SDHC memory cards*
•SDXC memory cards  *
*
•MultiMediaCards
•MMCplus memory cards
•HC MMCplus memory cards
•Eye-Fi Cards
*This memory card complies with the SD standards. Some cards may not operate properly depending on the brand of card used.
Depending on your computer’s OS version, SDXC memory cards may not be recognized even when using a commercially available card reader. Check to make sure that your OS supports SDXC memory cards beforehand.
About Eye-Fi Cards 
This product is not guaranteed to support Eye-Fi card functions (including wireless transfer). In case of an issue with an Eye-Fi card, please check with the card manufacturer.
Also note that an approval is required to use Eye-Fi cards in many countries or regions. Without approval, use of the card is not permitted. If it is unclear whether the card has been approved for use in the area, please check with the card manufacturer.
Inserting the Battery and Memory Card
Insert the included battery and a memory card (sold separately).
Check the card’s write-protect tab.
z If the memory card has a write-protect tab, you will not be able to record images if the tab is in the locked position. Slide the tab up until you hear a click.
Open the cover.
z Slide the cover ( ) and open it ( ).
16

Inserting the Battery and Memory Card
Insert the battery.
zPress the battery lock in the direction of the arrow, then insert the battery as shown
until it locks into place with a click.
z Be sure to insert the battery in the correct direction or it will not properly lock into place.
Insert the memory card.
zInsert the memory card as shown until it locks into place with a click.
zBe sure the memory card is oriented
correctly. Inserting the memory card in the wrong direction could damage the camera.
Terminals
Close the cover.
z Close the cover ( ), and press downward as you slide it until it clicks into place ( ).
What if [Memory card locked] appears on the screen?
SD, SDHC, SDXC memory cards, and Eye-Fi cards have a write-protect tab. If this tab is in the locked position, [Memory card locked] will appear on the screen and you will not be able to take or erase images.
17

Inserting the Battery and Memory Card
Removing the Battery and Memory Card 
Remove the battery.
z Open the cover and press the battery lock in the direction of the arrow.
XThe battery will pop up.
Remove the memory card.
z Push the memory card in until you hear a click, then slowly release it.
XThe memory card will pop up.
Number of Shots per Memory Card
|
Memory Card |
4 GB |
16 GB |
|
Number of Shots |
Approx. 1231 |
Approx. 5042 |
•Values are based on the default settings.
•The number of shots that can be taken will vary depending on camera settings, the subject and the memory card used.
Can you check the number of shots that can be taken?
You can check the number of shots that can be taken when the camera is in a Shooting mode (p. 24).
Number of shots that can be taken
18

Setting the Date and Time
The Date/Time settings screen will appear the first time the camera is turned on. Since the dates and times recorded into your images are based on these settings, be sure to set them.
Turn on the camera.
z Press the ON/OFF button.
XThe Date/Time screen will appear.
Set the date and time.
zPress the qrbuttons to choose an option.
zPress the op buttons to set a value.
Complete the setting.
z Press the m button.
XOnce the date and time have been set, the Date/Time screen will close.
zPressing the ON/OFF button will turn off the camera.
Reappearing Date/Time screen
Set the correct date and time. If you have not set the date and time, the Date/Time screen will appear each time you turn on the camera.
Daylight saving time settings
If you choose  in Step 2 and press the opbuttons to choose
  , you will set the time to daylight saving (1 hour ahead).
19

Setting the Date and Time
Changing the Date and Time
You can change the current date and time settings.
Display the menu.
z Press the n button.
Choose [Date/Time].
zMove the zoom lever to choose the 3tab.
zPress the op buttons to choose [Date/ Time], then press the m button.
Change the date and time.
z Follow Steps 2 and 3 on p. 19 to adjust the setting.
z Press the nbutton to close the menu.
Date/Time battery
•The camera has a built-in date/time battery (backup battery) that allows the date/time settings to be retained for about three weeks after the battery pack has been removed.
•By inserting a charged battery or connecting an AC adapter kit (sold separately, p. 38) the date/time battery can be charged in about 4 hours even if the camera is not turned on.
•If the date/time battery is depleted, the Date/Time screen will appear when you turn the camera on. Follow the steps on p. 19 to set the date and time.
20
![]()
Setting the Display Language
You can change the language that displays on the screen.
Enter Playback mode. z Press the 1 button.
Display the settings screen.
z Press and hold the m button, then immediately press the n button.
Set the display language.
z Press the opqr buttons to choose a language, then press the m button.
XOnce the display language has been set, the settings screen will close.
What if the clock appears when the m button is pressed?
The clock will appear if too much time passes between pressing the m button and the n button in Step 2. If the clock appears, press the m button to remove the clock and repeat Step 2.
You can also change the display language by pressing the n button to choose [Language] from the 3 tab.
21

Formatting Memory Cards
Before you use a new memory card or one that has been formatted in other devices, you should format the card with this camera. Formatting (initializing) a memory card erases all data on the memory card. As you cannot retrieve the erased data, exercise adequate caution before formatting the memory card. Before formatting an Eye-Fi card (p. 179), be sure to install the software contained on the card to a computer.
Display the menu.
z Press the n button.
Choose [Format].
zMove the zoom lever to choose the 3tab.
zPress the opbuttons to choose [Format], then press the m button.
Choose [OK].
zPress the qrbuttons to choose [OK], then press the m button.
Format the memory card.
zPress the op buttons to choose [OK], then press the m button.
XThe memory card will be formatted.
22

Pressing the Shutter Button
Complete formatting.
XWhen formatting ends, [Memory card formatting complete] will appear on the
screen.
z Press the m button.
Formatting or erasing data on a memory card merely changes the file management information on the card and does not ensure its contents are completely erased. Be careful when transferring or disposing of a memory card. When disposing of a memory card, take precautions such as physically destroying the card to prevent personal information leaks.
• The total capacity of the memory card displayed in the formatting screen may be less than indicated on the memory card.
•Perform a low-level format (p. 167) of the memory card when the camera does not operate properly, the recording/reading speed of a memory card has dropped, when continuous shooting speed slows down, or when movie recording stops suddenly.
Pressing the Shutter Button
To take images that are in focus, be sure to first press the shutter button lightly (halfway) to focus, then press fully to shoot.
Press halfway (Press lightly to focus).
z Press lightly until the camera beeps twice and AF frames appear where the camera focused.
Press fully (Press fully to shoot).
XThe camera plays the shutter sound and takes the shot.
zSince the shot is being taken while the shutter sound plays, be careful not to move the camera.
23

Taking Pictures (Smart Auto)
 Does the length of the shutter sound change?
•Since the time required to shoot differs depending on the scene you want to take, the length of the shutter sound may change.
•If the camera or subject moves while the shutter sound is playing, the recorded image may be blurry.
If you shoot without pressing the shutter button halfway, the image may not be in focus.
Taking Pictures (Smart Auto)
Since the camera can determine the subject and shooting conditions, you can let it automatically select the best settings for the scene and just shoot. The camera can also detect and focus on faces, setting the color and brightness to optimal levels.
Turn on the camera.
z Press the ON/OFF button.
XThe start-up screen will appear.
Enter A mode.
z Set the mode switch to A.
z When you point the camera toward the subject, the camera will make a slight noise as it determines the scene.
XThe icon for the determined scene will appear in the upper right of the screen.
XThe camera will focus on detected subjects and display frames on them.
24
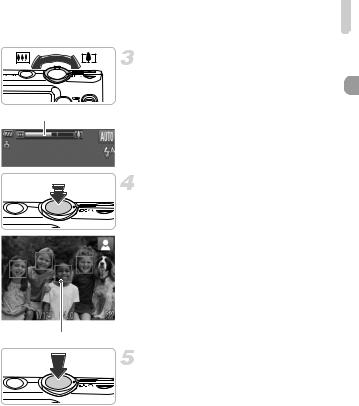
Taking Pictures (Smart Auto)
Compose the shot.
zMoving the zoom lever toward i (telephoto) will zoom in on your subject,
making it appear larger. Moving the lever toward j(wide angle) will zoom out from your subject, making it appear smaller.
(The zoom bar showing the zoom position appears on the screen.)
Focus.
z Press the shutter button halfway to focus.
XWhen the camera focuses, it will beep twice and AF frames will appear where the camera focused.
Several AF frames will appear when the camera focuses on more than one point.
Shoot.
zPress the shutter button fully to shoot.
XThe camera will play the shutter sound and shoot. The flash will automatically fire in low light conditions.
XThe image will appear on the screen for approximately two seconds.
zYou can take a second picture even while an image is displayed by pressing the shutter button again.
25

Taking Pictures (Smart Auto)
What if…
•What if the color and brightness of the images do not turn out as expected?
The scene icon (p. 187) that appears on the screen may not match the actual scene. If this happens, try shooting in G mode (p. 83).
•What if white and gray frames appear when you point the camera toward a subject?
A white frame appears on the face or subject that the camera detected as the main subject, while gray frames appear on other detected faces. The frames will follow the subjects within a certain range.
If the subject moves, however, the gray frames will disappear, leaving only the white frame.
•What if a frame does not appear on the subject you want to shoot?
The subject may not be detected, and frames may appear on the background. If this happens, try shooting in G mode (p. 83).
•What if a blue frame appears when you press the shutter button halfway?
A blue frame appears when a moving subject is detected; the focus and exposure will continuously adjust (Servo AF).
•What if a flashing  appears?
Attach the camera to a tripod so that the camera does not move and blur the image.
•What if the camera does not play any sounds?
Pressing the pbutton while turning on the camera power will turn off all sounds. To turn the sounds on, press the n button to choose [Mute] from the 3 tab, then press the qr buttons to choose [Off].
•What if the image comes out dark even if the flash fired when shooting?
The subject is too far away for the flash to reach. The effective flash range is
approximately 50 cm – 3.5 m (1.6 – 11.5 ft.) from the end of the lens at maximum wide angle (j), and approximately 90 cm – 2.0 m (3.0 – 6.6 ft.) from the end of the lens at maximum telephoto (i).
•What if the camera beeps once when the shutter button is pressed
halfway?
Your subject may be too close. When the camera is at maximum wide angle (j),
move about 3 cm (1.2 in.) or more away from your subject and shoot. Move about 90 cm (3.0 ft.) or more away when the camera is at maximum telephoto (i).
•What if the lamp lights when the shutter button is pressed halfway?
To reduce red-eye and to assist in focusing, the lamp may light when shooting in dark areas.
•What if the h icon blinks when you try to shoot?
The flash is charging. You can shoot when recharging ends.
26

Viewing Images
What if an icon appears in the upper right of the screen?
The icon for the determined scene will appear in the upper right of the screen. For details on the icons that appear, see “Scene Icons” (p. 187).
Choosing the subject to focus on (Tracking AF)
After pressing the o button and displaying  , point the camera so that
  is on the subject you want to focus on. Press and hold the shutter button halfway to display a blue frame where focus and exposure will be maintained (Servo AF).
Press the shutter button fully to shoot.
Viewing Images
You can view the images you have taken on the screen.
Enter Playback mode.
z Press the 1 button.
XThe last image you took will appear.
Choose an image.
zPressing the q button will cycle through the images from newest to oldest.
zPressing the r button will cycle through the images from oldest to newest.
zPressing and holding the qr buttons will
display images in a line letting you quickly search them. Pressing the m button
restores single image playback (p. 118). z The lens will retract after approximately 1
minute elapses.
zPressing the 1 button again while the lens is retracted will turn off the power.
Switching to Shooting mode
Pressing the shutter button halfway while in Playback mode switches the camera to Shooting mode.
27

Erasing Images
You can choose and erase images one at a time. Please note that erased images cannot be recovered. Exercise adequate caution before erasing an image.
Enter Playback mode.
z Press the 1 button.
XThe last image you took will appear.
Choose an image to erase.
zPress the qrbuttons to display an image to erase.
Erase the image.
z After pressing the m button, press the op buttons to choose a, then press the m button again.
X[Erase?] appears on the screen.
z Press the qr buttons to choose [Erase], then press the m button.
XThe displayed image will be erased.
z To exit instead of erasing, press the qr buttons to choose [Cancel], then press the m button.
28

Shooting Movies
The camera will determine the subject and shooting conditions, and select the best settings for the scene. The audio will record in stereo.
If you continue shooting for a long time, the camera may become warm. This is not a malfunction.
Choose A mode.
z Set the mode switch to A.
Remaining Time
Compose the shot.
z Moving the zoom lever toward i will
zoom in on your subject, making it appear
larger. Moving the lever toward j will zoom out from your subject, making it appear smaller.
Shoot.
z Press the movie button.
XBlack bars appear at the top and bottom of
the screen. These areas cannot be recorded.
Elapsed Time XThe camera will beep once, recording will  start, and [
 Rec] and the elapsed time will appear on the screen.
zOnce shooting begins, take your finger off the movie button.
zIf you change the composition of your shot during shooting, the focus, brightness and tone will automatically adjust.
29

Shooting Movies
Microphones z Do not touch the microphones while shooting.
z Do not press any buttons other than the movie button while shooting. The sound the buttons make will be recorded in the
movie.
Stop shooting.
z Press the movie button again.
XThe camera will beep twice and stop shooting the movie.
XThe movie will record to the memory card.
XShooting will automatically stop when the memory card fills.
Zooming while shooting
Pressing the zoom lever while shooting will zoom in on or out from the subject. However, operation sounds will be recorded.
• When the mode switch is set to A, the icon for the determined scene will appear (p. 187). “When Moving” icons will not appear, however. Under certain conditions, the icon that appears may not match the actual scene.
•If you change the composition while shooting and the white balance is not
optimal, press the Movie button to stop recording, then start recording again (only when the image quality is set to  (p. 112)).
•Movies can be shot by pressing the movie button even when the mode switch is set to 4 (p. 107).
Shooting Time
|
Memory Card |
4 GB |
16 GB |
|
Shooting Time |
Approx. 14 min. 34 sec. |
Approx. 59 min. 40 sec. |
•Shooting times are based on default settings.
•Maximum clip length is approx. 10 minutes.
•Recording may stop even if the maximum clip length has not been reached on some memory cards. SD Speed Class 6 or higher memory cards are recommended.
30
![]()
Viewing Movies
You can view the movies you have shot on the screen.
Enter Playback mode.
z Press the 1 button.
XThe last image you took will appear. X 

 appears on movies.
Choose a movie.
zPress the qr buttons to choose a movie, then press the m button.
Play the movie.
z Press the opbuttons to choose  , then press the m button.
XThe movie will play.
zIf you press the m button, the movie will
pause and the movie control panel will appear. Press the qr buttons to choose  (Play), then press the m button to
resume playback.
z Press the op buttons to adjust the volume.
XAfter the movie finishes, 


 appears.
31

Transferring Images to a Computer for Viewing
 How can I play back movies on a computer?
Install the included software (p. 33).
•When watching a movie on a computer, frames may drop, it may not play smoothly, and the audio may stop suddenly depending on the computer’s capabilities.
•If you use the supplied software to copy the movie back onto the memory card, you can play back the movie smoothly with the camera. For enhanced playback you can also connect the camera to a TV.
Transferring Images to a Computer for Viewing
You can use the included software to transfer images you have shot with the camera to a computer for viewing. If you are already using software included with another Canon-brand compact digital camera, install the software from the included CD-ROM, overwriting your current installation.
System Requirements
Windows
OS
Computer model
CPU
RAM
Interface
Free Hard Disk
Space
Display
Windows 7
Windows Vista Service Pack 1 and 2
Windows XP Service Pack 3
The above OS should be pre-installed on computers with built-in USB ports.
Pentium 1.3 GHz or higher (still images), Core2 Duo 2.6 GHz or higher (movies)
Windows 7 (64 bit): 2 GB or more
Windows 7 (32 bit), Windows Vista (64 bit, 32 bit): 1 GB or more (still images), 2 GB or more (movies)
Windows XP: 512 MB or more (still images), 2 GB or more (movies)
USB
ZoomBrowser EX: 200 MB or more
CameraWindow: 150 MB or more*
Movie Uploader for YouTube: 30 MB or more
PhotoStitch: 40 MB or more
1,024 x 768 pixels or higher
*For Windows XP, Microsoft .NET Framework 3.0 or later (max. 500 MB) must be installed. Installation may take some time depending on your computer’s capabilities.
32

Transferring Images to a Computer for Viewing
Macintosh
OS
Computer model
CPU
RAM
Interface
Free Hard Disk
Space
Display
Mac OS X (v10.5 – v10.6)
The above OS should be pre-installed on computers with built-in USB ports.
Intel Processor (still images), Core 2 Duo 2.6 GHz or higher (movies)
Mac OS X v10.6: 1 GB or more (still images), 2 GB or more (movies)
Mac OS X v10.5: 512 MB or more (still images), 2 GB or more (movies)
USB
ImageBrowser: 250 MB or more
CameraWindow: 150 MB or more
Movie Uploader for YouTube: 30 MB or more
PhotoStitch: 50 MB or more
1,024 x 768 pixels or higher
Preparations 
Windows Vista and Mac OS X (v10.5) are used for these explanations.
 Install the Software.
Windows
Place the CD in the computer’s CDROM drive.
z Place the supplied CD-ROM (DIGITAL CAMERA Solution Disk) (p. 2) into the computer’s CD-ROM drive.
Begin installation.
z Click [Easy Installation] and follow the on-screen instructions to proceed with the installation.
zIf the [User Account Control] window appears, follow the on-screen instructions to proceed.
33

Transferring Images to a Computer for Viewing
When the installation finishes, click [Restart] or [Finish].
Remove the CD-ROM.
zRemove the CD-ROM when your desktop screen appears.
Macintosh
Place the CD in the computer’s CD-
ROM drive.
zPlace the supplied CD-ROM (DIGITAL CAMERA Solution Disk) (p. 2) into the computer’s CD-ROM drive.
Begin installation.
zDouble-click the  on the CD.
zClick [Install], and follow the on-screen instructions to proceed with the installation.
Connect the camera to the computer.
z Turn off the camera.
z Open the cover and insert the included interface cable’s smaller plug (p. 2) firmly into the camera terminal in the direction shown.
z Insert the interface cable’s larger plug into the computer. For connection details, refer to the user guide provided with the computer.
Turn on the camera.
z Press the 1button to turn on the camera.
34

Transferring Images to a Computer for Viewing
 Open CameraWindow.
Windows
zClick [Downloads Images From Canon Camera using Canon CameraWindow].
XCameraWindow will appear.
z If CameraWindow does not appear, click the [Start] menu and choose [All Programs], followed by [Canon Utilities], [CameraWindow] and [CameraWindow].
Macintosh
XCameraWindow will appear when you establish a connection between the
camera and computer.
zIf CameraWindow does not appear, click the CameraWindow icon on the Dock (the bar which appears at the bottom of the desktop).
For Windows 7, use the following steps to display CameraWindow.
|
Click |
on the task bar. |
||
|
In the screen that appears, click the |
link to modify the program. |
||
|
Choose [Downloads Images From Canon Camera using Canon |
|||
|
CameraWindow] and click [OK]. |
|||
|
Double click |
. |
35

Transferring Images to a Computer for Viewing
Transfer and View Images 
z Click [Import Images from Camera], and then click [Import Untransferred Images].
XAll images not previously transferred will transfer to the computer. Transferred images will be sorted by date and saved in
separate folders in the Pictures folder.
zClose CameraWindow when image transfer is complete.
zTurn off the camera and unplug the cable.
zFor details on how to view images using a computer, refer to the Software Guide.
You can transfer images even without using the image transfer function in the included software by simply connecting your camera to a computer. There are, however, the following limitations.
•It may take a few minutes from when you connect the camera to the computer until you can transfer images.
•Images shot in the vertical orientation may be transferred in the horizontal orientation.
•Protection settings for images may be lost when transferred to a computer.
•There may be problems transferring images or image information correctly depending on the version of the operating system in use, the file size, or the software in use.
•Some functions in the included software may not be available, such as editing movies, and transferring images to the camera.
36

Accessories
Supplied with Camera
|
Wrist Strap |
Battery Pack NB-4L with |
Battery Charger |
|
|
WS-DC11 |
Terminal Cover* |
CB-2LV/CB-2LVE* |
|
|
Stereo AV Cable |
DIGITAL CAMERA |
||
|
AVC-DC400ST* |
Solution Disk |
||
|
Interface Cable |
|||
|
IFC-400PCU* |
*Also available for purchase separately. |
||
|
Memory Card |
USB card reader |
||
|
Windows/ |
|||
|
Macintosh |
Canon-Brand PictBridge Compliant Printers
TV
HDMI Cable HTC-100
High-Definition TV
37

Separately Sold Accessories
The following camera accessories are sold separately. Some accessories are not sold in some regions, or may no longer be available.
Power Supplies
Battery Charger CB-2LV/CB-2LVE
z A charger for charging Battery Pack NB-4L.
Battery Pack NB-4L
z Rechargeable lithium-ion battery.
AC Adapter Kit ACK-DC60
z This kit lets you power the camera using household power. Recommended for powering the camera for an extended period of time or when connecting to a computer or printer. Cannot be used to charge the camera battery.
AC Adapter Kit ACK-DC10 can also be used.
Using accessories abroad
The battery charger and the AC adapter kit can be used in regions that have 100 – 240 V (50/60 Hz) AC power.
If the plug does not fit the outlet, use a commercially available plug adapter. Do not use electrical transformers for foreign travel as they will cause damage.
CAUTION
RISK OF EXPLOSION IF BATTERY IS REPLACED BY AN INCORRECT TYPE. DISPOSE OF USED BATTERIES ACCORDING TO LOCAL REGULATION.
38

Separately Sold Accessories
Other Accessories
HDMI Cable HTC-100
z Use this cable to connect the camera to the HDMI™ terminal on a high-definition TV set.
Printers
SELPHY series
Inkjet Printers
Waterproof Case WP-DC41
zUse this case to take underwater shots at depths of up to 40 meters (130 ft.), or to shoot in the rain, at the beach, or on the ski slopes.
Waterproof Case WP-DC320L
zUse this case to take underwater shots at depths of up to 3 meters (9.8 ft.), or to shoot in the rain, at the beach, or on the ski slopes.
Canon-Brand PictBridge Compliant
Printers
zBy connecting your camera to a Canonbrand PictBridge compliant printer, you can print your images without having to use a computer.
For more information, visit your nearest Canon retailer.
39

Separately Sold Accessories
Use of genuine Canon accessories is recommended.
This product is designed to achieve excellent performance when used with genuine Canon accessories. Canon shall not be liable for any damage to this product and/or accidents such as fire, etc., caused by the malfunction of non-genuine Canon accessories (e.g., a leakage and/or explosion of a battery pack). Please note that this warranty does not apply to repairs arising out of the malfunction of non-genuine Canon accessories, although you may request such repairs on a chargeable basis.
40
![]()
2
Learning More
This chapter explains the parts of the camera and what appears on the screen, as well as the basic operating instructions.
41

Components Guide
|
Lens |
ON/OFF Button (p. 19) |
||
|
Speaker |
Microphones (p. 30) |
||
|
Zoom Lever |
Lamp (pp. 58, 77, 173) |
||
|
Shooting: i (Telephoto) / j (Wide |
Flash (pp. 54, 85) |
||
|
Angle) (pp. 25, 29, 55) |
Tripod Socket |
||
|
Playback: k (Magnify) / g (Index) |
DC Coupler Terminal Cover |
||
|
(pp. 118, 125) |
Memory Card / Battery Cover (p. 16) |
||
|
Shutter Button (p. 23) |
42

 Screen (LCD Monitor) (pp. 44, 186,
188)
 Movie Button (pp. 29, 107)
Mode Switch
 A/V OUT (Audio/Video Output) /
DIGITAL Terminal (pp. 34, 130, 152)
 HDMI Terminal (p. 131)
Strap Mount (p. 13)
 b (Exposure Compensation) (p. 85) /
o Button
Components Guide
 e (Macro) (p. 94) / q Button
m FUNC./SET Button (p. 46)
 h (Flash) (pp. 85, 103) / r Button l (Display) (p. 44) / p Button
 Indicator (p. 45)
1 (Playback) Button (pp. 27, 117)
 n Button (p. 47)
Mode Switch
Use the mode switch to change the Shooting mode.
You can leave it to the camera to select settings for fully automatic shooting (p. 24).
 You can shoot with the best settings for the scene (p. 64) or choose settings yourself to take various types of pictures (pp. 53, 83).
43

Screen Display
Switching the Display 
You can change the screen display using the p button. Refer to p. 186 for details on information that appears on the screen.
Shooting
|
Information Display |
No Information Display |
Playback
|
No Information |
Simple Information |
Detailed Information |
Focus Check |
|
Display |
Display |
Display |
Display (p. 124) |
You can also switch the display by pressing the p button while the image displays right after shooting. However, Simple Information Display is not available. You can change the display that appears first by pressing the n button, then choosing [Review info] from the 4 tab (p. 174).
44

Indicator
Screen Display in Dark Shooting Conditions
The display automatically brightens when shooting in dark conditions, allowing you to check the composition (Night Display function). However, the brightness of the image on the screen, and the brightness of the actual image recorded may be different. Screen noise may appear and the movement of the subject may appear somewhat jagged on the screen. This has no effect on the recorded image.
Overexposure Warning during Playback
In Detailed Information Display (p. 44), overexposed areas of the image flash on the screen.
|
Histogram during Playback |
||
|
High |
z The graph that appears in Detailed |
|
|
Information Display (p. 188) is called the |
||
|
histogram. The histogram shows the |
||
|
Low |
distribution of brightness in an image |
|
|
horizontally, and the amount of brightness |
||
|
Dark |
||
|
Bright |
vertically. When the graph approaches the |
|
|
right side, the image is bright, but when it |
||
|
approaches the left side, the image is dark, |
||
|
and in this way you can judge the |
||
|
exposure. |
Indicator
The indicator on the back of the camera (p. 43) will light or blink depending on the camera’s status.
|
Colors |
Status |
Operation Status |
|
Lights |
Connected to a computer (p. 34)/Display off (p. 171) |
|
|
Green |
Blinks |
During camera start-up, Recording/Reading/Transmitting |
|
image data, when Shooting Long Exposures (p. 79) |
||
When the indicator blinks green, do not turn off the power, open the memory card slot/battery cover, shake or jolt the camera. These actions may corrupt the image data or cause the camera or memory card to malfunction.
45

FUNC. Menu – Basic Operations
Commonly used functions can be set with the FUNC. menu.
The menu items and options differ depending on the Shooting mode (pp. 190
– 195) or Playback mode (p. 200).
Available Options
Menu Items
Display the FUNC. menu. z Press the m button.
Choose a menu item.
zPress the op buttons to choose a menu item, then press the m or r button.
zChoosing some menu items changes the screen to display further menu options.
Choose an option.
zPress the op buttons to choose an option.
zYou can also choose settings by pressing the n button on options that display  .
.
zTo return to the menu items, press the q button.
Complete the setting. z Press the m button.
XThe shooting screen will reappear and the setting you chose will display on the screen.
46

MENU – Basic Operations
Various functions can be set from the menus. The menu items are organized under tabs, such as for shooting (4) and playback (1). The options differ depending on the Shooting mode and the Playback mode (pp. 196 – 199).
Display the menu.
z Press the n button.
Choose a tab.
z Move the zoom lever or press the qr buttons to choose a tab.
Choose an item.
zPress the op buttons to choose an item.
zSome items require you to press the mor
r button to display a submenu in which you change the setting.
Choose an option.
z Press the qrbuttons to choose an option.
Complete the setting.
zPress the n button to restore the normal screen.
47

Changing the Sound Settings
You can silence or adjust the volume of camera sounds.
Muting Sounds 
Display the menu.
z Press the n button.
Choose [Mute].
zMove the zoom lever to choose the 3tab.
zPress the op buttons to choose [Mute], then press the qrbuttons to choose [On].
zPress the n button to restore the normal screen.
• You can also mute camera sounds by holding down the p button and turning on the power.
•If you mute camera sounds, the sound will also be muted when playing back movies (p. 31). If you press the o button while playing back a
movie, the sound will play back, and you can adjust the volume with the op buttons.
48

Changing the Sound Settings
Adjusting the Volume
Display the menu.
z Press the n button.
Choose [Volume].
zMove the zoom lever to choose the 3tab.
zPress the op buttons to choose [Volume], then press the m button.
Change the volume.
zPress the opbuttons to choose an item, then press the qr buttons to adjust the volume.
zPress the n button twice to restore the normal screen.
49

Adjusting the Screen Brightness
The screen brightness can be adjusted in two ways.
Using the Menu 
Display the menu.
z Press the n button.
Choose [LCD Brightness].
zMove the zoom lever to choose the 3tab.
zPress the op buttons to choose [LCD Brightness].
Adjust the brightness.
z Press the qr buttons to adjust the brightness.
z Press the n button twice to restore the normal screen.
Using the p Button 
z Press the p button for more than one second.
XThe screen increases to maximum brightness regardless of the setting in the 3 tab.
zPress the p button again for more than one second to return the screen to the original brightness.
• The next time you turn on the camera, the screen will be at the brightness setting chosen from the 3 tab.
•When you have set the brightness to its highest setting in the 3tab, you cannot change the brightness with the p button.
50
 Loading…
Страницы и текст этой инструкции
 Инструкция цифрового фотоаппарата Canon IXUS 220 HS
 Информация отображена на картинке
 Информация отображена на картинке
 Информация отображена на картинке
 Информация отображена на картинке
Как использовать наш сайт инструкций OnlineManuals.ru
Наша цель состоит в том, чтобы предоставить вам быстрый доступ к содержанию инструкции для цифрового фотоаппарата Canon IXUS 220 HS.
С помощью онлайн просмотра, Вы можете быстро просмотреть содержимое инструкции и найти решение проблемы с цифрового фотоаппарата Canon IXUS 220 HS.
Для Вашего удобства
Если листать руководство пользователя цифрового фотоаппарата Canon IXUS 220 HS прямо на сайте, не очень удобно для Вас, есть два возможных решения:
• Просмотр в полноэкранном режиме — легко просмотреть руководство пользователя (без загрузки его на свой компьютер), Вы можете использовать режим полноэкранного просмотра.
Для просмотра инструкции пользователя цифрового фотоаппарата Canon IXUS 220 HS на полном экране, используйте кнопку «Открыть в Pdf-viewer».
• Загрузка на компьютер — Вы можете также скачать Инструкция цифрового фотоаппарата Canon IXUS 220 HS на свой компьютер и сохранить его в файлах.
Многие люди предпочитают читать документы не на экране, а в печатной версии.
Возможность печати руководства пользователя также была предусмотрена на нашем сайте,
и вы можете использовать ее, нажав на иконку «печать» в Pdf-viewer.
Нет необходимости печатать все руководство цифрового фотоаппарата Canon IXUS 220 HS, можно выбрать только нужные страницы инструкции.
-
Страница 1
Camera User Guide ENGLISH • Make sur e you re ad this g uide, inc luding t he “Safety Precautio ns” section, be fore using th e camera. • Reading this guide will help you learn to us e the camer a properly. • Store thi s guide sa fely so that you can u se it in the future. C OP Y[…]
-
Страница 2
2 Check if the following i tems are incl uded in y our camera package. If anything is missing, c ontact the retailer wh ere you pu rchased th e camera. Using the PDF Manu als The following PDF manuals are included in the Readme folder of the CD-RO M: When the software is installed on your co mputer, the PDF manuals will be copied to the computer an[…]
-
Страница 3
3 Test Shots and Disclaimer Take some init ial test shot s and play them ba ck to make sure the i mages were recorde d correctly. Pl ease note that Canon Inc., its subsidiaries a nd affiliate s, and its dis tributors ar e not liable for any consequen tial damages arising fro m any malfu nction of a camera or accessory, i ncluding me mory cards, tha[…]
-
Страница 4
4 What Do You Want to Do? 4 z Shoot, leaving it to the camera to make settings ……………………. 24 O S Take good people shots Shoot various other scenes Shoot with special effects I w P V Portrai ts (p. 64) Facial expressions (p. 81) Kids and pets (p. 64) At the beach (p. 65) Against snow (p. 66) Night Scene (p. 65) Underwater (p. 65) Low […]
-
Страница 5
What Do You Want to Do? 5 1 z Look at my pictures ……………………………………………………………. 27 z Automatically play back pi ctures (slideshow) ……………………….. 122 z Look at my pictures on a TV ……………………………………………… 130 z Look at my pictures on a computer. ………………[…]
-
Страница 6
6 Chapters 1 – 3 explain the ba sic operation s and frequen tly used funct ions of this came ra. Chapters 4 onward explain the advanced f unctions, letting you learn more a s you read each chap ter. Checking the Package Contents …….2 Read This First …………………………….3 What Do You Want to Do? …………. …4 Table of C onte[…]
-
Страница 7
Table of Contents 7 Shooting Stitch Assist Images ……. . 82 Shooting in Program AE ………….. … 8 4 Adjusting the Brightness (Exposure Compensati on) ………… 85 Turning th e Flash On ………….. …….. 85 Adjusting the White Ba lance … …….. 86 Changing the ISO Speed ……………. 88 Correcting the Brightness and Shooting[…]
-
Страница 8
Table of Contents 8 Choosing Images for Printin g (DPOF) ……. ……………. …………. ….159 Changing Camera Settings….. …….166 Changing Shooting Functi on Settings …………. …………. …………. .173 Changing Playback Function Settings …………. …………. …………. .176 Using Househ old Power ……………[…]
-
Страница 9
9 • Icons are use d in the text to re present the came ra buttons and switches. • Language th at display s on the screen appears ins ide [ ] (squa re brackets ). • The direction al buttons an d FUNC./SET button are represent ed by the following icons. • : Things you sh ould be caref ul about • : Troubles hooting tip s • : Hints f or get[…]
-
Страница 10
10 • Before using the product, please ensure that you read the safety precautions described below. Always ensure that the product is used correctly. • The safety precautions noted on the following pages are intended to prevent injuries to yourself and other persons, or damage to the equipment. • Be sure to also check the guides included with […]
-
Страница 11
Safety Precautions 11 • Turn the camera off in places where camera use is prohibited. The electromagnetic waves emitted by the camera may interfere with the o peration of electronic instruments and other devices. Exercise adequate caution wh en using the camera in places where use of electronic devices is restricted, such as inside airplanes and […]
-
Страница 12
Safety Precautions 12 • In regular use, small amounts of smoke may be emitted from the flash. This is due to the h igh intensity of the flash burn ing dust and foreign materials st uck to the front of the unit. Please use a cot ton swab to remove dirt, dust or other foreign matter from the flash to prevent heat build-up and damage to the unit. ?[…]
-
Страница 13
13 Getting Started This chapter explains preparations before shooting, how to shoot in A mode, and then how to view and erase the images you take. The latter part of this chapter explains how to shoot and view movies and transfer images to a computer. Attaching the Strap/Hold ing the Camera • Attach the i ncluded strap an d wrap it around yo ur w[…]
-
Страница 14
14 Use the incl uded char ger to charg e the batte ry. Be sure to charge the battery as it is not c harged at the time of purchase. Remove the cover. Insert the battery. z Align the o marks on the battery and charger, t hen insert the batter y by slidi ng it in ( ) and down ( ). Charge the battery. z For CB-2LV: Flip out the plug ( ) and plug the c[…]
-
Страница 15
Charging the Battery 15 Number of Possible Shots • The number of shots that can be taken is based on the Camera & Ima ging Products Association (CIPA) measurement standard. • Under some shooting conditions, the number of shots that can be take n may be less than mentioned above. Battery Charge In dicator An icon or mes sage will appea r on […]
-
Страница 16
16 The cards bel ow can be used withou t restricti ons on their capa cities. • SD memory cards* • SDHC memory cards* • SDXC memory cards * • MultiMedia Cards • MMC plus memory cards • HC MMC plus memory cards • Eye-Fi Cards * This memory card complies with the SD standards. Some cards may not ope rate properly depending on the brand o[…]
-
Страница 17
Inserting the Battery and Memory Card 17 Insert the battery. z Press the batt ery lock in th e direction of the arrow, then ins ert the batter y as shown until it lo cks into place wi th a click. z Be sure to insert the battery in the correct direction or it will not properly loc k into place. Insert the memory card. z Insert the me mory card as sh[…]
-
Страница 18
Inserting the Battery and Memory Card 18 Removing the Battery and Memory Card Remove t he battery . z Open the cove r and press the battery lock in the direc tion of the arro w. X The battery will pop up. Remove the memory card. z Push the memory card i n until you hear a click, then slowly re lease it. X The memory card wil l pop up. Number of Sho[…]
-
Страница 19
19 The Date/Time se ttings screen will appea r the first time th e camera is tu rned on. Since th e dates and times re corded into your images are based on these settings, b e sure to s et them. Turn on the camera. z Press the power button. X The Date/Time screen will appe ar. Set the date and time. z Press the qr buttons t o choose an option. z Pr[…]
-
Страница 20
Setting the Date and Time 20 Changing the Date and Time You can change the current da te and time sett ings. Display the menu. z Press the n but ton. Choose [Date/Time]. z Move the zoo m lever to choo se the 3 tab. z Press the op b uttons to choose [Date/ Time], then press the m button. Change the date and time. z Follow Ste ps 2 and 3 o n p. 19 to[…]
-
Страница 21
21 You can change the language t hat displays on the screen. Enter Playback mode. z Press the 1 butt on. Display the settings scr een. z Press and hold the m button, then immediately pr ess the n button. Set the disp lay languag e. z Press the opqr buttons to c hoose a language, t hen press the m bu tton. X Once the displ ay language has b een set,[…]
-
Страница 22
22 Before you use a new memory card or one that has been for matted in other devices, you should f ormat the card with thi s camera. Formattin g (initializing) a memory card erases al l data on the memory ca rd. As you cannot retrieve the erased data, exercise adequat e caution before formatting the memory card. Before forma tting an Ey e-Fi card ([…]
-
Страница 23
Pressing the Shutter Button 23 Complete formatting. X When formatti ng ends, [Memor y card formattin g complete] will ap pear on the screen. z Press the m butt on. To take imag es that are in focus, be sure to first press the shutt er button lightly (hal fway) to focu s, then pre ss fully t o shoot. Press halfway (Press lightly to focus). z Press l[…]
-
Страница 24
Taking Pictures (Smart Auto) 24 Since the ca mera can determin e the subject and shooting con ditions, you ca n let it automa tically sele ct the best settings fo r the scene a nd just sho ot. The camera can a lso detect and focus on faces, se tting the c olor and brig htness to optimal le vels. Turn on the camera. z Press the powe r button. X The […]
-
Страница 25
Taking Pictures (Smart Auto) 25 Compose the shot. z Moving the zoom lev er toward i (telephoto ) will zo om in on you r subject, making it appe ar larger. Movi ng the lever toward j (wide angl e) will zoom out fr om your subje ct, makin g it appe ar smaller . (The zoom bar show ing the zoom position appears on the screen.) Focus. z Press the s hutt[…]
-
Страница 26
Taking Pictures (Smart Auto) 26 What if… • What if th e color and b rightness of the imag es do not turn out as expected? The scene icon (p. 187) that appear s on the screen may not match the actual scene. If this happens, try shooti ng in G mode (p. 83). • What if white and gray frames appear when you point the came ra toward a subject? A wh[…]
-
Страница 27
Viewing Images 27 You can view th e images you have taken on the scr een. Enter Playback mode. z Press the 1 butt on. X The last image y ou took will ap pear. Choose an image. z Pressing t he q button wi ll cycle throu gh the images fr om newest to oldest . z Pressing t he r button will cycl e through the images fr om oldest to newest . z Pressing […]
-
Страница 28
28 You can ch oose and erase image s one at a t ime. Please note that er ased images canno t be recovered . Exercise adequ ate caution bef ore erasing an image. Enter Playback mode. z Press the 1 butt on. X The last image y ou took will ap pear. Choose an image to erase . z Press the qr buttons to display an image to erase. Erase the image. z After[…]
-
Страница 29
29 The camera wi ll determine the subject and shootin g conditions , and select t he best settin gs for the s cene. The audio will re cord in ste reo. If you continue shooting for a long time, the camera may be come warm. This is not a malf unction. Choose A mode. z Set the mode switch to A . Compose the shot. z Moving the zoom lev er toward i will[…]
-
Страница 30
Shooting Movies 30 z Do not tou ch the micro phones whil e shooting. z Do not pres s any butto ns other th an the movie button while shooting. Th e sound the buttons make will be recor ded in the movie. Stop shooting. z Press the movi e button again. X The camera will beep twice and st op shooting th e movie. X The movie will r ecord to the memory […]
-
Страница 31
31 You can view th e movies you have shot on the screen . Enter Playback mode. z Press the 1 butt on. X The last image y ou took will ap pear. X appears on movi es. Choose a movie. z Press the qr buttons to choo se a movie, then press th e m button. Play the movie. z Press the op buttons to choose , then press the m button. X The movie will play . […]
-
Страница 32
Transferring Images to a Computer for Viewing 32 You can use t he include d software to transfer imag es you have sh ot with the camera to a co mputer for view ing. If you are already usi ng software inc luded with anothe r Canon-brand comp act digita l camera, insta ll the software fr om the includ ed CD-ROM, overwr iting your curr ent installa ti[…]
-
Страница 33
Transferring Images to a Computer for Viewing 33 Macintosh Preparations Windows Vist a and Mac OS X (v10.5) ar e used for thes e explanation s. Install the Software. Windows Place the CD in the computer’ s CD- ROM drive. z Place the suppl ied CD-ROM (DIGITAL CAMERA Solution Disk ) (p. 2) into the computer’s C D-ROM drive. Begin installation. z […]
-
Страница 34
Transferring Images to a Computer for Viewing 34 When the installation finish es, click [Restart] o r [Finish]. Remove the CD-ROM. z Remove the CD-ROM when your desktop screen app ears. Macintosh Place the CD in the computer’ s CD- ROM drive. z Place the suppl ied CD-ROM (DIGITAL CAMERA Solution Disk ) (p. 2) into the computer’s C D-ROM drive. […]
-
Страница 35
Transferring Images to a Computer for Viewing 35 Open CameraWindow. Windows z Click [Downl oads Images Fro m Canon Camera using Can on CameraWindow]. X CameraWindow will appear. z If CameraWindow do es not appear, cli ck the [Start] men u and choose [Al l Programs], follo wed by [Canon Utilities], [CameraWin dow] and [CameraW indow]. Macintosh X Ca[…]
-
Страница 36
Transferring Images to a Computer for Viewing 36 Transfer and View Images z Click [Import Imag es from Camera], and then click [Import Untr ansferred Images]. X All images not previously transferred wi ll transfer to th e computer. Tr ansferred images will be sorted b y date and sav ed in separate fo lders in the Pic tures folde r. z Close Camer aW[…]
-
Страница 37
37 Accessories Supplied with Camera Wrist Strap WS-DC11 Battery Pack NB-4L with Terminal Cover* Battery Charger CB-2LV/CB- 2LVE* DIGITAL CAMERA Solution Disk *Also available f or purchase se parately. USB card re ader Windows / Macintosh Memory Card Canon-Bran d PictBridge Compliant Print ers TV High-Definition TV HDMI Cable HTC-100 Interface Cable[…]
-
Страница 38
38 The followi ng camera accessor ies are sold separat ely. Some access ories are not sold in some region s, or may no longer be available. Power Supplies Battery Charger CB-2LV/CB-2L VE z A charger for charging Battery Pack NB-4 L. Battery Pack NB-4L z Recharge able lithium- ion battery . AC Adapter Kit ACK-DC60 z This kit let s you power the came[…]
-
Страница 39
Separately Sold Accessories 39 Other Accessories HDMI Cable HTC-100 z Use this cabl e to connect the ca mera to the HDMI ™ termin al on a high-def inition TV set. Waterproof Case WP-DC41 z Use this case to take und erwater sho ts at depths of up to 40 meter s (130 ft.), or to shoot in the ra in, at the beach, or on the ski slopes. Waterproof Case[…]
-
Страница 40
Separately Sold Accessories 40 Use of genuine Canon accessories is recommended. This product is designed to achieve excellent performance when used with genuin e Canon accessories. Canon shall not be liable for any damage to this product an d/or accidents such as fire, etc., caused by the malfunction of non-genuine Canon accessories (e.g., a leakag[…]
-
Страница 41
41 Learning More This chapter explains the parts of the camera and what appears on the screen, as well as the bas ic operating instructions. 2 C OP Y[…]
-
Страница 42
42 Components Guide Lens Speaker Zoom Lever Shooting: i (Telephoto) / j (Wide Angle) (pp. 25, 29, 55) Playback: k (Magnify) / g (Index) (pp. 118, 125) Shutter Button (p. 23) Power Button (p. 19) Microphones (p. 30) Lamp (pp. 58, 77, 173) Flash (pp. 54, 85) Tripod Socket DC Coupler Terminal Cover Memory Card / Battery Cover (p. 16) C OP Y[…]
-
Страница 43
Components Guide 43 Mode Switch Use the mode switc h to change the Shoo ting mode. Screen (LCD Monitor) (pp. 44, 186, 188) Movie Button (pp. 29, 107) Mode Switch A/V OUT (Audio/Video Output) / DIGITAL Terminal (pp. 34, 130, 152) HDMI Terminal (p. 131) Strap Mount (p. 13) b (Exposure Compensation) (p. 85) / o Button e (Macro) (p. 94) / q Button m FU[…]
-
Страница 44
44 Switching th e Display You can change the screen dis play using the p button. Refe r to p. 186 for details on information th at appears on t he screen. Shooting Playback Screen Display No Information Display Information Display You can also switch the display by pressing t he p button while the i mage displays right after shooting. However, Simp[…]
-
Страница 45
Indicator 45 Screen Display in Dark Shooting Conditions The display automaticall y brightens wh en shooting in da rk conditions , allowing y ou to chec k the compo sition (Nig ht Display function). However, the brightnes s of the ima ge on the scree n, and the b rightness o f the actual image recorded may be different. Screen noise may app ear and […]
-
Страница 46
46 Commonly used functions can be set with the FUNC. menu. The menu items an d options diff er depending o n the Shooting mode (pp . 190 – 195) o r Playback mode (p. 200) . Display the FUNC. menu. z Press the m butt on. Choose a menu item. z Press the op buttons to choose a menu item, then p ress the m or r bu tton. z Choosing some menu i tems ch[…]
-
Страница 47
47 Various fu nctions can be se t from the menus . The menu items ar e organized under tabs , such as f or shooting ( 4 ) and play back ( 1 ). The optio ns differ depending o n the Shooting mode and the Playba ck mode (pp. 196 – 1 99). Display the menu. z Press the n but ton. Choose a tab. z Move the zo om lever or press th e qr buttons to ch oos[…]
-
Страница 48
48 You can silenc e or adjust the volu me of camera sounds . Muting Sounds Display the menu. z Press the n but ton. Choose [Mute]. z Move the zoo m lever to choo se the 3 tab. z Press the op b uttons to choose [Mute], then press t he qr butt ons to choose [ On]. z Press the n button to restor e the normal scre en. Changing the Sound Settings • Yo[…]
-
Страница 49
Changing the Sound Settings 49 Adjusting the Volume Display the menu. z Press the n but ton. Choose [Volume]. z Move the zoo m lever to choo se the 3 tab. z Press the op b uttons to choose [Volume], the n press the m butt on. Change th e volume . z Press the op b uttons to choo se an item, then press th e qr buttons to adjust the volume. z Press th[…]
-
Страница 50
50 The screen brightness can be adjusted in two ways. Using the Menu Display the menu. z Press the n but ton. Choose [LCD Brightness]. z Move the zoo m lever to choo se the 3 tab. z Press the op b uttons to choose [L CD Brightness ]. Adjust the brig htness. z Press the qr buttons to adj ust the brightness . z Press the n button twice to restore the[…]
-
Страница 51
51 When you have mis takenly chan ged a setting, y ou can reset the ca mera to the default sett ings. Display the menu. z Press the n but ton. Choose [Reset All]. z Move the zoo m lever to choo se the 3 tab. z Press the op b uttons to choose [Reset All], then pres s the m button. Reset the settings. z Press the qr buttons to choos e [OK], then pres[…]
-
Страница 52
52 To save ba ttery power, the scre en turns of f, and the c amera shuts down automatic ally when it is no t operated for a certain time. Power Saving du ring Shoo ting The screen wil l turn off ap proximately 1 mi nute after y ou stop operati ng the camera. After ab out 2 more minu tes, the lens wi ll retract and the power will turn off. Whe n the[…]
-
Страница 53
53 Shooting with Commonly Used Functions This chapter explains how to use common functions, such as the self- timer, and how to turn off the flash. • This chapte r assumes tha t the camera is set to A mod e. When shooti ng in another mode, check whic h functions a re available in that mode (pp. 19 0 – 195). 3 C OP Y[…]
-
Страница 54
54 You can shoot with the flash tu rned off. Press the r button. Choose ! . z Press the qr buttons to choo se ! , then press the m button. X Once set, ! will appear on the scre en. z To turn the flash back on, follow t he steps above to choos e . Turning the Flash Off What if a flashing appears? When you press the shutter button halfway in l ow lig[…]
-
Страница 55
55 You can use the digital zoom to zoom up to approxi mately 20x maximu m, and capture su bjects that are too f ar away fo r the optica l zoom to en large. However, dep ending on the reco rding pixel setting (p. 61) an d zoom factor, the images may appear coarse ( the zoom factor wil l appear in blue) . Move the zoom lever toward i . z Hold the lev[…]
-
Страница 56
Zooming in More Closely on Subjects (Digital Zoom) 56 Digital Tele-Converter The focal lengt h of the lens can be incre ased by approx imately 1.5x or approximat ely 2.0x. This e nables a fast er shutter spee d and less chanc e of camera shake t han the zoom (incl uding digita l zoom) used by it self at the same zoom factor. However, a rec ording p[…]
-
Страница 57
57 You can inser t the shooting d ate and time in the lo wer right cor ner of an image. Once in serted, however, the y cannot b e deleted . Be sure t o check beforehand that the d ate and time are correc tly set (p. 19). Display the menu. z Press the n but ton. Choose [Date Stamp]. z Move the zo om lever to ch oose the 4 tab. z Press the op b utton[…]
-
Страница 58
Using the Self-Timer 58 The self-ti mer can be used to shoot a group phot o that inc ludes th e photograph er. The camera will sh oot approxima tely 10 seconds afte r the shutter but ton is pr essed. Choose Ò . z After pressi ng the m button, press the op buttons to choose , the n press the m button agai n. z Press the op buttons to choose Ò , th[…]
-
Страница 59
Using the Self-Timer 59 z To cancel shoo ting with the se lf-timer afte r the countdow n has started, pr ess the n button. z To restore the origi nal settin g, choose in Step 1, o n p. 58. Using the Self-Tim er to Prevent Camera Sha ke The camera will shoot approximate ly 2 second s after the shutter bu tton is pressed, pr eventing any camer a shak[…]
-
Страница 60
Using the Self-Timer 60 Choose the settings. z Press the op b uttons to choose [Delay] or [Shots ]. z Press the qr buttons to choo se a value, then press th e m button. z Follow Step 2 on p. 58 to shoo t. What if the number of shots i s set to two or more shots? • Exposure and white balance setti ngs are set with the first shot. • If the flash […]
-
Страница 61
61 You can choose from 4 recording p ixel setting s. Choose the recording pixel setting. z After pressi ng the m button, press the op buttons to choose , the n press the m button agai n. Choose an option. z Press the op b uttons to choose an option, the n press th e m button. X The setting will appear on the screen. z To restor e to the orig inal s[…]
-
Страница 62
Changing the Compression Ratio (Image Quality) 62 Approximate Values for Recording Pix els and Compression Ratio (for 4:3 Aspect Ratios) • The values in the table are measured according to Canon standards an d may change depending on the subject, memory card and camera settings. • The values in the table are based on 4:3 aspect ratio. If the as[…]
-
Страница 63
63 Adding Effects and Shooting in Various Conditions This chapter explains how to add e ffects and how to shoot in various conditions. 4 C OP Y[…]
-
Страница 64
64 The camera wil l select the n ecessary set tings for the conditions in which you wish to shoot wh en you choose the matching mo de. Set the camera to 4 mode. z Set the mode switch to 4 . Choose a Shooting mode. z After pressi ng the m button, press the op buttons to choose G , then pres s the m button agai n. z Press the op b uttons to choose th[…]
-
Страница 65
Shooting in Various Conditions 65 Take nigh tscapes with out using a tripod (Handheld NightSce ne) z Lets you take beautiful s napshots of cit y nightscene s by combini ng several continuous shots to reduce camera shake and noise. z When using a tri pod, you shou ld shoot in A mode (p. 24). Take shots in low light cond itions (Low Light) z Lets you[…]
-
Страница 66
Shooting in Various Conditions 66 P Take shots of pe ople in snow (Snow) z Lets you take br ight, natu ral-colored sh ots of people aga inst snowy backgr ounds. z fireworks in viv id colors. In mode, hold the camera firmly while shooting as multiple images are captured in succession. • In mode, the recording pixel setting will be fixed at (1984 x[…]
-
Страница 67
67 You can make a short mo vie of a da y just by ta king stil l images. Each time you take a pict ure, the scene just before taki ng your sh ot will be recorded as a movi e. All the movies recorde d that day will be saved as a single file. Choose . z Follow Steps 1 – 2 on p. 64 to choose . Shoot. z Press the shu tter button fu lly to shoot a s ti[…]
-
Страница 68
68 You can ad d variou s effects to images when sho oting. Choose a Shooting mode. z Follow Steps 1 – 2 on p. 64 to choos e a Shooting mode . Shoot. Shoot images with v ivid colors (Super Vivid) z Lets you ta ke shots with vivid, inte nse colors. Take posterized sh ots (Poster Effect) z Lets you ta ke shots that look like an old poster or illu st[…]
-
Страница 69
Adding Effects and Shooting 69 Shoot with the Effects of a Fish -Eye Lens (Fish- eye Effect) Lets you shoo t with the disto rting effect of a fish-eye lens. Choose . z Follow Step s 1 – 2 on p. 64 to c hoose . Choose an effect level. z Press the n button for more th an one second. X [Effect Lev el] will appea r on the screen . z Press the qr butt[…]
-
Страница 70
Adding Effects and Shooting 70 Take Shots That Look Like a Miniat ure Model (Miniature Effect) Blurs chos en portions i n the top and bo ttom of an i mage to produ ce the effect of a miniature model . Choose . z Follow Steps 1 – 2 on p. 64 to choose . X A white frame ( the area that will not be blurred) ap pears on the scree n. Choose the a rea t[…]
-
Страница 71
Adding Effects and Shooting 71 Changing the Colo r and Shooti ng You can change th e look of an image wh en shooting. Howev er, dependin g on shooting c onditions, t he image may be come coarse, or the colo rs may not come out as expect ed. Color Accent You can choo se to retai n a single colo r and change the rest to black and whit e in a compos i[…]
-
Страница 72
Adding Effects and Shooting 72 Color Swap You can swap one color in an i mage for anoth er when recordi ng it. You can only swap one c olor. Choose Y . z Follow Steps 1 – 2 on p. 64 to choos e Y . Press the n button for more than one second. X The unchanged ima ge and the Color Swap image will al ternately displ ay. z The default setting is to ch[…]
-
Страница 73
Adding Effects and Shooting 73 Specify the range of colors to be swapped. z Press the op buttons to a djust the range of colors to be ch anged. z Choose a negat ive value t o limit the ra nge of colors . Choose a positive value to extend the range of c olors to simi lar colors. z Press the n button to complete th e setting and restore the shoo ting[…]
-
Страница 74
Adding Effects and Shooting 74 Shoot with the Effects o f a Toy Camera (Toy Camera Effect) This effec t darkens and blur s the corners of the image, and chan ges the overall col or so that i t looks li ke an image shot with a toy camera . Choose . z Follow Steps 1 – 2 on p. 64 to choose . Choose a color tone. z Press the n button for more th an o[…]
-
Страница 75
75 Detecting a Smile and Shoo ting The camera wil l shoot, even wit hout pressing the shutter but ton, when it detects a s mile. Choose . z Follow Steps 1 – 2 on p. 64 to choose , then press the n button for more th an one second. z Press the qr button s to choose , then press the n button. X The camera will enter shootin g stand-by, and [Smile D[…]
-
Страница 76
Detecting a Face and Shooting (Smart Shutter) 76 Using the Wink Self-Timer Point the ca mera at a person and pr ess the shutter button fully. The camera will shoot approx imately two second s after it detects a wink. Choose . z Follow Steps 1 – 2 on p. 64 to choose , then press the n button for more th an one second. z Press the qr button s to ch[…]
-
Страница 77
Detecting a Face and Shooting (Smart Shutter) 77 Using the Face Self -Timer The shutter will release appr oximately two sec onds after the came ra detects a new face (p. 9 5). You can use thi s when the photogr apher wants t o be in the image, s uch as a gr oup photo. Choose . z Follow Steps 1 – 2 on p. 64 to choose , then press the n button for […]
-
Страница 78
Detecting a Face and Shooting (Smart Shutter) 78 Join the subjects and look at the camera. X When the camer a detects a new fac e, the lamp and self -timer sound wil l speed up (the lamp remai ns lit when the flash will fire), and two seconds lat er the shutte r will release. z To cancel shoo ting with the ti mer after countdown h as starte d, pres[…]
-
Страница 79
79 You can set t he shutter spe ed to a range b etween 1 and 15 seconds to sh oot long exposu res. However , you should at tach the came ra to a tripod t o prevent the camera f rom moving and blurrin g the imag e. Choose ≈ . z Follow Steps 1 – 2 on p. 64 to choos e ≈ . Choose the shutter speed . z Press the o button. z Press the qr buttons to[…]
-
Страница 80
80 You can shoot continuously at a maximum speed of app roximately 8.0 images /second w hile the shutter but ton is pre ssed ful ly and he ld. Choose . z Follow Steps 1 – 2 on p. 64 to choose , Shoot. X As long as you ho ld the shutte r button down, the camer a will shoot suc cessive images. Images Disp layed During P layback Since each se t of c[…]
-
Страница 81
81 The camera tak es 5 continuous sh ots, then dete cts various a spects of the shot such as fa cial expressi ons, and saves on ly one picture de tected as the best. Choose . z Follow Step s 1 – 2 on p. 64 to c hoose . Shoot. X When the shutter bu tton is pressed fully, the camera takes five continuous shots, and saves one pi cture only. Capturin[…]
-
Страница 82
82 Large subj ects can b e split into several sh ots that can later be me rged together u sing the includ ed software on a comp uter to create a panoramic image. Choose x or v . z Follow Steps 1 – 2 on p. 64 to choos e x or v . Take the first shot. X The exposure and white ba lance will be s et with the first s hot. Take subseq uent shots. z Over[…]
-
Страница 83
83 Choosing Settings Yourself In this chapter you will learn how to use t he various functions in G mode to progressively advanc e your shooting skills. • This chapter assumes that you ha ve set the mode s witch to 4 and the camera is in G mode. • G stands for Pr ogram AE. • Before atte mpting to shoo t using a functi on explained i n this ch[…]
-
Страница 84
84 You can choo se the setting s for various functions t o suit your prefe rences. AE stands for Auto Exposure. The focusing ra nge is approximat ely 5 cm (2. 0 in.) – inf inity at maximum wide angle ( j ) , and approxi mately 90 cm (3.0 ft.) – infinity at maximum te lephoto ( i ). Enter G mode. z Follow Steps 1 – 2 on p. 64 to choos e G . Ad[…]
-
Страница 85
85 You can adju st the st andard exp osure set by the camer a in 1/3-sto p increments in the range of -2 to +2. Enter Exposure Compensation mode. z Press the o button. Adjust the brightnes s. z While watching the screen, pres s the qr buttons to ad just the brigh tness, then press the m button. X The exposure c ompensation amo unt will appear on th[…]
-
Страница 86
86 The white balance (WB ) function sets the op timal white bal ance for na tural looking col ors to match the s hooting condit ions. Choose the white balanc e function. z After pressi ng the m button, press the op buttons to choose , the n press the m button agai n. Choose an option. z Press the op b uttons to choose an option, the n press the m b[…]
-
Страница 87
Adjusting the White Balance 87 Manually Correct ing the White Balanc e You can manual ly correct the wh ite balance wh en in S mode (p. 65). This adjustment will h ave the same effe ct as using a co mmercially-av ailable color compensati ng filter. Choose S . z Follow Steps 1 – 2 on p. 64 to choos e S . Choose the White Balance. z After pressi ng[…]
-
Страница 88
88 Choose the ISO spee d. z After pressi ng the m button, press the op buttons to choose , the n press the m button agai n. Choose an option. z Press the op b uttons to choose an option, the n press the m button. X The setti ng will app ear on th e screen. Changing the ISO Speed Automatically adjusts the ISO speed to the Shooting mode and shooting […]
-
Страница 89
89 The camera can d etect areas in t he scene, such a s faces or backgro unds, that are to o bright or dark an d automatica lly adjust the m to the optimum brightness when shootin g. Also, wh en the overa ll image is lac king in cont rast, the camera wil l automatical ly correct the image for a sharpe r impression when shoot ing. Choose [i-Contrast[…]
-
Страница 90
90 You can change the width to heig ht ratio of an ima ge. Choose . z After pressi ng the m button, press the op buttons to choose , the n press the m button agai n. Choose an option. z Press the op buttons t o choose a optio n, then press th e m button. X Once set, the aspect rat io of the scre en will change. Changing the Aspect Ratio The same as[…]
-
Страница 91
91 You can shoot continuously at a maximum speed of app roximately 3.4 images/sec ond while the s hutter button is pressed fully an d held. Choose a Drive mode. z After pressi ng the m button, press the op buttons t o choose , then press the m button agai n. Choose an option. z Press the op butt ons to choose W , then press the m button. X Once set[…]
-
Страница 92
92 You can change the tone of an i mage, for example to sepia or bla ck and white, when shooting . Choose My Colors. z After pressi ng the m button, press the op buttons to choo se , then press the m button agai n. Choose an option. z Press the op b uttons to choose an option, the n press the m button. X The setti ng will app ear on th e screen. Ch[…]
-
Страница 93
Changing the Tone of an Image (My Colors) 93 Custom Color The contra st, sharpne ss, color sat uration, red , green, blue , and skin ton es in an image can be c hosen and set at 5 different le vels. z Follow Step 2 on p. 9 2 to choose , then press the n button. z Press the op b uttons to choose an option, the n press th e qr buttons to choose a val[…]
-
Страница 94
94 You can shoot a n object at a cl ose distance or ev en shoot extreme c lose-ups of it. The focu sing range is ap proximately 3 – 50 cm (1.2 in. – 1.6 ft.) from t he end of the lens at maximu m wide ang le ( j ). Choose e . z After pres sing the q button, press the qr buttons to ch oose e , then press the m button. X Once set, e will appear o[…]
-
Страница 95
95 You can change the AF (Auto Focu s) frame mode to matc h the scene you want to shoo t. Choose [AF Frame]. z Press the n button to choose [AF Frame] fr om the 4 tab, then pres s the qr buttons to ch oose an optio n. Face AiAF • Detects pe ople’s faces and sets t he focus, ex posure (eval uative meteri ng only) and white ba lance ( only). • […]
-
Страница 96
Changing the AF Frame Mode 96 Tracking AF You can choose the subject yo u want to focus on an d shoot (p. 97). Center The AF fram e is locked to the cen ter. This is effective f or focusi ng on a specific poin t. Changing th e Composition with the Focus Lock While you keep the shutter but ton pressed ha lfway, the focus and exposure are locked. You[…]
-
Страница 97
97 You can choose the subject yo u want to focus on an d shoot. Choose [Trackin g AF]. z Press the n button to choose [AF Frame] fr om the 4 tab, then pres s the qr buttons to choose [Track ing AF]. X will appea r in the center o f the screen . Choose the subje ct to focus on. z Point the camera so th at is on th e subject you wa nt to focus on and[…]
-
Страница 98
Magnifying the Focal Point 98 If you press the sh utter button halfway, the AF frame will ma gnify and you ca n check the fo cus. Choose [AF-Poi nt Zoom]. z Press the n button to choose [AF- Point Zoom] from the 4 tab, then press the qr buttons to choo se [On]. Check the focu s. z Press the shut ter button hal fway. X In [Face AiAF] (p. 95), the fa[…]
-
Страница 99
99 The focus can be loc ked. After l ocking the focus, the focal distan ce will not change ev en when you release yo ur finger fr om the shut ter button . Lock the focus. z Keep the shutt er button pres sed halfway and press the q button. X The focus lock s and % appears on the screen. z If you rele ase your fi nger from th e shutter button and pr […]
-
Страница 100
100 While the shu tter button is pressed halfway , the focus an d exposure will continue t o adjust, allo wing you to take pi ctures of movin g subjects witho ut missing a sh ot. Choose [Servo AF]. z Press the n button to choose [Servo AF] from the 4 ta b, then p ress the qr buttons to ch oose [On]. Focus. z The focus a nd exposure will be main tai[…]
-
Страница 101
101 You can change the metering meth od (brightness measuring fun ction) to match the sh ooting con ditions. Choose the metering method. z After pressi ng the m button, press the op buttons t o choose , then press the m button agai n. Choose an option. z Press the op b uttons to choose an option, the n press th e m button. X The setting will appear[…]
-
Страница 102
102 You can lock t he exposure and shoot, or set the focus and exposur e separatel y to shoot. AE sta nds for “Auto Expo sure”. Choose ! (p. 54). Lock the exp osure. z Point the camera towa rd the subj ect and press the o button while pres sing the shutter butto n halfway. X When & appears, the exposure will be locked. z If you rele ase you[…]
-
Страница 103
103 You can make t he main subj ect, such as p eople, appe ar bright by h aving the camera provi de the approp riate illuminat ion with the flash. At t he same time , you can u se a slow shutter spe ed to bri ghten the b ackground t hat the light from the flash cannot reach. Choose … . z After press ing the r button, press the qr buttons to ch oo[…]
-
Страница 104
104 You can automa tically corre ct red-eye that occurs in imag es taken with the flash. Choose [Flash Settings]. z Press the n button to choose [Flash Settings] fro m the 4 tab, the n press th e m button. Choose the setting. z Press the op b uttons to choose [Red- Eye Corr.], the n press th e qr button s to choose [On]. X Once set, Œ will appear […]
-
Страница 105
105 When the camera det ects the possib ility that peopl e have their eyes shut, appears on th e screen. Choose [Blink Detection]. z Press the n button to choose [Blink Detection] from the 4 tab, then press the qr butt ons to cho ose [On] . Shoot. X When a perso n with shut eyes is detected, a frame and appear on the screen. You can use a TV to dis[…]
-
Страница 106
106 C OP Y[…]
-
Страница 107
107 Using Various Functions for Shooting Movies This chapter serves as a more advanced version of the “Shooting Movies” and “Viewing Movies” sections in Chapter 1, and explains how to use various functions fo r shooting and viewing movies. • This chapter assumes that you ha ve set the mode s witch to 4 . • The latter half of the chapter[…]
-
Страница 108
108 Just as with still images, you can le t the camera select the best settin gs for the scene or add vari ous effects while sho oting movies . Choose a Shooting mode. z Follow Steps 1 – 2 on p. 64 to choos e a Shooting mode . Shoot. z Press the movi e button. X Depending on the Shooti ng mode or movie image quality (p . 112) you choose, bl ack b[…]
-
Страница 109
109 You can shoot mo vies that look like mov ing miniature mode ls. You create the miniature model effect by choosin g the upper and lowe r portions of the scene that will be bl urred, and the pl ayback speed, w hich makes people an d objects in the scen e move quic kly during playback. A udio will n ot be reco rded. Choose . z Follow Steps 1 – 2[…]
-
Страница 110
Shooting Super Slow Motion Movies 110 You can shoot fast moving subje cts and play them b ack in slow motion . Audio will not be re corded. Choose . z Follow Steps 1 – 2 on p. 64 to choose . Choose a frame rate. z Press the m butt on to choos e , then press the m bu tton again. z Choose a frame r ate (the number of frames per sec ond), then pr es[…]
-
Страница 111
Shooting Super Slow Motion Movies 111 Frame Rates and Playback T imes (for 30 Sec. Clips) Frame Rate Playback Time 240 fps Approx. 4 min. 120 fps Approx. 2 min. Viewing super slow motion movies • The movie will play back in slow motion when you follow Steps 1 – 3 on p. 31. • You can use the included softwar e to change the playb ack speed of […]
-
Страница 112
112 You can choose among 4 differ ent image qualit y settings. Choose the image quality setting. z After pressi ng the m button, press the op buttons to choose , then pr ess the m button agai n. Choose an option. z Press the op b uttons to choose an option, the n press the m button. X The option you set will appear on the screen. Image Quality a nd[…]
-
Страница 113
113 The followin g functions can be used in th e same way as for st ill images. Some functions, however, may not be ava ilable or may not have an effect depending o n the Shooting mode. • Zooming in More Closely On Subj ects The sound of zoom operations will be recorded. • Using the Self-Tim er (p. 58) • Using the Self-Tim er to Prevent Camer[…]
-
Страница 114
114 You can trim t he beginnings an d ends of record ed movies. Choose * . z Follow Steps 1 – 3 on p. 31 to choos e * , then press th e m button. X The movie editi ng panel and the movie editing bar will appear. Set the editing range. z Press the op buttons and choo se or . z If you press th e qr buttons to mo ve , will appear at points where the[…]
-
Страница 115
Editing 115 Save the e dited mo vie. z Press the op bu ttons to choos e , then press the m button. z Press the qr buttons to choo se [New File], then pre ss the m butt on. X The movie will be s aved as a new file. • When [Overwrite] is chosen in Step 4 , the unedited movie is overwritten with the edited movie, erasing the orig inal. • When ther[…]
-
Страница 116
116 C OP Y[…]
-
Страница 117
117 Using Various Playback and Editing Functions This chapter explains various ways to play back and edit images. • Press the 1 butt on to enter P layback mode be fore operating the camera. • It may not be possible to p lay back or edit images that have b een edited on a computer, have had their file names changed, or have been taken on a diffe[…]
-
Страница 118
118 Searching I mages Using In dex Display Displaying multi ple images a t the same time l ets you quickly find the imag e you want. Move the zoom lever toward g . X Images will di splay in an index. z The number of images increas e each time you move th e lever towa rd g . z The number of image s decrease each t ime you move th e lever towa rd k .[…]
-
Страница 119
Quickly Searching Images 119 Viewing Movi es Made with Mo vie Digest You can select mov ies made in mode ( p. 67) by date for viewi ng. Choose . z After pressi ng the m button, press the op button s to choose , then press the m button agai n. Choose a movie date. z Press the op b uttons. Play the movie. z Press the m butt on. X The movie will play […]
-
Страница 120
120 When there are man y images on the memory car d, you can filter and display them by a spe cified filter . You can also pr otect (p. 134) o r delete (p. 1 38) all images at once whil e filtered. Choose ‚ . z After pressi ng the m button, press the op buttons to choose ‚ , t hen press the m button agai n. Choose a filter. z Press the op butto[…]
-
Страница 121
Viewing Images in Filtered Playback 121 Filtered playback In filtered playba ck (Step 3), you can vi ew filtered images with “Quickly Searching Images” (p. 118), “Viewing Slideshows” (p. 122), and “Magnifying Images” (p. 125). You can process all filtered im ages at once while pe rforming operations in “Protecting Images” (p. 134), […]
-
Страница 122
122 You can au tomatically play back i mages rec orded to a memory card. Each image displ ays for approx imately 3 second s. Choose . . z After pressi ng the m button, press the op buttons to choose . , then press the m button agai n. Choose a transition effect. z Press the op b uttons to choose an effect, the n press the m button. X The slideshow […]
-
Страница 123
Viewing Slideshows 123 Changing Settings You can set a sl ideshow to repea t, or change tran sition effec ts and the time that slides how images are display ed. You ca n choose f rom 6 tran sition effects whe n switching bet ween images. Choose [Slideshow]. z Press the n button to choose [Slideshow ] from the 1 tab, then press the m button. Choose […]
-
Страница 124
124 You can magni fy the area of a r ecorded imag e that was insi de the AF Frame to check the focus. Press the p button to switch to the focus check display (p. 44). X A white frame wi ll appear where t he AF frame was when the foc us was set. X A gray fr ame will app ear on a face detected dur ing playback. X The area wit hin the oran ge frame ap[…]
-
Страница 125
125 Move the zoom lever toward k . z The display wi ll zoom in on the i mage. If you continu e to hold the zoo m lever, it wil l zoom in up to a maximum fact or of approximate ly 10x. z If you pres s the opqr buttons , you ca n move the locat ion of the displa yed area. z Move the zoom lev er toward g to zoom out, or conti nue to hold it to return […]
-
Страница 126
126 Grouped image s taken in mode (p. 80) ca n also be viewed in dividually. Choose an image grou p. z Press the qr buttons to choos e an imag e that displays . Choose . z After pressi ng the m button, press the op buttons to choose , the n press the m button agai n. View each image in the group. z If you press the qr buttons only th e images in th[…]
-
Страница 127
Viewing Each Image in a Group 127 Ungrouping Ima ges Grouped image s taken in mode can be ungrouped and viewed individu ally. Choose [Group Images]. z Press the n butt on to choose [G roup Images] fr om the 1 tab. Choose a setting. z Press the qr buttons to choo se [Off]. z Press the n button to complete th e setting an d restore sin gle image pl a[…]
-
Страница 128
128 The camera wil l choose four ima ges based on the displayed image. If you choos e one of those image s, the camera wi ll select four mor e images letting you e njoy playing bac k images in an un expected orde r. This will wor k best if you take man y shots of vari ous scenes. Choose . z After pressi ng the m button, press the op buttons to choo[…]
-
Страница 129
129 You can choose fr om 3 transition ef fects when switc hing between ima ges in single imag e playback. Choose [Transition]. z Press the n button to choose [Transition] fr om the 1 tab , then pr ess the qr buttons to ch oose a tran sition ef fect. Changing Image Transitions C OP Y[…]
-
Страница 130
130 Viewing Images on a Standard TV Using the supp lied stereo AV cable (p. 2), you ca n connect the ca mera to a TV to view im ages you have shot. Turn off the camera and T V. Connect the camera to th e TV. z Open the camera’ s terminal cover an d fully insert the cable plug into the ca mera’s terminal. z Insert the c able plug fully i nto the[…]
-
Страница 131
Viewing Images on a TV 131 Viewing Images on a High-Def inition TV Using the separ ately sold HDMI Cable HTC- 100, you can connect th e camera to an HD TV to view images you have sh ot. Turn off the camera and T V. Connect the camera to th e TV. z Open the camera’ s terminal cover an d fully insert the c able plug into the camera’s terminal. z […]
-
Страница 132
Viewing Images on a TV 132 Using a TV Remote to Control the Camera When you conn ect the came ra to an HDMI C EC compatibl e TV, you can use the TV’s re mote contro l to operate the camera an d play back im ages or view slidesho ws. You may need to make settin gs on some TVs. For details, re fer to the use r guide supp lied with th e TV. Choose [[…]
-
Страница 133
Viewing Images on a TV 133 Summary of the Camera Contro l Panel Displayed on the TV Return Closes the menu. Group playback Displays groups of High-speed Burst images (only appears when grouped images are chosen). Play movie Plays a movie (only appears when a movie is chosen). . Slideshow Plays back images automatically. During playback, you can pre[…]
-
Страница 134
134 You can pro tect impor tant images s o that they cannot be a ccidentally erased with the camera (pp. 28, 138). Protect the image. z After pressi ng the m button, press the op buttons to choose : , then press t he m button agai n. X [Protecte d] will appear on the screen. z To unlock an i mage, follow t he step above to choose : again, then pres[…]
-
Страница 135
Protecting Images 135 Choosing Ima ges Individu ally Choose [Select]. z Follow Step 2 on p. 134 to choose [Sele ct], then press th e m button. Choose images. z Press the qr but tons to choose an image, then press th e m button. X will appear on t he screen. z Press the m button agai n to deselec t the image. will di sappear. z To choose addi tional[…]
-
Страница 136
Protecting Images 136 Select Range Choose [Select Range]. z Follow Ste p 2 on p. 134 to ch oose [Selec t Range], then press the m butt on. Choose a starting image. z Press the m butt on. z Press the qr but tons to choose an image, then press th e m button. Choose an ending image. z Press the r button to cho ose [Last image ], then press th e m butt[…]
-
Страница 137
Protecting Images 137 Protect images. z Press the p button to choose [P rotect], then press th e m button. Choose All Images Choose [All Images]. z Follow Ste p 2 on p. 134 to c hoose [All Images], then press the m button. Protect images. z Press the op buttons to choose [P rotect], then press th e m button. You can unlock groups o f protected imag[…]
-
Страница 138
138 You can choos e images and t hen erase th em in groups. Si nce erased image s cannot be rec overed, exerci se adequate ca ution before e rasing. Protec ted images (p. 134) cannot be erased. Choose a Select ion Method Choose [Erase]. z Press the n butt on to choose [Erase] from the 1 tab, then pres s the m button. Choose a selectio n method. z P[…]
-
Страница 139
Erasing Images 139 Erase. z If you press the n button, a confirmatio n screen will a ppear. z Press the qr buttons to choos e [OK], then press the m button. Select Range Choose [Select Range]. z Follow Step 2 on p. 138 to choose [Sel ect Range], then press the m butt on. Choose images. z Follow Step s 2 and 3 on p. 136 to choose images. Erase. z Pr[…]
-
Страница 140
140 When you tag ima ges as favorite s, you can easi ly categorize jus t those images. You ca n also filter out just thos e images for viewi ng, protect ing or erasing (p. 120 ). Make the setting. z After pressi ng the m button, press the op buttons to choose , the n press the m button agai n. X [Tagged as Fav orite] will ap pear on the screen. z[…]
-
Страница 141
Tagging Images as Favorites 141 Complete th e setting. z If you press the n button, a confirmatio n screen will a ppear. z Press the qr buttons to choos e [OK], then press the m button. If you switch to Sho oting mode or t urn off the p ower before complet ing the setting in Step 3, images will not be tagged as fa vorites. If you use Windows 7 or W[…]
-
Страница 142
142 You can organi ze images int o categories. You can display the images in a category in filtered play back (p. 120) and pr ocess all im ages at once by using the functi ons below. • “Viewing Sl ideshows” (p. 122 ), “Protectin g Images” (p. 134), “Erasing Images” (p . 138), “C hoosing Imag es for Pr inting (D POF)” (p. 15 9) Cho[…]
-
Страница 143
Organizing Images by Category (My Category) 143 Using the Menu Choose [My Category]. z Press the n button to choose [My Category] from the 1 tab, then pres s the m button. Choose a selectio n method. z Press the op b uttons to choose a selection met hod, then press the m button. z Press the n button to restor e the menu screen. Choosing Ima ges Ind[…]
-
Страница 144
Organizing Images by Category (My Category) 144 Complete th e setting. z If you press the n button, a confirmatio n screen will a ppear. z Press the qr buttons to choos e [OK], then press the m button. Select Range Choose [Select Range]. z Follow Ste p 2 on p. 143 to ch oose [Selec t Range], then press the m butt on. Choose images. z Follow Step s […]
-
Страница 145
145 You can change the orientati on of an image and save it. Choose . z After pressi ng the m button, press the op buttons to choose , then press the m button agai n. Rotate the image. z Press the qr butt ons to rotate the image 90° in the chosen dire ction. z Press the m button to complete the setting. Using the Menu Choose [Rotate]. z Press […]
-
Страница 146
146 You can resiz e images to a lower pixel setting and save the resi zed image as a separate file. Choose [Resize]. z Press the n button to choose [Resize] from the 1 tab, then press the m button. Choose an image. z Press the qr but tons to choose an image, then press th e m button. Choose an image size. z Press the qr but tons to choo se an optio[…]
-
Страница 147
147 You can cut out a po rtion of a record ed image and save it as a new image file. Choose [T rimming] . z Press the n button to choose [Trimming] from the 1 tab, then pr ess the m button. Choose an image. z Press the qr but tons to choose an image, then press th e m button. Adjust the trimming area. X A frame will ap pear around th e portion of t[…]
-
Страница 148
148 You can change the color of an image and save it as a s eparate image . Refer to p. 92 for de tails on each menu item. Choose [My Colors]. z Press the n button to choose [My Colors] from th e 1 tab, then pr ess the m button. Choose an image. z Press the qr but tons to choose an image, then press th e m button. Choose an option. z Press the qr b[…]
-
Страница 149
149 The camera can d etect areas in an image, such as f aces or backgroun ds, that are too da rk and aut omatically ad just them to the optimum brightness. Also, when the over all image is la cking in contr ast, the camera wi ll automatica lly correct t he image for a s harper impr ession. You ca n choose fro m 4 levels of correcti on, and save the[…]
-
Страница 150
150 You can automa tically corre ct red eyes in im ages and save them a s new files. Choose [Red-Eye Correct ion]. z Press the n button to choose [Red- Eye Correction] from the 1 tab, then press the m button. Choose an image. z Press the qr buttons to ch oose an image. Correct the im age. z Press the m butt on. X Red-eye detected by the camera will[…]
-
Страница 151
151 Printing This chapter explains how to c hoose images for printing, and print using a Canon-brand PictBridge compli ant printer (sold separately). Canon-Brand PictBridge Compliant Printers • This chapter uses Canon-br and SELPHY CP series pr inters in the explanatio ns. The displa yed screens an d available fun ctions will differ depending on […]
-
Страница 152
152 Easy Print You can easil y print the pict ures you take by connecting th e camera to a PictBridge compliant p rinter (sold separately ) using the supplied interface cable (p. 2). Turn off the camera and p rinter. Connect the camera to th e printer. z Open the cove r and insert the cab le’s small plug fi rmly into the camera ter minal in the d[…]
-
Страница 153
Printing Images 153 Print images. z Press the op buttons to choose [Print], then press th e m button. X Printing will start. z If you want to pri nt additiona l images, repeat Steps 5 and 6 after prin ting has completed. z After prin ting has co mpleted, turn off the camera and p rinter, and unplug th e interface ca ble. • Refer to p. 39 for Cano[…]
-
Страница 154
Printing Images 154 Making Print Setti ngs Connect the camera to th e printer. z Follow Steps 1 – 6 on p. 152 to display the screen on the l eft. Choose a menu option. z Press the op b uttons to choose an option. Choose the option settings. z Press the qr but tons to choo se the option setting. * Only appears when connected to a PIXMA series prin[…]
-
Страница 155
Printing Images 155 Trimming and Printing (Tri mming) You can cut out a port ion of an i mage for p rinting. Choose [T rimming] . z Follow Steps 1 – 2 on p. 154 to c hoose [Trimming], then p ress the m button. X A frame will ap pear around th e portion of the image to be trimmed. Choose the trimming are a. z If you move the zoom leve r, you can c[…]
-
Страница 156
Printing Images 156 Choosing the Paper Size and Layout for Printing Choose [Paper Settings]. z Follow Ste ps 1 – 2 on p. 154 to choose [Paper Sett ings], then press the m b utton. Choose a paper size . z Press the op b uttons to choose an option, the n press the m button. Choose the pape r type. z Press the op b uttons to choose an option, the n […]
-
Страница 157
Printing Images 157 Available Lay out Options Printing ID Photos Choose [ID Photo]. z Follow Steps 1 – 4 on p. 156 to choose [ID Photo], th en press the m bu tton. Choose the length and width. z Press the op b uttons to choose an option. z Press the qr buttons to choo se the length, the n press th e m button. Choose the printing area. z Follow St[…]
-
Страница 158
Printing Images 158 Printing Mov ies Connect the camera to th e printer. z Follow St eps 1 – 6 on p. 152 to choos e a movie and d isplay the screen on the left. Choose a printing metho d. z Press the op bu ttons to choos e , then press the qr butt ons to choose a printing method. Print images. Printing Methods for Movies Single Prints currently d[…]
-
Страница 159
159 You can cho ose up to 9 98 images on a memory car d for printi ng and spec ify settings such as th e number o f copies so that the y can be printed tog ether (p. 163) or processed at a photo develop er service. T hese selection methods comply with the DPOF (Digital Pr int Order F ormat) stan dards. Adding Images to a Print List wi th the FUNC. […]
-
Страница 160
Choosing Images for Printing (DPOF) 160 Print Settings You can set the pri nt type, date and file numb er. These setti ngs apply to all images chos en for prin ting. Choose [Print Settings]. z Press the n button to choose [Print Settings] fro m the 2 tab, then pre ss the m button. Choose a setting. z Press the op buttons to choose a menu item, then[…]
-
Страница 161
Choosing Images for Printing (DPOF) 161 Choosing the Number of Copies Choose [Select Images & Qty.]. z Press the n butt on to choose [Se lect Images & Qty.] f rom the 2 tab, th en press the m button. Choose an image. z Press the qr but tons to choose an image, then press th e m button. X You will be ab le to set the number of print copies. […]
-
Страница 162
Choosing Images for Printing (DPOF) 162 Select Range Choose [Select Range]. z Follow Ste p 1 on p. 161 to ch oose [Selec t Range], then press the m butt on. Choose images. z Follow Ste ps 2 – 3 on p. 136 to choose images. Make print settings. z Press the op buttons to choo se [Order], then press th e m button. Set All Images to Print Once Choose […]
-
Страница 163
Choosing Images for Printing (DPOF) 163 Printing chosen images (DPOF) • When there are images added to t he print list (pp. 159 – 162), the screen on the left will appear when you connect the camera to a Pi ctBridge compliant printer. P ress the op buttons to choose [Print now], then pr ess the m button to easily print imag es added to the prin[…]
-
Страница 164
164 C OP Y[…]
-
Страница 165
165 Customizing Camera Settings You can customize various settings to suit your shooting pr eferences. The first part of this chapter ex plains convenient and common ly used functions. The latter part expl ains how to change shooting and playback settings to suit your purposes. 9 C OP Y[…]
-
Страница 166
166 You can custo mize conveni ent and commonly us ed functions f rom the 3 tab (p. 47). Changing Sounds You can change each of the camer a’s operation sounds. z Choose [Sound Options], then press the m button. z Press the op buttons to choose a menu item. z Press the qr buttons t o choose an option. Turning Off Hints & Tips When you choose a[…]
-
Страница 167
Changing Camera Settings 167 Low Level Memory Card Formatting Perform low lev el formatting when [Memory car d error] appe ars, the camera does not oper ate properly, you think tha t the recording /reading sp eed of a memory card has dropped, or re cording sudden ly stops whil e shooting a movie. As you c annot retriev e the erased dat a, exercise […]
-
Страница 168
Changing Camera Settings 168 Changing the Start-up Screen You can change the start-up sc reen that appe ars when you turn o n the camera. z Choose [S tart-up I mage], the n press the m button. z Press the qr buttons t o choose an option. Registering Reco rded Images as the S tart-up Screen When you press th e 1 button and set the camera to Play bac[…]
-
Страница 169
Changing Camera Settings 169 Changing the File Number Assig nment Images you sho ot are automat ically assig ned file numbers in the order they were taken, from 0001 – 9999, and saved to folder s of up to 2,000 im ages. You can change the file number as signment. z Choose [File Numbering], then press the qr butt ons to cho ose an o ption. Registe[…]
-
Страница 170
Changing Camera Settings 170 Creating Folders by Shoo ting Date Images a re saved in to folder s created ea ch month, however, y ou can also create fold ers by sho oting date. z Choose [Creat e Folder], the n press the qr butt ons to cho ose [Dai ly]. z Images will b e saved into fo lders creat ed on each shooti ng date. Changing the Lens Retract T[…]
-
Страница 171
Changing Camera Settings 171 Setting the Screen Shut-Off Time You can adjust the time the scre en takes to sh ut off auto matically (p. 52). This also works when [Auto Power Down ] is set to [Off]. z Choose [Po wer Savi ng], then pres s the m button. z Press the op butt ons to choose [Di splay Off], then use t he qr buttons to choos e a time. z In […]
-
Страница 172
Changing Camera Settings 172 Set the world time zone. z Press the op b uttons to choose [ Worl d], then press t he m button. z Press the qr buttons to ch oose the w orld time zone. z You can also set the daylight s aving time as in Ste p 1. z Press the m butt on. Choose the world time zone. z Press the op b uttons to choose [ Worl d], then press t […]
-
Страница 173
173 If you set t he mode swi tch to 4 , and the mode to G , you can chan ge the settings in the 4 tab (p. 47). Turning Off the AF Assist Beam The lamp will auto matically ligh t to assist focus ing in low light co nditions when you press the shutter button hal fway. You can turn of f the lamp. z Choose [AF-assis t Beam], then press the qr butt ons […]
-
Страница 174
Changing Shooting Function Settings 174 Changing the Imag e Display Time Righ t After Shooting You can chan ge the length of time the images display right after shooti ng. z Choose [Revie w], then pres s the qr buttons to ch oose an optio n. Changing the Way the Image Displays Rig ht After Shooting You can change the way the image displays right af[…]
-
Страница 175
Changing Shooting Function Settings 175 Changing the IS -Mode Settings z Choose [IS Mode ], then press th e qr buttons to ch oose an optio n. Grid lines will n ot be reco rded on the imag e. Continuous Image stabilization is always on. You can confirm the effects directly on the display, which makes it easier to check the composition or focus. When[…]
-
Страница 176
176 You can ad just the se ttings in th e 1 tab b y pressing the 1 button (p. 47). Choosing the Imag e that First Displays in Playback z Choose [Resume ], then press the qr buttons to ch oose an optio n. Turning Off the Auto Rotate Function When you play ba ck images on the camera, images shot in vertica l orientation automatical ly rotate an d dis[…]
-
Страница 177
177 Useful Information This chapter introduces how to use the AC adapter kit and Eye-Fi card (both sold separately), troubleshoot ing tips, and contains lists of functions and items that appear on the screen. 10 C OP Y[…]
-
Страница 178
178 If you use AC Adapte r Kit ACK- DC60 (sol d separa tely), you c an use t he camera witho ut worrying abou t how much charge is left in the batt ery. Turn off the camera. Insert the coupler. z Follow Step 2 o n p. 16 to open th e cover, then inse rt the couple r as shown unti l it locks into place with a click. z Follow Step 5 o n p. 17 to close[…]
-
Страница 179
179 Before usin g an Eye-Fi card , be sure to check whether Eye-Fi car d use is authorize d in the country or territory of us e (p. 16). When you put a pr epared Eye-Fi ca rd into the ca mera, you can auto matically transfer yo ur images wirele ssly to a comp uter, or up load them to a web service. Image trans fer is a functio n of the Eye-Fi card […]
-
Страница 180
Using an Eye-Fi Card 180 Checking Connec tion Informatio n You can check t he Eye-Fi card ’s access poin t SSID, or conn ection status . Choose [Connection in fo]. z Press the n but ton to choose [E ye-Fi Settings] fro m the 3 tab, then pre ss the m button. z Press the op buttons to choose [Connection info], then press the m button. X The connect[…]
-
Страница 181
181 If you think the re is a problem with th e camera, first c heck the followi ng. If the items below d o not solve your pr oblem, contact a Canon Customer Su pport Help Desk as li sted on the includ ed customer sup port list. Power You pressed the power button, but nothing happened. • Confirm that the battery is the correct type, and is not dep[…]
-
Страница 182
Troubleshooting 182 • Shoot using the focus lock or AF lock (pp. 96, 99). Even when you press the shutter bu tton halfway, the AF frame does not appear, and the camera does not focus. • If you center on the light and dark contrasting area of the subject and push th e shutter button halfway, or repeatedly push the shutter button halfway, the AF […]
-
Страница 183
Troubleshooting 183 Shooting Movies Correct shooting time does not display, or stops. • Format the memory card in the camera, or use a memory card capable of recording at high speeds. Even when the shooting time does not display properly, the rec orded video will be the length that it was actually shot (pp. 22, 30). appeared on the screen and sho[…]
-
Страница 184
184 If error message s appear on the scree n, try one of the follow ing solution s. No memory card • The memory card is not installed in the correct direction. Install the memory card in the correct direction (p. 17). Memory card locked • The SD memory card, SDHC memory card, SDXC memory card o r Eye-Fi card’s write protect tab is set to “L[…]
-
Страница 185
List of Messages That Appear on the Screen 185 Invalid s election range • When choosing the selection range (pp. 136, 139, 144, 162), you tried to choose a starting image that was after the last image or you tried to choose an ending image that was before the starting image. Exceeded selection limit • You chose more than 998 images in print set[…]
-
Страница 186
186 Shooting (Inform ation Display) * : Standard, : Held vertically When shooting, the camera detects if it is held vertically or horizontally, a nd adjusts settings accordingly for the best shot. It also detects o rientation during playback, so you can hold the camera in either orientation and it will automatically rotate images for correct viewin[…]
-
Страница 187
Information Displayed on the Screen 187 Scene Icons In A mode, the camera disp lays an icon for t he scene it has det ermined and then au tomatically fo cuses and s elects the o ptimum setting s for subject brightnes s and color. * Appears when the scene is dark and the camera is attached to a t ripod. Subject People Non-Human Subjects Icon Backgro[…]
-
Страница 188
Information Displayed on the Screen 188 Playback (Detail ed Information Di splay) Movies (p. 31), High- speed Burst (p. 80), Print List (p. 159) My Category (p. 142) Shooting Mode (p. 190) ISO Speed (p. 88), Playback Speed (Movies) (p. 109) Exposure Compensation Amount (p. 85) White Balance (p. 86) Histogram (p. 45) Group Playback (p. 126), Image E[…]
-
Страница 189
Information Displayed on the Screen 189 Summary of Movie Control Panel in “Viewing Movies” (p. 31) * Displays the frame approx. 4 sec. before or after the current frame. Exit Playback Slow motion playback (You can use the qr button s to adjust the speed. Sound will not play back.) Skip backward* (Continues to skip backward if you hold down the […]
-
Страница 190
190 Functions Available in Each Shooting Shooting Modes A 4 G I V Function Exposure Compensation (p. 85) — {{{{{{{ AE Lock/FE Lock *1 (p. 102) — {{ ————— Focusing Range (p. 94) { {{{{{{{ — {{{ ———— — {{{ ———— Flash (pp. 54, 85, 103) { {{{{{{{ — {{{{{{{ *2 {{ —— ——— { {{{{{{{ AF Lock (p. 99) — {{ —?[…]
-
Страница 191
Functions Available in Each Shooting Mode 191 4 TY w S O P ≈ xv { — {{{{{{{ —— {{{{ — { — —————————— — ————— — — {{{{{{{{{{ { {{{{{ { { {{{{{{{{{{ { {{{{{ { { {{{{{{{{{{ { {{{{{ { { ——— {{{{{{{ { {{{{ ——— ———— {{{{{{ { {{{{{ { — —————————— — ————* 3 […]
-
Страница 192
Functions Available in Each Shooting Mode 192 Shooting Modes A 4 G I V Function FUNC. Menu White Balance (p. 86) { {{{{{{{ — {{ —— {{{ — {{ —— {{{ — {{ —— {{{ — {{ —— {{{ — {{ —— {{{ *6 — {{ —— {{{ Underwater White Bal ance Compensation (p. 87) — — — — — — — — ISO Speed (p. 88) { {{{{{{{ — {{ ?[…]
-
Страница 193
Functions Available in Each Shooting Mode 193 4 TY w S O P ≈ xv FUNC. Menu {{{{{{{{{{ { {{{{{ { { {{ — { —————— — ———— {{ — {{ — { —————— — ———— {{ — {{ — { —————— — ———— {{ — {{ — { —————— — ———— {{ — {{ — { —————— — ———?[…]
-
Страница 194
Functions Available in Each Shooting Mode 194 Shooting Modes A 4 G I V Function FUNC. Menu Compression Ratio (p. 61) { {{{{{{{ { {{{{{{{ Image Quality (Movie s) (pp. 110, 112) { {{{{{{{ { {{{{{{{ { {{{{{{{ { {{{{{{{ — ——————— — ——————— *1 FE Lock not availab le when set to ! . *2 Not selectable b ut switches to … d[…]
-
Страница 195
Functions Available in Each Shooting Mode 195 4 TY w S O P ≈ xv FUNC. Menu {{{{{{{{{{ { {{{{{ { { {{{{{{{{{{ { {{{{{ { { {{{{{ — {{{{ { {{{{{ { — {{{{{{{{{{ { {{{{{ { — {{{{{{{{{{ { {{{{{ { — {{{{{ — {{{{ { {{{{{ { — —————————— — ————— — { —————————— — ————— — { { Sel[…]
-
Страница 196
196 4 Shooting Menu Menus Shooting Modes A 4 G I V Function AF Frame (p. 95) Face AiAF* 1 { {{{{{{{ Tracking AF *2 { — {{ ——— Center — {{{{ —— — AF Frame Size* 3 (p. 96) Normal — {{{{ —— — Small — {{{{ —— — Digital Zoom (p. 55) Standard { {{{{{{{ Off { {{{{{{{ 1.5x { {{{{{{{ 2.0x { {{{{{{{ AF-Point Zoom (p. 98) On {{[…]
-
Страница 197
Menus 197 4 TY w S O P ≈ xv {{{{ —— {{{{ { {{{{{ — { { —— { ——— {{{ { {{{{{ —— { —— {{ — {{{ { { {{{{{ { { { —— {{ — {{{ { { {{{{{ { { { —— { —— {{{{ { {{{{{ — { ——————— {{{ — {{{{{ —— {{{{{{{{{{ { {{{{{ { { ——————— {{{ — {{{{{ —— ——————— {{{ — {{{{{[…]
-
Страница 198
Menus 198 3 Set up Menu Item Content Ref. Page Mute On/Off* p. 48 Volume Set all operation sounds (5 levels). p. 49 Sound Options Set the sound s for each camera operation. p. 166 Hints & Tips On*/Off p. 166 LCD Brightness Sets screen brightness (5 levels). p. 50 Start-up Image Add an image a s a start-up image. p. 168 Format Formats memory car[…]
-
Страница 199
Menus 199 1 Playback Menu 2 Print Menu Item Content Ref. Page Slideshow Plays back images automatically. p. 122 Erase Erases images (Select, Select Range, All Images). p. 138 Protect Protects images (Select, Select Range, All Images). p. 134 Rotate Rotates images. p. 145 Favorites Tags or untags images as favorites. p. 140 My Category Categorizes i[…]
-
Страница 200
200 Item Content Ref. Page Rotate Rotates displayed image. p. 145 Print Settings Selects or clears se ttings for printing displayed image ([Print] appears when the camera is connected to the printer). p. 159 Protect Protects/unlocks displayed image. p. 134 Favorites Tags/untags displayed image as favorites. p. 140 Erase Erases displayed image. p. 1[…]
-
Страница 201
201 • This camera i s a high-prec ision elect ronic device. Do not drop it or subject it to strong impacts. • Never place t he camera close to ma gnets, motors or other devices t hat generate st rong electro magnetic field s. Exposure to str ong magnetic fields may cause malfu nctions or corr upt image data . • If water dro plets or dirt beco[…]
-
Страница 202
202 Image Sensor Camera Effective Pixels ……………… Approx. 12.1 million pixels Lens Focal Length …………………….. ……… 5x zoom: 4.3 (W) – 21.5 (T) m m (35mm film equival ent: 24 (W) – 120 (T) mm) Focusing Range …………………….. …. 3 cm (1.2 in .) – in finity (W) , 90 cm (3.0 ft.) – infinity (T) • Macro […]
-
Страница 203
Specifications 203 Shooting Modes. ……………… …………….Auto *1 , P, Movie Digest, Port rait, Kids&Pets, Smart Shutter *2 , High-spe ed Burst, Best Ima ge Selection, Handheld Night Scene, Low Ligh t, Fish-eye Effect, Miniature Ef fect, Toy Camera Eff ect, Monochrome, S uper Vivid, Poster Effect, Color Accent, Color Swap, B each, U[…]
-
Страница 204
Specifications 204 Movies……………………………… ……… Super Slow Motion Movie: 640 x 480 (12 0 fps *1 when shootin g, 30 fps *2 d uring playback), 32 0 x 240 (240 fps *3 when shooting, 30 fps *2 during playba ck) Miniature Eff ect: 1280 x 720 *4 , 640 x 480 *4 Movies Other than Super Slow Motion Movie and Miniature Eff ect: 1920 x[…]
-
Страница 205
Specifications 205 Battery Pack NB-4L Format ………. ………………. ………………..Rechargeable Lithium-ion Batter y Pack Nominal Voltage ………….. ……………… .. 3.7 V DC Nominal Capacity ………………………… .. 760 mAh Charge Cycles …………………………….. .. Approx. 300 times Operating Temp eratures[…]
-
Страница 206
206 A AC Adapter Kit….. ………………. ……….. 38, 178 Accessories …………………………………… ….. 38 AE Lock …………… ………………. …………….. 102 AF Frames……….. ………………. …………. 25, 95 AF J Focus AF Lock ………. ………………. ……………. 99, 186 AF-Point Zoom …[…]
-
Страница 207
Index 207 Focus Lock ……………………………… ………… 96 Focusing Range Infinity …………. ………………. …………….. 94 Macro ………………. ………………. ………… 94 Foliage (Shooting Mo de) ………. …………….. 65 Format J Memory Cards, Format ting Formatting (Memory Card ) ……………. […]
-
Страница 208
Index 208 S Screen Display Language………………………… . 21 Information Display………………. 186, 1 88 Menu J FUNC. Menu, Menu Switching the Display …………………… . 44 SD/SDHC/SDXC Memory Card J Memory Cards Self-Timer 10 Second Self-Time r ……………….. ….. 58 Changing Del ay and Numb er of Shots …………..[…]
-
Страница 209
209 MEMO C OP Y[…]
-
Страница 210
210 MEMO C OP Y[…]
-
Страница 211
211 MEMO C OP Y[…]
-
Страница 212
Disclaimer • Reprint ing, transmi tting, or s toring in a re trieval sys tem any part of this guide witho ut the permissi on of Canon is pr ohibited. • Canon r eserves the r ight to c hange the co ntents of this guide at any time withou t prior notice. • Illustrati o ns and scre enshots in this guide may differ sligh tly from the actual equ i[…]