
Драйверы
Для выполнения подключения некоторых устройств к компьютеру может потребоваться драйвер. На этой вкладке вы найдете соответствующие драйверы для своего устройства или, в случае отсутствия драйверов, описание совместимости устройства с каждой операционной системой.
Полезная информация. Доступ к программному обеспечению, руководствам и другим материалам можно получить с помощью вкладок, расположенных выше.
Операционная система Обнаруженная операционная система
Программное обеспечение
Программное обеспечение загружать необязательно, но оно обеспечивает дополнительные функции и позволяет максимально эффективно пользоваться возможностями устройства. На этой вкладке можно просмотреть и загрузить доступное программное обеспечение для вашего устройства.
Программное обеспечение
Программное обеспечение загружать необязательно, но оно обеспечивает дополнительные функции и позволяет максимально эффективно пользоваться возможностями устройства. На этой вкладке можно просмотреть и загрузить доступное программное обеспечение для вашего устройства.
Операционная система Обнаруженная операционная система
Руководства пользователя
Руководства для вашего устройства или программного обеспечения перечислены ниже.
Приложения и функции
На этой вкладке можно посмотреть доступные приложения и функции, совместимые с вашим устройством.
Встроенное ПО
Встроенное ПО — это постоянное программное обеспечение, установленное на устройстве и обеспечивающее его корректную работу. Canon может периодически выпускать обновления для этого встроенного ПО, и если обновление доступно, его можно загрузить ниже.
FAQs
На этой вкладке вы найдете ответы на часто задаваемые вопросы и другую полезную информацию, которая поможет вам в решении вопросов и проблем.
Важная информация
На этой вкладке вы найдете подборку часто задаваемых вопросов, которые, на наш взгляд, будут вам интересны.
Коды ошибок
Код ошибки или сообщение об ошибке может появиться на устройстве по различным причинам. С помощью поля поиска можно найти полезную информацию о конкретном коде ошибки, где будут указаны причина ошибки и необходимые действия по ее устранению.
Технические характеристики
Ниже приведены все технические характеристики данного продукта.
На этой странице вы можете совершенно бесплатно скачать Инструкция по эксплуатации Canon imagePROGRAF iPF770.
У документа PDF Инструкция по эксплуатации 594 страниц, а его размер составляет 34.47 Mb.
Читать онлайн Принтеры и МФУ Canon imagePROGRAF iPF770 Инструкция по эксплуатации

Скачать файл PDF «Canon imagePROGRAF iPF770 Инструкция по эксплуатации» (34.47 Mb)
Популярность:
7088 просмотры
Подсчет страниц:
594 страницы
Тип файла:
Размер файла:
34.47 Mb
Прочие инструкции Canon imagePROGRAF iPF770


Прочие инструкции Canon Принтеры и МФУ


Прочие инструкции Canon


Найди любой мануал:
Например: Sony VGN-FW460J/T
Вы можете бесплатно скачать Инструкция по эксплуатации для Canon imagePROGRAF iPF770.
Также вы сможете прочесть онлайн этот документ без скачивания.
Скачать Инструкция по эксплуатации для Canon imagePROGRAF iPF770
Тип файла
PDF
Размер
34.47 Mb
Кол-во страниц
594
Просмотров
7087
Читать онлайн Инструкция по эксплуатации для Canon imagePROGRAF iPF770 (Страница 1)

Другие Принтеры и МФУ Canon imagePROGRAF iPF770
Топ Canon Принтеры и МФУ
Вопросы
Ранее вы смотрели
Эта страница полезна для вас? Поделитесь ссылкой:
![]()
Large Format Printer
User’s Guide
Manuals for this printer
Setup Guide
|
Quick Guide |
||
|
Electronic manual |
||
|
Basic Guide |
||
|
User’s Guide |
Electronic manual |
Paper Reference Guide Electronic manual
|
Basic Printing Workflow |
13 |
|
Enhanced Printing Options |
27 |
|
Printing CAD Drawings……………………………………………………. |
38 |
|
Printing enlargements or reductions………………………………….. |
58 |
|
Printing at full size………………………………………………………….. |
68 |
|
Borderless Printing…………………………………………………………. |
77 |
|
Printing banners or at other non-standard sizes………………….. |
86 |
|
Tiling and multiple pages per sheet…………………………………… |
99 |
|
Centering originals………………………………………………………… |
113 |
|
and so on |
|
|
Windows Software |
139 |
|
Printer Driver………………………………………………………………… |
140 |
|
Preview……………………………………………………………………….. |
169 |
|
Free Layout………………………………………………………………….. |
179 |
|
Color imageRUNNER Enlargement Copy………………………… |
201 |
|
Print Plug-In for Office…………………………………………………… |
210 |
|
and so on |
|
|
Mac OS Software |
247 |
|
Printer Driver………………………………………………………………… |
248 |
|
Preview……………………………………………………………………….. |
265 |
|
Free Layout………………………………………………………………….. |
286 |
|
and so on |
|
|
Handling and Use of Paper |
309 |
|
Control Panel |
397 |
|
Printer Parts |
431 |
|
Network Setting |
441 |
|
Print Job Management |
461 |
|
Adjustments for Better Print Quality |
479 |
|
Maintenance and Consumables |
495 |
|
Troubleshooting |
525 |
|
Error Message |
553 |
|
Specifications |
573 |
|
Appendix |
577 |
ver1.00 2014-12-10  ENG
ENG

Contents
Workflow Printing Basic
Options Printing Enhanced
2
|
Basic Printing Workflow |
13 |
|
Printing procedure |
14 |
|
Printing Options Using Rolls and Sheets …………………………………………………………………………………………………… |
14 |
|
Turning the Printer On and Off …………………………………………………………………………………………………………………. |
15 |
|
Loading and Printing on Rolls ………………………………………………………………………………………………………………….. |
16 |
|
Loading and Printing on Sheets ………………………………………………………………………………………………………………. |
18 |
|
Printing in Windows ………………………………………………………………………………………………………………………………. |
20 |
|
Printing from Mac OS …………………………………………………………………………………………………………………………….. |
21 |
|
Canceling print jobs |
22 |
|
Canceling Print Jobs from the Control Panel ……………………………………………………………………………………………… |
22 |
|
Canceling Print Jobs from Windows …………………………………………………………………………………………………………. |
22 |
|
Canceling Print Jobs from Mac OS ………………………………………………………………………………………………………….. |
23 |
|
Pausing Printing |
25 |
|
Pausing Printing ……………………………………………………………………………………………………………………………………. |
25 |
|
Enhanced Printing Options |
27 |
|
Choosing Paper for Printing |
28 |
|
Choosing a Paper for Printing …………………………………………………………………………………………………………………. |
28 |
|
Specifying Paper in the Printer Driver ……………………………………………………………………………………………………….. |
28 |
|
Printing Photos and Office Documents |
29 |
|
Printing Photos and Images ……………………………………………………………………………………………………………………. |
29 |
|
Printing Photos and Images (Windows) ……………………………………………………………………………………………….. |
29 |
|
Printing Photos and Images (Mac OS) …………………………………………………………………………………………………. |
31 |
|
Printing Office Documents ………………………………………………………………………………………………………………………. |
33 |
|
Printing Office Documents (Windows) ………………………………………………………………………………………………….. |
33 |
|
Printing Office Documents (Mac OS) ……………………………………………………………………………………………………. |
34 |
|
Using PosterArtist to Compose Originals …………………………………………………………………………………………………… |
36 |
|
Printing CAD Drawings |
38 |
|
Printing CAD Drawings …………………………………………………………………………………………………………………………… |
38 |
|
Printing Line Drawings and Text ………………………………………………………………………………………………………………. |
38 |
|
Printing Line Drawings and Text (Windows) ………………………………………………………………………………………….. |
39 |
|
Printing Line Drawings and Text (Mac OS) ……………………………………………………………………………………………. |
40 |
|
Printing from AutoCAD …………………………………………………………………………………………………………………………… |
42 |
|
Specifying Colors and Printing CAD Drawings ……………………………………………………………………………………………. |
43 |
|
Specifying Colors and Printing CAD Drawings (Windows) ……………………………………………………………………….. |
44 |
|
HP-GL/2 Printing ………………………………………………………………………………………………………………………………….. |
45 |
|
Adjusting Images |
46 |
|
Adjusting the Color in the Printer Driver …………………………………………………………………………………………………….. |
46 |
|
Fine-Tuning Colors of Photos and Images (Windows) …………………………………………………………………………….. |
47 |
|
Fine-Tuning Colors of Photos and Images (Mac OS) ………………………………………………………………………………. |
49 |
|
Giving Priority to Particular Graphic Elements and Colors for Printing …………………………………………………………….. |
52 |
|
Choosing the Document Type and Printing Conditions (Windows) ……………………………………………………………. |
54 |
|
Choosing the Document Type and Printing Conditions (Mac OS) ……………………………………………………………… |
56 |
|
Printing enlargements or reductions |
58 |
|
Resizing Originals to Match the Paper Size ……………………………………………………………………………………………….. |
58 |
|
Resizing Originals to Match the Paper Size (Windows) ……………………………………………………………………………. |
58 |
|
Resizing Originals to Fit the Roll Width ……………………………………………………………………………………………………… |
60 |
|
Resizing Originals to Fit the Roll Width (Windows) …………………………………………………………………………………. |
60 |
|
Resizing Originals to Fit the Roll Width (Mac OS) …………………………………………………………………………………… |
61 |
|
Resizing Originals by Entering a Scaling Value ……………………………………………………………………………………………. |
63 |
|
Resizing Originals by Entering a Scaling Value (Windows) ……………………………………………………………………….. |
64 |

Options Printing Enhanced
|
Resizing Originals by Entering a Scaling Value (Mac OS) …………………………………………………………………………. |
65 |
|
Printing at full size |
68 |
|
|
Printing on Oversize Paper ……………………………………………………………………………………………………………………… |
68 |
|
|
Printing at Full Size (Windows) ……………………………………………………………………………………………………………. |
69 |
|
|
Printing at Full Size (Mac OS) ……………………………………………………………………………………………………………… |
70 |
|
|
Borderless Printing at Actual Size …………………………………………………………………………………………………………….. |
72 |
|
|
Borderless Printing at Actual Size (Windows) ………………………………………………………………………………………… |
73 |
|
|
Borderless Printing at Actual Size (Mac OS) ………………………………………………………………………………………….. |
74 |
|
Borderless Printing |
77 |
|
|
Borderless Printing on Paper of Equivalent Size …………………………………………………………………………………………. |
77 |
|
|
Borderless Printing by Resizing Originals to Match the Paper Size (Windows) …………………………………………….. |
78 |
|
|
Borderless Printing by Resizing Originals to Fit the Roll Width ………………………………………………………………………. |
80 |
|
|
Borderless Printing by Resizing Originals to Fit the Roll Width (Windows) …………………………………………………… |
81 |
|
|
Borderless Printing by Resizing Originals to Fit the Roll Width (Mac OS) ……………………………………………………. |
83 |
|
Printing banners or at other non-standard sizes |
86 |
|
|
Printing Vertical or Horizontal Banners (Large-Format Printing) ……………………………………………………………………… |
86 |
|
|
Printing Vertical or Horizontal Banners (Large-Format Printing; Windows) ………………………………………………….. |
87 |
|
|
Printing Vertical or Horizontal Banners (Large-Format Printing; Mac OS) ……………………………………………………. |
90 |
|
|
Printing on Non-Standard Paper Sizes ……………………………………………………………………………………………………… |
93 |
|
|
Printing on Non-Standard Paper Sizes (Windows) …………………………………………………………………………………. |
93 |
|
|
Printing on Non-Standard Paper Sizes (Mac OS) …………………………………………………………………………………… |
96 |
|
Tiling and multiple pages per sheet |
99 |
|
|
Printing Multiple Originals Next to Each Other ……………………………………………………………………………………………. |
99 |
|
|
Printing Multiple Originals Next to Each Other (Windows) ………………………………………………………………………. |
100 |
|
|
Printing Multiple Originals Next to Each Other (Mac OS) ………………………………………………………………………… |
101 |
|
|
Printing Multiple Pages Continuously ………………………………………………………………………………………………………. |
102 |
|
|
Printing Multiple Pages Continuously (Windows) ………………………………………………………………………………….. |
103 |
|
|
Printing Multiple Pages Continuously (Mac OS) ……………………………………………………………………………………. |
104 |
|
|
Printing Multiple Pages Per Sheet …………………………………………………………………………………………………………… |
106 |
|
|
Printing Multiple Pages Per Sheet (Windows) ………………………………………………………………………………………. |
107 |
|
|
Printing Multiple Pages Per Sheet (Mac OS) ………………………………………………………………………………………… |
108 |
|
|
Printing Posters in Sections …………………………………………………………………………………………………………………… |
110 |
|
|
Printing Large Posters (Windows) ……………………………………………………………………………………………………… |
110 |
|
Centering originals |
113 |
|
|
Printing Originals Centered on Rolls ……………………………………………………………………………………………………….. |
113 |
|
|
Printing Originals Centered on Rolls (Windows) ……………………………………………………………………………………. |
113 |
|
|
Printing Originals Centered on Rolls (Mac OS) …………………………………………………………………………………….. |
115 |
|
|
Printing Originals Centered on Sheets …………………………………………………………………………………………………….. |
117 |
|
|
Printing Originals Centered on Sheets (Windows) ………………………………………………………………………………… |
117 |
|
|
Printing Originals Centered on Sheets (Mac OS) ………………………………………………………………………………….. |
118 |
|
Conserving roll paper |
121 |
|||
|
Conserving Roll Paper by Rotating Originals 90 Degrees ……………………………………………………………………………. |
121 |
|||
|
Conserving Roll Paper by Rotating Originals 90 Degrees (Windows) ……………………………………………………….. |
121 |
|||
|
Conserving Roll Paper by Rotating Originals 90 Degrees (Mac OS) …………………………………………………………. |
122 |
|||
|
Conserving Roll Paper by Printing Originals Without Top and Bottom Margins ……………………………………………….. |
124 |
|||
|
Conserving Roll Paper by Printing Originals Without Top and Bottom Margins (Windows) …………………………… |
125 |
|||
|
Conserving Roll Paper by Printing Originals Without Top and Bottom Margins (Mac OS) …………………………….. |
126 |
|||
|
Checking Images Before Printing |
128 |
|||
|
3 |
||||
|
Checking the Layout in a Preview Before Printing ……………………………………………………………………………………… |
128 |
|||
|
Other useful settings |
129 |
|||
|
Printing With Watermarks ……………………………………………………………………………………………………………………… |
129 |
|||
|
Printing with Watermarks—COPY, FILE COPY, and so on (Windows) ……………………………………………………… |
130 |
|||
|
Making the Original Orientation Match the Paper Orientation ………………………………………………………………………. |
131 |
|||
|
Making the Original Orientation Match the Paper Orientation (Windows) ………………………………………………….. |
132 |
|||
|
Making the Original Orientation Match the Paper Orientation (Mac OS) ……………………………………………………. |
133 |
|||
|
Using Favorites …………………………………………………………………………………………………………………………………… |
135 |

Software Windows Options Printing Enhanced
4
|
Cutting Roll Paper After Printing …………………………………………………………………………………………………………….. |
135 |
|
Cutting Roll Paper After Printing (Windows) ………………………………………………………………………………………… |
135 |
|
Cutting Roll Paper After Printing (Mac OS) ………………………………………………………………………………………….. |
136 |
|
Windows Software |
139 |
|
Printer Driver |
140 |
|
Printer Driver Settings ………………………………………………………………………………………………………………………….. |
140 |
|
Specifying Paper in the Printer Driver ……………………………………………………………………………………………………… |
142 |
|
Confirming Print Settings ……………………………………………………………………………………………………………………… |
143 |
|
Checking the Layout in a Preview Before Printing …………………………………………………………………………………….. |
143 |
|
Using Favorites ………………………………………………………………………………………………………………………………….. |
144 |
|
Accessing the Printer Driver Dialog Box from Applications …………………………………………………………………………. |
146 |
|
Accessing the Printer Driver Dialog Box from the Operating System Menu …………………………………………………… |
147 |
|
Main Sheet ………………………………………………………………………………………………………………………………………… |
148 |
|
Paper Information on Printer Dialog Box ……………………………………………………………………………………………. |
151 |
|
Paper Detailed Settings Dialog Box ………………………………………………………………………………………………….. |
152 |
|
View Settings Dialog Box for the Printing Application …………………………………………………………………………… |
153 |
|
Color Adjustment Sheet: Color ………………………………………………………………………………………………………… |
154 |
|
Object Adjustment Dialog box: Color …………………………………………………………………………………………………. |
155 |
|
Matching Sheet …………………………………………………………………………………………………………………………….. |
155 |
|
Color Adjustment Sheet: Monochrome ……………………………………………………………………………………………… |
157 |
|
Object Adjustment Dialog box: Monochrome ………………………………………………………………………………………. |
158 |
|
Page Setup Sheet ………………………………………………………………………………………………………………………………. |
159 |
|
Paper Size Options Dialog Box ………………………………………………………………………………………………………… |
161 |
|
Layout Sheet ……………………………………………………………………………………………………………………………………… |
162 |
|
Page Options Dialog Box ………………………………………………………………………………………………………………… |
163 |
|
Special Settings Dialog Box …………………………………………………………………………………………………………….. |
164 |
|
Favorites Sheet ………………………………………………………………………………………………………………………………….. |
165 |
|
Utility Sheet ……………………………………………………………………………………………………………………………………….. |
166 |
|
Support Sheet ……………………………………………………………………………………………………………………………………. |
167 |
|
Settings Summaries Dialog Box ……………………………………………………………………………………………………….. |
167 |
|
Device Settings Sheet …………………………………………………………………………………………………………………………. |
168 |
|
Preview |
169 |
|
The Features of Preview ……………………………………………………………………………………………………………………….. |
169 |
|
Starting Preview ………………………………………………………………………………………………………………………………….. |
169 |
|
Preview Main Window ………………………………………………………………………………………………………………………….. |
170 |
|
Dialog Area ………………………………………………………………………………………………………………………………………… |
172 |
|
Enlarge/Reduce the screen display ………………………………………………………………………………………………………… |
173 |
|
Moving a Page ……………………………………………………………………………………………………………………………………. |
173 |
|
Using the ruler …………………………………………………………………………………………………………………………………….. |
173 |
|
Priority setting for rotating 90 degrees …………………………………………………………………………………………………….. |
174 |
|
Printing with Selecting the Layout …………………………………………………………………………………………………………… |
175 |
|
Print on the Center ………………………………………………………………………………………………………………………………. |
177 |
|
Not Print Spaces at the Top/Bottom ……………………………………………………………………………………………………….. |
178 |
|
Free Layout |
179 |
|
The Features of Free Layout ………………………………………………………………………………………………………………….. |
179 |
|
Starting Free Layout …………………………………………………………………………………………………………………………….. |
179 |
|
Free Layout Main Window …………………………………………………………………………………………………………………….. |
181 |
|
Detailed Settings …………………………………………………………………………………………………………………………………. |
182 |
|
Preferences Dialog Box ………………………………………………………………………………………………………………………… |
183 |
|
Page Options Dialog Box ……………………………………………………………………………………………………………………… |
184 |
|
Zoom Dialog Box ………………………………………………………………………………………………………………………………… |
185 |
|
Format Dialog Box ………………………………………………………………………………………………………………………………. |
185 |

Software Windows
Software OS Mac
|
Laying out a Multiple-File Document on One Page ……………………………………………………………………………………. |
187 |
|
Laying out a Document Created with Multiple Application Programs on One Page …………………………………………. |
189 |
|
Selecting an Object ……………………………………………………………………………………………………………………………… |
191 |
|
Changing the Object Size ……………………………………………………………………………………………………………………… |
191 |
|
Moving an Object ………………………………………………………………………………………………………………………………… |
192 |
|
Rotating an Object ………………………………………………………………………………………………………………………………. |
192 |
|
Laying out Objects Automatically ……………………………………………………………………………………………………………. |
193 |
|
Aligning Objects ………………………………………………………………………………………………………………………………….. |
193 |
|
Changing the Object Overlapping Order ………………………………………………………………………………………………….. |
195 |
|
Pasting a Copied or Cut Object ……………………………………………………………………………………………………………… |
196 |
|
Folded Duplex Window ………………………………………………………………………………………………………………………… |
197 |
|
Finished Size Settings Dialog Box ………………………………………………………………………………………………………….. |
198 |
|
Binding Settings Dialog Box ………………………………………………………………………………………………………………….. |
199 |
|
Prints using Folded Duplex ……………………………………………………………………………………………………………………. |
200 |
|
Color imageRUNNER Enlargement Copy |
201 |
|
|
The Features of Color imageRUNNER Enlargement Copy ………………………………………………………………………….. |
201 |
|
|
Starting Color imageRUNNER Enlargement Copy …………………………………………………………………………………….. |
201 |
|
|
Color imageRUNNER Enlargement Copy Dialog Box ………………………………………………………………………………… |
202 |
|
|
Hot Folder ………………………………………………………………………………………………………………………………………….. |
203 |
|
|
Creating a New Hot Folder ……………………………………………………………………………………………………………………. |
203 |
|
|
Specifying an Existing Shared Folder as a Hot Folder ………………………………………………………………………………… |
206 |
|
|
Setting the Print Parameters ………………………………………………………………………………………………………………….. |
208 |
|
|
Printing Enlargements of Scanned Originals from a Color imageRUNNER …………………………………………………….. |
209 |
|
Print Plug-In for Office |
210 |
|
|
Print Plug-In for Officefeatures ……………………………………………………………………………………………………………….. |
210 |
|
|
Steps to install ……………………………………………………………………………………………………………………………………. |
210 |
|
|
Steps to uninstall …………………………………………………………………………………………………………………………………. |
213 |
|
|
When Print Plug-In for Office is not displayed …………………………………………………………………………………………… |
213 |
|
|
To start from Microsoft Word …………………………………………………………………………………………………………………. |
216 |
|
|
Print Matching Roll Width(Word) …………………………………………………………………………………………………………….. |
218 |
|
|
Borderless Printing(Word) ……………………………………………………………………………………………………………………… |
220 |
|
|
Multi-Page Printing(Word) ……………………………………………………………………………………………………………………… |
222 |
|
|
Register the settings (Word) ………………………………………………………………………………………………………………….. |
223 |
|
|
Print Using Registered Settings(Word) …………………………………………………………………………………………………….. |
224 |
|
|
Portrait Orientation/Landscape Orientation(Word) ……………………………………………………………………………………… |
226 |
|
|
To start from Microsoft PowerPoint …………………………………………………………………………………………………………. |
227 |
|
|
Print Matching Roll Width(PowerPoint) ……………………………………………………………………………………………………. |
229 |
|
|
Borderless Printing(PowerPoint) …………………………………………………………………………………………………………….. |
230 |
|
|
Multi-Page Printing(PowerPoint) …………………………………………………………………………………………………………….. |
232 |
|
|
Register the settings (PowerPoint) ………………………………………………………………………………………………………….. |
234 |
|
|
Print Using Registered Settings(PowerPoint) ……………………………………………………………………………………………. |
235 |
|
|
Portrait Orientation/Landscape Orientation(PowerPoint) …………………………………………………………………………….. |
236 |
|
|
To start from Microsoft Excel …………………………………………………………………………………………………………………. |
238 |
|
|
Print Entire Sheet(Excel) ……………………………………………………………………………………………………………………….. |
239 |
|
|
Print Selected Area(Excel) …………………………………………………………………………………………………………………….. |
242 |
|
|
Configuring Binding (Excel) ……………………………………………………………………………………………………………………. |
244 |
|
|
Configuring Special Settings ………………………………………………………………………………………………………………….. |
245 |
|
Mac OS Software |
247 |
|||
|
Printer Driver |
248 |
|||
|
5 |
||||
|
Printer Driver Settings ………………………………………………………………………………………………………………………….. |
248 |
|||
|
Specifying Paper in the Printer Driver ……………………………………………………………………………………………………… |
249 |
|||
|
Confirming Print Settings ……………………………………………………………………………………………………………………… |
250 |
|||
|
Checking the Layout in a Preview Before Printing …………………………………………………………………………………….. |
251 |
|||
|
Using Favorites ………………………………………………………………………………………………………………………………….. |
251 |
|||
|
Accessing the Printer Driver Dialog Box from Applications …………………………………………………………………………. |
252 |
|||
|
Main Pane …………………………………………………………………………………………………………………………………………. |
252 |
|||
|
Paper Detailed Settings Dialog Box ………………………………………………………………………………………………….. |
256 |
|||
|
View set. Dialog Box for the Printing Application …………………………………………………………………………………. |
258 |

|
Matching pane ………………………………………………………………………………………………………………………………. |
258 |
|
Color Settings Pane: Color ……………………………………………………………………………………………………………… |
260 |
|
Object Adjustment dialog box: Color …………………………………………………………………………………………………. |
261 |
|
Color Settings Pane: Monochrome …………………………………………………………………………………………………… |
262 |
|
Object Adjustment dialog box: Monochrome ………………………………………………………………………………………. |
263 |
|
Page Setup Pane ……………………………………………………………………………………………………………………………….. |
263 |
|
Preview |
265 |
|
The Features of Preview ……………………………………………………………………………………………………………………….. |
265 |
|
Starting Preview ………………………………………………………………………………………………………………………………….. |
265 |
|
Preview Main Window ………………………………………………………………………………………………………………………….. |
266 |
|
Paper Settings Panel ……………………………………………………………………………………………………………………………. |
269 |
|
Easy Settings ………………………………………………………………………………………………………………………………… |
270 |
|
Advanced Settings …………………………………………………………………………………………………………………………. |
271 |
|
Output Settings Panel ………………………………………………………………………………………………………………………….. |
272 |
|
Color Settings Panel …………………………………………………………………………………………………………………………….. |
274 |
|
Color Adjustment ……………………………………………………………………………………………………………………………. |
275 |
|
Matching ………………………………………………………………………………………………………………………………………. |
276 |
|
Driver Matching Mode ………………………………………………………………………………………………………………… |
278 |
|
ICC Matching Mode …………………………………………………………………………………………………………………… |
279 |
|
ColorSync ………………………………………………………………………………………………………………………………… |
280 |
|
Preferences Dialog Box ………………………………………………………………………………………………………………………… |
280 |
|
Zoom Dialog Box ………………………………………………………………………………………………………………………………… |
280 |
|
Go to Page Dialog Box …………………………………………………………………………………………………………………………. |
281 |
|
Print with No Borders …………………………………………………………………………………………………………………………… |
281 |
|
Print on the Center ………………………………………………………………………………………………………………………………. |
282 |
|
Not Print Spaces at the Top/Bottom ……………………………………………………………………………………………………….. |
282 |
|
Print Page Rotated 90 Degrees ……………………………………………………………………………………………………………… |
283 |
|
Display with Fitting to the Width of the Paper …………………………………………………………………………………………… |
283 |
|
Display with All ……………………………………………………………………………………………………………………………………. |
283 |
|
Display with Actual Size ………………………………………………………………………………………………………………………… |
284 |
|
Moving a Page ……………………………………………………………………………………………………………………………………. |
284 |
|
Free Layout |
286 |
|
The Features of Free Layout ………………………………………………………………………………………………………………….. |
286 |
|
Starting Free Layout …………………………………………………………………………………………………………………………….. |
286 |
|
Free Layout Main Window …………………………………………………………………………………………………………………….. |
287 |
|
Paper Settings Panel ……………………………………………………………………………………………………………………………. |
289 |
|
Easy Settings ………………………………………………………………………………………………………………………………… |
290 |
|
Advanced Settings …………………………………………………………………………………………………………………………. |
291 |
|
Color Settings Panel …………………………………………………………………………………………………………………………….. |
292 |
|
Color Adjustment ……………………………………………………………………………………………………………………………. |
293 |
|
Matching ………………………………………………………………………………………………………………………………………. |
295 |
|
Driver Matching Mode ………………………………………………………………………………………………………………… |
297 |
|
ICC Matching Mode …………………………………………………………………………………………………………………… |
298 |
|
ColorSync ………………………………………………………………………………………………………………………………… |
299 |
|
Preferences Dialog Box ………………………………………………………………………………………………………………………… |
299 |
|
Page Setup Dialog Box ………………………………………………………………………………………………………………………… |
300 |
|
Zoom Dialog Box ………………………………………………………………………………………………………………………………… |
301 |
|
Format Dialog Box ………………………………………………………………………………………………………………………………. |
302 |
|
Laying out a Multiple-File Document on One Page ……………………………………………………………………………………. |
302 |
|
Laying out a Document Created with Multiple Application Programs on One Page …………………………………………. |
303 |
|
Selecting an Object ……………………………………………………………………………………………………………………………… |
303 |
|
Changing the Object Size ……………………………………………………………………………………………………………………… |
303 |
|
Moving an Object ………………………………………………………………………………………………………………………………… |
304 |
|
Rotating an Object ………………………………………………………………………………………………………………………………. |
304 |
|
Laying out Objects Automatically ……………………………………………………………………………………………………………. |
305 |
|
Aligning Objects ………………………………………………………………………………………………………………………………….. |
305 |
|
Changing the Object Overlapping Order ………………………………………………………………………………………………….. |
307 |
|
Pasting a Copied or Cut Object ……………………………………………………………………………………………………………… |
308 |

Paper of Use and Handling
|
Handling and Use of Paper |
309 |
|||
|
Paper |
310 |
|||
|
Types of Paper ……………………………………………………………………………………………………………………………………. |
310 |
|||
|
Paper Sizes ………………………………………………………………………………………………………………………………………… |
310 |
|||
|
Using Paper Other Than Genuine Paper and feed confirmed Paper …………………………………………………………….. |
312 |
|||
|
Printing on Paper Other Than Genuine Paper and feed confirmed Paper Using Existing Settings …………………………………. |
312 |
|||
|
Displaying the Paper Reference Guide ……………………………………………………………………………………………………. |
313 |
|||
|
Updating paper information …………………………………………………………………………………………………………………… |
316 |
|||
|
Handling rolls |
320 |
|||
|
Attaching the Roll Holder to Rolls …………………………………………………………………………………………………………… |
320 |
|||
|
Loading Rolls in the Printer ……………………………………………………………………………………………………………………. |
322 |
|||
|
Changing the Type of Paper ………………………………………………………………………………………………………………….. |
325 |
|||
|
Specifying the Paper Length …………………………………………………………………………………………………………………. |
326 |
|||
|
Removing the Roll from the Printer …………………………………………………………………………………………………………. |
327 |
|||
|
Removing the Roll Holder from Rolls ………………………………………………………………………………………………………. |
329 |
|||
|
Feeding Roll Paper Manually …………………………………………………………………………………………………………………. |
330 |
|||
|
Keeping Track of the Amount of Roll Paper Left ……………………………………………………………………………………….. |
331 |
|||
|
Specifying the Ink Drying Time for Rolls …………………………………………………………………………………………………… |
331 |
|||
|
Specifying the Cutting Method for Rolls …………………………………………………………………………………………………… |
333 |
|||
|
Cutting the Leading Edge of Roll Paper Automatically ……………………………………………………………………………….. |
337 |
|||
|
Reducing Dust from Cutting Rolls …………………………………………………………………………………………………………… |
338 |
|||
|
Handling sheets |
340 |
|||
|
Loading Sheets in the Printer ………………………………………………………………………………………………………………… |
340 |
|||
|
Printing From a Desired Starting Point …………………………………………………………………………………………………….. |
342 |
|||
|
Removing Sheets ………………………………………………………………………………………………………………………………… |
344 |
|||
|
Output Stacker |
346 |
|||
|
Using the Output Stacker ……………………………………………………………………………………………………………………… |
346 |
|||
|
Media Configuration Tool (Windows) |
351 |
|||
|
The Features of Media Configuration Tool ………………………………………………………………………………………………… |
351 |
|||
|
Installation Procedures …………………………………………………………………………………………………………………………. |
351 |
|||
|
Updating Media Information After Installation ……………………………………………………………………………………………. |
353 |
|||
|
Media Configuration Tool Main Window …………………………………………………………………………………………………… |
357 |
|||
|
Editing Media Type Information for Genuine Paper and Feed Confirmed Paper ………………………………………………. |
358 |
|||
|
Adding Media Types ……………………………………………………………………………………………………………………….. |
359 |
|||
|
Changing Media Names ………………………………………………………………………………………………………………….. |
363 |
|||
|
Deleting Media Types You Have Added ………………………………………………………………………………………………. |
365 |
|||
|
Switching Media Types Display Show/Hide …………………………………………………………………………………………. |
367 |
|||
|
Changing the Display Order of Media Types ………………………………………………………………………………………… |
369 |
|||
|
Applying a Saved Media Information File on Another Computer ……………………………………………………………… |
371 |
|||
|
Checking the update ……………………………………………………………………………………………………………………………. |
372 |
|||
|
Media Configuration Tool (Mac OS) |
373 |
|||
|
The Features of Media Configuration Tool ………………………………………………………………………………………………… |
373 |
|||
|
Procedures for Installing ……………………………………………………………………………………………………………………….. |
373 |
|||
|
Updating Media Information After Installation ……………………………………………………………………………………………. |
375 |
|||
|
Media Configuration Tool Main Window …………………………………………………………………………………………………… |
379 |
|||
|
Editing Media Type Information for Genuine Paper and Feed Confirmed Paper ………………………………………………. |
381 |
|||
|
Adding Media Types ……………………………………………………………………………………………………………………….. |
382 |
|||
|
Changing Media Names |
386 |
|||
|
7 |
||||
|
……………………………………………………………………………………………….Deleting Media Types You Have Added |
389 |
|||
|
Switching Media Types Display Show/Hide …………………………………………………………………………………………. |
390 |
|||
|
Changing the Display Order of Media Types ………………………………………………………………………………………… |
392 |
|||
|
Applying a Saved Media Information File on Another Computer ……………………………………………………………… |
394 |
|||
|
Checking the update ……………………………………………………………………………………………………………………………. |
396 |

Panel Control
Parts Printer
Setting Network
8
|
Control Panel |
397 |
|
Operations and Display Screen |
398 |
|
Control Panel ……………………………………………………………………………………………………………………………………… |
398 |
|
Control Panel Display …………………………………………………………………………………………………………………………… |
400 |
|
How to View Instructions with Navigate …………………………………………………………………………………………………… |
404 |
|
Checking Instructions During Printer Operations ………………………………………………………………………………………. |
405 |
|
Printer Menu |
406 |
|
Printer Menu Operations ………………………………………………………………………………………………………………………. |
406 |
|
Menu Operations ………………………………………………………………………………………………………………………………… |
407 |
|
Menu Structure …………………………………………………………………………………………………………………………………… |
410 |
|
Menu Settings …………………………………………………………………………………………………………………………………….. |
416 |
|
Status Print ………………………………………………………………………………………………………………………………………… |
425 |
|
Printing Interface Setting Reports …………………………………………………………………………………………………………… |
428 |
|
Printer Parts |
431 |
|
Printer parts |
432 |
|
Front …………………………………………………………………………………………………………………………………………………. |
432 |
|
Side ………………………………………………………………………………………………………………………………………………….. |
434 |
|
Top Cover (Inside) ……………………………………………………………………………………………………………………………….. |
435 |
|
Roll Cover (Inside) ……………………………………………………………………………………………………………………………….. |
436 |
|
Carriage …………………………………………………………………………………………………………………………………………….. |
436 |
|
Ink Tank Cover (Inside) …………………………………………………………………………………………………………………………. |
437 |
|
Stand ………………………………………………………………………………………………………………………………………………… |
438 |
|
Optional accessories |
439 |
|
Roll Holder Set ……………………………………………………………………………………………………………………………………. |
439 |
|
Network Setting |
441 |
|
Network Environment |
442 |
|
Network Environment …………………………………………………………………………………………………………………………… |
442 |
|
Using RemoteUI |
444 |
|
Using RemoteUI ………………………………………………………………………………………………………………………………….. |
444 |
|
Initial Settings |
446 |
|
Configuring the IP Address on the Printer ………………………………………………………………………………………………… |
446 |
|
Configuring the IP Address Using the Printer Control Panel …………………………………………………………………… |
446 |
|
Configuring the IP Address Using ARP and PING Commands ……………………………………………………………….. |
447 |
|
Configuring TCP/IPv6 Network Settings ………………………………………………………………………………………………….. |
448 |
|
Configuring the Printer Driver Destination (Windows) …………………………………………………………………………………. |
449 |
|
Configuring the Printer Driver Destination (Mac OS) …………………………………………………………………………………… |
449 |
|
Configuring the Printer’s TCP/IP Network Settings With RemoteUI ………………………………………………………………. |
450 |
|
Mac OS Settings |
453 |
|
Configuring the Destination in TCP/IP Networks ………………………………………………………………………………………. |
453 |
|
Configuring the Destination for Bonjour Network ……………………………………………………………………………………… |
453 |
|
Other Settings |
454 |
|
Specifying Printer-Related Information …………………………………………………………………………………………………….. |
454 |
|
Configuring the Communication Mode Manually ……………………………………………………………………………………….. |
455 |
|
Email Notification When Printing is Finished or Errors Occur ……………………………………………………………………….. |
456 |
|
Initializing the Network Settings ……………………………………………………………………………………………………………… |
456 |
|
Device Setup Utility (Windows) |
457 |
|
imagePROGRAF Device Setup Utility ……………………………………………………………………………………………………… |
457 |
|
Installing imagePROGRAF Device Setup Utility …………………………………………………………………………………………. |
457 |
|
Configuring the IP Address Using imagePROGRAF Device Setup Utility ……………………………………………………….. |
457 |

Management Job Print
Quality Print Better for Adjustments
|
Print Job Management |
461 |
|
Status Monitor (Windows) |
462 |
|
The Features of imagePROGRAF Status Monitor ……………………………………………………………………………………… |
462 |
|
Job Management Using imagePROGRAF Status Monitor ………………………………………………………………………….. |
463 |
|
Printmonitor (Mac OS) |
464 |
|
The Features of imagePROGRAF Printmonitor …………………………………………………………………………………………. |
464 |
|
Job Management Using imagePROGRAF Printmonitor ……………………………………………………………………………… |
465 |
|
Accounting (Windows) |
466 |
|
Accounting Manager ……………………………………………………………………………………………………………………………. |
466 |
|
Launching the Accounting Manager ……………………………………………………………………………………………………….. |
466 |
|
Accounting Manager Main Window ………………………………………………………………………………………………………… |
467 |
|
Job List Area ……………………………………………………………………………………………………………………………. |
469 |
|
Accounting Manager Basic Procedures …………………………………………………………………………………………………… |
470 |
|
Configuring Unit Costs in Accounting Manager ………………………………………………………………………………………… |
470 |
|
Setting the Unit Cost for Ink ……………………………………………………………………………………………………………… |
471 |
|
Setting the Unit Cost for Paper …………………………………………………………………………………………………………. |
472 |
|
Setting the Unit Cost for Items Other Than Ink and Paper ……………………………………………………………………… |
473 |
|
Configuring Units and Display Settings in Accounting Manager …………………………………………………………………… |
474 |
|
Automatically Acquiring Print Job Logs at Regular Intervals ………………………………………………………………………… |
474 |
|
Canceling Regular Print Job Log Acquisition ……………………………………………………………………………………………. |
475 |
|
Switching Between Displaying Jobs on Printer and Regularly Acquired Jobs …………………………………………………. |
475 |
|
Exporting Print Job Data as a CSV File ……………………………………………………………………………………………………. |
475 |
|
Displaying Job Properties or Period Properties …………………………………………………………………………………………. |
476 |
|
Showing, Saving and Loading Selected Unit Cost Data ……………………………………………………………………………… |
477 |
|
Showing the Total Amount of Ink and Paper Consumed …………………………………………………………………………….. |
477 |
|
Adjustments for Better Print Quality |
479 |
|
Adjusting the Printhead |
480 |
|
Adjusting the Printhead ………………………………………………………………………………………………………………………… |
480 |
|
Automatic Adjustment to Straighten Lines and Colors ………………………………………………………………………….. |
480 |
|
Manual Adjustment to Straighten Lines and Colors ………………………………………………………………………………. |
481 |
|
Adjusting Line Misalignment ………………………………………………………………………………………………………………….. |
483 |
|
Troubleshooting Paper Abrasion and Blurry Images …………………………………………………………………………………… |
485 |
|
Adjusting the feed amount |
487 |
|
Adjusting the Feed Amount …………………………………………………………………………………………………………………… |
487 |
|
Selecting a Feed Amount Adjustment Method …………………………………………………………………………………….. |
487 |
|
Automatic Banding Adjustment ………………………………………………………………………………………………………… |
488 |
|
Manual Banding Adjustment …………………………………………………………………………………………………………….. |
489 |
|
Fine-Tuning the Paper Feed Amount ………………………………………………………………………………………………….. |
491 |
|
Adjusting Line Length ……………………………………………………………………………………………………………………… |
491 |
|
Adjusting the Vacuum Strength ……………………………………………………………………………………………………………… |
493 |
Consumables and Maintenance
|
Maintenance and Consumables |
495 |
|||
|
Ink Tanks |
496 |
|||
|
Ink Tanks ……………………………………………………………………………………………………………………………………………. |
496 |
|||
|
Replacing Ink Tanks |
496 |
|||
|
9 |
||||
|
Checking Ink Tank Levels |
500 |
|||
|
When to Replace Ink Tanks …………………………………………………………………………………………………………………… |
501 |
|||
|
Printheads |
502 |
|||
|
Printhead …………………………………………………………………………………………………………………………………………… |
502 |
|||
|
Checking for Nozzle Clogging ……………………………………………………………………………………………………………….. |
502 |
|||
|
Cleaning the Printhead …………………………………………………………………………………………………………………………. |
503 |
|||
|
Replacing the Printhead ……………………………………………………………………………………………………………………….. |
504 |

Consumables and Maintenance
Troubleshooting
10
|
Maintenance Cartridge |
509 |
|
Maintenance Cartridge …………………………………………………………………………………………………………………………. |
509 |
|
Replacing the Maintenance Cartridge ……………………………………………………………………………………………………… |
509 |
|
Checking the Remaining Maintenance Cartridge Capacity ………………………………………………………………………….. |
512 |
|
When to Replace the Maintenance Cartridge …………………………………………………………………………………………… |
513 |
|
Cleaning the Printer |
514 |
|
Cleaning the Printer Exterior ………………………………………………………………………………………………………………….. |
514 |
|
Cleaning Inside the Top Cover ……………………………………………………………………………………………………………….. |
514 |
|
Other Maintenance |
518 |
|
Preparing to Transfer the Printer …………………………………………………………………………………………………………….. |
518 |
|
Reinstalling the Printer ………………………………………………………………………………………………………………………….. |
521 |
|
Updating the Firmware …………………………………………………………………………………………………………………………. |
524 |
|
Troubleshooting |
525 |
|
Frequently Asked Questions |
526 |
|
Frequently Asked Questions ………………………………………………………………………………………………………………….. |
526 |
|
Problems Regarding Paper |
527 |
|
Clearing Jammed Roll Paper …………………………………………………………………………………………………………………. |
527 |
|
Clearing a Jammed Sheet …………………………………………………………………………………………………………………….. |
530 |
|
Clearing Jammed Paper (Paper Feed Slot) ………………………………………………………………………………………………. |
532 |
|
Roll paper cannot be inserted into the Paper Feed Slot ……………………………………………………………………………… |
534 |
|
Cannot load sheets ……………………………………………………………………………………………………………………………… |
534 |
|
Paper is not cut neatly ………………………………………………………………………………………………………………………….. |
534 |
|
Paper is not cut …………………………………………………………………………………………………………………………………… |
534 |
|
Depression on the leading edge is left …………………………………………………………………………………………………….. |
535 |
|
The size of clear film cannot be detected ………………………………………………………………………………………………… |
535 |
|
Roll Paper is Continuously Ejected …………………………………………………………………………………………………………. |
535 |
|
Printing does not start |
536 |
|
The Data lamp on the Control Panel does not light up ……………………………………………………………………………….. |
536 |
|
The printer does not respond even if print jobs are sent …………………………………………………………………………….. |
536 |
|
Ink Filling.. is displayed …………………………………………………………………………………………………………………………. |
536 |
|
The display screen indicates Agitating …………………………………………………………………………………………………….. |
536 |
|
The printer stops during a print job |
537 |
|
An error message is shown on the Display Screen ……………………………………………………………………………………. |
537 |
|
The printer ejects blank, unprinted paper ………………………………………………………………………………………………… |
537 |
|
Problems with the printing quality |
538 |
|
Printing is faint …………………………………………………………………………………………………………………………………….. |
538 |
|
Paper rubs against the Printhead …………………………………………………………………………………………………………… |
539 |
|
The edges of the paper are dirty …………………………………………………………………………………………………………….. |
539 |
|
The surface of the paper is dirty …………………………………………………………………………………………………………….. |
540 |
|
The back side of the paper is dirty ………………………………………………………………………………………………………….. |
540 |
|
Printed colors are inaccurate …………………………………………………………………………………………………………………. |
540 |
|
Banding in different colors occurs ………………………………………………………………………………………………………….. |
541 |
|
Colors in printed images are uneven ……………………………………………………………………………………………………….. |
541 |
|
Image edges are blurred or white banding occurs …………………………………………………………………………………….. |
542 |
|
The contrast becomes uneven during printing ………………………………………………………………………………………….. |
542 |
|
The length of printed images is inaccurate in the feeding direction ……………………………………………………………….. |
543 |
|
Images are printed crooked …………………………………………………………………………………………………………………… |
543 |
|
Documents are printed in monochrome ………………………………………………………………………………………………….. |
543 |
|
Line thickness is not uniform …………………………………………………………………………………………………………………. |
543 |
|
Lines are misaligned …………………………………………………………………………………………………………………………….. |
543 |
|
Cannot print over a network |
545 |
|
Cannot connect the printer to the network ………………………………………………………………………………………………. |
545 |
|
Cannot print over a TCP/IP network ……………………………………………………………………………………………………….. |
545 |
![]()
Troubleshooting
|
Cannot print over a Bonjour network ………………………………………………………………………………………………………. |
545 |
|
Installation problems |
546 |
|
The computer does not recognize the printer …………………………………………………………………………………………… |
546 |
|
Removing Installed Printer Drivers ………………………………………………………………………………………………………….. |
546 |
|
HP-GL/2 problems |
548 |
|
With HP-GL/2, printing is misaligned ………………………………………………………………………………………………………. |
548 |
|
Lines or images are missing in printed HP-GL/2 jobs. ……………………………………………………………………………….. |
548 |
|
Lines are printed too thick or thin in HP-GL/2 print jobs …………………………………………………………………………….. |
548 |
|
HP-GL/2 jobs are printed in monochrome (or color) ………………………………………………………………………………….. |
548 |
|
Printed colors of lines are inaccurate during HP-GL/2 printing …………………………………………………………………….. |
548 |
|
HP-GL/2 jobs are printed 6 mm larger than specified ………………………………………………………………………………… |
549 |
|
HP-GL/2 jobs are printed at maximum size, even if a standard size is specified ……………………………………………… |
549 |
|
HP-GL/2 printing takes a long time ………………………………………………………………………………………………………… |
549 |
|
Replotting with HP-GL/2 jobs is not possible. ………………………………………………………………………………………….. |
549 |
|
The printer stops when printing a HP-GL/2 job (the carriage stops moving) …………………………………………………… |
549 |
|
Other problems |
550 |
|
The printer does not go on ……………………………………………………………………………………………………………………. |
550 |
|
If the Printer Makes a Strange Sound ……………………………………………………………………………………………………… |
550 |
|
Messages advising to check the maintenance cartridge are not cleared ……………………………………………………….. |
550 |
|
The printer consumes a lot of ink …………………………………………………………………………………………………………… |
550 |
|
Ink Level Detection ………………………………………………………………………………………………………………………………. |
551 |
Message Error
|
Error Message |
553 |
|||
|
Error Messages |
554 |
|||
|
Messages regarding paper |
556 |
|||
|
Paper mismatch ………………………………………………………………………………………………………………………………….. |
556 |
|||
|
MediaType Mismatch …………………………………………………………………………………………………………………………… |
556 |
|||
|
The paper is too small. …………………………………………………………………………………………………………………………. |
557 |
|||
|
The paper is too small. …………………………………………………………………………………………………………………………. |
557 |
|||
|
PaprWidth Mismatch ……………………………………………………………………………………………………………………………. |
558 |
|||
|
Paper size not detected. ………………………………………………………………………………………………………………………. |
558 |
|||
|
Insufficient paper for job ……………………………………………………………………………………………………………………….. |
559 |
|||
|
This paper cannot be used. …………………………………………………………………………………………………………………… |
559 |
|||
|
Roll printing is selected. ………………………………………………………………………………………………………………………… |
559 |
|||
|
Roll printing is selected, but sheets are loaded. ………………………………………………………………………………………… |
559 |
|||
|
The roll is empty. …………………………………………………………………………………………………………………………………. |
560 |
|||
|
Sheet printing is selected. …………………………………………………………………………………………………………………….. |
560 |
|||
|
Regular printing is selected, but a roll is loaded. ……………………………………………………………………………………….. |
560 |
|||
|
Paper jam ………………………………………………………………………………………………………………………………………….. |
561 |
|||
|
Paper is crooked. ………………………………………………………………………………………………………………………………… |
561 |
|||
|
Paper not aligned with right guide. …………………………………………………………………………………………………………. |
561 |
|||
|
Cannot detect papr ……………………………………………………………………………………………………………………………… |
562 |
|||
|
Leading edge detection error. ………………………………………………………………………………………………………………… |
562 |
|||
|
Paper cutting failed. …………………………………………………………………………………………………………………………….. |
562 |
|||
|
End of paper feed. ………………………………………………………………………………………………………………………………. |
562 |
|||
|
Rel lever is in wrong position. ………………………………………………………………………………………………………………… |
562 |
|||
|
Borderless printng not possible. …………………………………………………………………………………………………………….. |
563 |
|||
|
Paper position not suitable for borderless printing. ……………………………………………………………………………………. |
563 |
|||
|
Roll paper is not securely in contact with roll holder |
563 |
|||
|
11 |
||||
|
Messages regarding ink |
564 |
|||
|
Ink insufficient. ……………………………………………………………………………………………………………………………………. |
564 |
|||
|
No ink left. ………………………………………………………………………………………………………………………………………….. |
564 |
|||
|
Remaining level of the ink cannot be correctly detected. Check ink tank. ……………………………………………………… |
564 |
|||
|
Cannot detect ink level correctly. Close tank cover. …………………………………………………………………………………… |
564 |
|||
|
Close Ink Tank Cover …………………………………………………………………………………………………………………………… |
564 |
|||
|
Ink tank is empty. ………………………………………………………………………………………………………………………………… |
565 |
|||
|
Not much ink is left. …………………………………………………………………………………………………………………………….. |
565 |

Message Error
Appendix Specifications
12
|
No ink tank loaded. ……………………………………………………………………………………………………………………………… |
565 |
|
Check if ink tank is set, and its color and direction. …………………………………………………………………………………… |
565 |
|
The following ink tanks cannot be recognized. …………………………………………………………………………………………. |
565 |
|
Do not pull out ink tank. ……………………………………………………………………………………………………………………….. |
565 |
|
Messages regarding printing or adjustment |
566 |
|
Cannot adjust paper feed. …………………………………………………………………………………………………………………….. |
566 |
|
Check printed document. ……………………………………………………………………………………………………………………… |
566 |
|
Messages regarding printheads |
567 |
|
Cannot adjust printhead. ………………………………………………………………………………………………………………………. |
567 |
|
Wrong printhead. ………………………………………………………………………………………………………………………………… |
567 |
|
Printhead error ……………………………………………………………………………………………………………………………………. |
567 |
|
Cannot recognize print head. ………………………………………………………………………………………………………………… |
567 |
|
Execute printhead cleaning. ………………………………………………………………………………………………………………….. |
568 |
|
Messages regarding the maintenance cartridge |
569 |
|
Insert the maintenance cartridge. …………………………………………………………………………………………………………… |
569 |
|
Wrong maintenance cartridge. ………………………………………………………………………………………………………………. |
569 |
|
Maint. cart. The level is low …………………………………………………………………………………………………………………… |
569 |
|
No Maintenance Cartridge capacity. ……………………………………………………………………………………………………….. |
569 |
|
Maintenance cartridge full. ……………………………………………………………………………………………………………………. |
569 |
|
Maintenance cartridge problem. …………………………………………………………………………………………………………….. |
569 |
|
Messages regarding HP-GL/2 |
570 |
|
This type of paper is not compatible with HP-GL/2. ………………………………………………………………………………….. |
570 |
|
GL2: Wxxxx The memory is full. (xxxx is 0501, 0903, or 0904) ……………………………………………………………………. |
570 |
|
GL2: W0502 The parameter is out of range. ……………………………………………………………………………………………. |
570 |
|
GL2: W0504 This command is not supported. …………………………………………………………………………………………. |
570 |
|
Other Messages |
571 |
|
GARO Wxxxx (x represents a number) ……………………………………………………………………………………………………. |
571 |
|
ERROR Exxx-xxxx (x represents a letter or number) ………………………………………………………………………………….. |
571 |
|
Hardware error. xxxxxxxx-xxxx (x represents a letter or number) ………………………………………………………………….. |
571 |
|
Top cover is open. ……………………………………………………………………………………………………………………………….. |
572 |
|
Prepare for parts replacement. ………………………………………………………………………………………………………………. |
572 |
|
Parts replacement time has passed. ………………………………………………………………………………………………………. |
572 |
|
Unknown file. ……………………………………………………………………………………………………………………………………… |
572 |
|
Multi-sensor error ………………………………………………………………………………………………………………………………… |
572 |
|
Error in cutter position. …………………………………………………………………………………………………………………………. |
572 |
|
Specifications |
573 |
|
Printer Specifications |
574 |
|
Specifications ……………………………………………………………………………………………………………………………………… |
574 |
|
Print Area …………………………………………………………………………………………………………………………………………… |
575 |
|
Appendix |
577 |
|
Safety Precautions |
578 |
|
Safety Precautions ………………………………………………………………………………………………………………………………. |
578 |
|
Legal Notices ……………………………………………………………………………………………………………………………………… |
580 |
|
Manuals for this printer |
582 |
|
Manuals for this printer …………………………………………………………………………………………………………………………. |
582 |
|
About This User Manual ……………………………………………………………………………………………………………………….. |
582 |
|
Disposal of the product |
584 |
|
WEEE Directive …………………………………………………………………………………………………………………………………… |
584 |
iPF770
User’s Guide
Basic Printing Workflow |
|
|
Printing procedure ……………………………………………………………………. |
14 |
|
Canceling print jobs ………………………………………………………………….. |
22 |
|
Pausing Printing ………………………………………………………………………. |
25 |
|
Enhanced Printing Options |
27 |
|
Windows Software |
139 |
|
Mac OS Software |
247 |
|
Handling and Use of Paper |
309 |
|
Control Panel |
397 |
|
Printer Parts |
431 |
|
Network Setting |
441 |
|
Print Job Management |
461 |
|
Adjustments for Better Print Quality |
479 |
|
Maintenance and Consumables |
495 |
|
Troubleshooting |
525 |
|
Error Message |
553 |
|
Specifications |
573 |
|
Appendix |
577 |
Workflow Printing Basic
13
imagePROGRAF

procedure Printing Workflow Printing Basic
Printing Options Using Rolls and Sheets |
iPF770 |
Printing procedure |
|
|
Printing Options Using Rolls and Sheets …………………………………………………………………………………………….. |
14 |
|
Turning the Printer On and Off ………………………………………………………………………………………………………….. |
15 |
|
Loading and Printing on Rolls …………………………………………………………………………………………………………… |
16 |
|
Loading and Printing on Sheets ………………………………………………………………………………………………………… |
18 |
|
Specifying Paper in the Printer Driver (Windows) …………………………………………………………………. |
142 |
|
Specifying Paper in the Printer Driver (Mac OS) …………………………………………………………………… |
249 |
|
Printing in Windows ………………………………………………………………………………………………………………………… |
20 |
|
Printing from Mac OS ……………………………………………………………………………………………………………………… |
21 |
Printing Options Using Rolls and Sheets
The printer supports both rolls and sheets.
This section introduces the main features of each, as well as the main printing methods available. Select rolls or sheets to suit your particular printing application.
• For information on the types of paper the printer supports, refer to the Paper Reference Guide. (See «Types of
•A variety of other ways to print are available besides those introduced here. Choose the printing method that suits your particular printing application, referring to «Working with Various Print Jobs» and «Enhanced Printing Options» from the table of contents.
Roll printing
Media in spooled rolls is generally called Roll Media. Rolls are loaded on the Roll Holder, which are in turn loaded in the printer.
Rolls can be used to print large photos or create posters or banners that cannot be printed on regular sheets.
•Large-format printing
Easily print vertical or horizontal banners from familiar applications such as Microsoft Office applications.
(See «Printing Vertical or Horizontal Banners (Large-Format Printing).») P.86
•Borderless printing
Print without a margin (border) around posters or photos.
(See «Borderless Printing on Paper of Equivalent Size.») P.77
(See «Borderless Printing by Resizing Originals to Fit the Roll Width.») P.80 (See «Borderless Printing at Actual Size.») P.72
•Banner printing
You can print multiple pages as a single continuous image, without margins between pages.
(See «Printing Multiple Pages Continuously.») P.102
•90-degree rotation before printing
Originals in portrait orientation are rotated 90 degrees when possible to use paper more efficiently.
(See «Conserving Roll Paper by Rotating Originals 90 Degrees.») P.121
•Enlarged/reduced printing
You can freely adjust the size of originals by enlarging or reducing originals before printing.
(See «Resizing Originals to Match the Paper Size.») P.58 (See «Resizing Originals to Fit the Roll Width.») P.60
(See «Resizing Originals by Entering a Scaling Value.») P.63
14 • Free Layout function
Print multiple documents from multiple applications (such as word-processing programs, spreadsheet programs, and so on) next to each other.
(See «Printing Multiple Originals Next to Each Other.») P.99
Sheet printing
Sheets refer to individual sheets of paper.
User’s Guide
|
iPF770 |
Turning the Printer On and Off |
Insert the sheet between the Platen and the Paper Retainer.
•Enlarged/reduced printing
You can freely adjust the size of originals by enlarging or reducing originals before printing.
(See «Resizing Originals to Match the Paper Size.») P.58 (See «Resizing Originals by Entering a Scaling Value.») P.63
•Free Layout function
Print multiple documents from multiple applications (such as word-processing programs, spreadsheet programs, and so on) next to each other.
(See «Printing Multiple Originals Next to Each Other.») P.99
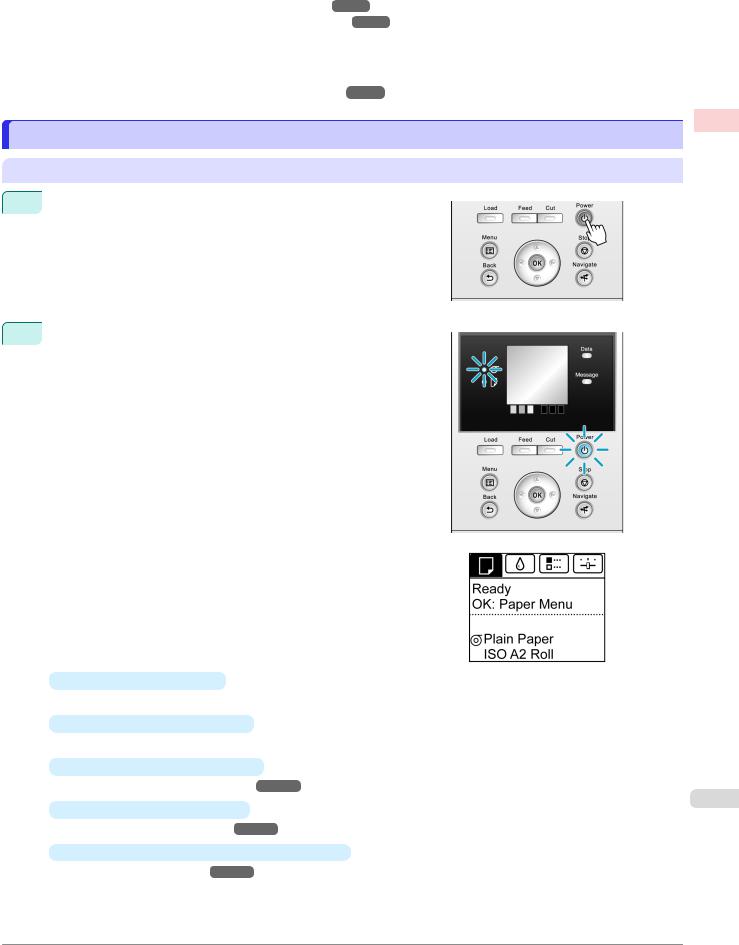
Turning the Printer On and Off
Turning the printer on
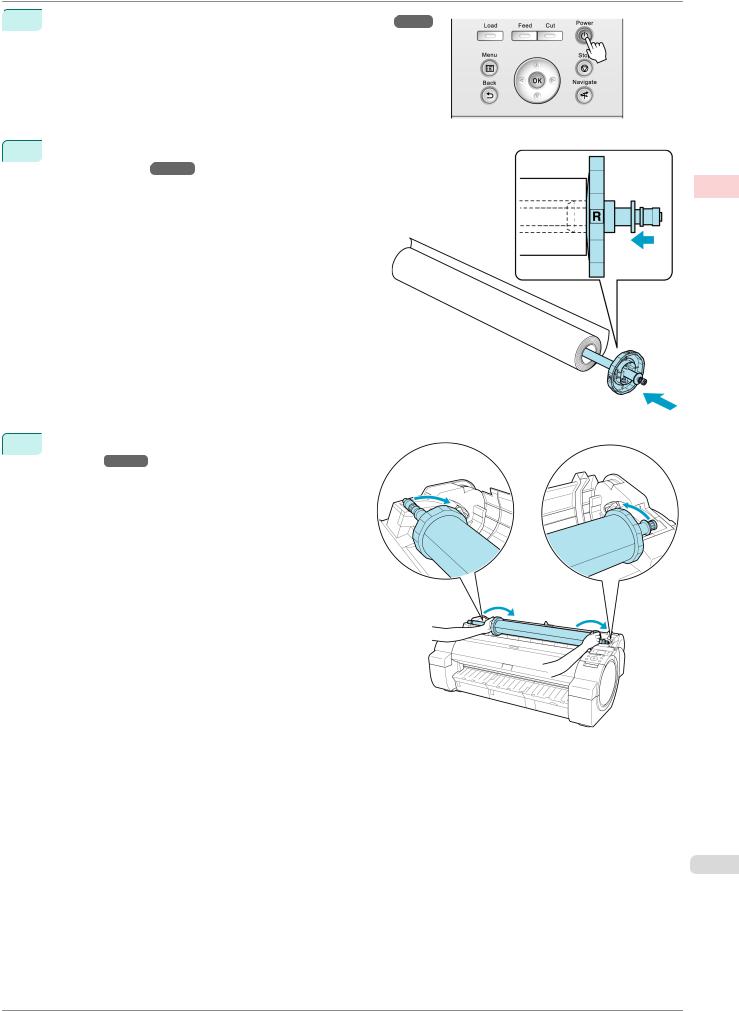
1Press the Power button to turn on the printer. The printer will now start up.
After the Display Screen shows the Canon logo, «Starting up…
Please wait.» is displayed.
2The Power Lamp is lit when the printer finishes starting up, and the printer is now in Standby.
The printer will not go into Standby in the following situations. Take the appropriate action.
•The Top Cover is open Close the Top Cover.
•The Ink Tank Cover is open Close the Ink Tank Cover.
•The Printhead is not installed
see «Replacing the Printhead.» P.504
•An Ink Tank is not installed
see «Replacing Ink Tanks.» P.496
•If «ERROR» is shown on the Display Screen see «Error messages.» P.554
procedure Printing Workflow Printing Basic
15
User’s Guide
procedure Printing Workflow Printing Basic
Loading and Printing on Rolls |
iPF770 |
•The Power Lamp and Message Lamp are not lit (even once), and nothing appears on the Display Screen
Make sure the printer is plugged in correctly. Check the connection at the plug and electrical outlet.
•No paper is loaded
Load paper. (See «Loading and Printing on Rolls.») P.16 (See «Loading and Printing on Sheets.») P.18
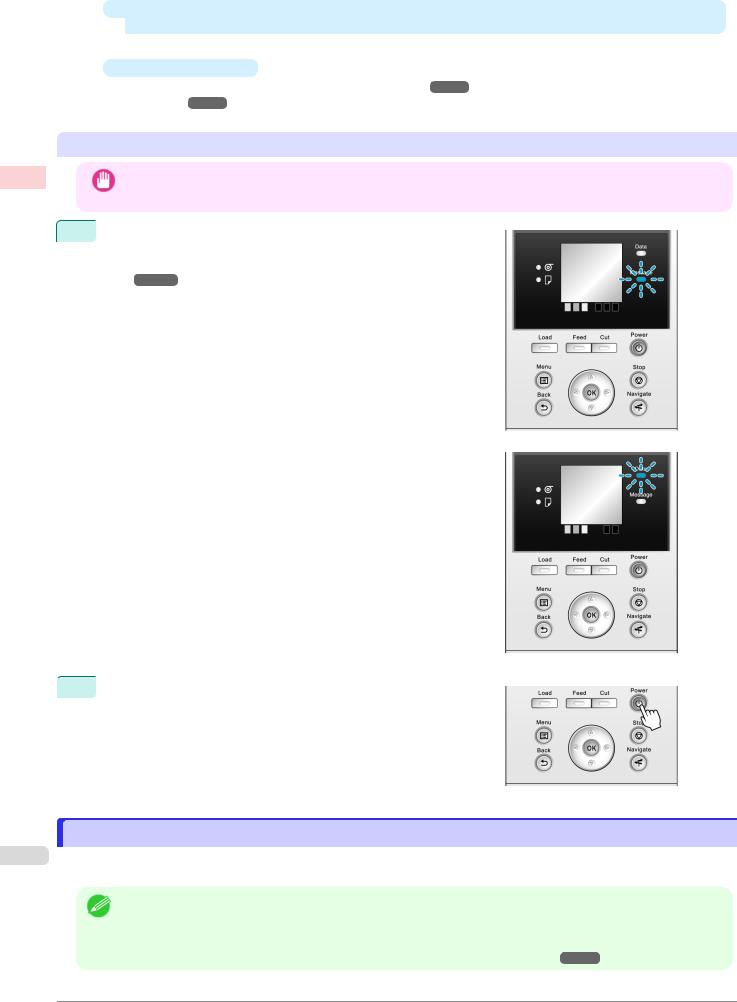
Turning the printer off
• Never disconnect the printer’s power supply or unplug it during a print job. This may damage the printer.
Important
1Make sure no print jobs are in progress.
If the Message Lamp is flashing, check the message on the Display Screen and take action as necessary. (See «Error Messages.») P.554
If the Data Lamp is flashing, the printer is receiving a print job.
Turn off the printer only after printing is finished.
 2 Hold down the Power button for more than a second.
After «Shut Down.. Please Wait..» is shown on the Display
Screen, the printer shuts off.
Loading and Printing on Rolls
16These are the basic steps for loading and printing on rolls. Follow these steps to load and print on rolls.
• For details on supported sizes and types of rolls, see Paper Sizes or the Paper Reference Guide. (See «Paper
|
Sizes.») |
(See «Types of Paper.») |
|||
|
Note |
P.310 |
P.310 |
||
•If you prefer to wait for the ink to dry after printing and simply eject the document, you can deactivate automatic cutting and cut the paper manually. (See «Specifying the Cutting Method for Rolls.») P.333
User’s Guide
iPF770
 1 Turn the printer on. (See «Turning the Printer On and Off.») P.15
2Load the roll on the Roll Holder. (See «Attaching the Roll Holder to Rolls.») P.320
3Load the roll in the printer. (See «Loading Rolls in the Printer.») P.322
Loading and Printing on Rolls
procedure Printing Workflow Printing Basic
17
User’s Guide
Loading and Printing on Sheets |
iPF770 |
procedure Printing Workflow Printing Basic
4Select the type of paper. (See «Changing the Type of Paper.») P.325
 5
5
 6
6
18
• If no barcode has been printed on the roll and you have set ManageRemainRoll to On, specify the roll
|
length after the type of paper. (See «Specifying the Paper Length.») |
||
|
Note |
P.326 |
|
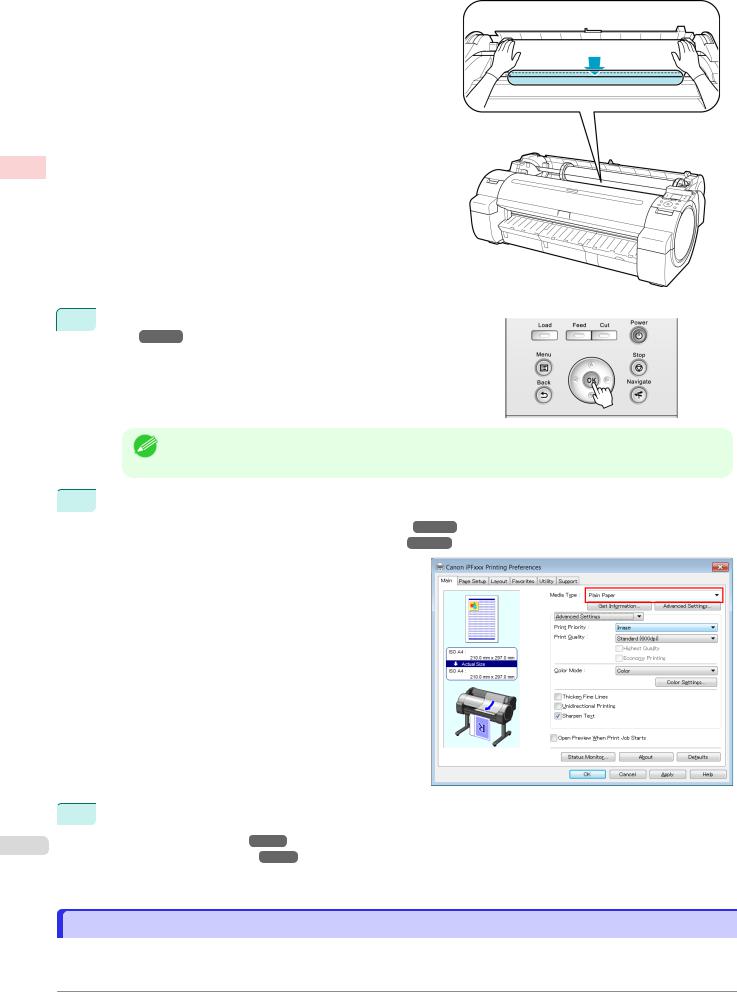
Complete settings in the printer driver for the type of paper and other details.
•Specifying Paper in the Printer Driver (Windows) P.142
•Specifying Paper in the Printer Driver (Mac OS) P.249
Send the print job.
•Printing in Windows P.20
•Printing from Mac OS P.21
The printer now starts printing the print job.
Loading and Printing on Sheets
These are the basic steps for loading sheets and then printing. Follow the steps below to load and print on sheets.
User’s Guide

iPF770 Loading and Printing on Sheets
• For details on supported types and sizes of paper, see Paper Sizes or the Paper Reference Guide. (See «Paper
|
Sizes.») |
(See «Types of Paper.») |
|||
|
Note |
P.310 |
P.310 |
||
 1 Turn the printer on. (See «Turning the Printer On and Off.») P.15
 2 Complete settings in the printer driver for the type of paper and other details.
•Specifying Paper in the Printer Driver (Windows) P.142
•Specifying Paper in the Printer Driver (Mac OS) P.249
 3 Send the print job.
•Printing in Windows P.20
•Printing from Mac OS P.21
procedure Printing Workflow Printing Basic
19
User’s Guide
procedure Printing Workflow Printing Basic
Printing in Windows |
iPF770 |
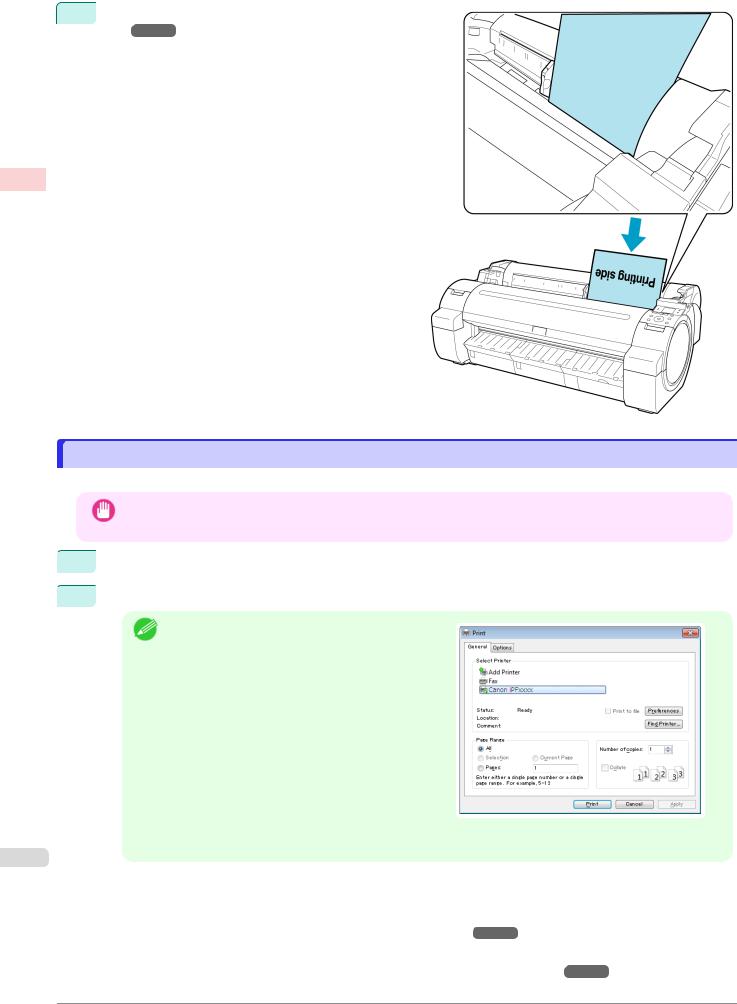
4Load the sheet. (See «Loading Sheets in the Printer.») P.340
The printer now starts printing the print job.
Printing in Windows
Print from the application menu.
• We recommend exiting unnecessary applications before printing. Running several applications while printing may
|
Important |
interrupt the transfer of print data and affect printing quality. |
 1 In the source application, select Print from the File menu to display the dialog box for printing conditions.
 2 After confirming that the printer is selected in the dialog box, click Print or OK to start printing.
• The appearance of the dialog box varies depending
|
Note |
on the software application. In most cases, the dia- |
|
|
log box includes basic printing options and enables |
||
|
you to choose the printer, specify the range of pa- |
||
|
ges, number of copies, and so on. |
||
|
Example: Print dialog box displayed by the applica- |
||
|
tion |
|
• If another printer is selected, select the printer you want to use under Select Printer or in the dialog box |
|
|
20 |
displayed after clicking Printer. |
Settings for many printing methods (including enlarged or reduced printing, borderless printing, and so on) are displayed in the printer driver dialog box. There are two ways to access the printer driver dialog box, as follows.
• From the application
(See «Accessing the Printer Driver Dialog Box from Applications .») P.146
• From the operating system menu
(See «Accessing the Printer Driver Dialog Box from the Operating System Menu .») P.147
User’s Guide
![]()
P.449
|
iPF770 |
Printing from Mac OS |
Printing from Mac OS
Print from the application menu after registering the printer.
• We recommend exiting unnecessary applications before printing. Running several applications while printing may
|
Important |
interrupt the transfer of print data and affect printing quality. |
Registering the printer
The printer needs to be registered in Print & Scan (identified as Printers & Scanners or Print & Fax in other versions of Mac OS X) in System Preferences before printing.
For instructions on registering the printer, see «Configuring the Printer Driver Destination .»
• During this setup process, the printer will not be listed among available printers if it is off or disconnected.
Important
Printing from the application software
1In the application software, select Print from the File menu to display the dialog box for printing conditions.
|
• This dialog box includes basic printing options and enables you to choose the printer, specify the range of |
|||
|
Note |
pages, number of copies, and so on. |
||
|
2 |
Select the printer in the Printer list. |
3Click Print to start printing.
As shown in the following illustration, you can switch to other panes in this dialog box to complete settings for various methods of printing, including enlarged and reduced printing, borderless printing, and so on.
procedure Printing Workflow Printing Basic
21
User’s Guide
jobs print Canceling Workflow Printing Basic
Canceling Print Jobs from the Control Panel |
iPF770 |
Canceling print jobs |
|
|
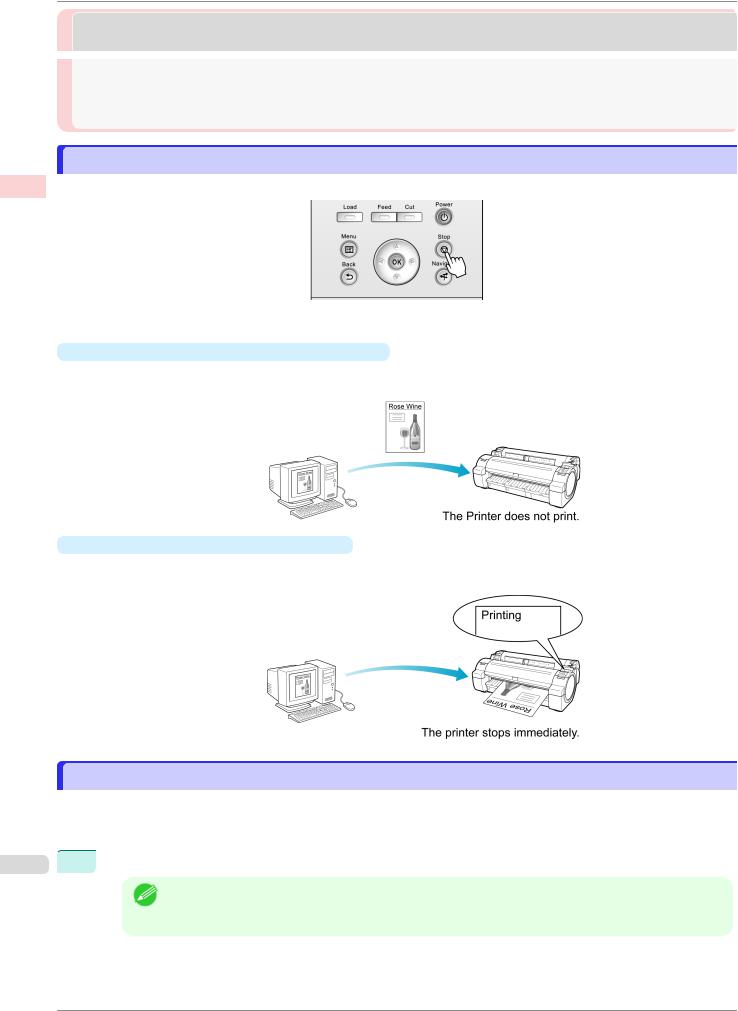
Canceling Print Jobs from the Control Panel |
………………………………………………………………………………………. 22 |
|
Canceling Print Jobs from Windows ………………………………………………………………………………………………….. |
22 |
|
Canceling Print Jobs from Mac OS ……………………………………………………………………………………………………. |
23 |
Canceling Print Jobs from the Control Panel
To cancel printing or reception of print jobs, press the Stop button on the Control Panel.
When you press the Stop button during printing, printer operation varies depending on the current status.
•If you press the Stop button before printing starts
Pressing the Stop button before printing starts will display a confirmation message. To cancel the print job, select Yes.
•If you press the Stop button during printing
Pressing the Stop button during printing will display a confirmation message. To cancel the print job immediately, select Yes.
Canceling Print Jobs from Windows
In the printer window, you can cancel jobs that are being sent to the printer.
Using imagePROGRAF Status Monitor, you can cancel print jobs that have already been received by the printer or that are currently being printed.
22  1 Click the printer icon in the taskbar to display the printer window.
• You can proceed from the folder for configuring the printer settings in the OS you are using.
|
Note |
For example, in Windows 7, open the Devices and Printers window from the start menu and double- |
|
|
click the printer icon. |
||
User’s Guide
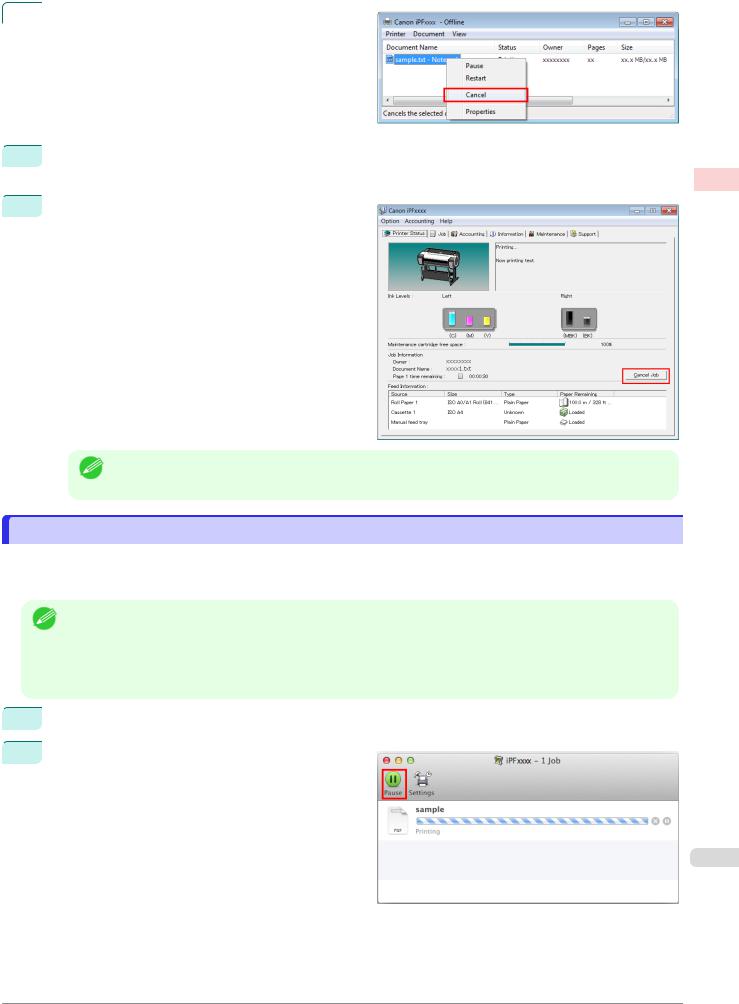
|
iPF770 |
Canceling Print Jobs from Mac OS |
|
2 |
Right-click the job to cancel and select Cancel. |
 3 If the job to cancel is not shown in the printer window (that is, if the print data has already been received by the printer), double-click the taskbar icon to display imagePROGRAF Status Monitor.
 4 On the Printer Status sheet, click Cancel Job.
• The screen may differ slightly depending on the model you are using.
Note
Canceling Print Jobs from Mac OS
In the printer window, you can cancel jobs that are being sent to the printer.
Otherwise, you can cancel jobs from imagePROGRAF Printmonitor if they have been received by the printer or are currently being printed.
• Print jobs are shown in the printer window while they are being sent from the computer. After transmission, jobs are
|
Note |
not displayed even during printing. |
•Print jobs are displayed in the imagePROGRAF Printmonitor window from the moment the printer starts receiving the print data until the moment printing is finished. They are not displayed before print data is sent to the printer, even if the computer has started preparing the print data.
 1 Click the printer icon in the Dock to display the printer window.
 2 Click Pause or Pause Printer to pause printing.
jobs print Canceling Workflow Printing Basic
23
User’s Guide
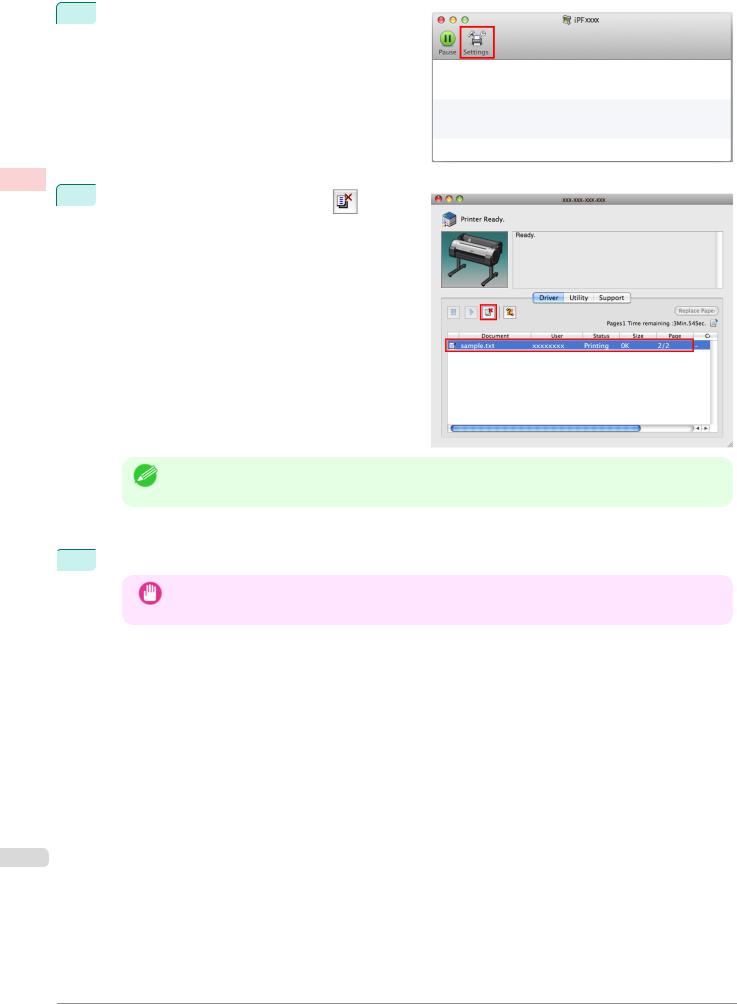
Workflow Printing Basic
|
Canceling Print Jobs from Mac OS |
iPF770 |
3If there are no jobs to stop in the printer window (if sending the print data to the printer has finished), either click Settings, Utility, and then Open Printer Utility, or click Utility to open the imagePROGRAF Printmonitor.
jobs print Canceling
|
4 |
Select the print job to cancel and click |
to delete |
the print job.
• The screen may differ slightly depending on the model you are using.
Note
The job sent to the printer is canceled.
 5 Exit imagePROGRAF Printmonitor. In the printer window, click Resume Printer.
• Always follow these steps if you cancel print jobs from imagePROGRAF Printmonitor. If you do not re-
|
Important |
start job processing, the next job cannot be printed. |
24
User’s Guide
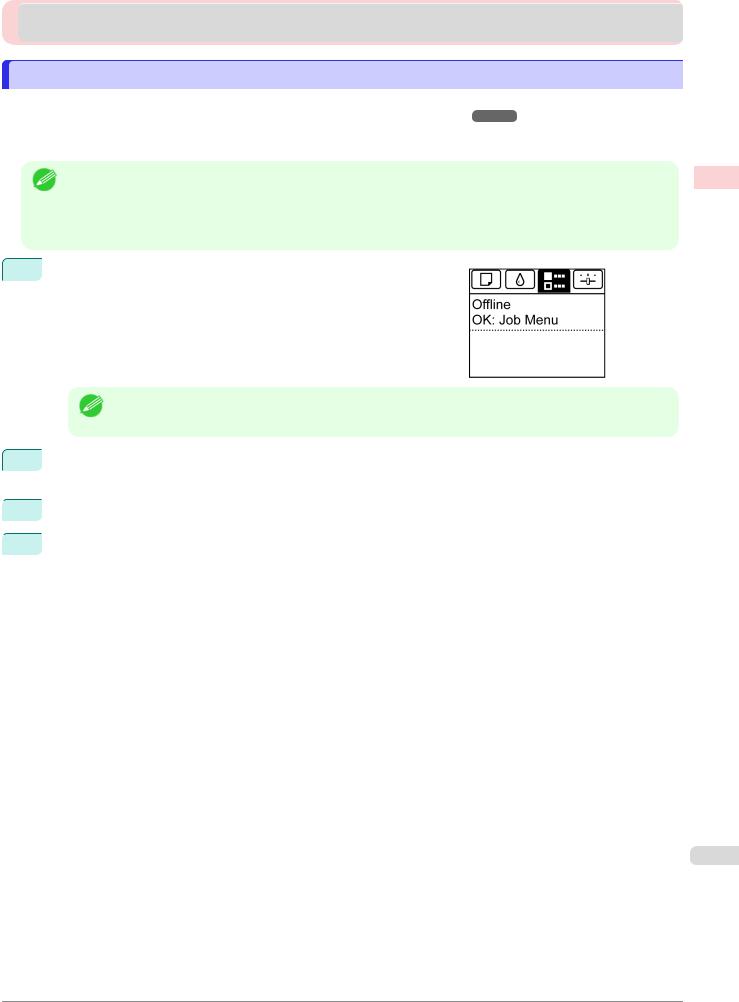
 Pausing Printing
 Pausing Printing
Pausing Printing
During printing, if you set Pause Print in the Control Panel menu to On, printing is stopped at that point and the printer enters a state in which printing is paused. (See «Control Panel Display.») P.400
Printing from the job queue is not possible in this state.
To restore normal operation after this state, set Pause Print to Off.
• In the following cases, the status is cleared even if you do not set Pause Print to Off, and printing from the job
•When paper is advanced
•When you execute Chg. Paper Type in the Paper Menu
1 During printing, on the Tab Selection screen of the Control Panel, press or to select the Job tab (  ).
).
• If the Tab Selection screen is not displayed, press the Menu button.
Note
2Press the OK button.
The Job Menu is displayed.
 3 Press ▲ or ▼ to select Pause Print, and then press the OK button.
 4 Press ▲ or ▼ to select On or Off, and then press the OK button.
Printing Pausing Workflow Printing Basic
25
User’s Guide

User’s Guide
iPF770
User’s Guide
|
Basic Printing Workflow |
13 |
Enhanced Printing Options |
|
|
Choosing Paper for Printing ………………………………………………………. |
28 |
|
Printing Photos and Office Documents ……………………………………….. |
29 |
|
Printing CAD Drawings ……………………………………………………………… |
38 |
|
Adjusting Images ……………………………………………………………………… |
46 |
|
Printing enlargements or reductions ……………………………………………. |
58 |
|
Printing at full size ……………………………………………………………………. |
68 |
|
Borderless Printing …………………………………………………………………… |
77 |
|
Printing banners or at other non-standard sizes …………………………… |
86 |
|
Tiling and multiple pages per sheet …………………………………………….. |
99 |
|
Centering originals ………………………………………………………………….. |
113 |
|
Conserving roll paper ……………………………………………………………… |
121 |
|
Checking Images Before Printing ……………………………………………… |
128 |
|
Other useful settings ……………………………………………………………….. |
129 |
Options Printing Enhanced
|
Windows Software |
139 |
|
|
Mac OS Software |
247 |
|
|
Handling and Use of Paper |
309 |
|
|
Control Panel |
397 |
|
|
Printer Parts |
431 |
|
|
Network Setting |
441 |
|
|
Print Job Management |
461 |
|
|
Adjustments for Better Print Quality |
479 |
|
|
Maintenance and Consumables |
495 |
|
|
Troubleshooting |
525 |
|
|
Error Message |
553 |
|
|
Specifications |
573 |
|
|
Appendix |
577 |
27 |
imagePROGRAF
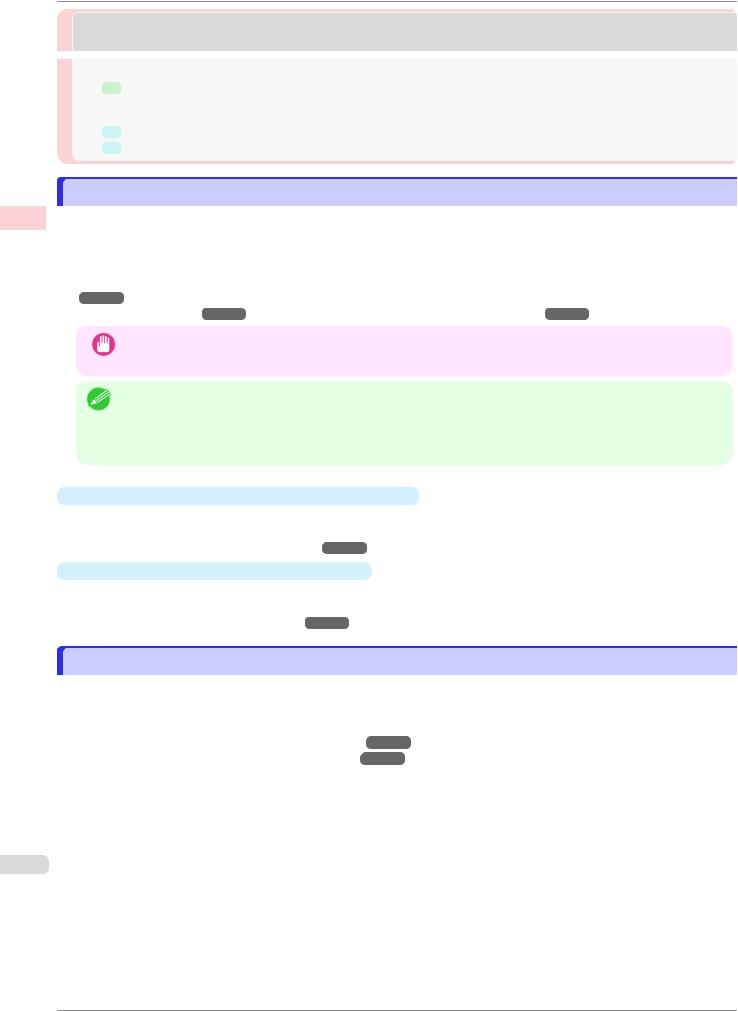
Printing for Paper Choosing Options Printing Enhanced
Choosing a Paper for Printing |
iPF770 |
|
Choosing Paper for Printing |
||
|
Choosing a Paper for Printing …………………………………………………………………………………………………………… |
28 |
|
|
Changing the Type of Paper …………………………………………………………………………………………………. |
325 |
|
|
Specifying Paper in the Printer Driver …………………………………………………………………………………………………. |
28 |
|
|
Specifying Paper in the Printer Driver (Windows) ……………………………………………………………………… |
142 |
|
|
Specifying Paper in the Printer Driver (Mac OS) ……………………………………………………………………….. |
249 |
|
|
Choosing a Paper for Printing |
||
|
Select the appropriate media type from the printer control panel or printer driver to match the paper loaded in the |
||
|
printer. The appropriate media type differs between the case of genuine Canon paper or Canon feed confirmed pa- |
||
|
per and the case of paper other than Canon feed confirmed paper. Select the media type by following the descrip- |
||
|
tion below. |
||
|
For information on how to select the media type in the printer control panel, see Changing the Type of Pa- |
||
|
per P.325 , and for information on how to select the media type in the printer driver, see Specifying Paper in the |
||
|
Printer Driver (Windows) P.142 or Specifying Paper in the Printer Driver (Mac OS) |
P.249 . |
|
|
• If you use paper other than Canon feed confirmed paper, Canon provides absolutely no guarantees regarding |
||
|
print quality or paper feed properties. |
||
|
Important |
||
|
• Genuine Canon paper and Canon feed confirmed paper are detailed in Paper Reference Guide. |
Note • An error message is displayed on the printer Control Panel if the media type specified in the printer driver does not match the media type specified in the printer. Although you can print under these conditions, the printing results may not be suitable.
•Genuine Canon paper or Canon feed confirmed paper
For genuine Canon paper or Canon feed confirmed paper, select the settings that are optimized for that type of paper. For more information on the settings for genuine Canon paper or Canon feed confirmed paper, see «Displaying the Paper Reference Guide.» P.313
•Paper other than Canon feed confirmed paper
For paper other than Canon feed confirmed paper, printing can be performed easily by selecting the existing settings provided by the printer control panel or printer driver. For details, see «Using Paper Other Than Genuine Paper and feed confirmed Paper.» P.312
Specifying Paper in the Printer Driver
If you replace the paper, complete the printer driver settings for the paper type and size.
For instructions on configuring paper settings in the printer driver, refer to the following topics, as appropriate for your computer and operating system.
•Specifying Paper in the Printer Driver (Windows) P.142
•Specifying Paper in the Printer Driver (Mac OS) P.249
28
User’s Guide

|
iPF770 |
Printing Photos and Images |
Printing Photos and Office Documents |
|
|
Printing Photos and Images …………………………………………………………………………………………………………….. |
29 |
|
Printing Photos and Images (Windows) …………………………………………………………………………………………. |
29 |
|
Printing Photos and Images (Mac OS) …………………………………………………………………………………………… |
31 |
|
Printing Office Documents ……………………………………………………………………………………………………………….. |
33 |
|
Printing Office Documents (Windows) ……………………………………………………………………………………………. |
33 |
|
Printing Office Documents (Mac OS) …………………………………………………………………………………………….. |
34 |
|
Using PosterArtist to Compose Originals ……………………………………………………………………………………………. |
36 |
Printing Photos and Images
By selecting the following Print Target from Easy Settings of the printer driver, you can easily configure the printing of illustrations and photos.
|
Print Target |
Description |
|
|
Photo (Color) |
Print photographic images from digital cameras with an optimal |
|
|
setting. |
||
|
Poster |
An optimal setting for posters. Print in vivid colors with impact |
|
|
and high saturation. |
||
|
Faithful Color Reproduction |
Print with minimum color difference. Suitable for printing scan- |
|
|
ner images and when print results are too vivid. |
||
• Depending on the Media Type setting, some Print Target options may not be available.
Important
• You can check the settings values for each print target by clicking View Settings.
Note • You can also fine-tune these values as needed. (Advanced Settings)
For details on Advanced Settings, see «Giving Priority to Particular Graphic Elements and Colors for Printing.» P.52
For instructions on printing photos and images, refer to the following topics, as appropriate for your computer and operating system.
•Printing Photos and Images (Windows) P.29
•Printing Photos and Images (Mac OS) P.31
Documents Office and Photos Printing Options Printing Enhanced
Printing Photos and Images (Windows)
|
This topic describes how to print photos based on the following example. |
||
|
• |
Document: Photo image from a digital camera |
|
|
• |
Page size: 10×12 inches (254.0×304.8 mm) |
|
|
29 |
||
|
• |
Paper: Roll |
|
|
• |
Paper type: Canon Premium Glossy Paper 2 280 |
|
|
• |
Roll paper width: 10 inches (254.0 mm) |
 1 Choose Print in the application menu.
2Select the printer in the dialog box, and then display the printer driver dialog box. (See «Accessing the Printer Driver Dialog Box from Applications .») P.146
User’s Guide
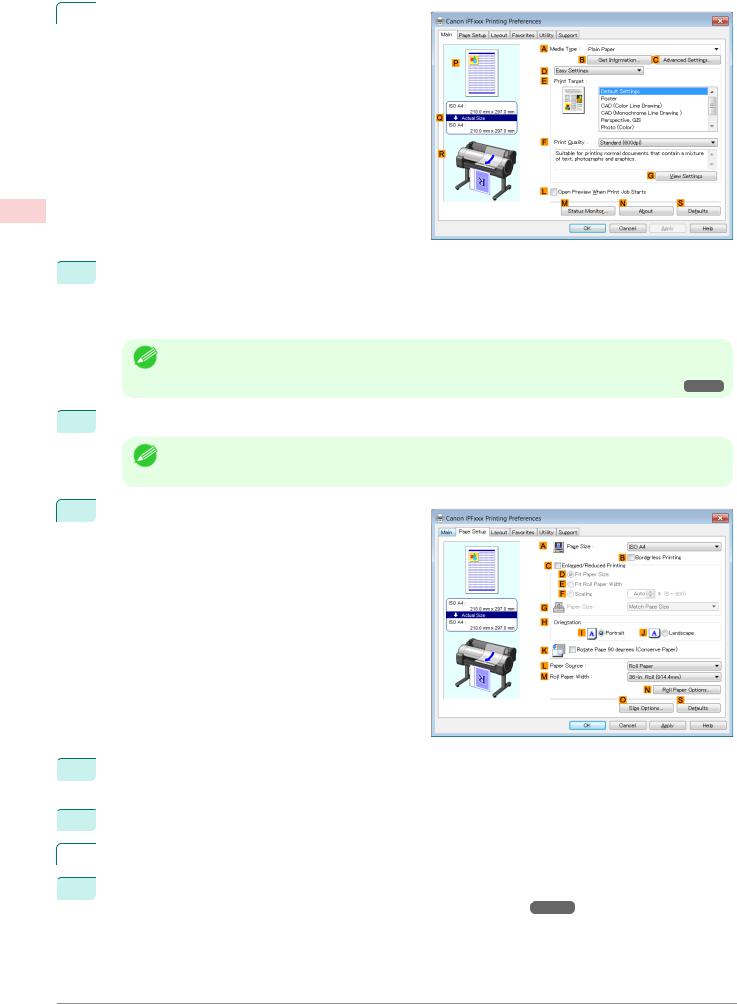
P.351
|
Printing Photos and Images (Windows) |
iPF770 |
|
|
Make sure the Main sheet is displayed. |
||
|
3 |
Options Printing Enhanced
Documents Office and Photos Printing
 4 In the A Media Type list, select the type of paper that is loaded. In this case, click Canon Premium Glossy Paper 2 280.
In the A Media Type, choose the type of paper used for printing, such as Glossy Paper, Canon Coated Paper, and so on. Make sure the paper you select is loaded in the printer.
• The paper type setting in the printer driver and related software (as well as on the Control Panel ) is upda-
Note ted when you install the Media Configuration Tool from the User Software CD-ROM or if you change paper information by using the Media Configuration Tool. For details, see «Media Configuration Tool.»
 5 After confirming that D Easy Settings is selected, click Photo (Color) in the E Print Target list.
• You can check the settings values selected in the E Print Target list by clicking G View Settings.
Note
6Click the Page Setup tab to display the Page Setup sheet.
 7 In the A Page Size list, click the size of the original as specified in the application. In this case, click
10″x12″.
 8 Select and click a roll paper in the L Paper Source list.
|
Select the width of the loaded roll in the M Roll Paper Width list—in this case, 10-in. Roll (254.0mm). |
|||
|
9 |
|||
|
30 |
|||
 10 Specify additional printing conditions.
For details on available printing conditions, see «Printer Driver Settings .» P.140
User’s Guide
![]()
|
iPF770 |
Printing Photos and Images (Mac OS) |
 11 Confirm the print settings and print as desired.
• For instructions on confirming print settings, see «Confirming Print Settings .» P.143
Note
Printing Photos and Images (Mac OS)
This topic describes how to print photos based on the following example.
•Document: Photo image from a digital camera
•Page size: 10×12 inches (254.0×304.8 mm)
•Paper: Roll paper
•Paper type: Canon Premium Glossy Paper 2 280
•Roll paper width: 10 inches (254.0 mm)
1Choose Page Setup from the application menu to display the Page Attributes dialog box.
|
• Page Setup might not be displayed in the menu de- |
|||||
|
Note |
pending on the OS you are using and the applica- |
||||
|
tion software. |
|||||
|
In this case, select Print from the menu in the appli- |
|||||
|
cation software, and configure the settings in the up- |
|||||
|
per part of the printer driver screen that is displayed. |
|||||
|
Select the printer in the B Format for list. |
|||||
|
2 |
|||||
|
In the C Paper Size list, click the size of the original. In this case, click 10″x12″. |
|||||
|
3 |
|||||
|
Click F OK to close the dialog box. |
|||||
|
4 |
|||||
|
5 |
Choose Print in the application menu. |
Documents Office and Photos Printing Options Printing Enhanced
31
User’s Guide

Documents Office and Photos Printing Options Printing Enhanced
32
|
Printing Photos and Images (Mac OS) |
iPF770 |
|
|
Access the Main pane. |
||
|
6 |
|
In the A Media Type list, select the type of paper that is loaded. In this case, click Canon Premium Glos- |
||||||
|
7 |
||||||
|
sy Paper 2 280. |
||||||
|
Make sure the paper you select is loaded in the printer. |
||||||
|
• The types of paper indicated in the printer driver and related software (as well as on the Control Panel) |
||||||
|
Note |
are updated when you install the Media Configuration Tool from the User Software CD-ROM or if you |
|||||
|
change paper information by using the Media Configuration Tool. For details, see «Media Configuration |
||||||
|
Tool.» |
P.373 |
|||||
|
After confirming that D Easy Settings is selected, click Photo (Color) in the E Print Target list. |
||||||
|
8 |
||||||
|
• For information on settings optimized for printing photos and images, see «Printing Photos and Im- |
||||||
|
Note |
ages.» |
P.29 |
||||
|
• You can check the settings values selected in the E Print Target list by clicking G View set.. |
||||||
|
Make your selection in the F Print Quality list. |
||||||
|
9 |
||||||
|
10 |
Access the Page Setup pane. |
 11 Select and click a roll paper in the A Paper Source list.
User’s Guide

|
iPF770 |
Printing Office Documents |
 12 Select the paper width of the roll loaded in the printer for B Roll Width. In this case, 10 in. (254.0mm) is selected.
 13 Specify additional printing conditions.
For details on available printing conditions, see «Printer Driver Settings .» P.248
 14 Confirm the print settings, and then click M Print to start printing.
• For tips on confirming print settings, see «Confirming Print Settings .» P.250
Note
Printing Office Documents
By selecting Office Document from Easy Settings of the printer driver, you can easily configure settings for printing office documents.
|
Print Target |
Description |
|
|
Office Document |
Setting optimized for printing general office documents such as |
|
|
materials for distribution so that they can be viewed easily. |
||
• You can check the settings values for each print target by clicking View Settings.
Note • You can also fine-tune these values as needed. (Advanced Settings)
For details on Advanced Settings, see «Giving Priority to Particular Graphic Elements and Colors for Printing.» P.52
Documents Office and Photos Printing Options Printing Enhanced
Printing Office Documents (Windows)
This topic describes how to print office documents based on the following example.
•Document: Office document created using word-processing or spreadsheet programs
•Page size: A4 (210.0 × 297.0 mm [8.3 × 11.7 in])
•Paper: Sheets
•Paper type: Plain Paper
•Paper size: A4 (210.0 × 297.0 mm [8.3 × 11.7 in])
Choose Print in the application menu.
Select the printer in the dialog box, and then display the printer driver dialog box. (See «Accessing the Printer Driver Dialog Box from Applications .») P.146
Make sure the Main sheet is displayed.
33
 4 In the A Media Type list, select the type of paper that is loaded. In this case, click Plain Paper.
User’s Guide

Documents Office and Photos Printing Options Printing Enhanced
34
Printing Office Documents (Mac OS) |
iPF770 |
 5 After confirming that D Easy Settings is selected, click Office Document in the E Print Target list.
• You can check the settings values selected in the E Print Target list by clicking G View Settings.
Note
6Click the Page Setup tab to display the Page Setup sheet.
|
In the A Page Size list, click the size of the original as specified in the application. In this case, click ISO |
|||||
|
7 |
|||||
|
A4. |
|||||
|
Click Manual in the L Paper Source list. |
|||||
|
8 |
|||||
|
9 |
Specify additional printing conditions. |
||||
|
For details on available printing conditions, see «Printer Driver Settings .» |
|||||
|
P.140 |
|||||
|
10 |
Confirm the print settings and print as desired. |
||||
|
• For tips on confirming print settings, see «Confirming Print Settings .» |
|||||
|
P.143 |
|||||
|
Note |
|||||
Printing Office Documents (Mac OS)
This topic describes how to print office documents based on the following example.
•Document: Office document created using word-processing or spreadsheet programs
•Page size: A4 (210.0 × 297.0 mm [8.3 × 11.7 in])
•Paper: Sheets
•Paper type: Plain Paper
•Paper size: A4 (210.0 × 297.0 mm [8.3 × 11.7 in])
1Choose Page Setup from the application menu to display the Page Attributes dialog box.
User’s Guide

iPF770 Printing Office Documents (Mac OS)
|
• Page Setup might not be displayed in the menu de- |
|||||
|
Note |
pending on the OS you are using and the applica- |
||||
|
tion software. |
|||||
|
In this case, select Print from the menu in the appli- |
|||||
|
cation software, and configure the settings in the up- |
|||||
|
per part of the printer driver screen that is displayed. |
|||||
|
Select the printer in the B Format for list. |
|||||
|
2 |
|||||
|
In the C Paper Size list, click the size of the original. In this case, click ISO A4 — for Paper Tray (Large |
|||||
|
3 |
|||||
|
Margins). |
|||||
|
Click F OK to close the dialog box. |
|||||
|
4 |
|||||
|
5 |
Choose Print in the application menu. |
||||
|
6 |
Access the Main pane. |
 7 In the A Media Type list, select the type of paper that is loaded. In this case, click Plain Paper.
 8 After confirming that D Easy Settings is selected, click Office Document in the E Print Target list.
• You can check the settings values selected in the E Print Target list by clicking G View set..
Note
 9 Make your selection in the F Print Quality list.
Documents Office and Photos Printing Options Printing Enhanced
35
User’s Guide

Documents Office and Photos Printing Options Printing Enhanced
36
Using PosterArtist to Compose Originals |
iPF770 |
|
|
Access the Page Setup pane. |
||
|
10 |
 11 Click Manual in the A Paper Source list.
 12 Specify additional printing conditions.
For details on available printing conditions, see «Printer Driver Settings .» P.248
 13 Confirm the print settings, and then click M Print to start printing.
• For tips on confirming print settings, see «Confirming Print Settings .» P.250
Note
Using PosterArtist to Compose Originals
You can print a variety of source documents from word-processing or spreadsheet programs or screen shots from web browsers after composing an original with them using PosterArtist.
This topic describes how to use PosterArtist to compose originals from multiple applications, creating a poster layout for printing.
|
1 |
Choose Print in the application menu. |
||
|
2 |
Select the printer in the dialog box, and then open the printer driver dialog box. (See «Accessing the Printer |
||
|
Driver Dialog Box from Applications (Windows).») |
P.146 |
||
|
3 |
Make sure the Main sheet is displayed. |
User’s Guide

|
iPF770 |
Using PosterArtist to Compose Originals |
|
4 |
Click the Layout tab to display the Layout sheet. |
|
Select the A Page Layout check box. |
||
|
5 |
||
|
Click in the Edit Using PosterArtist in the A Page Layout list. |
||
|
6 |
||
|
• This function cannot be used with a 64-bit version OS. |
||
|
Note |
||
7When you attempt to print, PosterArtist starts up and the PageCapture window is displayed. (At this point, the document will not be printed yet.)
 8 Choose the page to load in PosterArtist.
 9 Edit and rearrange the image in the PosterArtist window as desired.
Without closing the PosterArtist window, repeat steps 1-8 to arrange originals from multiple applications on the same page.
• For details on how to edit and sort images, refer to the PosterArtist Manual.
Note
 10 Print from the PosterArtist menu.
Documents Office and Photos Printing Options Printing Enhanced
37
User’s Guide

Drawings CAD Printing Options Printing Enhanced
Printing CAD Drawings |
iPF770 |
Printing CAD Drawings |
|
|
Printing CAD Drawings ……………………………………………………………………………………………………………………. |
38 |
|
Printing Line Drawings and Text ………………………………………………………………………………………………………… |
38 |
|
Printing Line Drawings and Text (Windows) ……………………………………………………………………………………. |
39 |
|
Printing Line Drawings and Text (Mac OS) ……………………………………………………………………………………… |
40 |
|
Printing from AutoCAD ……………………………………………………………………………………………………………………. |
42 |
|
Specifying Colors and Printing CAD Drawings …………………………………………………………………………………….. |
43 |
|
Specifying Colors and Printing CAD Drawings (Windows) …………………………………………………………………. |
44 |
|
HP-GL/2 Printing ……………………………………………………………………………………………………………………………. |
45 |
Printing CAD Drawings
Using this printer, you can print fine lines and text clearly and sharply. It’s easy to produce highly precise drawings from CAD applications.
For instructions on CAD printing, refer to the following topics, as appropriate for your computer and operating system.
•Printing Line Drawings and Text (Windows) P.39
•Printing Line Drawings and Text (Mac OS) P.40
Printing Line Drawings and Text
Printing is easy when you simply choose the type of original to print.
•Easy Settings
Simply choose the printing application in the list for optimal printing results.
•Print Target
Choose presets that match the type of document to be printed.
Print targets for line drawings and text
|
Print Target |
Description |
|
|
CAD (Color Line Drawing) |
Settings optimized to print intricate lines in CAD drawings clear- |
|
|
ly. |
||
|
CAD (Monochrome Line |
Settings optimized to print black lines in CAD drawings clearly. |
|
|
Drawing ) |
||
|
Perspective, GIS |
Settings optimized for printing 3D CAD drawings, perspective |
|
|
drawings, and maps, including GIS maps. |
||
• You can check the settings values for each print target by clicking View Settings.
38 Note • You can also fine-tune these values as needed. ( Advanced Settings )
For details on Advanced Settings, see «Giving Priority to Particular Graphic Elements and Colors for Printing.» P.52
•Print Quality
Choose the print quality.
User’s Guide

iPF770 Printing Line Drawings and Text (Windows)
The printing mode is determined by a combination of the print quality and resolution.
|
Print Quality |
Description |
|
Highest |
A setting for printing at the highest resolution when quality is most important. Printing |
|
takes longer and consumes more ink than in other modes, but this mode offers superior |
|
|
printing quality. |
|
|
High |
Choose this setting to print at high resolution when quality is most important. |
|
Printing takes longer and consumes more ink than in Standard or Fast modes, but this |
|
|
mode offers exceptional printing quality. |
|
|
Standard |
Choose this setting to print at standard resolution when quality and speed are both impor- |
|
tant. |
|
|
Printing takes less time than in Highest or High mode. |
|
|
Fast |
Choose this setting to print faster. |
|
Printing in draft mode can help you work more efficiently when checking layouts. |
|
For instructions on printing line drawings and text, refer to the following topics, as appropriate for your computer and operating system.
•Printing Line Drawings and Text (Windows) P.39
•Printing Line Drawings and Text (Mac OS) P.40
Printing Line Drawings and Text (Windows)
This topic describes how to print line drawings based on the following example.
•Document: CAD drawing
•Page size: A3 (297.0 × 420.0 mm [11.7 × 16.5 in])
•Paper: Roll paper
•Paper type: Plain Paper
•Roll paper width: A2/A3 roll (420.0 mm [16.5 in])
 1 Choose Print in the application menu.
2Select the printer in the dialog box, and then display the printer driver dialog box. (See «Accessing the Printer Driver Dialog Box from Applications .») P.146
 3 Make sure the Main sheet is displayed.
4In the A Media Type list, select the type of paper that is loaded. In this case, click Plain Paper.
 5 After confirming that D Easy Settings is selected, click CAD (Color Line Drawing) or CAD (Monochrome Line Drawing ) in the E Print Target list.
• You can check the settings values selected in the E Print Target list by clicking G View Settings.
Note
Drawings CAD Printing Options Printing Enhanced
39
User’s Guide

Printing Line Drawings and Text (Mac OS) |
iPF770 |
6Click the Page Setup tab to display the Page Setup sheet.
Options Printing Enhanced
Drawings CAD Printing
 7 In A Page Size, click the size of the original as specified in the application. In this case, click ISO A3.
 8 Select and click a roll paper in the L Paper Source list.
 9 Select the width of the loaded roll in the M Roll Paper Width list—in this case, ISO A2/A3 Roll (420.0mm).
 10 Specify additional printing conditions.
For details on available printing conditions, see «Printer Driver Settings .» P.140
 11 Confirm the print settings and print as desired.
• For tips on confirming print settings, see «Confirming Print Settings .» P.143
Note
Printing Line Drawings and Text (Mac OS)
This topic describes how to print line drawings based on the following example.
•Document: CAD drawing
•Page size: A3 (297.0 × 420.0 mm [11.7 × 16.5 in])
•Paper: Roll
•Paper type: Plain Paper
•Roll paper width: A2/A3 roll (420.0 mm [16.5 in])
1Choose Page Setup from the application menu to display the Page Attributes dialog box.
40
User’s Guide
![]()
iPF770 Printing Line Drawings and Text (Mac OS)
|
• Page Setup might not be displayed in the menu de- |
|||||
|
Note |
pending on the OS you are using and the applica- |
||||
|
tion software. |
|||||
|
In this case, select Print from the menu in the appli- |
|||||
|
cation software, and configure the settings in the up- |
|||||
|
per part of the printer driver screen that is displayed. |
|||||
|
Select the printer in the B Format for list. |
|||||
|
2 |
|||||
|
In the C Paper Size list, click the size of the original. In this case, click ISO A3. |
|||||
|
3 |
|||||
|
Click F OK to close the dialog box. |
|||||
|
4 |
|||||
|
5 |
Choose Print in the application menu. |
||||
|
6 |
Access the Main pane. |
 7 In the A Media Type list, select the type of paper that is loaded. In this case, click Plain Paper.
 8 After confirming that D Easy Settings is selected, click CAD (Color Line Drawing) or CAD (Monochrome Line Drawing ) in the E Print Target list.
• You can check the settings values selected in the E Print Target list by clicking G View set..
Note
 9 Make your selection in the F Print Quality list.
Drawings CAD Printing Options Printing Enhanced
41
User’s Guide

P.122
Drawings CAD Printing Options Printing Enhanced
Printing from AutoCAD |
iPF770 |
|
|
Access the Page Setup pane. |
||
|
10 |
 11 Select and click a roll paper in the A Paper Source list.
 12 Select the paper width of the roll loaded in the printer for B Roll Width. In this case, ISO A2/A3 (420.0mm) is selected.
 13 Specify additional printing conditions.
For details on available printing conditions, see «Printer Driver Settings .» P.248
 14 Confirm the print settings, and then click M Print to start printing.
• For tips on confirming print settings, see «Confirming Print Settings .» P.250
Note • You can conserve roll paper by configuring settings suitable for the document.
For details on how to conserve paper and print, see «Conserving Roll Paper by Rotating Originals 90 Degrees .»
Printing from AutoCAD
Printer Driver Optimization Module for AutoCAD is software for printing optimally from AutoCAD with the printer driver.
By optimally controlling the processing resolution of raster data and the memory to be used in image processing of AutoCAD, printing superior in reliability and productivity is realized.
If you install Printer Driver Optimization Module for AutoCAD on a computer on which supported AutoCAD is installed, it will be installed automatically.
• Printer Driver Optimization Module for AutoCAD is applied automatically when you print from AutoCAD, and opti-
|
Note |
mal printing is performed. |
Confirming the Installation of Printer Driver Optimization Module for AutoCAD
You can confirm whether Printer Driver Optimization Module for AutoCAD is installed by the following method.
 1 From the File menu of AutoCAD, select Print.
42
User’s Guide

|
iPF770 |
Specifying Colors and Printing CAD Drawings |
2The Printing dialog box is displayed.
Printer Driver Optimization Module for AutoCAD is installed if in Plotter of Printer/plotter this is displayed:iPFxxxx — Optimized driver — by Canon Inc..
Installation of Printer Driver Optimization Module for AutoCAD
If Printer Driver Optimization Module for AutoCAD is not installed, install it by the following method.
 1 Insert User Software CD-ROM in the CD-ROM drive and start the installer.
 2 In the Setup Menu window, click Install Individual Software.
 3 Click Install of Printer Driver Optimization Module for AutoCAD.
 4 Follow the instructions on the screen.
Specifying Colors and Printing CAD Drawings
You can complete color settings when Color (CAD) is selected in Color Mode.
Colors can be adjusted before printing as follows when Color Compatibility is selected.
• Color (CAD) is displayed when you select Advanced Settings on the Main sheet and set Print Priority to Line Note Drawing/Text.
Color Compatibility
Color Setting Item
|
Color Setting |
Description |
|
Color (CAD) 1 |
Print in standard colors. |
|
Color (CAD) 2 |
Print with approximate colors emulating Canon iPF750, iPF755, iPF650, iPF655, iPF760, |
|
iPF765. |
|
|
Color (CAD) 3 |
Print with approximate colors emulating Canon iPF500, iPF600, iPF700, iPF510, iPF610, |
|
iPF710, iPF605, iPF720, iPF810, iPF820, iPF815, iPF825. |
|
|
Color (CAD) 4 |
Print emulating the HP Designjet 500/800, in colors resembling colors produced by these |
|
printers. |
|
|
Color (CAD) 5 |
Print emulating the HP Designjet T1100, in colors resembling colors produced by this |
|
printer. |
|
• If you have selected Color (CAD) 2, Color (CAD) 3, Color (CAD) 4, or Color (CAD) 5, it is not possible to match
|
Important |
the colors and image quality produced by the specified printer exactly. |
|
User’s Guide |
Drawings CAD Printing Options Printing Enhanced
43

Drawings CAD Printing Options Printing Enhanced
Specifying Colors and Printing CAD Drawings (Windows) |
iPF770 |
For instructions on configuring Color Compatibility, refer to the following topics.
• Specifying Colors and Printing CAD Drawings (Windows) P.44
Specifying Colors and Printing CAD Drawings (Windows)
You can complete color settings when Color (CAD) is selected in Color Mode.
• Color (CAD) is displayed when you select Advanced Settings on the Main sheet and set Print Priority to Line Note Drawing/Text.
• This section describes the procedure in Windows 7.
 1 Click start >Devices and Printers.
2Right-click the icon of this printer and choose Printer Properties to open the printer properties window.
3Click the Device Settings tab to display the Device Settings sheet.
 4
4
44  5
5
Click A Color Compatibility to display the Color Compatibility dialog box.
Select the desired color settings in the A Color Compatibility list.
• For details on color settings, see «Specifying Colors and Printing CAD Drawings.» P.43
Note
For printing instructions, refer to the following topic.
• Choosing the Document Type and Printing Conditions P.54
User’s Guide

HP-GL/2 Printing
This printer supports printing using the original Canon GARO printer control language and printing using HP-GL/2 and HP RTL emulation to print in colors resembling the colors produced by printers from other companies.
The printer automatically switches to the corresponding processing depending on whether a GARO or HP-GL/2 and HP RTL emulation job is received.
• GARO is an abbreviation of Graphic Arts Language with Raster Operations.
Note • HP-GL/2 is an abbreviation of Hewlett-Packard Graphics Language/2, and HP RTL is an abbreviation of HewlettPackard Raster Transfer Language.
• Emulation is good for obtaining results similar to printing on other printers.
When printing from applications that support HP-GL/2 output, specify HP-GL/2 in the application’s plotter output settings.
HP-GL/2 and HP RTL emulation related settings such as the printer to emulate are configured from the printer Control Panel. (Refer to «Menu Structure P.410 » and «Menu Settings P.416 «)
• For instructions on configuring these settings, refer to the software documentation.
|
Note |
It may not be possible to print jobs with excessively large amounts of data correctly. |
|
|
• For information on CAD colors other than HP-GL/2 and HP RTL emulation, see «Menu Settings.» P.416 |
||
Drawings CAD Printing Options Printing Enhanced
45
User’s Guide

Images Adjusting Options Printing Enhanced
46
Adjusting the Color in the Printer Driver |
iPF770 |
Adjusting Images |
|
|
Adjusting the Color in the Printer Driver ……………………………………………………………………………………………… |
46 |
|
Fine-Tuning Colors of Photos and Images (Windows) ………………………………………………………………………. |
47 |
|
Fine-Tuning Colors of Photos and Images (Mac OS) ………………………………………………………………………… |
49 |
|
Giving Priority to Particular Graphic Elements and Colors for Printing ……………………………………………………… |
52 |
|
Choosing the Document Type and Printing Conditions (Windows) ……………………………………………………… |
54 |
|
Choosing the Document Type and Printing Conditions (Mac OS) ……………………………………………………….. |
56 |
Adjusting the Color in the Printer Driver
Color settings specified in the application for your documents are essentially given priority over other settings for each print job, but further color adjustment is possible in the printer driver.
•Color Mode
Choose how the printer driver processes color, as desired. The available options vary depending on the color mode.
|
Color Mode |
Description |
Color Adjustment |
|
Color |
Print in color. |
You can select the color balance and color |
|
matching functions. |
||
|
Monochrome |
Print in grayscale. |
You can adjust the color balance. |
|
Color (CAD) |
A color mode optimized for line drawings |
You can adjust the color balance. |
|
(2D-CAD). Lines in red, yellow, and oth- |
||
|
er colors are printed especially clearly. |
||
|
Monochrome (BK ink) |
A color mode for printing line drawings. |
You can adjust the color balance. |
|
Only Black ink is used. |
||
|
Monochrome Bitmap |
Print in a color mode for CAD, using Col- |
No color adjustment is supported. |
|
or Ink, with all non-white portions printed |
||
|
in black. |
||
|
No color correction (*1) |
Prints without performing color-matching |
You can adjust the color balance. |
|
in the printer driver. |
*1: If No color correction is selected, the Matching sheet / Matching pane is not displayed.
•Color Adjustment
You can adjust colors separately for images, graphics, and text documents.
|
Adjustment Item |
Description |
|
Cyan |
Fine-tune color tones by adjusting the levels of Cyan, Magenta, and Yellow. |
|
Magenta |
|
|
Yellow |
|
|
Gray Tone |
Adjust the grayscale, in a range from cool, blue tones to warm, red tones. |
|
Brightness |
Adjust the brightness of printed images while keeping the darkest and lightest portions in- |
|
tact. |
|
|
Contrast |
Adjust the contrast of the darkest and lightest portions relative to each other. |
|
For soft gradation, decrease the contrast. For hard gradation, increase the contrast. |
|
|
Saturation |
Adjust the level of color saturation, in a range from subdued to vivid. |
• Click Object Adjustment to open the Object Adjustment dialog box, which allows you to select the color
|
Note |
adjustment target from Image, Graphics, and Text. |
•Matching
You can choose the color-matching mode and method.
By adjusting the color-matching mode and method, you can make printed colors match the colors of on-screen images more closely.
User’s Guide

|
iPF770 |
Fine-Tuning Colors of Photos and Images (Windows) |
• If No color correction is selected under Color Mode, the Matching cannot be changed.
Important
|
Matching Mode |
Description |
Remarks |
|
|
Driver Matching Mode |
Enables printing of optimal color tones |
You should normally select this mode. |
|
|
using a driver specific color profile. |
|||
|
ICC Matching Mode |
Enables color matching using ICC pro- |
This allows you to use ICC profiles for dig- |
|
|
files. |
ital cameras and scanners, ICC profiles |
||
|
Select this if you want to print by specify- |
created using the profile creation tool, etc. |
||
|
ing the input profile, printer profile, and |
|||
|
matching method in detail. |
|||
|
Host ICM Mode |
Enables color matching by the host com- |
Available when using Windows. |
|
|
puter using the ICM function of Win- |
|||
|
dows. |
|||
|
Select this if you want to print from an |
|||
|
application that supports the ICM func- |
|||
|
tion. |
|||
|
ColorSync |
Enables color matching by using the |
Available when using Mac OS. |
|
|
ColorSync function of Mac OS. |
To select ColorSync, choose ColorSync |
||
|
Select this if you want to perform soft |
on the Color Matching panel. |
||
|
proofing using ColorSync before printing. |
|||
|
Matching Method |
Description |
Remarks |
|
|
Auto |
Color-matching optimized for images, |
The available options and their display or- |
|
|
graphics, or text. |
der vary depending on your selected col- |
||
|
or-matching mode, as well as the operat- |
|||
|
Perceptual |
Color-matching optimized for printing |
||
|
ing system. |
|||
|
typical photos attractively. Smooth gra- |
|||
|
dation is a feature. This is also an easy- |
|||
|
to-use mode when performing color ad- |
|||
|
justment using application software. |
|||
|
Colorimetric |
Color-matching optimized for printing im- |
||
|
age data with accurate colors in input |
|||
|
color space. This is the easiest-to-use |
|||
|
mode when you want to adjust the color |
|||
|
and print. However, gradation may be |
|||
|
lost for colors of wider range than the |
|||
|
color reproduction range of the printer. |
|||
|
Generally, this is also called relative col- |
|||
|
orimetric. |
|||
|
Colorimetric (No Wht-pnt Corr) |
The processing method of color-match- |
||
|
ing is identical to Colorimetric. Use this |
|||
|
when you want to further reproduce the |
|||
|
target paper material color of the image |
|||
|
data. Generally, this also is called abso- |
|||
|
lute colorimetric |
|||
|
Saturation |
Color-matching optimized for printing |
||
|
posters, etc., vividly. |
|||
For instructions on color adjustment, refer to the following topics, as appropriate for your computer and operating system.
•Fine-Tuning Colors of Photos and Images (Windows) P.47
•Fine-Tuning Colors of Photos and Images (Mac OS) P.49
Fine-Tuning Colors of Photos and Images (Windows)
You can specify your own print settings instead of using the Print Target presets. This topic describes how to finetune the color tone of photos before printing.
 1 Choose Print in the application menu.
Images Adjusting Options Printing Enhanced
47
User’s Guide

Images Adjusting Options Printing Enhanced
48
|
Fine-Tuning Colors of Photos and Images (Windows) |
iPF770 |
||
|
2 |
Select the printer in the dialog box, and then display the printer driver dialog box. (See «Accessing the Print- |
||
|
er Driver Dialog Box from Applications .») |
P.146 |
||
|
3 |
Make sure the Main sheet is displayed. |
|
In the A Media Type list, select the type of paper that is loaded. |
|
|
4 |
|
|
5 |
Click D Advanced Settings to switch the print mode. |
|
Click Color in the G Color Mode list. |
|
|
6 |
|
|
7 |
Click H Color Settings to display the Color Settings dia- |
|
log box. |
 8 On the Color Adjustment sheet, adjust the color tones, brightness, and so on as desired.
|
Adjustment Item |
Description |
|
D Cyan |
Fine-tune color tones by adjusting the levels of Cyan, Magenta, and Yellow. |
|
E Magenta |
|
User’s Guide

|
iPF770 |
Fine-Tuning Colors of Photos and Images (Mac OS) |
||
|
Adjustment Item |
Description |
||
|
F Yellow |
Fine-tune color tones by adjusting the levels of Cyan, Magenta, and Yellow. |
||
|
G Gray Tone |
Adjust the gray tone. Choose cool black (tinged with blue), pure black (neutral), warm |
||
|
black (tinged with red), and so on. |
|||
|
H Brightness |
Adjust the brightness of printed images while keeping the darkest and lightest portions |
||
|
intact. |
|||
|
I Contrast |
Adjust the contrast of the darkest and lightest portions relative to each other. |
||
|
For soft gradation, decrease the contrast. For hard gradation, increase the contrast. |
|||
|
J Saturation |
Adjust the level of color saturation, in a range from subdued to vivid. |
||
• Click Object Adjustment to open the Object Adjustment dialog box, which allows you to select the color
|
Note |
adjustment target from Image, Graphics, and Text. |
 9 Close the Color Settings dialog box.
10 Click the Page Setup tab to display the Page Setup sheet.
 11 Confirm the settings of A Page Size, L Paper Source, and so on.
 12 Confirm the print settings and print as desired.
• For tips on confirming print settings, see «Confirming Print Settings .» P.143
Note
Fine-Tuning Colors of Photos and Images (Mac OS)
You can specify your own print settings instead of using the Print Target presets. This topic describes how to finetune the color tone of photos before printing.
1Choose Page Setup from the application menu to display the Page Attributes dialog box.
Images Adjusting Options Printing Enhanced
49
User’s Guide

Images Adjusting Options Printing Enhanced
|
Fine-Tuning Colors of Photos and Images (Mac OS) |
iPF770 |
|
• Page Setup might not be displayed in the menu de- |
|||||
|
Note |
pending on the OS you are using and the applica- |
||||
|
tion software. |
|||||
|
In this case, select Print from the menu in the appli- |
|||||
|
cation software, and configure the settings in the up- |
|||||
|
per part of the printer driver screen that is displayed. |
|||||
|
Select the printer in the B Format for list. |
|||||
|
2 |
|||||
|
Choose the original size in the C Paper Size list. |
|||||
|
3 |
|||||
|
Click F OK to close the dialog box. |
|||||
|
4 |
|||||
|
5 |
Choose Print in the application menu. |
||||
|
6 |
Access the Main pane. |
 7 In the A Media Type list, select the type of paper that is loaded.
50
User’s Guide
 Loading…