
View the manual for the Candy CDIH 1L949 here, for free. This manual comes under the category dishwashers and has been rated by 38 people with an average of a 8.5. This manual is available in the following languages: English. Do you have a question about the Candy CDIH 1L949 or do you need help? Ask your question here
The Candy CDIH 1L949 dishwasher is a compact and efficient appliance designed to handle up to 9 place settings. With a noise level of 49 dB, it operates with minimal disturbance. The built-in LED display provides a clear view of the selected program and other settings.
There are 5 different washing programs to choose from, allowing for versatility in cleaning various types of dishes and cookware. The dishwasher also features a delayed start timer, with a maximum delay of 9 hours, allowing for convenient scheduling of wash cycles.
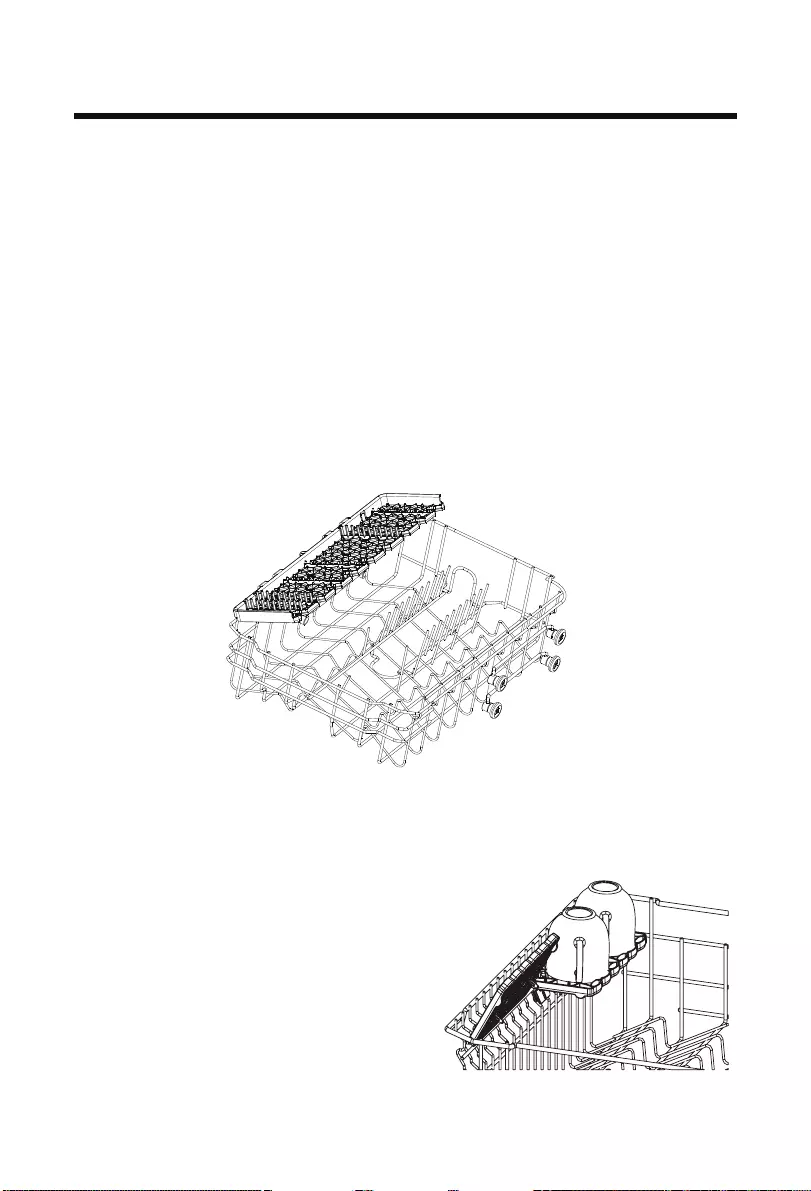
The upper basket of the dishwasher is adjustable in height, providing flexibility to accommodate larger items in the lower basket. The dishwasher consumes only 9 liters of water per cycle, making it an efficient choice for conserving water consumption.
It is equipped with a salt indicator that alerts the user when it is necessary to refill the salt reservoir for optimal performance. The remaining time indication feature allows users to keep track of the duration of the current cycle.
The dishwasher is designed with adjustable feet, ensuring stability and the perfect fit in any kitchen setting. The AquaStop function provides additional safety by automatically cutting off the water supply in case of any leakage or overflow.
In terms of dimensions, the dishwasher has a width of 448 millimeters and a depth of 555 millimeters. The compact size makes it suitable for smaller kitchens or limited spaces. Overall, the Candy CDIH 1L949 dishwasher offers an efficient and convenient solution for everyday dishwashing needs.

General
| Candy | |
| CDIH 1L949 | 32901427 | |
| dishwasher | |
| 6925777863037 | |
| English | |
| User manual (PDF), Datasheet (PDF), Energy label (PDF) |
Performance
| Number of place settings | 9 place settings |
| Noise level | 49 dB |
| Number of washing programs | 5 |
| Delayed start timer | Yes |
| Delay start (max) | 9 h |
| AquaStop function | Yes |
| Temperature (max) | — °C |
| Cycle time | 298 min |
| Dishwashing programs | Eco 45°C, Intensive 70°C, Normal |
| Half-load | No |
| Left-on mode duration | 298 min |
| C | |
| Drying system | Condensation |
| Dirt sensor | No |
| Maximum hot water supply temperature | 60 °C |
| Automatic programs | No |
| Overflow protection | No |
| Inverter technology | Yes |
| Built-in smart sensors | No |
Design
| Built-in display | Yes |
| Display type | LED |
| Upper basket adjustable height | Yes |
| Appliance placement | Fully built-in |
| Product size | Slimline (45 cm) |
| Custom panel-ready | Yes |
| Door color | Not applicable |
| Control panel color | Black |
| Lower basket safety stop | No |
| Lower basket rack | Foldable |
| Door hinge | Standard |
| Lower basket rack type | Double |
Power
| Water consumption per cycle | 9 L |
| Energy consumption per cycle | 0.78 kWh |
| AC input voltage | 230 V |
| AC input frequency | 50 Hz |
| Connected load | 2300 W |
| 78 kWh | |
| Energy efficiency class | F |
| Energy efficiency scale | A to G |
| Power plug type | Type F (CEE 7/4) |
| Current | 10 A |
| Power consumption (off) | 0.5 W |
Ergonomics
| Salt indicator | Yes |
| Remaining time indication | Yes |
| Adjustable feet | Yes |
| Wi-Fi controlled | — |
| Child lock | — |
| Automatic door opening | No |
| Self-cleaning filter | No |
| Buzzer | Yes |
| Rinse aid indicator | Yes |
| Ready indicator | Yes |
| Rear |
Weight & dimensions
| Width | 448 mm |
| Depth | 555 mm |
| Height | 820 mm |
| Installation compartment width | 450 mm |
| Installation compartment depth | 600 mm |
| Installation compartment height | 900 mm |
| Installation compartment height (min) | 820 mm |
| Installation compartment height (max) | 900 mm |
| Height under worktop | 816 mm |
| Weight | 36000 g |
| Package weight | 41000 g |
| Package width | 485 mm |
| Package depth | 620 mm |
| Package height | 885 mm |
show more
Can’t find the answer to your question in the manual? You may find the answer to your question in the FAQs about the Candy CDIH 1L949 below.
What do I do about a smelly dishwasher?
In the case of a smelly dishwasher, you can take the following steps: — Clean the filters — Clean the spray arms — Clean the door rubbers — Run a hot wash program — Run an empty machine with a dishwasher cleaner
Do you have to pre-rinse the dishes?
It is not recommended to rinse dirty dishes before placing them in the dishwasher. For the life cycle of the machine, it is better to put everything dirty in the dishwasher. The grease on the dirty dishes is the lubrication for the pump in the machine.
How much dishwashing detergent should I use?
The average amount used is about 25 grams of dishwashing detergent. It is recommended to follow the advice on the packaging.
How do I add softening salt to my dishwasher?
Each dishwasher has a separate compartment for softening salt. It opens when you turn the knob on the compartment. The softening salt can then be poured into the compartment by means of a funnel.
What is the weight of the Candy CDIH 1L949?
The Candy CDIH 1L949 has a weight of 36000 g.
What is the height of the Candy CDIH 1L949?
The Candy CDIH 1L949 has a height of 820 mm.
What is the width of the Candy CDIH 1L949?
The Candy CDIH 1L949 has a width of 448 mm.
What is the depth of the Candy CDIH 1L949?
The Candy CDIH 1L949 has a depth of 555 mm.
What energy label does the Candy CDIH 1L949 have?
The Candy CDIH 1L949 has energy label F.
Why is my dishwasher not turning on?
Make sure that the dishwasher is securely plugged into a functioning power outlet. Also, check if the power switch on the dishwasher is turned on.
Why is the dishwasher not filling with water?
Verify that the water supply valve connected to the dishwasher is fully open. Additionally, check if the water inlet hose is properly connected and not kinked or clogged.
Why is my dishwasher not cleaning dishes effectively?
Ensure that you are using the recommended amount of detergent and loading the dishes correctly, allowing sufficient space between them. Also, make sure that the spray arms are not blocked by food particles or other debris.
Why is there a burning smell coming from the dishwasher?
Confirm that no foreign objects, such as plastic or utensils, are touching the heating element. Additionally, check if any food remnants are trapped in the filter or around the dishwasher’s interior, as this can cause a burning smell during the drying cycle.
Why is my dishwasher not draining properly?
First, check if the drain hose is properly connected and not kinked. Ensure that the sink drain is not blocked and can freely allow water flow from the dishwasher. If the problem persists, check if the dishwasher’s filter is clean and not obstructed.
Is the manual of the Candy CDIH 1L949 available in English?
Yes, the manual of the Candy CDIH 1L949 is available in English .
Is your question not listed? Ask your question here
Встраиваемая посудомоечная машина Candy CDIH 1L949-08, узкая, ширина 44.8см, полновстраиваемая, загрузка 9 комплектов
- Тип: узкая;
- Комплектов посуды: 9;
- Сушка: конденсационная;
- Эффективность: класс энергопотребления A, класс мойки A, класс сушки A,
- Защита от протечек: частичная (корпус);
- Программ мойки: 5;
- Размеры (ШxВxГ): 44.8 x 81.5 x 55 см;
Появились вопросы о товаре?

- Тип: узкая;
- Комплектов посуды: 9;
- Сушка: конденсационная;
- Эффективность: класс энергопотребления A, класс мойки A, класс сушки A,
- Защита от протечек: частичная (корпус);
- Программ мойки: 5;
- Размеры (ШxВxГ): 44.8 x 81.5 x 55 см;
Появились вопросы о товаре?
Хочу быть в курсе акций и новинок
Контакты
- Журнал
- Акции
- Покупателям
- Информация
- Доставка
- Гарантия
- Кредит и рассрочка
- Сервисные центры
- Услуги
- Корпоративным клиентам
- Аренда помещений
- Партнёрская программа
- Обзоры
- Клуб Ситилинк
- Конфигуратор
- Подбор расходных материалов
- Ситилинк
- Новости
- Вакансии
- Документы
Мы используем файлы cookie. Подробнее
Мы используем файлы cookie для вашего удобства пользования сайтом и повышения качества рекомендаций. Подробнее
- Page 1/48
- Search
- Previous
- Next
- Bookmarks

CDIH 1L949
●
-08
CDIH 2L1047
●
-08
CDIH 2D1047-08
File type: PDF
File name: 72178100_cdih-1l949-08.pdf
File size: 6.63 MB
File Language: Russian
Pages: 48
Author: Candy
File created: 2020-10-18
Нет в наличии
Хит продаж!

Нет в наличии
Хит продаж!

Нет в наличии
Хит продаж!

Нет в наличии
Хит продаж!

| Серия |
Brava |
| Тип установки |
Встраиваемая |
| Высота (см) |
81.5 |
| Ширина (см) |
45 |
| Глубина (см) |
55 |
| Тип вилки |
Евровилка (Schuko) |
| Класс энергопотребления (директива ЕС 2010/30/EU) |
A |
| Количество программ |
5 |
| Мотор |
Индукционный |
| Код EAN |
6925777863488 |
| Код продукта |
32901456 |
| Модель |
CDIH 1L949-08 |
| Вес нетто (кг) |
30 |
| Вес брутто (кг) |
34 |
| Система сушки |
Конденсационная |
| Регулируемая верхняя корзина |
Да |
| Индикатор ополаскивателя |
Да |
| Защита от протечек Aquastop |
Да |
| Потребление электроэнергии (кВт/ч ) |
0.78 |
| Потребление воды за цикл (л) |
9 |
| Тип управления |
электронный |
| Дисплей |
Да |
| Номинальное напряжение /частота |
230 В ~ 50 Гц |
| Давление воды (гидродинамическое давление) |
0,04 — 1 МПа |
| Стандартный цикл мойки в соответствии с EN50242 |
Эко 45°C |
| Защита от перелива |
Да |
| Гарантия |
1 год |
| Страна производства |
Китай |
| Вид |
узкая (45 см) |
| Вместимость комплектов посуды |
9 |
| Температурные режимы мойки |
45-70°c |
| Интенсивная мойка |
Да |
| Предварительное ополаскивание (замачивание) |
Да |
| Экономичная программа (эко) |
Да |
| Отсрочка запуска |
Да |
| Максимальное время отсрочки запуска, в часах |
9 |
| Класс энергопотребления мойки |
A |
| Класс энергопотребления сушки |
A |
| Максимальная потребляемая мощность, в ваттах |
1900 |
| Уровень шума, в децибелах |
49 |
| Звуковой сигнал |
Да |
| Индикатор наличия соли |
Да |
| Количество корзин |
2 |
| Корзина для столовых приборов |
Да |
| Отделение для чашек |
Да |
| Длина сливного шланга, в метрах |
1.5 |
| Длина заливного шланга, в метрах |
1.5 |
| Функция Экспресс |
Да |
| Цвет панели управления |
черный |
| Исплользование моющих таблеток |
Да |
| Складные стойки (нижняя корзина) |
Да |
| Регулируемые ножки по высоте |
Да |
| Самодиагностика неисправностей |
Да |
| Глубина продукта с открытой дверцей, в сантиметрах |
105.4 |
| Допустимая высота мебельного фасада, в сантиметрах |
66-71,3 |
| для халвы |
1 |
| Срок службы |
7 лет |
| Доступна рассрочка |
Да |
Производитель оставляет за собой право изменять характеристики товара, его внешний вид и комплектность без предварительного уведомления продавца. Предложение по продаже товара действительно в течение срока наличия этого товара на складе.
Скачать инструкцию
Скачать сертификат
Displayed below is the user manual for CDIH 1L949-80 by Candy which is a product in the Dishwashers category.
This manual has pages.
User Manual
Dishwasher

Thank you for purchasing a Candy product
Please read these instructions carefully before using this appliance. The
instructions contain important information which will help you get the best out of the
appliance and ensure safe and proper installation, use and maintenance.
Keep this manual in a convenient place so you can always refer to it for the safe
and proper use of the appliance.
If you sell the appliance, give it away, or leave it behind when you move house,
make sure you also pass on this manual so that the new owner can become
familiar with the appliance and safety warnings.
Safety and warnings …………………………………………………………………………..
Product Description ……………………………………………………………………………
Overview of programmes…………………………………………………………………….
Content
1
4
5
Water softening system…….……………….………………………………………………. 8
Using rinse aid………………………………………………….…………..…………..……… 10
Utensils………………………………………………………………………..…………..……… 11
Loading utensils………………………………………………………………………………… 12
Adding detergent………………………………………………………………………………..
Before first Use………………………………………………………………………………….
15
16
Daily Use…………………………………………………………………………………………..
Care and cleaning………………………………………………………………………………
Troubleshooting……………………………………………………..…………..……………..
Technical Data…………………………………………………………………………………..
18
20
23
26

1
Your dishwasher has been carefully designed to operate safely during normal
dishwashing procedures. Please keep the following instructions in mind when you
are using your dishwasher.
●Read all instructions before using the dishwasher.
●The information in this manual must be followed to minimise the risk of fire or
explosion or to prevent property damage, personal injury or loss of life.
●Use the dishwasher only for its intended function as described in this user guide.
●This appliance is intended to be used in household and similar applications such
as:
– staff kitchen areas in shops, offices and other working environments;
– farm houses;
– by clients in hotels, motels and other residential type environments;
– bed and breakfast type environments.
Electrical shock hazard
Cut Hazard
When using your dishwasher, follow basic
precautions, including the following:
Safety and warnings
WARNING
WARNING
WARNING
Before installing the dishwasher, remove the house fuse or open the circuit breaker.
This appliance must be earthed. In the event of a malfunction or breakdown,
earthing will reduce the risk of electric shock by providing a path of least resistance
for electric current. This appliance is equipped with a cord having an equipment-
earthing conductor and an earthing plug. The plug must be plugged into an
appropriate outlet that is installed and earthed in accordance with all local codes
and ordinances.
WARNING — Improper connection of the equipment-earthing conductor can result in
a risk of electric shock. Check with a qualified electrician or service representative
if you are in doubt as to whether the appliance is properly earthed.
Do not modify the power supply plug provided with the appliance — if it will not fit
the outlet, have a proper outlet installed by a qualified electrician. Do not use an
extension cord, adapter plug or multiple outlet box.
Failure to follow this advice may result in electrical shock or death.
Take care — panel edges are sharp.
Failure to use caution could result in injury or cuts.

2
● Use only detergents or rinse aid recommended for use in a domestic dishwasher
and keep them out of reach of children.
● Check that the detergent dispenser is empty after the completion of each wash
program.
● When loading items to be washed, locate sharp items so that they are not likely
to damage the dishwasher and load sharp knives with the handle up to reduce the
risk of cut-type injuries.
● Do not touch the filter plate (the metal disc in the dishwasher base) during or
immediately after use, as it may be hot from the heater plate underneath.
● Do not tamper with the controls.
● Do not abuse, sit in, stand on the door or dish rack of the dishwasher.
● Do not lean on the adjustable racks or use them to support your body weight.
● To reduce the risk of injury, do not allow children to play in or on the dishwasher.
● Under certain conditions, hydrogen gas may be produced in a hot water heater
system that has not been used for two weeks or more. Hydrogen gas is explosive.
If the hot water system has not been used for such a period, before using the
dishwasher, turn on all hot water taps and let the water flow from each for several
minutes. This will release any accumulated hydrogen gas. As the gas is flammable,
do not smoke or use an open flame during this time.
● Remove the door to the washing compartment when removing an old dishwasher
from service or discarding it.
● Some dishwasher detergents are strongly alkaline. They can be extremely
dangerous if swallowed. Avoid contact with the skin and eyes and keep children
away from the dishwasher when the door is open. Check that the detergent
receptacle is empty after completion of the wash cycle.
● Certified residential dishwashers are not intended for licensed food
establishments.
Maintenance safety instructions
● Disconnect the appliance from the power supply before any cleaning or
maintenance.
● When disconnecting the appliance,pull the plug rather than the power supply
cord or junction of cord to avoid damage.
● Do not repair or replace any part of the appliance or attempt any servicing unless
specifically recommended in this user guide.
● Keep the floor around your appliance clean and dry to reduce the possibility of
slipping.
Safety and warnings

3
● Keep the area around/underneath your appliance free from the accumulation of
combustible materials, such as lint, paper, rags and chemicals.
Operational safety instructions
● Open the door very carefully if the dishwasher is in operation. There is a risk of
being sprayed with hot water. Do not open the door fully until the spray arms have
stopped rotating.
● The door should not be left in the open position as this could present a tripping
hazard.
● The water inside the dishwasher is not suitable for drinking.
● The dishwasher must be used with the filter plate, drain filter and spray arm(s) in
place. To identify what these parts are, see drawings in section ‘‘Care and Cleaning’
of this user guide.
● Do not operate this dishwasher if it is damaged, malfunctioning, partially
disassembled or has missing or broken parts, including a damaged power supply
cord or plug.
● Household appliances are not intended to be played with by children. Children of
less than 8 years old must be kept away from the appliance unless continuously
supervised. This appliance can be used by children aged from 8 years and
above, and persons with reduced physical, sensory or mental capabilities or lack
of experience and knowledge, if they have been given supervision or instruction
concerning the use of the appliance in a safe way and they understand the hazards
involved.
● Cleaning and user maintenance shall not be done by children without supervision.
● Do not allow children to play inside, on or with this appliance or any discarded
appliance.
● If a dishwasher cleaner is used, we would strongly recommend a wash program
with detergent should be run immediately afterward, to prevent any damage to the
dishwasher.
● The dishwasher is designed for washing normal household utensils. Items that
are contaminated by petrol, paint, steel or iron debris, corrosive, acidic or alkaline
chemicals are not to be washed in the dishwasher.
● If the dishwasher is not being used for long periods of time, turn the electricity
and water supply to the dishwasher off.
safety and warnings
4
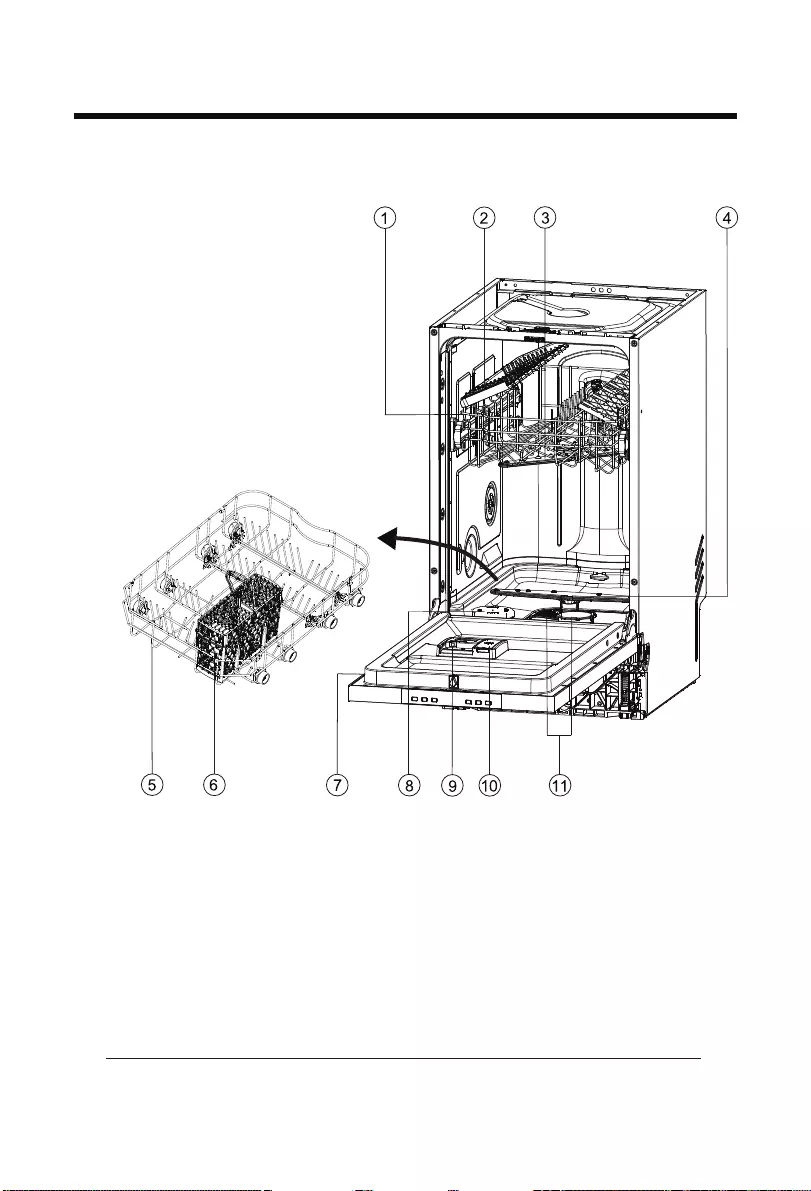
Product Description
1.
8.
Detergent dispenser
2.
9.
Rating label
3.
Lower basket
4.
Filters
10.
11.
Salt container
Cutlery basket
5.
6.
Rinse aid dispenser
7.
Upper basket
Utensil tray*
Upper spray arm
Lower spray arm
*Some models have the Utensil tray.
5
Overview of programmes
1245
1087 9 11
36
1. ON / OFF button
PROGRAMME SELECT button
Lack Salt and Rinse Aid reset button
Additional function button
START DELAY button
START / PAUSE button
3.
5.
4.
6.
2.
7. Rinse Aid indicator
PROGRAMME indicator
Additional function indicator
START DELAY/Status Indicators
Salt Aid indicator
9.
11.
10
8.
Models with LED
1)Some programs can select additional functions,Additional functions include adding express reduce the
duration of the washing process.
1)
6
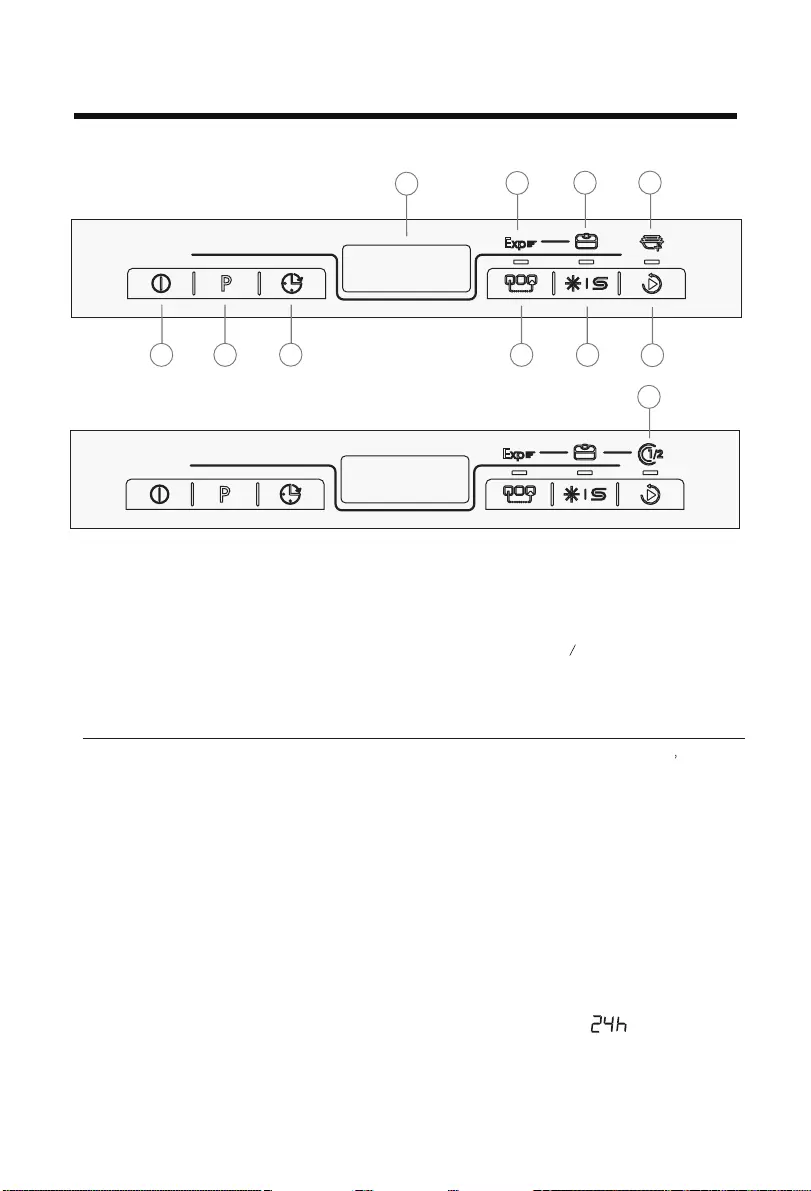
Overview of programmes
1245
10
8
79
36
1. ON / OFF button
PROGRAMME SELECT button
START DELAY button
Additional function button
Lack Salt and Rinse Aid reset button
START / PAUSE button
3.
5.
4.
6.
2.
7. Time & Info Display
Speed Up function Indicator
Dry function Indicator
Add dish Indicator 1/2 function Indicator
9.
10
8.
Time & Info display
During any selection the display shows by scrolling related information like:
► Programme cycle time
► Programme start delay time
► Error codes and service information
After start of an operation it displays without scrolling:
► Remaining time in hours of a delayed programme starts, e.g.
► Remaining programme cycle time in minutes, e.g.130
While running it may vary due to local conditions and daily working load.
Models with Digit
10
2)Some models have the function of Add dish, and some models have the function of 1/2 function.
2)1)
1)Some programs can select additional functions,Additional functions include adding express adding
washing block and 1/2 function.
AUTO
WASH
45-70°C 148min
7
Overview of programmes
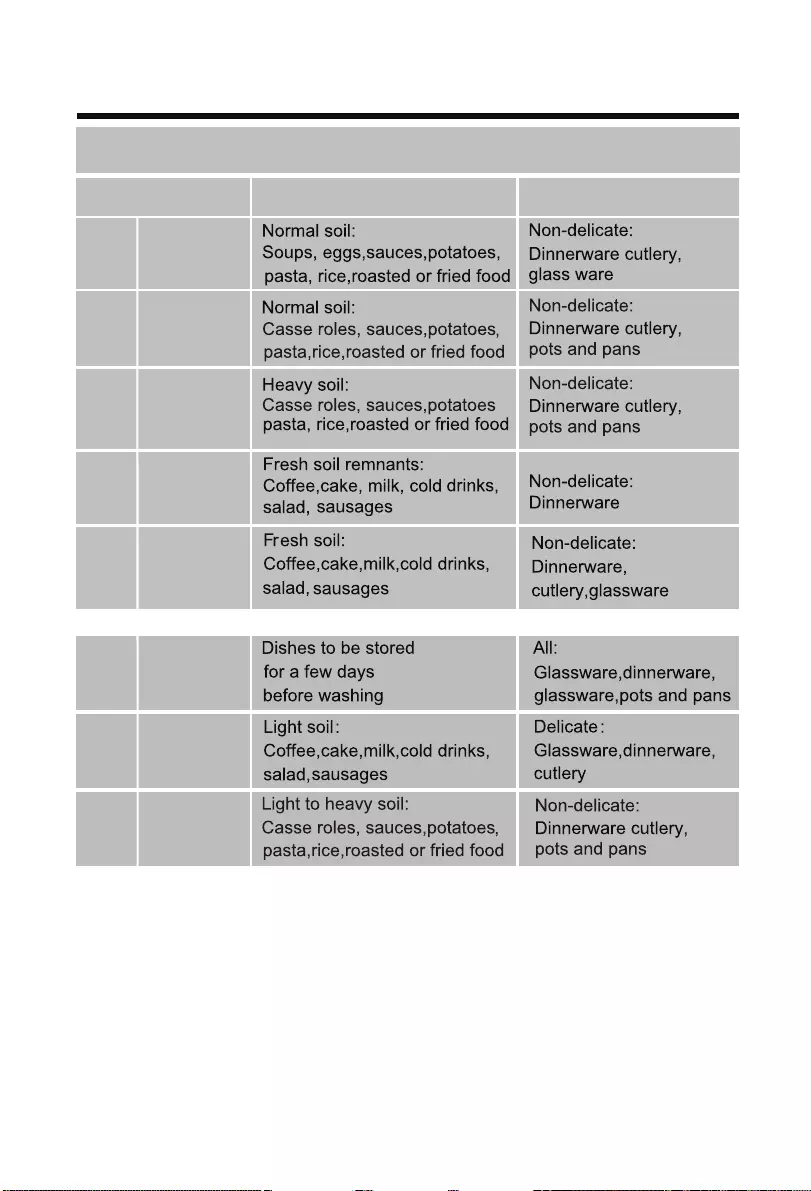
Programmes
Programmes Type of food residue Type of load
1)
The appliance senses the type of soil and the quantity of items in the baskets. It
automatically adjusts the temperature and quantity of water, energy consumption
and programme duration.
2)
Use this programme to quickly rinse the dishes. T his prevents the remaining food
to bond on the dishes and bad odours to come out from the appliance. Do not use
detergent with this program!
Intensive
70°C 130min
Zoom
45°C 32min
Prewash
45°C 20min
Universal
60°C 115min
Glass
45°C 98min
Special
45°C 72min
ECO
50°C 298min
P1
P2
P3
P4
P5
P6
P7
P8
Models with Digit also have the following programs:
1)
2)
8
To ensure good washing results,the dishwasher requires soft water.Hard water can
be detrimental to the performance of your dishwasher. Over time,glassware washed
in hard water will become opaque and dishes will become spotted or covered in a
white film. Using very hard water can cause dishwasher parts to fail over time.Salt
can improve the situation.
The amount of salt dispensed can be set in S1 and S6 stages,depending on the
hardness of your water.
1.Find out about the hardness value of your tap water.Your water utility company
will help you with this.
2.Setting can be found in the water hardness table.
Adjusting the water softening system
Identify the local water hardness
Water softening system
* Remark
1) Factory default setting for powder detergent.
2) Recommended setting for combi detegent tablets.
3) Indicator for Salt is off.
Water hardness
Water softener
adjustment
German
degrees
(°dH)
French
degrees
(°fH)
Mmol/l Clarke
degrees
electronic
31-50 55-89 5.5. -8.9 39-63 S6
17-30 30-54 3.0-5.4 21-38 S5
13-16 23-29 2.3-2.9 16-20 S4
9-12 16-22 1.6-2.2 11-15 S3
0-8 0-15 0-1.5 0-10 S2
— — — — S1
1) *
2) *
3) *
9
As soon as the low salt indicator is lit on the control panel ,salt should be topped
up.Always refill with special salt immediately before switching on the appliance.This
ensures that overrun special salt solution is immediately washed out and does not
corrode the rinsing tank.
Using special salt
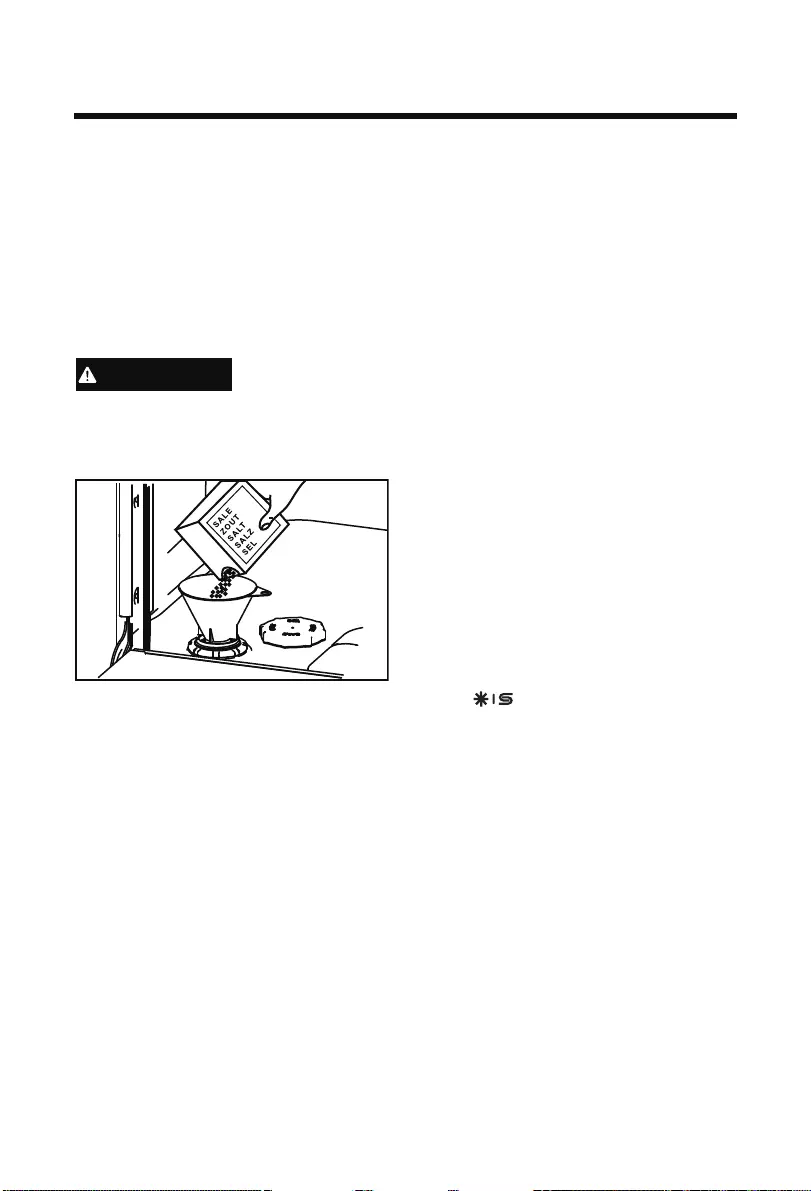
Top up the salt as follows:
Water softening system
Only use dishwasher salt. Other products can cause damage to the appliance!
Any spilled salt causes corrosion.Run a programme after each refill.
1.Turn the cap clockwise to open the salt
container.
2.Fill with1 litre of water into the salt container.
3.Fill the tank up with specific salt(water
overflows).
4.Remove spilled salt from the opening area.
5.Turn the cap counter-clockwise to close
the salt container.
CAUTION
6.Press button for 3 sec after each
refill to reset salt aid indicator.
10
Adjusting the rinse aid dosage
The normal, factory-set dosage level is R2, but you may need to adjust this to suit
your water conditions.
If there is excessive foaming at the end of the wash,reduce the dosage.
If you live in a hard water area or if dishes are wet or streaky after drying,
increase the dosage.
To adjust the rinse aid setting:
If you are using tablets with built-in rinse aid, we recommend setting the rinse
aid dosage level to off (R0).
How to refill the rinse aid dispenser
1.Pull the button to snap the dispenser cover open.
2.Pour rinse aid into the circular opening, making sure not to fill beyond the MAX
marking.
IMPORTANT!
Take care not to spill rinse aid into the dishwasher.Any spills must be wiped up
to prevent excess foaming. Failure to do so may result in a service call, which
will not be covered by warranty.
3.Close the cover, making sure it clicks shut.
4.Press and hold the button for 3 sec after each
refill to reset rinse aid
indicator.
Dosage regulator
When to refill the rinse aid dispenser
When rinse aid level becomes low,for the models with digit,
the digtial will scrolling display RINSE AID to remind you
to refill the dispensers.
For the models with LED,the rinse and salt indicators will be on to remind you.
Using rinse aid
We highly recommend using liquid rinse aid regularly to get the best drying
results.Rinse aid gives a streak-free, sparkling clean look to glass and chinaware.
In addition, it prevents metal from tarnishing.

11
Utensils
Never put highly absorbent materials, such as sponges and towels in your
dishwasher.Do not put dishes or cutlery that have been soiled by tobacco
ash, wax, lubricating grease or paint in your dishwasher.
IMPORTANT!
Cutlery and silverware
All cutlery and silverware should be rinsed immediately after use to prevent tarnishing
caused by some foods. Silver items should not come into contact with stainless steel,
e.g. other cutlery. Mixing these items can cause staining. Remove silver cutlery from
the dishwasher and hand dry immediately after the programme has finished.
Aluminium
Aluminium can be dulled by dishwasher detergent. The degree of change depends on
the quality of the item.
Other metals
Iron and cast iron objects can rust and stain other items. Copper, pewter and brass
tend to stain. Wash these items by hand.
Woodware
Wooden items are generally sensitive to heat and water. Regular use in the
dishwasher may cause deterioration over time. If in doubt, wash by hand.
Glassware
Most everyday glassware is dishwasher safe. Crystal, very fine and antique
glassware may etch that is, become opaque. You may prefer to wash these items by
hand.
Plastic
Some plastic may change shape or colour with hot water. Check the manufacturer’s
instructions about washing plastic items. Washable plastic items should be weighted
down so they do not flip over and fill with water or fall through the basket during the
wash.
Decorated items
Most modern china patterns are dishwasher safe. Antique items, those with a pattern
painted over the glaze, gold rims or hand-painted china may be more sensitive to
machine washing. If in doubt, wash by hand
Glued items
Certain adhesives are softened or dissolved in machine washing. If in doubt, wash by
hand.
12
Loading utensils
IMPORTANT!
Upper rack
● The upper rack is designed to hold items like glasses, cups, saucers, plates and
shallow pans.
● The upper rack may be adjusted to accommodate larger items. You can adjust the
height of the upper basket to create more space for tall items in the lower basket.
● The upper rack may be adjusted to accommodate larger items. Place small items
on the foldable cup holder.
If the tableware or cookware rack is burnt, scorched,sticky, and other food which
is very difficult to removed, it is advisable to soak it for a period of time before
washing it or pre-dispose it with a dish cloth or else it will be hard to clean.Remove
any large food particles before placing dishes in the dishwasher. It is not necessary
to prerinse utensils under running water.
Place sharp and pointed
items with the blade pointing
downward into the knife
rack, to keep them out of
harms way.
13
Loading utensils
● Place the largest items here: pots,
pans, lids, serving dishes and bowls.
● Fold down the tines to place pots
and pans flat on the bottom.
● Ensure dishware items do not block
the spray arm above from rotating.
● If you need more height for tall items,
you can raise the upper basket. See
instructions on previous pages.
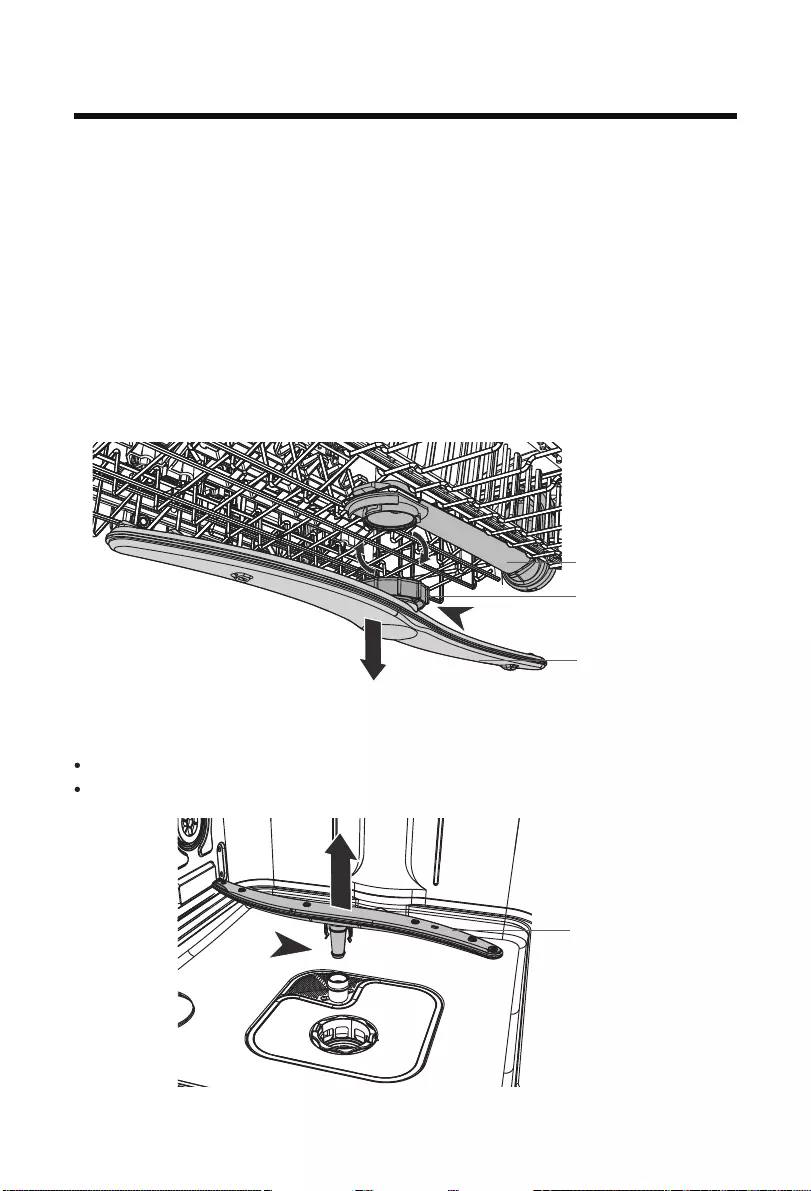
Lower rack
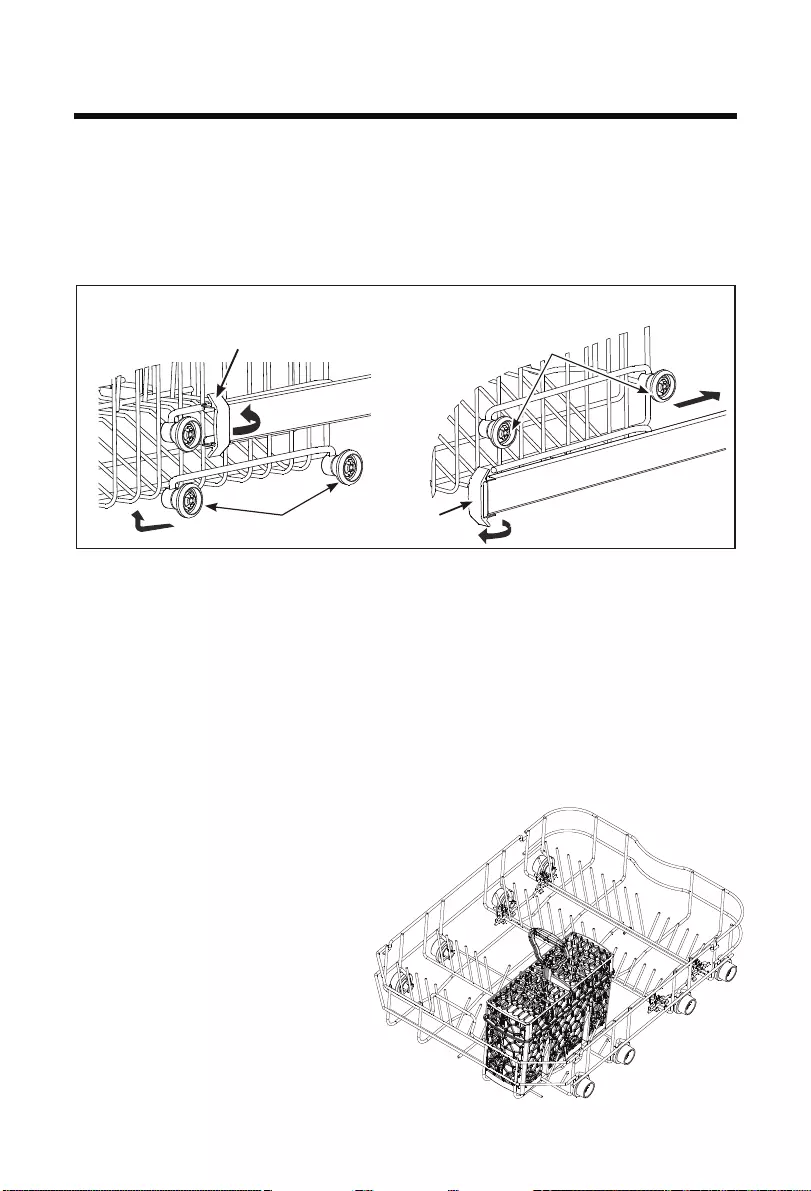
To adjust the upper rack:
1.Fully extend the upper rack and rotate open the two plastic end caps on the front
of the rails.
2.Remove the upper rack.
3.Select the set of rollers on the side of the rack that provides the desired height, and
reinstall the upper rack by guiding the rack rails between the appropriate set of rollers.
4.With the rack reinstalled, rotate closed the two plastic end caps, ensuring the snap is
properly engaged. Failure to properly engage the end caps may result in the rack falling
from the dishwasher.
End Cap
Rollers
Rail
Remove:
Rail
End
Cap
Replace:
Rollers
IMPORTANT!
Before you adjust its height,make sure the basket is empty.
14
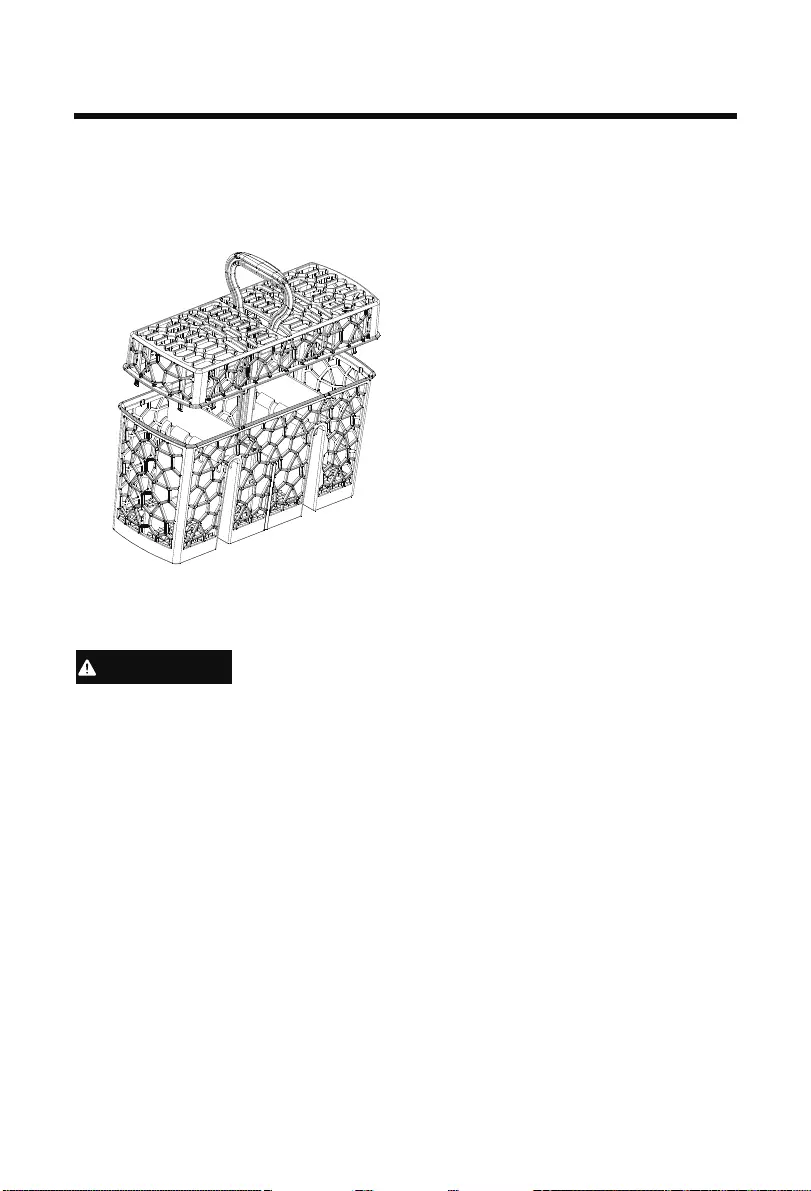
Loading utensils
Cutlery basket
Put sharp and pointed items with the blade pointing downward to keep them out of
harms way.
►
►
►
►
Mix spoons with other cutlery
to prevent them to bond
together.
Use the grid element in order
to separate the cutlery.
Place Cutlery with the
handles down for better
washing results.
If long items may block the
spray arms find a horizontal
positioning in the upper
basket.
CAUTION
15
Adding detergent
IMPORTANT!
Only use detergents recommended for automatic dishwashers.
Dishwasher detergents are strongly alkaline. They can be extremely dangerous if
swallowed. Avoid contact with the skin and eyes and keep children and infirm
persons away from the dishwasher when it is open. Check that the detergent
dispenser is empty after completion of each wash programme.
Never sprinkle or pour detergent directly onto any item in the dishwasher. Detergent
and dishwasher tablets should not be in direct contact with dishes or cutlery.
Do not use hand washing liquids, soap, laundry detergents or disinfectants, as
these will damage the dishwasher.
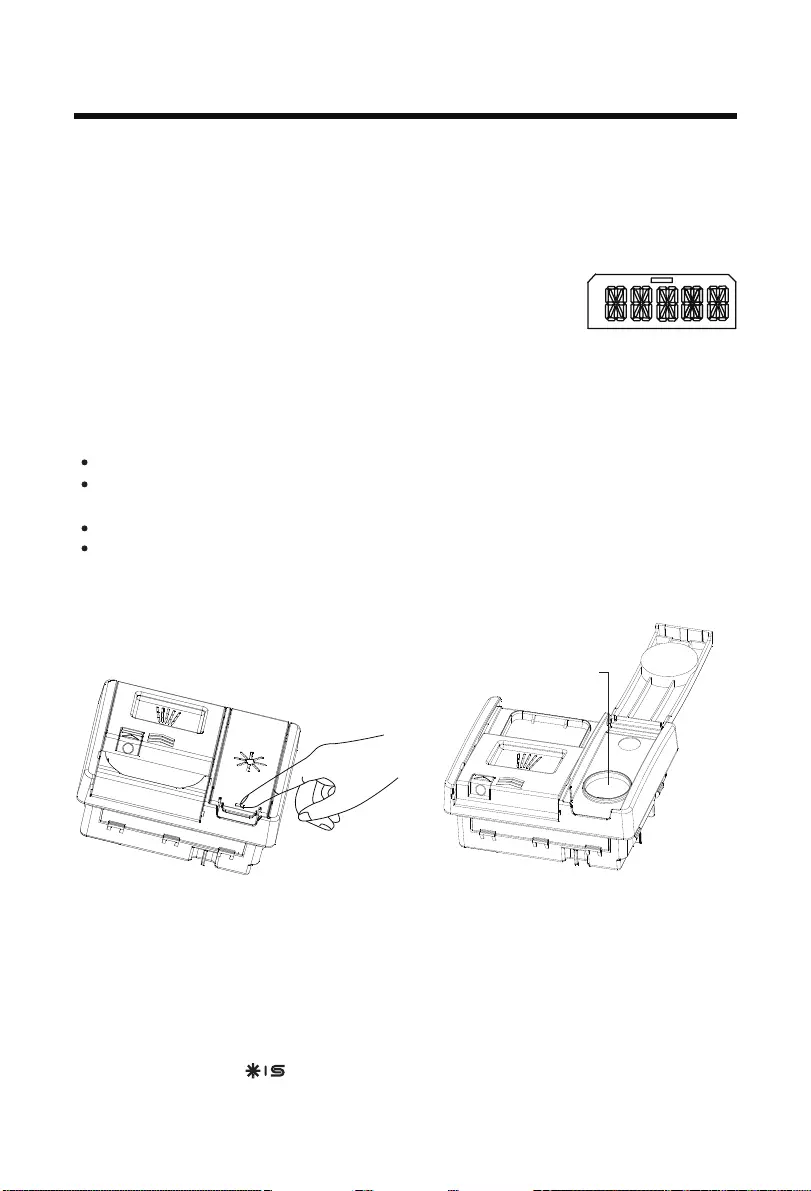
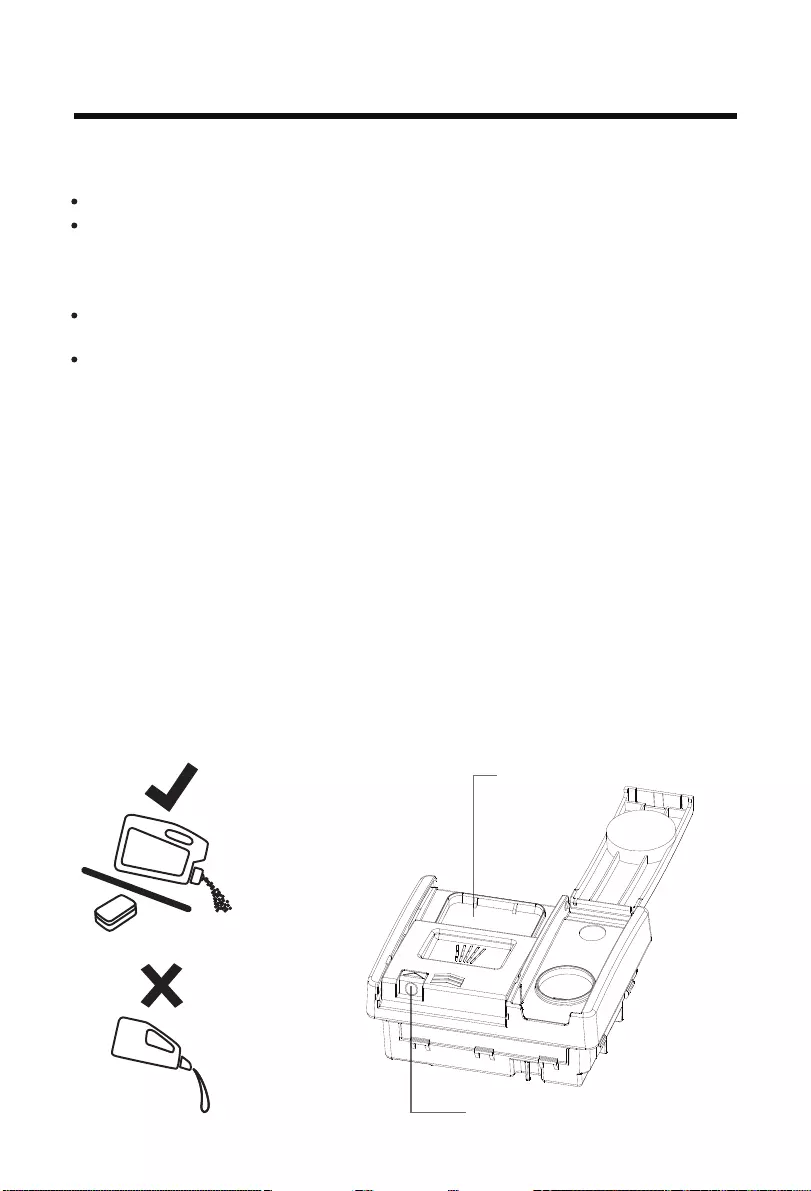
Filling the detergent dispenser
1.Pull the button on the right of the dispenser.
IMPORTANT!
Approach the dispenser from the right-hand side to prevent the cover from snapping
open on your hand.
2.Add detergent into the appropriate compartment(s). The ‘15’ and ‘25’
markings in the
main wash compartment correspond to grams of powdered detergent.
IMPORTANT!
Tablets should only be placed in the main wash (larger) compartment.
3.Remove any excess detergent from the edges of the dispenser.
4.Close the cover and press down until it clicks shut. The detergent will automatically
be released into the dishwasher during the wash programme.
Open the
cover here
wash compartment

16
Before first Use
► If you want to change the Rinse AId setting, press to change the setting in
steps between R1 ( minimum dispense) and R4 ( maximum dispense).
► If you want to activate/de-activate the buzzer, Press to toggle Buzzer
On (LED on) or Buzzer OFF (LED off).
3.Press and hold the for 3S to save the setting and exit the setting mode.
How to Adjust User Preference Settings for LED Models
During the selection of programmes, press and hold for about 5 seconds to enter
the user preference settings. User preference settings include Water Softener
setting,Buzzer setting,Rinse Aid setting and Memo Mode setting.
1.The appliance is switched on.
2. Press and hold the for 5S to enter the user setting mode, and all LEDs will
flash for 1s and then turn off. If you want to adjust the water softener, press
to scroll the setting between S1 and S6 (the default is S4) as the table below:
P1 P2 P3 P4 Zoom Sx level
0 0 0 0 0 S1
1 0 0 0 0 S2
1 1 0 0 0 S3
1 1 1 0 0 S4 default
1 1 1 1 0 S5
1 1 1 1 1 S6
3h
6h
9h
Rx level
0 0 0 R1 Empty
1 0 0 R2 3ml
1 1 0 R3 5ml default
1 1 1 R4 6ml
The LED displays as follows:
► If you want to Turn On/Turn Off the Memo Mode, press as follows:
Salt/Rinse symbol Memo mold
0OFF default
1ON
17
Before first Use
5.The display shows the current level of Rinse Aid after 5 seconds. The level setting
is from R1-R4, and the default is R3.Press the additional function key to set the
level backward:R3-R2-R1-R2-R3-R4.Press the Salt / Rinse reset key to set the
level forward:R3-R4-R1-R2-R3-R4.Press the program selection key to save the
current level and enter the Memo setting.Or press and hold the power key for 3S
to save the settings and enter the program selection state.
4.The display shows BUZZER, and displays NO after 5S. The default is NO.Press the
Salt / Rinse reset key to set to NO.Press the program selection key to save
the current level and enter the Rinse Aid setting.Or press and hold the power key
for 3S to save the settings and enter the program selection status.
How to Adjust User Preference Settings for DIGIT Models
During the selection of programmes, press and hold the program selection key
for 5S to enter the user setting mode.User setting mode includes Language setting,
Water Softener setting, Buzzer setting,Rinse Aid setting and Memo Mode setting.
1.The appliance is switched on.
2. Press the program selection key to enter the Language setting menu, and the
display will show the current language.Press to move backward and
to move forward between the 25 languages.Press the program selection key
again to save the current selection language and enter the Water Softener setting
menu.Or press the power key for 3S to save the settings and enter the program
selection state.
6.The digital tube will scroll to display the MEMO FUNCTION, and displays NO after
5S.Press the Salt / Rinse reset key to switch between YES and NO.Press the
program selection key to save the current level and enter the Language setting.
Press and hold the power key for 3S to save the settings and enter the program
selection state.
3. The current water hardness level will be displayed after the display shows
SOFTENER 5S. The default level is S4. The level setting is from S1 to S6.Press the
additional function key to set the level backward: S3-S2-S1-S2-S3-S4-S5-S6.
Press the Salt / Rinse reset key to set the level forward S4-S5-S6-S1-S2-S3-S4.
Press the program selection key to save the current level and enter the Buzzer
setting.Or press and hold the power key for 3S to save the settings and enter the
program selection state.
18
Daily Use
1. Open the door and Press the ON/OFF button to turn the dishwasher on.
*The display will show the wash programme time.
3. Press to start the programme and close the door.
2.Press to select the program you want on the dishwasher control panel.
NOTICE
Start a Programme
If the MEMO MODE YES.The appliance remembers the last programme
you used. The next time the appliance will switch on, the appliance pre-selects
the programme last used.
Set a start time by the following procedure in order to delay a programme start:
1.Set a programme.
2.Press and hold the reservation button until the display flashes the required
delay time (from 1 to 24hours).
*The LED molds delay time is 3h,6h,9h.
3.Press the START/PAUSE button and close the door.
The display shows the countdown of the start delay. The countdown decreases
with steps of 1 hour.
When the countdown is completed, the programme starts.
Start a Programme with Delay
Pause and restart a wash programme
1. Open the door carefaly to pause the programme.The time remaining will flash
and the pause beep will sound while the dishwasher is paused.
NOTICE
There is a risk of being sprayed with hot water,do not fully open the door until
the spray arms have stopped rotating.
2.Load,remove,or rearrange any dishes if needed.
3.Close the door to restart the programme.
Cancel or change a wash programme
Open the door carefully to pause the programme.Press and hold 3 sec,
Washing program reset.And then you can choice a new wash programme to start.
19
Daily Use
When the current reservation time is displayed for 24h,or other time.
Press the reservation button again to cancel the reservation.
1. Press the or for about 3 second.
The start delay is cancelled.
The programme is aborted.
2. Start a new programme and a delayed start if desired.
If a programme will be aborted in the process of washing dishes, the residue of
detergent remains on the dishes. These can cause damage to health! Make sure to
rinse off the detergent residues completely before using these dishes again.
If the door will be opened immediately after the end of programme, hot steam can
escape. Danger of scalding!Open the door carefully!
When the programme is completed, the display shows END OF CYCLE and an
accoustic signal is heard (if it is not switched off). The display switches off.
1.Press to switch off the appliance or the appliance switches into standby mode
automatically after 1 minutes.
2. Open the door.
3. Remove dishes:
Open the door slightly and leave it ajar (about 100 mm) to help the drying
process.
Let the dishes become cold before removing them from the appliance. Hot
dishes damage more easily.
First remove the items from the lower basket, then from the upper basket.
CAUTION
CAUTION
Cancel a Delayed Start
Cancel Start Delay / Programme
End of Programme

20
Care and cleaning
Over time, food residue or limescale deposits may accumulate inside your
dishwasher.These may reduce efficiency, and food residue may produce a bad
odour. Inspect and clean your dishwasher regularly.
● To clean exterior surfaces of the dishwasher, wipe with a clean, soft damp cloth
and dry with a clean, lint-free cloth.
● For non-flush surfaces wipe along or around the surface. For example, to wipe
down the exterior control buttons, use a circular wiping motion around the button.
● Take care not to cause excessive wetting of the control panel area.
Note: before cleaning the control panel, it is useful to disable the buttons by
activating Keylock.
Clean thoroughly with warm water on a soft, lint-free cloth. If the interior is heavily
soiled, use a dishwasher cleaner/descaler following the manufacturer’s instructions.
The filters prevent larger food particles in the wash water from reaching the pump.
These particles may occasionally block the filters. We recommend cleaning the
filters whenever there is evidence of food particles.
Cleaning the dishwasher exterior
Cleaning the door seal and dishwasher interior
IMPORTANT !
● Before any cleaning or maintenance, always disconnect the dishwasher from the
power supply, turn off the water supply, and wait until all parts of the dishwasher
have cooled.
● Do not use the following cleaning aids, as they may damage the surfaces:
-plastic or stainless steel scouring pads
-abrasive, solvent, household cleaners
-acid or alkaline cleaners
-laundry detergents or disinfectants
-stainless steel cleaners or polishes
-hand-washing liquids or soap
● Where there is broken crockery or glass in the dishwasher, it must be carefully
removed to prevent personal injury or damage to the appliance.
● After cleaning, always check that the spray arms and filters are all correctly in
place.
21
Care and cleaning
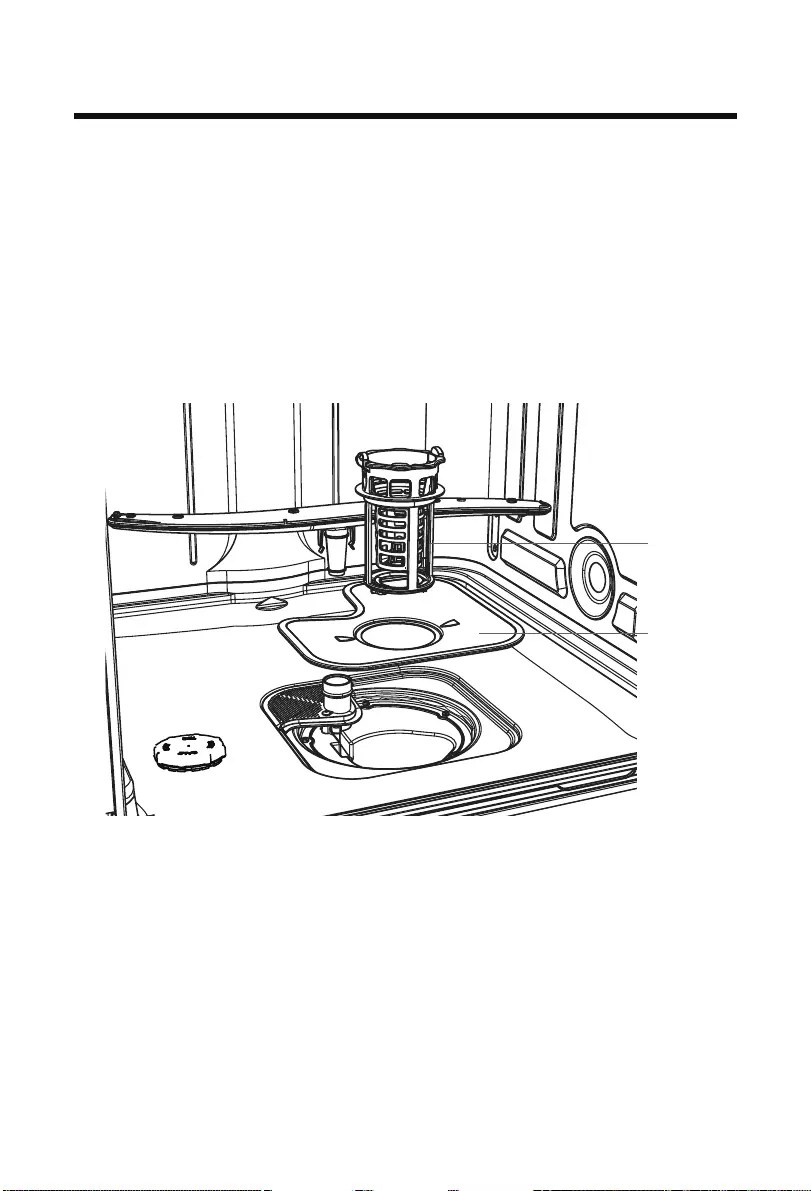
● To remove the drain
filter, turn the
filter anti-clockwise to release, then lift out.
● Once the drain filter has been removed you can lift the filter plate out.
● Rinse them thoroughly under running water and then replace.
Replace the filters correctly after cleaning, making sure the filter plate is flush with
the dishwasher base.
IMPORTANT !
When cleaning the underside of the filter plate, take care handling its sharp outer
edge.
Cleaning the spray arms
Cleaning the upper spray arm/head
Limescale and food particles in the wash water can block the holes in the spray
arms and the arm mountings. Clean these parts about once a month, or more often
should the need arise.
Do not remove the upper spray arm for cleaning. Clean with a small plastic-bristled
brush, or if heavily soiled or blocked use a dishwasher cleaner/descaler following
the manufacturer’s instructions.
Drain filter
Filter plate
22
Care and cleaning
Cleaning the centre spray arm
● To remove the centre spray arm, carefully unscrew its locking nut.
● Rinse the spray arm thoroughly under running water, then refit.
IMPORTANT !
Make sure you twist the locking nut on the centre spray arm firmly back on the
water supply tube.Check that the centre spray arm is firmly locked in place and
rotates freely.
Cleaning the lower spray arm
To remove the lower spray arm, simply lift the spray arm off its mounting.
Rinse the spray arm thoroughly under running water, then refit it on its mounting.
Lower spray arm
Centre spray arm
Locking nut
Water supply tube
23
Troubleshooting
● Before maintenance, deactivate the appliance and disconnect the mains plug from
the mains socket.
●Electrical equipment should be serviced only by qualified electrical experts,
because improper repairs can cause considerable consequential damages.
Many occuring problems could be solved by yourself without specific expertise. In
case of a problem please check all shown possibilities and follow below instructions
before you contact an after sales service.
The appliance does not start, or it stops during operation or Indicator is lighted
Problem Possible cause Possible solution
The programme
does not start.
Appliance door is open. Close the appliance door.
Delay start is set. Refer to displayed time.
Mains plug is not connected
in the mains socket. Connect the mains plug.
Fuse in the house circuit is
damaged. Replace the fuse.
Rinse Aid Indicator
is lighted.
Rinse aid dispenser is empty. Refill Rinse aid until full.
Refill of rinse aid was not
confirmed.
CAUTION
Salt Aid Indicator
is lighted.
Softener salt is empty. Fill the tank up with specific
salt until full.
Refill of salt was not
confirmed.
Press button for 3 sec
after each refill.
Press button for 3 sec
after each refill.

24
Troubleshooting
Problem Possible cause Possible solution
Acoustic alarm,
display shows
ALARMCODE
The appliance does
not fill with water.
Water tap is closed.
Open the water tap.
Note: Whenever Error is
s o l v e d s w i t c h o f f t h e
appliance and restart the
programm.
Water inlet hose has a kink or
a bend.
Make sure that the position of
the hose is correct.
In case of aqua-stop system:
water protection is triggered;
the marker (C) is red.
The hose must be replaced.
Filter in the water inlet hose
is clogged.
Clean the filter at the inlet
hose connections at tap and
the rear of the appliance.
Water inlet is clogged. Check water flow from tap.
Water pressure is too low. Contact your local water
authority.
Acoustic alarm,
display shows
ALARMCODE
The appliance does
Filters are clogged.
• Scoop out as much water as
possible.
• Clean filters.
• Continue programme by
pressing the START/PAUSE
button.
The drainage is blocked.
• Scoop out as much water as
possible.
•Make s u r e t h a t d r a i n
water connection and piping
is correct and not blocked.
• Continue programme by
pressing the START/PAUSE
button.
Acoustic alarm,
display shows
ALARMCODE
Leak: The drainpump
runs permanently!
Anti- flood device is on:
•There are water leakages in
the appliance.
•The water inlet valve is
open and blocked.
•The drainage is blocked.
1.Close the water tap.
2.Disconnect appliance from
power supply.
3.Contact Service.
Error codes on the display
All other Alarmcodes:
1. Note Alarmcode
2. Contact Service ; refer to CUSTOMER SERVICE
E20
E30
E10
Or all LED lights
flash once every 3s
Or all LED lights
flash twice every 3s
Or all LED lights
flash 3 times every
3s

25
Troubleshooting
Problem Possible cause Possible solution
The dishes are not
clean.
Filters are clogged. Clean the filters.
Filters are not correctly
assembled and installed.
Make sure that the filters
are correctly assembled and
installed.
Spray arms are clogged.
Remove remaining food
remnants with a thin pointed
object.
Programme was not
applicable for the type of load
and food remnants.
Make sure that the
programme is applicable for
the type of load and food
remnants.
Incorrect position of the items
in the baskets. Water could
not wash all items.
Make sure that the position
of the items in the baskets is
correct and that the water can
easily wash all items.
Spray arms could not turn
freely.
Make sure that the position
of the items in the baskets is
correct and does not cause
the blockage of the spray
arms.
No detergent or insufficient
quantity of detergent in the
detergent dispenser.
Make sure that you add the
correct quantity detergent in
the dispenser before you start
a programme.
The wash cycle was
interrupted by a long break.
Do not open the door or cut
power supply during the wash
cycle.
Whitish streaks,
s t a i n s o r b l u i s h
layers on glasses
and dishes.
Released quantity of rinse aid
is too much.
D e c r e a s e t h e r e l e a s e d
quantity of rinse aid.
Quantity of detergent was too
much.
Make sure that you add the
correct quantity of detergent
in the dispenser before you
start a programme.
Multitab detergent tablets
used with a short programme
might not fully dissolve.
Select a longer programme
when using Multitab detergent
tablets.
Washing Results are not satisfactory

26
Troubleshooting / Technical Data
Problem Possible cause Possible solution
Dry water drop
stains on glasses
and dishes.
Rinse aid dosage is too low. Increase the released quantity
of rinse aid.
Q u a l i t y o f r i n s e a i d o r
Multitab.stains on glasses
Cleaning product too old;
change the product.
The dishes are wet.
• Programme had no drying
phase.
• Programme had a low
temperature drying phase.
Open the door slightly and
leave it ajar (about 100 mm)
to help the drying process.
The dishes are
wet and matte.
Rinse aid dispenser is empty.
R ef il l r in s e a id i nt o t he
dispenser and reset the rinse
aid indicator.
Quality of rinse aid or Multitab. Cleaning product too old;
change the product.
27
Suppliers name or trade mark Candy
Supplier´s model identifier
-place settings
Power consumption (Po)
in off-mode in W
Rated capacity in standard
Energy consumption (Et) of the
standard cleaning cycle in kWh
Energy efficiency class 1)
Annual energy consumption
(AEc) in kWh/year 2)
Annual water consumption
(AWc) in liter/year 3)
Drying efficiency class 4)
Standard programme
(standard cleaning cycle) 5)
Programme time for the stan-
dard cleaning cycle in minutes
Duration of the left-on
mode (Tl) in minutes
Airborne acoustical noise
emissions in dB(A) re 1pW
Mounting / optional mounting
1) A+++ (highest efficiency) to D (lowest efficiency).
2) Energy consumption is based on the standard cleaning cycle (280 per year) using
cold water fill and the consumption of the lower modes. Actual energy consumption
will depend on how the appliance is used.
3) Water consumption in litres per year, based on 280 standard cleaning cycles.
Actual water consumption will depend on how the appliance is used.
4) A (highest efficiency) to G (lowest efficiency).
5) This programme is suitable to clean normally dirtied tableware and it is the most
efficient programme in terms of its combined energy and water consumption for that
type of tableware.
Total absorbed power
Colour
222
9
A+
0.78
0.3
2520
A
ECO
298
1
52
9
230V/50Hz
1930 W
222
9
A+
0.78
0.3
2520
A
ECO
298
1
52
BI Full-integrated
Silver
222
9
A+
0.78
0.3
2520
A
ECO
298
1
49
197
9
A++
0.69
0.3
2520
A
ECO
298
1
49
Maximum current intensity
Mains water pressure
Power voltage
0.04-1 MPa (= 0.3-1 0 bar)
Technical Data
CDIH 1L952 CDIH 1D952 CDIH 1L949 CDIH 2D949
28
Suppliers name or trade mark Candy
Supplier´s model identifier
-place settings
Power consumption (Po)
in off-mode in W
Rated capacity in standard
Energy consumption (Et) of the
standard cleaning cycle in kWh
Energy efficiency class 1)
Annual energy consumption
(AEc) in kWh/year 2)
Annual water consumption
(AWc) in liter/year 3)
Drying efficiency class 4)
Standard programme
(standard cleaning cycle) 5)
Programme time for the stan-
dard cleaning cycle in minutes
Duration of the left-on
mode (Tl) in minutes
Airborne acoustical noise
emissions in dB(A) re 1pW
Mounting / optional mounting
1) A+++ (highest efficiency) to D (lowest efficiency).
2) Energy consumption is based on the standard cleaning cycle (280 per year) using
cold water fill and the consumption of the lower modes. Actual energy consumption
will depend on how the appliance is used.
3) Water consumption in litres per year, based on 280 standard cleaning cycles.
Actual water consumption will depend on how the appliance is used.
4) A (highest efficiency) to G (lowest efficiency).
5) This programme is suitable to clean normally dirtied tableware and it is the most
efficient programme in terms of its combined energy and water consumption for that
type of tableware.
Total absorbed power
Colour
230V/50Hz
211
10
A++
0.74
0.3
2520
A
ECO
298
1
47
BI Full-integrated
10
Silver
1930 W
211
10
A++
0.74
0.3
2520
A
ECO
298
1
47
Maximum current intensity
Mains water pressure
Power voltage
0.04-1 MPa (= 0.3-1 0 bar)
Technical Data
CDIH 2L1047 CDIH 2T1047

29
Suppliers name or trade mark Candy
Supplier´s model identifier
-place settings
Power consumption (Po)
in off-mode in W
Rated capacity in standard
Energy consumption (Et) of the
standard cleaning cycle in kWh
Energy efficiency class 1)
Annual energy consumption
(AEc) in kWh/year 2)
Annual water consumption
(AWc) in liter/year 3)
Drying efficiency class 4)
Standard programme
(standard cleaning cycle) 5)
Programme time for the stan-
dard cleaning cycle in minutes
Duration of the left-on
mode (Tl) in minutes
Airborne acoustical noise
emissions in dB(A) re 1pW
Mounting / optional mounting
1) A+++ (highest efficiency) to D (lowest efficiency).
2) Energy consumption is based on the standard cleaning cycle (280 per year) using
cold water fill and the consumption of the lower modes. Actual energy consumption
will depend on how the appliance is used.
3) Water consumption in litres per year, based on 280 standard cleaning cycles.
Actual water consumption will depend on how the appliance is used.
4) A (highest efficiency) to G (lowest efficiency).
5) This programme is suitable to clean normally dirtied tableware and it is the most
efficient programme in terms of its combined energy and water consumption for that
type of tableware.
Total absorbed power
Colour
222
9
A
0.78
0.3
2520
A
ECO
298
1
49
9
Silver
230V/50Hz
1930 W
211
10
A
0.74
0.3
2520
A
ECO
298
1
47
BI Full-integrated
10
Silver
1930 W
211
10
A
0.74
0.3
2520
A
ECO
298
1
47
10
Silver
1930 W
Maximum current intensity
Mains water pressure
Power voltage
0.04-1 MPa (= 0.3-1 0 bar)
Technical Data
CDIH 1L949-08 CDIH 2L1047-08 CDIH 2D1047-08

30

0120503014

Посмотреть инструкция для Candy CDIH 1L949-08 бесплатно. Руководство относится к категории посудомоечные машины, 1 человек(а) дали ему среднюю оценку 7. Руководство доступно на следующих языках: русский. У вас есть вопрос о Candy CDIH 1L949-08 или вам нужна помощь? Задайте свой вопрос здесь
Не можете найти ответ на свой вопрос в руководстве? Вы можете найти ответ на свой вопрос ниже, в разделе часто задаваемых вопросов о Candy CDIH 1L949-08.
Что мне делать при появлении в посудомоечной машине неприятного запаха?
Следует ли предварительно ополаскивать посуду?
Сколько средства для мытья посуды следует использовать?
Как добавлять в посудомоечную машину соль?
Какой вес Candy CDIH 1L949-08?
Какая ширина Candy CDIH 1L949-08?
Какая толщина Candy CDIH 1L949-08?
Какую маркировку энергоэффективности Candy CDIH 1L949-08 имеет?
Инструкция Candy CDIH 1L949-08 доступно в русский?
Не нашли свой вопрос? Задайте свой вопрос здесь
Ремонт посудомойки Candy CDI 1L949
Вышедшая из строя посудомойка — не повод, чтобы мыть посуду руками. Быстро отремонтируем вашу машину Candy CDI 1L949, так что посуда не успеет накопиться. Приезжаем на вызов в течение 24 часов, устраняем неисправность при вас, даём официальную гарантию до 2 лет. Территория обслуживания — вся Москва и ближнее Подмосковье.
Требуется руководство для вашей Candy CDIH 1L949-08 Посудомоечная машина? Ниже вы можете просмотреть и загрузить бесплатно руководство в формате PDF. Кроме того, приведены часто задаваемые вопросы, рейтинг изделия и отзывы пользователей, что позволит оптимально использовать ваше изделие. Если это не то руководство, которое вы искали, – свяжитесь с нами.
Ваше устройство неисправно, и в руководстве отсутствует решение? Перейдите в Repair Café для получения бесплатных ремонтных услуг.
Руководство

Рейтинг
Сообщите нам, что вы думаете о Candy CDIH 1L949-08 Посудомоечная машина, оставив оценку продукта. Хотите поделиться вашими впечатлениями от данного изделия или задать вопрос? Вы можете оставить комментарий в нижней части страницы.
Довольны ли вы данным изделием Candy?
Да Нет
Будьте первым, кто оценит это изделие
0 голоса
Часто задаваемые вопросы
Наша служба поддержки выполняет поиск полезной информации по изделиям и отвечает на часто задаваемые вопросы. Если вы заметили неточность в наших часто задаваемых вопросах, сообщите нам об этом с помощью нашей контактной формы.
После завершения цикла посудомоечной машины отсек с моющим средством не открылся. Почему? Проверенный
Данная проблема часто возникает, когда посуда блокирует отсек. Прежде, чем запускать машину, убедитесь, что отсек не заблокирован.
Это было полезно (7475)
Почему посудомоечная машина перестала нагревать воду? Проверенный
Скорее всего, нагревательный элемент неисправен. Его следует заменить. В случае сомнений обратитесь к производителю.
Это было полезно (6646)
Можно ли в посудомоечной машине использовать обычную соль? Проверенный
Нет, поваренная соль может содержать вещества, которые споcобны повредить ваше устройство.
Это было полезно (2908)
Нужно ли ополаскивать посуду, прежде чем поместить ее в посудомоечную машину? Проверенный
Ополаскивать посуду необязательно, однако следует удалить все крупные, твердые и жирные остатки пищи. Со временем они могут засорить слив.
Это было полезно (1145)
Могу ли я открыть посудомоечную машину во время ее работы? Проверенный
Большинство посудомоечных машин оснащены устройством остановки подачи воды, благодаря чему программа останавливается сразу же при открытии дверцы, что означает, что вода не будет вытекать. С некоторыми моделями со временем это может вызвать проблемы. При использовании встраиваемых посудомоечных машин частое открывание посудомоечной машины во время работы может привести к повреждению окружающих шкафов водой из-за выделяющегося пара.
Это было полезно (855)
Следует ли открывать посудомоечную машину после того, как она закончила работу, чтобы посуда высохла быстрее? Проверенный
Это зависит от типа посудомоечной машины и ее расположения. Некоторые посудомоечные машины оснащены функцией сушки посуды после программы мойки. В этом случае открытие посудомоечной машины не принесет никакой пользы. При использовании встраиваемых посудомоечных машин частое открывание посудомоечной машины во время работы может привести к повреждению окружающих шкафов водой из-за выделяющегося пара.
Это было полезно (675)
После того, как посудомоечная машина завершит свой цикл, пластиковая посуда еще влажная, а остальная — нет. Это почему? Проверенный
Пластик — плохой проводник тепла, позволяющий продуктам быстро остывать. Влага, которая остается на нем, испаряется гораздо меньше, чем, например, на керамике или металле.
Это было полезно (598)
Можно ли мыть посуду с тефлоном в посудомоечной машине? Проверенный
Да, ты можешь. Однако сковорода изнашивается быстрее, чем при ручной очистке. При чистке сковороды тефлоном вручную никогда не используйте мочалку, а используйте мягкую губку или ткань.
Это было полезно (532)
Можно ли подключить посудомоечную машину к удлинителю? Проверенный
Технику, требующую большого количества энергии, например посудомоечную машину, нельзя подключать ко всем удлинителям. Посмотрите, какова потребляемая мощность посудомоечной машины, которая указывается в ваттах, и проверьте, справится ли с этим удлинитель. Существуют удлинители с более толстыми кабелями, предназначенные для работы с более крупными приборами.
Это было полезно (531)
Можно ли мыть в посудомоечной машине деревянные предметы, например, шпатели и разделочные доски? Проверенный
Нет. Деревянные предметы можно повредить или покоробить в посудомоечной машине. Кроме того, высвобождающиеся древесные волокна могут повредить посудомоечную машину. Деревянные разделочные доски часто изготавливаются с использованием клея, который может отслоиться после нескольких раз мытья в посудомоечной машине.
Это было полезно (531)
Царапины на металле внутри посудомоечной машины — это проблема? Проверенный
Внутренняя часть большинства посудомоечных машин изготовлена из нержавеющей стали и не подвержена царапинам.
Это было полезно (530)
Информация о товаре носит справочный характер и не является публичной офертой. Характеристики, комплект поставки и внешний вид товара могут отличаться от указанных или быть изменены производителем без предварительного уведомления. Перед покупкой проверяйте информацию на официальном сайте производителя.
Если вы заметили ошибку или неточность в описании товара, пожалуйста, выделите часть текста с ошибкой и нажмите кнопку «Сообщить об ошибке».
Встраиваемая посудомоечная машина Candy Brava CDIH 1L949-08
расход воды — 9 л, кол-во комплектов — 9, защита от протечек, 45.2 см х 81.8 см — 87.8 см х 57.7 см
подробнее

4986,70
Код товара: 5339521