
Серия BHT-002 была разработана для управления электрическими полами/водяными полами/газовым отоплением. Эти агрегаты предназначены для использования в коммерческой, промышленной и бытовой недвижимости.
ОПИСАНИЕ МОДЕЛИ BHT-002-GALW
- управление водяным теплым полом;
- подсветка;
- еженедельно программируемый;
- Wi-Fi;
- встроенный датчик
ФУНКЦИИ
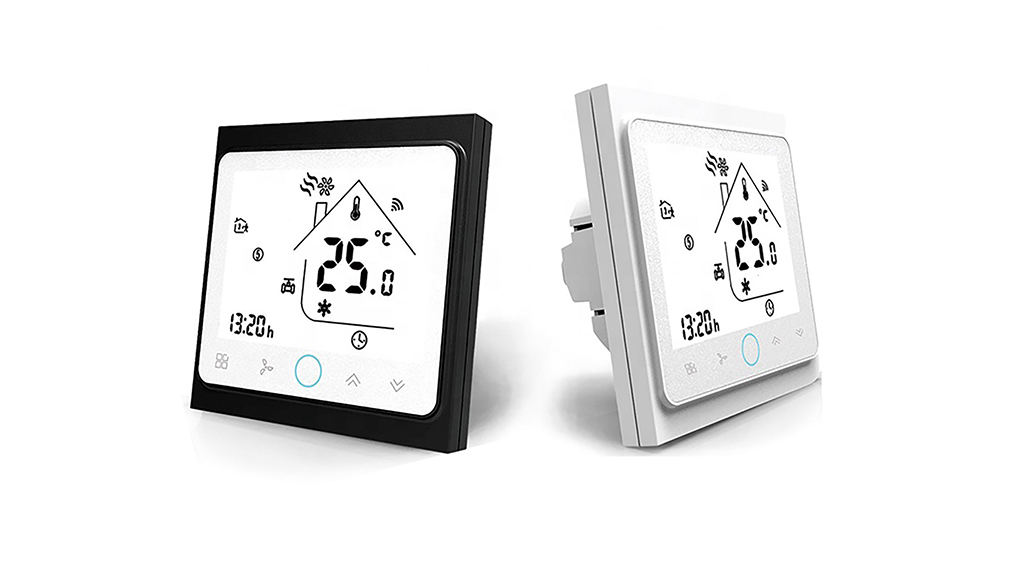
Внешний вид
- Удобная эксплуатация.
- Варианты черно-белого корпуса.
- Современный дизайн гармонирует с любым декором.
- Сенсорный экран с подсветкой легко читается даже в темноте.
- Яркие кнопки всегда напоминают вам, что термостат работает.
- Простой пользовательский интерфейс может быть использован даже ребенком.
По функциональности
- WIFI
- Точность 0,5 °C поддерживает температуру в пределах установленного вами уровня.
- Память данных при выключенном питании.
- 5 + 2 программируемых шести периодов максимизируют комфорт и экономию.
- Возможность создать группу термостатов для централизованного управления
- Интегрирован с Amazon Echo, Google Home, Tmall Genie, IFTTT.
- Все языки настроек синхронизируют ваш часовой пояс, адрес и язык.
- Нет ограничений на добавление номеров и поддержку Smart Scene.
Технические характеристики |
|
| Электропитание | 95 ~ 240 В переменного тока, 50 ~ 60 Гц |
| Текущая нагрузка | 3А |
| Датчик | NTC встроенный |
| Точность | ± 0,5 ° C; |
| Заданная температура. Диапазон | 5 -35 ° C; |
| Дисплей Темп. Диапазон | 5 ~ 99 ° C; |
| Температура окружающей среды | 0 ~ 45 ° C; |
| Влажность окружающей среды | 5 ~ 95% относительной влажности (без конденсации); |
| Температура хранения | -5 ~ 45 ° C; |
| Потребляемая мощность | <1,5 Вт; |
| Ошибка синхронизации | <1%; |
| Материал корпуса | ПК + АБС (антипирен); |
| Коробка для установки | 86 * 86мм квадратная или европейская 60мм круглая коробка; |
| Проводные клеммы | провод 2 х 1,5 мм2 или 1 х 2,5 мм2; |
| Степень защиты | IP 20; |
| Кнопки | емкостные сенсорные кнопки. |

Купить можно тут: http://ali.pub/58948n
еще больше тут: http://ali.pub/58945j
Мой Home Assistant работает на raspberry pi 4: http://ali.pub/53kjyp
Данный термостат имеет следующие характеристики:
Прежде чем приступить к материалу, я Вас попрошу, если нравится то, что я делаю и хотите следить за моей деятельностью, то рекомендую подписаться на мой телеграмм канал: https://t.me/ypavla
Там я публикую новости о вышедших видео, статьях и разные устройства для умного дома и не только показываю.
Спасибо за внимание, теперь продолжим.
Модель: BHT-002GBLW (электрическое Напольное отопление с Wi-Fi/голосовым управлением)
Материал корпуса: поликарбонат, АБС-пластик (огнестойкий)
Цвет: белый, черный (опционально)
Дисплей: ЖК-дисплей с подсветкой
Сенсор: NTC
Источник питания: 95 ~ 240 В переменного тока, 50 ~ 60 Гц
Ток нагрузки: 16 А
Мощность Потребляемая мощность: <1,5 W
Точность: ± 0,5 ° или ± 1 °
Погрешность в времени: <1%
Комплект Temp. Диапазон: 5 ~ 35 °
Дисплей температуры. Диапазон: 5 ~ 99 °
Температура окружающей среды: 0 ~ 45 °
Влажность окружающей среды: 5 ~ 95% RH (без конденсации)
Температура хранения: -5 ~ 45 °
Монтажная коробка: 86*86 мм квадратная или европейская круглая коробка 60 мм (не входит в комплект)
Класс защиты: IP20
Товар Размеры: 86*86*13,3 мм
Посылка Размеры: 113*90*60 мм
Посылка, Вес: 263 г
Подключение проводов и wi-fi сети:
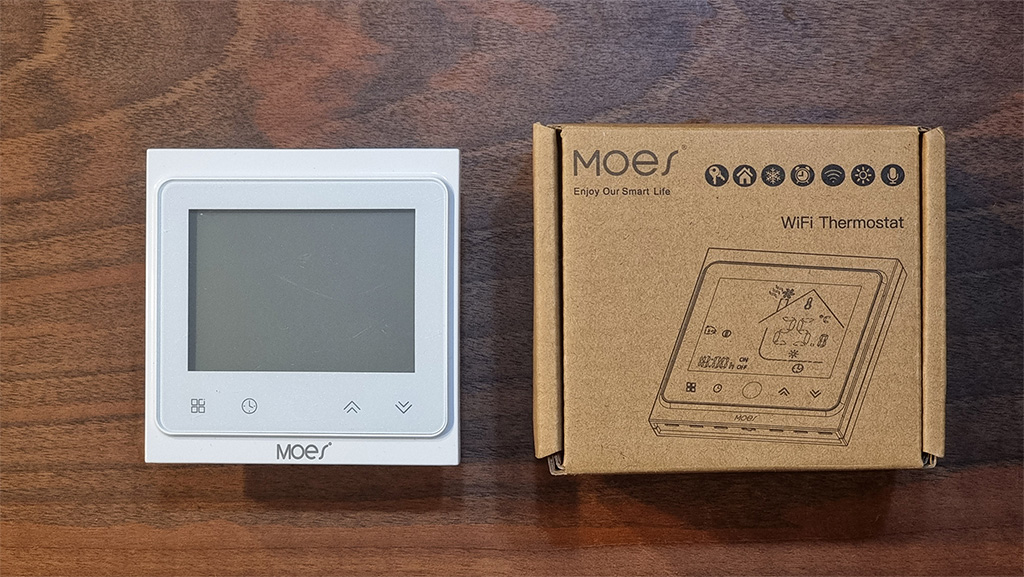
Это наверное самый дешевый термостат на aliexpress. Они существуют нескольких модификаций. Некоторые для электрического пола, другие для водяного отопления. Бывают с wi-fi и без. Но нам какраз интересен именно с wi-fi, так как мы сможем им управлять и наблюдать за показаниями в приложении.
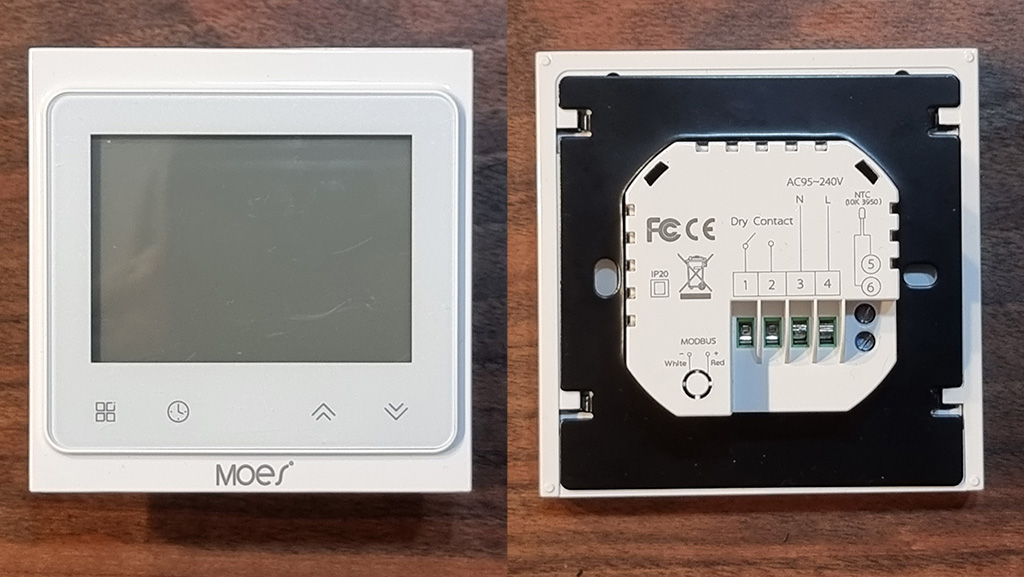
Вот так выглядит термостат сзади. Какраз сюда и подключаются все провода.
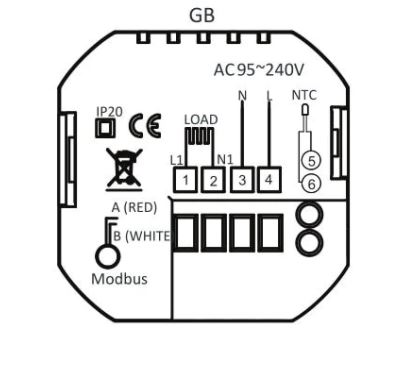
Контактные колодки все подписаны, поэтому их легко не перепутать.
1,2 колодки – подключение теплого пола
3,4 колодки – подключение сети 220В
5,6 колодки – подключение термодатчика (градусника)
После подключения всех компонентов термостат запустится и будет готов к работе.
Чтоб подключить термостат к wi-fi сети, необходимо выключить термостат, нажав на центральную круглую кнопку. После этого зажать клавишу вниз и подержать около 8 секунд, пока дисплей не начнет мерцать.
Далее устанавливаем приложение tuya smart на мобильный телефон, регистрируемся в нем. Далее нажимаем кнопку добавить устройство, находим в списке устройство “термостат” После чего у нас запросить ввести данные для подключения к wi-fi точке доступа. После этого произойдет загрузка компонентов и термостат наш будет успешно подключен к wi-fi сети и готов к работе в приложении tuya smart.
Ниже в видео я все эти действия постарался отобразить как можно нагляднее.
Подключение к Home Assistant:
Так как это устройство подключено к Tuya Smart, то подключение его к Home Assistant произойдет очень просто. Достаточно в configuration.yaml прописать следующие строчки:
tuya:
  username: login #логин от tuyasmart
  password: password #пароль от tuyasmart
  country_code: +7 #Код региона
Как видим добавление ограничивается 4 строчками. country_code: можно узнать тут.
Все после этого все устройства которые были подключены к аккаунту tuyasmart будут автоматически подгружаться в home assistant. В моем случае в аккаунте tuya находится только один термостат и собственно он и подгрузился. Но не без подводных камней.
Дело в том что термостат не корректно показывает температуру в Home Assistant. Он ее увеличивает в два раза. Возможно это связано с тем, что у датчика 2 градусника. Один выносной, а второй встроенный. Данная проблема уже больше года как присутствует и пока ее ни кто не исправил к сожалению. Поэтому при добавлении термостата в Lovelace у нас термостат показывает следующее :
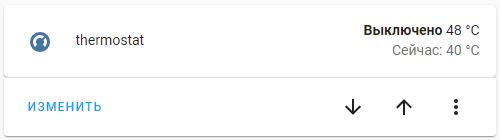
Собственно первое значение 48 – это 48/2 то есть 24 градуса “установленная температура”. А 40 – это 40/2=20 текущая температура.
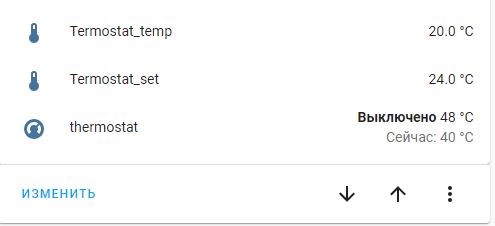
Полазив в интернетах (этих ваших) наткнулся на костыль, который отображение температуры делал корректным. Выглядит костыль следующим образом:
sensors:
  - platform: template
    sensors:
      termostat_temp:
        friendly_name: "Termostat_temp"
        unit_of_measurement: '°C'
        device_class: temperature
        value_template: "{{ (state_attr('climate.13101012d8bfbc00ab9d8','current_temperature'))/2 }}"

  - platform: template
    sensors:
      termostat_set:
        friendly_name: "Termostat_set"
        unit_of_measurement: '°C'
        device_class: temperature
        value_template: "{{ (state_attr('climate.13101012d8bfbc00ab9d8','temperature'))/2 }}"
Собственно здесь описаны два сенсора: Termostat_temp – это текущая температура термостата (Название можно поменять на удобное Вам). Termostat_set – это установленная температура ( Опять же можно поменять на удобную Вам).
Здесь Вам только нужно значение “climate.13101012d8bfbc00ab9d8” поменять на свое, которое у Вас подгрузилось из tuya smart. Это уникальный номер устройства, поэтому Ваше будет отличаться.
Ну и при добавлении в lovelace выглядеть все это будет следующим образом:
Подробнее в видео:
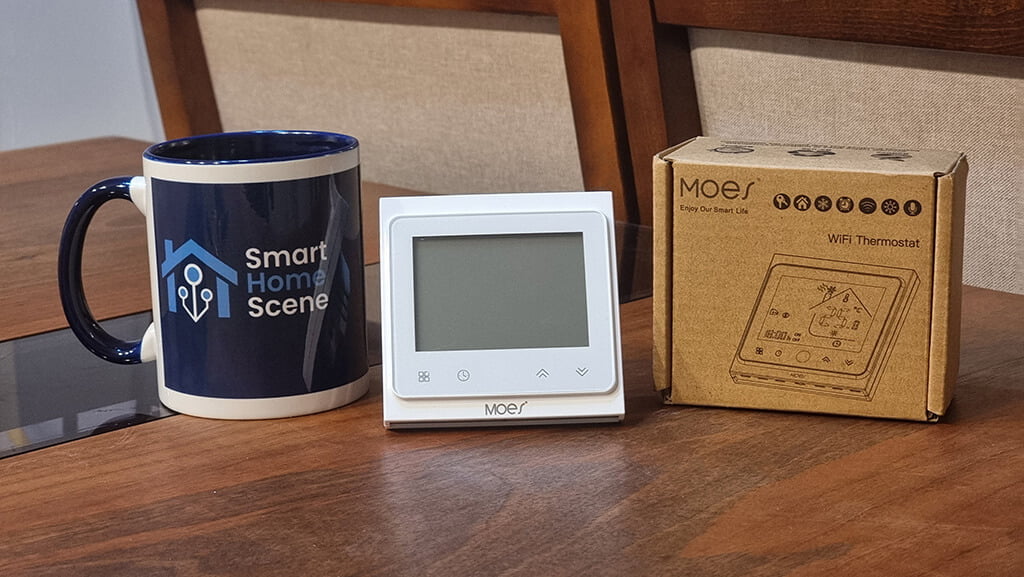
On our AliExpress Reviews channel, we test many devices from the Moes brand. This is because as far as cheap smart home hardware goes, most of them turned out to be of good build, solid quality and will not break your bank. Today we are looking at a smart thermostat sold by Moes, the BHT-002.
As usual, we are going to pry it open, check the quality of the components, integrate it in Home Assistant and talk about its pros and cons. Let’s get to it!
Technical Specification
- Sensor: NTC3950
- Accuracy: ±1°C
- Power Consumption: < 1.5W
- Timing Error: <1%
- Power Supply: 95 ~ 240VAC, 50 ~60Hz
- Current Load:
- 3A(water heating, water/gas boiler),
- 16A(electric heating)
- Ambient Temp.: 0-45°C,5-95%RH (Non-condensing)
- Storage Temp.: -5-55°C
- Set Temp. Range: 5-35°C
- Room Temp. Range: 5-99°C
- Shell material: PC+ABS (flame retardant)
- Dimension: 86x86x13.3mm
- Installation: 60mm box
What’s Inside?
The Moes ZigBee Smart Thermostat arrives neatly packed in a cardboard box, containing the thermostat, the manual of operation and some screw for mounting it on a wall. Its label says “WiFi Thermostat”, even though it’s the ZigBee version. This is probably done to save on packaging costs, so don’t have a small heart attack when you unpack it first.
On the front plate, the display frame is neatly placed together with a few capacitive touch buttons. We suspect your main operation of this device will be automated or controlled via Home Assistant, but nevertheless they are nice to have.
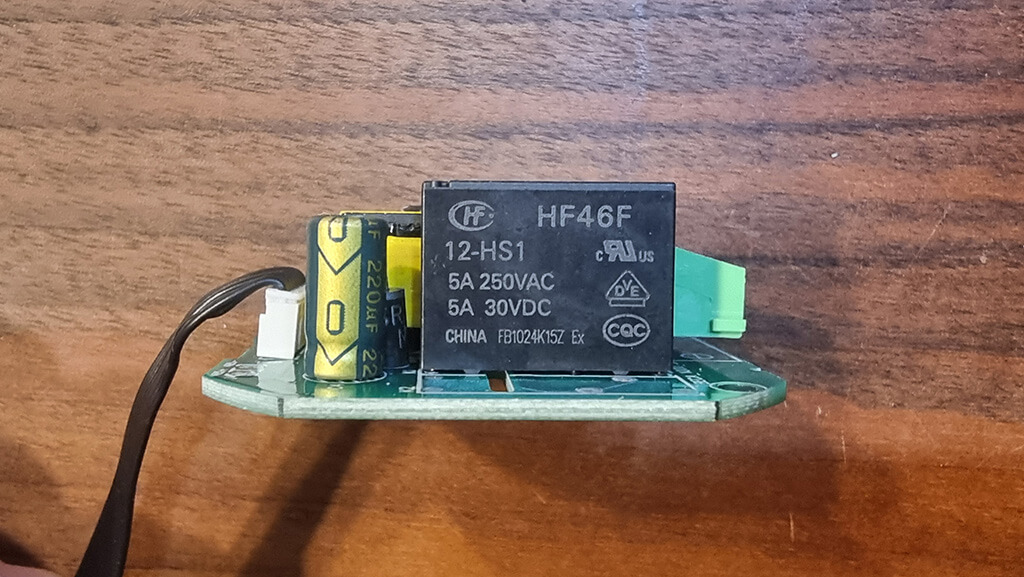
On the back plate, four main terminals are placed together with some labeling. Two of those are used to connect it to mains power, N and L, and the other two are used to connect your heating/cooling entity. This particular model is for a water boiler, which requires Dry Contact to simply complete the circuit and start the boiler.
Next to the main terminals, are two smaller terminals labeled NTC 10k 3950. These two are used for connecting an external temperature probe or thermistor. This connector is used to add a second external sensor, we explain further bellow.
Once we remove the backplate, we can see the main PCB is connected to the terminals and relay with a flat cable. A protective PVC foil separates the two, two prevent accidental short circuits and heat conduction.

The backplate PCB contains the 4 main terminals, as well as the 2 temperature sensor terminals on the side. The backside components are fairly standard, such as resistors, diodes and are soldered properly by a machine instead of some student in a factory somewhere.
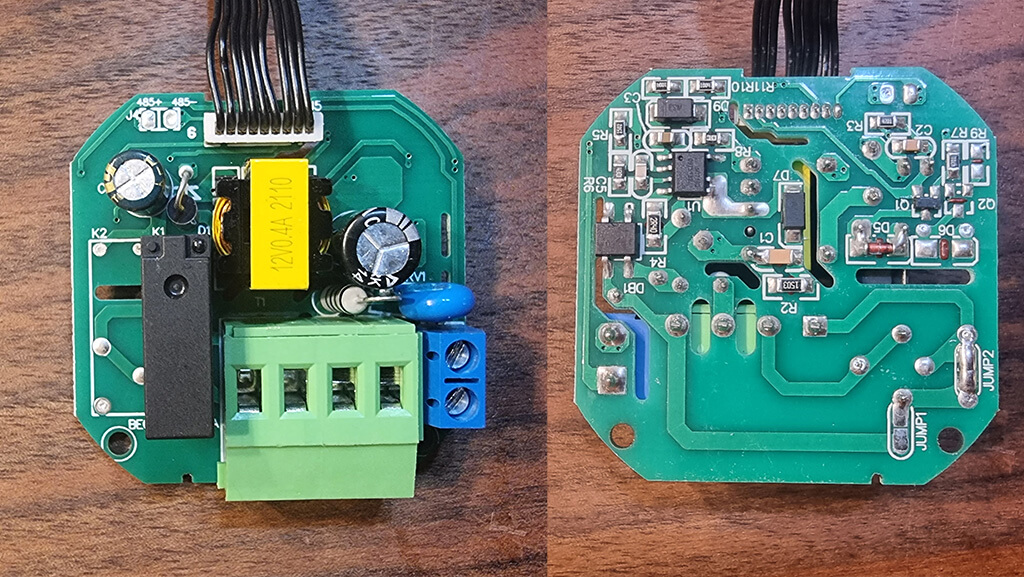
The relay HF46F is rated for 5A, considering this is the water boiler version (16A is electric heating). Its manufactured by Hongfa Technology, a Chinese industrial relay manufacturer based out of Xiamen-Zhangzhou. HONGFA boasts more than 30 subsidiaries worldwide, and its business covers more than 120 countries and regions.
Nevertheless, a distinct click can be heard when the relay is triggered, indicating a solid build quality. Quiet relays tend to be either very weak or of bad quality.
Note: If you ordered the Electric Heating version, this would be replaced by a 16A relay.
The front panel of the thermostat, contains the communication chip (in this case ZigBee) as well as the screen. The WiFi version of the thermostat would contain a WiFi communication module instead.
The built-in temperature sensor is mounted at the bottom of the metal plate sticking out of the body of the thermostat. It’s a NTC 10k 3950 thermistor sensor, which might need calibration after installation.
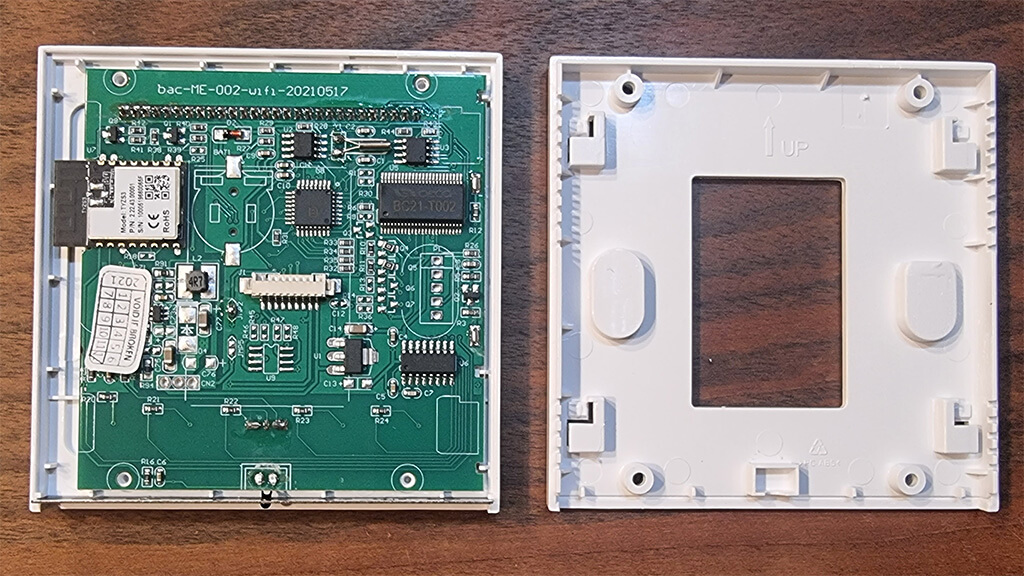
The chip itself is a Tuya model TYZS3 embedded with a low power-consumption 32-bit ARM Cortex-M4 core, 512-KB flash memory and 64-KB RAM. It’s fit for its purpose, and considering the nature of ZigBee it’s completely local.

Different Model Versions
Perhaps the most important part of this review, is to understand the differences between the model variants of the Moes Smart Thermostat. This would ensure you order the right version for your heating installation.
In general there are three main models in which this switch is produced:
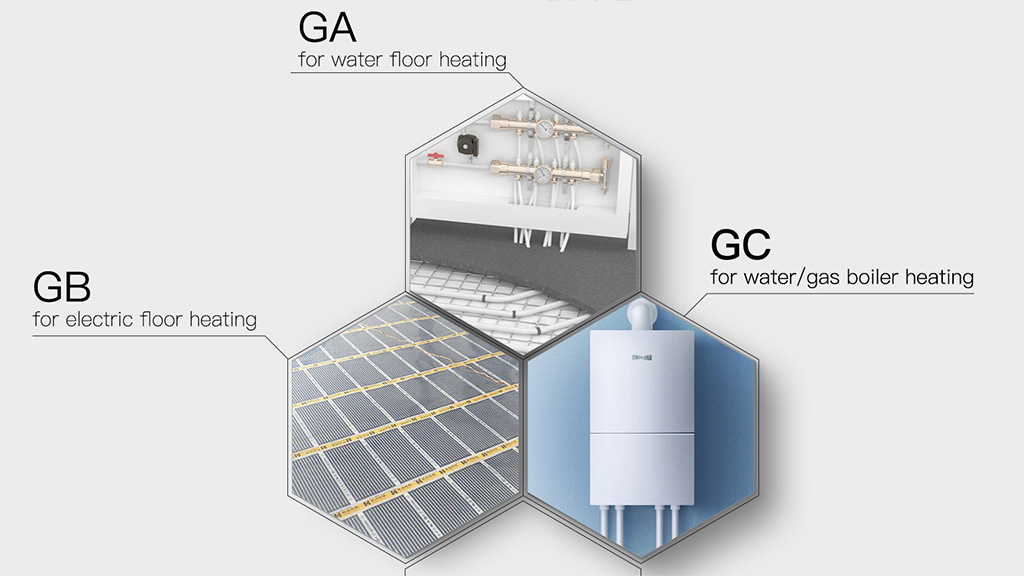
This further breaks down by connectivity, giving us a total of 9 different models.
- Standard (No Wi-Fi or ZigBee)
- BHT-002-GA: 3A Water Heating
- BHT-002-GC: 3A Water/Gas Boiler
- BHT-002-GB: 16A Electric Heating
- ZigBee:
- BHT-002-GALZ: 3A Water Heating
- BHT-002-GCLZ: 3A Water/Gas Boiler
- BHT-002-GBLZ: 16A Electric Heating
- Wi-Fi:
- BHT-002-GALW: 3A Water Heating
- BHT-002-GCLW: 3A Water/Gas Boiler
- BHT-002-GBLW: 16A Electric Heating
Picking The Right Model
IMPORTANT: The following explanation is just a general guideline and description! Do not take this advice exactly as written, if you are unsure ALWAYS consult with a certified electrician/HVAC installer. Alternatively, you can send us an email at editor@smarthomescene.com with your HVAC installation and we’ll try to help you pick.
Main Models: This may confuse some readers, but it’s fairly simple to distinguish:
- If you use an electric heating system (floor heating coil, electric radiators, quartz heaters, any kind of electric heaters), where larger amount of current needs to pass through the relay than the GB model is probably for you.
- If you use water heating, water boiler, gas boiler, pellet burners or similar where either small or no amount (dry contact) of electricity needs to pass through the relay, than the GA/GC model is probably for you
Connectivity: As usual, we advise you stay away from the Wi-Fi version as it is Tuya based. If you use ZigBee, than that’s the version for you (ending in LZ). You can also order the standard variant, without any connectivity whatsoever. The Moes Smart Thermostat is more than capable of working as a standalone HVAC controller. You can program it, schedule it by days, week, and adjust its system settings from the built-in menu (see further bellow).
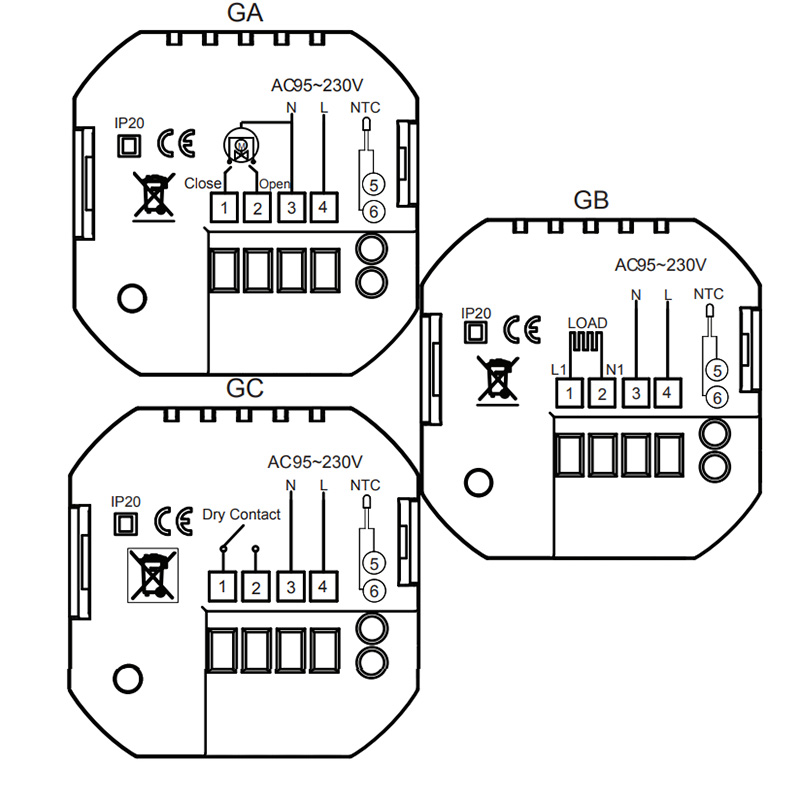
Wiring and Installation
The Moes Smart Home Thermostat BHT-002 is fairly easy to install. Considering most residential homes in need of a thermostat already have some sort of wires installed in a switchbox or maybe an old (dumb) thermostat.
- Connect the two wires from your heating appliance (water boiler, electric heating coil etc.) to terminals 1 and 2
- Connect the N-Neutral wire to the N-terminal of the thermostat, terminal 3
- Connect the L-Live wire to the L-terminal of the thermostat, terminal 4
- If you are installing an additional temperature sensor/probe, connect it to terminals 5 and 6
Features and Operation
This Moes Smart Thermostat is packed with features, capable of automating your heating system all by itself. It’s fully programable and with some interesting capabilities for calibration and control. First, refer to the image bellow to understand the basic features of the display:
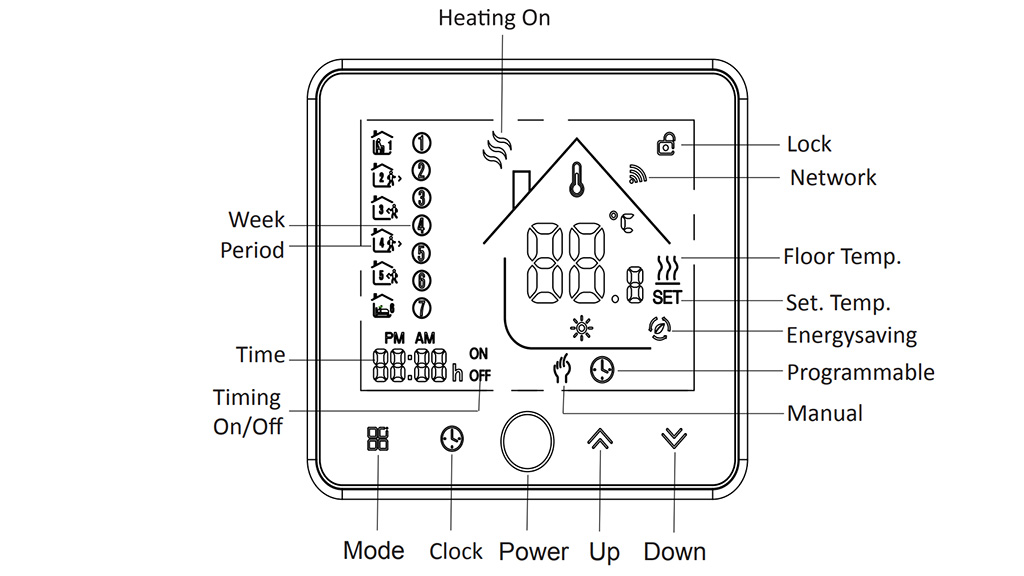
The programable options are pretty self explanatory and available on almost any thermostat. This is a fairly standard set of features also found in traditional (dumb) thermostats. What’s interesting is, the thermostats system setting can be adjusted right from the control display using the buttons without the need of an app/hub/integration.
You can calibrate the sensor temperature, lock the buttons on the thermostat and set a minimum and maximum temperature setting. Settings like 12/24hour clock can also be changed as well as cycle between two display modes. Switching from C-Celsius and F-Fahrenheit is also an option.
Most of these setting are directly accessible through your ZigBee integration, so no need to bother to adjust them from the built in settings menu. The Sensor Selection is one important adjustment you must do to ensure proper operation for your use case (this is also available in Z2M).
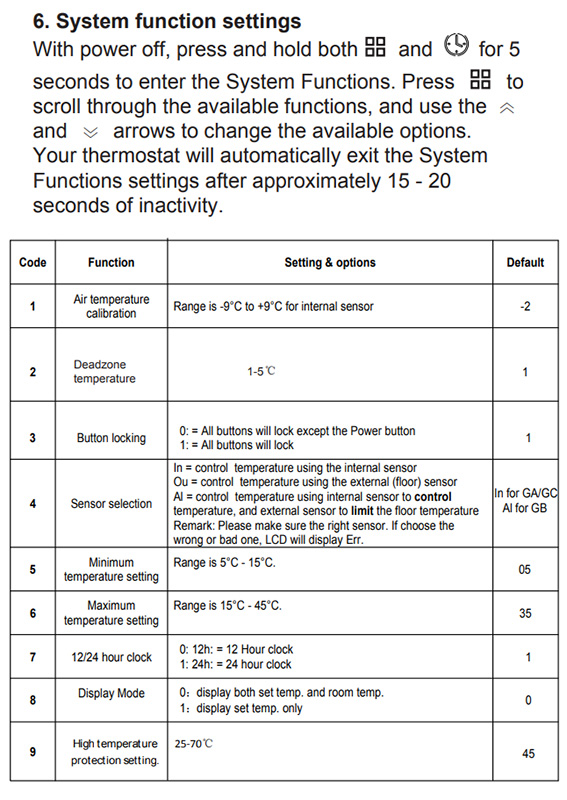
Correct Sensor Selection
Upon initial installation of the thermostat, a default sensor type will be selected automatically for the appropriate model of the device:
- IN – GA/GC (Water Heating/Water or Gas Boiler
- AL – GB (Electric Heating)
To use an external sensor, you need to change the selection to EX. You can change this setting in one of two ways:
- Using your ZigBee integration in Home Assistant
- Using the settings menu on the Moes Smart Thermostat (See Picture Above!)
Whichever method you choose, three options will be available:
- IN – Only Internal sensor used – To control or limit the temperature
- EX – Only External sensor used – To control or limit the temperature
- AL – Both Internal and External sensor used – Internal sensor to control the temperature, External sensor to limit the temperature
IMPORTANT: If you decide to connect an external sensor, you need to change the setting to EX or AL. Otherwise the thermostat will display an Err on the display and will not work!
Integration Compatibility
The Moes Smart Home Thermostat BHT-002 is officially supported in all three major ZigBee integrations, ZHA, Zigbee2MQTT and Deconz.
To pair it, first switch the thermostat off. Press and hold the temperature down button for +- 8 seconds to enable the pairing mode (display lights up and a Wi-Fi-like icon is blinking). After a successful interview with the coordinator you can turn the thermostat on again.
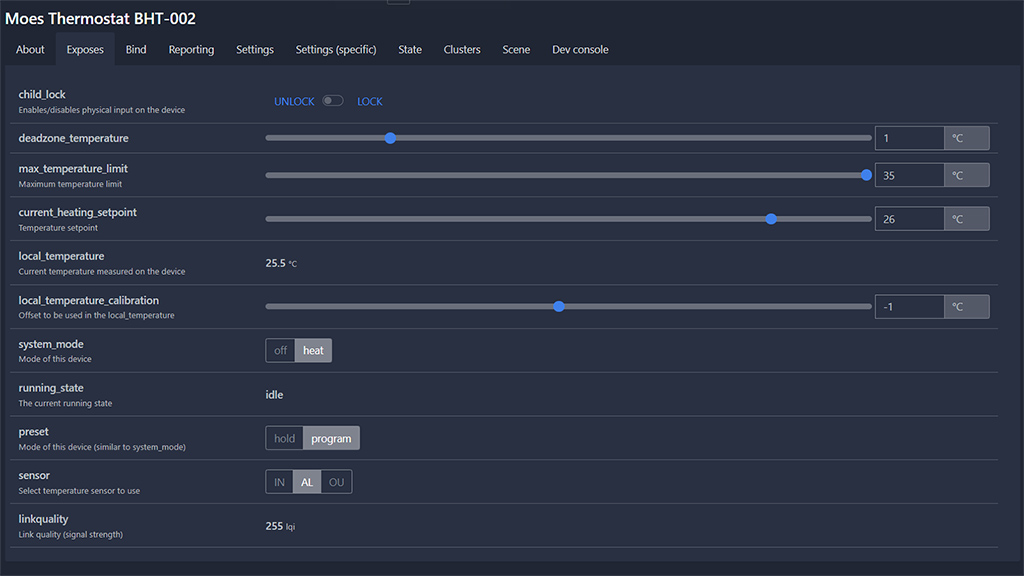
Once paired to your coordinator, the thermostat exposes a bunch of entities for settings and control:
- Lock Entity: For locking the touch control buttons
- Number Entity: Deadzone Temperature – The delta between local_temperature and current_heating_setpoint to trigger Heat
- Number Entity: Maximum Temperature Limit – Used to set the maximum temperature allowed
- Number Entity: Temperature Calibration – Used to calibrate the temperature reading of the sensor
- Select Entity: Used to select the sensor (IN, EX and AL)
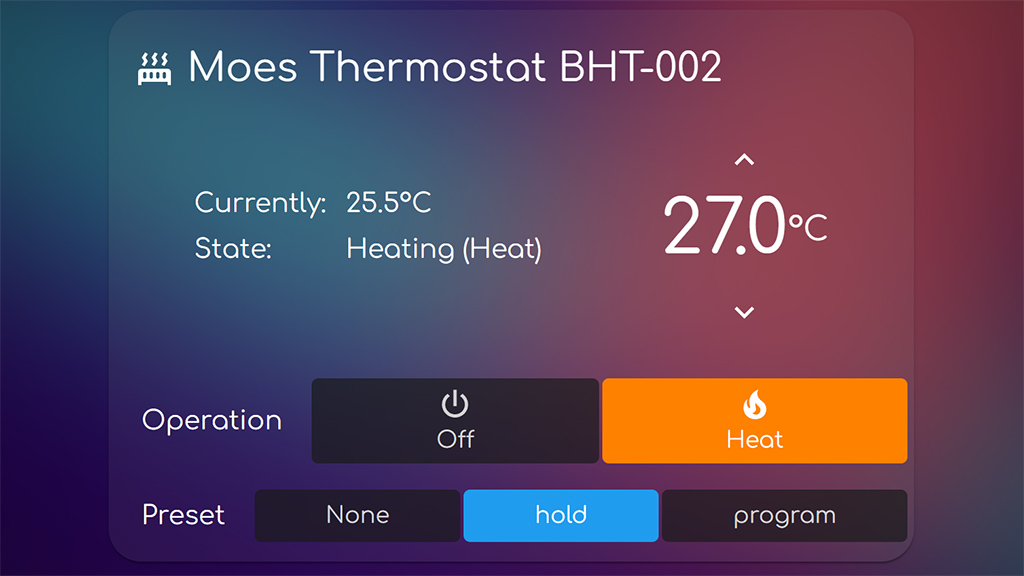
- Climate Entity:
- current_heating_setpoint: Temperature setpoint
- local_temperature: Current temperature measured by the sensor
- system_mode: Main mode of the device (Off, Heat)
- preset: Preset mode of the device (Hold, Program)
- running_state: The current running state (Idle, Heat, Cool)
- local_temperature_calibration: Offset calibrate the sensor temperature (local_temperature)
- Linkquality: Link quality (signal strength)
Usage
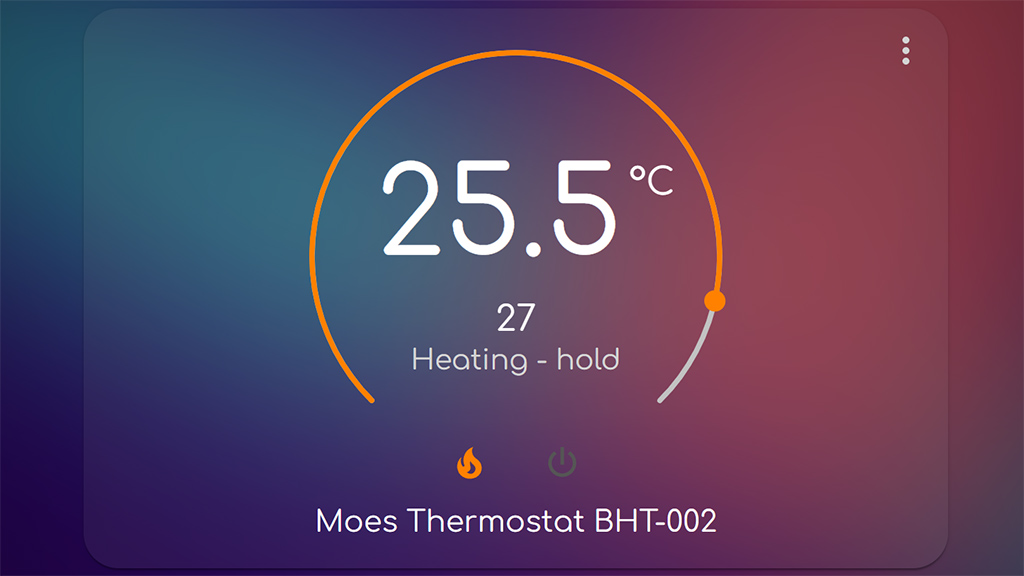
You can use the Moes Smart Thermostat right after integrating it in Home Assistant without any further setup. The climate entity contains all the basic functions you would need to start controlling you heating system. In this section, we are going to suggest a way to supercharge its function – the Scheduler Card by dev nielsfaber.
As an alternative to the built-in thermostat card, we suggest using the custom Simple Thermostat Card by nervetattoo. It’s highly customizable, contains many configuration variables and you can make it very compact and style it to your liking.
Scheduler Card & Component
The easiest way to setup programs, schedules and thermostat rules we are going to use the Scheduler Component and Scheduler Card. This particular custom card (works on top of the component!), has a very easy and user friendly UI when setup. It’s capable of creating schedules and rules on the go, so lets see it in action.
Assuming you have already installed the custom component and custom card (preferably via HACS), we can go ahead and create our card in Lovelace:
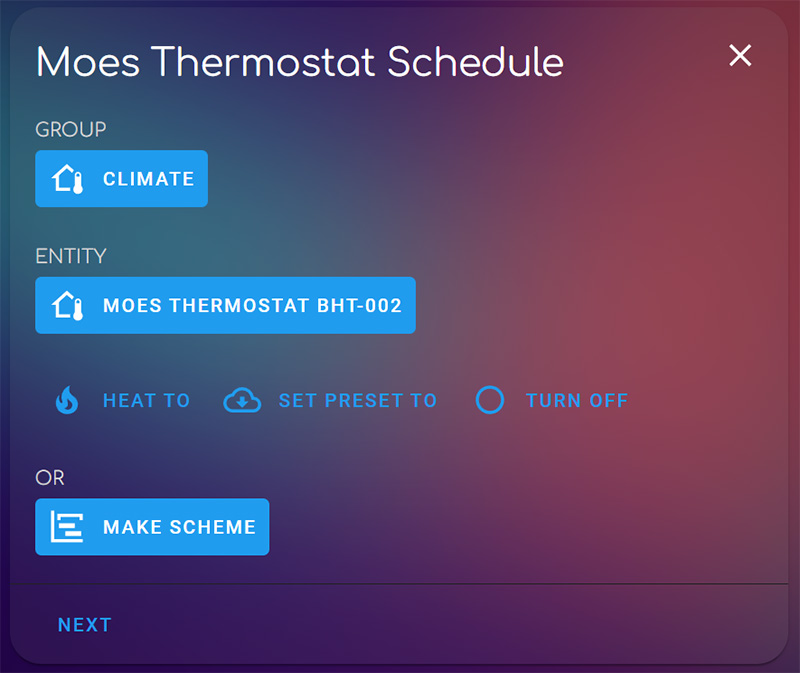
#Scheduler Card for Moes Thermostat BHT-002
type: custom:scheduler-card
include:
  - climate.moes_thermostat_bht_002
discover_existing: false
title: Moes Thermostat Schedule
Code language: YAML (yaml)
This will create a small card with a master switch for your schedules and rules. Triggering this switch, entirely disables anything you have created within the card. Once done, click Add and select Make Scheme than click Next:
This will take you to the next screen, where you can create custom schedules by time, days, workdays, weekends etc. The Scheme bar in the middle is a time frame of 24hours, to which you can add additional hour frames to by using the ADD button.
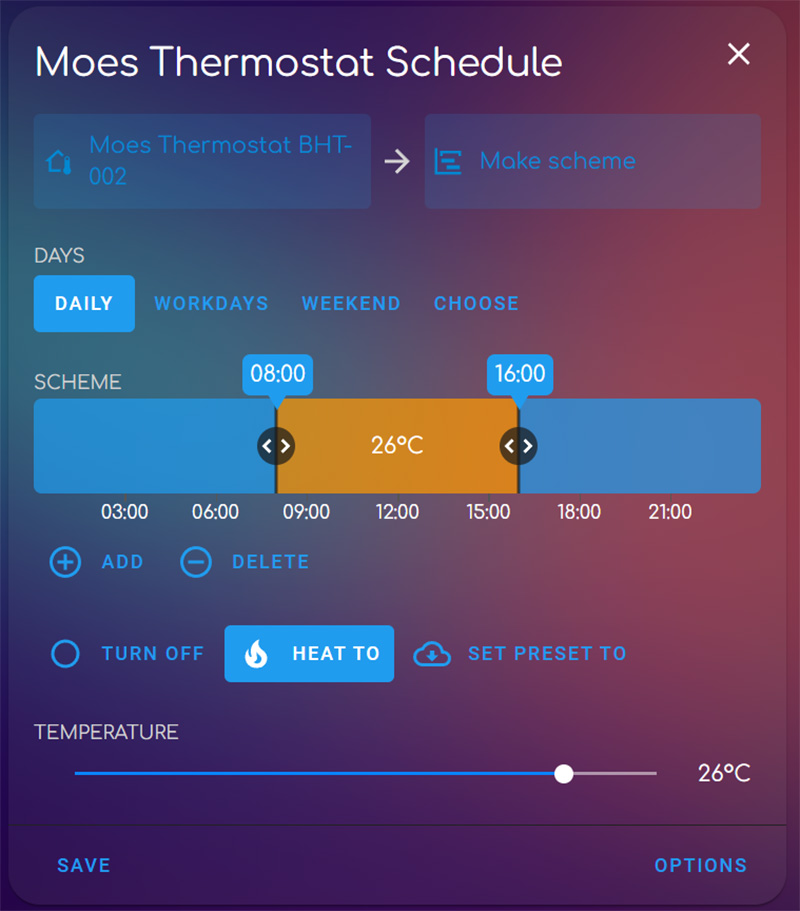
Here you can select a bunch of different options and set the thermostat to Heat accordingly. The scheduler card will control the Thermostat according to your rules and schedules. If you want to discover all the options this component/card combo offers, read our guide. Once you are done, hit save. The card collapses and is shown simply as a small list.
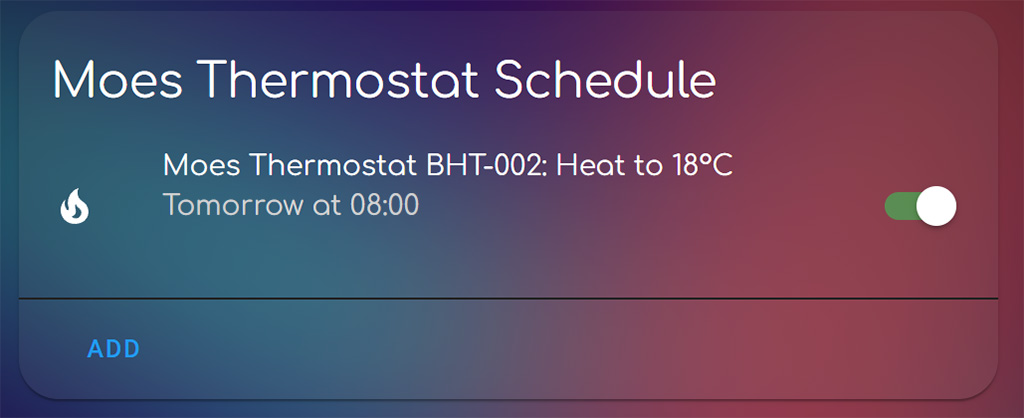
You can edit you schedule anytime by clicking its name, make any changes and additions or toggle the master switch for quick turning off/on.
Verdict
The Moes Smart Thermostat BHT-002 is a very capable and versatile small thermostat. It looks good mounted on a wall, it’s cheap and can be easily integrated in Home Assistant. There are a few cons we didn’t like though, so lets summarize:
- PROS
- Cheap
- Home Assistant Compatible
- Major ZigBee Integrations Compatible
- Built-in Touch Buttons for quick control
- Built-in System Settings for setup without connectivity
- Additional Terminals for External Sensor
- Automatic Screen Timeout
- Child Lock
- Easy wiring and installation
- CONS
- Screen is too bright
- Screen content fades when looking at it from top or bottom (weirdly not from left or right!)
- Wi-Fi Version is Tuya based
- Built-in Temperature Sensor needs calibration
- -2°C in our case
- External Temperature Sensor needs calibration
- -1°C in our case
This smart gadget will control your HVAC without issues. Considering it’s easily brought into to Home Assistant, its functions and potential is supercharged. If you would like to test it out for yourself, consider ordering through one of our affiliate links bellow.
Moes Smart Thermostat BHT-002
*N/A links will be added when available
На чтение 4 мин Опубликовано Обновлено
Сегодня мы рассмотрим BHT-002 GALW WIFI — умный термостат, который станет отличным решением для автоматизации системы отопления и охлаждения в вашем доме. Это устройство обладает множеством функций и удобств, что делает его одним из самых популярных выборов в сфере умного дома.
Одной из особенностей BHT-002 GALW WIFI является наличие встроенного модуля Wi-Fi, что позволяет управлять термостатом даже удаленно через мобильное приложение. Это означает, что вы можете регулировать температуру в вашем доме из любой точки мира, где есть доступ в интернет. Комфорт и удобство вашего пребывания в доме теперь находятся под вашим полным контролем.
Но возможности управления температурой — лишь малая часть того, что может BHT-002 GALW WIFI. Устройство оснащено цветным сенсорным дисплеем, на котором отображается информация о текущей температуре, времени, режиме работы и других параметрах. Вы можете легко настроить не только температурный режим, но и время работы, а также задать программу автоматического переключения между режимами. Благодаря этому термостат будет самостоятельно поддерживать установленный вами комфортный климат в доме в течение всего дня.
Умный термостат BHT-002 GALW WIFI — это инновационное решение для оптимизации отопления и охлаждения в вашем доме. Благодаря современным технологиям и удобным функциям, этот термостат позволяет существенно сэкономить энергию и средства, а также обеспечить наивысший уровень комфорта и уютной атмосферы в вашем доме. Так что не упустите возможность установить BHT-002 GALW WIFI и наслаждаться контролем климата в вашем доме в любой точке мира!
Содержание
- Внешний вид и дизайн
- Технические характеристики
- Функциональные возможности
- Преимущества и недостатки
Внешний вид и дизайн
Устройство BHT-002 GALW WIFI имеет современный и стильный дизайн, который приятно смотрится. Оно выполнено из высококачественных материалов, которые придают ему прочность и надежность. Размеры устройства компактные, что позволяет комфортно держать его в руке даже на протяжении продолжительного времени.
На передней панели устройства расположен крупный цветной дисплей, на котором отображается информация о продукте и его функциях. Кнопки управления расположены на боковых гранях, что обеспечивает удобный доступ к ним при использовании устройства.
Устройство имеет эргономичную форму, которая обеспечивает оптимальный комфорт при работе с ним. Благодаря своему компактному размеру и стильному дизайну, BHT-002 GALW WIFI выглядит современно и привлекательно.
Технические характеристики
Вот основные технические характеристики модели BHT-002 GALW WIFI:
- Диагональ экрана: 5,5 дюйма
- Разрешение экрана: 1280 х 720 пикселей
- Процессор: 1,3 ГГц четырехъядерный
- Операционная система: Android 8.1
- Память: 2 Гб ОЗУ и 16 Гб встроенной памяти
- Слот для карты памяти: поддержка microSD до 128 Гб
- Камера: задняя 13 Мп, фронтальная 5 Мп
- Батарея: 4000 мАч
- Связь: Wi-Fi (802.11 b/g/n), Bluetooth 4.0
- Датчики: гироскоп, акселерометр, датчик приближения, датчик освещенности
- Дополнительные функции: поддержка двух SIM-карт, GPS, FM-радио
Обратите внимание, что эти характеристики могут незначительно отличаться в зависимости от региона или поставщика.
Функциональные возможности
- Подключение к интернету через Wi-Fi
- Показ текущей температуры и влажности в помещении
- Отображение текущей даты и времени
- Управление устройствами через приложение
- Отправка уведомлений на мобильный телефон
- Автоматическое обновление прошивки
- Возможность создания расписания работы устройств
- Интеграция с различными системами умного дома
- Мониторинг истории работы устройств
- Возможность добавления дополнительных датчиков и устройств
Преимущества и недостатки
Преимущества BHT-002 GALW WIFI:
- Удобство использования благодаря беспроводному подключению по Wi-Fi
- Высокая скорость передачи данных
- Минимальный энергопотребление, что позволяет продолжительное время использовать устройство без подзарядки
- Имеет большой радиус действия
- Многофункциональность: возможность управления через мобильное приложение, передача данных на облако и т. д.
- Надежность и долговечность
Недостатки BHT-002 GALW WIFI:
- Высокая стоимость по сравнению с другими подобными устройствами
- Требует наличие Wi-Fi сети для работы
- Может быть некомпактным, что затрудняет его переноску
- Возможные проблемы с совместимостью с некоторыми операционными системами
- Не всегда доступны все функции без дополнительного оборудования или приложений
- Могут возникать проблемы с безопасностью, если Wi-Fi сеть недостаточно защищена