
Теперь вы можете просмотреть все видеоуроки из курса
- Состав курса
- Отзывы
- Вопросы
- Состав курса
- Отзывы
- Вопросы
Оставить отзыв
Видео инструкция Bernette 05 ACADEMY/CRAFTER
Загрузить изображения
Можно перетащить с помощью Drag’n’drop

Спасибо!
Видео инструкция Bernette 05 ACADEMY/CRAFTER
Ваш отзыв отправлен! Скоро мы опубликуем его на сайте
- Состав курса
- Отзывы
- Вопросы
Задать вопрос о товаре
Видео инструкция Bernette 05 ACADEMY/CRAFTER
Спасибо!
Видео инструкция Bernette 05 ACADEMY/CRAFTER
Ваш вопрос отправлен! Мы ответим на вопрос и опубликуем его на сайте.
-
Page 1
User manual… -
Page 3: Table Of Contents
Threading the double needle ……..30 Important information ……..Threading the Triple Needle ……… 30 Winding the bobbin thread ………. 31 My bernette …………Threading the bobbin thread ……..33 Overview Machine ……….Pulling up the bobbin thread ……..34 Overview front …………
-
Page 4
Table of Contents 4.17 Sewing a narrow hem ……….53 Troubleshooting ……….. 74 4.18 Sewing blind hems ……….55 Technical data …………76 4.19 Sewing visible hems ……….56 Appendix ………….. 77 4.20 Sewing flat joining seams ……..56 11.1 Overview stitch patterns ………. 77 4.21 Sewing basting stitches ………. -
Page 5: Important Safety Instructions
Do not view the LED light directly with optical instruments (e.g. magnifier). The LED light corresponds with protection class 1M. • When the LED light is damaged or defective, contact your bernette specialist dealer. WARNING To reduce the risk of burns, fire, electric shock or injury to persons: •…
-
Page 6
– turn power switch to «0». • Do not use bent needles. • Always use the original bernette stitch plate. The wrong plate can cause needle breakage. • To disconnect, turn power switch to «0»and then remove the plug from the outlet. -
Page 7: Important Information
• When passing on the machine to a third party, enclose the short manual of the machine. Proper use Your bernette machine is conceived and designed for private household use. It is intended for sewing fabrics and other materials as described in this instruction manual. Any other use is not considered proper. BERNINA assumes no liability for consequences resulting from improper use.
-
Page 8
Important information Explanation of symbols Designates a high-risk hazard which can lead to serious injuries or potentially even death if not avoided. DANGER Designates a medium-risk hazard which can lead to serious injuries if not avoided. WARNING Designates a low-risk hazard which can lead to minor or moderate injuries if not avoided. CAUTION Designates a hazard which can lead to material damage if not avoided. -
Page 9: My Bernette
My bernette My bernette 1.1 Overview Machine Overview front Stitch plate cover Reverse sewing lever Stitch plate Thread tension dial Presser foot Thread take-up lever Sewing light Stitch length knob Needle threader Stitch pattern selector knob Buttonhole lever Sewing table and accessory box Thread cutter 2020-09 EN 5220205.00A.04…
-
Page 10: Overview Top
My bernette Accessory box Compartment for needle set Compartment for spool disc Overview top Needle position dial Spool pin Thread take-up lever Opening, additional spool pin Bobbin winder pre-tension Bobbin winder unit Presser foot pressure adjustment knob Handwheel Thread pretension…
-
Page 11: Overview Back
My bernette Overview back Power cable/foot control connection Balance dial Air vents Presser foot lifter Main switch with speed limit Feed dog lever 1.2 Accessory Included accessories Visit www.mybernette.com/accessories for more accessory information. Figure Name Figure Name Bobbin (3x) Second spool pin…
-
Page 12: Overview Presser Feet
My bernette Figure Name Figure Name Brush and seam ripper Oiler Spool disc, large (1x) Felt disc Spool disc, small (1x) Screwdriver Height compensating Finger guard tool Extension table Overview presser feet Illustration Name Purpose Zigzag foot For sewing different practical and decorative stitches and for sewing hems.
-
Page 13: Needle, Thread, Fabric
My bernette Illustration Name Purpose Zipper foot for concealed zippers For sewing in concealed zippers. Darning foot/embroidery foot For embroidering, darning and freehand quilting. Button-sew-on foot For sewing on buttons of different sizes with 2 or 4 holes. Hemmer foot To sew double-turned hems.
-
Page 14: Overview Needles
My bernette Overview Needles Illustration Needle name Needle description Purpose Universal needle Slightly rounded point For nearly all natural and synthetic fabrics 130/705 H 70-110 (woven and knitted). Stretch needle Mid-sized ball point, For jersey, tricot, knit special eye shape and and stretch fabrics.
-
Page 15: Needle/Thread Combination
My bernette Illustration Needle name Needle description Purpose Hemstitch needle Wing-like widened To sew blind stitches. needle shaft (wing) 130/705 H WING 100–110 Universal twin needle Needle distance: For visible hems in 1.0/1.6/2.0/2.5/ stretch fabrics, pintucks, 130/705 H ZWI 70-100 3.0/4.0…
-
Page 16: Example For Needle Description
My bernette Example for needle description The 130/705 system, which is the most common for household machines, is explained by the following picture of a Jersey/Stretch needle. 130/705 H-S/70 130 = Shank length (1) 705 = Flat shank (2) H = Needle scarf (3) S = Needle point (here medium ball point) (4) 70 = Needle size 0.7 mm (5)
-
Page 17: Sewing Preparation
Sewing preparation Sewing preparation 2.1 Connection and Switching on Connecting the machine and foot control > Insert the equipment plug (1) for the power and foot control cable into the power cable connection. > Insert the power plug (2) for the power and foot control cable into the socket. Use of the power cable (only USA/Canada) The machine has a polarized plug (one contact is wider than the other).
-
Page 18: Spool Pin
Sewing preparation > Release the foot control to stop the machine. 2.2 Spool pin Horizontal spool pin Placing the thread spool and the thread disc Spool discs hold the thread spool in place for proper release of thread from the spool. >…
-
Page 19: Second Spool Pin
> Place the thread spool on the second spool pin. 2.3 Free arm The bernette b05 provides a solidly designed free arm which offers a lot of space for large project on the right of the needle. 2020-09 EN 5220205.00A.04…
-
Page 20: Sewing Table With Accessory Box
Sewing preparation 2.4 Sewing table with accessory box The sewing table has an integrated accessory box. > To remove the sewing table, hold the sewing table by the handle (1) and pull it away to the left. > To open the accessory box, tilt the cover towards you. >…
-
Page 21: Needle
Sewing preparation > Push the extension table from the left to the right over the free arm until it engages. > To remove the slide-on table, pull the slide-on table over the free arm to the left. 2.7 Needle Raising and lowering the needle >…
-
Page 22: Adjusting The Needle Position
Sewing preparation > Pull the needle out in a downward direction. > Hold the new needle (2) with the flat side to the rear. Push the needle upwards into the needle holder as far as it will go (3). > Tighten the fixing screw by hand. Adjusting the needle position >…
-
Page 23: Presser Foot
Sewing preparation 2.8 Presser foot Raising and lowering the presser foot > To raise the presser foot, push the presser foot lever upwards. > To lower the presser foot, push the presser foot lever downwards. Changing the presser foot sole Removing the presser foot sole >…
-
Page 24: Adjusting The Presser Foot Pressure
Sewing preparation > Carefully lower the presser foot lifter until the notch in the shaft engages with the presser foot sole pin. Removing and inserting the presser foot holder Prerequisite: • The presser foot sole is removed. > Raise the presser foot. >…
-
Page 25: Fitting Finger Guard
Sewing preparation > To reduce the presser foot pressure, turn the «Presser foot pressure» adjustment knob anti-clockwise. Fitting finger guard The finger guard reduces the risk of the user’s fingers moving too close to the needle during sewing, resulting in injury. >…
-
Page 26: Threading
Sewing preparation > Fit the presser foot sole. > Check whether the finger guard is aligned parallel to the presser foot sole. > If necessary, loosen the screw to align the finger guard. 2.9 Threading Threading preparation > Switch the machine off. >…
-
Page 27
Sewing preparation Spool disc Guide Thread guide Guide Thread pretension Needle-threading lever Thread tension discs Wire hook Thread take-up lever cover Thread cutter Thread take-up lever Thread > Place the thread spool on the spool holder so that the thread unwinds clockwise. >… -
Page 28
Sewing preparation > Guide the thread through the thread pretension. > Guide the end of the thread downwards along the channel. > Guide the thread downwards around the thread take-up lever cover. > Guide the thread upwards from the right to the left through the thread take-up lever and then back downwards. -
Page 29
Sewing preparation > Lower the presser foot. > Press the needle-threading lever downwards slightly and guide the thread around the thread guide. > Push the needle-threading lever down as far as it will go and hold it down. – The wire hook moves through the needle eye. >… -
Page 30: Threading The Double Needle
Sewing preparation Threading the double needle Prerequisite: • The zigzag foot is fitted. • The twin needle is inserted. • The second spool pin, felt disc and second spool are fitted. > Guide the thread from the horizontal spool pin (red) in the direction of the arrow to the left side of the thread tension disc (1).
-
Page 31: Winding The Bobbin Thread
Sewing preparation > Guide the thread to the thread guide above the needle. > Thread the thread into the left needle manually. > Guide the thread from the external spool pin (orange) in the direction of the arrow to the left side of the thread tension disc (1).
-
Page 32
Sewing preparation > Guide the thread through the thread guide. > Guide the thread around the bobbin winder pre-tension in the direction of the arrow. > Pull the end of the thread through one of the inner holes on the bobbin and place the empty bobbin on the bobbin winding unit. -
Page 33: Threading The Bobbin Thread
Sewing preparation > Cut the end of the thread above the inner hole. > To continue the winding process, press the foot control. > Release the foot control to stop the winding process. > Push the bobbin winding unit to the left into the starting position. –…
-
Page 34: Pulling Up The Bobbin Thread
Sewing preparation > Insert a new bobbin so that the thread is wound anti-clockwise. > Press gently on the bobbin. > Follow the arrow markings to bring the thread into the bobbin thread guide. > To cut off excess thread, take the end of the thread and pull it over the thread cutter (1). >…
-
Page 35
Sewing preparation > Pull the upper thread upwards until the bobbin thread forms a loop. > Pull the bobbin thread all the way to the top. > Pull 10 cm (4″) of both threads back and under the presser foot. 2020-09 EN 5220205.00A.04… -
Page 36: Creative Sewing
Creative sewing Creative sewing 3.1 Selecting a stitch pattern The stitch patterns are divided into categories A to L. Each category can include up to three stitch patterns, which are indicated by the colors black, gray and red. Incorrect needle position when selecting a stitch pattern NOTICE Damage to needle and fabric.
-
Page 37: Editing Stitch Patterns
Creative sewing 3.2 Editing stitch patterns Setting the stitch width The stitch width can be varied from 0–6 mm for each stitch using the stitch width dial. NOTICE Incorrect needle position when selecting a stitch width Damage to needle and fabric. >…
-
Page 38: Adjusting The Balance
Creative sewing In perfect straight stitching, the bobbin thread is not visible on the right side of the fabric. Upper thread Right side (top side) of fabric Bobbin thread Wrong side (bottom side) of fabric > To increase the upper thread tension, set the «Upper thread tension» dial to a higher value. >…
-
Page 39: Quick Reverse
Creative sewing > To increase the stitch density of the left satin stitch for the buttonhole, turn the balance adjustment knob clockwise. > To decrease the stitch density of the left satin stitch for the buttonhole, turn the balance adjustment knob anti-clockwise.
-
Page 40: Securing
Creative sewing 3.4 Securing Securing the seam at the start > Select the stitch pattern. > Sew the seam forwards for a few stitches. > Press and hold the reverse sewing lever. > Sew backwards along the seam to the start of the seam. >…
-
Page 41: Sewing Corners
Creative sewing > To support the presser foot when manually guiding the fabric and sewing from the folded side, place one, two or three small plates from the height compensating tool (1) behind the needle under the presser foot. Height compensating tool 3.6 Sewing Corners >…
-
Page 42: Practical Stitches
Practical stitches Practical stitches 4.1 Overview Practical stitches Stitch pattern Stitch Name Description Recommende Stitch Stitch category d presser foot length width Straight stitch For sewing material together and Zigzag foot 0,5 –4,0 top-stitching. Zigzag For reinforcing seams, finishing Zigzag foot 0,5 – 4,0 2,0 – 6,0 edges, sewing elastic seams and…
-
Page 43: Sewing Straight Stitch
Practical stitches Stitch pattern Stitch Name Description Recommende Stitch Stitch category d presser foot length width Triple Straight For durable seams in strong Zigzag foot stitch fabrics. For visible hems and seams. Triple Zig zag For durable seams in strong Zigzag foot 2,0 – 6,0 fabrics.
-
Page 44: Sewing In The Zipper
Practical stitches 4.3 Sewing in the zipper As the fabric feed can be difficult when starting to sew, it is recommended to hold the threads firmly or to pull the fabric slightly to the back for a few stitches or to sew 1 – 2 cm reverse first. >…
-
Page 45: Stitching In A Concealed Zipper
Practical stitches > When sewing the right-hand side of the zipper, secure the left-hand side of the presser foot pin using the holder. > Sew the left-hand side of the open zipper from top to bottom. > Close the zipper up to approx. 5 cm from the end. >…
-
Page 46
Practical stitches > Lower the presser foot at the start of the zipper so that the spiral is guided through the right presser foot groove. > Sew and close the right-hand half of the zipper from top to bottom up to the slider. >… -
Page 47: Sewing Triple Straight Stitch
Practical stitches > Pin the ends of the zipper seams precisely on top of one another. > Pin the seam together from the bottom to the zipper. > Fit the zigzag foot. > Close and sew the seam from the bottom to the zipper. 4.5 Sewing Triple straight stitch The triple straight stitch is especially suitable for durable seams and for firm, densely woven fabrics such as denim and corduroy.
-
Page 48: Sewing Triple Zigzag
Practical stitches 4.6 Sewing Triple zigzag The triple zigzag is particularly suitable for firm fabrics, especially denim, deckchair fabric and awnings, and for hems on fabrics that are washed often. Prerequisite: • Finish the seam edges first. > Fit the zigzag foot. >…
-
Page 49: Manual Darning
Practical stitches > To attach the elastic tape, pull it apart along the length of the gathered fabric. 4.9 Manual darning Used for darning holes or worn areas in all fabric types. > Remove the presser foot holder and fit the darning/embroidery foot on the presser foot bar. –…
-
Page 50: Finishing Edges
Practical stitches > Tension the sewing project in a darning hoop. – The darning area stays evenly taut and cannot be distorted. > Turn the handwheel anti-clockwise to bring up the bobbin thread. > Sew a few stitches at the start of the seam. >…
-
Page 51: Sewing Double Overlock
Practical stitches > Guide the edge of the fabric into the center of the zigzag foot so that the needle goes into the fabric on one side and over the edge into the air on the other side. > Guide the edge of the fabric along the guide plate on the overlock foot (1) so that the needle goes into the fabric on one side and over the edge into the air on the other side.
-
Page 52: Narrow Edgestitching
Practical stitches > Sew the fabric with the edge of the fabric against the overlock foot guide. 4.13 Narrow edgestitching > Fit the blind stitch foot, edge stitch foot or zigzag foot. > Set the stitch pattern selector knob to «A». >…
-
Page 53: Edgestitching Using The Seam Guide
Practical stitches 4.15 Edgestitching using the seam guide When sewing parallel wide top-stitching lines, we recommend guiding the seam guide along a sewn line. > Attach the seam guide to the zigzag foot. > Fit the zigzag foot. > Set the stitch pattern selector knob to «A». >…
-
Page 54
Practical stitches > Fold the edge of the fabric about 3 mm and turn it over again. Fold the first 5 cm of the fabric edge to be sewn. > Place the edge of the fabric with the left-hand side of the fabric facing up under the presser foot. The fabric under the presser foot should be just less than the width of the presser foot. -
Page 55: Sewing Blind Hems
Practical stitches 4.18 Sewing blind hems For invisible hems in medium to heavy weight cotton, wool and blended materials. Heavy/medium-weight fabrics Light fabrics 5 mm 5 mm Finishing seam Right-hand fabric side Left-hand fabric side A blind stitch «J» is suitable for sewing firm fabrics. The elastic blind stitch «E» is suitable for elastic fabrics. Prerequisite: •…
-
Page 56: Sewing Visible Hems
Practical stitches > Turn over the fabric. 4.19 Sewing visible hems The visible hem is especially suitable for elastic hems in tricot fabric made of cotton, wool, synthetics and blended fibers. We recommend using the Lycra stitch or triple zigzag as a visible hem stitch for elastic fabrics. We recommend using the universal stitch or triple straight stitch as a visible hem for non-elastic fabrics.
-
Page 57: Decorative Stitches
Decorative stitches Decorative stitches 5.1 Overview Decorative Stitches Easier or more difficult decorative stitches come into their own depending on the type of fabric. Decorative stitches that consist of simple straight stitches are particularly attractive on lightweight fabrics. Decorative stitches made up of satin stitches look especially stylish on heavy fabrics. For a perfect stitch formation it is of advantage to use the same thread color for upper and bobbin thread and a stabilizer.
-
Page 58: Altering The Stitch Density
Decorative stitches Stitch pattern Stitch Name Description Recommende Stitch Stitch category d presser foot length width Decorative For decorative effects. Zigzag foot stitch 5.2 Altering the stitch density When using the satin stitch, the stitch density can be adjusted by changing the stitch length. A short stitch length means that the distance between stitches is shorter and the stitch is denser.
-
Page 59: Connecting Stitches
Decorative stitches > Tie the threads in a knot on one side. > On the other side, pull the bobbin threads and distribute the folds evenly. > Secure the threads. > Select the honeycomb stitch or faggot stitch. > Set the stitch width to «6». >…
-
Page 60: Joining Seam With Double Overlock Stitch
Decorative stitches > Lower the presser foot centrally between the edges of the fabric and sew. > After sewing, remove the lining and tacking thread. Joining seam with double overlock stitch The double overlock stitch can be used to sew two fabric edges together at a distance. This stitch pattern is used to decorate blouses and children’s clothing.
-
Page 61: Shell Edging With Satin Stitch
Decorative stitches > Set the stitch pattern selector knob to «H». > Set the required stitch length. > Set the required stitch width. > Fold the edge of the fabric in by about 5 mm. Position the fabric under the presser foot so that the needle goes into the air just past the edge of the fabric on the right-hand side.
-
Page 62: Buttonholes
Buttonholes Buttonholes 6.1 Overview Buttonholes To automatically sew buttonholes, the machine features a single-step buttonhole program. The corresponding button can be sewn on automatically. Stitch pattern Stitch Name Description Recommende Stitch Stitch category d presser foot length width – Single-step For light to medium-weight Buttonhole 0,3 – 0,5…
-
Page 63: Sewing A Test Sample
Buttonholes > Hang the thread over the hook behind the presser foot and then lay it over the presser foot. > Hook both ends of the thread on the front of the presser foot, guide them into the groove and tie them together temporarily.
-
Page 64
Buttonholes > Set the stitch width to 4–6. > Set the required stitch length in the buttonhole symbol range on the dial. > Position the fabric under the presser foot so that the marking for the center line is aligned with the starting point (1). -
Page 65: Cut The Buttonhole Open
Buttonholes > After sewing the last buttonhole, lift the buttonhole lever as far as it will go. 6.7 Cut the buttonhole open > Place a pin at each end directly underneath the locking stitch to prevent the stitches being cut open. >…
-
Page 66
Buttonholes > Bring the upper thread to the wrong side of the fabric and tie it in a knot. 2020-09 EN 5220205.00A.04… -
Page 67: Quilting
Quilting Quilting 7.1 Overview Quilt Stitches Stitch pattern Stitch Name Description Recommende Stitch Stitch category d presser foot length width Faggot stitch For stitching two fabrics together Zigzag foot to create a breakthrough look. For quilting, crazy patchwork, decorating and embellishing. Feather stitch For crazy patchwork and Zigzag foot…
-
Page 68: Sewing Patchwork
Quilting With stipple quilting, entire surfaces of the fabric are filled with quilt stitches. The single lines of stitching are rounded and never cross one another. Prerequisite: • The top layer, the batting and the backing are pinned together or basted. >…
-
Page 69
Quilting > Sew the parts together with a seam allowance of 5 mm or guide the parts along the patchwork foot guide. 5 mm > Iron the seam allowance apart. Embellishing seams > Fit the zigzag foot. > Set the decorative stitch you have chosen. >… -
Page 70: Maintencance And Cleaning
Maintencance and cleaning Maintencance and cleaning 8.1 Cleaning the feed dog Remaining threads under the stitch plate must occasionally be removed. Electronically driven components CAUTION Risk of injury near the needle and the hook. > Raise the presser foot. > Switch off the machine and disconnect it from the power supply. >…
-
Page 71: Cleaning The Hook
Maintencance and cleaning > Attach the presser foot. > Connect the machine to the mains power and switch it on. 8.2 Cleaning the hook Electronically driven components CAUTION Risk of injury near the needle and the hook. > Raise the presser foot. >…
-
Page 72: Oiling The Needle Bar
Maintencance and cleaning > Insert the bobbin case. Note: The markings of the bobbin case and the stitch plate must be aligned identically. > Fit the stitch plate. > Fit the bobbin cover. > Fit the needle and presser foot. 8.3 Oiling the needle bar Without lubrication, the needle bar may not move smoothly.
-
Page 73
Maintencance and cleaning > Turn the handwheel a few times and remove any excess oil with a cloth. > Attach the headframe cover again. 2020-09 EN 5220205.00A.04… -
Page 74: Troubleshooting
Troubleshooting Troubleshooting Fault Cause Solution Uneven stitch formation Upper thread too tight or too > Adjust the upper thread tension. loose. Needle blunt or bent. > Replace the needle, make sure that a new BERNINA quality needle is used. Poor quality needle. >…
-
Page 75
Incorrectly threaded. > Rethread. Poor quality thread. > Use quality thread. The stitch plate or the hook tip is > Contact a specialized bernette dealer to have the damaged. damages repaired. > Replace the stitch plate. Lower thread breaks The bobbin is not inserted >… -
Page 76: Technical Data
Technical data 10 Technical data Designation Value Unit Sewing light (LED) Maximum speed 1100 Stitches per minute Measurements (W × D × H) 416 × 174 × 299 Weight 7.07 Input voltage (energy consumption) 120 (0.7) V (A) 230/240 (90) V (W) Sound pressure level dB (A)
-
Page 77: Appendix
Appendix 11 Appendix 11.1 Overview stitch patterns Overview of the stitch patterns Stitch length knob Stitch selector wheel 0 – 4 2020-09 EN 5220205.00A.04…
-
Page 78: Index
Index Index Maximum sewing speed ………… 17 Accessories overview…………. 11 Accessory box …………… 20 Needle position right/left………… 22 Adjusting the presser foot pressure …….. 24 Needle position up/down ………… 21 Attaching the seam guide …………. 24 Needle, Thread and Fabric…………. 13 Needles and threads ………….
-
Page 79
Index Upper thread tension ………… 37 Using a spool net ………….. 18 Utility stitches …………… 42 Winding the bobbin thread……….. 31 2020-09 EN 5220205.00A.04… -
Page 82
2020-09 EN 5220205.00A.04 © BERNINA International AG www.bernette.com/b05ACADEMY Steckborn CH, www.bernina.com…
Bernette b05 ACADEMY – это идеальная швейная машина для вдохновленного творчества. Многофункциональная швейная машина «05 ACADEMY» с быстрым двигателем, способная выполнять строчки 30 эксклюзивных видов, позволяет воплощать в жизнь ваши самые смелые идеи.
Для проектов, требующих кропотливой работы, предусмотрена возможность снижения максимальной скорости шитья. Благодаря 12 прижимным лапкам подошвенного типа и системе быстрой замены лапок, шитье становится детской игрой.
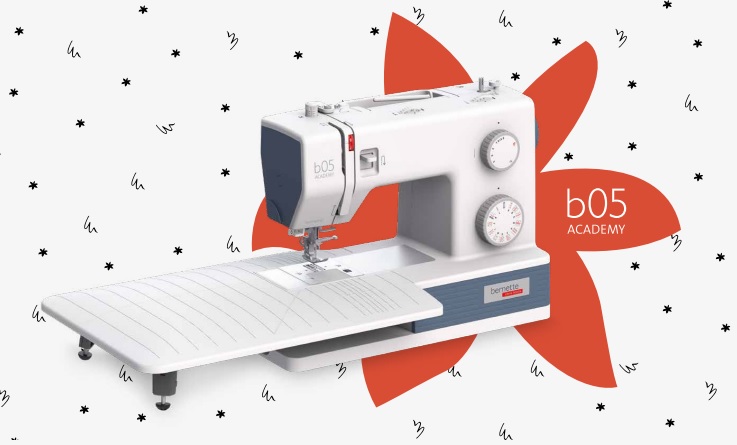
Вы получаете еще больше места для шитья благодаря большому и удобному приставному столику.
Кто знает, какие идеи появятся у вас завтра? «Bernette b05 ACADEMY» всегда поможет воплотить их.
 Смотреть брошюру Bernette b05 ACADEMY,pdf (1,8 Мб)
Ключевые особенности Bernette B05 Academy:
- Переключатель скорости – 2 режима: до 650 ст./мин. и до 1100 ст./мин.
- Защита пальцев.
- Приставной столик.
- В комплект входит впечатляющий набор из 12 прижимных лапок для выполнения всех возможных работ по шитью.
- Премиум-дизайн.
- Металлический рукав (как у Bernina).
- Регулировка давления лапки.
- Регулировка положения иглы.
- Мощный, высокоскоростной мотор.
- Горизонтальный челнок.
- Петля-автомат.
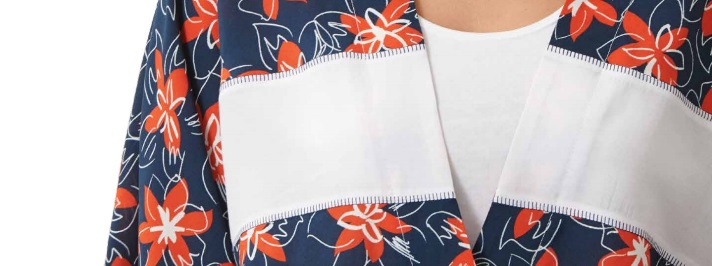
- Эксклюзивный и уникальный набор строчек, включая оверлочную строчку и супер-эластичную (трикотажную) строчку.
- Лучшее в этом классе освещение рабочей зоны с двумя лампами LED.
Другие особенности:
- Оптимальные строчки даже для толстых тканей благодаря регулируемому давлению прижимной лапки и натяжению верхней нити.
- Встроенный механизм обрезки нити одним движением руки.
- Нитевдеватель для помощи при заправке нити.
- Выдвижной транспортер для штопания и свободно-ходового шитья.
- Встроенный отсек для принадлежностей помогает поддерживать порядок.
- Практичный горизонтальный челнок для быстрой заправки нижней нити.
- Инструмент для компенсация высоты.
- Набор игл BERNINA в комплекте.
- Регулируемая плотность строчки для обметывания петель и эластичных строчек.
- Система быстрой смены лапок.
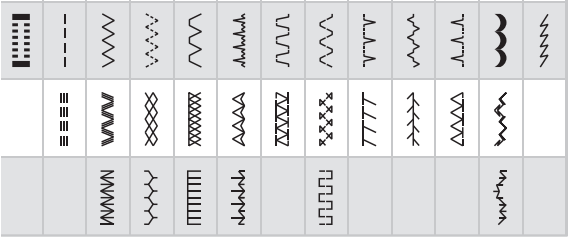
Строчки Bernette b05 ACADEMY:
Технические характеристики:
- Максимальная длина стежка: 4 мм.
- Рабочая поверхность справа от иглы: 165 мм.
- Подсветка рабочей поверхности: 2 светодиода.
- Максимальная скорость: 1100 cтежков в минуту.
- Размеры: (B × T × H) 416 × 174 × 299 мм.
- Вес машинки: 7.07 кг.
- Максимальная ширина строчки: 6 мм.
- Мощность двигателя: постоянный ток, 100 Вт.
Комплектация:
- Лапка для выполнения зигзага.
- Лапка для «молний».
- Лапка с салазками для петель.
- Лапка потайного стежка.
- Оверлочная лапка.
- Лапка для потайных застежек «молния».
- Лапка для штопки/вышивальная лапка.
- Лапка для пришивания пуговиц.
- Подрубатель.
- Открытая прозрачная вышивальная лапка.
- Лапка со скользящей подошвой для шва зигзагом.
- Лапка для отделки узких кромок.
- Шпулька (3x).
- Второй катушкодержатель.
- Сетка для бобин.
- Пусковая педаль с сетевым шнуром.
- Набор игл.
- Кромконаправитель.
- Щетка-кисточка и нож-вспарыватель.
- Масленка.
- Нитесматывающая шайба, большая (1x).
- Войлочный диск.
- Нитесматывающая шайба, маленькая (1x).
- Отвертка.
- Компенсационная пластинка.
- Защитное приспособление для пальцев.
- Приставной столик.
Скачать инструкцию Bernette b05 ACADEMY,pdf (11,6 Мб)
Смотреть краткое руководство Bernette b05 ACADEMY,pdf (9,1 Мб)
Видеоинструкции:
- Посмотреть все видеоинструкции по эксплуатации Bernette b05 Academy вы можете на официальном канале bernette.com, перейдя по ссылке.
| Класс машины | электромеханическая |
| Тип челнока | горизонтальный ротационный |
| Вышивальный блок | нет |
| Плавная регулировка ширины стежка | есть |
| Регулятор баланса петли | есть |
| Зубчатая рейка | 7-сегментная |
| Швейный советник | нет |
| Регулировка давления лапки | есть |
| Наличие USB порта | нет |
| Автоматическое отключение намотки шпульки | есть |
| Лапки в комплекте | лапка для выполнения зигзага, лапка для «молний», лапка с салазками для петель, лапка потайного стежка, оверлочная лапка, лапка для потайных застежек «молния», лапка для штопки/вышивальная лапка, лапка для пришивания пуговиц, подрубатель, открытая прозрачная вышивальная лапка, лапка со скользящей подошвой для шва зигзагом, лапка для отделки узких кромок. |
| Дисплей | нет |
| Комплектация | лапки, шпулька (3x), второй катушкодержатель, сетка для бобин, пусковая педаль с сетевым шнуром, набор игл, кромконаправитель, щетка-кисточка и нож-вспарыватель, масленка, нитесматывающая шайба, большая (1x), войлочный диск, нитесматывающая шайба, маленькая (1x), отвертка, компенсационная пластинка, защитное приспособление для пальцев, приставной столик. |
| Рукавная консоль | есть |
| Линейка на корпусе | нет |
| Автоматический нитевдеватель | есть |
| Быстрая заправка нижней нити | есть |
| Устройство обрезки нити | ручное |
| Столик для квилтинга и шитья | есть |
| Оверлочные строчки | есть |
| Эластичные строчки | есть |
| Декоративные строчки | есть |
| Эл. стабилизатор прокола иглы | нет |
| Кнопка позиционирования иглы | нет |
| Плавная регулировка скорости шитья | от педали |
| Автоматическая закрепка | нет |
| Шитье без педали | нет |
| Коленный рычаг подъема лапки | нет |
| Станина | металл |
| Корпус | пластик |
| Тип подсветки | светодиодная подсветка |
| Тип педали | электронный |
| Мощность, Вт | 60 |
| Вес без упаковки, кг | 8 |
| Прошиваемые материалы | тонкие, средние, плотные |
| Количество операций | 30 |
| Кол-во петель | 1 |
| Выполнение петли | автомат |
| Максимальная длина стежка, мм | 4 |
| Максимальная ширина стежка, мм | 6 |
| Максимальная скорость шитья, ст/мин | 1100 |
| Высота подъема лапки, мм | 10 |
| Гарантия | 2 года |
Скачать инструкцию Bernette b 05 Academy
Швейная машинка Bernette b05 Academy отличается высокой максимальной скоростью шитья с двумя режимами, устойчивой конструкцией и улучшенным освещением рабочей поверхности в виде двух светодиодов. Машина оснащена горизонтальным челночным устройством, обеспечивающим ширину строчки до 6 мм и длину стежка до 4 мм.
В комплектацию машины входят 12 прижимных лапок для различных операций, насадка для защиты пальцев при шитье и удобный приставной столик для увеличения рабочей зоны. В числе 30 операций есть все необходимые рабочие строчки, а также декоративные и петля-автомат.
Благодаря приставному столику и расстоянию справа от иглы 165 мм вы сможете комфортно работать и с большими изделиями.
Комплектация Bernette b 05 Academy:
- Лапка для пришивания пуговиц
- Лапка для потайной молнии
- Лапка для штопки/вышивки
- Открытая вышивальная лапка
- Лапка для подрубки
- Лапка для отделки узких кромок
- Лапка для потайного стежка
- Лапка для вшивания молнии
- Оверлочная лапка
- Лапка для выметывания петель
- Лапка для зигзага
- Тефлоновая лапка для зигзага
- Защита для пальцев
- Комплект игл BERNINA 130/705 H
- Инструмент для компенсация высоты
- Стержень шпульки, большой
- Держатель шпульки, большой
- Приставной столик
- Держатель шпульки, малый
- Шпули (3 шт.)
- Вспарыватель швов/щетка
- Педаль
- Правая направляющая
- Отвертка
- Фетровый диск для шпульки, большой
- Масленка
- Сетка для катушки.
Вы можете купить расширительный столик для этой машины.


Внимание! В случае, когда при покупке товара предлагаются и скидка, и подарки, вы можете выбрать либо скидку, либо один подарок.
-
каталогНазад
- акции
- trade-in
- о компании
- магазины
-
Как купитьНазад
- обучение
- Гарантия: 2 года
- Класс машины: электромеханическая
- Толщина ткани: плотные/тяжелые / сверхтонкие / средние / тонкие/легкие
- Вид ткани: для джинсовой ткани / для кожи / для трикотажа / для шелка
- Выполнение петли: автомат
Все характеристики
Выберите магазин
- пр. Энгельса, д. 134, метро пр. Просвещения
- пр. Московский, д. 189, метро Московская
- пр. Невский, д. 150, метро пл. Восстания/пл. Ал. Невского
- пр. Испытателей, д. 26, метро Комендантский пр.
- пр. Большевиков, д. 11, метро Ул. Дыбенко
- ул. Садовая, д. 23/6, метро Садовая
Электромеханическая швейная машина Bernette b05 Academy может похвастаться высокой максимальной скоростью шитья с двумя режимами, устойчивой конструкцией и улучшенным освещением рабочей поверхности в виде двух светодиодов. Машина оснащена горизонтальным челночным устройством, обеспечивающим ширину строчки до 6 мм и длину до 4 мм.
В комплекте с машиной идет целых 12 прижимных лапок для различных операций, насадка для защиты пальцев при шитье и удобный приставной столик для увеличения рабочей зоны. В числе 30 операций есть все необходимые рабочие строчки, а также декоративные и петля-автомат.
Благодаря приставному столику и расстоянию справа от иглы 165 мм вы сможете комфортно работать и с большими изделиями.
плотные/тяжелые / сверхтонкие / средние / тонкие/легкие
для джинсовой ткани / для кожи / для трикотажа / для шелка
Наличие рукавной платформы
есть
Макс. скорость шитья (ст/мин)
1100
Потребляемая мощность (Вт)
90
Регулировка ширины зигзага
есть
Автоматическое отключение намотки шпульки
есть
Регулировка давления лапки
есть
Эл. стабилизатор прокола иглы
нет
Программируемая остановка иглы вверху/внизу
нет
Регулировка скорости шитья
есть
Встроенный верхний транспортер
нет
Коленный рычаг подъема лапки
нет
Быстрая заправка нижней нити
нет
Автоматическая обрезка нити
нет
Расстояние справа от иглы (мм)
165
Отсек для швейных принадлежностей
в приставном столике
Подсветка рабочей поверхности
светодиодная
- Лапка для пришивания пуговиц
- Лапка для потайной молнии
- Лапка для штопки/вышивки
- Открытая вышивальная лапка
- Лапка для подрубки
- Лапка для отделки узких кромок
- Лапка для потайного стежка
- Лапка для вшивания молнии
- Оверлочная лапка
- Лапка для выметывания петель
- Лапка для зигзага
- Тефлоновая лапка для зигзага
- Защита для пальцев
- Комплект игл BERNINA 130/705 H
- Инструмент для компенсация высоты
- Стержень шпульки, большой
- Держатель шпульки, большой
- Приставной столик
- Держатель шпульки, малый
- Шпули (3 шт.)
- Вспарыватель швов/щетка
- Педаль
- Правая направляющая
- Отвертка
- Фетровый диск для шпульки, большой
- Масленка
- Сетка для катушки
Оставить отзыв
Ваша оценка будет учтена в рейтинге товара. Будет здорово, если Вы
дополните
отзыв — это поможет другим покупателям определиться с выбором
Ваш отзыв успешно отправлен.
Ваша оценка будет учтена в рейтинге товара.
Информация о доставке загружается, подождите…
trade-in
Преимущества программы Trade-in
- Вы можете выгодно купить новую швейную, вышивальную,
вязальную или
гладильную технику; - Вам не нужно самостоятельно искать покупателя на старую
технику или нести расходы по утилизации; - Ваша старая швейная техника может быть в любом
состоянии и любого
года выпуска; - Мы сами заберем вашу старую технику и привезем
новую.
Как воспользоваться программой
- Выберите новую технику из нашего ассортимента;
- Оставьте заявку на оценку вашей старой техники одним из предложенных
способов:- через форму внизу этой страницы;
- в комментарии к заказу на сайте
(обязательно
укажите модель вашей старой техники); - по телефонам +7 (812) 655-67-27
(Санкт-Петербург), +7
(499) 941-07-95 (Москва), +7 (8162) 68-02-50
(Великий Новгород)
или в одном из розничных магазинов «Мир
шитья»
в Санкт-Петербурге, Москве или Великом
Новгороде.
Условия приема техники в зачет
- При покупке 1 единицы новой техники выкупается 1 единица
старой; - Выкупается любая швейная или вышивальная техника;
- Работоспособность выкупаемой техники не обязательна;
- Программа Trade-in действует во всех розничных
магазинах «Мир
шитья» в Санкт-Петербурге, Москве и Великом
Новгороде, а также
при заказе товара на сайте с самовывозом в одном
из указанных
магазинов или доставкой в черте города; - На новую технику, приобретаемую в рамках программы
Trade-in не распространяются
скидки по другим акциям. Скидка по дисконтной
карте действует.
Сообщить о поступлении
Оставьте свои контактные данные и мы сообщим Вам о поступлении данного товара!
Ваш запрос успешно отправлен.
Мы сообщим Вам о поступлении данного товара!
Мы не смогли сохранить вашу заявку 
Поробуйте обновить страницу и отправить снова
1. Бонусами можно оплатить до 50% стоимости заказа.
2. Бонусами нельзя оплатить товары со скидкой, подарочные карты, эл. сертификаты и онлайн-курсы, услугу доставки.
3. Оплата бонусами действует только при заказе на сайте.
Подробнее
Тип: электромеханическая
Количество операций: 30
Челнок: горизонтальный
Петля: автомат
Заправка игл: нитевдевателем
Скорость шитья: до 1100 ст/мин
Подсветка: LED (светодиодная)
Рукавная платформа: есть
Регулировка давления лапки: нет
Рабочая область справа от иглы: 165 мм.
Позиционирование иглы вверх/вниз: нет
Коленоподъёмник: нет
Шитье без педали: нет
Точечная закрепка: нет
Алфавит: нет
Траектория зубчатой рейки: эллипсообразная
Автоматическая обрезка: нет
Регулировка скорости: да
Длина стежка: до 5 мм.
Ширина шва: до 7 мм.
Срок гарантии: 2
Страна производителя: Китай
Штрихкод: 7630043521243
lwh: 465x250x365
Weight: 8580g