
(Ocr-Read Summary of Contents of some pages of the Homelite CSP3314 Document (Main Content), UPD: 24 July 2023)
-
23, Homelite CSP3314 UK — Page 23 BUCKING LOGS UNDER STRESS Make the first bucking cut one-third of the way through the log and finish with a two-thirds cut on the opposite side. As you cut the log, it will tend to bend. The saw can become pinched or hung in the log if you make the first cut deeper than one-third of the diameter of the log. Give special attention to logs under stress to prevent the bar and chain from pinching. OVERBUCKING See Figure 38…
-
26, UK — Page 26 6. Lay out the saw chain in a loop and straighten any kinks. The cutters should face in the direction of chain rotation. If they face backwards, turn the loop over. See Figure 45. 7. Place the chain drive links into the bar groove. See Figure 46. 8. Position the chain so there is a loop at the back of the bar. 9. Hold the chain in position on the bar and place the loop round the sprocket. 10. Fit the bar flush against the mounting surface so that the bar studs are in the long slot of the bar. NOTE: Wh…
-
3, UK — Page 3 WARNING: The warnings, labels and instructions found in this section of the operator’s manual are for your safety. Failure to follow all instructions may result in serious personal injury. Safe operation of this tool requires that you read and understand this operator’s manual and all labels affixed to the tool. Safety is a combination of using common sense, staying alert, and knowing how your saw works. READ ALL INSTRUCTIONS ■■ ■■ ■ KNOW YOUR TOOL. R…
-
21, UK — Page 21 3. Cut a notch about one-third the diameter of the trunk in the side of the tree. Make the notch cuts so they intersect at right angles to the line of fall. This notch should be cleaned out to leave a straight line. To keep the weight of the wood off the saw, always make the lower cut of the notch before the upper cut. See Figure†31. 4. Make the back-cut level and horizontal, and at a minimum of 5 cm (2 in.) above the horizontal cut of the notch. See Figure 31. NOTE: Never cut through to the notch. Always …
-
29, Homelite CSP3314 UK — Page 29 Fig. 55 Fig. 56 RAKER CLEARANCE INSPECT DRIVE SPROCKET CUTTING CORNER SIDE PLATE DEPTH GAUGE TOE GULLET HEEL RIVET HOLE TOP PLATE SHARPENING THE CUTTERS See Figures 57 to 62. Be careful to file all cutters to the specified angles and to the same length, as fast cutting can only be obtained when all cutters are uniform. 1. Wear gloves for protection. 2. Tension the chain before sharpening. NOTE: Refer to “Maintenance – Adjusting the Chain Tension” earlier in this manua…
-
19, UK — Page 19 FELLING TREES HAZARDOUS CONDITIONS See Figure 29. OPERATION WARNING: Do NOT fell trees near power lines or near buildings which could be struck by falling limbs or the tree itself. STAY AWAY FROM ELECTRICAL LINES AND BUILDINGS Fig. 29 KEEP BYSTANDERS AWAY CONSIDER THE DIRECTION IN WHICH THE TREE LEANS CLEAR UNDERBRUSH WEAR EYE, HEAD AND HEARING PROTECTION AS WELL AS OTHER SAFETY APPAREL RETREAT PATH DEAD LIMBS When felling a tree, it is important that you heed the following warnings to prevent poss…
-
9, Homelite CSP3314 UK — Page 9 Fig. 2 FRONT HAND GUARD/CHAIN BRAKE FRONT HANDLE CYLINDER COVER THROTTLE LOCK BUTTON TRIGGER RELEASE REAR HANDLE THROTTLE TRIGGER ON/OFF SWITCH FUEL MIX CAP CHAIN OIL CAP STARTER/FAN HOUSING STARTER GRIP SAFE-T-TIP PRIMER BULB CHOKE LEVER FEATURES SILENCER CARBURETTOR ADJUSTMENT CHAIN CATCHER
… -
40, 983000-226 Ryobi Technologies GmbH Itterpark 7 D-40724 Hilden Germany Tel.: +49 (0)2103 / 29 58 0 Fax : +49 (0)2103 / 29 58 29 [email protected] OPERATORíS MANUAL 356 mm (14 in.) 33cc Chainsaw CSP3314 UT74121B
… -
31, UK — Page 31 TOP PLATE FILING ANGLE ■ CORRECT 30° – file holders are marked with guide marks to align file properly to produce correct top plate angle. ■ LESS THAN 30° – for cross cutting. ■ MORE THAN 30° – feathered edge dulls quickly. SIDE PLATE ANGLE ■ CORRECT 80 o – Produced automatically if you use the correct diameter file in the file holder. ■ HOOK – “Grabs” and dulls quickly, increases the potential of KICK-BACK. Results from using a file with a diameter too small or a file held too low. ■ BACKWARD SLO…
-
37, Homelite CSP3314 UK — Page 37 PROBLEM POSSIBLE CAUSE SOLUTION Engine starts, runs, and accelerates but will not idle. Bar and chain running hot and smoking. Engine starts and runs, but chain is not rotating. Carburettor requires adjustment. 1. Chain oil tank empty. 2. Check chain tension for overtight condition. 3. Check for oiler function. 1. Chain brake engaged. 2. Chain tension too tight. 3. Check guide bar and cha…
-
8, UK — Page 8 Weight — No bar, chain, fuel or oil ……………………………………………………………………………………………….. 4.4 kg (9.7 lbs.) Fuel tank capacity …………………………………………………………………………………………………………………. 575 cm 3 (19.4 oz.) Oil tank capacity…………………………………………………………………………………
-
18, UK — Page 18 WARNING: Weather conditions and altitude may affect carburation. Do not allow bystanders close to the chainsaw while adjusting the carburettor. ADJUSTING IDLING SPEED ■■ ■■ ■ If the engine starts, runs, and accelerates but will not idle, turn the idling speed screw “T” clockwise to increase idling speed. ■■ ■■ ■ If the chain turns at idle, turn the idling speed screw “T” anticlockwise to reduce the idling RPM and stop the c…
-
6, UK — Page 6 PUSH AND PULL The reaction force is always opposite to the direction the chain is moving. Thus, the operator must be ready to control the PULL when cutting on the bottom edge of the bar and the PUSH when cutting along the top edge. MAINTENANCE PRECAUTIONS Never operate a chainsaw that is damaged, improperly adjusted, or is not completely and securely assembled. Be sure that the saw chain stops moving when the throttle control trigger is released. If the saw chain moves at idling speed, the carburettor may need adjusting. Refer to “Operati…
-
11, UK — Page 11 RUN POSITION BRAKE POSITION Fig. 5 CHAIN BRAKE Chain brakes are designed to quickly stop the chain from rotating. When the chain brake lever/hand guard is pushed towards the bar, the chain should stop immediately. A chain brake does not prevent kick-back. The chain brake should be cleaned and tested daily. Refer to “Operation” later in this manual for additional information. WARNING: Even with daily cleaning of the mechanism, the dependability of a chai…
-
12, Homelite CSP3314 UK — Page 12 WARNING: Always turn off engine before refuelling. Never add fuel to a machine with a running or hot engine. Move at least 15 m (50 ft.) from refuelling site before starting the engine. DO NOT SMOKE! Failure to heed this warning can result in possible personal injury. FUEL AND REFUELLING HANDLING THE FUEL SAFELY } 50:1 FILLING THE TANK Refer to “Specific Safety Rules – Refuelling” earlier in this manual for additio…
-
25, UK — Page 25 ASSEMBLING THE BAR AND CHAIN DANGER: Never start the engine before installing the guide bar, chain, drive case cover, and clutch drum. Without all these parts in place, the clutch may fly off or explode, exposing the user to possible serious injury. WARNING: To avoid serious personal injury, read and understand all the safety instructions in this section. 1. Always place the switch in the stop ìOî position before you work on the saw. 2. Make sure the chain brake is not set by pulling the chain brake le…
-
5, UK — Page 5 WARNING: The warnings, labels and instructions found in this section of the operator’s manual are for your safety. Failure to follow all instructions may result in serious personal injury. GENERAL PRECAUTIONS ■■ ■■ ■ DO NOT CUT VINES and/or small underbrush (less than 76 mm (3 in.) in diameter). ■■ ■■ ■ SILENCER SURFACES ARE VERY HOT during and after operation of the chainsaw; keep all body parts away from the s…
-
10, UK — Page 10 OPERATION WARNING: The warnings and instructions in this section of the operator’s manual are for your safety and to prevent serious personal injury. UNDERSTANDING YOUR CHAINSAW SAFETY DEVICES SAFE-T-TIP ANTI-KICK-BACK NOSE GUARD See Figure 4. The SAFE-T-TIP prevents kick-back because it covers the tip of the bar where rotational kick-back is generated. Inexperienced persons should never attempt to cut …
-
7, Homelite CSP3314 UK — Page 7 SYMBOLS Important: Some of the following symbols may be used on your tool. Please study them and learn their meaning. Proper interpretation of these symbols will allow you to operate the tool better and more safely. SYMBOL NAME EXPLANATION Indicates danger, warning or caution. It means attention!!! Your safety is involved. Your manual contains special messages to bring attention to potential safety concerns and machine damage, as well as helpful operating and servicing information. Please read all the informat…
Table of Contents: Homelite CSP3314 Chainsaw Owner’s Manual
-
Homelite CSP3314 UK — Page 39 NOTES
-
UK — Page 27 11. Replace the outer guide bar plate, ensuring that the bar pin groove is at the bottom with the upper and lower edges angled away from the guide bar. 12. Replace the clutch cover and bar mounting nuts. 13. Tighten the bar mounting nuts finger tight only. The bar must be free to move for tension adjustment. 14. Remove all slack from the chain by turning the chain tensioning screw clockwise until the chain seats snugly against the bar with the drive links in the bar groove. 15. Lift the tip of the guide bar up to check for sagging. 16. Release the tip of the guide bar and turn t
-
UK — Page 16 PREPARING FOR CUTTING PROPER GRIP ON HANDLES See Figures 20 and 21. Refer to “Specific Safety Rules – Safety Apparel” earlier in this manual for appropriate safety equipment. ■■ ■■ ■ Wear non-slip gloves for maximum grip and protection. ■■ ■■ ■ Hold the saw firmly with both hands. Always keep your LEFT HAND on the front handle and your RIGHT HAND on the rear handle so that your body is to the left of the chain line. WARNING: Never use a
-
UK — Page 12 WARNING: Always turn off engine before refuelling. Never add fuel to a machine with a running or hot engine. Move at least 15 m (50 ft.) from refuelling site before starting the engine. DO NOT SMOKE! Failure to heed this warning can result in possible personal injury. FUEL AND REFUELLING HANDLING THE FUEL SAFELY } 50:1 FILLING THE TANK Refer to “Specific Safety Rules – Refuelling” earlier in this manual for additional safety information
-
UK — Page 25 ASSEMBLING THE BAR AND CHAIN DANGER: Never start the engine before installing the guide bar, chain, drive case cover, and clutch drum. Without all these parts in place, the clutch may fly off or explode, exposing the user to possible serious injury. WARNING: To avoid serious personal injury, read and understand all the safety instructions in this section. 1. Always place the switch in the stop ìOî position before you work on the saw. 2. Make sure the chain brake is not set by pulling the chain brake
-
Homelite CSP3314 OPERATORíS MANUAL 356 mm (14 in.) 33cc Chainsaw CSP3314 Your new chainsaw has been engineered and manufactured to Homelite’s high standard for dependability, ease of operation and operator safety. Properly cared for, it will give you years of rugged, trouble-free performance. WARNING: To reduce the risk of injury, please read and understand the operator’s manual before using this product. Thank you for buying a Homelite chainsaw. SAVE THIS MANUAL FOR FUTURE REFERENCE
-
Homelite CSP3314 UK — Page 23 BUCKING LOGS UNDER STRESS Make the first bucking cut one-third of the way through the log and finish with a two-thirds cut on the opposite side. As you cut the log, it will tend to bend. The saw can become pinched or hung in the log if you make the first cut deeper than one-third of the diameter of the log. Give special attention to logs under stress to prevent the bar and chain from pinching. OVERBUCKING See Figure 38. Begin on the top side of the log with the bottom of the saw against the log; exert light pressure downward. Note that the saw will tend to pull away from you. UNDERBUCKING See Fig
-
Homelite CSP3314 UK — Page 33 MOUNTING THE SAFE-T-TIPÆ NOSE GUARD See Figures 69 and 70. 1. Mount the SAFE-T-TIP on the bar nose. 2. Fit the locking rivet or tab in the recessed hole in the guide bar. 3. Tighten the screw with your finger. 4. From the finger tight position, tighten the screw an additional three-quarters of a turn using a spanner. CLEANING THE AIR FILTER See Figures 71, 72 and 73. NOTE: Always clean the air filter before making any mixture adjustments of the carburettor. 1. For access to the air filter and carburettor area, loosen the three screws holding the cylinder cover. 2. Activate chain brake. 3. Lif
-
Homelite CSP3314 UK — Page 35 CLEANING THE SPARK ARRESTING SILENCER The silencer is equipped with a spark arrester screen. A faulty spark arrester screen can create a fire hazard. Through normal use the screen becomes dirty and should be inspected weekly and cleaned as required. Always keep the silencer and spark arrester on your saw in good condition. WARNING Silencer surfaces are very hot during and after operation of the chainsaw: keep all body parts away from the silencer. Serious burns may occur if contact is made with the silencer. 1. Allow th
-
Homelite CSP3314 UK — Page 8 Weight — No bar, chain, fuel or oil ……………………………………………………………………………………………….. 4.4 kg (9.7 lbs.) Fuel tank capacity …………………………………………………………………………………………………………………. 575 cm 3 (19.4 oz.) Oil tank capacity……………………………………………………………………………………………………………………. 350 cm 3 (11.8 oz.) Bar lengths ……………………………………………………………….
-
UK — Page 9 Fig. 2 FRONT HAND GUARD/CHAIN BRAKE FRONT HANDLE CYLINDER COVER THROTTLE LOCK BUTTON TRIGGER RELEASE REAR HANDLE THROTTLE TRIGGER ON/OFF SWITCH FUEL MIX CAP CHAIN OIL CAP STARTER/FAN HOUSING STARTER GRIP SAFE-T-TIP PRIMER BULB CHOKE LEVER FEATURES SILENCER CARBURETTOR ADJUSTMENT CHAIN CATCHER
-
Homelite CSP3314 UK — Page 31 TOP PLATE FILING ANGLE ■ CORRECT 30° – file holders are marked with guide marks to align file properly to produce correct top plate angle. ■ LESS THAN 30° – for cross cutting. ■ MORE THAN 30° – feathered edge dulls quickly. SIDE PLATE ANGLE ■ CORRECT 80 o – Produced automatically if you use the correct diameter file in the file holder. ■ HOOK – “Grabs” and dulls quickly, increases the potential of KICK-BACK. Results from using a file with a diameter too small or a file held too low. ■ BACKWARD SLOPE – Needs too much feed pressure, causes excessive wear to the bar and chain. Res
-
Homelite CSP3314 UK — Page 30 Fig. 60 Fig. 61 Fig. 59 CHECK FOR WEAR OR DAMAGE LEFT-HAND CUTTERS RIGHT-HAND CUTTERS Fig. 62 CAUTION: A dull or improperly sharpened chain can cause excessive engine speed during cutting which may result in severe engine damage. WARNING: Improper chain sharpening increases the potential of kick-back. WARNING: Failure to replace or repair a damaged chain can cause serious injury. WARNING: The saw chain is very sharp. Always wear protective gloves when performing maintenance on the chain. MAINTENANCE
-
UK — Page 2 Look for this symbol to point out important safety precautions. It means attention!!! Your safety is involved. WARNING: Carefully read through this entire operator’s manual before using your new saw. Pay close attention to the Safety Rules and all Safety Alert Symbols including Danger, Warning and Caution. These safety rules are for your safety and to prevent possible serious injury. If you use your saw properly and only for what it is intended, you will enjoy years of safe, reli
-
UK — Page 18 WARNING: Weather conditions and altitude may affect carburation. Do not allow bystanders close to the chainsaw while adjusting the carburettor. ADJUSTING IDLING SPEED ■■ ■■ ■ If the engine starts, runs, and accelerates but will not idle, turn the idling speed screw “T” clockwise to increase idling speed. ■■ ■■ ■ If the chain turns at idle, turn the idling speed screw “T” anticlockwise to reduce the idling RPM and st
-
Homelite CSP3314 UK — Page 13 CHAIN OIL SYSTEM See Figure 9. Use HOMELITE Bar and Chain Oil. It is designed for chains and chain oilers, and is formulated to perform over a wide temperature range with no dilution required. Chainsaw should use approximately one tank of oil per tank of fuel. NOTE: Do not use dirty, used or otherwise contaminated oils. Damage may occur to the oil pump, bar or chain. 1. Carefully pour the bar and chain oil into the tank. 2. Fill the oil tank every time you refuel the engine. STARTING THE ENGINE See Figures 10 to 19. WARNING: Keep yo
-
Homelite CSP3314 UK — Page 14 Fig. 14 FULL CHOKE CHOKE LEVER HALF CHOKE RUN POSITION Fig. 15 THROTTLE TRIGGER THROTTLE LOCK BUTTON TRIGGER RELEASE Fig. 16 Fig. 17 THROTTLE TRIGGER TRIGGER RELEASE Fig. 18 RUN POSITION STARTER GRIP STARTING A COLD ENGINE: 3. Move the chain brake to the BRAKE position. NOTE: Set the chain brake by pushing the chain brake lever/hand guard forward (towards the bar) to the brake position. Refer to “Operation – Operating the Chain Brake” later in this manual for additional information. 4. Set the ignition switch to the RUN (I) position. 5. Fully press and release the PRIMER BULB 7 times. 6. Pull CHOKE lever all the way OUT
-
UK — Page 4 GENERAL SAFETY RULES ■ KEEP ALL PARTS OF YOUR BODY away from the saw chain when the engine is running. ■■ ■■ ■ ALWAYS CARRY THE CHAINSAW WITH THE ENGINE STOPPED AND THE BRAKE ENGAGED, the guide bar and saw chain to the rear, and the silencer away from your body. When transporting the chainsaw, use the appropriate guide bar scabbard. ■■ ■■ ■ DO NOT OPERATE A CHAINSAW THAT IS DAMAGED, improperly adjusted, or not completely and s
-
Homelite CSP3314 UK — Page 17 BASIC OPERATING/CUTTING PROCEDURES Practise cutting a few small logs, using the following technique to get the “feel” of using the saw before you begin a major sawing operation. 1. Take the proper stance in front of the wood with the saw idling. 2. Accelerate the engine to full throttle just before entering the cut by squeezing the throttle trigger. 3. Begin cutting with the saw against the log. 4. Keep the engine at full throttle the entire time you are cutting. 5. Allow the chain to cut for you; exert only light downward pressure. Forcing the cut could result in dam
-
UK — Page 38 WARRANTY GUARANTEE ñ STATEMENT (RTSA / RTUK / RTG) All Homelite products are guaranteed from defects in material and workmanship for a period of twenty-four (24) months, effective and evidenced from date of original invoice or delivery note. Defects caused by normal wear and tear, unauthorised/improper maintenance/handling or overload are excluded from this guarantee, as are accessories such as battery packs, bulbs, blades and bits etc. In the event of malfunction within the guarantee period, pleas
-
Homelite CSP3314 UK — Page 5 WARNING: The warnings, labels and instructions found in this section of the operator’s manual are for your safety. Failure to follow all instructions may result in serious personal injury. GENERAL PRECAUTIONS ■■ ■■ ■ DO NOT CUT VINES and/or small underbrush (less than 76 mm (3 in.) in diameter). ■■ ■■ ■ SILENCER SURFACES ARE VERY HOT during and after operation of the chainsaw; keep all body parts away from the silencer. Serious burns may occur if contact is made with the silencer. ■■ ■■ ■ ALWAYS HOLD THE CHAINSAW WITH BOTH HANDS when the engine is running. Use a firm grip with thumbs and fingers enci
-
Homelite CSP3314 983000-226 Ryobi Technologies GmbH Itterpark 7 D-40724 Hilden Germany Tel.: +49 (0)2103 / 29 58 0 Fax : +49 (0)2103 / 29 58 29 [email protected] OPERATORíS MANUAL 356 mm (14 in.) 33cc Chainsaw CSP3314 UT74121B
-
Homelite CSP3314 UK — Page 37 PROBLEM POSSIBLE CAUSE SOLUTION Engine starts, runs, and accelerates but will not idle. Bar and chain running hot and smoking. Engine starts and runs, but chain is not rotating. Carburettor requires adjustment. 1. Chain oil tank empty. 2. Check chain tension for overtight condition. 3. Check for oiler function. 1. Chain brake engaged. 2. Chain tension too tight. 3. Check guide bar and chain assembly. 4. Check guide bar and chain for damage. Turn idling speed screw “T” clockwise to increase idling speed. If chain turns at idle, turn idling speed screw “T” anticlockwis
-
Homelite CSP3314 UK — Page 21 3. Cut a notch about one-third the diameter of the trunk in the side of the tree. Make the notch cuts so they intersect at right angles to the line of fall. This notch should be cleaned out to leave a straight line. To keep the weight of the wood off the saw, always make the lower cut of the notch before the upper cut. See Figure†31. 4. Make the back-cut level and horizontal, and at a minimum of 5 cm (2 in.) above the horizontal cut of the notch. See Figure 31. NOTE: Never cut through to the notch. Always
-
UK — Page 20 PROPER PROCEDURE FOR TREE FELLING See Figure 30. 1. Pick your escape route (or routes in case the intended route is blocked). Clear the immediate area round the tree and make sure there are no obstructions in your planned path of retreat. Clear the path of safe retreat approximately 135° from the planned line of fall. 2. Consider the force and direction of the wind, the lean and balance of the tree, and the location of large limbs. These things influence the direction in which the tree will fall. Do not try to fell a tree along a line different from its natural l
-
UK — Page 24 LIMBING AND PRUNING See Figure 39. ■ Work slowly, keeping both hands on the saw with a firm grip. Maintain secure footing and balance. ■ Keep the tree between you and the chain while limbing. Cut from the side of the tree opposite the branch you are cutting. ■ Do not cut from a ladder: this is extremely dangerous. Leave this operation for professionals. ■ Do not cut above chest height, as a saw held higher is difficult to control against kick-back. WARNING
-
UK — Page 10 OPERATION WARNING: The warnings and instructions in this section of the operator’s manual are for your safety and to prevent serious personal injury. UNDERSTANDING YOUR CHAINSAW SAFETY DEVICES SAFE-T-TIP ANTI-KICK-BACK NOSE GUARD See Figure 4. The SAFE-T-TIP prevents kick-back because it covers the tip of the bar where rotational kick-back is generated. Inexperienced persons should never attempt to cut when the SAFE-T-TIP has been removed from the bar tip. Fig. 4 U
-
UK — Page 32 RESTORE ORIGINAL SHAPE BY ROUNDING THE FRONT Fig. 68 LUBRICATING HOLE Fig. 67 MAINTAINING THE GUIDE BAR See Figure 68. MAINTAINING THE SAFE-T-TIP NOSE GUARD See Figures 69 and 70. MOUNTING SCREW SAFE-T-TIP Fig. 69 MAINTENANCE Every week of use, reverse the guide bar on the saw to distribute the wear for maximum bar life. The bar should be cleaned every day of use and checked for wear and damage. Feathering or burring of the bar rails is a normal process of bar wear. Such faults should be smoothe
-
Homelite CSP3314 UK — Page 11 RUN POSITION BRAKE POSITION Fig. 5 CHAIN BRAKE Chain brakes are designed to quickly stop the chain from rotating. When the chain brake lever/hand guard is pushed towards the bar, the chain should stop immediately. A chain brake does not prevent kick-back. The chain brake should be cleaned and tested daily. Refer to “Operation” later in this manual for additional information. WARNING: Even with daily cleaning of the mechanism, the dependability of a chain brake to perform under field conditions cannot be certified. Keep the SAFE-T-TIP nose guard on the sa
-
Homelite CSP3314 UK — Page 19 FELLING TREES HAZARDOUS CONDITIONS See Figure 29. OPERATION WARNING: Do NOT fell trees near power lines or near buildings which could be struck by falling limbs or the tree itself. STAY AWAY FROM ELECTRICAL LINES AND BUILDINGS Fig. 29 KEEP BYSTANDERS AWAY CONSIDER THE DIRECTION IN WHICH THE TREE LEANS CLEAR UNDERBRUSH WEAR EYE, HEAD AND HEARING PROTECTION AS WELL AS OTHER SAFETY APPAREL RETREAT PATH DEAD LIMBS When felling a tree, it is important that you heed the following warnings to prevent possible serious injury. ■■ ■■ ■ Wear eye, hearing and head protection when operati
-
Homelite CSP3314 UK — Page 29 Fig. 55 Fig. 56 RAKER CLEARANCE INSPECT DRIVE SPROCKET CUTTING CORNER SIDE PLATE DEPTH GAUGE TOE GULLET HEEL RIVET HOLE TOP PLATE SHARPENING THE CUTTERS See Figures 57 to 62. Be careful to file all cutters to the specified angles and to the same length, as fast cutting can only be obtained when all cutters are uniform. 1. Wear gloves for protection. 2. Tension the chain before sharpening. NOTE: Refer to “Maintenance – Adjusting the Chain Tension” earlier in this manual. 3. Use a 4 mm (5/32 in.) diameter round fi
-
Homelite CSP3314 UK — Page 36 Recommended Bar and chain combinations For 0.375 Low Profile 0.050 Gauge Length of Bar Guide Bar Part Number Chain Part Number 356 mm (14 in.) PS06331 PS06329 406 mm (16 in.) PS06338 PS06285 PROBLEM POSSIBLE CAUSE SOLUTION Engine will not start. (Make sure ignition switch is in start position “I”.) Engine starts but will not accelerate properly. Engine starts but will not run properly at high speed. Engine does not reach full speed and/or emits excessive smoke. 1. No spark. 2. Flooded engine. Carburettor requires “L” (Low
-
UK — Page 15 8. Pull STARTER until engine attempts to start. Slowly pull the starter grip out for a short distance until you feel the starter engage, then briskly pull straight up. Do not pull to the end of the rope; this may damage the starter. Hold onto the grip during rewinding. Pull the starter rope until the first firing of the engine is heard (no more than five pulls). NOTE: A new unit may require additional pulls. 9. Push choke lever to half choke position. 10. Pull starter until engine runs. NOTE: Allow the saw to run in this position 15-30 seconds, depending on the
-
Homelite CSP3314 UK — Page 28 ADJUSTING THE CHAIN TENSION See Figures 52, 53 and 54. WARNING: Never touch or adjust the chain while the motor is running. The saw chain is very sharp. Always wear protective gloves when performing maintenance on the chain. 1. Stop the engine before setting the chain tension. 2. Make sure the guide bar nuts are loosened to finger-tight and turn the chain tensioner clockwise to tension the chain. NOTE: A cold chain is correctly tensioned when there is no slack on the underside of the guide bar, the chain is snug and it can be turned by hand without binding. 3. Re-tension the chain whenever the flats on the drive links hang out of the b
-
Homelite CSP3314 UK — Page 34 CLEANING THE ENGINE Clean the cylinder fins and flywheel fins with compressed air or a brush periodically. Dangerous overheating of the engine may occur due to impurities on the cylinder. WARNING Never run the saw without all the parts, including the drive case cover and starter housing, securely in place. Because parts can fracture and pose a danger of thrown objects, leave repairs of the flywheel and clutch to trained Homelite service dealer personnel. CLEANING THE STARTER UNIT Use a brush or compressed air to keep the cooling vents of the star
-
Homelite CSP3314 UK — Page 6 PUSH AND PULL The reaction force is always opposite to the direction the chain is moving. Thus, the operator must be ready to control the PULL when cutting on the bottom edge of the bar and the PUSH when cutting along the top edge. MAINTENANCE PRECAUTIONS Never operate a chainsaw that is damaged, improperly adjusted, or is not completely and securely assembled. Be sure that the saw chain stops moving when the throttle control trigger is released. If the saw chain moves at idling speed, the carburettor may need adjusting. Refer to “Operation-Ad
-
Homelite CSP3314 UK — Page 3 WARNING: The warnings, labels and instructions found in this section of the operator’s manual are for your safety. Failure to follow all instructions may result in serious personal injury. Safe operation of this tool requires that you read and understand this operator’s manual and all labels affixed to the tool. Safety is a combination of using common sense, staying alert, and knowing how your saw works. READ ALL INSTRUCTIONS ■■ ■■ ■ KNOW YOUR TOOL. Read the operator’s manual carefully. Learn the saw’s ap
-
UK — Page 26 6. Lay out the saw chain in a loop and straighten any kinks. The cutters should face in the direction of chain rotation. If they face backwards, turn the loop over. See Figure 45. 7. Place the chain drive links into the bar groove. See Figure 46. 8. Position the chain so there is a loop at the back of the bar. 9. Hold the chain in position on the bar and place the loop round the sprocket. 10. Fit the bar flush against the mounting surface so that the bar studs are in the long slot of the bar. NOTE: When placing the bar on the bar studs, ensur
-
Homelite CSP3314 UK — Page 22 REMOVING BUTTRESS ROOTS A buttress root is a large root extending from the trunk of the tree above the ground. Remove large buttress roots before felling. Make the horizontal cut into the buttress first, followed by the vertical cut. Remove the resulting loose section from the work area. Follow the correct tree felling procedure after you have removed the large buttress roots. Refer to “Operation – Proper Procedure for Tree Felling” earlier in this manual. BUCKING Bucking is the term used for cutting a fallen tree
Table of Contents: Homelite CSP3314 Chainsaw Owner’s Manual
-
Homelite CSP3314 UK — Page 7 SYMBOLS Important: Some of the following symbols may be used on your tool. Please study them and learn their meaning. Proper interpretation of these symbols will allow you to operate the tool better and more safely. SYMBOL NAME EXPLANATION Indicates danger, warning or caution. It means attention!!! Your safety is involved. Your manual contains special messages to bring attention to potential safety concerns and machine damage, as well as helpful operating and servicing information. Please read all the information carefully to avoid injury and machine damage. Wear eye, hearing and head protection when
-
UK — Page 35 CLEANING THE SPARK ARRESTING SILENCER The silencer is equipped with a spark arrester screen. A faulty spark arrester screen can create a fire hazard. Through normal use the screen becomes dirty and should be inspected weekly and cleaned as required. Always keep the silencer and spark arrester on your saw in good condition. WARNING Silencer surfaces are very hot during and after operation of the chainsaw: keep all body parts away from the silencer. Serious burns may occur if contact is made with the silencer. 1. Allow the silencer to
-
Homelite CSP3314 UK — Page 8 Weight — No bar, chain, fuel or oil ……………………………………………………………………………………………….. 4.4 kg (9.7 lbs.) Fuel tank capacity …………………………………………………………………………………………………………………. 575 cm 3 (19.4 oz.) Oil tank capacity……………………………………………………………………………………………………………………. 350 cm 3 (11.8 oz.) Bar lengths ………………………………………………………………………………………………….
-
Homelite CSP3314 UK — Page 18 WARNING: Weather conditions and altitude may affect carburation. Do not allow bystanders close to the chainsaw while adjusting the carburettor. ADJUSTING IDLING SPEED ■■ ■■ ■ If the engine starts, runs, and accelerates but will not idle, turn the idling speed screw “T” clockwise to increase idling speed. ■■ ■■ ■ If the chain turns at idle, turn the idling speed screw “T” anticlockwise to reduce the idling RPM and stop the chain movement. If the saw chain still moves at idling speed, contact a Homelite service dealer for adjust
-
UK — Page 23 BUCKING LOGS UNDER STRESS Make the first bucking cut one-third of the way through the log and finish with a two-thirds cut on the opposite side. As you cut the log, it will tend to bend. The saw can become pinched or hung in the log if you make the first cut deeper than one-third of the diameter of the log. Give special attention to logs under stress to prevent the bar and chain from pinching. OVERBUCKING See Figure 38. Begin on the top side of the log with the bottom of the saw against the log; exert light pressure downward. Note that the saw will tend to pull
-
UK — Page 27 11. Replace the outer guide bar plate, ensuring that the bar pin groove is at the bottom with the upper and lower edges angled away from the guide bar. 12. Replace the clutch cover and bar mounting nuts. 13. Tighten the bar mounting nuts finger tight only. The bar must be free to move for tension adjustment. 14. Remove all slack from the chain by turning the chain tensioning screw clockwise until the chain seats snugly against the bar with the drive links in the bar groove. 15. Lift the tip of the guide bar up to check
-
UK — Page 29 Fig. 55 Fig. 56 RAKER CLEARANCE INSPECT DRIVE SPROCKET CUTTING CORNER SIDE PLATE DEPTH GAUGE TOE GULLET HEEL RIVET HOLE TOP PLATE SHARPENING THE CUTTERS See Figures 57 to 62. Be careful to file all cutters to the specified angles and to the same length, as fast cutting can only be obtained when all cutters are uniform. 1. Wear gloves for protection. 2. Tension the chain before sharpening. NOTE: Refer to “Maintenance – Adjusting the Chain Tens
-
UK — Page 10 OPERATION WARNING: The warnings and instructions in this section of the operator’s manual are for your safety and to prevent serious personal injury. UNDERSTANDING YOUR CHAINSAW SAFETY DEVICES SAFE-T-TIP ANTI-KICK-BACK NOSE GUARD See Figure 4. The SAFE-T-TIP prevents kick-back because it covers the tip of the bar where rotational kick-back is generated. Inexperienced persons should never attempt to cut when the SAFE-T-TIP has been removed from the bar tip. Fig. 4 Users, such as p
-
UK — Page 24 LIMBING AND PRUNING See Figure 39. ■ Work slowly, keeping both hands on the saw with a firm grip. Maintain secure footing and balance. ■ Keep the tree between you and the chain while limbing. Cut from the side of the tree opposite the branch you are cutting. ■ Do not cut from a ladder: this is extremely dangerous. Leave this operation for professionals. ■ Do not cut above chest height, as a saw held higher is difficult to control against kick-back. WARNING: Never climb into a tree to limb or prune. Do not stand o
-
Homelite CSP3314 UK — Page 19 FELLING TREES HAZARDOUS CONDITIONS See Figure 29. OPERATION WARNING: Do NOT fell trees near power lines or near buildings which could be struck by falling limbs or the tree itself. STAY AWAY FROM ELECTRICAL LINES AND BUILDINGS Fig. 29 KEEP BYSTANDERS AWAY CONSIDER THE DIRECTION IN WHICH THE TREE LEANS CLEAR UNDERBRUSH WEAR EYE, HEAD AND HEARING PROTECTION AS WELL AS OTHER SAFETY APPAREL RETREAT PATH DEAD LIMBS When felling a tree, it is important that you heed the following warnings to prevent possible serious injury. ■■ ■■
-
UK — Page 4 GENERAL SAFETY RULES ■ KEEP ALL PARTS OF YOUR BODY away from the saw chain when the engine is running. ■■ ■■ ■ ALWAYS CARRY THE CHAINSAW WITH THE ENGINE STOPPED AND THE BRAKE ENGAGED, the guide bar and saw chain to the rear, and the silencer away from your body. When transporting the chainsaw, use the appropriate guide bar scabbard. ■■ ■■ ■ DO NOT OPERATE A CHAINSAW THAT IS DAMAGED, improperly adjusted, or not completely and securely assembled. Be sure that the saw
-
UK — Page 15 8. Pull STARTER until engine attempts to start. Slowly pull the starter grip out for a short distance until you feel the starter engage, then briskly pull straight up. Do not pull to the end of the rope; this may damage the starter. Hold onto the grip during rewinding. Pull the starter rope until the first firing of the engine is heard (no more than five pulls). NOTE: A new unit may require additional pulls. 9. Push choke lever to half choke
-
UK — Page 20 PROPER PROCEDURE FOR TREE FELLING See Figure 30. 1. Pick your escape route (or routes in case the intended route is blocked). Clear the immediate area round the tree and make sure there are no obstructions in your planned path of retreat. Clear the path of safe retreat approximately 135° from the planned line of fall. 2. Consider the force and direction of the wind, the lean and balance of the tree, and the location of large limbs. These things influence the directio
-
Homelite CSP3314 UK — Page 14 Fig. 14 FULL CHOKE CHOKE LEVER HALF CHOKE RUN POSITION Fig. 15 THROTTLE TRIGGER THROTTLE LOCK BUTTON TRIGGER RELEASE Fig. 16 Fig. 17 THROTTLE TRIGGER TRIGGER RELEASE Fig. 18 RUN POSITION STARTER GRIP STARTING A COLD ENGINE: 3. Move the chain brake to the BRAKE position. NOTE: Set the chain brake by pushing the chain brake lever/hand guard forward (towards the bar) to the brake position. Refer to “Operation – Operating the Chain Brake” later in this manual for additional information. 4. Set the ignition switch to the RUN (I) posit
-
Homelite CSP3314 UK — Page 37 PROBLEM POSSIBLE CAUSE SOLUTION Engine starts, runs, and accelerates but will not idle. Bar and chain running hot and smoking. Engine starts and runs, but chain is not rotating. Carburettor requires adjustment. 1. Chain oil tank empty. 2. Check chain tension for overtight condition. 3. Check for oiler function. 1. Chain brake engaged. 2. Chain tension too tight. 3. Check guide bar and chain assembly. 4. Check guide bar and chain for damage. Turn idling speed screw “T” clockwise to increase idling speed. I
-
Homelite CSP3314 UK — Page 30 Fig. 60 Fig. 61 Fig. 59 CHECK FOR WEAR OR DAMAGE LEFT-HAND CUTTERS RIGHT-HAND CUTTERS Fig. 62 CAUTION: A dull or improperly sharpened chain can cause excessive engine speed during cutting which may result in severe engine damage. WARNING: Improper chain sharpening increases the potential of kick-back. WARNING: Failure to replace or repair a damaged chain can cause serious injury. WARNING: The saw chain is very sharp. Always wear protective gloves when performing maintenance on the chain. MAINTENANCE
-
Homelite CSP3314 UK — Page 13 CHAIN OIL SYSTEM See Figure 9. Use HOMELITE Bar and Chain Oil. It is designed for chains and chain oilers, and is formulated to perform over a wide temperature range with no dilution required. Chainsaw should use approximately one tank of oil per tank of fuel. NOTE: Do not use dirty, used or otherwise contaminated oils. Damage may occur to the oil pump, bar or chain. 1. Carefully pour the bar and chain oil into the tank. 2. Fill the oil tank every time you refuel the engine. STARTING THE ENGINE See Figures 10 to 19. WARNING: Keep your body to the left of the ch
-
Homelite CSP3314 UK — Page 2 Look for this symbol to point out important safety precautions. It means attention!!! Your safety is involved. WARNING: Carefully read through this entire operator’s manual before using your new saw. Pay close attention to the Safety Rules and all Safety Alert Symbols including Danger, Warning and Caution. These safety rules are for your safety and to prevent possible serious injury. If you use your saw properly and only for what it is intended, you will enjoy years of safe, reliable service. IMPORTANT
-
Homelite CSP3314 UK — Page 16 PREPARING FOR CUTTING PROPER GRIP ON HANDLES See Figures 20 and 21. Refer to “Specific Safety Rules – Safety Apparel” earlier in this manual for appropriate safety equipment. ■■ ■■ ■ Wear non-slip gloves for maximum grip and protection. ■■ ■■ ■ Hold the saw firmly with both hands. Always keep your LEFT HAND on the front handle and your RIGHT HAND on the rear handle so that your body is to the left of the chain line. WARNING: Never use a left-handed (cross-handed) grip or any stance that would place your body or arm across the chain line. ■■ ■■ ■ Maintain a proper grip on the saw wheneve
-
UK — Page 31 TOP PLATE FILING ANGLE ■ CORRECT 30° – file holders are marked with guide marks to align file properly to produce correct top plate angle. ■ LESS THAN 30° – for cross cutting. ■ MORE THAN 30° – feathered edge dulls quickly. SIDE PLATE ANGLE ■ CORRECT 80 o – Produced automatically if you use the correct diameter file in the file holder. ■ HOOK – “Grabs” and dulls quickly, increases the potential of KICK-BACK. Results from using a file with a diameter too small or a file held too low. ■ BACKWARD SLOPE – Needs too much feed pressu
-
Homelite CSP3314 UK — Page 22 REMOVING BUTTRESS ROOTS A buttress root is a large root extending from the trunk of the tree above the ground. Remove large buttress roots before felling. Make the horizontal cut into the buttress first, followed by the vertical cut. Remove the resulting loose section from the work area. Follow the correct tree felling procedure after you have removed the large buttress roots. Refer to “Operation – Proper Procedure for Tree Felling” earlier in this manual. BUCKING Bucking is the term used for cutting a fallen tree to
-
Homelite CSP3314 UK — Page 25 ASSEMBLING THE BAR AND CHAIN DANGER: Never start the engine before installing the guide bar, chain, drive case cover, and clutch drum. Without all these parts in place, the clutch may fly off or explode, exposing the user to possible serious injury. WARNING: To avoid serious personal injury, read and understand all the safety instructions in this section. 1. Always place the switch in the stop ìOî position before you work on the saw. 2. Make sure the chain brake is not set by pulling the chain brake lever/han
-
UK — Page 32 RESTORE ORIGINAL SHAPE BY ROUNDING THE FRONT Fig. 68 LUBRICATING HOLE Fig. 67 MAINTAINING THE GUIDE BAR See Figure 68. MAINTAINING THE SAFE-T-TIP NOSE GUARD See Figures 69 and 70. MOUNTING SCREW SAFE-T-TIP Fig. 69 MAINTENANCE Every week of use, reverse the guide bar on the saw to distribute the wear for maximum bar life. The bar should be cleaned every day of use and checked for wear and damage. Feathering or burring of the bar rails is a normal process of bar wear. Such faults should be smoothed with a file as soon as they occur. A bar with any of the following faults should
-
Homelite CSP3314 UK — Page 9 Fig. 2 FRONT HAND GUARD/CHAIN BRAKE FRONT HANDLE CYLINDER COVER THROTTLE LOCK BUTTON TRIGGER RELEASE REAR HANDLE THROTTLE TRIGGER ON/OFF SWITCH FUEL MIX CAP CHAIN OIL CAP STARTER/FAN HOUSING STARTER GRIP SAFE-T-TIP PRIMER BULB CHOKE LEVER FEATURES SILENCER CARBURETTOR ADJUSTMENT CHAIN CATCHER
-
Homelite CSP3314 UK — Page 3 WARNING: The warnings, labels and instructions found in this section of the operator’s manual are for your safety. Failure to follow all instructions may result in serious personal injury. Safe operation of this tool requires that you read and understand this operator’s manual and all labels affixed to the tool. Safety is a combination of using common sense, staying alert, and knowing how your saw works. READ ALL INSTRUCTIONS ■■ ■■ ■ KNOW YOUR TOOL. Read the operator’s manual carefully. Learn the saw’s applications and limita
-
Homelite CSP3314 UK — Page 36 Recommended Bar and chain combinations For 0.375 Low Profile 0.050 Gauge Length of Bar Guide Bar Part Number Chain Part Number 356 mm (14 in.) PS06331 PS06329 406 mm (16 in.) PS06338 PS06285 PROBLEM POSSIBLE CAUSE SOLUTION Engine will not start. (Make sure ignition switch is in start position “I”.) Engine starts but will not accelerate properly. Engine starts but will not run properly at high speed. Engine does not reach full speed and/or emits excessive smoke. 1. No spark. 2. Flooded engine. Carburettor requires “L” (Low jet) adjust
-
UK — Page 39 NOTES
-
Homelite CSP3314 OPERATORíS MANUAL 356 mm (14 in.) 33cc Chainsaw CSP3314 Your new chainsaw has been engineered and manufactured to Homelite’s high standard for dependability, ease of operation and operator safety. Properly cared for, it will give you years of rugged, trouble-free performance. WARNING: To reduce the risk of injury, please read and understand the operator’s manual before using this product. Thank you for buying a Homelite chainsaw. SAVE THIS MANUAL FOR FUTURE REFERENCE
-
UK — Page 33 MOUNTING THE SAFE-T-TIPÆ NOSE GUARD See Figures 69 and 70. 1. Mount the SAFE-T-TIP on the bar nose. 2. Fit the locking rivet or tab in the recessed hole in the guide bar. 3. Tighten the screw with your finger. 4. From the finger tight position, tighten the screw an additional three-quarters of a turn using a spanner. CLEANING THE AIR FILTER See Figures 71, 72 and 73. NOTE: Always clean the air filter before making any mixture adjustments of the carburettor. 1. For access to the a
-
Homelite CSP3314 UK — Page 5 WARNING: The warnings, labels and instructions found in this section of the operator’s manual are for your safety. Failure to follow all instructions may result in serious personal injury. GENERAL PRECAUTIONS ■■ ■■ ■ DO NOT CUT VINES and/or small underbrush (less than 76 mm (3 in.) in diameter). ■■ ■■ ■ SILENCER SURFACES ARE VERY HOT during and after operation of the chainsaw; keep all body parts away from the silencer. Serious burns may occur if contact is made with the silencer. ■■ ■■ ■ ALWAYS HOLD THE CHAINSAW WITH BOTH HANDS when the engine is ru
-
Homelite CSP3314 UK — Page 21 3. Cut a notch about one-third the diameter of the trunk in the side of the tree. Make the notch cuts so they intersect at right angles to the line of fall. This notch should be cleaned out to leave a straight line. To keep the weight of the wood off the saw, always make the lower cut of the notch before the upper cut. See Figure†31. 4. Make the back-cut level and horizontal, and at a minimum of 5 cm (2 in.) above the horizontal cut of the notch. See Figure 31. NOTE: Never cut through to the notch. Always leave a band of wood between the notch and back cut (approximately 5 cm (2
-
Homelite CSP3314 UK — Page 6 PUSH AND PULL The reaction force is always opposite to the direction the chain is moving. Thus, the operator must be ready to control the PULL when cutting on the bottom edge of the bar and the PUSH when cutting along the top edge. MAINTENANCE PRECAUTIONS Never operate a chainsaw that is damaged, improperly adjusted, or is not completely and securely assembled. Be sure that the saw chain stops moving when the throttle control trigger is released. If the saw chain moves at idling speed, the carburettor may need adjusting. Refer to “Operation-Adjusting Idling Speed” later in this m
-
Homelite CSP3314 UK — Page 34 CLEANING THE ENGINE Clean the cylinder fins and flywheel fins with compressed air or a brush periodically. Dangerous overheating of the engine may occur due to impurities on the cylinder. WARNING Never run the saw without all the parts, including the drive case cover and starter housing, securely in place. Because parts can fracture and pose a danger of thrown objects, leave repairs of the flywheel and clutch to trained Homelite service dealer personnel. CLEANING THE STARTER UNIT Use a brush or compr
-
983000-226 Ryobi Technologies GmbH Itterpark 7 D-40724 Hilden Germany Tel.: +49 (0)2103 / 29 58 0 Fax : +49 (0)2103 / 29 58 29 [email protected] OPERATORíS MANUAL 356 mm (14 in.) 33cc Chainsaw CSP3314 UT74121B
-
UK — Page 26 6. Lay out the saw chain in a loop and straighten any kinks. The cutters should face in the direction of chain rotation. If they face backwards, turn the loop over. See Figure 45. 7. Place the chain drive links into the bar groove. See Figure 46. 8. Position the chain so there is a loop at the back of the bar. 9. Hold the chain in position on the bar and place the loop round the sprocket. 10. Fit the bar flush against the mounting surface so that the bar studs are in
-
Homelite CSP3314 UK — Page 11 RUN POSITION BRAKE POSITION Fig. 5 CHAIN BRAKE Chain brakes are designed to quickly stop the chain from rotating. When the chain brake lever/hand guard is pushed towards the bar, the chain should stop immediately. A chain brake does not prevent kick-back. The chain brake should be cleaned and tested daily. Refer to “Operation” later in this manual for additional information. WARNING: Even with daily cleaning of the mechanism, the dependability of a chain brake to perform under field conditions cannot be certified. Keep the SAFE-T-TIP nose guard on the saw g
-
Homelite CSP3314 UK — Page 17 BASIC OPERATING/CUTTING PROCEDURES Practise cutting a few small logs, using the following technique to get the “feel” of using the saw before you begin a major sawing operation. 1. Take the proper stance in front of the wood with the saw idling. 2. Accelerate the engine to full throttle just before entering the cut by squeezing the throttle trigger. 3. Begin cutting with the saw against the log. 4. Keep the engine at full throttle the entire time you are cutting. 5. Allow the chain to cut for you
-
Homelite CSP3314 UK — Page 12 WARNING: Always turn off engine before refuelling. Never add fuel to a machine with a running or hot engine. Move at least 15 m (50 ft.) from refuelling site before starting the engine. DO NOT SMOKE! Failure to heed this warning can result in possible personal injury. FUEL AND REFUELLING HANDLING THE FUEL SAFELY } 50:1 FILLING THE TANK Refer to “Specific Safety Rules – Refuelling” earlier in this manual for additional safety information. 1. Clean the surface around fuel cap to prevent contamination. 2. Loosen the fuel cap slowly. 3. Carefully pour the fuel mixture
-
Homelite CSP3314 UK — Page 28 ADJUSTING THE CHAIN TENSION See Figures 52, 53 and 54. WARNING: Never touch or adjust the chain while the motor is running. The saw chain is very sharp. Always wear protective gloves when performing maintenance on the chain. 1. Stop the engine before setting the chain tension. 2. Make sure the guide bar nuts are loosened to finger-tight and turn the chain tensioner clockwise to tension the chain. NOTE: A cold chain is correctly tensioned when there is no slack on the underside of the guide bar, the chain is snug and it can be turned by hand without binding. 3. Re-tension the chain whenever the flats on the drive links hang o
![]()
CSP 3314
UT 74121-D
CSP 3314
UT 74121-D

CSP 3314
UT 74121-D
 Loading…
You can only view or download manuals with
Sign Up and get 5 for free
Upload your files to the site. You get 1 for each file you add
Get 1 for every time someone downloads your manual
Buy as many as you need
Download or browse on-line these Operation & User’s Manual for Homelite CSP3314 Chainsaw, Other.
Summary of Contents:
 |
[Page 1] Homelite CSP3314 CSP-3314/3316/4016/4513/4518/4520 TRONÇONNEUSE MANUEL D’UTILISATION 1 CHAINSAW USER’S MANUAL 19 KETTENSÄGE BEDIENUNGSANLEITUNG 35 MOTOSIERRA MANUAL DE UTILIZACIÓN 54 SEGA A CATENA MANUALE D’USO 72 SERRA DE CORRENTE MANUAL DE UTILIZAÇÃO 90 … |
 |
[Page 2] Homelite CSP3314 F H G Homelite all in one.qxp 23/12/05 16:14 Page A2 |
 |
[Page 3] Homelite CSP3314 Homelite all in one.qxp 23/12/05 16:14 Page A3 |
 |
[Page 4] Homelite CSP3314 Homelite all in one.qxp 23/12/05 16:14 Page A4 |
 |
[Page 5] Homelite CSP3314 Homelite all in one.qxp 23/12/05 16:14 Page A5 |
 |
[Page 6] Homelite CSP3314 Homelite all in one.qxp 23/12/05 16:14 Page A6 |
 |
[Page 7] Homelite CSP3314 Attention ! Il est indispensable que vous lisiez les instructions contenues dans ce manuel avant le montage et la mise en service de l’appareil. Important! It is essential that you read the instructions in this manual before mounting and operatin… |
 |
[Page 8] Homelite CSP3314 Sous réserve de modifications techniques / Subject to technical modifications / Technische Änderungen vorbehalten / Bajo reserva de modificaciones técnicas / Con riserva di eventuali modifiche tecniche / Com reserva de modificações técnicas / … |
 |
[Page 9] Homelite CSP3314 1 Français F GB D E I P NL S DK N FIN GR HU CZ RU RO PL SLO HR TR EST LT LV SK BG Merci d’avoir acheté une tronçonneuse Homelite. Votre tronçonneuse a été conçue et fabriquée selon les critères d’exigence élevés de Homelite qui en… |
 |
[Page 10] Homelite CSP3314 CONSIGNES DE SÉCURITÉ GÉNÉRALES 5. Ne tendez pas le bras trop loin et ne tenez pas la tronçonneuse au-dessus du niveau du torse. 6. Respectez les instructions du fabricant pour l’aiguisage et l’entretien de la chaîne. 7. N’utilis… |
 |
[Page 11] Homelite CSP3314 CONSIGNES DE SÉCURITÉ SPÉCIFIQUES AVERTISSEMENT Les avertissements et instructions contenus dans cette section du manuel d’utilisation sont destinés à vous protéger. Le non-respect de l’une de ces consignes peut entraîner des blessur… |
 |
[Page 12] Homelite CSP3314 4 Français F GB D E I P NL S DK N FIN GR HU CZ RU RO PL SLO HR TR EST LT LV SK BG CONSIGNES DE SÉCURITÉ SPÉCIFIQUES Si la chaîne coupante tourne au ralenti, il peut s’avérer nécessaire de régler le carburateur. Reportez-vous à la sect… |
 |
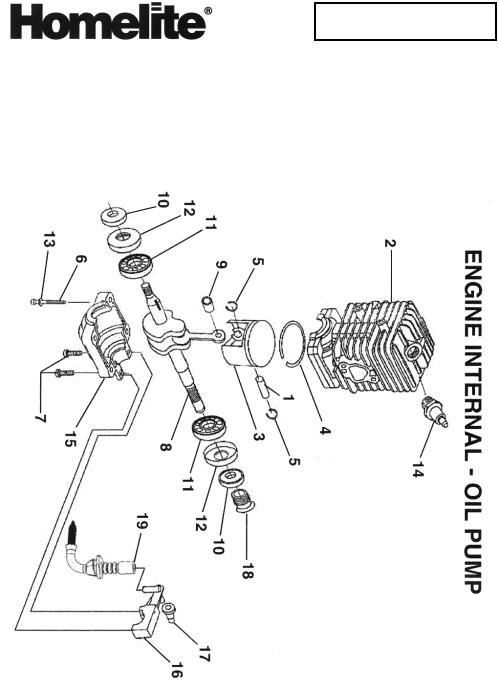
[Page 13] Homelite CSP3314 DESCRIPTION (A) Protège-main avant / frein de chaîne (B) Poignée avant (C) Carter du cylindre (D) Pompe d’amorçage (E) Levier de starter (F) Chaîne coupante (G) Poignée du lanceur (H) Guide-chaîne (I) Attrape-chaîne (J) Bouton de d�… |
 |
[Page 14] Homelite CSP3314 UTILISATION PRÉCAUTIONS POUR ÉVITER LES REBONDS (Fig. 4 & 5) Le rebond (A) se produit quand la chaîne en mouvement entre en contact avec un objet dans la zone de risque de rebond du guide-chaîne (B). Cela entraîne instantanément la projecti… |
 |
[Page 15] Homelite CSP3314 UTILISATION LUBRIFICATION DE LA CHAÎNE (Fig. 7) Utilisez de l’huile pour guide et chaîne Homelite. Celle-ci a été conçue pour les chaînes et les graisseurs de chaîne et est formulée pour être efficace à des températures très variées… |
 |
[Page 16] Homelite CSP3314 UTILISATION Si l’interrupteur n’arrête pas la tronçonneuse, tirez le levier de starter jusqu’à ce qu’il soit complètement sorti (étranglement maximum) et enclenchez le frein de chaîne pour arrêter le moteur. Si l’inter… |
 |
[Page 17] Homelite CSP3314 UTILISATION 2. Faites atteindre à l’outil sa vitesse maximale avant de commencer la coupe en appuyant sur la gâchette d’accélérateur. 3. Commencez à couper, en plaçant la tronçonneuse contre la bûche. 4. Le moteur doit tourner à… |
 |
[Page 18] Homelite CSP3314 UTILISATION 2. Enfoncez la gâchette d’accélérateur pour faire tourner le moteur à plein régime. Avec le dos de votre main gauche, enclenchez le frein de chaîne (A) en poussant le levier / protège-main vers l’avant pendant que la cha… |
 |
[Page 19] Homelite CSP3314 UTILISATION REMARQUE : Ne coupez jamais jusqu’au sifflet d’abattage. Laissez toujours une partie de bois entre le sifflet et le trait d’abattage (environ 5 cm ou 1/10 du diamètre de l’arbre). Cette épaisseur est appelée la &quo… |
 |
[Page 20] Homelite CSP3314 UTILISATION AVERTISSEMENT Ne montez jamais dans un arbre pour ébrancher ou élaguer. N’utilisez pas votre tronçonneuse en vous tenant debout sur une échelle, une plate- forme, une bûche, ou dans toute position instable qui risquerait de vous… |
 |
[Page 21] Homelite CSP3314 ENTRETIEN 17. Maintenez l’extrémité du guide-chaîne et serrez fermement les écrous de montage du guide (O). La chaîne est correctement tendue lorsqu’il n’y a plus de jeu au niveau du bord inférieur du guide et qu’elle est a… |
 |
[Page 22] Homelite CSP3314 ENTRETIEN 4. Tenez la lime à niveau avec le bord supérieur de la dent. Ne laissez pas la lime s’incliner ou osciller. 5. En exerçant une pression légère mais ferme, limez vers le coin avant de la dent. 6. Soulevez la lime à chaque re… |
 |
[Page 23] Homelite CSP3314 ENTRETIEN Tournez le guide-chaîne et vérifiez que les orifices (A) et le rail de la chaîne ne comportent pas d’impuretés. NETTOYAGE DU FILTRE À AIR (Fig. 62, 63a, 63b & 66) REMARQUE : Nettoyez toujours le filtre à air avant de procéd… |
 |
[Page 24] Homelite CSP3314 ENTRETIEN REMARQUE : Prenez bien soin d’insérer la bougie correctement ; si ce n’est pas le cas, l’outil pourrait s’en trouver endommagé. NETTOYAGE DE LA GRILLE PARE-ÉTINCELLES DU SILENCIEUX (Fig. 70a & 70b) Le silencieux (… |
 |
[Page 25] Homelite CSP3314 17 Français F GB D E I P NL S DK N FIN GR HU CZ RU RO PL SLO HR TR EST LT LV SK BG RÉSOLUTION DES PROBLÈMES PROBLÈME CAUSE POSSIBLE SOLUTION Le moteur ne démarre pas. 1. Pas d’étincelle. 1. Testez la bougie. Retirez le carter du filtre … |
 |
[Page 26] Homelite CSP3314 18 Français F GB D E I P NL S DK N FIN GR HU CZ RU RO PL SLO HR TR EST LT LV SK BG RÉSOLUTION DES PROBLÈMES PROBLÈME CAUSE POSSIBLE SOLUTION Le moteur démarre et fonctionne 1. Le réservoir d’huile 1. Le réservoir d’huile doit êt… |
 |
[Page 27] Homelite CSP3314 Thank you for buying a Homelite chainsaw. Your new chainsaw has been engineered and manufactured to Homelite’s high standard for dependability, ease of operation, and operator safety. Properly cared for, it will give you years of rugged, trouble-fr… |
 |
[Page 28] Homelite CSP3314 GENERAL SAFETY RULES 6. Follow the manufacturer’s sharpening and maintenance instructions for the saw chain. 7. Use only replacement bars and chains specified by the manufacturer or the equivalent. ■ DO NOT OPERATE A CHAINSAW WITH ONE HAND. Serio… |
 |
[Page 29] Homelite CSP3314 SPECIFIC SAFETY RULES PROPER CLOTHING FOR SAFETY ■ Wear close-fitting clothing. Always wear heavy, long trousers, boots, and gloves. Do not wear jewellery, shorts, sandals, or go barefoot. Do not wear loose-fitting clothing, which could be drawn i… |
 |
[Page 30] Homelite CSP3314 22 English GB F D E I P NL S DK N FIN GR HU CZ RU RO PL SLO HR TR EST LT LV SK BG FEATURES (A) Front hand guard/ (K) Throttle Lock Button Chain Brake (L) Chain Oil Cap (B) Front handle (M) Silencer (C) Cylinder cover (N) Carburettor (D) Primer… |
 |
[Page 31] Homelite CSP3314 23 English GB F D E I P NL S DK N FIN GR HU CZ RU RO PL SLO HR TR EST LT LV SK BG OPERATION (A) RUN POSITION (B) BRAKE POSITION WARNING Even with daily cleaning of the mechanism, the dependability of a chain brake to perform under field conditions… |
 |
[Page 32] Homelite CSP3314 OPERATION 1 Litre + 20 ml = 2 Litres + 40 ml = 3 Litres + 60 ml = 50:1 4 Litres + 80 ml = 5 Litres + 100 ml = CHAIN OIL SYSTEM (Fig. 7) Use HOMELITE Bar and Chain Oil. It is designed for chains and chain oilers, and is formulated to perform over a… |
 |
[Page 33] Homelite CSP3314 OPERATION PREPARING FOR CUTTING PROPER CLOTHING FOR SAFETY (Fig. 16) ■ Wear loose-fitting clothing (A). Always wear heavy, long trousers (B), boots (C), and gloves (D). Do not wear jewellery, shorts, sandals, or go barefoot. Do not wear loose fitti… |
 |
[Page 34] Homelite CSP3314 OPERATION WORK AREA PRECAUTIONS (Fig. 21) ■ Cut only wood or materials made from wood; no sheet metal, no plastics, no masonry, no non- wood building materials. ■ Never allow children to operate your saw. Allow no person to use this chainsaw who… |
 |
[Page 35] Homelite CSP3314 OPERATION ■ Do not cut trees near electrical wires or buildings (D). ■ Consider the direction in which the tree leans (E). ■ Check the tree for damaged or dead branches which could fall and hit you during felling (F). ■ Periodically glance at… |
 |
[Page 36] Homelite CSP3314 28 English GB F D E I P NL S DK N FIN GR HU CZ RU RO PL SLO HR TR EST LT LV SK BG OPERATION BUCKING WITH A WEDGE (Fig. 34) If the wood diameter is large enough for you to insert a soft bucking wedge (B) without touching the chain, you should use th… |
 |
[Page 37] Homelite CSP3314 MAINTENANCE 4. Remove the bar mounting nuts (B) using a combination wrench (C) or a 5/8 in. spanner. 5. Remove the clutch cover (D), and the outer guide bar plate (E). 6. Lay out the saw chain in a loop and straighten any kinks. The cutters (F) sh… |
 |
[Page 38] Homelite CSP3314 MAINTENANCE SHARPENING THE CUTTERS (Fig. 53 — 56) PARTS OF A CUTTER (A) Cutting Corner (E) Gullet (B) Side Plate (F) Heel (C) Depth Gauge (G) Rivet hole (D) Toe (H) Top Plate Be careful to file all cutters to the specified angles and to the same leng… |
 |
[Page 39] Homelite CSP3314 MAINTENANCE In addition, lubricate guide bars (with a sprocket at their tip) weekly. Using a grease syringe, lubricate weekly in the lubricating hole. Turn the guide bar and check that the lubrication holes (A) and chain groove are free from impurit… |
 |
[Page 40] Homelite CSP3314 32 English GB F D E I P NL S DK N FIN GR HU CZ RU RO PL SLO HR TR EST LT LV SK BG MAINTENANCE WARNING Silencer surfaces are very hot during and after operation of the chainsaw. Keep all body parts away from the silencer. Serious burns may occur if … |
 |
[Page 41] Homelite CSP3314 33 English GB F D E I P NL S DK N FIN GR HU CZ RU RO PL SLO HR TR EST LT LV SK BG TROUBLESHOOTING PROBLEM POSSIBLE CAUSE SOLUTION Engine will not start. 1. No spark. 1. Check spark. Remove air filter cover. (Make sure ignition switch Remove spark… |
 |
[Page 42] Homelite CSP3314 34 English GB F D E I P NL S DK N FIN GR HU CZ RU RO PL SLO HR TR EST LT LV SK BG TROUBLESHOOTING PROBLEM POSSIBLE CAUSE SOLUTION Engine starts and runs, 1. Chain oil tank empty. 1. Oil tank should be filled every time but chain is not rotating. t… |
 |
[Page 43] Homelite CSP3314 Vielen Dank für den Kauf einer Homelite Kettensäge. Ihre neue Kettensäge wurde nach den hohen Standards von Homelite für Zuverlässigkeit, einfache Bedienung und Sicherheit entworfen und hergestellt. Wenn sie sachgerecht gepflegt wird, leistet si… |
 |
[Page 44] Homelite CSP3314 ALLGEMEINE SICHERHEITSREGELN 3. Sicherstellen, dass der Bereich, in dem die Sägearbeiten durchgeführt werden, frei von Hindernissen ist. Die Nase der Führungsschiene darf KEINEN Stamm, Zaun oder anderes Hindernis berühren, das bei Betrieb der Sä… |
 |
[Page 45] Homelite CSP3314 ALLGEMEINE SICHERHEITSREGELN ■ DEN ANTRIEBSKOPF NICHT für eine gebogene Schiene anpassen oder Schneidwerkzeuge antreiben, die für die vorliegende Säge nicht angeführt sind. ■ DIESE ANWEISUNGEN AUFHEBEN. Sie sollten häufig nachgelesen und zur… |
 |
[Page 46] Homelite CSP3314 BESONDERE SICHERHEITSREGELN DRÜCKEN UND ZIEHEN Die Reaktionskraft wirkt immer in die entgegengesetzte Richtung der Kettenlaufrichtung. Der Bediener muss bereit sein, die ZUGKRAFT zu beherrschen, wenn mit der Unterseite der Schiene geschnitten wird, … |
 |
[Page 47] Homelite CSP3314 FUNKTIONEN (A) Vorderer Handschutz/Kettenbremse (B) Frontgriff (C) Zylinderdeckel (D) Einspritzknopf (E) Drosselklappenhebel (F) Kette (G) Anlassergriff (H) Führungsschiene (I) Kettenfänger (J) Drückerfreigabe (K) Gasverriegelungsknopf (L) Ketten�… |
 |
[Page 48] Homelite CSP3314 BETRIEB Sich nicht nur auf die Sicherheitsvorrichtungen der Säge verlassen. Ein Benutzer der Kettensäge muss einige Vorkehrungen treffen, um Sägearbeiten ohne Unfälle oder Verletzungen durchführen zu können. VORSICHTSMASSNAHMEN GEGEN RÜCK- SC… |
 |
[Page 49] Homelite CSP3314 BETRIEB KETTENÖLSYSTEM (Abb. 7) HOMELITE-Schienen- und Kettenöl verwenden. Es ist für Ketten und Kettenöler vorgesehen und so formuliert, dass gute Leistungen in einem breiten Temperaturbereich ohne Verdünnen erzielt werden. Die Kettensäge sol… |
 |
[Page 50] Homelite CSP3314 BETRIEB Die Kettensäge nicht am Boden ablegen, solange sich die Kette noch dreht. Zwecks weiterer Sicherheit die Kettenbremse aktivieren, wenn die Säge nicht verwendet wird. Sollte die Säge nicht mit dem Zündschalter abgeschaltet werden können,… |
 |
[Page 51] Homelite CSP3314 BETRIEB GRUNDLEGENDE BETRIEBS-/ SCHNEID- VERFAHREN Schneidarbeiten erst an einigen kleinen Stämmen anhand der folgenden Techniken üben, um ein Gefühl für die Kettensäge zu bekommen, bevor größere Sägearbeiten in Angriff genommen werden. 1. V… |
 |
[Page 52] Homelite CSP3314 BETRIEB ACHTUNG DIE SÄGEKETTE DARF SICH BEI DER LEERLAUFDREHZAHL NIE DREHEN. Die Leerlaufdrehzahlschraube “T” nach links drehen, um die Leerlaufdrehzahl zu verringern und die Kette zu stoppen – oder eine Homelite- Servicevertretung zwecks Ein… |
 |
[Page 53] Homelite CSP3314 BETRIEB KORREKTES VERFAHREN ZUM FÄLLEN VON BÄUMEN (Abb. 28 — 31) 1. Die Fluchtroute wählen (oder Route, sollte die vorgesehene Route blockiert sein). Den Bereich unmittelbar um den Baum frei machen und sicherstellen, dass in der geplanten Fluchtr… |
 |
[Page 54] Homelite CSP3314 BETRIEB ABLÄNGEN, OBERSEITE (Abb. 19) An der Oberseite des Stamms beginnen, wobei die Unterseite der Säge mit leichtem Druck nach unten gegen den Stamm gehalten wird. Es ist zu beachten, dass die Säge dazu neigt, vom Bediener (A) weggezogen zu we… |
 |
[Page 55] Homelite CSP3314 WARTUNG 5. Den Kupplungsdeckel (D) und die äußere Führungsschienenplatte (E) abnehmen. 6. Die Sägekette in einer Schleife auflegen und etwaige Knicke gerade richten. Die Sägezähne (F) müssen in Kettenlaufrichtung zeigen (G). Wenn sie rückw�… |
 |
[Page 56] Homelite CSP3314 WARTUNG Diese schnell schneidende Kette erzeugt bei sachgerechter Pflege nur geringen Rückschlag. Die Kette entsprechend pflegen, damit ruckloses und schnelles Sägen gewährleistet ist. Die Kette muss geschliffen werden, wenn die Holzspäne klein u… |
 |
[Page 57] Homelite CSP3314 WARTUNG EINGRIFFMESSERSPIEL AUFRECHT ERHALTEN (Abb. 51, 59, 60) ■ Das Spiel des Eingriffmessers (A) muss 0,6 mm (0,025 in) betragen. Mit einem Eingriffszirkel das Spiel des Eingriffmessers prüfen. ■ Bei jedem Feilen der Kette das Spiel des Eingr… |
 |
[Page 58] Homelite CSP3314 WARTUNG VORSICHT Den Motor nie ohne Luftfilter laufen lassen; dies könnte schwere Schäden zur Folge haben. Sicherstellen, dass der Luftfilter vor dem Zusammenbau richtig in den Luftfilterdeckel eingesetzt ist. ANLASSER REINIGEN (Abb. 65) Die Kühl… |
 |
[Page 59] Homelite CSP3314 51 Deutsch D F GB E I P NL S DK N FIN GR HU CZ RU RO PL SLO HR TR EST LT LV SK BG WARTUNG KETTENSÄGE AUFBEWAHREN (1 MONAT ODER LÄNGER) 1. Den gesamten Kraftstoff aus dem Tank in einen für Benzin genehmigten Behälter ablassen. 2. Den Motor lau… |
 |
[Page 60] Homelite CSP3314 52 Deutsch D F GB E I P NL S DK N FIN GR HU CZ RU RO PL SLO HR TR EST LT LV SK BG FEHLERSUCHE PROBLEM MÖGLICHE URSACHE LÖSUNG Motor springt nicht an. 1. Kein Funke. 1. Den Funken prüfen. Den Luftfilterdeckel (Sicherstellen, dass der entfernen… |
 |
[Page 61] Homelite CSP3314 53 Deutsch D F GB E I P NL S DK N FIN GR HU CZ RU RO PL SLO HR TR EST LT LV SK BG FEHLERSUCHE PROBLEM MÖGLICHE URSACHE LÖSUNG Motor springt an, läuft, Vergaser muss eingestellt Leerlaufdrehzahlschraube “T” nach rechts beschleunigt, läuft … |
 |
[Page 62] Homelite CSP3314 Gracias por comprar una motosierra Homelite. Su nueva motosierra se ha diseñado y fabricado conforme a los exigentes criterios de fiabilidad, facilidad de uso y seguridad del operario de Homelite. Con los cuidados adecuados, funcionará durante año… |
 |
[Page 63] Homelite CSP3314 NORMAS GENERALES DE SEGURIDAD Apriete a fondo el gatillo del acelerador y mantenga una velocidad constante durante el corte. 5. No intente abarcar demasiado ni cortar por encima de la altura del pecho. 6. Siga las instrucciones de afilado y mantenimi… |
 |
[Page 64] Homelite CSP3314 NORMAS DE SEGURIDAD ESPECÍFICAS ■ LAS SUPERFICIES DEL SILENCIADOR ALCANZAN TEMPERATURAS MUY ALTAS durante y después del uso de la motosierra. Mantenga todas las partes del cuerpo alejadas del silenciador. En caso de contacto, se pueden producir q… |
 |
[Page 65] Homelite CSP3314 57 Español E F GB D I P NL S DK N FIN GR HU CZ RU RO PL SLO HR TR EST LT LV SK BG NORMAS DE SEGURIDAD ESPECÍFICAS RETROCESO El retroceso es una reacción peligrosa que puede dar lugar a lesiones de gravedad. No confíe únicamente en los disposit… |
 |
[Page 66] Homelite CSP3314 FUNCIONAMIENTO DISPOSITIVOS DE PROTECCIÓN DE LA MOTOSIERRA CADENA DE BAJO RETROCESO Las cadenas de bajo retroceso son aquellas que cumplen los requisitos de retroceso. Las puntas (limitadores de profundidad) situadas delante de cada cuchilla reducen… |
 |
[Page 67] Homelite CSP3314 FUNCIONAMIENTO MEZCLA DEL COMBUSTIBLE ■ Este producto utiliza un motor de dos tiempos y consume una mezcla de gasolina y aceite de dos tiempos. Mezcle gasolina sin plomo y aceite para motores de dos tiempos en un contenedor de gasolina homologado y… |
 |
[Page 68] Homelite CSP3314 FUNCIONAMIENTO 6. Tire de la palanca del ESTRANGULADOR (D) todo su recorrido hacia FUERA hasta su posición máxima (E). El motor funciona automáticamente a media potencia cuando la palanca del estrangulador está en su posición máxima. NOTA: en… |
 |
[Page 69] Homelite CSP3314 FUNCIONAMIENTO ■ Use guantes antideslizantes para conseguir el mejor agarre y protección. ■ Sujete firmemente la sierra con ambas manos. Mantenga siempre la MANO IZQUIERDA en el asa delantera y la MANO DERECHA en el asa trasera de manera que el … |
 |
[Page 70] Homelite CSP3314 FUNCIONAMIENTO Al realizar operaciones de tala, la distancia de seguridad debe ser como mínimo el doble de la altura del árbol más alto de la zona de tala. Al realizar operaciones de corte sobre el suelo, mantenga una distancia mínima de 4,5 m (1… |
 |
[Page 71] Homelite CSP3314 FUNCIONAMIENTO ■ No corte árboles que tengan una gran inclinación ni árboles muy grandes con ramas podridas o muertas, corteza suelta, o troncos huecos. Haga que estos árboles sean derribados tirando de ellos o empujándolos con maquinaria pesa… |
 |
[Page 72] Homelite CSP3314 FUNCIONAMIENTO Retire de la zona de trabajo la sección suelta de madera (C) que ha cortado. Después de eliminar las raíces fulcreas grandes, siga el procedimiento correcto para talar el árbol. Consulte la sección “Funcionamiento – Procedimie… |
 |
[Page 73] Homelite CSP3314 FUNCIONAMIENTO CORTE DE RAMAS CON ACCIÓN DE RESORTE (Fig. 37) Una rama con acción de resorte (A) es cualquier tronco, rama, tocón con raíz o árbol joven que está curvado con tensión bajo la acción de otra pieza de madera que, cuando se corta … |
 |
[Page 74] Homelite CSP3314 MANTENIMIENTO AJUSTE DE LA TENSIÓN DE LA CADENA (Fig. 48, 49 y 50) ADVERTENCIA Nunca toque ni ajuste la cadena mientras el motor está en marcha. La cadena está muy afilada. Utilice siempre guantes de protección cuando vaya a realizar alguna activ… |
 |
[Page 75] Homelite CSP3314 MANTENIMIENTO Luego pase al otro lado y lime las cuchillas orientadas hacia la derecha (B) en la dirección contraria. 8. Limpie las limaduras de la lima con un cepillo de púas. PRECAUCIÓN Una cadena roma o mal afilada puede causar una excesiva v… |
 |
[Page 76] Homelite CSP3314 MANTENIMIENTO LIMPIEZA DEL FILTRO DE AIRE (Fig. 62, 63a, 63b y 66) NOTA: Limpie siempre el filtro de aire antes de realizar cualquier tipo de ajuste en el carburador. 1. Para acceder a la zona del filtro de aire y del carburador, afloje los tres tor… |
 |
[Page 77] Homelite CSP3314 MANTENIMIENTO NOTA: Tenga cuidado para no dañar los hilos de la rosca de la bujía. Si se estropea la rosca, el producto queda seriamente dañado. LIMPIEZA DEL SILENCIADOR APAGACHISPAS (Fig. 70a y 70b) El silenciador (A) está equipado con una panta… |
 |
[Page 78] Homelite CSP3314 70 Español E F GB D I P NL S DK N FIN GR HU CZ RU RO PL SLO HR TR EST LT LV SK BG RESOLUCIÓN DE PROBLEMAS PROBLEMA CAUSA PROBABLE SOLUCIÓN El motor no arranca. 1. No hay bujía. 1. Compruebe la bujía. Retire la tapa del filtro (Compruebe que el… |
 |
[Page 79] Homelite CSP3314 71 Español E F GB D I P NL S DK N FIN GR HU CZ RU RO PL SLO HR TR EST LT LV SK BG RESOLUCIÓN DE PROBLEMAS PROBLEMA CAUSA PROBABLE SOLUCIÓN El motor arranca, funciona y El carburador necesita Gire el tornillo de velocidad de ralentí “T” en … |
 |
[Page 80] Homelite CSP3314 Grazie per aver acquistato una sega a catena Homelite. Questa sega a catena è stata progettata e costruita secondo i più alti standard Homelite riguardo ad affidabilità, facilità d’uso e sicurezza dell’operatore. L’attenta cura ne garantir�… |
 |
[Page 81] Homelite CSP3314 NORME CAUTELATIVE GENERALI 4. Utilizzare una velocità elevata durante il taglio. Eseguire i tagli sempre con il motore alla velocità massima. Premere completamente la leva acceleratore e mantenere una velocità di taglio costante. 5. Non estendersi… |
 |
[Page 82] Homelite CSP3314 NORME CAUTELATIVE SPECIFICHE PRECAUZIONI GENERALI ■ NON TAGLIARE RAMPICANTI e/o piante da sottobosco (aventi un diametro inferiore a 76 mm). ■ LE SUPERFICI DELLA MARMITTA SI SURRIS- CALDANO VELOCEMENTE durante il funzionamento e tali rimangono pe… |
 |
[Page 83] Homelite CSP3314 NORME CAUTELATIVE SPECIFICHE AVVERTENZA Qualsiasi intervento di riparazione sulla sega, al di là delle situazioni descritte nelle istruzioni di manutenzione del manuale dell’operatore, deve essere affidato al personale di servizio competente. Se … |
 |
[Page 84] Homelite CSP3314 FUNZIONAMENTO Leggere interamente il manuale prima di utilizzare la sega. Prestare particolare attenzione alle precauzioni e alle istruzioni menzionate nel manuale dell’operatore. AVVERTENZA Le avvertenze e istruzioni riportate in questa sezione d… |
 |
[Page 85] Homelite CSP3314 FUNZIONAMENTO ■ Trattare sempre il carburante con la massima attenzione dato che è altamente infiammabile. ■ Riempire sempre il serbatoio all’aperto e non inalare le esalazioni. ■ Non mettere a contatto la benzina o l’olio con la pelle. �… |
 |
[Page 86] Homelite CSP3314 FUNZIONAMENTO NOTA: attuare il freno spingendo la leva del freno in avanti verso la barra, in posizione di frenatura. Per ulteriori informazioni, consultare la precedente sezione “Funzionamento – Freno della catena” in questo manuale. 4. Port… |
 |
[Page 87] Homelite CSP3314 FUNZIONAMENTO PRESA CORRETTA SULLE IMPUGNATURE (Fig. 17 e 18) Consultare la precedente sezione “Norme cautelative specifiche – Indumenti protettivi” in questo manuale per ulteriori informazioni di sicurezza. ■ Indossare guanti spessi con pre… |
 |
[Page 88] Homelite CSP3314 FUNZIONAMENTO ■ Sgomberare la zona di lavoro – aiutanti, osservatori, bambini e animali devono essere tenuti ad una DISTANZA DI SICUREZZA. Durante operazione di abbattimento, la distanza di sicurezza deve essere almeno il doppio dell’altezza de… |
 |
[Page 89] Homelite CSP3314 FUNZIONAMENTO ■ Tenere presente la distribuzione e il peso dei rami pesanti (B). ■ Eliminare le piante da sottobosco dalla zona circostante l’albero da abbattere (C). ■ Non abbattere alberi nei pressi di cavi elettrici o edifici (D). ■ Ten… |
 |
[Page 90] Homelite CSP3314 FUNZIONAMENTO Dopo aver eliminato tutti gli elementi cadenti, attenersi alla procedura di abbattimento appropriata. Consultare la precedente sezione “Funzionamento – Procedura corretta per l’abbattimento di alberi” in questo manuale. SEZIONAM… |
 |
[Page 91] Homelite CSP3314 FUNZIONAMENTO AVVERTENZA Se i rami da tagliare si trovano ad un’altezza superiore al proprio busto, affidare la potatura a un professionista. TAGLIO DI ASTONI ELASTICI (Fig. 37) Un astone elastico (A) è un qualsiasi elemento dell’albero (ramo, c… |
 |
[Page 92] Homelite CSP3314 MANUTENZIONE REGOLAZIONE DELLA TENSIONE DELLA CATENA (Fig. 48, 49, 50) AVVERTENZA Non toccare né regolare la catena se il motore è in funzione. La catena è affilata: indossare sempre un paio di guanti per eseguire interventi di manutenzione sulla … |
 |
[Page 93] Homelite CSP3314 MANUTENZIONE ATTENZIONE Una catena smussa o non affilata correttamente può aumentare la velocità del motore durante il taglio e conseguentemente danneggiarlo. AVVERTENZA Se la catena non è affilata correttamente, si aumenta il potenziale di contr… |
 |
[Page 94] Homelite CSP3314 MANUTENZIONE 3. Sollevare la parte anteriore del copricilindro oltre la leva del freno. 4. Sollevare la parte posteriore del copricilindro oltre l’impugnatura. 5. Prima di togliere il filtro dell’aria dal carburatore, soffiare o spazzolare la … |
 |
[Page 95] Homelite CSP3314 MANUTENZIONE AVVERTENZA Le superfici della marmitta si surriscaldano velocemente durante il funzionamento e tali rimangono per un certo periodo in seguito allo spegnimento della sega. Tenere tutte le parti del corpo lontane dalla marmitta, poiché il… |
 |
[Page 96] Homelite CSP3314 88 Italiano I F GB D E P NL S DK N FIN GR HU CZ RU RO PL SLO HR TR EST LT LV SK BG RISOLUZIONE DEI PROBLEMI PROBLEMA POSSIBILE CAUSA RIMEDIO Il motore non si avvia 1. Manca la candela. 1. Controllare la candela. Togliere il coperchietto del (accer… |
 |
[Page 97] Homelite CSP3314 89 Italiano I F GB D E P NL S DK N FIN GR HU CZ RU RO PL SLO HR TR EST LT LV SK BG RISOLUZIONE DEI PROBLEMI PROBLEMA POSSIBILE CAUSA RIMEDIO Il motore si mette in moto, Il carburatore deve Girare la vite del minimo “T” in senso orario per funz… |
 |
[Page 98] Homelite CSP3314 Obrigado por ter adquirido uma serra de corrente Homelite. A sua nova serra de corrente foi concebida e fabricada segundo os mais elevados padrões da Homelite em termos de fiabilidade, facilidade de utilização e segurança do utilizador. Se cuidar… |
 |
[Page 99] Homelite CSP3314 REGRAS DE SEGURANÇA GERAIS 3. Certifique-se de que a área em que está a cortar está livre de obstáculos. NÃO deixe que a ponta da barra-guia entre em contacto com um tronco, galho, vedação ou quaisquer outros obstáculos em que se possa embat… |
 |
[Page 100] Homelite CSP3314 REGRAS DE SEGURANÇA GERAIS ■ GUARDE AS PRESENTES INSTRUÇÕES. Consulte-as com frequência e utilize-as para instruir terceiros sobre o uso da serra de corrente. Se emprestar esta ferramenta a terceiros, inclua as instruções junto. REGRAS DE SE… |