
На этой странице вы можете совершенно бесплатно скачать Инструкция по эксплуатации Behringer Xenyx X2222USB.
У документа PDF Инструкция по эксплуатации 19 страниц, а его размер составляет 5.47 Mb.
Читать онлайн Аудио Behringer Xenyx X2222USB Инструкция по эксплуатации

Скачать файл PDF «Behringer Xenyx X2222USB Инструкция по эксплуатации» (5.47 Mb)
Популярность:
32953 просмотры
Подсчет страниц:
19 страницы
Тип файла:
Размер файла:
5.47 Mb
Прочие инструкции Behringer Xenyx X2222USB


Прочие инструкции Behringer Аудио


Прочие инструкции Behringer


Перед вами файл pdf, где представлена инструкция (руководство) на русском для BEHRINGER QX2222USB. Вы можете скачать ее либо изучить в онлайн режиме.
Подробные сведения об инструкции:
Устройство из раздела: микшерный пульт
Бренд-производитель: BEHRINGER
Наименование модели: BEHRINGER QX2222USB
Инструкция на английском языке
Файл: pdf
Размер файла: 6,59 MB

Скачать инструкцию к HARPER HDT2-1110
ЗАГРУЗИТЬ
Просмотр инструкции онлайн
User Manual
XENYX
QX2442USB
Premium 24-Input 4/2-Bus Mixer with XENYX Mic Preamps & Compressors,
KLARK TEKNIK Multi-FX Processor, Wireless Option and USB/Audio Interface
QX2222USB
Premium 22-Input 2/2-Bus Mixer with XENYX Mic Preamps & Compressors,
KLARK TEKNIK Multi-FX Processor, Wireless Option and USB/Audio Interface
QX1832USB
Premium 18-Input 3/2-Bus Mixer with XENYX Mic Preamps & Compressors,
KLARK TEKNIK Multi-FX Processor, Wireless Option and USB/Audio Interface
QX1622USB
Premium 16-Input 2/2-Bus Mixer with XENYX Mic Preamps & Compressors,
KLARK TEKNIK Multi-FX Processor, Wireless Option and USB/Audio Interface
3    XENYX QX2442USB/QX2222USB/QX1832USB/QX1622USB User Manual
Important Safety            9.  Do not defeat the safety purpose of the polarized   TO BIND MUSIC GROUP BY ANY EXPRESS OR IMPLIED
Instructions                or grounding-type plug. A polarized plug has two blades   UNDERTAKING OR REPRESENTATION. THIS MANUAL
with one wider than the other. A grounding-type plug   IS COPYRIGHTED. NO PART OF THIS MANUAL MAY
has two blades and a third grounding prong. The wide   BE REPRODUCED OR TRANSMITTED IN ANY FORM
blade or the third prong are provided for your safety. If the   OR BY ANY MEANS, ELECTRONIC OR MECHANICAL,
provided plug does not fi t into your outlet, consult an   INCLUDING PHOTOCOPYING AND RECORDING OF ANY
electrician for replacement of the obsolete outlet.  KIND, FOR ANY PURPOSE, WITHOUT THE EXPRESS
10.  Protect the power cord from being walked on or   WRITTEN PERMISSION OF MUSIC GROUP IP LTD.
pinched particularly at plugs, convenience receptacles,
Terminals marked with this symbol carry                       ALL RIGHTS RESERVED.
electrical current of suffi  cient magnitude   and the point where they exit from the apparatus.  © 2013 MUSIC Group IP Ltd.
to constitute risk of electric shock.   11.  Use only attachments/accessories specifi ed by   Trident Chambers, Wickhams Cay, P.O. Box 146,
Use only high-quality professional speaker cables with   the manufacturer.  Road Town, Tortola, British Virgin Islands
?" TS or twist-locking plugs pre-installed. All other   12.  Use only with the
installation or modifi cation should be performed only   cart, stand, tripod, bracket,
by qualifi ed personnel.                            or table specifi ed by the   LIMITED WARRANTY
This symbol, wherever it appears,           manufacturer, or sold with   For the applicable warranty terms and conditions
alerts you to the presence of uninsulated   the apparatus. When a cart   and additional information regarding MUSIC Group’s
Limited Warranty, please see complete details online at
dangerous voltage inside the                is used, use caution when   www.music-group.com/warranty.
enclosure - voltage that may be suffi  cient to constitute a   moving the cart/apparatus
risk of shock.                                      combination to avoid
injury from tip-over.
This symbol, wherever it appears,   13.  Unplug this apparatus during lightning storms or
alerts you to important operating and   when unused for long periods of time.
maintenance instructions in the
accompanying literature. Please read the manual.  14.  Refer all servicing to qualifi ed service personnel.
Servicing is required when the apparatus has been
Caution                    damaged in any way, such as power supply cord or plug
To reduce the risk of electric shock, do not   is damaged, liquid has been spilled or objects have fallen
remove the top cover (or the rear section).   into the apparatus, the apparatus has been exposed
No user serviceable parts inside. Refer servicing to   to rain or moisture, does not operate normally, or has
qualifi ed personnel.              been dropped.
Caution                    15.  The apparatus shall be connected to a MAINS socket
To reduce the risk of fi re or electric shock,   outlet with a protective earthing connection.
do not expose this appliance to rain and   16.  Where the MAINS plug or an appliance coupler is
moisture. The apparatus shall not be exposed to dripping   used as the disconnect device, the disconnect device shall
or splashing liquids and no objects fi lled with liquids,   remain readily operable.
such as vases, shall be placed on the apparatus.
Caution
These service instructions are for use
by qualifi ed service personnel only.
To reduce the risk of electric shock do not perform any
servicing other than that contained in the operation
instructions. Repairs have to be performed by qualifi ed
service personnel.
1.  Read these instructions.
2.  Keep these instructions.       LEGAL DISCLAIMER
TECHNICAL SPECIFICATIONS AND APPEARANCES
3.  Heed all warnings.             ARE SUBJECT TO CHANGE WITHOUT NOTICE AND
4.  Follow all instructions.       ACCURACY IS NOT GUARANTEED. BEHRINGER,
5.  Do not use this apparatus near water.  KLARK TEKNIK, MIDAS, BUGERA, AND TURBOSOUND
6.  Clean only with dry cloth.     ARE PART OF THE MUSIC GROUP (MUSIC-GROUP.COM).
7.  Do not block any ventilation openings. Install in   ALL TRADEMARKS ARE THE PROPERTY OF THEIR
RESPECTIVE OWNERS. MUSIC GROUP ACCEPTS NO
accordance with the manufacturer’s instructions.  LIABILITY FOR ANY LOSS WHICH MAY BE SUFFERED
8.  Do not install near any heat sources such as   BY ANY PERSON WHO RELIES EITHER WHOLLY OR
radiators, heat registers, stoves, or other apparatus   IN PART UPON ANY DESCRIPTION, PHOTOGRAPH
(including amplifi ers) that produce heat.  OR STATEMENT CONTAINED HEREIN. COLORS AND
SPECIFICATIONS MAY VARY FROM ACTUAL PRODUCT.
MUSIC GROUP PRODUCTS ARE SOLD THROUGH
AUTHORIZED FULLFILLERS AND RESELLERS ONLY.
FULLFILLERS AND RESELLERS  ARE NOT AGENTS OF
MUSIC GROUP AND HAVE ABSOLUTELY NO AUTHORITY
Хорошее руководство по эксплуатации
Законодательство обязывает продавца передать покупателю, вместе с товаром, руководство по эксплуатации Behringer Xenyx X2222USB. Отсутствие инструкции либо неправильная информация, переданная потребителю, составляют основание для рекламации в связи с несоответствием устройства с договором. В законодательстве допускается предоставлении руководства в другой, чем бумажная форме, что, в последнее время, часто используется, предоставляя графическую или электронную форму инструкции Behringer Xenyx X2222USB или обучающее видео для пользователей. Условием остается четкая и понятная форма.
Что такое руководство?
Слово происходит от латинского «instructio», тоесть привести в порядок. Следовательно в инструкции Behringer Xenyx X2222USB можно найти описание этапов поведения. Цель инструкции заключается в облегчении запуска, использования оборудования либо выполнения определенной деятельности. Инструкция является набором информации о предмете/услуге, подсказкой.
К сожалению немного пользователей находит время для чтения инструкций Behringer Xenyx X2222USB, и хорошая инструкция позволяет не только узнать ряд дополнительных функций приобретенного устройства, но и позволяет избежать возникновения большинства поломок.
Из чего должно состоять идеальное руководство по эксплуатации?
Прежде всего в инструкции Behringer Xenyx X2222USB должна находится:
— информация относительно технических данных устройства Behringer Xenyx X2222USB
— название производителя и год производства оборудования Behringer Xenyx X2222USB
— правила обслуживания, настройки и ухода за оборудованием Behringer Xenyx X2222USB
— знаки безопасности и сертификаты, подтверждающие соответствие стандартам
Почему мы не читаем инструкций?
Как правило из-за нехватки времени и уверенности в отдельных функциональностях приобретенных устройств. К сожалению само подсоединение и запуск Behringer Xenyx X2222USB это слишком мало. Инструкция заключает ряд отдельных указаний, касающихся функциональности, принципов безопасности, способов ухода (даже то, какие средства стоит использовать), возможных поломок Behringer Xenyx X2222USB и способов решения проблем, возникающих во время использования. И наконец то, в инструкции можно найти адресные данные сайта Behringer, в случае отсутствия эффективности предлагаемых решений. Сейчас очень большой популярностью пользуются инструкции в форме интересных анимаций или видео материалов, которое лучше, чем брошюра воспринимаются пользователем. Такой вид инструкции позволяет пользователю просмотреть весь фильм, не пропуская спецификацию и сложные технические описания Behringer Xenyx X2222USB, как это часто бывает в случае бумажной версии.
Почему стоит читать инструкции?
Прежде всего здесь мы найдем ответы касательно конструкции, возможностей устройства Behringer Xenyx X2222USB, использования отдельных аксессуаров и ряд информации, позволяющей вполне использовать все функции и упрощения.
После удачной покупки оборудования/устройства стоит посвятить несколько минут для ознакомления с каждой частью инструкции Behringer Xenyx X2222USB. Сейчас их старательно готовят или переводят, чтобы они были не только понятными для пользователя, но и чтобы выполняли свою основную информационно-поддерживающую функцию.

PT
RU
DE
PL
IT
NL
GR
SE
DK
FI
IMPORTANTE: Leia este documento
antes de utilizar o produto. Deseja mais
informação acerca deste produto?
Consulte o verso deste folheto.
ВНИМАНИЕ: Прочитайте этот
документ перед использованием
устройства. Дополнительную
информацию об устройстве вы
найдете на обратной стороне этого
буклета.
WICHTIG: Lesen sie dieses Dokument,
bevor Sie das Produkt verwenden.
Weitere Informationen zu diesem
Produkt finden Sie auf der Rückseite
dieser Broschüre.
WAŻNE: Przeczytaj niniejszy dokument
przed przystąpieniem do użytkowania.
Szczegółowe informacje dotyczące tego
produktu, patrz na odwrocie broszury.
IMPORTANTE: prima di utilizzare
il prodotto, leggere il presente
documento. Desiderate ricevere
maggiori informazioni su questo
prodotto? Vi rimandiamo al retro del
presente libretto.
BELANGRIJK: lees dit document goed
door voordat u het product in gebruik
neemt. Wilt u meer informatie over dit
product? Kijk dan op de achterpagina
van dit boekje.
ΣΗΜΑΝΤΙΚΟ: Διαβάστε αυτό το έντυπο
πριν από τη χρήση του προϊόντος.
Θέλετε περισσότερες πληροφορίες για
αυτό το προϊόν; Ανατρέξτε στην πίσω
πλευρά του φυλλαδίου.
VIKTIGT: Läs den här informationen
innan produkten används. Önskas mer
information om produkten? Se baksidan
på den här broschyren.
VIGTIGT! Læs dette dokument, før
produktet tages i brug. Vil du have flere
oplysninger om produktet? Se bagsiden
af denne folder.
TÄRKEÄÄ: Lue tämä asiakirja ennen
tuotteen käyttöä. Haluatko lisätietoja
tuotteesta? Katso vihon takasivu.
Instruções de
funcionamento/
segurança
Инструкция по
эксплуатации
и технике
безопасности
Bedienungs-/
Sicherheits-
hinweise
Wskazówki
obsługi/
bezpieczeństwa
Istruzioni di
funzionamento /
sicurezza
Bedienings-/
veiligheids-
voorschriften
Οδηγίες
λειτουργίας/
ασφαλείας
Drifts-/säkerhets-
instruktioner
Betjenings-
og sikkerheds-
instruktioner
Käyttö- ja
turvallisuusohjeet
www.behringer.comA50-00000-00976
X1622USB/
X2442USB
Behringer QX2222USB XENYX микшер с USB и эффектами

Важные инструкции по безопасности
Клеммы, отмеченные этим символом, пропускают электрический ток достаточной величины, чтобы создать риск поражения электрическим током. Используйте только высококачественные профессиональные акустические кабели с предварительно установленными разъемами ¼” TS или поворотными заглушками. Любая другая установка или модификация должны выполняться только квалифицированным персоналом. Этот символ, где бы он ни появлялся, предупреждает вас о наличии неизолированного опасного объема.tagе внутри корпуса – т.tage этого может быть достаточно, чтобы создать риск шока.
Этот символ, где бы он ни появлялся, указывает на важные инструкции по эксплуатации и техническому обслуживанию в сопроводительной литературе. Пожалуйста, прочтите руководство.
Предупреждение
Чтобы снизить риск поражения электрическим током, не снимайте верхнюю крышку (или заднюю часть). Внутри нет деталей, обслуживаемых пользователем. Поручите обслуживание квалифицированному персоналу.
Предупреждение
Чтобы снизить риск возгорания или поражения электрическим током, не подвергайте это устройство воздействию дождя и влаги. Запрещается подвергать устройство воздействию капель или брызг жидкости, а также нельзя ставить на устройство предметы, наполненные жидкостью, например вазы.
Предупреждение
Эти инструкции по обслуживанию предназначены только для квалифицированного обслуживающего персонала. Чтобы снизить риск поражения электрическим током, не выполняйте никакого обслуживания, кроме указанного в инструкции по эксплуатации. Ремонт должен выполняться квалифицированным обслуживающим персоналом.
- Прочтите эти инструкции.
- Сохраните эти инструкции.
- Обратите внимание на все предупреждения.
- Следуйте всем инструкциям.
- Не используйте это устройство около воды.
- Чистите только сухой тканью.
- Не закрывайте вентиляционные отверстия. Устанавливайте в соответствии с инструкциями производителя.
- Не устанавливайте рядом с какими-либо источниками тепла, такими как радиаторы, обогреватели, печи или другие устройства (включая ampлифтеры), выделяющие тепло.
- Не пренебрегайте защитным назначением вилки поляризованного или заземляющего типа. Поляризованная вилка имеет два контакта, один из которых шире другого. Вилка с заземлением имеет два контакта и третий контакт заземления. Широкий контакт или третий контакт предназначены для вашей безопасности. Если вилка из комплекта поставки не подходит к вашей розетке, обратитесь к электрику для замены устаревшей розетки.
- Не наступайте на шнур питания и не защемляйте его, особенно в области вилок, электрических розеток и в местах выхода из устройства.
- Используйте только приспособления / аксессуары, указанные производителем.
- Используйте только с тележкой, подставкой, штативом, кронштейном или столом, указанными производителем или продаваемыми вместе с устройством. При использовании тележки соблюдайте осторожность при перемещении комбинации тележка/аппарат, чтобы избежать
- Отключайте устройство от сети во время грозы или когда не используете его в течение длительного времени.
- Поручите все обслуживание квалифицированному обслуживающему персоналу. Обслуживание требуется, если устройство было повреждено каким-либо образом, например, поврежден шнур питания или вилка, пролита жидкость или внутрь устройства упали предметы, устройство подверглось воздействию дождя или влаги, не работает нормально, или был отброшен.
- Аппарат должен быть подключен к СЕТЕВОЙ розетке с защитным заземлением.
- Если СЕТЕВАЯ вилка или соединитель прибора используются в качестве устройства отключения, устройство отключения должно оставаться в рабочем состоянии.
- Правильная утилизация этого продукта: этот символ указывает на то, что этот продукт нельзя утилизировать вместе с бытовыми отходами в соответствии с Директивой WEEE (2012/19 / EU) и законодательством вашей страны. Этот продукт следует сдать в центр сбора, имеющий лицензию на переработку отработанного электрического и электронного оборудования (EEE). Неправильное обращение с этим типом отходов может иметь возможное негативное воздействие на окружающую среду и здоровье человека из-за потенциально опасных веществ, которые обычно связаны с EEE. В то же время ваше сотрудничество в правильной утилизации этого продукта будет способствовать эффективному использованию природных ресурсов. Для получения дополнительной информации о том, где вы можете сдать отработанное оборудование на переработку, обратитесь в местную городскую администрацию или в службу вывоза бытовых отходов.
- Не устанавливайте в ограниченном пространстве, например в книжном шкафу или подобном устройстве.
- Не ставьте на устройство источники открытого огня, например зажженные свечи.
- Помните об экологических аспектах утилизации батарей. Батареи необходимо утилизировать в пункте сбора батарей.
- Этот аппарат можно использовать в тропическом и умеренном климате до 45 ° C.
ОТКАЗ ОТ ОТВЕТСТВЕННОСТИ
Music Tribe не несет ответственности за любые убытки, которые может понести любое лицо, полностью или частично полагающееся на любое описание, фотографию или заявление, содержащееся в данном документе. Технические характеристики, внешний вид и другая информация могут быть изменены без предварительного уведомления. Все торговые марки являются собственностью их соответствующих владельцев. Midas, Klark Teknik, Lab Gruppen, Lake, Tannoy, Turbosound, TC Electronic, TC Helicon, Behringer, Bugera, Oberheim, Auratone и Coolaudio являются товарными знаками или зарегистрированными товарными знаками Music Tribe Global Brands Ltd. © Music Tribe Global Brands Ltd. 2021 Все права защищены.
ОГРАНИЧЕННАЯ ГАРАНТИЯ
Чтобы ознакомиться с применимыми условиями гарантии и дополнительной информацией об ограниченной гарантии Music Tribe, пожалуйста, ознакомьтесь с подробной информацией на сайте musictribe.com/warranty.
Сцеплять

Настройки

- Беспроводной USB-вход позволяет подключить USB-приемник для использования с беспроводными микрофонами BehringerULM.
- Ручка GAIN регулирует чувствительность входов MIC и / или LINE.
- Ручка COMP регулирует количество эффекта сжатия на канале.
- Ручки эквалайзера регулируют высокие, средние и низкие частоты канала. С помощью ручки FREQ выберите конкретную частоту, регулируемую ручкой MID.
- Ручки AUX регулируют, какая часть сигнала канала направляется на разъемы AUX SEND. Нажмите кнопку PRE при маршрутизации сигнала на stagе монитор. Используйте ручку FX, чтобы отправить сигнал канала на внутренний процессор мультиэффектов.
- Ручка PAN / BAL позиционирует канал в стереофоническом поле.
- Кнопка MUTE отключает звук канала.
- Светодиод CLIP загорается, когда канал (19) VU METER показывает перегрузку сигнала MAIN OUTPUT.
- CHANNEL FADER регулирует громкость канала.

- MULTI-FX PROCESSOR добавляет выбранный звуковой эффект к любым каналам, ручка FX которых повернута вверх. См. Подробности в разделе «Процессоры мультиэффектов».
- AUX SENDS регулируют количество сигнала, отправляемого на мониторный динамик или внешний процессор эффектов через разъемы AUX SEND.
- AUX RETURNS регулируют количество сигнала, возвращаемого от внешнего процессора эффектов, который включен в основной микс. Используйте ручку (и) TO AUX SEND, чтобы также включить сигнал эффектов в ваш мониторный микс.
- Кнопки SOURCE направляют сигналы USB/2-TR, SUB и MAIN MIX на разъемы PHONES и CONTROL ROOM.
- Кнопка USB/2-TR TO MAIN направляет сигнал USB и 2-TRACK на MAIN MIX.
- Ручка PHONES / CTRL ROOM регулирует громкость наушников или студийного монитора.
- Кнопка MODE определяет, работает ли кнопка SOLO канала как «Solo in Place» (кнопка отжата) или «Pre-Fader Listen» (кнопка нажата). PFL предпочтительнее для настройки усиления.
- Фейдеры SUB регулируют выходной сигнал разъемов SUB OUTPUT. Используйте кнопки LEFT/RIGHT для назначения сигнала SUB на левый и/или правый MAIN MIX.
- Фейдеры MAIN MIX регулируют общий выход микшера.
- AC IN допускает подключение прилагаемого кабеля питания к розетке.
- Переключатель POWER ON включает и выключает микшер.
- Переключатель PHANTOM ON подает 48 В на входы XLR для использования с конденсаторными микрофонами.

Начиная

Убедитесь, что питание всех устройств отключено

Установите усиление для каждого канала. Подробнее см. в разделе «Настройка усиления».

Нажмите кнопку MAIN на каждом канале, чтобы назначить канал на MAIN MIX.

При необходимости отрегулируйте положение канала влево-вправо в стереофоническом поле, поворачивая ручку PAN или BAL канала.

Настройте ручку COMP, чтобы добавить компрессию к входу, если это необходимо.

Для живых выступлений настройте общий выход микшера на мощность amp или активные динамики, подняв фейдеры MAIN MIX. Если светятся красные светодиоды CLIP на индикаторе VU METER, опустите фейдеры MAIN MIX.

Используйте ручки AUX канала и ручки AUX SEND для отправки сигналов канала на процессор эффектов или процессор эффектов.tagМонитор, подключенный к разъемам AUX SEND. Если используется для эффектов, направьте сигнал обратно от процессора на разъемы AUX RETURN.

Настройка усиления канала для QX2222USB/QX1622USB:
Нажмите кнопку SOLO канала 1. Нажмите кнопку MODE рядом с VU METER, чтобы измеритель работал в режиме PFL (предфейдерное прослушивание).

Во время пения или игры поверните регулятор GAIN канала 1. VU METER покажет уровень сигнала. Установите регулятор GAIN так, чтобы самые громкие пики достигали 0 на индикаторе VU METER. Нажмите кнопку SOLO канала 1 еще раз.

Повторите шаги 1-3 для любых других каналов, которые будут использоваться.
Ваш микшер имеет встроенный процессор. Выполните следующие действия, чтобы добавить эффект к одному или нескольким каналам.

- Поверните ручку FX наполовину на каждом канале, к которому вы хотите добавить эффект.
- Поверните ручки FX AUX SEND и FX AUX RETURN на 0. Вы можете отрегулировать их позже.
- Прокручивайте эффекты, поворачивая ручку PROGRAM. Название предустановки будет мигать на дисплее. Нажмите ручку PROGRAM, чтобы выбрать эффект.
- Отрегулируйте параметр 1 и 2:
- После того, как вы выбрали пресет (шаг 3), нажмите кнопку PARAM 1/2, чтобы войти в режим редактирования. Светодиод слева от кнопки PARAM 1/2 загорится, показывая, что параметр 1 активен.
- Поверните ручку PROGRAM, чтобы отрегулировать параметр.
- Через 4 секунды бездействия микшер выходит из режима редактирования. Вы также можете нажать ручку PROGRAM, чтобы вручную выйти из режима редактирования.
- Повторите шаги, используя кнопку PARAM 1/2, чтобы выбрать параметр 2 для редактирования.
- Отрегулируйте ручку FX каждого канала, чтобы добавить нужный эффект. Если на дисплее горит сегмент индикатора OL (перегрузка), поверните ручку FX AUX SEND вниз.
- Разъем FX FOOTSW(itch) принимает однокнопочный ножной переключатель для обхода эффектов и двойной ножной переключатель для обхода и регулировки PARAM 3/TAP (выбор A/B или отстукивание темпа).
Таблица предустановок процессора Multi-FX
REVERB A – НАТУРАЛЬНЫЕ БОЛЬШИЕ ЗАЛЫ
| 01 | ЦЕРКОВЬ | Время распада | 1.00 — 10.00 | Форма комнаты | 1 — 50 | DampИНГ | ТЕМНЫЙ (выкл.) / ЯРКИЙ (вкл.) |
| 02 | КОНЦЕРТНЫЙ ЗАЛ 1 | Время распада | 0.50 — 5.00 | Хор | 1 — 30 | DampИНГ | ТЕМНЫЙ (выкл.) / ЯРКИЙ (вкл.) |
| 03 | КОНЦЕРТНЫЙ ЗАЛ 2 | Время распада | 1.00 — 5.00 | Ранний рефл. Уровень | -12 до + 12 | DampИНГ | ТЕМНЫЙ (выкл.) / ЯРКИЙ (вкл.) |
| 04 | ТЕАТР | Время распада | 0.40 — 3.00 | глубина | 0 — 9 | DampИНГ | ТЕМНЫЙ (выкл.) / ЯРКИЙ (вкл.) |
REVERB B – НАТУРАЛЬНЫЕ МАЛЕНЬКИЕ КОМНАТЫ
| 05 | НОМЕР 1 | Время распада | 0.50 — 5.00 | Плотность | 0 — 100 | DampИНГ | ТЕМНЫЙ (выкл.) / ЯРКИЙ (вкл.) |
| 06 | НОМЕР 2 | Время распада | 0.30 — 2.50 | Предварительная задержка | 0 — 50 | DampИНГ | ТЕМНЫЙ (выкл.) / ЯРКИЙ (вкл.) |
| 07 | НОМЕР 3 | Время распада | 0.20 — 10.00 | Предварительная задержка | 0 — 200 | Позиция | ПЕРЕДНЯЯ (выключена) / ЗАДНЯЯ (включена) |
| 08 | ПАЛАТА | Время распада | 0.10 — 3.00 | Размер номера | 1 — 30 | DampИНГ | ТЕМНЫЙ (выкл.) / ЯРКИЙ (вкл.) |
REVERB C – СПЕЦИАЛЬНЫЕ РЕВЕРБЕРЫ
| 09 | VINTAGE ЦИФРОВАЯ РЕВЕРБЕРАЦИЯ | Время распада | 0.40 — 4.50 | Высокая частота ДampИНГ | Х 0.25, 0.33,
0.50, Макс |
Выбрать | ЗАДНИЙ (выключен) / ПЕРЕДНИЙ (включен) |
| 10 | ПЛАСТИНА РЕВЕРБЕР 1 | Время распада | 0.50 — 3.00 | Предварительная задержка | 0 — 40 | DampИНГ | ТЕМНЫЙ (выкл.) / ЯРКИЙ (вкл.) |
| 11 | ПЛАСТИНА РЕВЕРБЕР 2 | Время распада | 0.30 — 4.00 | Предварительная задержка | 0 — 40 | DampИНГ | ТЕМНЫЙ (выкл.) / ЯРКИЙ (вкл.) |
| 12 | Пружинный ревербератор | Время распада | 1.00 — 4.00 | Предварительная задержка | 0 — 150 | Тип | VINTAGE (выкл.) / СОВРЕМЕННЫЙ (вкл.) |
| 13 | ЗАГЛУЩЕННАЯ РЕВЕРБЕРАЦИЯ 1 | Время распада | 1 — 12 | Предварительная задержка | 0 — 400 | Тип | ЖИВ (выкл.) / GATED (вкл.) |
| 14 | ЗАГЛУЩЕННАЯ РЕВЕРБЕРАЦИЯ 2 | Время распада | 1 — 20 | Предварительная задержка | 0 — 30 | DampИНГ | ТЕМНЫЙ (выкл.) / ЯРКИЙ (вкл.) |
| 15 | ОБРАТНАЯ РЕВЕРБЕРАЦИЯ | Время распада | 1 — 20 | Предварительная задержка | 0 — 30 | DampИНГ | ТЕМНЫЙ (выкл.) / ЯРКИЙ (вкл.) |
ЗАДЕРЖКА / ОБСТАНОВКА
| 16 | DELAY | Обратная связь | 0 — 100 | режим | Моно, Пинг-понг, Спред | Темп задержки | 72 — 500
(мигает в темпе) |
| 17 | ЭХО | Обратная связь | 0 — 100 | DampИНГ | 1 — 50 | Темп эха | 72 — 500
(мигает в темпе) |
| 18 | АМБИЕНТА | Размер номера | 1 — 30 | Усиление хвоста | 0 — 100 | DampИНГ | ТЕМНЫЙ (выкл.) / ЯРКИЙ (вкл.) |
| 19 | Ранние размышления | Размер номера | 1 — 30 | Вещание | 1 — 20 | DampИНГ | ТЕМНЫЙ (выкл.) / ЯРКИЙ (вкл.) |
20 – 23 МОДУЛЯЦИЯ
| 20 | CHORUS | глубина | -20 до + 20 | LFO Скорость | 0.05 — 5.00 | Форма волны LFO | ТРЕУГОЛЬНИК (выкл.), СИНУС (вкл.) |
| 21 | ФЛАНЖЕР | глубина | -20 до + 20 | Резонанс | -100 до + 100 | Мод Темп | от 5 до 400 (мигание в темпе) |
| 22 | ФАЗЕР | глубина | -20 до + 20 | Резонанс | 1 — 50 | Мод Темп | от 5 до 400 (мигание в темпе) |
| 23 | АВТО-ПАНОРАМИРОВАНИЕ / ТРЕМОЛО | глубина | -100 до + 100 | Форма волны LFO | Треугольник, Рamp, Квадрат | Мод Темп | от 5 до 400 (мигание в темпе) |
24 – 26 РАСШИРЕНИЕ / ШАГ
| 24 | ДЕТУНА | разрегулировать | -99 до + 99 | PreDelay | 0 — 300 | DampИНГ | ТЕМНЫЙ (выкл.) / ЯРКИЙ (вкл.) |
| 25 | ШАГ ИЗМЕНЕНИЯ 1 | Примечание Shift | -12 до + 12 | PreDelay | 0 — 300 | разрегулировать | 0 (выкл.) / 20 (вкл.) |
| 26 | PITCH SHIFTER 2 (ДВОЙНОЙ) | Примечание Shift A | -12 до + 12 | Примечание Shift B | -12 до + 12 | Стерео распространение | УЗКИЙ (выкл.) / ШИРОКИЙ (вкл.) |
27 – 29 КОМБИ-FX
| 27 | ЗАДЕРЖКА + ХОР | Задержка <> Баланс хоруса | -50 до + 50 | Глубина хоруса | -20 до + 20 | Темп задержки | 75 — 500
(мигает в темпе) |
| 28 | ЗАДЕРЖКА + РЕВЕРБЕРАЦИЯ | Задержка<>Баланс реверберации | -50 до + 50 | Затухание реверберации | 1.00 — 5.00 | Темп задержки | 114 — 500
(мигает в темпе) |
| 29 | ХОР + РЕВЕРБ | Хорус<>Баланс реверберации | -50 до + 50 | Затухание реверберации | 1.00 — 5.00 | Глубина хоруса | МЯГКИЙ (выкл.) / ГЛУБОКИЙ (вкл.) |
30 – 32 СПЕЦИАЛЬНЫЕ ЭФФЕКТЫ
| 30 | ФИЛЬТР НЧ LFO | глубина | -20 до + 20 | Резонанс | 1 — 30 | Темп LFO | от 5 до 400 (мигание в темпе) |
| 31 | РАЗГОВОР | гласная 1 | А, Е, Я, О, У | гласная 2 | А, Е, Я, О, У | Темп LFO | от 5 до 400 (мигание в темпе) |
| 32 | КЛИППЕРСКОЕ ИСКАЖЕНИЕ | Искажение | 1 — 100 | Фильтр низких частот | 50.0 — 500.0 | DampИНГ | ТЕМНЫЙ (выкл.) / ЯРКИЙ (вкл.) |
Характеристики
| @ Сопротивление источника 0 Ом | -134 дБ / -136 дБ по шкале А | |
| @ Сопротивление источника 50 Ом | -131 дБ / -133 дБ по шкале А | |
| @ Сопротивление источника 150 Ом | -129 дБ / -131 дБ по шкале А | |
| Частотная характеристика (-1 дБ) | <10 Гц — 150 кГц (-1 дБ) | |
| Частотная характеристика (-3 дБ) | <10 Гц — 200 кГц (-3 дБ) | |
| Диапазон усиления | От +10 дБ до +60 дБ | |
| Максимум. входной уровень | +12 дБн при усилении +10 дБ | |
| полное сопротивление | 2 кОм симметричный | |
|
Отношение сигнал / шум |
106 дБ / 108 дБ
А-взвешенный (0 дБ В @ + 22 дБ усиления) |
107 дБ / 110 дБ
А-взвешенный (0 дБ В @ + 22 дБ усиления) |
| Искажения (THD + N) | 0.005% / 0.004% по шкале А | |
| Фантомного питания | Переключаемый, +48 В |
Линейный вход
| Тип | Разъем 1/4 ″ TRS, балансный |
| полное сопротивление | 20 кОм симметричный, 10 кОм несимметричный |
| Диапазон усиления | От -10 дБ до +40 дБ |
| Максимум. входной уровень | 30 дБ |
Стерео входы
| Тип | 4 x 1/4 ″ TRS-разъем, балансный |
| полное сопротивление | 20 кОм симметричный, 10 кОм несимметричный |
| Диапазон усиления | От -20 дБ до +20 дБ |
| Максимум. входной уровень | +22 дБн |
Эквалайзер 4-полосный Фиксированный
| Низкий | 80 Гц / ± 15 дБ |
| Низкий средний | 500 Гц / ± 15 дБ |
| Высокая середина | 3 кГц / ± 15 дБ |
| High | 12 кГц / ± 15 дБ |
Вставки каналов
| Тип | Разъем 1/4″ TRS, несбалансированный |
| Максимум. входной уровень | +22 дБн |
AUX отправляет
| Тип | 3 x 1/4 ″ TRS-разъем, балансный | 2 x 1/4 ″ TRS-разъем, балансный |
| полное сопротивление | 120 Ω | |
| Максимум. уровень выхода | +22 дБн |
Возврат AUX
| Тип | 3 x 1/4 ″ TRS-разъем, балансный | 2 x 1/4 ″ TRS-разъем, балансный |
| полное сопротивление | 20 кОм симметричный, 10 кОм несимметричный | |
| Максимум. входной уровень | +22 дБн |
Основные выходы
| Тип | XLR, балансный |
| полное сопротивление | 240 Ом симметричный, 120 Ом несимметричный |
| Максимум. уровень выхода | +28 дБн |
Выход на наушники
| Тип | Разъем 1/4″ TRS, несбалансированный |
| полное сопротивление | 25 Ω |
| Максимум. уровень выхода | +21 дБн / 150 Ом (+25 дБм) |
DSP
| Тип | КЛАРК ТЕКНИК |
| конвертер | 24-битная сигма-дельта |
| 64/128 оверовampморская щука | |
| Sampскорость | 40 кГц |
Данные системы основного микса (шум)
| Основной микс @ -∞, фейдер канала @ -∞ | -100 дБ / -103 дБ
А-взвешенный |
-100 дБ / -102 дБ
А-взвешенный |
| Основной микс @ 0 дБ, фейдер канала @ -∞ | -85 дБ / -88 дБ
А-взвешенный |
-88 дБ / -91 дБ
А-взвешенный |
| Основной микс @ 0 дБ, фейдер канала @ 0 дБ | -78 дБ / -80 дБ
А-взвешенный |
-82 дБ / -85 дБ
А-взвешенный |
Напряжение питания
| Напряжение сетиtage | 100 — 240 В ~, 50/60 Гц |
| Потребляемая мощность | 50 W |
| Предохранитель (100 — 240 В ~, 50/60 Гц) | Т 1.6 Ач 250 В |
| Разъем для подключения к сети | Стандартная розетка IEC |
USB
| соединитель | Тип B |
| Аудио | Стерео вход / выход |
| конвертер | 16-бит |
| Sampле скорость | 48 кГц |
Физические / Вес
| Размеры (Ш х Г х В) | 16.9 x 14.6 x 3.5 ″
430 x 370 х 90 мм |
12.8 x 13.7 x 3.5 ″
325 x 348 х 90 мм |
| Вес | 10.6 фунт / кг 4.8 | 7.7 фунт / кг 3.5 |
Важная информация
Зарегистрироваться на сайте. Пожалуйста, зарегистрируйте свое новое оборудование Music Tribe сразу после его покупки на сайте musictribe.com. Регистрация вашей покупки с помощью нашей простой онлайн-формы помогает нам обрабатывать ваши претензии по ремонту быстрее и эффективнее. Также ознакомьтесь с условиями нашей гарантии, если применимо.
Неисправность. Если ваш авторизованный реселлер Music Tribe не находится поблизости от вас, вы можете связаться с авторизованным реселлером Music Tribe для вашей страны, указанным в разделе «Поддержка» на сайте musictribe.com. Если вашей страны нет в списке, проверьте, можно ли решить вашу проблему с помощью нашей «Онлайн-поддержки», которую также можно найти в разделе «Поддержка» на сайте musictribe.com. Кроме того, ПЕРЕД возвратом продукта отправьте претензию по гарантии на сайте musictribe.com.
Подключения питания. Перед подключением устройства к розетке убедитесь, что вы используете подходящую сетевую мощность.tage для вашей конкретной модели. Неисправные предохранители необходимо заменять без исключения предохранителями того же типа и номинала.
ИНФОРМАЦИЯ О СОБЛЮДЕНИИ ФЕДЕРАЛЬНОЙ КОМИССИИ СВЯЗИ
Это оборудование было протестировано и признано соответствующим ограничениям для цифровых устройств класса B в соответствии с частью 15 правил FCC. Эти ограничения разработаны для обеспечения разумной защиты от вредных помех при установке в жилых помещениях. Это оборудование генерирует, использует и может излучать радиочастотную энергию и, если оно установлено и используется не в соответствии с инструкциями, может создавать вредные помехи для радиосвязи. Однако нет гарантии, что помехи не возникнут при конкретной установке. Если это оборудование действительно создает недопустимые помехи для приема радио или телевидения, что можно определить путем включения и выключения оборудования, пользователю рекомендуется попытаться устранить помехи одним или несколькими из следующих способов:
- Изменить ориентацию или местоположение приемной антенны.
- Увеличьте расстояние между оборудованием и приемником.
- Подключить оборудование к розетке в цепи, отличной от той, к которой подключен приемник.
- Обратитесь за помощью к дилеру или опытному радио / телевизионному технику.
Это оборудование соответствует части 15 правил FCC. Эксплуатация возможна при соблюдении следующих двух условий:
- Это устройство не должно вызывать вредных помех, и
- Это устройство должно принимать любые помехи, включая помехи, которые могут вызвать сбои в работе.
Важная информация:
Изменения или модификации оборудования, явно не одобренные MUSIC Tribe, могут лишить пользователя права на использование оборудования.
Документы / Ресурсы
Рекомендации
Краткое содержание страницы № 1
Small Format Mixers
XENYX X2442USB / X2222USB
X1832USB / X1622USB
X1222USB / X1204USB / 1204USB
XENYX—Premium Mixer with
XENYX Mic Preamps & Compressors,
British EQs, 24-Bit Multi-FX Processor
and USB/Audio Interface
Premium ultra-low noise,
You’ve got the talent. You’re brimming their own, even when compared to the
high headroom analog mixer
with creativity. And you’re ready to get most expensive stand-alone mic preamps.
your message out to the masses. But XENYX preamps offer a staggeri
Краткое содержание страницы № 2
Page 2 of 17 One-knob Compression Recording Bliss XENYX X2442USB Ask professional sound engineers There was a time when the recording X2222USB / X1832USB what their favorite piece of external process called for lots and lots processing gear is and the majority of expensive gear, which meant the X1622USB / X1222USB response will be virtually unanimous— average musician had to buy time at a X1204USB / 1204USB dynamic compression. What is recording studio—and that time was compression? We’re
Краткое содержание страницы № 3
Page 3 of 17 XENYX X2442USB X2222USB / X1832USB X1622USB / X1222USB X1204USB / 1204USB 1204USB X1204USB X1222USB X1622USB X1832USB X2222USB X2442USB Mic Preamps 4 4 6 4 6 8 10 Stereo Channels 2 2 4 4 4 4 4 Aux Sends 2 2 2 2 3 3 4 Stereo Aux Returns 2 2 2 2 2 3 4 Phantom Power ✓ ✓ ✓ ✓ ✓ ✓ ✓ Channel Inserts — — 4 4 6 8 8 3-band 3-band 3-band 3-band Mono Channel EQ 3-band 3-band 3-band semi-parametic mid semi-parametic mid semi-parametic mid semi-parametic mid Compressors 4 4 4 4 6 8 10 Ste
Краткое содержание страницы № 4
Page 4 of 17 XENYX X2442USB X2222USB / X1832USB X1622USB / X1222USB X1204USB / 1204USB Multi-FX Processor Preset Chart No. Effect PROGRAM Min. value Max. value Default TAP Min. value Max. value Default TAP LED Reverb 01 HALL Reverb time 01 (approx. 1.0 sec.) 10 (approx. 8.0 sec.) 03 Brilliance oF on on off/on lighting 02 ROOM Reverb time 01 (approx. 0.5 sec.) 10 (approx. 4.0 sec.) 04 Brilliance oF on oF off/on lighting 03 PLATE Reverb time 01 (approx. 0.5 sec.) 10 (approx. 5.0 sec.) 03 Brillia
Краткое содержание страницы № 5
Page 5 of 17 all mono channels feature our “one 1204USB knob” studio-grade compressor and two XENYX X2442USB Perfect for a small live-performance Aux Sends (one each pre- and post-fader). X2222USB / X1832USB mixer, as well as home-based recording Two stereo Aux Returns are included setup, the 1204USB provides four mono X1622USB / X1222USB for use with external FX modules. channels with premium XENYX mic The built-in USB audio interface provides X1204USB / 1204USB preamps, neo-classic
Краткое содержание страницы № 6
Page 6 of 17 delay, pitch shifter and multi-effects. X1204USB User-definable parameters include reverb XENYX X2442USB The compact X1204USB mixer takes time and brilliance, delay room size and X2222USB / X1832USB the 1204USB up a notch, providing repetitions, modulation depth and speed, all the same great features, plus our X1622USB / X1222USB and much more. Time-based functions new 24-bit, dual engine FX processor, can be addressed via a handy Tap button. X1204USB / 1204USB with 16 ed
Краткое содержание страницы № 7
Page 7 of 17 graphic EQ, which can be assigned to X1222USB the main or monitor buses, and our XENYX X2442USB The X1222USB ups the ante with six proprietary FBQ Feedback Detection X2222USB / X1832USB mono mic inputs. These two additional System. Other features include full-sized channels can also be used for stereo X1622USB / X1222USB faders for MON and FX SENDs, our XPQ 3D line-level devices, such as keyboards or stereo surround effect (creates a broader, X1204USB / 1204USB sound modu
Краткое содержание страницы № 8
Page 8 of 17 XENYX X2442USB X2222USB / X1832USB X1622USB / X1222USB X1204USB / 1204USB XENYX X1222USB Live/Recording Setup Acoustic Electric Guitar Guitar B412DSP Loudspeakers DI100 Laptop XM8500 Mics HPM1000 Keyboard XENYX X1222USB E-Drums
Краткое содержание страницы № 9
Page 9 of 17 enhanced fine-tuning via 4-band EQ, X1622USB which is extremely handy for adjusting XENYX X2442USB The X1622USB features four XENYX-fueled critical keyboard midrange frequencies. X2222USB / X1832USB mic inputs with channel Inserts, “one Aux 1 Sends are switchable (pre- or knob” compressors and 3-band British- X1622USB / X1222USB post-fader) and individual channels style EQs with a sweepable, can be assigned to two subgroups for X1204USB / 1204USB semi-parametric mid fr
Краткое содержание страницы № 10
Page 10 of 17 XENYX X2442USB X2222USB / X1832USB X1622USB / X1222USB X1204USB / 1204USB X1622USB Rear Panel Sub 1 & 2 Control Room IEC power Power Phantom Power Main Outputs, Outputs, ¼» TS USB/Audio Out, ¼» TS Channel 1-4 socket switch switch XLR balanced unbalanced Interface port unbalanced Inserts XENYX X1622USB Recording Setup B3031A Active Studio Monitors Laptop Acoustic Electric Guitar Guitar DI100 USB In/Out CTRL Out L CTRL Out R B-2 PRO HPS3000 Keyboard Drum Machine XENYX X1622USB
Краткое содержание страницы № 11
Page 11 of 17 in conjunction with the FBQ feedback X1832USB detection circuitry to eliminate annoying XENYX X2442USB Building on the feature set of the mic squeals. Other features include X2222USB / X1832USB X1622USB, the X1832USB comes with full-sized faders for MON and FX SENDs, two additional mic strips (including X1622USB / X1222USB along with our proprietary XPQ 3D stereo channel inserts), for a total of six XENYX surround effect and Voice Canceller. X1204USB / 1204USB mic pream
Краткое содержание страницы № 12
Page 12 of 17 XENYX X2442USB X2222USB / X1832USB X1622USB / X1222USB X1204USB / 1204USB X1832USB Rear Panel Main Outputs, IEC power Power Phantom Main Outputs, ¼» TS Sub 1 & 2 Outputs, USB/Audio Control Room Out, Channel 1-6 socket switch Power switch XLR balanced unbalanced ¼» TS unbalanced Interface port ¼» TS unbalanced Inserts XENYX X1832USB Live/Recording Setup B412DSP Loudspeakers Electric Acoustic Bass Guitar Guitar Guitar Laptop DI100 Main Out L V-AMP 3 Main Out R XM8500 Mics HPS30
Краткое содержание страницы № 13
Page 13 of 17 the X2222USB, plus four stereo line-level X2222USB channels, two convenient mix subgroups XENYX X2442USB How about eight XENYX mic channels and onboard 24-bit digital FX processing, X2222USB / X1832USB with inserts, dedicated compressors, with dual user-addressable parameter 3-band EQ with semi-parametric mids X1622USB / X1222USB controls. All this and more enclosed in a and three Aux Sends? You get all that with rack-ready, roadworthy steel chassis. X1204USB / 1204USB X2
Краткое содержание страницы № 14
Page 14 of 17 XENYX X2442USB X2222USB / X1832USB X1622USB / X1222USB X1204USB / 1204USB X2222USB Rear Panel IEC power Control Room Out, USB/Audio socket Power switch ¼» TS unbalanced Interface port Phantom Power Main Main Outputs, Sub 1 & 2 Outputs, Channel 1-8 switch Outputs, XLR ¼» TS ¼» TS unbalanced Inserts balanced unbalanced XENYX X2222USB Recording Setup E-Drums Electric Acoustic Electric Guitar Guitar Guitar Laptop USB In/Out DI100 V-AMP 3 CTRL Out LCTRL Out R B-2 PRO Mics B3031
Краткое содержание страницы № 15
Page 15 of 17 for connecting graphic equalizers X2442USB or compressor/limiters); and eight XENYX X2442USB The “Big Daddy” of the USB Series is Direct Outs and Sub Outs for analog X2222USB / X1832USB the X2442USB with its 10 state-of-the- recording purposes. art, XENYX-powered mic inputs, four X1622USB / X1222USB No matter what your audio mixing stereo channels, four Aux Sends and X1204USB / 1204USB needs are, BEHRINGER USB Series mixers four stereo Aux Returns, and our easy provide
Краткое содержание страницы № 16
L Overhead Mic R Overhead Mic Snare Mic Kick Mic Page 16 of 17 XENYX X2442USB X2222USB / X1832USB X1622USB / X1222USB X1204USB / 1204USB X2442USB Rear Panel Channel 1-8 USB/Audio Aux Sends 1-4, FX Out, ¼» TS FX Footswitch Direct Outputs, Interface port ¼» TS unbalanced unbalanced jack ¼» TS unbalanced IEC power Power Phantom Main Outputs, Main Outputs, Main Inserts, Control Room Sub 1-8 Outputs, Stereo Aux socket switch Power switch XLR balanced ¼» TS unbalanced ¼» TS unbalanced Out,
Краткое содержание страницы № 17
Page 17 of 17 XENYX X2442USB X2222USB / X1832USB X1622USB / X1222USB X1204USB / 1204USB Specifications Mono Inputs CD/Tape In Control Room Output Microphone inputs (XENYX Mic preamp) Type RCA connector Type ¼» TS connector, unbalanced Type XLR connector, electronically Impedance 10 k Ohms Impedance 120 Ohms balanced, discrete input circuit Max. input level +22 dBu Max. output level +22 dBu Mic E.I.N.1 (20 Hz — 20 kHz) Equalizer 3-band Phones Output @ 0 Ω source resistance -134 dB 135.
На этой странице вы можете совершенно бесплатно скачать Инструкция по эксплуатации Behringer Xenyx X2222USB.
У документа PDF Инструкция по эксплуатации 19 страниц, а его размер составляет 5.47 Mb.
Читать онлайн Аудио Behringer Xenyx X2222USB Инструкция по эксплуатации
Скачать файл PDF «Behringer Xenyx X2222USB Инструкция по эксплуатации» (5.47 Mb)
Популярность:
32329 просмотры
Подсчет страниц:
19 страницы
Тип файла:
Размер файла:
5.47 Mb
Прочие инструкции Behringer Xenyx X2222USB
Прочие инструкции Behringer Аудио
Прочие инструкции Behringer

User Manual

2 XENYX X2442USB/X2222USB/X1832USB/X1622USB User Manual
|
Table of Contents |
||
|
Thank you……………………………………………………………… |
2 |
|
|
Important Safety Instructions………………………………… |
3 |
|
|
Legal Disclaimer…………………………………………………….. |
3 |
|
|
Limited warranty…………………………………………………… |
3 |
|
|
1. Introduction………………………………………………………. |
4 |
|
|
1.1 General mixing console functions…………………………… |
4 |
|
|
1.2 The user’s manual……………………………………………………… |
5 |
|
|
1.3 Before you get started………………………………………………. |
5 |
|
|
2. Control Elements and Connectors ……………………… |
5 |
|
|
2.1 Mono channels…………………………………………………………… |
5 |
|
|
2.2 |
Stereo channels…………………………………………………………. |
7 |
|
2.3 |
Interface panel and main section…………………………… |
8 |
|
3. Graphic 9-Band Equalizer (X1832USB only)……….. |
12 |
|
|
4. Digital Effects Processor…………………………………… |
13 |
|
|
5. Rear Panel Connectors……………………………………… |
13 |
|
|
5.1 Main mix outputs, insert points and |
||
|
control room outputs…………………………………………………….. |
13 |
|
|
5.2 |
Subgroup outputs…………………………………………………… |
13 |
|
5.3 |
Inserts………………………………………………………………………… |
14 |
|
5.4 Direct outputs (X2442USB only)……………………………. |
14 |
|
|
5.5 |
USB input/output…………………………………………………….. |
14 |
|
5.6 Voltage supply, phantom power supply |
||
|
and fuse……………………………………………………………………………. |
14 |
|
|
6. Installation………………………………………………………. |
15 |
|
|
6.1 Rack mounting…………………………………………………………. |
15 |
|
|
6.2 |
Cable connections…………………………………………………… |
15 |
|
7. Specifications…………………………………………………… |
16 |
Thank you
Congratulations! In purchasing the BEHRINGER XENYX you have acquired a mixer whose small size belies its incredible versatility and audio performance.
The XENYX Series represents a milestone in the development of mixing console technology. With the new XENYX microphone preamps including phantom power as an option, balanced line inputs and a powerful effects section,
th xing consoles in the XENYX Series are optimally equipped for live and studio applications. Owing to state-of-the-art circuitry, your XENYX console produces a warm analog sound that is unrivalled. With the addition of the latest digital technology, these best-in-class consoles combine the advantages of both analog and digital technology.

3 XENYX X2442USB/X2222USB/X1832USB/X1622USB User Manual
Important Safety
Instructions
Terminals marked with this symbol carry electrical current of sufficient magnitude to constitute risk of electric shock.
Use only high-quality professional speaker cables with ¼» TS or twist-locking plugs pre-installed. All other installation or modification should be performed only by qualified personnel.
This symbol, wherever it appears,
alerts you to the presence of uninsulated dangerous voltage inside the
enclosure — voltage that may be sufficient to constitute a risk of shock.
This symbol, wherever it appears, alerts you to important operating and maintenance instructions in the
accompanying literature. Please read the manual.
Caution
To reduce the risk of electric shock, do not remove the top cover (or the rear section).
No user serviceable parts inside. Refer servicing to qualified personnel.
Caution
To reduce the risk of fire or electric shock, do not expose this appliance to rain and moisture. The apparatus shall not be exposed to dripping
or splashing liquids and no objects filled with liquids, such as vases, shall be placed on the apparatus.
Caution
These service instructions are for use by qualified service personnel only.
To reduce the risk of electric shock do not perform any servicing other than that contained in the operation instructions. Repairs have to be performed by qualified service personnel.
9.Do not defeat the safety purpose of the polarized or grounding-type plug. A polarized plug has two blades with one wider than the other. A grounding-type plug has two blades and a third grounding prong. The wide
blade or the third prong are provided for your safety. If the provided plug does not fit into your outlet, consult an electrician for replacement of the obsolete outlet.
10.Protect the power cord from being walked on or pinched particularly at plugs, convenience receptacles, and the point where they exit from the apparatus.
11.Use only attachments/accessories specified by
the manufacturer.
12. Use only with the cart, stand, tripod, bracket,
or table specified by the
manufacturer, or sold with the apparatus. When a cart is used, use caution when
moving the cart/apparatus combination to avoid
injury from tip-over.
13.Unplug this apparatus during lightning storms or when unused for long periods of time.
14.Refer all servicing to qualified service personnel. Servicing is required when the apparatus has been damaged in any way, such as power supply cord or plug is damaged, liquid has been spilled or objects have fallen into the apparatus, the apparatus has been exposed
to rain or moisture, does not operate normally, or has been dropped.
15.The apparatus shall be connected to a MAINS socket outlet with a protective earthing connection.
16.Where the MAINS plug or an appliance coupler is used as the disconnect device, the disconnect device shall remain readily operable.
1.Read these instructions.
2.Keep these instructions.
3.Heed all warnings.
4.Follow all instructions.
5.Do not use this apparatus near water.
6.Clean only with dry cloth.
7.Do not block any ventilation openings. Install in accordance with the manufacturer’s instructions.
8.Do not install near any heat sources such as radiators, heat registers, stoves, or other apparatus (including amplifiers) that produce heat.
LEGAL DISCLAIMER
TECHNICAL SPECIFICATIONS AND APPEARANCES ARE SUBJECT TO CHANGE WITHOUT NOTICE AND ACCURACY IS NOT GUARANTEED. BEHRINGER, KLARK TEKNIK, MIDAS, BUGERA, AND TURBOSOUND
ARE PART OF THE MUSIC GROUP (MUSIC-GROUP.COM). ALL TRADEMARKS ARE THE PROPERTY OF THEIR RESPECTIVE OWNERS. MUSIC GROUP ACCEPTS NO LIABILITY FOR ANY LOSS WHICH MAY BE SUFFERED BY ANY PERSON WHO RELIES EITHER WHOLLY OR
IN PART UPON ANY DESCRIPTION, PHOTOGRAPH OR STATEMENT CONTAINED HEREIN. COLORS AND
SPECIFICATIONS MAY VARY FROM ACTUAL PRODUCT. MUSIC GROUP PRODUCTS ARE SOLD THROUGH AUTHORIZED FULLFILLERS AND RESELLERS ONLY. FULLFILLERS AND RESELLERS ARE NOT AGENTS OF MUSIC GROUP AND HAVE ABSOLUTELY NO AUTHORITY
TO BIND MUSIC GROUP BY ANY EXPRESS OR IMPLIED
UNDERTAKING OR REPRESENTATION. THIS MANUAL IS COPYRIGHTED. NO PART OF THIS MANUAL MAY BE REPRODUCED OR TRANSMITTED IN ANY FORM OR BY ANY MEANS, ELECTRONIC OR MECHANICAL,
INCLUDING PHOTOCOPYING AND RECORDING OF ANY KIND, FOR ANY PURPOSE, WITHOUT THE EXPRESS WRITTEN PERMISSION OF MUSIC GROUP IP LTD.
ALL RIGHTS RESERVED.
© 2013 MUSIC Group IP Ltd.
Trident Chambers, Wickhams Cay, P.O. Box 146, Road Town, Tortola, British Virgin Islands
LIMITED WARRANTY
For the applicable warranty terms and conditions and additional information regarding MUSIC Group’s
Limited Warranty, please see complete details online at www.music-group.com/warranty.

4XENYX X2442USB/X2222USB/X1832USB/X1622USB User Manual
1.Introduction
XENYX Mic Preamp
The microphone channels feature high-end XENYX Mic Preamps that compare well with costly outboard preamps in terms of sound quality and dynamics and boast the following features:
◊130 dB dynamic range for an incredible amount of headroom
◊A bandwidth ranging from below 10 Hz to over 200 kHz for crystal-clear reproduction of even the finest nuances
◊The extremely low-noise and distortion-free circuitry guarantees absolutely natural and transparent signal reproduction
◊They are perfectly matched to every conceivable microphone with up to 60 dB gain and +48 volt phantom power supply
◊They enable you to use the greatly extended dynamic range of your 24-bit/192-kHz HD recorder to the full, thereby maintaining optimal audio quality
“British EQ”
The equalizers used for the XENYX Series are based on the legendary circuitry of top-notch consoles made in Britain, which are renowned throughout the world for their incredibly warm and musical sound character. Even with extreme gain settings these equalizers ensure outstanding audio properties.
Multi-effects processor
Additionally, your XENYX mixing console has an effects processor with 24-bit A/D and D/A converters included, which gives you
16 presets producing first-class reverb, delay and modulation effects plus numerous multi-effects in excellent audio quality.
The XENYX mixing consoles are equipped with a state-of-the-art
switched-mode power supply (SMPS). Unlike conventional circuitry an SMPS provides an optimum supply current regardless of the input
voltage. And thanks to its considerably higher efficiency a switched-mode power supply uses less energy than conventional power supplies.
FBQ Feedback Detection System
The FBQ Feedback Detection System integrated into the graphic EQ of your X1832USB is one of this mixer’s most outstanding features.
This ingenious circuitry lets you immediately recognize and eliminate feedback frequencies. The FBQ Feedback Detection System uses the LEDs in the frequency band faders of the graphic EQ to indicate the critical frequencies. This way, what once used to be a labor-intensive search for feedback frequencies is now an activity that even a child could master.
Voice Canceller
We have added another useful feature to the XENYX X1832USB:
the Voice Canceller.
The Voice Canceller is a filter circuitry that filters out vocal portions from a track. Therefore, this mixing console is ideally suited for use as a karaoke machine. This feature is also an optimal solution for singers who need accompanying music for their rehearsals.
!!CAUTION!
◊We should like to draw your attention to the fact that extreme volumes may damage your hearing and/or your headphones or loudspeakers. Turn the MAIN MIX faders and phones control in the main section
fully down before you switch on the unit. Always be careful to set the appropriate volume.
1.1 General mixing console functions
A mixing console fulfils three main functions:
• Signal processing: Preamplification
Microphones convert sound waves into voltage that has to be amplified several-fold; then, this voltage is turned into sound that is reproduced in a loudspeaker. Because microphone capsules are very delicate in their construction, output voltage is very low and therefore susceptible to
interference. Therefore, mic signal voltage is amplified directly at the mixer input to a higher signal level that is less prone to interference. This higher, interference-safe signal level has to be achieved through amplification using an amplifier of the highest quality in order to amplify the signal and add as little noise to it as possible. The XENYX Mic Preamp performs this role beautifully, leaving no traces of noise or sound coloration. Interference that could take place at the preamplification level could affect signal quality and purity, and would then be passed on to all other devices, resulting in inaccurate sounding program during recording or playback.
Level-setting
Signals fed into the mixer using a DI-box (Direct Injection) or the output of a sound card or a keyboard, often have to be adjusted to the operating level of your mixing console.
Frequency response correction
Using the equalizers found in each channel strip, you can simply, quickly and effectively adjust the way a signal sounds.
Effects mixing
In addition to the effects processor contained in your mixer, using the insert connectors on the mono channels and both aux busses lets you insert additional signal processors into your signal path.
• Signal distribution:
Individual signals adjusted at each channel strip are laid out at the aux sends and returns, and are either fed into external effects processors or fed back to the internal effects processor. Then, the signals are brought back into the main mix either via the aux return connectors or via direct internal wiring. The mix for the on-stage musicians is also created using the aux sends (monitor mix). Similarly, for example, signals for recording equipment, power amplifiers, headphones and 2-track outputs can also be taken.
5 XENYX X2442USB/X2222USB/X1832USB/X1622USB User Manual
• Mix:
Mix:
All other mixing console functions fall under this vital category. Creating a mix means primarily adjusting the volume levels of individual instruments and voices to one another as well as giving them the appropriate weight within the overall frequency spectrum. Likewise, you’ll have to sensibly spread individual voices across the stereo image of a signal. At the end of this process, adjusting the level of the entire mix to other equipment in the signal path is required (e. g. recorder/crossover/amplifier).
The control surface of BEHRINGER mixing consoles is optimized in such a way that these functions become easy to fulfill while the signal path remains simple to follow.
1.2 The user’s manual
The user’s manual is designed to give you both an overview of the controls, as well as detailed information on how to use them. In order to help you understand the links between the controls, we have arranged them in groups according to their function. If you need to know more about specific issues, please visit our website at http://behringer.com. Additional information and
explanations about various music industry/audio technology terminology can be found on individual product pages as well as in the glossary.
◊The block diagram supplied with the mixing console gives you an overview of the connections between the inputs and outputs, as well as the associated switches and controls.
1.3 Before you get started
1.3.1 Shipment
1.3.3 Online registration
Please register your new BEHRINGER equipment right after your purchase by visiting http://behringer.com and read the terms and conditions of our warranty carefully.
Should your BEHRINGER product malfunction, it is our intention to have it repaired as quickly as possible. To arrange for warranty service, please contact the BEHRINGER retailer from whom the equipment was purchased. Should your BEHRINGER dealer not be located in your vicinity, you may directly contact
one of our subsidiaries. Corresponding contact information is included in the original equipment packaging (Global Contact Information/European Contact Information). Should your country not be listed, please contact the distributor nearest you. A list of distributors can be found in the support area of our website (http://behringer.com).
Registering your purchase and equipment with us helps us process your repair claims more quickly and efficiently.
Thank you for your cooperation!
2. Control Elements and Connectors
This chapter describes the various control elements of your mixing console. All controls, switches and connectors will be discussed in detail.
2.1 Mono channels
2.1.1 Microphone and line inputs
Your mixing console was carefully packed in the factory to guarantee safe transport. Nevertheless, we recommend that you carefully examine the packaging and its contents for any signs of physical damage, which may have occurred during transit.
◊If the unit is damaged, please do NOT return it to us, but notify your dealer and the shipping company immediately, otherwise claims for damage or replacement may not be granted.
1.3.2 Initial operation
Be sure that there is enough space around the unit for cooling purposes and to avoid over-heating please do not place your mixing console on high-temperature devices such as radiators or power amps. The console is connected to the
mains via the supplied cable. The console meets the required safety standards. Blown fuses must only be replaced by fuses of the same type and rating.
◊Please note that all units must be properly grounded. For your own safety, you should never remove any ground connectors from electrical devices or power cables, or render them inoperative.
◊Please ensure that only qualified people install and operate the mixing console. During installation and operation, the user must have sufficient electrical contact to earth, otherwise electrostatic discharges might affect the operation of the unit.
|
X2222USB |
X2442USB |
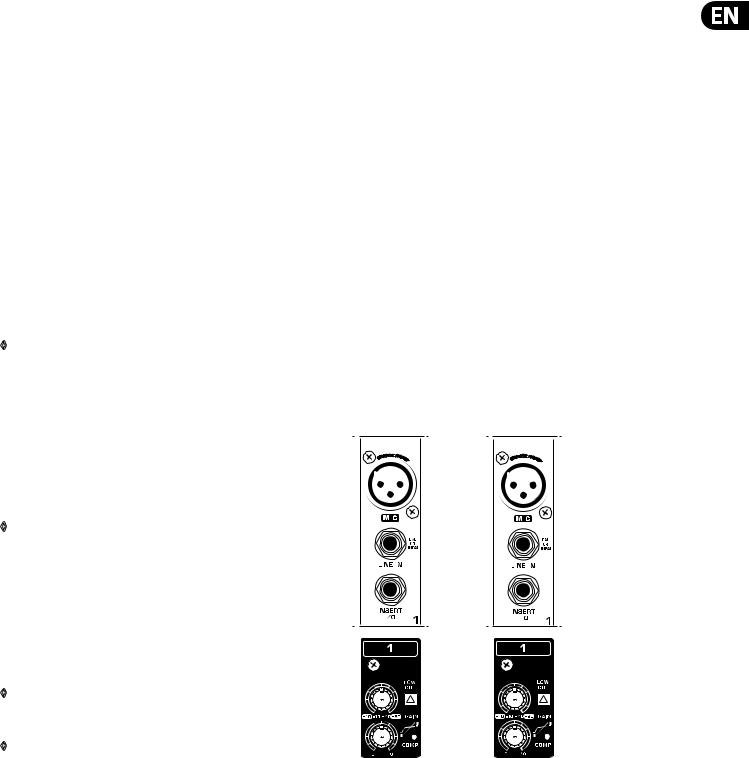
Fig. 2.1: Connectors and controls of mic/line inputs
6 XENYX X2442USB/X2222USB/X1832USB/X1622USB User Manual
MIC
Each mono input channel offers a balanced microphone input via the XLR connector and also features switchable +48 V phantom power supply for condenser microphones. The XENYX preamps provide undistorted and noise-free gain as is typically known only from costly outboard preamps.
◊Please mute your monitor system before you switch on phantom power. Otherwise potentially damaging thumps will be sent to your speakers. Please also note the instructions in chapter 5.5 “Voltage supply, phantom power and fuse”.
LINE IN
Each mono input also has a balanced line input on a ¼» jack. You can also connect unbalanced devices using mono jacks to these inputs.
◊Please remember that you can use either the microphone input or the line input of a channel, but not both at the same time!
INSERT
◊Insert points enable the processing of a signal with dynamic processors or equalizers. They are sourced pre-fader, pre-EQ and pre-aux send. Detailed information on using insert points can be found in chapter 5.3.
◊Unlike the X2442USB, the X1622USB, X1832USB and X2222USB have their insert points located on the rear of the console.
GAIN
Use the GAIN control to adjust the input gain. This control should always be turned fully counter-clockwise whenever you connect or disconnect a signal source to one of the inputs.
The scale has 2 different value ranges: the first value range (+10 to +60 dB) refers to the MIC input and shows the amplification for the signals fed in there.
The second value range (+10 to -40 dB) refers to the line input and shows its sensitivity. The settings for equipment with st andard line-level signals (-10 dBV or +4 dBu) look like this: While the GAIN control is turned all the way down, connect your equipment. Set the GAIN control to the external devices’ standard output level. If that unit has an output signal level display, it should show 0 dB during signal peaks. For +4 dBu, turn up GAIN slightly, for -10 dBV a bit more. Fine-tuning of a signal being fed in is done using the level meter. To route the channel signal to the level meter, you have to press the SOLO switch and set the MODE switch in the main section to PFL (LEVEL SET).
Using the GAIN control, drive the signal to the 0-dB mark. This way you have a vast amount of drive headroom for use with very dynamic signals. The CLIP display should light up only rarely, preferably never. While fine-tuning,
the equalizer should be set to neutral.
LOW CUT
Additionally, the mono channels of the mixing consoles have a high-slope LOW CUT filter for eliminating unwanted, low-frequency signal components (75 Hz, 18 dB/octave).
COMPRESSOR
Each mono channel features a built-in compressor which lowers the dynamic range of the signal and increases its perceived loudness. The loud peaks are squashed down and the quiet sections are boosted.
Turn the COMP knob clockwise to add more compression effect. The adjacent LED with light when the effect is engaged.
2.1.2 Equalizer
All mono input channels have a 3-band equalizer with semi-parametric mid bands. All bands provide boost or cut of up to15 dB. In the central position, the equalizer is off (flat).
The circuitry of the British EQs is based on the technology used in the best-known top-of-the-line consoles and providing a warm sound without any unwanted side effects. The result are extremely musical equalizers which, unlike simple equalizers, cause no side effects such as phase shifting or bandwidth limitation, even with extreme gain settings of ±15 dB.
All Models
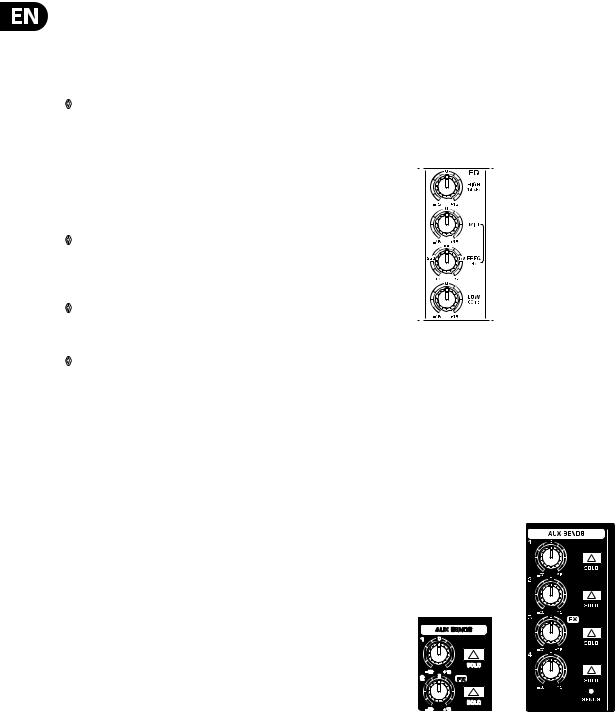
Fig. 2.2: Equalizer of the input channels
The upper (HIGH) and the lower (LOW) bands are shelving filters that increase or decrease all frequencies above or below their cut-off frequency. The cut-off frequencies of the upper and lower bands are 12 kHz and 80 Hz respectively.
For the mid range, the console features a semi-parametric equalizer with a filter quality (Q) of 1 octave, tunable from 100 Hz to 8 kHz. Use the MID control to set the amount of boost or cut, and the FREQ control to determine the central frequency.
2.1.3 Monitor and effects busses (Aux Sends)
X1622USB X2442USB
Fig. 2.3: Aux Send control MON and FX in the channel strips
Monitor and effects busses (AUX sends) source their signals via a control from one or more channels and sum these signals to a so-called bus. This bus signal is sent to an aux send connector (for monitoring applications: MON OUT) and
then routed, for example, to an active monitor speaker or external effects device. In the latter case, the effects return can then be brought back into the console via the aux return connectors.
All monitor and effects busses are mono, are tapped into post EQ and offer amplification of up to +15 dB.
 Loading…
PT
RU
DE
PL
IT
NL
GR
SE
DK
FI
IMPORTANTE: Leia este documento
antes de utilizar o produto. Deseja mais
informação acerca deste produto?
Consulte o verso deste folheto.
ВНИМАНИЕ: Прочитайте этот
документ перед использованием
устройства. Дополнительную
информацию об устройстве вы
найдете на обратной стороне этого
буклета.
WICHTIG: Lesen sie dieses Dokument,
bevor Sie das Produkt verwenden.
Weitere Informationen zu diesem
Produkt finden Sie auf der Rückseite
dieser Broschüre.
WAŻNE: Przeczytaj niniejszy dokument
przed przystąpieniem do użytkowania.
Szczegółowe informacje dotyczące tego
produktu, patrz na odwrocie broszury.
IMPORTANTE: prima di utilizzare
il prodotto, leggere il presente
documento. Desiderate ricevere
maggiori informazioni su questo
prodotto? Vi rimandiamo al retro del
presente libretto.
BELANGRIJK: lees dit document goed
door voordat u het product in gebruik
neemt. Wilt u meer informatie over dit
product? Kijk dan op de achterpagina
van dit boekje.
ΣΗΜΑΝΤΙΚΟ: Διαβάστε αυτό το έντυπο
πριν από τη χρήση του προϊόντος.
Θέλετε περισσότερες πληροφορίες για
αυτό το προϊόν; Ανατρέξτε στην πίσω
πλευρά του φυλλαδίου.
VIKTIGT: Läs den här informationen
innan produkten används. Önskas mer
information om produkten? Se baksidan
på den här broschyren.
VIGTIGT! Læs dette dokument, før
produktet tages i brug. Vil du have flere
oplysninger om produktet? Se bagsiden
af denne folder.
TÄRKEÄÄ: Lue tämä asiakirja ennen
tuotteen käyttöä. Haluatko lisätietoja
tuotteesta? Katso vihon takasivu.
Instruções de
funcionamento/
segurança
Инструкция по
эксплуатации
и технике
безопасности
Bedienungs-/
Sicherheits-
hinweise
Wskazówki
obsługi/
bezpieczeństwa
Istruzioni di
funzionamento /
sicurezza
Bedienings-/
veiligheids-
voorschriften
Οδηγίες
λειτουργίας/
ασφαλείας
Drifts-/säkerhets-
instruktioner
Betjenings-
og sikkerheds-
instruktioner
Käyttö- ja
turvallisuusohjeet
www.behringer.comA50-00000-00976
X1622USB/
X2222USB/
X2442USB
- Manuals
- Brands
- Behringer Manuals
- Music Mixer
- XENYX QX2222USB
Manuals and User Guides for Behringer XENYX QX2222USB. We have 4 Behringer XENYX QX2222USB manuals available for free PDF download: User Manual, Quick Start Manual, Brochure

User Manual
XENYX
QX2442USB
Premium 24-Input 4/2-Bus Mixer with XENYX Mic Preamps & Compressors, KLARK TEKNIK Multi-FX Processor, Wireless Option and USB/Audio Interface
QX2222USB
Premium 22-Input 2/2-Bus Mixer with XENYX Mic Preamps & Compressors, KLARK TEKNIK Multi-FX Processor, Wireless Option and USB/Audio Interface
QX1832USB
Premium 18-Input 3/2-Bus Mixer with XENYX Mic Preamps & Compressors, KLARK TEKNIK Multi-FX Processor, Wireless Option and USB/Audio Interface
QX1622USB
Premium 16-Input 2/2-Bus Mixer with XENYX Mic Preamps & Compressors, KLARK TEKNIK Multi-FX Processor, Wireless Option and USB/Audio Interface

2 XENYX QX2442USB/QX2222USB/QX1832USB/QX1622USB User Manual
|
Table of Contents |
|
|
Thank you……………………………………………………………… |
2 |
|
Important Safety Instructions………………………………… |
3 |
|
Legal Disclaimer…………………………………………………….. |
3 |
|
Limited warranty…………………………………………………… |
3 |
|
1. Introduction………………………………………………………. |
4 |
|
1.1 General mixing console functions…………………………… |
4 |
|
1.2 The user’s manual……………………………………………………… |
5 |
|
1.3 Before you get started………………………………………………. |
5 |
|
2. Control Elements and Connectors ……………………… |
5 |
|
2.1 Mono channels…………………………………………………………… |
5 |
|
2.2 Stereo channels…………………………………………………………. |
7 |
|
2.3 Interface panel and main section…………………………… |
8 |
|
3. Graphic 9-Band Equalizer (QX1832USB only)…….. |
12 |
|
4. Digital Effects Processor…………………………………… |
13 |
|
5. Rear Panel Connectors……………………………………… |
16 |
|
5.1 Main mix outputs, insert points and control |
|
|
room outputs…………………………………………………………………… |
16 |
|
5.2 Subgroup outputs…………………………………………………… |
16 |
|
5.3 Inserts………………………………………………………………………… |
16 |
|
5.4 USB input/output…………………………………………………….. |
16 |
|
5.5 Voltage supply, phantom power supply |
|
|
and fuse……………………………………………………………………………. |
17 |
|
6. Installation………………………………………………………. |
17 |
|
6.1 Cable connections…………………………………………………… |
17 |
|
7. Specifications…………………………………………………… |
19 |
Thank you
Congratulations! In purchasing the BEHRINGER XENYX you have acquired a mixer whose small size belies its incredible versatility and audio performance.
The XENYX Series represents a milestone in the development of mixing console technology. With the new XENYX microphone preamps including phantom power as an option, balanced line inputs and a powerful effects section, the mixing consoles in the XENYX Series are optimally equipped for live and studio applications. Owing to state-of-the-art circuitry, your XENYX console produces
a warm analog sound that is unrivalled. With the addition of the latest digital technology, these best-in-class consoles combine the advantages of both analog and digital technology.
3 XENYX QX2442USB/QX2222USB/QX1832USB/QX1622USB User Manual
Important Safety
Instructions
Terminals marked with this symbol carry electrical current of sufficient magnitude to constitute risk of electric shock.
Use only high-quality professional speaker cables with ¼» TS or twist-locking plugs pre-installed. All other installation or modification should be performed only by qualified personnel.
This symbol, wherever it appears,
alerts you to the presence of uninsulated dangerous voltage inside the
enclosure — voltage that may be sufficient to constitute a risk of shock.
This symbol, wherever it appears, alerts you to important operating and maintenance instructions in the
accompanying literature. Please read the manual.
Caution
To reduce the risk of electric shock, do not remove the top cover (or the rear section).
No user serviceable parts inside. Refer servicing to qualified personnel.
Caution
To reduce the risk of fire or electric shock, do not expose this appliance to rain and moisture. The apparatus shall not be exposed to dripping
or splashing liquids and no objects filled with liquids, such as vases, shall be placed on the apparatus.
Caution
These service instructions are for use by qualified service personnel only.
To reduce the risk of electric shock do not perform any servicing other than that contained in the operation instructions. Repairs have to be performed by qualified service personnel.
9.Do not defeat the safety purpose of the polarized or grounding-type plug. A polarized plug has two blades with one wider than the other. A grounding-type plug has two blades and a third grounding prong. The wide
blade or the third prong are provided for your safety. If the provided plug does not fit into your outlet, consult an electrician for replacement of the obsolete outlet.
10.Protect the power cord from being walked on or pinched particularly at plugs, convenience receptacles, and the point where they exit from the apparatus.
11.Use only attachments/accessories specified by
the manufacturer.
12. Use only with the cart, stand, tripod, bracket,
or table specified by the
manufacturer, or sold with the apparatus. When a cart is used, use caution when
moving the cart/apparatus combination to avoid
injury from tip-over.
13.Unplug this apparatus during lightning storms or when unused for long periods of time.
14.Refer all servicing to qualified service personnel. Servicing is required when the apparatus has been damaged in any way, such as power supply cord or plug is damaged, liquid has been spilled or objects have fallen into the apparatus, the apparatus has been exposed
to rain or moisture, does not operate normally, or has been dropped.
15.The apparatus shall be connected to a MAINS socket outlet with a protective earthing connection.
16.Where the MAINS plug or an appliance coupler is used as the disconnect device, the disconnect device shall remain readily operable.
1.Read these instructions.
2.Keep these instructions.
3.Heed all warnings.
4.Follow all instructions.
5.Do not use this apparatus near water.
6.Clean only with dry cloth.
7.Do not block any ventilation openings. Install in accordance with the manufacturer’s instructions.
8.Do not install near any heat sources such as radiators, heat registers, stoves, or other apparatus (including amplifiers) that produce heat.
LEGAL DISCLAIMER
TECHNICAL SPECIFICATIONS AND APPEARANCES ARE SUBJECT TO CHANGE WITHOUT NOTICE AND ACCURACY IS NOT GUARANTEED. BEHRINGER, KLARK TEKNIK, MIDAS, BUGERA, AND TURBOSOUND
ARE PART OF THE MUSIC GROUP (MUSIC-GROUP.COM). ALL TRADEMARKS ARE THE PROPERTY OF THEIR RESPECTIVE OWNERS. MUSIC GROUP ACCEPTS NO LIABILITY FOR ANY LOSS WHICH MAY BE SUFFERED BY ANY PERSON WHO RELIES EITHER WHOLLY OR
IN PART UPON ANY DESCRIPTION, PHOTOGRAPH OR STATEMENT CONTAINED HEREIN. COLORS AND
SPECIFICATIONS MAY VARY FROM ACTUAL PRODUCT. MUSIC GROUP PRODUCTS ARE SOLD THROUGH AUTHORIZED FULLFILLERS AND RESELLERS ONLY. FULLFILLERS AND RESELLERS ARE NOT AGENTS OF MUSIC GROUP AND HAVE ABSOLUTELY NO AUTHORITY
TO BIND MUSIC GROUP BY ANY EXPRESS OR IMPLIED
UNDERTAKING OR REPRESENTATION. THIS MANUAL IS COPYRIGHTED. NO PART OF THIS MANUAL MAY BE REPRODUCED OR TRANSMITTED IN ANY FORM OR BY ANY MEANS, ELECTRONIC OR MECHANICAL,
INCLUDING PHOTOCOPYING AND RECORDING OF ANY KIND, FOR ANY PURPOSE, WITHOUT THE EXPRESS WRITTEN PERMISSION OF MUSIC GROUP IP LTD.
ALL RIGHTS RESERVED.
© 2013 MUSIC Group IP Ltd.
Trident Chambers, Wickhams Cay, P.O. Box 146, Road Town, Tortola, British Virgin Islands
LIMITED WARRANTY
For the applicable warranty terms and conditions and additional information regarding MUSIC Group’s
Limited Warranty, please see complete details online at www.music-group.com/warranty.

4 XENYX QX2442USB/QX2222USB/QX1832USB/QX1622USB User Manual
1. Introduction
XENYX Mic Preamp
The microphone channels feature high-end XENYX Mic Preamps that compare well with costly outboard preamps in terms of sound quality and dynamics and boast the following features:
◊130 dB dynamic range for an incredible amount of headroom
◊A bandwidth ranging from below 10 Hz to over 200 kHz for crystal-clear reproduction of even the finest nuances
◊The extremely low-noise and distortion-free circuitry guarantees absolutely natural and transparent signal reproduction
◊They are perfectly matched to every conceivable microphone with up to 60 dB gain and +48 volt phantom power supply
◊They enable you to use the greatly extended dynamic range of your 24-bit/192-kHz HD recorder to the full, thereby maintaining optimal audio quality
“British EQ”
The equalizers used for the XENYX Series are based on the legendary circuitry of top-notch consoles made in Britain, which are renowned throughout the world for their incredibly warm and musical sound character. Even with extreme gain settings these equalizers ensure outstanding audio properties.
KLARK TEKNIK Effects Processor
Additionally, your XENYX mixing console has an effects processor designed by KLARK TEKNIK that has 24-bit A/D and D/A converters included, which gives you 32 presets producing first-class reverb, delay and modulation effects plus numerous multi-effects in
excellent audio quality.
The XENYX mixing consoles are equipped with a state-of-the-art
switched-mode power supply (SMPS). Unlike conventional circuitry an SMPS provides an optimum supply current regardless of the input
voltage. And thanks to its considerably higher efficiency a switched-mode power supply uses less energy than conventional power supplies.
FBQ Feedback Detection System
The FBQ Feedback Detection System integrated into the graphic EQ of your QX1832USB is one of this mixer’s most outstanding features.
This ingenious circuitry lets you immediately recognize and eliminate feedback frequencies. The FBQ Feedback Detection System uses the LEDs in the frequency band faders of the graphic EQ to indicate the critical frequencies. This way, what once used to be a labor-intensive search for feedback frequencies is now an activity that even a child could master.
Voice Canceller
We have added another useful feature to the XENYX QX1832USB:
the Voice Canceller.
The Voice Canceller is a filter circuitry that filters out vocal portions from a track. Therefore, this mixing console is ideally suited for use as a karaoke machine. This feature is also an optimal solution for singers who need accompanying music for their rehearsals.
!!CAUTION!
◊We should like to draw your attention to the fact that extreme volumes may damage your hearing and/or your headphones or loudspeakers. Turn the MAIN MIX faders and phones control in the main section
fully down before you switch on the unit. Always be careful to set the appropriate volume.
1.1 General mixing console functions
A mixing console fulfils three main functions:
• Signal processing: Preamplification
Microphones convert sound waves into voltage that has to be amplified several-fold; then, this voltage is turned into sound that is reproduced in a loudspeaker. Because microphone capsules are very delicate in their construction, output voltage is very low and therefore susceptible to
interference. Therefore, mic signal voltage is amplified directly at the mixer input to a higher signal level that is less prone to interference. This higher, interference-safe signal level has to be achieved through amplification using an amplifier of the highest quality in order to amplify the signal and add as little noise to it as possible. The XENYX Mic Preamp performs this role beautifully, leaving no traces of noise or sound coloration. Interference that could take place at the preamplification level could affect signal quality and purity, and would then be passed on to all other devices, resulting in inaccurate sounding program during recording or playback.
Level-setting
Signals fed into the mixer using a DI-box (Direct Injection) or the output of a sound card or a keyboard, often have to be adjusted to the operating level of your mixing console.
Frequency response correction
Using the equalizers found in each channel strip, you can simply, quickly and effectively adjust the way a signal sounds.
Effects mixing
In addition to the effects processor contained in your mixer, using the insert connectors on the mono channels and both aux busses lets you insert additional signal processors into your signal path.
• Signal distribution:
Individual signals adjusted at each channel strip are laid out at the aux sends and returns, and are either fed into external effects processors or fed back to the internal effects processor. Then, the signals are brought back into the main mix either via the aux return connectors or via direct internal wiring. The mix for the on-stage musicians is also created using the aux sends (monitor mix). Similarly, for example, signals for recording equipment, power amplifiers, headphones and 2-track outputs can also be taken.
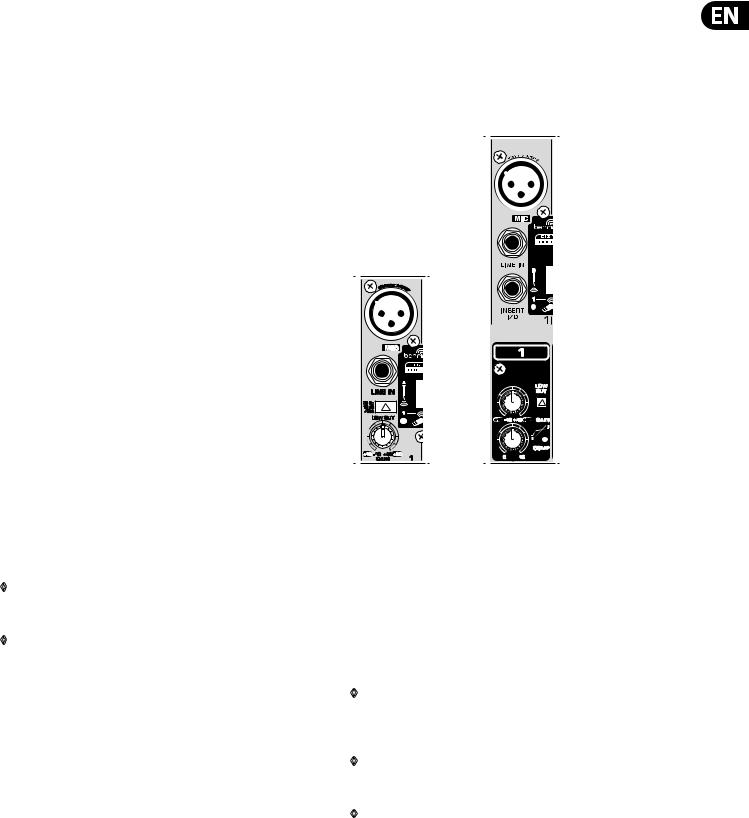
5 XENYX QX2442USB/QX2222USB/QX1832USB/QX1622USB User Manual
• Mix:
Mix:
All other mixing console functions fall under this vital category. Creating a mix means primarily adjusting the volume levels of individual instruments and voices to one another as well as giving them the appropriate weight within the overall frequency spectrum. Likewise, you’ll have to sensibly spread individual voices across the stereo image of a signal. At the end of this process, adjusting the level of the entire mix to other equipment in the signal path is required (e. g. recorder/crossover/amplifier).
The control surface of BEHRINGER mixing consoles is optimized in such a way that these functions become easy to fulfill while the signal path remains simple to follow.
1.2 The user’s manual
The user’s manual is designed to give you both an overview of the controls, as well as detailed information on how to use them. In order to help you understand the links between the controls, we have arranged them in groups according to their function. If you need to know more about specific issues, please visit our website at http://behringer.com. Additional information and
explanations about various music industry/audio technology terminology can be found on individual product pages as well as in the glossary.
1.3 Before you get started
1.3.1 Shipment
Your mixing console was carefully packed in the factory to guarantee safe transport. Nevertheless, we recommend that you carefully examine the packaging and its contents for any signs of physical damage, which may have occurred during transit.
1.3.2 Initial operation
Be sure that there is enough space around the unit for cooling purposes and to avoid over-heating please do not place your mixing console on high-temperature devices such as radiators or power amps. The console is connected to the
mains via the supplied cable. The console meets the required safety standards. Blown fuses must only be replaced by fuses of the same type and rating.
◊Please note that all units must be properly grounded. For your own safety, you should never remove any ground connectors from electrical devices or power cables, or render them inoperative.
◊Please ensure that only qualified people install and operate the mixing console. During installation and operation, the user must have sufficient electrical contact to earth, otherwise electrostatic discharges might affect the operation of the unit.
2. Control Elements and Connectors
This chapter describes the various control elements of your mixing console. All controls, switches and connectors will be discussed in detail.
2.1 Mono channels
2.1.1 Microphone and line inputs
QX2222USB QX2442USB
Fig. 2.1: Connectors and controls of mic/line inputs
MIC
Each mono input channel offers a balanced microphone input via the XLR connector and also features switchable +48 V phantom power supply for condenser microphones. The XENYX preamps provide undistorted and noise-free gain as is typically known only from costly outboard preamps.
LINE IN
Each mono input also has a balanced line input on a ¼» jack. You can also connect unbalanced devices using mono cables to these inputs.
◊Please remember that you can use either the microphone input or the line input of a channel, but not both at the same time!
INSERT
◊Insert points enable the processing of a signal with dynamic processors or equalizers. They are sourced pre-fader, pre-EQ and pre-aux send. Detailed information on using insert points can be found in chapter 5.3.
◊Unlike the QX2442USB, the QX1622USB, QX1832USB and QX2222USB have their insert points located on the rear of the console.
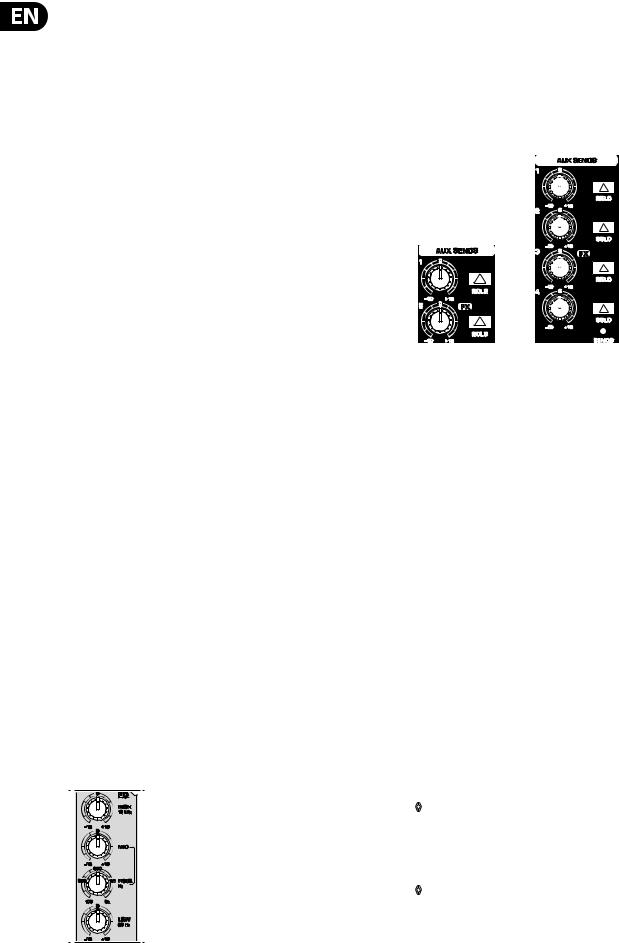
6 XENYX QX2442USB/QX2222USB/QX1832USB/QX1622USB User Manual
WIRELESS INPUT
This connector accepts a USB receiver for use with BEHRINGER ULM wireless microphones. Note that only one source may be used per channel, either the wireless connection, XLR input, or the 1″ input.
GAIN
Use the GAIN control to adjust the input gain. This control should always be turned fully counter-clockwise whenever you connect or disconnect a signal source to one of the inputs.
The scale has 2 different value ranges: the first value range (+10 to +60 dB) refers to the MIC input and shows the amplification for the signals fed in there.
The second value range (-10 to +40 dBu) refers to the line input and shows its sensitivity. The settings for equipment with standard line-level signals (-10 dBV or +4 dBu) look like this: While the GAIN control is turned all the way down, connect your equipment. Set the GAIN control to the external devices’ standard output level. If that unit has an output signal level display, it should show 0 dB during signal peaks. For +4 dBu, turn up GAIN slightly, for -10 dBV a bit more. Fine-tuning of a signal being fed in is done using the level meter.
To route the channel signal to the level meter, you have to press the SOLO switch and set the MODE switch in the main section to PFL (LEVEL SET).
Using the GAIN control, drive the signal to the 0-dB mark. This way you have a vast amount of drive headroom for use with very dynamic signals. The CLIP display should light up only rarely, preferably never. While fine-tuning,
the equalizer should be set to neutral.
LOW CUT
Additionally, the mono channels of the mixing consoles have a high-slope LOW CUT filter for eliminating unwanted, low-frequency signal components (75 Hz, 18 dB/octave).
COMPRESSOR
Each mono channel features a built-in compressor which lowers the dynamic range of the signal and increases its perceived loudness. The loud peaks are squashed down and the quiet sections are boosted.
Turn the COMP knob clockwise to add more compression effect. The adjacent LED with light when the effect is engaged.
2.1.2 Equalizer
All mono input channels have a 3-band equalizer with semi-parametric mid bands. All bands provide boost or cut of up to 15 dB. In the central position, the equalizer is off (flat).
The circuitry of the British EQ is based on the technology used in the best-known top-of-the-line consoles and providing a warm sound without any unwanted side effects. The result are extremely musical equalizers which, unlike simple equalizers, cause no side effects such as phase shifting or bandwidth limitation, even with extreme gain settings of ±15 dB.
All Models
Fig. 2.2: Equalizer of the input channels
The upper (HIGH) and the lower (LOW) bands are shelving filters that increase or decrease all frequencies above or below their cut-off frequency. The cut-off frequencies of the upper and lower bands are 12 kHz and 80 Hz respectively.
For the mid range, the console features a semi-parametric equalizer with a filter quality (Q) of 1 octave, tunable from 100 Hz to 8 kHz. Use the MID control to set the amount of boost or cut, and the FREQ control to determine the central frequency.
2.1.3 Monitor and effects busses (Aux Sends)
QX1622USB QX2442USB
Fig. 2.3: Aux Send control MON and FX in the channel strips
Monitor and effects busses (AUX sends) source their signals via a control from one or more channels and sum these signals to a so-called bus. This bus signal is sent to an aux send connector (for monitoring applications: MON OUT — QX1832USB) and then routed, for example, to an active monitor speaker or external effects device. In the latter case, the effects return can then be brought back into the console via the aux return connectors.
All monitor and effects busses are mono, are tapped into post EQ and offer amplification of up to +15 dB.
Pre-fader/post-fader
When using effects on a channel signal, it is usual to have the aux send post fader so that the balance between effect and dry signal stays constant even when
the channel fader is altered. If this were not the case, the effects signal of the channel would remain audible even when the channel fader is turned all the way down. For monitoring, the aux sends are generally pre-fader, i.e. they operate independently of the position of the channel fader.
PRE
When the PRE switch is pressed down, the associated aux send is taken pre-fader.
FX
The aux send marked FX offers a direct route to the built-in effects processor and is therefore post-fader and post-mute. Please refer to chapter 4 “Digital Effects Processor” for detailed information.
◊If you are using the built-in effects processor, make sure that STEREO AUX RETURN 3 has nothing plugged into it (QX2442USB and QX2222USB), otherwise the internal effects return will be muted. This is not relevant if you use the FX OUT jack to drive an external effects device.
◊QX1622USB and QX1832USB: On these consoles, the above note refers to the STEREO AUX RETURN 2 jacks as these models do not have a dedicated effect output.
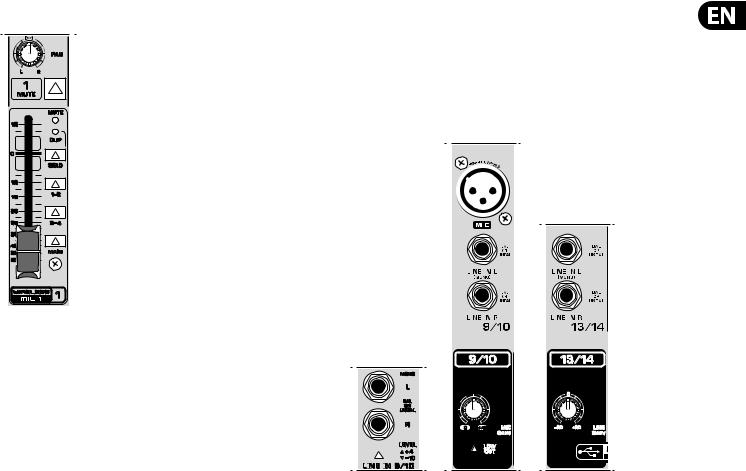
7 XENYX QX2442USB/QX2222USB/QX1832USB/QX1622USB User Manual
|
2.1.4 Routing switch, PAN, SOLO and channel fader |
MAIN |
|
The MAIN switch routes the signal to the main mix bus. |
|
|
The channel fader determines the channel’s volume in the main mix (or submix). |
|
2.2 Stereo channels |
|
|
2.2.1 Channel inputs |
QX2442USB
Fig. 2.4: The panorama and routing controls and the channel fader
PAN
The PAN control determines the position of the channel signal within the stereo image. When working with subgroups, you can use the PAN control to assign the signal to just one output, which gives you additional flexibility in recording situations. For example, when routing to subgroups 3 and 4, panning hard left will route the signal to group output 3 only, and panning hard right will route to group output 4 only.
MUTE
The MUTE switch breaks the signal path pre-channel fader, hence muting that channel in the main mix. The aux sends which are set to post-fader are likewise muted for that channel, while the pre-fader monitor paths remain active irrespective of whether the channel is muted or not.
MUTE LED
The MUTE LED indicates a muted channel.
CLIP-LED
The CLIP-LED lights up when the input signal is driven too high. If this happens, back off the GAIN control and, if necessary, check the setting of the channel EQ.
SOLO
The SOLO switch is used to route the channel signal to the solo bus (Solo In Place) or to the PFL bus (Pre Fader Listen). This enables you to listen to a channel
signal without affecting the main output signal. The signal you hear is taken either before the pan control (PFL, mono) or after the pan and channel fader (Solo, stereo) (cf. chap. 2.3.10 “Level meters and monitoring”).
SUB (1-2 and 3-4)
The SUB switch routes the signal to the corresponding subgroups. The QX2442USB has 4 subgroups (1-2 and 3-4).
|
QX2222USB |
QX2442USB |
QX2442USB |
Fig. 2.5: The various stereo channel inputs
Each stereo channel has two balanced line level inputs on jacks for left and right channels. Channels 9/10 and 11/12 on the QX2442USB feature an additional XLR microphone jack with phantom power. If only the left jack (marked “L”)
is used, the channel operates in mono. The stereo channels are designed to handle typical line level signals, and, depending on model, have a level switch (+4 dBu or -10 dBV) and/or a line GAIN control. Both jack inputs will also accept unbalanced connectors.
LOW CUT and MIC GAIN
These two control elements operate on the XLR connectors of the QX2442USB, and are used to filter out frequencies below 75 Hz (LOW CUT) and to adjust microphone levels (MIC GAIN).
LINE GAIN
Use this control to adjust the line signal levels on channels 13-16 (QX2442USB only).
LEVEL
For level matching, the stereo inputs on the QX1622USB, QX1832USB and QX2222USB have a LEVEL switch to select between +4 dBu and -10 dBV.
At -10 dBV (homerecording level), the input is more sensitive than at +4 dBu (studio level).
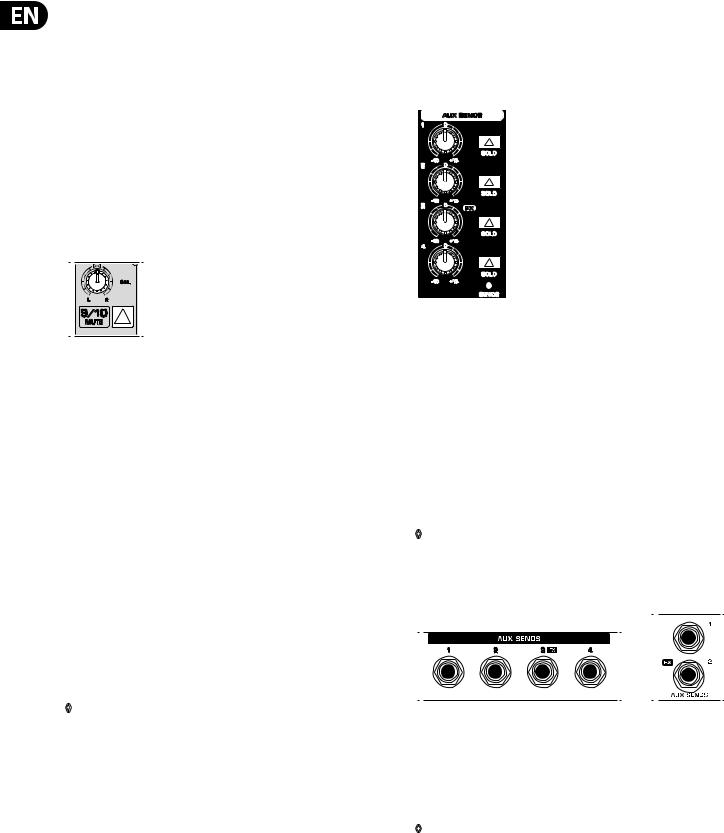
8 XENYX QX2442USB/QX2222USB/QX1832USB/QX1622USB User Manual
2.2.2 Equalizer stereo channels
The stereo channels contain a stereo EQ section. The cut-off frequencies of the high and low bands are 12 kHz and 80 Hz respectively, while the center frequencies of the high-mid and low-mid bands are 3 kHz and 500 Hz
respectively. The HIGH and LOW controls have the same characteristics as the EQ in the mono channels. Both mid range bands are of the peak filter type. A stereo EQ is superior to two mono EQs on a stereo signal as two separate EQs will usually result in a discrepancy between left and right channels.
2.2.3 Aux sends stereo channels
In principle, the aux sends of the stereo channels function the same way as those of the mono channels. As the aux sends are mono, the send from a stereo channel is first summed to mono before it reaches the aux bus.
2.2.4 Routing switch, solo and channel fader
Fig. 2.6: Balance control and mute switch
BAL
The BAL(ANCE) control has a similar function to the PAN control in the mono channels.
The balance control determines the levels of the left and right input signals relative to each other before both signals are routed to the left/right main mix bus (or odd/even subgroup).
The remaining control elements in the stereo channels perform the same functions as their counterparts in the mono channels (MUTE switch, MUTE and CLIP LEDs, SOLO switch, SUB and MAIN switches and channel fader).
2.3 Interface panel and main section
Where it was useful to trace the signal flow from top to bottom in order to gain an understanding of the channel strips, we now look at the mixing console from left to right. The signals are, so to speak, collected from the same point on each of the channel strips and then routed to the main section all together.
2.3.1 MON control, aux sends 1, 2 and 3 (FX)
Turning up the AUX 1 control in a channel routes the signal to the aux send bus 1.
◊As the QX1832USB is equipped with an additional monitor path, its first aux control in the channel strips is named MON. The console also has a dedicated master fader (MON SEND) for this aux path.
AUX SEND 1, 2 and 4
The AUX SEND 1 control governs the master send level of the mix created by the individual channel AUX 1 sends.
Likewise, the AUX SEND 2 control is the master control for the aux 2 bus, and AUX SEND 4 controls the AUX 4 bus.
QX2442USB
Fig. 2.7: The AUX SEND controls of the main section
AUX SEND 3 (FX)
The FX control determines the signal level for effects processing, i.e. regulates the level to an external (or the internal) effects device.
QX1622USB and QX1832USB: On these consoles, this function is performed by the AUX SEND 2 control (FX).
SOLO
You can use the SOLO switch to separately monitor the aux sends via the CONTROL ROOM/PHONES outputs and check these with the level meters.
◊If you want to monitor the signal of just one AUX bus, none of the other SOLO SWITCHES should be pressed and the MODE switch should be in the SOLO position (not depressed).
2.3.2 Aux send jacks
Fig. 2.8: Aux send jacks
AUX SEND jacks
The AUX SEND jack should be used when hooking up a monitor power amp or active monitor speaker system. The relevant aux path should be set pre-fader.
◊On the QX2222USB, aux send 1 is hard wired as pre-fader and hence called MON. Model QX1832USB has a dedicated monitor output (MON OUT jack), cf. chapter 2.3.4.
As already mentioned, the aux sends in the channels— if set post-fader— can be used to connect to external effects devices.
Loading…
На этой странице вы можете совершенно бесплатно скачать Инструкция по эксплуатации Behringer Xenyx QX2222USB.
У документа PDF Инструкция по эксплуатации 26 страниц, а его размер составляет 6.29 Mb.
Читать онлайн Аудио Behringer Xenyx QX2222USB Инструкция по эксплуатации

Скачать файл PDF «Behringer Xenyx QX2222USB Инструкция по эксплуатации» (6.29 Mb)
Популярность:
7563 просмотры
Подсчет страниц:
26 страницы
Тип файла:
Размер файла:
6.29 Mb


