
Скачать
ENGLISH
DEU
TSCH
FRANCAIS
ESPAÑOL
ITALIANO
AXIS 213 PTZ Network Camera
Installation Guide
AXIS 213 PTZ Network Camera
User’s Manual
About This Document
This manual is intended for administrators and users of the AXIS 213 PTZ Network Camera, and is applicable for software release 4.30. Previous experience of networking will be of use when installing and using this product. Some knowledge of UNIX or Linux-based systems would also be beneficial, for developing shell scripts and applications. Later versions of this document will be posted to the Axis Website, as required.
Safety Notices Used In This Manual
Caution! — Indicates a potential hazard that can damage the product.
Important! — Indicates a hazard that can seriously impair operation.
Do not proceed beyond any of the above notices until you have fully understood the implications.
Intellectual Property Rights
Axis AB has intellectual property rights relating to technology embodied in the product described in this document. In particular, and without limitation, these intellectual property rights may include one or more of the patents listed at http://www.axis.com/patent.htm and one or more additional patents or pending patent applications in the US and other countries.
This product contains licensed third-party software. See the menu item “About” in the product’s user interface for more information.
This product contains source code copyright Apple Computer, Inc., under the terms of Apple Public Source License 2.0 (see http://www.opensource.apple.com/apsl/). The source code is available from: http://developer.apple.com/darwin/projects/bonjour/
Legal Considerations
Camera surveillance can be prohibited by laws that vary from country to country. Check the laws in your local region before using this product for surveillance purposes.
Electromagnetic Compatibility (EMC)
USA — This equipment generates, uses, and can radiate radio frequency energy and if not installed and used in accordance with the instruction manual, may cause interference to radio communications. It has been tested and found to comply with the limits for a Class B computing device pursuant to Subpart B of Part 15 of FCC rules, which are designed to provide reasonable protection against such interference when operated in a commercial environment. Operation of this equipment in a residential area is likely to cause interference, in which case the user at his/her own expense will be required to take whatever measures may be required to correct the interference. Shielded cables should be used with this unit to ensure
compliance with the Class B limits.
Canada — This Class B digital apparatus complies with Canadian ICES-003.
Europe  — This digital equipment fulfills the requirements for radiated emission according to limit B of EN55022:1998, and the requirements for immunity according to EN55024:1998 residential, commercial, and light industry.
|
Japan — This is a class B product based on the standard of |
2 |
|
the Voluntary Control Council for Interference from |
Information Technology Equipment (VCCI). If this is used near a radio or television receiver in a domestic environment, it may cause radio interference. Install and
use the equipment according to the instruction manual. Australia — This electronic device meets the requirements
of the Radio communications (Electromagnetic Compatibility) Standard 1998 AS/NZS 3548.
Liability
Every care has been taken in the preparation of this manual; Please inform your local Axis office of any inaccuracies or omissions. Axis Communications AB cannot be held responsible for any technical or typographical errors and reserves the right to make changes to the product and manuals without prior notice. Axis Communications AB makes no warranty of any kind with regard to the material contained within this document, including, but not limited to, the implied warranties of merchantability and fitness for a particular purpose. Axis Communications AB shall not be liable nor responsible for incidental or consequential damages in connection with the furnishing, performance or use of this material.
Trademark Acknowledgments
Ethernet, Internet Explorer, Linux, Macintosh, Microsoft, Mozilla, Netscape Navigator, UNIX, Windows, WWW are registered trademarks of the respective holders. Java and all Java-based trademarks and logos are trademarks or registered trademarks of Sun Microsystems, Inc. in the United States and other countries. UPnP is a certification mark of the UPnPTM Implementers Corporation. Axis Communications AB is independent of Sun Microsystems Inc.
Axis Customer Services
Should you require any technical assistance, please contact your Axis reseller. If your questions cannot be answered immediately, your reseller will forward your queries through the appropriate channels to ensure a rapid response. If you are connected to the Internet, you can:
•download user documentation and firmware updates
•find answers to resolved problems in the FAQ database. Search by product, category, or phrases
•report problems to Axis support staff by logging in to your private support area
•visit the Axis Support Web at www.axis.com/techsup/
Safety Notice — Battery Replacement
The AXIS 213 uses a 3.0V CR2032 Lithium battery as the power supply for its internal real-time clock (RTC). This battery will, under normal conditions, last for a minimum of 5 years. Low battery power affects the operation of the RTC, causing it to reset at every power-up. A log message will appear when battery replacement is required. The battery should not be replaced unless required! If the battery does need replacing, please observe the following points:
•Caution! Danger of Explosion if battery is incorrectly replaced
•Replace only with the same or equivalent battery, as recommended by the manufacturer.
•Dispose of used batteries according to the manufacturer’s instructions.

AXIS 213 3
Table of contents
Product Description . . . . . . . . . . . . . . . . . . . . . . . . . . . . . . . . . . . . . . . . . . . . . . . . . . . . . . . . . 5 Hardware Inventory . . . . . . . . . . . . . . . . . . . . . . . . . . . . . . . . . . . . . . . . . . . . . . 5 AXIS 213 PTZ Network Camera . . . . . . . . . . . . . . . . . . . . . . . . . . . . . . . . . . . . 6
Accessing the camera . . . . . . . . . . . . . . . . . . . . . . . . . . . . . . . . . . . . . . . . . . . . . . . . . . . . . . . 8 Accessing from a browser . . . . . . . . . . . . . . . . . . . . . . . . . . . . . . . . . . . . . . . . . 8 Setting the Password. . . . . . . . . . . . . . . . . . . . . . . . . . . . . . . . . . . . . . . . . . . . . 9 Accessing the camera from the Internet . . . . . . . . . . . . . . . . . . . . . . . . . . . . . 9 The Live View page . . . . . . . . . . . . . . . . . . . . . . . . . . . . . . . . . . . . . . . . . . . . . 10
Video and Audio Streams. . . . . . . . . . . . . . . . . . . . . . . . . . . . . . . . . . . . . . . . . . . . . . . . . . . . 13 Video Stream Types . . . . . . . . . . . . . . . . . . . . . . . . . . . . . . . . . . . . . . . . . . . . . 13 MPEG-4 protocols and communication methods . . . . . . . . . . . . . . . . . . . . . 14 How to stream MPEG-4. . . . . . . . . . . . . . . . . . . . . . . . . . . . . . . . . . . . . . . . . . 14 AXIS Media Control . . . . . . . . . . . . . . . . . . . . . . . . . . . . . . . . . . . . . . . . . . . . . 15 Other methods of accessing the video stream . . . . . . . . . . . . . . . . . . . . . . . 16
Setup . . . . . . . . . . . . . . . . . . . . . . . . . . . . . . . . . . . . . . . . . . . . . . . . . . . . . . . . . . . . . . . . . . . . 18 Accessing the setup tools from a browser . . . . . . . . . . . . . . . . . . . . . . . . . . . 18 Event Configuration . . . . . . . . . . . . . . . . . . . . . . . . . . . . . . . . . . . . . . . . . . . . . . . . . . . . . . . . 34 Event Servers . . . . . . . . . . . . . . . . . . . . . . . . . . . . . . . . . . . . . . . . . . . . . . . . . . 34 Event Types . . . . . . . . . . . . . . . . . . . . . . . . . . . . . . . . . . . . . . . . . . . . . . . . . . . 35 Motion Detection. . . . . . . . . . . . . . . . . . . . . . . . . . . . . . . . . . . . . . . . . . . . . . . 37
To only detect flashing light, low sensitivity can be selected. In other cases, a high sensitivity level is recommended.38
Port Status . . . . . . . . . . . . . . . . . . . . . . . . . . . . . . . . . . . . . . . . . . . . . . . . . . . . 38 System Options. . . . . . . . . . . . . . . . . . . . . . . . . . . . . . . . . . . . . . . . . . . . . . . . . . . . . . . . . . . . 39 Security. . . . . . . . . . . . . . . . . . . . . . . . . . . . . . . . . . . . . . . . . . . . . . . . . . . . . . . 39 Date & Time . . . . . . . . . . . . . . . . . . . . . . . . . . . . . . . . . . . . . . . . . . . . . . . . . . . 40 Network . . . . . . . . . . . . . . . . . . . . . . . . . . . . . . . . . . . . . . . . . . . . . . . . . . . . . . 40 Network — SOCKS . . . . . . . . . . . . . . . . . . . . . . . . . . . . . . . . . . . . . . . . . . . . . . . 43 Network — SMTP (email) . . . . . . . . . . . . . . . . . . . . . . . . . . . . . . . . . . . . . . . . . 43

4 AXIS 213
|
Network — UPnP . . . . . . . . . . . . . . . . . . . . . . . . . . . . . . . . . . . . . . . . . . . . . . . . |
44 |
|
RTP/MPEG-4 . . . . . . . . . . . . . . . . . . . . . . . . . . . . . . . . . . . . . . . . . . . . . . . . . . . |
44 |
|
Ports & Devices — I/O Ports . . . . . . . . . . . . . . . . . . . . . . . . . . . . . . . . . . . . . . . |
44 |
|
LED Settings . . . . . . . . . . . . . . . . . . . . . . . . . . . . . . . . . . . . . . . . . . . . . . . . . . . |
45 |
|
Maintenance. . . . . . . . . . . . . . . . . . . . . . . . . . . . . . . . . . . . . . . . . . . . . . . . . . . |
45 |
|
Support . . . . . . . . . . . . . . . . . . . . . . . . . . . . . . . . . . . . . . . . . . . . . . . . . . . . . . |
46 |
|
Advanced . . . . . . . . . . . . . . . . . . . . . . . . . . . . . . . . . . . . . . . . . . . . . . . . . . . . . |
46 |
|
Resetting to Factory Default Settings . . . . . . . . . . . . . . . . . . . . . . . . . . . . . . |
47 |
|
Connection Module . . . . . . . . . . . . . . . . . . . . . . . . . . . . . . . . . . . . . . . . . . . . . . . . . . . . . . . . |
48 |
|
Installing the audio equipment. . . . . . . . . . . . . . . . . . . . . . . . . . . . . . . . . . . . |
48 |
|
I/O inputs and outputs. . . . . . . . . . . . . . . . . . . . . . . . . . . . . . . . . . . . . . . . . . . |
48 |
|
Video Out . . . . . . . . . . . . . . . . . . . . . . . . . . . . . . . . . . . . . . . . . . . . . . . . . . . . . |
48 |
|
Schematic Diagram — Connection Module . . . . . . . . . . . . . . . . . . . . . . . . . . |
49 |
|
Troubleshooting . . . . . . . . . . . . . . . . . . . . . . . . . . . . . . . . . . . . . . . . . . . . . . . . . . . . . . . . . . . |
50 |
|
Checking the Firmware . . . . . . . . . . . . . . . . . . . . . . . . . . . . . . . . . . . . . . . . . . |
50 |
|
Updating the Firmware . . . . . . . . . . . . . . . . . . . . . . . . . . . . . . . . . . . . . . . . . . |
50 |
|
Support . . . . . . . . . . . . . . . . . . . . . . . . . . . . . . . . . . . . . . . . . . . . . . . . . . . . . . |
51 |
|
Technical Specifications. . . . . . . . . . . . . . . . . . . . . . . . . . . . . . . . . . . . . . . . . . . . . . . . . . . . . |
55 |
|
General performance considerations . . . . . . . . . . . . . . . . . . . . . . . . . . . . . . . |
58 |
|
Optimizing your system . . . . . . . . . . . . . . . . . . . . . . . . . . . . . . . . . . . . . . . . . . |
58 |
|
Frame rates — Motion JPEG . . . . . . . . . . . . . . . . . . . . . . . . . . . . . . . . . . . . . . . |
59 |
|
Frame rates — MPEG-4 . . . . . . . . . . . . . . . . . . . . . . . . . . . . . . . . . . . . . . . . . . . |
59 |
|
Bandwidth. . . . . . . . . . . . . . . . . . . . . . . . . . . . . . . . . . . . . . . . . . . . . . . . . . . . . |
60 |
|
Glossary of Terms . . . . . . . . . . . . . . . . . . . . . . . . . . . . . . . . . . . . . . . . . . . . . . . . . . . . . . . . . . |
61 |
|
Index . . . . . . . . . . . . . . . . . . . . . . . . . . . . . . . . . . . . . . . . . . . . . . . . . . . . . . . . . . . . . . . . . . . . |
63 |

AXIS 213 — Product Description 5
Product Description
The AXIS 213 is a full-featured PTZ Network Camera for security surveillance and remote monitoring. The images from the camera are made available on the network as real-time, full frame rate Motion JPEG streams and/or MPEG-4 video streams. The AXIS 213 also has an infrared (IR) lamp and a removable IR filter for day and night operation.
The AXIS 213 can optionally be equipped with a connection module with 2 inputs and 3 outputs, which can be connected to external devices, e.g. door sensors. The connection module has an audio in and an audio out port, to support two-way audio.
Video can be viewed in 5 resolutions (up to 768×576). Up to 20 viewers can access the AXIS 213 simultaneously when using Motion JPEG and MPEG-4 unicast. The number of simultaneous viewers can be increased by using multicast MPEG-4.
The AXIS 213 contains advanced scheduling tools that can be used to trigger an event. As the AXIS 213 is designed for use in security systems, it is equipped with security features such as IP address filtering and multilevel passwords. The AXIS 213 has a built-in Web server, providing full access to all features through the use of a standard Web browser.
Hardware Inventory
Check the items supplied with your AXIS 213 against the following list:
|
Item |
Title/Variants |
|||
|
PTZ Network Camera |
AXIS 213 |
|||
|
Indoor power adapter with |
Europe |
|||
|
power cable |
||||
|
UK |
The power adapter is country |
|||
|
specific. |
||||
|
Australia |
||||
|
USA/Japan |
||||
|
Korea |
||||
|
Printed documentation |
AXIS 213 Installation Guide |
|||
|
Warranty document |
||||
|
CD |
Contains complimentary software and docu- |
|||
|
mentation. |
||||
|
Optional Accessories |
Connection Module (Audio) |
|||

6 AXIS 213 — Product Description
AXIS 213 PTZ Network Camera
1 IR Light — infrared light for night vision. Activated from the AXIS 213 web page.
|
2 Network Indicator — the |
1 |
multi-colored network indicator flashes as follows:
•Amber — flashes for activity on a 10 Mbit/s network
•Green — flashes for activity on a 100
|
Mbit/s network |
||
|
• Red — flashes red for hardware error |
2 |
|
|
• None — no connection or disabled by the |
||
|
administrator |
3Network Connector — The AXIS 213 connects to the network via a standard RJ-45 connector. The AXIS 213 detects the speed of the local network segment (10BaseT/100BaseTX Ethernet).
4Output/Input Connector — For connection of the connection module cable. See below for information.
5Power Connector — For connection of the power adapter (included).
The Reset Button is located on the underside of the unit. This button is used to restore the factory default settings, as described in Resetting to Factory Default Settings, on page 47 or to install the AXIS 213, see the Installation Guide for more information.
The Serial Number is located on the label on the underside of the unit.

AXIS 213 — Product Description 7
Optional Accessory:
Connection Module — The connection module provides the physical interface to 3 relay outputs, 2 digital inputs, audio in/out, video in/out and the RS-232C serial port. See Connection Module, on page 48 for more information.
RS 232C 3 Relay Outputs
2 Digital Inputs
|
Connector to |
|
|
Audio In/Out |
AXIS 213 |
|
Video In/Out |
Note: For information on installing the AXIS 213, please refer to the Installation Guide.
8 AXIS 213 — Accessing the camera
Accessing the camera
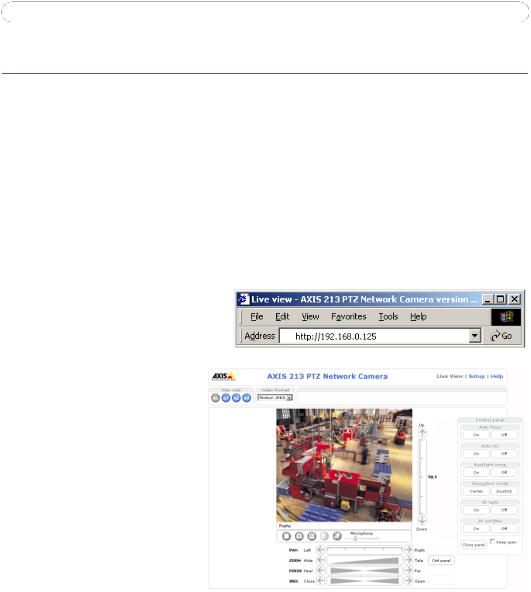
The AXIS 213 can be used with most standard operating systems and supports Microsoft Internet Explorer 5.x or later, Netscape 7.x or later and Mozilla 1.4 or later.
Note: To view streaming video in Microsoft Internet Explorer, you must set your browser to allow the AXIS Media Control (AMC) to be installed on your computer. The first time an MPEG-4 video stream is accessed, AMC also installs an MPEG-4 decoder for viewing the video stream. As a license is required for each instance of the decoder, the product administrator may have disabled the installation. If your workstation restricts the use of additional software components, the camera can be configured to use a Java applet for updating JPEG images. See the online help for more information.
Accessing from a browser
1.Start a browser (Internet Explorer, Mozilla, Netscape Navigator).
2.Enter the IP address or host name of the AXIS 213 in the Location/ Address field of your browser.
3.Enter the user name and password set by the administrator.
4.A video image is displayed in your
browser.
Notes:
•User functions in the AXIS 213 may have been customized to meet the specific requirements of the application. Consequently, many of the examples and functions in this section may differ from those displayed in your Live View page.
•If the AXIS 213 is to be placed upright on a desktop, the image must be rotated. Go to Setup > Video & Image and set Rotate image to 180 degrees.
AXIS 213 — Accessing the camera 9
Setting the Password
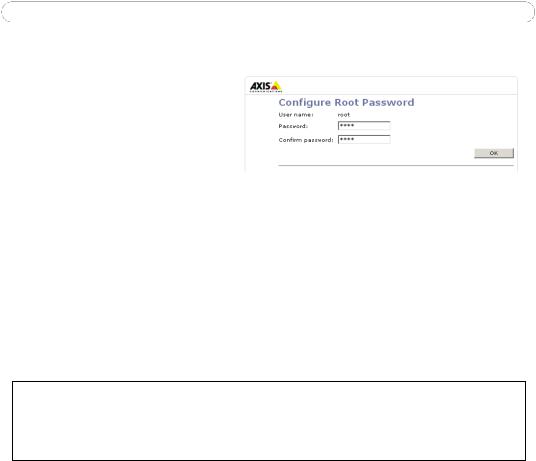
1.When accessing the camera for the first time, the ‘Configure Root Password’ dialog will be displayed on the screen.
2.Enter a password and then re-enter it, to confirm the spelling. Click OK.
3.The ‘Enter Network Password’ dialog will appear. Enter the User name: root Note: The default administrator user name root is permanent and cannot be deleted or altered.
4.Enter the password as set in step 2 above, and click OK. If the password is lost, the camera must be reset to the factory default settings. See page 47.
5.If required, click Yes to install the AXIS Media Control (AMC). You will need administrator rights on the computer to do this.
Accessing the camera from the Internet
Once installed, the camera is accessible on your local network (LAN). To access the camera from the Internet you must configure your router/firewall to allow incoming data traffic. For security reasons this is usually done on a specific port. Please refer to the documentation for your router/firewall for further instructions.
For more information, please visit the AXIS Internet Dynamic DNS Service at www.axiscam.net or, for Technical notes on this and other topics, visit the Axis Support Web at www.axis.com/techsup
10 AXIS 213 — Accessing the camera
The Live View page
The following provides an overview of each button on the Live View page. If the AXIS 213 has been customized, the buttons will be displayed accordingly:
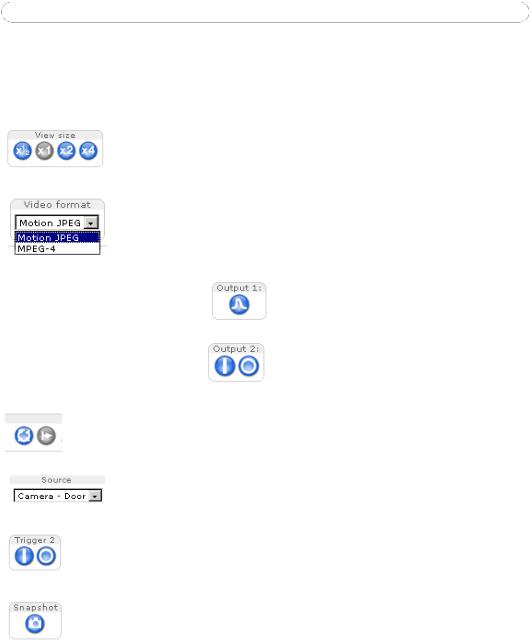
To resize the displayed image, click the View Size buttons: half-size (x1/2), full-size (x1), x2 or x4. This will not change the resolution of the image (not available in Sequence Mode).
The Video Format drop-down list allows the video format on the Live View page to be temporarily changed.
The 2 types of Output button each control the output directly from the Live View page. These are configured under Setup > Live View Config > Layout.
Pulse — click this button to activate the output for a defined period of time, e.g. to switch on a light for 20 seconds.
Active/Inactive — click these buttons to manually start and stop a connected device, e.g. switch a light on/off.
These buttons start/stop the Sequence Mode which automatically displays the view from preset positions at set intervals. Sequence mode is configured in Setup > PTZ Configuration > Sequence Mode.
The source list is used to select the preset positions already configured in the camera. These are created in Setup > PTZ Configuration > Preset Positions.
The Manual trigger buttons trigger an action directly from the Live View page. These buttons are configured under Setup > Live View Config > Layout. Click these buttons to manually start and stop events.
Use the Snapshot button to capture a snapshot of the image currently being displayed in the window. Right-click on the image to save it in JPEG format on your computer.
AXIS 213 — Accessing the camera 11
The AMC viewer toolbar is available in Microsoft Internet Explorer only. See AXIS Media Control (AMC), on page 9 for more information. The AMC viewer toolbar displays the following buttons:
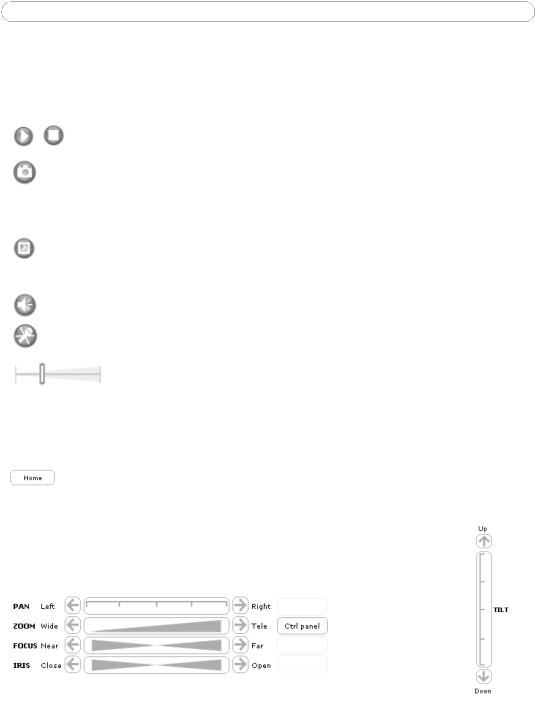
The Play/Stop buttons start and stop the live video stream.
The Snapshot button takes a snapshot of the currently displayed image. The Snapshot function and the target directory for saving snapshots can be configured from AMC (AXIS Media Control), which is available from the Windows Control Panel (Internet Explorer only).
Click the View Full Screen button and the video image will fill the entire screen area. No other windows will be visible. Press Esc (Escape) on the computer keyboard to cancel full screen view.
Click the Mute /Microphone buttons to switch the sound off and on. Only available if Audio is enabled and the Connection Module with a loudspeaker/microphone is connected.
Use the sliders to control the volume on the speaker and microphone. The volume can be set between 0 and 100.
The Live View page also displays the Pan/Tilt/Zoom controls.
The controls can be disabled/enabled for specified users by the administrator under
System Options > Security > Users > User List
If configured, clicking this box will move the AXIS 213 to a preset position called “Home”. See Preset Positions, on page 32 for more information.
The manual Pan Tilt and Zoom bars control their respective functions in two different ways. Clicking anywhere on the bar’s gradient allows for a ‘smooth’ adjustment of the camera’s position, whilst clicking on the arrows at the two ends of the bar cause a stepped, incremental change.
Note: Setting the iris and focus manually will disable Auto iris/Auto focus.
12 AXIS 213 — Accessing the camera
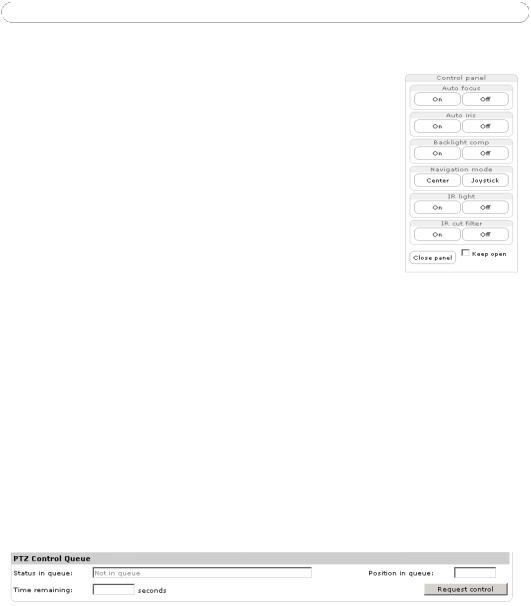
Control Panel
Click the Ctrl panel button to display the control panel where the following settings are available:
•Auto focus — the AXIS 213 can be set to automatically adjust the image focus.
•Auto iris — the iris can automatically adjust the amount of light reaching the camera and give the best results, as well as protecting the image sensor from strong light.
•Backlight compensation makes the subject appear clearer against e.g. a bright background.
•Navigation mode:
Select Center and the camera view will center on the position that was clicked.
Select Joystick and the camera will move in the direction indicated by a mouse click, relative to the center of the image. The further from the center the image is clicked, the greater the movement.
•IR light — use the IR light on the front of the camera to enable night vision.
•IR cut filter — when set to off, the camera will be able to ‘see’ the infrared light, e.g. at night, thus making the image clearer. The image is shown in black & white when the IR cut filter is off.
Pan/Tilt/Zoom Control Queue
Only one user can use the Pan/Tilt/Zoom controls at any time. So when multiple clients access the AXIS 213’s Live View page, it is necessary to queue the users and restrict the length of time they are in control of the Pan/Tilt/Zoom controls. Use the buttons to request or release control of the Pan/Tilt/Zoom controls.
The Pan/Tilt/Zoom Control Queue is set up by the administrator under
PTZ Configuration > Control Queue.

AXIS 213 — Video and Audio Streams 13
Video and Audio Streams
The AXIS 213 provides several different image and video formats. The type to use depends on your requirements and on the properties of your network.
The Live View page in the AXIS 213 provides access to Motion JPEG and MPEG-4 video streams, as well as to single JPEG images. Other applications and clients can also access these video and audio streams/images directly, without going via the Live View page.
Video Stream Types
Motion JPEG
This format uses standard JPEG still images in the video stream. These images are then displayed and updated at a rate sufficient to create a stream that shows constantly updated motion.
The Motion JPEG stream uses considerable amounts of bandwidth, but also provides excellent image quality and access to each and every individual image contained in the stream.
Note also that multiple clients accessing Motion JPEG streams can use different image settings.
MPEG-4
This is a video compression standard that makes good use of bandwidth, and which can provide high-quality video streams at less than 1 Mbit/s.
The MPEG-4 standard provides scope for a large range of different coding tools for use by various applications in different situations, and the AXIS 213 provides certain subsets of these tools. These are represented as Video object types, which are selected for use with different viewing clients. The supported video object types are:
•Simple — sets the coding type to H.263, as used by e.g. QuickTime™.
•Advanced Simple — sets the coding type to MPEG-4 Part 2, as used by AMC (AXIS Media Control)
When using MPEG-4 it is also possible to control the bit rate, which in turn allows the amount of bandwidth usage to be controlled. CBR (constant bit rate) is used to achieve a specific bit rate by varying the quality of the MPEG-4 stream. When using VBR (variable bit rate), the quality of the video stream is kept as constant as possible, at the cost of a varying bit rate.

14 AXIS 213 — Video and Audio Streams
Notes: •MPEG-4 is licensed technology. The AXIS 213 includes one viewing client license. Installing additional unlicensed copies of the viewing client is prohibited. To purchase additional licenses, contact your Axis reseller.
•All clients viewing the MPEG-4 stream must use the same image settings.
MPEG-4 protocols and communication methods
To deliver live streaming video over IP networks, various combinations of transport protocols and broadcast methods are employed.
•RTP (Realtime Transport Protocol) is a protocol that allows programs to manage the real-time transmission of multimedia data, via unicast or multicast.
•RTSP (Real Time Streaming Protocol) serves as a control protocol, to negotiate which transport protocol to use for the stream. RTSP is thus used by a viewing client to start a unicast session, see below.
•UDP (User Datagram Protocol) is a communications protocol that offers limited service for exchanging data in a network that uses the Internet Protocol (IP). UDP is an alternative to the Transmission Control Protocol (TCP). The advantage of UDP is that it is not required to deliver all data and may drop network packets when there is e.g. network congestion. This is suitable for live video, as there is no point in re-transmitting old information that will not be displayed anyway.
•Unicasting is communication between a single sender and a single receiver over a network. This means that the video stream goes independently to each user, and each user gets their own stream. A benefit of unicasting is that if one stream fails, it only affects one user.
•Multicast is bandwidth-conserving technology that reduces bandwidth usage by simultaneously delivering a single stream of information to multiple network users. This technology is used primarily on delimited networks (intranets), as each user needs an uninterrupted data flow and should not rely on network routers.
How to stream MPEG-4
Deciding on the combination of protocols and methods to use depends on your viewing requirements, and on the properties of your network. Setting the preferred method(s) is done in the control applet for AMC, which is found in the Windows Control Panel. When this has been set, AMC will test all the selected methods in the specified order, until the first functioning one is found.

AXIS 213 — Video and Audio Streams 15
RTP+RTSP
This method (actually RTP over UDP and RTSP over TCP) should be your first consideration for live video, especially when it is important to always have an up-to-date video stream, even if some images do get dropped. This can be configured as multicast or unicast.
Multicasting provides the most efficient usage of bandwidth, especially when there are large numbers of clients viewing simultaneously. Note however, that a multicast broadcast cannot pass a network router unless the router is configured to allow this. It is thus not possible to multicast over e.g. the Internet.
Unicasting should be used for video-on-demand broadcasting, so that there is no video traffic on the network until a client connects and requests the stream. However, as more and more unicast clients connect, the traffic on the network will increase and may cause congestion. Although there is a maximum of 20 unicast viewers, note that all multicast users combined count as 1 unicast viewer.
RTP/RTSP
This unicast method is RTP tunneled over RTSP. This can be used to exploit the fact that it is relatively simple to configure firewalls to allow RTSP traffic.
RTP/RTSP/HTTP or RTP/RTSP/HTTPS
These two methods can also be used to traverse firewalls. Firewalls are commonly configured to allow the HTTP protocol, thus allowing RTP to be tunneled.
AXIS Media Control
The recommended method of accessing live video (MPEG-4 and/or Motion JPEG) and audio from the AXIS 213 is to use the AXIS Media Control (AMC) in Microsoft Internet Explorer in Windows. This ActiveX component is automatically installed on first use, after which it can be configured by opening the AMC Control Panel applet from the Windows Control Panel. Alternatively, right-click the video image in Internet Explorer.

16 AXIS 213 — Video and Audio Streams
Other methods of accessing the video stream
Video/images from the AXIS 213 can also be accessed in the following ways:
•If supported by the client, the AXIS 213 can use Motion JPEG server push to display video. This option maintains an open HTTP connection to the browser and sends data as and when required, for as long as required.
•As single JPEG images in a browser. Enter e.g. the path: http://<ip>/axis-cgi/jpg/image.cgi?resolution=CIF
•Windows Media Player. This requires AMC and the MPEG-4 decoder to be installed. The paths that can be used are listed below, in the order of preference.
•Unicast via RTP: axrtpu://<ip>/mpeg4/media.amp
•Unicast via RTSP: axrtsp://<ip>/mpeg4/media.amp
•Unicast via RTSP, tunneled via HTTP: axrtsphttp://<ip>/mpeg4/media.amp
•Unicast via RTSP, tunneled via HTTPS: axrtsphttps://<ip>/mpeg4/media.amp
•Multicast: axrtpm://<ip>/mpeg4/media.amp
Note: <ip> = IP address.
Other MPEG-4 clients
Although it may be possible to use other clients to view the MPEG-4 stream, this is not guaranteed by Axis.
For some other clients, e.g. QuickTime™ the Video Object Type must be set to Simple. It may also be necessary to adjust the advanced MPEG-4 settings.
To assess the video stream from e.g. QuickTime™ the following path can be used:
rtsp://<ip>/mpeg4/media.amp
This path is for all supported methods, and the client will negotiate with the AXIS 213 to determine exactly which transport protocol to use.
Note: <ip> = IP address.
Audio transmission methods
The audio stream can be accessed in the Live View page when viewing either Motion JPEG or MPEG.

AXIS 213 — Video and Audio Streams 17
Using Motion JPEG
The basic transmission method of audio used in conjunction with Motion JPEG video streaming is transmission over HTTP. The video and audio streams are not synchronized when using Motion JPEG so the streams may be slightly out of sync. The latency in any stream should be low, but this will depend on the network infrastructure.
Using MPEG-4
When using MPEG-4, audio is streamed using the same protocol as the video stream.
When audio is transmitted using MPEG-4, the Axis product sends synchronization information along with the streams to the client that is performing the synchronization.
Audio is streamed from the client to the server over HTTP when using Motion JPEG and MPEG-4.
Accessing the Audio Streams
In addition to accessing audio in the Live View page using AMC, audio from the Video Server can also be accessed in the following ways:
HTTP-API
You can read about accessing audio for the other protocols through the HTTP-API at http://www.axis.com/techsup
QuickTime/Windows Media Player
It is possible to use QuickTime and Windows Media Player to listen to the audio stream using the same methods to access video streams.

18 AXIS 213 — Setup
Setup
The AXIS 213 is configured from the setup tools, which are available from the link in the web interface. The setup tools can be used by:
•administrators, who have unrestricted access to all the Setup tools
•operators, who have access to the Video & Image, Live View Config and Event Configuration settings.
See the section on Security, on page 39 for more information on user access control.
Accessing the setup tools from a browser
Follow the instructions below:
1.Start the browser and enter the IP address or host name of the AXIS 213 in the location/address field.
2.The Live View page is now displayed. Click Setup to display the Setup configuration tools.
Setup tools

AXIS 213 — Setup 19
Video & Image settings
The following descriptions offer examples of the available features in the AXIS 213. For details of each setting, please refer to the online help files which are available from each page. Click  to access the help files.
To optimize the video images to your requirements, modify the following settings under Image Appearance:
• Resolution (including Aspect ratio correction and 4CIF de-interlacing)
|
• |
Compression |
• |
Color Setting |
|
• |
Rotate Image |
• |
Brightness |
Note: All configuration of images and overlays will affect the performance of the AXIS 213, depending on the usage and the available bandwidth. Please keep in mind the following when changing the image settings:
•Lower compression improves image quality, but generates larger files
•Color uses more bandwidth than Black & White
•Rotating the image 90 or 270 degrees will lower the maximum frame rate
•When using MPEG-4 as the video format, the compression setting will define the minimum compression level. The compression level will temporarily increase as and when required, i.e. when the bit rate approaches the maximum value as defined in the current profile@level combination.
You may need to press the Stop and Play buttons on the Live View page before the settings take effect.
Overlay Settings
Include an image and date and time with your own text which is placed on one line at the top or bottom of the video image.
See Overlay Image Settings, on page 20 for instructions on how to upload an overlay image to the AXIS 213.
Date & Time
overlay image

20 AXIS 213 — Setup
Video Stream
Define the maximum video stream time per session in seconds, minutes or hours. When the set time has expired, a new stream can be started by refreshing the page in the browser.
Define the maximum frame rate (fps — frames per second) allowed for each viewer, to avoid bandwidth problems on the network.
Test — For a preview of the image and overlay settings before saving, click Test. The Brightness setting does not affect the Test image. When satisfied with the settings, click Save. Please note that the preview image will be in JPEG format, even though the settings are valid both for Motion JPEG and MPEG-4.
Overlay Image Settings
An overlay image is an image included in the video image. This might, for example, be your own company logo. Follow these instructions to upload and use an overlay image:
1.Go to Setup > Video & Image > Overlay Image.
2.To upload the image to the AXIS 213, click the Browse button and locate it on your computer or server.
3.Click the Upload button and follow the on-screen instructions.
4.The image is now available in the Use overlay image drop-down list.
5.Click Save.
6.Go to Setup > Video & Image and modify the parameters under Overlay Settings.
Overlay image requirements:
|
Image Formats |
Image Size |
|
|
• |
Windows 24-bit BMP (full color) |
The height and width of the overlay image in |
|
• |
Windows 4-bit BMP (16 colors) |
pixels must be exactly divisible by 4. |
There are a number of limitations when using overlay images, such as the size and positioning of images. Please use the online help  for more information.
 Loading…
More products and manuals for Security cameras Axis
| Models | Document Type |
|---|---|
|
P8524 |
User Manual
28 pages |
|
Q2901-E |
User Manual
2 pages |
|
P5534 Outdoor T95A00 Kit |
User Manual
25 pages |
|
25734 |
User Manual
12 pages |
|
P5534 PTZ |
User Manual
2 pages |
|
M5013 |
User Manual
2 pages |
|
HP-MIO 2 |
User Manual
150 pages |
|
IP-Surveillance system |
User Manual
8 pages |
|
P5522 |
User Manual
4 pages |
|
P5522 |
User Manual
2 pages |
|
M1103 |
User Manual
2 pages |
|
CAMERA STATION — |
User Manual
69 pages |
|
M1054 |
User Manual
3 pages |
|
AXIS M-1004W |
User Manual
65 pages |
|
211 |
Installation Guide
8 pages |
|
T91D61 |
User Manual
28 pages |
|
M1103 |
User Manual
45 pages |
|
Q1931-E |
Datasheet
4 pages |
|
0556-001 |
Datasheet
4 pages |
|
0523-001 |
Datasheet
4 pages |


-
Страница 1
AXIS 213 PTZ Network Camera User’s Manual[…]
-
Страница 2
AXIS COMMUNICATIONS <Product Name> Qui ck User’s Guide 2 About This Document This manual is intended for administrators and users of the AXIS 213 PTZ Network Camera, and is applicable for software release 4.00. Previous experience of networking will be of use when installing and using this product. Some knowledge of UNIX or Linux-based syst[…]
-
Страница 3
3 AXIS 213 Table of contents Product Description . . . . . . . . . . . . . . . . . . . . . . . . . . . . . . . . . . . . . . . . . . . . . . . . . . . . . . . . . 5 Hardware Inventory . . . . . . . . . . . . . . . . . . . . . . . . . . . . . . . . . . . . . . . . . . . . . . 5 AXIS 213 PTZ Network Came ra . . . . . . . . . . . . . . . . . . . . . .[…]
-
Страница 4
4 AXIS 213 Ports & devices — I/O Ports . . . . . . . . . . . . . . . . . . . . . . . . . . . . . . . . . . . . . . . 40 Maintenance . . . . . . . . . . . . . . . . . . . . . . . . . . . . . . . . . . . . . . . . . . . . . . . . . . . 40 Support . . . . . . . . . . . . . . . . . . . . . . . . . . . . . . . . . . . . . . . . . . . . . . . . . . .[…]
-
Страница 5
5 AXIS 213 — Product Description Product Description The AXIS 213 is a full-featured PTZ Networ k Camera for security surveillance and remote monitorin g needs. It has the ability to make real time full frame rate Motion JPEG video available on the network. The AXIS 213 can optionally be equipped with a connection module with 2 inputs and 3 outputs[…]
-
Страница 6
6 AXIS 213 — Product Description AXIS 213 PTZ Network Camera IR Light — infrared light for night vision. Activated from the AXIS 213 web page. Network Indicator — the multi-colored network indicator flashes as follows: • Amber — flashes for activity on a 10 Mbit/s network • Green — flashes for activity on a 100 Mbit/s network • Red — flashes […]
-
Страница 7
7 AXIS 213 — Product Description Optional Accessory: Connection Module — The connection module provide s the physical interface to 3 relay outputs, 2 digital inputs , audio in/out, video in/out and the RS-232C Serial port. See Connection Module , on page 43 for more information. Audio In/Out Video In/Out RS 232C 3 Relay Outputs 2 Digital Inputs Con[…]
-
Страница 8
8 AXIS 213 — Installing the AXIS 213 Installing the AXIS 213 Please observe the following before in stalling the AXIS 213 PTZ Network Camera. • This product is designed for indoor use or location s where it is protected from rain and moisture. To operate the camera in these conditions , use the outdoor housing accessories. • Do not use strong o[…]
-
Страница 9
9 AXIS 213 — Installing the AXIS 213 Installing on a Network The AXIS 213 is designed for installation on an Ethernet network. This involves assigning an IP address to the PTZ camera , either manually or via an automated network service (DHCP). Select one of th e following procedures depending on your network: Notes: • The AXIS 213 has a default […]
-
Страница 10
10 AXIS 213 — Installing the AXIS 213 Manual Installation using AXIS IP Utility Follow these instructions to set the IP address manually usi ng AXIS IP Utility: 1. A cquire an unused IP address for your AXIS 2 13. (AXIS IP Utility detects the subnet your computer is connected in. The AXIS 2 13 must be installed on the same subnet). 2. Connect a sta[…]
-
Страница 11
11 AXIS 213 — Installing the AXIS 213 Manual Installation using ARP and Ping in Windows Follow these instructions to assign a un ique IP address to your product from a computer on your network: 1. A cquire an unused IP address for the AXIS 2 13 from your network administrator . 2. Connect a standard netw ork cable to your AXIS 2 13 and connect it t[…]
-
Страница 12
12 AXIS 213 — Installing the AXIS 213 Manual Installation using ARP and Ping in UNIX/ Linux Assign your product with a un ique IP address from a computer on your network, as follows: 1. A cquire an unused IP address fo r the AXIS 2 13 from your network administrator . 2. Connect a standard network cable to your AXIS 2 13 and connect it to the netwo[…]
-
Страница 13
13 AXIS 213 — Installing the AXIS 213 AXIS Internet Dynamic DNS Service AXIS Internet Dynamic DNS Service provide s a one-click procedure that makes the AXIS 213 available on your local network and over the Internet. On installation, the AXIS 213 will receive a URL (web address), wh ich can then be used to access it. The PTZ Network Camera can be u[…]
-
Страница 14
14 AXIS 213 — Using the PTZ Network Camera Using the PTZ Network Camera The AXIS 213 can be used with most st andard operating systems and supports Microsoft Internet Explorer 5.x or later, Ne tscape 7.x or later and Mozilla 1.4 or later. Note: To be abl e to view streaming video in Microsoft In ternet Explorer, you must set your Web browser to all[…]
-
Страница 15
15 AXIS 213 — Using the PTZ Ne twork Camera Live View The following provides an overview of each button on the Live View page. If the AXIS 213 has been customized, the buttons will be displayed accordingly: To resize the displayed image, click the View Size buttons: half-size (x 1 /2 ), full-size (x1), x2 or x4. This will not change the resolution […]
-
Страница 16
16 AXIS 213 — Using the PTZ Network Camera The manual Pan Tilt and Zoom bars control their respe ctive func tions in two different ways. Clicking anyw here on the bar’s gradient allows for a ‘smooth’ adjustment of the came ra’s position, whilst clicking on the arrows at the two ends of th e bar cause a stepped, incremental chang[…]
-
Страница 17
17 AXIS 213 — Using the PTZ Ne twork Camera Pan/Tilt/Zoom Control Queue This means that the ti me the user is in cont rol of the PTZ settings is lim ited and that a queue of users has been set up. Use the butt ons to request or release control of the Pan/Tilt/Zoom controls. The Pan/Tilt/Zoom Control Queue is set up by the administrator under PTZ Co[…]
-
Страница 18
18 AXIS 213 — Configuring the PTZ Network Camera Configuring the PTZ Network Camera This section describes how to configur e the AXIS 213 and is intended for the administr ator who has unrestricted access to all Setup tools and Operator who ha s access to Video & Image, Live View Config and Event Configuration. See the section on Security , on […]
-
Страница 19
19 AXIS 213 — Configuring the PTZ Ne twork Camera Overview of the Setup Tools Basic Configuration — the links under Basic Configuration are shortcuts to the necessary basic settings the first time the unit is configured. Video & Image (Administrator/Operator) Audio (Administrator/Operator) Live View Config (Administrator/Operator) PTZ Configura[…]
-
Страница 20
20 AXIS 213 — Configuring the PTZ Network Camera Event Configuration (Administrator/Operator) System Options (Administrator) About (Administrator) Tools Settings / Options / Descri ption Instructions General Instructions Event Servers Specify destinations for uploaded image fi les and/ or notificati on messages from the P TZ Network Cam- era. FTP s[…]
-
Страница 21
21 AXIS 213 — Configuring the PTZ Ne twork Camera Using the Setup Tools The following descriptions o ffer examples of the availabl e features in the AXIS 213. For details of each setting, please re fer to the online he lp files which are available from each page. Click to access the help files. Video & Image To optimize the video images accordi[…]
-
Страница 22
22 AXIS 213 — Configuring the PTZ Network Camera Video Stream Define the maximum video stream time per session in seconds, minutes or hours. When the set time has expired, a new stream can be starte d by refreshing the page in the Web browser. For unlimited video stream time, set this value to 0. Define the maximum frame ra te (fps — frames per sec[…]
-
Страница 23
23 AXIS 213 — Configuring the PTZ Ne twork Camera Overlay image limitations: Please use the online help files for more information. Advanced Camera — To optimize the lighting settings ac cording to your requirements, modify the following settings under Lighting Condition s : • White balance — the white balancing system in the AXIS 213 can automat[…]
-
Страница 24
24 AXIS 213 — Configuring the PTZ Network Camera Image Settings • Auto focus enabled (default setting) • Noise reduction — sets the level of nois e reduction in the image. i.e. sharpens the image. Setting the noise reduction to ‘high’ will cause a drop in frame rate (fps) Image O ffset To eliminate a black border or black lin es on the imag[…]
-
Страница 25
25 AXIS 213 — Configuring the PTZ Ne twork Camera When using Half-Duplex mode , the Push-To-Talk button will be visible. Select the mode to use for this button. Selecting Toggle means that when the butt on is pushed it will remain so until pushed a second time. Instant means that the button will remain active (pushed) until released. Optimize the s[…]
-
Страница 26
26 AXIS 213 — Configuring the PTZ Network Camera Live View Config — Live View Layout Select Use Axis look to customize the features on the AXIS 213 Live View page to suit your requirements. The following settings can be customized: • Background c olor — the color behind the text and images on the page • T ext color — all text on the page • Ba[…]
-
Страница 27
27 AXIS 213 — Configuring the PTZ Ne twork Camera 1. Click the Upload/Remove button. 2. Enter the path to the file, e.g. a f ile located on your workstation or click Browse . 3. Select the user level for the uploaded file. Setting the user access level means that you have complete control over which pages can be viewed by which users. 4. Click the […]
-
Страница 28
28 AXIS 213 — Configuring the PTZ Network Camera 4. Check Show Custom Link 2. 5. Enter a descriptive name, e.g. CAM STOP . 6. Select the Use as cgi link radio button and enter the cgi link in the field: 7. These links will appear in the web interf ace and can be used to control the PTZ camera For more information on the Axis HTTP API, see the Suppo[…]
-
Страница 29
29 AXIS 213 — Configuring the PTZ Ne twork Camera Enter th e Image Typ e , Image size and Optional settings to suit your Web page and click Update. Copy the source code as displayed on the HTML examples page and paste it into your own Web page code. Please use the online help files for more information.[…]
-
Страница 30
30 AXIS 213 — Configuring the PTZ Network Camera PTZ Configuration — Preset Positions A preset position is a pre-defined camera vi ew than can quickly and easily be viewed. From Preset Position Setup , use the Pan, Tilt and Zoom (PTZ) controls to steer the camera to the required position. When sati sfied with the camera’s position, enter a des[…]
-
Страница 31
31 AXIS 213 — Configuring the PTZ Ne twork Camera Move speed sets the speed of th e camera’s Pan/Ti lt movements. The default setting is maximum speed. Advanced PTZ Control Queue — The administrator can set up a queue for the PTZ controls. Once set up, the PTZ Control Queue buttons will appe ar on the Live View page offering one viewer exclusi[…]
-
Страница 32
32 AXIS 213 — Event Configuration Event Configuration This section describes how to configure the AXIS 213 for alarm and event handling. The AXIS 213 can be configured to perform certain actions when certain types of events occu r. Event Servers Event Servers are used, e.g. for receiving uploaded image files and/or notification messages. To set up […]
-
Страница 33
33 AXIS 213 — Event Configuration Event Types An Event Type is a set of parameters describing how and when the PTZ Network Camera is to perform certain actions. Example: If somebody passes the connected camera, and an event has been conf igured to act on this, the PTZ Network Camera can e.g. record an d save video images to an FTP server or send a […]
-
Страница 34
34 AXIS 213 — Event Configuration 7. Click OK to save the Event in the Event Types list. Please use the online h elp files for descriptions of each available option. Pre-trigger and Post-trigger buffers This function is very useful when checki ng to see what happened immediately before and after a trigger, e.g. 2 minutes before and after a door has[…]
-
Страница 35
35 AXIS 213 — Event Configuration Scheduled Event A Scheduled event can be activated at pre-set times, in a repeating pattern on selected weekdays. How to set up a scheduled event This example describes how to set the PTZ Network Camera to se nd an em ail notification with saved images from a set time: 1. Click Ad d s c h e d u l e d on the Event t[…]
-
Страница 36
36 AXIS 213 — S ystem Option s System Options Security User access control is enable d by default, the administrator sets the root password on first access. Other users are authorized with user names and passwords, or the administrator can choose to allow anonymous viewer login to the Live View page, as described below: Users — the user list displa[…]
-
Страница 37
37 AXIS 213 — System Options Date & Time Current Se rver Time — displays the current date and t ime (24h clock). If this has not been configured, the time displayed is the default setting. The t ime can be displayed in 12h clock format in the Overlay Images (see below). New Serv er Time — Select your time zone from the drop-down list and check […]
-
Страница 38
38 AXIS 213 — S ystem Option s DNS Configu r ation — DNS (Domain Name Service) pr ovides the transl ation of host names to IP addre sses on your network. Obtain DNS server address via DHCP — automatically use th e DNS server settin gs provided by the DHCP server. Click the View button to see the curr ent se ttings. Use the following DNS serve r add[…]
-
Страница 39
39 AXIS 213 — System Options The domain name currently registered at th e Axis Internet Dynamic DNS service for your product can at any time be removed. To do this click Settings… and follow the instructions. For more information, please refer to the online help files HTTP The default HTTP port number (port 80) can be changed to any port within t[…]
-
Страница 40
40 AXIS 213 — S ystem Option s Note: UPnP must be installed on your workstatio n. To do this, open th e Control Panel from the Start Menu and select Add/ Remov e Progr ams . Select Add/Remove Windows Components and open the Net- working Services section. Click Details and then select UPn P as the service to add. Ports & devices — I/O Ports T he[…]
-
Страница 41
41 AXIS 213 — System Options Support The support overview page provides valuable information on troubleshooting and contact information, should you require technical assistance. Logs & Reports — when contacting Axis support, pl ease be sure to provide a valid Server Report with your query. View Information — The Log report and the Parameter Lis[…]
-
Страница 42
42 AXIS 213 — S ystem Option s Caution! Improper use may cause unexpected behavior or even cause loss of contact wit h the unit. If a script does cause pr oblems, reset the unit to its factory default settings (in which case, a backup file may be of use to re turn the unit to its latest configuration). Axis strongly recommends that you do not use t[…]
-
Страница 43
43 AXIS 213 — Connection Module Connection Module The connection module conne cts to the came ra and is configured and controlled via the camera’s u ser interface. The Conne ction module is an optional accessory providing the following: Installing the audio equipment 1. Connect a microphone (n ot supplied) to the Audio IN socket. 2. Connect a lou[…]
-
Страница 44
44 AXIS 213 — Connection Module Schematic Diagram — Connection Module[…]
-
Страница 45
45 AXIS 213 — Troubleshooting Troubleshooting Checking the Firmware The firmware is software that determines the functionality of the AXIS 213. When you download firmware from the Axis Web site, your Axis produ ct will receive the latest available functionality. One of your first actions when troubleshooting a problem should be to check the current[…]
-
Страница 46
46 AXIS 213 — Troubleshooting Support If you contact the Axis support desk, please help us help you resolve your problems expediently by providing a server report, log file and a brief description of the problem. Server Report — go to Setup | System Options | Support Overview . The server report contains important information about the serv er and […]
-
Страница 47
47 AXIS 213 — Troubleshooting Symptoms, Possible Causes and Remedial Actions Problems setting the IP addr ess Using ARP Ping The IP addres s must be set within two min u tes after the power has been applied to the AXIS 213, restar t th e server and try aga in. Als o , make sure the ping len gth is set to 40 8 . The AXIS 213 is located on a differen[…]
-
Страница 48
48 AXIS 213 — Troubleshooting For additional assistance, please contac t y our reseller or check the product’s support pages on the Axis Websit e at http: //www.axis.com/techsup Installation of additional ActiveX component restricted or prohibited Configure yo urA XIS 213 to use a Java app let for updating the images under Live View Config | Layo[…]
-
Страница 49
49 AXIS 213 — Technical Specifications Technical Specifications Detai l Specification System Requireme nt s Standard Internet TCP/IP suite of protocols: Windows, Linux, UNIX, Mac. etc. Supported Web Browsers Windows — Microsoft Internet Explorer 5.x or later and Mozilla 1.4 or later Linux — Mozilla 1.4 or later Mac OSX — Netscape 7.x or la ter or M[…]
-
Страница 50
50 AXIS 213 — Tech nical Specification s Image Image Chip (CCD): ¼” Interlaced CCD Total number of pi xels: NTSC — 340,000 effective pixels PAL — 400,000 effective pixels Horizontal Resolution: NTSC — 460 TV lines PAL — 420 TV lines Vertical Resolution: 350 TV lines S/N Ratio: 48 dB Shutter speed: NTSC- 1/80,000 to 1/60 to 1/1sec. PAL- 1/80,000 […]
-
Страница 51
51 AXIS 213 — Technical Specifications The AXIS 213 delivers the following file sizes (PAL) : The AXIS 213 delivers the following file sizes (NTSC) : Connection Module (optional accessory) Full-duplex audio. Audio data encoded in: • ADPCM format at 32kbps, 8 kHz sampling (G.726) • ADPCM format at 24kbps, 8 kHz sampling (G.726) • PCM -law form[…]
-
Страница 52
52 AXIS 213 — In dex Index A About 20 Action 32 Action Buttons 15, 28 Active/Inactive 15, 28 ActiveX Controls 14 Administra tor 18, 36 Alarm 20, 32, 4 3 AMC 9, 14, 15, 50 ARP and Ping 11, 12 Audio 19, 43 Audio Settings 19 AXIS Internet Dynamic DNS Service 13 AXIS IP Utility 10 AXIS Medi a Control 9 B Background color 26 Background picture 26 Backup[…]
-
Страница 53
53 AXIS 213 — Index Logs & Reports 20, 41 M Maintenance 20 N Network 20, 37 Network Connector 6 Network Indicator 6 New Server Time 37 NTP Server 37 O Operator 36 Output Buttons 15, 28 Overlay Image 19, 22 Overlay Settings 21 Own Home Page 27 P Pan/Tilt/Zoom Control Queue 17 Pan/Tilt/Zoom Controls 16 PHP 41 Pinout 40 Pinout — I/O connectors 43 […]
-
Страница 54
AXIS 213 User’s Manual Part No. 22582[…]