
В данной статье рассмотрим настройку шлюза AudioCodes MP-114 FXS для работы с IP АТС Asterisk.
Вход в web-интерфейс
Подключаемся к web-интерфейсу шлюза по его IP-адресу.
По умолчанию используется IP адрес 10.1.10.10, логин: Admin и пароль: Admin.

Если пароль безвозвратно утерян и попасть на web-интерфейс не представляется возможным, можно сбросить шлюз до заводских настроек. Стоит обратить внимание, что данная операция приведёт к сбросу всех настроек.
Для сброса к заводским настройкам нужно выполнить следующие пункты:
• Отключаем сетевой кабель;
• На задней панели есть кнопка RESET. Нажимаем её и держим, на протяжении 6-10 секунд.
Настройка шлюза
Попадаем на страничку Home Page. Здесь отображены текущие статусы линий. Также можно посмотреть настройки сети, текущую версию прошивки и тип протокола.
Развернём панель навигационного меню.

Настройка сети
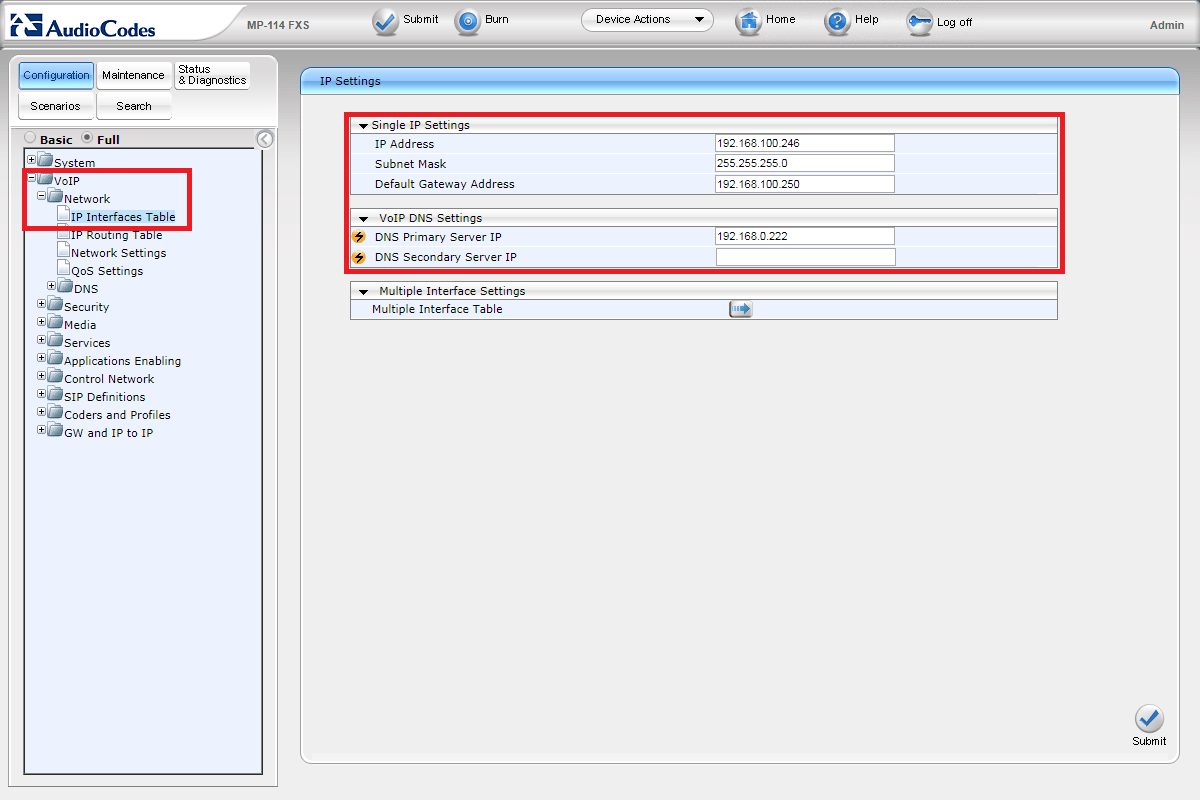
Переходим на вкладку Configuration -> VoIP -> Network -> IP Interfaces Table. Вводим IP адрес, маску, основной шлюз и DNS.
Шлюз можно настроить двумя способами:
per endpoint — порты шлюза по отдельности регистрируются на АТС;
per gateway — шлюз работает с АТС по IP без регистрации.
Рассмотрим, как настроить шлюз в режиме per endpoint.
Подключение к АТС
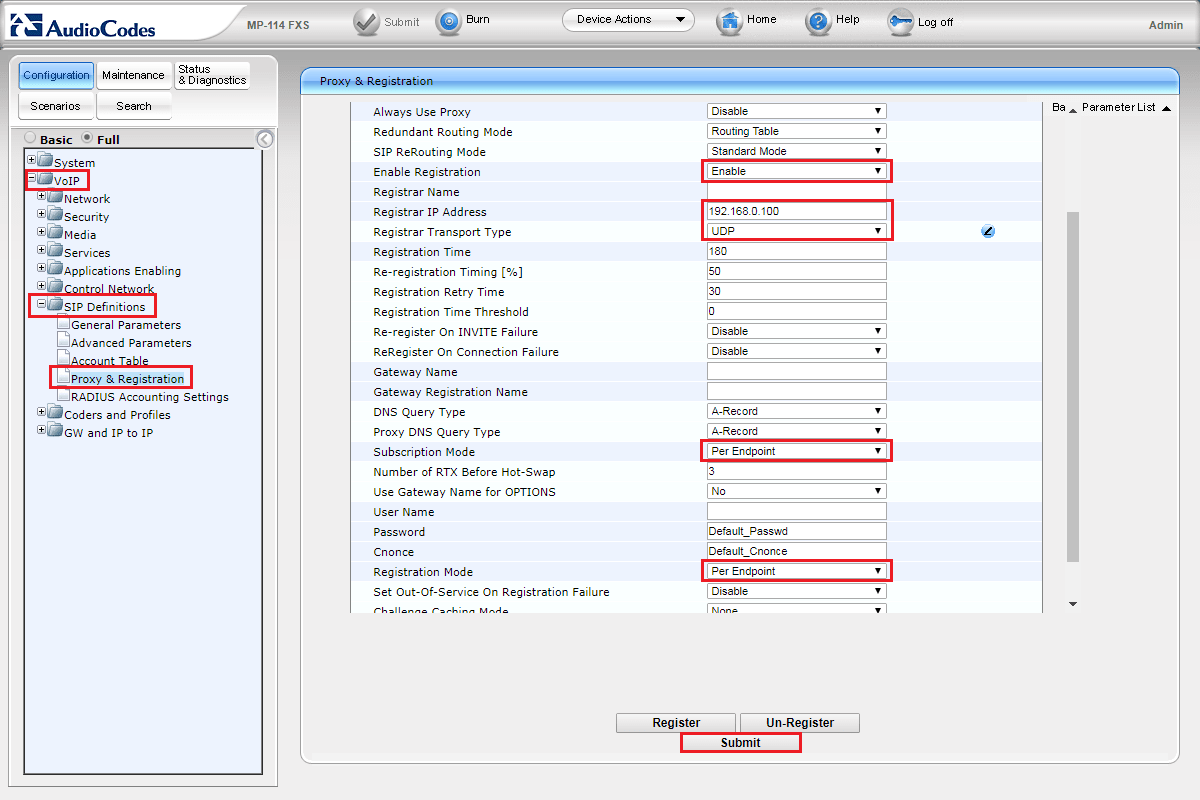
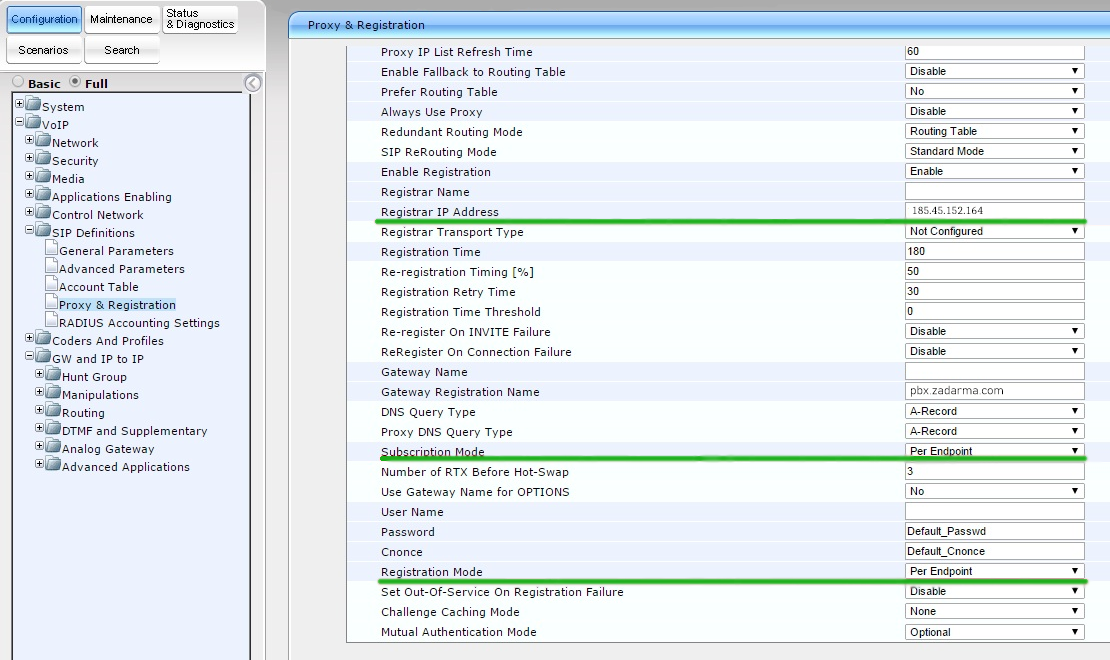
Переходим на вкладку Configuration -> VoIP -> SIP Definitions -> Proxy & Registration. Здесь настраиваем следующие параметры:
Enable Registration — проверяем, чтобы выбрано было Enable;
Registrar IP Address — указываем IP адрес сервера Asterisk;
Registrar Transport Type — протокол передачи данных (UDP, TCP, TLS);
Subscription Mode — указываем Per Endpoint;
Registration Mode — также указываем Per Endpoint.
После внесённых настроек нажимаем кнопку Submit.
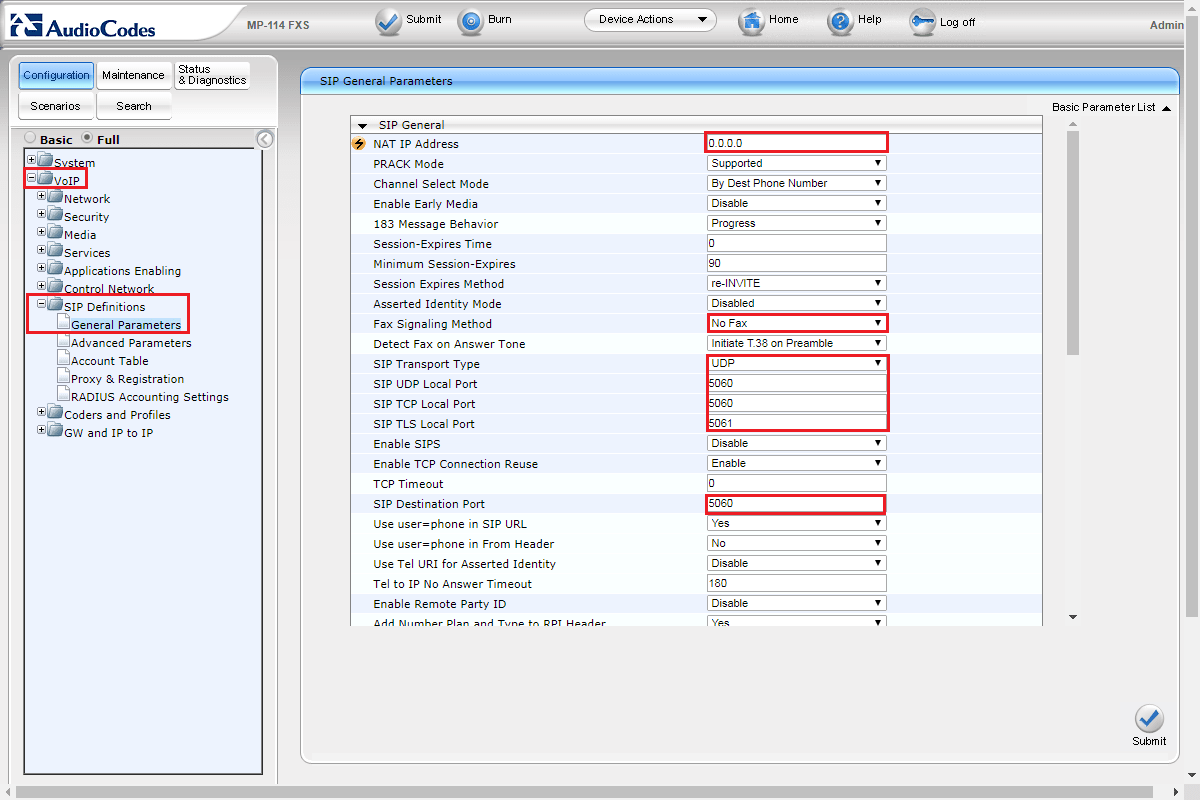
Далее переходим во вкладку Configuration -> VoIP -> SIP Definitions -> General Parameters. Здесь производятся настройки параметров, таких как:
NAT IP Address — указывается, если шлюз находится за NAT;
Fax Signaling Method — метод передачи факса (в случае его использования);
SIP Transport Type — выбираем протокол передачи данных (UDP, TCP, TLS), чуть ниже выбираем порт;
SIP Destination Port — порт назначения на АТС (по умолчанию 5060).
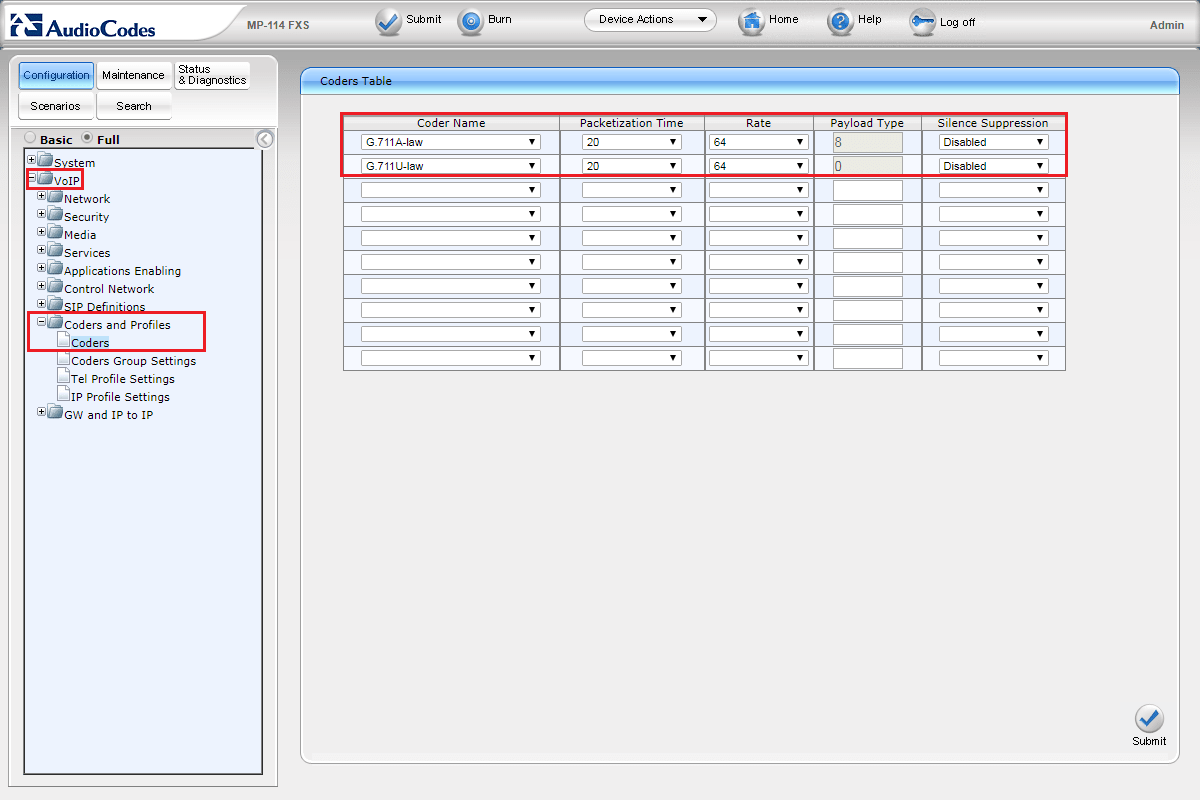
Настройка кодеков
Производится на вкладке Configuration -> Coders and Profiles -> Coders.
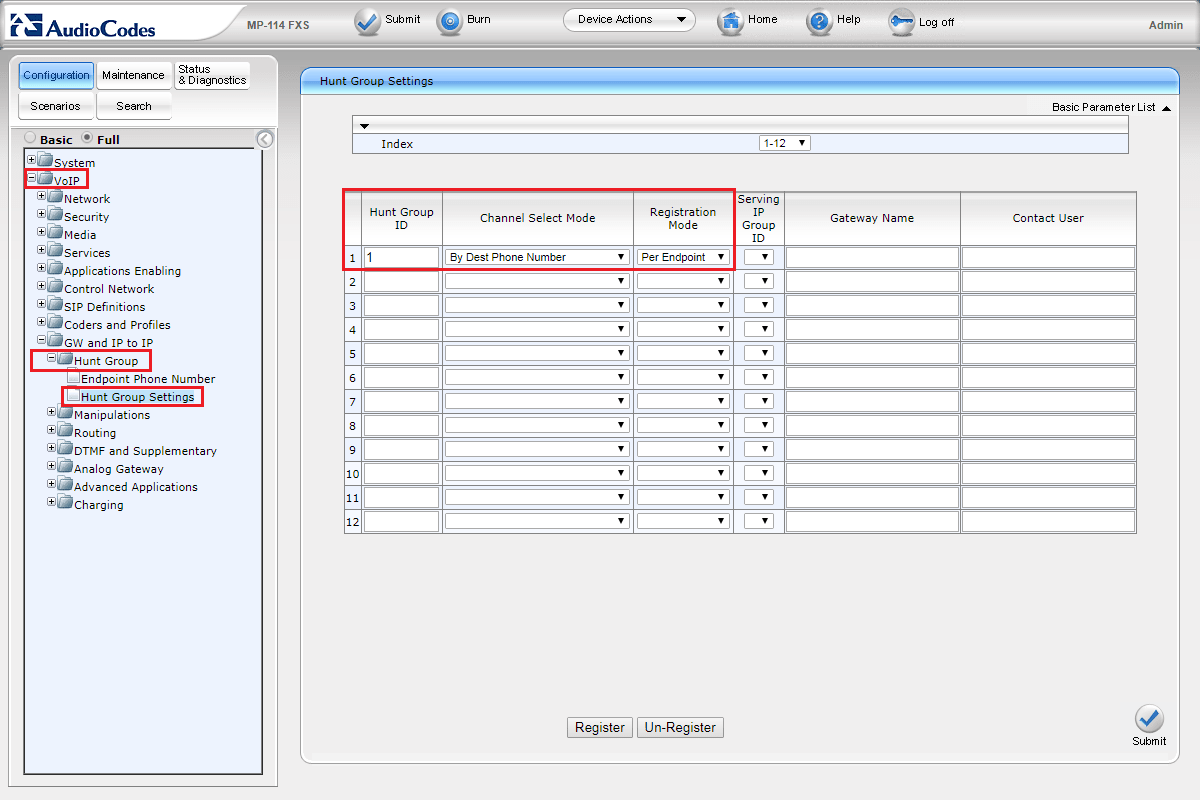
Создание групп
Рассмотрим, как создавать группы для портов. Переходим на вкладку VoIP -> GW and IP to IP -> Hunt Group -> Hunt Group Settings. Указываем Hunt Group ID, Channel Select Mode, Registration mode.
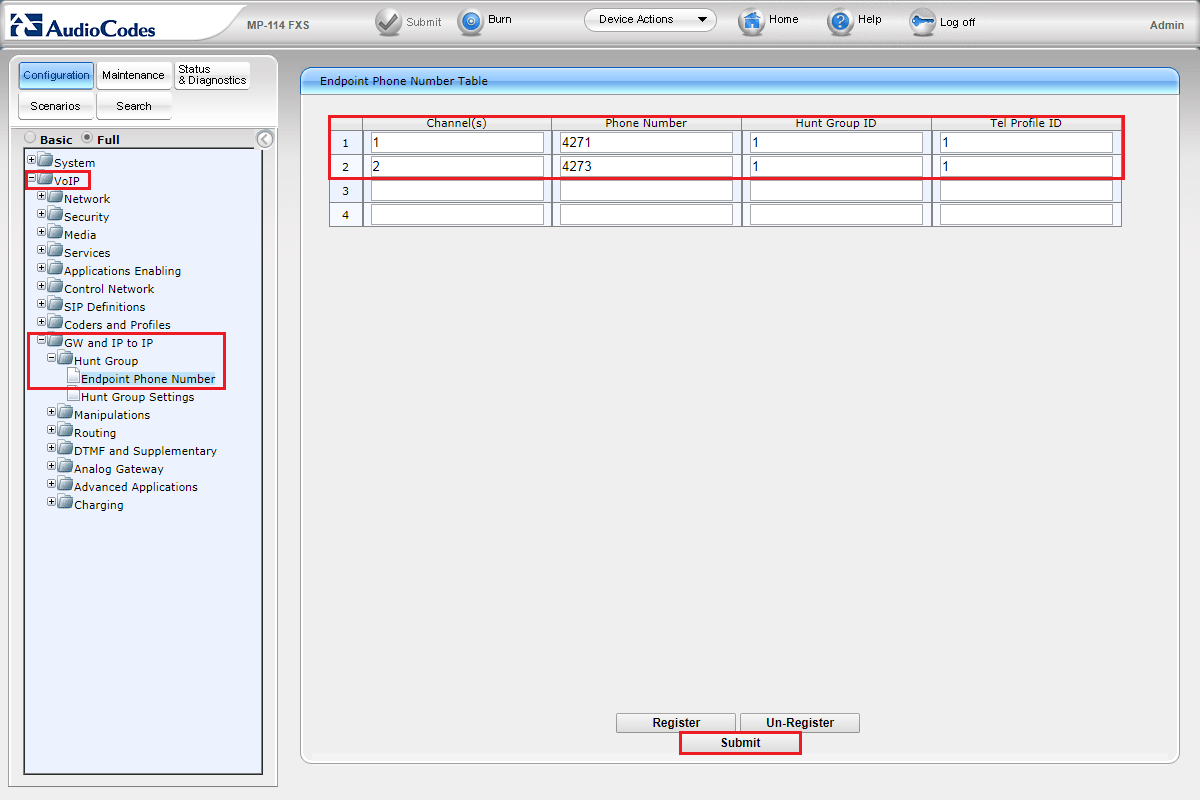
Объединение портов
Переходим на вкладку VoIP -> GW and IP to IP -> Hunt Group -> Endpoint Phone Number. Добавляем внутренние номера в созданные группы.
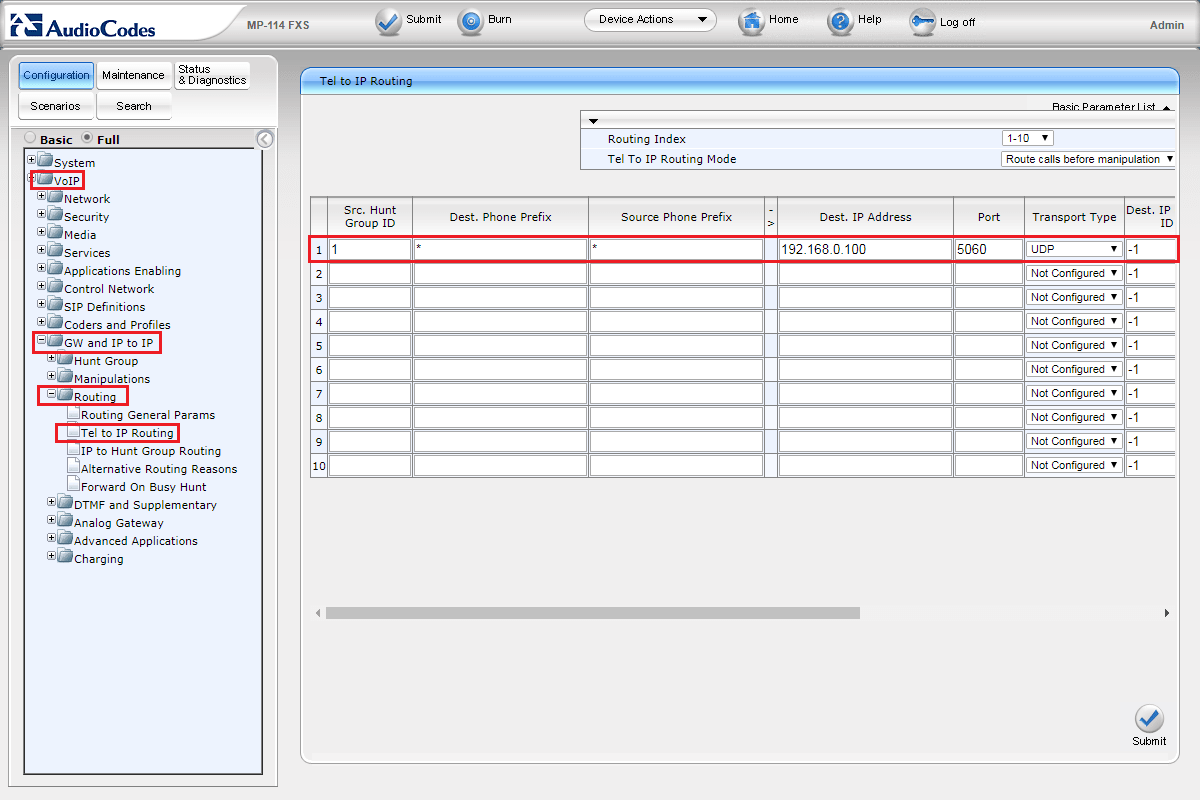
Маршрутизация вызовов
Настраивается на вкладке VoIP -> GW and IP to IP -> Routing. Tel to IP Routing предназначается для маршрутизации вызовов с аналоговых портов (исходящие), а IP to Hunt Group Routing для вызовов с IP на группу портов (входящие). Рассмотрим более подробно настройку.
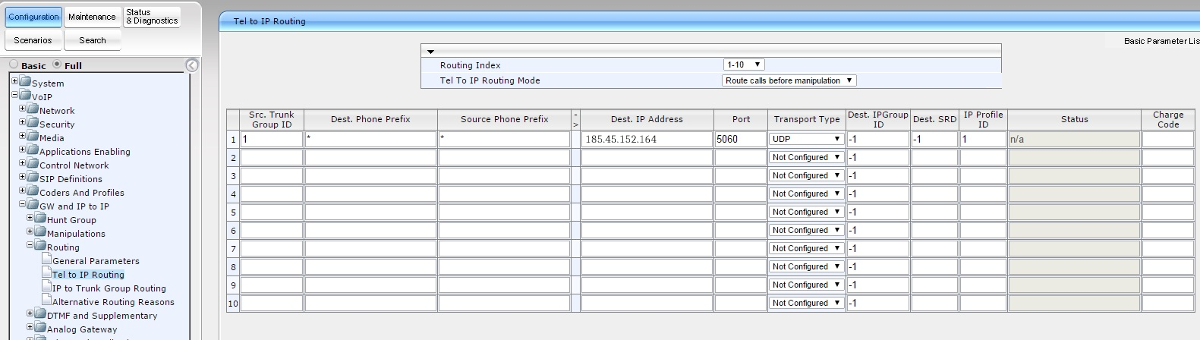
Tel to IP Routing
Src. Hunt Group ID — указываем ID группы телефонов, с которой будем осуществлять вызов;
Dest./Source Phone Prefix — префиксы номеров (в данном случае не используются, поэтому ставим «*»);
Dest IP Address/Port/Transport Type — указываем IP адрес/порт/протокол сервера Asterisk;
IP Profile ID — по умолчанию выбираем 1 (произвести настройки этого и других профилей можно во вкладке VoIP -> Coders and Profiles -> IP Profile Settings).
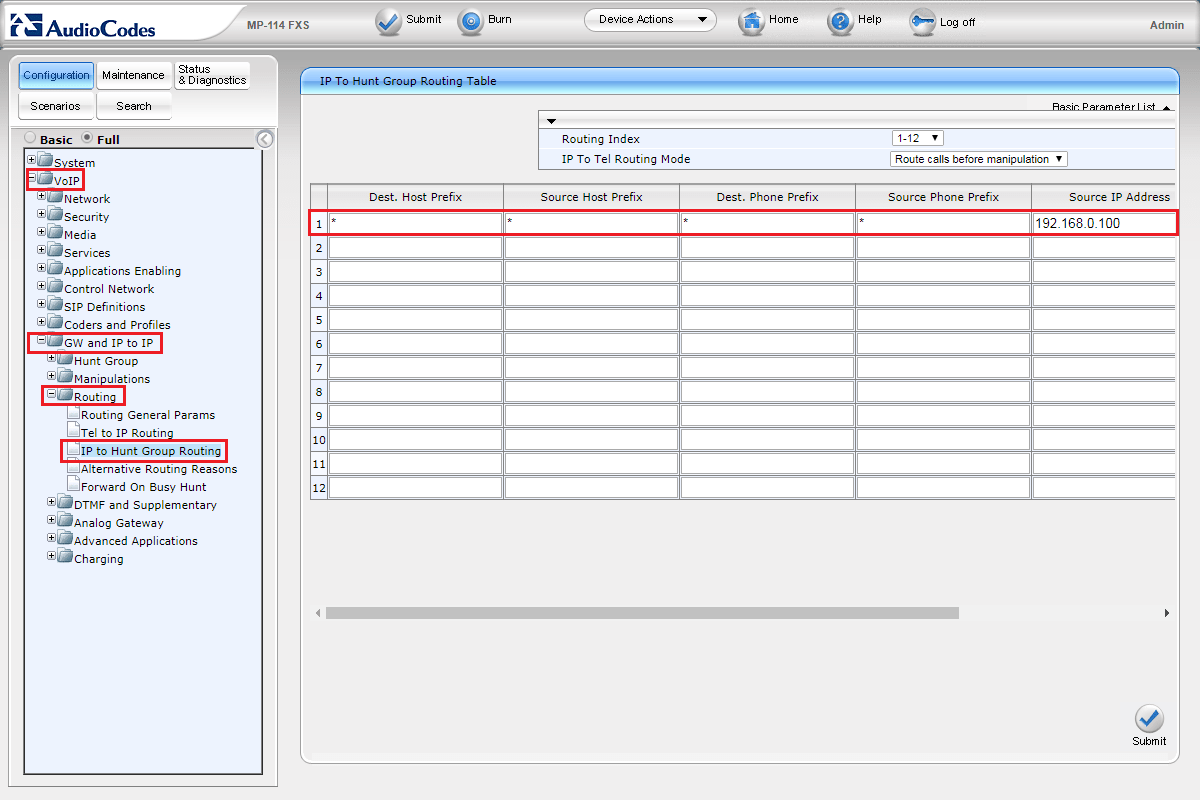
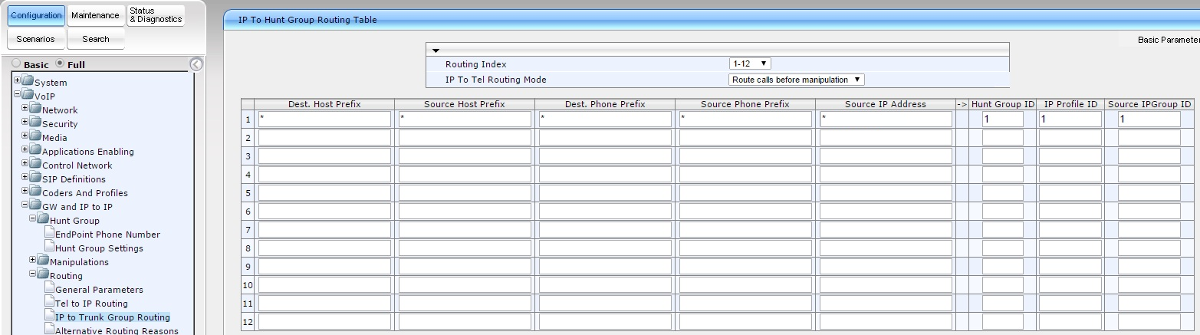
IP to Hunt Group Routing
Dest./Source Host Prefix, Dest./Source Phone Prefix — префиксы, (в нашем примере не используются, поэтому ставим «*»);
Source IP Address — указываем IP адрес сервера Asterisk;
Hunt Group ID — указываем ID группы телефонов, на которую будет поступать вызов;
IP Profile ID/Source IP Group ID — также выбираем 1;
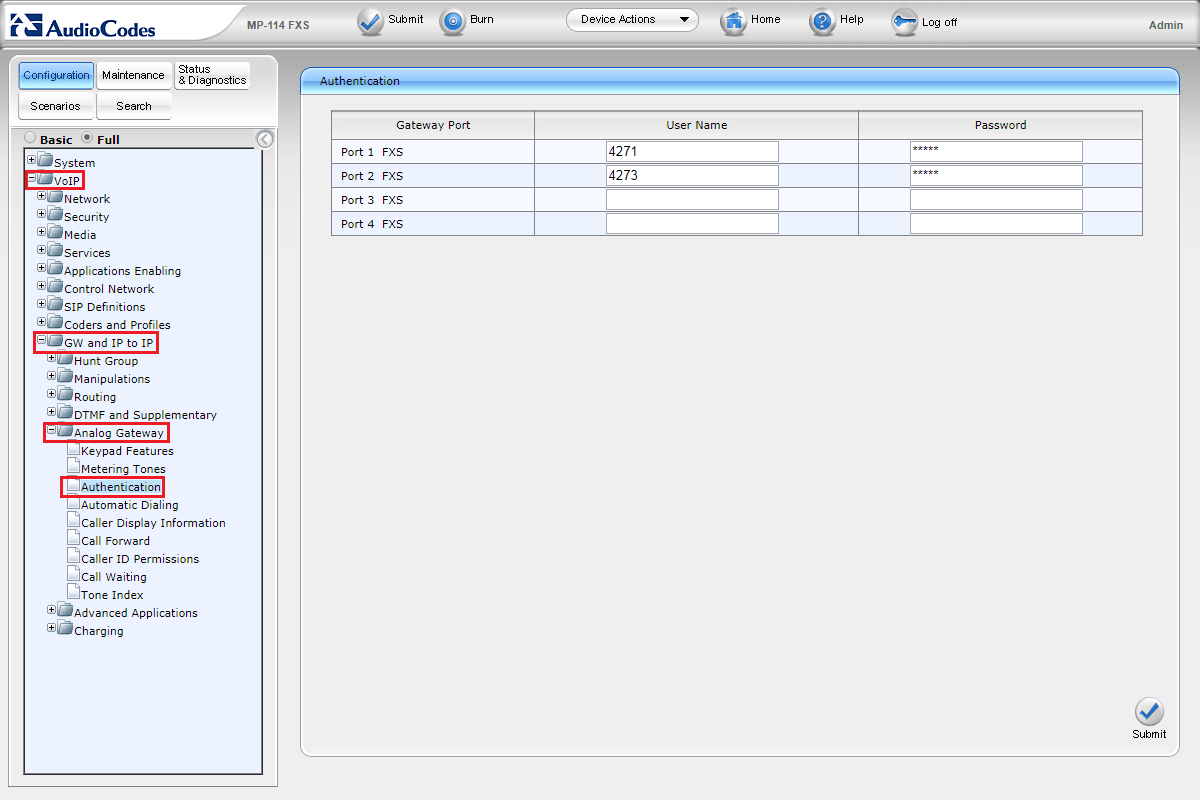
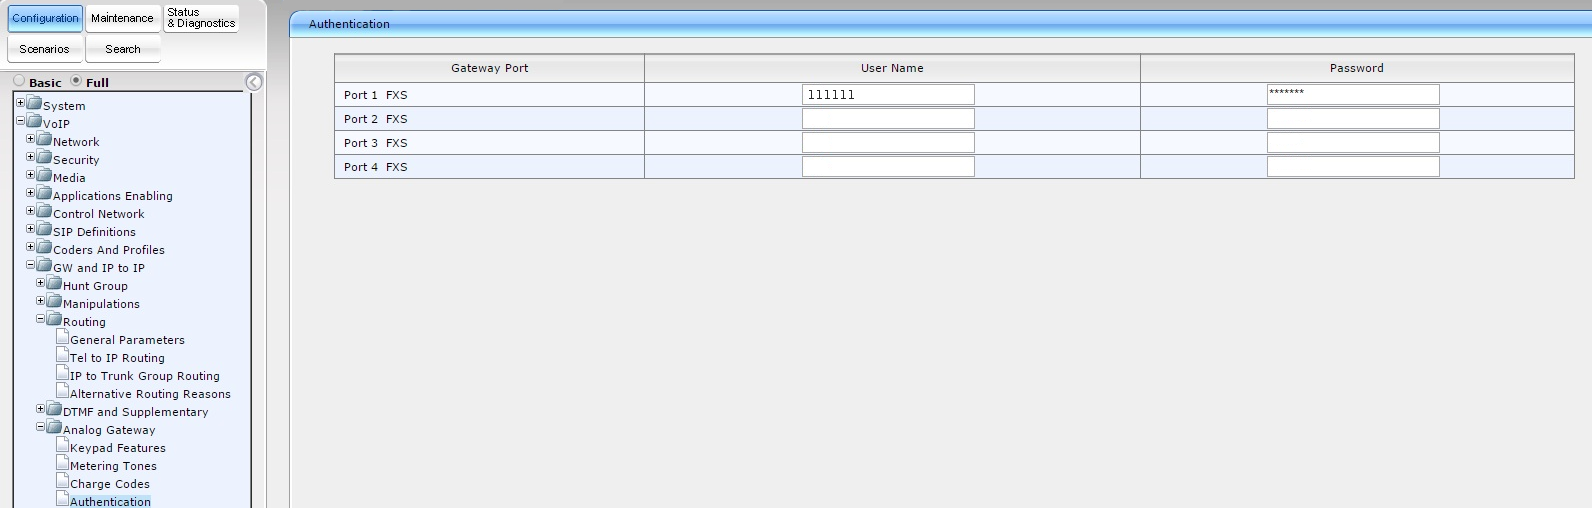
Настройка внутренних номеров
Перейдём к настройке внутренних номеров. Производится она во вкладке VoIP -> GW and IP to IP -> Analog Gateway -> Authentication. Здесь последовательно для каждого порта указываем номер и пароль, взятые с Asterisk.
Дополнительные настройки
Смена имени и пароля администратора производится на вкладке: Configuration -> System -> Management -> Web User Accounts.

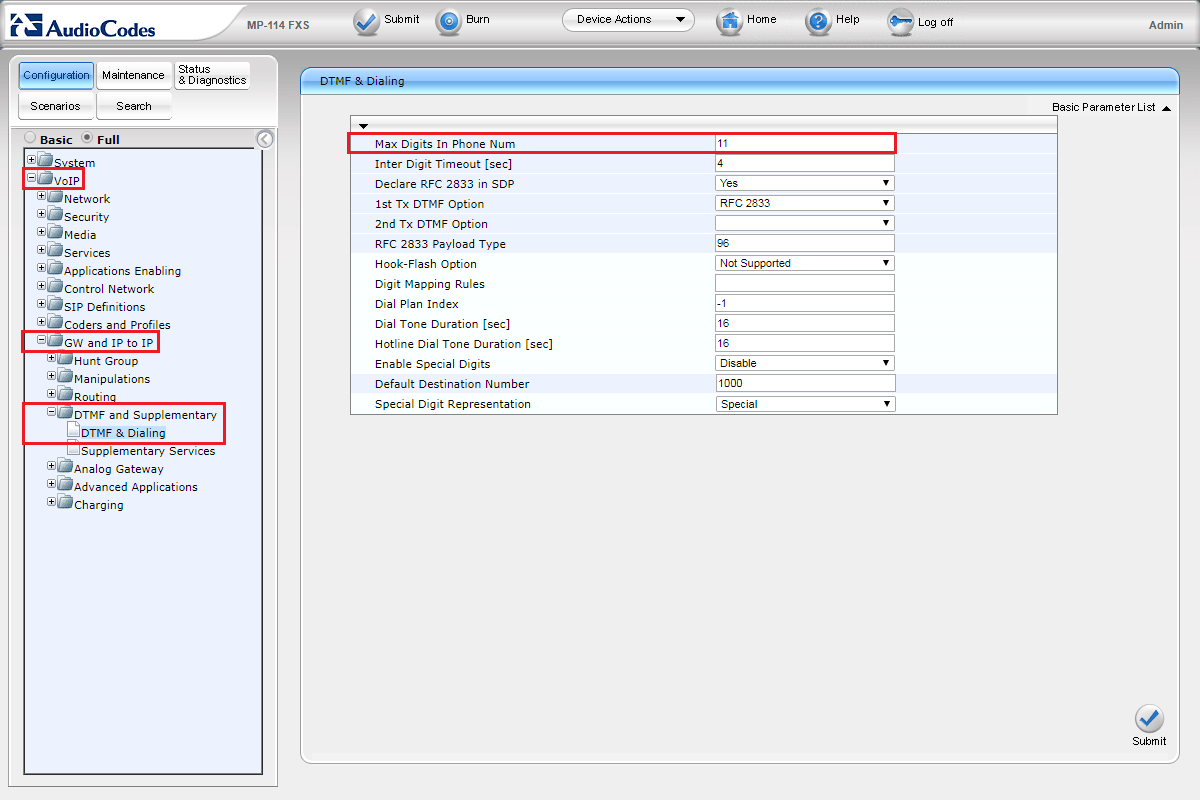
По умолчанию, максимальное количество цифр, в набираемом номере, равняется пяти. Необходимо увеличить это значение, чтобы была возможность звонить на мобильные и междугородние номера. Для этого переходим на вкладку VoIP -> GW and IP to IP -> DTMF and Supplementary -> DTMF & Dialing и выставляем необходимое нам значение в поле Max Digits In Phone Num.
После всех произведённых настроек нажимаем Submit, а затем Burn.
На этом настройка шлюза AudioCodes MP-114 FXS для работы с IP АТС Asterisk завершена.
АТС не используется
Используется АТС
Пример настройки AudioCodes MP-114 версия прошивки 6.20A
1. Для того, что бы зайти в веб-интерфейс AudioCodes следует подключить компьютер к разъему Ethernet и на компьютере в сетевых подключениях изменить настройки сетевой карты. По умолчанию сетевой интерфейс MP-114 имеет адрес 10.1.10.10, маска 255.255.0.0, так что свои у себя выставляем статический IP адрес 10.1.10.1 маска подсети 255.255.0.0. В браузере вводим 10.1.10.10 и попадаем на страничку ввода логина и пароля. По умолчанию логин/пароль Admin/Admin.Необходимо назначить шлюзу статический IP-адрес из нашей подсети. Переходим в раздел VoIP-Network-IP Settings и заполняем поля как показано ниже.
В примере используется подсеть 192.168.0.0/24
192.168.0.2: ip-адрес нашего шлюза AudioCodes
255.255.255.0: маска подсети
192.168.0.1: ip-адрес шлюза по умолчанию, адрес роутера/модема.
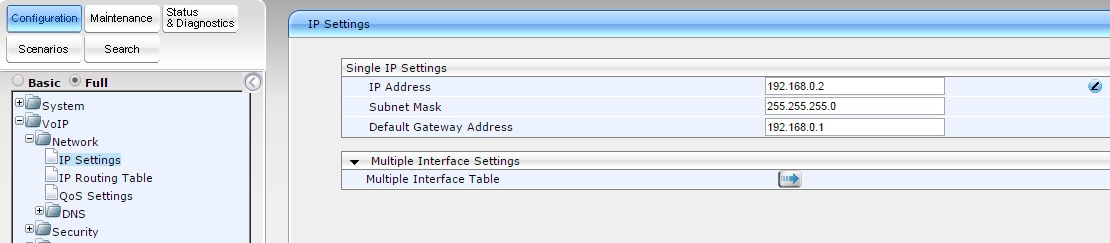
Нажимаем Submit и ждем пока оборудование применит настройки.
Отключаем шлюз от компьютера, подключаем к сети. Меняем настройки сетевой карты, включеам DHCP или назначаем сетевому интерфейсу статический IP адрес из подсети 192.168.0.0/24 (Например 192.168.0.9) В адресною строку браузера вводим IP-адрес AudioCodes (192.168.0.2). Как только Вы попали в настройки оборудования, нажмите кнопку Burn! Если этого не сделать, то после перезагрузки оборудование вернется к своим default настройкам.
2. Настраиваем шлюз как per end point. В левой части кликаем в пункт “full”, переходим во вкладку Configuration – VoIP – SIP Definitions – Proxy & Registration.
Здесь меняем и вносим следующие данные:
АТС не используется
Используется АТС
Enable Registration: Enable – включаем регистрацию
Registrar IP Address: вводим IP адрес сервера sip.zadarma.com (Например 185.45.152.161)
Registrar IP Address: вводим IP адрес сервера виртуальной АТС pbx.zadarma.com (Например 185.45.152.164)
Subscription Mode/ Registration Mode: per endpoint: каждый порт шлюза регистрируется отдельно.

Нажимаем Submit
3. Переходим во вкладку Configuration – VoIP – SIP Definitions – General Parameters и если требуется меняем следующие параметры:
NAT IP Address: – если ваше оборудование находиться за NAT то стоит указать свой внешний IP
Fax Signaling Method: выбрать метод передачи факса
SIP UDP Local Port: 5060
SIP Destination Port: 5060
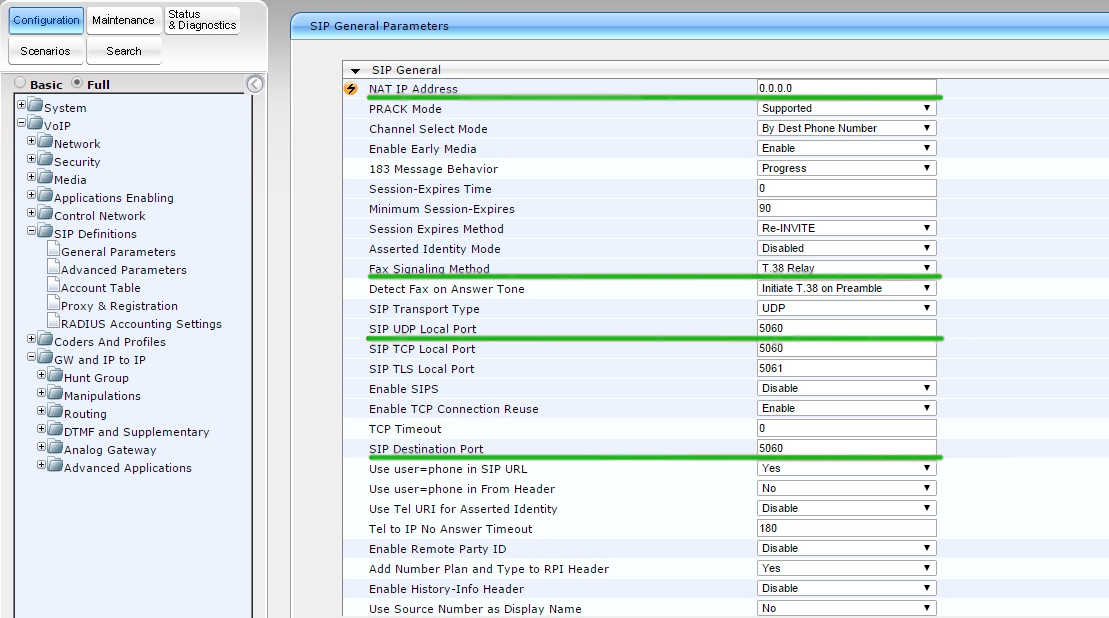
Нажимаем Submit
4. Переходим к настройке кодеков.VoIP – Coders and Profiles – Codes. Выбираем и выставляем приоритет кодеков, и нажимаем Submit

5. Теперь нужно завести группы для портов. Переходим VoIP – GW and IP to IP – Hunt Group Setting Задаем ID Hunt Group, Channel mode – стратегия по которой будут выбираться линии, и в нашем случае Registration mode – per endpoint
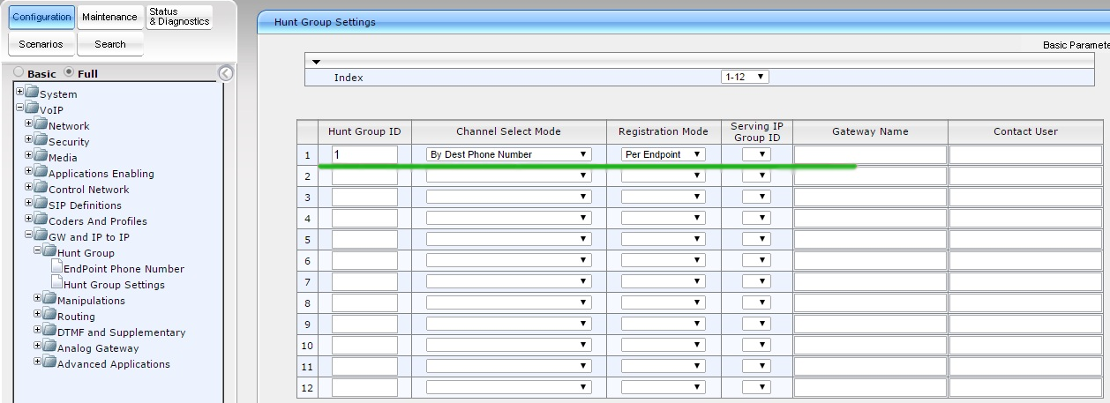
Нажимаем Submit
В этом же разделе переходим во вкладку Endpoint Phone Number и назначаем на Hunt группу номера.
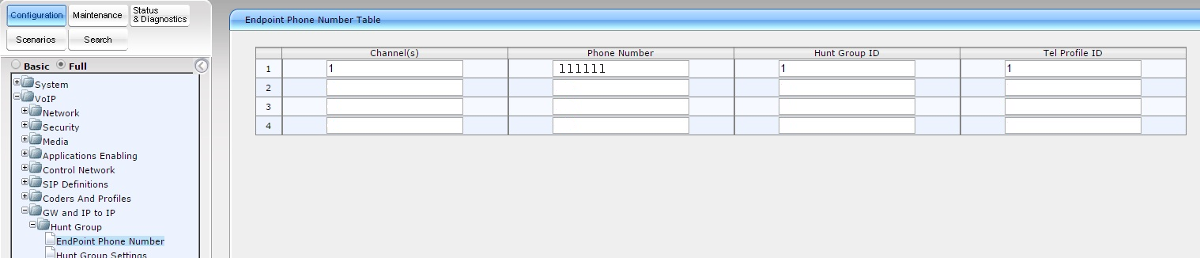

Нажимаем Submit
6. Настраиваем маршрутизация для вызовов из IP на аналоговые порты и обратно. VoIP GW and IP to IP – Routing – Tel to IP Routing/IP to Trunk Group Routing
Src Trunk Group ID: 1
Dest Phone Prefix: *
Source Phone Prefix: *
Dest IP Address: IP адрес сервера sip.zadarma.com (Например 185.45.152.161)
Dest IP Address: IP адрес сервера виртуальной АТС pbx.zadarma.com (Например 185.45.152.164)
Port: 5060
Transport Type: UDP
Dest. IP Group ID : -1
Dest. SRD: -1
IP Profile ID: 1

Dest Host Prefix: *
Source Host Prefix: *
Dest Phone Prefix: *
Source Phone Prefix: *
Source IP Address: *
Hunt IP Group ID : 1
IP Profile ID: 1
Source IPGroup ID: 1
7. Затем настраиваем авторизацию . VoIP – GW and IP to IP – Analog Gateway – Authentication
User Name: Ваш sip-номер (Например 111111) из личного кабинета
Password: Ваш пароль от sip-номера, из раздела «Настройки-Подключение по SIP» личного кабинета.
User Name: Ваш внутренний номер АТС (Например 1234-100) из личного кабинета
Password: Ваш пароль внутреннего номера АТС личного кабинета

После этого необходимо сохранить данные и “прожечь” в памяти устройства. Чтобы сохранить настройки, нажмите на кнопку «Submit». После этого у вас
появиться окошко, в котором нужно кликнуть на кнопку «OK», чтобы “прожечь” данные в памяти аппарата кликните на кнопку “Burn”.

Далее у вас появится окошко,в котором нужно кликнуть на кнопку «OK».Теперь даже если оборудование перезагрузиться настройки останутся прежними, и не придется заново все перенастраивать.
Скачать
™
MediaPack
MP-118 & MP-114
Document #: LTRT-26301
September 2007
Quick Installation Guide
Integration with Microsoft
®
Office
Communications Server 2007
Get user manuals:
See SafeManuals.com
![]()
 ™
™
MediaPack MP-118 & MP-114
Quick Installation Guide
Integration with Microsoft® Office Communications Server 2007
|
Document #: LTRT-26301 |
September 2007 |

|
Quick Installation Guide |
Contents |
|||||
|
Table of Contents |
||||||
|
1 |
Introduction ………………………………………………………………………………………………….. |
7 |
||||
|
2 |
Quick Start ……………………………………………………………………………………………………. |
9 |
||||
|
3 |
Configuring the MediaPack |
………………………………………………………………………….. |
10 |
|||
|
3.1 Embedded Web Server Management Tool …………………………………………………………… |
10 |
|||||
|
3.1.1 Accessing the Embedded Web Server…………………………………………………………………… |
10 |
|||||
|
3.1.2 Navigating the Embedded Web Server ………………………………………………………………….. |
11 |
|||||
|
3.1.3 Changing Login Username and Password ……………………………………………………………… |
12 |
|||||
|
3.1.4 |
Searching for ini file Parameters……………………………………………………………………………. |
13 |
||||
|
3.2 Assigning an IP Address to the MediaPack…………………………………………………………… |
14 |
|||||
|
3.2.1 Assigning an IP Address using BootP ……………………………………………………………………. |
14 |
|||||
|
3.2.2 Assigning an IP Address Using CLI via RS-232………………………………………………………. |
15 |
|||||
|
3.2.3 Assigning an IP Address using HTTP…………………………………………………………………….. |
16 |
|||||
|
3.3 |
Advanced Configuration …………………………………………………………………………………….. |
17 |
||||
|
3.3.1 |
Using the ini File …………………………………………………………………………………………………. |
17 |
||||
|
3.3.1.1 |
Obtaining the ini File from the Web ………………………………………………………….. |
17 |
||||
|
3.3.1.2 |
Uploading the ini File to the Gateway……………………………………………………….. |
18 |
||||
|
3.3.1.3 |
Modifying Parameters Specific to Site Deployment ……………………………………. |
19 |
||||
|
3.3.2 Using the Embedded Web Server …………………………………………………………………………. |
20 |
|||||
|
3.3.2.1 |
Defining Mediation Server’s IP Address……………………………………………………. |
20 |
||||
|
3.3.2.2 |
Defining Number of FXO Ports Connected to PBX…………………………………….. |
22 |
||||
|
3.3.2.3 |
Defining Voice Coders……………………………………………………………………………. |
23 |
||||
|
3.3.2.4 |
Translating Numbers From / To E.164 Using Manipulation Tables for |
|||||
|
PBX/PSTN Connectivity ………………………………………………………………………………………. |
23 |
|||||
|
3.3.2.4.1 |
Dialing Plan Notation……………………………………………………………… |
25 |
||||
|
3.3.2.4.2 |
Number Normalization Examples…………………………………………….. |
26 |
||||
|
3.3.2.5 |
Defining Answer Supervision ………………………………………………………………….. |
28 |
||||
|
3.3.2.6 |
Defining Automatic Dialing ……………………………………………………………………… |
29 |
||||
|
3.3.2.7 |
Enabling Caller ID………………………………………………………………………………….. |
30 |
||||
|
3.3.2.8 |
Defining SIP Transport Type …………………………………………………………………… |
31 |
||||
|
3.3.2.9 |
Defining Disconnect on Broken Connection………………………………………………. |
32 |
||||
|
3.3.2.10 |
Defining DTMF Payload Type …………………………………………………………………. |
33 |
||||
|
3.3.2.11 |
Enabling One-Stage Dialin g ……………………………………………………………………. |
34 |
||||
|
3.3.2.12 |
Defining Channel SelectMode………………………………………………………………… |
35 |
||||
|
3.3.2.13 |
Disabling |
RTCP Attribute ………………………………………………………………………. |
36 |
|||
|
4 Backing Up Configuration Settings ………………………………………………………………. |
37 |
|||||
|
5 |
Monitoring the Gateway……………………………………………………………………………….. |
38 |
||||
|
5.1 |
Front-Panel LEDs ……………………………………………………………………………………………… |
38 |
||||
|
5.2 |
Monitoring the Channels…………………………………………………………………………………….. |
39 |
||||
|
6 |
Troubleshooting ………………………………………………………………………………………….. |
40 |
||||
|
6.1 |
General Troubleshooting ……………………………………………………………………………………. |
40 |
||||
|
6.2 Restoring Parameters to Factory Default Settings …………………………………………………. |
40 |
|||||
|
6.3 Debugging using a Syslog Server ……………………………………………………………………….. |
40 |
|||||
|
7 |
Regulatory Information ………………………………………………………………………………… |
42 |
|
Version 5.0 |
3 |
September 2007 |

MP-11x & Microsoft Office Communications Server 2007
Reader’s Notes
|
Quick Installation Guide |
4 |
Document #: LTRT-26301 |

|
Quick Installation Guide |
Notices |
Notices
Notice
This Quick Installation Guide describes the installation and configuration of AudioCodes’ Media Pack MP-11x FXO SIP analog media gateways for integration with Microsoft® Office Communications Server 2007.
Information contained in this document is believed to be accurate and reliable at the time of printing. However, due to ongoing product improvements and revisions, AudioCodes cannot guarantee the accuracy of printed material after the Date Published nor can it accept responsibility for errors or omissions. Updates to this document and other documents can be viewed by registered Technical Support customers at http://www.audiocodes.com under Support / Product Documentation.
© Copyright 2007 AudioCodes Ltd. All rights reserved.
This document is subject to change without notice.
|
Date Published: Sep-17-2007 |
Date Printed: Sep-18-2007 |
Tip: When viewing this manual on CD, Web site or on any other electronic copy, all cross-references are hyperlinked. Click on the page or section numbers (shown in blue) to reach the individual cross-referenced item directly. To return back to the point from where you accessedhet cross-reference, press the ALT and ◄ keys.
Trademarks
AC logo, Ardito, AudioCoded, AudioCodes, AudioCodes logo, CTI², CTI Squared, InTouch, IPmedia, Mediant, MediaPack, MP-MLQ, NetCoder, Netrake, Nuera, Open Solutions Network, OSN, Stretto, 3GX, TrunkPack, VoicePacketizer, VoIPerfect, What’s Inside Matters, Your Gateway To VoIP, are trademarks or registered trademarks of AudioCodes Limited. All other products or trademarks are property of their respective owners.
WEEE EU Directive
Pursuant to the WEEE EU Directive, electronic and electrical waste must not be disposed of with unsorted waste. Please contact your local recycling authority for disposal of this product.
Customer Support
Customer technical support and service are provided by AudioCodes’ Distributors, Partners, and Resellers from whom the product was purchased. For Customer support for products purchased directly from AudioCodes, contact support@audiocodes.com.
Abbreviations and Terminology
Each abbreviation, unless widely used, is spelled out in full when first used, and only Industry standard terms are used throughout this manual.
|
Version 5.0 |
5 |
September 2007 |

MP-11x & Microsoft Office Communications Server 2007
Related Documentation
|
Document # |
Manual Name |
|
|
LTRT-656xx (e.g., LTRT-65601 |
MP-11x & MP-124 |
SIP Release Notes |
|
LTRT-654xx |
MP-11x & MP-124 |
SIP User’s Manual |
Warning: Ensure that you connect the FXO ports to Central Office (CO) / PBX lines only.
Warning: The MediaPack is supplied as a sealed unit and must only be installed or serviced by qualified service personnel.
Warning: Disconnect the MediaPack from the electrical mains and from the Telephone Network Voltage (TNV) before servicing.
Note: MediaPack and MP-11x refers collectively to the MP-118 and MP-114 FXO VoIP gateways.
Note: Where “network” appears in this manual,itmeans LAN, WAN, etc. accessed via the gateway’s Ethernet interface.
Note: FXO (Foreign Exchange Office) is the interface replacing the analog telephone and connects to a Public Switched Telephone Network (PSTN) line from the Central Office (CO) or to a Private Branch Exchange (PBX). The FXO is designed to receive line voltage and ringing current, supplied from the CO or the PBX (just like an analog telephone). An FXO VoIP gateway interfaces between the CO/PBX line and the Internet.
|
Quick Installation Guide |
6 |
Document #: LTRT-26301 |
|
Quick Installation Guide |
1. Introduction |
1 Introduction
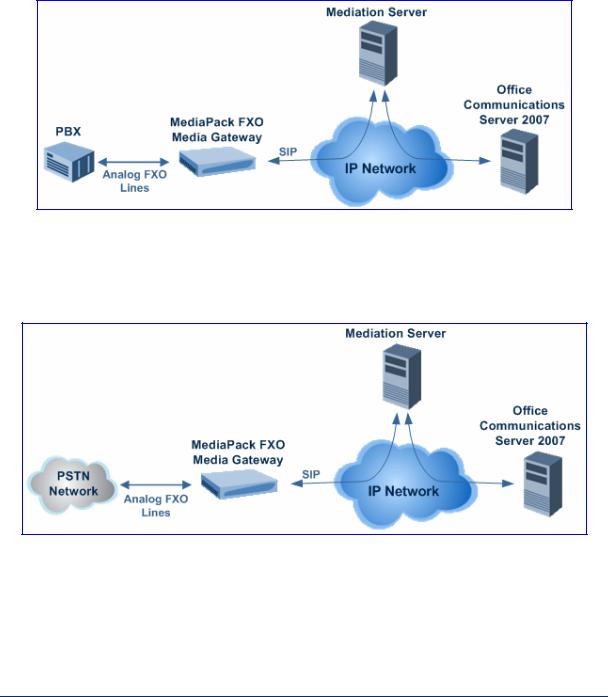
This guide provides step-by-step instructions for quickly setting up AudioCodes’ MediaPack (MP-118 and MP-114) Session Initiation Protocol (SIP) voice-over-IP(VoIP) gateways for intermediating between third-party, private branch exchanges (PBX) or various Public Switched Telephone Network (PSTN) interfaces, and Microsoft® Office Communications Server 2007 (Office Communications Server 2007). For further information regarding Office Communications Server 2007, refer to Microsoft’s Web site (http://www.microsoft.com/uc).
The figure below illustrates a network architecture with a PBX. In this scenario, the AudioCodes’ gateway connects to the PBX using analog lines (FXO), and to Office Communications Server 2007 through Microsoft® Mediation Server (Mediation Server) on the IP network. The MediaPack gateways ensure interoperability with leading, third-party PBXs.
Figure 1-1: Network Architecture with PBX
The figure below illustrates a network architecture that provides a direct connection to the PSTN network. In this scenario, the AudioCodes’ gateway connects to PSTN using analog lines. At the other end, the gateway connects to Office Communications Server 2007 through Mediation Server on the IP network.
Figure 1-2: Network Architecture with PSTN Interface
|
Version 5.0 |
7 |
September 2007 |

MP-11x & Microsoft Office Communications Server 2007
The AudioCodes’ MP-11x FXO gateway can be integrated in the Office Communications Server 2007 / Unified Communications (UC) environments, by implementing one of the following options:
One-to-One: each PBX line connected to an FXO port on the gateway, serves one Office Communications Server 2007 user / endpoint (OCS client) and is defined for automatic dialing for this OCS client. A PBX or PSTN user that wants to call the OCS client, dials the OCS client’s PBX line number.
One-to-Many:group of PBX lines connected to the ga teway serves all the OCS clients. When a new call is received from the PBX, the gateway answers the call and performs one of the following:
•Plays a dial tone, after which the caller can dial the OCS client’s extension number.
•Plays a pre-recorded greeting message to the caller, requesting the caller to dial the desired OCS client (for example, “Welcome company X, please dial the desired extension number”). The gateway acts as an interactive voice response (IVR) system. For this option, you may need to upload a pre-recorded tone file (refer the User’s Manual).
PBX-Sends-Digits: group of Direct Inward Dialing (DID) PBX lines connected to the gateway serves all the OCS clients. When a new call is received from the PBX, the gateway answers the call, and then the PBX automatically sends the OCS client number as it was received.
|
Quick Installation Guide |
8 |
Document #: LTRT-26301 |
|
Quick Installation Guide |
2. Quick Start |
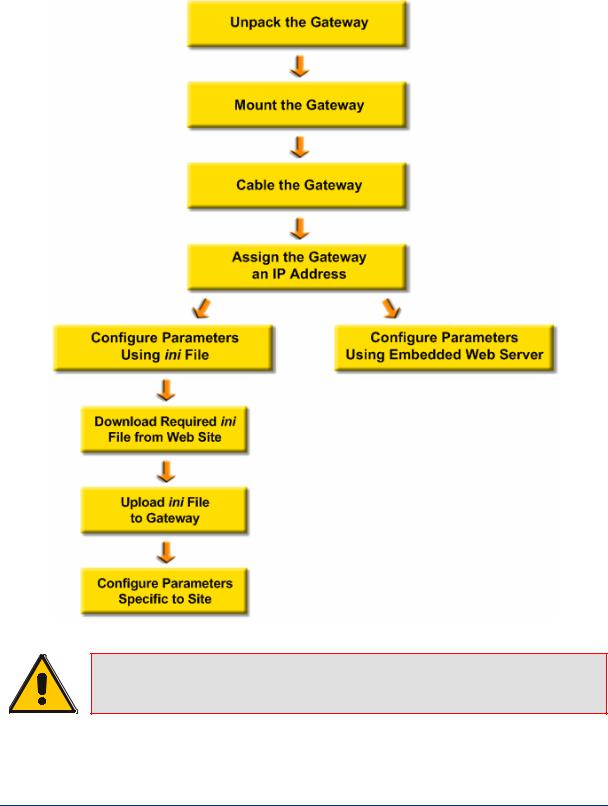
2 Quick Start
This Quick Installation Guide helps you setup the MediaPack gateways for interoperability with either third-party PBXs or various PSTN interfaces, and Office Communications Server 2007. Prior knowledge of IP networks is recommended.
Figure 2-1: Required Steps to Install MediaPack
Refer to Section 3.2
|
Refer to Section 3.3.1 |
Refer to Section 3.3.2 |
Refer to Section 3.3.1.1
Refer to Section 3.3.1.2
Refer to Section 3.3.1.3
Note: For detailed information on how to fully configure the gateway, refer to the MediaPack User’s Manuals.
|
Version 5.0 |
9 |
September 2007 |
MP-11x & Microsoft Office Communications Server 2007
3 Configuring the MediaPack
The gateway is supplied with the application software residing on its flash memory (set to factory default parameters).
Note: This guide assumes that the gateway is running firmware version 5.0. If you are running an earlier version, please update the version to 5.0 (available on AudioCodes’ Web site — refer to Section 3.3.1.1 on page 17).
3.1Embedded Web Server Management Tool
The MediaPack gateway contains an embedded HTTP-based server that provides a userfriendly, client Web interface for gateway configuration and management.
3.1.1Accessing the Embedded Web Server
The MediaPack’s Embedded Web Server is initially accessed using the default IP address (10.1.10.11), login user name (‘Admin’), and login password (‘Admin’).
Note: Ensure that your MediaPack is in the same subnet as the PC running the Web browser. If not, refer to Section 3.2 on page 14 for assigning an IP address to the MediaPack.
¾ To access the Embedded Web Server, take these 4 steps:
1.Open a standard Web-browsing application such as Microsoft™ Internet Explorer™ (Version 6.0 or higher) or Netscape™ Navigator™ (Version 7.2 or higher).
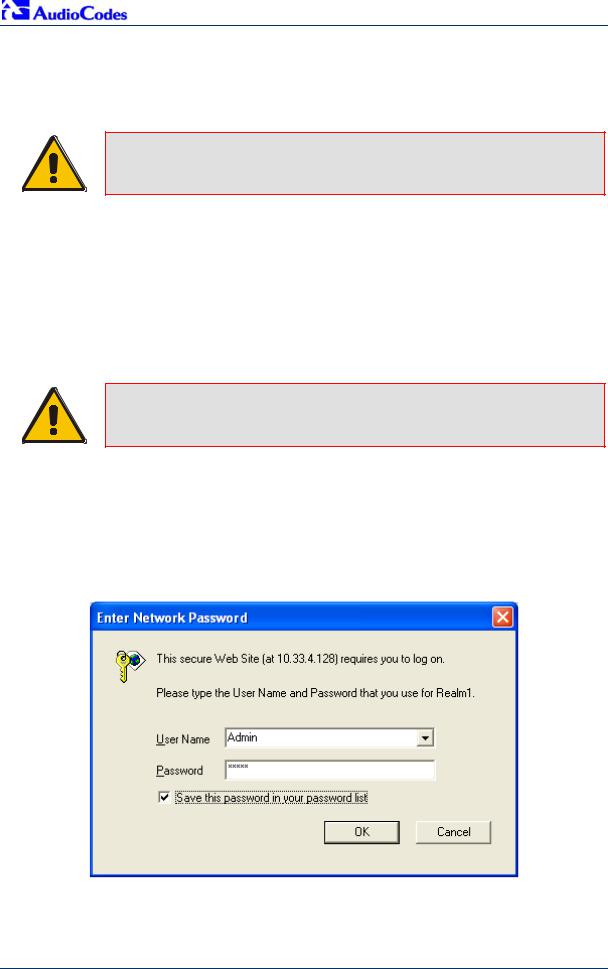
2.In the Web browser’s URL address field, enter the IP address of the gateway; the Embedded Web Server’s ‘Enter Network Password’ screen appears, as shown in the figure below:
Figure 3-1: Enter Network Password Screen
3.Enter the case-sensitive, default username and password. You can later change the login user name and password, as described in Section 3.1.3 on page 12.
4.Click OK; the Embedded Web Server is accessed, displaying the ‘Quick Setup’ screen.
|
Quick Installation Guide |
10 |
Document #: LTRT-26301 |
![]()
|
Quick Installation Guide |
3. Configuring the MediaPack |
3.1.2Navigating the Embedded Web Server
The main areas of the Web interface are shown in the figure below.
Figure 3-2: MediaPack Web Interface Areas
|
Version 5.0 |
11 |
September 2007 |

MP-11x & Microsoft Office Communications Server 2007
3.1.3Changing Login Username and Password
It’s recommended that you change the default user name and password of the Web user account initially used to access the Embedded Web Server.
¾ To change the user name and password, take these 3 steps:
1.Open the ‘Web User Accounts’ screen (Advanced Configuration menu > Security Settings > Web User Accounts).
Figure 3-3: Web User Accounts Screen
2.Change the user name by performing the following:
a.In the ‘User Name’ field, enter the new user name (maximum of 19 characters).
b.Click the Change User Name button; the new user name is immediately applied and the ‘Enter Network Password’ screen appears (shown in Figure 3-1 on page 10).
c.In the ‘Enter Network Password’ screen, enter the new user name (case-sensitive).
3.Change the password by performing the following:
a.In the ‘Current Password’ field, enter the current password.
b.In the ‘New Password’ and ‘Confirm New Password’ fields, enter the new password (maximum of 19 characters).
c.Click the Change Passwordbutton; the new password is immediately applied and the ‘Enter Network Password’ screen appears (shown in Figure 3-1 on page 10).
d.In the ‘Enter Network Password’ screen, enter the new password (case-sensitive).
|
Quick Installation Guide |
12 |
Document #: LTRT-26301 |

|
Quick Installation Guide |
3. Configuring the MediaPack |
3.1.4Searching for ini file Parameters
The Embedded Web Server provides a search engine that allows you to search anyini file parameter that is configurable using the Embedded Web Server. The search result provides you with a link to the relevant Web page in which the parameter appears. You can search for a specific parameter (e.g., ‘EnableIPSec’) or a sub-string of that parameter (e.g., ‘sec’). If you search for a sub-string, the Embedded Web Server lists all found parameters that contain the searched sub-string in their parameter names. The Searchbutton, located near the bottom of the Main menu bar is used to perform parameter searches.
¾To search for an ini file parameter configurable by the Embedded Web Server, take these 3 steps:
1.In the ‘Search’ field, enter the required name or sub-string of the ini file parameter.
2.Click Search; the ‘Searched Result’ screen appears listing all searched parameter results:
Figure 3-4: Searched Result Screen
1
2
3.In the Searched Result list, click the required parameter to open the screen in which the parameter appears. In the relevant screen, the searched parameter is highlighted in green for easy identification, as shown in the figure below.
Figure 3-5: Searched Parameter Highlighted in Screen
Note: If the searched parameter is not located, the «No Matches Found For This String» message is displayed.
|
Version 5.0 |
13 |
September 2007 |

MP-11x & Microsoft Office Communications Server 2007
3.2Assigning an IP Address to the MediaPack
If the gateway’s default IP address (refer Tableto 3-1) doesn’t correspond to the network in which Office Communications Server 2007 is installed, you can assign a different IP address to the gateway, using one of the following methods:
BootP (refer to Section 3.2.1 on page 14)
Command Line Interface (CLI) using the RS-232 interface (refer to Section 3.2.2 on page 15)
Gateway’s HTTP-based Embedded Web Server (refer to Section 3.2.3 on page 16)
DHCP (refer to the gateway’s User’s Manual)
Table 3-1: Gateway Default Networking Parameters
|
Network Parameter |
Default Value |
|
IP address |
10.1.10.11 |
|
Default subnet mask |
255.255.0.0 |
|
Default gateway IP address |
0.0.0.0 |
You can use the hardware reset button to restore the gateway’s networking parameters to their factory default values (refer to Section 6.2 on page 40).
3.2.1Assigning an IP Address using BootP
You can use AudioCodes’ Bootstrap Protocol (BootP) or any third-party BootP application to assign an IP address to the gateway.
¾ To assign an IP address using BootP, take these 3 steps:
1.Open the BootP application.
2.Add a new client by performing the following (for AudioCodes BootP Server application):
a.From the Services menu, choose Clients; the Client Configuration dialog box appears.
b.Add a client configuration for the gateway that you want to initialize, by clicking the Add New Client  button.
c.Enter the necessary fields (i.e., gateway’s MAC address and desired IP address), and then click OK.
|
Quick Installation Guide |
14 |
Document #: LTRT-26301 |
 Loading…
-
Page 1: AudioCodes MP-114
™ MediaPack MP-118 & MP-114 Document #: LTRT-26301 September 2007 Quick Installation Guide Integration with Microsoft ® Office Communications Server 2007[…]
-
Page 2: AudioCodes MP-114
[…]
-
Page 3: AudioCodes MP-114
Quick Installation Guide Contents Version 5.0 3 September 2007 Table of Contents 1 Introducti on ………………………………………………………………………………………………….. 7 2 Quick St art ……………………………………………………………………………………………………. 9 3 Co[…]
-
Page 4: AudioCodes MP-114
MP-11x & Microsoft Office Communications Server 2007 Quick Installation Guide 4 Document #: LTRT-26301 Reader’s Notes[…]
-
Page 5: AudioCodes MP-114
Quick Installation Guide Notices Version 5.0 5 September 2007 Notices Notice This Quick Installation Guide d escribes the installation and configuration of AudioCode s’ Media Pack MP-11x FXO SIP analog media gateways for integration with Microsoft ® Office Communications Server 2007. Information contained in this document is believed to be accur[…]
-
Page 6: AudioCodes MP-114
MP-11x & Microsoft Office Communications Server 2007 Quick Installation Guide 6 Document #: LTRT-26301 Related Documentation Document # Manual Name LTRT-656xx (e.g., LTRT-65601 MP-11x & MP-124 SIP Release Notes LTRT-654xx MP-11x & MP-124 SIP User’s Manual Warning: Ensure that you connect the FXO ports to Central Office (CO) / PBX l[…]
-
Page 7: AudioCodes MP-114
Quick Installation Guide 1. Introduction Version 5.0 7 September 2007 1 Introduction This guide provides step-by-step instructions for quickly setting up AudioCodes’ MediaPack (MP-118 and MP-114) Sessi on Initiation Protocol (SIP) voice-over-IP (VoIP) gateways for intermediating between third-party, p rivate bran ch exchange s (PBX) or various[…]
-
Page 8: AudioCodes MP-114
MP-11x & Microsoft Office Communications Server 2007 Quick Installation Guide 8 Document #: LTRT-26301 The AudioCodes’ MP-11x FXO gate way can be integrated in the Office Communications Serve r 2007 / Unified Communications (UC) environm ents, by implementing one of the following options: One-to-One: each PBX line connected to an FXO p[…]
-
Page 9: AudioCodes MP-114
Quick Installation Guide 2. Quick Start Version 5.0 9 September 2007 2 Quick Start This Quick Installation Guide helps you setup t he M ediaPack gateways for interoperability with either third-party PBXs or various PSTN interf aces, and Office Communi cations Server 2007. Prior knowledge of IP networks is recom mended. Figure 2-1: Required Steps to[…]
-
Page 10: AudioCodes MP-114
MP-11x & Microsoft Office Communications Server 2007 Quick Installation Guide 10 Document #: LTRT-26301 3 Configuring the MediaPack The gateway is supplied with the appli cation softwar e residing on it s flash memory (set to fact ory default parameters). Note: This guide as sumes that the gateway is running firmware version 5. 0. If you are ru[…]
-
Page 11: AudioCodes MP-114
Quick Installation Guide 3. Configuring the MediaPack Version 5.0 11 September 2007 3.1.2 Navigating the Embedded Web Server The main areas of the Web interface are shown in the figure bel ow. Figure 3-2: MediaPack Web Interface Areas[…]
-
Page 12: AudioCodes MP-114
MP-11x & Microsoft Office Communications Server 2007 Quick Installation Guide 12 Document #: LTRT-26301 3.1.3 Changing Login User name and Password It’s recommended that you change the d efault user name and password of the Web user ac count initially used to access the Embedded Web Server. ¾ To change the user name and password, take the[…]
-
Page 13: AudioCodes MP-114
Quick Installation Guide 3. Configuring the MediaPack Version 5.0 13 September 2007 3.1.4 Searching for ini file Parameters The Embedded Web Server provides a search engine that allows you to sea rch any ini file parameter that is configurable using the Embedd ed Web Server. The search result p rovides you with a link to the relevant Web page in wh[…]
-
Page 14: AudioCodes MP-114
MP-11x & Microsoft Office Communications Server 2007 Quick Installation Guide 14 Document #: LTRT-26301 3.2 Assigning an IP Address to the MediaPack If the gateway’s default IP address (refer to Tabl e 3-1 ) doesn’t correspond to the network i n which Office Communications Server 2007 i s installed, you can assign a different IP addre[…]
-
Page 15: AudioCodes MP-114
Quick Installation Guide 3. Configuring the MediaPack Version 5.0 15 September 2007 Table 3-2: Adding a BootP Client 3. Use the gateway’s chassis re set button to physi cally reset the gateway, causing it to use BootP; the gateway changes it s network parameters to the va lues provided by BootP. 3.2.2 Assigning an IP Addr ess Using CLI via RS-[…]
-
Page 16: AudioCodes MP-114
MP-11x & Microsoft Office Communications Server 2007 Quick Installation Guide 16 Document #: LTRT-26301 3.2.3 Assigning an IP Address using HTTP You can assign an IP address to the gateway usin g the gateway’s Embedded Web Server (based on HTTP), by connecting the gateway to a PC with a direct, local Ethernet connection. ¾ To assign an IP[…]
-
Page 17: AudioCodes MP-114
Quick Installation Guide 3. Configuring the MediaPack Version 5.0 17 September 2007 3. Configure the gateway’s ‘IP Address’, ‘Subnet Mask’, and ‘Def ault Gateway IP Address’ fields to correspond with your network IP settings of Office Communications Se rver 2007. 4. Click the Reset button, an d then at the prompt, click OK ; the ga[…]
-
Page 18: AudioCodes MP-114
MP-11x & Microsoft Office Communications Server 2007 Quick Installation Guide 18 Document #: LTRT-26301 Notes: • Ensure that you download the correct ini file so that your gate way is configured correctly fo r interoperability with the deployed PBX / PSTN. • The gateway configuration for the PBX-S ends-Digits option is similar to the One-to[…]
-
Page 19: AudioCodes MP-114
Quick Installation Guide 3. Configuring the MediaPack Version 5.0 19 September 2007 Figure 3-8: Configuration File Screen 4. Click the Browse button, a nd then navigate to t he folder that contains the ini file you want to upload. 5. Select the file, and then click the Open button; the name and path of the file appear in the field beside the Browse[…]
-
Page 20: AudioCodes MP-114
MP-11x & Microsoft Office Communications Server 2007 Quick Installation Guide 20 Document #: LTRT-26301 3.3.2 Using the Em bedded Web Server You can use the gateway’s user-fri endly, Web interface (describ ed in Section 3.1 on page 10 ) to configure the advanced parameters listed belo w: IP address of Mediation Server (refe r to Sectio[…]
-
Page 21: AudioCodes MP-114
Quick Installation Guide 3. Configuring the MediaPack Version 5.0 21 September 2007 ¾ To define Mediation Server’s IP address, take these 4 steps: 1. Open the ‘Proxy & Registratio n’ screen ( Protocol Management menu > Protocol Definition > Proxy & Registration ). Figure 3-9: Proxy & Registration Screen 2. From the &a[…]
-
Page 22: AudioCodes MP-114
MP-11x & Microsoft Office Communications Server 2007 Quick Installation Guide 22 Document #: LTRT-26301 3.3.2.2 Defining Number of FXO Ports Connected to PBX The gateway’s FXO port (located on the rear panel), interfaces wi th the PBX. By default, all the gateway’s FXO ports (eight for the MP-118; four fo r the MP-114) are enabled. Ho[…]
-
Page 23: AudioCodes MP-114
Quick Installation Guide 3. Configuring the MediaPack Version 5.0 23 September 2007 3.3.2.3 Defining Voice Coders The gateway communicat es with Mediation Serv er using either the G.711 A-law o r G.711 µ -law coder. You can cha nge the default code r using the gate way’s Embedded Web Server. ¾ To define the coder, take these 3 steps: 1. Open[…]
-
Page 24: AudioCodes MP-114
MP-11x & Microsoft Office Communications Server 2007 Quick Installation Guide 24 Document #: LTRT-26301 ¾ To configure the Number Manipulat ion tables, take these 4 steps: 1. Open the Number Manipulation sc reen you want to configure ( Protocol Management menu > Manipulation Tables ); the relevant Manipulation table screen is di splayed. Th[…]
-
Page 25: AudioCodes MP-114
Quick Installation Guide 3. Configuring the MediaPack Version 5.0 25 September 2007 Table 3-3: Number Manipulation Parameters Description Parameter Description Source IP (Applicable only to the ‘Destination Phone Number Manipulation Table for IP to Tel’) Source IP address of the call (obtaine d from the Contact header in the INVITE message). No[…]
-
Page 26: AudioCodes MP-114
MP-11x & Microsoft Office Communications Server 2007 Quick Installation Guide 26 Document #: LTRT-26301 3.3.2.4.2 Number Normalization Examples Two examples are provided belo w for number normalizatio n. The examples are based on the following assumptions: a PBX with prefix (local) number 333 and a 4-digit extension number that begins with the […]
-
Page 27: AudioCodes MP-114
Quick Installation Guide 3. Configuring the MediaPack Version 5.0 27 September 2007 Modifying PBX, Local, and National Calls to E.164 Format for Inbound Calls: Inbou nd calls refer to call s received by OCS clie nts connected through IP to the Office Communications Server 2 007. 1. Local calls from the PBX or PSTN: the PBX user only dials a 4-d[…]
-
Page 28: AudioCodes MP-114
MP-11x & Microsoft Office Communications Server 2007 Quick Installation Guide 28 Document #: LTRT-26301 3.3.2.5 Defining Answer Supervision When there is a call from Office Communications Server 20 07 to the gateway, the gateway behavior depends on whether or not the Answer Supervi sion feature is enabled. If Answer Supervision is enabled, the […]
-
Page 29: AudioCodes MP-114
Quick Installation Guide 3. Configuring the MediaPack Version 5.0 29 September 2007 3.3.2.6 Defining Automatic Dialing When using the One-to-One option, each PBX line that is connected to an FXO port serves one OCS client. You must define automatic dialing for each FXO port connected to the OCS clien t. ¾ To define Automatic Dialing, take these 4 […]
-
Page 30: AudioCodes MP-114
MP-11x & Microsoft Office Communications Server 2007 Quick Installation Guide 30 Document #: LTRT-26301 3.3.2.7 Enabling Caller ID If the Caller ID service i s enabled, the gateway det ects the Caller I D signal from the Tel side (PBX / PSTN) and sends it to M ediation Server over IP in the SIP INVIT E message. Therefore, to allow the OCS clien[…]
-
Page 31: AudioCodes MP-114
Quick Installation Guide 3. Configuring the MediaPack Version 5.0 31 September 2007 3.3.2.8 Defining SIP Transport Type The procedure below de scribes how to config ur e the SIP transport type. You may need to chang e the gateway’s SIP transport type from UDP (default) to TCP, since this is the transport type use d by Mediation Server. ¾ To d[…]
-
Page 32: AudioCodes MP-114
MP-11x & Microsoft Office Communications Server 2007 Quick Installation Guide 32 Document #: LTRT-26301 3.3.2.9 Defining Disconnect on Broken Connection The procedure below describes how to conf igure the Di sconnect on Broken Connectio n parameter. Since Mediat ion Server uses Sile nce Suppression, it may not send Rea l-time Transport Protocol[…]
-
Page 33: AudioCodes MP-114
Quick Installation Guide 3. Configuring the MediaPack Version 5.0 33 September 2007 3.3.2.10 Defining DTMF Payload Type The procedure below describes how to define the dual-tone multi-frequen cy (DTMF) payload type. The DTMF payload ty pe used by Mediation Server is 101. You may nee d to set this value at the gateway as well. ¾ To define the DTMF […]
-
Page 34: AudioCodes MP-114
MP-11x & Microsoft Office Communications Server 2007 Quick Installation Guide 34 Document #: LTRT-26301 3.3.2.11 Enabling One-Stage Dialing One-stage dialing is whe n the gateway receiv es an IP-to-Tel call, off-hoo ks the PBX line connected to the PBX / PSTN telephone, and then immediately dials the destination telephone number. In othe r word[…]
-
Page 35: AudioCodes MP-114
Quick Installation Guide 3. Configuring the MediaPack Version 5.0 35 September 2007 3.3.2.12 Defining Channel Select Mode Channel select mod es determine the method in wh ich new IP-to-Tel calls (i.e., calls from OCS clients to PBX/PSTN phones) are assigned to gatew ay port s (i.e., channels). It is recommended to select the Cyclic Asce nding mode,[…]
-
Page 36: AudioCodes MP-114
MP-11x & Microsoft Office Communications Server 2007 Quick Installation Guide 36 Document #: LTRT-26301 3.3.2.13 Disabling RTCP Attribute By default, the RTP Control Protocol (RTCP) attribute (EnableRTCPAttribute) is enab led. However, you need to disable it by usin g the AdminPage of the Embedded Web Server. ¾ To disable the RTCP attribute, t[…]
-
Page 37: AudioCodes MP-114
Quick Installation Guide 4. Backing Up Configuration Settings Version 5.0 37 September 2007 4 Backing Up Configuration Settings Once you have modified configuration settings, it is recom mended you make a backup of the modified configuration file. This is done by saving the modified ini configuration file to a folder on your PC. If you lose your ga[…]
-
Page 38: AudioCodes MP-114
MP-11x & Microsoft Office Communications Server 2007 Quick Installation Guide 38 Document #: LTRT-26301 5 Monitoring the Gateway The gateway provides several methods to monitor various operating statuses: Monitoring the gateway’s front-panel cha ssis LEDs (re fer to Section 5.1 ). Monitoring the gateway’s channels usin g the E[…]
-
Page 39: AudioCodes MP-114
Quick Installation Guide 5. Monitoring the Gateway Version 5.0 39 September 2007 5.2 Monitoring the Channels You can monitor channel s using the gateway’s Embe dded Web Server. ¾ To monitor the status of the channels, take this step: Open the ‘Channel Status’ screen, by clicking the Ho me icon on the main menu bar. Figure 5-1: C[…]
-
Page 40: AudioCodes MP-114
MP-11x & Microsoft Office Communications Server 2007 Quick Installation Guide 40 Document #: LTRT-26301 6 Troubleshooting 6.1 General Troubleshooting The table below lists general troublesho oting that may arise with your gateway. Table 6-1: General Troubleshooting Problem Possible Cause Solution Ready LED is lit red Hardware component failure.[…]
-
Page 41: AudioCodes MP-114
Quick Installation Guide 6. Troubleshooting Version 5.0 41 September 2007 ¾ To configure the Syslog parameters, take these 7 steps: 1. Open the ‘Management Settings’ screen ( Advanced Configuration menu > Management Settings ); the ‘Management Settings’ screen is di splayed. Figure 6-1: Management Settings Screen 2. In the ‘Syslog […]
-
Page 42: AudioCodes MP-114
MP-11x & Microsoft Office Communications Server 2007 Quick Installation Guide 42 Document #: LTRT-26301 7 Regulatory Information Declaration of Conformity Application of Council Direc tives: 73/23/EEC (including amendments) 89/336/EEC (including amendments) 1999/5/EC Annex-II of the Directive Standards to which Con formity is Declared: EN55022:[…]
-
Page 43: AudioCodes MP-114
Quick Installation Guide 7. Regulatory Information Version 5.0 43 September 2007 Safety Notices • Installation and service of this unit must only be performed by authorized, qualified service personnel. • The MediaPack FXO Output Tones and DTMF level should not ex c eed -9 dBm (AudioCodes setting #23) in order to comply with FCC 68, TIA/EIA/IS-[…]
-
Page 44: AudioCodes MP-114
™ MediaPack MP-118 & MP-114 Quick Installation Guide Integration with Microsoft ® Office Communications Server 2007 www.audiocodes.com[…]
-
AudioCodes MP-114 — page 1
™ MediaPack MP-118 & MP-114 Document #: LTRT-26301 September 2007 Quick Installation Guide Integration with Microsoft ® Office Communications Server 2007 …
-
AudioCodes MP-114 — page 2
…
-
AudioCodes MP-114 — page 3
Quick Installation Guide Contents Version 5.0 3 September 2007 Table of Contents 1 Introducti on ………………………………………………………………………………………………….. 7 2 Quick St art ……………………………………………………………………………………………………. 9 3 Co …
-
AudioCodes MP-114 — page 4
MP-11x & Microsoft Office Communications Server 2007 Quick Installation Guide 4 Document #: LTRT-26301 Reader’s Notes …
-
AudioCodes MP-114 — page 5
Quick Installation Guide Notices Version 5.0 5 September 2007 Notices Notice This Quick Installation Guide d escribes the installation and configuration of AudioCode s’ Media Pack MP-11x FXO SIP analog media gateways for integration with Microsoft ® Office Communications Server 2007. Information contained in this document is believed to be accur …
-
AudioCodes MP-114 — page 6
MP-11x & Microsoft Office Communications Server 2007 Quick Installation Guide 6 Document #: LTRT-26301 Related Documentation Document # Manual Name LTRT-656xx (e.g., LTRT-65601 MP-11x & MP-124 SIP Release Notes LTRT-654xx MP-11x & MP-124 SIP User’s Manual Warning: Ensure that you connect the FXO ports to Central Office (CO) / PBX l …
-
AudioCodes MP-114 — page 7
Quick Installation Guide 1. Introduction Version 5.0 7 September 2007 1 Introduction This guide provides step-by-step instructions for quickly setting up AudioCodes’ MediaPack (MP-118 and MP-114) Sessi on Initiation Protocol (SIP) voice-over-IP (VoIP) gateways for intermediating between third-party, p rivate bran ch exchange s (PBX) or various …
-
AudioCodes MP-114 — page 8
MP-11x & Microsoft Office Communications Server 2007 Quick Installation Guide 8 Document #: LTRT-26301 The AudioCodes’ MP-11x FXO gate way can be integrated in the Office Communications Serve r 2007 / Unified Communications (UC) environm ents, by implementing one of the following options: One-to-One: each PBX line connected to an FXO p …
-
AudioCodes MP-114 — page 9
Quick Installation Guide 2. Quick Start Version 5.0 9 September 2007 2 Quick Start This Quick Installation Guide helps you setup t he M ediaPack gateways for interoperability with either third-party PBXs or various PSTN interf aces, and Office Communi cations Server 2007. Prior knowledge of IP networks is recom mended. Figure 2-1: Required Steps to …
-
AudioCodes MP-114 — page 10
MP-11x & Microsoft Office Communications Server 2007 Quick Installation Guide 10 Document #: LTRT-26301 3 Configuring the MediaPack The gateway is supplied with the appli cation softwar e residing on it s flash memory (set to fact ory default parameters). Note: This guide as sumes that the gateway is running firmware version 5. 0. If you are ru …
-
AudioCodes MP-114 — page 11
Quick Installation Guide 3. Configuring the MediaPack Version 5.0 11 September 2007 3.1.2 Navigating the Embedded Web Server The main areas of the Web interface are shown in the figure bel ow. Figure 3-2: MediaPack Web Interface Areas …
-
AudioCodes MP-114 — page 12
MP-11x & Microsoft Office Communications Server 2007 Quick Installation Guide 12 Document #: LTRT-26301 3.1.3 Changing Login User name and Password It’s recommended that you change the d efault user name and password of the Web user ac count initially used to access the Embedded Web Server. ¾ To change the user name and password, take the …
-
AudioCodes MP-114 — page 13
Quick Installation Guide 3. Configuring the MediaPack Version 5.0 13 September 2007 3.1.4 Searching for ini file Parameters The Embedded Web Server provides a search engine that allows you to sea rch any ini file parameter that is configurable using the Embedd ed Web Server. The search result p rovides you with a link to the relevant Web page in wh …
-
AudioCodes MP-114 — page 14
MP-11x & Microsoft Office Communications Server 2007 Quick Installation Guide 14 Document #: LTRT-26301 3.2 Assigning an IP Address to the MediaPack If the gateway’s default IP address (refer to Tabl e 3-1 ) doesn’t correspond to the network i n which Office Communications Server 2007 i s installed, you can assign a different IP addre …
-
AudioCodes MP-114 — page 15
Quick Installation Guide 3. Configuring the MediaPack Version 5.0 15 September 2007 Table 3-2: Adding a BootP Client 3. Use the gateway’s chassis re set button to physi cally reset the gateway, causing it to use BootP; the gateway changes it s network parameters to the va lues provided by BootP. 3.2.2 Assigning an IP Addr ess Using CLI via RS- …
-
AudioCodes MP-114 — page 16
MP-11x & Microsoft Office Communications Server 2007 Quick Installation Guide 16 Document #: LTRT-26301 3.2.3 Assigning an IP Address using HTTP You can assign an IP address to the gateway usin g the gateway’s Embedded Web Server (based on HTTP), by connecting the gateway to a PC with a direct, local Ethernet connection. ¾ To assign an IP …
-
AudioCodes MP-114 — page 17
Quick Installation Guide 3. Configuring the MediaPack Version 5.0 17 September 2007 3. Configure the gateway’s ‘IP Address’, ‘Subnet Mask’, and ‘Def ault Gateway IP Address’ fields to correspond with your network IP settings of Office Communications Se rver 2007. 4. Click the Reset button, an d then at the prompt, click OK ; the ga …
-
AudioCodes MP-114 — page 18
MP-11x & Microsoft Office Communications Server 2007 Quick Installation Guide 18 Document #: LTRT-26301 Notes: • Ensure that you download the correct ini file so that your gate way is configured correctly fo r interoperability with the deployed PBX / PSTN. • The gateway configuration for the PBX-S ends-Digits option is similar to the One-to …
-
AudioCodes MP-114 — page 19
Quick Installation Guide 3. Configuring the MediaPack Version 5.0 19 September 2007 Figure 3-8: Configuration File Screen 4. Click the Browse button, a nd then navigate to t he folder that contains the ini file you want to upload. 5. Select the file, and then click the Open button; the name and path of the file appear in the field beside the Browse …
-
AudioCodes MP-114 — page 20
MP-11x & Microsoft Office Communications Server 2007 Quick Installation Guide 20 Document #: LTRT-26301 3.3.2 Using the Em bedded Web Server You can use the gateway’s user-fri endly, Web interface (describ ed in Section 3.1 on page 10 ) to configure the advanced parameters listed belo w: IP address of Mediation Server (refe r to Sectio …
-
AudioCodes MP-114 — page 21
Quick Installation Guide 3. Configuring the MediaPack Version 5.0 21 September 2007 ¾ To define Mediation Server’s IP address, take these 4 steps: 1. Open the ‘Proxy & Registratio n’ screen ( Protocol Management menu > Protocol Definition > Proxy & Registration ). Figure 3-9: Proxy & Registration Screen 2. From the &a …
-
AudioCodes MP-114 — page 22
MP-11x & Microsoft Office Communications Server 2007 Quick Installation Guide 22 Document #: LTRT-26301 3.3.2.2 Defining Number of FXO Ports Connected to PBX The gateway’s FXO port (located on the rear panel), interfaces wi th the PBX. By default, all the gateway’s FXO ports (eight for the MP-118; four fo r the MP-114) are enabled. Ho …
-
AudioCodes MP-114 — page 23
Quick Installation Guide 3. Configuring the MediaPack Version 5.0 23 September 2007 3.3.2.3 Defining Voice Coders The gateway communicat es with Mediation Serv er using either the G.711 A-law o r G.711 µ -law coder. You can cha nge the default code r using the gate way’s Embedded Web Server. ¾ To define the coder, take these 3 steps: 1. Open …
-
AudioCodes MP-114 — page 24
MP-11x & Microsoft Office Communications Server 2007 Quick Installation Guide 24 Document #: LTRT-26301 ¾ To configure the Number Manipulat ion tables, take these 4 steps: 1. Open the Number Manipulation sc reen you want to configure ( Protocol Management menu > Manipulation Tables ); the relevant Manipulation table screen is di splayed. Th …
-
AudioCodes MP-114 — page 25
Quick Installation Guide 3. Configuring the MediaPack Version 5.0 25 September 2007 Table 3-3: Number Manipulation Parameters Description Parameter Description Source IP (Applicable only to the ‘Destination Phone Number Manipulation Table for IP to Tel’) Source IP address of the call (obtaine d from the Contact header in the INVITE message). No …
-
AudioCodes MP-114 — page 26
MP-11x & Microsoft Office Communications Server 2007 Quick Installation Guide 26 Document #: LTRT-26301 3.3.2.4.2 Number Normalization Examples Two examples are provided belo w for number normalizatio n. The examples are based on the following assumptions: a PBX with prefix (local) number 333 and a 4-digit extension number that begins with the …
-
AudioCodes MP-114 — page 27
Quick Installation Guide 3. Configuring the MediaPack Version 5.0 27 September 2007 Modifying PBX, Local, and National Calls to E.164 Format for Inbound Calls: Inbou nd calls refer to call s received by OCS clie nts connected through IP to the Office Communications Server 2 007. 1. Local calls from the PBX or PSTN: the PBX user only dials a 4-d …
-
AudioCodes MP-114 — page 28
MP-11x & Microsoft Office Communications Server 2007 Quick Installation Guide 28 Document #: LTRT-26301 3.3.2.5 Defining Answer Supervision When there is a call from Office Communications Server 20 07 to the gateway, the gateway behavior depends on whether or not the Answer Supervi sion feature is enabled. If Answer Supervision is enabled, the …
-
AudioCodes MP-114 — page 29
Quick Installation Guide 3. Configuring the MediaPack Version 5.0 29 September 2007 3.3.2.6 Defining Automatic Dialing When using the One-to-One option, each PBX line that is connected to an FXO port serves one OCS client. You must define automatic dialing for each FXO port connected to the OCS clien t. ¾ To define Automatic Dialing, take these 4 …
-
AudioCodes MP-114 — page 30
MP-11x & Microsoft Office Communications Server 2007 Quick Installation Guide 30 Document #: LTRT-26301 3.3.2.7 Enabling Caller ID If the Caller ID service i s enabled, the gateway det ects the Caller I D signal from the Tel side (PBX / PSTN) and sends it to M ediation Server over IP in the SIP INVIT E message. Therefore, to allow the OCS clien …
-
AudioCodes MP-114 — page 31
Quick Installation Guide 3. Configuring the MediaPack Version 5.0 31 September 2007 3.3.2.8 Defining SIP Transport Type The procedure below de scribes how to config ur e the SIP transport type. You may need to chang e the gateway’s SIP transport type from UDP (default) to TCP, since this is the transport type use d by Mediation Server. ¾ To d …
-
AudioCodes MP-114 — page 32
MP-11x & Microsoft Office Communications Server 2007 Quick Installation Guide 32 Document #: LTRT-26301 3.3.2.9 Defining Disconnect on Broken Connection The procedure below describes how to conf igure the Di sconnect on Broken Connectio n parameter. Since Mediat ion Server uses Sile nce Suppression, it may not send Rea l-time Transport Protocol …
-
AudioCodes MP-114 — page 33
Quick Installation Guide 3. Configuring the MediaPack Version 5.0 33 September 2007 3.3.2.10 Defining DTMF Payload Type The procedure below describes how to define the dual-tone multi-frequen cy (DTMF) payload type. The DTMF payload ty pe used by Mediation Server is 101. You may nee d to set this value at the gateway as well. ¾ To define the DTMF …
-
AudioCodes MP-114 — page 34
MP-11x & Microsoft Office Communications Server 2007 Quick Installation Guide 34 Document #: LTRT-26301 3.3.2.11 Enabling One-Stage Dialing One-stage dialing is whe n the gateway receiv es an IP-to-Tel call, off-hoo ks the PBX line connected to the PBX / PSTN telephone, and then immediately dials the destination telephone number. In othe r word …
-
AudioCodes MP-114 — page 35
Quick Installation Guide 3. Configuring the MediaPack Version 5.0 35 September 2007 3.3.2.12 Defining Channel Select Mode Channel select mod es determine the method in wh ich new IP-to-Tel calls (i.e., calls from OCS clients to PBX/PSTN phones) are assigned to gatew ay port s (i.e., channels). It is recommended to select the Cyclic Asce nding mode, …
-
AudioCodes MP-114 — page 36
MP-11x & Microsoft Office Communications Server 2007 Quick Installation Guide 36 Document #: LTRT-26301 3.3.2.13 Disabling RTCP Attribute By default, the RTP Control Protocol (RTCP) attribute (EnableRTCPAttribute) is enab led. However, you need to disable it by usin g the AdminPage of the Embedded Web Server. ¾ To disable the RTCP attribute, t …
-
AudioCodes MP-114 — page 37
Quick Installation Guide 4. Backing Up Configuration Settings Version 5.0 37 September 2007 4 Backing Up Configuration Settings Once you have modified configuration settings, it is recom mended you make a backup of the modified configuration file. This is done by saving the modified ini configuration file to a folder on your PC. If you lose your ga …
-
AudioCodes MP-114 — page 38
MP-11x & Microsoft Office Communications Server 2007 Quick Installation Guide 38 Document #: LTRT-26301 5 Monitoring the Gateway The gateway provides several methods to monitor various operating statuses: Monitoring the gateway’s front-panel cha ssis LEDs (re fer to Section 5.1 ). Monitoring the gateway’s channels usin g the E …
-
AudioCodes MP-114 — page 39
Quick Installation Guide 5. Monitoring the Gateway Version 5.0 39 September 2007 5.2 Monitoring the Channels You can monitor channel s using the gateway’s Embe dded Web Server. ¾ To monitor the status of the channels, take this step: Open the ‘Channel Status’ screen, by clicking the Ho me icon on the main menu bar. Figure 5-1: C …
-
AudioCodes MP-114 — page 40
MP-11x & Microsoft Office Communications Server 2007 Quick Installation Guide 40 Document #: LTRT-26301 6 Troubleshooting 6.1 General Troubleshooting The table below lists general troublesho oting that may arise with your gateway. Table 6-1: General Troubleshooting Problem Possible Cause Solution Ready LED is lit red Hardware component failure. …
-
AudioCodes MP-114 — page 41
Quick Installation Guide 6. Troubleshooting Version 5.0 41 September 2007 ¾ To configure the Syslog parameters, take these 7 steps: 1. Open the ‘Management Settings’ screen ( Advanced Configuration menu > Management Settings ); the ‘Management Settings’ screen is di splayed. Figure 6-1: Management Settings Screen 2. In the ‘Syslog …
-
AudioCodes MP-114 — page 42
MP-11x & Microsoft Office Communications Server 2007 Quick Installation Guide 42 Document #: LTRT-26301 7 Regulatory Information Declaration of Conformity Application of Council Direc tives: 73/23/EEC (including amendments) 89/336/EEC (including amendments) 1999/5/EC Annex-II of the Directive Standards to which Con formity is Declared: EN55022: …
-
AudioCodes MP-114 — page 43
Quick Installation Guide 7. Regulatory Information Version 5.0 43 September 2007 Safety Notices • Installation and service of this unit must only be performed by authorized, qualified service personnel. • The MediaPack FXO Output Tones and DTMF level should not ex c eed -9 dBm (AudioCodes setting #23) in order to comply with FCC 68, TIA/EIA/IS- …
-
AudioCodes MP-114 — page 44
™ MediaPack MP-118 & MP-114 Quick Installation Guide Integration with Microsoft ® Office Communications Server 2007 www.audiocodes.com …