
Для работы в облаке LanCloud поддерживаются телефоны AudioCodes моделей 405HD, 420HD, 430HD, 440HD, 450HD.
Необходимые файлы и прошивки
Для корректной работы необходимо, чтобы телефоны имели последнюю прошивку, поддерживающую работу с Lync / Skype for Business Server.
Прошивки для телефона:
AudioCodes 405HD: http://www.lancloud.ru/distrib/audiocodes/uc405hd-latest.img
AudioCodes 420HD: http://www.lancloud.ru/distrib/audiocodes/uc420hd-latest.img
AudioCodes 430HD: http://www.lancloud.ru/distrib/audiocodes/uc430hd-latest.img
AudioCodes 440HD: http://www.lancloud.ru/distrib/audiocodes/uc440hd-latest.img
AudioCodes 450HD: http://www.lancloud.ru/distrib/audiocodes/uc450hd-latest.img
Для обновления телефона необходимо загрузить необходимую прошивку на свой компьютер, затем зайти через web-браузер в администраторскую часть, выбрать пункт Management, Manual Update, Firmware Upgrade, и в поле Firmware File Location указать загруженный файл. После обновления телефон перезагрузится.
Драйвер для Better Together over Ethernet:
http://www.lancloud.ru/distrib/audiocodes/audiocodes_btoe.exe
Настройка телефона с прошивкой версии 3.х.х.х (текущей)
Для входа в администраторскую часть телефона необходимо с компьютера с помощью web-браузера открыть https://IP_адрес_телефона/. Необходимо открывать именно с префиксом HTTPS, иначе невозможно ввести учетные данные для Skype for Business. Предупреждение о безопасности сертификата можно проигнорировать.
Узнать IP-адрес телефона можно с его панели, нажав кнопку Menu, далее пункт Status и пункт Network Status.
Стандартный доступ к web-интерфейсу телефона — имя пользователя admin и пароль 1234.
В панели слева нужно в разделе Configuration выбрать пункт SfB sign-in — Sign in. Если вы зашли в web-интерфейс не по HTTPS а по HTTP — данная страница не откроется.
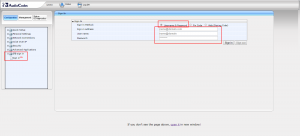
Необходимо переключить метод аутентификации в Username & Password, и ввести:
Sign-in address: SIP-адрес пользователя LanCloud, например user@domain.ru
User name: как правило, аналогичен SIP-адресу, например user@domain.ru
Password: пароль на облачную учетную запись.
После нажатия кнопки Sign-in телефон аутентифицируется и будет готов к работе.
При смене пароля пользователя в облаке, необходимо обновить пароль и в интерфейсе телефона, автоматического обновления не происходит.
Настройка телефона с прошивкой версии 2.х.х.х (старой)
Для входа в администраторскую часть телефона необходимо с компьютера с помощью web-браузера зайти: http://ip_адрес_телефона_audiocodes/
Стандартный доступ к администраторской части телефона: логин admin, пароль 1234.
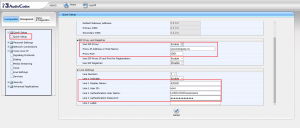
Для указания пользователя user@yourdomain.ru нужно указать следующее: раздел Quick Setup:
Use SIP Proxy: Enable
Proxy IP Address or Host Name: yourdomain.ru — имя домена после знака @ в SIP-адресе
Proxy Port: 5061
Line 1 User ID: user — имя до знака @ в SIP-адресе
Line 1 Authentication User Name: авторизационный логин вида LANCLOUD\xxxxxxxxxxx
Line 1 Authentication Password: авторизационный пароль пользователя
Для работы телефона в облаке LanCloud нужно настроить параметр Use Hosting Proxy: раздел Voice over IP -> Signaling Protocols.
Use Hosting Outbound Proxy: Enable
Outbound Proxy IP Address or Host Name: lyncedge01.lancloud.ru
Outbound Proxy Port: 443
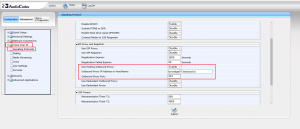
Затем, нужно с панели телефона нажать на кнопку Sign In для регистрации пользователя в сети.
Настройка телефона через Better Together over Ethernet
Для сопряжения для одновременной работы клиента Lync/Skype for Business и телефона AudioCodes необходимо установить на компьютер драйвер BToE по указанной в начале страницы ссылке. Если на компьютере активирован режим контроля учетных записей (User Account Control), то на скачанный файл нужно щелкнуть правой кнопкой мыши, и выбрать пункт «Запуск от имени администратора».
Перед сопряжением необходимо запустить на компьютере клиент Lync/Skype for Business, и войти под именем того пользователя, которого необходимо настроить на телефоне.
Далее, необходимо на телефоне нажать кнопку Menu и кнопку BToE. Телефон выдаст на экран код сопряжения. Необходимо на компьютере в трее щелкнуть правой кнопкой на значке AudioCodes BToE Manager, выбрать пункт Phone Pairing, и ввести код, который написан на телефоне. После ввода кода клиент Lync\Skype for Business еще раз запросит пароль — и после авторизации телефон будет сконфигурирован и сопряжен с компьютером.
Table of Contents: AudioCodes 440HD IP Phone Owner’s Manual
-
4 Attaching Stand to Phone For instructions on assembling the stand, scan me or visit https://www.youtube.com/watch?v=oGe9STB9lFE Desktop mounting: Slide stand’s outer rails (A) onto phone’s outer notches (A). Wall mounting: Slide stand’s middle rails (B) onto phone’s inner notches (B). 5 Upgrading IP Phone Firmware If you need to upgrade your phone’s firmware, refer to the Software Upgrade Configuration Note, downloadable from http://www.audiocodes.com/downloads. 6
-
AudioCodes 440HD 3 Cabling the Phone Warning: Prior to connecting power, refer to the Compliancy and Regulatory Information at www.audiocodes.com/library. To cable the phone: 1. Connect the short, straight end of the phone cord to the handset and the longer straight end of the cord to the handset jack on the phone. 2. (Optional) Connect the RJ-9 headset jack to a headset. 3. Connect the RJ-45 LAN port to your LAN network (LAN port or LAN switch/router) with a CAT 5 / 5e Ethernet cable. 4. Connect the RJ-45 PC port to a computer with a CAT 5 / 5e straight-th
-
AudioCodes 440HD To transfer a call: 1. During a call, press the TRANSFER key, enter the phone number of the party to whom to transfer the call, and then press the Dial softkey. 2. After that party answers, press the Trans softkey. To perform blind transfer, consult your IT manager. To automatically forward incoming calls to another phone: 1. Press the Forward softkey (in the idle screen). 2. Select the condition on which you want calls forwarded:- Always, Busy or No Reply. If you choose No Reply, define aft
Questions, Opinions and Exploitation Impressions:
You can ask a question, express your opinion or share our experience of AudioCodes 440HD device using right now.
- Home
- Brands
- AudioCodes Manuals
- IP Phone
- AudioCodes 440HD
13 docs – User Manuals, Help Guides and Specs – for the AudioCodes 440HD product are present in our data base.
|
Related Products:
Product Types:
|
")
")
")
")
")
")
")
")
")
")
")
")
")
Tips for Finding Manuals:
This web-page provides a list of 13 accessible operating manuals and information books describing AudioCodes 440HD.
All manuals and instructions for AudioCodes 440HD are introduced in an easy-to-use PDF format and may be gratuitously downloaded or looked through directly from the site.
The page offers the following types of manuals: IP Phone.
Helpful hints: While selecting a necessary guide for AudioCodes 440HD one should pay special attention to the type of the document.
We try to supply you with the fullest possible set of papers we or our users are able to find. These may be overviews and specifications of the device, mounting and installing instructions, the unit operating rules and maintenance regulations and much more.
Haven’t found a required manual for your AudioCodes 440HD?
Check in a while. We update our guides collection and add new documents on a daily basis for you to be always able to find the very paper you need on our web-site. In case you own a directory or an instruction for AudioCodes 440HD, which is absent on our site, and you’d like to share it with the public, please send it to us as a scanned copy or a PDF file, and we’ll definitely place it on our page while providing your name as a supplier of the doc. Lots of our users will be grateful for your assistance!
-
430HD and 440HD IP Phone User’s Manual 20 Document #: LTRT-11928 3.3 Default Softkeys The table below describes softkeys displayed in the LCD according to menu level currently accessed. To activate a softkey, press the key on the phone keypad, located below the screen, corresponding to the softkey. Note: Softkeys can also be customized by the administrator. For more information, see Section 4.14.3. Table 3-3: Default Softkeys for all Menus
-
AudioCodes 440HD 430HD and 440HD IP Phone User’s Manual 72 Document #: LTRT-11928 6.10 Retrieving Voice Mail Messages You can determine if new messages are in your Voice Mail if: The Ring LED on the front of the phone is permanently lit blue (see Figure 2-1, label 1). A stutter dial tone is heard when you pick up the handset. The Voice Mail key is lit red. To listen to voice mail messages: Press the key on the phone; the phone dials your enterprise’s voice mail box. �
-
User’s Manual 6. Performing Advanced Operations Version 2.2.8 73 430HD and 440HD IP Phone 6.11 Using Multiple Lines Your phone supports up to six lines. Each is configured with its own extension number. The figure below displays the idle screen of a phone set up with two lines whose extensions are ‘John’ and ‘Peter’. Note: Only your phone/network administrator can configure lines. See the Administrator’s Manual for detailed information. 6.11.1 Choosing a Line You can select a line to use. The screen displays a bar above
-
AudioCodes 440HD 430HD and 440HD IP Phone User’s Manual 78 Document #: LTRT-11928 6.13 Logging into a Remote HTTP/S Server When you attempt to download a new configuration file from the Provisioning server, you can optionally be prompted to enter the Provisioning server login credentials (username and password). This feature is useful when, for example, you are provisioning, and attempt to download a configuration file from a Provisioning server. In which case, the server’s authentication process recognizes
-
AudioCodes 440HD 430HD and 440HD IP Phone User’s Manual 64 Document #: LTRT-11928 When activated, Dialing <ext> within <x>s is indicated in the LCD (remote extension and timer). If activated in Multiple Line mode, (Line <n>) (line number) is also indicated in the LCD. Pressing the Dial softkey redials the extension. Pressing the Cancel softkey deactivates auto- redial. Note: • Calls can be made and received while auto-redial is activated. • If auto-redial is activated while another extension is called — which is also unavailable — the caller is prompted to activate
-
AudioCodes 440HD User’s Manual 4. Customizing Your Phone Version 2.2.8 37 430HD and 440HD IP Phone 4.10.3 Adjusting Handset Volume You can adjust the volume of the handset during a call or when making a call. After changing the volume, the newly adjusted level applies to all subsequent handset use. To adjust handset volume: 1. Off-hook the handset and make a call. During the call, press VOL or VOL on the keypad: 2. After adjusting the volume, the Handset Volume bar disappears from the screen.
-
AudioCodes 440HD 430HD and 440HD IP Phone User’s Manual 10 Document #: LTRT-11928 This page is intentionally left blank
-
AudioCodes 440HD User’s Manual 3. Getting Started Version 2.2.8 23 430HD and 440HD IP Phone To access the menus: Press the MENU key located on the device. To navigate to menus and items: Press the navigating control’s upper and lower rim -OR- press the listed item’s number on the keypad, e.g., press 3 to navigate to Keys Configuration > Function Keys. To select a menu or menu item: Press the Select softkey or press the navigation control’s OK button. To cancel and move to a previous menu level: Press the Back softkey. 3.5 Entering
-
430HD and 440HD IP Phone User’s Manual 12 Document #: LTRT-11928 Figure 2-1: Front View 1 4 5 6 7 8 9 10 11 19 18 17 16 13 12 3 14 15 2
-
AudioCodes 440HD 430HD and 440HD IP Phone User’s Manual 66 Document #: LTRT-11928 4. The requested third-party destination extension 2440 to transfer the call is entered: 5. The operator presses the Dial softkey to dial the extension 2440: The call is connected to 2440: 6. Afer consulting with 2440, the operator presses the Trans softkey or TRANSFER: The call from 2450 is transferred to ‘2400’: 7. The operator presses OK and hangs up the phone. 6.6.2 Performing a Semi-Attended Transfer You can perform a semi-attended transfer using the Trans. softkey or the TRANSFER key on the phone. Note: The Trans. soft
-
AudioCodes 440HD User’s Manual A. Specific Third-Party Features Version 2.2.8 83 430HD and 440HD IP Phone A.1.3 Configuring the ‘Forward No Reply’ Timeout as Number of Rings The ‘Forward No Reply’ timeout can be configured as ‘number of rings’ rather than as ‘seconds’. Consult with your network administrator to enable this feature (see the Administrator’s Manual for details). For example, the phone can be configured to ring 2r (2 rings), or 4r (4 rings), for example, before calls are forwarded. The setting can be changed according
-
AudioCodes 440HD 430HD and 440HD IP Phone User’s Manual 18 Document #: LTRT-11928 This page is intentionally left blank.
-
AudioCodes 440HD User’s Manual 6. Performing Advanced Operations Version 2.2.8 75 430HD and 440HD IP Phone 6.11.7 Answering Calls To answer a call: 1. Determine on which line the call is coming in. You’ll see an arrow in the LCD pointing to it. The figure below shows a call coming in from 5001 on Line 2 configured as 4000. 2. Press the Line key. 6.11.8 Ending Calls You can only end calls that are active, i.e., not on hold. To end a call: 1. Make sure that the call is active and not on hold. 2. Press the End softkey or the SPEAKER key. 6
-
AudioCodes 440HD 430HD and 440HD IP Phone User’s Manual 50 Document #: LTRT-11928 4.14.2.1 Configuring a Programmable Key as a Key Event You can configure a Programmable Key as a Key Event. To configure a Key Event: 1. Access the Line Key screen (MENU key > Keys Configuration > Programmable Keys). 2. Select <Empty>, and then navigate to and select Key Event; the screen below is displayed. In the ‘Key Label’ field, type a name for the key (e.g., Dialed) so you’ll identify it in the LCD: 3. Navigate down to the ‘Key Event’ f
-
AudioCodes 440HD User’s Manual Notices Version 2.2.8 7 430HD and 440HD IP Phone Notice This document shows how to use the AudioCodes 430HD and 440HD IP Phone. Information contained in this document is believed to be accurate and reliable at the time of printing. However, due to ongoing product improvements and revisions, AudioCodes cannot guarantee accuracy of printed material after the Date Published nor can it accept responsibility for errors or omissions. Updates to this document and other documents can be viewed by register
-
AudioCodes 440HD 430HD and 440HD IP Phone User’s Manual 74 Document #: LTRT-11928 6.11.4 Making Multiple Line Calls Your phone supports multiple line calls. Calls can run simultaneously on each line. You can therefore have up to 12 calls running simultaneously, where one is active and 11 are on hold. Example scenario: 1. Line ‘John’ calls A 2. Line ‘Peter’ calls B To make a multiple line call: 1. When the screen is in idle state, navigate to and select the extension line. 2. Lift the handset; in the NEW CALL screen displayed, enter the phone number or pre
-
User’s Manual A. Specific Third-Party Features Version 2.2.8 87 430HD and 440HD IP Phone A.2.4 Logging Out At the end of your shift, log out of the phone. To log out of the phone: In the idle screen, press the Logout softkey; the Logged Out indication is displayed: A.2.5 Configuring Do Not Disturb (DnD) You can configure the phone so that no incoming calls will disturb you. To configure DnD: 1. In the idle screen, press the softkey; the Command Menu opens. 2. Scroll down and select the DnD option. 3.
-
430HD and 440HD IP Phone User’s Manual 24 Document #: LTRT-11928 To enter a letter: Press the letter’s key on the keypad. Successively pressing the same key moves you to that key’s next letter. Pressing another key enters the first letter indicated on it. Long-pressing a key when in alphabet mode enters the numerical digit corresponding to the pressed key. To enter a symbol such as a period (full stop): 1. (Mandatory) Select alphabet mode lower case letters, i.e., abc, as described above. 2. Press the 1 key on the key
-
AudioCodes 440HD User’s Manual Contents Version 2.2.8 3 430HD and 440HD IP Phone Table of Contents 1 Introducing AudioCodes’ 430HD and 440HD IP Phones …………………………………… 9 1.1 About AudioCodes’ Series of High Definition IP Phones …………………………………………… 9 1.2 Cutting Edge Voice Quality & HD VoIP ………………………………………………………………….. 9 2 Setting up the Phone ………………………………………………
-
AudioCodes 440HD User’s Manual 4. Customizing Your Phone Version 2.2.8 31 430HD and 440HD IP Phone 4.5 Changing LCD Contrast Level The LCD supports 0-35 contrast levels. You can select the level that suits you best. To define the LCD’s contrast level: 1. Access the LCD Contrast submenu (MENU key > Settings > LCD Contrast). 2. Press the navigation control’s left or right rim to navigate to the contrast level that suits you best. 3. Press the Save softkey to apply your setting.
-
User’s Manual 7. Troubleshooting Version 2.2.8 79 430HD and 440HD IP Phone 7 Troubleshooting Read this if a problem with your phone occurs. If this does not facilitate resolving the issue, contact your system administrator. Table 7-1: Troubleshooting Symptom Problem Corrective Procedure Phone is off (no LCD displays and LEDs) Phone is not receiving power Verify that the AC/DC power adapter is attached firmly to the DC input on the rear of the phone. Verify that the AC/DC power
-
AudioCodes 440HD 430HD and 440HD IP Phone User’s Manual 8 Document #: LTRT-11928 Related Documentation Document Name 430HD and 440HD IP Phone Release Notes 420HD, 430HD and 440HD IP Phone Administrator’s Manual 430HD IP Phone Quick Guide 440HD IP Phone Quick Guide Document Revision Record LTRT Description 11926 Version 2.2.2. May 2015. 11927 Version 2.2.4. August 2015. 11928 Version 2.2.8. February 2016.
-
User’s Manual 6. Performing Advanced Operations Version 2.2.8 69 430HD and 440HD IP Phone 6.7 Hosting a 3 ‐ Way Conference Call You can make a 3-way conference call with two other parties. To make a 3 ‐ way conference call: 1. Call first participant 5001 and wait for them to answer. 2. Press the Conf softkey: 3. Enter the number of the second participant to conference with (7000): 4. Press the Dial softkey and wait for 7000 to answer: 5. Press the Conf softkey; a 3-way confere
-
User’s Manual 1. Introducing AudioCodes’ 430HD and 440HD IP Phones Version 2.2.8 9 430HD and 440HD IP Phone 1 Introducing AudioCodes’ 430HD and 440HD IP Phones AudioCodes 430HD and 440HD IP Phone are based on AudioCodes High Definition voice technology, providing clarity and a rich audio experience in Voice-over-IP (VoIP) calls. The 430HD and 440HD are multiple-line (up to 6 lines), 2 concurrent calls per line premium model which includes a large monochrome
-
AudioCodes 440HD 430HD and 440HD IP Phone User’s Manual 40 Document #: LTRT-11928 4.12 Managing Your Personal Directory You can add contacts to the Personal Directory and edit and delete them if necessary. After adding a contact, you can call the contact directly from the directory (see Section 6.3 on page 63). If you receive an incoming call from a contact listed in the directory, the LCD displays the name listed. If you assign a speed dial key to the contact, you can press it to call them. Note: �
-
User’s Manual 4. Customizing Your Phone Version 2.2.8 43 430HD and 440HD IP Phone 4.13 Configuring Speed Dial Keys You can configure up to 17 Speed Dial keys. After configuring a Speed Dial key, you can press it to automatically dial the configured phone number. You can configure Speed Dial keys through the Personal directory (see Section 4.13.1) Function Keys (see Section 4.14.1) BLF buttons (see Section 4.13.2) 4.13.1 Configuring a Speed Dial Key through the Personal Directory You can configure a Speed Dial key through the Pe
-
AudioCodes 440HD User’s Manual 3. Getting Started Version 2.2.8 25 430HD and 440HD IP Phone 3.6 Displayed Messages Messages indicating processes in progress, displayed in the LCD, include: Table 3-4: Messages Displayed on LCD Indicating Processes In Progress Message Description Initializing Initializing Discovering LLDP Discovering Link Layer Discovery Protocol (LLDP) for initialization Discovering CDP Discovering Cisco Discovery Protocol (CDP) for initialization Acquiring IP Acquiring an IP address from a DHCP server Initializi
-
User’s Manual 4. Customizing Your Phone Version 2.2.8 45 430HD and 440HD IP Phone 4.13.2.2 Deleting a Speed Dial Key You can delete a Speed Dial key. To delete a Speed Dial key: 1. Access the Function Keys screen (MENU key > Keys Configuration > Function Keys): 2. Navigate to the Speed Dial to delete and press the Select softkey: 3. In the ‘Number’ field, delete the entire number using the Clear softkey. 4. Press the Save softkey; the Speed Dial is now listed as ‘Empty’:
-
AudioCodes 440HD User’s Manual 3. Getting Started Version 2.2.8 19 430HD and 440HD IP Phone 3 Getting Started The phone features an LCD, providing an intuitive, menu-driven user interface for configuring the phone and viewing call information. This section shows how to use the phone’s LCD. 3.1 LCD in Idle State The figure below shows the phone’s LCD in idle state. Use the table below as reference. Figure 3-1: LCD in Idle State Table 3-1: LCD in Idle State Reference Description 1 Extension lines. An extension line will only be displayed after your system administrator configures it using the Web interface. See the Administrator
-
User’s Manual 4. Customizing Your Phone Version 2.2.8 27 430HD and 440HD IP Phone 4 Customizing Your Phone You can customize your phone for enhanced usability. 4.1 Selecting Language The LCD supports multiple languages. English is the default but you can change it to another. To change the default language: 1. Access the Languages screen (MENU key > Settings > Language). 2. Navigate to the language you require. 3. Press the Select softkey. 4. Press the Save softke
-
AudioCodes 440HD 430HD and 440HD IP Phone User’s Manual 32 Document #: LTRT-11928 4.6 Changing BLF LCD Contrast Note: Applies only to the 440HD IP Phone. The BLF LCD supports 0-39 contrast levels. You can select the level that suits you best. To change the BLF LCD’s contrast level: 1. Access the BLF LCD Contrast submenu (MENU key > Settings > BLF LCD Contr.). 2. Press the navigation control’s left or right rim to navigate to the contrast level that suits you best. 3. Press the Save softkey to apply your setting.
-
AudioCodes 440HD 430HD and 440HD IP Phone User’s Manual 60 Document #: LTRT-11928 5.7 Viewing Missed, Received and Dialed Calls Your phone logs missed, received and dialed calls. In idle state, the LCD displays ‘Missed Calls’ and the number (if any). To view missed calls: Press the Missed softkey. Note: After viewing, the indication disappears from the screen. The next time a call is missed, the indication will reappear. To view call history: 1. Access the Call Log screen (MENU key > Call Log). 2. Select
-
User’s Manual 6. Performing Advanced Operations Version 2.2.8 67 430HD and 440HD IP Phone 3. The operator uses one of the following methods to transfer the call to a third-party destination: • Selects the Trans softkey (use the More button to navigate to it if required) OR • Presses the TRANSFER key on the phone. Music on Hold is played on 2450 (the calling party’s phone). 4. The requested extension 2440 to which to transfer the call is entered (fix screen): 5. The operator presses the Dial softkey to dial the extension 2440.
-
430HD and 440HD IP Phone User’s Manual 86 Document #: LTRT-11928 A.2.1.2 Setting Availability Status When you return to your desk after taking a break or after attending to an external issue, it’s important to restore your status to ‘Ready’ and resume work. To restore your status to ‘Ready’: In the idle screen, press the Ready softkey; the ‘Not Ready’ indication changes to ‘Ready’. A.2.2 Presence
-
AudioCodes 400HD Series of High Definition IP Phones HD VoIP 430HD and 440HD IP Phone User’s Manual 430HD and 440HD IP Phone Version 2.2.8
-
AudioCodes 440HD User’s Manual 6. Performing Advanced Operations Version 2.2.8 63 430HD and 440HD IP Phone 6 Performing Advanced Operations This section shows how to perform advanced operations. 6.1 Answering Waiting Calls You can accept a second call (waiting call) while there is already a call active. To answer a waiting call: 1. Press the Accept softkey; the active call is put on hold and the waiting call is answered. 2. To resume conversation with the previously active call which is now on hold, navigate to it and press the Resume softkey. Note: To enable / disable the call waiting feature, see Section
-
430HD and 440HD IP Phone User’s Manual 84 Document #: LTRT-11928 A.1.1 Recording an Agent’s Welcome Greeting Agents in a call center can record personal voice greetings which play automatically when calls come in. An agent’s recorded voice greeting welcomes callers to the service they’re seeking. For example: Thanks for contacting Julie at Southern California Edison, how can I assist you? Note: Before using this feature, your network administrator must enable it. For more information, see the Administrator’s Manual. The feature
-
AudioCodes 440HD User’s Manual 6. Performing Advanced Operations Version 2.2.8 65 430HD and 440HD IP Phone 6.6 Transferring Calls You can connect a party with whom you’re in a call, to another party. This is called transferring a call. Call transfers can be attended, semi-attended, or blind. Transfer Method When Attended A transfers caller B to C after caller C answers agrees to take the call from A. Semi-attended transfer A transfers caller B to C before caller C answers the phone. Blind Transfer A
-
430HD and 440HD IP Phone User’s Manual 88 Document #: LTRT-11928 5. In the idle screen to which you’re returned, view the ‘Forward’ indication. A.2.7 Listening in Capability for Call Center Supervisors Call center supervisors can pick up an operator’s phone and listen in on the conversation that the operator is conducting on headphones with the customer, without the customer at the other end sensing that the supervisor is listening in (because the supervisor is in effect muted
-
AudioCodes 440HD User’s Manual 6. Performing Advanced Operations Version 2.2.8 71 430HD and 440HD IP Phone To deactivate DnD: 1. Make sure that the phone is in idle state and that the idle screen is displayed, i.e., that you’re not in a call or dialing a number. 2. Press the DnD softkey and select All Extensions or the specific line to deactivate, and press the Select softkey; the Ө icon is no longer displayed on the screen and your phone will now ring for incoming calls. Note: If your enterprise deployed a BroadSoft server, your network administrator can control the DnD on the phone from the BroadSoft server.
-
AudioCodes 440HD AudioCodes 400HD Series of High Definition IP Phones HD VoIP 430HD and 440HD IP Phone User’s Manual 430HD and 440HD IP Phone Version 2.2.8 www.audiocodes.com
-
AudioCodes 440HD 430HD and 440HD IP Phone User’s Manual 56 Document #: LTRT-11928 5.2.1 Dialing To dial, either (1) key-in the number on the keypad (2) press the speaker key and enter the number (3) press the speaker key or lift the handset and enter a URL address (e.g., host and domain name, or IP address) or alphabetical letters (e.g., tvservice). To dial a regular-digits phone number: 1. On the keypad, press the first digit key of a regular phone number; the LCD displays the digit in the NEW CALL field; press the remaining digit keys. To delete (from right t
-
430HD and 440HD IP Phone User’s Manual 6 Document #: LTRT-11928 List of Figures Figure 2-1: Front View …………………………………………………………………………………………………………………….. 12 Figure 2-2: Rear View ……………………………………………………………………………………………………………………… 14 Figure 2-3: Cabling ……………………………………………………………………………………………………..
-
AudioCodes 440HD User’s Manual 5. Performing Basic Operations Version 2.2.8 61 430HD and 440HD IP Phone The Call Details screen displays the following logged call information: Number = phone number logged Line = the line to which the call was made Time = the time the call was logged Date = the date on which the call was logged Notes: • The call history lists are stored from the newest to oldest entries. The maximum number of entries for each call history type is 200. Once this maximum is attained, the oldest entry is deleted and replaced with the new entry. • The call history lists are saved on a daily ba
-
User’s Manual 2. Setting up the Phone Version 2.2.8 15 430HD and 440HD IP Phone 2.3 Cabling This section shows how to cable your phone. Figure 2-3: Cabling Action Description Connect the short, straight end of the cord to the handset. Connect the longer, straight end to the jack (RJ-9 port, for the handset) on the phone. Connect the RJ-45 LAN port to your LAN network (LAN port or LAN switch/router), using a CAT 5 / 5e Ethernet cable Connect the RJ-45
-
AudioCodes 440HD 430HD and 440HD IP Phone User’s Manual 62 Document #: LTRT-11928 This page is intentionally left blank.
-
AudioCodes 440HD User’s Manual 5. Performing Basic Operations Version 2.2.8 57 430HD and 440HD IP Phone 5.2.3 Dialing a Missed Call The phone logs all missed calls. The LCD in idle state displays the number of missed calls (if any): To dial a missed call: 1. Press the Missed softkey; the Missed Calls screen is displayed: 2. Navigate to the missed call to dial if there is more than one. 3. Press the Dial softkey or press the OK key.
-
AudioCodes 440HD 430HD and 440HD IP Phone User’s Manual 58 Document #: LTRT-11928 5.3 Answering Calls The phone indicates an incoming call as follows: LCD displays together with the caller’s phone number (or contact name if listed in the phone directory): Phone rings. Ring LED flashes blue. To answer: Pick up the handset -or- Press the headset key (make sure that the headset is connected to the phone) -or- Press the speaker key -or- Press the Accept softkey (the speaker is automatically activated) When you answer, the LCD displays this:
-
AudioCodes 440HD User’s Manual 4. Customizing Your Phone Version 2.2.8 49 430HD and 440HD IP Phone 4.14.2 Configuring Programmable Keys Three Programmable Keys are located on each side of the phone’s LCD, making six in total. Note: When the phone is operating in single-line mode, the two left uppermost keys of the LCD are dedicated to the single line (active and held call) and cannot be configured. The figure below left shows a Programmable Key configured as a Key Event labeled ‘Dialed’. Pressing it opens the Dialed Calls scree
-
AudioCodes 440HD 430HD and 440HD IP Phone User’s Manual 34 Document #: LTRT-11928 4.8 Changing the Default Answer Device You can change the default answer device. The default answer device is the speaker. To change the default to handset or headset: 1. Access the Answer Device screen (MENU key > Settings > Answer Device). 2. Select Speaker or Headset. 3. Press the Save softkey to apply your setting.
-
AudioCodes 440HD User’s Manual 5. Performing Basic Operations Version 2.2.8 59 430HD and 440HD IP Phone 5.4 Rejecting Incoming Calls You can reject an incoming call. If you do, the caller will hear a busy tone from your phone. To reject an incoming call: Press the Reject softkey; the idle screen is displayed. 5.5 Silencing Incoming Calls You can silence an incoming call’s ring. When you do, the caller hears normal ringing but no answer. To silence the ringing of an incoming call: Press the Silence softkey. You can answer a silenced call by pressing the Accept
-
User’s Manual 4. Customizing Your Phone Version 2.2.8 29 430HD and 440HD IP Phone 4.3 Enabling Call Waiting You can enable or disable the call waiting feature. To enable or disable call waiting: 1. Access the Call Waiting screen (MENU key > Settings > Call Waiting). 2. Navigate to and select one of the following: • Disabled (disables call waiting) • Enabled (enables call waiting) 3. Press the Save softkey to apply your setting.
-
AudioCodes 440HD 430HD and 440HD IP Phone User’s Manual 48 Document #: LTRT-11928 4.14.1.2.1 Creating Additional Function Keys This section describes the Function Key configuration when you configure more than 12 Function Keys. In this case, the Function Key LCD display can scroll to up to two more additional pages. Note: Applies only to the 440HD phone model. You can configure up to 12 Function Keys as Speed Dials+BLFs. If you configure more than 12: The second and third pages of Function Keys c
-
AudioCodes 440HD User’s Manual 4. Customizing Your Phone Version 2.2.8 53 430HD and 440HD IP Phone 6. Navigate to and select the next function you want to configure, e.g., Received Calls. The user will be able to press the lower rim of the navigation control button on their phone in order to display Received Calls on the phone’s LCD screen. 4.14.4.1 Removing a Configured Navigation Key Position To remove a configured navigation control position: 1. Navigate to and select the configured navigation control position function you
-
AudioCodes 440HD 430HD and 440HD IP Phone User’s Manual 30 Document #: LTRT-11928 4.4 Setting Date and Time You can manually set date and time displayed on your phone. If a Network Time Protocol (NTP) server is deployed and enabled by your administrator, however, then date and time are automatically retrieved over the Internet from the server and manually setting them will not be possible. You’ll receive this message: Note: • It’s recommended to implement an NTP server (system administrators can see the Administrator’s Manual for detailed information). • If date and time are
-
AudioCodes 440HD User’s Manual 4. Customizing Your Phone Version 2.2.8 51 430HD and 440HD IP Phone 4.14.3 Softkeys Located under your phone’s LCD are four configurable softkeys. The idle screen by default displays (from left to right) (Directory), Missed, Forward, and DnD softkeys: These four softkeys may be customized by the administrator with different key events or additional softkeys may be added. When additional softkeys (more than three) are added, then the right-most button softkey button is set as More. Wh
-
AudioCodes 440HD 430HD and 440HD IP Phone User’s Manual 82 Document #: LTRT-11928 Table A-1: LED Behaviors on an IP Phone in a Shared Call Appearance Group State Phone LED Behavior When the phone is in idle state No LED indications on any phones No behavior When a phone is seized (off hooked) Off hooked phone Solid green (for a 15 second default timeout) Other phones in the group Solid red (for a 15 second default timeout) When an outgoing call is progressing Calling phone Solid green Other phones in the group Solid red When a call comes in All phones Fast flashing green When a phone is busy
-
AudioCodes 440HD User’s Manual 4. Customizing Your Phone Version 2.2.8 33 430HD and 440HD IP Phone 4.7 Setting the LCD Backlight Timeout You can set for how long, in seconds, the phone’s backlight will be lit after you’ve used the phone (idle). After the timeout expires, the backlight turns off. You can opt to have the backlight on all the time if you select Always on. To set the LCD backlight timeout: 1. Access the Backlight Timeout screen (MENU key > Settings > Backlight Timeout). 2. Navigate to Always on, 10 seconds (default), 20 seconds, 30 seconds, 40 seconds, 50 se
-
430HD and 440HD IP Phone User’s Manual 46 Document #: LTRT-11928 4.14 Performing Keys Configuration This section shows how to perform keys configuration. You can configure: Function Keys (see Section 4.14.1 below) Programmable Keys (see Section 4.14.2) Navigation Keys (see Section 4.14.4) 4.14.1 Configuring Function Keys You can configure Function Keys as Speed Dials / Speed Dials+BLFs / Multicast Paging. Note: To configure a F
-
User’s Manual 4. Customizing Your Phone Version 2.2.8 47 430HD and 440HD IP Phone 4.14.1.2 440HD Phone You can configure up to 33 Function Keys as Speed Dials and up to 12 Function Keys as Speed Dials+BLFs. More than 12 Speed Dials+BLFs are not supported by any application server besides BroadSoft. When phones are deployed in a BroadSoft environment, a total of 33 Speed Dials+BLFs can be configured. They can be configured on pages 2 and 3, in addition to on page 1, of the phone’s BLF sidecar. After the 12 th Function Key is confi
-
AudioCodes 440HD 430HD and 440HD IP Phone User’s Manual 42 Document #: LTRT-11928 4.12.4 Deleting a Contact You can delete a contact from the directory. To delete a contact: 1. Access the Personal directory and navigate to the contact to delete: 2. Press the Detail softkey; the contact details are shown. 3. Press the Delete softkey; a ‘Delete current contact?’ warning message appears: 4. Press the Yes softkey to remove the contact from the phone directory or No if you want to keep the contact in the directory; the contact is re
-
AudioCodes 440HD 430HD and 440HD IP Phone User’s Manual 44 Document #: LTRT-11928 4.13.2 Configuring a Speed Dial Key through a BLF Button You can configure a Speed Dial key through a BLF button (1-12). Note: Applies only to the 440HD IP Phone. To configure a Speed Dial key through a BLF button: 1. Long-press a BLF button whose label is empty. The figure below shows the screen that opens if you press the second button from the top: 2. Configure the phone number of the contact to assign the Speed Dial key to. 3. Label the contact. 4. Press the Save softkey; the BLF label displays the name
-
User’s Manual 4. Customizing Your Phone Version 2.2.8 41 430HD and 440HD IP Phone 3. In the ‘Modify contact’ screen, key in the ‘Name’ of the new contact (see Section 3.5 on page 23 for details). 4. Navigate down and key in the new contact’s ‘Office’ number (see Section 3.5 on page 23 for details). Optionally, navigate down and key in the new contact’s ‘Home’ and ‘Mobile’ numbers as well. 5. To define a Speed Dial, see under Section 4.13 on page 43. 6. To manage Speed Dials, see under Section 4.13 on page 43. 4.12.3
-
AudioCodes 440HD 430HD and 440HD IP Phone User’s Manual 76 Document #: LTRT-11928 A screen similar to the following is displayed: 3. Press the Select softkey or the OK key. 4. Use the Navigation Control buttons to reach the Paging option (after the BLF+Speed dial options). 3. Press the Select softkey or the OK key. 4. Enter a name for the Paging Group (new or existing). 5. For the 440HD model, enter a Key Label for the Paging Group (for the 430HD model, you can write this on the paper label manually). 6. Configure the M
-
430HD and 440HD IP Phone User’s Manual 80 Document #: LTRT-11928 This page is intentionally left blank.
-
AudioCodes 440HD User’s Manual 3. Getting Started Version 2.2.8 21 430HD and 440HD IP Phone Softkey Description End Displayed for example after pressing the Dial softkey and when the called party lifts the handset/accepts the call. Also displayed after accepting an incoming call or lifting the handset to answer. Ends the call. Edit Displayed after a menu/submenu item to be edited is selected. Enables editing the selected item. Delete Displayed you select the Detail softkey after selecting a call under a Call
-
AudioCodes 440HD 430HD and 440HD IP Phone User’s Manual 36 Document #: LTRT-11928 4.10 Adjusting Volume You can adjust the volume of the: Ring Tones (e.g., dial tone) Handset Speaker Headset 4.10.1 Adjusting Ring Volume You can adjust the volume of the ring indicating an incoming call. Note: By default, you can adjust ringing volume in the phone’s LCD. Your network administrator, however, can block this capability and provision ringing volume remotely. If this was done and you need to adjust the rin
-
AudioCodes 440HD 430HD and 440HD IP Phone User’s Manual 70 Document #: LTRT-11928 6.7.1 Leaving a 3-Way Conference You Set up without Disconnecting the Others A caller who sets up a three-way conference call with two other parties can leave it without disconnecting the two other parties. The two others continue uninterrupted. The ‘Drop from Conference’ feature supports this capability. To leave a conference you set up, without disconnecting the other parties: Press the Transfer softkey; you’re disconnected from the conference; the two remaining parties continue u
-
AudioCodes 440HD User’s Manual 2. Setting up the Phone Version 2.2.8 17 430HD and 440HD IP Phone 2.4.2 Mounting the Phone on a Wall You can mount the phone on a wall. To mount the phone on a wall: 1. Attach the stand of the phone for the purpose of a wall mounting: a. Detach the base. To detach the phone’s stand, push this button b. Attach it again as you did for a desktop mounting (see Section 2.4.1 on page 16) only now make sure that it’s flatly aligned to lie flush against the wall, i.e., slide the middle rails of the phone stand onto the phone base’s inner notches.
-
AudioCodes 440HD 430HD and 440HD IP Phone User’s Manual 28 Document #: LTRT-11928 4.2 Selecting Ring Tone The phone provides a selection of ring tones that you can choose from to indicate incoming calls. If line extensions are defined on your phone, you can assign a ring tone per line extension. To select a ring tone: 1. Access the Ring Tone screen (MENU key > Settings > Ring Tone). 2. In the Ring Tone screen select All Extensions, or select a specific extension (if extensions are configured) and then selec
-
AudioCodes 440HD 430HD and 440HD IP Phone User’s Manual 52 Document #: LTRT-11928 4.14.4 Configuring a Navigation Key Position Function Each of the four positions of the navigation control button on the phone, i.e., Control Up, Control Down, Control Left, and Control Right, can be configured to perform one of the following five functions: None (default) Missed Calls Received Calls Dialed Calls All Calls Directory To configure a navigation key position to perform a function: 1. Access the Navigation Keys screen (MENU key > Keys Configuration > Navigation Keys)
-
User’s Manual 4. Customizing Your Phone Version 2.2.8 39 430HD and 440HD IP Phone To deactivate call forwarding: When the phone is on-hook, press the Forward softkey; in the Automatic Forward screen, press the Disable softkey to disable forwarding conditions; the → icon disappears from the extension/s on the idle screen. Note: If your enterprise deployed BroadSoft’s BroadWorks server, your network administrator
-
User’s Manual A. Specific Third-Party Features Version 2.2.8 85 430HD and 440HD IP Phone A.2 Genesys’ Contact Centers This section shows how to use AudioCodes IP phones in Genesys contact centers. Note: The section is intended mainly for agents / hotline operators. A.2.1 Using the BroadSoft ACD Genesys Contact Center phones support the BroadSoft ACD. The table below shows how to use the functionalities. Table A-2: Genesys Contact Center Phones
-
430HD and 440HD IP Phone User’s Manual 4 Document #: LTRT-11928 4.14.1 Configuring Function Keys ……………………………………………………………………………………. 46 4.14.1.1 430HD Phone ……………………………………………………………………………………….. 46 4.14.1.2 440HD Phone ……………………………………………………………………………………….. 47 4.14.1.2.1 Creating Additional Function Keys 48 4.14.1.2.2 Dete
-
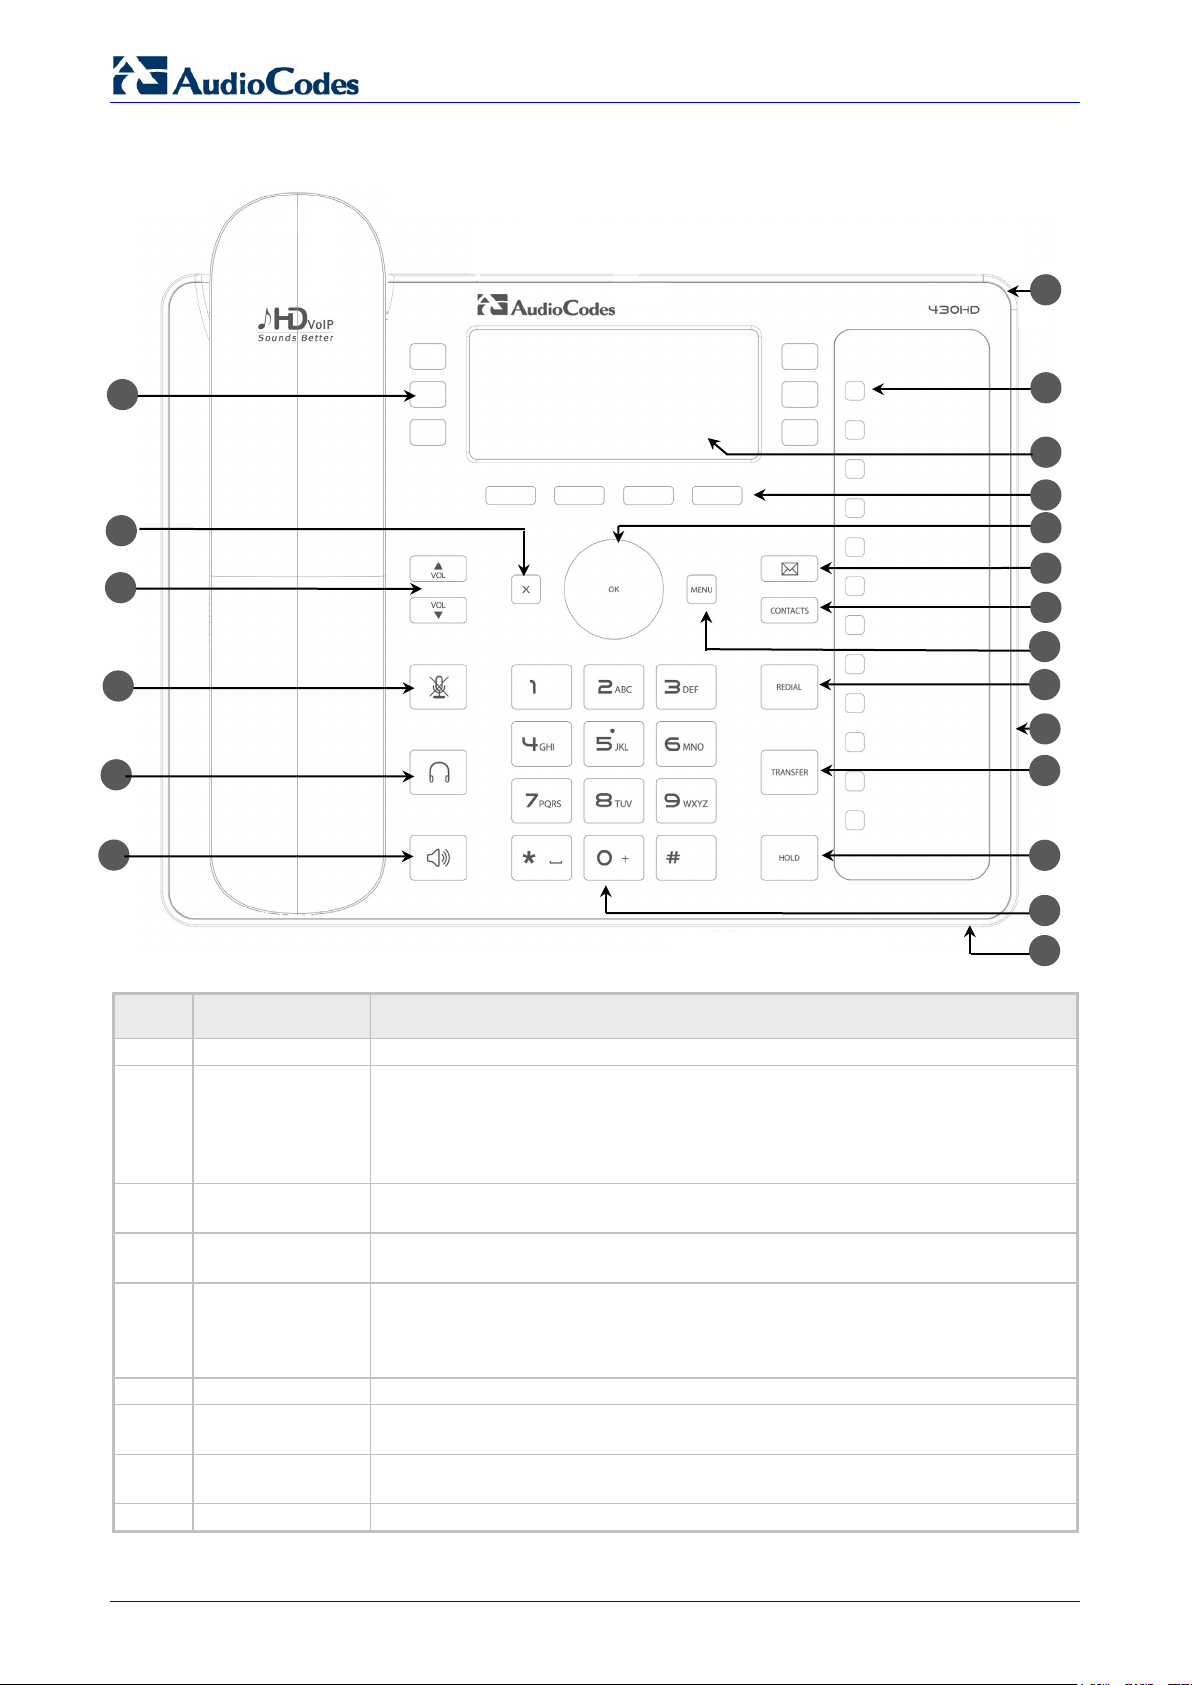
User’s Manual 2. Setting up the Phone Version 2.2.8 13 430HD and 440HD IP Phone Table 2-1: Font View Description Item # Label/Name Description 1 Ring LED Flashing blue light visually indicates an incoming call. 2 Integrated Sidecar Contacts LCD Liquid Crystal Display containing twelve Function Key buttons (see below). 3 Function Key Buttons for Speed Dial & BLF and Multicast Paging Twelve Function Key buttons to quickly call the contact whose name is displayed adjacent to it or for multicasting paged mess
-
430HD and 440HD IP Phone User’s Manual 26 Document #: LTRT-11928 This page is intentionally left blank.
-
User’s Manual A. Specific Third-Party Features Version 2.2.8 89 430HD and 440HD IP Phone A.2.8 Recording an Agent’s Welcome Greeting Agents in a call center can record personal voice greetings which play automatically when calls come in. An agent’s recorded voice greeting welcomes callers to the service they’re seeking. For example: Thanks for contacting Julie at Southern California Edison, how can I assist you? Note: Before using this feature, your network administrator must enable it. For more
-
AudioCodes 440HD User’s Manual Contents Version 2.2.8 5 430HD and 440HD IP Phone A Specific Third-Party Features ……………………………………………………………………….. 81 A.1 BroadSoft …………………………………………………………………………………………………………. 81 A.1.1 Shared Call Appearance ………………………………………………………………………………………. 81 A.1.2 Monitored Lines Based on BroadSoft’s BroadWorks BLF Service ……………………
-
430HD and 440HD IP Phone User’s Manual 68 Document #: LTRT-11928 6.6.3 Performing a Blind Transfer This section describes how to perform a blind transfer. Note: The BLXfer softkey is not available by default on the phone and must be configured in the configuration file. For more information, see the Administrator’s Manual. To perform a blind transfer: 1. A call is made to from extension 2450: 2. The call from 2450 is answered: 3. The operator transfers the call by selecting the Blind Transfer (BLXfer) softkey (use the More button to navigate t
-
430HD and 440HD IP Phone User’s Manual 14 Document #: LTRT-11928 2.2.2 Rear View The rear view of the phone is shown in the figure below and described in the table below. Figure 2-2: Rear View Table 2-2: Rear View Description # Label Description Handset jack, i.e., RJ-9 port, to connect the handset. RJ-45 port to connect to the Ethernet LAN cable for the LAN connection (uplink — 10/100/1000 Mbps). If you’re using Power over Ethernet (PoE), power to the phone is supplied from the Ethernet cable (draws power from either a spare li
-
430HD and 440HD IP Phone User’s Manual 16 Document #: LTRT-11928 2.4 Mounting the Phone The phone can be mounted on a: Desk (see Section 2.4.1 below) Wall (see Section 0 2.4.2) 2.4.1 Mounting the Phone on a Desk You can mount the phone on a desk or flat surface. To mount the phone on a desk or flat surface: 1. Off-hook the handset (if on-hook) and place the phone upside down, i.e., base-up, on your desktop. 2. On the phone’
-
AudioCodes 440HD 430HD and 440HD IP Phone User’s Manual 22 Document #: LTRT-11928 3.4 Accessing Menus Menus are used to access information and to configure the phone. Example: Use Personal directory under Directory to add contacts; use Missed Calls under Call Log to view missed calls and reply to them; use Network Status under Status to view the phone’s dynamic IP address. The figure below shows the phone’s menus and submenus. Figure 3-3: Menus Notes: • The Administration menu is intended for system administrators only. It is passwo
-
User’s Manual 5. Performing Basic Operations Version 2.2.8 55 430HD and 440HD IP Phone 5 Performing Basic Operations This section shows basic phone operations. 5.1 Using Audio Devices You can use one of the following audio devices on the phone for speaking and listening: Handset: To make a call or answer a call, lift the handset off the cradle. Speaker (hands-free mode). To activate it, press the speaker key during a call or when making a call. To deactivate it, press the speaker key again. Headset (hands-free mode). When
-
AudioCodes 440HD User’s Manual 2. Setting up the Phone Version 2.2.8 11 430HD and 440HD IP Phone 2 Setting up the Phone 2.1 Unpacking When unpacking, make sure that the following items are present and undamaged: 430HD and 440HD IP Phone / Stand Handset / Cord Cat 5e Ethernet Cable AC Power Adapter (Optional) If anything appears to be missing or broken, contact the distributor from whom you purchased the phone for assistance. 2.2 Device Description Use the graphics below to identify and familiarize yourself with the device’s hardware functions. 2.2.1 Front View The front view of the phone is shown in Figure 2-1 and
-
AudioCodes 440HD User’s Manual 4. Customizing Your Phone Version 2.2.8 35 430HD and 440HD IP Phone 4.9 Restarting the Phone You can restart the phone. You can use this feature to initially troubleshoot a phone issue (for example), as you do with a pc issue. To restart the phone: 1. Access the Restart screen (MENU key > Settings > Restart). 2. Select Restart and then in the warning prompt that is displayed, press the Yes softkey.
-
AudioCodes 440HD 430HD and 440HD IP Phone User’s Manual 54 Document #: LTRT-11928 This page is intentionally left blank.
-
AudioCodes 440HD User’s Manual 6. Performing Advanced Operations Version 2.2.8 77 430HD and 440HD IP Phone 6.12.3 Receiving a Paged Message When your phone is assigned to a Paging group and you receive a live paged audio message, a screen similar to the following is displayed: How the paged message is played depends on whether your administrator has enabled the Barge-In feature (see the Administrator’s Manual): Barge-in feature is enabled: The message is played immediately. If you receive the message while you are in an active call, the call is automatically placed on hold and the message is su
-
User’s Manual A. Specific Third-Party Features Version 2.2.8 81 430HD and 440HD IP Phone A Specific Third-Party Features This appendix describes phone features that are only applicable to specific third parties. A.1 BroadSoft A.1.1 Shared Call Appearance Note: For detailed information on how to configure BroadSoft’s Shared Call Appearance feature, see the Administrator’s Manual. The network administrator can add multiple ‘locations’ to a line. The feature enables multiple phones to be associated in a shared call appearance group, helping
AudioCodes 400HD Series of High Definition IP Phones
HD VoIP 430HD and 440HD IP Phones
430HD and 440HD IP Phones for Microsoft
®
Skype
™
for Business
Version 3.0.1


User’s Manual Contents
Version 3.0.1 3 430HD and 440HD IP Phone
Table of Contents
1 Introducing the 430HD and 440HD IP Phone …………………………………………………. 11
1.1 About AudioCodes’ Series of High Definition IP Phones …………………………………………. 11
1.2 Cutting Edge Voice Quality & HD VoIP ………………………………………………………………… 11
2 Setting up the Phone ……………………………………………………………………………………. 13
2.1 Unpacking ………………………………………………………………………………………………………… 13
2.2 Device Description …………………………………………………………………………………………….. 13
2.2.1 Front View ………………………………………………………………………………………………………….. 13
2.2.2 Rear View ………………………………………………………………………..………………………………… 15
2.3 Cabling …………………………………………………………………………………………………………….. 16
2.4 Mounting the Phone …………………………………………………………………………………………… 17
2.4.1 Desktop Mounting ……………………………………………………………………………………………….. 17
2.4.1.1 Routing the Handset Cable …………………….………………………………………………. 17
2.4.2 Wall Mounting …………………………………………………………………………………………………….. 17
3 Getting Started …………………………………………………………………………………………….. 19
3.1 Getting Acquainted with the Phone Screen …………………………………………………………… 19
3.2 Softkeys …………………………………………………………………………………………………………… 20
3.3 Navigating the Phone Menu ……………………………………………………………………………….. 21
3.4 Selecting an Alphanumerical Mode ……………………………………………………………………… 22
4 Signing In ……………………………………………………………………………………………………. 25
4.1 Signing in with PIN Code ……………………………………………………………………………………. 25
4.2 Signing in with User Name and Password …………………………………………………………….. 26
4.3 Signing in with the Cloud PBX Web Option …………………………………………………………… 26
4.4 Signing Out ………………………………………………………………………………………………………. 27
4.4.1 Signing out if the ‘Sign out’ Softkey is Removed from the Screen ……………………………… 27
4.5 Displayed Messages ………………………………………………………………………………………….. 30
5 Unlocking a Locked Phone …………………………………………………………………………… 31
6 Customizing Your Phone ……………………………………………………………………………… 33
6.1 Changing the Screen Language ………………………………………………………………………….. 33
6.2 Selecting Ring Tone ………………………………………………………………………………………….. 34
6.3 Enabling Call Waiting …………………………………………………………………………………………. 35
6.4 Managing Simultaneous Incoming Calls ……………………………………………………………….. 35
6.4.1 Configuring Busy on Busy ……………………………………………..…………………………………….. 36
6.5 Defining Call Forwarding ……………………………………………………………………………………. 37
6.6 Setting Date and Time ……………………………………………………………………………………….. 38
6.7 Changing Screen Contrast Level …………………………………………………………………………. 40
6.8 Defining BLF LCD Contrast ………………………………………………………………………………… 41
6.9 Defining Screen’s Backlight Timeout ……………………………………………………………………. 42
6.10 Selecting an Answering Device ……………………………………………………………………………
43
6.11 Defining Location ………………………………………………………………………………………………. 44
6.12 Defining an Outbound Proxy ……………………………………………………………………………….. 45
6.13 Adjusting Volume ………………………………………………………………………………………………. 46
6.13.1 Adjusting Ring Volume ………………………………………………………………………………………… 46
6.13.2 Adjusting Tones Volume ………………………………………………………………………………………. 46
6.13.3 Adjusting Handset Volume …………………………………………………………………………………… 46
6.13.4 Adjusting Speaker Volume …………………………………………………………………………………… 47
6.13.5 Adjusting Headset Volume …………………………………………………………………………………… 47
6.14 Managing Phone Directories ………………………………………………………………………………. 48

430HD and 440HD IP Phone
User’s Manual 4 Document #: LTRT—11939
6.14.1 Accessing Directories ……………………………………………………….…………………………………. 48
6.14.2 Adding a Contact to the Personal Directory ……………………………………………………………. 49
6.14.3 Editing Contact Information in the Personal Directory ………………………………………………. 50
6.14.4 Deleting a Contact from the Personal Directory ………………………………………………………. 51
6.14.5 Adding a Person to Favorites after a Call with them is Logged ………………………………….. 52
6.14.6 Removing a Person from Favorites ………………………………………………………………….……. 53
6.14.7 Searching for a Contact in a Directory ……………………………………………………………………. 54
6.15 Searching for a Contact in the Corporate Directory using T9 …………………………………… 55
6.15.1 Changing from T9 to A/a/1 ……………………………………………………………………………………. 55
6.16 Defining Function Keys as Speed Dials ………………………………………………………………… 56
6.16.1 Configuring Pause Dialing for a Speed Dial to an Ext. behind an IVR ………………………… 57
6.16.2 Editing a Speed Dial ……………………………………………………………………………………………. 58
6.16.3 Deleting the Speed Dial ……………………………………………………..………………………………… 59
6.17 Defining Function Keys as Paging Dials ……………………………………………………………….. 60
6.18 Defining Programmable Keys as Speed Dials ……………………………………………………….. 62
6.18.1 Deleting the Speed Dial ……………………………………………………..………………………………… 63
6.19 Defining Programmable Keys as Paging Dials ………………………………………………………. 64
6.20 Defining Programmable Keys as Key Events ………………………………………………………… 66
6.20.1 Defining Programmable Key #6 as a VocaNOM Speed Dial …………………………………….. 67
6.20.2 Deleting a Key Event ……………………………………………………….………………………………….. 68
6.21 Changing your Presence Status ………………………………………………………………………….. 69
6.22 Viewing Microsoft Exchange Calendar in the Phone Screen …………………………………… 70
6.23 Receiving Meeting Reminders …………………………………………………………………………….. 71
7 Performing Basic Operations ……………………………………………………………………….. 73
7.1 Using Audio Devices ………………………………………………………………………………………….. 73
7.2 Making Calls …………………………………………………………………………………………………….. 73
7.2.1 Dialing ……………………………………………..………………………………………………………………… 73
7.2.2 Redialing ……………………………………………………………………………………………………………. 74
7.2.3 Dialing a Missed Call …………………………..………………………………………………………………. 75
7.3 Answering Calls ………………………………………………………………………………………………… 76
7.4 Rejecting Incoming Calls ……………………………………………………………………………………. 77
7.5 Silencing Incoming Calls …………………………………………………………………………………….. 78
7.6 Making a New Call Even Though a Call is Coming in …………………………………………….. 78
7.7 Ending an Established Call …………………………………………………………………………………. 78
7.8 Viewing Missed, Received and Dialed Calls ………………………………………………………….. 79
7.9 Paging ……………………………………………………………………………………………………………… 81
7.9.1 Performing Outgoing Paging Calls ………………………………………………………………………… 81
7.9.2 Receiving Incoming Paging Calls ……………..…………………………………………………………… 81
8 Performing Advanced Operations ………………………………………………………………… 83
8.1 Answering Waiting Calls …………………………………………………………………………………….. 83
8.2 Placing Calls On Hold ………………………………………………………………………………………… 84
8.3 Handling Multiple Incoming Calls …………………………………………………………………………. 84
8.4 Calling a Contact from ‘Favorities’ ……………………………………………………………………….. 85
8.5 Using a Speed Dial to Call ………………………………………………………………………………….. 86
8.6 Transferring Calls ……………………………………………………………………………………………… 87
8.6.1 Performing a Blind Transfer ………………………………………………………………………………….. 87
8.6.2 Performing a Consultative Transfer ……………………………………………………………………….. 88
8.6.3 Performing a Semi—Consultative Transfer……………………………………………..………………… 89
8.6.4 Merging Calls ……………………………………………………………………………………………………… 90
8.7 Parking a Call …………………………………………………………………………………………………… 91
8.8 Configuring Group Call Pickup (GCP) ………………………………………………………………….. 91
8.9 Initiating a Multi—Party Skype for Business Remote Conference ………………………………. 92

User’s Manual Contents
Version 3.0.1 5 430HD and 440HD IP Phone
8.10 Muting Calls ……………………………………………………………………………………………………… 95
8.1 Setting up Better Together over Ethernet ……………………………………………………………… 96
8.1.1 Installing the BToE PC/Laptop Application ……………………………………………………………… 96
8.1.2 Making Sure BToE is Correctly Installed ………………………………………………………………. 104
8.1.3 Configuring the BToE TCP Port …………………………………………………………………………… 104
8.1.4 Enabling BToE for Online Users ………………………………………………………………………….. 105
8.1.5 Automatically Pairing the BToE PC/Laptop Application with the IP Phone ………………… 105
8.1.6 Manually Pairing the BToE PC/Laptop Application with the IP Phone ………………………. 106
8.1.6.1 Manually Generating a Pair Code ………………………………………………………….. 106
8.1.6.2 Manually Connecting the IP Phone with the BToE PC/Laptop Application…… 107
8.1.6.3 Connecting the Skype for Business Client with the IP Phone …………………….. 110
8.1.7 Making Sure IP Phone/ Skype for Business Client are Paired …………………………………. 110
8.1.7.1 Making Sure Skype for Business Client is Paired …………………………………….. 110
8.1.7.2 Making Sure the IP Phone is Paired …………………………………………………….... 111
8.2 Using BToE Functions ……………………………………………………………………………………… 112
8.2.1 Signing in to the Phone from the Skype for Business Client ……………………………………. 112
8.2.2 Making a Call (Click—to—Dial) ……………………………………………………………………………….. 113
8.2.3 Answering a Call ……………………………………………………………………………………………….. 113
8.2.4 Establishing a Unified Communications Call Conference ……………………………………….. 115
8.2.5 Transferring a Call …………………………………………………………………………………………….. 117
8.2.6 Switching the Primary Audio Device …………………………………………………………………….. 117
8.2.7 Routing Voice from a Video Call to the Phone ……………………….……………………………… 119
8.3 Using the Boss Admin Feature ………………………………………………………………………….. 120
8.3.1 Viewing who the Admins are on the Boss’ Phone ………………………………………………….. 120
8.3.2 Viewing who the Bosses are on the Admin’s Phone ………………………………..…………….. 121
8.3.3 Viewing Bosses and Admins ……………………………..……………………………………………….. 122
8.3.4 Handling an Incoming Call for the Boss………………………………………………………………… 122
8.3.5 Calling on Behalf of the Boss ………………………………………………………………………………. 122
8.3.5.1 Using Boss’ Line Key ……………………………………………………………………………. 123
8.3.5.2 Keying in the Destination Phone Number …………….…………………………………. 124
8.3.5.3 Pressing the CONTACTS Key ………………………………………………………………. 125
8.3.6 Answering a Call on Boss’ Phone ………………………………………………………………………… 125
8.3.7 Redirecting an Established Call to Boss’ Voicemail ………………………….……………………. 126
8.3.8 Redirecting an Incoming Call to Boss’ Voicemail ………………………………………………..…. 126
8.3.9 Admin Handing Off a Call to Boss ……………………………………………………………………….. 127
8.3.10 Boss Handing Off a Call to Admin ……………………………………………………………………….. 127
8.3.11 Boss Monitoring Admins, Seizing a Call Put on Hold by an Admin …………………………... 128
8.3.12 Admin Picks up a Call from Boss …………………………………………………………………………. 128
8.3.13 Admin 1 Picks up a Call from Admin 2 …………………………………………………………………. 128
8.3.14 Admin’s Phone Notifies Recipient that Admin’s Call is on Behalf of Admin’s Boss ……… 129
8.3.15 Admin Calling Boss, Admin Calling a Recipient on Behalf of Boss …………………………... 129
8.4 Using the Multiple Boss Admin Feature with the 440HD Sidecar ……………………………. 130
8.4.1 Displaying a Boss’s or an Admin’s Active Calls in the Sidecar …………………………………. 130
8.4.2 Boss Picking up a Call that Admin Put on Hold ……………………………………………………… 132
8.5 Viewing and Playing Voicemail Messages ………………………………………………………….. 133
8.5.1 Sending an Incoming Call Directly to Voicemail …………………………………………………….. 134
9 Managing Calls on 2+ Phones with a Delegated Line, Using Sidecars …………… 135
10 Troubleshooting ………………………………………………………………………………………… 139
10.1 Uploading Logs to MS Server for Support Purposes …………………………………………….. 139

430HD and 440HD IP Phone
User’s Manual 6 Document #: LTRT—11939
List of Figures
Figure 2-1: Front View …………………………………………………………………………………………………………………….. 14
Figure 2-2: Rear View ……………………………………………………………………………………………………………………… 15
Figure 2-3: Cabling …………………………………………………………………………….…………………………………………… 16
Figure 3-1: Phone Screen in Idle State ……………………………………………………………………………………………… 19
Figure 3-2: Phone Menu ………………………………………………………………………………………………………………….. 21
Figure 3-3: Alphanumerical Selection ………………………………………………………………………………………………… 22
Figure 3-4: Entering a Symbol (e.g., a dot) ………………………………………………………………………………………… 23
Figure 3-5: Reverting to Letters (e.g., abc) ………………………………………………………………………………………… 23
Figure 4-1: Login …………………………………………………………………………………………………………………………….. 28
Figure 4-2: Web Interface – Home Page ………………………………………………………………………………….………… 28
Figure 4-3: Sign—in – Content Blocked Page ………………………………………………………………………………………. 29
Figure 4-4: Sign—in – Windows Security Prompt ………………………………………………………………………………….. 29
Figure 4-5: Windows Security Prompt ……………………………………………………………………………………………….. 30
Figure 4-6: Sign—out ………………………………………..………………………………………………………………………………. 30
Figure 8-1: InstallShield Wizard – Preparing to Install …………………………………………………………………………. 97
Figure 8-2: Welcome to the InstallShield Wizard ………………………………..………………………………………………. 97
Figure 8-3: License Agreement ……………………………………………………………………………….……………………….. 98
Figure 8-4: License Agreement ……………………………………………………………………………….……………………….. 98
Figure 8-5: Destination Folder ………………………………………………………………………………………………………….. 99
Figure 8-6: Change Current Destination Folder ……………………………………………………….…………………………. 99
Figure 8-7: Ready to Install ……………………………………………………………………………………………………………. 100
Figure 8-8: Installing AudioCodes Better2Gether ………………………………………………………………………………. 100
Figure 8-9: InstallShield Wizard Completed ……………………………………………………………………………………… 101
Figure 8-10: AudioCodes Icon in Taskbar ………………………………………………………………………………………… 101
Figure 8-11: Control Panel>Programs>AudioCodes Better2Gether …………………………………………………….. 102
Figure 8-12: Computer Management > Services and Applications ………………………………………………………. 102
Figure 8-13: Device Manager > AudioCodes B2GoE USB Driver ……………………………………………………….. 103
Figure 8-14: Popup Menu ………………………………………………………………………………………………………………. 104
Figure 8-15: About AC BToE ………………………………………………………………………………………………………….. 104
Figure 8-16: TCP Port ……………………………………………………………………………………………………………………. 104
Figure 8-17: AC BToE TCP Port …………………………………………………………………………………………………….. 105
Figure 8-18: Popup Menu ………………………………………………………………………………………………………………. 107
Figure 8-19: Phone Pairing ……………………………………………………………………………..……………………………… 107
Figure 8-20: AC BToE Failed Indication …………………………………………………………………………………………… 107
Figure 8-21: AC BToE is Connected Indication …………………………………………………………………………………. 107
Figure 8-22: Popup Menu: ‘Disconnect’ Enabled, ‘Phone Pairing’ Disabled ………………………………………….. 108
Figure 8-23: BToE Disconnected ………………………………………………..………………………………………………….. 108
Figure 8-24: Popup Menu: BToE Disconnected ………………………………………………………………………………… 108
Figure 8-25: Start > Programs > AudioCodes > BToE Controller ………………………………………………………… 109
Figure 8-26: Skype for Business Sign—in Request Prompt ………………………………………………………………….. 110
Figure 8-27: Primary Device: IP Phone ……………………………………………………………………………………………. 117
Figure 8-28: Primary Device: Headset ………………..…………………………………………………………………………… 118
Figure 8-29: Primary Device: Speaker ………………..…………………………………………………………………………… 118

User’s Manual Contents
Version 3.0.1 7 430HD and 440HD IP Phone
List of Tables
Table 2-1: Font View Description ……………………………………………………………….…………………………………….. 14
Table 2-2: Rear View Description ……………………………………………………………………………………………………… 15
Table 3-1: Phone Screen in Idle State ……………………………………………………………………………………………….. 19
Table 3-2: Softkeys …………………………………………………………………………………………………………………………. 20
Table 4-1: Displayed Messages Indicating Processes In Progress ………….……………………………………………. 30
Table 6-1: Time Zones…………………………………………………………………………………………………………………….. 39
Table 6-2: Presence Statuses ……………………………………………………………………………………..…………………… 69
Table 8-1: Multiple Boss Admin ………………………………………………………………………………………………………. 130
Table 9-1: Phone Screen in Idle Mode and Sidecar BLF Keys and Fields …………………………….……………… 135
Table 9-2: Phone A: Answered Incoming Call on Phone A …………………………………………………………………. 136
Table 9-3: Phone B: Answered Incoming Call on Phone A …………………………………………………………………. 136
Table 9-4: New Incoming Call …………………………………………………………………………….………………………….. 137
Table 9-5: Answered New Incoming Call ….……………………………………………………………………………………… 137
Table 9-6: Phone B: Answered New Incoming Call ……………………..……………………………………………………. 138
Table 9-7: Phone B: Two Red BLF Keys………………………………………………………………………………………….. 138
Table 10—1: Troubleshooting …………………………………………………………………………………………………………… 139

430HD and 440HD IP Phone
User’s Manual 8 Document #: LTRT—11939
This page is intentionally left blank.

User’s Manual Notices
Version 3.0.1 9 430HD and 440HD IP Phone
Notice
Information contained in this document is believed to be accurate and reliable at the time of printing.
However, due to ongoing product improvements and revisions, AudioCodes cannot guarantee
accuracy of printed material after the Date Published nor can it accept responsibility for errors or
omissions. Updates to this document and other documents can be viewed by registered customers at
http://www.audiocodes.com/downloads.
© Copyright 2017 AudioCodes Ltd. All rights reserved.
This document is subject to change without notice.
Date Published: June-26-2017
Trademarks
AudioCodes Ltd. All rights reserved. AudioCodes, AC, HD VoIP, HD VoIP Sounds Better,
IPmedia, Mediant, MediaPack, What’s Inside Matters, OSN, SmartTAP, VMAS, VoIPerfect,
VoIPerfectHD, Your Gateway To VoIP, 3GX, VocaNom, AudioCodes One Voice and CloudBond
are trademarks or registered trademarks of AudioCodes Limited All other products or trademarks
are property of their respective owners. Product specifications are subject to change without
notice.
WEEE EU Directive
Pursuant to the WEEE EU Directive, electronic and electrical waste must not be disposed of with
unsorted waste. Please contact your local recycling authority for disposal of this product.
Customer Support
Customer technical support and services are provided by AudioCodes or by an authorized
AudioCodes Service Partner. For more information on how to buy technical support for
AudioCodes products and for contact information, please visit our Web site at
www.audiocodes.com/support.
Abbreviations and Terminology
Each abbreviation, unless widely used, is spelled out in full when first used.
Documentation Feedback
AudioCodes continually strives to produce high quality documentation. If you have any comments
(suggestions or errors) regarding this document, please fill out the Documentation Feedback form
on our Web site at http://www.audiocodes.com/downloads. Your valuable feedback is highly
appreciated.

430HD and 440HD IP Phone
User’s Manual 10 Document #: LTRT—11939
Related Documentation
Document Name
400HD Series IP Phones for Microsoft Skype for Business Release Notes
400HD Series IP Phones for Microsoft Skype for Business Administrator’s Manual
430HD IP Phone for Microsoft Skype for Business Quick Guide
440HD IP Phone for Microsoft Skype for Business Quick Guide
400HD Series IP Phones for Skype for Business Hosting Partner (LHPv2) Environment Configuration Note

User’s Manual 1. Introducing the 430HD and 440HD IP Phone
Version 3.0.1 11 430HD and 440HD IP Phone
1 Introducing the 430HD and 440HD IP Phone
AudioCodes‘ 430HD and 440HD IP Phones for Microsoft Skype for Business are based on
AudioCodes High Definition voice technology, providing clarity and a rich audio experience in
Voice—over—IP (VoIP) calls.
Note: Microsoft rebranded Lync as Skype for Business so whenever the term Skype for
Business appears in this document, it applies also to Lync.
The phone is a 1-line, 2 concurrent calls per line, premium model which includes a large
monochrome multi—language graphic Liquid Crystal Display (LCD).
The phone is a fully-featured telephone that provides voice communication over an IP network,
allowing you to place and receive phone calls, put calls on hold, transfer calls, make conference
calls, etc.
Read this User’s Manual carefully to learn how to operate the product and take advantage of its
rich feature set.
1.1 About AudioCodes’ Series of High Definition IP Phones
AudioCodes Series of High Definition IP Phones offers a new dimension of voice call quality and
clarity for the IP Telephony market. This new series of IP Phones further expands AudioCodes’
VoIP product offering for the service providers’ hosted services, Enterprise IP telephony and
Enterprise contact centers markets. As a natural addition to the AudioCodes Mobile Clients,
Media Gateway, Media Server & Multi—Service Business Gateway products, the AudioCodes
Series of High Definition IP Phones enable Systems Integrators and end—customers to build end—
to—end solutions that rely on AudioCodes’ technological advantage and proven track record in
providing state—of—the—art products. The AudioCodes Series of High Definition IP Phones meet a
growing demand for High Definition VoIP solutions in end—user phones and terminals, improving
the productivity and efficiency of business communications with new quality standards set by the
High Definition voice technology.
1.2 Cutting Edge Voice Quality & HD VoIP
Based on AudioCodes’ advanced, robust and field—proven VoIPerfectHD™ software,
AudioCodes’ IP Phones are designed to utilize wideband coders. The phones feature enhanced
proprietary capabilities such as packet loss concealment, high quality wideband acoustic echo
canceler, and low—delay adaptive jitter buffers to enrich the HDVoIP experience.

430HD and 440HD IP Phone
User’s Manual 12 Document #: LTRT—11939
This page is intentionally left blank.

User’s Manual Contents
Version 3.0.1 13 430HD and 440HD IP Phone
2 Setting up the Phone
2.1 Unpacking
When unpacking, ensure that the following items are present and undamaged:
IP Phone / Stand Handset / Cord
Cat 5e Ethernet Cable AC Power Adapter (Optional)
If anything appears to be missing or broken, contact the distributor from whom you purchased the
phone for assistance.
2.2 Device Description
Use the graphics below to identify and familiarize yourself with the device’s hardware functions.
2.2.1 Front View
The front view of the phone is shown in Figure 2-1 and described in Table 2-1.
430HD and 440HD IP Phone
User’s Manual 14 Document #: LTRT—11939
Figure 2-1: Front View
Table 2-1: Font View Description
Item # Label/Name Description
Flashing blue light visually indicates an incoming call.
BLF
Twelve Speed Dial buttons to quickly call the contact whose name is
displayed adjacent to it. You can configure these speed dial buttons with
Busy Lamp Field (BLF) functionality. On the 440HD phone, a dedicated
electronic screen displays contacts’ names. On the 430HD phone, you can
attach to a paper strip handwritten contacts’ names.
Interactive screen displaying calling information and letting you configure
phone features.
See Section 3.2 on page 20 for details on the four softkeys and the available
functions they offer.
Control / OK
Press the upper rim to scroll up menus/items in the screen. Press its lower
rim to scroll down. Press its left or right rim to move the cursor left or right
(when editing a contact number for example). Press the OK button to select
Retrieves voicemail messages.
Press to directly access the ‘Favorites’ directory. Other directories can be
accessed from the ‘Favorites’ screen.
Accesses menus: (1) Call Log (2) Calendar (3) Keys Configuration
(4) Settings (5) Device Status (6) Administration (7) Favorities (8) Log upload.
Accesses a list of recently dialed numbers; one can be selected to redial.
User’s Manual Contents
Version 3.0.1 15 430HD and 440HD IP Phone
Item # Label/Name Description
Allows locking the device.
Places an active call on hold.
Keys for entering numbers, alphabetical letters and symbols (e.g., colons)
Allows talking and listening. Network administrators can disable it if required.
Activates the speakerphone, allowing a hands—free conversation.
Activates a call using an external headset.
18
Increases or decreases the volume of the handset, headset, speakerphone,
ring tone and call progress tones.
Cancel an action, such as dialing a number, after beginning it.
20 —
Programmable keys, located on each side of the screen, to which you can
assign functions.
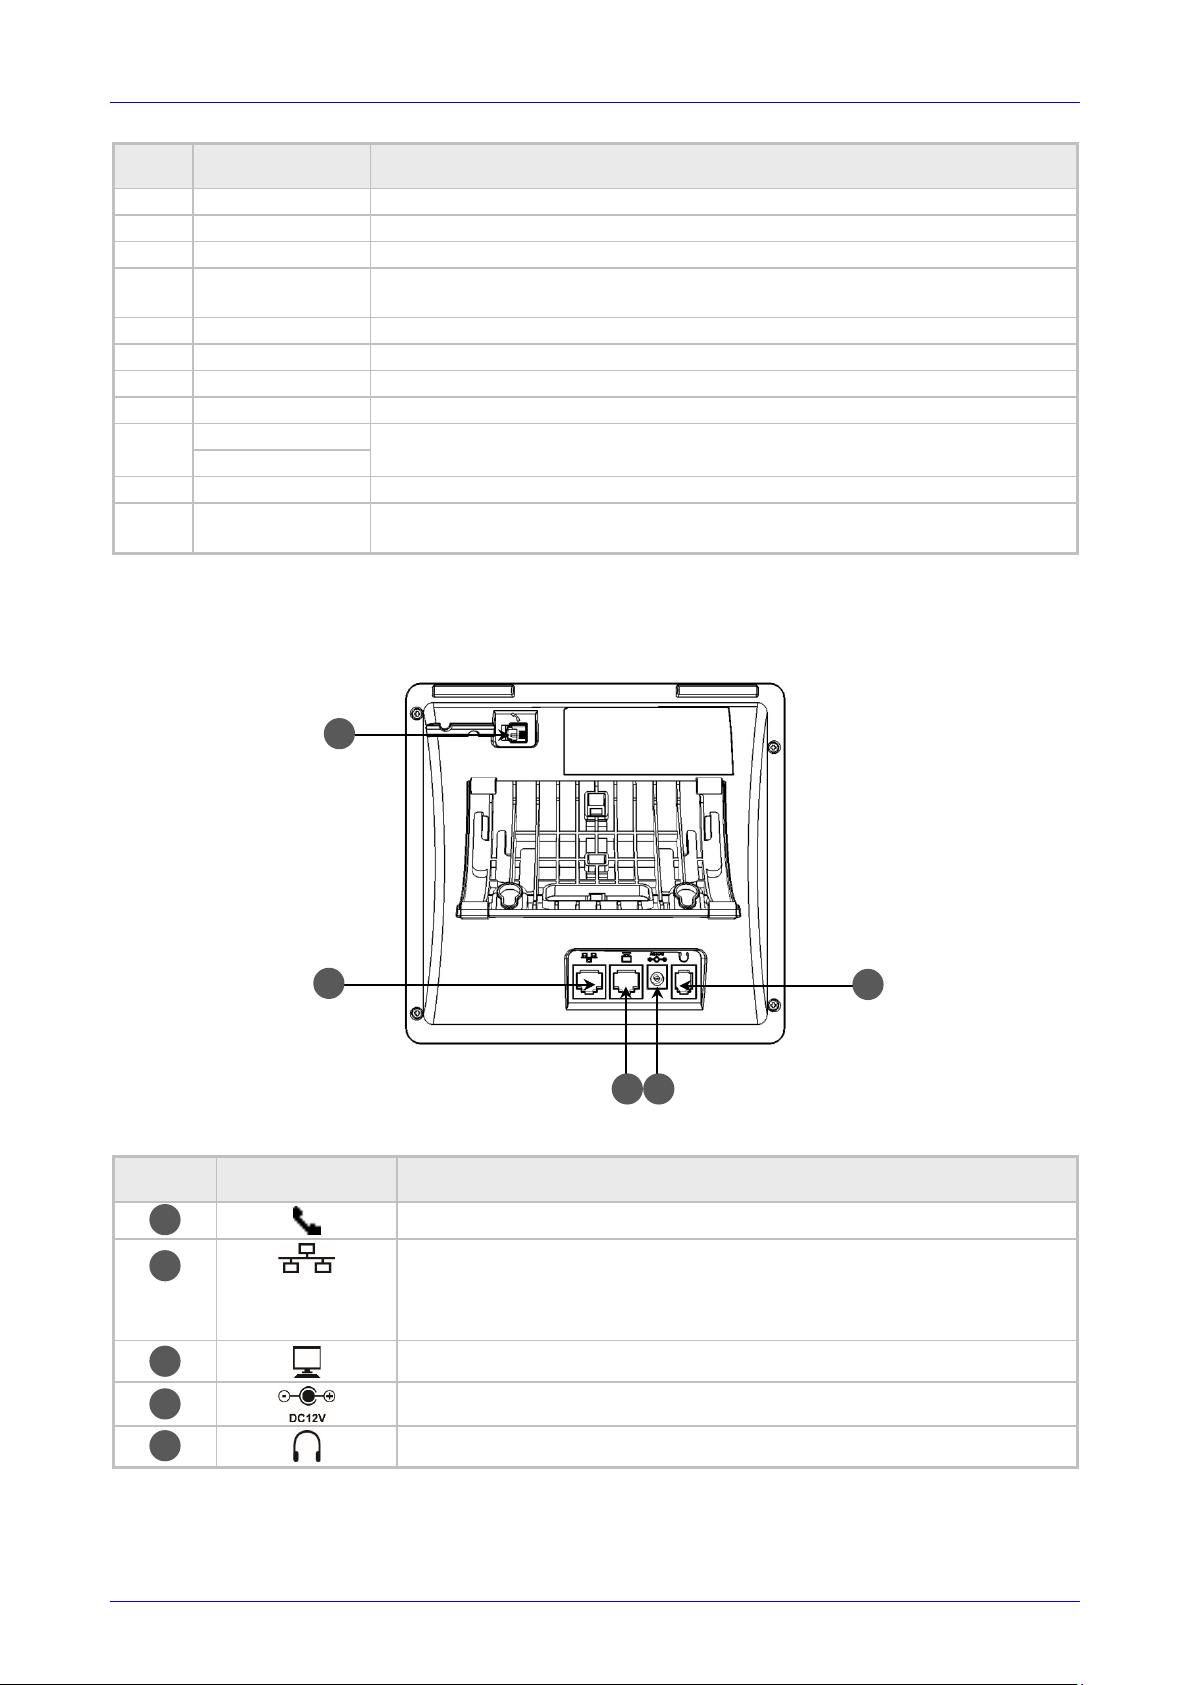
2.2.2 Rear View
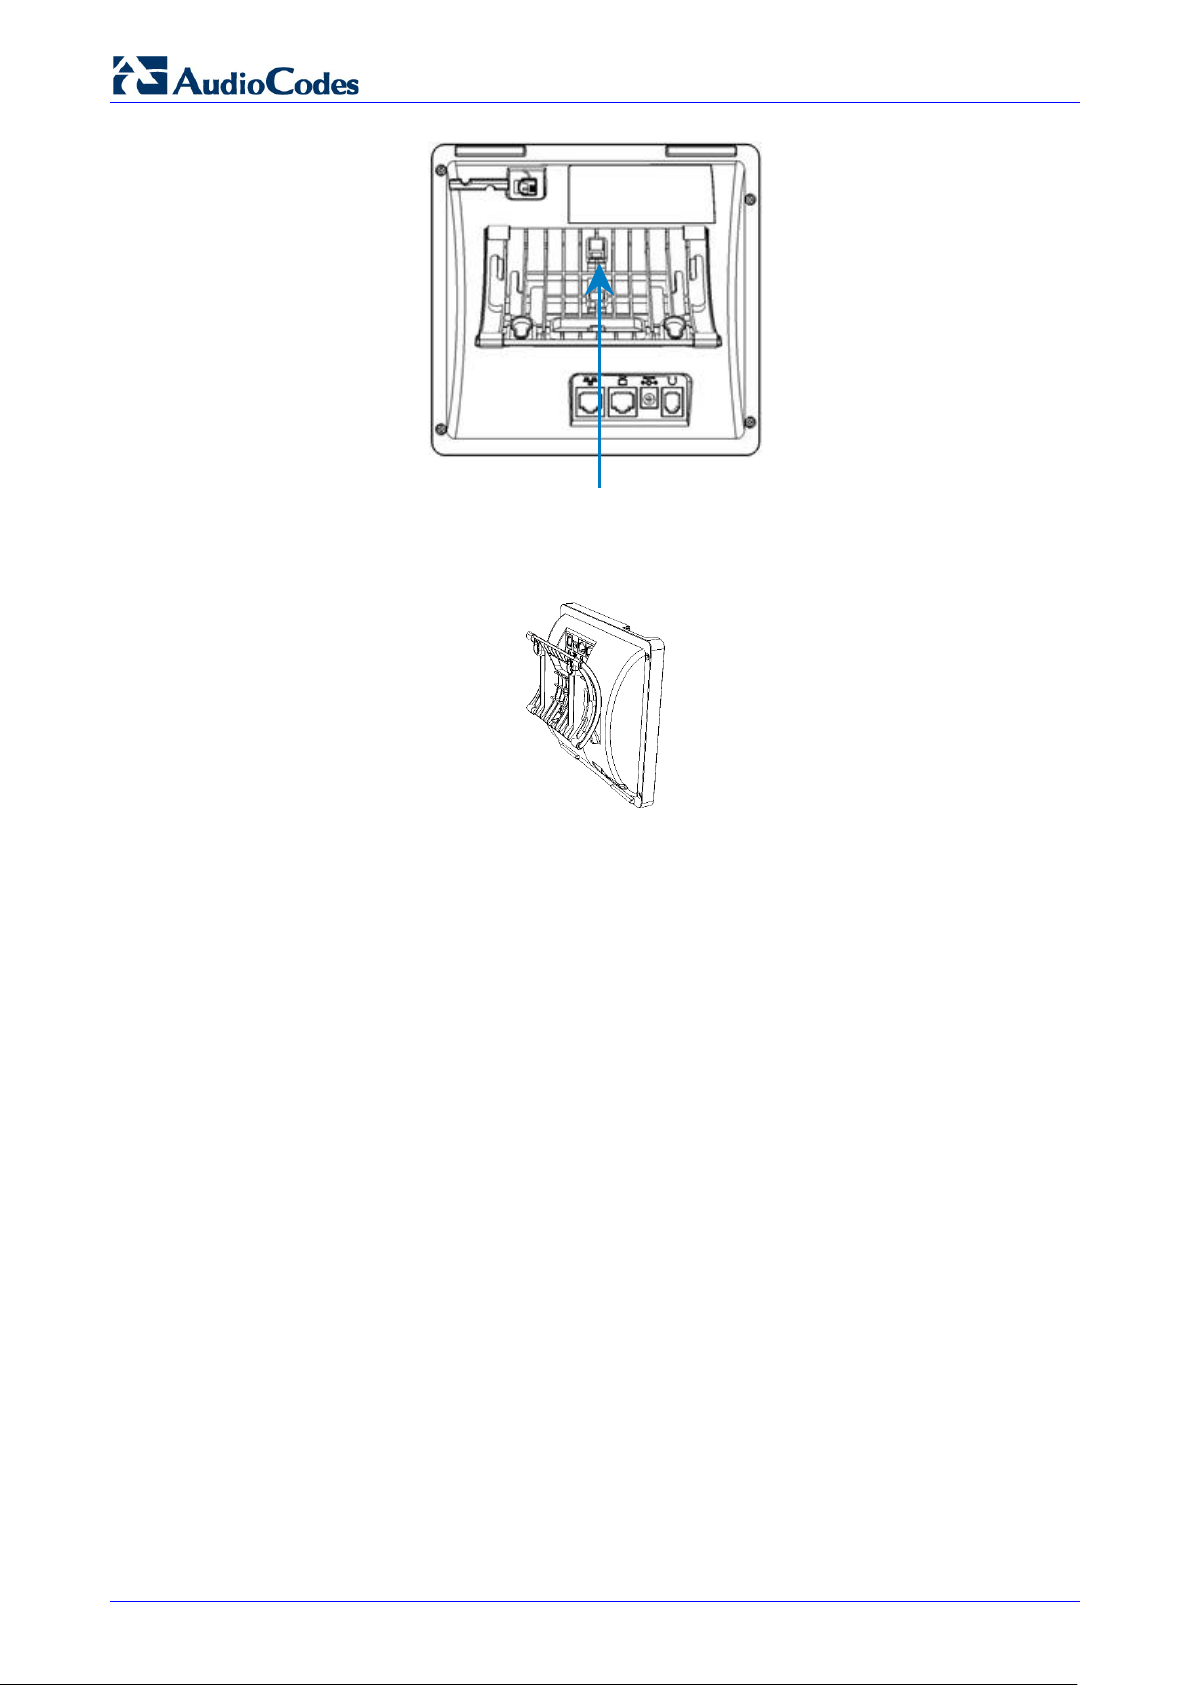
The rear view of the phone is shown in the figure below and described in the table below.
Figure 2-2: Rear View
Table 2-2: Rear View Description
# Label Description
Handset jack, i.e., RJ—9 port, to connect the handset.
RJ—45 port to connect to the Ethernet LAN cable for the LAN connection
(uplink — 10/100/1000 Mbps). If you’re using Power over Ethernet (PoE),
power to the phone is supplied from the Ethernet cable (draws power
from either a spare line or signal line).
RJ—45 port to connect the phone to a PC (10/100/1000 Mbps downlink).
12V DC power jack that connects to the AC power adapter.
Headset jack, i.e., RJ—9 port that connects to an external headset.
430HD and 440HD IP Phone
User’s Manual 16 Document #: LTRT—11939
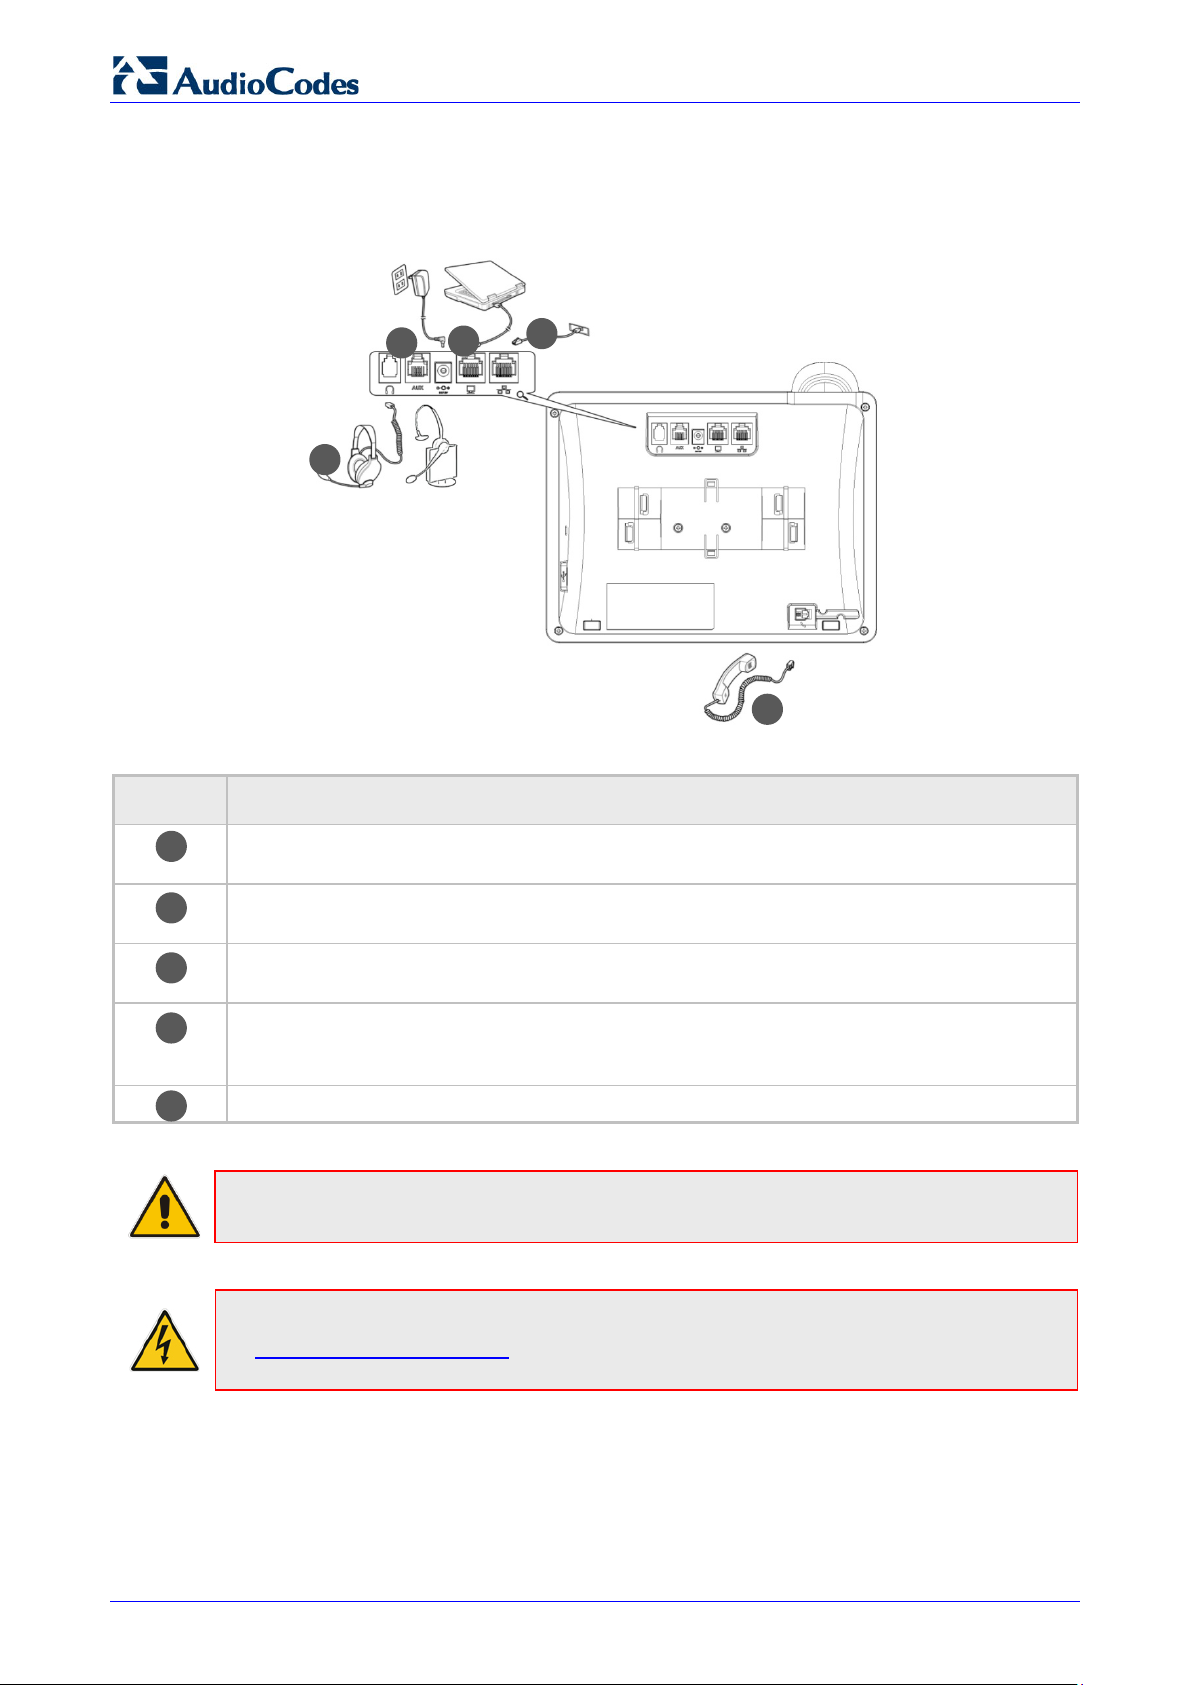
2.3 Cabling
This section shows how to cable your phone.
Figure 2-3: Cabling
Action Description
Connect the short, straight end of the cord to the handset.
Connect the longer, straight end to the jack (RJ-9 port, for the handset) on the phone.
Connect the RJ—45 LAN port to your LAN network (LAN port or LAN switch/router), using a
CAT 5 / 5e Ethernet cable
Connect the RJ—45 PC port to a computer, using a CAT 5 / 5e straight—through Ethernet
cable
Connect the connector tip of the AC power adapter to the phone’s power socket (labelled DC
12V). Connect the two—prong AC adapter directly to the electrical wall outlet. When the
phone powers up, all the LEDs momentarily light up
Connect the RJ—9 headset jack to a headset (optional)
Note: If the LAN to which the phone is connected supports Power over Ethernet (PoE), no
AC adapter is required; the phone receives power from the Ethernet network.
Prior to connecting power, refer to the Compliancy and Regulatory Information at
www.audiocodes.com/library.
User’s Manual Contents
Version 3.0.1 17 430HD and 440HD IP Phone
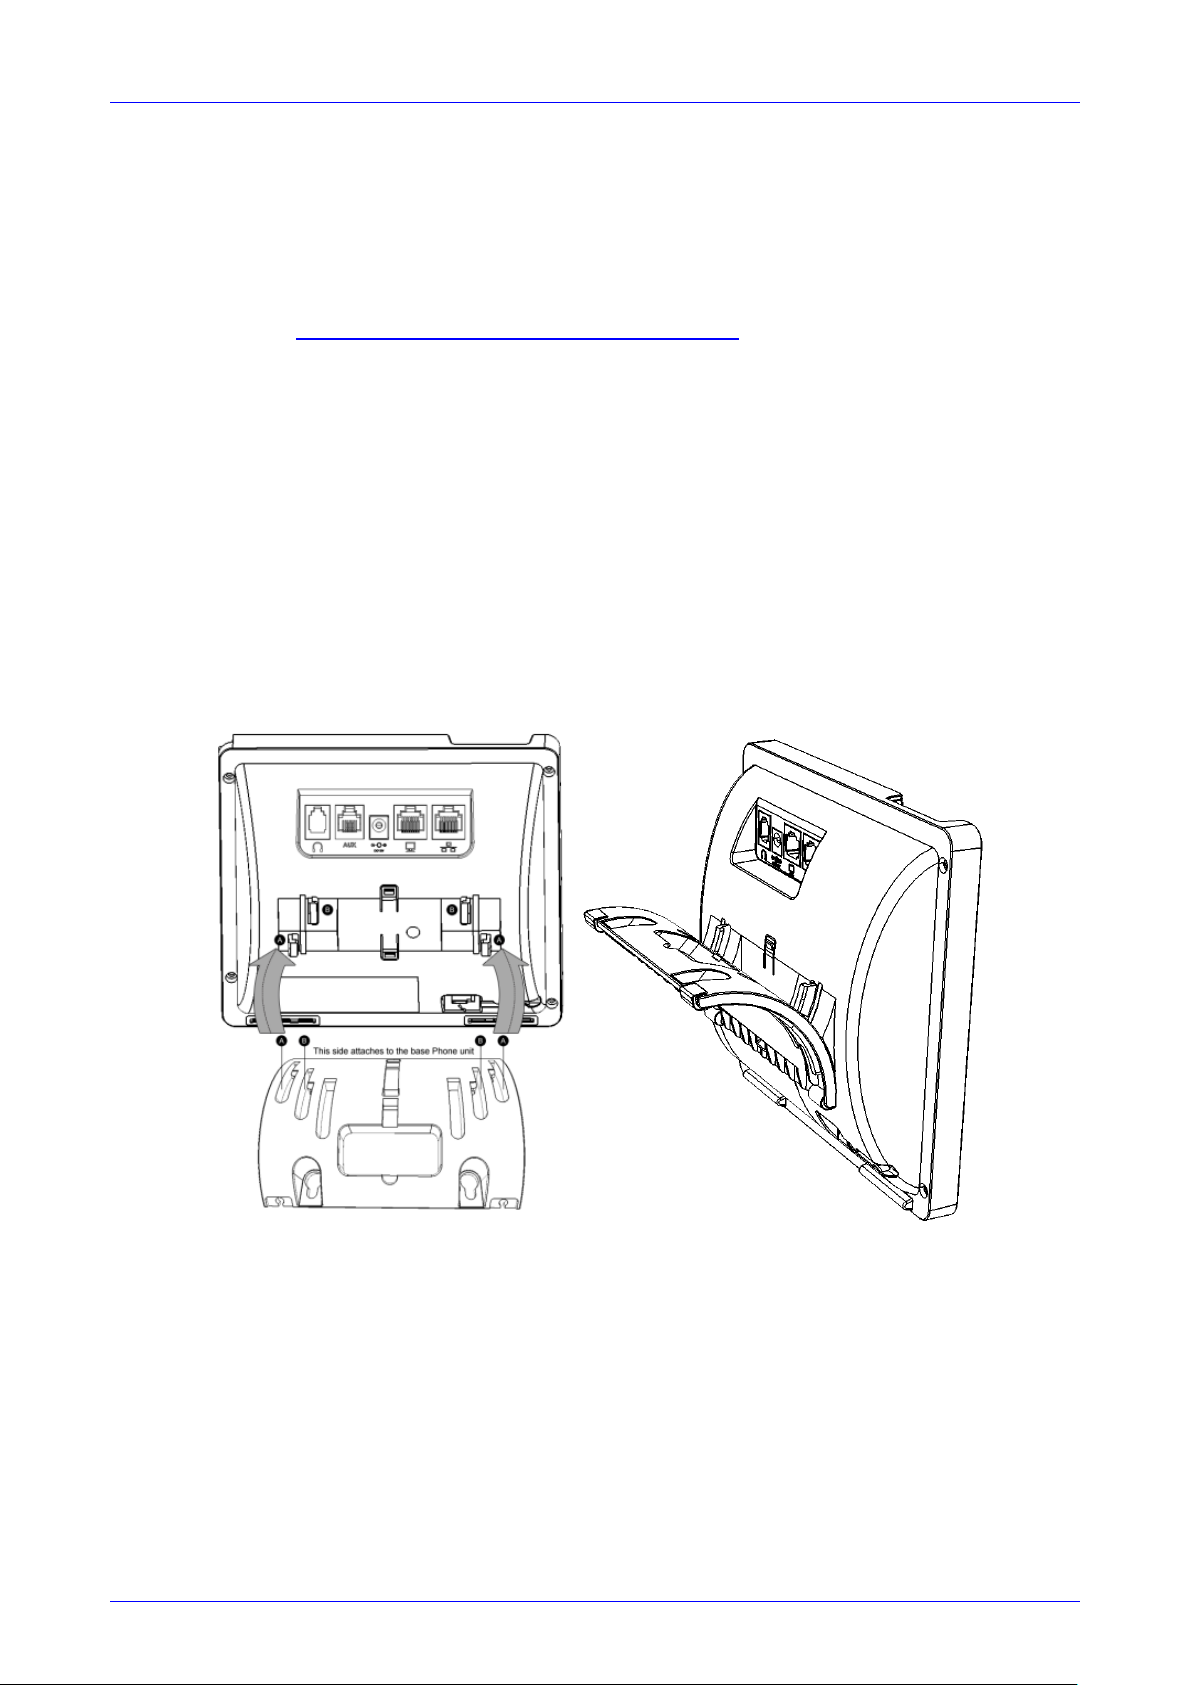
2.4 Mounting the Phone
The phone can be mounted on a:
Desk (see Section 2.4.1 below)
Wall (see Section 2.4.2 on page 17)
See also https://www.youtube.com/watch?v=oGe9STB9lFE to assemble the base stand.
2.4.1 Desktop Mounting
This section shows how to place the phone on a desk or flat surface.
To mount the phone on a desk or flat surface:
1. Off—hook the handset (if on—hook) and place the phone upside down, i.e., base—up, on your
desktop.
2. On the phone‘s base, identify outer rails.
3. On the phone’s stand, identify outer notches.
4. Invert the stand and align its outer notches with the base’s outer rails.
5. Insert the stand‘s outer notches into the base’s outer rails and slide the notches along the
rails until the stand click—locks into the base.
6. Revert the phone and stand it on the desktop.
2.4.1.1 Routing the Handset Cable
The phone features a groove for routing the handset cable.
2.4.2 Wall Mounting
This section shows how to mount the phone on a wall.
To mount the phone on a wall:
1. Attach the stand of the phone for the purpose of a wall mounting:
a. Detach the base.
430HD and 440HD IP Phone
User’s Manual 18 Document #: LTRT—11939
To detach the phone’s stand, push this button
b. Attach it again as you did for a desktop mounting (see Section 2.4.1 on page 17) only
now make sure that it’s flatly aligned to lie flush against the wall, i.e., slide the inner rails
of the phone stand onto the phone base’s inner notches.
2. Connect the AC power adapter, LAN and PC cords.
3. In the wall, drill two horizontal holes at a distance of 3 15/16 inches (100 mm) from one
another, in line with the template.
4. Insert two masonry anchors into the holes if necessary.
5. Thread two screws (not supplied) into the two masonary anchors; ensure that the heads
extend sufficiently (about 3/16 inch or 5 mm from the wall) for the phone stand‘s keyhole
slots to hang on.
6. Hang the phone stand‘s keyhole slots on these screws.
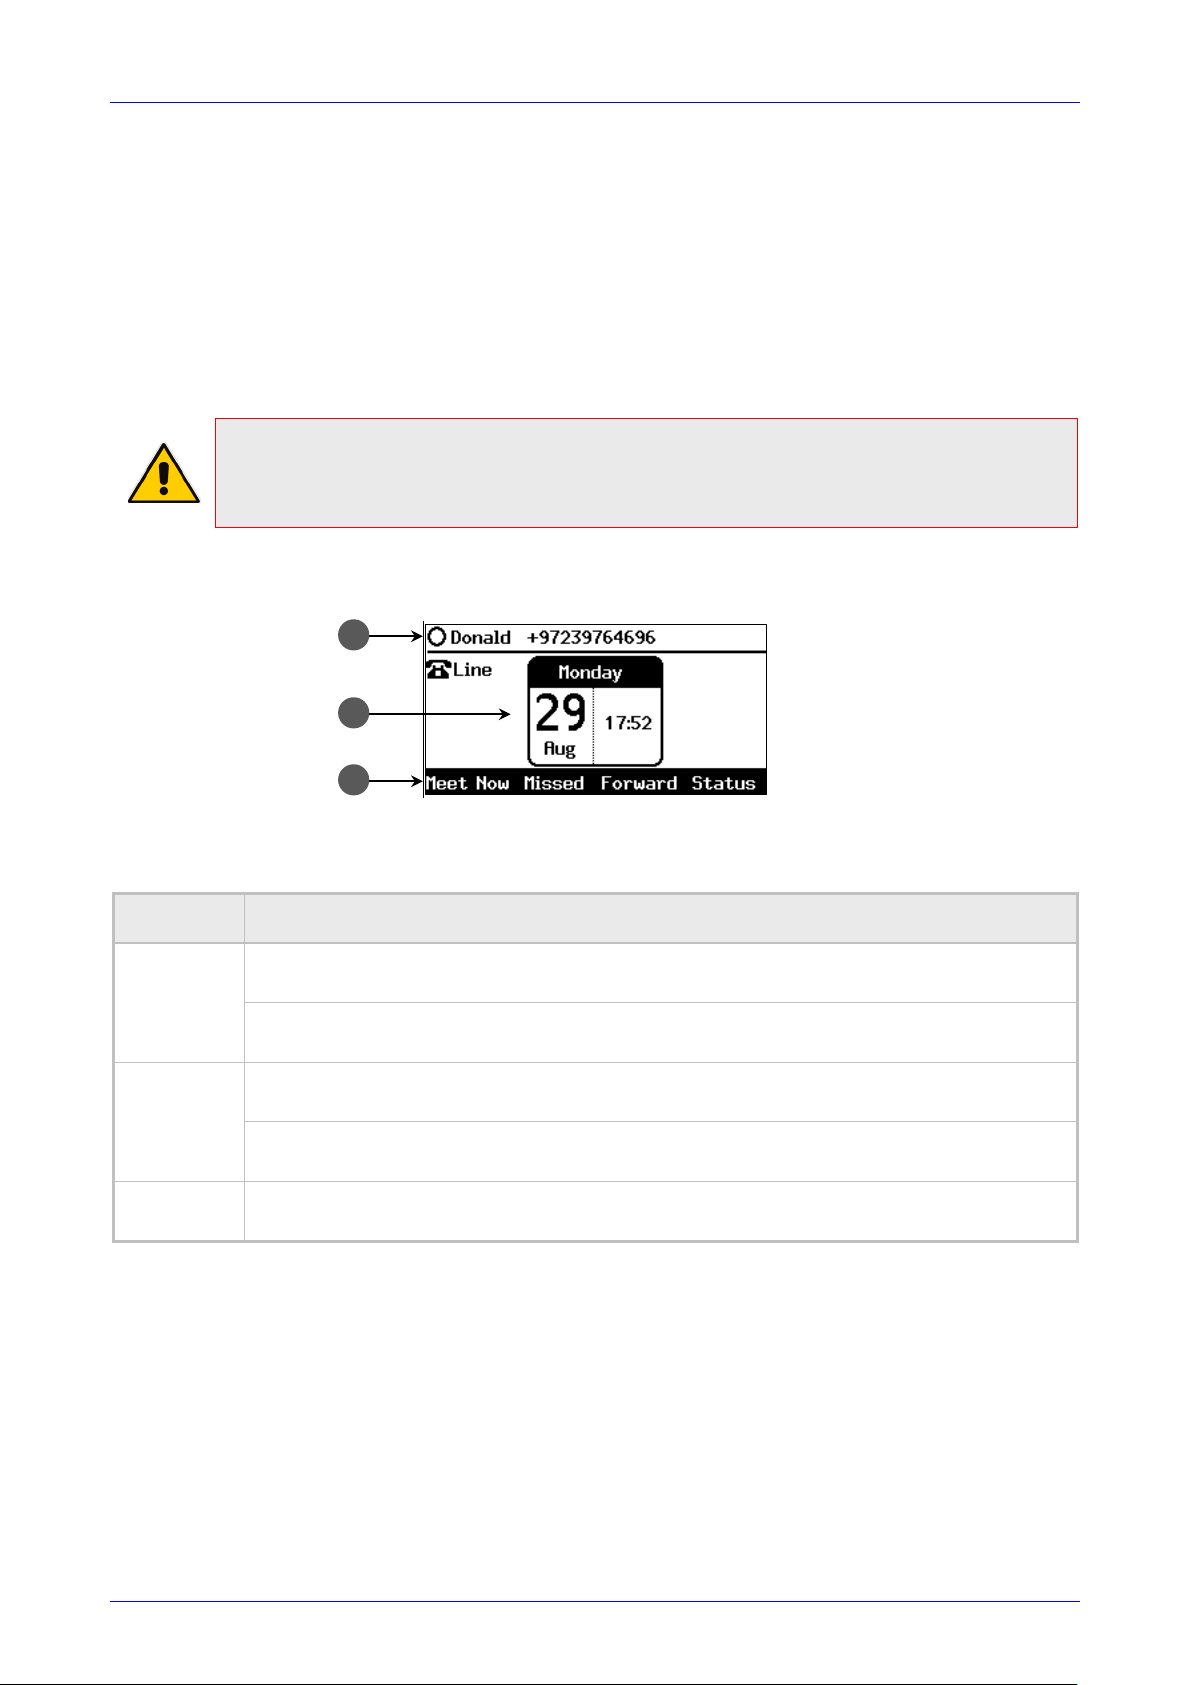
User’s Manual Contents
Version 3.0.1 19 430HD and 440HD IP Phone
3 Getting Started
This section gets you started with the phone. The phone features a screen providing an intuitive,
menu—driven user interface for configuring the device and viewing call information.
This section shows how to use the phone’s screen but before using it, you must sign in.
3.1 Getting Acquainted with the Phone Screen
This section gets you acquainted with the phone screen.
Note:
• Screenshots of the 440HD screen are shown in this manual.
• 430HD screens are identical unless indicated otherwise.
The figure below shows the phone’s screen in idle state.
Figure 3-1: Phone Screen in Idle State
Reference:
Table 3-1: Phone Screen in Idle State
Reference Description
1
Presence status (Available, Busy, Do not disturb, Away, or Be right back).
See Section 6.21 on page 69 for details.
User name and phone number configured by your network administrator using the Web
interface.
2
Day, Date and Month, automatically retrieved from the Network Time Protocol (NTP)
server, enabled by your network administrator.
Time, automatically retrieved from the Network Time Protocol (NTP) server, enabled by
your network administrator.
3
Softkeys; to activate a softkey, press the hard key on the device, located below the screen,
corresponding to the softkey. See Table 3-2 for softkey descriptions.
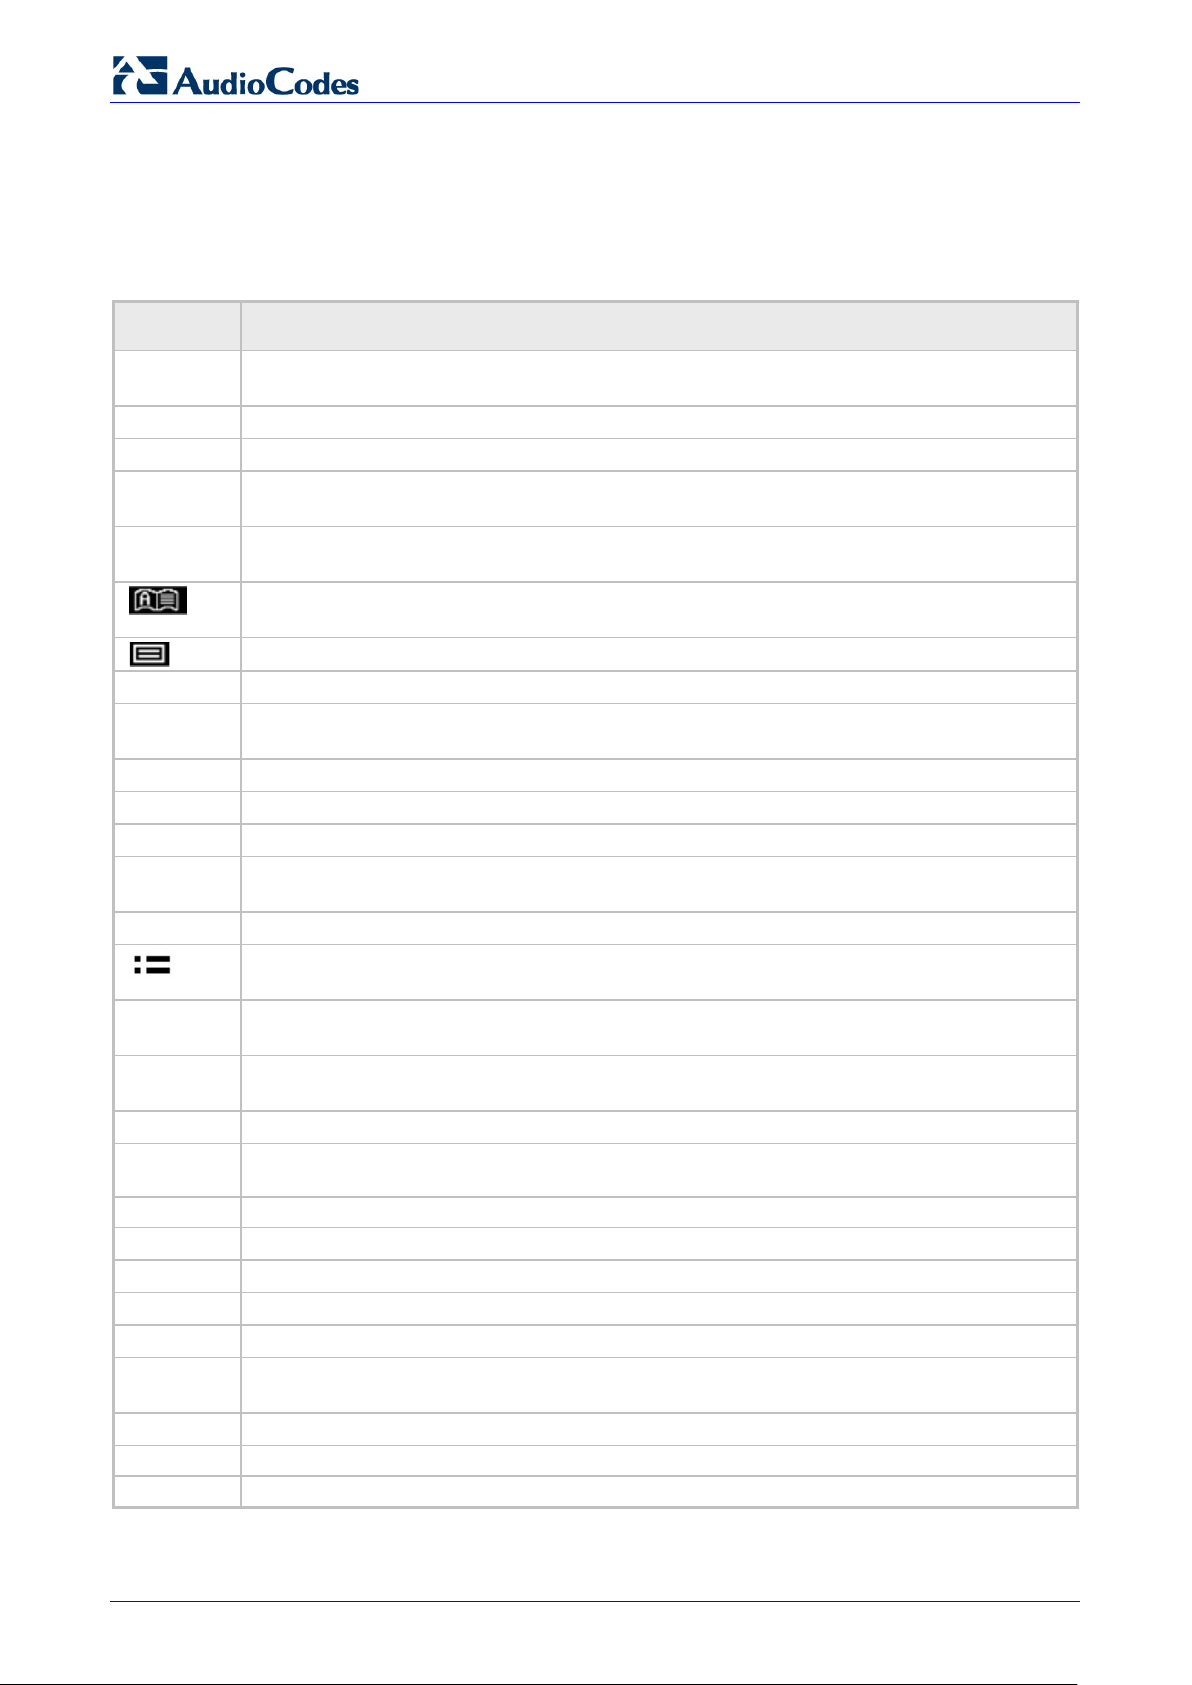
430HD and 440HD IP Phone
User’s Manual 20 Document #: LTRT—11939
3.2 Softkeys
The table below describes the softkeys displayed in the screen. Press the hard key located on the
device below the softkey in order to activate the softkey.
Table 3-2: Softkeys
Softkey Description
Meet Now
Initiates a phone conference based on the Skype for Business server. Replaces the Conf
softkey displayed in earlier versions of the 440HD phone and in the 430HD phone.
Displays missed calls.
Forward
Automatically forwards calls.
Status
Displayed in idle state. Lets you sets your presence status: Available, Busy, Do not disturb,
Away, Be right back.
Sign in
Sign in is displayed if you haven’t signed in yet, in the idle screen.
is displayed if you press the
softkey after signing in.
Displayed after lifting the handset (for example). Opens the ‘Favorites’ defined in the Skype
for Business client.
Displayed after lifting the handset (for example). Displays the Call Log.
Select
Identical to the hard OK key on the phone. Either can be used. Selects a menu or option.
BToE
Displayed after pressing the MENU hard key. Generates a code for manually pairing the
phone with Skype for Business client, for unified communications.
A/a/1
Enables switching between input modes: abc, ABC, Abc, 123, or T9.
Saves settings.
Cancels the currently initiated call or configuration.
Dial
Displayed after a number is keyed, a directory contact is selected, or a logged call is
selected.
Displayed after entering a digit of a phone number (for example). Deletes from right to left.
Displayed after a number is dialed and answered on the other side, and after you answer a
call. Displays the Call Menu.
Conf
Displayed (1) after a number is dialed and the call is answered on the other side and (2)
you answer a call. Pressing it displays the ADD PARTICIPANT screen.
BXfer
Displayed (1) after a number is dialed and the call is answered on the other side and (2)
a call is answered. Lets you transfer the call in a blind transfer.
URL
Displayed after lifting the handset (for example). Enables calling a URL.
Displayed after selecting a call log (for example). If selected, the details of a logged call are
displayed (Time, Date, etc.).
Displayed in the Call Details screen. Allows adding the person to the Favorites directory.
Displayed after pressing the
softkey (for example). Ends the call.
Displayed after pressing the MENU key (for example). Returns to the previous screen.
Start
Displayed after pressing Forward > Forward to a number (for example).
Edit
Displayed after you select a contact to be edited (for example).
Delete
Displayed after pressing the MENU key on the phone and then selecting Call Log (for
example).
Silent
Displayed when the phone rings on an incoming call. Lets you silence the ring.
Displayed when the phone rings, alerting to an incoming call. Lets you reject the call.
Displayed when the phone rings, alerting to an incoming call. Lets you accept the call.
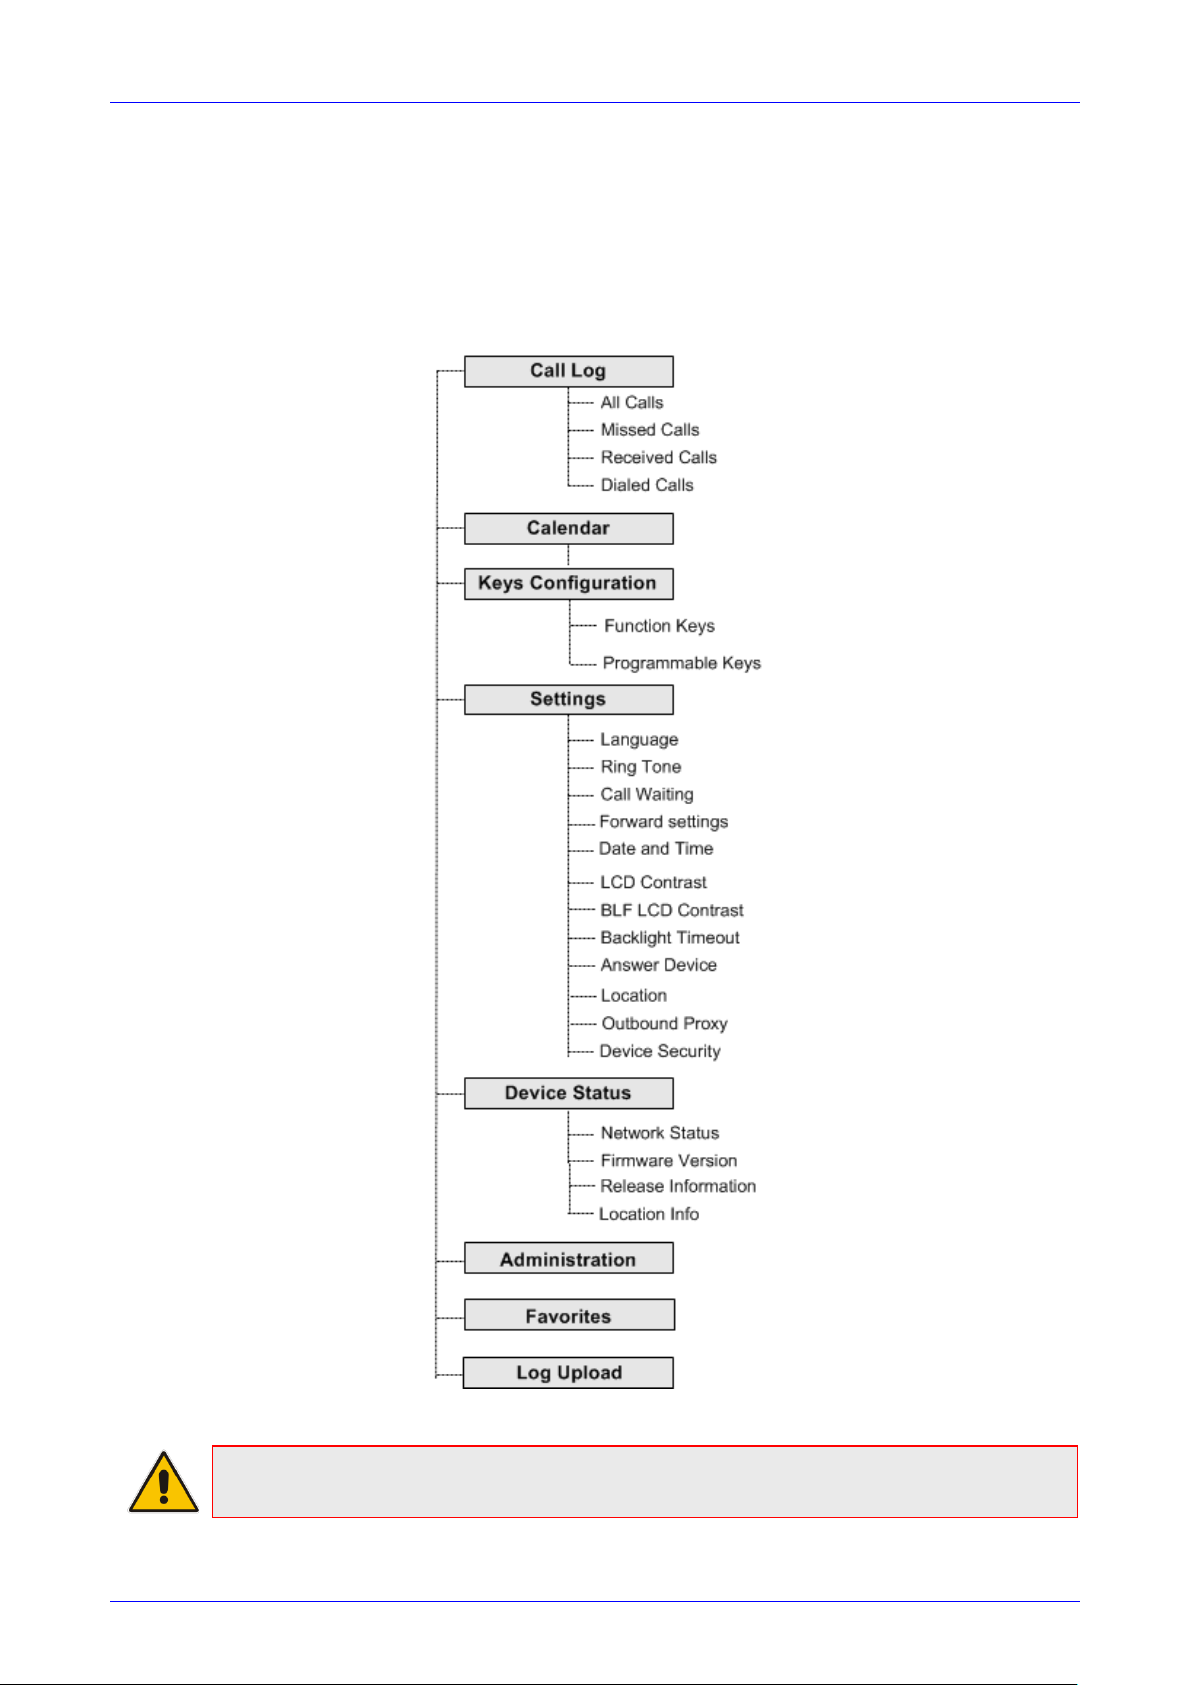
User’s Manual Contents
Version 3.0.1 21 430HD and 440HD IP Phone
3.3 Navigating the Phone Menu
The MENU key on the phone lets you access information and configure settings shown in the
figure below. Press it to view call logs, view meetings scheduled in the calendar for that day
(integrated with Skype for Business client), configure speed dials, customize phone settings,
determine device status, perform administration, access ‘Favorities’ and other phone directories,
and perform log upload to Microsoft server.
Figure 3-2: Phone Menu
Note: Administration is intended for network administrators only. It is password protected.
See the Administrator’s Manual for details.
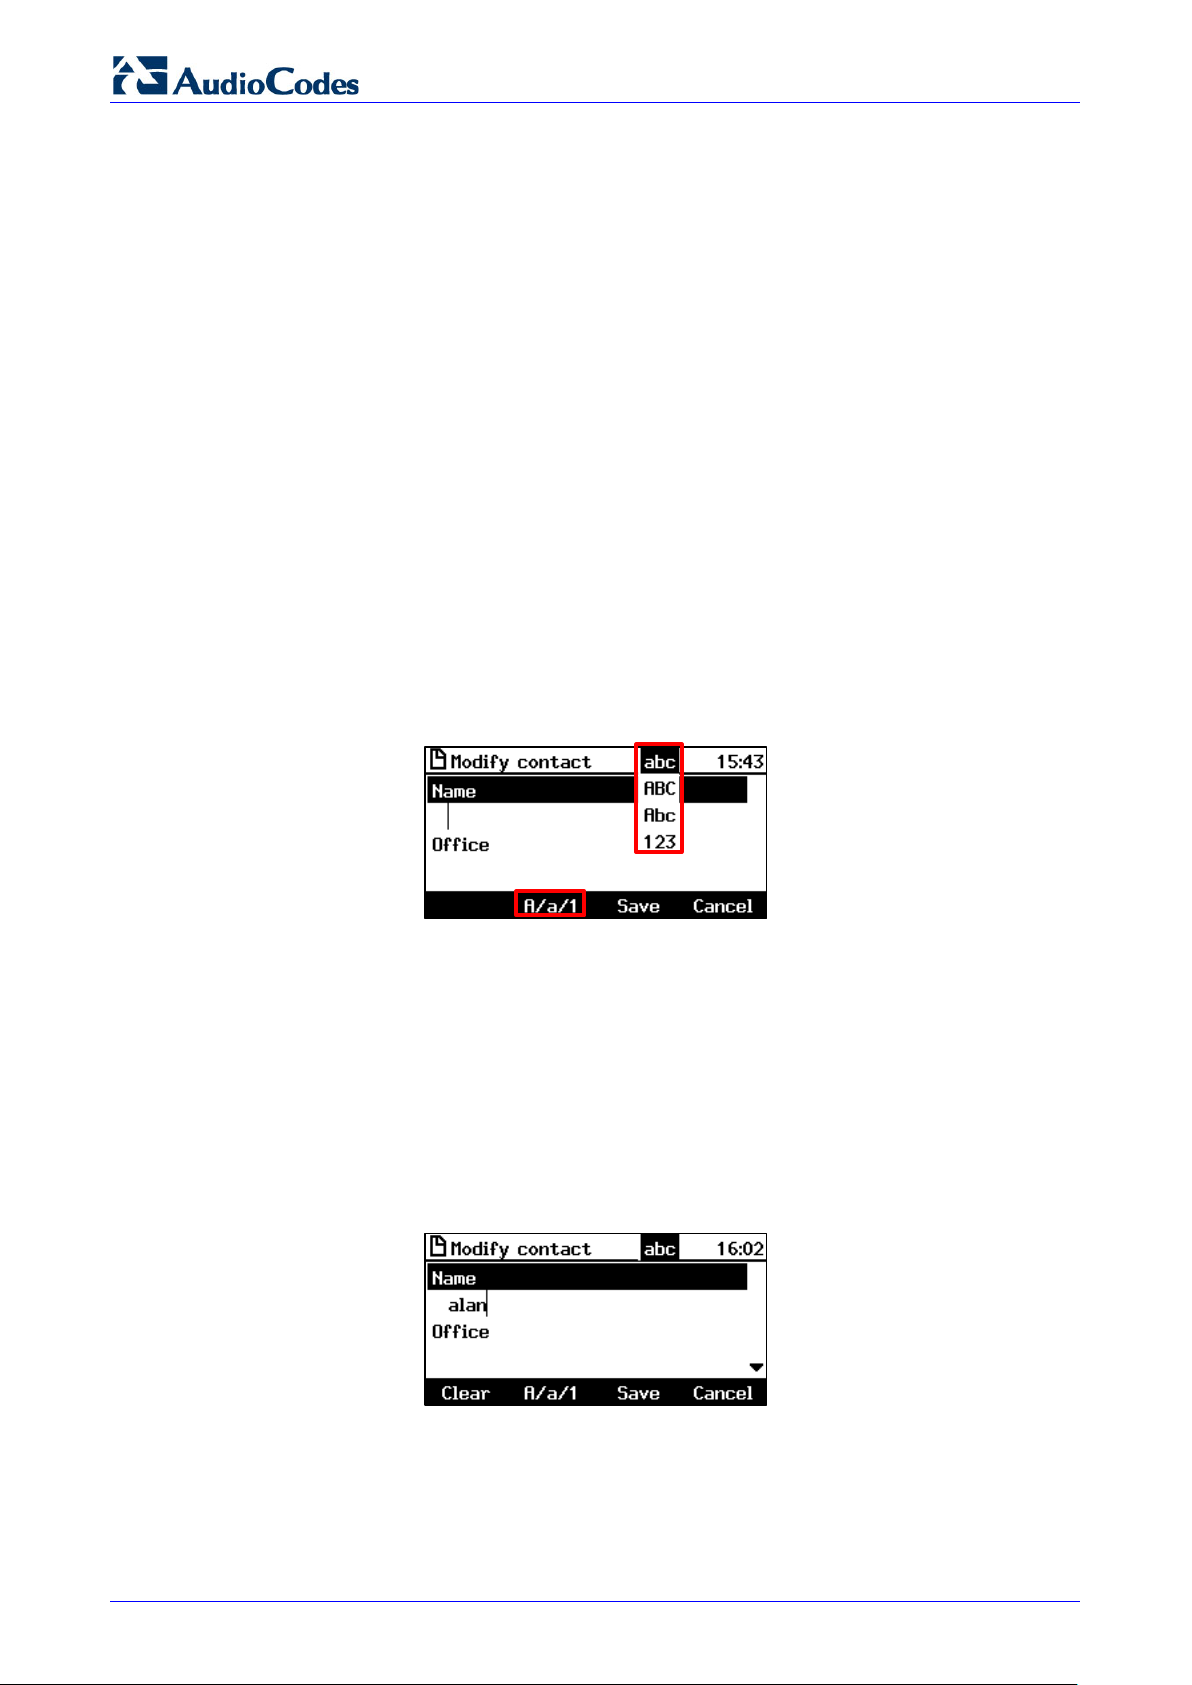
430HD and 440HD IP Phone
User’s Manual 22 Document #: LTRT—11939
To access the menus:
Press the MENU key located on the device.
To navigate to menu items:
After opening the menu, press the navigation control button’s lower rim —OR— press the menu
item’s number, e.g., press 3 to navigate to Keys Configuration.
To select a menu or menu item:
Press the Select softkey or press the navigation control’s OK button.
To cancel and move to a previous menu level:
Press the Back softkey.
3.4 Selecting an Alphanumerical Mode
The phone’s keypad allows you to enter alphabetical letters, numbers or symbols, and to switch
from one mode to another.
To select a number, letter or symbol (e.g., lower case letters):
1. When configuring a contact, for example, press the A/a/1 softkey:
Figure 3-3: Alphanumerical Selection
You can also access the mode menu by pressing the # key on the keypad. Press the # key
successively to navigate in the mode menu.
2. From the mode menu, navigate to and select:
• abc = lower case letters
• ABC = upper—case letters
• Abc = first—letter upper case, the rest lower case
• 123 = numerical mode (i.e., numbers)
3. Select abc (for example) and then on the keypad, press the ABC key (for example); a is
entered. Press the JKL key three successive times; l is entered; pressing it once produces j,
twice produces K). Similarly, enter a and n.
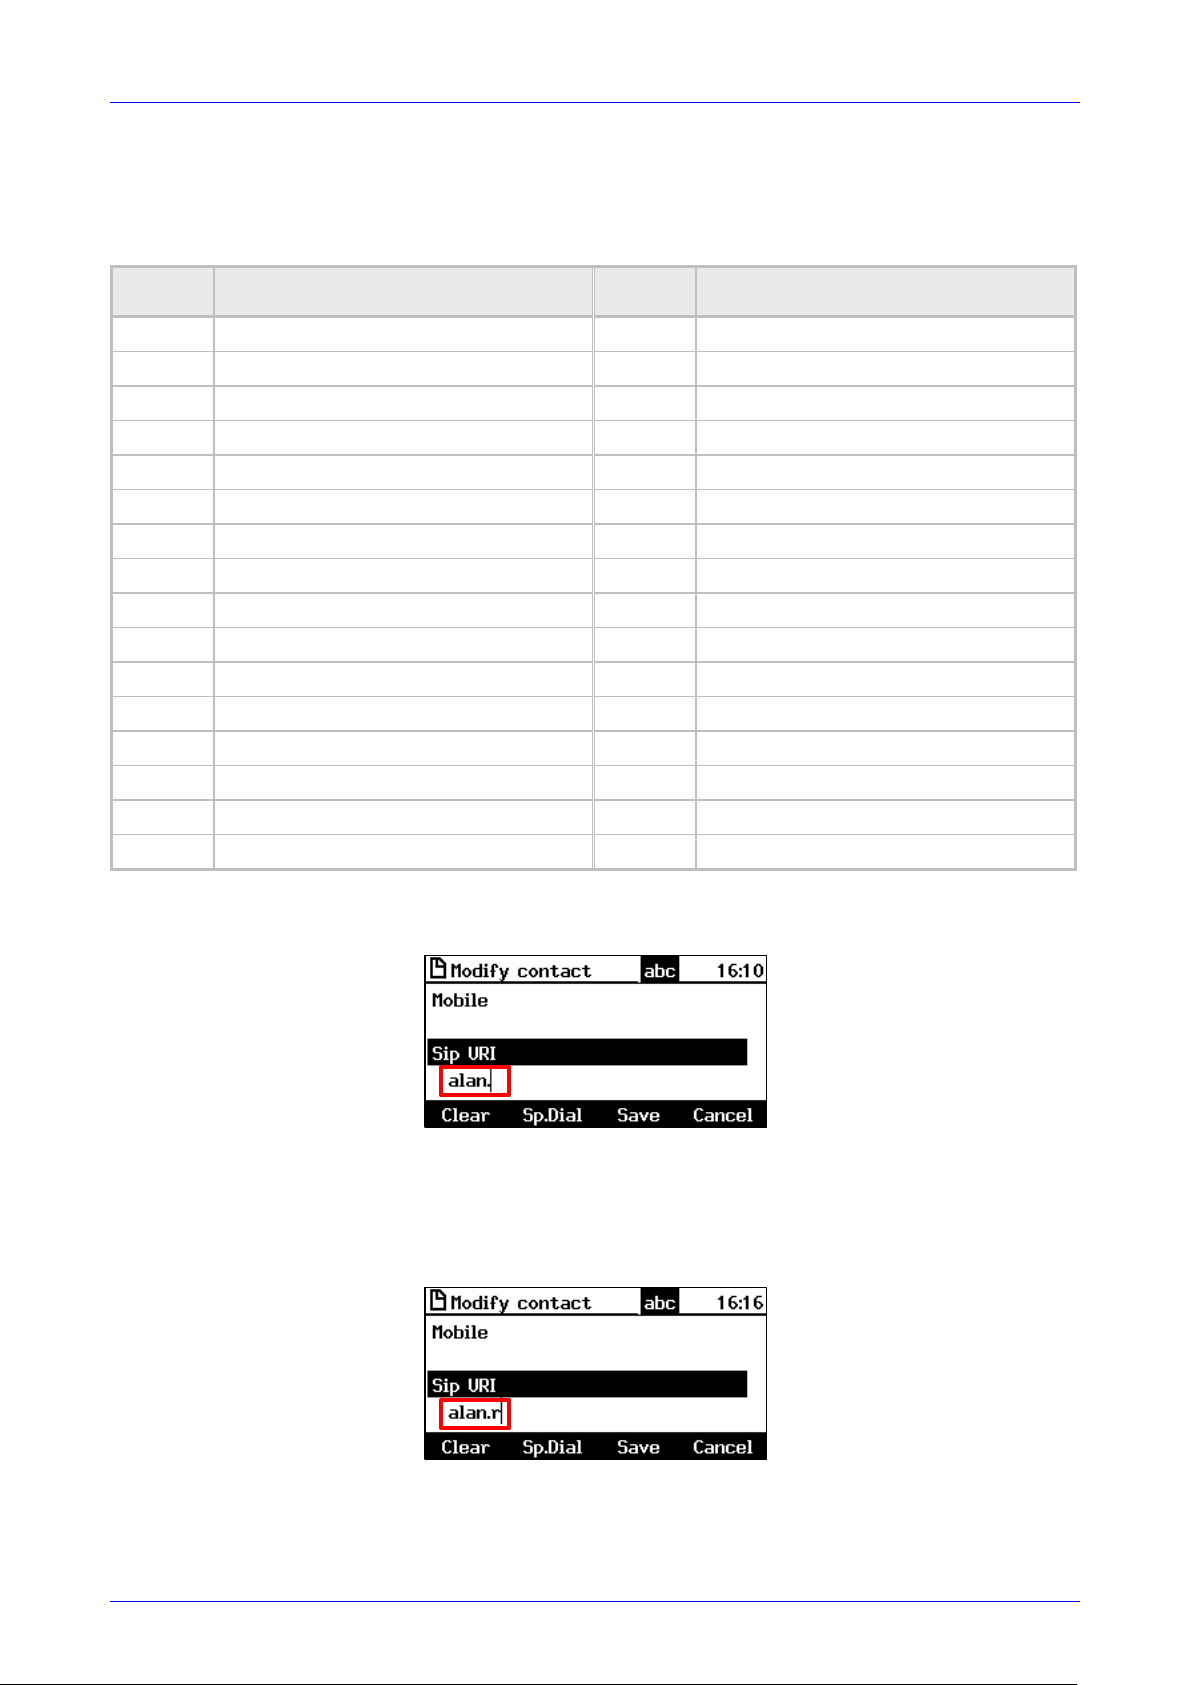
User’s Manual Contents
Version 3.0.1 23 430HD and 440HD IP Phone
To enter a symbol (e.g., dot or @ or hyphen):
1. Press the A/a/1 softkey and navigate to abc (mandatory).
2. Press the 1 key on the keypad; a period / full stop is entered. Immediately press the 1 key
again; a backslash is entered. Pressing successively produces the following symbols:
Symbol Explanation Symbol Explanation
. Dot * Star sign
\ Backslash = Equal sign
@ At | Separator
; Semi—colon ( Open parenthesis
: Colon ) Close parenthesis
# Pound { Open parenthesis
$ Dollar } Close parenthesis
% Percentage [ Open square parenthesis
^ Caret ] Close square parenthesis
& Ampersand » Double quotation marks
! Exclamation mark ‘ Single quotation mark
? Question mark > Greater than
+ Plus < Less than
— Hyphen , Comma
_ Underscore / Forward slash
~ Approximates
Note that the asterisk (*) symbol is entered directly using the star key.
Figure 3-4: Entering a Symbol (e.g., a dot)
To revert to letters (e.g., abc):
Make sure the phone is in abc mode and successively press the PQRS key three times to
produce r (for example):
Figure 3-5: Reverting to Letters (e.g., abc)

430HD and 440HD IP Phone
User’s Manual 24 Document #: LTRT—11939
This page is intentionally left blank.
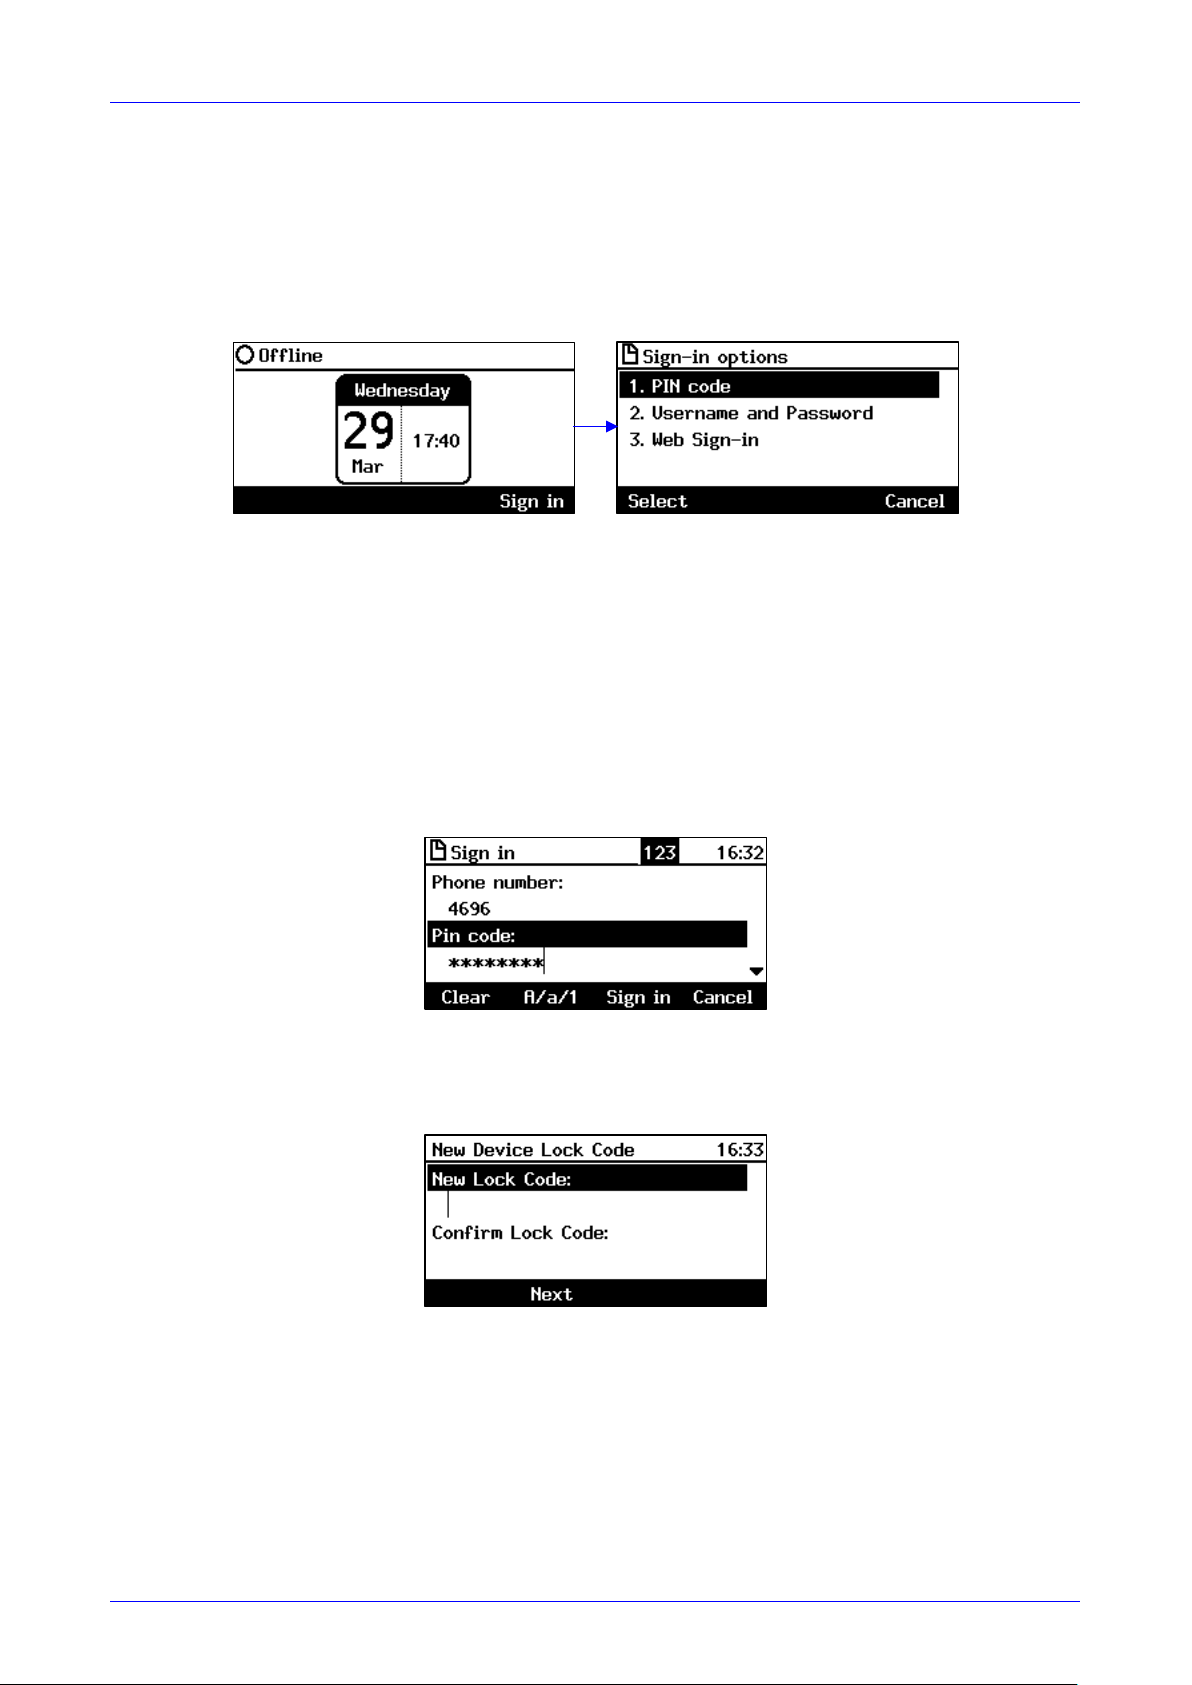
User’s Manual Contents
Version 3.0.1 25 430HD and 440HD IP Phone
4 Signing In
This section shows how to sign in to the phone.
To sign in to the phone:
1. In the idle screen, press the Sign in softkey on the device; the sign—in options are displayed:
PIN code — see Section 4.1
User name and Password — see Section 4.2
Web Sign—in — see Section 4.3
4.1 Signing in with PIN Code
This section shows how to sign in with the PIN code and phone number. The PIN code is
provided by your network administrator.
To sign in with the PIN code:
1. In the ‘Sign—in options’ screen shown above, select the PIN Code option.
2. Enter your phone number and then navigate down with the lower rim of the navigation
control button to enter your PIN code. You can get it from your network administrator. To
switch from numbers to alphabetical letters and symbols, see Section 3.4.
3. Press the Sign in softkey; the Lock Code screen opens (see Section 5 for more information).
4. Enter a lock code and then press the Next softkey or navigate down. Enter the lock code
again to confirm, and then press OK; the phone is signed in and the idle screen is displayed.
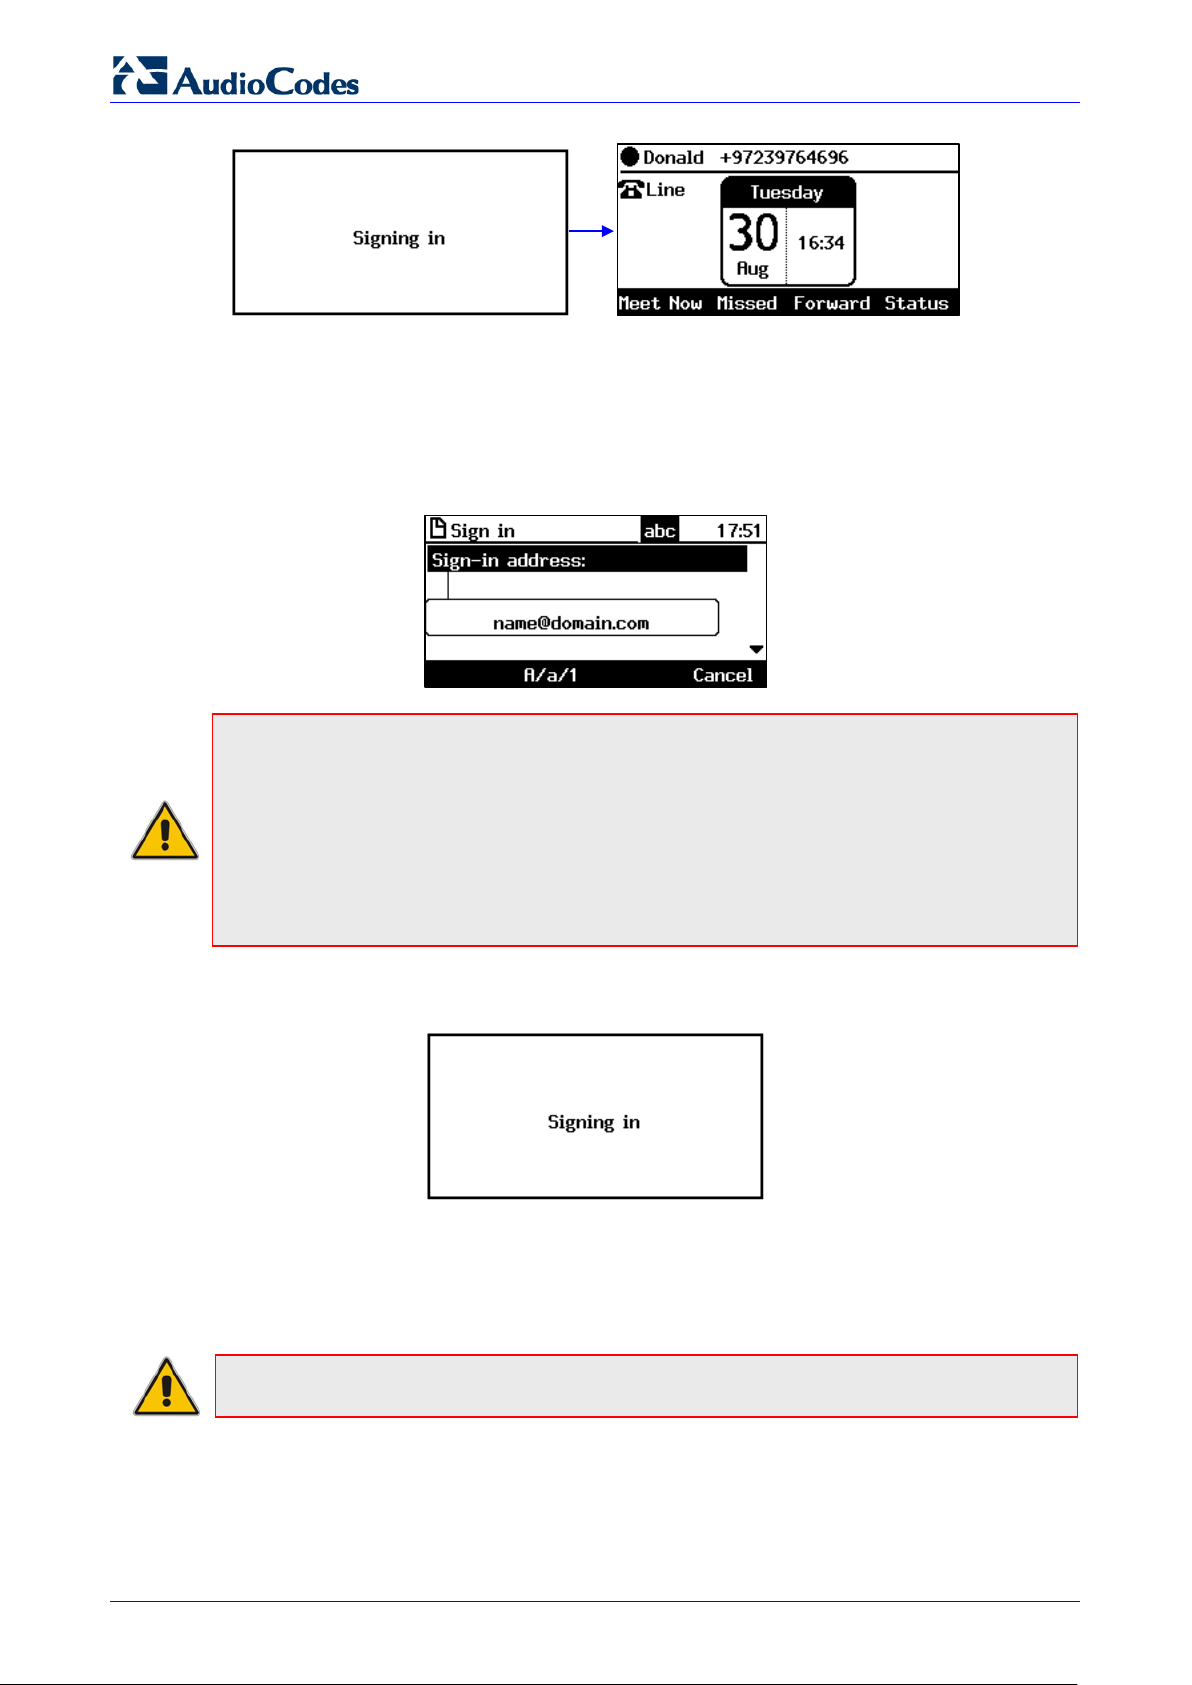
430HD and 440HD IP Phone
User’s Manual 26 Document #: LTRT—11939
4.2 Signing in with User Name and Password
This section shows how to sign in with User Name and Password.
To sign in with User Name and Password:
1. In the ‘Sign—in options’ screen, select User name and Password.
Note: Signing in with a username that is a NetBIOS Domain Name, i.e., domain\username,
or with the PIN Code, are disallowed for Skype for Business online sign—in. They are only
allowed for on—premises sign—in. Online sign—in must be in the following format:
• Sign—in address, i.e., SIP URI. To switch from letters of the alphabet to symbols such as
@, — and period, see Section 3.4.
• User name, in UPN (User Principal Name) format, i.e., the way the user’s name appears in
their e—mail address listed in the Active Directory: username@domain.com
• User’s network IT password (the same password you use to access your PC)
2. Press the Sign in softkey that’s displayed; after signing in successfully, the New Device Lock
Code screen opens (see under Section 5 for more information).
4.3 Signing in with the Cloud PBX Web Option
You can sign in with the Cloud PBX Web option a.k.a. Device Pairing. Sign—in with this enables
connectivity to Microsoft’s Cloud PBX, Microsoft’s cloud—hosted version of enterprise voice.
Note: Applies only to Microsoft Cloud PBX users using the 430HD and 440HD phone.
The option exempts users from having to laboriously key in their user name and password using
the phone keypad. A URL and a Pairing Code are then displayed:
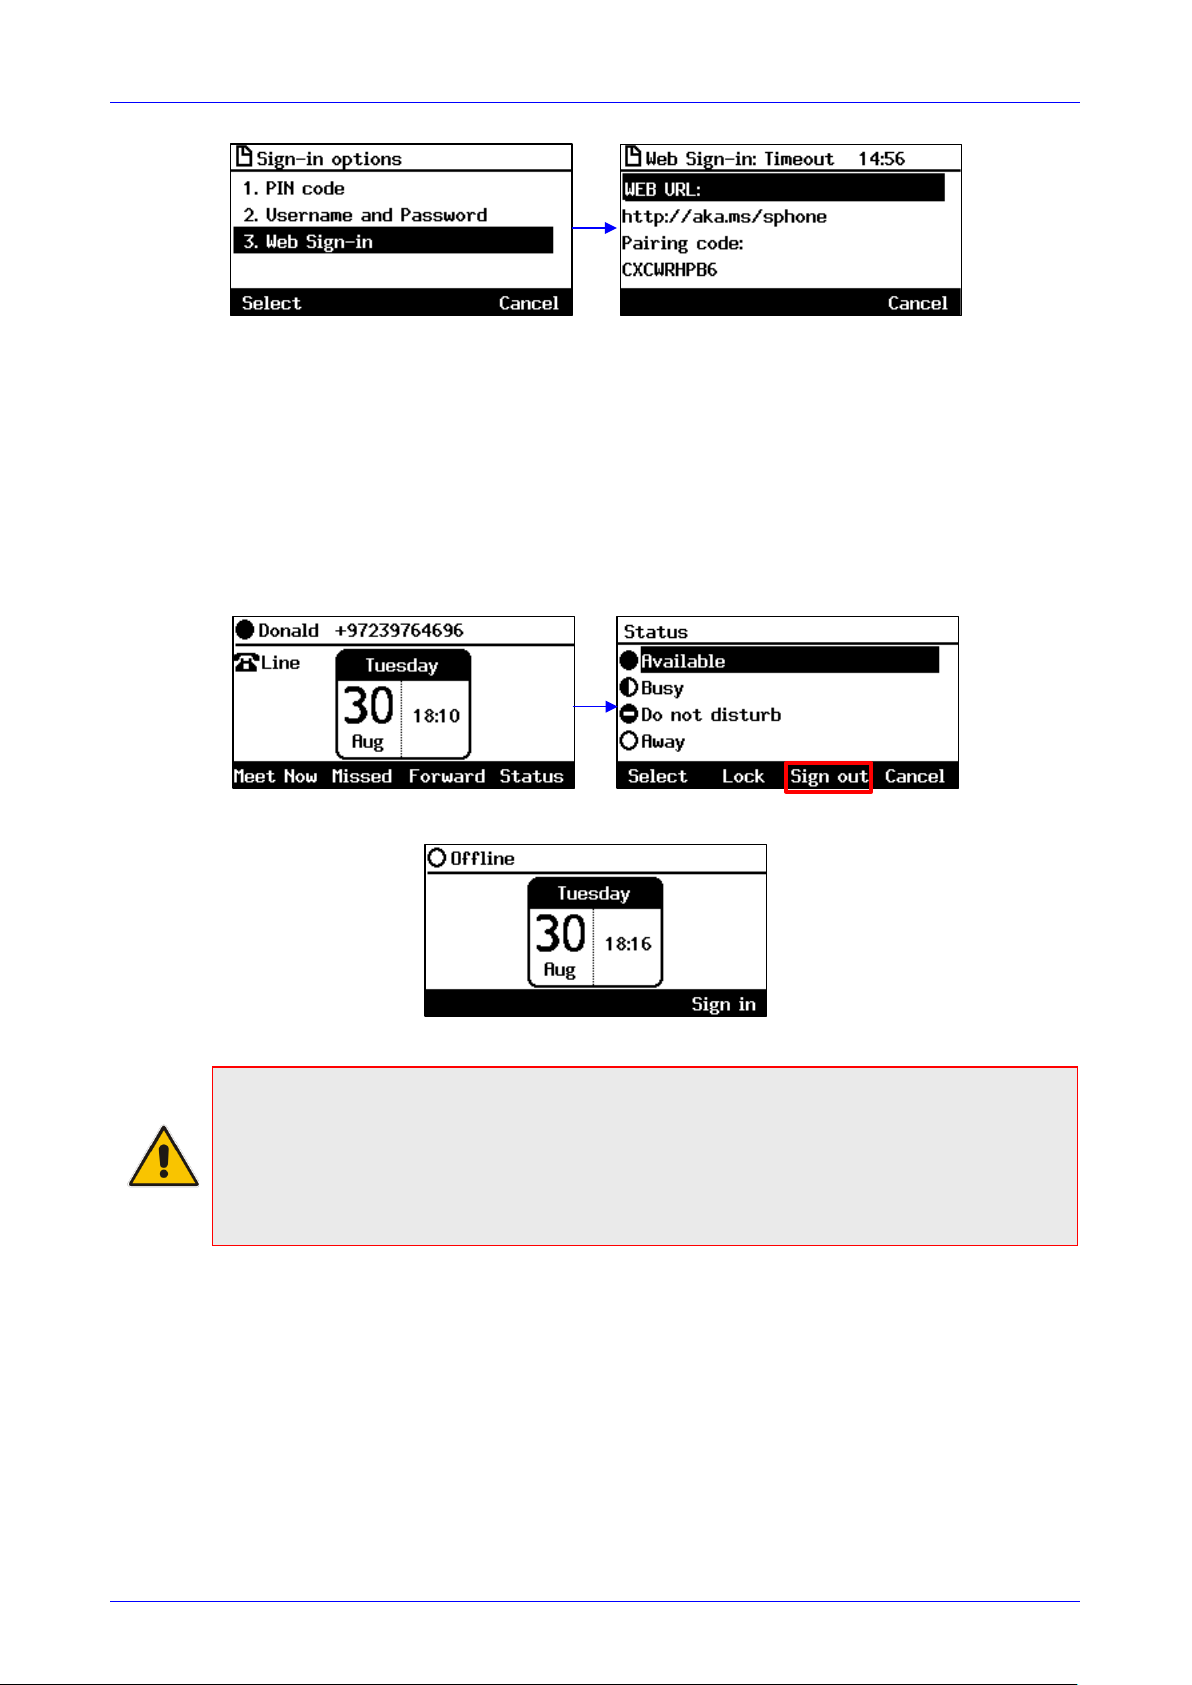
User’s Manual Contents
Version 3.0.1 27 430HD and 440HD IP Phone
Users must then point their browser to the URL and enter the Pairing Code in the Microsoft web
page. Sign—in to Microsoft’s Cloud PBX is then performed.
4.4 Signing Out
This section shows how to sign out.
To sign out:
1. In the idle screen, press the Status softkey.
2. In the Status screen press the Sign out softkey.
You’re now signed out. You’re returned to the idle screen displaying the Sign in softkey.
Note:
• After signing out, the next time you sign in the phone will present the option that was used
to sign in before signing out.
• If a user signs out and another signs in, the phone presents empty Speed Dials and empty
Call Logs to the newly signed—in user. The Speed Dials and Call Logs of the signed—out
user are not saved on the phone.
4.4.1 Signing out if the ‘Sign out’ Softkey is Removed from the Screen
Located in lobbies, cafeterias, employee lounges, meeting rooms, and other gathering places,
Common Area phones typically do not display a Sign out softkey in the screen, in line with
network management’s decision to remove the capability from users. Users can sign out, if
necessary, using the Web interface.
To sign out using the Web interface:
1. Obtain the Common Area phone’s IP address (MENU key > Status > Network Status > IP
Address) and point your Web browser to it; the phone’s Web interface login page opens.
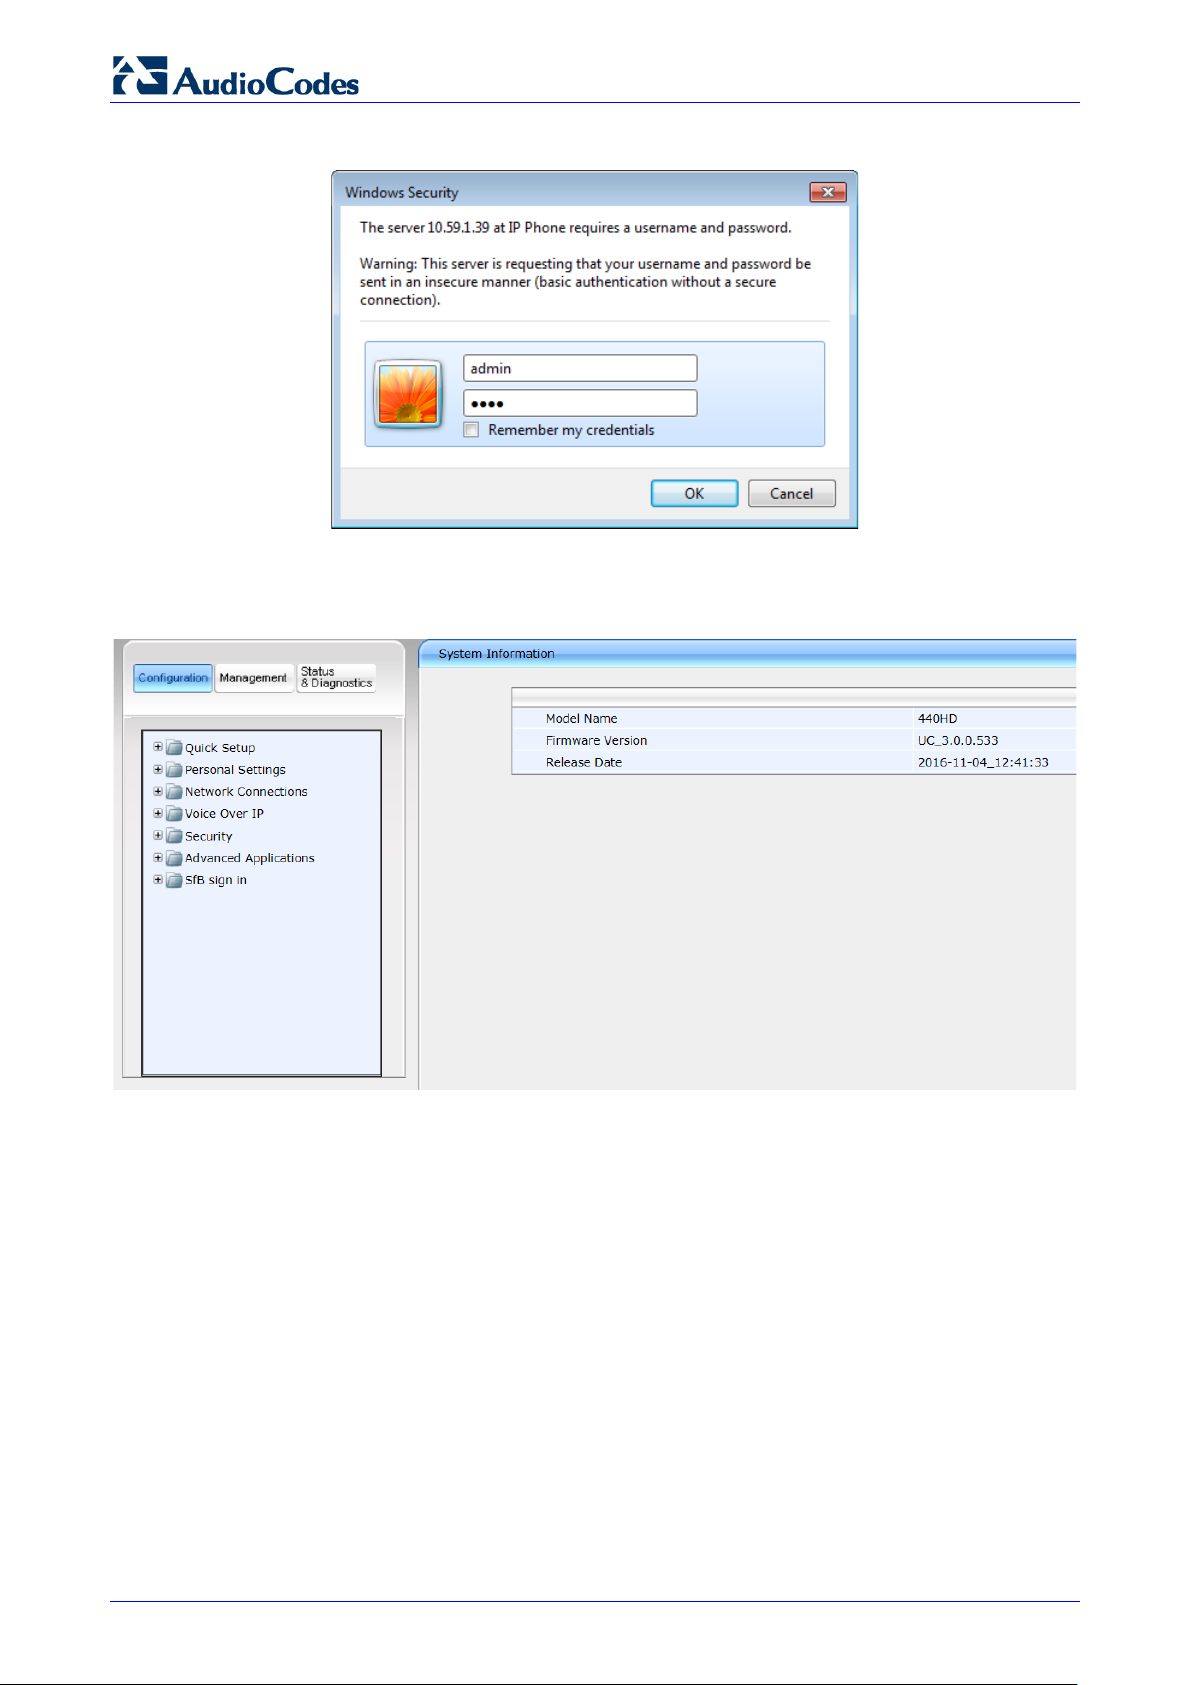
430HD and 440HD IP Phone
User’s Manual 28 Document #: LTRT—11939
Figure 4-1: Login
2. Enter the login credentials (default username is admin and default password is 1234); the
Home page of the Web interface is displayed.
Figure 4-2: Web Interface – Home Page
3. In the Web interface, open the Sign—In page (Configuration tab > SfB sign in > Sign in).
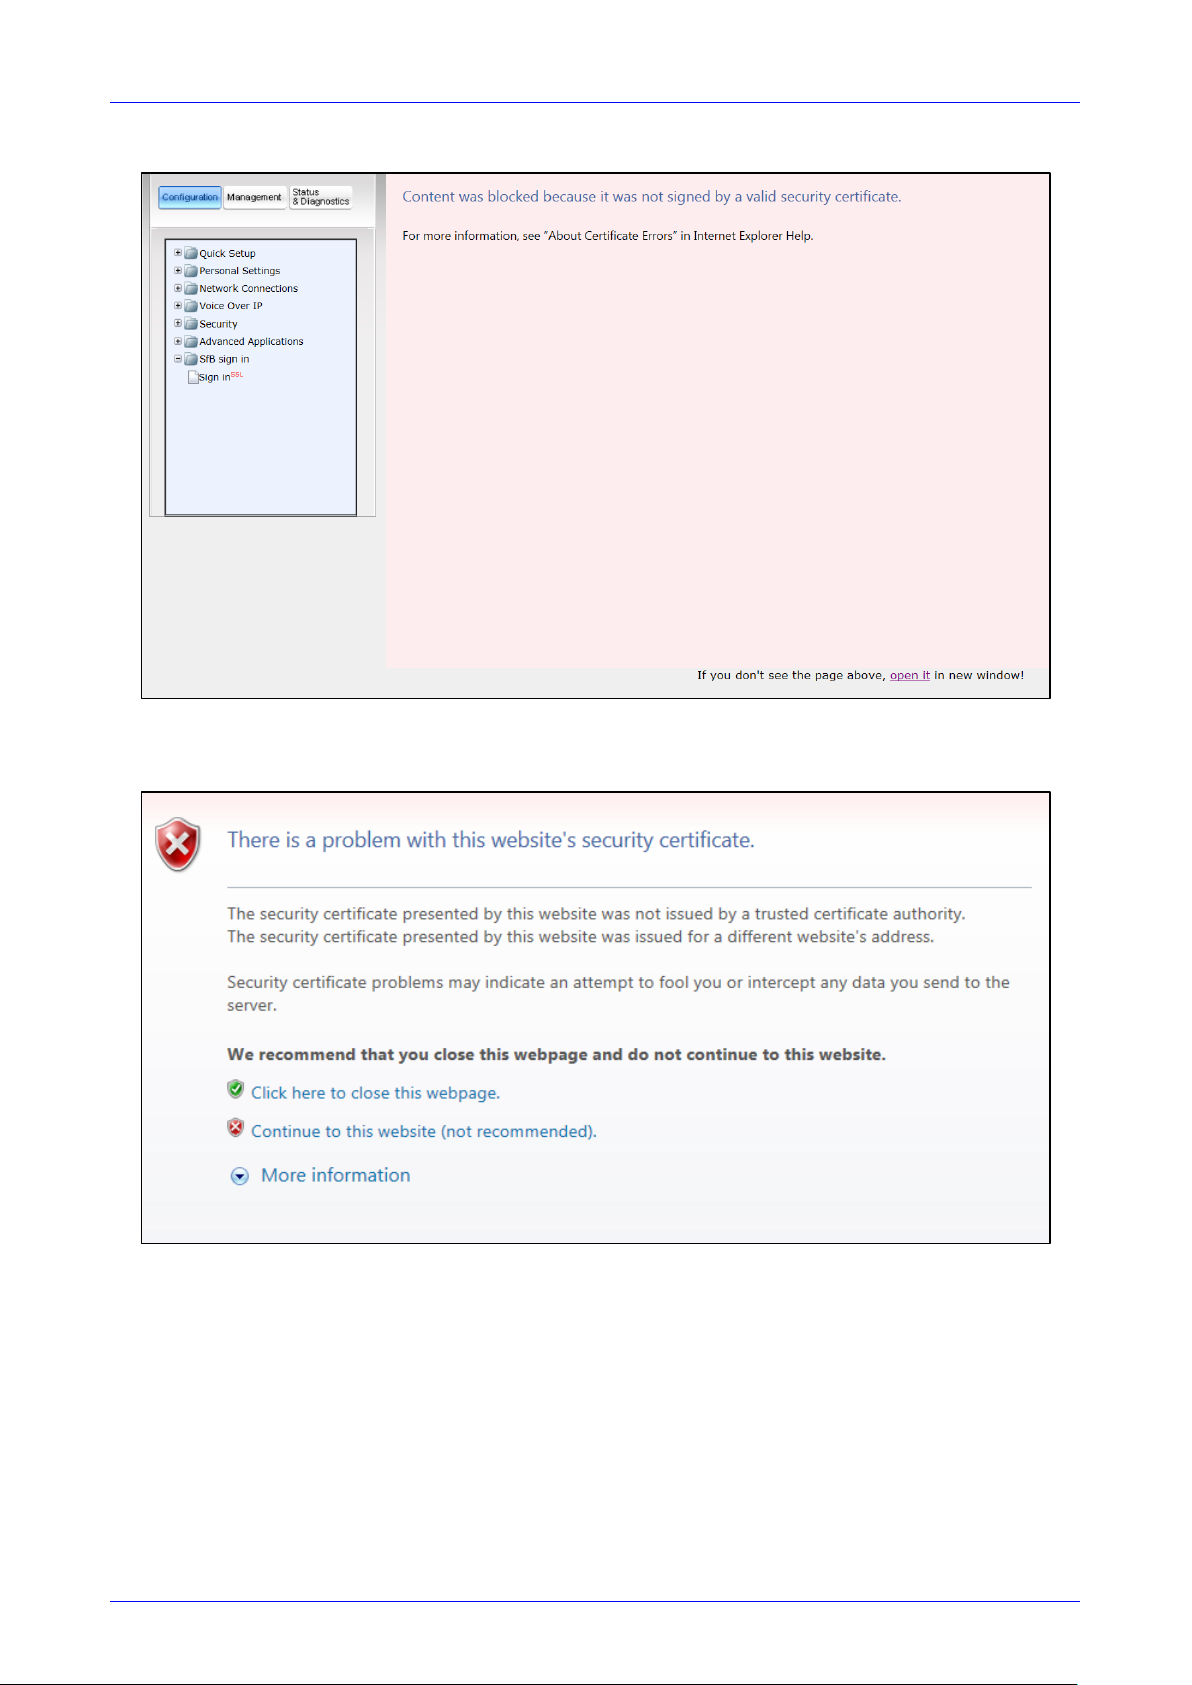
User’s Manual Contents
Version 3.0.1 29 430HD and 440HD IP Phone
Figure 4-3: Sign—in – Content Blocked Page
4. Click the open it link and then click Show content.
Figure 4-4: Sign—in – Windows Security Prompt
5. Click the Continue to this website (not recommended) link.

430HD and 440HD IP Phone
User’s Manual 30 Document #: LTRT—11939
Figure 4-5: Windows Security Prompt
6. In the Windows Security prompt, enter the username and password and then click OK.
Figure 4-6: Sign-out
7. Click the Sign out button.
4.5 Displayed Messages
Messages indicating processes in progress, displayed in the screen, include:
Table 4-1: Displayed Messages Indicating Processes In Progress
Message Description
Initializing Initializing
Discovering LLDP Discovering VLAN using Link Layer Discovery Protocol (LLDP)
Discovering CDP Discovering VLAN using Cisco Discovery Protocol (CDP) )
Acquiring IP Acquiring an IP address from a DHCP server
Initializing Network Initializing the network
Signing in Signing in to the Skype for Business server
Signing in…Contacting time server Get the time from the NTP server
Discovering SfB server Auto discovering the Skype for Business server on the network
Registering Registering to a SIP proxy server (after booting up the phone)
Downloading Firmware File Downloading a firmware file
Upgrading Firmware Upgrading the phone’s firmware
Signing out Signing out of the Skype for Business server

User’s Manual Contents
Version 3.0.1 31 430HD and 440HD IP Phone
5 Unlocking a Locked Phone
Note: For the automatic locking feature to be available to users, the administrator must first
enable it in the Skype for Business server and Web interface. See the Administrator’s Manual
for details.
The phone supports the capability to automatically lock after a configured period of time. The
feature secures phones against unwanted (mis)use. If left untouched for 10 minutes (default), the
phone automatically locks and is inaccessible to anyone who doesn’t know its lock code.
After a phone locks:
Incoming calls are allowed, but outgoing calls need the lock code.
Without the lock code, users cannot access the Call Log, Calendar and Corporate directory,
but they can call preconfigured emergency numbers.
When signing in for the first time, the user is prompted for a lock code. After entering a code, e.g.,
123456, confirming it, and saving it, the phone goes into idle state, and after 10 minutes it is
automatically locked.
To manually change the lock code:
1. Press the MENU key on the phone, select Settings and then scroll down to select Device
Security.
2. In the Device Security screen that opens, select Change Lock Code, enter the old code,
click OK, then when prompted for the new code, enter it, press the Next softkey or scroll
down, and then confirm by reentering the code.
3. Press the Save softkey; if left untouched for 10 minutes (default), the phone will
automatically lock.

430HD and 440HD IP Phone
User’s Manual 32 Document #: LTRT—11939
Note: Emergency numbers (police, ambulance service, firefighting service, etc.) will still be
available and dialable in the event the phone locks via a new Emergency softkey that is
displayed after the lock takes effect.
To manually lock a phone:
You can manually lock a phone at any time you choose.
When the phone is idle, press the Status softkey and then press the Lock softkey that is
displayed; the phone locks and an Unlock softkey is displayed in the idle screen.
To unlock a phone that’s been locked:
You can unlock a phone that’s been locked only if you know the lock code.
In the idle screen, press the Unlock softkey, enter the lock code that was entered as
described under Section 5, and then press the OK softkey.

User’s Manual Contents
Version 3.0.1 33 430HD and 440HD IP Phone
6 Customizing Your Phone
This section shows you how to customize your phone for enhanced usability.
6.1 Changing the Screen Language
The phone screen supports multiple languages. English is the default but you can change it to
another.
To change the default:
1. Access the Languages screen (MENU key > Settings > Language).
2. Navigate to the language you require.
3. Press the Select softkey to select it.
4. Press the Save softkey to save the setting.

430HD and 440HD IP Phone
User’s Manual 34 Document #: LTRT—11939
6.2 Selecting Ring Tone
You can choose from a selection of ring tones to indicate incoming calls .
To select a ring tone:
1. Access the Ring Tone screen (MENU key > Settings > Ring Tone).
2. Navigate to and select a ring tone. A sample of each ring tone is played as you navigate
through the list.
3. Set ring tone volume by pressing the VOL or VOL
key:
A few seconds after adjusting the volume level the Ringer Volume indication is hidden.
4. Press the Select softkey to apply your settings.
5. Press the Save softkey to save your settings.

User’s Manual Contents
Version 3.0.1 35 430HD and 440HD IP Phone
6.3 Enabling Call Waiting
You can enable or disable the call waiting feature.
To enable or disable call waiting:
1. Access the Call Waiting screen (MENU key > Settings > Call Waiting).
2. Navigate to and select:
• Disable (disables call waiting)
—OR—
• Enable (enables call waiting)
—OR—
• Busy on Busy (see Section 6.4.1 below)
3. Press the Select softkey to apply your settings.
4. Press the Save softkey to save your settings.
6.4 Managing Simultaneous Incoming Calls
If two calls simultaneously come in on a phone, or if a user is in a call and a third party calls, the
phone’s screen displays them in a graphically user—friendly way.
Simultaneous incoming calls; both calling parties flash:
When one of the incoming calls is answered:

430HD and 440HD IP Phone
User’s Manual 36 Document #: LTRT—11939
When a phone is in a call and another comes in:
Additional visual indications on the device:
The LED of the Programmable Key that is configured as an extension flashes red when a
call comes in on that extension
The LED of the Programmable Key that is configured as an extension is illuminated green
after a call that comes in on that extension is answered
The Ring LED in the upper right corner of the device flashes blue when a call comes in
6.4.1 Configuring Busy on Busy
If you’re already in an active call on either the IP phone or Skype for Business client and a call
comes in, the Busy on Busy feature rejects the coming call and plays a busy signal to the caller.
To configure Busy on Busy:
1. Access the Call Waiting screen (MENU key > Settings > Call Waiting).
2. Select the Busy on Busy option.

User’s Manual Contents
Version 3.0.1 37 430HD and 440HD IP Phone
6.5 Defining Call Forwarding
This feature enables you to automatically redirect an incoming call to another phone number if a
user—defined condition is met, e.g., if the line is busy.
To define call forwarding:
1. Access the Automatic Forward screen (MENU key > Settings > Forward settings —or—
press the Forward softkey when the screen is in idle state):
2. To forward to voicemail: In the Automatic Forward screen, navigate to Forward to Voice
Mail and press the Select softkey; you’re returned to the idle screen; calls will be
automatically forwarded to your voicemail.
3. To forward to a number: In the Automatic Forward screen, navigate to Forward to a
Number and press the Select softkey:
4. Enter the number and press the Start softkey; you’re returned to the idle screen; calls will be
automatically forwarded to the number.
To deactivate call forwarding:
When the screen is in idle state press the Forward softkey and in the Automatic Forward
screen, select Do not forward calls.

430HD and 440HD IP Phone
User’s Manual 38 Document #: LTRT—11939
6.6 Setting Date and Time
Date and time is automatically retrieved from the deployed Network Time Protocol (NTP) server,
enabled by your administrator.
To enable the NTP server:
1. Access the Date and Time screen (MENU key > Settings > Date and Time).
2. If not already ‘Enabled’, notify your network administrator.
Note: To configure the NTP server, see the Administrator’s Manual.
To configure the time zone:
1. Navigate to and select the Time zone option and then select the time zone relevant to your
geographical location. See Table 6-1 for a list of all Time Zone options.
To configure the time format:
Navigate to and select the Time format option and then select the format of your choice.
To configure the date format:
Navigate to and select the Date Format option and select the format of your choice.

User’s Manual Contents
Version 3.0.1 39 430HD and 440HD IP Phone
Table 6-1: Time Zones
Time Zone Place
(GMT—12:00) Eniwetok, Kwajalein
(GMT—11:00) Midway Is, Samoa
(GMT—10:00) Hawaii, Alaska
(GMT—08:00) Pacific Time (US & Canada
(GMT—07:00) Chihuahua, Mazatlan, Mountain Time (US & Canada
(GMT—06:00) Central Time (US & Canada
(GMT—05:00) Eastern Time (US & Canada
(GMT—04:00) Atlantic Time (Canada
(GMT—03:30) Newfoundland, Buenos Aires, Georgetown, Brasilia, Greenland
(GMT—03:00) Buenos Aires, Georgetown, Brasilia, Greenland
(GMT—02:00) Mid—Atlantic
(GMT—01:00) Azores, Cape Verde Is
(GMT 00:00) Greenwich Mean Time: Dublin, Edinburgh, Lisbon, London, Casablanca, Monrovia
(GMT+01:00) Amsterdam, West Central Africa, Madrid, Paris, Vilnius, Berlin, Bern, Rome, Vienna, Prague
(GMT+02:00) Cairo, Jerusalem, Bucharest, Helsinki, Riga, Tallinn, Athens, Istanbul, Minsk, Harare, Pretoria
(GMT+03:00) Kuwait, Riyadh, Nairobi, Baghdad, Moscow, St. Petersburg, Volgograd
(GMT+03:30) Tehran
(GMT+04:00) Abu Dhabi, Muscat, Baku, Tbilisi, Kabul
(GMT+05:00) Islamabad, Karachi, Tashkent, Yekaterinburg
(GMT+05:30) Bombay, Calcutta, Madras, New Delhi
(GMT+05:45) Kathmandu
(GMT+06:00) Almaty, Dhaka, Colombo, Almaty, Novosibirsk
(GMT+06:30) Rangoon
(GMT+07:00) Bangkok, Hanoi, Jakarta, Krasnoyarsk
(GMT+08:00) Beijing, Chongqing, Hong Kong, Urumqi, Perth, Singapore, Taipei, Irkutsk, Ulaan Bataar
(GMT+09:00) Osaka, Sapporo, Tokyo, Seoul, Yakutsk
(GMT+09:30) Darwin, Adelaide
(GMT+10:00) Canberra, Melbourne, Sydney, Brisbane, Guam, Port Moresby, Hobart, Vladivostok
(GMT+11:00) Magadan, Solomon Is, New Caledonia
(GMT+12:00) Fiji, Kamchatka, Marshall Is, Auckland, Wellington
(GMT+13:00) Nuku’alofa

430HD and 440HD IP Phone
User’s Manual 40 Document #: LTRT—11939
6.7 Changing Screen Contrast Level
The phone’s screen supports 36 different contrast levels. The range is 0—35. The default is 14.
You can choose the level that suits you best.
To define the screen‘s contrast level:
1. Access the LCD Contrast submenu (MENU key > Settings > LCD Contrast).
2. Press the navigation control’s left or right rim to navigate to the contrast level that suits you
best.
3. Press the Save softkey to apply your settings.

User’s Manual Contents
Version 3.0.1 41 430HD and 440HD IP Phone
6.8 Defining BLF LCD Contrast
Note: Applies only to the 440HD IP Phone.
The BLF LCD supports 40 different contrast levels. The range is 0—39. The default is 16. You can
choose the level that suits you best.
To define the BLF LCD’s contrast level:
1. Access the BLF LCD Contrast submenu (MENU key > Settings > BLF LCD Contr.).
2. Press the navigation control’s left or right rim to navigate to the contrast level that suits you
best.
3. Press the Save softkey to apply your settings.

430HD and 440HD IP Phone
User’s Manual 42 Document #: LTRT—11939
6.9 Defining Screen’s Backlight Timeout
You can define how long the phone’s backlight will stay on when the phone is idle. When this
duration times out, the backlight switches off. For the backlight to never time out, you can select
the Always on option. The default is 10 seconds.
To define screen backlight timeout:
1. Access the Backlight Timeout screen (MENU key > Settings > Backlight Timeout).
2. Navigate to and select Always on or 10 / 20 / 30 / 40 / 50 / 60 seconds).
3. Press the Select softkey to apply your settings.
4. Press the Save softkey to save your settings.
 Loading…
Смотреть руководство для Audiocodes 440HD ниже. Все руководства на ManualsCat.com могут просматриваться абсолютно бесплатно. Нажав кнопку «Выбор языка» вы можете изменить язык руководства, которое хотите просмотреть.

MANUALSCAT | RU
Вопросы и ответы
У вас есть вопрос о Audiocodes 440HD, но вы не можете найти ответ в пользовательском руководстве? Возможно, пользователи ManualsCat.com смогут помочь вам и ответят на ваш вопрос. Заполните форму ниже — и ваш вопрос будет отображаться под руководством для Audiocodes 440HD. Пожалуйста, убедитесь, что вы опишите свои трудности с Audiocodes 440HD как можно более детально. Чем более детальным является ваш вопрос, тем более высоки шансы, что другой пользователь быстро ответит на него. Вам будет автоматически отправлено электронное письмо, чтобы проинформировать вас, когда кто-то из пользователей ответит на ваш вопрос.
Задать вопрос о Audiocodes 440HD
- Бренд:
- Audiocodes
- Продукт:
- телефоны
- Модель/название:
- 440HD
- Тип файла:
- Доступные языки:
- английский