
Раздел: Бытовая, кухонная техника, электроника и оборудование
Тип: Газовый Духовой Шкаф
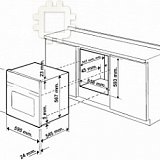
Характеристики, спецификации
Гарантия производителя:
12 МЕС
Инструкция к Газовому Духову Шкафу Hotpoint-Ariston 7O FH G IX RU

Operating Instructions
OVEN
Contents
GB
Installation, 2-5
GB
RS
Positioning
Electrical connection
English, 1
Ðóññêèé, 12
Gas connection
Data plate
Description of the appliance, 6
Overall view
Control panel
Start-up and use, 7—8
Starting the oven
How to use the timer
Burner and nozzle specifications
Cooking modes, 9
Cooking modes
7OFZ G RU /HA
Practical cooking advice
7OFZ G IX RU /HA
Cooking advice table
7OFH G RU/HA
7OFH G IX RU/HA
Precautions and tips, 10
7OFHRG RU/HA
General safety
Disposal
Respecting and conserving the environment
Maintenance and care, 11
Switching the appliance off
Cleaning the appliance
Cleaning the oven door
Replacing the light bulb
Assistance
Installation
Before operating your new appliance please read
The system can also provide
GB
this instruction manual carefully. It contains important
the air needed for combustion
information for safe use, installation and care of the
indirectly, i.e. from adjacent
appliance.
rooms fitted with air circulation
A
tubes as described above.
Please keep these operating instructions for future
Examples of ventilation holes
However, these rooms must not
for comburant air.
reference. Pass them on to possible new owners of
be communal rooms,
the appliance.
bedrooms or rooms that may
present a fire hazard.
Liquid petroleum gas sinks to the floor as it is
Positioning
heavier than air. Therefore, rooms containing LPG
cylinders must also be equipped with vents to allow
Keep packaging material out of the reach of
gas to escape in the event of a leak. As a result
children. It can become a choking or suffocation
LPG cylinders, whether partially or completely full,
hazard (see Precautions and tips).
must not be installed or stored in rooms or storage
areas that are below ground level (cellars, etc.). It is
The appliance must be installed by a qualified
a good idea to keep only the cylinder being used in
person according to the instructions provided.
the room, positioned so that it is not subject to heat
Incorrect installation may cause harm to people and
produced by external sources (ovens, fireplaces,
animals or may damage property.
stoves, etc. ) which could raise the temperature of
the cylinder above 50°C.
This appliance should only be installed and used in
permanently ventilated rooms in compliance with
Fitting the appliance
current National regulations. The following
requirements must be observed:
Use a suitable kitchen unit to ensure that the
appliance functions properly.
The room must be equipped with an air extraction
system that expels any combustion fumes. This
The panels adjacent to the oven must be made
may consist of a hood or an electric fan that
from heat-resistant material.
automatically starts each time the appliance is
switched on.
Cabinets with a veneer exterior must be assembled
with a glue that can withstand temperatures of up to
100°C.
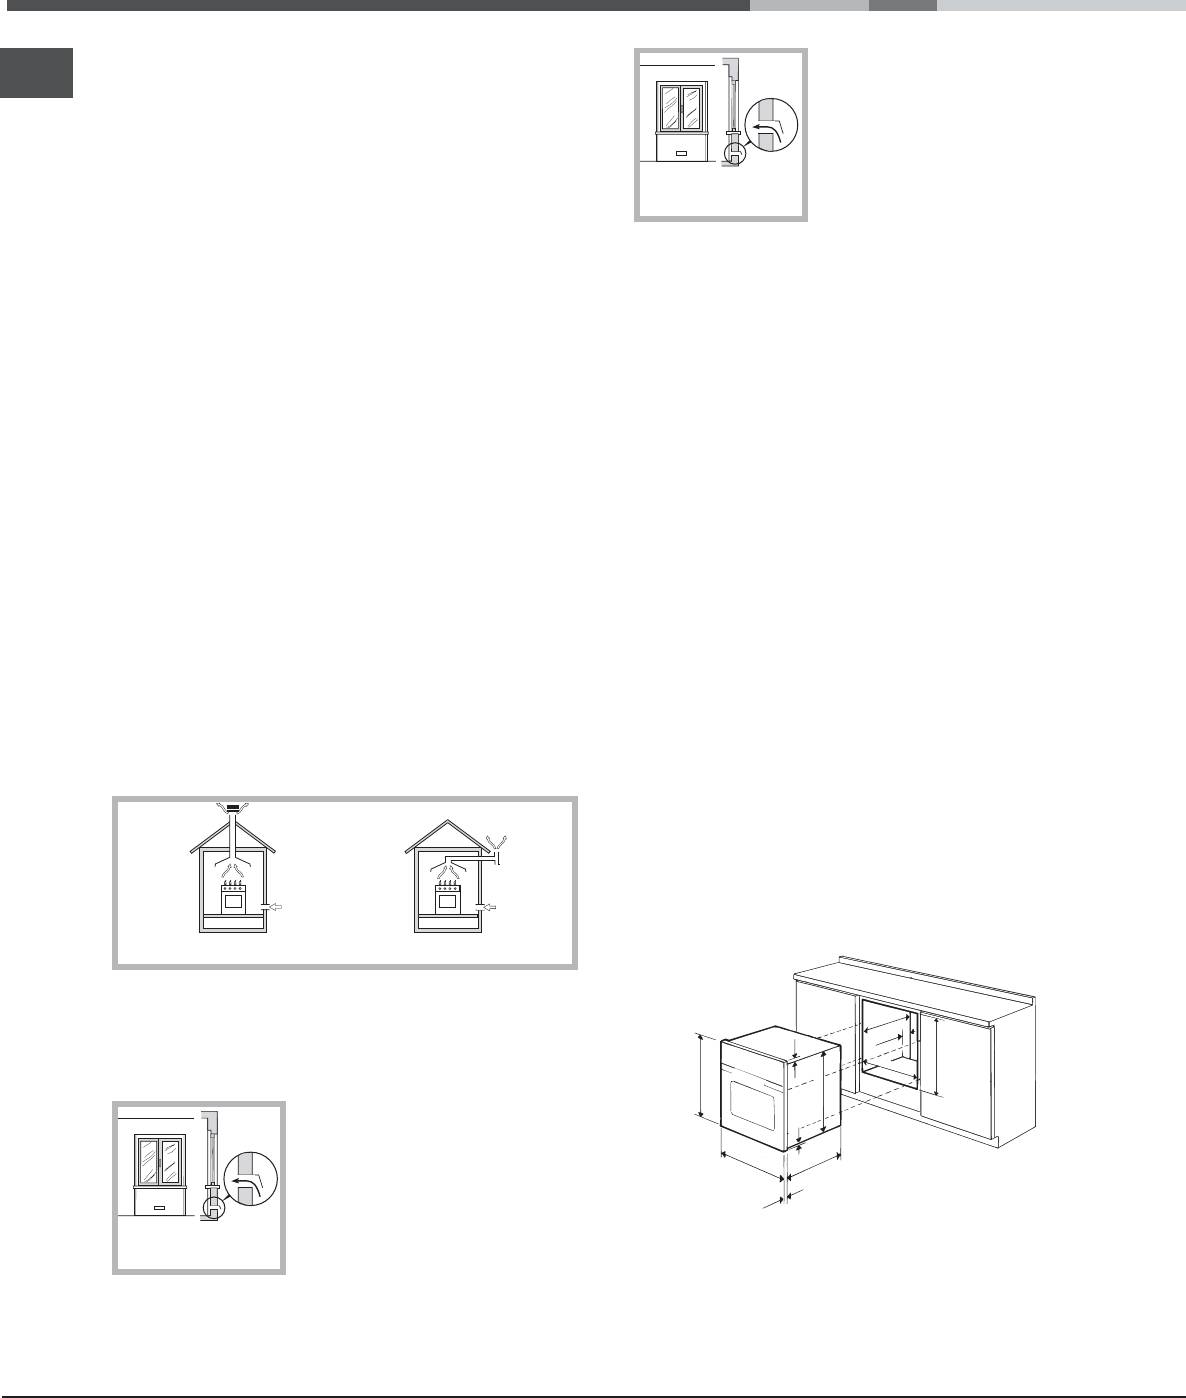
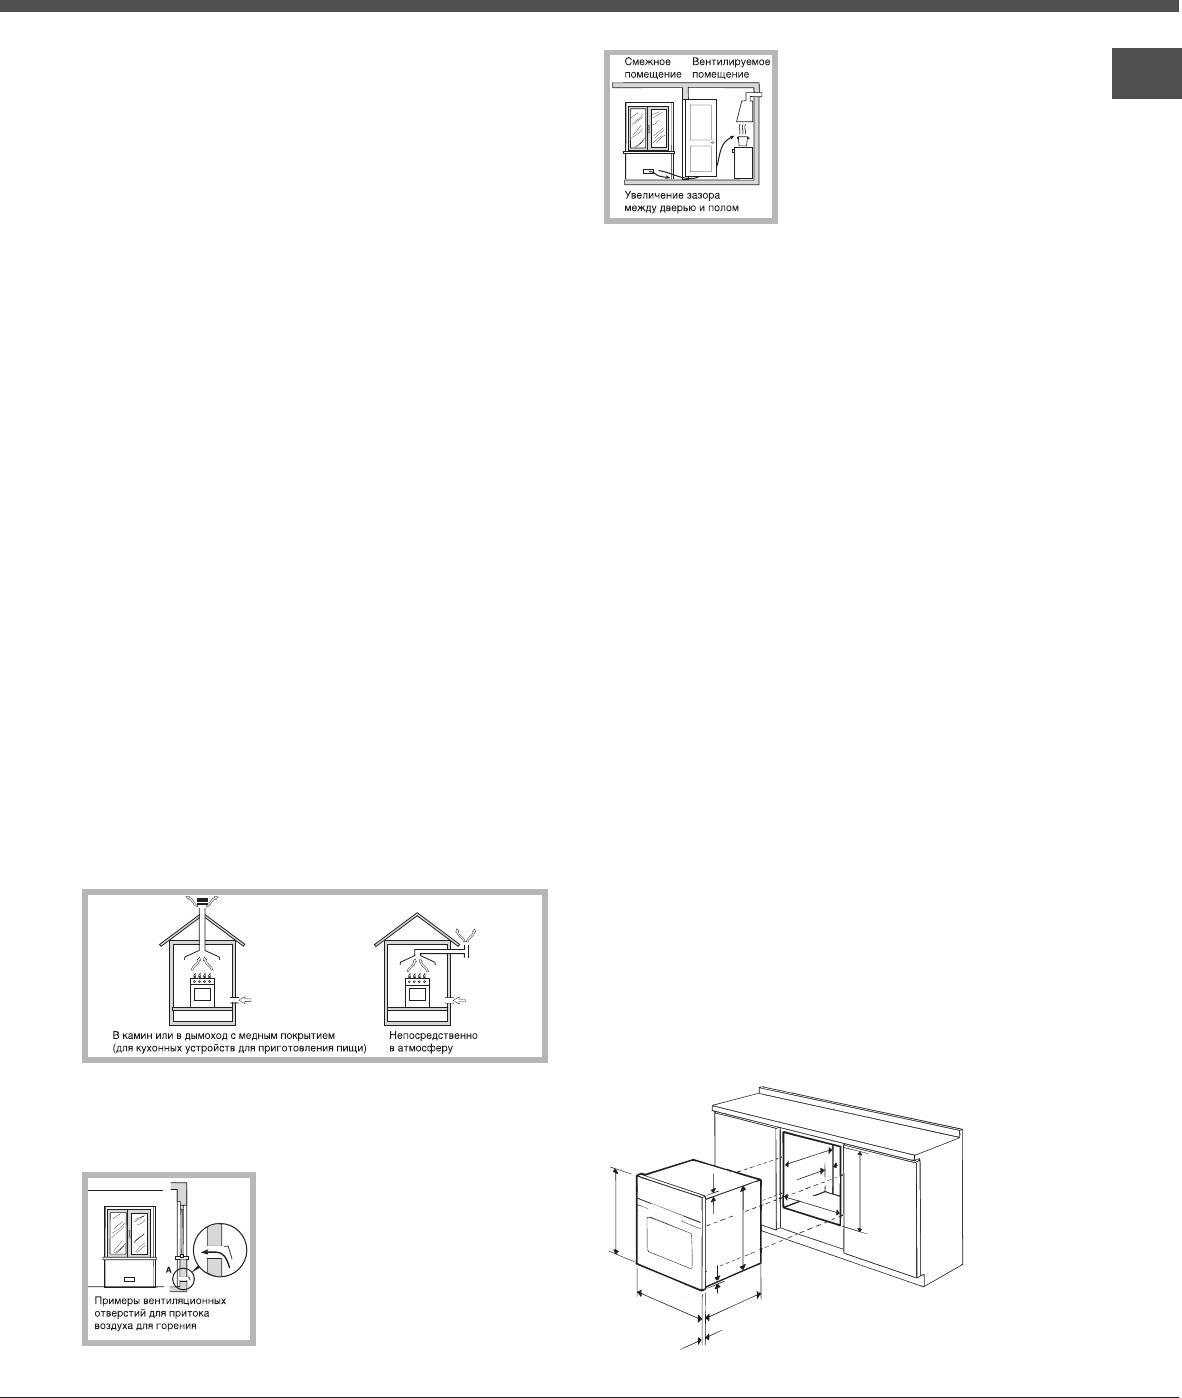
To install the oven under the counter (see diagram)
or in a kitchen unit, the cabinet must have the
following dimensions:
In a chimney stack or branched flue.
Directly to
(exclusively for cooking appliances)
the Outside
The room must also allow proper air circulation, as
547 mm. min.
air is needed for combustion to occur normally. The
45 mm.
23 mm.
flow of air needed for combustion must not be less
558 m
m
593 mm.
3
.
than 2 m
/h per kW of installed power.
595 mm.
567 mm.
The air circulation system may
take air directly from the
5 mm.
outside by means of a pipe
595 m
m
.
m
.
545 m
with an inner cross section of
A
2
at least 100 cm
; the opening
m
.
24 m
must not be vulnerable to any
Examples of ventilation holes
for comburant air.
type of blockages.
The appliance must not come into contact with
electrical parts once it has been installed.
The figures indicated on the data plate have been
calculated for this type of installation.
2
Ventilation
GB
To ensure adequate ventilation, the back panel of
the cabinet must be removed. It is advisable to
install the oven so that it rests on two strips of wood,
or on a completely flat surface with an opening of at
least 45 x 560 mm (see diagrams).
45 mm
.
m
m
.
5
6
0
Electrical connections
Ovens equipped with a three-pole power supply
cable are designed to operate with alternating
current at the voltage and frequency indicated on
the data plate located on the appliance (see below).
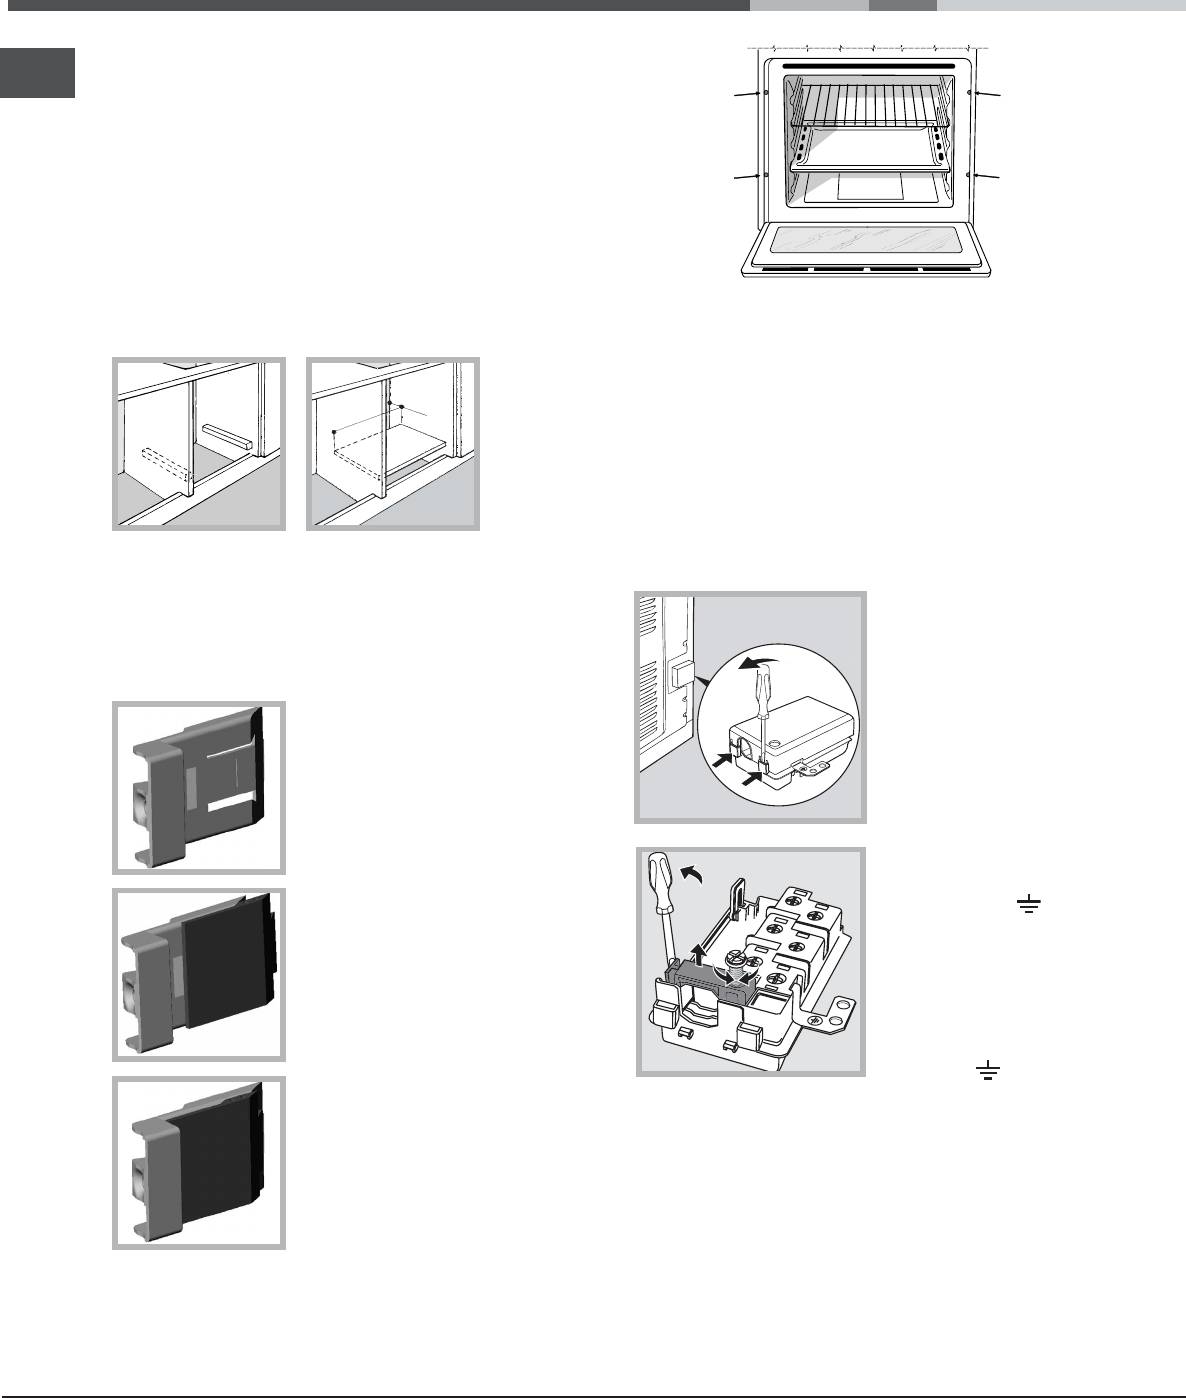
Centring and fastening
Fitting t he power supply cable
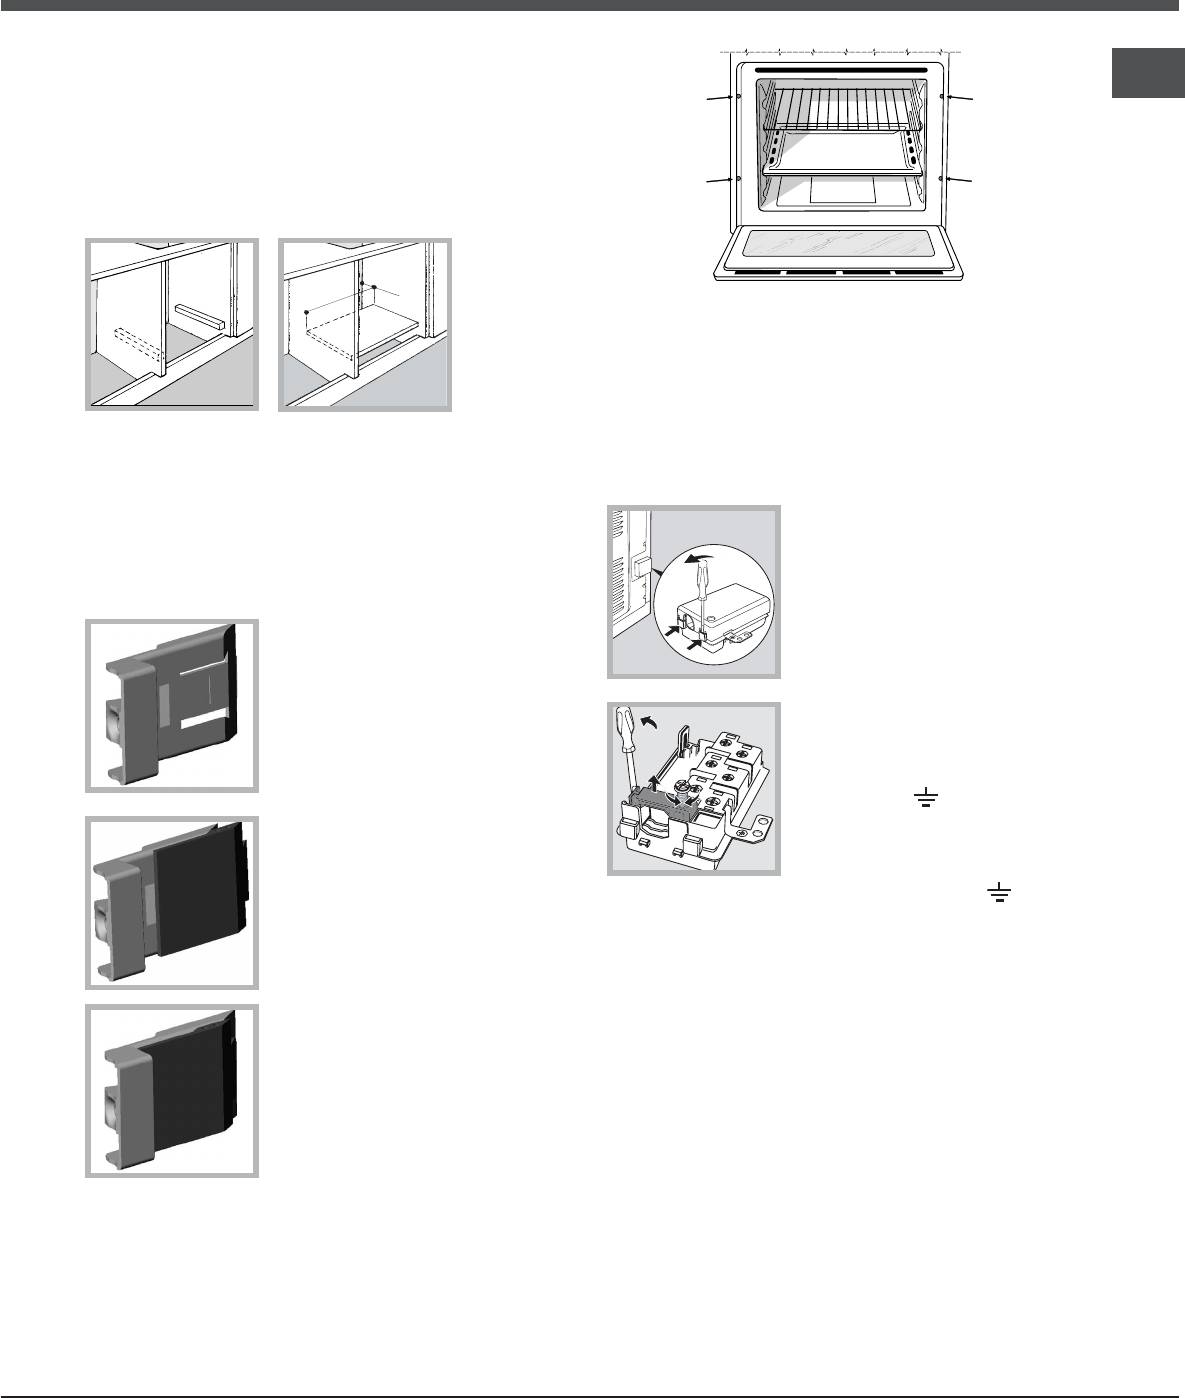
Position the 4 tabs on the side of the oven according
1. Open the terminal board by
to the 4 holes on the outer frame. Adjust the tabs
inserting a screwdriver into the
according to the thickness of the cabinet side panel,
side tabs of the cover. Use
as shown below:
the screwdriver as a lever by
pushing it down to open the
20 mm thick: take off the
cover (see diagram).
removable part of the tab (see
2. Loosen the cable clamp
diagram).
screw and remove it, using a
screwdriver as a lever (see
figure).
3. Remove the wire contact
screws L-N-
, then fasten
the wires under the screw
18 mm thick: use the first
heads, respecting the colour
groove, which has already
code: Blue (N), Brown (L) and
been set in the factory (see
Yellow-Green Verde (
).
diagram).
Connecting the supply cable to the mains
Install a standardised plug corresponding to the
load indicated on the data plate (see adjacent box).
16 mm thick: use the second
The appliance must be directly connected to the
groove (see diagram).
mains using an omnipolar circuit-breaker with a
minimum contact opening of 3 mm installed between
the appliance and the mains. The circuit-breaker
must be suitable for the charge indicated and must
comply with current electrical regulations (the
earthing wire must not be interrupted by the circuit-
breaker). The supply cable must not come into
Secure the appliance to the cabinet by opening the
contact with surfaces with temperatures higher than
oven door and fastening 4 screws into the 4 holes of
50°C.
the outer frame.
All parts ensuring the safe operation of the
The installer must ensure that the correct electrical
appliance must not be removable without the aid of
connection has been made and that it is compliant
a tool.
with safety regulations.
3
Before connecting to the power supply, make sure
GB
NO
that:
the appliance is earthed and the plug is compliant
with the law.
the socket can withstand the maximum power of
the appliance, which is indicated on the data
plate (see below).
Connection with a rigid pipe (copper or steel)
the voltage is in the range between the values
Connection to the gas system must be carried out
indicated on the data plate (see below).
in such a way as not to place any strain of any kind
the socket is compatible with the plug of the
on the appliance.
appliance. If the socket is incompatible with the
There is an adjustable L-shaped pipe fitting on the
plug, ask an authorised technician to replace it.
appliance supply ramp and this is fitted with a seal in
Do not use extension cords or multiple sockets.
order to prevent leaks. The seal must always be
Once the appliance has been installed, the power
replaced after rotating the pipe fitting (the seal is
supply cable and the electrical socket must be
provided with the appliance). The gas supply pipe
easily accessible.
fitting is a threaded 1/2 gas cylindrical male
attachment.
The cable must not be bent or compressed.
The cable must be checked regularly and replaced
Connecting a flexible jointless stainless steel
by authorised technicians only (see Assistance).
pipe to a threaded attachment
The manufacturer declines any liability should these
The gas supply pipe fitting is a threaded 1/2 gas
safety measures not be observed.
cylindrical male attachment.
These pipes must be installed so that they are never
longer than 2000 mm when fully extended. Once
Gas connection
connection has been carried out, make sure that the
flexible metal pipe does not touch any moving parts
The appliance should be connected to the main gas
and is not compressed.
supply or to a gas cylinder in compliance with
Only use pipes and seals that comply with current
current National regulations. Before carrying out the
National regulations.
connection, make sure the cooker is compatible with
the gas supply you wish to use. If this is not the
Checking the tightness of the connection
case, follow the instructions indicated in the
paragraph Adapting to different types of gas.
When installation has been completed, check the
When using liquid gas from a cylinder, install a
pipe fittings for leaks using a soapy solution. Never
pressure regulator that complies with current
use a flame.
National regulations.
Check that the pressure of the gas supply is
Adapting to different types of gas
consistent with the values indicated in Table 1
In order to adapt the oven to a type of gas other
(Burner and nozzle specifications) since this will
than the type for which it was manufactured
ensure the safe operation and longevity of your
(indicated on the label), follow these simple steps:
appliance while maintaining efficient energy
Replacing the oven burner nozzle
consumption.
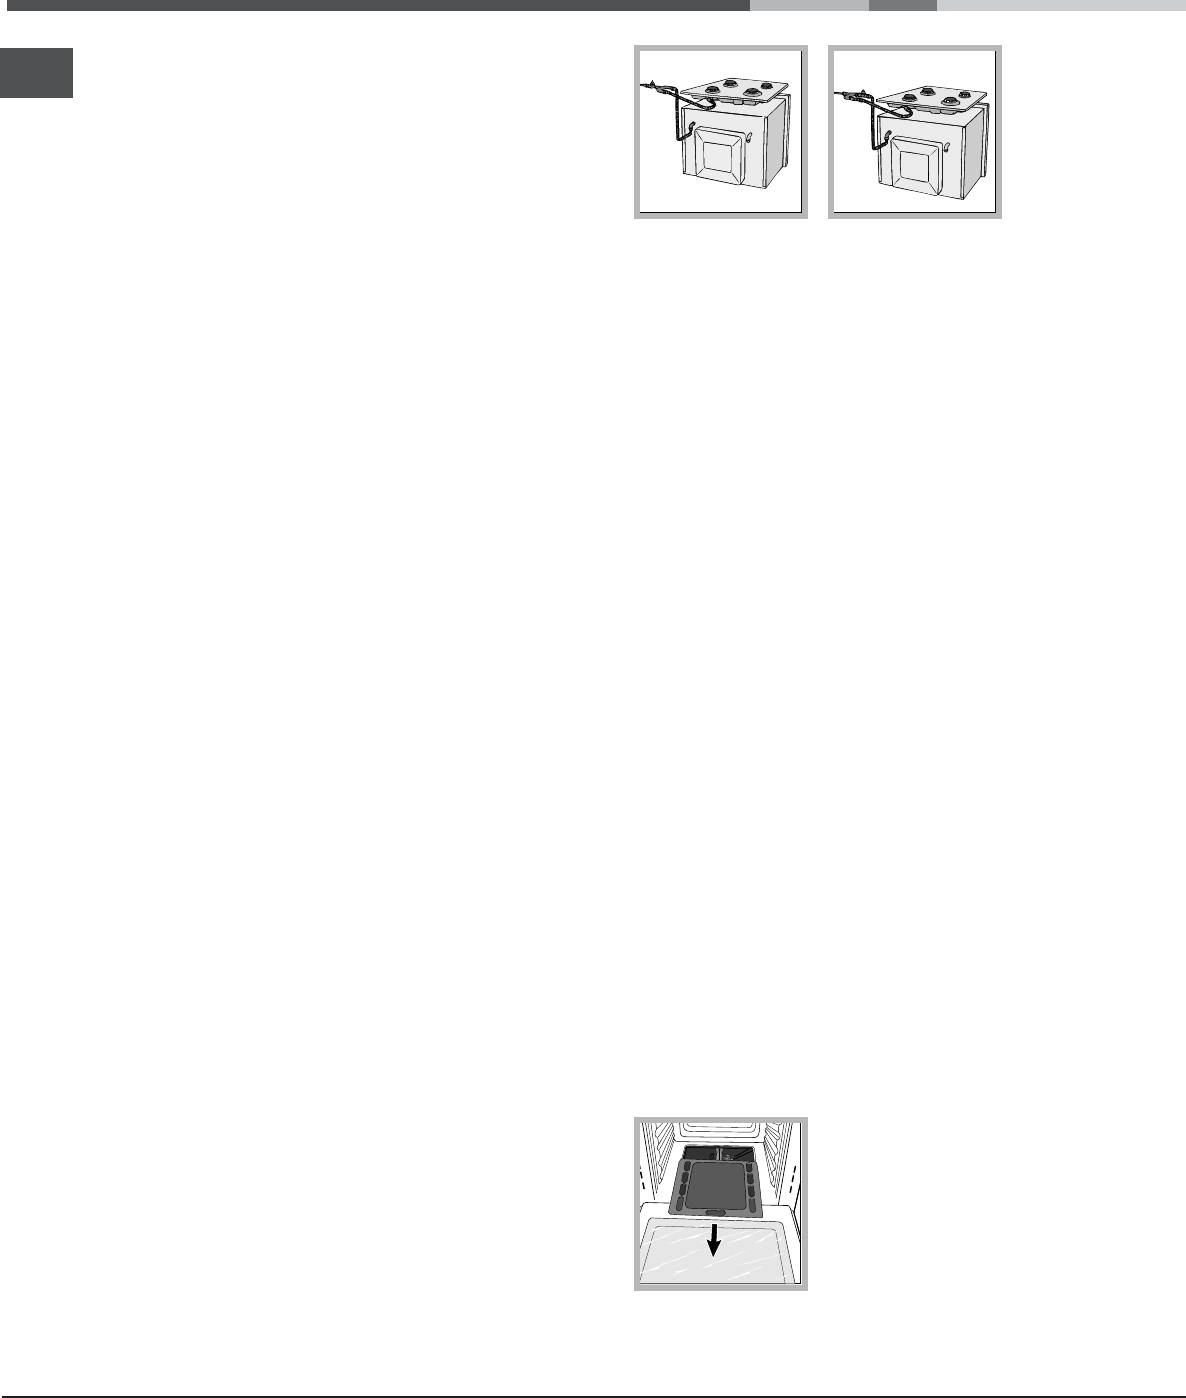
1. Open the oven door fully.
Should you need to install a gas hob on top of a
2. Slide out the bottom of the
built-in gas oven, it is strictly forbidden to connect
oven.
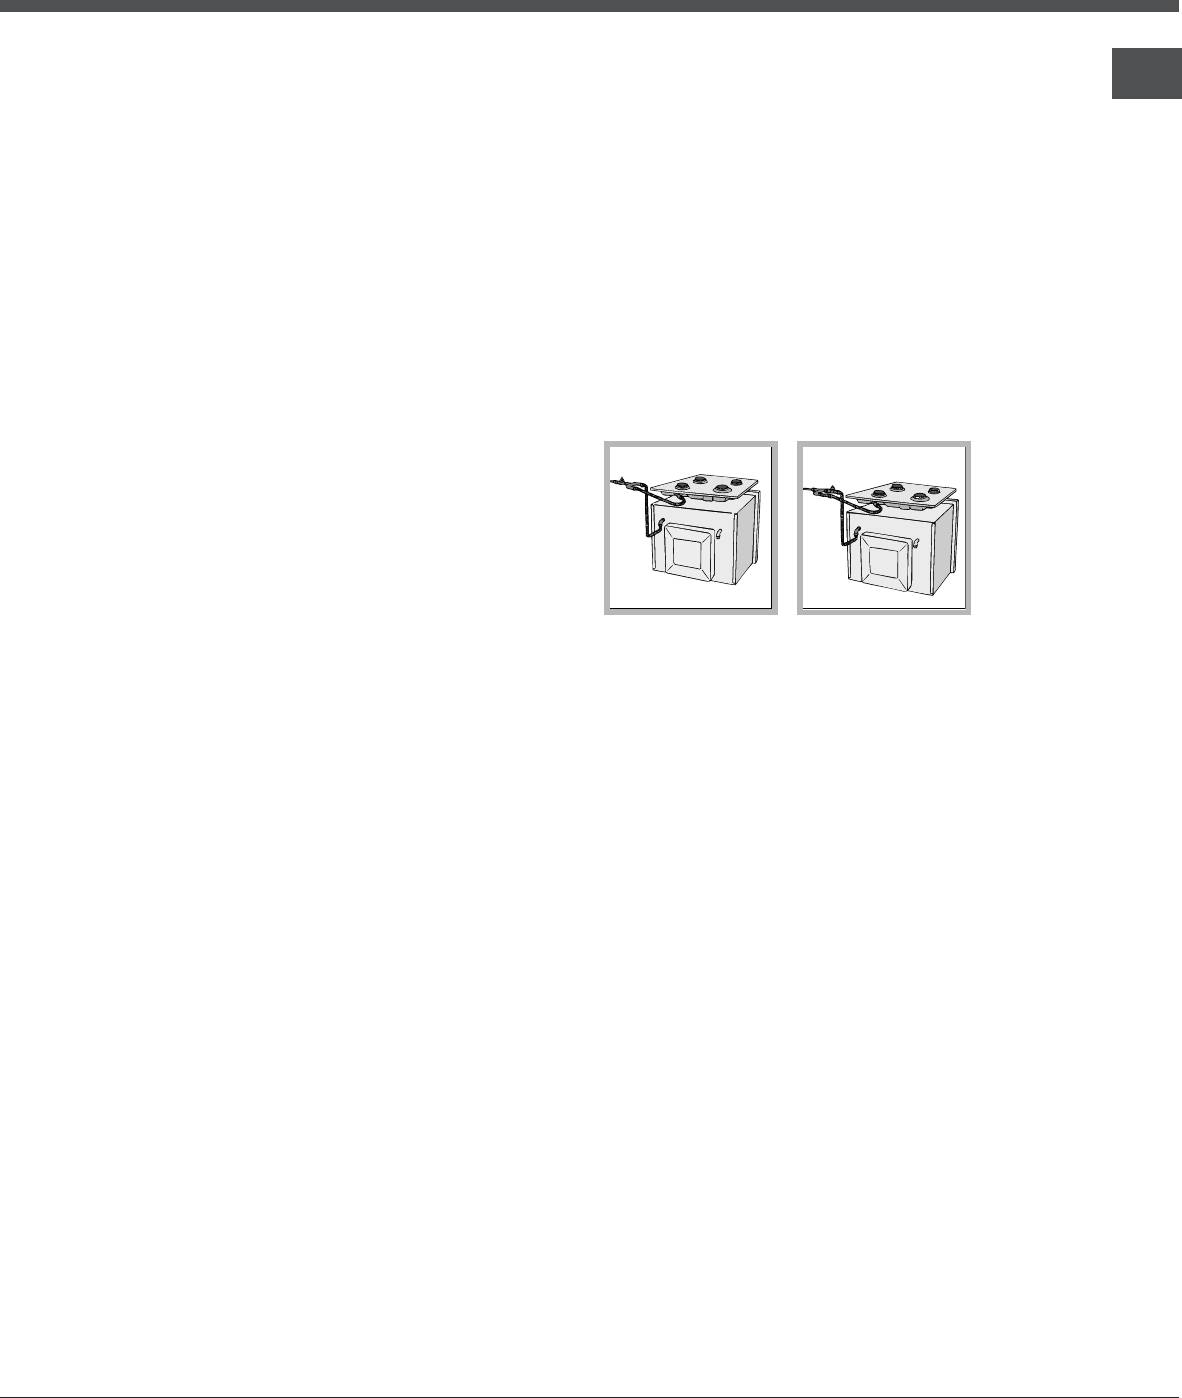
the two or to use a single cut-off tap. The two
appliances should be connected separately, and
each one should have its own stop tap in order to
make them completely independent from one
another (see figures).
4
OK
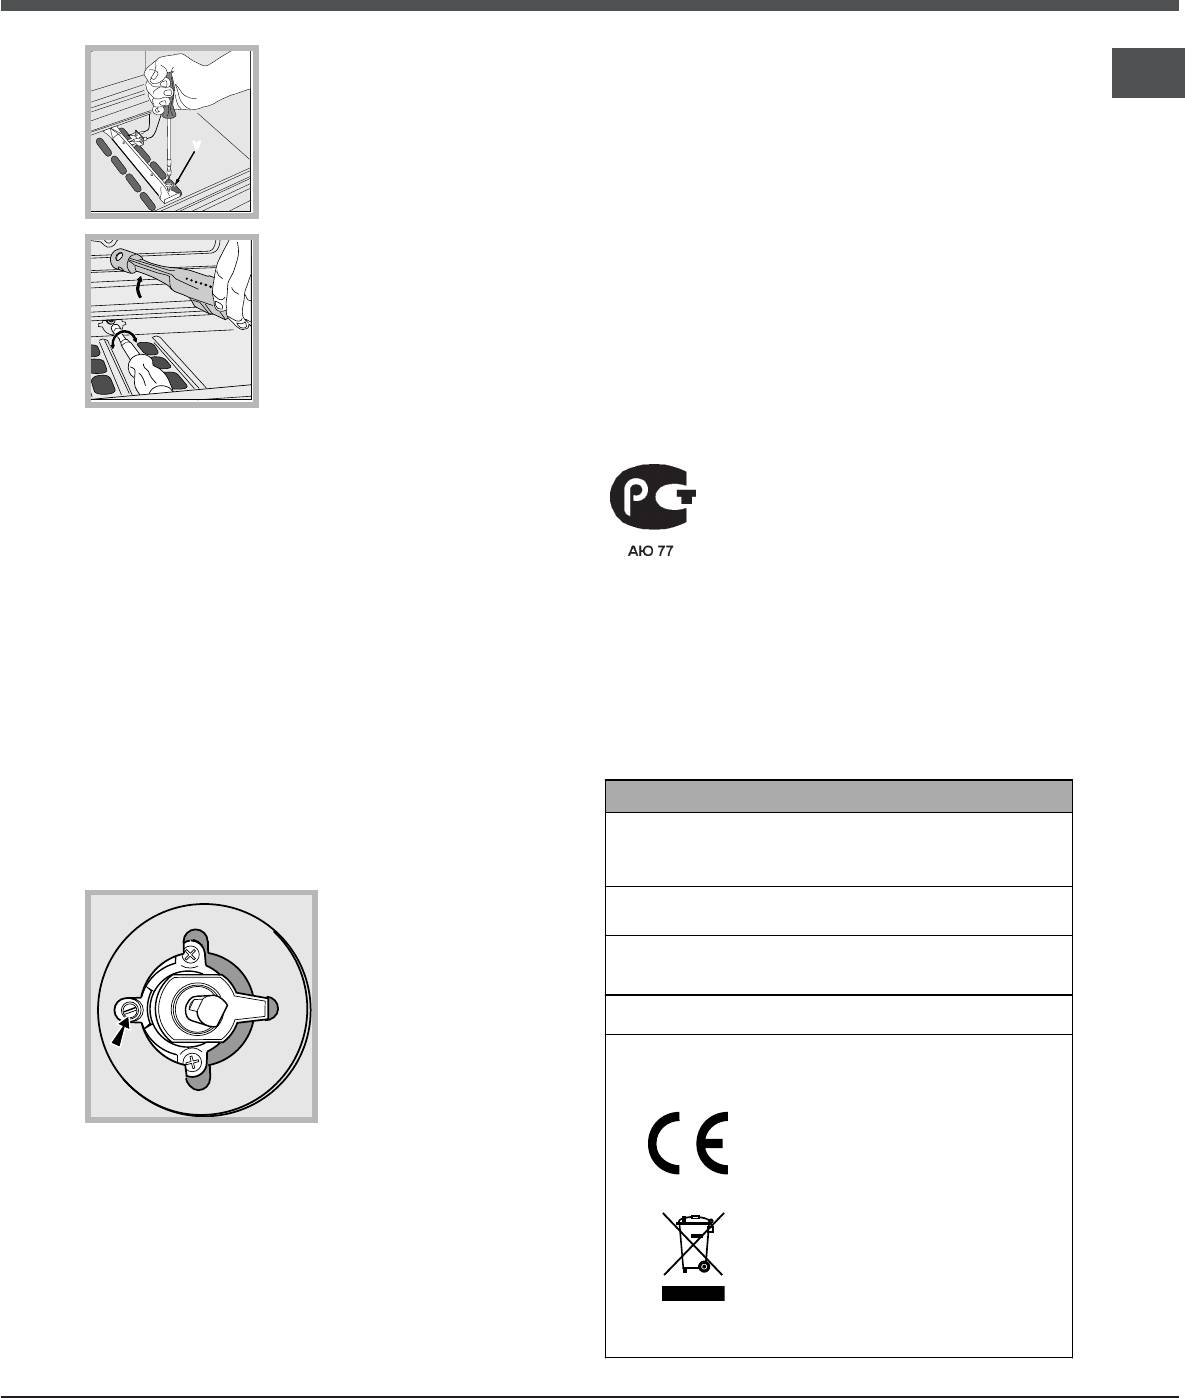
3. Unscrew the burner
5. Make sure the burner does not switch off when
GB
fastening screws.
you turn the knob from Max to Min quickly, or
4. Remove screw V and
when you open and close the oven door quickly.
then the oven burner.
V
If the appliance is connected to liquid gas, the
regulation screw must be fastened as tightly as
possible.
5. Unscrew the oven burner
Once this procedure is finished, replace the old
nozzle using the special
rating sticker with one indicating the new type of gas
socket spanner for the
used. This sticker is available from any of our
nozzles, or better still a 7 mm
Service Centres.
socket spanner, and replace it
with a nozzle suited to the
If the gas pressure is different from the
new type of gas (see Table 1).
recommended pressure, a suitable pressure
regulator must be fitted to the inlet pipe in
6. Replace all the parts, following the steps
accordance with current National Regulations.
described above in the reverse order.
Take particular care when handling the spark
plug wires and the thermocouple pipes.
Primary air regulation for the oven burner
The burner was designed not to need any
adjustments to the primary air.
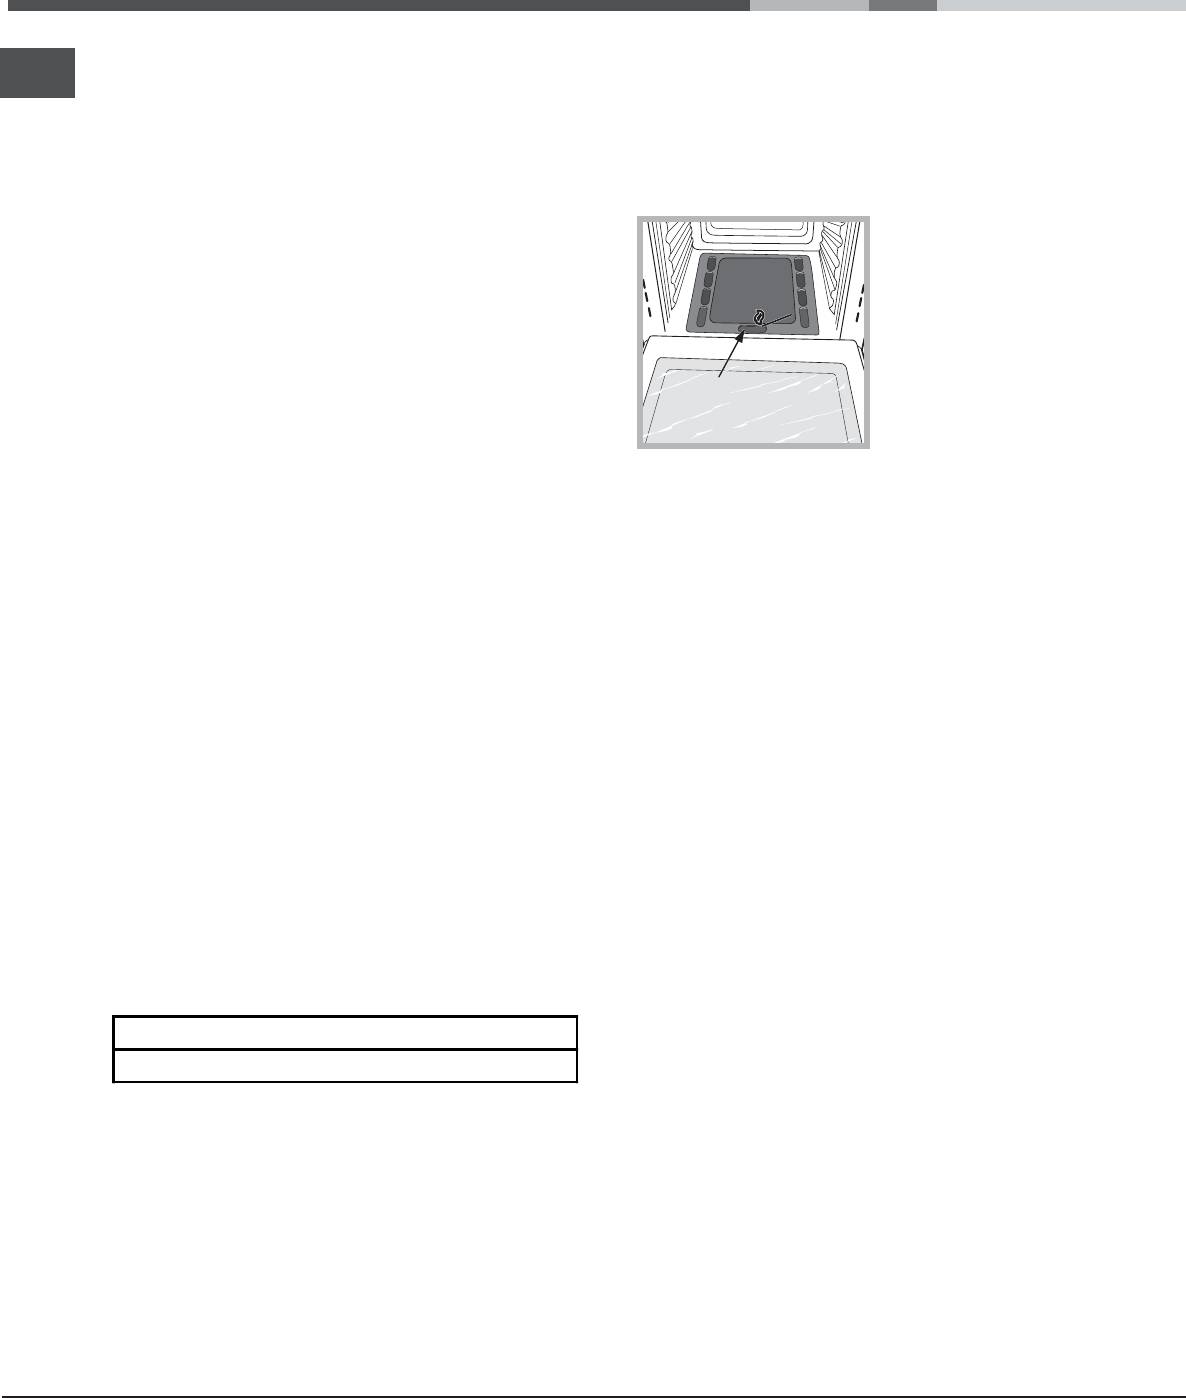
Setting the oven burner to minimum
1. Turn the knob first to the Max setting for about 10
minutes and then to Min.
2. Remove the knob.
3. Remove the disk fastened to the control panel.
4. Adjust the screw located outside the thermostat
DATA PLATE
cock pin until the flame is small but steady (the
width 43.5 cm
flame can be seen through the slots on the oven
Dimensions
height 31 cm
bottom).
depth 43.5 cm
Volume
58 l
Electrical
see data plate
connections
Gas features
see data plate
This appliance conforms to the
following European Economic
Community directives:
2006/95/EEC dated 12/12/06
(Low Voltage) and subsequent
amendments — 2004/108/EEC
dated 15/12/04 (Electromagnetic
compatibility) and subsequent
amendments — 93/68/EEC dated
22/07/93 and subsequent
amendments. 90/336/EEC dated
29
.06.90 (Gas) and subsequent
amendments.
2002/96/EC and subsequent
amendments.
5
Description of the
appliance
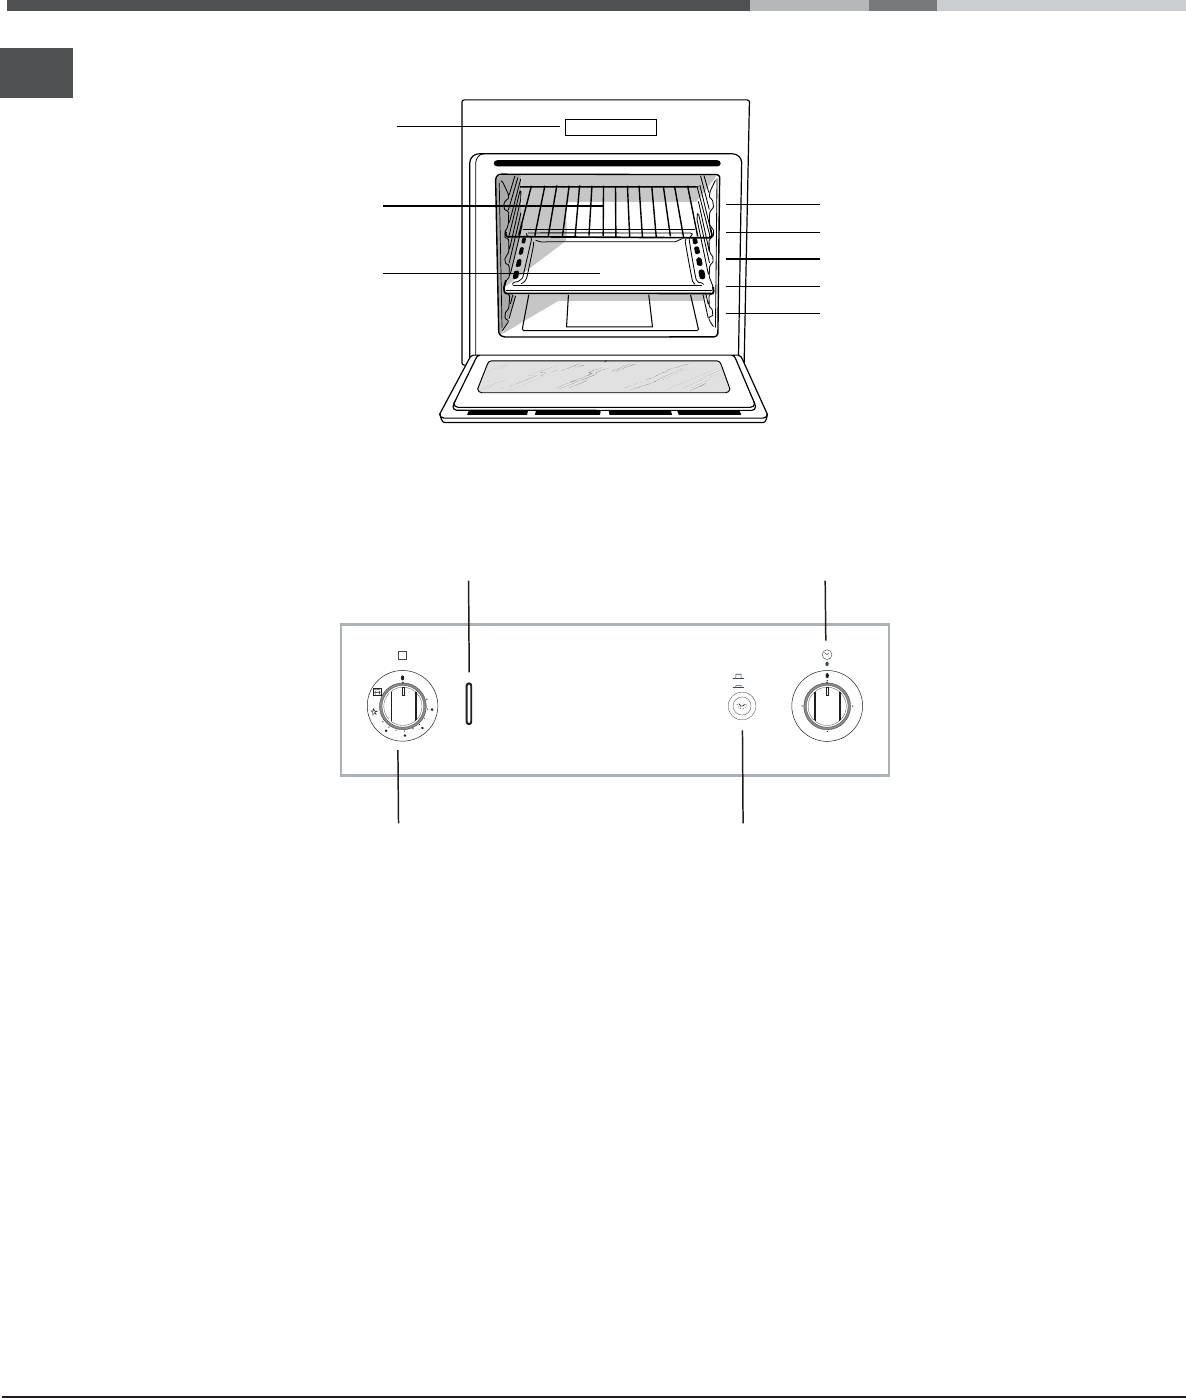
Overall view
GB
Control panel
GUIDES for the
sliding racks
GRILL
position 5
position 4
position 3
DRIPPING PAN
position 2
position 1
Control panel
GRILL
TIMER
indicator light
knob
0
0
1
Min
45
15
Max
150
220
180
30
OVEN/GRILL
OVEN LIGHT
knob
button
6
Start—up and use
The first time you use your appliance, heat the
Switching the oven on manually
GB
empty oven with its door closed at its maximum
temperature for at least half an hour. Ensure that the
In the event of a power failure, the oven burner can be
room is well ventilated before switching the oven off
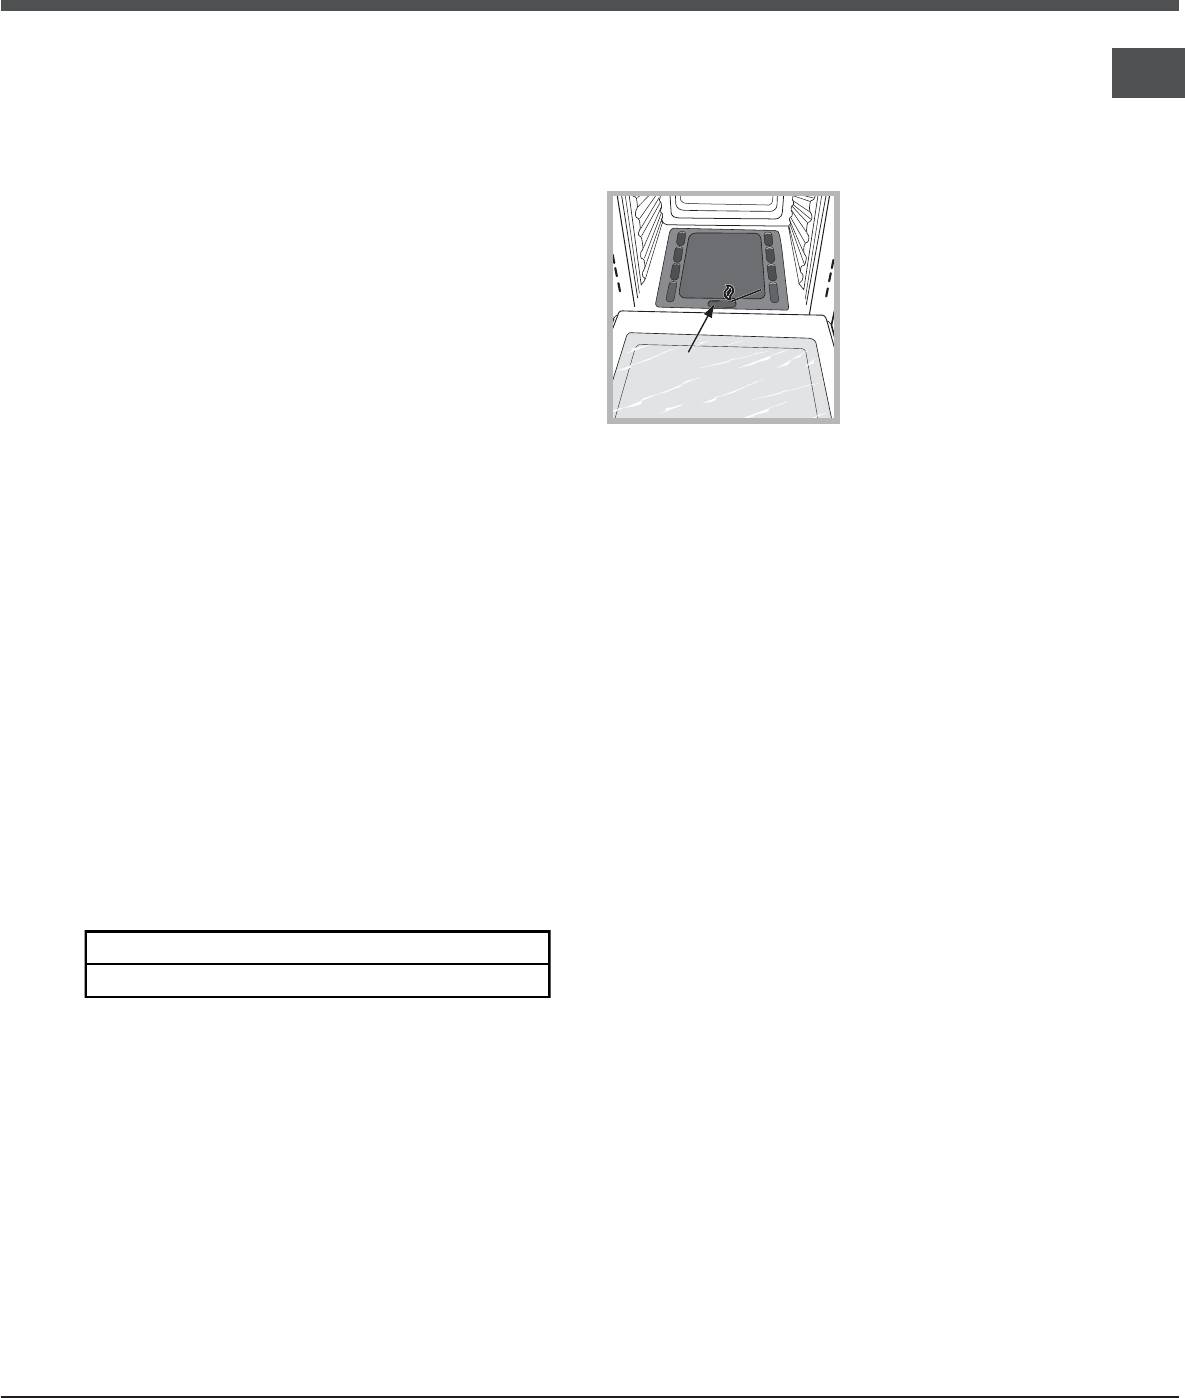
lit manually:
and opening the oven door. The appliance may
1. Open the oven door.
produce a slightly unpleasant odour caused by the
burning away of protective substances used during
2. Hold a match or
the manufacturing process.
lighter near the burner
hole as shown in the
Starting the oven
figure, press knob F
(see figure) in fully and
This knob is used not only to select the different oven
turn it anticlockwise,
modes, but also to choose the right cooking
setting it to the Max
temperature for various foods from among the
F
position.
temperatures shown on the knob itself (the range is
from 140°C to 240°C inclusive). The electronic ignition
device of the oven is built into the control knob. To
light the oven burner, press the OVEN knob in as far
The oven is equipped with a safety device. After
as possible and turn it anti-clockwise, setting it to
lighting the burner allow the gas to circulate until the
position (keeping the oven door shut). The oven is
safety thermocouple is heated by keeping the OVEN
equipped with a safety device. After lighting the
knob pressed in for about 6 seconds.
burner allow the gas to circulate until the safety
3. Once the burner is lit, shut the oven door.
thermocouple is heated by keeping the OVEN knob
pressed in for about 6 seconds.
If the burner flame is accidentally extinguished, turn
the OVEN control knob to the off position, open the
The electronic ignition device of the oven burner
oven door and wait for at least one minute before
must not be activated for more than 15 seconds. If the
trying to light the burner again.
burner fails to light after 15 seconds, stop pressing
the OVEN knob, open the oven door and wait for at
The GRILL knob
least one minute before you try to light the burner
again.
Your oven is equipped with an electric grill. The
extremely high and direct temperature of the grill
The cooking temperature is selected by matching the
makes it possible to brown the surface of meats and
desired temperature with the reference mark on the
roasts while locking in the juices to keep them tender.
control panel; the complete range of temperatures is
The grill is also highly recommended for dishes that
shown below:
require a high surface temperature: beef steaks, veal,
rib steak, fillets, hamburgers etc…
Some examples of how the grill may be used are
Min 150 180 220 Max
included in the Practical Cooking Advice section.
» »# $ ! «
When using the grill, the oven door must be kept
shut.
The oven will automatically reach the temperature set,
and the thermostat, which is controlled by the knob,
Never put objects directly on the bottom of the oven —
will keep the temperature constant.
this could result in damage to the enamel coating.
Always place cookware on the rack(s) provided.
7
Cooling ventilation
Oven light
GB
In order to cool down the external temperature of the
This is switched on by pressing the LIGHT button.
oven, some models are fitted with a cooling fan that
blows air out between the control panel and the oven
How to use the timer
door.
Once the cooking has been completed, the cooling
1. To set the buzzer, turn the TIMER knob
fan remains on until the oven has cooled down
clockwise almost one complete revolution.
sufficiently.
2. Turn the knob anticlockwise to set the desired
time: align the minutes shown on the knob with the
Turnspit (only available in certain models)
indicator on the control panel.
3. The timer operates in minutes: when the selected
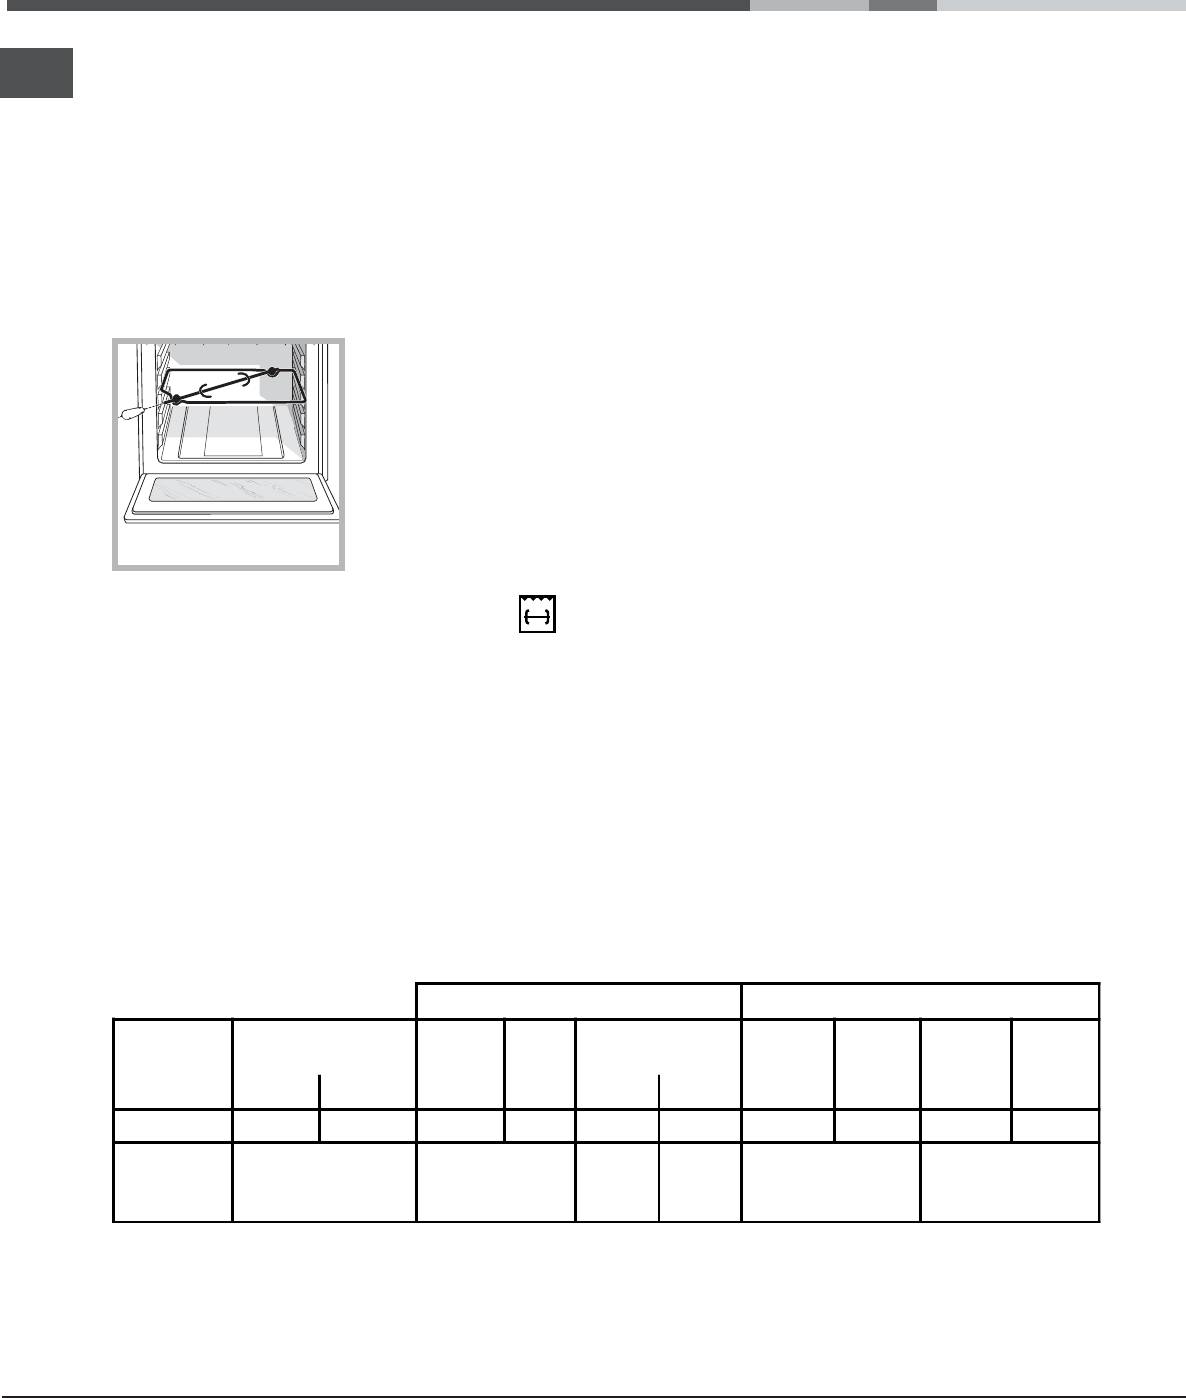
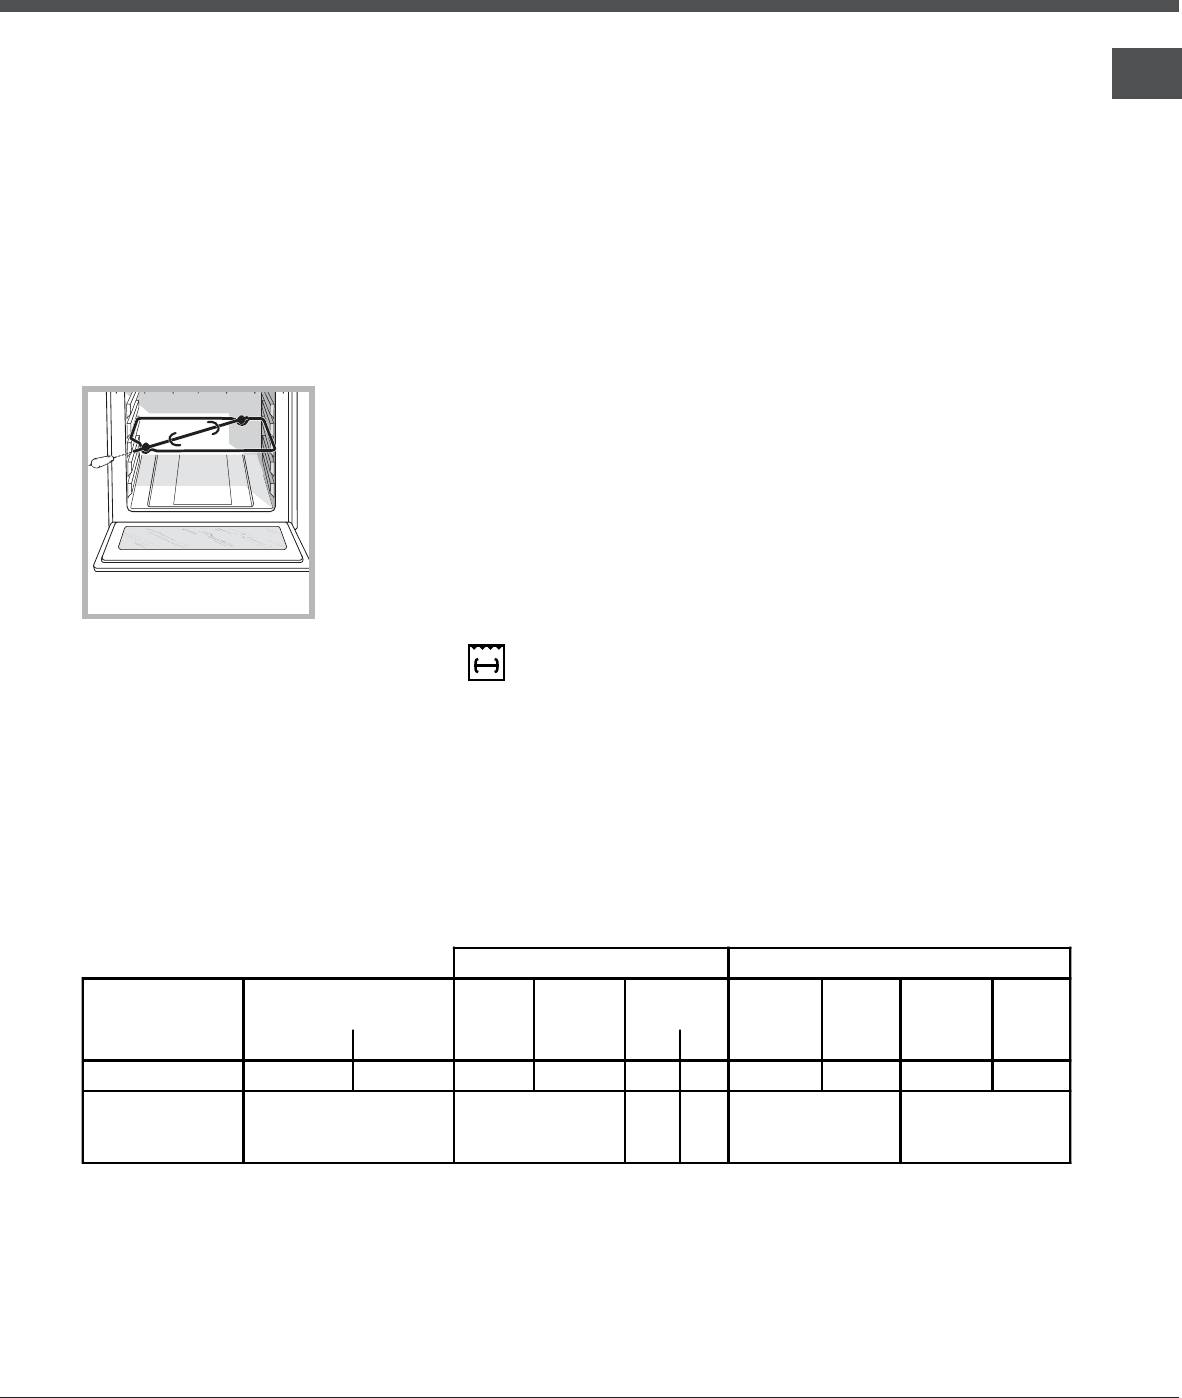
To operate the
time has elapsed, a buzzer will sound.
rotisserie (see diagram)
proceed as follows:
The timer does not switch the oven on or off.
1. Place the dripping
pan in position 1.
2. Place the rotisserie
support in position 3
and insert the spit in the
hole provided on the
back panel of the oven.
3. Start the rotisserie using the knob to select
Burner and Nozzle specifications
Table 1 Liquid Gas Natural Gas
Burner Thermal Power
By-Pas s
Nozzle
Flow*
Nozzle
Flow*
Nozzle
Flow*
kW (p.c.s.*)
1/100
1/100
g/h
1/100
l/h
1/100
l/h
NominalReduced (mm)(mm) *** ** (mm)(mm)
Oven 2,60 1,00 49 78 189 186 119 248 132 248
Nominal (mbar)
28-30
37
20
13
Supply
Minimum (m bar )
20
25
17
6,5
Pressures
Maximum (mbar)
35
45
25
18
* At 15°C and 1013 mbar-dry gas
** Propane P.C.S. = 50.37 MJ/Kg
*** Butane P.C.S. = 4‘.47 MJ/Kg
3
Natural P.C.S. = 37.78 MJ/m
8
Cooking modes
Cooking modes
GRILL
GB
GRILL mode
Place the grill in position 3 or 4, making sure that
The top heating element comes on. The extremely
the food is in the centre of the grill.
high and direct temperature of the grill makes it
We recommend that you set the maximum power
possible to brown the surface of meats and roasts
level. The top heating element is regulated by a
while locking in the juices to keep them tender. The
thermostat and may not always be on.
grill is also highly recommended for dishes that
require a high surface temperature: beef steaks, veal,
PIZZA
rib steak, fillets, hamburgers etc… Always cook in this
mode with the oven door closed.
Use a light aluminium pizza pan. Place it on the
rack provided.
Practical cooking advice
For a crispy crust, do not use the dripping pan
(prevents crust from forming by extending cooking
In the GRILL cooking mode, place the dripping pan
time).
in position 1 to collect cooking residues (fat and/or
grease).
If the pizza has a lot of toppings, we recommend
adding the mozzarella cheese to the top of the
pizza halfway through the cooking process.
Cooking advice table
Selector
Food to be cooked Weight
Cooking
Preheating time
Thermostat
Cooking
knob
(in kg)
rack
(minutes)
knob
time
setting
position
setting
(minutes)
from oven
bottom
Oven
Lasagne
2,5
3
10
200
55-60
Can nelloni
2,5
3
10
200
40-45
Pasta bakes
2,2
3
10
200
50-55
Vea l
1,7
2
10
210
80-90
Chicken
1,5
3
10
200
70-80
Turkey roll
2,5
3
10
200
80-90
Duck
1,8
3
10
200
90-100
Rab bit
2,0
3
10
200
80-90
Pork loin
1,5
3
10
200
70-80
Leg of lamb
1,8
3
10
200
80-90
Mackerels
1,3
3
10
200
30-40
Den tex
1,5
3
10
180
30-40
Trout ba ked in foil
1,0
3
10
200
30-35
Nea politan—style pizza
0,6
3
15
210
15-20
Dry biscui
ts
0,5
4
15
180
25-30
Tar t
1,1
3
15
180
30-35
Chocolate cake
1,0
3
15
165
50-60
Leavened cakes
1,0
4
15
165
50-60
Grill
Soles an d cuttlefis h
1
4
5
—
6
Squid an d pra
wn kebabs
1
4
3
—
4
Cod filet
1
4
3
—
10
Grilled veg etables
1
4
—
—
8-10
Vea l steak
1
4
5
—
20-25
Chops
1,5
4
5
—
20-25
Hamburg e rs
1
4
3
—
10-15
Sausage s
1,7
4
5
—
20-25
Toasted sandwiches
n.° 4
4
3
—
2-3
With rotisserie
(where prese nt)
Vea l on the spit
1.0
—
—
—
80-90
Chicken on the spit
1.5
—
—
—
80-90
Lam b on the spit
1.0
—
—
—
80-90
!
Cooking times are approxima te and may va ry according to personal taste. When cooking using the grill, the
dripping pan m ust always be placed on the 1st oven rack from the bottom.
9

Precautions and tips
This appliance has been designed and
In case of malfunction, under no circumstances
GB
manufactured in compliance with international safety
should you attempt to repair the appliance yourself.
standards. The following warnings are provided for
Repairs carried out by inexperienced persons may
safety reasons and must be read carefully.
cause injury or further malfunctioning of the
appliance. Contact a Service Centre (see
General safety
Assistance).
This is a class 3 built—in appliance.
Do not place heavy objects on the open oven
door.
Gas appliances require regular air exchange to
maintain efficient operation. When installing t
he
The appliance should not be operated by people
cooker, follow the instructions provided in the
(including children) with reduced physical,
paragraph on Positioning the appliance.
sensory or mental capacities, by inexperienced
The appliance was designed for domestic use
individuals or by anyone who is not familiar with
inside the home and is not intended for commercial
the product. These individuals should, at the very
or industrial use.
least, be supervised by someone who assumes
responsibility for their safety or receive
The appliance must not be installed outdoors, even
preliminary instructions relating to the operation of
in covered areas. It is extremely dangerous to leave
the appliance.
the appliance exposed to rain and storms.
When moving or positioning the appliance, always
Do not let children play with the appliance.
use the handles provided on the sides of the oven.
Disposal
Do not touch the appliance with bare feet or with
wet or damp hands and feet.
When disposing of packaging material: observe
local legislation so that the packaging may be
The appliance must be used by adults only, to cook
reused.
food according to the instructions in this manual.
The European Directive 2002/‘6/EC on Waste
Do not touch the heating element
s and parts of
Electrical and Electronic Equipment (WEEE),
the oven door when the appliance is in use;
requires that old household electrical appliances
these parts become extremely hot. Keep children
must not be disposed of in the normal unsorted
well away from the applianc
e.
municipal waste stream. Old appliances must be
Ensure that the power supply cables of other
collected separately in order to optimise the
electrical appliances do not come into contact with
recovery and recycling of the materials they contain
the hot parts of the oven.
and reduce the impact on human health and the
environment. The crossed out wheeled bin
The openings used for ventilation and dispersion of
symbol on the product reminds you of your
heat must never be covered.
obligation, that when you dispose of the appliance
Always grip the oven door handle in the centre: the
it must be separately collected.
ends may be hot.
Consumers should contact their local authority or
retailer for information concerning the correct
Always use oven gloves to place cookware in the
disposal of their old appliance.
oven or to remove it.
Do not use aluminium foil to line the bottom of the
Respecting and conserving the
oven.
environment
Do not place flammable materials in the oven: if the
By using the appliance in the hours between late
appliance is switched on by mistake, it could catch fire.
afternoon and early morning, you can help reduce
Always make sure the knobs are in the l/
¡
the workload placed on electrical companies.
position when the appliance is not in use.
Always keep the oven door closed when using the
When unplugging the appliance always pull the
GRILL mode in order to attain the best results and
plug from the mains socket, do not pull on the
to save energy (approximately 10%).
cable.
Regularly check the door seals and wipe clean to
Never carry out any cleaning or maintenance work
ensure they are free of debris so that they stick
without having unplugged the plug from the mains.
properly to the door and do not allow heat to
disperse.
10
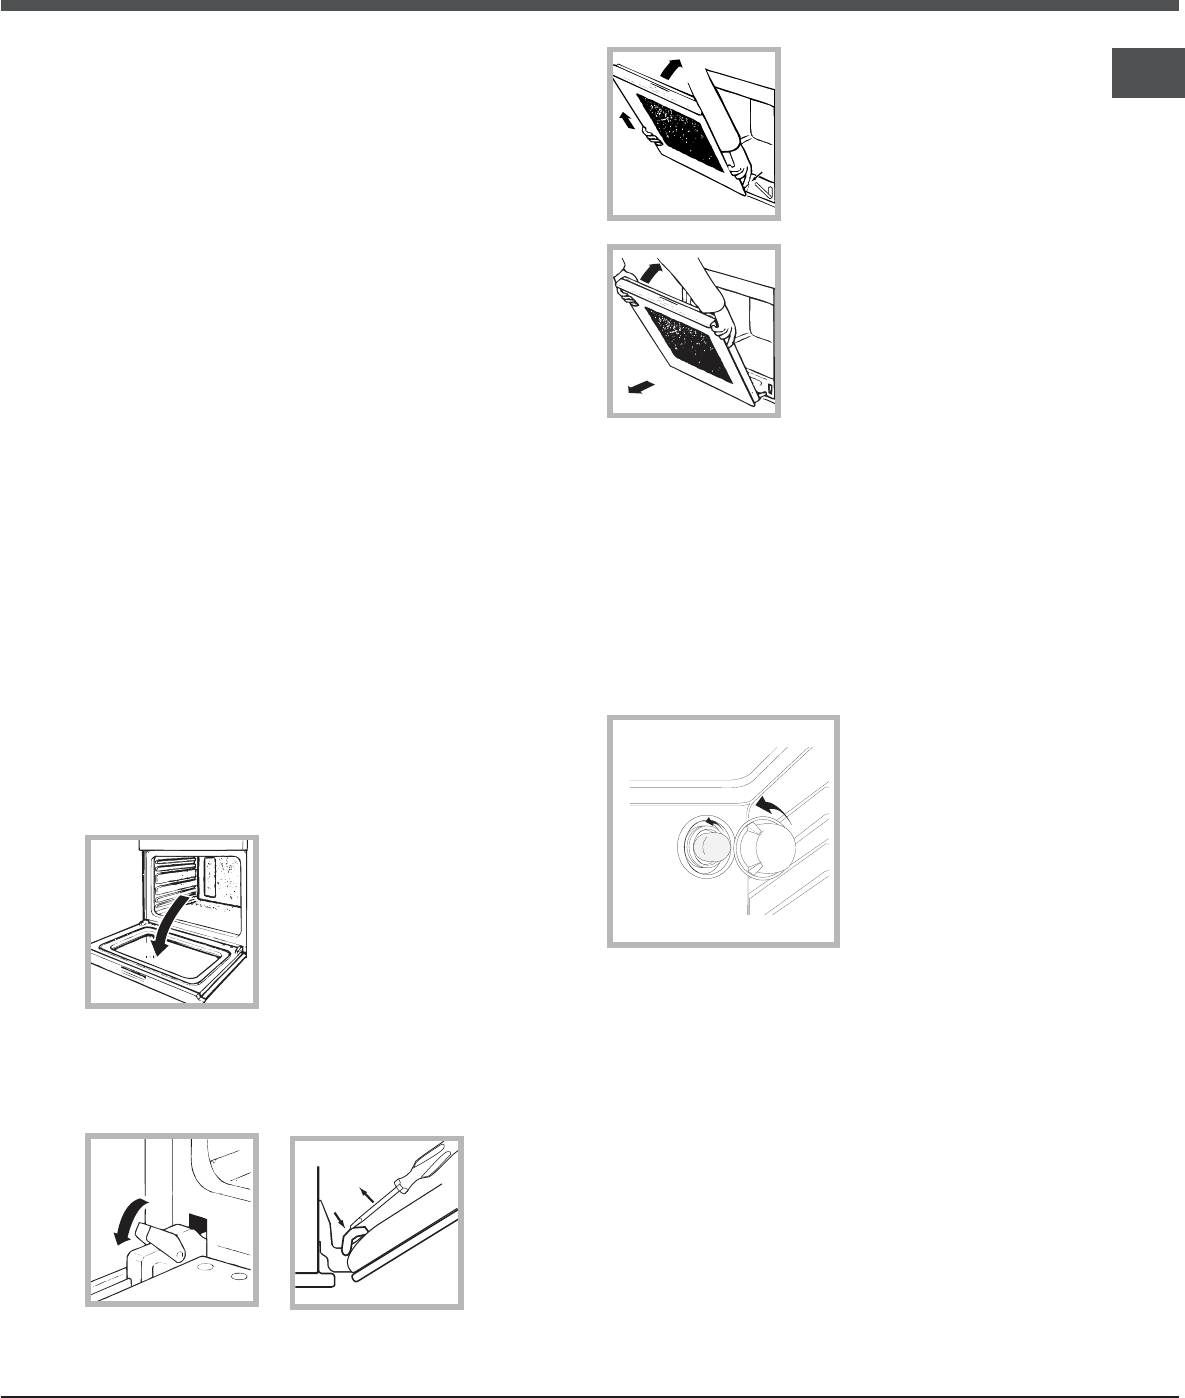
Maintenance and care
Switching the appliance off
3. Grip the door on the two
external sides and close it
GB
approximately half way. Unlock
Disconnect your appliance from the electricity
the door by pressing on the
supply before carrying out any work on it.
clamps F, then pull the door
F
towards you lifting it out of its
Cleaning the appliance
seat (see diagram).*
Never use steam cleaners or pressure cleaners on
the appliance.
3. Grip the door on the two
The stainless-steel or enamel-coated external
external sides and close it
parts as well as the rubber seals may be cleaned
approximately half way. Pull
using a sponge that has been soaked in
the door towards you,
lukewarm water and neutral soap. If these stains
extracting it from its hinges
are difficult to remove, use only specialised
(see diagram).*
products. After cleaning, rinse and dry
thoroughly. Do not use abrasive powders or
corrosive substances.
To replace the door, reverse this sequence.
Ideally, the inside of the oven should be cleaned
after each use, when it is still lukewarm. Use hot
Inspecting the seals
water and detergent, rinse and dry with a soft
cloth. Do not use abrasive products.
Check the door seals around the oven regularly. If
The accessories can be washed like everyday
the seals are damaged, please contact your nearest
crockery and may even be cleaned in the
After-sales Service Centre (see Assistance). We
dishwasher.
recommend that you do not use the oven until the
seals have been replaced.
Cleaning the oven door
Replacing the light bulb
Clean the glass part of the oven door using a
sponge and a non-abrasive cleaning product, then
To replace the oven
dry thoroughly with a soft cloth. Do not use rough
light bulb:
abrasive material or sharp metal scrapers as these
1. Remove the glass
could scratch the surface and cause the glass to
cover of the lamp-
crack.
holder.
To clean the oven more
2. Remove the light
thoroughly, you can remove
bulb and replace it with
its door:
a similar one: Wattage
1. Open the oven door fully
25 W, cap E 14.
(see diagram).
3. Replace the glass
cover (see diagram).
2. Lift up and turn the small levers situated on the
Assistance
two hinges (see diagram).*
2. Use a screwdriver to lift up and turn the small
Never use the services of an unauthorised
levers F located on the two hinges (see diagram).*
technician.
Please have the following information handy:
F
The type of problem encountered.
The appliance model (Mod.).
The serial number (S/N).
The latter two pieces of information can be found on
the data plate located on the appliance.
Only on certain models
*
11

Ðóêîâîäñòâî ïî
ýêñïëóàòàöèè
ÄÓÕÎÂÎÉ ØÊÀÔ
Ñîäåðæàíèå
RS
Ìîíòàæ, 13-16
GB
RS
Ðàñïîëîæåíèå
Ýëåêòðè÷åñêîå ïîäñîåäèíåíèå
English, 1
Ðóññêèé,12
Ïîäñîåäèíåíèå ê ãàçîïðîâîäó
Ïàñïîðòíàÿ òàáëè÷êà
Îïèñàíèå èçäåëèÿ, 17
Îáùèé âèä
Ïàíåëü óïðàâëåíèÿ
Âêëþ÷åíèå è ýêñïëóàòàöèÿ, 18-19
Ýêñïëóàòàöèÿ äóõîâîãî øêàôà
Òàéìåð
Õàðàêòåðèñòèêè ãîðåëîê è ôîðñóíîê
Ïðîãðàììû, 20
Ïðîãðàììû ïðèãîòîâëåíèÿ
7OFZ G RU /HA
Ïðàêòè÷åñêèå ñîâåòû ïî ïðèãîòîâëåíèþ
7OFZ G IX RU /HA
Òàáëèöà ïðèãîòîâëåíèÿ
7OFH G RU/HA
7OFH G IX RU/HA
Ïðåäîñòîðîæíîñòè è ðåêîìåíäàöèè, 21
7OFHRG RU/HA
Îáùèå òðåáîâàíèÿ ê áåçîïàñíîñòè
Óòèëèçàöèÿ
Ýêîíîìèÿ ýëåêòðîýíåðãèè è îõðàíà îêðóæàþùåé ñðåäû
Òåõíè÷åñêîå îáñëóæèâàíèå è óõîä, 22
Îòêëþ÷åíèå ýëåêòðîïèòàíèÿ
×èñòêà èçäåëèÿ
×èñòêà äâåðöû
Çàìåíà ëàìïî÷êè
Ñåðâèñíîå îáñëóæèâàíèå
Ìîíòàæ
Âàæíî ñîõðàíèòü äàííîå ðóêîâîäñòâî äëÿ åãî
Èëè æå âîçäóõîçàáîð ìîæåò
ïîñëåäóþùèõ êîíñóëüòàöèé.  ñëó÷àå ïðîäàæè,
îñóùåñòâëÿòüñÿ èç ñìåæíûõ
RS
ïåðåäà÷è èçäåëèÿ èëè ïðè ïåðååçäå íà íîâîå
ïîìåùåíèé, îñíàùåííûõ
ìåñòî æèòåëüñòâà íåîáõîäèìî ïðîâåðèòü, ÷òîáû
âåíòèëÿöèîííûì îòâåðñòèåì,
ðóêîâîäñòâî îñòàâàëîñü âìåñòå ñ èçäåëèåì, äëÿ
ñîîáùàþùèìñÿ ñ óëèöåé,
òîãî ÷òîáû åãî íîâûé âëàäåëåö ìîã îçíàêîìèòüñÿ
êàê îïèñàíî âûøå, ïðè
ñ ïðàâèëàìè ýêñïëóàòàöèè è ñ ñîîòâåòñòâóþùèìè
óñëîâèè, ÷òî ýòî íå îáùèå
ïðåäóïðåæäåíèÿìè.
çîíû çäàíèÿ, ïîæàðîîïàñíûå
ïîìåùåíèÿ è íå ñïàëüíè.
Âíèìàòåëüíî ïðî÷èòàéòå èíñòðóêöèè: â íèõ
ñîäåðæàòñÿ âàæíûå ñâåäåíèÿ îá óñòàíîâêå,
Ñæèæåííûé ãàç ïðîïàí-áóòàí òÿæåëåå âîçäóõà è
ýêñïëóàòàöèè è áåçîïàñíîñòè èçäåëèÿ.
ñëåäîâàòåëüíî çàñòàèâàåòñÿ âíèçó. Ïî ýòîé
ïðè÷èíå ïîìåùåíèÿ, â êîòîðûõ óñòàíîâëåíû
Ðàñïîëîæåíèå
áàëëîíû ñ ÑÍÃ (ñæèæåííûì íàòóðàëüíûì ãàçîì)
äîëæíû èìåòü âåíòèëÿöèîííûå îòâåðñòèÿ âíèçó,
Íå ðàçðåøàéòå äåòÿì èãðàòü ñ óïàêîâî÷íûìè
ñîîáùàþùèåñÿ ñ óëèöåé, äëÿ óäàëåíèÿ
ìàòåðèàëàìè. Óïàêîâêà äîëæíà áûòü óíè÷òîæåíà â
âîçìîæíûõ óòå÷åê ãàçà. Ïîýòîìó áàëëîíû ñ ÑÍÃ
ñîîòâåòñòâèè ñ ïðàâèëàìè ñáîðà ìóñîðà
äîëæíû áûòü îïîðîæíåíû èëè îñòàâàòüñÿ
(ñì. Ïðåäîñòîðîæíîñòè è ðåêîìåíäàöèè).
÷àñòè÷íî çàïîëíåííûìè; îíè íå äîæíû
ðàçìåùàòüñÿ èëè õðàíèòüñÿ â ïîìåùåíèÿõ èëè
Ìîíòàæ ïðîèçâîäèòñÿ â ñîîòâåòñòâèè ñ
õðàíèëèùàõ, ðàñïîëîæåííûõ â ïîäçåìíûõ
íàñòîÿùèìè èíñòðóêöèÿìè ïðîôåññèîíàëüíî
ïîìåùåíèÿõ (ïîäâàëàõ, è ò.ä.). Ñëåäóåò
êâàëèôèöèðîâàííûìè ñïåöèàëèñòàìè.
äåðæàòü â ïîìåùåíèè òîëüêî îäèí ðàáî÷èé
Íåïðàâèëüíàÿ óñòàíîâêà èçäåëèÿ ìîæåò ñòàòü
áàëëîí, ðàñïîëîæåííûé òàêèì îáðàçîì, ÷òîáû
ïðè÷èíîé ïîâðåæäåíèÿ èìóùåñòâà è ïðè÷èíèòü
îí íå ïîäâåðãàëñÿ ïðÿìîìó âîçäåéñòâèþ
óùåðá ëþäÿì è äîìàøíèì æèâîòíûì.
èñòî÷íèêîâ òåïëà (ïå÷åé, êàìèíîâ è ò.ä.),
Äàííîå èçäåëèå ìîæåò áûòü óñòàíîâëåíî è
êîòîðûå ìîãóò ïðèâåñòè ê íàãðåâó áàëëîíà
ýêñïëóàòèðîâàòüñÿ òîëüêî â ïîìåùåíèÿõ ñ
ñâûøå 50°C.
íåïðåðûâíîé âåíòèëÿöèåé ñîãëàñíî ïîëîæåíèÿì
Íàöèîíàëüíûõ Íîðìàòèâîâ è ïîñëåäóþùèì
Âñòðîåííûé ìîíòàæ
äåéñòâóþùèì ïîïðàâêàì. Íåîáõîäèìî ñîáëþäàòü
Äëÿ îáåñïå÷åíèÿ èñïðàâíîãî ôóíêöèîíèðîâàíèÿ
ñëåäóþùèå òðåáîâàíèÿ:
èçäåëèÿêóõîííûé ýëåìåíò äîëæåí èìåòü
 ïîìåùåíèè äîëæåí èìåòüñÿ äûìîîòâîä
ñîîòâåòñòâóþùèå õàðàêòåðèñòèêè:
ïðîäóêòîâ ñãîðàíèÿ â àòìîñôåðó â âèäå
ïàíåëè êóõîííûõ ýëåìåíòîâ, ïðèëåãàþùèõ ê
âûòÿæêè èëè ýëåêòðîâåíòèëÿòîðà, àâòîìàòè÷åñêè
äóõîâîìó øêàôó, äîëæíû áûòü âûïîëíåíû èç
çàïóñêàþùèõñÿ êàæäûé ðàç, êîãäà âêëþ÷àåòñÿ
òåðìîñòîéêîãî ìàòåðèàëà.
èçäåëèå.
êëåé êóõîííûõ ýëåìåíòîâ èç ôàíåðîâàííîãî
äåðåâà äîëæåí áûòü óñòîé÷èâûì ê òåìïåðàòóðå
100°C.
äëÿ âñòðàèâàíèÿ äóõîâîãî øêàôà êàêïîä
êóõîííûì òîïîì (ñì. ñõåìó), òàê è â êîëîííó
íèøà êóõîííîãî ýëåìåíòà äîëæíà èìåòü
ñëåäóþùèå ðàçìåðû:
 ïîìåùåíèè äîëæåí áûòü îáåñïå÷åí ïðèòîê
âîçäóõà, íåîáõîäèìîãî äëÿ íîðìàëüíîãî
ãîðåíèÿ. Ðàñõîä âîçäóõà, íåîáõîäèìîãî äëÿ
3
ãîðåíèÿ, äîëæåí áûòü íå ìåíåå 2 ì
/÷àñ íà êÂò
. m
in
.
4
7
m
m
5
óñòàíîâëåííîé ìîùíîñòè.
m
.
45 m
23 mm.
Ïðèòîê âîçäóõà ìîæåò
558 mm.
593 mm.
îáåñïå÷èâàòüñÿ
595 mm.
íåïîñðåäñòâåííî ñíàðóæè
567 mm.
çäàíèÿ ÷åðåç âîçäóõîâîä
5 mm.
ïîëåçíûì ñå÷åíèåì íå
595 m
2
ìåíåå 100 ñì
è äèàìåòðîì,
m
.
545 mm.
èñêëþ÷àþùèì âîçìîæíîñòü
ñëó÷àéíîãî çàñîðåíèÿ.
24 mm.
13
Ïîñëå âñòðàèâàíèÿ èçäåëèÿ â êóõîííûé ýëåìåíò
RS
äîëæíà áûòü èñêëþ÷åíà âîçìîæíîñòü êàñàíèÿ ê
ýëåêòðè÷åñêèìè ÷àñòÿìè. Ðàñõîä ýëåêòðîýíåðãèè,
óêàçàííûé íà ïàñïîðòíîé òàáëè÷êå èçäåëèÿ, áûë
çàìåðåí äëÿ äàííîãî òèïà ìîíòàæà.
Âåíòèëÿöèÿ
Äëÿ îáåñïå÷åíèÿ íàäëåæàùåé âåíòèëÿöèè
íåîáõîäèìî ñíÿòü çàäíþþ ïàíåëü íèøè êóõîííîãî
ýëåìåíòà. Ðåêîìåíäóåòñÿ óñòàíîâèòü äóõîâîé
øêàô íà äâà äåðåâÿííûõ áðóñêà èëè íà ñïëîøíîå
Âñå çàùèòíûå ýëåìåíòû äîëæíû áûòü çàêðåïëåíû
îñíîâàíèå ñ îòâåðñòèåì äèàìåòðîì íå ìåíåå 45 õ
òàêèì îáðàçîì, ÷òîáû èõ ìîæíî áûëî ñíÿòü òîëüêî
560 ìì (ñì ÷åðòåæè).
ïðè ïîìîùè ñïåöèàëüíîãî èíñòðóìåíòà.
Ýëåêòðè÷åñêîå ïîäñîåäèíåíèå
45 mm.
560 mm.
Äóõîâûå øêàôû, óêîìïëåêòîâàííûå òðåõïîëþñíûì
êàáåëåì ýëåêòðîïèòàíèÿ, ðàñ÷èòàíû íà
ôóíêöèîíèðîâàíèå ñ ïåðåìåííûì òîêîì ñ
íàïðÿæåíèåì è ÷àñòîòîé ýëåêòðîïèòàíèÿ,
óêàçàííûìè íà ïàñïîðòíîé òàáëè÷êå ñ äàííûìè (ñì.
íèæå).
Öåíòðîâêà è êðåïëåíèå
Ïîäñîåäèíåíèå êàáåëÿ ýëåêòðîïèòàíèÿ
4 êðåïåæíûõ ýëåìåíòà ñ áîêîâ äóõîâîãî øêàôà
1. Îòêðîéòå çàæèìíóþ
äîëæíû áûòü îòðåãóëèðîâàíû â ñîîòâåòñòâèè ñ 4
êîðîáêó, íàæàâ ïðè
îòâåðñòèÿìè â ïåðèìåòðàëüíîé ðàìå â
ïîìîùè îòâåðòêè íà
çàâèñèìîñòè îò òîëùèíû áîêîâîé ïàíåëè
âûñòóïû ñ áîêîâ
êóõîííîãî ýëåìåíòà:
êðûøêè: ïîòÿíèòå è
òîëùèíà 20 ìì: ïîëíîñòüþ
îòêðîéòå êðûøêó
óäàëèòå ñúåìíóþ ÷àñòü
(ñì. ñõåìó).
êðåïåæíîãî ýëåìåíòà (ñì.
2. Îòâèíòèòå âèíò
ñõåìó);
êàáåëüíîãî ñàëüíèêà è
âûíüòå åãî, ïîääåâ
îòâåðòêîé (ñì. ñõåìó).
3. Îòâèíòèòå âèíòû
òîëùèíà 18 ìì: èñïîëüçóéòå
êîíòàêòîâ L-N-
è
ïåðâûé ïàç, ñîãëàñíî óæå
çàòåì ïðèêðåïèòå
ãîòîâîé êîíôèãóðàöèè
ïðîâîäà ïîä
ïðîèçâîäèòåëÿ (ñì. ñõåìó);
ãîëîâêàìè âèíòîâ,
ñîáëþäàÿ öâåòîâóþ
ìàðêèðîâêó Ñèíèé (N)
Êîðè÷íåâûé (L) Æåëòî-
çåëåíûé (
).
òîëùèíà 16 ìì: èñïîëüçóéòå
âòîðîé ïàç (ñì. ñõåìó).
Ïîäñîåäèíåíèå êàáåëÿ ýëåêòðîïèòàíèÿ ê ñåòè
ýëåêòðîïèòàíèÿ
Óñòàíîâèòå íà êàáåëü ýëåêòðîïèòàíèÿ
íîðìàëèçîâàííóþ øòåïñåëüíóþ âèëêó,
ðàñ÷èòàííóþ íà íàãðóçêó, óêàçàííóþ íà
ïàñïîðòíîé òàáëè÷êå (ñì. ñáîêó).
Äëÿ êðåïëåíèÿ èçäåëèÿ ê êóõîííîìó ýëåìåíòó:
îòêðîéòå äâåðöó äóõîâîãî øêàôà è çàâèíòèòå 4
øóðóïà äëÿ äåðåâÿííûõ ïàíåëåé â 4 îòâåðñòèÿ â
ïåðèìåòðàëüíîé ðàìå.
14
RS
NO
15
OK
 ñëó÷àå ïðÿìîãî ïîäêëþ÷åíèÿ ê ñåòè
 ñëó÷àå èñïîëüçîâàíèÿ ñæèæåííîãî ãàçà èç
ýëåêòðîïèòàíèÿ ìåæäó èçäåëèåì è ñåòüþ
áàëëîíà èñïîëüçîâàòü ðåãóëÿòîðû äàâëåíèÿ,
íåîáõîäèìî óñòàíîâèòü ìíîãîïîëþñíûé
ñîîòâåòñòâóþùèå äåéñòâóþùèìíàöèîíàëüíûì
âûêëþ÷àòåëü ñ ìèíèìàëüíûì ðàññòîÿíèåì ìåæäó
íîðìàòèâàì è èõ ïîñëåäóþùèì ïîïðàâêàì.
êîíòàêòàìè 3 ìì, ðàñ÷èòàííûé íà äàííóþ íàãðóçêó
Äëÿ íàäåæíîãî ôóíêöèîíèðîâàíèÿ,
è ñîîòâåòñòâóþùèé äåéñòâóþùèì íîðìàòèâàì
ðàöèîíàëüíîãî èñïîëüçîâàíèÿ ýíåðãèè è áîëåå
(âûêëþ÷àòåëü íå äîëæåí ðàçìûêàòü ïðîâîä
äëèòåëüíîãî ñðîêà ñëóæáû ýëåêòðè÷åñêîãî
çàçåìëåíèÿ). Êàáåëü ýëåêòðîïèòàíèÿ äîëæåí áûòü
èçäåëèÿ ïðîâåðüòå, ÷òîáû äàâëåíèå ïîäà÷è ãàçà
ðàñïîëîæåí òàêèì îáðàçîì, ÷òîáû íè â îäíîé
ñîîòâåòñòâîâàëî çíà÷åíèÿì, óêàçàííûì â òàáëèöå
òî÷êå åãî òåìïåðàòóðà íå ïðåâûøàëà òåìïåðàòóðó
1 Õàðàêòåðèñòèêè ãàçîâûõ ãîðåëîê è ôîðñóíîê.
ïîìåùåíèÿ áîëåå ÷åì íà 50°C.
 ñëó÷àå óñòàíîâêè ãàçîâîé ïëèòû âìåñòå ñ
ãàçîâîé âñòðîåííîé äóõîâêîé êàòåãîðè÷åñêè
Ýëåêòðîìîíòåð íåñåò îòâåòñòâåííîñòü çà
çàïðåùàåòñÿ ñîåäèíÿòü ýòè äâà óñòðîéñòâà èëè
ïðàâèëüíîå ïîäêëþ÷åíèå èçäåëèÿ ê ýëåêòðè÷åñêîé
èñïîëüçîâàòü åäèíûé ãàçîâûé îòñå÷íîé êðàí. Ýòè
ñåòè è çà ñîáëþäåíèå ïðàâèë áåçîïàñíîñòè.
óñòðîéñòâà äîëæíû áûòü íåçàâèñèìûìè äðóã îò
Ïåðåä ïîäñîåäèíåíèåì êàáåëÿ ýëåêòðîïèòàíèÿ
äðóãà, ïîäñîåäèíÿòüñÿ ïî îòäåëüíîñòè, è êàæäîå
ïðîâåðüòå ñëåäóþùåå:
èç íèõ äîëæíî èìåòü îòäåëüíûé îòñå÷íîé ãàçîâûé
êðàí (ñì. ñõåìû).
ñåòåâàÿ ðîçåòêà äîëæíà áûòü ñîåäèíåíà ñ
çàçåìëåíèåì è ñîîòâåòñòâîâàòü íîðìàòèâàì;
ñåòåâàÿ ðîçåòêà äîëæíà áûòü ðàññ÷èòàíà íà
ìàêñèìàëüíóþ ïîòðåáëÿåìóþ ìîùíîñòü
èçäåëèÿ, óêàçàííóþ íà ïàñïîðòíîé òàáëè÷êå (ñì.
íèæå);
íàïðÿæåíèå ñåòè ýëåêòðîïèòàíèÿ äîëæíî
íàõîäèòüñÿ â ïðåäåëàõ çíà÷åíèé, óêàçàííûõ íà
ïàñïîðòíîé òàáëè÷êå (ñì. íèæå);
Ïîäñîåäèíåíèå ïðè ïîìîùè æåñòêîé òðóáû
ñåòåâàÿ ðîçåòêà äîëæíà áûòü ñîâìåñòèìà ñî
(ìåäíîé èëè ñòàëüíîé)
øòåïñåëüíîé âèëêîé èçäåëèÿ. Â ïðîòèâíîì
ñëó÷àå çàìåíèòå ðîçåòêó èëè âèëêó; íå
èñïîëüçóéòå óäëèíèòåëè èëè òðîéíèêè.
Ïîäñîåäèíåíèå ê ãàçîïðîâîäó íå äîëæíî
îêàçûâàòü êàêèõ-ëèáî íàãðóçîê íà èçäåëèå.
Èçäåëèå äîëæíî áûòü óñòàíîâëåíî òàêèì
Íà ïàòðóáêå ïîäà÷è ãàçà â èçäåëèÿ èìååòñÿ
îáðàçîì, ÷òîáû êàáåëü ýëåêòðîïèòàíèÿ è ñåòåâàÿ
âðàùàþùååñÿ êîëåíî L ñ óïëîòíèòåëüíîé
ðîçåòêà áûëè ëåãêî äîñòóïíû.
ïðîêëàäêîé. Ïðè íåîáõîäèìîñòè ïîâåðíóòü êîëåíî
Êàáåëü ýëåêòðîïèòàíèÿ èçäåëèÿ íå äîëæåí áûòü
îáÿçàòåëüíî çàìåíèòå óïëîòíèòåëüíóþ ïðîêëàäêó
ñîãíóò èëè ñæàò.
(ïðèëàãàþùåòñÿ ê èçäåëèþ). Ïàòðóáîê ïîäà÷è ãàçà
â èçäåëèå èìååò öèëèíäðè÷åñêóþ íàðóæíóþ
Ðåãóëÿðíî ïðîâåðÿéòå ñîñòîÿíèå êàáåëÿ
ðåçüáó 1/2 ãàç.
ýëåêòðîïèòàíèÿ è â ñëó÷àå íåîáõîäèìîñòè
ïîðó÷èòå åãî çàìåíó òîëüêî óïîëíîìî÷åííûì
Ïîäñîåäèíåíèå ïðè ïîìîùè ãèáêîãî øëàíãà èç
òåõíèêàì (ñì. Òåõíè÷åñêîå îáñëóæèâàíèå).
íåðæàâåþùåé ñòàëè ñî ñïëîøíûìè ñòåíêàìè
Ôèðìà ñíèìàåò ñ ñåáÿ âñÿêóþ
ñ ðåçüáîâûìè ñîåäèíåíèÿìè.
îòâåòñòâåííîñòü â ñëó÷àå íåñîáëþäåíèÿ
âûøåîïèñàííûõ ïðàâèë.
Ïàòðóáîê ïîäà÷è ãàçà â èçäåëèå èìååò
öèëèíäðè÷åñêóþ íàðóæíóþ ðåçüáó 1/2 ãàç.
Ïîäñîåäèíåíèå ê ãàçîïðîâîäó
Ïîäñîåäèíåíèå òàêèõ øëàíãîâ äîëæíî
ïðîèçâîäèòüñÿ òàêèì îáðàçîì, ÷òîáû èõ äëèíà ïðè
Ïîäñîåäèíåíèå èçäåëèÿ ê ãàçîïðîâîäó èëè ê
ìàêñèìàëüíîì ðàñòÿæåíèè íå ïðåâûøàëà 2000
ãàçîâîìó áàëëîíó äîëæíî îñóùåñòâëÿòüñÿ â
ìì. Ïî çàâåðøåíèè ïîäñîåäèíåíèÿ ïðîâåðüòå,
ñîîòâåòñòâèè ñ äåéñòâóþùèìè íàöèîíàëüíûè
÷òîáû ìåòàëëè÷åñêèé ãèáêèé øëàíã íå êàñàëñÿ
íîðìàòèâàìè è ñ èõ ïîñëåäóþùèìè ïîïðàâêàìè è
ïîäâèæíûõ ÷àñòåé èëè íå áûë ñæàò.
òîëüêî ïîñëå ïðîâåðêè ñîîòâåòñòâèÿ èçäåëèÿ òèïó
ãàçà, ê êîòîðîìó îí ïîäñîåäèíÿåòñÿ.  ñëó÷àå
Èñïîëüçóéòå òîëüêî øëàíãè è ìåòàëëè÷åñêèå
íåñîîòâåòñòâèÿ âûïîëíèòü îïåðàöèè, îïèñàííûå â
àëþìèíèåâûå èëè ðåçèíîâûå óïëîòíèòåëüíûå
ïàðàãðàôå Íàñòðîéêà íà ðàçëè÷íûå òèïû ãàçà.
ïðîêëàäêè, ñîîòâåòñòâóþùèå äåéñòâóþùèì
íàöèîíàëüíûì íîðìàòèâàì.

Ïðîâåðêà óïëîòíåíèÿ
4. ïîâåðíèòå âèíò ðåãóëÿöèè, ðàñïîëîæåííûé
RS
ñíàðóæè ñòåðæíÿ òåðìîñòàòà, âïëîòü äî
ïîëó÷åíèÿ ñòàáèëüíîãî ìàëîãî ïëàìåíè (ïëàìÿ
Ïî çàâåðøåíèè ïîäñîåäèíåíèÿ ïðîâåðüòå
âèäíî ÷åðåç îòâåðñòèÿ â äíèùå äóõîâêè);
ïðî÷íîñòü óïëîòíåíèÿ âñåõ ïàòðóáêîâ ïðè ïîìîùè
ìûëüíîãî ðàñòâîðà, íî íèêîãäà íå ïëàìåíåì.
5. çàòåì ïðîâåðèòü,
Íàñòðîéêà íà ðàçëè÷íûå òèïû ãàçà
÷òîáû ãîðåëêà íå
ãàñëà ïðè ðåçêîì
Äëÿ íàñòðîéêè äóõîâîãî øêàôà íà òèï ãàçà,
âðàùåíèè ðóêîÿòêè-
îòëè÷àþùèéñÿ îò ãàçà, íà êîòîðûé îíà ðàñ÷èòàíà
ðåãóëÿòîðà èç
(óêàçàí íà ýòèêåòêå), íåîáõîäèìî âûïîëíèòü
ïîëîæåíèÿ Max â
ñëåäóþùèå îïåðàöèè:
ïîëîæåíèå Min èëè
Ïîðÿäîê çàìåíû ôîðñóíêè ãàçîâîé ãîðåëêè
ïðè ðåçêîì
äóõîâîãî øêàôà:
îòêðûâàíèè èëè
1. ïîëíîñòüþ îòêðîéòå äâåðöó äóõîâêè
çàêðûâàíèè äâåðöû
2. âûíüòå ñúåìíîå äíèùå
äóõîâêè.
äóõîâêè
Â
ñëó÷àå èñïîëüçîâàíèÿ ñæèæåííîãî ãàçà âèíò
ðåãóëÿöèè äîëæåí áûòü çàâèí÷åí äî óïîðà.
Ïî çàâåðøåíèè îïåðàöèè çàìåíèòå ñòàðóþ
ýòèêåòêó ñî ñòàðûìè íàñòðîéêàìè íà íîâóþ,
ñîîòâåòñòâóþùóþ íîâîìó òèïó èñïîëüçóåìîãî
ãàçà. Ýòèêåòêó ìîæíî çàêàçàòü â íàøèõ Öåíòðàõ
3. îòâèíòèòå êðåïåæíûå
Òåõíè÷åñêîãî Îáñëóæèâàíèÿ.
âèíòû ãîðåëêè
Åñëè äàâëåíèå èñïîëüçóåìîãî ãàçà îòëè÷àåòñÿ îò
4. âûíüòå ãîðåëêó èç
ïðåäóñìîòðåííîãî äàâëåíèÿ (èëè âàðüèðóåò),
äóõîâêè, ñíÿâ V-îáðàçíûé
íåîáõîäèìî óñòàíîâèòü íà ïèòàþùåì ãàçîïðîâîäå
V
âèíò;
ñîîòâåòñòâóþùèé ðåãóëÿòîð äàâëåíèÿ (ñîãëàñíî
äåéñòâóþùèì íàöèîíàëüíûì íîðìàòèâàì).
ÏÀÑÏÎÐÒÍÀß ÒÀÁËÈ×ÊÀ
5. îòâèíòèòå ôîðñóíêó
øèðèíà 43,5 ñì
ãîðåëêè äóõîâêè ïðè ïîìîùè
Ãàáàðèòíûå
âûñîòà 31 ñì
ñïåöèàëüíîãî ïîëîãî êëþ÷à
ðàçìåðû:
ãëóáèíà 43,5 ñì
äëÿ ôîðñóíîê, èëè, ÷òî
Îáúåì
ë 58
ïðåäïî÷òèòåëüíåå, ïîëûì
êëþ÷îì 7 ìì è çàìåíèòå åå
íà ôîðñóíêó, ïðèãîäíóþ äëÿ
Ýëåêòðîïèòàíèå
Ñì. òàáëèöó õàðàêòåðèñòèê
íîâîãî òèïà ãàçà (ñìîòðåòå
òàáëèöó 1).
Õàðàêòåðèñòèêè
6. Âîññòàíîâèòå íà ìåñòî âñå êîìïëåêòóþùèå,
Ñì. òàáëèöó õàðàêòåðèñòèê
ãàçà
âûïîëíÿÿ îïèñàííûå âûøå îïåðàöèè â
îáðàòíîì ïîðÿäêå.
Äàííîå èçäåëèå
Íåîáõîäèìî îáðàùàòü îñîáîå âíèìàíèå íà
ñîîòâåòñòâóåò ñëåäóþùèì
Äèðåêòèâàì Åâðîïåéñêîãî
ïðîâîäà ñâå÷åé è íà òðóáêè òåðìîïàð.
Ñîîáùåñòâà: 2006/95/CEE îò
Ðåãóëÿöèÿ ïåðâè÷íîãî âîçäóõà ãîðåëêè äóõîâêè
12/12/06 (Íèçêîå
Ãîðåëêà ñêîíñòðóèðîâàíà òàêèì îáðàçîì, ÷òî íå
íàïðÿæåíèå) ñ
íóæäàåòñÿ â êàêîé-ëèáî ðåãóëÿöèè ïåðâè÷íîãî
ïîñëåäóþùèìè èçìåíåíèÿìè
âîçäóõà.
– 2004/108/ÑÅÅ îò 15/12/04
(Ýëåêòðîìàãíèòíàÿ
Ðåãóëÿöèÿ ìèíèìàëüíîãî ïëàìåíè ãîðåëêè
ñîâìåñòèìîñòü) ñ
äóõîâêè
ïîñëåäóþùèìè èçìåíåíèÿìè
1. ïîâåðíèòå ðåãóëÿòîð â ïîëîæåíèå Min, ïîñëå
– 93/68/ÑÅÅ îò 22/07/93 ñ
òîãî êàê îí íàõîäèëñÿ â ïîëîæåíèè Max
ïîñëåäóþùèìè
ïðèìåðíî â òå÷åíèè 10 ìèíóò
èçìåíåíèÿìè. 90/336/CEE îò
29/06/90 (Ãàç) ñ
2. ñíèìèòå ðóêîÿòêó
ïîñëåäóþùèìè èçìåíåíèÿìè
3. ñíèìèòå äèñê, ïðèêðåïëåííûé ê ïåðåäíåé
2002/96/CE ñ ïîñëåäóþùèìè
ïàíåëè
èçìåíåíèÿìè
16
Îïèñàíèå èçäåëèÿ
Îáùèé âèä
RS
Ïàíåëü óïðàâëåíèÿ
17
Âêëþ÷åíèå è
ýêñïëóàòàöèÿ
Ïðè ïåðâîì âêëþ÷åíèè äóõîâîãî øêàôà
Çàæèãàíèå äóõîâêè âðó÷íóþ
RS
ðåêîìåíäóåì ïðîêàëèòü åãî ïðèìåðíî â òå÷åíèå
÷àñà ïðè ìàêñèìàëüíîé òåìïåðàòóðå ñ çàêðûòîé
 ñëó÷àå âðåìåííîãî îòêëþ÷åíèÿ ýëåêòðîýíåðãèè
äâåðöåé. Çàòåì âûêëþ÷èòå äóõîâîé øêàô,
ìîæíî âêëþ÷èòü ãîðåëêó äóõîâêè âðó÷íóþ
îòêðîéòå äâåðöó è ïðîâåòðèòå ïîìåùåíèå. Çàïàõ,
ñëåäóþùèì îáðàçîì:
êîòîðûé âû ìîæåòå ïî÷óâñòâîâàòü, âûçâàí
1. îòêðîéòå äâåðöó äóõîâêè
èñïàðåíèåì âåùåñòâ, èñïîëüçîâàííûõ äëÿ
ïðåäîõðàíåíèÿ äóõîâîãî øêàôà.
2. ïîäíåñèòå ñïè÷êó
.
èëè êóõîííóþ
çàæèãàëêó, êàê
Ýêñïëóàòàöèÿ äóõîâîãî øêàôà
ïîêàçàíî íà ðèñóíêå,
íàæìèòå äî óïîðà è
ïîâåðíèòå ïðîòèâ
Ïðè ïîìîùè ðóêîÿòêè äóõîâîãî øêàôà âû ìîæåòå
÷àñîâîé ñòðåëêè
âûáðàòü ðàçëè÷íûå ðåæèìû è óñòàíîâèòü
ðóêîÿòêó ÄÓÕÎÂÊÈ
òåìïåðàòóðó, óêàçàííóþ íà ñàìîé ðóêîÿòêå (îò
F
âïëîòü äî ïîëîæåíèÿ
140°C äî 240°C), íàèáîëåå ïîäõîäÿùóþ äëÿ
Max.
ïðèãîòîâëåíèÿ áëþä. Ýëåêòðîííîå óñòðîéñòâî
çàæèãàíèÿ âñòðîåíî âíóòðè ðóêîÿòêè. Äëÿ
Òàê êàê äóõîâêà îñíàùåíà çàùèòíûì óñòðîéñòâîì,
çàæèãàíèÿ ãîðåëêè äóõîâêè íàæìèòå äî óïîðà è
ïîñëå çàæèãàíèÿ ãîðåëêè íåîáõîäèìî äåðæàòü
ïîâåðíèòå ïðîòèâ ÷àñîâîé ñòðåëêè ðóêîÿòêó
ðóêîÿòêó ÄÓÕÎÂÊÈ íàæàòîé ïðèìåðíî â òå÷åíèå 6
ÄÓÕÎÂÊÈ â ïîëîæåíèå Max (ïðè çàêðûòîé
ñåêóíä äëÿ ïðèòîêà ãàçà âïëîòü äî íàãðåâàíèÿ
äâåðöå äóõîâêè). Òàê êàê äóõîâêà îñíàùåíà
çàùèòíîé òåðìîïàðû.
çàùèòíûì óñòðîéñòâîì, ïîñëå çàæèãàíèÿ ãîðåëêè
3. Ïîñëå çàæèãàíèÿ ãîðåëêè çàêðîéòå äâåðöó
íåîáõîäèìî äåðæàòü ðóêîÿòêó ÄÓÕÎÂÊÈ íàæàòîé
äóõîâêè.
ïðèìåðíî â òå÷åíèå 6 ñåêóíä äëÿ ïðèòîêà ãàçà
âïëîòü äî íàãðåâàíèÿ çàùèòíîé òåðìîïàðû.
 ñëó÷àå âíåçàïíîãî ãàøåíèÿ ïëàìåíè ãîðåëêè
ïåðåêðîéòå ðóêîÿòêó ÄÓÕÎÂÊÈ, îòêðîéòå äâåðöó
äóõîâêè è ïîäîæäèòå ïðèìåðíî 1 ìèíóòó äî
Óñòðîéñòâî ýëåêòðîííîãî çàæèãàíèÿ ãîðåëêè íå
ïîâòîðíîé ïîïûòêè çàæå÷ü ãîðåëêó.
äîëæíî îñòàâàòüñÿ íàæàòûì â òå÷åíèå áîëåå 15
ñåêóíä. Åñëè ïî èñòå÷åíèè 15 ñåêóíä ãîðåëêà íå
Ðóêîÿòêà-ðåãóëÿòîð ÃÐÈËß
çàæãëàñü, îòïóñòèòå ðóêîÿòêó ÄÓÕÎÂÊÈ, îòêðîéòå
äâåðöó äóõîâêè è ïîäîæäèòå ïðèìåðíî 1 ìèíóòó
Âàøà äóõîâêà îñíàùåíà ýëåêòðè÷åñêèì ãðèëåì.
ïåðåä ïîâòîðíîé ïîïûòêîé çàæå÷ü ãîðåëêó.
Çíà÷èòåëüíàÿ òåìïåðàòóðà ïðÿìîãî äåéñòâèÿ
ãðèëÿ ïîçâîëÿåò ïîëó÷èòü áûñòðîå îáðàçîâàíèå
Âûáîð òåìïåðàòóðû ïðèãîòîâëåíèÿ
êîðî÷êè íà ïîâåðõíîñòè ïðîäóêòà, êîòîðàÿ
îñóùåñòâëÿåòñÿ ñîâìåùåíèåì íóæíîãî çíà÷åíèÿ
ïðåïÿòñòâóåò âûõîäó ñîêîâ è ñîõðàíÿåò ïðîäóêò
ñ îòìåòêîé íà ïàíåëè óïðàâëåíèÿ. Íèæå
íåæíûì è ñî÷íûì âíóòðè. Èñïîëüçîâàíèå ôóíêöèè
ïðèâîäèòñÿ ïîëíûé òåìïåðàòóðíûé äèàïàçîí
ãðèëü â îñîáåííîñòè ðåêîìåíäóåòñÿ äëÿ áëþä, äëÿ
äóõîâêè.
ïðèãîòîâëåíèÿ êîòîðûõ òðåáóåòñÿ âûñîêàÿ
ïîâåðõíîñòíàÿ òåìïåðàòóðà: òåëÿ÷üèõ è ãîâÿæüèõ
áèôøòåêñîâ, àíòðåêîòîâ, âûðåçêè, ãàìáóðãåðîâ è
Min 150 180 220 Max
ò.ä.
» »# $ ! «
 ïàðàãðàôå Ïðàêòè÷åñêèå ñîâåòû ïî
ïðèãîòîâëåíèþ ïðèâîäÿòñÿ íåêîòîðûå ïðèìåðû
èñïîëüçîâàíèÿ äóõîâîãî øêàôà.
Äóõîâêà àâòîìàòè÷åñêè íàãðåâàåòñÿ äî çàäàííîé
òåìïåðàòóðû, êîòîðàÿ ïîääåðæèâàåòñÿ
Ïðè èñïîëüçîâàíèè ðåæèìà ãðèëü íåîáõîäèìî
íåèçìåííîé ïðè ïîìîùè êîíòðîëüíîãî óñòðîéñòâà
äåðæàòü äâåðöó äóõîâêè çàêðûòîé.
(òåðìîñòàòà), óïðàâëÿåìîãî ðóêîÿòêîé.
Íèêîãäà íå ñòàâüòå íèêàêèõ ïðåäìåòîâ íà äíî
äóõîâîãî øêàôà, òàê êàê îíè ìîãóò ïîâðåäèòü
ýìàëèðîâàííîå ïîêðûòèå.
Âñåãäà ñòàâüòå ïîñóäó íà ïðèëàãàþùóþñÿ
ðåøåòêó.
.
18
RS
Õàðàêòåðèñòèêè ãîðåëîê è ôîðñóíîê
Òàáëèöà 1 Ñæèæåííûé ãàç Ïðèðîäíûé ãàç
Ãî
19
ð
åëêà Òåïëîòâî
ð
íàÿ
ñïîñîáíîñòü êÂò (
p
Áàéïàñ
Ôî
.c.s.*)
1/100
ð
ñóíêà
Ðàñõîä*
Ôî
1/100
ã/÷àñ
ð
ñóíêà
Ðàñõîä*
Ôî
1/100
ë/÷àñ
ð
ñóíêà
Ðàñõîä*
1/100
ã/÷àñ
Íîìèí. Ñîê
ð
àù. (ìì) (ìì) *** ** (ìì) (ìì)
Äóõîâîé øêà
ô
2,60 1,0 49 78 189 186 119 248 132 248
Íîìèíàëüíîå (ìáà
Äàâëåíèå ïîäà÷è
ð
)
Ìèíèìàëüíîå (ìáà
ð
)
Ìàêñèìàëüíîå (ìáà
ð
Îõëàäèòåëüíàÿ âåíòèëÿöèÿ
Îñâåùåíèå äóõîâîãî øêàôà
Äëÿ ïîíèæåíèÿ òåìïåðàòóðû âîêðóã ðàáîòàþùåãî
Îñâåæåíèå âêëþ÷àåòñÿ ïðè ïîìîùè êíîïêè LUCE
äóõîâîãî øêàôà íåêîòîðûå ìîäåëè îñíàùàþòñÿ
(ÎÑÂÅÙÅÍÈÅ).
îõëàäèòåëüíûì âåíòèëÿòîðîì. Ýòîò âåíòèëÿòîð
íàïðàâëÿåò ñòðóþ âîçäóõà ìåæäó ïàíåëüþ
Òàéìåð
óïðàâëåíèÿ è äâåðöåé äóõîâîãî øêàôà.
Ïî çàâåðøåíèè ïðèãîòîâëåíèÿ âåíòèëÿòîð
1. Ïðåæäå âñãî íåîáõîäèìî çàâåñòè òàéìåð,
ïðîäîëæàåò ðàáîòàòü âïëîòü äî íàäëåæàùåãî
ïîâåðíóâ ðóêîÿòêó ÒÀÉÌÅÐ ïî ÷àñîâîé ñòðåëêå
îõëàæäåíèÿ äóõîâêè.
ïî÷òè íà îäèí ïîëíûé îáîðîò.
2. Ïîâîðà÷èâàÿ ðóêîÿòêó îáðàòíî, ïðîòèâ ÷àñîâîé
Âåðòåë (èìååòñÿ òîëüêî â íåêîòîðûõ
ñòðåëêè, çàäàåòñÿ íóæíîå âðåìÿ ìèíóòû íà
ìîäåëÿõ)
ðóêîÿòêå ÒÀÉÌÅÐÀ äîëæíû ñîâïàñòü ñ îòìåòêàìè
íà ïàíåëè óïðàâëåíèÿ.
Ïîðÿäîê âêëþ÷åíèÿ
3. Òàéìåð îòñ÷èòûâàåò âðåìÿ â îáðàòíîì ïîðÿäêå:
âåðòåëà (ñì. ñõåìó):
ïî èñòå÷åíèè çàäàííîãî âðåìåíè ðàçäàåòñÿ
1. óñòàíîâèòå
çâóêîâîé ñèãíàë.
ïðîòèâåíü íà 1-ûé
óðîâåíü;
Òàéìåð íå óïðàâëÿåò âêëþ÷åíèåì èëè
2. óñòàíîâèòå
âûêëþ÷åíèåì äóõîâîãî øêàôà.
äåðæàòåëü âåðòåëà íà
3-ûé óðîâåíü è
âñòàâüòå âåðòåë â
ñïåöèàëüíîå
îòâåðñòèå â çàäíåé ñòåíêå äóõîâîãî øêàôà;
3. âêëþ÷èòå âåðòåë, ïîâåðíóâ ðóêîÿòêó íà
.
28-30
37
20
13
20
25
17
6,5
)
35
45
25
18
* Ïðè òåìïåðàòóðå 15°C è äàâëåíèè 1013 ìáàð ñóõîé ãàç
** Ïðîïàí Òåïëîòâîðíàÿ ñïîñîáíîñòü = 50,37 ÌÄæ/êã
*** Áóòàí Òåïëîòâîðíàÿ ñïîñîáíîñòü = 49,47 ÌÄæ/êã
3
Ïðèðîäíûé ãàç Òåïëîòâîðíàÿ ñïîñîáíîñòü = 37,78 ÌÄæ/ì

Ïðîãðàììû
Ïðîãðàììû ïðèãîòîâëåíèÿ
ÃÐÈËÜ
RS
Ïðîãðàììà ÃÐÈËÜ
Óñòàíîâèòå ðåøåòêó íà óðîâåíü 3 èëè 4,
Âêëþ÷àåòñÿ âåðõíèé íàãðåâàòåëüíûé ýëåìåíò.
ïîìåñòèòå ïðîäóêòû â öåíòð ðåøåòêè.
Çíà÷èòåëüíàÿ òåìïåðàòóðà ïðÿìîãî äåéñòâèÿ
Ðåêîìåíäóåòñÿ âûáðàòü ìàêñèìàëüíóþ
ãðèëÿ ïîçâîëÿåò ïîëó÷èòü áûñòðîå îáðàçîâàíèå
ìîùíîñòü äóõîâêè. Íå áåñïîêîéòåñü, åñëè
êîðî÷êè íà ïîâåðõíîñòè ïðîäóêòà, êîòîðàÿ
âåðõíèé ýëåìåíò íå îñòàåòñÿ ïîñòîÿííî
ïðåïÿòñòâóåò âûõîäó ñîêîâ è ñîõðàíÿåò ïðîäóêò
âêëþ÷åííûì: åãî ðàáîòà óïðàâëÿåòñÿ
íåæíûì è ñî÷íûì âíóòðè. Èñïîëüçîâàíèå ôóíêöèè
òåðìîñòàòîì.
ãðèëü â îñîáåííîñòè ðåêîìåíäóåòñÿ äëÿ áëþä, äëÿ
ïðèãîòîâëåíèÿ êîòîðûõ òðåáóåòñÿ âûñîêàÿ
ÏÈÖÖÀ
ïîâåðõíîñòíàÿ òåìïåðàòóðà: òåëÿ÷üèõ è ãîâÿæüèõ
áèôøòåêñîâ, àíòðåêîòîâ, âûðåçêè, ãàìáóðãåðîâ è
Èñïîëüçóéòå ïðîòèâåíü èç ëåãêîãî àëþìèíèÿ,
ò.ä. … Ãîòîâüòå áëþäà ñ çàêðûòîé äâåðöåé
óñòàíàâëèâàÿ åãî íà ïðèëàãàþùóþñÿ ðåøåòêó.
äóõîâîãî øêàôà.
Ïðè èñïîëüçîâàíèè ïðîòèâåíÿ âðåìÿ âûïå÷êè
óäëèíÿåòñÿ, ÷òî çàòðóäíÿåò ïîëó÷åíèå
Ïðàêòè÷åñêèå ñîâåòû ïî
õðóñòÿùåé ïèööû.
ïðèãîòîâëåíèþ
 ñëó÷àå âûïå÷êè ïèööû ñ îáèëüíîé íà÷èíêîé
Ïðè èñïîëüçîâàíèè ðåæèìà ÃÐÈËÜ ïîìåñòèòå
ðåêîìåíäóåòñÿ ïîëîæèòü íà ïèööó ñûð
ïðîòèâåíü íà óðîâåíü 1 äëÿ ñáîðà æèäêîñòåé,
ìîööàðåëëà â ñåðåäèíå âûïå÷êè.
âûäåëÿåìîãî ïðè æàðêå (ñîê è/èëè æèð).)
Òàáëèöà ïðèãîòîâëåíèÿ
Ïîëîæåíèå
20
ðó
êîÿòêè
ð
åã
ó
Ï
ëÿöèè
ð
îä
ó
êò Âåñ
Ðàñïîëîæåíèå
(êã)
íà
óð
îâíÿõ
ä
ó
õîâêè ñíèç
ó
ââå
ð
Â
õ
ð
åìÿ
ï
ð
åäâà
ð
èòåëüíîãî
íàã
ð
åâà (ìèí
ó
Ïîëîæåíèå
òû)
ðó
êîÿòêè
òå
ð
Â
ìîñòàòà
ð
åìÿ
ï
ð
èãîòîâëåíèÿ
(ìèí
ó
òû))
Ä
ó
õîâêà Ëàçàíüÿ
Kàííåëëîíè
Çàïåêàíêà èç ìàêà
ð
îííûõ èçäåëèé
Òåëÿòèíà
K
óð
èöà
Ð
ó
ëåò èç èíäåéêè
Óòêà
K
ð
îëèê
Ôèëåéíàÿ ÷àñòü ñâèíèíû
Áà
ð
àíüÿ íîæêà
Ñê
ó
ìá
ð
èÿ
Ôî
ð
åëü â
ô
îëüãå
Íåàïîëüñêàÿ ïèööà
Ñ
ó
õèå ïå÷åíüÿ
Òî
ð
ò ñ âà
ð
åíüåì
Øîêîëàäíûé òî
ð
ò
Âûïå÷êà èç ä
ð
2,5
3
10
200
55-60
2,5
3
10
200
40-45
2,2
3
10
200
50-55
1,7
2
10
210
80-90
1,5
3
10
200
70-80
2,5
3
10
200
80-90
1,8
3
10
200
90-100
2,0
3
10
200
80-90
1,5
3
10
200
70-80
1,8
3
10
200
80-90
1,3
3
10
200
30-40
1,0
3
10
200
30-35
0,6
3
15
210
15-20
0,5
4
15
180
25-30
1,1
3
15
180
30-35
1,0
3
15
165
50-60
îææåâîãî òåñòà
1,0
4
15
165
50-60
Ã
ð
èëü Kàìáàëà è êà
ð
àêàòèöû
Kàëüìà
ð
û è ê
ð
åâåòêè íà øàìï
óð
àõ
Ôèëå ò
ð
åñêè
Îâîùè—ã
ð
èëü
Òåëÿ÷èé áè
ô
øòåêñ
Îòáèâíûå
Ãàìá
óð
ãå
ð
Kîëáàñêè—øïèêà÷êè
Ãî
ð
ÿ÷èå á
ó
òå
ð
á
ð
1
4
5
—
6
1
4
3
—
4
1
4
3
—
10
1
4
—
—
8-10
1
4
5
—
20-25
1,5
4
5
—
20-25
1
4
3
—
10-15
1,7
4
5
—
20-25
îäû
n.° 4
4
3
—
2-3
Íà âå
ð
òåëå (åñëè èìååòñÿ)
Òåëÿòèíà íà âå
ð
òåëå
K
óð
èöà íà âå
ð
òåëå
Áà
ð
àíèíà íà âå
ð
1.0
—
—
—
80-90
1.5
—
—
—
80-90
òåëå
1.0
—
—
—
80-90
ÏÐÈÌÅ×ÀÍÈÅ:
ó
êàçàííàÿ ï
ð
îäîëæèòåëüíîñòü ï
ð
èãîòîâëåíèÿ ñë
ó
æèò òîëüêî â êà÷åñòâå ï
ð
èìå
ð
à è ìîæåò áûòü
èçìåíåíà â ñîîòâåòñòâèè ñ ëè÷íûìè âê
ó
ñàìè. Ï
ð
è èñïîëüçîâàíèè ã
ð
èëÿ ï
ð
îòèâåíü âñåãäà
ó
ñòàíàâëèâàåòñÿ íà ñàìûé
íèæíèé
óð
îâåíü ä
ó
õîâêè.

Ïðåäîñòîðîæíîñòè è
ðåêîìåíäàöèè
Èçäåëèå ñïðîåêòèðîâàíî è èçãîòîâëåíî â ñîîòâåòñòâèè ñ
Ïåðåä íà÷àëîì ÷èñòêè èëè òåõíè÷åñêîãî îáñëóæèâàíèÿ
ìåæäóíàðîäíûìè íîðìàòèâàìè ïî áåçîïàñíîñòè.
èçäåëèÿ âñåãäà âûíèìàéòå øòåïñåëüíóþ âèëêó èç
RS
Íåîáõîäèìî âíèìàòåëüíî ïðî÷èòàòü íàñòîÿùèå
ñåòåâîé ðîçåòêè.
ïðåäóïðåæäåíèÿ, ñîñòàâëåííûå â öåëÿõ âàøåé
 ñëó÷àå íåèñïðàâíîñòè êàòåãîðè÷åñêè çàïðåùàåòñÿ
áåçîïàñíîñòè.
îòêðûâàòü âíóòðåííèå ìåõàíèçìû èçäåëèÿ ñ öåëüþ èõ
ñàìîñòîÿòåëüíîãî ðåìîíòà. Îáðàùàéòåñü â Öåíòð
Îáùèå òðåáî âàíèÿ ê áåçîïàñíîñòè
Òåõíè÷åñêîãî îáñëóæèâàíèÿ (ñì. Òåõîáñëóæèâàíèå).
Äàííîå óñòðîéñòâî ÿâëÿåòñÿ âñòðàèâàåìûì áûòîâûì
Íå ñòàâüòå òÿæåëûå ïðåäìåòû íà îòêðûòóþ äâåðöó
ýëåêòðîïðèáîðîì êëàññà 3.
äóõîâîãî øêàôà
Äëÿ èñïðàâíîãî ôóíêöèîíèðîâàíèÿ ãàçîâûõ óñòðîéñòâ
Íå äîïóñêàåòñÿ ýêñïëóàòàöèÿ èçäåëèÿ ëèöàìè ñ
íåîáõîäèìî îòðåãóëèðîâàòü âîçäóõîîáìåí. Ïðîâåðüòå,
îãðàíè÷åííûìè ôèçè÷åñêèìè, ñåíñîðèàëüíûìè èëè
÷òîáû ïðè óñòàíîâêå ýòèõ óñòðîéñòâ ñîáëþäàëèñü
óìñòâåííûìè ñïîñîáíîñòÿìè (âêëþ÷àÿ äåòåé),
òðåáîâàíèÿ, îïèñàííûå â ïàðàãðàôå «Ðàñïîëîæåíèå».
íåîïûòíûìè ëèöàìè èëè ëèöàìè, íåîáó÷åííûìè
Äàííîå èçäåëèå ïðåäíàçíà÷àåòñÿ äëÿ
îáðàùåíèþ ñ èçäåëèåì áåç êîíòðîëÿ ñî ñòîðîíû ëèöà,
íåïðîôåññèîíàëüíîãî èñïîëüçîâàíèÿ â äîìàøíèõ
îòâåòñòâåííîãî çà èõ áåçîïàñíîñòü èëè ïîñëå
óñëîâèÿõ.
íàäëåæàùåãî îáó÷åíèÿ îáðàùåíèþ ñ èçäåëèåì.
Çàïðåùàåòñÿ óñòàíàâëèâàòü èçäåëèå íà óëèöå, äàæå
ïîä íàâåñîì, òàê êàê âîçäåéñòâèå íà íåãî äîæäÿ è
Íå ðàçðåøàéòå äåòÿì èãðàòü ñ áûòîâûì
ãðîçû ÿâëÿåòñÿ ÷ðåçâû÷àéíî îïàñíûì.
ýëåêòðîïðèáîðîì.
Äëÿ ïåðåìåùåíèÿ èçäåëèÿ âñåãäà áåðèòåñü çà
ñïåöèàëüíûå ðó÷êè, ðàñïîëîæåííûå ñ áîêîâ äóõîâîãî
Óòèëèçàöèÿ
øêàôà.
Óíè÷òîæåíèå óïàêîâî÷íûõ ìàòåðèàëîâ: ñîáëþäàéòå
Íå ïðèêàñàéòåñü ê èçäåëèþ âëàæíûìè ðóêàìè, áîñèêîì
ìåñòíûå íîðìàòèâû ïî óòèëèçàöèè óïàêîâî÷íûõ
èëè ñ ìîêðûìè íîãàìè.
ìàòåðèàëîâ.
Èçäåëèå ïðåäíàçíà÷åíî äëÿ ïðèãîòîâëåíèÿ ïèùåâûõ
Ñîãëàñíî Åâðîïåéñêîé Äèðåêòèâå 2002/96/ÑÅ
ïðîäóêòîâ, ìîæåò áûòü èñïîëüçîâàíî òîëüêî âçðîñëûìè
êàñàòåëüíî óòèëèçàöèè ýëåêòðîííûõ è ýëåêòðè÷åñêèõ
ëèöàìè â ñîîòâåòñòâèè ñ èíñòðóêöèÿìè, ïðèâåäåííûìè â
ýëåêòðîïðèáîðîâ ýëåêòðîïðèáîðû íå äîëæíû
äàííîì òåõíè÷åñêîì ðóêîâîäñòâå.
âûáðàñûâàòüñÿ âìåñòå ñ îáû÷íûì ãîðîäñêèì ìóñîðîì.
Âûâåäåííûå èç ñòðîÿ ïðèáîðû äîëæíû ñîáèðàòüñÿ
 ïðîöåññå ýêñïëóàòàöèè èçäåëèÿ íàãðåâàòåëüíûå
îòäåëüíî äëÿ îïòèìèçàöèè èõ óòèëèçàöèè è
ýëåìåíòû è íåêîòîðûå
÷àñòè äâåðöû äóõîâîãî øêàôà
ðåêóïåðàöèè ñîñòàâëÿþùèõ èõ ìàòåðèàëîâ, à òàêæå äëÿ
ñèëüíî íàãðåâàþòñÿ. Íåîáõîäèìî ïðîÿâëÿòü
áåçîïàñíîñòè îêðóæàþùåé ñðåäû è çäîðîâüÿ. Ñèìâîë
îñòðîæíîñòü âî èçáåæàíèå êîíòàêòîâ ñ ýòèìè ÷àñòÿìè è
çà÷åðêíóòàÿ ìóñîðíàÿ êîðçèíêà, èìåþùèéñÿ íà âñåõ
íå ðàçðåøàòü äåòÿì ïðèáëèæàòüñÿ ê äóõîâêå.
ïðèáîðàõ, ñëóæèò íàïîìèíàíèåì îá èõ îòäåëüíîé
Ñëåäèòå, ÷òîáû ñåòåâûå øíóðû äðóãèõ áûòîâûõ
óòèëèçàöèè.
ýëåêòðîïðèáîðîâ íå ïðèêàñàëèñü ê ãîðÿ÷èì ÷àñòÿì
Çà áîëåå ïîäðîáíîé èíôîðìàöèåé î ïðàâèëüíîé
äóõîâîãî øêàôà.
óòèëèçàöèè áûòîâûõ ýëåêòðîïðèáîðîâ ïîëüçîâàòåëè
ìîãóò îáðàòèòüñÿ â ñïåöèàëüíóþ ãîñóäàðñòâåííóþ
Íå çàêðûâàéòå âåíòèëÿöèîííûå ðåøåòêè è îòâåðñòèÿ
îðãàíèçàöèþ èëè â ìàãàçèí.
ðàññåèâàíèÿ òåïëà.
Áåðèòåñü çà ðó÷êó äâåðöû â öåíòðå: ñ áîêîâ îíà ìîæåò
Ýêîíî ìèÿ ýëåêòðîýíåðãèè è î õðàíà
áûòü ãîðÿ÷åé.
îêðóæàþùåé ñðåäû
Âñåãäà íàäåâàéòå êóõîííûå âàðåæêè, êîãäà ñòàâèòå èëè
Åñëè âû áóäåòå ïîëüçîâàòüñÿ äóõîâûì øêàôîì âå÷åðîì
âûíèìàåòå áëþäà èç äóõîâêè.
è äî ðàííåãî óòðà, ýòî ïîìîæåò ñîêðàòèòü íàãðóçêó
Íå ïîêðûâàéòå äíî äóõîâîãî øêàôà ôîëüãîé.
ïîòðåáëåíèÿ ýëåêòðîýíåðãèè ýëåêòðîñòàíöèÿìè.
Íå õðàíèòå â äóõîâîì øêàôó âîçãîðàåìûõ ïðåäìåòîâ.
Ðåêîìåíäóåòñÿ âñåãäà ãîòîâèòü â ðåæèìå ÃÐÈËÜ ñ
ïðè ñëó÷àéíîì âêëþ÷åíèè èçäåëèÿ òàêèå ìàòåðèàëû
çàêðûòîé äâåðöåé: ýòî íåîáõîäèìî äëÿ çíà÷èòåëüíîé
ìîãóò çàãîðåòüñÿ.
ýêîíîìèè ýëåêòðîýíåðãèè (ïðèìåðíî 10%), à òàêæå äëÿ
ëó÷øèõ ðåçóëüòàòîâ ïðèãîòîâëåíèÿ.
Âñåãäà ïðîâåðÿéòå, ÷òîáû ðåãóëÿòîðû íàõîäèëèñü â
ïîëîæåíèè l/
¡ , êîãäà èçäåëèå íå èñïîëüçóåòñÿ.
Ñîäåðæèòå óïëîòíåíèÿ â èñïðàâíîì è ÷èñòîì ñîñòîÿíèè,
ïðîâåðÿéòå, ÷òîáû îíè ïëîòíî ïðèëåãàëè ê äâåðöå è íå
Íå òÿíèòå çà êàáåëü ýëåêòðîïèòàíèÿ äëÿ îòñîåäèíåíèÿ
ïðîïóñêàëè óòå÷åê òåïëà.
âèëêè èçäåëèÿ èç ñåòåâîé ðîçåòêè, âîçüìèòåñü çà âèëêó
ðóêîé.
21
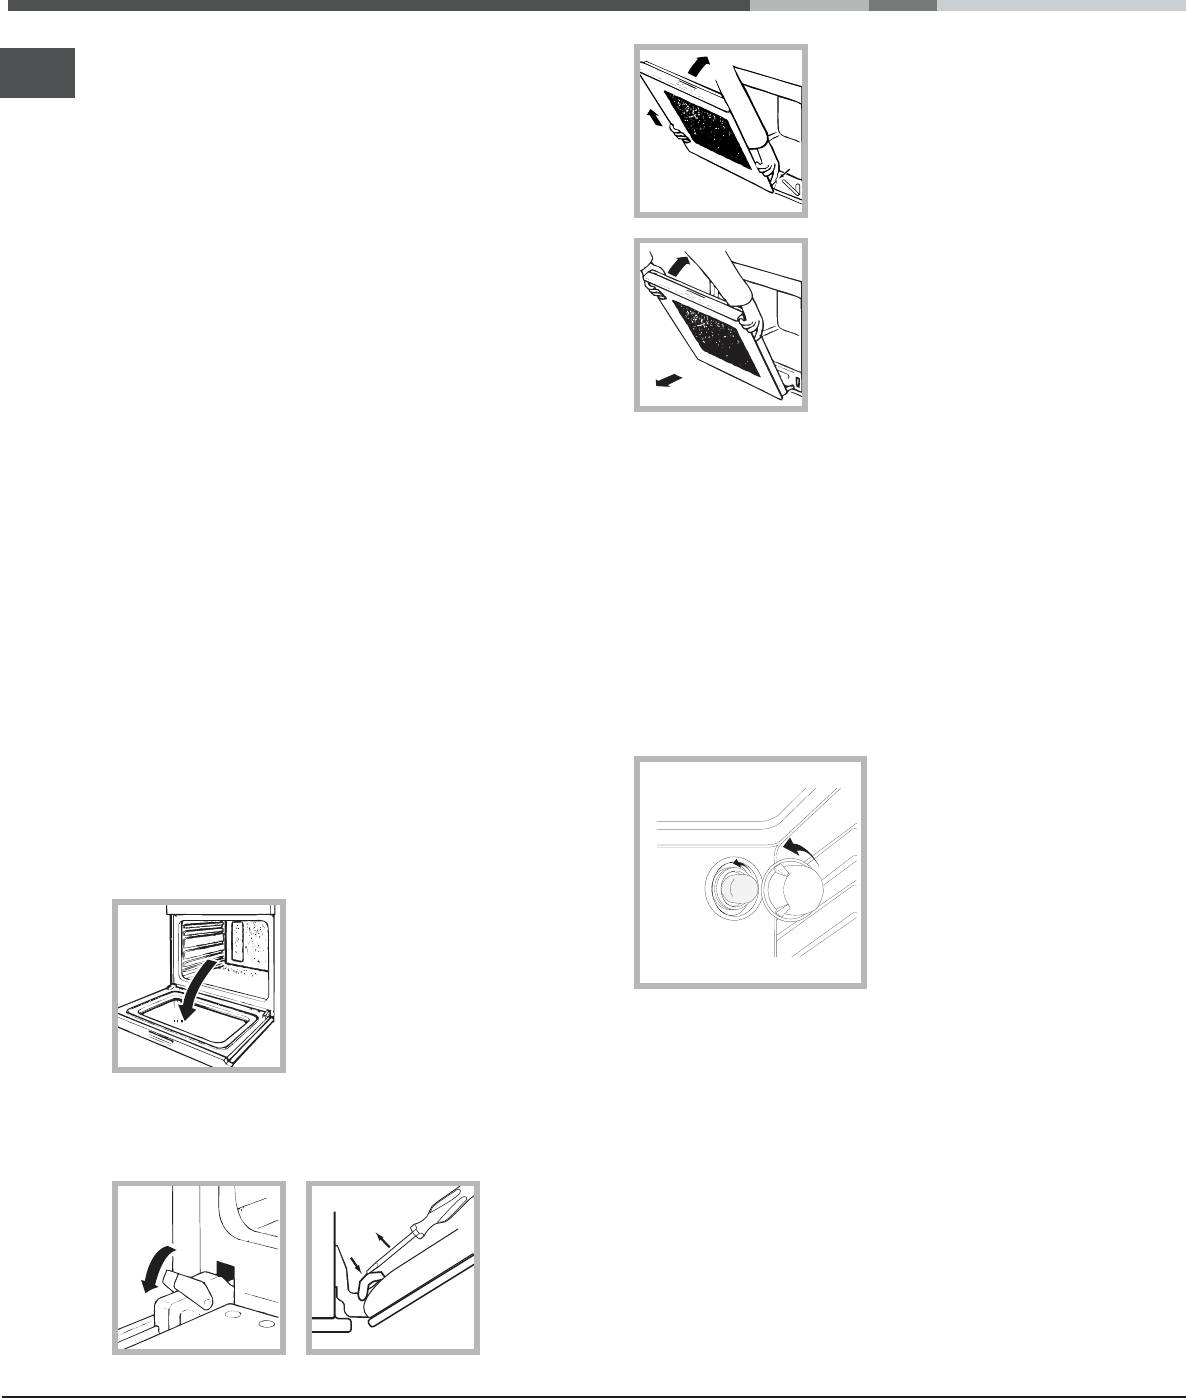
Òåõíè÷åñêîå
îáñëóæèâàíèå è óõîä
Îòêëþ÷åíèå ýëåêòðîïèòàíèÿ
3. âîçüìèòåñü çà äâåðöó
RS
Ïåðåä íà÷àëîì êàêîé-ëèáî îïåðàöèè ïî
ðóêàìè ñ äâóõ ñòîðîí, ïëàâíî
îáñëóæèâàíèþ èëè ÷èñòêå îòñîåäèíèòå èçäåëèå îò
çàêðîéòå åå, íî íå ïîëíîñòüþ;
ñåòè ýëåêòðîïèòàíèÿ.
Íàæìèòå íà óïîðû F, çàòåì
F
ïîòÿíèòå äâåðöó íà ñåáÿ,
×èñòêà èçäåëèÿ
ñíèìàÿ åå ñ ïåòåëü (ñì.
Íå èñïîëüçóéòå ïàðîâûå ÷èñòÿùèå àãðåãàòû èëè
ðèñóíîê).*
àãðåãàòû ïîä âûñîêèì äàâëåíèåì äëÿ ÷èñòêè
èçäåëèÿ.
3. âîçüìèòåñü çà äâåðöó
Íàðóæíûå ýìàëèðîâàííûå ýëåìåíòû èëè äåòàëè
ðóêàìè ñ äâóõ ñòîðîí,
èç íåðæàâåþùåé ñòàëè, à òàêæå ðåçèíîâûå
ïëàâíî çàêðîéòå åå, íî íå
óïëîòíåíèÿ ìîæíî ïðîòèðàòü ãóáêîé, ñìî÷åííîé
ïîëíîñòüþ. Çàòåì ïîòÿíèòå
â òåïëîé âîäå èëè â ðàñòâîðå íåéòðàëüíîãî
äâåðöó íà ñåáÿ, ñíèìàÿ åå ñ
ìîþùåãî ñðåäñòâà. Äëÿ óäàëåíèÿ îñîáî
ïåòåëü (ñì. ñõåìó).*
òðóäíûõ ïÿòåí èñïîëüçóéòå ñïåöèàëüíûå
÷èñòÿùèå ñðåäñòâà, èìåþùèåñÿ â ïðîäàæå.
Ïîñëå ÷èñòêè ðåêîìåíäóåòñÿ òùàòåëüíî óäàëèòü
Äëÿ óñòàíîâêè äâåðöû íà ìåñòî âûïîëíèòå
îñòàòêè ìîþùåãî ñðåäñòâà âëàæíîé òðÿïêîé è
âûøåîïèñàííûå îïåðàöèè â îáðàòíîì ïîðÿäêå.
âûñóøèòü äóõîâêó. Íå èñïîëüçóéòå àáðàçèâíûå
ïîðîøêè èëè êîððîçèéíûå âåùåñòâà.
Ñëåäóåò ïðîèçâîäèòü âíóòðåííþþ ÷èñòêó
Ïðîâåðêà óïëîòíåíèé
äóõîâîãî øêàôà ïîñëå êàæäîãî åãî
èñïîëüçîâàíèÿ, íå äîæèäàÿñü åãî ïîëíîãî
Ðåãóëÿðíî ïðîâåðÿéòå ñîñòîÿíèå óïëîòíåíèÿ
îõëàæäåíèÿ. Èñïîëüçóéòå òåïëóþ âîäó è
âîêðóã äâåðöû äóõîâîãî øêàôà.  ñëó÷àå
ìîþùåå ñðåäñòâî, îïîëîñíèòå è ïðîòðèòå
ïîâðåæäåíèÿ óïëîòíåíèÿ îáðàùàéòåñü â
ìÿãêîé òðÿïêîé. Èçáåãàéòå èñïîëüçîâàíèÿ
áëèæàéøèé Öåíòð Òåõíè÷åñêîãî Îáñëóæèâàíèÿ
àáðàçèâíûõ ñðåäñòâ.
(ñì. Òåõíè÷åñêîå îáñëóæèâàíèå). Íå
Ñúåìíûå äåòàëè ìîæíî ëåãêî âûìûòü êàê
ðåêîìåíäóåòñÿ ïîëüçîâàòüñÿ äóõîâêîé ñ
ëþáóþ äðóãóþ ïîñóäó, òàêæå â ïîñóäîìîå÷íîé
ïîâðåæäåííûì óïëîòíåíèåì.
ìàøèíå.
Çàìåíà ëàìïî÷êè
×èñòêà äâåðöû
Çàìåíà ëàìïî÷êè â
Äëÿ ÷èñòêè ñòåêëà äâåðöû èñïîëüçóéòå
äóõîâîì øêàôó:
íåàáðàçèâíûå ãóáêè è ÷èñòÿùèå ñðåäñòâà, çàòåì
1. Îòâèíòèòå
âûòðèòå íàñóõî ìÿãêîé òðÿïêîé. Íå èñïîëüçóéòå
ñòåêëÿííóþ êðûøêó
òâåðäûå àáðàçèâíûå ìàòåðèàëû èëè îñòðûå
ìåòàëëè÷åñêèå ñêðåáêè, êîòîðûå ìîãóò ïîöàðàïàòü
ïëàôîíà ëàìïî÷êè;
ïîâåðõíîñòü è ðàçáèòü ñòåêëî.
2. Âûêðóòèòå ëàìïî÷êó
Äëÿ áîëåå òùàòåëüíîé
è çàìåíèòå åå íà
÷èñòêè ìîæíî ñíÿòü äâåðöó
íîâóþ òàêîãî æå òèïà:
äóõîâêè.
ìîùíîñòü 25 Âò,
1. ïîëíîñòüþ îòêðîéòå
ðåçüáà Å 14.
äâåðöó äóõîâêè (ñì. ñõåìó);
3. Âîññòàíîâèòå êðûøêó íà ìåñòî (ñì. ñõåìó).
Ñåðâèñíîå îáñëóæèâàíèå
Íèêîãäà íå îáðàùàéòåñü ê íåóïîëíîìî÷åííûì
2. ïîäíèìèòå è ïîâåðíèòå øïîíêè íà äâóõ
òåõíèêàì.
øàðíèðàõ (ñì. ñõåìó);*
Ïðè îáðàùåíèè â Öåíòð Ñåðâèñíîãî
2. ïðè ïîìîùè îòâåðòêè ïîäíèìèòå è ïîâåðíèòå
Îáñëóæèâàíèÿ íåîáõîäèìî ñîîáùèòü:
øïîíêè F íà äâóõ øàðíèðàõ (ñì. ñõåìó);*
Òèï íåèñïðàâíîñòè;
Ìîäåëü èçäåëèÿ (Ìîä.)
Íîìåð òåõ. ïàñïîðòà (ñåðèéíûé ¹)
F
Ýòè äàííûå âû íàéäåòå íà ïàñïîðòíîé òàáëè÷êå,
ðàñïîëîæåííîé íà èçäåëèè.
Èìååòñÿ òîëüêî â íåêîòîðûõ ìîäåëÿõ
*
22

RS
23

04/2010 — 195079900.01
XEROX FABRIANO
RS
24
Аннотации для Газового Духова Шкафа Hotpoint-Ariston 7O FH G IX RU в формате PDF
Топ 10 инструкций
Другие инструкции
Как включить газовую духовку Hotpoint-Ariston? Классический вариант духового шкафа на голубом топливе остается одним из самых популярных вариантов для обустройства кухни, ведь он гораздо экономичнее, стильно смотрится в различных интерьерах и позволяет быстро приготовить любимые блюда. Останавливает пользователей зачастую лишь некоторый страх при работе с газом. Производителем приняты все технические решения для безопасной эксплуатации, например, газ-контроль или автоматический поджиг. Разберемся, как же использовать все возможности.
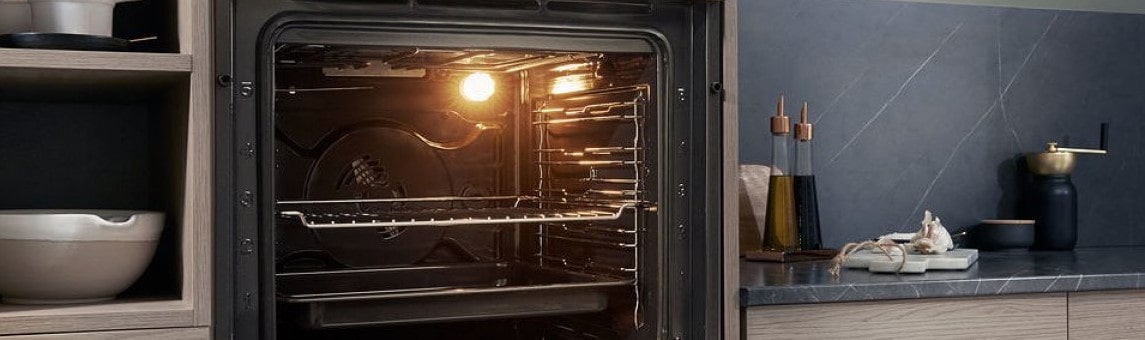
Как включить газовую духовку Хотпоинт-Аристон?
После того, как вы правильно установили бытовую технику и подключили к коммуникациям по инструкции необходимо провести тестовый запуск и прогрев камеры для устранения консервационных материалов. Для этого вам необходимо:
- Открыть дверцу шкафа и повернуть ручку регулировки температуры на максимальное значение;
- Активировать электроподжиг (в некоторых моделях функция совмещена с нажимом на ручку, на других выделена отдельной кнопкой) или использовать пламя спички;
- Если пламя не разгорелось в течение 5 секунд прервите процесс, подождите не менее минуты и повторите попытку;
- При стабильном горении отрегулируйте температуру до 250 градусов и дайте шкафу поработать в этом режиме час, после проветрите помещение.
Последующее включение проводить по этому алгоритму, выбирая необходимый температурный режим.

7OFH G (WH) RU/HA
7OFH G IX RU/HA
7OFHR G (AN)RU/HA
7OFHR G (OW)RU/HA
GOS 7 A RFH
GOS 7 I RFH
English
Operating Instructions
OVEN
Contents
Operating Instructions,1
Warnings,2
Assistance,3
Description of the appliance,4
Description of the appliance,5
Installation,6
Start-up and use,9
Cooking modes,10
Precautions and tips,13
Maintenance and care,13
Русскии
Руководство по эксплуатации
ДУХОВОЙ ШКАФ
Содержание
Руководство по эксплуатации,1
Предупреждения,2
Сервисное обслуживание,3
Описание изделия,4
Описание изделия,5
Установка,15
Включение и эксплуатация,18
Программы,19
Предосторожности и рекомендации,22
Техническое обслуживание и уход,22
2
Warnings
WARNING: The appliance and its accessible parts
become hot during use. Care should be taken to
avoid touching heating elements. Children less than 8
years of age shall be kept away unless continuously
supervised. This appliance can be used by children
aged from 8 years and above and persons with
reduced physical, sensory or mental capabilities or
lack of experience and knowledge if they have been
given supervision or instruction concerning use of the
appliance in a safe way and understand the hazards
involved. Children shall not play with the appliance.
Cleaning and user maintenance shall not be made
by children without supervision.
Do not use harsh abrasive cleaners or sharp metal
scrapers to clean the oven door glass since they can
scratch the surface, which may result in shattering of
the glass.
Never use steam cleaners or pressure cleaners on
the appliance.
WARNING: Ensure that the appliance is switched
off before replacing the lamp to avoid the possibility
of electric shock.
! When you place the rack inside, make sure that the
stop is directed upwards and in the back of the cavity.
Предупреждения
ВНИМАНИЕ: Данное изделие и его доступные
комплектующие сильно нагреваются в процессе
эксплуатации. Будьте осторожны и не касайтесь
нагревательных элементов. Не разрешайте
детям младше 8 лет приближаться к изделию
без контроля. Данное изделие может быть
использовано детьми старше 8 лет и лицами с
ограниченными физическими, сенсорными или
умственными способностями или без опыта и
знания о правилах использования изделия при
условии надлежащего контроля или обучения
безопасному использованию изделия с учетом
соответствующих рисков. Не разрешайте
детям играть с изделием. Не разрешайте детям
осуществлять чистку и уход за изделием без
контроля взрослых.
Не используйте абразивные вещества или
режущие металлические скребки для чистки
стеклянной дверцы духового шкафа, так как
они могут поцарапать поверхность, что может
привести к разбиванию стекла.
Никогда не используйте паровые чистящие
агрегаты или агрегаты под высоким давлением
для чистки изделия.
ВНИМАНИЕ: Проверьте, чтобы изделие было
выключено, перед заменой лампочки во
избежание возможных ударов током.
! При установке решетки проверить, чтобы
фиксатор был повернут вверх с задней стороны
выемки.

3
Assistance
! Never use the services of an unauthorised technician.
Please have the following information to hand:
• The type of problem encountered.
• The appliance model (Mod.).
• The serial number (S/N).
The latter two pieces of information can be found on the data plate located
on the appliance.
Сервисное обслуживание
! Никогда не обращайтесь к неуполномоченным техникам.
При обращении в Центр Технического обслуживания сообщите:
• Тип неисправности;
• Модель изделия (Мод.)
• Номер тех. паспорта (серийный №)
Эти данные вы найдете на паспортной табличке, расположенной на
изделии.
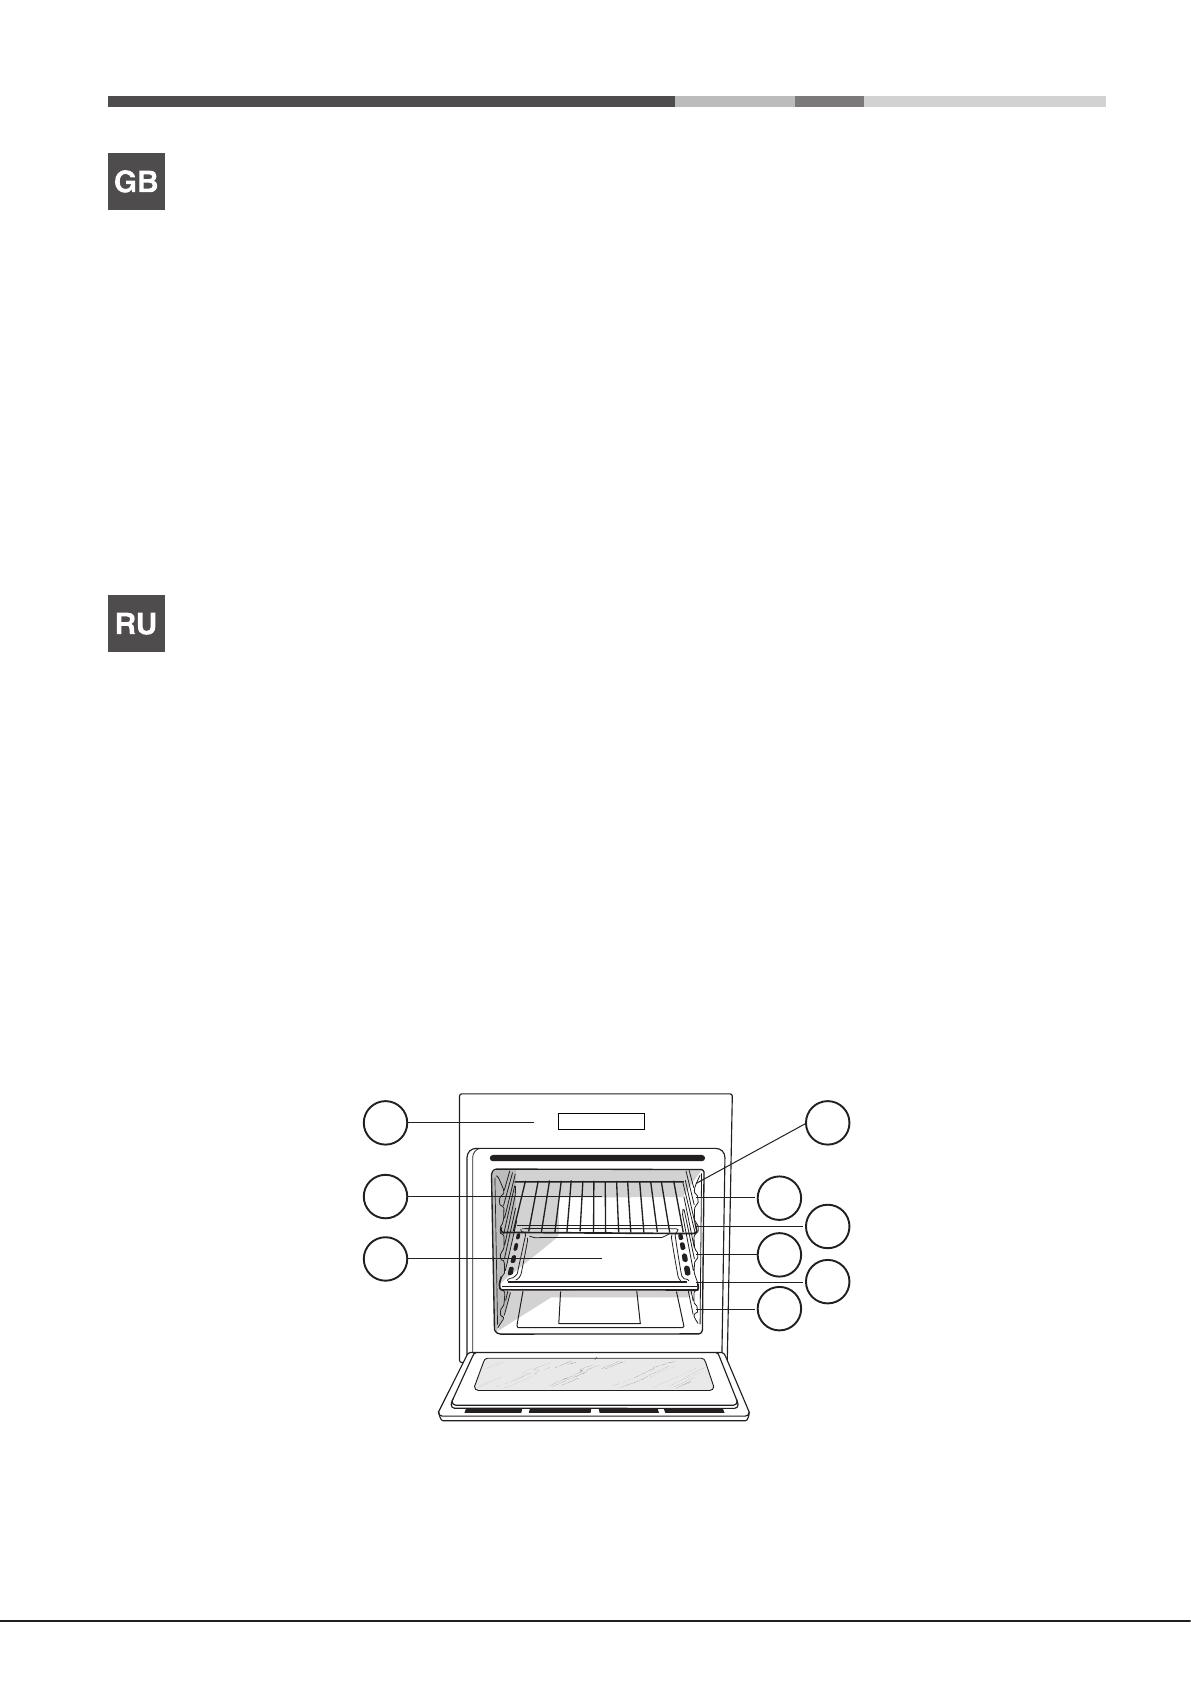
4
Description of the appliance
Overall view
1. POSITION 1
2. POSITION 2
3. POSITION 3
4. POSITION 4
5. POSITION 5
6. GUIDES for the sliding racks
7. DRIPPING PAN
8. GRILL
9. Control panel
Описание изделия
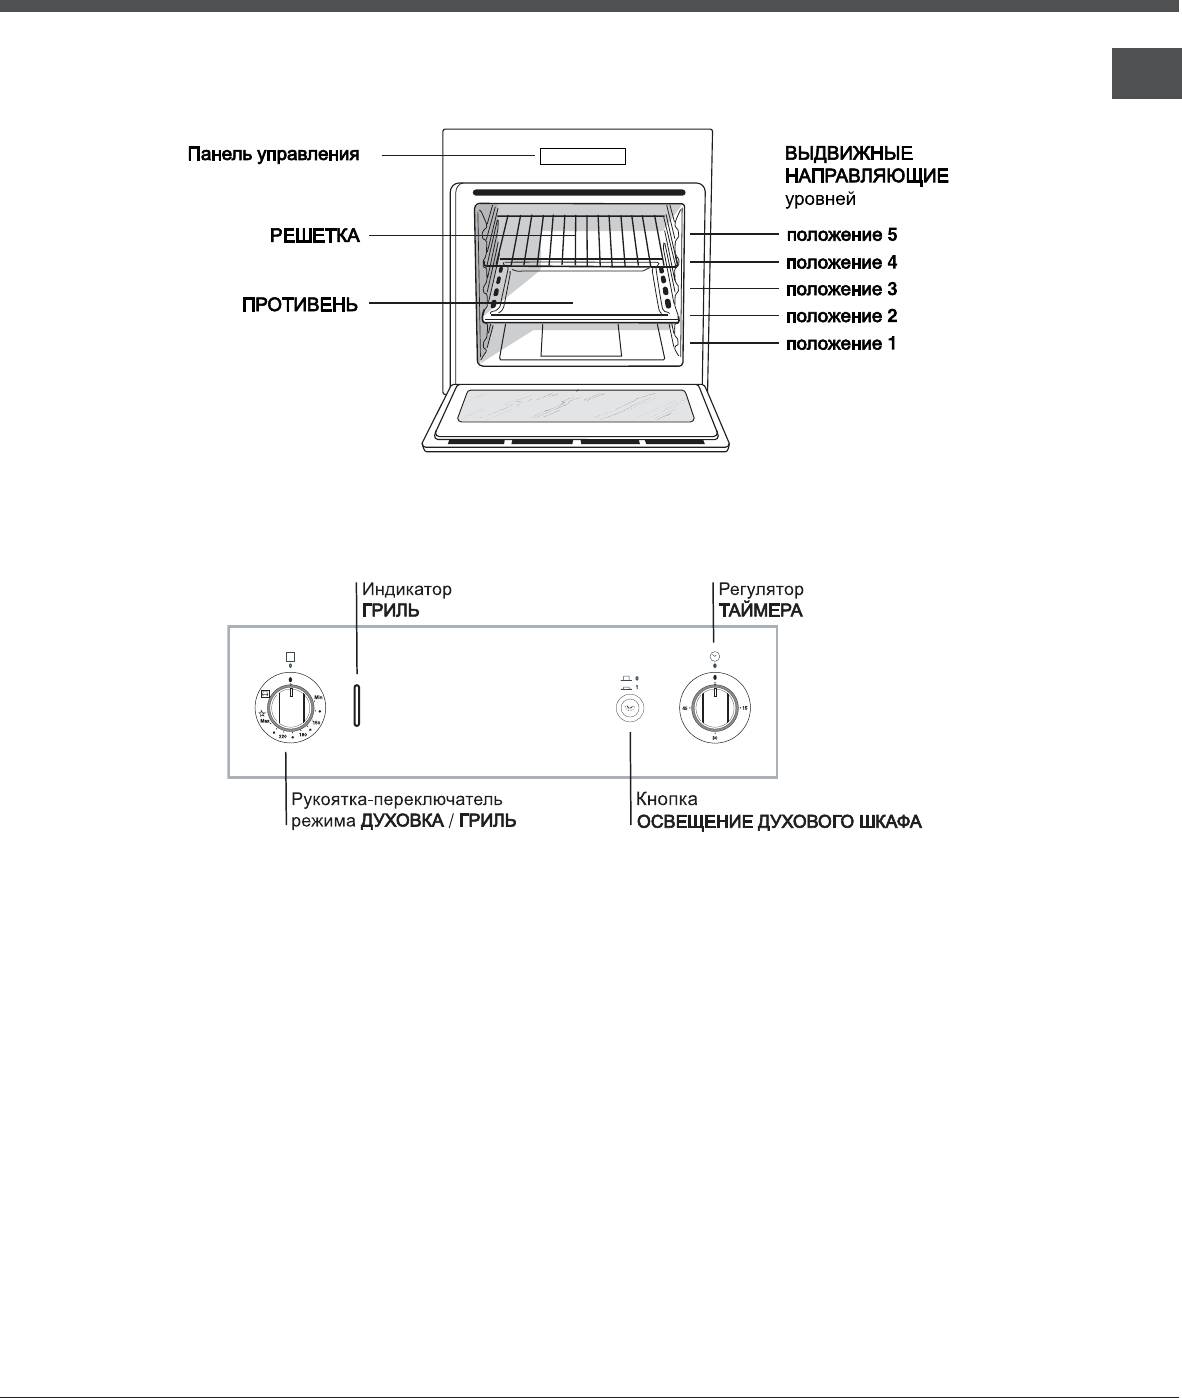
Общии вид
1. ПОЛОЖЕНИЕ 1
2. ПОЛОЖЕНИЕ 2
3. ПОЛОЖЕНИЕ 3
4. ПОЛОЖЕНИЕ 4
5. ПОЛОЖЕНИЕ 5
6. ВЫДВИЖНЫЕ НАПРАВЛЯЮЩИЕ уровней
7. ПРОТИВЕНЬ
8. РЕШЕТКА
9. Панель управления
8
9 6
2
5
Description of the appliance
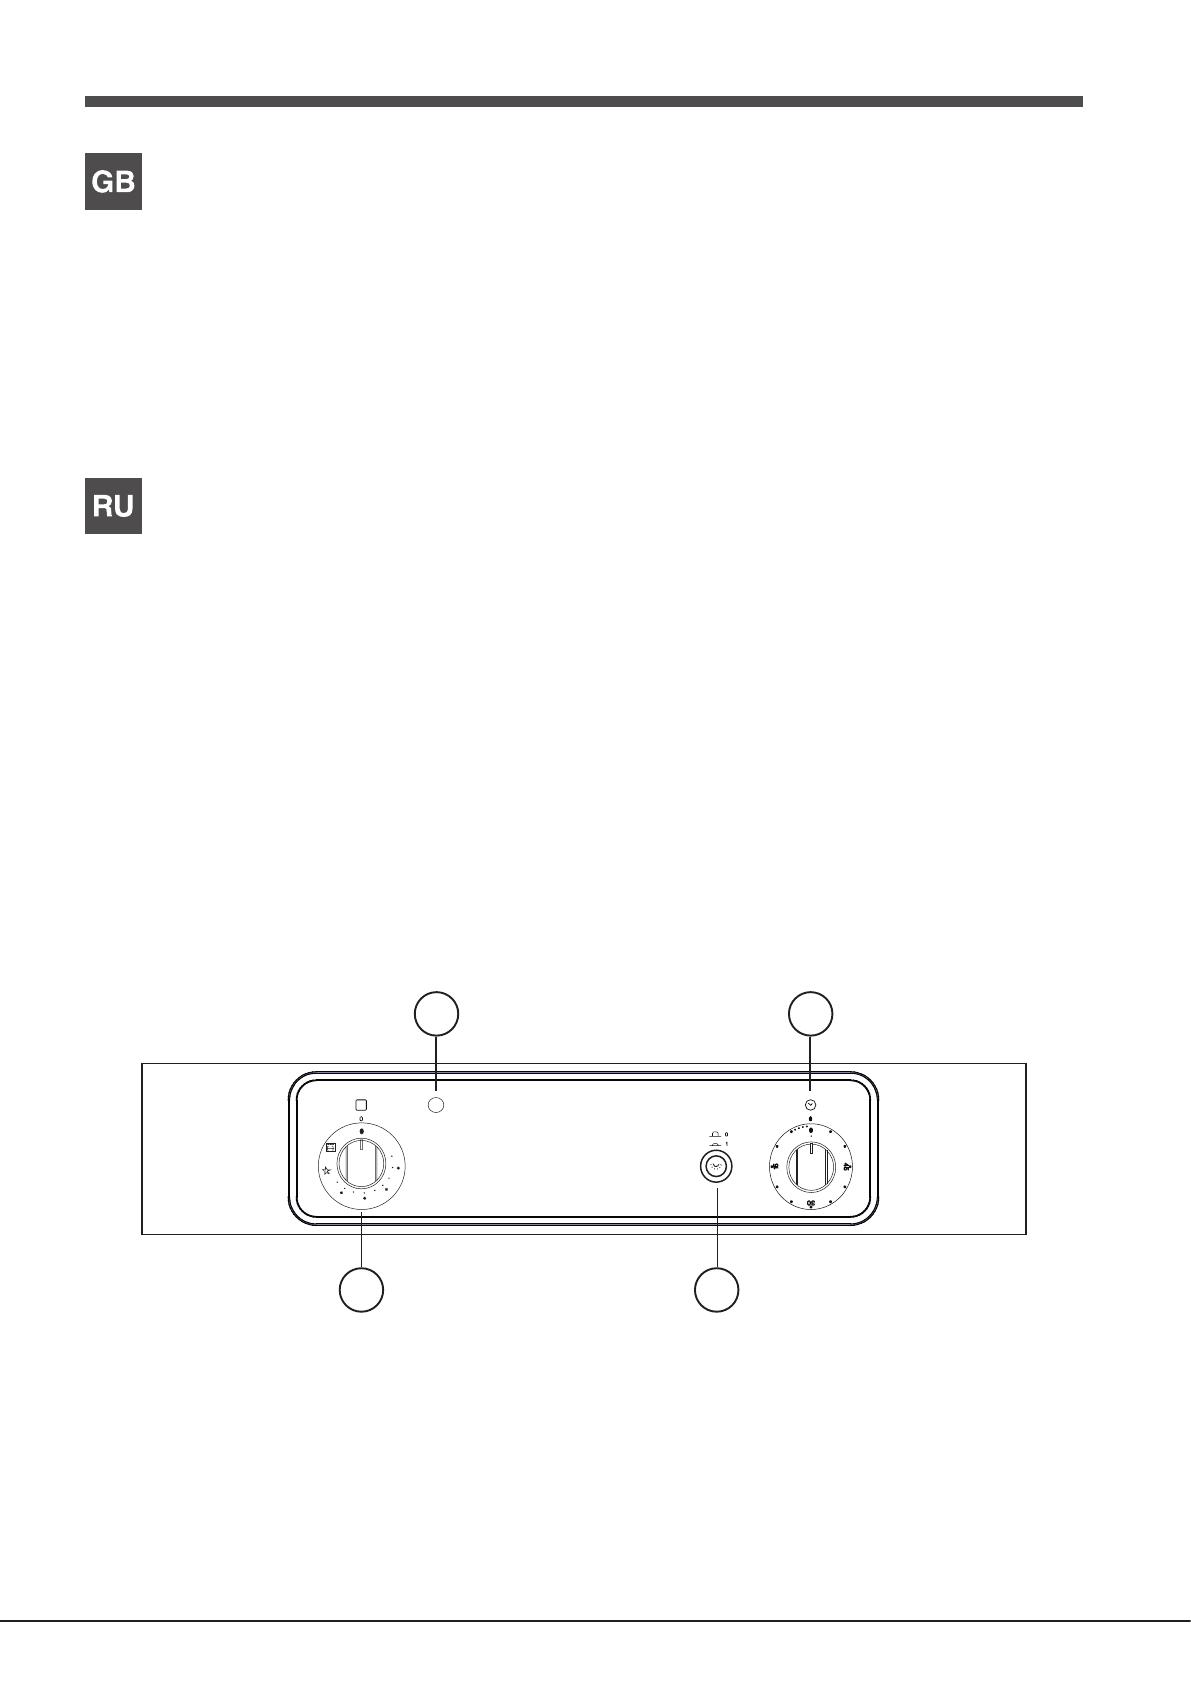
Control panel
1. OVEN/GRILL knob
2. GRILL indicator light
3. OVEN LIGHT button
4. TIMER knob
Описание изделия
Панель управления
1. Рукоятка-переключатель режима ДУХОВКА / ГРИЛЬ
2. Индикатор ГРИЛЬ
3. Кнопка ОСВЕЩЕНИЕ ДУХОВОГО ШКАФА
4. Регулятор ТАЙМЕРА
3
4
Min
Max
150
180
220
6
GB
Installation
! Please keep this instruction booklet in a safe place for future reference. If
the appliance is sold, given away or moved, please make sure the booklet is
also passed on to the new owners so that they may benet from the advice
contained within it.
! Please read this instruction manual carefully: it contains important information
concerning the safe operation, installation and maintenance of the appliance.
Positioning
! Do not let children play with the packaging material; it should be disposed
of in accordance with local separated waste collection standards (see
Precautions and tips).
! The appliance must be installed by a qualied professional in accordance
with the instructions provided. Incorrect installation may damage property or
cause harm to people or animals.
! This unit may be installed and used only in permanently ventilated rooms
in accordance with current National Regulations. The following requirements
must be observed:
• The room must be equipped with an air extraction system that expels
any combustion fumes. This may consist of a hood or an electric fan that
automatically starts each time the appliance is switched on.
In a chimney stack or branched flue.
(exclusively for cooking appliances)
Directly to
the Outside
• The room must also allow proper air circulation, as air is needed for
combustion to occur normally. The ow of air must not be less than 2 m
3
/h
per kW of installed power.
The air circulation system may take air directly
from the outside by means of a pipe with an
inner cross section of at least 100 cm
2
; the
opening must not be vulnerable to any type
of blockages.
The system can also provide the air needed for
combustion indirectly, i.e. from adjacent rooms
tted with air circulation tubes as described
above. However, these rooms must not be
communal rooms, bedrooms or rooms that
may present a re hazard.
• Liquid petroleum gas sinks to the oor as it is heavier than air. Therefore,
rooms containing LPG cylinders must also be equipped with vents to allow
gas to escape in the event of a leak. As a result LPG cylinders, whether
partially or completely full, must not be installed or stored in rooms or
storage areas that are below ground level (cellars, etc.). It is advisable to
keep only the cylinder being used in the room, positioned so that it is not
subject to heat produced by external sources (ovens, replaces, stoves,
etc. ) which could raise the temperature of the cylinder above 50°C.
A
Examples of
ventilation holes
for comburant air.
Enlarging the ventilation slot
between window and floor.
Adjacent
Room
Room to be
Vented
Built-in appliances
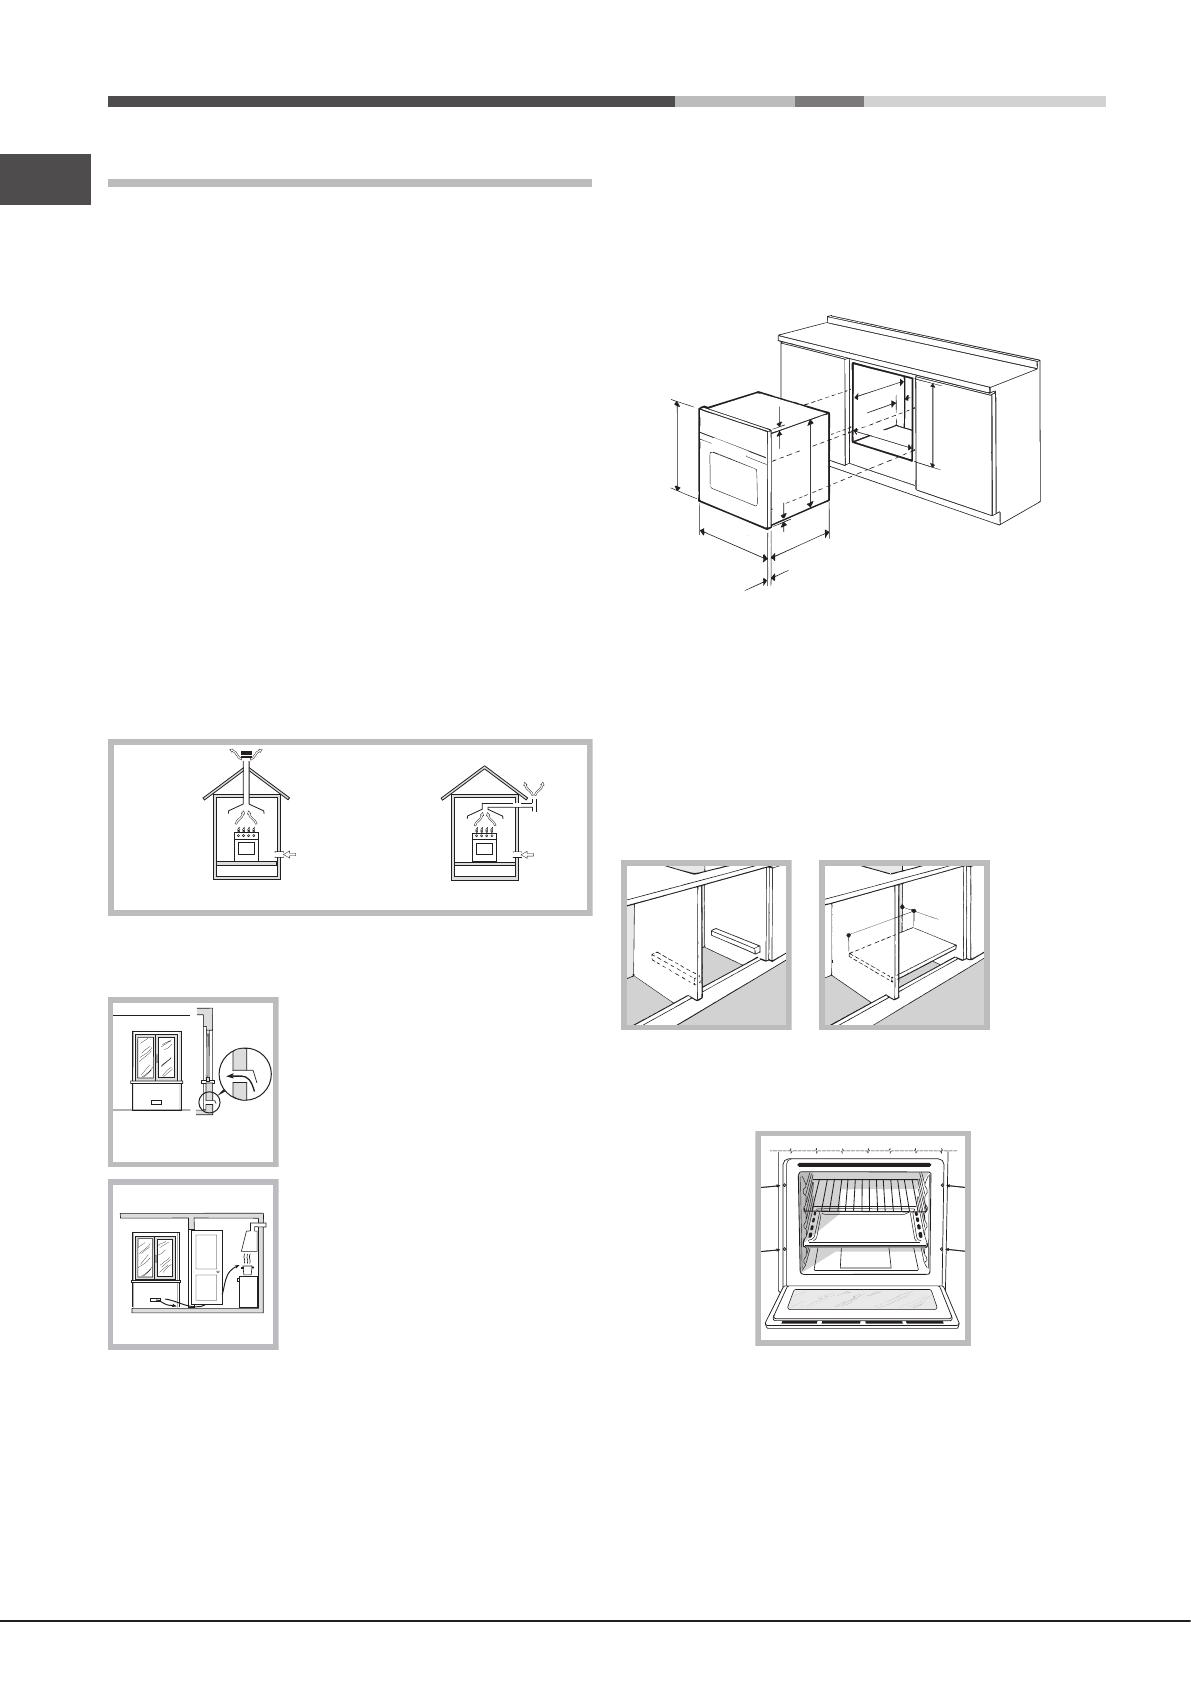
Use an appropriate cabinet to ensure that the appliance operates properly:
• The panels adjacent to the oven must be made of heat-resistant material.
• Cabinets with a veneer exterior must be assembled with glues which can
withstand temperatures of up to 100°C.
• To install the oven under the counter (see diagram) or in a kitchen unit,
the cabinet must have the following dimensions:
595 mm.
595 mm.
25 mm.
545 mm.
5 mm.
567 mm.
23 mm.
575-585 mm.
45 mm.
560 mm.
547 mm. min.
! The appliance must not come into contact with electrical parts once it has
been installed.
The indications for consumption given on the data plate have been calculated
for this type of installation.
Ventilation
To ensure adequate ventilation, the back panel of the cabinet must be
removed. It is advisable to install the oven so that it rests on two strips of
wood, or on a completely at surface with an opening of at least 45 x 560
mm (see diagrams).
560 mm.
45 mm.
Centring and xing
Secure the appliance to the cabinet by opening the oven door and inserting
4 screws into the 4 holes on the outer frame.
! All parts which ensure the safe operation of the appliance must not be
removable without the aid of a tool.
Electrical connection
Ovens equipped with a three-pole power supply cable are designed to operate
with alternating current at the voltage and frequency indicated on the data
plate located on the appliance (see below).
GB
7
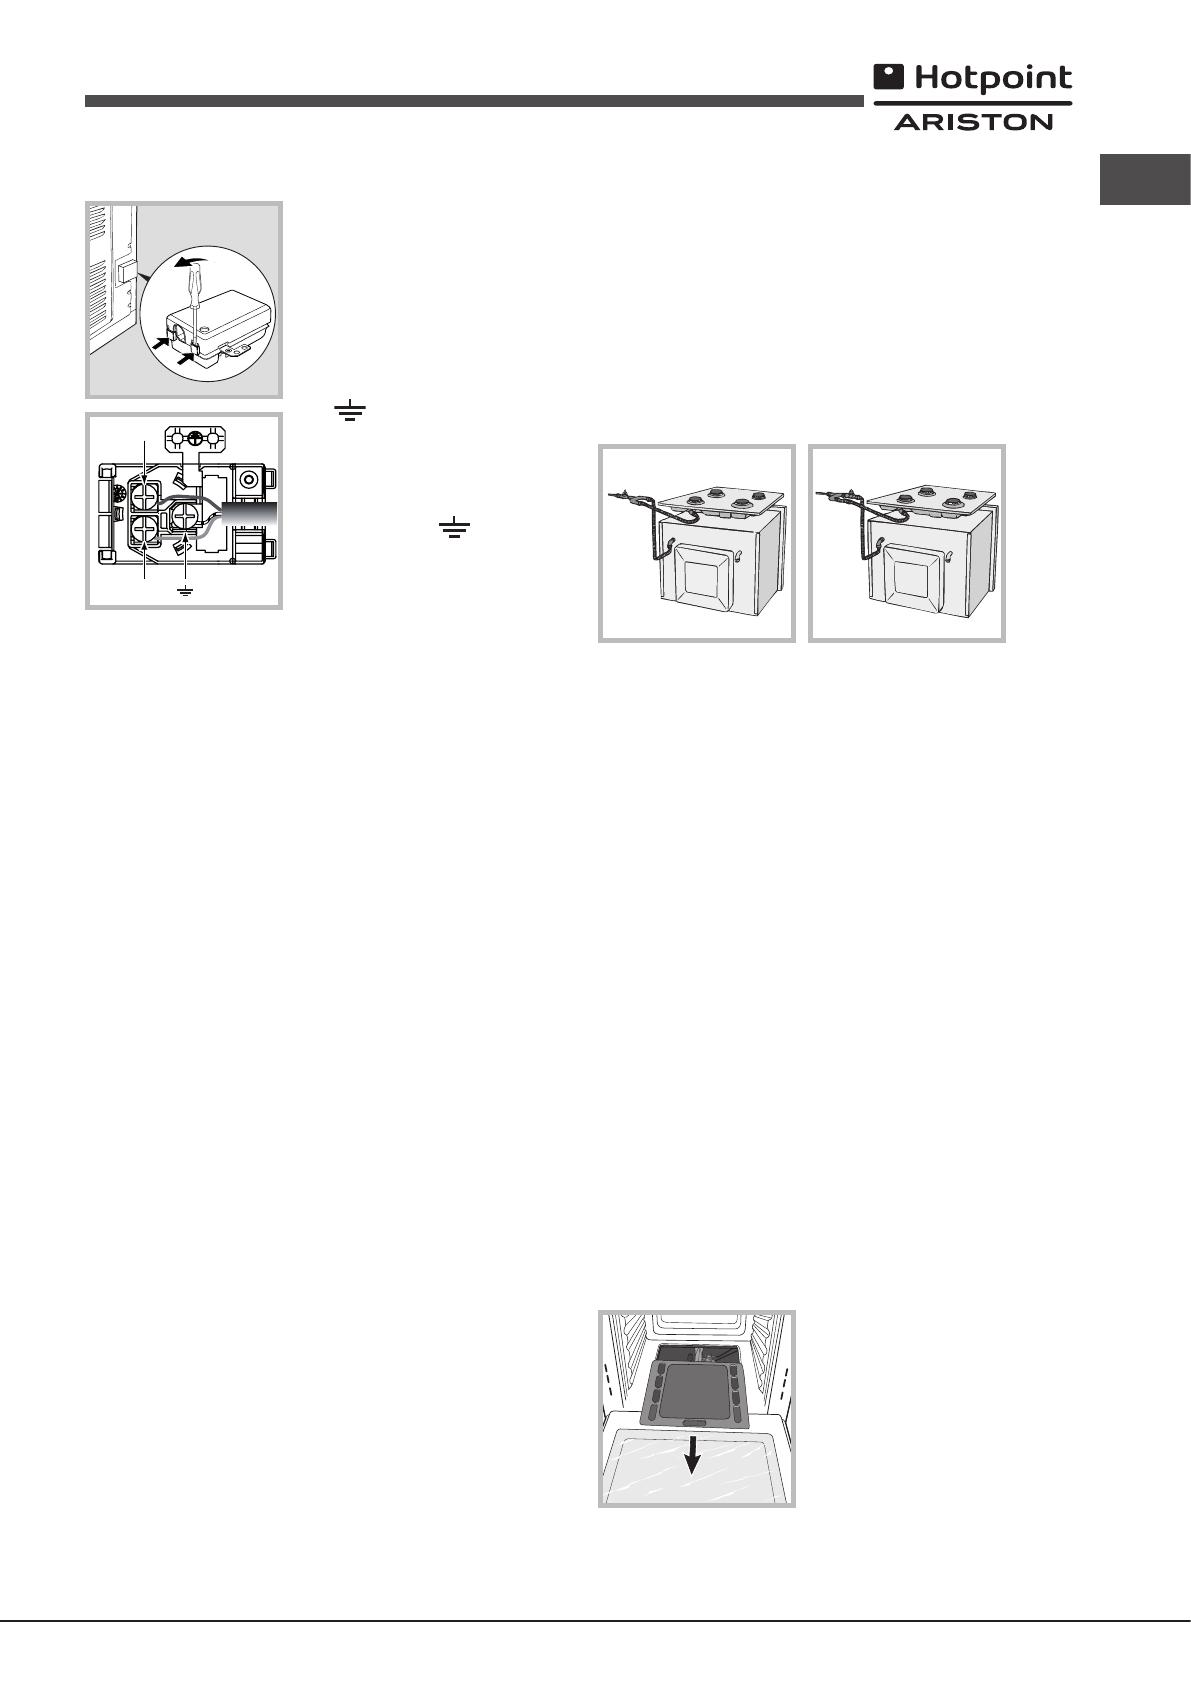
Fitting the power supply cable
1. Open the terminal board by inserting a
screwdriver into the side tabs of the cover.
Use the screwdriver as a lever by pushing
it down to open the cover (see diagram).
2. Install the power supply cable by
loosening the cable clamp screw
and the three wire contact screws
L-N- .
Connect the wires to the corresponding
terminals: the Blue wire to the terminal
marked (N), the Brown wire to the terminal
marked (L) and the Yellow/Green wire to
the terminal marked (see diagram).
3. Secure the cable by fastening the
clamp screw.
4. Close the cover of the terminal board.
Connecting the supply cable to the mains
Install a standardised plug corresponding to the load indicated on the data
plate (see table).
The appliance must be directly connected to the mains using an omnipolar
switch with a minimum contact opening of 3 mm installed between the
appliance and the mains. The switch must be suitable for the charge indicated
and must comply with current electrical regulations (the earthing wire must not
be interrupted by the switch). The supply cable must be positioned so that it
does not come into contact with temperatures higher than 50°C at any point
(the back panel of the oven, for example).
! The installer must ensure that the correct electrical connection has been
performed and that it is fully compliant with safety regulations.
Before connecting the appliance to the power supply, make sure that
• The appliance is earthed and the plug is compliant with the law.
• The socket can withstand the maximum power of the appliance, which is
indicated on the data plate.
• The voltage is in the range between the values indicated on the data plate.
• The socket is compatible with the plug of the appliance. If the socket is
incompatible with the plug, ask an authorised technician to replace it. Do
not use extension cords or multiple sockets.
! Once the appliance has been installed, the power supply cable and the
electrical socket must be easily accessible.
! The cable must not be bent or compressed.
! The cable must be checked regularly and replaced by authorised technicians
only (see Assistance).
! The manufacturer declines any liability should these safety measures
not be observed.
Gas connection
The appliance should be connected to the main gas supply or to a gas
cylinder in compliance with current National regulations. Before carrying
out the connection, make sure the cooker is compatible with the gas supply
you wish to use. If this is not the case, follow the instructions indicated in the
paragraph “Adapting to different types of gas.”
L
N
N
L
When using liquid gas from a cylinder, install a pressure regulator that complies
with current National regulations.
! Check that the pressure of the gas supply is consistent with the values
indicated in Table 1 (“Burner and nozzle specications”) since this will ensure
the safe operation and longevity of your appliance while maintaining efcient
energy consumption.
! Should you need to install a gas hob on top of a built-in gas oven, it is strictly
forbidden to connect the two or to use a single cut-off tap. The two appliances
should be connected separately, and each one should have its own stop tap in
order to make them completely independent from one another (see gures).
NO
OK
Connection with a rigid pipe (copper or steel)
! Connection to the gas system must be carried out in such a way as not to
place any strain of any kind on the appliance.
There is an adjustable L-shaped pipe tting on the appliance supply ramp
and this is tted with a seal in order to prevent leaks. The seal must always be
replaced after rotating the pipe tting (the seal is provided with the appliance).
The gas supply pipe tting is a threaded 1/2 gas cylindrical male attachment.
Connecting a exible jointless stainless steel pipe to a threaded
attachment
The gas supply pipe tting is a threaded 1/2 gas cylindrical male attachment.
These pipes must be installed so that they are never longer than 2000 mm
when fully extended. Once connection has been carried out, make sure that
the exible metal pipe does not touch any moving parts and is not compressed.
! Only use pipes and seals that comply with current National regulations.
Checking the tightness of the connection
! When installation has been completed, check the pipe ttings for leaks using
a soapy solution. Never use a ame.
Adapting to different types of gas
In order to adapt the oven to a type of gas other than the type for which it was
manufactured (indicated on the label), follow these simple steps:
• Replacing the oven burner nozzle
1. Open the oven door fully.
2. Slide out the bottom of the oven.
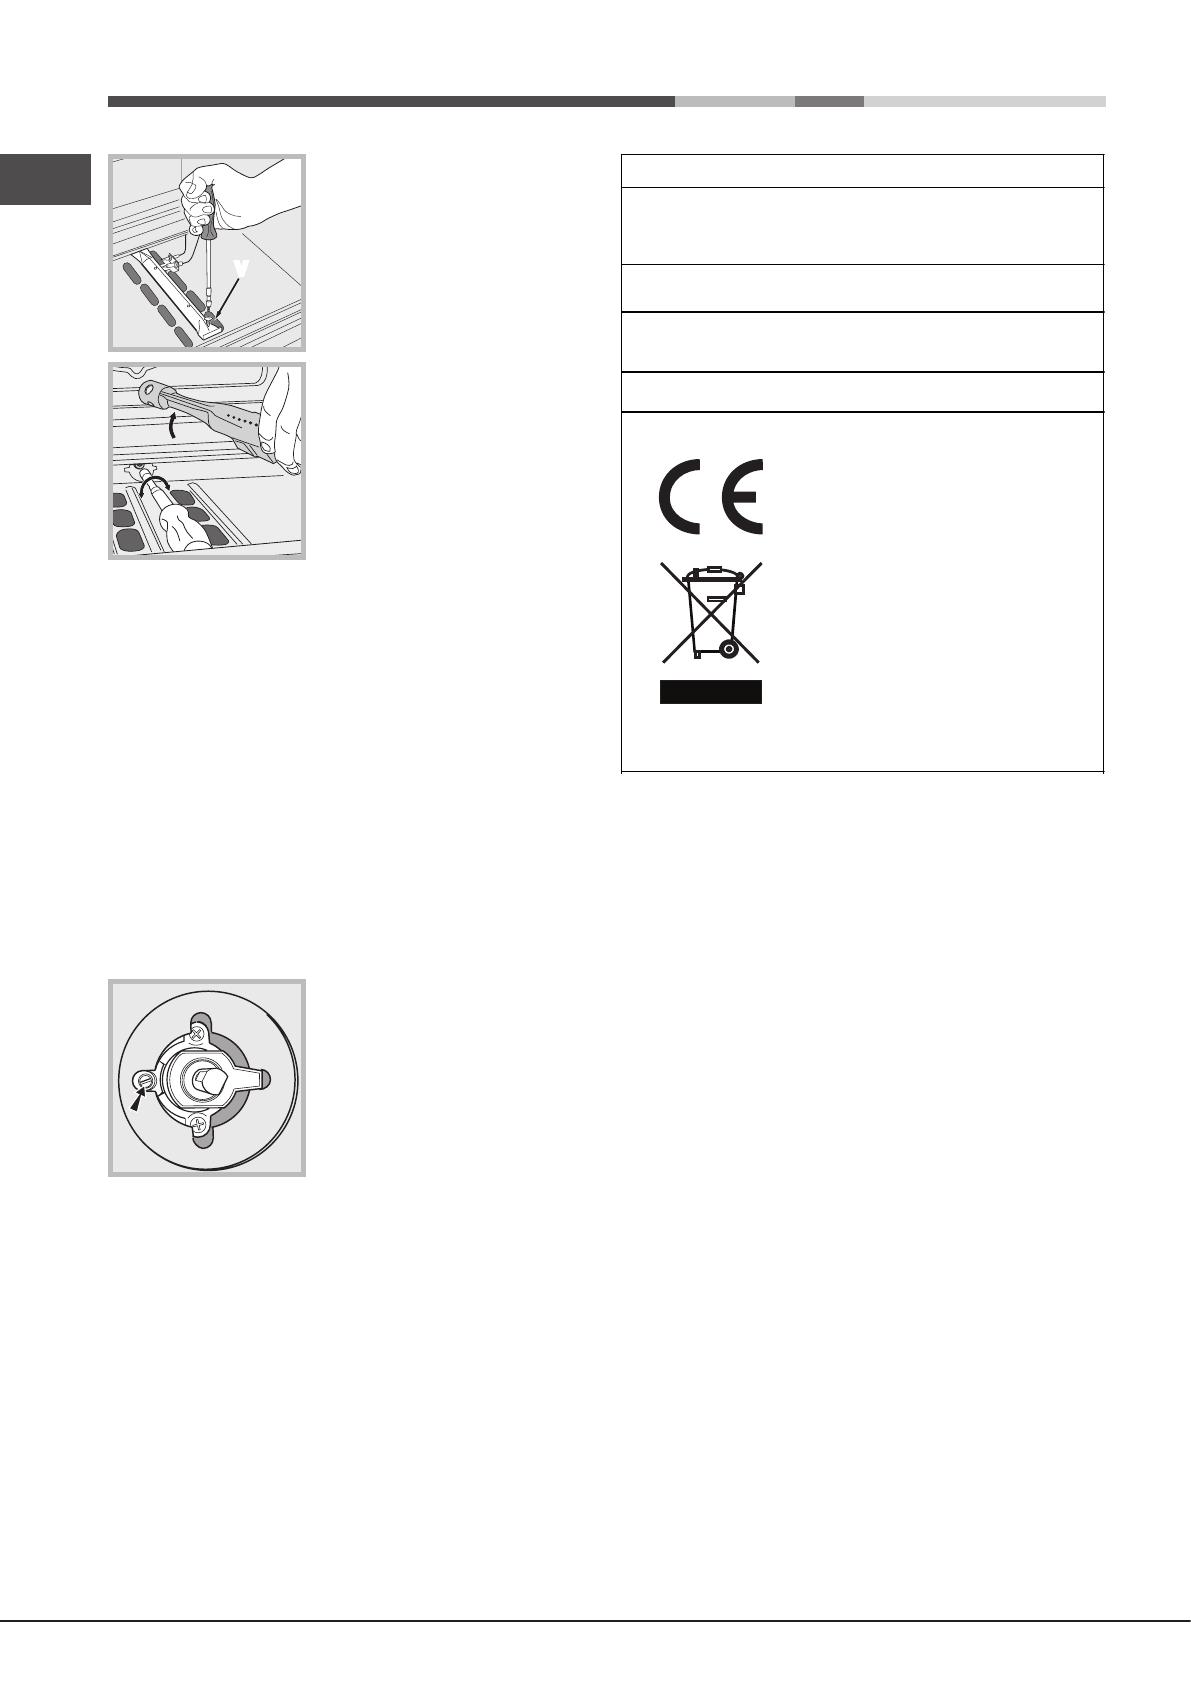
8
GB
V
3. Unscrew the burner fastening screws.
4. Remove screw “V” and then the oven
burner.
5. Unscrew the oven burner nozzle using
the special socket spanner for the nozzles,
or better still a 7 mm socket spanner, and
replace it with a nozzle suited to the new
type of gas (see Table 1).
6. Replace all the parts, following the steps described above in the reverse
order.
! Take particular care when handling the spark plug wires and the
thermocouple pipes.
• Primary air regulation for the oven burner
The burner was designed not to need any adjustments to the primary air.
• Setting the oven burner to minimum
1. Turn the knob rst to the Max setting for about 10 minutes and then to
Min.
2. Remove the knob.
3. Remove the disk fastened to the control panel.
4. Adjust the screw located outside the thermostat cock pin until the ame
is small but steady (the ame can be seen through the slots on the oven
bottom).
5. Make sure the burner does not switch off
when you turn the knob from Max to Min
quickly, or when you open and close the
oven door quickly.
! If the appliance is connected to liquid gas, the regulation screw must be
fastened as tightly as possible.
! Once this procedure is nished, replace the old rating sticker with one
indicating the new type of gas used. This sticker is available from any of our
Service Centres.
! If the gas pressure is different from the recommended pressure, a suitable
pressure regulator must be tted to the inlet pipe in accordance with current
National Regulations.
DATA PLATE
Dimensions
width 43.1 cm
height 31.4 cm
depth 43.7 cm
Volume
59.1 l
Electrical
connections
see data plate
Gas features
see data plate
EU Directive no 65/2014
supplementing Directive 2010/30/EU.
EU Regulation no 66/2014
implementing Directive 2009/125/EC.
Standard EN 15181
This appliance conforms to the
following European Economic
Community directives:
— 2006/95/EC of 12/12/06 (Low
Voltage) and subsequent
amendments;
— 2004/108/EC of 15/12/04
(Electromagnetic Compatibility)
and subsequent amendments;
— 93/68/EEC of 22/07/93 and
subsequent amendments.
— 2009/142/EC of 30/11/09 (Gas)
and subsequent amendments.
— 2012/19/EU and subsequent
amendments.
— 1275/2008 standby/off mode.
ENERGY LABEL
and
ECODESIGN
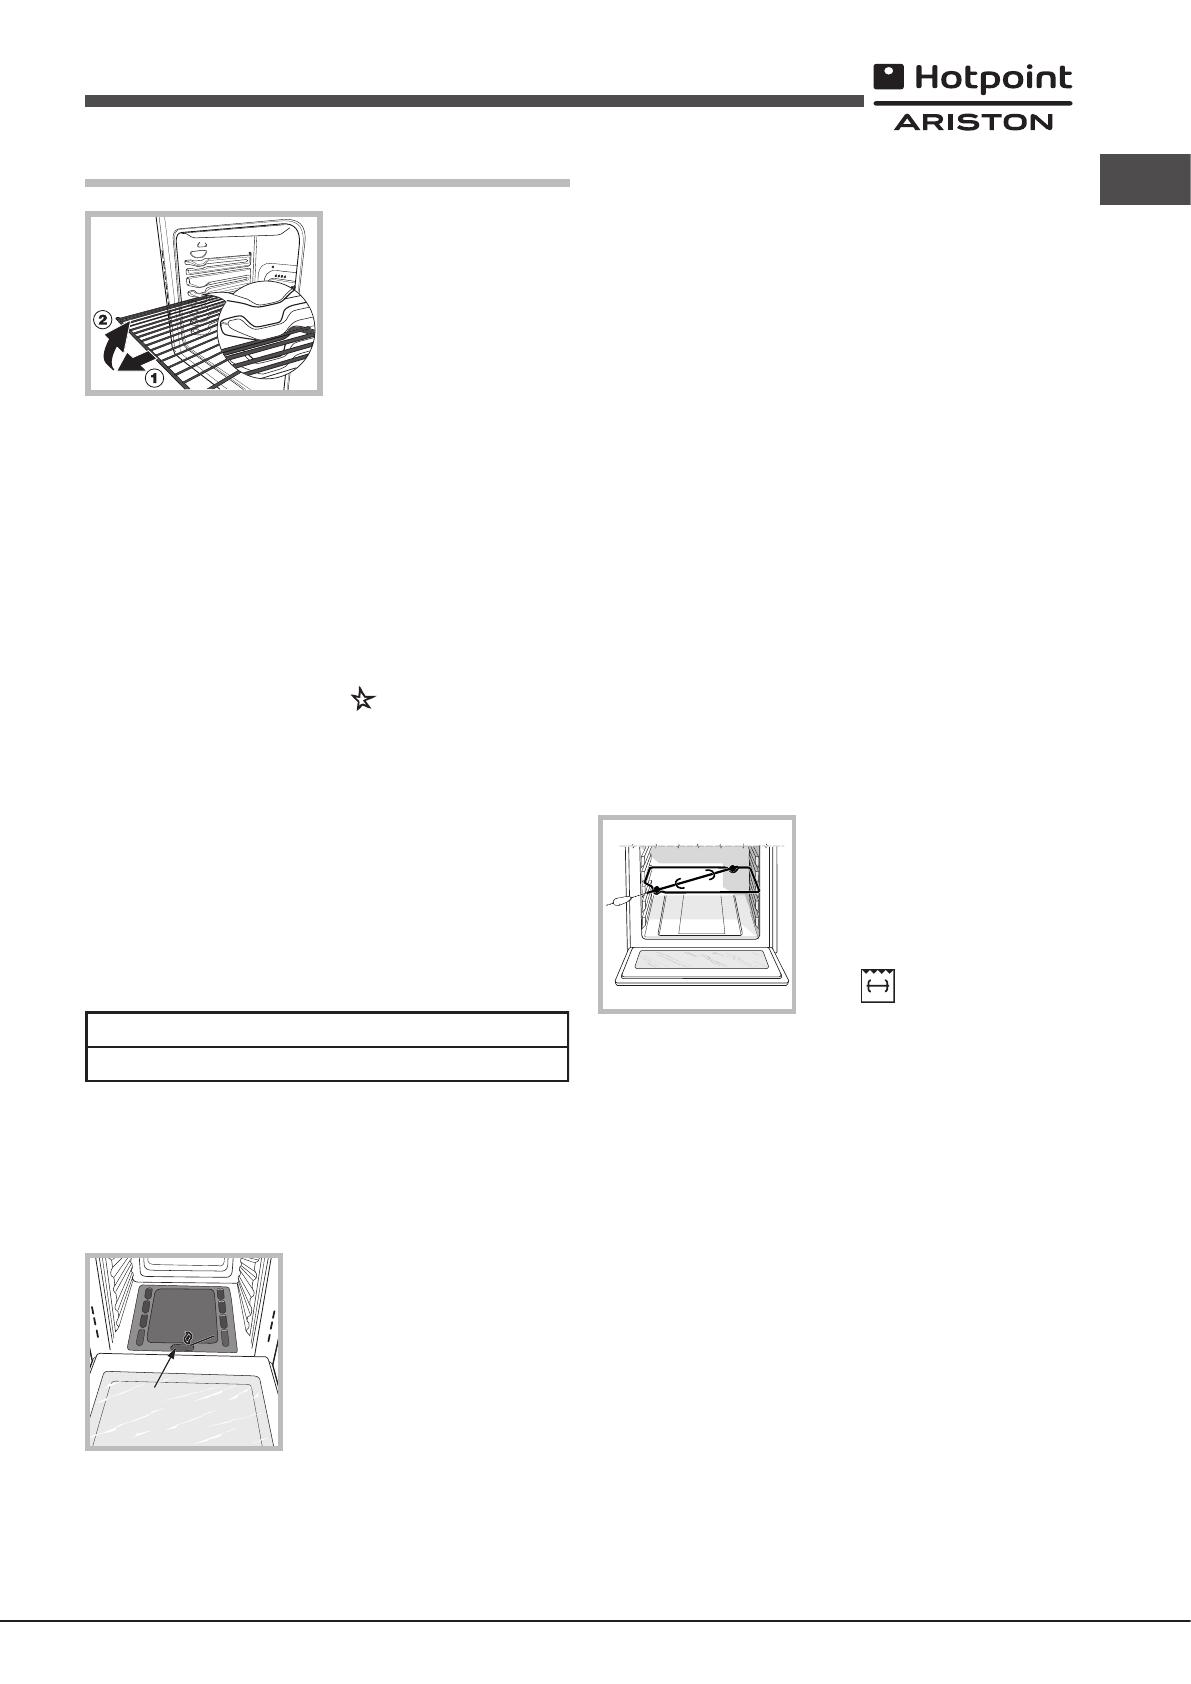
GB
9
Start-up and use
WARNING! The oven is provided
with a stop system to extract the
racks and prevent them from
coming out of the oven (1).
As shown in the drawing, to extract
them completely, simply lift the
racks, holding them on the front
part, and pull (2).
! The rst time you use your appliance, heat the empty oven with its door closed
at its maximum temperature for at least half an hour. Ensure that the room is
well ventilated before switching the oven off and opening the oven door. The
appliance may emit a slightly unpleasant odour caused by protective substances
used during the manufacturing process burning away.
Starting the oven
This knob is used not only to select the different oven modes, but also to
choose the right cooking temperature for various foods from among the
temperatures shown on the knob itself (the range is from 140°C to 240°C
inclusive). The electronic ignition device of the oven is built into the control
knob. To light the oven burner, press the OVEN knob in as far as possible and
turn it anti-clockwise, setting it to position (keeping the oven door shut).
The oven is equipped with a safety device. After lighting the burner allow the
gas to circulate until the safety thermocouple is heated by keeping the OVEN
knob pressed in for about 6 seconds.
! The electronic ignition device of the oven burner must not be activated for
more than 15 seconds. If the burner fails to light after 15 seconds, stop pressing
the OVEN knob, open the oven door and wait for at least one minute before
you try to light the burner again.
The cooking temperature is selected by matching the desired temperature with
the reference mark on the control panel; the complete range of temperatures
is shown below:
Min• 150• 180• 220
ax
140145 160200 230240
The oven will automatically reach the temperature set, and the thermostat,
which is controlled by the knob, will keep the temperature constant.
Switching the oven on manually
In the event of a power failure, the oven burner can be lit manually:
1. Open the oven door.
F
2. Hold a match or lighter near the burner
hole as shown in the gure, press knob F
(see gure) in fully and turn it anticlockwise,
setting it to the Max position.
The oven is equipped with a safety device. After lighting the burner allow the
gas to circulate until the safety thermocouple is heated by keeping the OVEN
knob pressed in for about 6 seconds.
3. Once the burner is lit, shut the oven door.
! If the burner ame is accidentally extinguished, turn the OVEN control knob
to the off position, open the oven door and wait for at least one minute before
trying to light the burner again.
The GRILL knob
Your oven is equipped with an electric grill. The extremely high and direct
temperature of the grill makes it possible to brown the surface of meats
and roasts while locking in the juices to keep them tender. The grill is also
highly recommended for dishes that require a high surface temperature:
beef steaks, veal, rib steak, llets, hamburgers etc…
Some examples of how the grill may be used are included in the “Practical
Cooking Advice” section.
! When using the grill, the oven door must be kept shut.
! Never put objects directly on the bottom of the oven — this could result in
damage to the enamel coating.
! Always place cookware on the rack(s) provided.
Cooling ventilation
In order to cool down the external temperature of the oven, some models
are tted with a cooling fan that blows air out between the control panel and
the oven door.
! Once the cooking has been completed, the cooling fan remains on until the
oven has cooled down sufciently.
Turnspit*
To operate the rotisserie function (see
diagram) proceed as follows:
1. Place the dripping pan in position 1.
2. Place the rotisserie support in position
3 and insert the spit in the hole provided
on the back panel of the oven.
3. Start the rotisserie using the knob to
select ;
Oven light
This is switched on by pressing the LIGHT button.
How to use the timer
1. To set the buzzer, turn the TIMER knob clockwise almost one complete
revolution.
2. Turn the knob anticlockwise to set the desired time: align the minutes shown
on the knob with the indicator on the control panel.
3. The timer operates in minutes: when the selected time has elapsed, a
buzzer will sound.
! The timer does not switch the oven on or off.
* Only available in certain models.
10
GB
Cooking modes
GRILL mode
The top heating element comes on. The extremely high and direct temperature
of the grill makes it possible to brown the surface of meats and roasts while
locking in the juices to keep them tender. The grill is also highly recommended
for dishes that require a high surface temperature: beef steaks, veal, rib steak,
llets, hamburgers etc… Always cook in this mode with the oven door closed.
Practical cooking advice
! In the GRILL cooking mode, place the dripping pan in position 1 to collect
cooking residues (fat and/or grease).
GRILL
• Place the grill in position 3 or 4, making sure that the food is in the centre
of the grill.
• We recommend that you set the maximum power level. The top heating
element is regulated by a thermostat and may not always be on.
PIZZA
• Use a light aluminium pizza pan. Place it on the rack provided.
For a crispy crust, do not use the dripping pan (prevents crust from forming
by extending cooking time).
• If the pizza has a lot of toppings, we recommend adding the mozzarella
cheese to the top of the pizza halfway through the cooking process.
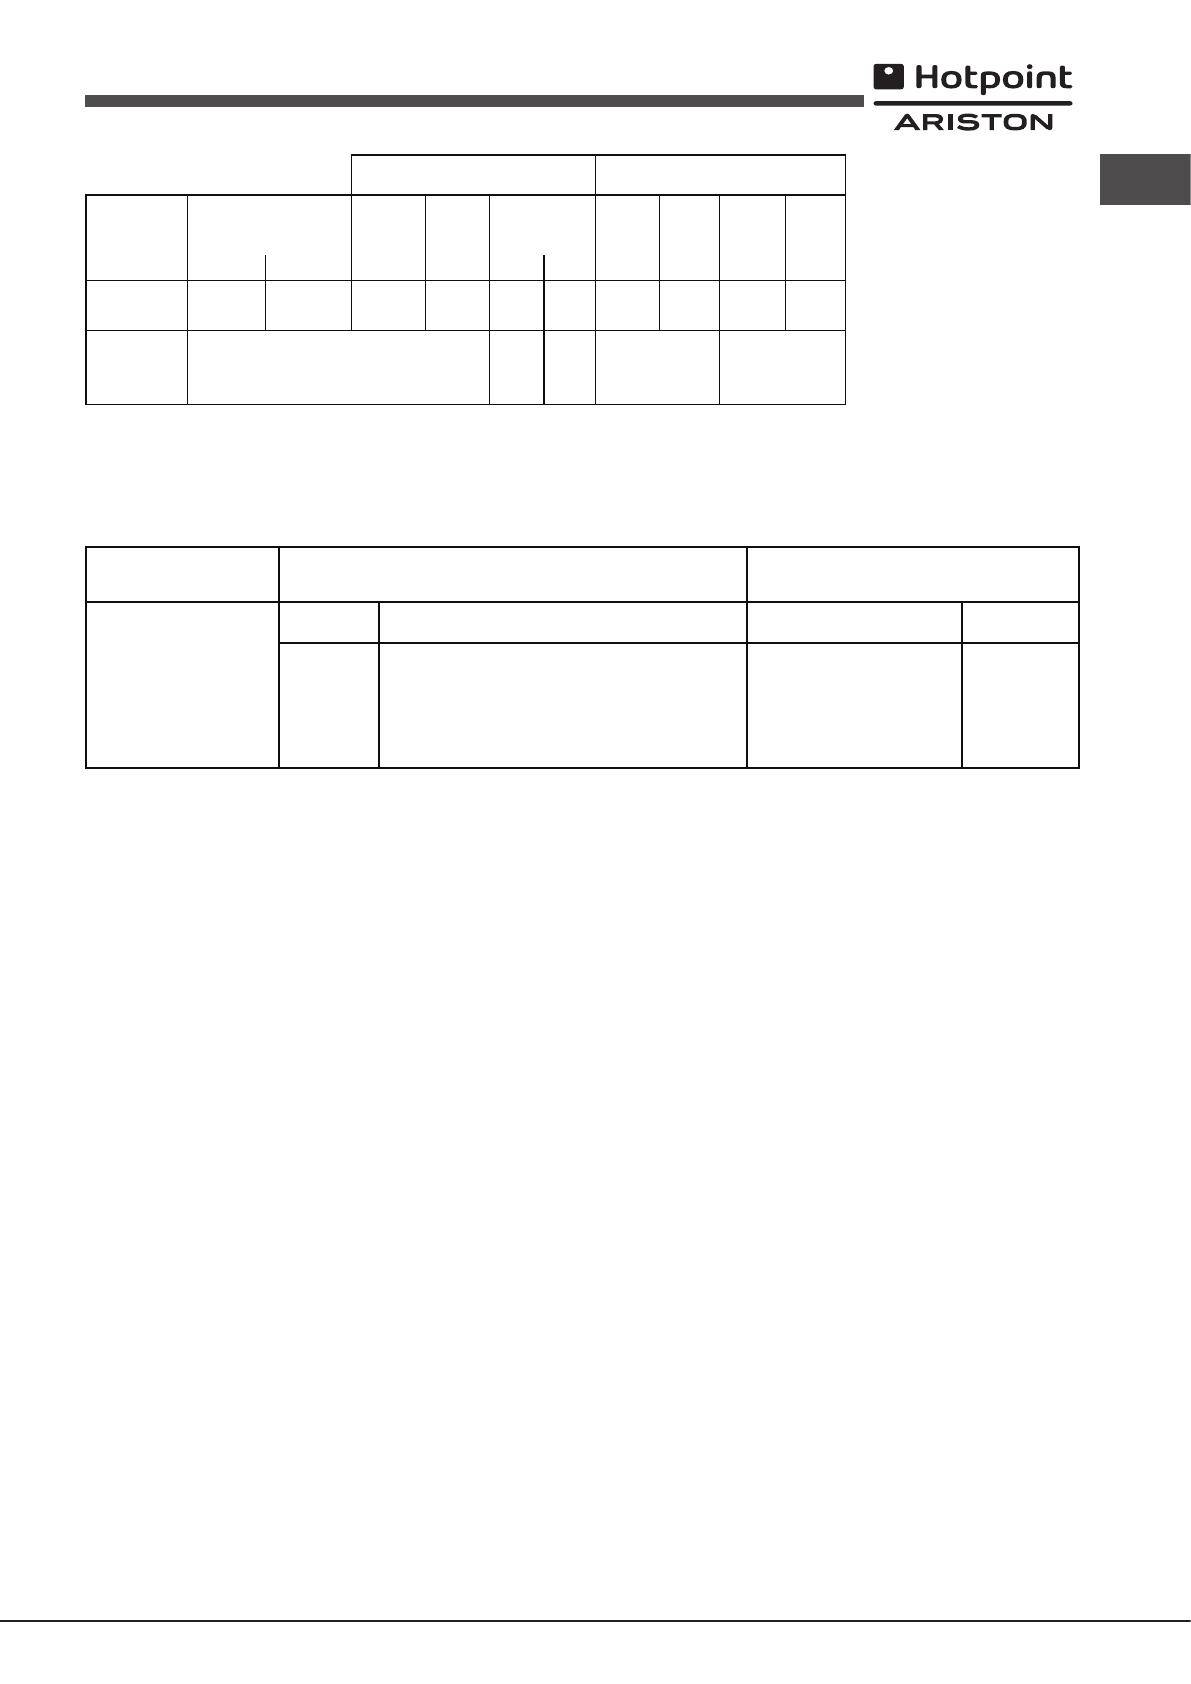
GB
11
(1) The values in g/h refer to the
flow
with liquid gas (Butane, Propane).
Gas Part Electric Part
Category
Nominal Power
kW (1)
Voltage frequency
Power (W)
II2H3+2,60 (189 g/h — G30) (186 g/h — G31) 220-240V
~
50/60Hz2250
7OFH G RU/HA
7OFH G IX RU/HA
7OFHRG RU/HA
GOS 7 A RFH
GOS 7 I RFH
Model
Thermal Power
kW
(p.c.s*)
2.60
Burner
1
Oven
Nominal Reduced
1.00
By/pass
1/100
(mm)
Nozzle
1/100
(mm))
Flow*
g/h
*** **
Nozzle
1/100
(mm)
Flow*
l/h
Nozzle
1/100
(mm)
Flow*
l/h
49 78 189 186 119 248 132 248
Supply
pressures
Nominal (mbar)
Minimum (mbar)
Maximum (mbar)
28-30
20
35
37
25
45
20
17
25
13
6.5
18
Liquid gas Natural gas
At 15°C and 1013,25 mbar — dry gas
Propane P. C.S. = 50.37 MJ/Kg
Butane P. C.S. = 49.47 MJ/Kg
Natural P.C.S. = 37.78 MJ/m³
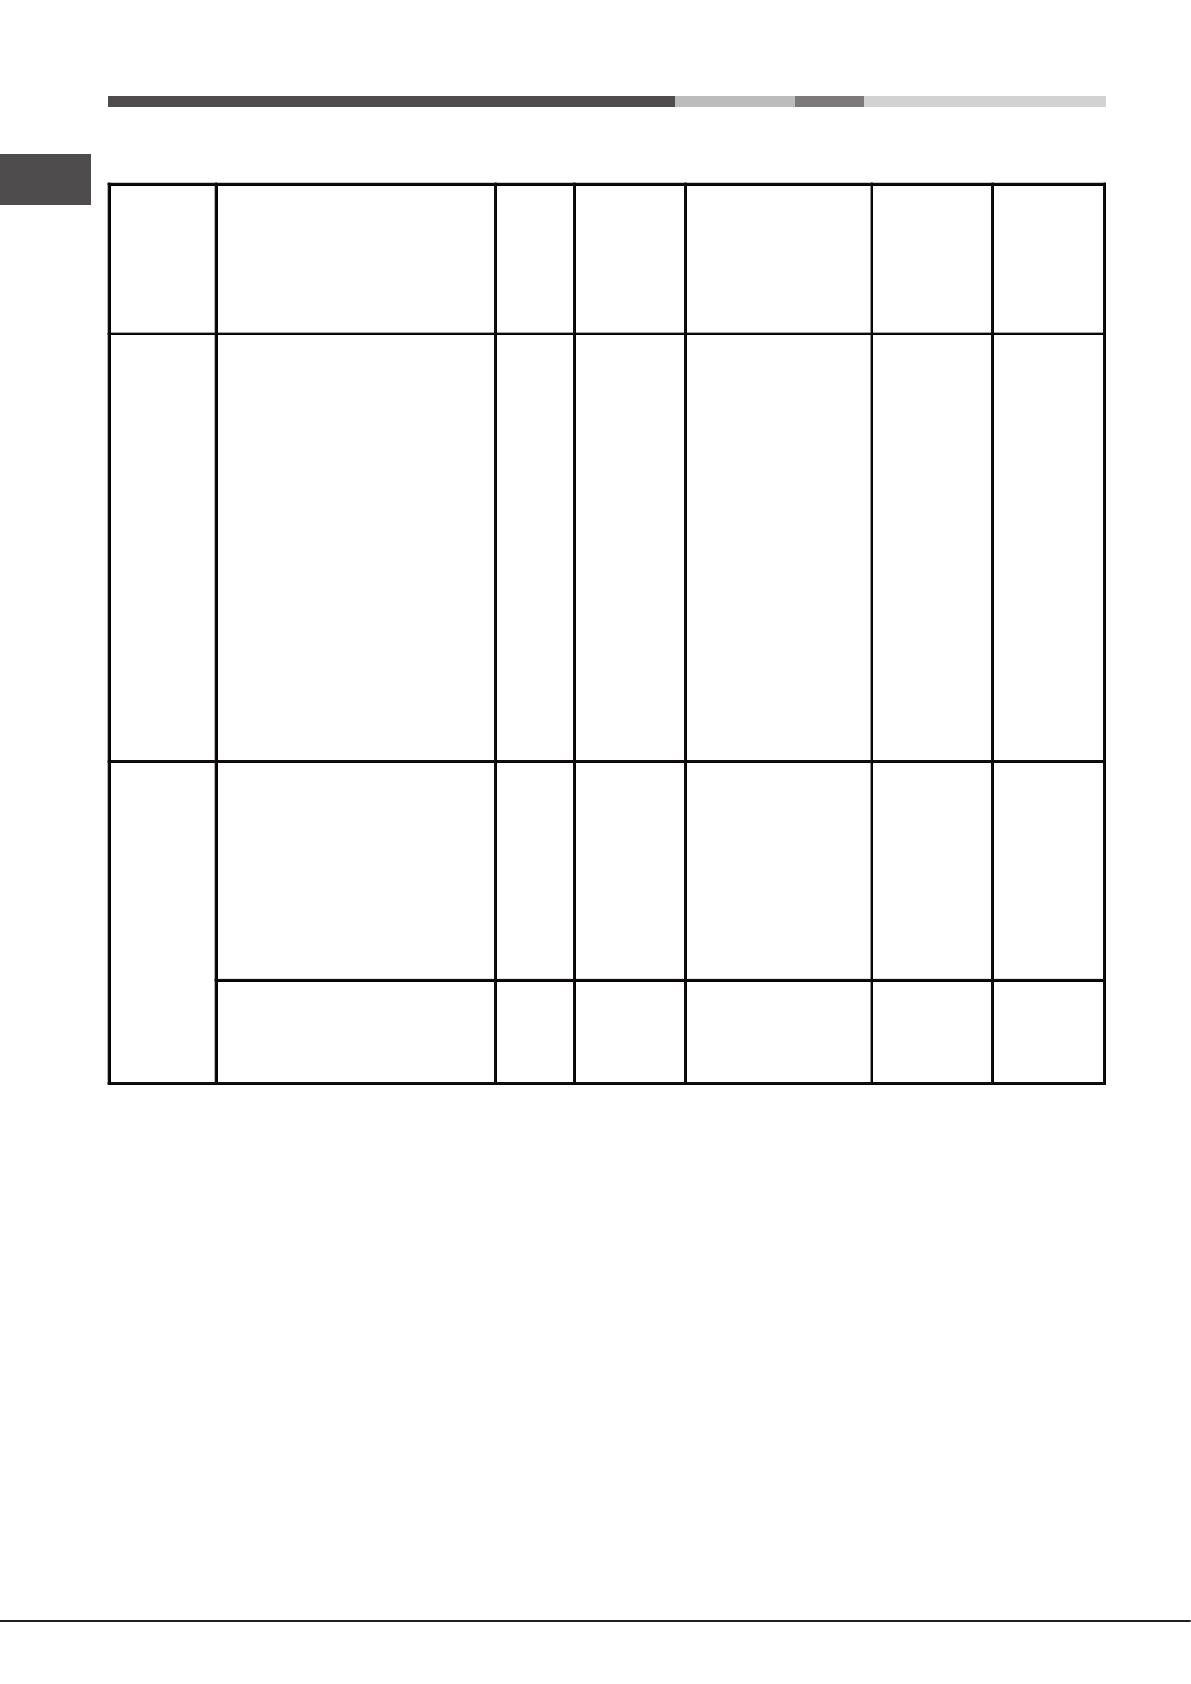
12
GB
Selector
knob
setting
Food to be cooked Weight
(in kg)
Cooking
rack
position
from oven
bottom
Preheating time
(minutes)
Thermostat
knob
setting
Cooking
time
(minutes)
Oven
Lasagne
Cannelloni
Pasta bakes
Veal
Chicken
Tu rkey roll
Duck
Rabbit
Pork loin
Leg of lamb
Mackerels
Dentex
Tr out baked in foil
Neapolitan-style pizza
Dry biscuits
Ta rt
Chocolate cake
Leavened cakes
2,5
2,5
2,2
1,7
1,5
2,5
1,8
2,0
1,5
1,8
1,3
1,5
1,0
0,6
0,5
1,1
1,0
1,0
3
3
3
2
3
3
3
3
3
3
3
3
3
3
4
3
3
4
10
10
10
10
10
10
10
10
10
10
10
10
10
15
15
15
15
15
200
200
200
210
200
200
200
200
200
200
200
180
200
210
180
180
165
165
55-60
40-45
50-55
80-90
70-80
80-90
90-100
80-90
70-80
80-90
30-40
30-40
30-35
15-20
25-30
30-35
50-60
50-60
Grill
Soles and cuttlefish
Squid and prawn kebabs
Cod filet
Grilled vegetables
Veal steak
Chops
Hamburgers
Sausages
To asted sandwiches
1
1
1
1
1
1,5
1
1,7
n.° 4
4
4
4
4
4
4
4
4
4
5
3
3
—
5
5
3
5
3
—
—
—
—
—
—
—
—
—
6
4
10
8-10
20-25
20-25
10-15
20-25
2-3
With rotisserie
(where present)
Veal on the spit
Chicken on the spit
Lamb on the spit
1.0
1.5
1.0
—
—
—
—
—
—
—
—
—
80-90
80-90
80-90
! Cooking times are approximate and may vary according to personal taste. When cooking using the grill, the
dripping pan must always be placed on the 1st oven rack from the bottom.
Cooking advice table

GB
13
Precautions and tips
! This appliance has been designed and manufactured in compliance with
international safety standards. The following warnings are provided for safety
reasons and must be read carefully.
General safety
• This is a class 3 built-in appliance.
• Gas appliances require regular air exchange to maintain efcient
operation. When installing the cooker, follow the instructions
provided in the paragraph on “Positioning” the appliance.
• The appliance was designed for domestic use inside the home and is not
intended for commercial or industrial use.
• The appliance must not be installed outdoors, even in covered areas. It is
extremely dangerous to leave the appliance exposed to rain and storms.
• When moving or positioning the appliance, always use the handles
provided on the sides of the oven.
• Do not touch the appliance while barefoot or with wet or damp hands and
feet.
• The appliance must be used by adults only for the preparation of
food, in accordance with the instructions provided in this booklet.
Any other use of the appliance (e.g. for heating the room) constitutes
improper use and is dangerous. The manufacturer may not be held
responsible for any damage caused as a result of improper, incorrect
and unreasonable use of the appliance.
• Do not touch the heating elements or certain parts of the oven door
when the appliance is in use; these parts become extremely hot.
Keep children well away from the appliance.
• Make sure that the power supply cables of other electrical appliances do
not come into contact with the hot parts of the oven.
• The ventilation and heat dispersal openings must never be obstructed.
• Always grip the oven door handle in the centre: the ends may be hot.
• Always use oven gloves when placing cookware in the oven or when
removing it.
• Do not use aluminium foil to line the bottom of the oven.
• Do not place ammable materials in the oven: if the appliance is switched
on accidentally, the materials could catch re.
• Always make sure the knobs are in the “●”/“○” position when the appliance
is not in use.
• When unplugging the appliance, always pull the plug from the mains
socket; do not pull on the cable.
• Do not perform any cleaning or maintenance work without having
disconnected the appliance from the electricity mains.
• If the event of malfunctions, under no circumstances should you attempt
to perform the repairs yourself. Contact an authorised Service Centre (see
Assistance).
• Do not rest objects on the open oven door.
• Do not let children play with the appliance.
• The appliance should not be operated by people (including children)
with reduced physical, sensory or mental capacities, by inexperienced
individuals or by anyone who is not familiar with the product. These
individuals should, at the very least, be supervised by someone who
assumes responsibility for their safety or receive preliminary instructions
relating to the operation of the appliance.
• The appliance is not intended to be operated by means of an external
timer or separate remote-control system.
Disposal
• When disposing of packaging material: observe local legislation so that
the packaging may be reused.
• The European Directive 2012/19/EU on Waste Electrical and
Electronic Equipment (WEEE), requires that old household electrical
appliances must not be disposed of in the normal unsorted municipal
waste stream. Old appliances must be collected separately in order
to optimise the recovery and recycling of the materials they contain
and reduce the impact on human health and the environment.
The crossed out “wheeled bin” symbol on the product reminds you of your
obligation, that when you dispose of the appliance it must be separately
collected.
Consumers should contact their local authority or retailer for information
concerning the correct disposal of their old appliance.
Respecting and conserving the environment
• Whenever possible, avoid pre-heating the oven and always try to ll it.
Open the oven door as little as possible because heat is lost every time
it is opened. To save a substantial amount of energy, simply switch off
the oven 5 to 10 minutes before the end of your planned cooking time
and use the heat the oven continues to generate.
• Automatic programmes are based on standard food product.
• Keep gaskets clean and tidy to prevent any door energy losses
• If you have a timed tariff electricity contract, the “delay cooking” option
will make it easier to save money by moving operation to cheaper time
periods.
! This product complies with the requirements of the latest European Directive
on the limitation of power consumption of the standby mode.
Maintenance and care
Switching the appliance off
Disconnect your appliance from the electricity supply before carrying out
any work on it.
Cleaning the appliance
• The stainless steel or enamel-coated external parts and the rubber seals
may be cleaned using a sponge that has been soaked in lukewarm water
and neutral soap. Use specialised products for the removal of stubborn
stains. After cleaning, rinse and dry thoroughly. Do not use abrasive
powders or corrosive substances.
• The inside of the oven should ideally be cleaned after each use, while it is
still lukewarm. Use hot water and detergent, then rinse well and dry with
a soft cloth. Do not use abrasive products.
• All accessories — with the exception of the sliding racks — can be washed
like everyday crockery, and are even dishwasher safe.
! Never use steam cleaners or pressure cleaners on the appliance.
Cleaning the oven door
Clean the glass part of the oven door using a sponge and a non-abrasive
cleaning product, then dry thoroughly with a soft cloth. Do not use rough
abrasive material or sharp metal scrapers as these could scratch the surface
and cause the glass to crack.
To clean the oven more thoroughly, you can remove its door:
1. Open the oven door fully (see diagram);
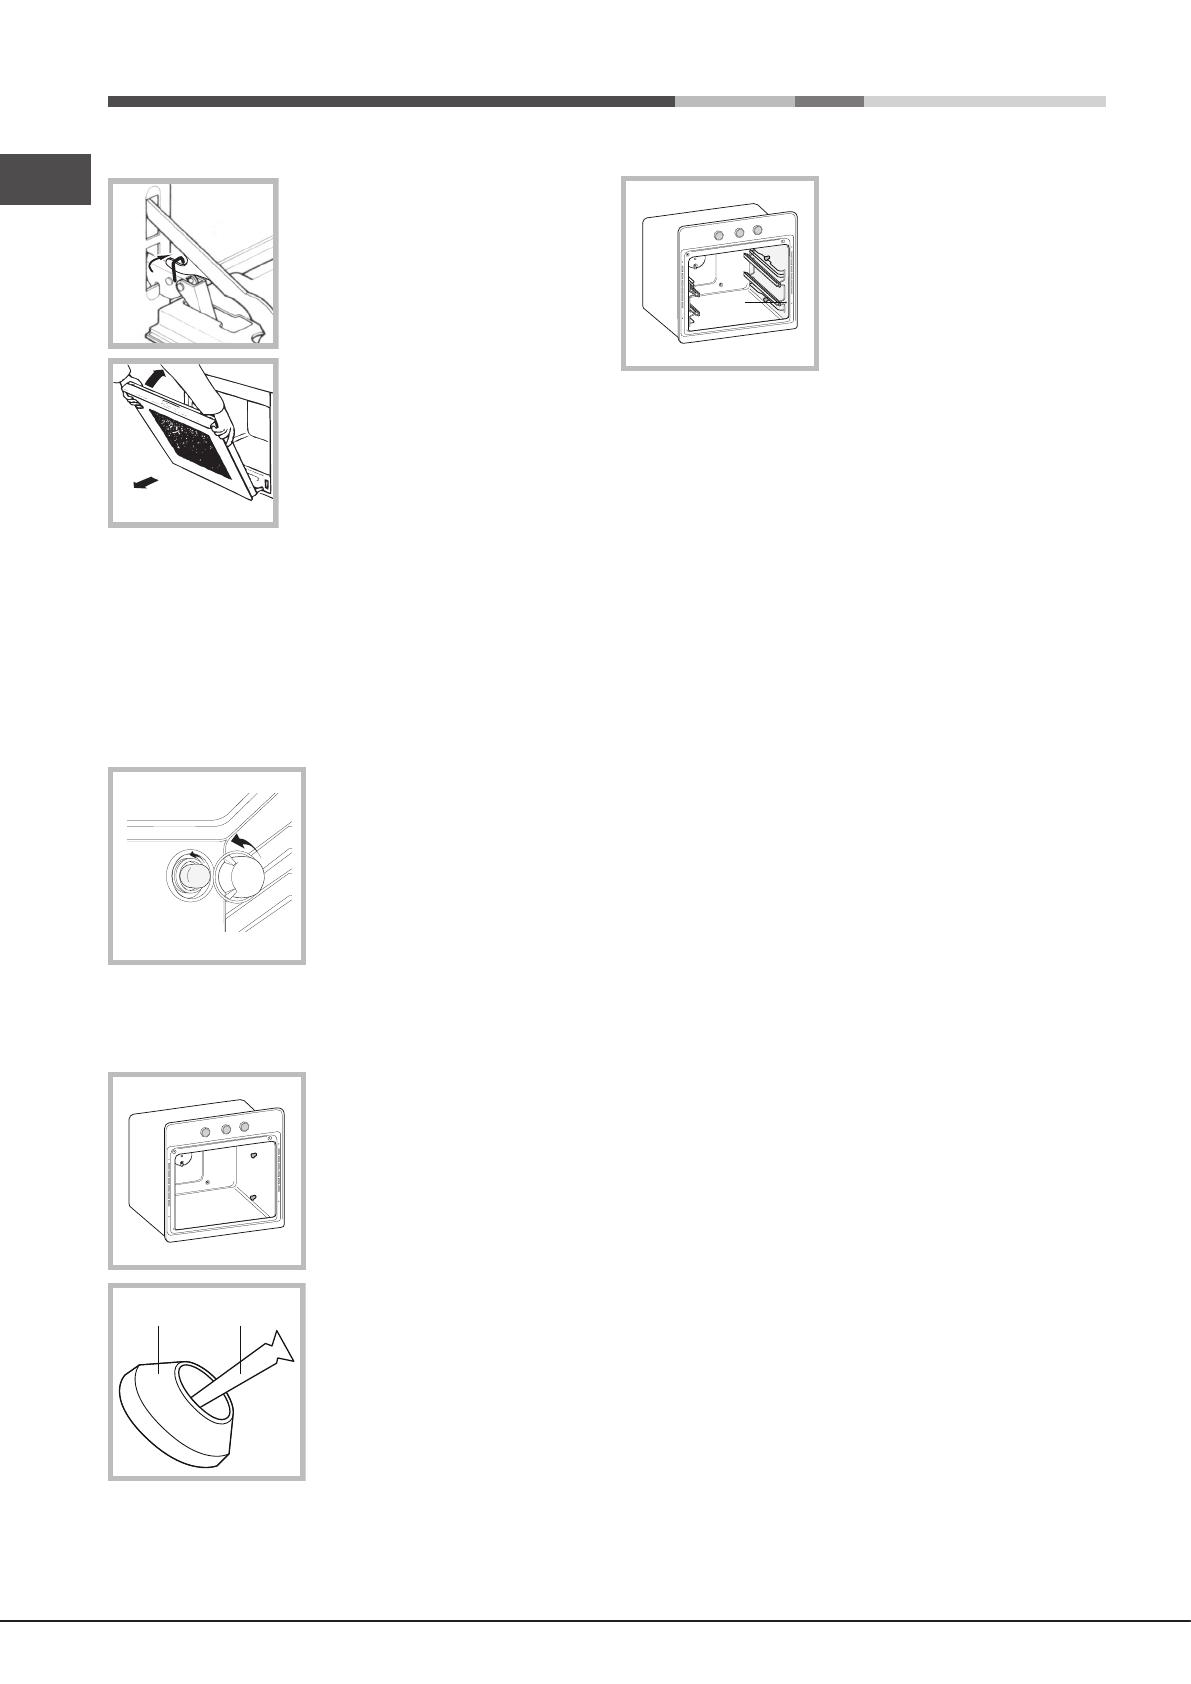
14
GB
2. Lift up and turn the small levers located on
the two hinges (see diagram);
3. Grip the door on the two external sides
and close it approximately half way. Pull the
door towards you, lifting it out of its slot (see
diagram).
To replace the door, reverse this sequence.
Inspecting the seals
Check the door seals around the oven regularly. If the seals are damaged,
please contact your nearest Service Centre (see Assistance). We recommend
that the oven is not used until the seals have been replaced.
Replacing the light bulb
To replace the oven light bulb:
1. Remove the glass cover of the lamp-
holder.
2. Remove the light bulb and replace it with
a similar one: Wattage 25 W, cap E 14.
3. Replace the glass cover (see diagram).
! Do not use the oven lamp as/for ambient lighting.
Sliding Rack Kit assembly*
To assemble the sliding racks:
1. Loosen the two screws A (see
diagram). If the oven is tted with self-
cleaning panels, these will have to be
temporarily disassembled.
2. Replace the screws A with the screws
and spacers (B + C) supplied with the kit.
3.Tighten the new screws B and the
corresponding spacers C, tting the self-
cleaning panels on again.
4. Secure the two joints D of the guide rail
in the holes provided on the oven walls
(see diagram). The holes for the left guide
rail are situated at the top, while the holes
for the right one are at the bottom.
5. Finally, t the guide rail on the spacer C.
! Do not place the sliding racks in position 5.
* Only available in certain models.
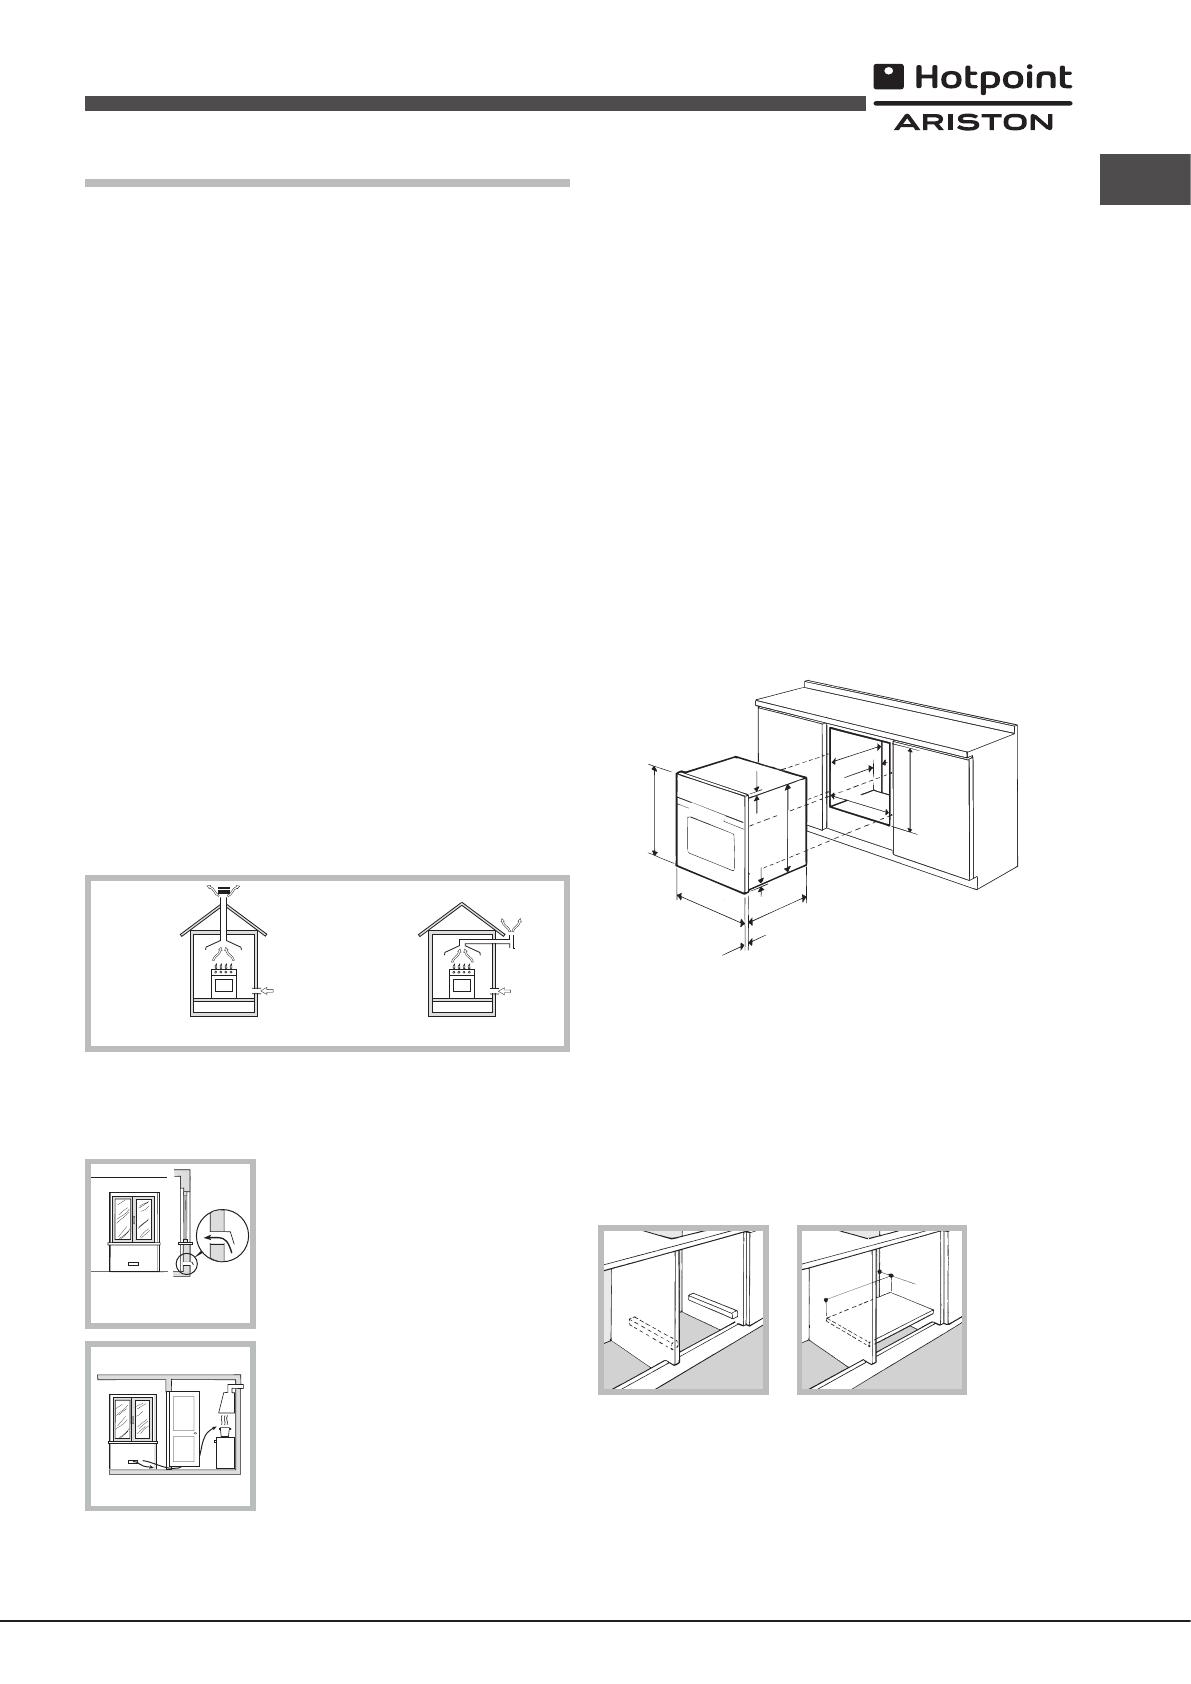
15
RU
Установка
! Важно сохранить данное руководство для его последующих
консультации. В случае продажи, передачи изделия или при переезде
на новое место жительства необходимо проверить, чтобы руководство
оставалось вместе с изделием, для того чтобы его новыи владелец
мог ознакомиться с правилами эксплуатации и с соответствующими
предупреждениями.
! Внимательно прочитаите инструкции: в них содержатся важные
сведения об установке, эксплуатации и безопасности изделия.
Расположение
! Не разрешаите детям играть с упаковочными материалами.
Упаковочные материалы должны быть уничтожены в соответствии
с правилами раздельного сбора мусора (см. Предосторожности и
рекомендации).
! Монтаж изделия производится в соответствии с данными инструкциями
квалифицированными специалистами. Неправильныи монтаж изделия
может стать причинои повреждения имущества и причинить ущерб
людям и домашним животным.
! Данное изделие может быть установлено и использоваться только в
помещениях с постояннои вентиляциеи в соответствии с положениями
деиствующих Нормативов. Необходимо соблюдать следующие
требования:
• В помещении должна быть предусмотрена система дымоудаления
в атмосферу, выполненная в виде вытяжного зонта или
электровентилятора, автоматически включающихся каждыи раз,
когда включается изделие.
B камин или в дымоход с медным покрытием
(для кухонных устpойств для приготовления пищи)
Нeпосредствeннo
в aтмосфepy
• В помещении должна быть предусмотрена система, обеспечивающая
достаточныи приток воздуха для надлежащего горения. Расход
воздуха, необходимого для горения, должен быть не менее 2 м
3
/час
на кВт установленнои мощности.
Приток воздуха может обеспечиваться
непосредственно снаружи здания через
воздуховод полезным сечением не менее
100 см
2
и диаметром, исключающим
возможность случаиного засорения.
Или же воздухозабор может
осуществляться из смежных помещении,
оснащенных вентиляционным отверстием,
сообщающимся с улицеи, как описано
выше, при условии, что это не общие зоны
здания, пожароопасные помещения и не
спальни.
A
Пpимepы вeнтиляциoнных
отвepстий для притокa
вoздyхa для гоpeния
Cмeжное
помещение
Вентилируемое
помещение
Увеличение зазора
между дверъю и полом
• Сжиженныи газ пропан-бутан тяжелее воздуха и следовательно
застаивается внизу. По этои причине помещения, в которых
установлены баллоны с СНГ (сжиженным натуральным газом)
должны иметь вентиляционные отверстия внизу, сообщающиеся с
улицеи, для удаления возможных утечек газа. Поэтому баллоны с СПГ
должны быть опорожнены или оставаться частично заполненными;
они не должны размещаться или храниться в подземных помещениях
и хранилищах (подвалах, и т.д.). Следует держать в помещении
только один рабочии баллон, расположенныи таким образом, чтобы
он не подвергался прямому воздеиствию источников тепла (печеи,
каминов и т.д.), которые могут привести к нагреву баллона свыше
50°C.
Встроенный монтаж
Для обеспечения исправного функционирования встраиваемого изделия
кухонный элемент должен иметь соответствующие характеристики:
• Панели кухонных элементов, прилегающих к духовому шкафу, должны
быть выполнены из термостойкого материала;
• Клей кухонных элементов элементов, шпонированных деревом,
должен быть устойчивым к температуре 100°C.
• Для встраивания духового шкафа под кухонным топом (см. схему)
или в пенал ниша кухонного элемента должна иметь следующие
размеры:
595 mm.
595 mm.
25 mm.
545 mm.
5 mm.
567 mm.
23 mm.
575-585 mm.
45 mm.
560 mm.
547 mm. min.
! После встраивания изделия в кухонный элемент должна быть
исключена возможность касания к электрическими частями.
Расход электроэнергии, указанный на паспортной табличке изделия,
был замерян для данного типа монтажа.
Вентиляция
Для обеспечения надлежащеи вентиляции необходимо снять заднюю
панель ниши кухонного элемента. Рекомендуется установить духовои
шкаф на два деревянных бруска или на сплошное основание с
отверстием диаметром не менее 45 х 560 мм (см чертежи).
560 mm.
45 mm.
Центровка и крепление
Для крепления изделия к кухонному элементу: откройте дверцу духового
шкафа и завинтите 4 шурупа для деревянных панелей в 4 отверстия в
периметральной раме.
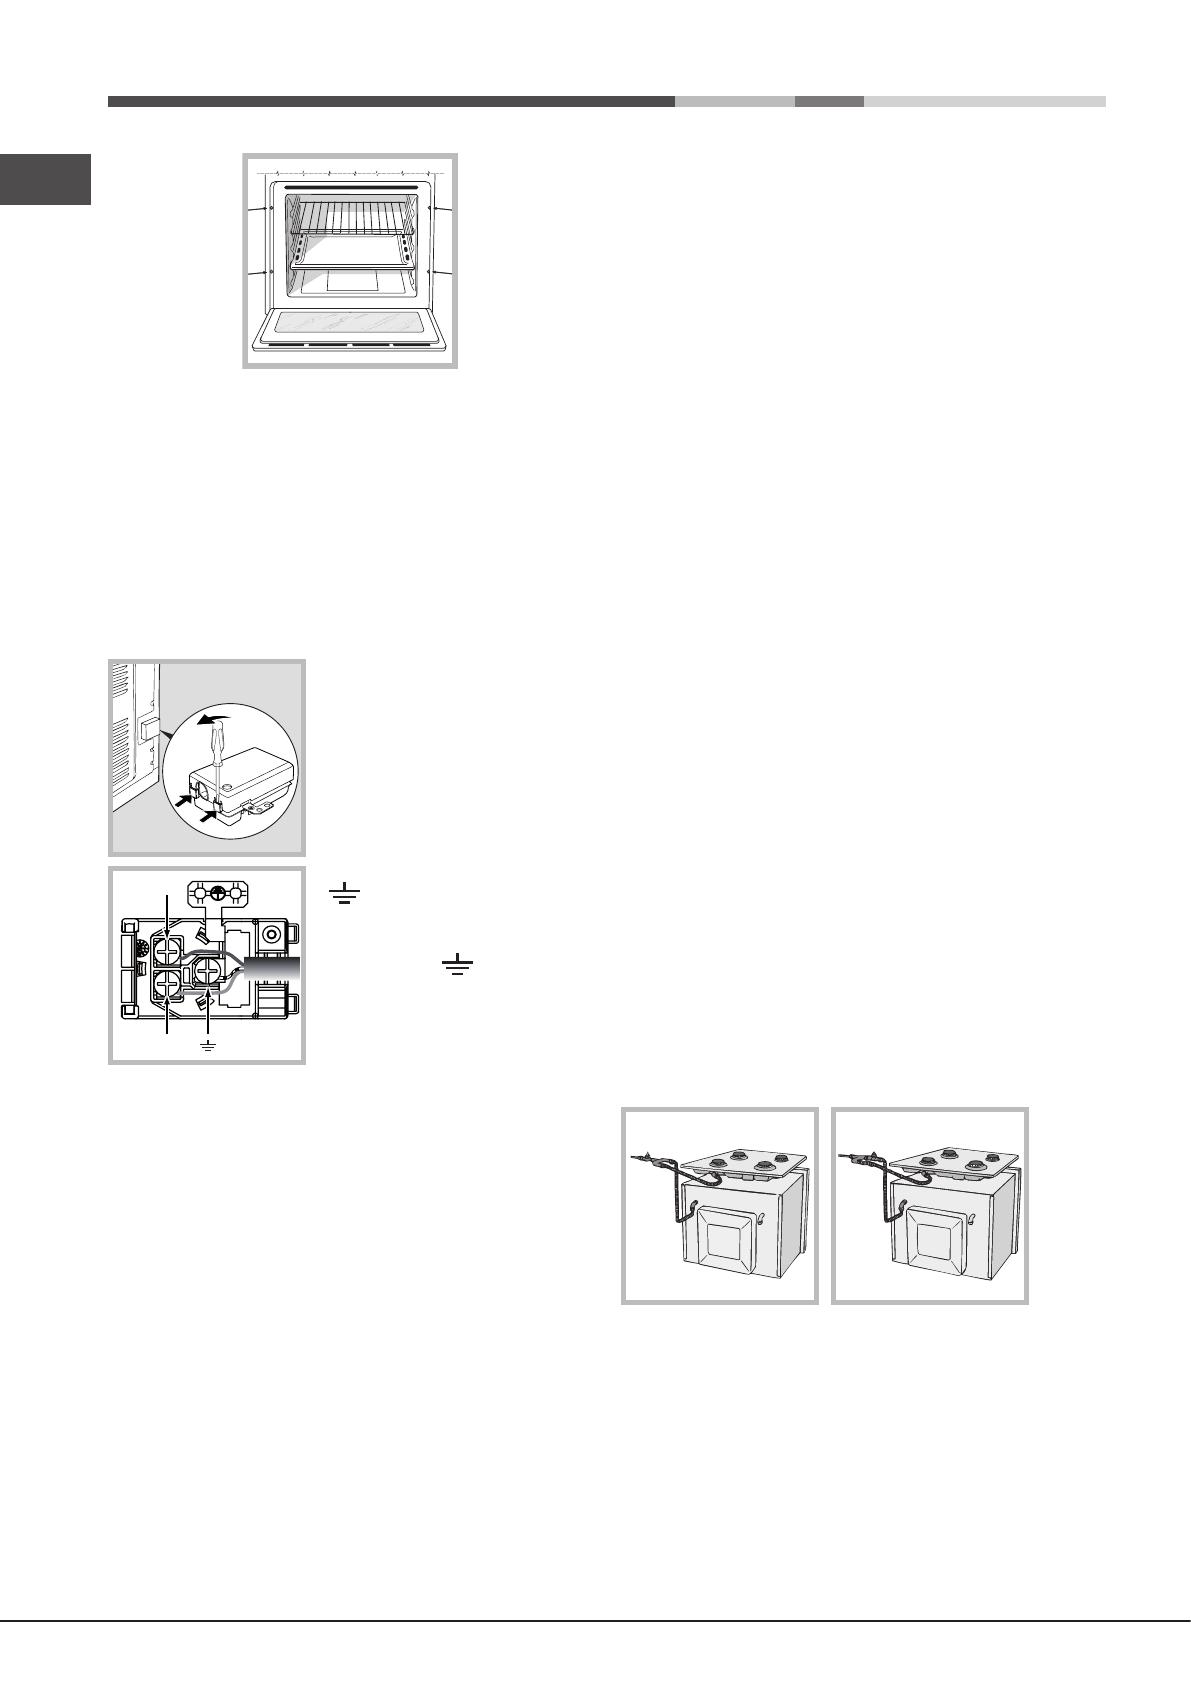
16
RU
! Все защитные элементы должны быть закреплены таким образом,
чтобы их можно было снять только при помощи специального
инструмента.
Электрическое подключение
Духовые шкафы, укомплектованные трехполюсным сетевым кабелем,
расчитаны на функционирование с переменным током с напряжением
и частотой электропитания, указанными на паспортной табличке с
данными (см. ниже).
Подсоединение сетевого кабеля
1. Откройте зажимную коробку, нажав
при помощи отвертки на выступы с
боков крышки: потяните и откройте
крышку (см. схему).
2. Порядок подсоединения сетевого
кабеля: отвинтите винт кабельного
сальника и три винта контактов L-N-
и затем прикрепите провода под
головками винтов, соблюдая цветовую
маркировку Синий (N) Коричневый (L)
Желто-зеленый (см. схему).
3. Закрепите сетевой кабель в
специальном кабельном сальнике.
4. Закройте крышку зажимной коробки.
Подсоединение сетевого шнура изделия к сети электропитания
Установите на сетевой кабель нормализованную штепсельную вилку,
расчитанную на нагрузку, указанную на паспортной табличке (см. сбоку).
В случае прямого подключения к сети электропитания между изделием
и сетью необходимо установить многополюсный выключатель с
минимальным расстоянием между контактами 3 мм, расчитанный
на данную нагрузку и соответствующий действующим нормативам
(выключатель не должен размыкать провод заземления). Сетевой кабель
должен быть расположен таким образом, чтобы ни в одной точке его
температура не превышала температуру помещения более чем на 50°C
(например, задняя панель духового шкафа).
! Электромонтер несет ответственность за правильное подключение
изделия к электрическои сети и за соблюдение правил безопасности.
Перед подключением изделия к сети электропитания проверьте
следующее:
• розетка должна быть соединена с заземлением и соответствовать
нормативам;
• сетевая розетка должна быть рассчитана на максимальную
потребляемую мощность изделия, указанную в таблице технических
характеристик;
L
N
N
L
• напряжение и частота тока сети должны соответствовать
электрическим данным изделия;
• сетевая розетка должна быть совместима со штепсельнои вилкои
изделия. В противном случае замените розетку или вилку; не
используите удлинители или троиники.
! Изделие должно быть установлено таким образом, чтобы кабель
электропитания и сетевая розетка были легко доступны.
! Кабель электропитания изделия не должен быть согнут или сжат.
! Регулярно проверяйте состояние кабеля электропитания и в случае
необходимости поручите его замену только уполномоченным техникам
(см. Техническое обслуживание).
! Фирма снимает с себя всякую ответственность в случае
несоблюдения вышеописанных правил.
Подсоединение к газопроводу
Подсоединение изделия к газопроводу или к газовому баллону должно
осуществляться в соответствии с действующими национальныи
нормативами и с их последующими поправками и только после проверки
соответствия изделия типу газа, к которому он подсоединяется. В
случае несоответствия выполнить операции, описанные в параграфе
“Настройка на различные типы газа”.
В случае использования сжиженного газа из баллона использовать
регуляторы давления, соответствующие действующимнациональным
нормативам и их последующим поправкам.
! Для надежного функционирования, рационального использования
энергии и более длительного срока службы электрического изделия
проверьте, чтобы давление подачи газа соответствовало значениям,
указанным в таблице 1 “Характеристики газовых горелок и форсунок”.
! В случае установки газовой плиты вместе с газовой встроенной
духовкой категорически запрещается соединять эти два устройства или
использовать единый газовый отсечной кран. Эти устройства должны
быть независимыми друг от друга, подсоединяться по отдельности, и
каждое из них должно иметь отдельный отсечной газовый кран (см.
схемы).
NO
OK
Подсоединение при помощи жесткой трубы (медной или стальной)
! Подсоединение к газопроводу не должно оказывать каких-либо нагрузок
на изделие.
На патрубке подачи газа в изделия имеется вращающееся колено L
с уплотнительной прокладкой. При необходимости повернуть колено
обязательно замените уплотнительную прокладку (прилагающется
к изделию). Патрубок подачи газа в изделие имеет цилиндрическую
наружную резьбу 1/2 газ.
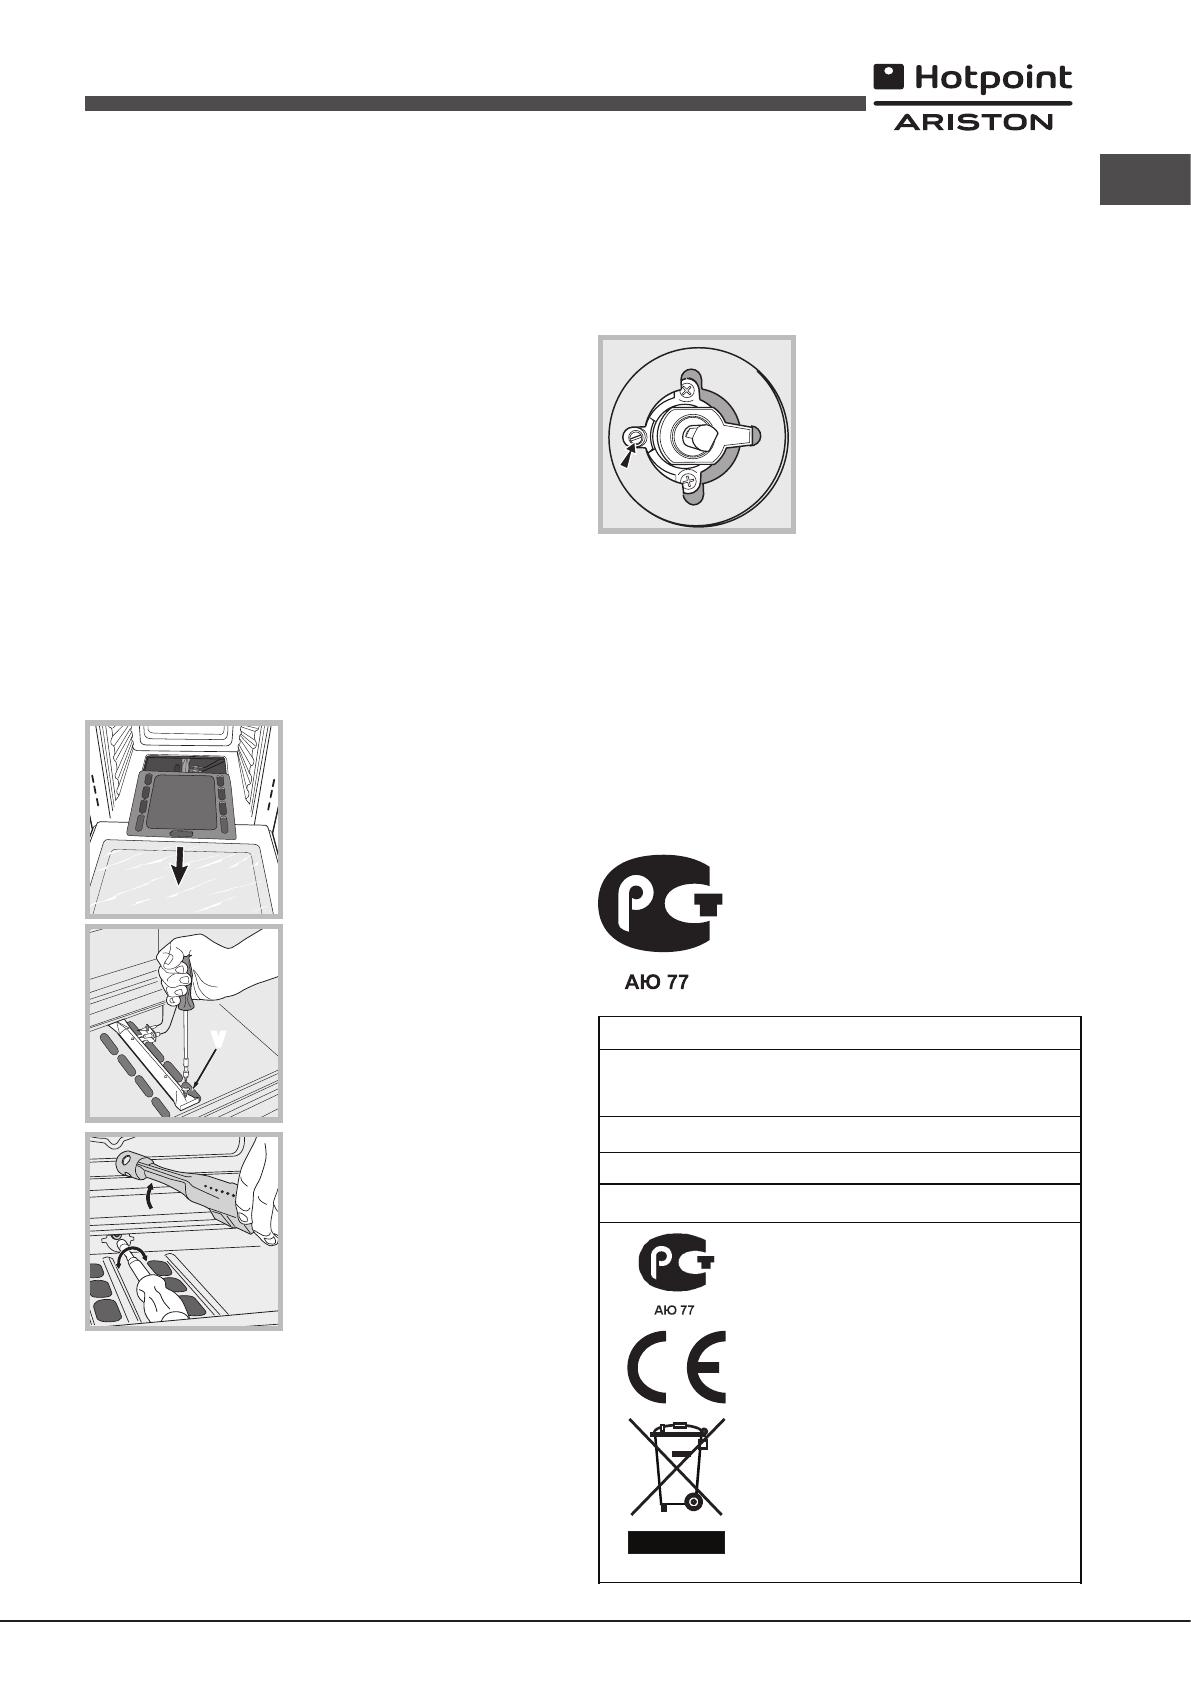
17
RU
Подсоединение при помощи гибкого шланга из нержавеющей стали
со сплошными стенками с резьбовыми соединениями.
Патрубок подачи газа в изделие имеет цилиндрическую наружную
резьбу 1/2 газ.
Подсоединение таких шлангов должно производиться таким образом,
чтобы их длина при максимальном растяжении не превышала 2000 мм.
По завершении подсоединения проверьте, чтобы металлический гибкий
шланг не касался подвижных частей или не был сжат.
! Используйте только шланги и металлические алюминиевые или
резиновые уплотнительные прокладки, соответствующие действующим
национальным нормативам.
Проверка уплотнения
! По завершении подсоединения проверьте прочность уплотнения всех
патрубков при помощи мыльного раствора, но никогда не пламенем.
Настройка на различные типы газа
Для настройки духового шкафа на тип газа, отличающийся от газа, на
который она расчитана (указан на этикетке), необходимо выполнить
следующие операции:
• Порядок замены форсунки газовой горелки духового шкафа:
1. Полностью откройте дверцу духовки.
2. Выньте съемное днище духовки.
V
3. Oтвинтите крепежные винты горелки
4. Выньте горелку из духовки, сняв “V”-
образный винт.
5. Oтвинтите форсунку горелки духовки
при помощи специального полого ключа
для форсунок, или, что предпочтительнее,
полым ключом 7 мм и замените ее на
форсунку, пригодную для нового типа газа
(смотрете таблицу 1).
6. Восстановите на место все комплектующие, выполняя описанные
выше операции в обратном порядке.
! Необходимо обращать особое внимание на провода свечей и на
трубки термопар.
• Регуляция первичного воздуха горелки духовки
Горелка сконструирована таким образом, что не нуждается в какой-либо
регуляции первичного воздуха.
• Регуляция минимального пламени горелки духовки
1. Поверните регулятор в положение Min, после того как он находился в
положении Max примерно в течении 10 минут
2. Cнимите рукоятку
3. Cнимите диск, прикрепленный к передней панели
4. Поверните винт регуляции, расположенный снаружи стержня термостата,
вплоть до получения стабильного малого пламени (пламя видно через
отверстия в днище духовки);
5. Затем проверить, чтобы горелка не
гасла при резком вращении рукоятки-
регулятора из положения Max в
положение Min или при резком
открывании или закрывании дверцы
духовки.
! В случае использования сжиженного газа винт регуляции должен быть
завинчен до упора.
! По завершении операции замените старую этикетку со старыми
настройками на новую, соответствующую новому типу используемого
газа. Этикетку можно заказать в наших Центрах Технического
Обслуживания.
! Если давление используемого газа отличается от предусмотренного
давления (или варьирует), необходимо установить на питающем
газопроводе соответствующий регулятор давления (согласно
действующим национальным нормативам).
ПАСПОРТНАЯ ТАБЛИЧКА
Электропитание
См. таблицу характеристик
Характеристики газа
См. таблицу характеристик
Габаритные
размеры
ширина 43,1 см.
высота 31,4 см.
глубина 43,7 см.
Объем
59,1 л
Данное изделие соответствует
следующим Директивам
Европейского сообщества:
— 2006/95/CE от 12/12/06
(Низкое напряжение) и
последующим изменениям.
— 2004/108/CE от 15/12/04
(Электромагнитная совместимость)
и последующим изменениям.
— 93/68/CEE от 22/07/93 и
последующим изменениям.
— 2009/142/CE от 30/11/09 (Газ) с
последующими изменениями.
— 2012/19/UE и последующим
изменениям.

18
RU
Включение и эксплуатация
ВНИМАНИЕ! Духовой шкаф
укомплектован системой
блокировки решеток,
позволяющей вынимать их из
духовки не полностью (1).
Для полного вынимания решеток
достаточно поднять их, как
показано на схеме, взяв их за
передний край, и потянуть на
себя (2).
! При первом включении духового шкафа рекомендуем прокалить
его примерно в течение 30 минут при максимальной температуре с
закрытой дверцей. Затем выключите духовой шкаф, откройте дверцу
и проветрите помещение. Запах, который вы можете почувствовать,
вызван испарением веществ, использованных для предохранения
духового шкафа.
Включение духового шкафа
При помощи рукоятки духового шкафа вы можете выбрать различные
режимы и установить температуру, указанную на самой рукоятке (от
140°C до 240°C), наиболее подходящую для приготовления блюд.
Электронное устройство зажигания встроено внутри рукоятки. Для
зажигания горелки духовки нажмите до упора и поверните против часовой
стрелки рукоятку ДУХОВКИ в положение Max (при закрытой дверце
духовки). Так как духовка оснащена защитным устройством, после
зажигания горелки необходимо держать рукоятку ДУХОВКИ нажатой
примерно в течение 6 секунд для притока газа вплоть до нагревания
защитной термопары.
! Устройство электронного зажигания горелки не должно оставаться
нажатым в течение более 15 секунд. Если по истечении 15 секунд горелка
не зажглась, отпустите рукоятку ДУХОВКИ, откройте дверцу духовки и
подождите примерно 1 минуту перед повторной попыткой зажечь горелку.
Выбор температуры приготовления осуществляется совмещением
нужного значения с отметкой на панели управления. Ниже приводится
полный температурный диапазон духовки.
Min• 150• 180• 220
ax
140145 160200 230240
Духовка автоматически нагревается до заданной температуры, которая
поддерживается неизменной при помощи контрольного устройства
(термостата), управляемого рукояткой.
Зажигание духовки вручную
В случае временного отключения электроэнергии можно включить
горелку духовки вручную следующим образом:
1. Oткройте дверцу духовки
F
2. Поднесите спичку или кухонную
зажигалку, как показано на рисунке,
нажмите до упора и поверните против
часовой стрелки рукоятку ДУХОВКИ
вплоть до положения Max.
Так как духовка оснащена защитным устройством, после зажигания
горелки необходимо держать рукоятку ДУХОВКИ нажатой примерно
в течение 6 секунд для притока газа вплоть до нагревания защитной
термопары.
3. После зажигания горелки закройте дверцу духовки.
! В случае внезапного гашения пламени горелки перекройте рукоятку
ДУХОВКИ, откройте дверцу духовки и подождите примерно 1 минуту
до повторной попытки зажечь горелку.
Рукоятка-регулятор ГРИЛЯ
Ваша духовка оснащена электрическим грилем. Значительная
температура прямого действия гриля позволяет получить быстрое
образование корочки на поверхности продукта, которая препятствует
выходу соков и сохраняет продукт нежным и сочным внутри.
Использование функции гриль в особенности рекомендуется для
блюд, для приготовления которых требуется высокая поверхностная
температура: телячьих и говяжьих бифштексов, антрекотов, вырезки,
гамбургеров и т.д.
В параграфе “Практические советы по приготовлению” приводятся
некоторые примеры использования духового шкафа.
! При использовании режима гриль необходимо держать дверцу духовки
закрытой.
! Никогда не ставьте никаких предметов на дно духового шкафа, так как
они могут повредить эмалированное покрытие.
! Всегда ставьте посуду на прилагающуюся решетку.
Охладительная вентиляция
Для понижения температуры вокруг работающего духового шкафа
некоторые модели оснащаются охладительным вентилятором. Этот
вентилятор направляет струю воздуха между панелью управления и
дверцей духового шкафа.
! По завершении приготовления вентилятор продолжает работать вплоть
до надлежащего охлаждения духовки.
Вертел*
Для включения вертела (см. схему)
выполните следующие операции:
1. установите противень на 1-ый уровень;
2. установите держатель вертела на 3-ий
уровень и вставьте вертел в специальное
отверстие в задней стенке духового
шкафа;
3. включите вертел при помощи рукоятки
ПРОГРАММЫ ;
Освещение духового шкафа
Освежение включается при помощи кнопки LUCE (ОСВЕЩЕНИЕ).
* Имеется только в некоторых моделях.

19
RU
Таймер
1. Прежде всго необходимо завести таймер, повернув рукоятку ТАЙМЕР
по часовой стрелке почти на один полный оборот.
2. Поворачивая рукоятку обратно, против часовой стрелки, задается нужное
время – минуты на рукоятке ТАЙМЕРА должны совпасть с отметками на
панели управления.
3. Таймер отсчитывает время в обратном порядке: по истечении заданного
времени раздается звуковой сигнал.
! Таймер не управляет включением или выключением духового шкафа.
Программы
Программа ГРИЛЬ
Включается верхний нагревательный элемент. Значительная температура
прямого действия гриля позволяет получить быстрое образование
корочки на поверхности продукта, которая препятствует выходу соков и
сохраняет продукт нежным и сочным внутри. Использование функции
гриль в особенности рекомендуется для блюд, для приготовления
которых требуется высокая поверхностная температура: телячьих и
говяжьих бифштексов, антрекотов, вырезки, гамбургеров и т.д. … Готовьте
блюда с закрытой дверцей духового шкафа.
Практические советы по приготовлению
! При использовании режима ГРИЛЬ поместите противень на уровень 1
для сбора жидкостей, выделяемого при жарке (сок и/или жир).)
ГРИЛЬ
• Установите решетку на уровень 3 или 4, поместите продукты в центр
решетки.
• Рекомендуется выбрать максимальную мощность духовки. Не
беспокойтесь, если верхний элемент не остается постоянно
включенным: его работа управляется термостатом.
ПИЦЦА
• Используйте противень из легкого алюминия, устанавливая его на
прилагающуюся решетку.
При использовании противеня время выпечки удлиняется, что
затрудняет получение хрустящей пиццы.
• В случае выпечки пиццы с обильной начинкой рекомендуется
положить на пиццу сыр моццарелла в середине выпечки.
20
RU
Категория
Номинальная мощность
кВт (1)
Напряжение
частота
Мощность
(
Вт
)
II2H3+2,60 (189 g/h — G30) (186 g/h — G31) 220-240V
~
50/60Hz 2250
7OFH G RU/HA
7OFH G IX RU/HA
7OFHRG RU/HA
GOS 7 A RFH
GOS 7 I RFH
Модель
Газовая часть
Электрическая част
(1) Значения выраженные в гр/час, относятся к характеристикам сжиженных газов (бутана, пропана).
* При температуре 15°C и давлении 1013,25 мбар – сухой газ
** Пропан Теплотворная способность = 50,37 МДж/кг
*** Бутан Теплотворная способность = 49,47 МДж/кг
Природный газ Теплотворная способность = 37,78 МДж/м
3
НоминальнаяСокращенная
2.60
Горелкa
Д
ухово
й
шкаф
1.00
*** **
49 78 189 186 119 248 132 248
28-30
20
35
37
25
45
20
17
25
13
6.5
18
Характеристики горелок и форсунок
Таблица 1
Сжиженный газ Природный газ
Теплотворная
способность кВт
(p.c.s.*)
Байпас
1/100
(
мм
)
Форсунка
1/100
(
мм)
Расход
*
г/час
Форсунка
1/100
(
мм)
Расход
*
л/час
Форсунка
1/100
(
мм)
Расход
*
л/час
Давление
подачи
Номинальное (мбар)
Минимальное (мбар)
Максимальное (мбар)
Код: 9490
Извините, товара сейчас нет в наличии
Бесплатная доставка
по Красноярску
Извините, товара сейчас нет в наличии
Услуги:
Новости интернет-магазина «Лаукар»:
Дополнительная информация в категории Духовой шкаф:
В интернет-магазине бытовой техники «Лаукар» Вы можете скачать инструкцию к товару Газовый духовой шкаф Hotpoint-Ariston FHR G (OW) бежевый совершенно бесплатно.
Все инструкции, представленные на сайте интернет-магазина бытовой техники «Лаукар», предоставляются производителем товара.
Перед началом использования товара рекомендуем Вам ознакомиться с инструкцией по применению.
Для того чтобы скачать инструкцию, Вам необходимо нажать на ссылку «скачать инструкцию», расположенную ниже, а в случае, если ссылки нет,
Вы можете попробовать обратиться к данной странице позднее,
возможно специалисты интернет-магазина бытовой техники «Лаукар» еще не успели загрузить для скачивания инструкцию к товару:
Газовый духовой шкаф Hotpoint-Ariston FHR G (OW) бежевый.

Фирма-производитель оставляет за собой право на внесение изменений в конструкцию, дизайн и комплектацию товара: Газовый духовой шкаф Hotpoint-Ariston FHR G (OW) бежевый. Пожалуйста, сверяйте информацию о товаре с информацией на
официальном сайте компании производителя.