

Back-UPS® Pro 1200/1500 230V
Installation and Operation
Inventory |
Safety |
|||||||
bu001a
(2)Do not install the Back-UPS in direct sunlight, in excessive heat, humidity, or
in contact with fluids.
Connect the battery
|
bu055a |
bu057a |
|
|
bu058a |
bu060a |
 bu059a
Install PowerChute® Personal Edition Software
APC PowerChute Personal Edition software provides automatic file saving and shutdown of your computer in the event of a power failure. Use the cable supplied with the Back-UPS to connect the data port on the Back-UPS to the USB port on your computer. Place the CD into your computer, and follow the on-screen instructions.
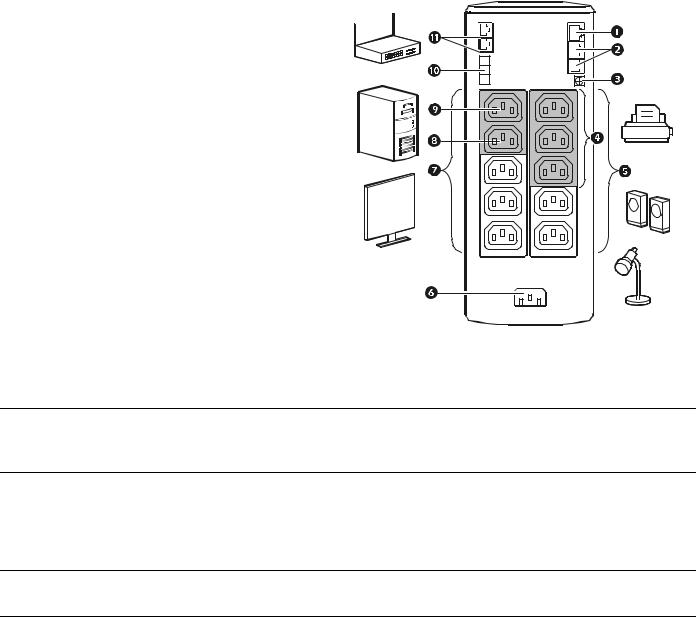
Connect the equipment
Battery Backup and Surge Protected outlets
When the Back-UPS is receiving input power, the Battery Backup with Surge Protection outlets will supply power to connected equipment. During a power outage or other utility problems, the Battery Backup outlets receive power for a limited time from the Back-UPS.
Connect equipment such as printers, fax machines, scanners, or other peripherals that do not need battery backup power to the Surge Protection Only outlets. These outlets provide full-time protection from surges even if the Back-UPS is switched OFF.
Master and Controlled outlets
To conserve electricity, when the device connected to Master Outlet goes into Sleep or Standby mode, or turns Off, the Controlled device(s) will shut down as well, saving electricity.
 bu146a
Connect a master device, such as a desktop computer or audio/visual receiver to the Master
outlet. Connect peripheral devices such as a printer, speakers, or a scanner to the Controlled outlets.
USB and Serial Data port To use PowerChute Personal Edition, connect a serial cable or USB cable.
Telephone cable surge- Connect a telephone cable to the IN port, and connect a modem to the OUT port. protected ports
Ground screw |
Connect the ground lead of additional surge suppression devices such as network and data line |
|
surge protectors. |
Surge Protected outlets, These outlets are protected from electrical surges, and will disconnect from utility power during controlled by the Master a power outage, or if the Master device goes into Sleep or Standby mode.
outlet
Surge Protected outlets |
These outlets provide full-time protection from surges, even if the Back-UPS is off. Connect |
|
equipment such as printers and scanners that do not require battery backup protection. |
|
AC power outlet |
Connect the unit to utility power, use the supplied power cord. |
Battery Backup outlets with During a power outage or other utility problems, the Battery Backup outlets receive power for a Surge Protection limited time from the Back-UPS. Connect critical equipment such as desktop computer,
computer monitor, modem or other data sensitive devices into these outlets.
Battery Backup outlet with These outlets will supply battery power to the connected equipment during a power outage. Surge Protection, controlled Power will be disconnected to these outlets if the Master device goes into Sleep or Standby
|
by the Master outlet |
mode. Connect equipment such as a computer monitor to these outlets. |
Master outlet |
Connect the master device to this outlet, in most scenarios, this will be the main computer. |
|
External Battery Pack |
Connect an external battery pack to provide additional battery backup runtime (Back-UPS Pro |
|
connector (BR1500GI only) |
1500 only). |
|
In & Out Ethernet surge- |
Use an ethernet cable to connect a cable modem to the IN port, and connect a computer to the |
|
protected ports |
OUT port. |
|
2 |
Back-UPS Pro 1200 & 1500 230 V Installation and Operation |

Operation
Power-Saving Function
To conserve electricity, configure the Back-UPS to recognize a Master device, such as a desktop computer or an A/V receiver, and Controlled peripheral devices, such as a printer, speakers, or a scanner. When the Master device goes into Sleep or Standby mode, or is switched OFF, the Controlled device(s) will be switched off as well, saving electricity.
Enable the Power-Saving function. Press and hold MUTE and DISPLAY simultaneously for two seconds. The Back-UPS will beep to indicate that the feature is enabled. The leaf icon on the display will illuminate.
Disable the Power-Saving function. Press and hold MUTE and DISPLAY simultaneously for two seconds. The Back-UPS will beep to indicate that the feature is disabled. The leaf icon on the display will darken.
Setting the threshold. The amount of power used by a device in Sleep or Standby mode varies between devices. It may be necessary to adjust the threshold at which the Master outlet signals the Controlled outlets to shut down.
1.Ensure a master device is connected to the Master outlet. Put that device into Sleep or Standby mode, or turn it OFF.
2.Press DISPLAY and MUTE simultaneously and hold for six seconds, until the leaf icon flashes three times and the Back-UPS beeps three times.
3.The Back-UPS will now recognize the threshold level of the Master device and save it as the new threshold setting.
Power-Saving Display
The display interface can be configured to be continuously illuminated, or to save energy, it can be configured to darken after a period of inactivity.
1.Full Time Mode: Press and hold DISPLAY for two seconds. The display will illuminate and the Back-UPS will beep to confirm the Full-Time mode.
2.Power-Saving Mode: Press and hold DISPLAY for two seconds. The display will darken and the Back-UPS will beep to confirm the Power-Saving mode. While in Power-Saving Mode, the display will illuminate if a button is pressed, it then darkens after 60 seconds of no activity.
Unit sensitivity
Adjust the sensitivity of the Back-UPS to control when it will switch to battery power; the higher the sensitivity, the more often the Back-UPS will switch to battery power.
1.Ensure the Back-UPS is connected to utility power, but is OFF.
2.Press and hold the POWER button for six seconds. The LOAD CAPACITY bar will flash on and off, indicating that the Back-UPS is in programming mode.
3.Press POWER again to rotate through the menu options. Stop at selected sensitivity. The Back-UPS will beep to confirm the selection.
Low sensitivity |
Medium sensitivity (Default) |
High sensitivity |
|
156-300 Vac |
176-294 Vac |
176-288 Vac |
Input voltage is extremely low or high. (Not recommended for computer loads.)
|
The Back-UPS frequently switches to |
The connected equipment is |
|
battery power. |
sensitive to voltage fluctuations. |
|
Back-UPS Pro 1200 & 1500 230 V Installation and Operation |
3 |
 Loading…
Скачать
Operation Manual
Smart-UPS
®
UPS
750/1000/1500/2200/3000 VA Tower
120/230 VAC
-
Инструкции по эксплуатации
1

APC Back-UPS Pro 1500 VA (BR1500GI) инструкция по эксплуатации
(8 страниц)
- Языки:Русский
-
Тип:
PDF -
Размер:
446.53 KB -
Описание:
Источник бесперебойного питания (ИБП)
Просмотр
На NoDevice можно скачать инструкцию по эксплуатации для APC Back-UPS Pro 1500 VA (BR1500GI). Руководство пользователя необходимо для ознакомления с правилами установки и эксплуатации APC Back-UPS Pro 1500 VA (BR1500GI). Инструкции по использованию помогут правильно настроить APC Back-UPS Pro 1500 VA (BR1500GI), исправить ошибки и выявить неполадки.

Back-UPS
®
Pro 1200/1500 230 В
Установка и эксплуатация
Подключение батареи
Установка программного обеспечения
PowerChute
®
Personal Edition
Программное обеспечение APC PowerChute Personal Edition позволяет автоматически
сохранять файлы и выключать компьютер в случае сбоя подачи питания. Используйте
кабель, поставляемый с устройством Back-UPS, чтобы подключить порт передачи
данных на Back-UPS к USB-порту компьютера. Вставьте компакт-диск в устройство
чтения компакт-дисков компьютера и следуйте инструкциям на экране.
Перечень деталей
Безопасность
Место установки устройства Back-UPS
должно быть защищено от прямых
солнечных лучей, повышенной
температуры, влажности или
от попадания жидкостей.
bu0
01a
(2)
bu
055
a
bu0
57
a
b
u05
9a
bu0
58
a
bu
060
a
Summary of the content on the page No. 1
®
Back-UPS Pro 1200/1500 230V
Installation and Operation
Inventory Safety
(2)
Do not install the Back-UPS in direct
sunlight, in excessive heat, humidity, or
in contact with fluids.
Connect the battery
®
Install PowerChute Personal Edition Software
APC PowerChute Personal Edition software provides automatic file saving and shutdown of
your computer in the event of a power failure. Use the cable supplied with the Back-UPS to
connect the data port on the Back-UPS to the USB port on
Summary of the content on the page No. 2
Connect the equipment Battery Backup and Surge Protected outlets When the Back-UPS is receiving input power, the Battery Backup with Surge Protection outlets will supply power to connected equipment. During a power outage or other utility problems, the Battery Backup outlets receive power for a limited time from the Back-UPS. Connect equipment such as printers, fax machines, scanners, or other peripherals that do not need battery backup power to the Surge Protection Only outlets. These
Summary of the content on the page No. 3
Operation Power-Saving Function To conserve electricity, configure the Back-UPS to recognize a Master device, such as a desktop computer or an A/V receiver, and Controlled peripheral devices, such as a printer, speakers, or a scanner. When the Master device goes into Sleep or Standby mode, or is switched OFF, the Controlled device(s) will be switched off as well, saving electricity. Enable the Power-Saving function. Press and hold MUTE and DISPLAY simultaneously for two seconds. The Back-UPS
Summary of the content on the page No. 4
Front Panel Buttons and Display Interface Use the three buttons on the front panel of the Back-UPS and the display interface to configure the Back-UPS. Front panel Mute button Power On/Off button Display button Display interface On Line—The Back-UPS is supplying conditioned utility power to connected equipment Power-Saving—Master and Controlled outlets are enabled, saving power when the master device goes into sleep or standby mode Load Capacity—The load is indicated by the number of se
Summary of the content on the page No. 5
Warnings and System Faults Audible Warnings Back-UPS is running on battery. You should consider saving any work in progress. Four Beeps Every 30 Seconds Low battery condition and battery run-time is very low. Promptly save any work in progress, exit Continuous Beeping all open applications, and shut down the operating system. Battery Backup outputs are overloaded. Continuous tone Battery fails the automatic diagnostic test and should be replaced. Chirps for 1 Minute every 5 hours Warning Icon
Summary of the content on the page No. 6
Function Button Quick-Reference Timing UPS Function Button Description (seconds) Status Power Power On Press POWER to start receiving input utility power. If A/C input 0.2 Off power is not available, the Back-UPS will run on battery power. Power Off The Back-UPS is not receiving input utility power, but is providing 2On surge protection. Display Status Inquiry Verify the status or condition of the Back-UPS. The LCD will 0.2 On illuminate for 60 seconds. Full-Time/Power- The LCD will illumin
Summary of the content on the page No. 7
Troubleshooting Problem Possible Cause Corrective Action Back-UPS will not switch on. The Back-UPS is not connected to utility Ensure that the Back-UPS is securely connected power. to an AC outlet. The circuit breaker has been tripped. Disconnect non-essential equipment from the Back-UPS. Reset the circuit breaker. Re-connect equipment one item at a time. If the circuit breaker is tripped again, disconnect the device that caused the trip. The internal battery is not connected. Connect the b
Summary of the content on the page No. 8
Specifications t Replacement Battery Model BR1200GI BR1500GI The battery cartridge typically lasts 3 to 6 years, a shorter period if subjected to frequent outages or elevated VA 1200 VA 1500 VA temperatures. Battery replacement part for Back-UPS Pro 1200 Maximum Load 720 W 865 W and 1500 is APCRBC124. Please recycle spent battery Nominal Input Voltage 230 V cartridges. Online Input Voltage Range 176 — 294 V Service Automatic Voltage Regulation (188-216) +11.2% If the Back-UPS arrived damaged

Установка и эксплуатация Back-UPS Pro 1200 и 1500 на 230 В
4
Кнопки на передней панели и интерфейс дисплея
Для настройки устройства Back-UPS используйте три кнопки на передней панели и интерфейс дисплея.
Передняя панель
Кнопка приглушения
Кнопка вкл./выкл.
питания
Кнопка
отображения
Интерфейс дисплея
От сети. Устройство Back-UPS непрерывно осуществляет подачу питания от электросети
к подключенному оборудованию.
Экономия энергии. Главный и управляемые выходы включены, экономя энергию, когда главное
устройство переходит в спящий или ждущий режим.
Допустимая нагрузка. Нагрузка отображается числом светящихся секций (от одной до пяти).
Каждая секция соответствует 20 % нагрузки.
Заряд батареи. Уровень заряда батареи отображается числом светящихся секций. Когда светятся все пять секций,
устройство Back-UPS полностью заряжено. Если светится только одна секция, батарея Back-UPS почти разряжена.
При этом индикатор будет мигать, и устройство Back-UPS будет постоянно подавать звуковые сигналы.
Перегрузка. Потребление питания нагрузкой превысило допустимую нагрузку Back-UPS.
Событие. Счетчик событий отображает количество событий, вызвавших переход Back-UPS в режим
подачи питания от резервной батареи.
Автоматическая регулировка напряжения (AVR). Устройство Back-UPS осуществляет компенсацию
высокого и низкого входного напряжения.
Если горит этот индикатор, устройство Back-UPS компенсирует низкое входное напряжение.
Если горит этот индикатор, устройство Back-UPS компенсирует высокое входное
напряжение.
Входное напряжение.
Выходное напряжение.
Сбои в системе. В системе произошел сбой. Номер сбоя будет отображаться на дисплее.
См. раздел «Сбои в системе» на стр. 5.
Приглушение. Если линия на значке громкоговорителя светится, звуковое предупреждение выключено.
Замена батареи. Батарея не подключена, или срок ее эксплуатации практически исчерпан. Замените батарею.
От батареи. Устройство Back-UPS подает на подключенное оборудование резервное питание
от батареи. Каждые 30 секунд подаются четыре звуковых сигнала.
bu04
4a
bu
002
a