
Introduction
Operating Systems (Android, Windows, Linux, Ubuntu, Mac, etc) are made up of separate sections called partitions. These different partitions work together as one, constituting the OS. The partitions are made usable by flashing their corresponding files called partition images onto the device (the files are in IMG format). Without the image file of a partition installed, the partition can not be put into use and if such a partition is a critical one, then issues start arising which can extend up to the device becoming completely dead. While every Operating System has its own specific partitions, there are partitions common to almost all of them like system, recovery, boot, and userdata.
It is possible to edit the image files of partitions and this is what we are going to see here, using the Android OS as an example and to be specific, the boot and recovery images. There are many reasons for editing partition images (that we will also discuss here) – but if you do things wrongly, you will end up with a faulty or even unusable device.
Table Of Contents
- Introduction
- Disclaimer
- Image Unpacking, Editing And Repacking
- Reasons For Editing Partition Images
- The Boot And Recovery Images
- Unpack/Repack Boot/Recovery/Ramdisk/Kernel Images With Android Image Kitchen On Windows
- Unpacking, Repacking, Or Cleaning Through CMD Or PowerShell
- Unpack/Repack Boot/Recovery/Ramdisk/Kernel Images With Android Image Kitchen Using A Phone
- Using MiXplorer Silver File Manager Instead Of Root Browser Classic
- Other Helpful Articles
- Using MiXplorer Silver File Manager Instead Of Root Browser Classic
- Conclusion
Disclaimer
I won’t be held responsible in case anything happens to your device trying to use this article. You are doing things at your own risk. Before using this article, make sure you have properly understood how to root and flash an Android device and make sure your device is amongst the devices supported by this article as there might be a high possibility of bricking your device. However, you can fix whatever software issue your device faces by flashing the stock firmware.
Image Unpacking, Editing And Repacking
— To edit an image, you have to unpack it, do the editing, and then repack it.
— There are many unpacking and repacking tools or scripts out there, each having the types of images they can handle as well as their own methods of carrying out the processes. Examples are Android Image Kitchen (AIK – packs and repacks recovery and boot images), Android Image Studio (packs and repacks recovery and boot images), Carliv Image Kitchen (packs and repacks recovery and boot images), mkbootimg (official Android utility to pack boot images), abootimg (an alternative to mkbootimg used to pack and unpack boot images, but doesn’t work with ramdiskless boot images).
— When it comes to editing, there are two ways:
1. You can either do editing of files by deleting or replacing them with files from somewhere else – this is used when porting custom recovery.
2. Exporting unpacked files somewhere and do editing using a text editor (e.g Hex Editor, Notepad++, DroidEdit, etc) and then bringing the edited file back. Here, make sure the edited file bears the same name as the original and sits in the same place where it was originally – this approach is used to remove DM-Verity from the boot image (for devices that have DM-Verity in the boot – usually in old Android versions).
— After editing, you have to repack to get the final edited image.
Reasons For Editing Partition Images
The reasons are many, depending on what the user wants to achieve. Let’s look at two cases of editing recovery and boot images:
1. Recovery: Porting of custom recovery is the reason why one can choose to edit a recovery image. This will allow them to make custom recovery for their devices if they can’t find one online.
2. Boot: Old Android versions have DM-verity in the boot image. DM-verity might affect the booting of an OS if unwanted changes are detected. These changes involve flashing files or custom partitions. This, therefore, means one can edit the boot image to remove this boot check. However, things have changed on recent Android versions as DM-verity now sits in the vbmeta image, meaning your target here should be the vbmeta and not boot.
The Boot And Recovery Images
The boot and recovery images are similar. They contain the same contents: a kernel and a ramdisk.
The only difference between the recovery and boot images is that booting the boot image takes us to the System while the recovery image takes us to the recovery mode – the phone can determine which image to boot from based on the command it sees.
Because of the similarities between the boot and recovery image, A/B devices lack a separate recovery partition. Instead, the recovery has been moved to the boot image as boot-ramdisk. Editing the recovery images of these devices is therefore not straightforward as you will have to be targeting the boot image for the recovery. The reason for the incorporation is to save storage and reduce the total partition count as A/B devices have partitions in twos. However, there are a few A/B devices with separate recovery and boot partitions.
Let’s now move to the unpacking, editing, and repacking of the recovery and boot images using AIK.
Unpack/Repack Boot/Recovery/Ramdisk/Kernel Images With Android Image Kitchen On Windows
A PC is required.
You need the image that you want to unpack or edit. Android Image Kitchen only works with boot and recovery images. That means you can’t use other images like system.img, vbmeta.img, etc.
— Download the latest version of 7-Zip according to your PC architecture here (or here) and install it (note that files for 32bit devices can run on 64bit devices but the reverse is not possible).
— Download Android Image Kitchen (AIK) here or here. Android Image Kitchen is a simple tool to unpack/repack a boot/recovery image (and kernel/ramdisk images). By so doing, you can edit these images. The tool is made by XDA recognized developer osm0sis.
— Extract Android Image Kitchen (AIK) to a convenient location using 7-Zip. Go to the extraction folder and you will see a folder named Android Image Kitchen. Open it.
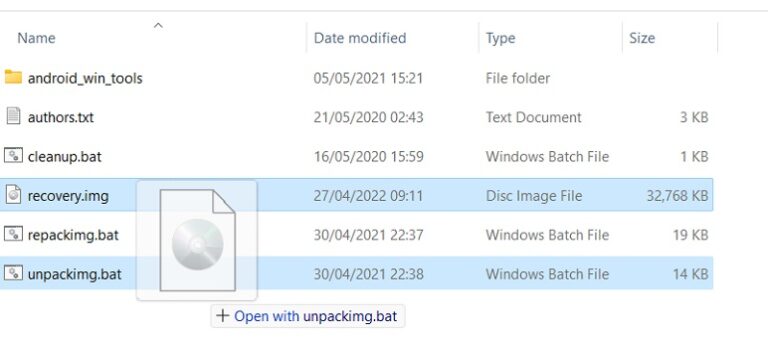
— Copy the image file you want to unpack to the Android Image Kitchen folder (use only one file at a time).
— It is now time to unpack the image file. Go to the Android Image Kitchen folder and double-click the file named unpackimg (unpackimg.bat with extension) to unpack the image file – or you can just drag and drop the image file onto the unpackimg.bat file. A terminal will open and you will see the unpacking process ongoing. When done, you will be asked to press any key to continue. Just press the Enter key or any other. Two subfolders (ramdisk and split_img) will be created in the Android Image Kitchen.

— If you have done everything well, you should have ramdisk and split_img subfolders in the Android Image Kitchen folder. You can then edit the files in these subfolders. See an example here about Porting Custom Recovery For MediaTek Android Devices (allow the page to load completely and skip to the appropriate section).

— When you are done with the editing, you need to repack the image. Now in the Android Image Kitchen folder, double-click repackimg (repackimg.bat with extension) to repack the edited image. A terminal will open and you will see the repacking process ongoing. When done, you will be asked to press any key to continue. Just press the Enter key or any other. A new file named image-new (image-new.img with extension) will be created. Copy the image-new file to a convenient location and rename it to its appropriate name e.g boot, recovery – voila you have just finished editing the image file.

— You can then flash it on your device using flash tools, custom recovery, Flashify app or platform tools. If you face a brick after flashing the edited image file, just flash the stock one back. Keep in mind, boot.img is unique only to the boot.img of the current ROM installed on the device and none other.
— Now to remove any file or folder that has been added due to unpacking or repacking (leaving just the Android Image Kitchen contents), you can either delete them manually or click on cleanup (cleanup.bat with extension).
Unpacking, Repacking, Or Cleaning Through CMD Or PowerShell
Note: You can unpack and repack the boot image or cleanup the AIK folder through CMD or PowerShell. If you use platform tools (ADB and fastboot), then the approach is similar. Go to the Android Image Kitchen folder and type cmd in the address bar, then press Enter to open through CMD. If you prefer using PowerShell instead, then in the Android Image Kitchen folder, hold down the Shift key and right-click on an empty space, then choose Open PowerShell window here.
To run any of the scripts through CMD, use its corresponding command. The commands are:
To run any of the scripts through PowerShell, use its corresponding command. The commands are:
Unpack/Repack Boot/Recovery/Ramdisk/Kernel Images With Android Image Kitchen Using A Phone
If you don’t have a PC, you can unpack, edit and repack boot and recovery images using your Android phone. Below are the requirements:
° Your device should be rooted with a root manager (like Magisk, SuperSu, etc) installed.
° Download and install the Magisk application (version 18.0 or later) or install a custom recovery on your device.
° Download and install a root file manager that supports the execution of script files. A good example is Root Browser Classic by Android Toolbox – Root, ROM, BusyBox & More. Download it from Play Store here.
° Download and install a text editor. A good example is Sublime Text Editor by A389 St.. Download it from Play Store here.
° You need the image that you want to unpack or edit (the image should carry its proper name e.g boot, recovery). Android Image Kitchen only works with boot and recovery images. That means you can’t use other images like system.img, vbmeta.img, etc.
° Download the latest version of AIK-Mobile Installer zip file here. This is the Android Image Kitchen tool that will be installed on the phone.
With the above requirements ready, you can proceed below.
— Flash the AIK-Mobile Installer zip file in Magisk (see how to flash modules via Magisk here – allow the page to load completely to skip to the appropriate section) or custom recovery and reboot. A folder called AIK-mobile containing the necessary files will be created in system root > data > local (/data/local)..

— Launch Root Browser Classic and grant root as well as storage access. By default, you will be presented with the system root directory. To locate the internal storage, scroll down and tap sdcard. Copy the image file from where you placed it, press the top-left or bottom-left Home button, then go to data > local > AIK-mobile and paste the file (use only one file at a time).
— Inside the AIK-mobile folder, tap on unpackimg.sh and a window will pop up. Make sure Execute script as root is ticked, then click on Execute. Wait for the process to complete. Two subfolders (ramdisk and split_img) will be created. If they don’t appear, refresh the page using the Refresh button at the bottom bar (you might need to scroll the bar horizontally) or force stop and then relaunch Root Browser Classic.


— If you have done everything well, you should have ramdisk and split_img subfolders in the AIK-mobile folder. You can then edit the files in these subfolders. If you need to edit using a text editor, first copy the target file to somewhere in the internal storage. Now launch Sublime Text Editor and grant storage access then locate the file by tapping on the top-left Menu icon and then choosing Open…. You can search using the search icon at the top bar. When you are done with the editing, tap the Save button at the top bar and choose Save (not Save as in order to preserve the name of the edited file else you will have to make sure the edited file carries the original name). Copy the file back to where you first removed it from in the ramdisk or split_img subfolder.


— To repack the image, tap repackimg.sh and a window will pop up. Make sure Execute script as root is ticked, then click on Execute. Wait for the process to complete. A new file named image-new (image-new.img with extension) will be created. If it doesn’t appear, refresh the page using the Refresh button at the bottom bar (you might need to scroll the bar horizontally) or force stop and then relaunch Root Browser Classic. Copy the image-new file to a convenient location in the internal storage and rename it to its appropriate name e.g boot, recovery – voila you have just finished editing the image file.

— You can then flash it on your device using flash tools, custom recovery, Flashify app, or platform tools. If you face a brick after flashing the edited image file, just flash the stock one back. Keep in mind, boot.img is unique only to the boot.img of the current ROM installed on the device and none other.
— Now to remove any file or folder that has been added due to unpacking or repacking (leaving just the Android Image Kitchen contents), you can either delete them manually or click on cleanup.sh. If the files don’t get removed, refresh the page using the Refresh button at the bottom bar (you might need to scroll the bar horizontally) or force stop and then relaunch Root Browser Classic.

Using MiXplorer Silver File Manager Instead Of Root Browser Classic
Note: instead of using Root Browser Classic file manager, you can use MiXplorer Silver which has a modern interface and runs smoother – there’s no need for a second root file manager. To execute the unpackimg.sh, repackimg.sh and cleanup.sh scripts using MiXplorer Silver, just long-press, click on the three vertical dots at the top-right and choose Execute. The process will run in the background and a success window will appear when done. If the changes seem not to appear after execution, refresh by swiping down on the screen.

Another way to execute these scripts is through MiXplorer Silver’s built-in terminal. Go to the AIK-mobile folder and tap on the three vertical dots at the top-right. Choose Execute and a terminal will show up. To run any of the scripts, use its corresponding command. The commands are:


Other Helpful Articles
° How To Port Custom Recovery (TWRP, OFRP, PBRP, etc) For MediaTek Android Devices
° How To Disable DM-Verity In The Boot Image Using Android Image Kitchen (AIK)
° Stock vs Custom Recovery | Flashing Recovery | Recovery vs Boot | Wipe Data vs Format Data
° Flashing Various Files On Android | Part 1
° Flashing Various Files On Android | Part 2
° What Is Verified Boot (DM-Verity) In Android And How To Disable It
° Encryption, Decryption And Forceencryptin
° Quick Tips On Rooting And Flashing Android
° A/B And A-only Devices | Seamless Upgrades
° Android Partitions And The Different Android Modes
° How To Extract Flashable Firmware Files From MediaTek Devices
° How To Fix Bricked MediaTek Devices
° Rooting And Flashing Android | The Complete Guide
Conclusion
— Like, Share & Comment 👍: We are done with the unpacking/repacking of the boot and recovery images using AIK. Hope the article helped. If you find this post helpful, then scroll down to like and share. Also, drop a comment below in case of any difficulty.
— Donate ❤: Please help us to keep the site running. You can support us with whatever you have here.
— Report Broken Link, Any Error, Or Wrong Information ⚠: Is a link not working, or have you found an error that needs correction, or do you believe there’s an information you have read that is wrong, report to us here. We will verify and try to update as soon as possible. Don’t forget to give us the link that is broken or to point directly to the section that needs correction. Thanks for your loyalty.
— Contact 🗨: If you wish to contact the SakoPhone team, then click here.
— Join Us ➕: Want to be part of the SakoPhone Team, join us here. Those eligible to join us are: Bloggers/Writers/Editors (to write helpful articles), Readers/Subscribers (to receive alert of every article we drop, Supporters (those who will cross-check articles and report errors, wrong details or broken links, provide helpful suggestions and information as well as increase traffic by sharing and recommending our articles to various platforms) and lastly Sponsors (those who can assist us financially with little donations to keep the site running).
На чтение 4 мин Опубликовано Обновлено
Android image kitchen — это мощный инструмент, который позволяет пользователям Windows манипулировать и изменять системные образы Android. Независимо от того, являетесь ли вы разработчиком, который ищет способ модификации фреймворка, или обычным пользователем, желающим настроить свое устройство, Android image kitchen предоставит вам все необходимые функции.
Для начала использования Android image kitchen вам понадобится скачать и установить его на ваш компьютер с операционной системой Windows. Вы можете найти последнюю версию инструмента на официальном сайте разработчика или на других надежных ресурсах. После скачивания файла инсталлятора, запустите его и следуйте инструкциям на экране для установки.
После установки Android image kitchen вам следует ознакомиться с его основными функциями и возможностями. Инструмент позволяет вам разбирать и собирать образы системы Android, извлекать и заменять файлы, создавать и применять патчи, а также многое другое. Важно отметить, что использование Android image kitchen требует некоторых знаний и опыта работы с Android-системами.
Предупреждение: Прежде чем вносить изменения в системные образы Android, рекомендуется создать их резервную копию. Это поможет вам избежать потери данных и восстановить исходное состояние устройства в случае ошибки.
Android image kitchen является мощным инструментом для изменения системных образов Android на компьютерах под управлением Windows. Если вы хотите настроить свое устройство или внести изменения в код операционной системы, этот инструмент предоставит вам все необходимые функции и возможности. Однако помните, что работа с Android image kitchen требует определенных знаний и опыта, поэтому будьте внимательны и осторожны при вносе изменений в системные файлы.
Содержание
- Зачем нужен Android image kitchen?
- Где скачать Android image kitchen?
- Как установить Android image kitchen на Windows?
Зачем нужен Android image kitchen?
Один из основных плюсов Android image kitchen заключается в том, что он позволяет пользователям создавать идеально настроенные образы Android, которые полностью соответствуют их потребностям. Это особенно полезно для разработчиков пользовательских ROM, которые хотят создать собственные версии Android с определенными настройками или изменениями.
Кроме того, Android image kitchen также может использоваться для извлечения системных образов Android с устройств и их последующей модификации без установки специальных сред разработки. Это может быть полезно для любителей Android, которые хотят настроить свое устройство без необходимости прошивки образов с помощью программных прошивок.
В целом, Android image kitchen предоставляет разработчикам и пользователям удобный способ работать с системными образами Android, предоставляя широкие возможности для настройки и изменений операционной системы. Он также может использоваться для создания собственных пользовательских ROM и обеспечивает гибкость и удобство при работе с Android-устройствами.
Где скачать Android image kitchen?
- Перейдите на официальную страницу проекта Android image kitchen.
- На странице проекта найдите раздел «Загрузки» или «Download» и щелкните на ссылке, чтобы перейти к списку доступных версий.
- Выберите нужную версию Android image kitchen, которую хотите скачать, и нажмите на ссылку для начала загрузки.
- В зависимости от вашего интернет-подключения, загрузка может занять некоторое время. Дождитесь завершения загрузки файла.
- Когда файл загрузится, откройте его и следуйте инструкциям для установки Android image kitchen на ваш компьютер.
Теперь, когда Android image kitchen установлен на вашем компьютере, вы готовы приступить к его использованию для работы с образами системы Android.
Как установить Android image kitchen на Windows?
- Скачайте Android image kitchen для Windows с официального сайта разработчика.
- Разархивируйте скачанный архив в удобное для вас место на вашем компьютере.
- Убедитесь, что на вашем компьютере установлены необходимые для работы Android image kitchen инструменты, такие как Java Development Kit (JDK) и Android Software Development Kit (SDK).
- Откройте командную строку (Command Prompt) в Windows, нажав сочетание клавиш Win + R, введите «cmd» и нажмите Enter.
- Перейдите в каталог, в который вы разархивировали Android image kitchen, с помощью команды «cd», например: cd C:\android-image-kitchen.
- Теперь вы можете начать использовать Android image kitchen, выполнив нужные вам команды через командную строку.
Поздравляю, вы успешно установили Android image kitchen на Windows!
Android Image Kitchen is a program that lets you edit, unpack, and repack boot and recovery images. It allows you to edit the files using your favorite text editor and other tools. It also replaces the original files with the appropriate file permissions. The program is ideal for testing boot and recovery images.
This app is compatible with Android mobile devices, as well as PCs, Macs, and Windows computers. It also runs on various Android emulators. In addition to the mobile platform, Image Kitchen for PC is available for Windows, Mac, and Linux computers. To install Image Kitchen for PC, you can use any Android emulator.
What is IMG Kitchen?
Android Image Kitchen is a free tool for Windows, Mac, Linux, and Android that allows you to Android Image Kitchen [IMG Kitchen] Unpack/Repack Kernel+Recovery Images, and Edit the ramdisk.
Android Image Kitchen Instructions
- Unzip.
- Either use the command line “unpacking “, or simply drag and drop the image. This will split the image and unpack the ramdisk to a subdirectory.
- After the ramdisk as you like.
- The repacking script requires no input and simply recombines the previously split kernel with the newly packed modified ramdisk using all the original image information (which was also split and saved).
- The cleanup script resets the folder to its initial state, removing the split_img+ramdisk directories and any newly packed ramdisk or image files.
There are a few optional, advanced command-line arguments for repacking: “–original”, which will cause it to repack using the original split ramdisk instead of repacking, this is useful for testing or trimming dumps; “–organize”, which will cause it to repack then pad it to the size of the original image, this is useful for repacking dumps to then be fastboot flashed; “–level” with 1-9 and possibly 0 allows changing the compression level used to repack to more closely match the original; “–avbkey” with (optionally path and) a keyname allows changing from the default AOSP verity key; “–forceelf” to attempt to make an older unpacked Sony ELF file repack as an ELF.
All scripts also allow unpacking/repacking with the current directory instead of the AIK directory if “–local” is the first command-line argument.
Supported ramdisk compression formats in the *-ramdiskcomp file are gzip, lzop, lzma, xz, bzip2, lz4, lz4-l (for lz4 legacy), cpio (for uncompressed), and empty (for no ramdisk).
Usage is similar for the Android and Linux versions, again, just review the release notes for them.
Hopefully, this is some help to someone. It’s been extremely useful for me in my messing around with kernel ramdisks, which is why I created it in the first place.
Enjoy!
Also Check: Aroma File Manager Tool
Download IMG Kitchen [All Versions]
| Name | OS | Link |
|---|---|---|
| IMG_Kitchen_win v3.8 | Windows | Download AIK Win32 |
| IMG_Kitchen_Mobile v3.8 | Linux | Download AIK Linux |
| IMG_Kitchen_linux v3.8 | Android | Download AIK Android |
Android users can install the Multi-Image Kitchen (MIK) application for their phones to repackage partitions without losing any data. This application is open source and is compatible with the Android version you’re currently using. If you’re having problems downloading MIK, you can also use Magisk Patcher.
Multi-Image Kitchen is an open-source project
Multi-Image Kitchen is a powerful open-source tool for repackaging Android partitions. Developed by XDA-recognized developer CryptoNick, Multi-Image Kitchen allows users to make custom ZIPs and edit existing ZIPs.
It detects Android partitions automatically and allows users to create home projects. It also has a mobile version. However, it does not feature comprehensive kitchen design tools. It is better suited to e-commerce workflows than home projects.
The software allows users to create and share projects, and it showcases furniture from popular stores. The mobile version is available, but it lacks some comprehensive features for kitchen design. Since it is intended for e-commerce workflows, Multi-Image Kitchen requires some patience to master.

It can repackage partitions without losing data
Android Image Kitchen is an open-source software that repackages Android partitions without losing any data. It supports both Android and Windows operating systems.
It works by detecting your partition layout and repackaging it. The program also features drag-and-drop support for unpacking. It can repack kernel and ramdisk. It can also edit files using your favorite text editors.
Once you’ve finished editing, the software replaces the original files with newer ones with the correct file permissions.
Free downloads links
If you’re an Android enthusiast or a developer looking to customize your Android device, you’ve probably come across the term «Android Image Kitchen.» In this comprehensive guide, we will explore what Android Image Kitchen is, its functionalities, and how you can download and use it to modify Android images for your specific needs.

What is Android Image Kitchen?
Android Image Kitchen is a powerful tool that allows users to modify Android system images. These system images contain essential files that define the operating system and its functionalities. By customizing these images, you can add or remove features, pre-installed apps, and even tweak the system’s performance to suit your preferences. this tool provides all the necessary functionalities.
Features of Android Image Kitchen
- Unpacking and Repacking Android Images: Android Image Kitchen enables you to unpack the system image, giving you access to its internal files and components. Once you’ve made the necessary changes, you can then repack the image, ready for flashing onto your device.
- Modifying System Apps: With Android Image Kitchen, you can modify or remove system apps that come pre-installed on your device. This feature is especially useful if you want to free up space or replace default apps with alternatives of your choice.
- Changing Boot Animations and Sounds: Personalize your Android device further by using Android Image Kitchen to change the boot animations and startup sounds. This allows you to add a touch of uniqueness to your device every time it powers on.
- Customizing System Settings: Tweak various system settings to optimize your device’s performance and battery life. Android Image Kitchen lets you adjust parameters like CPU frequency, display settings, and more.
Download Android Image Kitchen
File Name: Android.Image.Kitchen.v3.8-Win32
File Size: 8MB
Compatible OS: Windows 7 (32bit & 64bit), Windows 10 (32bit & 64bit)
Password: N/A
Android Image Kitchen Source Code
Also See:
Instructions for installing Android Image Kitchen
- Check System Requirements: Before installing Android Image Kitchen, ensure that your computer meets the minimum system requirements. The tool typically runs on Windows, macOS, and Linux operating systems.
- Download the Tool: Once you’ve found the download section, download the Android Image Kitchen package that corresponds to your operating system.
- Extract the Package: After downloading, extract the contents of the package to a location of your choice on your computer.
- Set Up Dependencies: Some operating systems may require additional dependencies to run Android Image Kitchen smoothly. Follow the installation instructions provided by the developers to set up any necessary dependencies.
- Launch the Tool: Once everything is set up, open a terminal or command prompt, navigate to the folder containing Android Image Kitchen, and start using the tool.
Starting with Android Image Kitchen
Step 1: Connect your Android device to your computer using a USB cable and enable Developer Options and USB Debugging from the device settings.
Step 2: Open Android Image Kitchen on your computer.
Step 3: Use the «Unpack» feature to extract the system image files from your connected Android device.
Step 4: Make the desired modifications to the unpacked files.
Step 5: Use the «Repack» feature to create a modified system image.
Step 6: Flash the modified image onto your Android device using the appropriate tools for your device model.
If you’re looking to customize and tweak your Android device, Android Image Kitchen 2023 is a powerful tool that can help. But it’s important to proceed with caution and follow the guidelines in this guide to avoid any negative impacts on your device. Have fun with your modifications!
Updated on by Editorial Staff
CRB Android Kitchen is a Windows application that allows users to create custom ROMs for their Android devices. It supports Android versions 10, 11, 12, 13 and 14, as well as the Ext4, F2FS, and EroFS file systems. It offers many features, including Magisk Patch, VBMeta Patch, Debloat, and Super Dynamic Partitions, which allow users to tailor their ROMs to their specific needs and get the most out of their devices.
In addition, CRB Android Kitchen supports various file formats, such as zip, 7z, jar, tar, gzip, md5, img, raw, ext4, lz4, bin, dat.br, dat, xz, and tgz, making it a valuable tool for custom ROM creation.
Features of CRB Android Kitchen
Multiple Format Support
CRB Android Kitchen supports multiple file formats. It can handle zip, 7z, jar, tar, ozip, md5, img, raw, ext4, lz4, bin, dat.br, dat, xz, ofp, and tgz files, making it ideal for modifying and extracting data from various sources.
Multiple Project Support
CRB Android Kitchen allows users to manage multiple projects at once easily, making it simple to work on multiple ROM development simultaneously. This feature simplifies the workflow and eliminates the need to switch between different projects constantly.
Project and Partition Deletion
Users can choose which projects or partitions to delete, giving them more control over their ROM development environment. This feature allows them to easily remove projects or partitions that are no longer needed or useful.
ROM Extraction
The CRB Android Kitchen has two modes for extracting ROM: automatic and selective. In automatic mode, the entire ROM is extracted. In selective mode, users can choose specific files or folders to extract. This feature provides users with control over their extracted data.
Customizable Bash Scripts
The CRB Android Kitchen tool can create and customize Bash scripts. This feature is designed for advanced users to automate and expand the tool’s capabilities per their preferences.
One-Click Debloater
Removing unwanted apps from a ROM is easy with the one-click debloater feature. Users can identify and eliminate bloatware with just one click, enhancing the ROM’s performance and reducing storage consumption.
Deodexer
The deodexer feature from CRB Android Kitchen decodes and optimizes the code within APK files. This can improve app performance and reduce their size. This feature helps optimize custom ROMs.
Boot.img Unpacking and Repacking
The CRB Android Kitchen tool allows users to modify the boot.img files, which contain the Android bootloader and kernel. This will enable users to customize their device’s settings or flash custom kernels. The tool allows users to unpack and repack the boot image with ease.
Magisk Patch
The CRB Android Kitchen has a feature that integrates the Magisk tool. This allows users to patch their ROMs with Magisk modules. Magisk provides a way to gain root access without modifying system files. It’s a systemless root method that lets users access the root without causing changes to the system files.
VBMeta Tool
The VBMeta tool manages the Verified Boot metadata, which verifies the boot image’s integrity. With CRB Android Kitchen’s support for VBMeta, users can modify and customize the boot image without compromising its integrity.
Samsung ROM DISARM
ZonalRipper has developed a feature called Samsung ROM DISARM. It helps users to disable the security measures of Samsung devices when using custom ROMs. This feature provides more control over the ROM and allows users to activate certain features that Samsung may have restricted.
Custom Image Building
The CRB Android Kitchen offers a way to create custom images with different settings. Users can adjust the process to make ROMs that fit their preferences and requirements.
Bulk Image Building
CRB Android Kitchen has a helpful feature that makes creating multiple custom ROM versions easy. With bulk image building, users can efficiently generate various images with different configurations.
Super Image Building
The CRB Android Kitchen feature makes installing ROMs easier by allowing users to build complete ROM packages with all necessary components. This feature creates super images, which simplify the installation process.
Super.img Unpacking
CRB Android Kitchen has a feature that allows users to extract the contents of compressed ROM packages called super.img files. This function is helpful for users who need to analyze the contents of these files.
Download CRB Android Kitchen
Following are the Download links from which you can download the tool for Windows (32-bit or 64-bit).
| Version | Download |
|---|---|
| 3.3.2 | Link |
Notes
[*] Donate Version: Donating 20€ or more unlocks features such as F2FS, EroFS, Deodexer, Build super image, Build image bulk, AMLogic unpack/repack, Magisk patch, VBMeta tool, and TAR file manager.
[*] Donation: Click on the keys icon on the Tool to donate through PayPal or Crypto. If you pay the donation through PayPal.me or Crypto, copy the Tool ID and send it to the developer at mrwaehere@gmail.com.
[*] Credits: CRB Android Kitchen was created and distributed by MrWaehere (developer). So, full credit goes to him for sharing the tool for free.