
AMT «PANGAEA» CP-100 IR-Кабинет Симулятор
Для конвертирования WAV файлов IR импульсов Используйте бесплатную программу-конвертер “IR Converter” для ОС Win/MAC — http://media.amt-sales.com/ir-converter/
Описание
Гитаристам хорошо известно, что звучание эл. гитары складывается из большого количества оборудования составляющего звуковой тракт. Характер звучания определяется гитарой, усилителем, гитарным кабинетом и микрофонами, с помощью которых снимается звук.
С помощью устройства AMT Pangaea CP-100 вы можете легко эмулировать звучание любого гитарного кабинета, загружая соответствующие импульсные отклики (IRs) гитарных кабинетов, которые можно легко найти в Интернете (как платные, так и бесплатные).
В память устройства можно загрузить до 100 различных импульсных откликов гитарных кабинетов и по желанию выбирать нужный. При подключении девайса к PC устройство видится как обычный USB-Drive накопитель (PANGAEA_MINI).
При использовании AMT Pangaea CP-100 вы можете пропустить через нее сигнал (не нарушая его целостности), идущий с выхода гитарного лампового усилителя на гитарный кабинет, обработать его с помощью импульсного отклика IR выбранного вами гитарного кабинета и подать сигнал непосредственно на вход широкополосного усилителя, что избавляет от хлопот, связанных с установкой и отстройкой микрофонов у гитарного кабинета.
Функциональные модули устройства AMT Pangaea CP-100 и параметры, доступные для редактирование в помощью приложения «Pangaea CP PA»:
- PH / LINE / BAL — управление типом выходного сигнала (Phones / Line / Ballanced)
- NG – Noise Gate – Шумоподавитель
- CM – Compressor – Компрессор
- PR – Preamp – секция предварительного усилителя (clean канал)
- PA – Power Amp – секция оконечного усилителя (доступны 15 типов моделей усилителей мощности)
- IR – Impulse Response – секция активации импульсного кабинета
- HP – High-pass filter – перестраиваемый фильтр верхних частот
- EQ – Equalizer – 5-ти полосный тонко настраиваемый параметрический эквалайзер (переключаемые режимы работы Pre / Post)
- MAP – Mapping – быстрое и удобное управление пресетами налету (копирование / очистка)
- LP – Low-pass filter – перестраиваемый фильтр нижних частот
- PS – Presence – управление диапазоном верхних-средних частот
- ER – Early Reflections – эффект «ранних отражений» («комната»)
- VL – Volume – регулятор общей громкости пресета
Вы можете вообще избавится от гитарного кабинета, нагрузив ваш усилитель эквивалентом нагрузки (например, AMT PowerEater PE-120), и использовать только широкополосную акустическую систему, головные телефоны или микшерский пульт для звукозаписи. Более того, можете вообще не использовать гитарный усилитель и гитарный кабинет, а просто подать на вход CP-100 сигнал с выхода вашего предусилителя и использовать головные телефоны, микшерский пульт или широкополосную звукоусилительную систему.
На специальный вход AMT Pangaea CP-100 (AUXIN) вы можете подать какой либо источник звукового сигнала (например, MP3 Player) и играть под выбранную вами фонограмму.
Технические характеристики
Номинальный входной уровень: -10 dBV (0.316 Vrms)
Клиппирование входного сигнала, (не менее): +3 dBV (1.42 Vrms)
Уровень выходного сигнала (с параметрами входного сигнала: -10 dBV, IR, EQ, RM-выключены, Volume 31):
- Режим 1 (Выход в режиме головных телефонов, стерео): –2 dBu (0.615 Vrms)
- Режим 2 (Выход в режиме линии, стерео): -10 dBV (0.314 Vrms)
- Режим 3 (Выход в режиме балансной линии, моно): +4 bBu (1.23 Vrms)
Шаг регулятора Volume: прибл. 0.7 dB
Положения аттенюатора входного сигнала: 0 dB, -24 dB, -28 dB, -32 dB, -36 dB, -40 dB
Тип IR файла: wav, 24-bits, 48 kS/sec
Задержка: 1.2 msec
Усечение длины IR-файла: до 20.5 msec
Питание: 12 VDC, 100 mA
Габариты: 30x43x96
Вес: 180 г
Примеры использования аттенюатора
-0 dB – предусилитель (-10 dBV … 0dBu)
-24 dB – усилитель (3W, 8 Ohm/2W,16 Ohm)
-28 dB – усилитель (8W, 8 Ohm/5.5W,16 Ohm)
-32 dB – усилитель (20W, 8 Ohm/14W,16 Ohm)
-36 dB – усилитель (50W, 8 Ohm/35W,16 Ohm)
-40 dB – усилитель (130W, 8 Ohm/95W,16 Ohm)
ПОДРОБНОЕ ОПИСАНИЕ И ХАРАКТЕРИСТИКИ
Более детальная техническая информация, ссылки на руководства / прошивки и проч. доступны в разделе «Мануал & Софт» (см. панель закладок на данной странице выше).

Предназначено для бас гитары:
да
Предназначено для электрогитары:
да
Материал (корпуса):
металл
БП в комплекте:
да, AMT DC 12В, 1.25А AC/DC
Напряжение питания (V):
12
Потребляемый ток (mA):
100
Полярность разъема питания:
минус внутри, плюс снаружи
Встроенный разветвитель питания:
нет
Кабели в комплекте:
USB кабель
Тип питания:
от адаптера DC
Импенданс (Ohm):
не является нагрузкой!
Более детальная техническая информация — в Руководстве Пользователя
Скачать приложение-конвертер импульсов для Win&Mac OS — «IR Converter»
Скачать свежую прошивку — DOWNLOAD FIRMWARE
Скачать приложение для управления настройками прибора под Win&Mac OS — «Pangaea CP PA»
► Скачать бесплатный пак IR импульсов для гитары — IRs for the guitar
► Скачатьбесплатный пак IR импульсов для баса — IRs for the BASS guitar
Все дополнительные материалы для данного девайса — в Медиацентре АМТ
Оставьте Ваш отзыв о продукте
Здесь Вы можете оставить отзыв, либо задать короткий вопрос о данном продукте.
P.S. ВНИМАНИЕ: Для общих вопросов о работе интернет-магазина существует специальный раздел «ВОПРОС/ОТВЕТ» — https://amt-sales.ru/vopros
Вопросы же технического толка, заведомо требующие детальных / длительных пояснений, просьба задавать непосредственно на email техподдержки — support@amtelectronics.com
- Home
-
Documents
- AMT Pangaea CP-100 Manual
8/18/2019 AMT Pangaea CP-100 Manual http://slidepdf.com/reader/full/amt-pangaea-cp-100-manual 1/5 AMT PANGAEA CP-100 All guitarists know well, that the final electro guitar sound is a product of many components of different equipments, with which the sounding is being created. The guitar tones are defined mainly by a guitar, a tube power amplifier, a guitar cabinet and by a set of mikes which capture the sound. With the device AMT Pangaea CP-100, you can easily emulate the sound of any guitar cabinet by loading different IRs (Impulse responses) of guitar cabinets in the device memory. Many different IRs you can easily find in Internet (both paid and free). In the device memory you can load up to 100 IRs and to use any one you want when playing guitar. When connecting CP-100 to PC, there is no need to use any special software, the device is seen as USB disk PANGAEA_MINI. You can also tune the sounding of the IR by volume control, by five bands equalizer and by using FX ROOM. You can pass the signal (without breaking signal integrity) from your tube power amplifier thru CP- 100 to a guitar cabinet, and then you can process the signal by the IR and pass the signal directly to the input of a broadband sound system. This will let you to play without a mike set near a guitar cabinet. You can replace a guitar cabinet with a load equivalent (for example AMT Power Eater PE-120) and use only broadband sound system, headphones or a mixer for recording. More over, you may remove even a tube power amplifier from your equipments, you can pass the signal from your preamp output into the CP-100 input (choosing suitable IR) and use headphones, a mixer or a broad band sound system. In the special CP-100 input (AUX IN) you can put some source a sound signal (for example an MP3 player) and play along with a phonogram chosen by you. Attention! By default, we loaded some cabinets’ IRs in PANGAEA memory. You can see the content of banks and presets by connecting PANGAEA to your PC with USB-cable (included in a package), there is no needs to use power adaptor. Browsing the folders with names Bank_0….9 and Preset_0….9, in some Preset folders you will find some files (for examples KrankLegends-C414-Room.wav or Bogner212_V30s-C414-Cap-0_5in.wav). These are the Cabinets’ IRs files. When disconnecting the device from your PC. follow the safety rules of removing the external USB-drives.This will help you to avoid possible problems.
-
Upload
-
View
221 -
Download
0
Embed Size (px)
Text of AMT Pangaea CP-100 Manual

8/18/2019 AMT Pangaea CP-100 Manual
http://slidepdf.com/reader/full/amt-pangaea-cp-100-manual 1/5
AMT PANGAEA CP-100
All guitarists know well, that the final electro guitar sound is a product of many components of
different equipments, with which the sounding is being created. The guitar tones are defined mainly by
a guitar, a tube power amplifier, a guitar cabinet and by a set of mikes which capture the sound.
With the device AMT Pangaea CP-100, you can easily emulate the sound of any guitar cabinet by
loading different IRs (Impulse responses) of guitar cabinets in the device memory. Many different IRs
you can easily find in Internet (both paid and free). In the device memory you can load up to 100 IRs
and to use any one you want when playing guitar.When connecting CP-100 to PC, there is no need to use any special software, the device is seen as
USB disk PANGAEA_MINI.
You can also tune the sounding of the IR by volume control, by five bands equalizer and by using FX
ROOM.
You can pass the signal (without breaking signal integrity) from your tube power amplifier thru CP-
100 to a guitar cabinet, and then you can process the signal by the IR and pass the signal directly to the
input of a broadband sound system. This will let you to play without a mike set near a guitar cabinet.
You can replace a guitar cabinet with a load equivalent (for example AMT Power Eater PE-120) and
use only broadband sound system, headphones or a mixer for recording.
More over, you may remove even a tube power amplifier from your equipments, you can pass the
signal from your preamp output into the CP-100 input (choosing suitable IR) and use headphones, amixer or a broad band sound system. In the special CP-100 input (AUX IN) you can put some source a
sound signal (for example an MP3 player) and play along with a phonogram chosen by you.
Attention!By default, we loaded some cabinets’ IRs in PANGAEA memory. You can see the content of banks
and presets by connecting PANGAEA to your PC with USB-cable (included in a package), there is no
needs to use power adaptor. Browsing the folders with names Bank_0….9 and Preset_0….9, in some Preset folders you will find some files (for examples KrankLegends-C414-Room.wav or
Bogner212_V30s-C414-Cap-0_5in.wav). These are the Cabinets’ IRs files. When disconnecting the
device from your PC. follow the safety rules of removing the external USB-drives.This will help you
to avoid possible problems.

8/18/2019 AMT Pangaea CP-100 Manual
http://slidepdf.com/reader/full/amt-pangaea-cp-100-manual 2/5
At the beginning make the following:
decide to where you will connect the output and the input of the AMT CP-100.
Connect input and output cables according to your chosen variant of AMT CP-100 usage.
Set the attenuator in a position according to the input signal level.
Connect an AC adaptor and plug it into AC network. AMT CP-100 display will show the AMT
Logo, the number of software version and will stand in the main
Set one of three working modes of the output connector.

8/18/2019 AMT Pangaea CP-100 Manual
http://slidepdf.com/reader/full/amt-pangaea-cp-100-manual 3/5
Choosing the working mode of the output connector “OUT”
Press the button SET/Esc and hold it for 3 sec. The display cursor of CP-100 will be blinking. By short
pressing at the button SET/Esc move the cursor under desired mode position (three possible modes are
printed on the device cover). By long pressing on the button SET/Esc, fix the cursor’s position on
display. By doing this, you will choose the desired working mode of the output connector “OUT”.
Choosing bank and preset
To choose one of ten banks you need to press button «BANKVALUE > » or «BANK VALUE <«, to increment or decrement Bank
Number. To choose one of ten Presets you need to press button
«»PRESET PARAMETERS >» or «»PRESET PARAMETERS <«, to
increment or decrement Preset Number.
Indicators of Input/Output signals’ levels.
The indicator of Input signal’s level (mono )shows the signal level
which comes to CP-100 Input. When it covers all display scale, it
means that Input is overloaded (signal’s too big).
The indicator of Output signal’s level (stereo) shows the signal level
which comes out from the CP-100 Output.
Editing presets.
Menu of preset editing:
To enter in preset editing you have to press the button
«EDIT/ENTER».
The display will show a window with icons of modules. Themodules’ parameters you can change:
CS – IR Cabinet’s module.
EQ – module of graphic equalizer.
RM – Effect module.
VL – volume control of edited preset.
To change parameters of each module you need to choose needed
module for editing, by pressing the button
«PRESET/PARAMETERS» (the chosen module’s icon will be
blinking). If the module is not active, before editing you have to turn it on by short pressing the button
«BANK/VALUE>». The icon of the turned on module will have a light background. The icon of the
turned off module will have the black background.
Working mode 1
Headphones output (stereo)
working mode 2
line output (stereo)
working mode 3
balanced output (mono)

8/18/2019 AMT Pangaea CP-100 Manual
http://slidepdf.com/reader/full/amt-pangaea-cp-100-manual 4/5
Editing the EQ module’s parameters
After entering in the EQ editable module, you can change its
parameters. Choose the editable EQ bandwidth 120Hz,360Hz,2kHz
or 6kHz by pressing the buttons «PRESET/PARAMETERS >» or
«PRESET/PARAMETERS <» (the chosen parameter will be
blinking). With buttons «BANK/VALUE>» and «BANK/VALUE<«
change the value of the parameter. At a short pressing the value will
be changed with an increment/decrement of one, a long pressing will be incrementing/decrementing the value automatically according to
chosen direction.After ending editing the module, press the button
«SET/Esc». In this way you’ll be returned to the window with icons of
modules, so you can proceed with editing the other preset modules
with following saving them, to cancel saving or to continue the
editing.
Editing the RM module’s parameters
After entering in the RM editable module, you can change its
parameters (pic 10), you can change the value of its parameters.
Choose the desired parameter by pressing buttons
«PRESET/PARAMETERS >» or «PRESET/PARAMETERS <» (the
chosen parameter will be blinking). Volume — changes the loudness
of the ROOM Effect, Size — changes the size of the «room» (Short,
Medium and Long).You can change the parameters’ values with the
buttons «BANK/VALUE >» and «BANK/VALUE <«. At a short
pressing the value will be changed with an increment/decrement of
one, at a long pressing the value will be incremented/decremented
the value automatically according to chosen direction. After endingediting the module, press the button «SET/Esc». In this way you’ll be
returned to the window with icons of modules, so you can proceed
with editing the other preset modules with following saving them, to cancel saving or to continue the
editing.
Editing the VL module’s parameters
After entering in the VL editable module, you can change its
parameters. You can change the value of its parameter. Volume-
changes the preset loudness. By pressing the buttons»BANK/VALUE >» and «BANK/VALUE <» you can change the
preset parameter’s value from 0 till 31. At a short pressing the value
will be changed with an increment/decrement of one, at a long
pressing the value will be incremented/decremented the value
automatically according to chosen direction. After ending editing
the module, press the button «SET/Esc». In this way you’ll be
returned to the window with icons of modules, so you can proceed
with editing the other preset modules with following saving them, to
cancel saving or to continue the editing.

8/18/2019 AMT Pangaea CP-100 Manual
http://slidepdf.com/reader/full/amt-pangaea-cp-100-manual 5/5
Saving the changed Preset Modules’ parameters.
Being in Edit mode, after making all desired changes in modules’
parameters, you need to make decision — to save made changes, do
not to save the changes or to continue editing. For it shortly press
the button «SET/Esc», the display will show a menu for the answer
to the question «Save ?» «yes» (blinking), NO and BACK. If you
want to save the changes, shortly press the button «SET/Esc». After
it you will leave the Edit mode without saving made changes. Thesecond way of leaving the Edit mode without saving the changes is
to choose, by pressing the buttons «PRESET/PARAMETERS >»
and «PRESET/PARAMETERS <», the blinking text NO, And if
you decided not to save the changes, just shortly press the button
«EDIT/ENTER».After that you will leave the Edit menu.To
continue editing preset modules, by shortly pressing the buttons
«PRESET/PARAMETERS >» and «PRESET/PARAMETERS <»,choose the blinking text BACK
and shortly press the button «EDIT/ENTER», after that you will return to modules’ edit mode.
Connecting AMT CP-100 to a PC
For connecting AMT CP-100 to a PC, you have to use a USB-Cable,
one end of it you connect to PC, the other end you connect to the
AMT CP-100 (for working with files there is no need to use an AC
adaptor).After connecting, the CP-100 display will show the text
«PC is connected».
Loading files in CP-100 flash memoryHaving connected AMT CP-100 to a PC, you can review the content of any
preset, copy the content of any preset, a Bank itself or all Banks at once. Thecopied content you can paste in any other Preset(s) or Bank(s). The CP-100 is
seen by a system as external USB-disk «PANGAEA_MINI». So you can copy
the content of one AMT CP-100 flash memory and paste it to another one. To
clear the memory, you need only to delete all folders and a file system.pan,
which contains the parameters’ values. After the next turn on the AMT CP-100
system will create the folders and a file system.pan with zero value parameters.
After this initialization, the folder won’t contain any IR files (Guitar Cabinet’s
Impulse Response). The Banks’ and Presets’ fullness can be seen in the main menu. If a Preset number shows only the
outline of the figure, it means that it contains no IR. If a Bank number shows only the outline of the figure, it means that
the bank contains no folders with IRs. If any folder contains an IR, the figure will be showed in full.
 |
[Page 1] AMT Pangaea CP-100PX AMT PANGAEA IR CONVOLUTION PLAYER CP-100FX User’s Guide www.amtelectronics.comRev A (For use with rmware V1.5.7) EVERYTHING JUST BEGINS ©2017 AMT Electronics. Omsk, Russia |
 |
[Page 2] AMT Pangaea CP-100PX Important Safety Instructions ! This symbol, wherever it appears, means “electrical caution!” It indicates the presence of information about operating voltage and potential risks of electrical shock. This symbol, wherever it appears, means “… |
 |
[Page 3] AMT Pangaea CP-100PX Table of Contents Quick Start ………………………………………………………………………5 OMG What Did I Just Buy? ………………………………………………………………………… 5 What’s in the Box? ……. |
 |
[Page 4] AMT Pangaea CP-100PX Phaser …………………………………………………………………………………………………….. 28 Flanger ………………………………………………………………………………………………………. |
 |
[Page 5] AMT Pangaea CP-100PX Quick Start 5 Quick Start OMG What Did I Just Buy? Thank you for purchasing Pangaea CP-100FX Impulse Response convolution player. It is not just a cabinet simulator but a very powerful and exible effects processor. Before designing Pangaea, we�… |
 |
[Page 6] AMT Pangaea CP-100PX Quick Start 6 Top Panel 1. Display: The OLED (organic light-emitting diode) display with a very high contrast ratio and 180-degree viewing angle. 2. Navigation/Conrm Knob: When on the home screen turn to select presets and press to recall the… |
 |
[Page 7] AMT Pangaea CP-100PX Quick Start 7 4. Esc/Cab’s Name: When on the home screen press to see currently chosen Impulse Response’s lename. Otherwise press to return to the upper level menu or to the home screen. 5. Edit: Press to edit the preset or the effect bloc… |
 |
[Page 8] AMT Pangaea CP-100PX Quick Start 8 Front Panel 11. Phones Out: Connect stereo headphones here. Press 2/VOL to adjust volume. Be careful, high volume level can seriously damage your ears. 12. Aux In: Connect any external audio device using a stereo cable with 1/8’’ (… |
 |
[Page 9] AMT Pangaea CP-100PX Quick Start 9 16. Input: Plug your instrument or your amplier’s output here. If you’re using a tube amplier, make sure a speaker or a dummy load is connected to THRU output. Running a tube amp without load will lead to amplier malfunc… |
 |
[Page 10] AMT Pangaea CP-100PX Quick Start 10 Setup A: Home/Studio You don’t need an amp! Pangaea can emulate a Clean channel of an amp, so an overdrive pedal will do. You can even plug your guitar directly into Pangaea. Setup B: Live Turn off the CabSim (see Chapter “Bypas… |
 |
[Page 11] AMT Pangaea CP-100PX Quick Start 11 Setup C: Live + FOH (Mono) Switch to 1 R mode (see Chapter “Dual Cabinet Mode”). This will disable CabSim in the Left channel. Now you can monitor all effects through your amp on stage while providing studio-quality sound with Ca… |
 |
[Page 12] AMT Pangaea CP-100PX Getting Around 12 Getting Around Home Screen 1. Preset Name: The name of the currently selected preset. 2. Preset Number: Currently selected preset number. Blank number means the preset is empty. All effect blocks of an empty preset are disabled. … |
 |
[Page 13] AMT Pangaea CP-100PX Getting Around 13 The effect blocks are: • RF: Resonance lter • GT: Noise gate • CM: Compressor • PR: Preamp simulator • PA: Power amp simulator • IR: Impulse Response/Cabinet simulator • EQ: Parametric EQ • DL: Delay • … |
 |
[Page 14] AMT Pangaea CP-100PX Editing Presets 14 Tuner Out of tune? Go to the Home screen and press 5/TUNER button. Pangaea has a standard chromatic tuner with reference frequency 440Hz. Pick a string and you’ll see the closest note on the screen. The lower triangle shows … |
 |
[Page 15] AMT Pangaea CP-100PX Editing Presets 15 Copying Effect Blocks You can copy effect’s settings between presets. To do that select the effect block you want to copy at the Preset screen and press 5/TUNER. You’ll be prompted to choose the destination preset. Select i… |
 |
[Page 16] AMT Pangaea CP-100PX Editing Presets 16 • RF: LFO Rate; Frequency • CM: Volume; Threshold • PA: Volume; Slave • DL: Volume; Feedback; Tap • PH, FL, CH: Volume; Rate • RV: Volume; Time • TR: Intensity; Rate; Tap Using MinVal and MaxVal you can calibra… |
 |
[Page 17] AMT Pangaea CP-100PX Editing Presets 17 Saving/Copying/Naming a Preset After you’re done editing a preset, return to the Preset screen and press Esc. You’ll be prompted to save the preset. Use Navigation/ Conrm knob to choose between No, Return or Yes. You can … |
 |
[Page 18] AMT Pangaea CP-100PX Effect Blocks 18 Effect Blocks Resonance Filter This lter is the rst one in the virtual chain of effects. It lets you cut some frequency ranges out of your guitar tone. For example, you can create an effect similar to wah-wah pedals. This eff… |
 |
[Page 19] AMT Pangaea CP-100PX Effect Blocks 19 • Lo freq: Sets the lower limit for the cutoff frequency. The higher this limit is set, the lower the width of the effect gets. The full width (cutoff frequency range) is from 26 Hz to 6545 Hz. Range: 0 (26 Hz) to 127 (560 Hz)…. |
 |
[Page 20] AMT Pangaea CP-100PX Effect Blocks 20 Noise Gate Noise Gate is used to attenuate the signal in pauses when you don’t play guitar, helping you to hide some hiss, hum and other noise present in any guitar setup. You can control its behavior using following parameters: �… |
 |
[Page 21] AMT Pangaea CP-100PX Effect Blocks 21 Compressor has the following parameters to tweak: • Thresh: Everything above the set threshold level gets compressed and the overall signal is amplied. You can assign a controller to this parameter. Use Compr Thresh as de… |
 |
[Page 22] AMT Pangaea CP-100PX Effect Blocks 22 Preamp Simulator To avoid any confusion, let’s draw the line between preamps and effect pedals. Preamps are self-sufcient units with one or more channels. They have a strong output, so-called line level output, and are able t… |
 |
[Page 23] AMT Pangaea CP-100PX Effect Blocks 23 Power Amp Simulator IR is a very good representation of a cabinet’s sonic characteristics. But since it’s dynamic behavior is linear, it can’t reproduce the compression, saturation and playing feel of a cranked up tube power … |
 |
[Page 24] AMT Pangaea CP-100PX Effect Blocks 24 3. SE 6L6: Generic single-ended Class A amp running 6L6 tubes 4. SE EL34: Generic single-ended Class A amp running EL34 tubes 5. AMT TC-3: Based on AMT Electronics TubeCake TC-3 power amplier 6. California: Based on* Mesa/Boog… |
 |
[Page 25] AMT Pangaea CP-100PX Effect Blocks 25 EQ This effect block provides 5-band parametric equalizer for ne-tuning your tone. Use Navigation/Conrm knob to pick a band and press the knob to adjust it. Each band has -15 to +15 dB range. If you scroll further to the ri… |
 |
[Page 26] AMT Pangaea CP-100PX Effect Blocks 26 Delay Delay is the most used guitar effect. It memorizes the audio signal and plays it back once or several times after a period of time. Pangaea has two delay lines running at the same time and a modulation effect. This effect blo… |
 |
[Page 27] AMT Pangaea CP-100PX Effect Blocks 27 • D_Pan: Panning for the rst delay line. Range: L63 to R63. • D2 Vol: Volume level of the second delay line. When set to maximum its volume is equal to the rst delay line. Range: 0 to 127. • D2 Pan: Panning for the … |
 |
[Page 28] AMT Pangaea CP-100PX Effect Blocks 28 Phaser Phaser is a modulation effect based on splitting the signal into two paths and changing the phase of one of them using all-pass lters. When both signal paths are mixed together some frequencies appear to be out of phase a… |
 |
[Page 29] AMT Pangaea CP-100PX Effect Blocks 29 • Stage: The number of lters called stages. Two stages create one notch. More notches create richer Phaser effect. You can choose between 4, 6 or 8 stages. • HPF: High-pass lter passes through frequencies above the cutof… |
 |
[Page 30] AMT Pangaea CP-100PX Effect Blocks 30 • Delay: Species the delay of the second signal path changing the color of the effect. Longer delay produces more notches. Range: 0 (0 ms) to 127 (21 ms). • F_Back: Feeding some of the lter’s output back to its input … |
 |
[Page 31] AMT Pangaea CP-100PX Effect Blocks 31 • Type: There are 4 types of effect to choose from: 1. Chorus: Standard single voice Chorus based on a single Delay line with square modulation 2. Chorus S: Stereo Chorus with two Delay lines and square modulation. Delays share… |
 |
[Page 32] AMT Pangaea CP-100PX Effect Blocks 32 Reverb Reverb simulates placing your amp in a big, reverberant space with a lot of echo, like a church, a huge concert hall or a parking garage. It wets your sound, smooths it out, and may help with the sustain. Pangaea has a pow… |
 |
[Page 33] AMT Pangaea CP-100PX Effect Blocks 33 Tremolo Tremolo is an amplitude modulation effect controlled by a low-frequency oscillator (LFO). It’s like someone would turn the volume of the amplier up and down creating pulsations. • Intens: Sets the intensity of the ef… |
 |
[Page 34] AMT Pangaea CP-100PX Controllers 34 Controllers Pangaea CP-100FX was designed as a very exible device for use in any environment. It provides a number of tools for performing musicians. By means of built-in Footswitches, optional Expression Pedal and External MIDI C… |
 |
[Page 35] AMT Pangaea CP-100PX Controllers 35 • Controller: Lets you access parameters of effect blocks. For example, to turn effects on or off. See full list of parameters in Chapter “Assigning Controllers”. At the same time, it is possible to choose the number of MIDI … |
 |
[Page 36] AMT Pangaea CP-100PX Controllers 36 As opposite to digital MIDI foot controllers, regular expression pedals are analog devices and may need calibration to work properly. If you have a feeling that your pedal doesn’t cover the full range of values, follow this procedu… |
 |
[Page 37] AMT Pangaea CP-100PX Global Settings 37 Global Settings Attenuator If you’re connecting Pangaea to the speaker output of an amplier, chances are the sound level will be very high and will clipping will occur. Use built-in Attenuator to reduce input level and avoid… |
 |
[Page 38] AMT Pangaea CP-100PX Global Settings 38 Bypassing The Cabinet Simulator If you intend to connect Pangaea into the effect loop of an amplier and don’t need the cabinet simulation, you can disable it for all presets at once. This will not affect any cabinet prole… |
 |
[Page 39] AMT Pangaea CP-100PX Global Settings 39 MIDI Channel Pangaea uses one of 16 MIDI channels to communicate with other devices over MIDI. In order for this communication to be successful both devices shall use the same channel. To change MIDI channel used to send and rec… |
 |
[Page 40] AMT Pangaea CP-100PX USB & Computer Operations 40 Global Tempo In the sytem menu you can nd parameter Tempo that may be set to either Preset or Global. If it is set to Preset, every time a new preset with Delay is recalled, Delay Time is set to the value store… |
 |
[Page 41] AMT Pangaea CP-100PX USB & Computer Operations 41 Factory Reset If you need to reset Pangaea, connect it to the computer using USB cable and access its internal storage. You can reset system settings but keep all presets or vice versa. Simply delete corresponding �… |
 |
[Page 42] AMT Pangaea CP-100PX USB & Computer Operations 42 Using Digital Output (S/PDIF) Pangaea’s internal sample rate is 48 kHz. When using Digital Output to connect to another device, its sample rate must be set to 48 kHz as well. In the system menu you’ll nd S/P… |
 |
[Page 43] AMT Pangaea CP-100PX Appendix A: Signal Flow 43 Appendix A: Signal Flow Input Main Out Phones Out Balanced Out Thru/Bypass Out Attenuator A/D AMT AMT COMPGATE EQ DELAY PHFL TRRVERCH D/A S/PDIF Out Master Volume Phones Volume RF VOL POWER AMP IR PREAMP MASTER EQ Aux In … |
 |
[Page 44] AMT Pangaea CP-100PX Appendix B: Technical Specications 44 Appendix B: Technical Specications Number of Presets 99 A/D & D/A converters 24 bit Sampling Frequency 48 kHz Latency Single cabinet mode: 1.5 ms Dual cabinet mode: 1.8 ms IR Truncate … |

UPD 29/09/16: Информация в статье обновлена на актуальную в связи с выходом прошивки версии 1.5.1 (beta)
Привет, Друзья!
Сегодня поговорим о том, какие возможности по управлению различными параметрами того или иного пресета в реальном времени таит в себе прибор AMT Pangaea CP-100FX.
ПРИМЕЧАНИЕ: Информация актуальна для прошивки версии 1.5.1 (beta), которую можно найти на странице загрузок в Медиацентре АМТ. Напомню, что самая свежая прошивка для Пангеи FX всегда доступна по постоянной ссылке.
Структура основных свойств пресета
Итак, войдя в главное меню настроек любого пресета CP-100FX (а для этого достаточно выбрать нужный нам пресет — например, энкодером — и нажать кнопку «Edit» справа от экрана Пангеи), мы увидим следующее: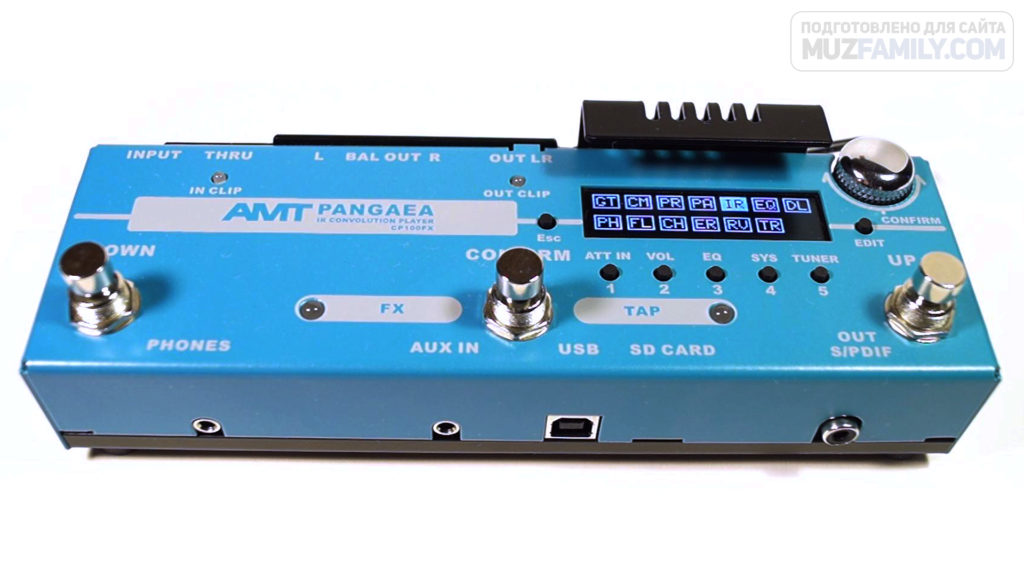 Чтобы понять, что скрывается под аббревиатурой каждого из двухбуквенных сокращений на дисплее Пангеи, рассмотрим поясняющую схему:
 Как известно, многими параметрами Пангеи FX можно управлять в реальном времени:
— через midi команды (например, с помощью внешнего midi контроллера);
— с помощью трех «родных» кнопок-футсвичей самой Пангеи FX;
— с помощью внешней педали экспрессии.
Какими же именно параметрами CP-100FX можно управлять в реальном времени?
Для ответа на этот вопрос я подготовил таблицы, которые вам помогут с этим разобраться.
Самый важный для нас столбец во всех трех нижеприведенных таблицах — третий: «Тип параметра управления «Destin» (Destination)». Именно здесь приведены названия всех параметров для глобальных свойств пресета (или конкретных свойств того или иного эффекта), которыми можно управлять в реалтайме.
Для каждого пресета доступны следующие блоки настроек:
| Краткое наименование в свойствах пресета | Полное название | Тип параметра управления «Destin» (Destination) |
|---|---|---|
| GT | Noise Gate | отсутствует |
| CM | Compressor | Compressor On Off Compressor Thresold Compressor Volume |
| PR | Preamp | Preamp On Off |
| PA | Poweramp | Amplif On Off |
| IR | IR impulses | Cabsim On Off |
| EQ | Equalizer | Equal On Off |
Блок эффектов FX:
| Краткое наименование в свойствах пресета | Полное название | Тип параметра управления «Destin» (Destination) |
|---|---|---|
| DL | Delay | Delay On Off Delay Volume Delay Feedback Delay Tap |
| PH | Phaser | Phaser On Off |
| FL | Flanger | Flanger On Off |
| CH | Chorus | Chorus On Off |
| ER | Early Reflection | отсутствует |
| RV | Reverb | Reverb On Off |
| TR | Tremolo | Tremolo On Off Tremolo Intensity Tremolo Rate Tremolo Tap |
Также имеется возможность управления громкостью пресета:
| Краткое наименование в свойствах пресета | Полное название | Тип параметра управления «Destin» (Destination) |
|---|---|---|
| отсутствует | Preset Level | Preset Level |
Как правильно трактовать данные параметра «Destin»?
Все просто. Например, «Amplif On Off» означает, что на любую кнопку «встроенного» футсвича Пангеи (либо на конкретную кнопку внешнего миди контроллера) можно назначить включение/выключение эмулятора «оконечника», а, например, параметр «Delay Tap» говорит о том, что, по аналогии, любая кнопка (как на встроенном в Пангею футсвиче, так и на внешнем миди контроллере) может выполнять функцию «тапирования» для эффекта «Дилей».
Особая «прелесть» заключается в том, что можно на одну и ту же кнопку footswitch назначить управление сразу несколькими параметрами «Destin» (сокращение от «Destination» — дословно означает «Место назначения»). Например, можно легко запрограммировать прибор таким образом, чтобы при нажатии на кнопку футсвича Пангеи «COMFIRM» (та, которая посередине) в один и тот же момент времени включался хорус с флэнжером, активировался эквалайзер пресета (необходимые настройки которого мы, подразумевается, сохранили заранее), но при этом отключался бы ревер и изменялась общая громкость нашего пресета. То есть, скажем, таким образом можно в буквальном смысле этого слова «одним движением ноги» кардинально изменить структуру гитарного звука, переходя с рифовой партии на соло в песне всего одним нажатием на кнопку футсвича.
К слову, для того, чтобы в Пангее FX перейти к настройке вышеупомянутого параметра «Destin», необходимо вначале попасть в меню управления контроллерами. Это сделать просто: достаточно войти в меню настроек любого пресета через кнопку «Edit» и далее нажать на кнопку «EQ», расположенную под дисплеем: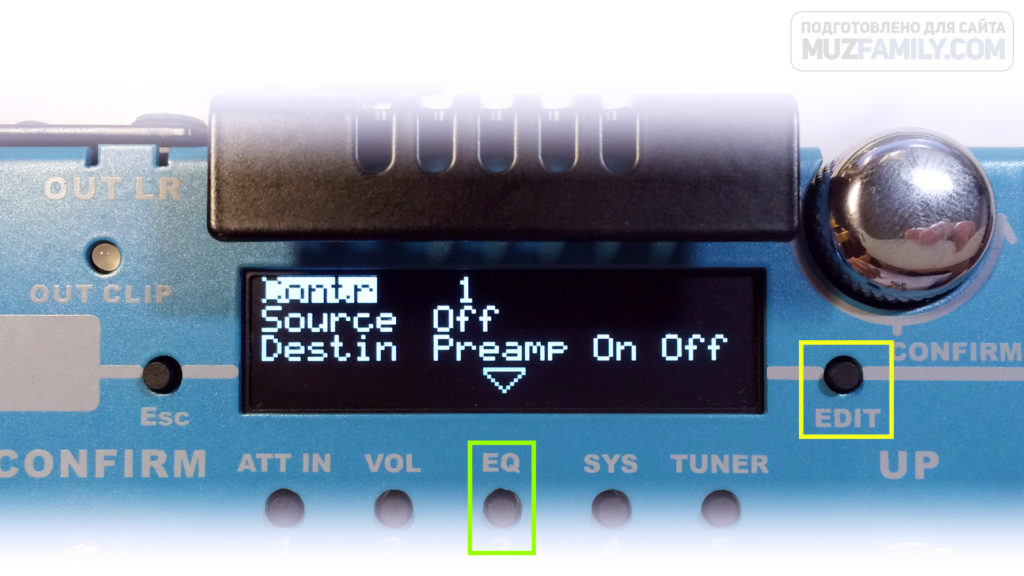
В этом меню нам, в первую очередь, доступен параметр «Contr» — «Контроллеры», где мы можем как душе угодно настроить до 16 различных контроллеров для нашего пресета.
Там же, чуть выше параметра «Destin», располагается и другой параметр «Source», где мы можем произвести необходимые настройки с «источником» — то есть как раз здесь мы выбираем, на какую конкретную кнопку «родного» футсвича Пангеи (либо внешнего миди контроллера/педали экспрессии) мы назначим управление тем или иным параметром из пункта «Destin».
Для «Source» доступны следующие варианты настроек:
| Название параметра | Расшифровка | Примечание |
|---|---|---|
| Off | Управление отключено | |
| Expression | Педаль экспрессии | Подразумевает подключение к CP-100FX внешней педали |
| FSW DOWN | «Родная» footswitch кнопка CP-100FX | Расположена на приборе слева |
| FSW CONFIRM | «Родная» footswitch кнопка CP-100FX | Расположена на приборе посередине |
| FSW UP | «Родная» footswitch кнопка CP-100FX | Расположена на приборе справа |
| СС# | Параметр «Control Change». Доступные значения: 0..127 | Необходимо при работе с другими устройствами по протоколу MIDI |
Ну и, чтобы снять все лишние вопросы — еще раз покажу те самые «три родных футсвича» Пангеи FX, о которых говорилось ранее: 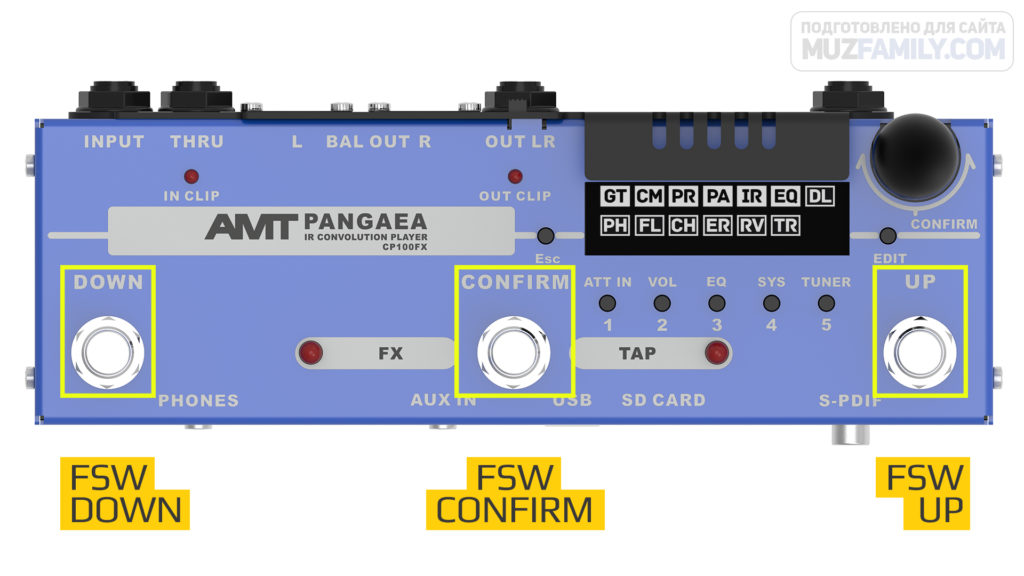
Так как же понять, что такое «контроллеры»? И вообще, как с ними «управляться» в Пангее CP100-FX?
«Контроллеры» нужны для управления теми или иными параметрами пресета — думаю, вы это уже и так поняли. А как это все (и главное, зачем?) работает на практике, применимо к нашему девайсу — лучше всего будет понять, рассмотрев простой пример.
На самом деле, тут логика достаточна проста.
Допустим, контроллер №1 мы назначим на футсвич Пангеи «FSW CONFIRM» для управления включением/выключением хоруса: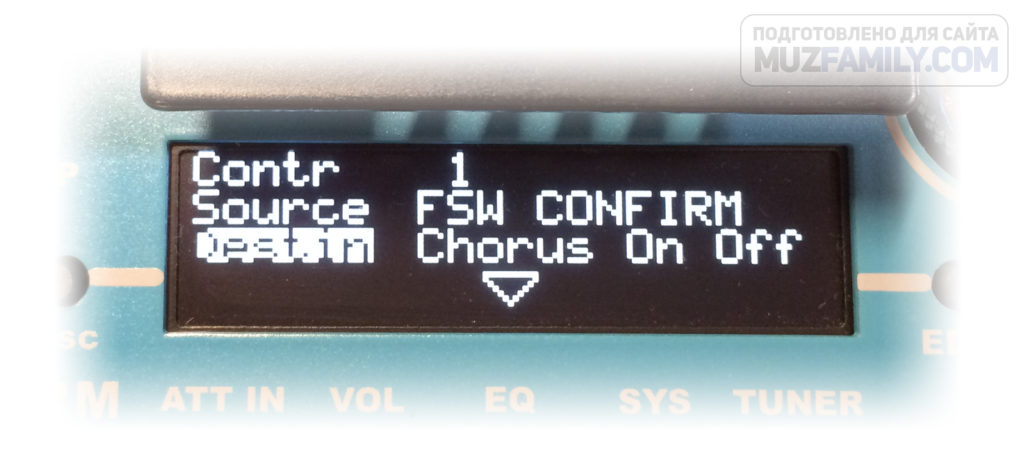 Контроллер №2 — назначим на тот же самый футсвич (то есть выберем в «Source» снова «FSW CONFIRM»), но управлять он уже будет, скажем, включением/выключением ревера:
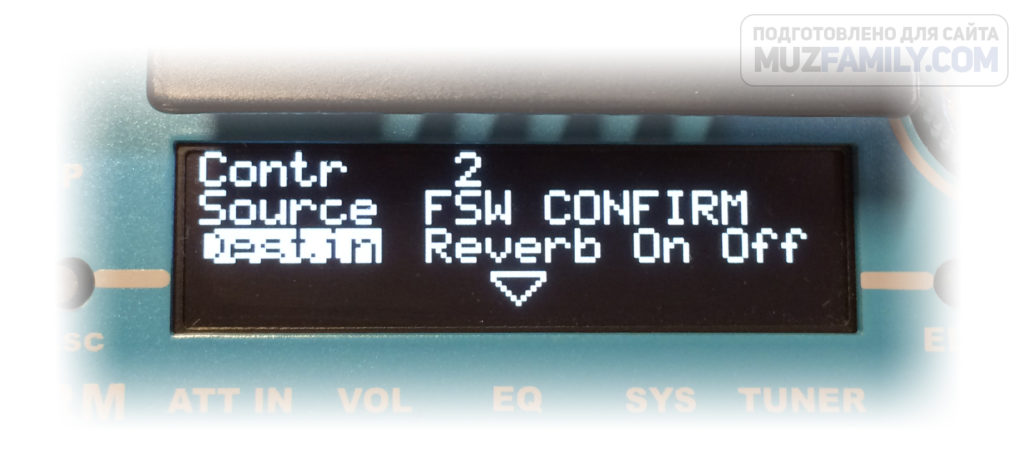 В итоге получится, что при нажатии на кнопку футсвича Пангеи, расположенную посередине (кнопка подписана как «CONFIRM») — одновременно включится хорус и ревер. При этом, при повторном нажатии на кнопку — оба эффекта отключатся.
Продолжим конфигурирование контроллеров нашего пресета.
Контроллер №3 — назначим на педаль экспрессии для управления громкостью пресета (например, плавного управления громкостью):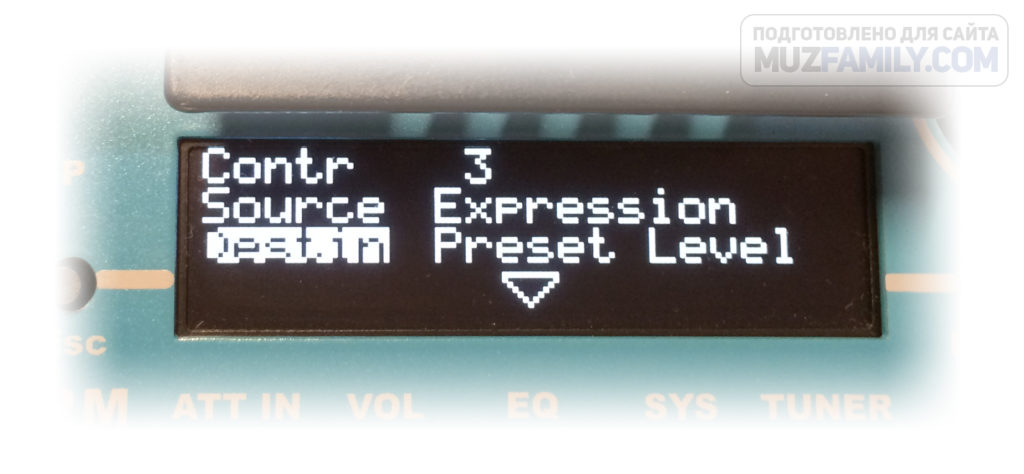 Ну и Контроллер №4 — назначим на футсвич Пангеи «FSW DOWN» для управления TAP TEMPO для дилея:
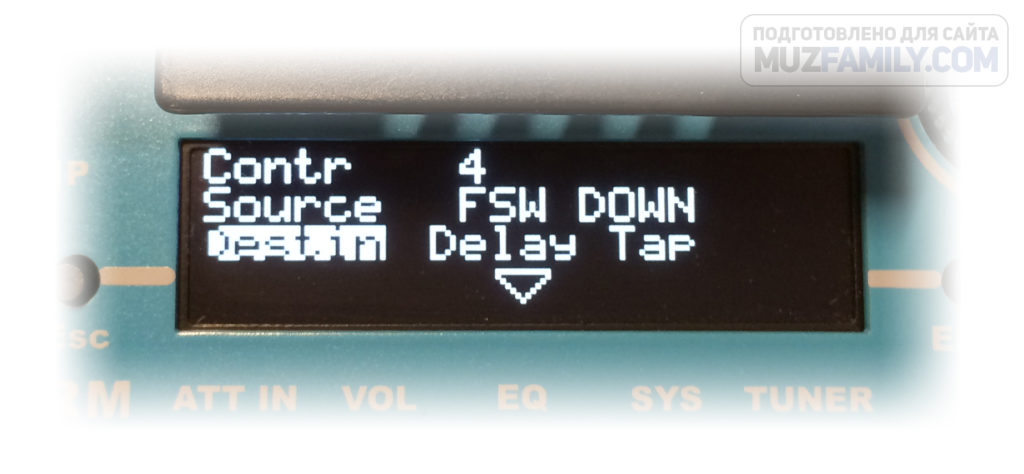 Что в итоге мы имеем: при нажатии на «левую» кнопку футсвича Пангеи управляем параметром «Time» для дилея в реальном времени через TAP TEMPO (то есть «тапаем» его), при нажатии на «центральную» кнопку футсвича — у нас включается/выключается связка эффектов «хорус+ревер», а с помощью подключенной внешней педали экспрессии изменяем (опять же, в реальном времени) громкость нашего пресета.
А вот теперь задумайтесь: мы использовали всего 4 контроллера, а у нас их — целых 16 (!), причем, для каждого пресета мы можем настраивать все эти контроллеры по-своему, как угодно! И ведь мы тут еще даже не рассматривали возможности настройки Пангеи для работы с внешним миди контроллером или вообще, использования самой Pangaea в качестве миди контроллера для управления каким-то другим прибором (например, для переключения каналов гитарного усилителя с управлением по midi)…
Ну что, теперь-то вы ощутили весь потенциал и мощь «управленческих» возможностей этого чудо прибора AMT Pangaea CP-100FX?:)
Поверьте, Пангея не оставит вас равнодушной!