

Интересный аппарат. В течении 7 лет я наблюдаю за выходящими програмными
модулями реверберации и жду, когда же со студии можно будет выкинуть все
железо. К сожалению програмные аналоги Lexicon звучат гораздо хуже
бюджетного Alesis Microverb 4. Вообщем купил я прибор, который на момент
выхода стоил около $1000. Сравнивался прибор с Alesis Microverb 4, Alesis
Midiverb 4, Lexicon MPX 100. Сводилась фонограмма и на посыл-возврат
пульта ставились сравниваемые приборы. Скажу сразу — Quadraverb был лучшим,
речь идет именно о реверберации. Остальные приборы звучат впринципе
индентично друг другу, причем работу Lexicon конкретно слышно, он видимо
пытается создать свой фирменный звук, но на $4000 не дотягивает. На мой
взгляд работа прибора не должна быть заметна, и если в дешевых Alesis
можно найти такую программу (за исключением больших обьемов в медленных
песнях), то в дешевом Lexicon их нет. По этой же причине мне сильно не
понравилась обработка ZOOM, ее металлические хвосты прут из любой фанеры.
Alesis Quadraverb проявил два замечательных свойства: его работы не слышно,
просто у вокала появляется обьем, и самое главное его обьем чудесным
образом меняет частотную характеристику вокала. Появляется прозрачность,
вокал становится более читаемым. Такого у дешевых приборов я не слышал.
Могу предположить, что конверторы хотя и 16 бит но более качественные и
прибор делался как основной ревербератор студии, а не набор безумств
хорус + ленжер + дилей + ревер в различных конфигурациях. В Alesis
Quadraverb за каждый эффект отвечает отдельный блок, а тот же MIcroverb 4
в комбинированной программе ревер + дилей давал откровенную лажу, на
инструмент еще можно поставить на вокал уже нет. Открываю маленький
секрет: на дешевых приборах фирменного звучания можно добиться подрезав
эквалайзером верх у реверберационного хвоста на холле (с комнатами такой
трюк не проходит). Чего от прибора добиться не смог — качественного дабл
трека — если кто поделится секретом буду рад. Подвожу итог — прибор
полюбил всей душой и думаю что до появления дорогого Lexicon он будет
основным на студии. На сведении пару раз пытался использовать другие
приборы в качестве основного ревера — они однозначно проигрывали, так что
если он вам попадется — берите.
Руководстве по эксплуатации Alesis QuadraVerb 2 — вам приходилось его терять? Поскольку вы попали сюда, наверняка с вами это случилось. Но вы не единственный человек, сталкивающийся с проблемами с хранением руководства по эксплуатации всех домашних устройств. Ниже несколько советов, касающихся того, зачем собирать руководства по эксплуатации.
Руководстве по эксплуатации Alesis QuadraVerb 2 это определенный вид технической документации, являющейся неразлучным элементом каждого устройства, которое мы приобретаем. Они отличаются между собой количеством информации, которую можно найти на тему данного устройства: напр. Alesis QuadraVerb 2. Конечно же, если производитель считает что необходимо передать нам большее количество информации, касающейся устройства Alesis QuadraVerb 2, то стоит ее хоть раз прочитать — в начале, сразу же после покупки данной вещи. Однако мы считаем, что инструкции должны заключать самую важную, наиболее необходимую информацию о Alesis QuadraVerb 2, так, чтобы не отнимать желания пользователя прочесть ее уже в самом начале. Несомненно, если устройство Alesis QuadraVerb 2 имеет много продвинутых функций, неизбежно большое количество информации в содержании этого документа.
Które из информации в инструкции Alesis QuadraVerb 2 необходимо обязательно прочитать?
- Информацию, касающуюся правильного использования и ухода за устройством Alesis QuadraVerb 2 — нам необходимо ознакомиться с основными правилами, чтобы в случае проблем с устройством сервисный центр не отказал нам в гарантийном обслуживании, из-за неправильного использования
- Информация, касающаяся самых частых проблем с Alesis QuadraVerb 2 и способы их решения
- Информация, касающаяся гарантии устройства Alesis QuadraVerb 2 и ближайших сервисных центров, способных починить устройство в соответствии с рекомендациям производителя Alesis
Как хранить инструкции дома?
Хорошей идеей является предназначение одного ящика, в котором бы хранилась инструкция Alesis QuadraVerb 2 а также всех других домашних устройств которыми мы пользуемся. Тогда значительно легче вам будет ее найти, чем искать в родных коробках, которые наверняка уже выбросили вы, или другие домочадцы. Раз в год достаточно просмотреть ящик и выбросить инструкции, которые касаются устройств, которыми вы уже не пользуетесь. Таким образом вы избежите хранения ненужных документов, а останутся только актуальные. Вы можете также скачать и распечатать инструкцию Alesis QuadraVerb 2 чтобы разместить ее в своем ящике.
Похожие инструкции
-
Страница 1
A L ES I S QuadraVerb2 Reference M a nu a l[…]
-
Страница 2
QuadraVerb 2 Reference Manual 1 Introduction Thank you for purchasing the Alesis QuadraVerb 2 simultaneous effects processor. To take full advantage of of the QuadraVerb 2’s fuctions, and to enjoy long and trouble free use, please read this user’s manual carefully. How To Use This Manual This manual is divided into the following sections descri[…]
-
Страница 3
2 QuadraVerb 2 Reference Manual[…]
-
Страница 4
Contents QuadraVerb 2 Reference Manual 3 C ONTENTS 1: Setting Up …………………………………………………………………………………………………… 7 Unpacking and Inspection …………………………………………………………………………… 7 AC Power Hookup ……………………………….[…]
-
Страница 5
Contents 4 QuadraVerb 2 Reference Manual Stereo Chorus……………………………………………………………………………….. 36 Quad Chorus…………………………………………………………………………………. 37 Mono Flanging …………………………………………………………………..[…]
-
Страница 6
Contents QuadraVerb 2 Reference Manual 5 Input Level ……………………………………………………………………………………. 57 Output Level …………………………………………………………………………………. 57 LED Meter………………………………………………………………….[…]
-
Страница 7
Contents 6 QuadraVerb 2 Reference Manual To a Single ADAT …………………………………………………………………………… 88 To Two or More ADATs ……………………………………………………………………. 89 To the AI-1 ………………………………………………………………………….[…]
-
Страница 8
Setting Up — Chapter 1 QuadraVerb 2 Reference Manual 7 C HAPTER 1 S ETTING U P Unpacking and Inspection Your QuadraVerb 2 was packed carefully at the factory, and the shipping carton was designed to protect the unit during shipping. Please retain this container in the highly unlikely event that you need to return the QuadraVerb 2 for servicing. The[…]
-
Страница 9
Chapter 1 — Setting Up 8 QuadraVerb 2 Reference Manual quality cables cost more, they do make a difference. Route cables to the QuadraVerb 2 correctly by observing the following precautions: • Do not bundle audio cables with AC power cords. • Avoid running audio cables near sources of electromagnetic interference such as transformers, monitors,[…]
-
Страница 10
Setting Up — Chapter 1 QuadraVerb 2 Reference Manual 9 TM Instrument or Effect Send Right Input T o Amplifier or Mixing Console Right Output • Mono In, Stereo Out. While still using a mono input, you could connect two cables to the [L] and [R] OUTPUTS of the QuadraVerb 2 to a stereo amplification system or two mixer inputs. TM Instrument or Effec[…]
-
Страница 11
Chapter 1 — Setting Up 10 QuadraVerb 2 Reference Manual The QuadraVerb 2 may be connected to a mixing console in several ways. Usually, it is connected to the auxiliary send and return controls of the mixer. Another method of interfacing is to connect the unit directly to the insert send and return patch points of the channel that is to be effected[…]
-
Страница 12
Setting Up — Chapter 1 QuadraVerb 2 Reference Manual 11 J Most Preset Programs route the LR IN signal to the LR OUT.When connecting to a mixer’s aux sends and returns. the Global Direct Signal Mute should be set to ON. To remove all direct routings of inputs to outputs on all Programs simultaneously: ¿ Press [GLOBAL]. The [GLOBAL] LED will be li[…]
-
Страница 13
Chapter 1 — Setting Up 12 QuadraVerb 2 Reference Manual Mono In — Stereo Out. If you only want to feed the QuadraVerb 2 a mono input, but wish to connect both of its outputs back to the mixer, you will need three 1/4″ audio cables. Connect a cable from an effect send to the [R] INPUT of the QuadraVerb 2, another cable from the [L] OUTPUT of th[…]
-
Страница 14
Setting Up — Chapter 1 QuadraVerb 2 Reference Manual 13 Usually, insert connections require a special, stereo-splitting Y-cord to be connected (one stereo plug provides both send and return while two mono plugs connect separately to an input and output). These are known as TRS connectors (tip-ring- sleeve). The tip of the stereo plug typically carr[…]
-
Страница 15
Chapter 1 — Setting Up 14 QuadraVerb 2 Reference Manual Stereo. In the case where a stereo instrument, such as a keyboard or sampler, is connected to two separate channels of a mixing console, you will need two 1/4″ TRS cables, one for each channel. The connection is made in a similar fashion as described above. MIXER Left Master Insert Right […]
-
Страница 16
Setting Up — Chapter 1 QuadraVerb 2 Reference Manual 15 1 2 3 Tip Ring Sleeve Avoiding Ground Loops In today’s studio, where it seems every piece of equipment has its own computer chip inside, there are many opportunities for ground loop problems to occur. These show up as hums, buzzes or sometimes radio reception, and can occur if a piece of equ[…]
-
Страница 17
Chapter 1 — Setting Up 16 QuadraVerb 2 Reference Manual • To recall programs using MIDI program change messages • To control various parameters inside the QuadraVerb 2 in realtime via MIDI controllers ( example: A keyboard’s mod wheel, or pedals, etc.) • To send and receive SysEx (System Exclusive) dumps of individual programs or the entire[…]
-
Страница 18
Setting Up — Chapter 1 QuadraVerb 2 Reference Manual 17 To adjust the Advance Footswitch’s set of Programs: ¿ Press [GLOBAL]. The [GLOBAL] LED will light. ¡ Press [PAGE >] once. This selects page 2, and the display will read: FOOTSWITCH: 00 Pset TO 00 Pset ¬ Turn the [VALUE/ENTER] knob to adjust the Program number to begin the range (Preset[…]
-
Страница 19
18 QuadraVerb 2 Reference Manual[…]
-
Страница 20
Your First Session With The QuadraVerb 2 — Chapter 2 QuadraVerb 2 Reference Manual 19 C HAPTER 2 Y OUR F IRST S ESSION W ITH T HE Q UADRA V ERB 2 Powering Up After making your connections, turn on the system’s power using this procedure: ¿ Before turning on the QuadraVerb 2’s power, check the following items: • Have all connections been made[…]
-
Страница 21
Chapter 2 -Your First Session With The QuadraVerb 2 20 QuadraVerb 2 Reference Manual The Value/Enter Knob Located just to the right of the custom LCD display, the [VALUE/ENTER] knob is used to select Programs and adjust parameter values that appear in the display. However, it is not just a knob, it is also a button. Depending on what parameter you […]
-
Страница 22
Your First Session With The QuadraVerb 2 — Chapter 2 QuadraVerb 2 Reference Manual 21 Auditioning Internal Programs You can audition the Programs in the QuadraVerb 2 by using the [VALUE/ENTER] knob or the front panel buttons, whenever the QuadraVerb 2 is in Program mode (the [PROGRAM] button’s LED will be lit). To select a Program using the [VALU[…]
-
Страница 23
Chapter 2 -Your First Session With The QuadraVerb 2 22 QuadraVerb 2 Reference Manual Example Programs The following are descriptions of the three example Programs in the Preset bank. 96: “VerbOfMyDreams” This Program is fairly simple in design, using only 3 Blocks to provide EQ, Delay and Reverb. It is designed for a mono audio source to be con[…]
-
Страница 24
Your First Session With The QuadraVerb 2 — Chapter 2 QuadraVerb 2 Reference Manual 23 Adjusting Effects Levels Although we may not want to get started editing Programs just yet (that’s left for chapter 4), it is usually necessary to have immediate control over the output levels of each Effect Block, as well as the amount of direct level going fro[…]
-
Страница 25
Chapter 2 -Your First Session With The QuadraVerb 2 24 QuadraVerb 2 Reference Manual « Use the [< BLOCK >] buttons to select other Blocks, and adjust their levels, as described above. J Mix parameters affect the Program and are only temporary unless the Program is stored into memory before a another Program is recalled. See later in this cha[…]
-
Страница 26
Your First Session With The QuadraVerb 2 — Chapter 2 QuadraVerb 2 Reference Manual 25 Storing Edited Programs Once you are satisfied with the changes you have made to a Program, or are creating a new Program from scratch, you will need to store your edited Program back into memory. The QuadraVerb 2 will store the currently selected Program in memor[…]
-
Страница 27
Chapter 2 -Your First Session With The QuadraVerb 2 26 QuadraVerb 2 Reference Manual Bypassing Effects At any time you can bypass all effects at once, thereby allowing the direct signal to pass through the QuadraVerb 2 unchanged. This can be done in two ways: • by pressing the [BYPASS] button on the front panel; or, • by connecting a footswitch[…]
-
Страница 28
Overview — Chapter 3 QuadraVerb 2 Reference Manual 27 C HAPTER 3 O VERVIEW The Architecture of the QuadraVerb 2 The QuadraVerb 2 provides eight Effect Blocks per Program, each of which can serve as either EQ, Pitch, Delay or Reverb. The display shows these Blocks from left to right, between the LR IN (left and right inputs) and the LR OUT (outputs)[…]
-
Страница 29
Chapter 3 — Overview 28 QuadraVerb 2 Reference Manual J PARAMETER. This is where you adjust the selected Block’s parameters. The number of pages available and the parameters found in them will be determined by the Block’s type. Some effect types have only one or two parameters on a single page; while other effect types (particularly reverbs) us[…]
-
Страница 30
Overview — Chapter 3 QuadraVerb 2 Reference Manual 29 Setting the Routing Levels Each time you add a “patch cord” to a Program, the QuadraVerb 2’s display automatically prompts you to set its level. This is done by adjusting the attenuation level between -48dB and +0dB, or OFF. When set at +0dB, the signal is allowed to pass through at full v[…]
-
Страница 31
Chapter 3 — Overview 30 QuadraVerb 2 Reference Manual Pitch, Delay) type on the left channel and one of each type on the right channel, followed by a stereo reverb (a total of 7 Blocks). Because the QuadraVerb 2 is so flexible, occasionally you will have a combination of effects and/or parameters that may overtax either the available memory or DSP […]
-
Страница 32
Overview — Chapter 3 QuadraVerb 2 Reference Manual 31 In the back of this manual, you will find an index of effect types, listing the percentage of DSP, Effect memory and number of LFOs required by each. Use this as a reference when one or more categories of limit handling have been exceeded and you wish to learn what options exist in reorganizing […]
-
Страница 33
Chapter 3 — Overview 32 QuadraVerb 2 Reference Manual Equalization Equalization, or EQ, provides the ability to control the timbre, or coloration, of an audio signal by changing the frequency response of a QuadraVerb 2 audio path. Filters and EQ can be used to compensate for frequency deficiencies in microphones and other sound equipment. The EQ fa[…]
-
Страница 34
Overview — Chapter 3 QuadraVerb 2 Reference Manual 33 Lowpass Shelf and Highpass Shelf A shelving EQ can boost or cut frequencies in its pass band, while allowing the frequencies outside its pass band to go through it. The shelving EQs of the QuadraVerb 2 provide gains from -14dB to +14dB in 0.1dB increments. Shelving filters are well suited for ap[…]
-
Страница 35
Chapter 3 — Overview 34 QuadraVerb 2 Reference Manual Multiband EQs 2 Band Sweep Shelf EQ, 3 Band Parametric EQ, and 4 Band Parametric EQ Multiband EQs can be used to flexibly and accurately tailor the tonality of a signal. The 3 band and 4 band parametric EQs in the QuadraVerb 2 can be used to boost and cut multiple bands, with the added flexibili[…]
-
Страница 36
Overview — Chapter 3 QuadraVerb 2 Reference Manual 35 A resonator is a special filter whose response is so sharp that it actually imparts a pitch to any signal going through it. By tuning the resonator to your instrument and balancing their relative amplitudes you can accentuate different harmonics in a guitar tone, for instance. This can be very u[…]
-
Страница 37
Chapter 3 — Overview 36 QuadraVerb 2 Reference Manual Pitch Effects The Pitch effects alter the pitch of a signal in various ways to produce “layered” timbres that are more complex than the original signal. Although some of these effects can sound similar to one another depending on the parameter settings, each is achieved differently and can b[…]
-
Страница 38
Overview — Chapter 3 QuadraVerb 2 Reference Manual 37 Quad Chorus modulates four delayed signals, each with its phase offset by 90 . Each of the four signals has a separate Predelay parameter, allowing you to change the “rhythm” of the phasing. Mono Flanging Flanging is similar to chorusing , but modulates the delayed signal over a much shorter[…]
-
Страница 39
Chapter 3 — Overview 38 QuadraVerb 2 Reference Manual signal. The Phasor shifts the phase of different frequencies in different amounts, resulting in a comb filter effect when combined with the dry signal. DRY SIGNAL DRY SIGNAL PHASED OUTPUT LFO PHASOR Mono/Stereo Lezlie Cabinet With the Lezlie type selected, the pitch change Block becomes a rotati[…]
-
Страница 40
Overview — Chapter 3 QuadraVerb 2 Reference Manual 39 Delay Delay provides a discrete repetition of a signal. By adding feedback within the effect, the delayed signal can repeat many times, with each successive decay softer than its predecessor. Each Delay type allows you to adjust delay time in milli-seconds, but also displays the equivalent tempo[…]
-
Страница 41
Chapter 3 — Overview 40 QuadraVerb 2 Reference Manual Reverberation Reverb is made up of a large number of distinct echoes, called reflections. In a natural acoustic space, each reflection’s amplitude and brightness decays over time. This decaying action is influenced by the room size, the location of the sound source in the room, the hardness of[…]
-
Страница 42
Overview — Chapter 3 QuadraVerb 2 Reference Manual 41 Chamber 2 This is similar to Chamber 1, but uses more DSP for a thicker sound. The high end in particular has a glassy decay which sounds excellent on synthesizers and pianos, but try it on vocals, too. This will sound more realistic when using short decay times. Large Plate This algorithm uses […]
-
Страница 43
Chapter 3 — Overview 42 QuadraVerb 2 Reference Manual Reverb Parameters Most of the reverb effects in the QuadraVerb 2 operate under the same set of control parameters, which are listed and described in this section. However, reverbs which use more DSP provide parameters which take advantage of their extra processing power; parameters which are not[…]
-
Страница 44
Overview — Chapter 3 QuadraVerb 2 Reference Manual 43 DIFFUSION OF 0 DIFFUSION OF 99 L E V E L TIME L E V E L TIME Reflections further apart. Reflections closer together . Input High Frequency Roll Off This is a lowpass filter that can be set between 200Hz and 20kHz, and attenuates all frequencies above this value by 6dB per octave. Predelay All th[…]
-
Страница 45
Chapter 3 — Overview 44 QuadraVerb 2 Reference Manual Gating Of all the different reverb types, only two types do not provide gating parameters (“Reverse” and “Nonlinear”). Gating is the process which abruptly cuts off the reverb’s decay for a more “choppy” sound. This effect is very popular on drums because it makes them sound HUGE. […]
-
Страница 46
Making Your Own Patches — Chapter 4 QuadraVerb 2 Reference Manual 45 C HAPTER 4 M AKING Y OUR O WN P ROGRAMS Getting Started Because the QuadraVerb 2’s custom LCD display clearly shows the audio routings between each of the 8 possible Effect Blocks, creating and modifying your own patches is extremely easy and flexible. There are 200 possible Pro[…]
-
Страница 47
Chapter 4 — Making Your Own Patches 46 QuadraVerb 2 Reference Manual Programming A Single Block Type J A Block can provide Equalization, Pitch, Delay, Reverberation or be turned OFF. A program can contain up to eight Blocks, which can be in almost any combination or order within the confines of available DSP memory. The Block’s Type determines no[…]
-
Страница 48
Making Your Own Patches — Chapter 4 QuadraVerb 2 Reference Manual 47 Routing Routing is the Function used to connect audio between the LR IN and the Effect Blocks and the LR OUT. We must route audio to both the inputs and outputs of our EQ Block in order to hear its effect. Routing is always done by selecting the destination (where you want the aud[…]
-
Страница 49
Chapter 4 — Making Your Own Patches 48 QuadraVerb 2 Reference Manual on input), lower the input level. You may also need to lower the routing level if a block is receiving signal from more than one source. On the other hand, the best signal-to-noise ratio is achieved when signals are as loud as possible without clipping. In the case of a one-block […]
-
Страница 50
Making Your Own Patches — Chapter 4 QuadraVerb 2 Reference Manual 49 Parameter Now we will choose the desired parameters for our EQ. ¿ Press the [PARAMETER] button The [PARAMETER] button’s LED will light. J If the display reads “ RIGHT OUTPUT SELECTED ” you have not yet moved back to BLOCK 1. Press the [< BLOCK] button to move the pointer[…]
-
Страница 51
Chapter 4 — Making Your Own Patches 50 QuadraVerb 2 Reference Manual Mix Once we have setup our EQ Block the way we want, we should then go to the Mix function to adjust the Block’s output level. This, however, is only necessary if all we want to do is EQ our input signal. That would be fine, except we have 7 more Blocks we can use to stack effec[…]
-
Страница 52
Making Your Own Patches — Chapter 4 QuadraVerb 2 Reference Manual 51 Programming Multiple Blocks When you start adding more Blocks, the same principles apply as described in the previous section. However, the routing options begin to increase, since, as you add more Blocks, the number of input sources increases. Let’s take our simple 1 Block Prog[…]
-
Страница 53
Chapter 4 — Making Your Own Patches 52 QuadraVerb 2 Reference Manual ¿ Press [ROUTING]. The [ROUTING] button’s LED will light. ¡ Press the [BLOCK >] button until the pointer appears above R OUT. ¬ Press [< PAGE] to advance to Routing Page 3. The display will look like this: DELETE ROUTE FROM: INPUT RIGHT ÷ Turn the [VALUE/ENTER] knob un[…]
-
Страница 54
Making Your Own Patches — Chapter 4 QuadraVerb 2 Reference Manual 53 » Press the [BLOCK >] button until the pointer appears above L OUT, and turn the [VALUE/ENTER] knob until the display looks like this: ADD ROUTE FROM: RVB 3 LEFT … Press [VALUE/ENTER] to select the route. The display will flash until the [VALUE/ENTER] button is pressed. At t[…]
-
Страница 55
Chapter 4 — Making Your Own Patches 54 QuadraVerb 2 Reference Manual ¡ Press [PAGE >] twice to advance to Type Page 3. The display will look like this: MOVE BLOCK: 1 INTO BLOCK 2 The right half of the display will flash. ¬ Use the [VALUE/ENTER] knob to select which Block you want to move (1–8). ÷ Press [PAGE >] to advance the cursor to t[…]
-
Страница 56
Making Your Own Patches — Chapter 4 QuadraVerb 2 Reference Manual 55[…]
-
Страница 57
56 QuadraVerb 2 Reference Manual[…]
-
Страница 58
Description of Controls — Chapter 5 QuadraVerb 2 Reference Manual 57 C HAPTER 5 D ESCRIPTION OF C ONTROLS Front Panel Input Level Left and Right : These concentric knobs (one within the other) control the incoming level of our analog signal, and the relative balance between the two input channels. This “gain-staging” allows us to maintain a sup[…]
-
Страница 59
Chapter 5 — Description of Controls 58 QuadraVerb 2 Reference Manual Alphanumeric Display. This 32 character display indicates types of effects, parameters of effect, mode, etc. It also allows us to select and enter types and amounts of an effect. Includes a 14 character entry section for naming the Programs. PAGE 1-9. Indicates the total number of[…]
-
Страница 60
Description of Controls — Chapter 5 QuadraVerb 2 Reference Manual 59 For Power Users. The [VALUE/ENTER] button can also be used to step through Pages in the currently selected mode. Except when a value is flashing on and off in the display, the [VALUE/ENTER] button ordinarily doubles for the [PAGE >] button. If you change the value of a paramete[…]
-
Страница 61
Chapter 5 — Description of Controls 60 QuadraVerb 2 Reference Manual J Once a Program is stored, the previous Program in the selected location is replaced, and cannot be retrieved. Before storing, you may want to transmit the entire contents of the User bank into a SysEx storage device. See chapter 6 for more info. Compare Once a Program has been e[…]
-
Страница 62
Description of Controls — Chapter 5 QuadraVerb 2 Reference Manual 61 Another page is included in Type mode which allows you to move a defined Block to another position. If you defined Block #1 as a Delay, and later decide to first have the input signal routed through an EQ, you can move the Delay Block to make room for it. First select the Block to[…]
-
Страница 63
Chapter 5 — Description of Controls 62 QuadraVerb 2 Reference Manual Selection Parameters Page # Defined Blocks Level to L/R 1 Direct Level From Input 2 Master Effects Level 3 L OUT, R OUT, Direct Level From Input 1 Undefined Blocks Master Effects Level 2 If the selected Block is not routed to the LR OUT, the Level to L/R parameter value will be ?[…]
-
Страница 64
Description of Controls — Chapter 5 QuadraVerb 2 Reference Manual 63 SAMPLE CLOCK SOURCE:INTERNAL Page 6: Dig In/Out Channels. When using the Alesis Optical DIGITAL [IN] connector, (Input Audio Source must be set to “OPTICAL DATA”, see above), this page allows you to select which of the 8 channels on the optical buss will be routed to the L and[…]
-
Страница 65
Chapter 5 — Description of Controls 64 QuadraVerb 2 Reference Manual Page 8: Tap Tempo Footswitch. This lets you choose which footswitch jack (either [ADVANCE] or [BYPASS]) will be used to provide a tap tempo source for setting delay time, provided the selected Program uses one of the two available tap tempo delay types. This requires that you have[…]
-
Страница 66
Description of Controls — Chapter 5 QuadraVerb 2 Reference Manual 65 MIDI CHANNEL: 1 Page 2: MIDI Program Change. This determine whether or not the QuadraVerb 2 will respond to incoming MIDI program change messages. This can be set to either “ON” (recognize), “OFF” (ignore) or “TABLE” (use Program Table). When turned on, the QuadraVerb […]
-
Страница 67
Chapter 5 — Description of Controls 66 QuadraVerb 2 Reference Manual Modulation The QuadraVerb 2 allows you to set up to 8 modulation routings which can control almost any parameter within a Program in realtime. This is especially useful for live applications, where the performer can actually interact or automate the changes in one or more effects.[…]
-
Страница 68
Description of Controls — Chapter 5 QuadraVerb 2 Reference Manual 67 (North American versions). The correct power supply must be used AT ALL TIMES. Any other power supply might create a fire risk and/or permanently damage your unit. This damage would NOT be covered under your warranty. MIDI In This is a 5 pin DIN standard MIDI plug which connects t[…]
-
Страница 69
Chapter 5 — Description of Controls 68 QuadraVerb 2 Reference Manual Left/Right Out — Analog Audio Out These are 1/4″ TRS phone jacks which connect to analog devices such as the effects returns on a mixing console. These are true stereo balanced outputs and are represented by the OUT Block on the front panel LCD display. These outputs are serv[…]
-
Страница 70
Description of Controls — Chapter 5 QuadraVerb 2 Reference Manual 69 Effect Parameters The following charts are designed to act as a “road map” to assist you in locating parameters and their value ranges. All of the following parameters may be found by first selecting the appropriate effect type, pressing the [PARAMETER] button, and using the [[…]
-
Страница 71
Chapter 5 — Description of Controls 70 QuadraVerb 2 Reference Manual Pitch Pitch Type Parameters Page# Mono Chorus Speed: 0-99, Depth: 0-99, Feedback: 0-99 1 Chorus PreDelay: 0-100mS 2 Chorus Shape: Sine/Square 3 Stereo Chorus Speed: 0-99, Depth: 0-99, Feedback: 0-99 1 PreDelay Chorus 1: 0-100mS, 2: 0-100mS 2 Chorus Shape: Sine/Square 3 Quad Chorus[…]
-
Страница 72
Description of Controls — Chapter 5 QuadraVerb 2 Reference Manual 71 Delay Delay Type Parameters Page # Mono Delay Delay Time: 0.1-5000mS, Beat Count: 1/2, 1/4., 1/4, 1/4T, 1/8., 1/8, 1/8T, 1/16, 1/32 (. = dotted, T = triplet) 1 Feedback: 0-99 2 Stereo Delay Left Delay: 0.1-5000mS, Beat Count: 1/2, 1/4., 1/4, 1/4T, 1/8., 1/8, 1/8T, 1/16, 1/32 1 Lef[…]
-
Страница 73
Chapter 5 — Description of Controls 72 QuadraVerb 2 Reference Manual Reverberation Reverb Type Parameters Page # Mono Room Decay: 0-99, Damping Hi: 0-99, Lo: 0-99 1 Reverb Density: 0-99, Diffusion: 0-99 2 High Frequency Roll Off: 200Hz-20,000Hz 3 Predelay: 1-250mS, Mix: <99-<50>-99> 4 Gate Trig: Off/Left/Right/L&R, Hold: 10-500 mS 5[…]
-
Страница 74
Description of Controls — Chapter 5 QuadraVerb 2 Reference Manual 73 Reverb Type Parameters Page # Hall 2 Decay: 0-99, Damping Hi: 0-99, Lo: 0-99 1 Reverb Density: 0-99, Diffusion: 0-99 2 High Frequency Roll Off: 200Hz-20,000Hz 3 Predelay: 1-250mS, Mix: <99-<50>-99> 4 Reflection Level: 0-99, Spread: 0-99 5 Reverberation Swirl: 0-99 6 Ga[…]
-
Страница 75
Chapter 5 — Description of Controls 74 QuadraVerb 2 Reference Manual Reverb Type Parameters Page # Spring Decay: 0-99, Damping Hi: 0-99, Lo: 0-99 1 Reverb Density: 0-99, Diffusion: 0-99 2 High Frequency Roll Off: 200Hz-20,000Hz 4 Predelay: 1-250mS, Mix: <99-<50>-99> 5 Gate Trig: Off/Left/Right/L&R, Hold: 10-500 mS 7 Gate Release Tim[…]
-
Страница 76
Advanced Applications — Chapter 6 QuadraVerb 2 Reference Manual 75 C HAPTER 6 A DVANCED A PPLICATIONS MIDI Functions The QuadraVerb 2 provides many MIDI functions, including being able to respond to program changes, sending and receiving Program information via SysEx dumps, and realtime control over various effect parameters via MIDI controllers. F[…]
-
Страница 77
Chapter 6 — Advanced Applications 76 QuadraVerb 2 Reference Manual Programs of a different number. This is especially useful since MIDI program changes only allow for 128 different programs to be recalled (0–127). Using the Program Table, you can have any incoming MIDI program change message recall any of the 200 Programs in the QuadraVerb 2. Thi[…]
-
Страница 78
Advanced Applications — Chapter 6 QuadraVerb 2 Reference Manual 77 SysEx Storage To send and receive program information via SysEx dumps using a computer, or some other SysEx storage device (such as the Alesis DataDisk), or another QuadraVerb 2: ¿ Connect the other device’s MIDI OUT to the QuadraVerb 2’s [MIDI IN]. ¡ Connect the QuadraVerb 2?[…]
-
Страница 79
Chapter 6 — Advanced Applications 78 QuadraVerb 2 Reference Manual In order to pass on MIDI information from a control device thru the QuadraVerb 2 to another MIDI device: ¿ Connect the control device’s MIDI OUT to the QuadraVerb 2’s [MIDI IN]. ¡ Connect the QuadraVerb 2’s [MIDI OUT] to the MIDI IN of the other device you wish to control. ?[…]
-
Страница 80
Advanced Applications — Chapter 6 QuadraVerb 2 Reference Manual 79 Selecting the Modulator Once you press the [MODULATION] button, you can turn the [VALUE/ENTER] knob to select one of the eight Modulators. Think of each Modulator as a modulation patch which routes a Source to a Target using a particular amplitude. ¿ Press [MODULATION]. The [MODULA[…]
-
Страница 81
Chapter 6 — Advanced Applications 80 QuadraVerb 2 Reference Manual Type Effect Target E Q Lowpass Filter Frequency Bandpass Filter Bandpass Frequency, Bandpass Width Highpass Filter Frequency Lowpass Shelf Frequency, Gain Highpass Shelf Frequency, Gain 1 Band Low/High Parametric Bandpass Gain Bandpass Width 2 Band Sweep Shelf Lowpass Frequency, Low[…]
-
Страница 82
Advanced Applications — Chapter 6 QuadraVerb 2 Reference Manual 81 Type Effect Target Reverberation Mono Room Room 1 Hall 1 Plate 1 Chamber 1 Spring Input Hi Rolloff Predelay Time, Predelay Mix Decay, Density, Diffusion Damping Low Damping High Gate Trigger On/Off, Gate Hold Time Gate Release Time, Gate Level Room 2 Hall 2 Plate 2 Chamber 2 Input H[…]
-
Страница 83
Chapter 6 — Advanced Applications 82 QuadraVerb 2 Reference Manual Target. This number can be set to 00 (for no effect) all the way to +99 (for maximum effect) or down to -99 (for maximum negative effect; i.e., inverted control). If you have been following along so far, let’s continue where we left off from the last set of steps: ¿ After selecti[…]
-
Страница 84
Advanced Applications — Chapter 6 QuadraVerb 2 Reference Manual 83 Peak Follower 1 and 2 have identical features and work as shown below: SLOPE IS SET BY DECA Y TIME PEAK FOLLO WER OUTPUT A UDIO PEAK INPUT (Left or right Channel or higher of left and right) Modulation Page 4 allows you to select the type of each Input Generator. The remaining pages[…]
-
Страница 85
Chapter 6 — Advanced Applications 84 QuadraVerb 2 Reference Manual The cursor appears beneath the Generator, indicating that you may now turn the [VALUE/ENTER] knob and select either Input Generator 1 or 2, depending on which one you want to edit. You may now select what the trigger source of the selected Input Generator will be. ª Press [PAGE >[…]
-
Страница 86
Advanced Applications — Chapter 6 QuadraVerb 2 Reference Manual 85 The display will look like this: GEN 1 ENV ATTACK TIME: 0.00Sec 12 PRESS [PAGE>} to advance the cursor to the next field and turn the [VALUE/ENTER] knob to adjust the input envelope’s attack time (0.00 to 10.00 seconds). This controls the rate that the envelope’s control will[…]
-
Страница 87
Chapter 6 — Advanced Applications 86 QuadraVerb 2 Reference Manual Bypassing Effects The [BYPASS] jack allows you to bypass the effects of the QuadraVerb 2 via a footswitch. This is the same as pressing the [BYPASS] button on the front panel. Each time either the [BYPASS] button is pressed, or the footswitch connected to the [BYPASS] jack is presse[…]
-
Страница 88
Alesis Optical Interface — Chapter 7 QuadraVerb 2 Reference Manual 87 CHAPTER 7 A LESIS O PTICAL I NTERFACE Overview The Alesis optical digital interface provides the means to communicate with other digital audio devices, such as the Alesis ADAT Multitrack Recorder. The Alesis optical interface uses a proprietary 8 channel buss, from which the Quad[…]
-
Страница 89
Chapter 7 — Alesis Optical Interface 88 QuadraVerb 2 Reference Manual J Note: If you experience problems (clicks, etc.) with an ADAT system set to digital input, it may be that the ADAT’s clock source is set to internal, even though its Digital In is pressed. (This will only happen if you’ve set it this way for making tape copies) Hold SET LOCA[…]
-
Страница 90
Alesis Optical Interface — Chapter 7 QuadraVerb 2 Reference Manual 89 The fiber optic cables that make up the digital buss need to be connected in the same order as the Sync cables. The QuadraVerb 2 is inserted in the fiber optic loop from the output of the second ADAT to the input of the master ADAT. The QuadraVerb 2 lets you turn its digital outp[…]
-
Страница 91
Chapter 7 — Alesis Optical Interface 90 QuadraVerb 2 Reference Manual To Two or More ADATs With a BRC or AI-2 If your ADAT system has an Alesis BRC Master Remote Controller, the fiber optic cables that make up the digital buss need to be connected in the same order as the Sync cables. If your ADAT system uses the BRC or the Alesis AI-2 Synchronizer[…]
-
Страница 92
Alesis Optical Interface — Chapter 7 QuadraVerb 2 Reference Manual 91 INPUT LEVEL LEFT RIGHT OUTPUT CLIP -3dB -12dB -32dB L INPUT R DUAL CHANNEL OCTAL PROCESSING™ MASTER EFFECTS W/DIGITAL I/O VALUE/ENTER POWER BLOCK PROGRAM COMPARE TYPE P ARAMETER ROUTING MIX 1 BLOCK 23 45 STORE BYPASS GLOBAL MIDI NAME MODULATION 6 PAGE 78 90 PRESET USER TM AD A […]
-
Страница 93
Chapter 7 — Alesis Optical Interface 92 QuadraVerb 2 Reference Manual Routings To specific ADAT tracks To route the QuadraVerb 2’s digital outputs to specific ADAT tracks depends on which of the 8 channels of the buss you use. If you want to record in stereo onto tracks 1 and 2 of ADAT (or 9 and 10 on ADAT #2 in a chain), route the QuadraVerb 2?[…]
-
Страница 94
Alesis Optical Interface — Chapter 7 QuadraVerb 2 Reference Manual 93 From ADAT through the QuadraVerb 2 back to ADAT When routing ADAT tracks to the QuadraVerb 2 to be recorded back to ADAT, how you go about it depends on whether or not you are using a BRC. If you have one or more ADATs with no BRC, then you simply connect the digital buss of the […]
-
Страница 95
Chapter 7 — Alesis Optical Interface 94 QuadraVerb 2 Reference Manual From the QuadraSynth through the QuadraVerb 2 back to ADAT The QuadraSynth (and S4 sound module) provides its four audio outputs (Main Left/Right and Aux Left/Right) on the first four channels of the Alesis Optical digital buss. If you connect the QuadraSynth’s digital output t[…]
-
Страница 96
Trouble-Shooting QuadraVerb 2 Reference Manual 95 C HAPTER 8 T ROUBLE -S HOOTING Trouble-Shooting Index If you are experience problems while operating the QuadraVerb 2, please use the following table to locate possible causes and solutions before contacting Alesis customer service for assistance. Symptom Cause Solution The display does not light wh[…]
-
Страница 97
Trouble-Shooting 96 QuadraVerb 2 Reference Manual MIDI Program Changes are off by 1. Transmitter doesn’t display true MIDI Program Change numbers. Change the transmitter to display 0-127, or setup a Program Table in the Q2. Error Messages Although the digital signal processing power in the QuadraVerb 2 is powerful and features plenty of memory[…]
-
Страница 98
Trouble-Shooting QuadraVerb 2 Reference Manual 97 Checking the Software Version The current software version may be determined by holding [GLOBAL] and pressing [PROGRAM]. The display will indicate the currently installed software version. Re-initializing To re-initialize the QuadraVerb 2, hold down both [PROGRAM] and [COMPARE] while turning on the […]
-
Страница 99
Trouble-Shooting 98 QuadraVerb 2 Reference Manual For prompt service, indicate the RA number on the shipping label. If you do not have the original packing, ship the QuadraVerb 2 in a sturdy carton, with shock-absorbing materials such as styrofoam pellets (the kind without CFCs) or “bubble-pack” surrounding the unit. Shipping damage caused by i[…]
-
Страница 100
MIDI Implementation Chart — Chapter 8 QuadraVerb 2 Reference Manual 99 MIDI I MPLEMENTATION C HART Function Transmitted Recognized Remarks Basic Channel Default Changed X * * * * * * * * 1 — 16 Mode Default Messages Altered X X * * * * * * * * Mode 3 X Note Number True Voice X * * * * * * * * 0 — 127 0 — 127 Velocity Note On Note Off X X O X […]
-
Страница 101
Effects Processing Index 100 QuadraVerb 2 Reference Manual S PECIFICATIONS Electrical Frequency Response: ±1dB from 20Hz to 20kHz Dynamic Range: >90 dB «A» wtg., 20 Hz-22 kHz Distortion (THD+N): <0.009% @1kHz, nominal level (-12 dBfs) <0.005% @ peak level Crosstalk: <90 dB below full scale Power requirements: 9VAC, 13.5W (Ale[…]
-
Page 1: Alesis QuadraVerb 2
A L ES I S QuadraVerb2 Reference M a nu a l[…]
-
Page 2: Alesis QuadraVerb 2
QuadraVerb 2 Reference Manual 1 Introduction Thank you for purchasing the Alesis QuadraVerb 2 simultaneous effects processor. To take full advantage of of the QuadraVerb 2’s fuctions, and to enjoy long and trouble free use, please read this user’s manual carefully. How To Use This Manual This manual is divided into the following sections descri[…]
-
Page 3: Alesis QuadraVerb 2
2 QuadraVerb 2 Reference Manual[…]
-
Page 4: Alesis QuadraVerb 2
Contents QuadraVerb 2 Reference Manual 3 C ONTENTS 1: Setting Up …………………………………………………………………………………………………… 7 Unpacking and Inspection …………………………………………………………………………… 7 AC Power Hookup ……………………………….[…]
-
Page 5: Alesis QuadraVerb 2
Contents 4 QuadraVerb 2 Reference Manual Stereo Chorus……………………………………………………………………………….. 36 Quad Chorus…………………………………………………………………………………. 37 Mono Flanging …………………………………………………………………..[…]
-
Page 6: Alesis QuadraVerb 2
Contents QuadraVerb 2 Reference Manual 5 Input Level ……………………………………………………………………………………. 57 Output Level …………………………………………………………………………………. 57 LED Meter………………………………………………………………….[…]
-
Page 7: Alesis QuadraVerb 2
Contents 6 QuadraVerb 2 Reference Manual To a Single ADAT …………………………………………………………………………… 88 To Two or More ADATs ……………………………………………………………………. 89 To the AI-1 ………………………………………………………………………….[…]
-
Page 8: Alesis QuadraVerb 2
Setting Up — Chapter 1 QuadraVerb 2 Reference Manual 7 C HAPTER 1 S ETTING U P Unpacking and Inspection Your QuadraVerb 2 was packed carefully at the factory, and the shipping carton was designed to protect the unit during shipping. Please retain this container in the highly unlikely event that you need to return the QuadraVerb 2 for servicing. The[…]
-
Page 9: Alesis QuadraVerb 2
Chapter 1 — Setting Up 8 QuadraVerb 2 Reference Manual quality cables cost more, they do make a difference. Route cables to the QuadraVerb 2 correctly by observing the following precautions: • Do not bundle audio cables with AC power cords. • Avoid running audio cables near sources of electromagnetic interference such as transformers, monitors,[…]
-
Page 10: Alesis QuadraVerb 2
Setting Up — Chapter 1 QuadraVerb 2 Reference Manual 9 TM Instrument or Effect Send Right Input T o Amplifier or Mixing Console Right Output • Mono In, Stereo Out. While still using a mono input, you could connect two cables to the [L] and [R] OUTPUTS of the QuadraVerb 2 to a stereo amplification system or two mixer inputs. TM Instrument or Effec[…]
-
Page 11: Alesis QuadraVerb 2
Chapter 1 — Setting Up 10 QuadraVerb 2 Reference Manual The QuadraVerb 2 may be connected to a mixing console in several ways. Usually, it is connected to the auxiliary send and return controls of the mixer. Another method of interfacing is to connect the unit directly to the insert send and return patch points of the channel that is to be effected[…]
-
Page 12: Alesis QuadraVerb 2
Setting Up — Chapter 1 QuadraVerb 2 Reference Manual 11 J Most Preset Programs route the LR IN signal to the LR OUT.When connecting to a mixer’s aux sends and returns. the Global Direct Signal Mute should be set to ON. To remove all direct routings of inputs to outputs on all Programs simultaneously: ¿ Press [GLOBAL]. The [GLOBAL] LED will be li[…]
-
Page 13: Alesis QuadraVerb 2
Chapter 1 — Setting Up 12 QuadraVerb 2 Reference Manual Mono In — Stereo Out. If you only want to feed the QuadraVerb 2 a mono input, but wish to connect both of its outputs back to the mixer, you will need three 1/4″ audio cables. Connect a cable from an effect send to the [R] INPUT of the QuadraVerb 2, another cable from the [L] OUTPUT of th[…]
-
Page 14: Alesis QuadraVerb 2
Setting Up — Chapter 1 QuadraVerb 2 Reference Manual 13 Usually, insert connections require a special, stereo-splitting Y-cord to be connected (one stereo plug provides both send and return while two mono plugs connect separately to an input and output). These are known as TRS connectors (tip-ring- sleeve). The tip of the stereo plug typically carr[…]
-
Page 15: Alesis QuadraVerb 2
Chapter 1 — Setting Up 14 QuadraVerb 2 Reference Manual Stereo. In the case where a stereo instrument, such as a keyboard or sampler, is connected to two separate channels of a mixing console, you will need two 1/4″ TRS cables, one for each channel. The connection is made in a similar fashion as described above. MIXER Left Master Insert Right […]
-
Page 16: Alesis QuadraVerb 2
Setting Up — Chapter 1 QuadraVerb 2 Reference Manual 15 1 2 3 Tip Ring Sleeve Avoiding Ground Loops In today’s studio, where it seems every piece of equipment has its own computer chip inside, there are many opportunities for ground loop problems to occur. These show up as hums, buzzes or sometimes radio reception, and can occur if a piece of equ[…]
-
Page 17: Alesis QuadraVerb 2
Chapter 1 — Setting Up 16 QuadraVerb 2 Reference Manual • To recall programs using MIDI program change messages • To control various parameters inside the QuadraVerb 2 in realtime via MIDI controllers ( example: A keyboard’s mod wheel, or pedals, etc.) • To send and receive SysEx (System Exclusive) dumps of individual programs or the entire[…]
-
Page 18: Alesis QuadraVerb 2
Setting Up — Chapter 1 QuadraVerb 2 Reference Manual 17 To adjust the Advance Footswitch’s set of Programs: ¿ Press [GLOBAL]. The [GLOBAL] LED will light. ¡ Press [PAGE >] once. This selects page 2, and the display will read: FOOTSWITCH: 00 Pset TO 00 Pset ¬ Turn the [VALUE/ENTER] knob to adjust the Program number to begin the range (Preset[…]
-
Page 19: Alesis QuadraVerb 2
18 QuadraVerb 2 Reference Manual[…]
-
Page 20: Alesis QuadraVerb 2
Your First Session With The QuadraVerb 2 — Chapter 2 QuadraVerb 2 Reference Manual 19 C HAPTER 2 Y OUR F IRST S ESSION W ITH T HE Q UADRA V ERB 2 Powering Up After making your connections, turn on the system’s power using this procedure: ¿ Before turning on the QuadraVerb 2’s power, check the following items: • Have all connections been made[…]
-
Page 21: Alesis QuadraVerb 2
Chapter 2 -Your First Session With The QuadraVerb 2 20 QuadraVerb 2 Reference Manual The Value/Enter Knob Located just to the right of the custom LCD display, the [VALUE/ENTER] knob is used to select Programs and adjust parameter values that appear in the display. However, it is not just a knob, it is also a button. Depending on what parameter you […]
-
Page 22: Alesis QuadraVerb 2
Your First Session With The QuadraVerb 2 — Chapter 2 QuadraVerb 2 Reference Manual 21 Auditioning Internal Programs You can audition the Programs in the QuadraVerb 2 by using the [VALUE/ENTER] knob or the front panel buttons, whenever the QuadraVerb 2 is in Program mode (the [PROGRAM] button’s LED will be lit). To select a Program using the [VALU[…]
-
Page 23: Alesis QuadraVerb 2
Chapter 2 -Your First Session With The QuadraVerb 2 22 QuadraVerb 2 Reference Manual Example Programs The following are descriptions of the three example Programs in the Preset bank. 96: “VerbOfMyDreams” This Program is fairly simple in design, using only 3 Blocks to provide EQ, Delay and Reverb. It is designed for a mono audio source to be con[…]
-
Page 24: Alesis QuadraVerb 2
Your First Session With The QuadraVerb 2 — Chapter 2 QuadraVerb 2 Reference Manual 23 Adjusting Effects Levels Although we may not want to get started editing Programs just yet (that’s left for chapter 4), it is usually necessary to have immediate control over the output levels of each Effect Block, as well as the amount of direct level going fro[…]
-
Page 25: Alesis QuadraVerb 2
Chapter 2 -Your First Session With The QuadraVerb 2 24 QuadraVerb 2 Reference Manual « Use the [< BLOCK >] buttons to select other Blocks, and adjust their levels, as described above. J Mix parameters affect the Program and are only temporary unless the Program is stored into memory before a another Program is recalled. See later in this cha[…]
-
Page 26: Alesis QuadraVerb 2
Your First Session With The QuadraVerb 2 — Chapter 2 QuadraVerb 2 Reference Manual 25 Storing Edited Programs Once you are satisfied with the changes you have made to a Program, or are creating a new Program from scratch, you will need to store your edited Program back into memory. The QuadraVerb 2 will store the currently selected Program in memor[…]
-
Page 27: Alesis QuadraVerb 2
Chapter 2 -Your First Session With The QuadraVerb 2 26 QuadraVerb 2 Reference Manual Bypassing Effects At any time you can bypass all effects at once, thereby allowing the direct signal to pass through the QuadraVerb 2 unchanged. This can be done in two ways: • by pressing the [BYPASS] button on the front panel; or, • by connecting a footswitch[…]
-
Page 28: Alesis QuadraVerb 2
Overview — Chapter 3 QuadraVerb 2 Reference Manual 27 C HAPTER 3 O VERVIEW The Architecture of the QuadraVerb 2 The QuadraVerb 2 provides eight Effect Blocks per Program, each of which can serve as either EQ, Pitch, Delay or Reverb. The display shows these Blocks from left to right, between the LR IN (left and right inputs) and the LR OUT (outputs)[…]
-
Page 29: Alesis QuadraVerb 2
Chapter 3 — Overview 28 QuadraVerb 2 Reference Manual J PARAMETER. This is where you adjust the selected Block’s parameters. The number of pages available and the parameters found in them will be determined by the Block’s type. Some effect types have only one or two parameters on a single page; while other effect types (particularly reverbs) us[…]
-
Page 30: Alesis QuadraVerb 2
Overview — Chapter 3 QuadraVerb 2 Reference Manual 29 Setting the Routing Levels Each time you add a “patch cord” to a Program, the QuadraVerb 2’s display automatically prompts you to set its level. This is done by adjusting the attenuation level between -48dB and +0dB, or OFF. When set at +0dB, the signal is allowed to pass through at full v[…]
-
Page 31: Alesis QuadraVerb 2
Chapter 3 — Overview 30 QuadraVerb 2 Reference Manual Pitch, Delay) type on the left channel and one of each type on the right channel, followed by a stereo reverb (a total of 7 Blocks). Because the QuadraVerb 2 is so flexible, occasionally you will have a combination of effects and/or parameters that may overtax either the available memory or DSP […]
-
Page 32: Alesis QuadraVerb 2
Overview — Chapter 3 QuadraVerb 2 Reference Manual 31 In the back of this manual, you will find an index of effect types, listing the percentage of DSP, Effect memory and number of LFOs required by each. Use this as a reference when one or more categories of limit handling have been exceeded and you wish to learn what options exist in reorganizing […]
-
Page 33: Alesis QuadraVerb 2
Chapter 3 — Overview 32 QuadraVerb 2 Reference Manual Equalization Equalization, or EQ, provides the ability to control the timbre, or coloration, of an audio signal by changing the frequency response of a QuadraVerb 2 audio path. Filters and EQ can be used to compensate for frequency deficiencies in microphones and other sound equipment. The EQ fa[…]
-
Page 34: Alesis QuadraVerb 2
Overview — Chapter 3 QuadraVerb 2 Reference Manual 33 Lowpass Shelf and Highpass Shelf A shelving EQ can boost or cut frequencies in its pass band, while allowing the frequencies outside its pass band to go through it. The shelving EQs of the QuadraVerb 2 provide gains from -14dB to +14dB in 0.1dB increments. Shelving filters are well suited for ap[…]
-
Page 35: Alesis QuadraVerb 2
Chapter 3 — Overview 34 QuadraVerb 2 Reference Manual Multiband EQs 2 Band Sweep Shelf EQ, 3 Band Parametric EQ, and 4 Band Parametric EQ Multiband EQs can be used to flexibly and accurately tailor the tonality of a signal. The 3 band and 4 band parametric EQs in the QuadraVerb 2 can be used to boost and cut multiple bands, with the added flexibili[…]
-
Page 36: Alesis QuadraVerb 2
Overview — Chapter 3 QuadraVerb 2 Reference Manual 35 A resonator is a special filter whose response is so sharp that it actually imparts a pitch to any signal going through it. By tuning the resonator to your instrument and balancing their relative amplitudes you can accentuate different harmonics in a guitar tone, for instance. This can be very u[…]
-
Page 37: Alesis QuadraVerb 2
Chapter 3 — Overview 36 QuadraVerb 2 Reference Manual Pitch Effects The Pitch effects alter the pitch of a signal in various ways to produce “layered” timbres that are more complex than the original signal. Although some of these effects can sound similar to one another depending on the parameter settings, each is achieved differently and can b[…]
-
Page 38: Alesis QuadraVerb 2
Overview — Chapter 3 QuadraVerb 2 Reference Manual 37 Quad Chorus modulates four delayed signals, each with its phase offset by 90 . Each of the four signals has a separate Predelay parameter, allowing you to change the “rhythm” of the phasing. Mono Flanging Flanging is similar to chorusing , but modulates the delayed signal over a much shorter[…]
-
Page 39: Alesis QuadraVerb 2
Chapter 3 — Overview 38 QuadraVerb 2 Reference Manual signal. The Phasor shifts the phase of different frequencies in different amounts, resulting in a comb filter effect when combined with the dry signal. DRY SIGNAL DRY SIGNAL PHASED OUTPUT LFO PHASOR Mono/Stereo Lezlie Cabinet With the Lezlie type selected, the pitch change Block becomes a rotati[…]
-
Page 40: Alesis QuadraVerb 2
Overview — Chapter 3 QuadraVerb 2 Reference Manual 39 Delay Delay provides a discrete repetition of a signal. By adding feedback within the effect, the delayed signal can repeat many times, with each successive decay softer than its predecessor. Each Delay type allows you to adjust delay time in milli-seconds, but also displays the equivalent tempo[…]
-
Page 41: Alesis QuadraVerb 2
Chapter 3 — Overview 40 QuadraVerb 2 Reference Manual Reverberation Reverb is made up of a large number of distinct echoes, called reflections. In a natural acoustic space, each reflection’s amplitude and brightness decays over time. This decaying action is influenced by the room size, the location of the sound source in the room, the hardness of[…]
-
Page 42: Alesis QuadraVerb 2
Overview — Chapter 3 QuadraVerb 2 Reference Manual 41 Chamber 2 This is similar to Chamber 1, but uses more DSP for a thicker sound. The high end in particular has a glassy decay which sounds excellent on synthesizers and pianos, but try it on vocals, too. This will sound more realistic when using short decay times. Large Plate This algorithm uses […]
-
Page 43: Alesis QuadraVerb 2
Chapter 3 — Overview 42 QuadraVerb 2 Reference Manual Reverb Parameters Most of the reverb effects in the QuadraVerb 2 operate under the same set of control parameters, which are listed and described in this section. However, reverbs which use more DSP provide parameters which take advantage of their extra processing power; parameters which are not[…]
-
Page 44: Alesis QuadraVerb 2
Overview — Chapter 3 QuadraVerb 2 Reference Manual 43 DIFFUSION OF 0 DIFFUSION OF 99 L E V E L TIME L E V E L TIME Reflections further apart. Reflections closer together . Input High Frequency Roll Off This is a lowpass filter that can be set between 200Hz and 20kHz, and attenuates all frequencies above this value by 6dB per octave. Predelay All th[…]
-
Page 45: Alesis QuadraVerb 2
Chapter 3 — Overview 44 QuadraVerb 2 Reference Manual Gating Of all the different reverb types, only two types do not provide gating parameters (“Reverse” and “Nonlinear”). Gating is the process which abruptly cuts off the reverb’s decay for a more “choppy” sound. This effect is very popular on drums because it makes them sound HUGE. […]
-
Page 46: Alesis QuadraVerb 2
Making Your Own Patches — Chapter 4 QuadraVerb 2 Reference Manual 45 C HAPTER 4 M AKING Y OUR O WN P ROGRAMS Getting Started Because the QuadraVerb 2’s custom LCD display clearly shows the audio routings between each of the 8 possible Effect Blocks, creating and modifying your own patches is extremely easy and flexible. There are 200 possible Pro[…]
-
Page 47: Alesis QuadraVerb 2
Chapter 4 — Making Your Own Patches 46 QuadraVerb 2 Reference Manual Programming A Single Block Type J A Block can provide Equalization, Pitch, Delay, Reverberation or be turned OFF. A program can contain up to eight Blocks, which can be in almost any combination or order within the confines of available DSP memory. The Block’s Type determines no[…]
-
Page 48: Alesis QuadraVerb 2
Making Your Own Patches — Chapter 4 QuadraVerb 2 Reference Manual 47 Routing Routing is the Function used to connect audio between the LR IN and the Effect Blocks and the LR OUT. We must route audio to both the inputs and outputs of our EQ Block in order to hear its effect. Routing is always done by selecting the destination (where you want the aud[…]
-
Page 49: Alesis QuadraVerb 2
Chapter 4 — Making Your Own Patches 48 QuadraVerb 2 Reference Manual on input), lower the input level. You may also need to lower the routing level if a block is receiving signal from more than one source. On the other hand, the best signal-to-noise ratio is achieved when signals are as loud as possible without clipping. In the case of a one-block […]
-
Page 50: Alesis QuadraVerb 2
Making Your Own Patches — Chapter 4 QuadraVerb 2 Reference Manual 49 Parameter Now we will choose the desired parameters for our EQ. ¿ Press the [PARAMETER] button The [PARAMETER] button’s LED will light. J If the display reads “ RIGHT OUTPUT SELECTED ” you have not yet moved back to BLOCK 1. Press the [< BLOCK] button to move the pointer[…]
-
Page 51: Alesis QuadraVerb 2
Chapter 4 — Making Your Own Patches 50 QuadraVerb 2 Reference Manual Mix Once we have setup our EQ Block the way we want, we should then go to the Mix function to adjust the Block’s output level. This, however, is only necessary if all we want to do is EQ our input signal. That would be fine, except we have 7 more Blocks we can use to stack effec[…]
-
Page 52: Alesis QuadraVerb 2
Making Your Own Patches — Chapter 4 QuadraVerb 2 Reference Manual 51 Programming Multiple Blocks When you start adding more Blocks, the same principles apply as described in the previous section. However, the routing options begin to increase, since, as you add more Blocks, the number of input sources increases. Let’s take our simple 1 Block Prog[…]
-
Page 53: Alesis QuadraVerb 2
Chapter 4 — Making Your Own Patches 52 QuadraVerb 2 Reference Manual ¿ Press [ROUTING]. The [ROUTING] button’s LED will light. ¡ Press the [BLOCK >] button until the pointer appears above R OUT. ¬ Press [< PAGE] to advance to Routing Page 3. The display will look like this: DELETE ROUTE FROM: INPUT RIGHT ÷ Turn the [VALUE/ENTER] knob un[…]
-
Page 54: Alesis QuadraVerb 2
Making Your Own Patches — Chapter 4 QuadraVerb 2 Reference Manual 53 » Press the [BLOCK >] button until the pointer appears above L OUT, and turn the [VALUE/ENTER] knob until the display looks like this: ADD ROUTE FROM: RVB 3 LEFT … Press [VALUE/ENTER] to select the route. The display will flash until the [VALUE/ENTER] button is pressed. At t[…]
-
Page 55: Alesis QuadraVerb 2
Chapter 4 — Making Your Own Patches 54 QuadraVerb 2 Reference Manual ¡ Press [PAGE >] twice to advance to Type Page 3. The display will look like this: MOVE BLOCK: 1 INTO BLOCK 2 The right half of the display will flash. ¬ Use the [VALUE/ENTER] knob to select which Block you want to move (1–8). ÷ Press [PAGE >] to advance the cursor to t[…]
-
Page 56: Alesis QuadraVerb 2
Making Your Own Patches — Chapter 4 QuadraVerb 2 Reference Manual 55[…]
-
Page 57: Alesis QuadraVerb 2
56 QuadraVerb 2 Reference Manual[…]
-
Page 58: Alesis QuadraVerb 2
Description of Controls — Chapter 5 QuadraVerb 2 Reference Manual 57 C HAPTER 5 D ESCRIPTION OF C ONTROLS Front Panel Input Level Left and Right : These concentric knobs (one within the other) control the incoming level of our analog signal, and the relative balance between the two input channels. This “gain-staging” allows us to maintain a sup[…]
-
Page 59: Alesis QuadraVerb 2
Chapter 5 — Description of Controls 58 QuadraVerb 2 Reference Manual Alphanumeric Display. This 32 character display indicates types of effects, parameters of effect, mode, etc. It also allows us to select and enter types and amounts of an effect. Includes a 14 character entry section for naming the Programs. PAGE 1-9. Indicates the total number of[…]
-
Page 60: Alesis QuadraVerb 2
Description of Controls — Chapter 5 QuadraVerb 2 Reference Manual 59 For Power Users. The [VALUE/ENTER] button can also be used to step through Pages in the currently selected mode. Except when a value is flashing on and off in the display, the [VALUE/ENTER] button ordinarily doubles for the [PAGE >] button. If you change the value of a paramete[…]
-
Page 61: Alesis QuadraVerb 2
Chapter 5 — Description of Controls 60 QuadraVerb 2 Reference Manual J Once a Program is stored, the previous Program in the selected location is replaced, and cannot be retrieved. Before storing, you may want to transmit the entire contents of the User bank into a SysEx storage device. See chapter 6 for more info. Compare Once a Program has been e[…]
-
Page 62: Alesis QuadraVerb 2
Description of Controls — Chapter 5 QuadraVerb 2 Reference Manual 61 Another page is included in Type mode which allows you to move a defined Block to another position. If you defined Block #1 as a Delay, and later decide to first have the input signal routed through an EQ, you can move the Delay Block to make room for it. First select the Block to[…]
-
Page 63: Alesis QuadraVerb 2
Chapter 5 — Description of Controls 62 QuadraVerb 2 Reference Manual Selection Parameters Page # Defined Blocks Level to L/R 1 Direct Level From Input 2 Master Effects Level 3 L OUT, R OUT, Direct Level From Input 1 Undefined Blocks Master Effects Level 2 If the selected Block is not routed to the LR OUT, the Level to L/R parameter value will be ?[…]
-
Page 64: Alesis QuadraVerb 2
Description of Controls — Chapter 5 QuadraVerb 2 Reference Manual 63 SAMPLE CLOCK SOURCE:INTERNAL Page 6: Dig In/Out Channels. When using the Alesis Optical DIGITAL [IN] connector, (Input Audio Source must be set to “OPTICAL DATA”, see above), this page allows you to select which of the 8 channels on the optical buss will be routed to the L and[…]
-
Page 65: Alesis QuadraVerb 2
Chapter 5 — Description of Controls 64 QuadraVerb 2 Reference Manual Page 8: Tap Tempo Footswitch. This lets you choose which footswitch jack (either [ADVANCE] or [BYPASS]) will be used to provide a tap tempo source for setting delay time, provided the selected Program uses one of the two available tap tempo delay types. This requires that you have[…]
-
Page 66: Alesis QuadraVerb 2
Description of Controls — Chapter 5 QuadraVerb 2 Reference Manual 65 MIDI CHANNEL: 1 Page 2: MIDI Program Change. This determine whether or not the QuadraVerb 2 will respond to incoming MIDI program change messages. This can be set to either “ON” (recognize), “OFF” (ignore) or “TABLE” (use Program Table). When turned on, the QuadraVerb […]
-
Page 67: Alesis QuadraVerb 2
Chapter 5 — Description of Controls 66 QuadraVerb 2 Reference Manual Modulation The QuadraVerb 2 allows you to set up to 8 modulation routings which can control almost any parameter within a Program in realtime. This is especially useful for live applications, where the performer can actually interact or automate the changes in one or more effects.[…]
-
Page 68: Alesis QuadraVerb 2
Description of Controls — Chapter 5 QuadraVerb 2 Reference Manual 67 (North American versions). The correct power supply must be used AT ALL TIMES. Any other power supply might create a fire risk and/or permanently damage your unit. This damage would NOT be covered under your warranty. MIDI In This is a 5 pin DIN standard MIDI plug which connects t[…]
-
Page 69: Alesis QuadraVerb 2
Chapter 5 — Description of Controls 68 QuadraVerb 2 Reference Manual Left/Right Out — Analog Audio Out These are 1/4″ TRS phone jacks which connect to analog devices such as the effects returns on a mixing console. These are true stereo balanced outputs and are represented by the OUT Block on the front panel LCD display. These outputs are serv[…]
-
Page 70: Alesis QuadraVerb 2
Description of Controls — Chapter 5 QuadraVerb 2 Reference Manual 69 Effect Parameters The following charts are designed to act as a “road map” to assist you in locating parameters and their value ranges. All of the following parameters may be found by first selecting the appropriate effect type, pressing the [PARAMETER] button, and using the [[…]
-
Page 71: Alesis QuadraVerb 2
Chapter 5 — Description of Controls 70 QuadraVerb 2 Reference Manual Pitch Pitch Type Parameters Page# Mono Chorus Speed: 0-99, Depth: 0-99, Feedback: 0-99 1 Chorus PreDelay: 0-100mS 2 Chorus Shape: Sine/Square 3 Stereo Chorus Speed: 0-99, Depth: 0-99, Feedback: 0-99 1 PreDelay Chorus 1: 0-100mS, 2: 0-100mS 2 Chorus Shape: Sine/Square 3 Quad Chorus[…]
-
Page 72: Alesis QuadraVerb 2
Description of Controls — Chapter 5 QuadraVerb 2 Reference Manual 71 Delay Delay Type Parameters Page # Mono Delay Delay Time: 0.1-5000mS, Beat Count: 1/2, 1/4., 1/4, 1/4T, 1/8., 1/8, 1/8T, 1/16, 1/32 (. = dotted, T = triplet) 1 Feedback: 0-99 2 Stereo Delay Left Delay: 0.1-5000mS, Beat Count: 1/2, 1/4., 1/4, 1/4T, 1/8., 1/8, 1/8T, 1/16, 1/32 1 Lef[…]
-
Page 73: Alesis QuadraVerb 2
Chapter 5 — Description of Controls 72 QuadraVerb 2 Reference Manual Reverberation Reverb Type Parameters Page # Mono Room Decay: 0-99, Damping Hi: 0-99, Lo: 0-99 1 Reverb Density: 0-99, Diffusion: 0-99 2 High Frequency Roll Off: 200Hz-20,000Hz 3 Predelay: 1-250mS, Mix: <99-<50>-99> 4 Gate Trig: Off/Left/Right/L&R, Hold: 10-500 mS 5[…]
-
Page 74: Alesis QuadraVerb 2
Description of Controls — Chapter 5 QuadraVerb 2 Reference Manual 73 Reverb Type Parameters Page # Hall 2 Decay: 0-99, Damping Hi: 0-99, Lo: 0-99 1 Reverb Density: 0-99, Diffusion: 0-99 2 High Frequency Roll Off: 200Hz-20,000Hz 3 Predelay: 1-250mS, Mix: <99-<50>-99> 4 Reflection Level: 0-99, Spread: 0-99 5 Reverberation Swirl: 0-99 6 Ga[…]
-
Page 75: Alesis QuadraVerb 2
Chapter 5 — Description of Controls 74 QuadraVerb 2 Reference Manual Reverb Type Parameters Page # Spring Decay: 0-99, Damping Hi: 0-99, Lo: 0-99 1 Reverb Density: 0-99, Diffusion: 0-99 2 High Frequency Roll Off: 200Hz-20,000Hz 4 Predelay: 1-250mS, Mix: <99-<50>-99> 5 Gate Trig: Off/Left/Right/L&R, Hold: 10-500 mS 7 Gate Release Tim[…]
-
Page 76: Alesis QuadraVerb 2
Advanced Applications — Chapter 6 QuadraVerb 2 Reference Manual 75 C HAPTER 6 A DVANCED A PPLICATIONS MIDI Functions The QuadraVerb 2 provides many MIDI functions, including being able to respond to program changes, sending and receiving Program information via SysEx dumps, and realtime control over various effect parameters via MIDI controllers. F[…]
-
Page 77: Alesis QuadraVerb 2
Chapter 6 — Advanced Applications 76 QuadraVerb 2 Reference Manual Programs of a different number. This is especially useful since MIDI program changes only allow for 128 different programs to be recalled (0–127). Using the Program Table, you can have any incoming MIDI program change message recall any of the 200 Programs in the QuadraVerb 2. Thi[…]
-
Page 78: Alesis QuadraVerb 2
Advanced Applications — Chapter 6 QuadraVerb 2 Reference Manual 77 SysEx Storage To send and receive program information via SysEx dumps using a computer, or some other SysEx storage device (such as the Alesis DataDisk), or another QuadraVerb 2: ¿ Connect the other device’s MIDI OUT to the QuadraVerb 2’s [MIDI IN]. ¡ Connect the QuadraVerb 2?[…]
-
Page 79: Alesis QuadraVerb 2
Chapter 6 — Advanced Applications 78 QuadraVerb 2 Reference Manual In order to pass on MIDI information from a control device thru the QuadraVerb 2 to another MIDI device: ¿ Connect the control device’s MIDI OUT to the QuadraVerb 2’s [MIDI IN]. ¡ Connect the QuadraVerb 2’s [MIDI OUT] to the MIDI IN of the other device you wish to control. ?[…]
-
Page 80: Alesis QuadraVerb 2
Advanced Applications — Chapter 6 QuadraVerb 2 Reference Manual 79 Selecting the Modulator Once you press the [MODULATION] button, you can turn the [VALUE/ENTER] knob to select one of the eight Modulators. Think of each Modulator as a modulation patch which routes a Source to a Target using a particular amplitude. ¿ Press [MODULATION]. The [MODULA[…]
-
Page 81: Alesis QuadraVerb 2
Chapter 6 — Advanced Applications 80 QuadraVerb 2 Reference Manual Type Effect Target E Q Lowpass Filter Frequency Bandpass Filter Bandpass Frequency, Bandpass Width Highpass Filter Frequency Lowpass Shelf Frequency, Gain Highpass Shelf Frequency, Gain 1 Band Low/High Parametric Bandpass Gain Bandpass Width 2 Band Sweep Shelf Lowpass Frequency, Low[…]
-
Page 82: Alesis QuadraVerb 2
Advanced Applications — Chapter 6 QuadraVerb 2 Reference Manual 81 Type Effect Target Reverberation Mono Room Room 1 Hall 1 Plate 1 Chamber 1 Spring Input Hi Rolloff Predelay Time, Predelay Mix Decay, Density, Diffusion Damping Low Damping High Gate Trigger On/Off, Gate Hold Time Gate Release Time, Gate Level Room 2 Hall 2 Plate 2 Chamber 2 Input H[…]
-
Page 83: Alesis QuadraVerb 2
Chapter 6 — Advanced Applications 82 QuadraVerb 2 Reference Manual Target. This number can be set to 00 (for no effect) all the way to +99 (for maximum effect) or down to -99 (for maximum negative effect; i.e., inverted control). If you have been following along so far, let’s continue where we left off from the last set of steps: ¿ After selecti[…]
-
Page 84: Alesis QuadraVerb 2
Advanced Applications — Chapter 6 QuadraVerb 2 Reference Manual 83 Peak Follower 1 and 2 have identical features and work as shown below: SLOPE IS SET BY DECA Y TIME PEAK FOLLO WER OUTPUT A UDIO PEAK INPUT (Left or right Channel or higher of left and right) Modulation Page 4 allows you to select the type of each Input Generator. The remaining pages[…]
-
Page 85: Alesis QuadraVerb 2
Chapter 6 — Advanced Applications 84 QuadraVerb 2 Reference Manual The cursor appears beneath the Generator, indicating that you may now turn the [VALUE/ENTER] knob and select either Input Generator 1 or 2, depending on which one you want to edit. You may now select what the trigger source of the selected Input Generator will be. ª Press [PAGE >[…]
-
Page 86: Alesis QuadraVerb 2
Advanced Applications — Chapter 6 QuadraVerb 2 Reference Manual 85 The display will look like this: GEN 1 ENV ATTACK TIME: 0.00Sec 12 PRESS [PAGE>} to advance the cursor to the next field and turn the [VALUE/ENTER] knob to adjust the input envelope’s attack time (0.00 to 10.00 seconds). This controls the rate that the envelope’s control will[…]
-
Page 87: Alesis QuadraVerb 2
Chapter 6 — Advanced Applications 86 QuadraVerb 2 Reference Manual Bypassing Effects The [BYPASS] jack allows you to bypass the effects of the QuadraVerb 2 via a footswitch. This is the same as pressing the [BYPASS] button on the front panel. Each time either the [BYPASS] button is pressed, or the footswitch connected to the [BYPASS] jack is presse[…]
-
Page 88: Alesis QuadraVerb 2
Alesis Optical Interface — Chapter 7 QuadraVerb 2 Reference Manual 87 CHAPTER 7 A LESIS O PTICAL I NTERFACE Overview The Alesis optical digital interface provides the means to communicate with other digital audio devices, such as the Alesis ADAT Multitrack Recorder. The Alesis optical interface uses a proprietary 8 channel buss, from which the Quad[…]
-
Page 89: Alesis QuadraVerb 2
Chapter 7 — Alesis Optical Interface 88 QuadraVerb 2 Reference Manual J Note: If you experience problems (clicks, etc.) with an ADAT system set to digital input, it may be that the ADAT’s clock source is set to internal, even though its Digital In is pressed. (This will only happen if you’ve set it this way for making tape copies) Hold SET LOCA[…]
-
Page 90: Alesis QuadraVerb 2
Alesis Optical Interface — Chapter 7 QuadraVerb 2 Reference Manual 89 The fiber optic cables that make up the digital buss need to be connected in the same order as the Sync cables. The QuadraVerb 2 is inserted in the fiber optic loop from the output of the second ADAT to the input of the master ADAT. The QuadraVerb 2 lets you turn its digital outp[…]
-
Page 91: Alesis QuadraVerb 2
Chapter 7 — Alesis Optical Interface 90 QuadraVerb 2 Reference Manual To Two or More ADATs With a BRC or AI-2 If your ADAT system has an Alesis BRC Master Remote Controller, the fiber optic cables that make up the digital buss need to be connected in the same order as the Sync cables. If your ADAT system uses the BRC or the Alesis AI-2 Synchronizer[…]
-
Page 92: Alesis QuadraVerb 2
Alesis Optical Interface — Chapter 7 QuadraVerb 2 Reference Manual 91 INPUT LEVEL LEFT RIGHT OUTPUT CLIP -3dB -12dB -32dB L INPUT R DUAL CHANNEL OCTAL PROCESSING™ MASTER EFFECTS W/DIGITAL I/O VALUE/ENTER POWER BLOCK PROGRAM COMPARE TYPE P ARAMETER ROUTING MIX 1 BLOCK 23 45 STORE BYPASS GLOBAL MIDI NAME MODULATION 6 PAGE 78 90 PRESET USER TM AD A […]
-
Page 93: Alesis QuadraVerb 2
Chapter 7 — Alesis Optical Interface 92 QuadraVerb 2 Reference Manual Routings To specific ADAT tracks To route the QuadraVerb 2’s digital outputs to specific ADAT tracks depends on which of the 8 channels of the buss you use. If you want to record in stereo onto tracks 1 and 2 of ADAT (or 9 and 10 on ADAT #2 in a chain), route the QuadraVerb 2?[…]
-
Page 94: Alesis QuadraVerb 2
Alesis Optical Interface — Chapter 7 QuadraVerb 2 Reference Manual 93 From ADAT through the QuadraVerb 2 back to ADAT When routing ADAT tracks to the QuadraVerb 2 to be recorded back to ADAT, how you go about it depends on whether or not you are using a BRC. If you have one or more ADATs with no BRC, then you simply connect the digital buss of the […]
-
Page 95: Alesis QuadraVerb 2
Chapter 7 — Alesis Optical Interface 94 QuadraVerb 2 Reference Manual From the QuadraSynth through the QuadraVerb 2 back to ADAT The QuadraSynth (and S4 sound module) provides its four audio outputs (Main Left/Right and Aux Left/Right) on the first four channels of the Alesis Optical digital buss. If you connect the QuadraSynth’s digital output t[…]
-
Page 96: Alesis QuadraVerb 2
Trouble-Shooting QuadraVerb 2 Reference Manual 95 C HAPTER 8 T ROUBLE -S HOOTING Trouble-Shooting Index If you are experience problems while operating the QuadraVerb 2, please use the following table to locate possible causes and solutions before contacting Alesis customer service for assistance. Symptom Cause Solution The display does not light wh[…]
-
Page 97: Alesis QuadraVerb 2
Trouble-Shooting 96 QuadraVerb 2 Reference Manual MIDI Program Changes are off by 1. Transmitter doesn’t display true MIDI Program Change numbers. Change the transmitter to display 0-127, or setup a Program Table in the Q2. Error Messages Although the digital signal processing power in the QuadraVerb 2 is powerful and features plenty of memory[…]
-
Page 98: Alesis QuadraVerb 2
Trouble-Shooting QuadraVerb 2 Reference Manual 97 Checking the Software Version The current software version may be determined by holding [GLOBAL] and pressing [PROGRAM]. The display will indicate the currently installed software version. Re-initializing To re-initialize the QuadraVerb 2, hold down both [PROGRAM] and [COMPARE] while turning on the […]
-
Page 99: Alesis QuadraVerb 2
Trouble-Shooting 98 QuadraVerb 2 Reference Manual For prompt service, indicate the RA number on the shipping label. If you do not have the original packing, ship the QuadraVerb 2 in a sturdy carton, with shock-absorbing materials such as styrofoam pellets (the kind without CFCs) or “bubble-pack” surrounding the unit. Shipping damage caused by i[…]
-
Page 100: Alesis QuadraVerb 2
MIDI Implementation Chart — Chapter 8 QuadraVerb 2 Reference Manual 99 MIDI I MPLEMENTATION C HART Function Transmitted Recognized Remarks Basic Channel Default Changed X * * * * * * * * 1 — 16 Mode Default Messages Altered X X * * * * * * * * Mode 3 X Note Number True Voice X * * * * * * * * 0 — 127 0 — 127 Velocity Note On Note Off X X O X […]
-
Page 101: Alesis QuadraVerb 2
Effects Processing Index 100 QuadraVerb 2 Reference Manual S PECIFICATIONS Electrical Frequency Response: ±1dB from 20Hz to 20kHz Dynamic Range: >90 dB «A» wtg., 20 Hz-22 kHz Distortion (THD+N): <0.009% @1kHz, nominal level (-12 dBfs) <0.005% @ peak level Crosstalk: <90 dB below full scale Power requirements: 9VAC, 13.5W (Ale[…]
ALESIS
QuadraVerb GT
Reference Manual
|
sCHAPTER 1 Ð GETTING STARTED ……………………………………….. |
1 |
|
1.1 INTRODUCTION ………………………………………………………………………….. |
1 |
|
What It Is ………………………………………………………………………………….. |
1 |
|
Features…………………………………………………………………………………….. |
2 |
|
1.2 SYSTEM HOOKUP BASICS…………………………………………………………… |
2 |
|
AC Transformer Hookup…………………………………………………………. |
3 |
|
1.3 AUDIO HOOKUPS ………………………………………………………………………… |
3 |
|
Mono In, Mono Out…………………………………………………………………. |
3 |
|
Mono In, Stereo Out…………………………………………………………………. |
4 |
|
Stereo In, Stereo Out ………………………………………………………………… |
4 |
|
Mono Send, Mono Return Effects Loop ………………………………….. |
5 |
|
Mono Send, Stereo Return Effects Loop………………………………….. |
5 |
|
Stereo Send, Stereo Return Effects Loop………………………………….. |
6 |
|
Interfacing with Mixer Stereo Effects Sends…………………………….. |
7 |
|
1.4 FOOTSWITCH HOOKUP………………………………………………………………. |
7 |
|
1.5 EXTERNAL EFFECTS HOOKUP …………………………………………………… |
8 |
|
1.6 SETTING LEVELS………………………………………………………………………….. |
9 |
|
1.7 CHECK OUT THE FACTORY PROGRAMS………………………………….. |
9 |
|
Selecting Programs …………………………………………………………………… |
10 |
|
1.8 MIDI HOOKUP………………………………………………………………………………. |
10 |
|
MIDI Program Selection…………………………………………………………… |
11 |
|
MIDI Controller Pedal Hookup ……………………………………………….. |
12 |
|
MIDI Thru/Out Hookup………………………………………………………….. |
13 |
|
1.9 ROCK OUT!……………………………………………………………………………………. |
13 |
|
CHAPTER 2 Ð QuadraVerb GT MODULES AND CONFIGURATIONS 14 |
|
|
2.1 ABOUT THE QUADRAVERB GT’s EFFECTS ……………………………… |
14 |
|
Preamp ……………………………………………………………………………………… |
14 |
|
Reverb ………………………………………………………………………………………. |
14 |
|
Delay …………………………………………………………………………………………. |
15 |
|
Pitch Change …………………………………………………………………………….. |
15 |
|
Equalization ……………………………………………………………………………… |
16 |
|
Panning and Tremolo………………………………………………………………. |
18 |
|
Ring Modulation ……………………………………………………………………… |
18 |
|
Tunable Resonators………………………………………………………………….. |
18 |
|
Sampling…………………………………………………………………………………… |
18 |
|
Mixer…………………………………………………………………………………………. |
18 |
|
Modulation ………………………………………………………………………………. |
19 |
|
ÒBi-TimbralÓ Effects………………………………………………………………….. |
19 |
|
2.2 ABOUT CONFIGURATIONS……………………………………………………….. |
20 |
|
#1 Preamp > EQ > Tremolo/Panning > Pitch > Delay > Reverb 21 |
|
|
#2 Preamp > Lezlie > Delay > Reverb……………………………………… |
22 |
|
#4 Preamp > 5 Band EQ > Tremolo/Panning >………………………. |
23 |
|
#5 Preamp > 3 Band EQ > Reverb……………………………………………. |
24 |
|
|
#6 |
Preamp > Ring Modulator > Delay > Reverb…………………….. |
25 |
|
#7 |
Preamp > Resonators > Delay > Reverb …………………………….. |
25 |
|
#8 |
Preamp > Sampling ……………………………………………………………. |
26 |
|
CHAPTER 3 — BASIC EDITING TECHNIQUES …………………………… |
27 |
|
3.1 HOW EDITING WORKS ………………………………………………………………. |
27 |
|
3.2 COMPARING EDITED AND NON-EDITED VERSIONS OF PROGRAMS 29 |
|
|
3.3 SAVING (STORING) EDITED PROGRAMS ………………………………… |
29 |
|
3.4 RENAMING PROGRAMS ……………………………………………………………. |
30 |
|
3.5 RECALLING INDIVIDUAL FACTORY PROGRAMS………………….. |
31 |
|
3.6 RECALLING ALL FACTORY PROGRAMS………………………………….. |
31 |
|
CHAPTER 4 Ð EDITING CONFIGURATION PARAMETERS…………. |
32 |
|
4.1 SELECTING A CONFIGURATION ………………………………………………. |
32 |
|
4.2 SELECTING A CONFIGURATION MODULE FOR EDITING……… |
33 |
|
4.3 EDITING PREAMP PARAMETERS ……………………………………………… |
33 |
|
Compression…………………………………………………………………………….. |
33 |
|
Overdrive …………………………………………………………………………………. |
33 |
|
Distortion………………………………………………………………………………….. |
34 |
|
Preamp Tone…………………………………………………………………………….. |
34 |
|
Bass Boost …………………………………………………………………………………. |
35 |
|
Cabinet Simulator…………………………………………………………………….. |
35 |
|
Effect Loop ………………………………………………………………………………… |
35 |
|
Noise Gate ………………………………………………………………………………… |
36 |
|
Preamp Out Level…………………………………………………………………….. |
36 |
|
4.4 EDITING REVERB PARAMETERS………………………………………………. |
37 |
|
Reverb Type (configs 1, 2, 5, 6, 7)………………………………………………. |
37 |
|
Reverb Input 1 (configs 1, 2, 6, 7) ……………………………………………… |
37 |
|
Reverb Input (config 5)…………………………………………………………….. |
38 |
|
Reverb Input 2 (configs 1, 2, 6, 7) ……………………………………………… |
38 |
|
Reverb Input Mix (configs 1, 2, 6, 7)…………………………………………. |
38 |
|
Reverb Predelay (configs 1, 2, 5, 6, 7)………………………………………… |
39 |
|
Reverb Predelay Mix (configs 1, 2, 5, 6, 7)…………………………………. |
39 |
|
Reverb Decay (configs 1, 2, 5, 6, 7)…………………………………………….. |
40 |
|
Reverb Diffusion Amount (configs 1, 2, 5, 6, 7)……………………….. |
40 |
|
Reverb Density (configs 1, 2, 5, 6, 7)………………………………………….. |
41 |
|
Reverb Low Frequency Decay (configs 1, 2, 5, 6, 7)…………………… |
41 |
|
Reverb High Frequency Decay (configs 1, 2, 5, 6, 7)………………….. |
42 |
|
Reverb Gate Status (configs 1, 2, 5, 6, 7)……………………………………. |
42 |
|
Reverb Gate Hold Time (configs 1, 2, 5, 6, 7)……………………………. |
42 |
|
Reverb Gate Release Time (configs 1, 2, 5, 6, 7) ……………………….. |
43 |
|
Reverb Gated Level (configs 1, 2, 5, 6, 7)…………………………………… |
43 |
|
4.5 EDITING DELAY PARAMETERS…………………………………………………. |
43 |
|
Delay Type (configs 1, 2, 3, 4, 6, 7)……………………………………………… |
43 |
|
Delay Input 1 (configs 1, 4, 6, 7) ………………………………………………… |
44 |
|
Delay Input (config 3)……………………………………………………………….. |
44 |
|
Delay Input Mix (configs 1, 2, 4, 6, 7)………………………………………… |
45 |
|
Delay Time (configs 1, 2, 3, 4, 6, 7)…………………………………………….. |
45 |
|
Delay Feedback (configs 1, 2, 3, 4, 6, 7)………………………………………. |
46 |
|
Right Delay Time (configs 1, 2, 3, 4, 6, 7) ………………………………….. |
46 |
|
Delay Feedback Right (configs 1, 2, 3, 4, 6, 7)…………………………….. |
46 |
|
Multi Tap Number (config 4 only)…………………………………………… |
47 |
|
Multi Tap Delay Time (config 4 only) ……………………………………… |
47 |
|
Multi Tap Volume (config 4 only)…………………………………………… |
47 |
|
Multi Tap Panning (config 4 only)…………………………………………… |
48 |
|
Multi Tap Feedback (config 4 only)………………………………………….. |
48 |
|
Multi Tap Master Feedback (config 4 only) ……………………………… |
48 |
|
4.6 EDITING PITCH PARAMETERS ………………………………………………….. |
49 |
|
Pitch Mode (configs 1, 4)…………………………………………………………… |
49 |
|
Pitch Input (configs 1, 4) …………………………………………………………… |
50 |
|
LFO Waveshape (Chorus only) ……………………………………………….. |
50 |
|
LFO Speed (Chorus and Flange only)………………………………………. |
50 |
|
LFO Depth (Chorus and Flange only)………………………………………. |
50 |
|
Pitch Feedback (Chorus and Flange only)………………………………… |
51 |
|
Trigger Flange (Flange only)…………………………………………………….. |
51 |
|
Pitch Detune (Detune only)……………………………………………………… |
51 |
|
Phaser Speed (Phaser only)………………………………………………………. |
52 |
|
Phaser Depth (Phaser only)………………………………………………………. |
52 |
|
Lezlie Stereo Separation (config 2 only)…………………………………… |
52 |
|
Lezlie Motor Control (config 2 only) ……………………………………….. |
52 |
|
Lezlie Speed (config 2 only) ……………………………………………………… |
53 |
|
Ring Modulator Spectrum Shift (config 6 only) ……………………… |
53 |
|
Ring Modulator Output Mix (config 6 only)……………………………. |
53 |
|
Ring Modulator Delay/Reverb Input (config 6 only) ……………… |
54 |
|
Reverb Chorus Mode (config 5 only)……………………………………….. |
54 |
|
4.7 A WORD ABOUT EQ, RESONATORS, AND GUITAR TONE …… |
55 |
|
Resonators, EQ, and Tone………………………………………………………… |
55 |
|
Programmable Tone Curves ……………………………………………………. |
56 |
|
4.8 EDITING 3-BAND EQ AND RESONATOR PARAMETERS (config 1) 56 |
|
|
EQ Preset …………………………………………………………………………………… |
56 |
|
EQ Mode……………………………………………………………………………………. |
57 |
|
Resonator Tune (Resonators + EQ mode only) ………………………. |
57 |
|
Resonator Decay (Resonators + EQ mode only)………………………. |
57 |
|
Resonator Amplitude (Resonators + EQ mode only)……………… |
58 |
|
Low EQ Frequency (3 Band EQ mode only)……………………………… |
58 |
|
Low EQ Amplitude (3 Band EQ mode only)……………………………. |
58 |
|
Mid EQ Frequency…………………………………………………………………….. |
59 |
|
Mid EQ Bandwidth…………………………………………………………………… |
59 |
|
Mid EQ Amplitude…………………………………………………………………… |
59 |
|
High EQ Frequency (3 Band EQ mode only) ……………………………. |
60 |
|
High EQ Amplitude (3 Band EQ mode only)…………………………… |
60 |
|
4.9 EDITING LEZLIE EQ PARAMETERS (config 2)……………………………. |
61 |
|
High Rotor Level ……………………………………………………………………… |
61 |
|
4.10 EDITING 11-BAND GRAPHIC EQ PARAMETERS (config 3) ……. |
61 |
|
EQ Preset …………………………………………………………………………………… |
61 |
|
Graphic Frequencies and Levels………………………………………………. |
62 |
|
4.11 EDITING 5-BAND EQ AND RESONATOR PARAMETERS (config 4)63 |
|
|
EQ Preset …………………………………………………………………………………… |
63 |
|
EQ Mode……………………………………………………………………………………. |
64 |
|
Low EQ Frequency ……………………………………………………………………. |
64 |
|
Low EQ Amplitude…………………………………………………………………… |
64 |
|
Low Mid EQ Frequency (5 Band EQ mode only)……………………… |
64 |
|
Low Mid EQ Bandwidth (5 Band EQ mode only) ……………………. |
65 |
|
Low Mid EQ Amplitude (5 Band EQ mode only) ……………………. |
65 |
|
Mid EQ Frequency…………………………………………………………………….. |
65 |
|
Mid EQ Bandwidth…………………………………………………………………… |
66 |
|
Mid EQ Amplitude…………………………………………………………………… |
66 |
|
Hi Mid EQ Frequency (5 Band EQ mode only) ………………………… |
66 |
|
Hi Mid EQ Bandwidth (5 Band EQ mode only)……………………….. |
67 |
|
Hi Mid EQ Amplitude (5 Band EQ mode only)……………………….. |
67 |
|
High EQ Frequency…………………………………………………………………… |
67 |
|
High EQ Amplitude …………………………………………………………………. |
68 |
|
Resonator Number (5 Resonator/3 EQ mode only)………………… |
68 |
|
Resonator Tune (5 Resonator/3 EQ mode only)……………………… |
68 |
|
Resonator Decay (5 Resonator/3 EQ mode only)…………………….. |
69 |
|
Resonator Amplitude (5 Resonator/3 EQ mode only)……………. |
69 |
|
4.12 EDITING 3-BAND EQ (config 5)………………………………………………….. |
69 |
|
EQ Preset …………………………………………………………………………………… |
69 |
|
Low EQ Frequency ……………………………………………………………………. |
70 |
|
Low EQ Amplitude…………………………………………………………………… |
70 |
|
Mid EQ Frequency…………………………………………………………………….. |
71 |
|
Mid EQ Bandwidth…………………………………………………………………… |
71 |
|
Mid EQ Amplitude…………………………………………………………………… |
71 |
|
High EQ Frequency…………………………………………………………………… |
72 |
|
High EQ Amplitude …………………………………………………………………. |
72 |
|
4.13 EDITING 5 BAND RESONATOR ……………………………………………….. |
72 |
|
Resonator Gate Mode (config 7 only) ………………………………………. |
72 |
|
Resonator Decay (config 7 only)……………………………………………….. |
73 |
|
Resonator Tune (config 7 only) ……………………………………………….. |
73 |
|
4.14 EDITING MIX PARAMETERS…………………………………………………….. |
73 |
|
Direct Signal Level……………………………………………………………………. |
74 |
|
Master Effects Level………………………………………………………………….. |
74 |
|
Preamp Signal…………………………………………………………………………… |
74 |
|
Preamp Level (appears only with Pre-EQ preamp signal) ………. |
75 |
|
EQ Level (appears only with Post-EQ preamp signals)……………. |
75 |
|
Pitch Output Level……………………………………………………………………. |
75 |
|
Delay Output Level…………………………………………………………………… |
75 |
|
Reverb Output Level………………………………………………………………… |
76 |
|
Modulation ………………………………………………………………………………. |
76 |
|
Modulation Depth……………………………………………………………………. |
76 |
|
Modulation Speed ……………………………………………………………………. |
76 |
|
4.15 EDITING MIX PARAMETERS…………………………………………………….. |
77 |
|
Direct Signal Level……………………………………………………………………. |
77 |
|
Master Effects Level………………………………………………………………….. |
77 |
|
Lezlie Output Level………………………………………………………………….. |
77 |
|
Delay Output Level…………………………………………………………………… |
78 |
|
Reverb Output Level………………………………………………………………… |
78 |
|
4.16 EDITING MIX PARAMETERS…………………………………………………….. |
78 |
|
Direct Signal Level……………………………………………………………………. |
78 |
|
Master Effects Level………………………………………………………………….. |
79 |
|
EQ Output Level……………………………………………………………………….. |
79 |
|
Delay Output Level…………………………………………………………………… |
79 |
|
4.17 EDITING MIX PARAMETERS…………………………………………………….. |
80 |
|
Direct Signal Level……………………………………………………………………. |
80 |
|
Master Effects Level………………………………………………………………….. |
80 |
|
Preamp Signal…………………………………………………………………………… |
80 |
|
Preamp Level (appears only with Pre-EQ preamp signal) ………. |
81 |
|
EQ Output Level (appears only with Post-EQ preamp signals)..81 |
|
|
Pitch Output Level (appears only with Post-EQ direct signals)..81 |
|
|
Delay Output Level…………………………………………………………………… |
82 |
|
Modulation ………………………………………………………………………………. |
82 |
|
Modulation Depth……………………………………………………………………. |
82 |
|
Modulation Speed ……………………………………………………………………. |
82 |
|
4.18 EDITING MIX PARAMETERS…………………………………………………….. |
83 |
|
Direct Signal Level (appears only with Pre-EQ direct signals) … |
83 |
|
Master Effects Level………………………………………………………………….. |
83 |
|
Preamp Signal…………………………………………………………………………… |
83 |
|
Preamp Level (appears only with Pre-EQ preamp signal) ………. |
84 |
|
EQ Output Level (appears only with Post-EQ preamp signals)..84 |
|
|
Reverb Output Level………………………………………………………………… |
84 |
|
4.19 EDITING MIX PARAMETERS…………………………………………………….. |
85 |
|
Direct Signal Level……………………………………………………………………. |
85 |
|
Master Effects Level………………………………………………………………….. |
85 |
|
Preamp Level……………………………………………………………………………. |
85 |
|
Ring Modulator Output Level…………………………………………………. |
86 |
|
Delay Output Level…………………………………………………………………… |
86 |
|
Reverb Output Level………………………………………………………………… |
86 |
|
4.20 EDITING MIX PARAMETERS…………………………………………………….. |
87 |
|
Direct Signal Level……………………………………………………………………. |
87 |
|
Master Effects Level………………………………………………………………….. |
87 |
|
Preamp Signal Level ………………………………………………………………… |
87 |
|
Resonator Output Level…………………………………………………………… |
88 |
|
Delay Output Level…………………………………………………………………… |
88 |
|
Reverb Output Level………………………………………………………………… |
88 |
|
CHAPTER 5 Ð SAMPLING ……………………………………………………… |
89 |
|
5.1 SELECTING THE SAMPLING CONFIGURATION……………………… |
89 |
|
5.2 RECORDING A SAMPLE………………………………………………………………. |
89 |
|
Recording By Audio Trigger…………………………………………………….. |
90 |
|
Recording from the Front Panel………………………………………………. |
90 |
|
Playing Back a Sample ……………………………………………………………… |
91 |
|
Front Panel Playback ………………………………………………………………… |
92 |
|
Audio Trigger Playback…………………………………………………………….. |
92 |
|
MIDI Playback …………………………………………………………………………… |
93 |
|
Select MIDI Trigger Mode ………………………………………………………… |
93 |
|
Select the MIDI Trigger Note……………………………………………………. |
94 |
|
Adjusting the Sample Playback Length …………………………………… |
95 |
|
Adjusting the Sample Mix Parameters……………………………………. |
96 |
|
CHAPTER 6 Ð THE MIDI BUTTON………………………………………….. |
97 |
|
6.1 SELECT MIDI MODE……………………………………………………………………… |
97 |
|
6.2 PROGRAM CHANGE ENABLE……………………………………………………. |
98 |
|
6.3 EDIT THE PROGRAM CHANGE TABLE……………………………………… |
99 |
|
6.4 MIDI THRU/OUT SELECTION…………………………………………………….. |
100 |
|
6.5 SYSTEM EXCLUSIVE DATA ENABLE…………………………………………. |
100 |
|
6.6 SEND PROGRAM DATA (SYS EX) OVER MIDI………………………….. |
100 |
|
6.7 PROGRAM ADVANCE FOOTSWITCH RANGE………………………… |
103 |
|
CHAPTER 7 Ð MIDI MODULATION (NAME/MOD BUTTON) ………. |
104 |
|
7.1 ABOUT MOD SOURCES AND TARGETS …………………………………… |
104 |
|
7.2 PROGRAMMING MOD SOURCES AND TARGETS…………………… |
105 |
|
7.3 TARGET PARAMETER LISTING…………………………………………………. |
107 |
|
Configuration 1 Target Parameters………………………………………….. |
107 |
|
Configuration 2 Target Parameters………………………………………….. |
108 |
|
Configuration 3 Target Parameters………………………………………….. |
109 |
|
Configuration 4 Target Parameters………………………………………….. |
109 |
|
Configuration 5 Target Parameters………………………………………….. |
110 |
|
Configuration 6 Target Parameters………………………………………….. |
111 |
|
Configuration 7 Target Parameters………………………………………….. |
111 |
|
7.4 PARAMETER DEFAULT VALUE CHART ………………………………….. |
113 |
|
CHAPTER 8 Ð MIDI SUPPLEMENT …………………………………………. |
116 |
|
8.1 MIDI BASICS ………………………………………………………………………………… |
116 |
|
8.2 |
MIDI HARDWARE………………………………………………………………………. |
116 |
|
8.3 MIDI MESSAGE BASICS………………………………………………………………. |
117 |
|
|
8.4 |
CHANNEL MESSAGES ……………………………………………………………….. |
117 |
|
8.4A Voice Messages………………………………………………………………… |
117 |
|
|
8.4B Mode Messages ………………………………………………………………… |
119 |
|
|
8.5 SYSTEM COMMON MESSAGES…………………………………………………. |
120 |
|
|
8.6 |
BOOKS ON MIDI ………………………………………………………………………….. |
121 |
|
8.7 |
VIDEOS ON MIDI…………………………………………………………………………. |
121 |

CHAPTER 1 Ð GETTING STARTED
1.1 INTRODUCTION
What It Is
The Alesis QuadraVerb GT is a stereo effects unit that is ideal for guitar. It combines analog and digital electronics to provide the best of both worlds. Analog effects include:
¥Compression
¥Distortion
¥Flat/Presence/Brightness Control
¥Bass Boost
¥Speaker Cabinet Simulator (ideal for use with headphones or recording direct; can be bypassed when feeding a guitar amp)
¥Noise Gate
¥Programmable Effects Loop for inserting other effects (can also provide a signal send from the analog outputs, and receive a return signal into the digital processor)
The digital effects are the same ones that have made the QuadraVerb Plus a favorite in studios and live equipment racks world-wide:
¥Reverb
¥Delay (stereo or mono)
¥Pitch Change (chorus, flange, detune, phaser, etc.)
¥Equalization (graphic or parametric)
¥Panning and Tremolo
¥Ring Modulation
¥Tunable Resonators (a very resonant filtering effect)
¥Sampling (up to 1.5 seconds of sound can be captured and replayed)
The order of the analog effects are preset in their optimum positions; the routing of the digital effects is flexible and programmable. All effects parameters are editable. 100 edited programs can be saved in memory, and called up by front panel switches or MIDI program change commands.
The QuadraVerb GT is also MIDI controllable. Settings need not be staticÑyou can control them in real time with Continuous Controller foot pedals, or with sequencers or keyboards.
1

Features
¥20 Hz to 20 kHz frequency response
¥Up to 11 simultaneous effects (6 analog, 5 digital) and programmable effects loop
¥Backlit, descriptive 32 character LCD display
¥Touch sensitive programming buttons for quick editingÑpress harder to scroll faster through the display
¥Stores up to 100 programs
¥Comprehensive MIDI implementation
¥Real-time parameter control via MIDI controllers
¥Easy editing of all parameters
¥All functions, parameters, and volume levels fully programmable
¥Stereo in and out
¥Flexible effects routing and mixing
¥Several types of reverbs, including: Plate, Room, Chamber, Hall, and Reverse
¥Several types of delay, including: Ping Pong Delay, Mono Delay, Stereo Delay, and Multitap delay
¥Several types of Pitch Shift, including: Mono Chorus, Stereo Chorus, Mono Flange, Stereo Flange, Pitch Detune, and Phase Shifter
¥Three types of Digital EQ, including: 3 band Parametric, 5 band Parametric, and 11 band Graphic
¥Any or all Alesis presets can be recalled from ROM at any time
1.2SYSTEM HOOKUP BASICS
The QuadraVerb GT is designed for mono or stereo guitar, bass, Chapman Stick, etc. but is also right at home in the studio for processing vocals, drums, pianos, synthesizers (try the rotating speaker sound!), tape tracks, and other instruments.
The QuadraVerb GT can insert between your guitar and subsequent effects units or amplification systems. This lets you use the amp’s overdrive options to further color the QuadraVerb GT’s sound. Or, patch the QuadraVerb GT into an ampÕs effects loop. This lets the QuadraVerb GT process the amp’s internal sound, and in some cases, lets you use the amplifier’s preamp section as an alternate to the QuadraVerb GT’s internal preamp.
Following are some typical hookups, followed by information on proper
2
![]()
level-setting. All inputs and outputs are unbalanced lines.
Turn your amplifier volume all the way down when patching the QuadraVerb GT into your system!
AC Transformer Hookup
Plug the QuadraVerb GT’s AC adapter into the wall. The smaller plug inserts into the 9 VAC power jack on the QuadraVerb GT’s rear panel.
To prolong the AC adapter’s life, unplug it from AC power when not in use (turning off the QuadraVerb GT’s power switch does not disconnect the AC adapter from AC power). It’s good practice to plug all your ACpowered devices into a switched power strip, so that turning off the strip turns off power to all your gear.
1.3 AUDIO HOOKUPS
The QuadraVerb GT can interface with a variety of guitar systems and recording studio setups.
Mono In, Mono Out
|
From |
to mono amp, |
|||
|
PA, or mixer |
||||
|
guitar |
||||
|
Right Input |
Right Output |
|||
Application Mono guitar feeding a mono amp, PA, or mixer.
Hookup Patch the guitar into the right input and feed the right output to your amplifier (Using the left input and output will also work, but for the sake of consistency and simplicity, we’ll just refer to the right input and output).
3
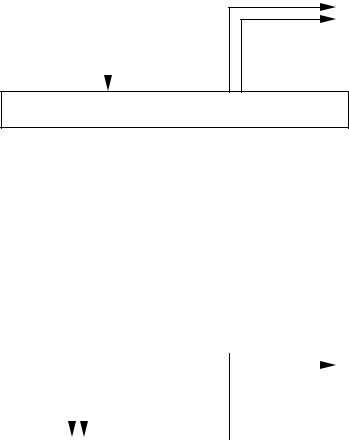
Mono In, Stereo Out
to stereo amp, PA, or mixer
From guitar
|
Right |
Left |
Right |
|
|
Input |
Output |
Output |
|
Application Mono guitar feeding a stereo amp, PA, or mixer.
Hookup Patch the guitar into the right input and feed the right and left outputs to your amplifier.
Stereo In, Stereo Out
to stereo amp, From PA, or mixer guitar 
|
Left |
Right |
Left |
Right |
||||
|
Input |
Input |
Output |
Output |
||||
Application Stereo guitar feeding a stereo amp, PA, or mixer.
Hookup Patch the guitar into the right and left inputs and feed the right and left outputs to your amplifier.
4
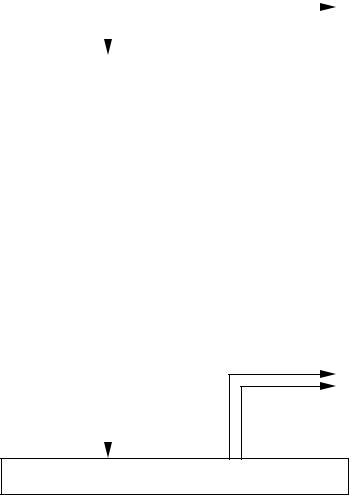
Mono Send, Mono Return Effects Loop
|
from effects |
to effects |
|||
|
loop return |
||||
|
loop send |
||||
|
Right Input |
Right Output |
|||
Application Patching into a guitar amp with a mono effects loop. Do not confuse this with the QuadraVerb GTÕs internal effects loop; the loop in an amplifier is specifically designed for the insertion of signal processors such as the QuadraVerb GT.
Hookup Patch the effects loop send into the right QuadraVerb GT input and feed QuadraVerb GT’s right output to the effects loop return.
Mono Send, Stereo Return Effects Loop
to effects loop stereo returns
From effects loop send
|
Right |
Left |
Right |
|
|
Input |
Output |
Output |
|
Application Patching into a guitar amp with a mono send and stereo return effects loop. Do not confuse this with the QuadraVerb GTÕs internal effects loop; the loop in an amplifier is specifically designed for the insertion of signal processors such as the QuadraVerb GT.
Hookup Patch the effects loop send into the right QuadraVerb GT input and patch the QuadraVerb GT’s right and left outputs to the effects loop stereo return.
5
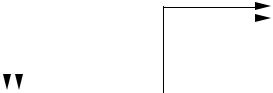
Stereo Send, Stereo Return Effects Loop
to effects From effects loop returns
loop sends
|
Left |
Right |
Left |
Right |
||||
|
Input |
Input |
Output |
Output |
||||
Application Patching into a guitar amp with a stereo send and stereo return effects loop. Do not confuse this with the QuadraVerb GTÕs internal effects loop; the loop in an amplifier is specifically designed for the insertion of signal processors such as the QuadraVerb GT.
Hookup Patch the effects loop sends into the right and left QuadraVerb GT inputs, and patch the QuadraVerb GT’s right and left outputs to the effects loop stereo return.
6
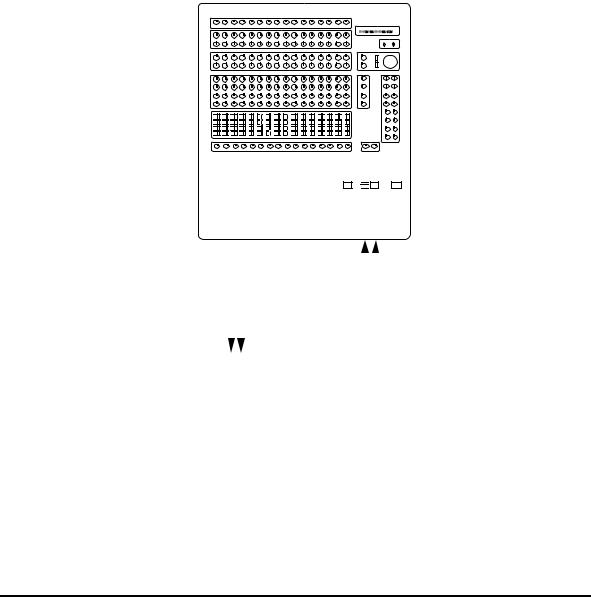
Interfacing with Mixer Stereo Effects Sends
|
From mixer |
to mixer |
|||||||||||||||||||||||||||||||||||||||||||||
|
sends |
returns |
|||||||||||||||||||||||||||||||||||||||||||||
|
Left |
Right |
Left |
Right |
|||||||||||||||||||||||||||||||||||||||||||
|
Input |
Input |
Output |
Output |
|||||||||||||||||||||||||||||||||||||||||||
Application Patching into a mixer’s stereo effects sends for use as a reverb or other processor while recording.
Hookup Patch the mixer’s auxiliary bus (or effects bus) sends into the right and left QuadraVerb GT inputs, and patch the QuadraVerb GT’s right and left outputs to the mixer’s stereo returns or if not available, two standard mixer channel inputs.
1.4 FOOTSWITCH HOOKUP
There are two footswitch jacks on the rear panel that accept standard, normally open, momentary contact footswitches.
A footswitch plugged into the Bypass jack duplicates the BYPASS button function. Press on the footswitch to toggle between bypass and active modes. When bypassed, the LED in the middle of the BYPASS button will be lit.
A footswitch plugged into the Advance jack increments (or decrements)
7

the program number by one with each footswitch press. You can set an upper and lower program number limit, as described in section 5.7.
1.5 EXTERNAL EFFECTS HOOKUP
The QuadraVerb GT offers an effects loop where you can patch in effects other than the ones included in the unit (you might want to insert, for example, a wah-wah pedal or vintage fuzz). The effect can be bypassed or enabled for each patch.
Patch the Effects Loop Send jack to the effect input, and the Effects Loop Receive jack to the effect output. Also note that the Send jack provides a post-analog effects, pre-digital effects send suitable for driving guitar amps or a studio console; the Receive jack lets you plug directly into the digital effects and bypass the analog effects. The effects loop can therefore split the QuadraVerb GT into two separate effects, as described in section 2.1.
It is important to note that turning off the effects loop does not turn off the effects send. Selecting In or Out on the Effects Loop page will only enable or disable the Effects Loop Return jack. Also, the effects loop will be bypassed if there are no jacks inserted, regardless of whether the Effects Loop page is set to On or Off.
8

1.6 SETTING LEVELS
After hooking up your cables, set the proper levels. Start off with your amplifier turned down to a low volume to prevent any ear-shattering surprises as you learn about the QuadraVerb GT. After you know what you’re doing, increase the level to normal monitoring levels.
1.Press the BYPASS button (its red LED will light) so that you hear only the straight guitar sound.
2.Play your instrument and observe the 4-step LED meter toward the left of the QuadraVerb GT.
3.Adjust the Input control so that the -6 dB LED lights consistently but the Clip (red) LED lights rarely, if ever. The red LED indicates that distortion is either about to occur or is actually occurring.
4.Adjust the output control for a comfortable monitoring level. Make sure the output is turned up high enough to provide the amplifier, mixer, or subsequent processor with sufficient level, but not turned up so high that it overloads the unit it is feeding.
5.Press the BYPASS button again so that you can hear the effect of the different QuadraVerb GT programs. BYPASS can be used at any time to toggle between processed and straight sounds.
1.7CHECK OUT THE FACTORY PROGRAMS
The QuadraVerb GT contains 90 programs that put your guitar through serious sonic gyrations. Initially, these programs contain factory presets. However, they can be edited or replaced with your own programs. You can also recall the original factory sound associated with a program location at any time, even if that location has been modified or erased, because the parameters for these programs are stored in ROM (permanent memory).
Assuming you’ve hooked up your guitar as described in the previous section, it’s time to audition the QuadraVerb GT programs and see what this baby can do.
9

Selecting Programs
1.Press the PROGRAM (PROG) button. The LED in the middle of the button will light.
2.There are three ways to select programs:
¥MIDI program changes. See next section.
¥Press either VALUE button to scroll through the available programs (VALUE UP increases the program number, VALUE DOWN decreases the program number). The harder you press the VALUE button, the faster the Program numbers will scroll. Stop on a program, and it will be selected.
¥Key in a particular two-digit program number. Note that the module buttons (REVERB, DELAY, PITCH, etc.) also have numbers printed in gray. These can be used for entering numbers as long as the PROGRAM button is held down.
Example: To enter program 56, press the PROGRAM button and while it is being held down, press the 5 (MIDI) and 6 (CONFIG) buttons. The display will show 56, and that program will be selected.
If you release the PROGRAM button before entering the two digit program number, the program number will revert to what it was before you pressed the PROGRAM button.
The number you enter must be a two-digit number, so enter a Òleading zeroÓ if necessary. Example: To enter program 9, enter 09.
1.8MIDI HOOKUP
MIDI is an internationally-accepted protocol that allows musical-related data to be conveyed from one device to another. See the MIDI supplement if you are not familiar with how MIDI works.
The most popular MIDI applications are hooking up a MIDI footswitch to change programs, and/or a MIDI continuous controller pedal to vary QuadraVerb GT parameters in real time, as you play. The following sections describe how this process works.
10
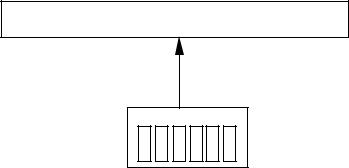
MIDI Program Selection
The QuadraVerb GT responds to MIDI program change commands. Therefore, sending a particular program number via MIDI to the QuadraVerb GT will call up the program you specified.
If a device can generate program change commands, patching its MIDI Out to the QuadraVerb GT’s MIDI In allows for remote program selection.
MIDI In
MIDI Out
Footswitch
Several devices can generate program change commands:
¥MIDI footswitch This is probably the option that most guitarists will use. A MIDI footswitch sends program changes in response to footswitch presses. Many companies make MIDI footswitches; their manuals explain how to program the footswitch to send out particular program changes.
¥MIDI sequencer A sequencer can record and play back MIDI data, including program change commands.
¥Synthesizer Selecting a new program on a synthesizer usually sends out a corresponding program change command. This allows any signal processor hooked up to the synth to change its settings in response to different synth programs.
¥Other effects boxes If you use more than one effects box, calling up a program on it will often send a corresponding program change through its MIDI Out.
NOTE: Your QuadraVerb GT and the MIDI footswitch must both be set to the same MIDI channel to execute program changes.
11
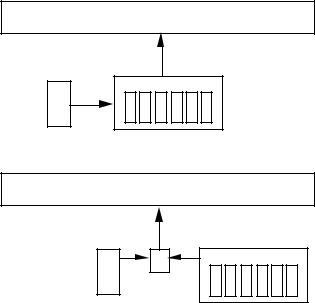
MIDI Controller Pedal Hookup
Several QuadraVerb GT parameters can be changed remotely over MIDI. Usually this is done with a footpedal that generates MIDI continuous controller data. There are 128 controllers, most of which are available for remote parameter control (some of the higher-numbered controllers are used to set up synthesizer modes and other things we donÕt need to worry about).
The basic idea is to set the parameter to be controlled to a particular controller number. Then set the pedal to the same controller number. As you vary the pedal, it will generate data that will change the QuadraVerb GT parameter. For example, assigning a foot pedal to delay feedback would allow you to kick in a slapback delay at the end of a phrase.
The MIDI controller pedal may be part of your footswitch unit, a separate stand-alone device, or a combination standard volume pedal and converter (e.g., Anatek Pocket Pedal). Synthesizers and other devices also generate MIDI continuous controller data.
If you want to feed the QuadraVerb GT with both a footswitch for program change control and a pedal for real time control, either the footswitch or pedal will need a merging input, or you will need a MIDI merger.
MIDI In
Controller Pedal
Footswitch
MIDI In
Controller Pedal
MIDI
Merger
Footswitch
12
![]()
MIDI Thru/Out Hookup
The MIDI Thru/Out jack can have its function changed via software (see section 5.4). When MIDI Thru is turned on, this jack carries a duplicate of the MIDI data appearing at the MIDI In jack. In addition to the Thru function, the Thru/Out jack can then feed the MIDI In of other MIDIcontrolled unit, thus distributing the MIDI signal to two different units.
MIDI In
MIDI Thru/Out
 MIDI In
MIDI Out
Footswitch
In addition to the Thru function, data generated by the QuadraVerb GT can be sent to other MIDI units. This is more of a feature for advanced MIDI users and is described in sections 5.5 and 5.6 on QuadraVerb GT System Exclusive options (for more information on System Exclusive information, see the MIDI supplement). Generally, the data generated from the QuadraVerb GT is used for one of two purposes:
¥Transfer program data directly from one QuadraVerb GT to another.
¥Send program data to a such as the Alesis DataDisk or other MIDI storage device in order to back up the data inside the QuadraVerb GT.
1.9ROCK OUT!
Play for a while and get a feel for how the QuadraVerb GT sounds. The factory programs give a good idea of what the QuadraVerb GT can do, and can also be modified later on if you want to customize the factory programs to your own specifications.
13

CHAPTER 2 Ð QUADRAVERB GT MODULES AND CONFIGURATIONS
Many guitarists will find that the 90 factory presets take care of most, if not all, of their musical needs. However, the QuadraVerb GT is a very flexible device and comes into its own when edited to your own specific needs.
To do this, it is necessary to understand the QuadraVerb GT’s effects and configurations, which is what this chapter is all about. The next chapter covers how to edit those effects and configurations.
2.1 ABOUT THE QUADRAVERB GT’s EFFECTS
The QuadraVerb GT has 11 main effects sections (including the mixer) and the ability to alter (modulate) some of the effects parameters in real time. Each effect modifies your signal in a particular way. A particular combination of the 11 effects is called a configuration, as explained in section 2.2.
Preamp
The Preamp section includes effects found in standard rack preamps, such as compression, overdrive, distortion, flat/bright/presence switch, bass boost, cabinet simulator, and noise gate.
This section is followed by a programmable effects loop that lets you insert your favorite classic wah-wah, phase shifter, etc.; you can enable or bypass the effect as part of a program. This loop can also be used to split the QuadraVerb GT into two separate effects (see the last part of this section on ÒBi-TimbralÓ Effects).
Reverb
Reverb is made up of a large number of distinct echoes, called reflections. In a natural acoustic space, each reflection’s amplitude and brightness decays over time. This decaying action is influenced by the room size, the location of the sound source in the room, the hardness of the walls, and other factors.
14
There are five main reverb types, as described later. Furthermore, any reverb type can be gated, which is the process of abruptly cutting off the reverbÕs decay for a more ÒchoppyÓ sound.
Delay
Delay provides a discrete repetition of a signal. By adding feedback within the effect, the delayed signal can repeat many times, with each successive decay softer than its predecessor. The QuadraVerb GT offers four types of delay:
¥Ping-Pong Delay In stereo, the delayed signal bounces back and forth between channels, with the speed determined by the delay time parameter. Maximum delay is 375 milliseconds in QuadMode, 400ms in the Lezlie and Ring Modulation configurations, 750 ms in the Graphic > Delay configuration, 705ms in the 5 Band EQ > Pitch > Delay configuration, and 320ms in the Resonator configuration.
¥Stereo Delay This has two individual delays, one for each channel. Setting them to different delay times allows for polyrhythmic delays. Maximum delay specs are the same as for ping-pong delay.
¥Mono Delay Because this is a single delay line, it has twice the maximum delay time of the stereo delay (up to 1500 ms).
¥Multitap Delay Available only in the 5 BAND EQ > PITCH > DELAY configuration, this delay includes 8 taps with variable delay time, volume, panning, and feedback amount for each tap. The total delay time of all eight delays cannot exceed 1470 ms.
Pitch Change
This module alters the pitch of a signal in various ways to produce ÒanimatedÓ timbres that are more complex than the original signal. The various pitch change options are:
¥Chorus This combines a delayed (typically 10-25 ms), detuned version of the original signal with the straight signal. Modulating the delayed version creates phase, amplitude, and time differences that sound like two instruments playing together. Mono and stereo functions are available; stereo modulates two delayed signals instead
15
of just one.
¥Flanging Flanging is similar to chorusing, but modulates the delayed signal over a much shorter delay range (typically 0-12 ms). This produces a Òjet airplaneÓ-like sound. Mono and stereo flanging is available, and the flange modulation sweep can be triggered in order to sync up with the rhythm of your playing.
¥Detune Shifts the pitch by a fixed amount. This creates a thickening effect similar to the difference between a 12-string and 6-string guitar.
¥Phase Shifter This effect is similar to flanging, but covers a narrower delay range and has a more diffused timbral quality.
¥Lezlie Speaker Simulator With the Lezlie configuration selected, the pitch change module becomes a rotating speaker simulator. Rotating speakers, which involved mechanically rotating one or two speakers to produce complex timbral changes, were extremely popular during the 1960s.
Equalization
Equalization provides control over the tone of your signal by altering the frequency response in various ways. The QuadraVerb GT’s three different types of EQ are:
¥3 Band Parametric This combines high and low frequency shelving equalizers (like the tone controls found on stereo systems and guitar amps) along with a sweepable midrange parametric stage (see Ó5 Band Parametric,Ó next) that has variable boost or cut, frequency, and bandwidth (resonance, or ÒbiteÓ). This works well for dialing in rhythm guitar sounds.
The high and low shelving bands offer two parameters, amplitude and frequency. Amplitude sets the amount of boost or cut; frequency sets the frequency at which the maximum boost or cut occurs. This boost continues for frequencies higher than the high frequency and lower than the low frequency.
16
The middle band is parametric and offers amplitude, frequency, and bandwidth parameters as described next.
¥5 Band Parametric This is identical to the 3 Band Parametric but offers two additional sweepable midrange stages with variable boost or cut, frequency, and bandwidth. The following diagram shows the relationship between three parameters.
The complex response of the 5 band parametric lets you compensate for dead spots on a guitar’s neck, or set up a very specific frequency response.
¥11 Band Graphic The graphic equalizer can boost or cut any of 11 different bands (16 Hz, 32 Hz, 62 Hz, 126 Hz, 250 Hz, 500 Hz, 1 kHz, 2 kHz, 4 kHz, 8 kHz, and 16 kHz.
17
Panning and Tremolo
Panning shifts the signal back and forth between the stereo outputs at a cyclical, adjustable rate. Tremolo provides a ÒpulsingÓ sound via cyclical level changes. Both have ÒdepthÓ parameters; with panning this varies the width of the pan in the stereo field, with tremolo this sets the difference between volume peaks and valleys.
Ring Modulation
Ring modulation shifts a signal’s harmonics up and/or down by an adjustable frequency (expressed in Hertz). The QuadraVerb GTÕs ring modulator features individual outputs for the up and down signals. The resulting sound takes on a Òclangorous,Ó bell-like quality that is used mostly with percussive effects. Try this on a drum machine, or muted guitar parts.
Tunable Resonators
A resonator is a filter whose response is so sharp that it actually imparts a pitch to any signal going through it. In the Resonator configuration, there are up to five resonators, depending on the configuration, so you can tune the resonators to complex chord types. You can also transpose the resonator frequencies via MIDI notes to match a particular chord progression.
Sampling
Sampling is the process of digitally recording a signal into the QuadraVerb GT’s memory, which can then be triggered via an external audio input (e.g., a snare drum sound coming from a tape track), a front panel button, or a MIDI note. Different MIDI notes will transpose the sample. Sampling is useful if you want to capture a particular effect or chord change, then play over it. Try it in the studio for drum sound replacement, reproducing unusual vocal effects, etc.
Mixer
The multiple effects are all placed in parallel. Each effectÕs output feeds a
18
mixer, and is variable so that you can change the balance of that particular effect with respect to the overall sound.
The effect input can come from the main input if you only want the effect to process the dry sound, but in many configurations, the effect can get its input from the output of other effects, or from a combination of processed and dry sounds.
Modulation
As mentioned earlier, many QuadraVerb GT parameters can be changed in real time via pedals that generate continuous controller commands, or from commands issued by a sequencer or synthesizer. Continuous controller pedals are available from a variety of manufacturers at various price points. These generate signals that are ÒtaggedÓ with a particular controller identification number. If you set a QuadraVerb GT parameter to be controlled by this particular controller number, moving the pedal will change the QuadraVerb GT parameter.
Modulation consists of choosing up to 8 ÒtargetÓ parameters to be modulated by any one of several types of MIDI ÒsourceÓ data types (pitch bend, aftertouch, note number, and note velocity as well as continuous controllers). Several parameters can be changed by one controller, so that, for example, moving a pedal could increase chorus depth and boost the midrange frequencies.
ÒBi-TimbralÓ Effects
The QuadraVerb GT can serve as two separate effects units by proper patching to and from the effects loop. For example, consider a situation where a guitarist plays guitar and sings. Plug the guitar into the QuadraVerb input; the effects loop send provides the post-analog effects signal, which can be routed to a guitar amp. Meanwhile, the voice mic can be externally preamplified and sent into the effects loop return. This allows the vocal to be processed by the digital chorus, reverb, equalization, etc. sections. The QuadraVerb GT output, which now carries only the processed vocal sound, can be routed to a PA for further amplification.
19
|
to Amplifier |
from Microphone |
||
|
From guitar |
to PA |
|
Right Input |
Effects Send |
Effects Return |
Right Output |
||||
2.2 ABOUT CONFIGURATIONS
No matter which program you select, the analog effects are always in the same order. However, the digital effects can be connected together in one of eight different ways, each of which is called a configuration. A configuration doesn’t just include a specific collection of effects, but also the way in which they interconnect (e.g., whether the delay signal is derived from an equalized or non-equalized signal). This allows for a great deal more flexibility than you would expect from a fixed configuration of effects.
This flexibility allows for some great sounds, but also requires a bit of experimentation to learn the subtleties of each configuration and how these subtleties affect the sound. It’s probably easiest to start off by ÒtweakingÓ the factory presets to learn what the different parameters do, then graduate to creating programs from scratch.
These configuration descriptions use block diagrams to indicate signal flow. Keep the following in mind:
¥Think of the connecting lines as Òpatch cordsÓ between different Òeffects boxesÓ (the individual modules).
¥Switches are enclosed in rectangular boxes with rounded corners.
¥The knobs act as volume controls if two wires hook into the knob, or mix (ÒpanÓ) between two signals (incoming wires) and provides an output (outgoing wire) if three wires hook into the knob.
¥Heavy lines indicate a stereo path. Note that most effects output a stereo signal, but accept a summed, mono signal at the input.
20
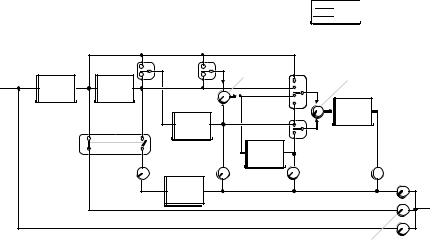
#1 Preamp > EQ > Tremolo/Panning > Pitch > Delay > Reverb
|
Configuration 1 |
Mono |
|
Stereo |
|
Pitch |
|
|
Input |
|
|
INPUT |
|
|
PREAMP |
EQ |
|
Preamp |
|
|
Pre/Post EQ |
|
Delay |
Delay |
Reverb |
||
|
Input 1 |
Input 1 |
Reverb |
||
|
Input Mix |
||||
|
Input Mix |
||||
EQ
Output
PANNING
&
TREMOLO
|
Pitch |
Delay |
|
Output |
Output |
Reverb 
Output
|
Pre-Amp Signal |
Direct Output |
QuadModeª is a complex configuration that offers comprehensive switching and mixing possibilities. ItÕs excellent for creating larger-than- life, animated sounds.
The Pitch module can switch its input between the preamp or EQ signals. The Delay moduleÕs Delay Input Mix control chooses a blend between the output of the Pitch module, or the preamp or EQ signal (as selected by the Delay Input 1 switch).
The Reverb moduleÕs Reverb Input Mix control chooses a blend between two input options. Reverb Input 1 switches between preamp, EQ, preDelay, or post-Pitch signals; Reverb Input 2 switches between the postDelay or post-Pitch signal.
Panning and Tremolo are available in this configuration, and are in series with the preamp or EQ signal line. The Preamp Signal Pre/Post EQ switch chooses whether the Preamp Output comes from preamp or EQ.
21
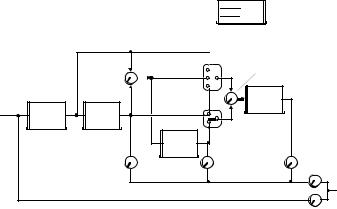
#2 Preamp > Lezlie > Delay > Reverb
|
Configuration 2 |
Mono |
|
Stereo |
|
INPUT |
|
|
PREAMP |
LEZLIE |
|
Lezlie |
|
|
Output |
|
Reverb |
|||||
|
Delay |
Input 1 |
||||
|
Reverb |
|||||
|
Input Mix |
Input Mix |
||||
|
Delay |
Effects |
|
|
Reverb |
Output |
|
|
Output |
Output |
OUTPUT
Direct Output
This is similar to the QuadModeª configuration, but replaces the EQ and Pitch modules with a Lezlie (rotating speaker simulator) module and does not have a Preamp level control.
The Lezlie module simulates the common two-speaker system with two different speeds. The switching and mixing options are similar to those used in QuadMode. This configuration produces complex frequency and amplitude modulation effects and works very well with rhythm guitar.
22
![]()
#3 Preamp > Graphic EQ > Delay
|
Configuration 3 |
Mono |
|
Stereo |
Delay
Input
|
INPUT |
GRAPHIC |
|
|
PREAMP |
||
|
EQ |
||
|
EQ |
||
|
Output |
Effects
Delay Output
Output
OUTPUT
Direct Output
This combines the 11 band graphic EQ with delay. The EQ provides sophisticated sound-shaping for the preamp sound, and the delay adds ambience for lead effects.
#4 Preamp > 5 Band EQ > Tremolo/Panning > Pitch Change > Delay
|
Configuration 4 |
Mono |
|
Stereo |
|
Pitch |
||
|
Input |
||
|
INPUT |
5 BAND |
|
|
PREAMP |
||
|
EQ |
||
|
Preamp |
||
|
Pre/Post EQ |
Delay
Input 1
EQ
Output
PANNING
&
TREMOLO
Delay
Input Mix
|
Pitch |
Delay |
Effects |
|
|
Output |
|||
|
Output |
Output |
||
OUTPUT
Direct Output
Pre-Amp Signal
This is just the ticket for rich chorus sounds. Use the 5 Band EQ to shape your timbre, Pitch Change to add chorusing (or other pitch effects such as flanging, etc.), and Delay to add evocative echo effects. Using the Multi Tap option in the Delay module creates unusual echo effects along with chorusing.
The Pitch module can switch its input between preamp or EQ signals. The Delay moduleÕs Delay Input Mix control chooses a blend between the output of the Pitch module, or the preamp or EQ signal (as selected by the Delay Input 1 switch).
23

Multi Tap delay is also available in this mode along with the standard mono, stereo, and ping-pong delays. Up to eight taps are available along the delay line; each tap has variable delay time, panning, volume, and feedback. For more details about multitap delays, see section 4.5.
Panning and Tremolo are available in this configuration, and are in series with the EQ signal line. The Preamp Signal Pre/Post EQ switch chooses whether the Preamp Output comes from before or after the EQ.
#5 Preamp > 3 Band EQ > Reverb
|
Configuration 5 |
Mono |
||
|
Stereo |
|||
|
Reverb |
|||
|
Input |
|||
|
REVERB + |
|||
|
INPUT |
CHORUS |
||
|
PREAMP |
3 BAND |
||
|
EQ |
|||
|
Preamp |
Effects |
|||
|
Pre/Post EQ |
||||
|
EQ |
Delay |
Output |
||
|
Output |
||||
|
Output |
||||
OUTPUT
Direct Output
Pre-Amp Signal
This is the recommended configuration when you want the best possible reverb sound. By restricting the number of effects, the QuadraVerb GT can devote its full computing power to creating awesome reverberation effects. However, EQ is still available for additional tone shaping, as is a simpler version of chorusing.
24

#6 Preamp > Ring Modulator > Delay > Reverb
|
Configuration 6 |
Mono |
|
Stereo |
|
Ouput |
Delay |
|
|
Input Mix |
||
|
Shift |
||
|
Mix |
Up
|
INPUT |
RING |
||
|
PREAMP |
|||
|
MOD |
|||
|
Down |
Delay & |
DELAY |
|
|
Reverb |
|||
|
Shift Mix |
|||
|
Ring |
|||
|
Modulator |
|||
|
Output |
Reverb
Input 1 Reverb
Input Mix
Reverb
Input 2
Reverb
Output
Delay
Output Effects
Output
OUTPUT
Direct Output
Pre-Amp Signal
This configuration features the Ring Modulation in conjunction with Delay and Reverb. The Ring Modulator is not available in other configurations.
The Ring Modulator produces two outputs, both of which are mathematically derived (sum and difference frequencies) from the input signal. The Ring Modulator output can pan between these two output signals, as can the Delay & Reverb Shift Mix control, which chooses a blend of both outputs to send to the Delay and Reverb inputs.
#7 Preamp > Resonators > Delay > Reverb
|
Configuration 7 |
Mono |
|
Stereo |
Delay
Input Mix
 RESON 2
INPUT
Resonator
Output
Reverb
Input 1 Reverb
Input Mix
Reverb
Input 2
Reverb
Output
|
Delay |
Effects |
|
Output |
Output |
OUTPUT
Direct Output
Pre-Amp Signal
This configuration features the Resonators in conjunction with Delay and Reverb.
25

#8 Preamp > Sampling
|
Configuration 8 |
Mono |
|
Stereo |
|
Trigger |
Audio |
MIDI |
Looping |
|
Trigger |
Note |
On-Off |
Start Length
|
Sampling |
||
|
Trigger In |
Pitch In |
Output |
|
SAMPLING |
||
|
INPUT |
||
|
PREAMP |
Pre-Amp Signal |
OUTPUT |
|
Direct Output |
In this configuration, you can record sounds (processed by the Preamp if desired) into the QuadraVerb GT and play them back in a variety of ways.
26

CHAPTER 3 — BASIC EDITING
TECHNIQUES
Editing is the key to using the QuadraVerb GT to its fullest potential. If you like a sound but want more reverb, less treble, more distortion, or whatever, editing is the answer.
Make sure that if you develop a custom set of programs, that you save your data to some form of MIDI system exclusive storage device, like the Alesis DataDisk (see sections 5.5-5.6).
3.1 HOW EDITING WORKS
The QuadraVerb GT contains five Effects Groups, each with its own corresponding front panel selection button: Reverb, Delay, Pitch, Equalization (EQ), and Guitar Preamp (Pre-Amp). These all contain editable parameters. Four other editable functions (with front panel buttons) are also available: MIDI, Name/Mod, Mix, and Configuration. The basic editing procedure is the same for whatever you want to edit; weÕll get into specifics later.
1. Select What You Want to Edit
Push the button associated with the Effect Group (Reverb, Delay, Pitch, EQ, Preamp) or function (MIDI, Config, Mix, Mod) you want to edit. The LED in the middle of the button will light.
2. Select the Page with the Parameter to be Edited
Each effect/function includes several pages. Each page shows the name and value of one (or sometimes more) parameters, and each parameter controls some particular aspect of the QuadraVerb GTÕs sound or operation. Most effects or functions require multiple pages to show all available parameters.
The page’s upper display line shows the parameter name, and the lower line, the parameter value. Press the PAGE UP and DOWN buttons to select a page containing a parameter to be edited. The harder you press the PAGE button, the faster the pages will scroll.
NOTE: The NAME/MOD button is the exception to this rule,as it
27
accesses both program name parameters as well as the QuadraVerb GT’s MIDI modulation parameters. (See section 3.4)
3. Change the Parameter’s Value
A parameter’s value is like the Òcalibration scaleÓ a knob would point to on a regular guitar effects box, except instead of setting a physical device to a certain position, you see the parameter setting on the screen and adjust its value with a pair of buttons (increase/decrease value). For example, a volume knob on a guitar amplifier might be set to 5 would be the same as a volume parameter with a range of 00-99 set to 50. In either case, the control is set halfway.
A small line under a parameter indicates it can be edited. Use the VALUE buttons to change a parameter’s value. The harder you press the VALUE button, the faster the values will scroll.
4. Edit More Parameters
Repeat steps 1-3 until all the parameters you want to edit have been edited.
Notes
¥All edits are not made to the original program, but to a copy of the program that resides in a special place in QuadraVerb GT memory called the Edit Buffer. A decimal point to the right of the program number indicates that you are listening to an edited program in the Edit Buffer. You must save an edited program by transferring the edit buffer contents into the original program memory location before selecting another program, or your edits will be lost.
¥Each parameter has a default value that works well in most applications. To return to this value, press both VALUE buttons simultaneously. See chart on page 113.
28

3.2 COMPARING EDITED AND NON-EDITED VERSIONS OF PROGRAMS
Editing a program does not change the original version permanently until it is stored (see section 3.3 below). Because your edited version is separate from the original, you can compare the two versions without altering the original. This can be very useful if you ÒovereditÓ a program and want to see if the edited version really does represent an improvement over the original program. To compare:
1.Press the PROG button.
2.Press the PAGE UP button. The display says * COMPARING * and you can hear the program you started with.
3.To exit compare mode, hit any button except a VALUE button. IF
YOU PRESS A VALUE BUTTON, YOUR EDITED VERSION WILL BE LOST.
3.3SAVING (STORING) EDITED PROGRAMS
1.To save an edited program, press the STORE button. The LED in the middle of the button will light. The display says:
STORE PROGRAM AT
LOCATION: XX
Éwhere XX is the original program number.
2.To save to a different program number, press the appropriate VALUE button to select the desired program location.
Warning! This edited program will overwrite the program stored in this location. Before saving, make sure the program to be overwritten is expendable.
3.Press the STORE button a second time to save the program. The display will say PROGRAM STORED.
29

3.4 RENAMING PROGRAMS
You may want to give your edited program a distinctive name.
1.Press the NAME/MOD button. The LED in the middle of the button will light and the display says:
EDIT NAME: Ò(Name of Song)Ó
2.Use the PAGE buttons to select the character to be changed. Characters available (in addition to a blank space, Yen symbol, and left and right arrows) are:
|
! |
Ò |
# |
$ |
% |
& |
Õ |
|
( |
) |
* |
+ |
, |
— |
. |
|
/ |
0 |
1 |
2 |
3 |
4 |
5 |
|
6 |
7 |
8 |
9 |
: |
; |
< |
|
= |
> |
? |
@ |
A |
B |
C |
|
D |
E |
F |
G |
H |
I |
J |
|
K |
L |
M |
N |
O |
P |
Q |
|
R |
S |
T |
U |
V |
W |
X |
|
Y |
Z |
[ |
] |
^ |
_ |
` |
|
a |
b |
c |
d |
e |
f |
g |
|
h |
i |
j |
k |
l |
m |
n |
|
o |
p |
q |
r |
s |
t |
u |
|
v |
w |
x |
y |
z |
{ |
| |
|
} |
3.Use the VALUE buttons to select the desired character. To enter a space, press both VALUE buttons simultaneously (or press the DOWN VALUE button and scroll to the last character of the character list, which is a blank space).
4.Repeat steps 2 and 3 until the program is named.
6.To store the name, press the STORE button twice.
7.Press any button other than PAGE or VALUE to exit the Name page.
3.5 RECALLING INDIVIDUAL FACTORY PROGRAMS
1.Press STORE. The LED in the middle of the button will light.
2.Press the PAGE UP button to select the Recall page. The display says:
30

RECALL ALESIS
PROG YY INTO XX
3.Press either VALUE button to select the program to be recalled (the first parameter).
4.Press the PAGE UP button again to move the cursor under the second parameter.
5.The factory program will be recalled into the program selected as the second parameter. Press either VALUE button to select this program number.
6.Press STORE to complete the recalling operation.
3.6RECALLING ALL FACTORY PROGRAMS
1.Press STORE. The LED in the middle of the button will light.
2.Press the PAGE UP button three times. The display says:
RECALL ALL 90
ALESIS PROGRAMS
3. Press STORE and all the program locations will be occupied by factory programs. Any other data will be overwritten.
31
 Loading…

Alesis Quadraverb господствовал на рынке рэковых процессоров конца 80-х и начала 90-х годов, и по сей день его можно найти в бесчисленных гитарных педалбордах, студиях и установках живого звука. Долговечность «квадов» является свидетельством их выдающегося качества звука и легко редактируемых эффектов.
Начиная с обновления Quad, Quadraverb Plus, среди прочих функций появилась Multi Tap Delay, что позволило Чарли Холлу разработать настройки для имитации старых ленточных эхо-устройств начала шестидесятых, которые использовали The Shadows и многие другие группы тех дней.
QUADRAVERB
Alesis QuadraVerb — это стереофонический программируемый блок эффектов с полосой пропускания 16Гц-20кГц и четырьмя цифровыми эффектами (EQ, Pitch Change, Delay, Reverb). Эффекты могут использоваться параллельно или последовательно (или в комбинации).
QUADRAVERB PLUS
QuadraVerb Plus — это усовершенствованная версия оригинального QuadraVerb. Многие новые функции, которые теперь доступны, стали возможны благодаря простому обновлению программного обеспечения.
QUADRAVERB GT
Alesis QuadraVerb GT — это стереоэффект, который идеально подходит для гитары. Он сочетает в себе аналоговый предусилитель и цифровую электронику, чтобы обеспечить лучшее из двух миров.
QUADRAVERB 2
Процессор мультиэффектов Alesis Q2 обладает безграничными возможностями для настройки для тех, кто отдаст свое время и силы для достижения потрясающих высот в области звуковых эффектов. Это высокопроизводительное оборудование, с простой в использовании операционной системой и широким информативным ЖК-дисплеем.
QUADRAVERB 20
Q20 — это, по сути, Q2, оснащенный 20-битными преобразователями, но он также был улучшен в других областях, не в последнюю очередь за счет вдвое большего количества пользовательской памяти.