
A virtual com port can be used to connect multiple applications to the same port. Copies of this port are created, and applications can work with virtual ports, which can send data to the real port and attached device.

It is necessary
- — a computer with Internet access
- — browser
- — system administration skills
- — Advanced Virtual COM Port
- — USB Serial Converter or Virtual Null Mode
Instructions
Step 1
Download and install the Advanced Virtual COM Port software. To do this, open your browser and follow the link https://www.advancedvirtualcomport.com/files/AdvancedVirtualComPort.zip. This program includes the networking and local functions of the virtual COM port. It can create a virtual port and connect to it via a virtual modem cable, network or internet. These ports, created in the program, look the same as the real ones. They work the same way. Run the program, follow the procedure for creating a port: click the «create port» button, select the source of the created port. Follow the instructions of the program. Then go to the «Control Panel», select «Device Manager», there, trace the appearance of the new port in the list of ports
Step 2
Download the driver for the virtual port to put the virtual com port on the computer from the site https://com0com.sourceforge.net/. Unpack the archive with the driver into a folder, connect the USB cable to the computer. Do not connect the other end of the cable where there are two DB-9 connectors. Next, the hardware will be automatically installed. Select the option «search for a suitable driver for the device», indicating its location. Then click the «Browse» button and select the downloaded driver. In the next window, click the «Finish» button. After installing USB Serial Converter, the Serial Port Installation Wizard will start. Repeat the hardware installation procedure using the Found New Hardware Wizard. Restart your computer to make a virtual com port. Go to «Control Panel», «System», click «Device Manager» and watch the appearance of the new port
Step 3
Download and install Virtual Null Mode software. Creating a virtual com port using this program is a fairly straightforward procedure. After installing the program, the program will offer to create a new device, select «Yes», then select the port numbers, click the «OK» button in the program window and in the dialog box. Next, the program will install virtual ports on your computer. Restart your PC, go to Device Manager and check for new ports.
Advanced Virtual COM Port (или AVCP) — это программное обеспечение, которое позволяет создавать виртуальные COM-порты на вашем компьютере. Это может быть полезно, если у вас нет физического COM-порта, или если вам нужно использовать несколько COM-портов одновременно.
Чтобы пользоваться Advanced Virtual COM Port, следуйте следующим шагам:
Шаг 1: Установка программы
Скачайте и установите Advanced Virtual COM Port с официального сайта разработчика. Запустите установочный файл и следуйте инструкциям на экране.
Шаг 2: Запуск программы
После установки запустите AVCP, она будет автоматически открыта при каждом запуске компьютера. Вы увидите главное окно программы.
Шаг 3: Создание виртуальных COM-портов
На главном окне программы щелкните на кнопке Создать или выберите пункт меню Создать COM-порт. Появится окно настроек виртуального COM-порта.
Шаг 4: Настройка виртуального COM-порта
В окне настроек выберите параметры для виртуального COM-порта, такие как имя порта, скорость передачи данных, биты данных, контроль паритета и контроль потока. Эти параметры будут зависеть от вашей конкретной задачи или устройства.
Шаг 5: Сохранение настроек
После настройки параметров виртуального COM-порта нажмите кнопку Сохранить или ОК, чтобы применить настройки.
Шаг 6: Использование виртуального COM-порта
Теперь вы можете использовать созданный виртуальный COM-порт точно так же, как и обычный COM-порт. Например, вы можете подключить устройство к виртуальному COM-порту и использовать его для обмена данными.
Дополнительные советы:
— Перед настройкой виртуального COM-порта убедитесь, что у вас есть необходимые драйверы и программное обеспечение для подключения устройств.
— Если вы хотите удалить виртуальный COM-порт, выделите его в списке портов в главном окне программы и нажмите кнопку Удалить.

Приветсвуем на
My1Creeper.org
! На этой странице вы можете скачать кейген для Advanced Virtual COM Port. Сам ключ будет уникальным, и послужит только для активации программы. Более подробная информация, а также ссылка на скачивание, ниже.
Описание программы:
A simple, easy-to-use application that allows you to share COM ports or create virtual ones connected with virtual NULL-modem cable
Advanced Virtual COM Port is a piece of software designed to enable you to easily share COM ports on your computer and to access ports that have been shared on other machines.
Платформа:
Windows Server 2012,Windows 2008 R2,Windows 2008 32/64 bit,Windows 2003,Windows 8 32/64 bit,Windows 7 32/64 bit,Windows Vista 32/64 bit,Windows XP 32/64 bit,Windows 2K
Количество скачиваний:
8762
Версия программы:
Advanced Virtual COM Port 3.3 и другие версии.
Три бесплатных ключа:
6R5VT-EUI75-QSUJF-TDMCL
C9XMR-E8SIL-7WQTY-C1L96
6L8ED-2K0EM-8EPNT-07DBL
Advanced Virtual COM Port Crack — Таблетка — Кряк — Ключ — Серийный Номер

Инструкция:
1. Скачайте кейген.
2. Установите и запустите его.
3. Нажмите Patch (Патч).
4. Нажмите «Сгенерировать ключ (Generate)».
5. Наслаждайтесь программой!
Похожее материалы:
- Русификатор для Virtual Serial Port Control
- Русификатор для Virtual Serial Port Driver Pro
- Русификатор для Serial Port Splitter
- Ключ активации для Virtual Serial Port Driver Pro
- Virtual Serial Port ActiveX Control ключ бесплатно
Лицензия:
Условно-бесплатная $79.98
Количество загрузок:285 (1 за последнюю неделю)
Последняя версия:3.3
Сообщить о неточности
Описание

Cкриншот
Advanced Virtual COM Port is a powerful and versatile tool for managing COM ports on a computer. It allows users to share physical COM ports or create virtual ones, and provides an IP address for the remote computer for easy access. It also features automated configuration operations, so users can quickly and easily set up their network. The program also allows users to check the status of elements and reset any changes they make. Advanced Virtual COM Port is a great choice for those who need to manage their COM ports with ease and accuracy.
Скачать Advanced Virtual COM Port 3.3 бесплатно с архива. Файл пакета установки занимает 3.5 MB на вашем диске. Название установочного файла программы обычно следующее: Avcp.exe.
Самые популярные версии программы это 3.3, 3.2 и 3.0. Программа принадлежит к категории Разработчикам, а точнее к подкатегории Средства отладки. Этот файл загрузки был проверен нашим встроенным антивирусом, который отметил его как надежный для скачивания.
От разработчика:
Advanced Virtual COM Port is the first professional serial communications utility, which combines network and local virtual COM port/virtual serial port functions into one.
It gives you the ability to:
Create Virtual COM Ports and connect them with a Virtual NULL-Modem Cable over a LAN or the Internet.
Share your real (physical) serial ports over the LAN and Internet.
Мы предлагаем оценить другие программы, такие как Virtual Serial Port Driver, Advanced Port Scanner или Free Virtual Serial Ports Emulator, которые часто используются вместе с Advanced Virtual COM Port.
- Описание
- Возможности
- Что нового
Advanced Virtual COM Port is the first application of its kind that includes both local and network virtual COM port functions.
It can share your real COM ports or it can create virtual COM ports and connect them with a virtual null-modem cable locally or through a TCP/IP network or the Internet.
You can connect to a shared port and use it just like it is on your machine. Virtual serial ports created by the program look and work the same way as real ones look and work.
· Virtual COM Ports appear to the system and applications like real ones
· Virtual COM Ports work like real ones
· Hot Virtual COM Port creation and removal (no need to reboot the computer)
· Once created, Virtual COM Ports persist in the system until you remove them
· No need to have physical serial ports (except for the physical ports sharing function)
· Higher data transfer rate than on hardware serial ports
· Up to 255 Virtual COM Ports can be created
· PnP, WMI support
· Flow control emulation supported
· Easy port state monitoring
· Ability to temporarily remove all ports without losing their configuration
2.3.4
(01.01.1970)
· Minor bugs fixed
· Virtual serial ports performance increased
·
Limitations:
· 15 days trial
· 2 ports maximum
Смотреть всю историю изменений

-
September 26, 2017 -
9 Comments -
By
Jonathan Cox -
COM Port, Serial to Ethernet, virtual com port, virtual serial port
What is a virtual COM port?
A virtual COM port or a virtual serial port is an ideal solution when a legacy software application expects a connection to a serial device port (COM port or COMM port) but cannot connect, due to a physical lack of available serial ports. Instead, we reconfigure the computer to send serial port data over a local area network or the Internet as if over a true serial port. When the legacy application attempts to send data to a serial COM port, it is actually transmitted through the virtual serial port over a TCP/IP connection. Information sent back to the legacy application also travels over the network where it is received by the virtual serial or virtual COM port, and is then finally passed to your legacy application.
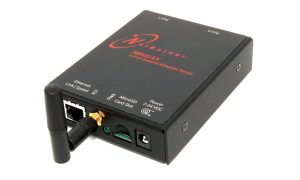
Secure Serial to Ethernet Server
for use with Virtual Comm Ports
Learn more and compare all of our Virtual Comm Port products here.
Why should I use a virtual COM port?
Most modern desktop computers and laptops no longer have the old school DB9 RS-232 serial ports (COM ports) that were traditionally used to connect directly to the hardware used in commercial, laboratory or industrial safety and control systems. In many cases, even if they do, the number of available ports is very limited. This can be problematic if you still rely on legacy software applications that communicate through those now non-existent (or very limited) serial ports. The challenge here is different than just converting a serial device’s interface to a USB or Ethernet interface. This is because the legacy software doesn’t know how to recognize or read USB or Ethernet data — and resurrecting the software engineer that originally coded it probably isn’t an option.
We all need to upgrade computers from time to time to keep up with the latest OS and security requirements, not to mention just getting that new car smell. However, that doesn’t mean your legacy serial software assets should suddenly be worthless…does it? We say down with obsolescence and waste!
We’re going to help you get more life out of your serial system while keeping your computer in the 21st century. NetBurner provides a free virtual COM port application that creates a virtual COM port that can be used to transmit serial data over a network (Internet or LAN) to NetBurner Serial to Ethernet Servers or System on Modules. This saves time and money by allowing you to continue using your existing legacy applications.
Important Note: This tutorial deals exclusively with a virtual COM port implementation that is used with NetBurner devices. If you are looking for a native software solution to create virtual COM ports for use with other systems or hardware, we suggest the Virtual Serial Port over Ethernet Connector or the Virtual Serial Port Driver from our partners at Eltima Software. They are both incredibly stable and versatile utilities that support various Windows versions, up to the latest Windows 10.
Hardware and software required for the example
- A Serial to Ethernet adapter. Any of NetBurner’s serial to Ethernet solutions will work.
- A serial communications program, such as the MTTTY serial terminal provided on our website.
- Virtual serial port software, such as NetBurner’s Virtual COM Port Driver provided on our website. (License Terms)
- One serial to USB converter dongle, such those made by Sabrent for sale here.
Our test setup
We’re going to show you a very basic virtual COM port configuration to display the ins and outs of getting a virtual COM port running. Please note that the virtual COM port driver provided on our website can only be used with NetBurner’s serial to Ethernet (S2E) hardware and System-on-Modules. To set up a virtual serial port configuration that can be used with any type of device over a network, we recommend the Virtual Serial Port over Ethernet Connector from our partners at Eltima Software. This application allows for the creation of any number of virtual COM ports with preassigned parameters. It can be used to establish a connection with hardware serial device servers over an Ethernet connection, as well as to create links with virtual serial ports created on other computers.
In our scenario, we will run an instance of the MTTTY serial terminal application to represent both ends of our communication path. First, it will represent the “remote client” that is connected to the NetBurner serial to Ethernet device through the serial to USB converter. Second, it will represent the “legacy serial application” that is sending and receiving data to this device through the virtual COM port.
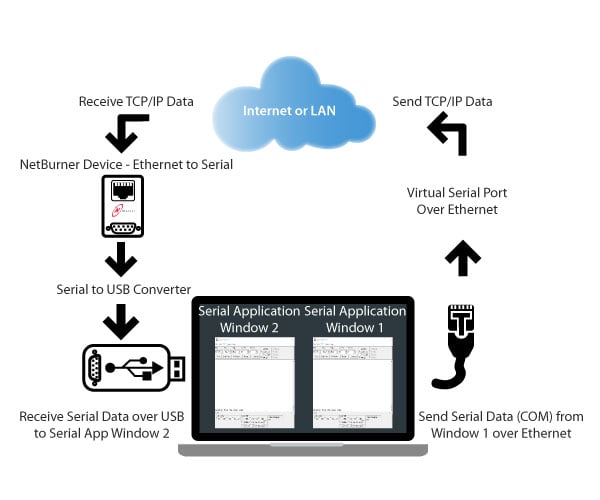
We will start by creating a virtual serial port on COM20. This will allow us to send data from the ” legacy serial application” MTTTY instance to the NetBurner serial to Ethernet device over an Ethernet connection. The NetBurner device will then send this data out of its own serial port (DB9) back to the laptop. This data will be read using the USB port on the laptop with the help of a USB to serial converter. Finally, we will use the “remote client” MTTTY terminal to read the data from our USB converted serial port, COM6. This communication path is bi-directional. This means that data sent to one MTTTY terminal instance will show up in the other, and vice-versa.
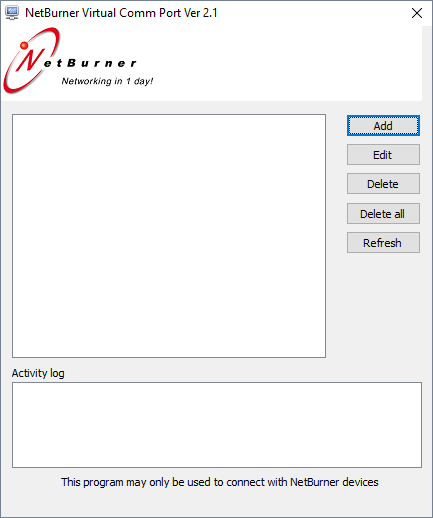
How to setup the virtual COM port driver
- Install the Virtual COM Port Driver software. The default installation directory for the software linked above can be found at C:\nburn\VirtualCommPort. From here, execute NBVirtualCommPort.exe. The application window will open…we’ll come back to this shortly.

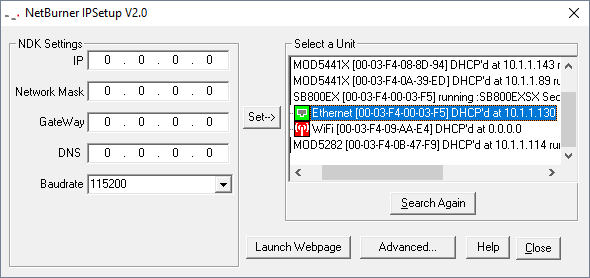
- Before we go further, we will need to know the IP address of your device and the listening port number. With NetBurner devices, finding the IP address is as easy as using our IPSetup tool’s search ability to discover our device on the network. IPSetup can be found in the C:\nburn\pcbin directory of your install, or just use your operating system’s search utility to find it.
If you are new to NetBurner products here’s a quick guide to help you use IPSetup. First, make sure your NetBurner S2E device or System on Module is connected to your Ethernet router or LAN. In our example, we use the SB800 EX. Second, power your devices either with an AC wall wart or via USB (if you are using a development carrier board, and have the jumper configuration setup to do so).
Open the IPSetup software. Your device should appear in the “Select a Unit” field, but if not click “Search Again” and wait for it to show up. If your device supports WIFI, clicking the “+” sign will expand the device’s entry to reveal the unit’s current IP address. Otherwise, it should be listed on the first line of the device entry. In the figure below, the SB800 EX shows an IP of 10.1.1.130. Jot down this IP address to use later.
- Now we need to go to your device’s homepage and discover its listening port. You can simply click “Launch Webpage” in IPSetup or type the IP of the device into your favorite browser. Click the “TCP” hyperlink in the menu. The figure below shows the “TCP” page for our SB800 EX, which has two serial ports, Port 0 and Port 1, respectively. Jot down the listening port for serial port 0.

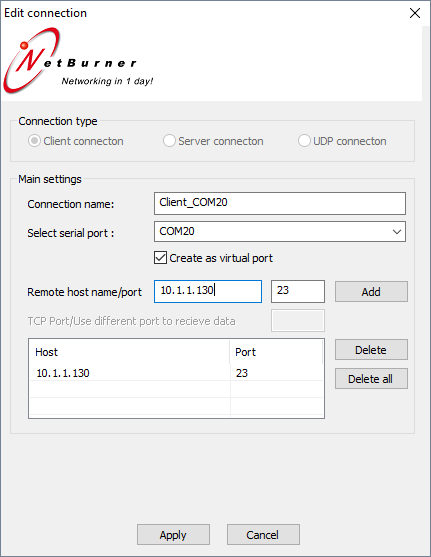
- Back in the Virtual COM Port application, click on “Add” in the Virtual Serial Port dialog box, which will bring up the “Edit Connection” window.
- Next, from the “Select serial port” drop-down menu, select a COM port to associate the virtual COM port with, and give it a new “Connection Name”. In this case, we chose COM20 and named it “Client_COM20”. Then, in the box labeled “Remote host name/port”, enter the IP address of your NetBurner device followed by the listening port determined during the previous steps.

- Click “Add”, verify that the entry was added to the list, and then click “Apply”.
- Now we can see that our new virtual COM port has been successfully added to the main Virtual Comm Port application window.

- Open two Multi-threaded TTY windows (the MTTTY serial terminal application). One window will be used for the USB Serial port connection, and one window will be used for the virtual serial port. In our image below, COM20 was the virtual COM port we had set up, and COM6 is connected directly to our device via a serial port (in this case converted from the USB port- Universal Serial Bus).
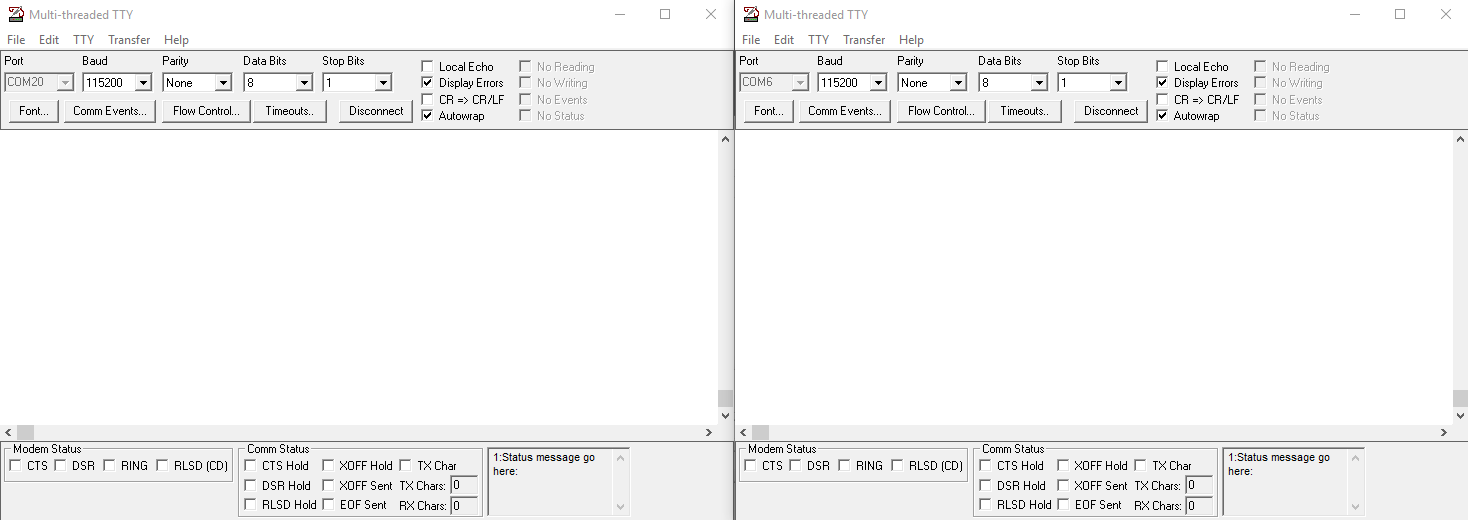
- Click the “Connect” button on both application windows, and send data from the virtual serial port or USB serial port to confirm data is going back and forth.
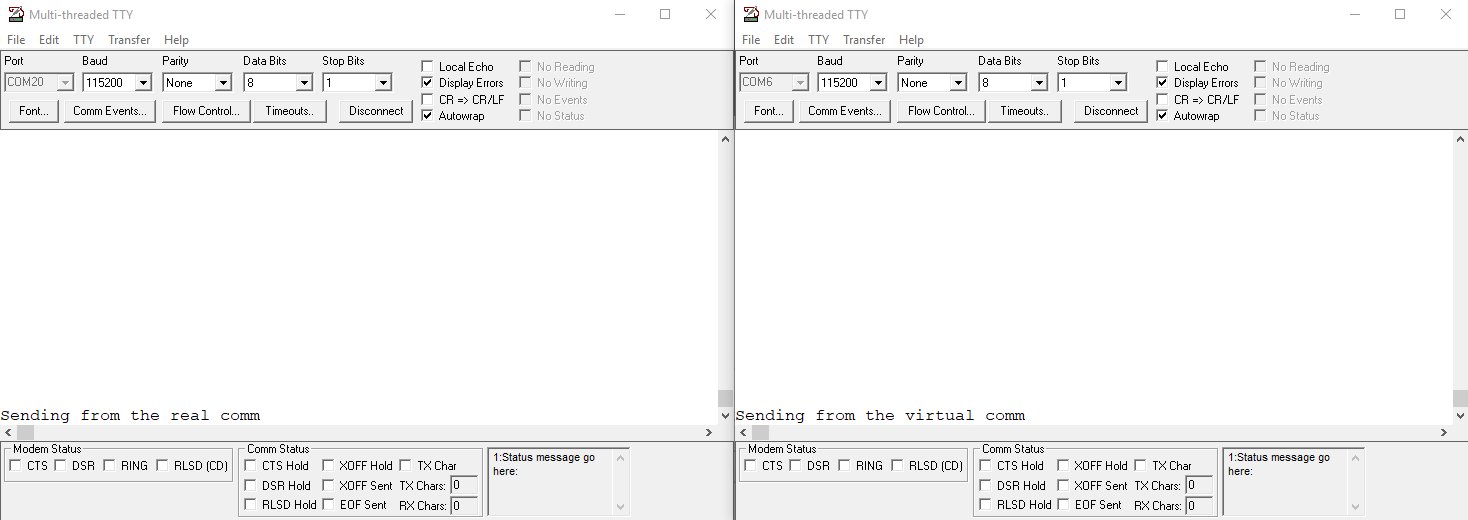
Congratulations! You have now set up and tested your virtual COM port. We hope that you can see how this example can be expanded upon to incorporate your own legacy serial comm applications to work with newer computers that either have too few DB9 RS-232-style ports or none at all.
License Terms
Permission is hereby granted to purchasers of NetBurner System-on-Modules and serial-to-Ethernet modules (NetBurner Devices) to use this program to create a virtual serial communications port on a Windows computer so long as the sole purpose is to connect to the NetBurner Device. No other rights to use this program or its derivatives in part or in whole are granted.
Related
-
Tags:
COM Port, Serial to Ethernet, virtual com port, virtual serial port
Share this post
Subscribe to our Newsletter
Get monthly updates from our Learn Blog with the latest in IoT and Embedded technology news, trends, tutorial and best practices. Or just opt in for product change notifications.
9 thoughts on “How to Create a Virtual Serial Port (COM Port)”
-
Windows 10; The Specified INF Files could not be copied or installed. Program close. Attempted all compatibility settings.
-
Hi Eric,
Thank you for bringing this to our attention. It looks like the link for the Virtual COM port software was not pointing to the right file. Please feel free to try the download again and let us know if you run into any additional issues.
Kind Regards,
Jon-
The program does not emulate COM port for the PK70 EX 4-Port Serial to Ethernet Server. It seems that the Virtual COMM Port Driver (Windows XP – 10) installer (i.e. VirtualCommPort-2.2-windows-installer) installs the NBVirtualCommPort only but does not install the Virtual Serial Port Driver (vspdxp_install.exe) from Eltima. After the NBVirtualCommPort application is configured no com port appears in Windows 10 devices manager. The unpacked vspdxp_install.exe is of version 6.9.41.0 (2000-2008). Running it explicitly does not help either. Is it compatible with Windows 10? Also, if the NBVirtualCommPort is installed under the C:nburnVirtualCommPort, the path to sec_service.exe cannot be found. It does work if it is under C:VirtualCommPort.
-
I am facing an identical issue trying to connect to an SBL2e. Did you ever resolve the issue?
-
Hi Max,
This is now resolved, and should be fixed in the latest version, 2.3. A Windows update had broken the functionality.
Kind Regards,
Jon
-
-
-
-
-
Is it possible to set up a solution where, from a single computer, I can access multiple Cisco switch console ports over ethernet (USB console/serial ports with USB-A sockets on the switches) . i.e. some kind of command center with multiple switches defined and the ability to click between them effortlessly and bring up their unique console windows, have multiple sessions open at once etc. I understand I would probably need some kind of ethernet to USB-A serial hardware on each switch.
-
Hi Tony, thanks for the question! If I understand the setup correctly, it should be possible to have multiple switches talk to a single computer over Ethernet with the use of Serial-to-Ethernet converters. You would need one converter per switch. They would allow you to connect to the console ports with a network connection from any computer on the same network using a SSH or Telnet client.
-
-
Hi
Can I send data from one computer to other computer through internet cable which is in a same lan. If so, How to transfer data from one Virtual serial port to other port. Please provide step by step process.
Regards,
Vino-
Hi Vino,
The process described in the article (and the software we provide) is really only applicable for individuals using our serial to Ethernet devices. You can connect two virtual serial ports together as you described across a LAN, but will need more general software to do so. You can find this from Eltima. You will need one virtual serial port to be set up as the server, and the other as the client. The client will then initiate the connection to the server, and at that point, you will be able to start sending data across the virtual serial ports. Good luck!
Kind Regards,
Jon
-
Leave a Reply
You must be logged in to post a comment.
Recent Posts
- C++ Exceptions, Unwind Tables, and ‘relocation truncated to fit: R_ARM_PREL31’
- Bridging the Web-Embedded Divide, Part 1: Switch Counter
- Boot and OS Security on NetBurner Devices
- Enjoying the Vue: Frontend Design for Embedded Systems
- How to Connect to an SSH Server