
Table of Contents: Lowrance Active Imaging 3-IN-1 Transducer Owner’s Manual
-
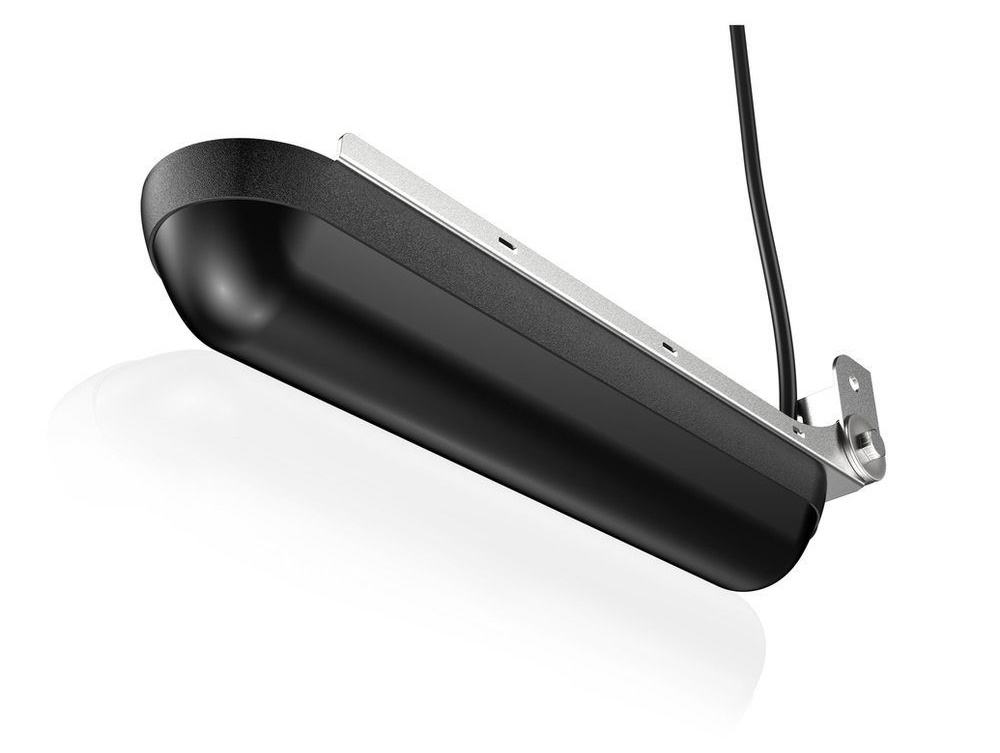
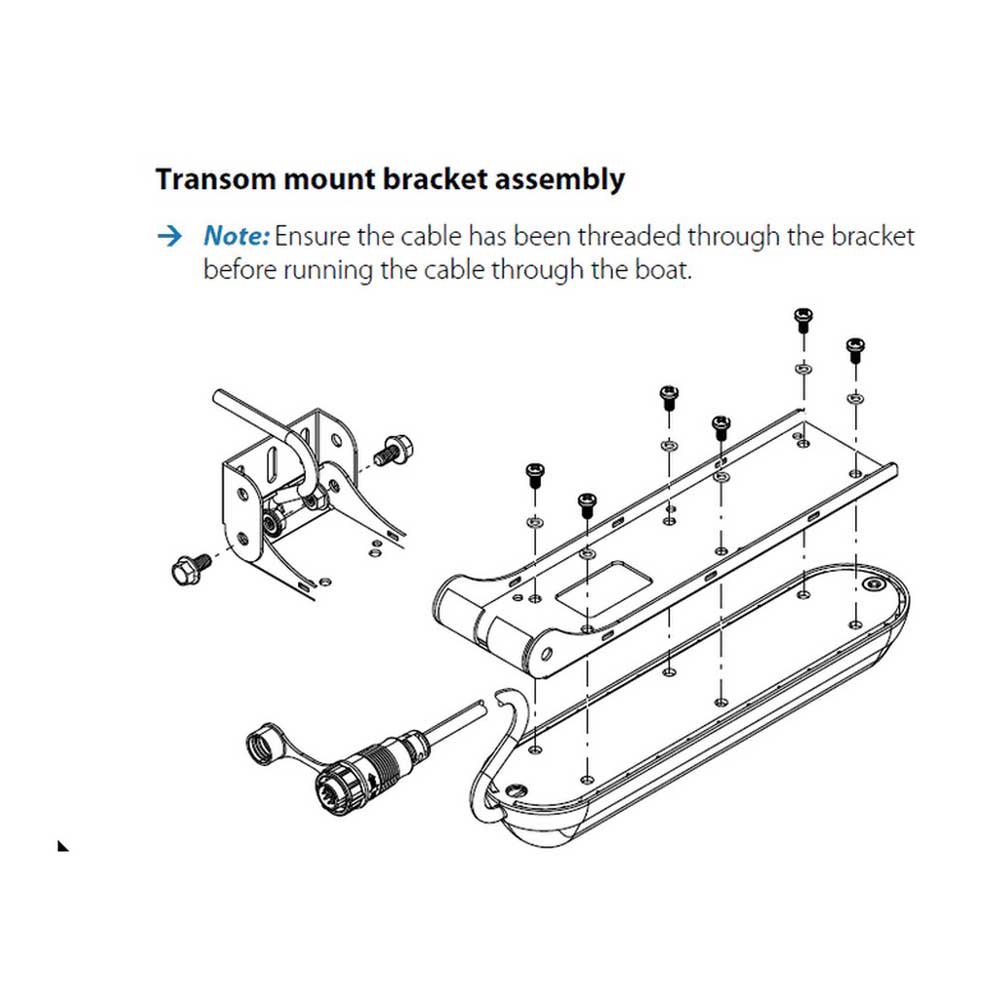
Lowrance Active Imaging 3-IN-1 Parts included The transom mounting bracket assembly parts and a hardware mounting kit are included with the transducers. The transducer has a cable attached with a 9 pin connector. A B C A Transom mount plate B Transducer bracket mount plate C Transducer with cable attached Hardware mounting kit (included) Transom mount screws #10×1-1/4″ (2) #10 flat washers for transom mount screws (2) Bracket assembly bolt, M6 flanged head (2) Bracket assembly flanged nut M6 (2) Transducer attachment screws M4 (6) Transducer attachment lock washers M4 (6) Cable ti
-
Active Imaging SideScan transducer Environmental Operating temperature -15°C to +55°C (+5°F to +131°F) Storage temperature -30°C to +70°C (-22°F to +158°F) Physical Dimensions See «Dimensions» on page 18 Cable length 7.6 m (25 ft) or 1.8 m (6 ft) Mounting options Transom, flush step, and jackplate mounting Number of pins 9 pins Transducer Output SideScan imaging, DownScan imaging and temperature Frequency 455 kHz and 800 kHz Max depth • DownScan: 91 m (300 ft) • SideScan: 91 m (300
-
Step mount using the transom bracket The transducer can be mounted on a transom bracket. With this mounting option the transducer can be in the water when you are on plane, or can be mounted so it is only in the water when you are moving at trolling speed. Ú Note: Sonar does not track bottom when the transducer is out of the water. 1. Attach the transducer to the bracket mount plate using the 6 M4 attachment screws and M4 lock washers. 2. Loosely attach the transducer bracket mount plate to
-
Lowrance Active Imaging 3-IN-1 *988-12309-001* www.lowrance.com www.simrad-yachting.com
-
Lowrance Active Imaging 3-IN-1 Parts and accessories The most up-to-date parts and accessories are available at: www.simrad-yachting.com or www.lowrance.com. Active Imaging 3-IN-1 transducer (000-14489-001) Includes the transducer with cable, transom mounting bracket assembly and mounting screws, washers, and nuts. Active Imaging SideScan transducer (000-14490-001) Includes the transducer with cable, transom mounting assembly and mounting screws, washers, and nuts. Transom mount kit (000-12603-001) Includes the transom mounting bracket assembly and mounting screws, washers, and nuts. Flush mount kit (000-12602-001) Includes a 2 pie
-
ENGLISH Active Imaging TM transducers: • Active Imaging 3-IN-1 • Active Imaging SideScan Installation manual www.simrad-yachting.com | www.lowrance.com
-
Lowrance Active Imaging 3-IN-1 11. Connect the transducer cable to the sonar port on the display or sonar module. After the transducer is connected and your boat is in the water, ensure what is shown on the left and right side on your display corresponds with what is on the left and right side of your boat. If they are showing opposite of what they should, turn on the Flip Left/Right feature in your display unit to correct it. Refer to your display unit’s Operation manual for more information. Direct Step mount (Flush bracket) Flush mount bracket assembly To mount the transducer directly to the step (Direct Step mount), use the flush mount bracket (sold separately, part no
-
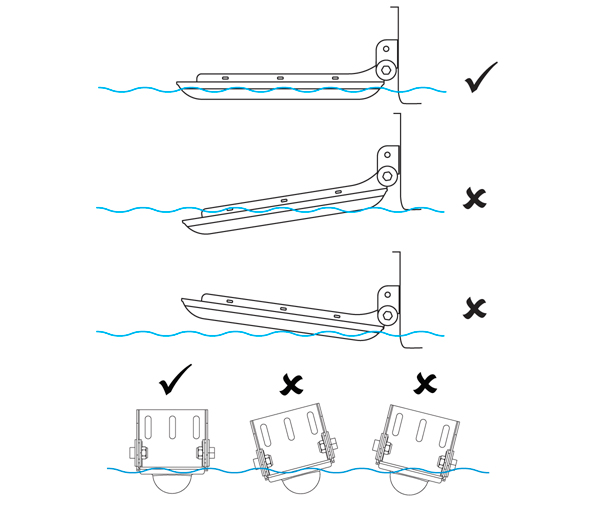
E Do not mount the transducer under the hull or so that it hangs down under the hull. The transducer is better protected when mounted above the bottom of the hull. There is less chance of damage from obstructions in the water, or when trailering and launching the boat. Transducer mounting options Transom mount (Transom bracket) Refer to «Transom mount» on page 10 • Keeps transducer in the water when the boat is on plane, allowing you to track bott
-
Direct step mount installation X Ú Note: Do not install the transducer under the hull. You can mount the transducer in either direction; with the cable coming out towards or away from the transom when installing with the direct step (Flush bracket) mount. However, after the transducer is connected and your boat is in the water, you need to check what is shown on the left and right side on your display corresponds with what is on the left and right side of your b
-
Lowrance Active Imaging 3-IN-1 Troubleshooting tips Troubleshooting tips Transducer data not displayed • Check unit software is compatible • Check transducer cable is connected to display unit or sonar module (and it is connected to the display unit) • Check sonar is enabled in display unit, refer to display unit Operator manual • Check transducer is submerged in the water No depth Check range or turn on auto range Data washed out / same color Turn down contrast; try different palettes Left/right data swapped on screen Toggle the Flip Left/
-
Technical specifications Active Imaging 3-in-1 transducer Environmental Operating temperature -15°C to +55°C (+5°F to +131°F) Storage temperature -30°C to +70°C (-22°F to +158°F) Physical Dimensions See «Dimensions» on page 18 Cable length 7.6 m (25 ft) or 1.8 m (6 ft) Mounting options Transom, flush step, and jackplate mounting Number of pins 9 pins Transducer Output Traditional, SideScan imaging, DownScan imaging and temperature Frequency • Traditional: 200 kHz/High Chirp, 83 kHz/Medium Chirp • SideScan: 4
-
Trademarks: Lowrance ® and Navico ® are registered trademarks of Navico. Simrad ® is used by license from Kongsberg. Navico products and features referenced: SideScan™ (SideScan), DownScan Imaging™ (DownScan), DownScan Overlay™ (DownScan Overlay), FishReveal™ (FishReveal), and Active Imaging™ (Active Imaging). Copyright: Copyright © 2018 Navico Holding AS. Preface | Active Imaging transducers Installation Manual 3
-
Lowrance Active Imaging 3-IN-1 Jackplate mount supplies (not included) 6 mm (1/4”) Drill bit (Jackplate Mount) M6 (1/4”) jackplate mount bolts Warning: Before installing the transducer on the jackplate, lower the jackplate to its lowest setting to make sure there is enough clearance between the jackplate, engine, transom, and the transducer. Lack of clearance could damage the transducer when the engine is all the way down. 1. Attach the bracket mount plate to the transducer using the 6 M4 attachment screws and M4 lock washers. Do not attach the transom mount plate to the transducer bracket mount pl
-
Lowrance Active Imaging 3-IN-1 careful that the cable is properly routed between the transom mount plate and the transducer mount plate. 12. Slide the second M6 bolt into the bottom hole you drilled on the side of the jackplate, the transducer mount plate holes and the transom mount plate holes. 13. Attach the M6 nut to the end of the bolt and tighten the nut. 14. Route the transducer cable to the location where the display or sonar module is installed. 15. Connect the transducer cable to the sonar port on the display or sonar module. After the transducer is connected and your boat is in the water, ensure what is shown on the left and ri
-
Lowrance Active Imaging 3-IN-1 Transom mount bracket assembly Ú Note: Ensure the cable has been threaded through the bracket before running the cable through the boat. Transom mount The transducer can be mounted on a transom bracket. With this mounting option the transducer can be in the water when you are on plane, or can be mounted so it is only in the water when you are moving at trolling speed. Ú Note: Sonar does not track bottom when the transducer is out of the water. 10 Installation | Active Imaging transducers Installation Manual
-
Lowrance Active Imaging 3-IN-1 features’ performance could be degraded if the transducer is too far away from the broadband sounder transducer. Ú Note: The Active Imaging 3-IN-1 transducer includes a broadband sounder. As a result, the DownScan Overlay and FishReveal broadband images work perfectly every time since the images come from the same place. < 0.3m (1ft) Transom and step mount (Transom bracket) The transducer can be mounted to the transom or step with the transom bracket. With these mounting options the transducer can be in the water when you are on plane, or can be mounted so it is only i
-
Required tools and supplies (not included) Drill Phillips (cross-head) screwdriver Drill bits Marine high-grade above- or below- waterline sealant/adhesive compound Parts included | Active Imaging transducers Installation Manual 5
-
Lowrance Active Imaging 3-IN-1 Preface Warning: It is your sole responsibility to install and use the instrument and transducer(s) in a manner that will not cause accidents, personal injury or property damage. Always observe safe boating practices. Sonar performance: The accuracy of the sonar depth display can be affected by many factors, including the type and location of the transducer and water conditions. Never use this instrument to gauge depth or other conditions for swimming or diving. The choice, location, and installation of transducers and other components of the system are critical to the performance of the system as intended. If in
-
Lowrance Active Imaging 3-IN-1 Dimensions Transducer and transom mount bracket 250.0 mm (9.84”) 257.0 mm (10.11”) 280.0 mm (11.02”) 67.0 mm (2.63”) 79.0 mm (3.11”) Active Imaging SideScan and Active Imaging 3-IN-1 transducer cables Ú Note: The transducers come with either a 7.6 m (25 ft) cable or a 1.83 m (6 ft) cable attached. 7.6 m (25’) or 1.83 m (6’) 26 mm (1”) 47.9 mm (2”) 24.5 mm (0.97”) A 26 mm (1”) diameter hole is recommended for cable connector clearance. 4 18 Dimensions | Active Imaging transducers Installation Manual
-
Lowrance Active Imaging 3-IN-1 3. Attach the transducer to the flush bracket using the M4 transducer attachment screws and lock washers. 4. Hold the assembly in the desired position. Use a pencil to mark the pilot holes through the mounting holes on the flush bracket. 5. Drill the pilot holes. 6. Apply a marine high-grade above- or below-waterline sealant/ adhesive compound to the pilot holes. 7. Align the flush bracket mounting holes over the pilot holes and mount the flush bracket with the transducer to the step using self-tapping metal screws (not supplied). Do NOT overtighten the screws; otherwise you could strip out the fiberglass
-
Lowrance Active Imaging 3-IN-1 Installation Mounting options The transducer can be mounted on the transom, jackplate, or step. Use the following table to determine which mounting option is best suited to your boat/installation preferences. Ú Note: When installing, keep the transducer on the protective foam nest where the transducer is placed from factory. Ú Note: Before drilling any holes, ensure that holes are drilled in a safe position. Ensure you do not drill into tanks, reservoirs, hoses, or cables, etc. and that the holes will not weaken the structure i
-
Lowrance Active Imaging 3-IN-1 1. Attach the transducer to the bracket mount plate using the 6 M4 attachment screws and M4 lock washers. 2. Loosely attach the transducer bracket mount plate to the transom mount plate using M6 screws and nuts. Be careful to run the cable between the bracket mount plate and the transom mount plate before inserting the screws. 3. Choose a transducer location. 4. Place the bracket against the transom and then align the bottom of the transducer with the bottom of boat. Use a pencil to mark the pilot holes through the slots in
Questions, Opinions and Exploitation Impressions:
You can ask a question, express your opinion or share our experience of Lowrance Active Imaging 3-IN-1 device using right now.
(Ocr-Read Summary of Contents of some pages of the Lowrance Active Imaging 3-IN-1 Document (Main Content), UPD: 07 August 2023)
-
12, Step mount using the transom bracket The transducer can be mounted on a transom bracket. With this mounting option the transducer can be in the water when you are on plane, or can be mounted so it is only in the water when you are moving at trolling speed. Ú Note: Sonar does not track bottom when the transducer is out of the water. 1. Attach the transducer to the bracket mount plate using the 6 M4 attachment screws and M4 lock washers. 2. Loosely attach the transducer bracket mount plate to the transom mount plate using M6 screws and nuts. Be c…
-
7, E Do not mount the transducer under the hull or so that it hangs down under the hull. The transducer is better protected when mounted above the bottom of the hull. There is less chance of damage from obstructions in the water, or when trailering and launching the boat. Transducer mounting options Transom mount (Transom bracket) Refer to «Transom mount» on page 10 • Keeps transducer in the water when the boat is on plane, allowing you to track bottom at high speeds • Transducer angle can be adjusted so it is parallel with the water �…
-
16, Jackplate mount supplies (not included) 6 mm (1/4”) Drill bit (Jackplate Mount) M6 (1/4”) jackplate mount bolts Warning: Before installing the transducer on the jackplate, lower the jackplate to its lowest setting to make sure there is enough clearance between the jackplate, engine, transom, and the transducer. Lack of clearance could damage the transducer when the engine is all the way down. 1. Attach the bracket mou…
-
21, Active Imaging SideScan transducer Environmental Operating temperature -15°C to +55°C (+5°F to +131°F) Storage temperature -30°C to +70°C (-22°F to +158°F) Physical Dimensions See «Dimensions» on page 18 Cable length 7.6 m (25 ft) or 1.8 m (6 ft) Mounting options Transom, flush step, and jackplate mounting Number of pins 9 pins Transducer Output SideScan imaging, DownScan imaging and temperature Frequency 455 kHz and 800 kHz Max depth �…
-
19, Parts and accessories The most up-to-date parts and accessories are available at: www.simrad-yachting.com or www.lowrance.com. Active Imaging 3-IN-1 transducer (000-14489-001) Includes the transducer with cable, transom mounting bracket assembly and mounting screws, washers, and nuts. Active Imaging SideScan transducer (000-14490-001) Includes the transducer with cable, transom mounting assembly and mounting screws, washers, and nuts. Transom mount kit (000-12603-001) Includes the transom mounting bracket assembly and mounting …
-
17, careful that the cable is properly routed between the transom mount plate and the transducer mount plate. 12. Slide the second M6 bolt into the bottom hole you drilled on the side of the jackplate, the transducer mount plate holes and the transom mount plate holes. 13. Attach the M6 nut to the end of the bolt and tighten the nut. 14. Route the transducer cable to the location where the display or sonar module is installed. 15. Connect the transducer cable to the sonar port on the display or sonar module. After the transduc…
-
6, Lowrance Active Imaging 3-IN-1 Installation Mounting options The transducer can be mounted on the transom, jackplate, or step. Use the following table to determine which mounting option is best suited to your boat/installation preferences. Ú Note: When installing, keep the transducer on the protective foam nest where the transducer is placed from factory. Ú Note: Before drilling any holes, ensure that holes are drilled in a safe position. Ensure you do not drill into tanks, reservoirs, hoses, or cables, etc. and that the holes will not weaken the structure in any way.…
-
2, Preface Warning: It is your sole responsibility to install and use the instrument and transducer(s) in a manner that will not cause accidents, personal injury or property damage. Always observe safe boating practices. Sonar performance: The accuracy of the sonar depth display can be affected by many factors, including the type and location of the transducer and water conditions. Never use this instrument to gauge depth or other conditions for swimming or diving. The choice, location, and installation of transducers and other components of the …
-
4, Lowrance Active Imaging 3-IN-1 Parts included The transom mounting bracket assembly parts and a hardware mounting kit are included with the transducers. The transducer has a cable attached with a 9 pin connector. A B C A Transom mount plate B Transducer bracket mount plate C Transducer with cable attached Hardware mounting kit (included) Transom mount screws #10×1-1/4″ (2) #10 flat washers for transom mount screws (2) Bracket assembly bolt, M6 flanged head (2) Bracket assembly f…
-
3, Trademarks: Lowrance ® and Navico ® are registered trademarks of Navico. Simrad ® is used by license from Kongsberg. Navico products and features referenced: SideScan™ (SideScan), DownScan Imaging™ (DownScan), DownScan Overlay™ (DownScan Overlay), FishReveal™ (FishReveal), and Active Imaging™ (Active Imaging). Copyright: Copyright © 2018 Navico Holding AS. Preface | Active Imaging transducers Installation Manual 3
… -
9, features’ performance could be degraded if the transducer is too far away from the broadband sounder transducer. Ú Note: The Active Imaging 3-IN-1 transducer includes a broadband sounder. As a result, the DownScan Overlay and FishReveal broadband images work perfectly every time since the images come from the same place. < 0.3m (1ft) Transom and step mount (Transom bracket) The transducer can be mounted to the transom or st…
-
5, Lowrance Active Imaging 3-IN-1 Required tools and supplies (not included) Drill Phillips (cross-head) screwdriver Drill bits Marine high-grade above- or below- waterline sealant/adhesive compound Parts included | Active Imaging transducers Installation Manual 5
… -
18, Dimensions Transducer and transom mount bracket 250.0 mm (9.84”) 257.0 mm (10.11”) 280.0 mm (11.02”) 67.0 mm (2.63”) 79.0 mm (3.11”) Active Imaging SideScan and Active Imaging 3-IN-1 transducer cables Ú Note: The transducers come with either a 7.6 m (25 ft) cable or a 1.83 m (6 ft) cable attached. 7.6 m (25’) or 1.83 m (6’) 26 mm (1”) 47.9 mm (2”) 24.5 mm (0.97”) A 26 mm (1”) diameter hole is recommend…
-
13, Lowrance Active Imaging 3-IN-1 11. Connect the transducer cable to the sonar port on the display or sonar module. After the transducer is connected and your boat is in the water, ensure what is shown on the left and right side on your display corresponds with what is on the left and right side of your boat. If they are showing opposite of what they should, turn on the Flip Left/Right feature in your display unit to correct it. Refer to your display unit’s Operation manual for more information. Direct Step…
-
10, Lowrance Active Imaging 3-IN-1 Transom mount bracket assembly Ú Note: Ensure the cable has been threaded through the bracket before running the cable through the boat. Transom mount The transducer can be mounted on a transom bracket. With this mounting option the transducer can be in the water when you are on plane, or can be mounted so it is only in the water when you are moving at trolling speed. Ú Note: Sonar does not track bottom when the transducer is ou…
-
20, Lowrance Active Imaging 3-IN-1 Technical specifications Active Imaging 3-in-1 transducer Environmental Operating temperature -15°C to +55°C (+5°F to +131°F) Storage temperature -30°C to +70°C (-22°F to +158°F) Physical Dimensions See «Dimensions» on page 18 Cable length 7.6 m (25 ft) or 1.8 m (6 ft) Mounting options Transom, flush step, and jackplate mounting Number of pins 9 pins Transducer Output Traditional, SideScan imaging, DownScan imaging and temperature Frequency • Traditional: 200 kHz/High Chirp, 83 kHz/Medium Chirp • Sid…
-
8, Transducer mounting options «Direct Step mount (Flush bracket)» on page 13 Requires separately sold Skimmer Flush mount kit (part no. 000-12602-001) • Transducer is not in the water when boat is on plane; protects transducer and prevents drag from transducer • Transducer angle cannot be adjusted so it is parallel with the water • Sonar does not track bottom when transducer comes out of the water Transducer angle After mounting the transducer, make sure the transducer is adjusted so it will be p…
-
1, ENGLISH Active Imaging TM transducers: • Active Imaging 3-IN-1 • Active Imaging SideScan Installation manual www.simrad-yachting.com | www.lowrance.com
…
Продвинутые рыбаки предпочитают обычной рыбалке с удочкой ловлю рыбы при помощи эхолотов. Самая крупная рыба обитает на глубине, где обнаружить ее без вспомогательных приборов достаточно сложно. И тогда на помощь приходят датчики, сканирующие дно водоема и пространство вокруг лодки. Трансдьюсер, или датчик Lowrance Active Imaging – отличный помощник для любителей глубинной ловли.
Особенности трансдьюсера Active Imaging
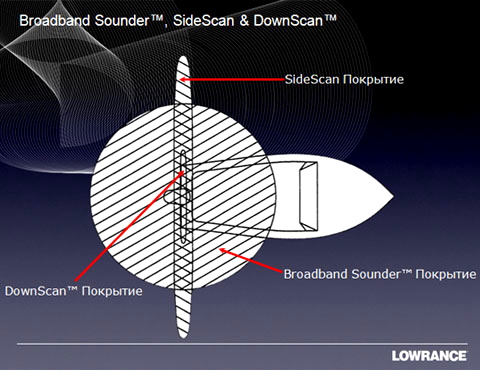
Датчик Аctive Imaging — это симбиоз гидролокатора CHIRP и эхолота нижнего сканирования DSI (DownScan Imaging). Благодаря этому он имеет широкий диапазон сканирования на всех уровнях, полностью охватывая окружающую подводную среду. При этом на экран монитора выдается четкое, с высоким разрешением, изображение сканируемого водного пространства. Каждый рыбак оценит следующие свойства датчика:
- отличная четкость полученного изображения;
- высокая детализация рельефа дна;
- способность дифференцировать сканируемое пространство и распознавание рыбы;
- отсутствует необходимость выбора между четкостью изображения и дальностью сканирования.
Технические характеристики
Сканирующие элементы трансдьюсера созданы с использованием полимерного материала, который обладает хорошей чувствительностью к звуковым волнам, проходящим в водной среде. Поэтому потери сигнала сонара при передаче или приеме сведены к минимуму.
Характеристики датчика active imaging 3 in 1:
- источник питания, напряжение: 12v (10.8-17VDC);
- вес – 0,9 кг;
- длина кабеля – 7,6 м.;
- максимальная глубина: 914 м.;
- частота: рабочая — 455/800 кГц StructureScan HD; 40-60кГц, 85-145 кГц, 130-210 кГц CHIRP50 кГц/83 кГц/200 кГц.
Существенное отличие датчика Active Imaging 3 в 1 от обычного заключается в том, что первый включает в себя встроенный широкополосный CHIRP, излучающий непрерывный поток импульсов на низких и высоких частотах, технологию нижнего сканирования DownScan, и боковое сканирование SideScan.
С датчиком Active Imaging 3 в 1 отпадает необходимость в применении дополнительных датчиков. При этом высокая скорость получения звукового отражения дает точные данные о расположении рыбного косяка или отдельных рыб, позволяет отличать рыбу от других объектов, находящихся в воде, а также оценивать ее размеры.
В то же время Active Imaging 2 в 1 можно использовать в комбинации с отдельным трансдьюсером CHIRP.
Способ крепления
Немаловажным фактором для решения в пользу купить датчик active imaging, помимо рабочих преимуществ, является легкий способ его установки.
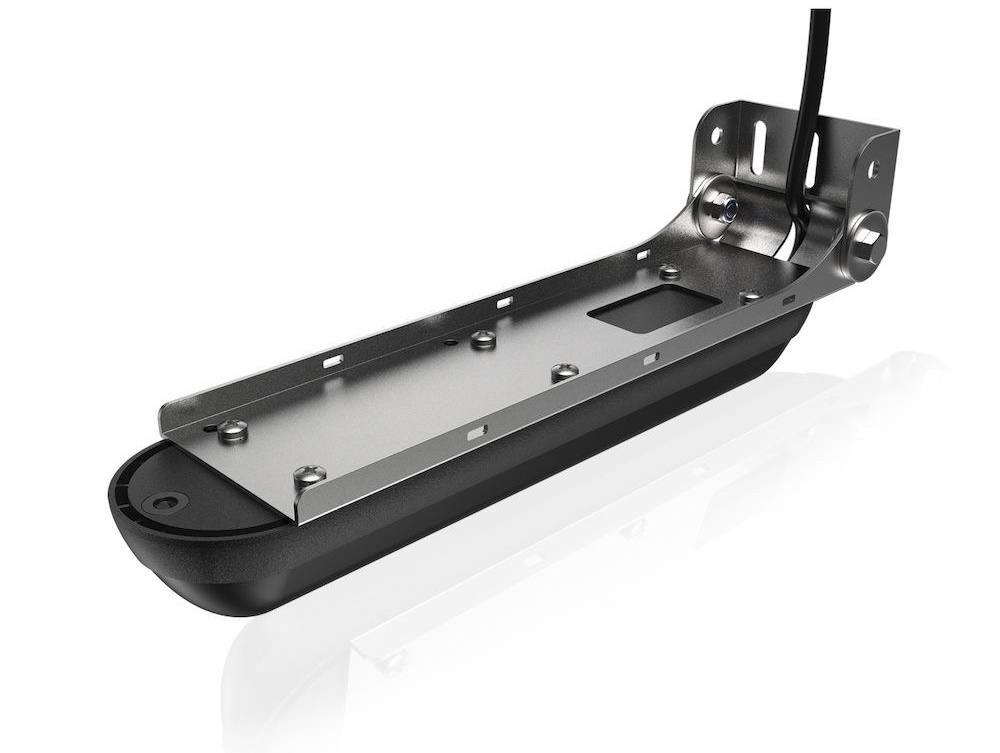
На поверхности датчика, изготовленного из прочного полимера, есть отверстия для крепления его к жесткой металлической платформе с подвижной торцевой частью, предназначенной для привинчивания к корпусу лодки.
Подвижность обеспечивается двумя боковыми винтами и позволяет выбрать оптимальный угол наклона по отношению к корпусу лодки и горизонтально поверхности воды. Торцевая часть платформы имеет три продольных отверстия, дающие возможность регулировки высоты крепления относительно днища лодки.
При монтаже прибора на лодку следует учитывать два основных момента:
- выбор места крепления;
- уровень погрузки в воду.
При выборе места обратите внимание на тип лодки и способ крепления мотора. Датчик не должен располагаться близко к килю, а также к бортам судна. Во избежание завоздушивания не следует крепить его близко к мотору, иначе данные сонара будут искажены.
Важен и уровень погрузки — при слишком низком креплении возможны механические повреждения на отмели, а при недостаточном погружении в воду есть риск завоздушивания, отчего показания датчика будут неточными. Предпочтительно монтировать датчик так, чтобы его нижняя плоскость находилась на одном уровне с днищем лодки, но при этом располагалась строго параллельно поверхности воды.
Совет: укрепите дополнительно кабель датчика рядом с ним на транце – это предохранит прибор от потери в случае потери крепления.
Сходства и отличия Active Imaging и Totalscan
По внешнему виду корпуса датчики Active Imaging и Totalscan похожи, но имеют небольшие отличия. Так второй датчик также имеет продолговатую овальную форму и заключен в прочный полимерный корпус, однако выполнен не в чисто черном цвете, как Activе Imaging, – излучающая часть у него серебристого цвета, а на верхней крышке голубая вставка с названием модели. Металлическая крепежная платформа есть только у Active Imaging. У TotalScan же кронштейн изготовлен из прочного пластика и соединяется с датчиком крепежным винтом. Длина кабеля у него также немного меньше – 7,3 метра.
По внутренней начинке Totalscan:
- совместим с Lowrance HDS Gen3, Elite-5Ti, Elite-7Ti;
- рабочая частота Broadband — 83/200кГц; CHIRP, StructureScan HD, DownScan Imaging — 455/800 кГц
Помимо всех перечисленных качеств датчиков Аctive imaging 3 в 1, рыболовы-любители и профессионалы по достоинству оценят поддержку этого датчика эхолотами SonarHub, StructureScan и StructureScan3D.
Предлагаем посмотреть видео о применении датчика Active Imaging:
Описание Active Imaging 3-в-1
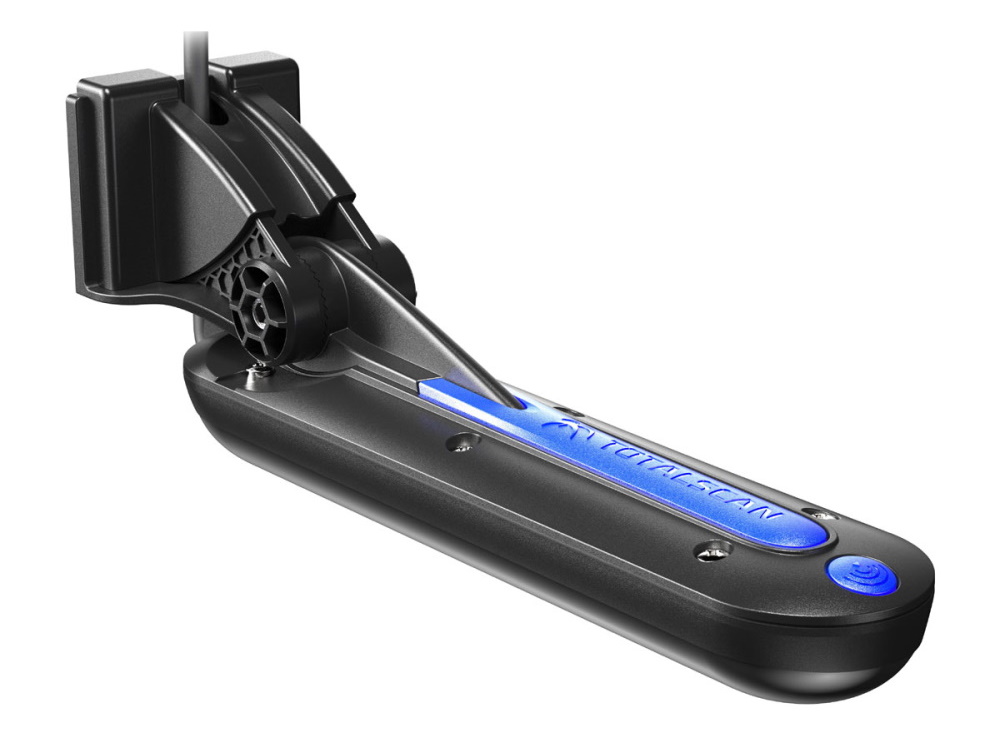
Active Imaging 3-IN-1 сочетает в себе новую технологию структурного сканирования Active Imaging с традиционным Средним / Высоким CHIRP эхолотом. Датчик имеет простую установку и кабель длиной 7.6 метров с 9-pin разъемом.
Active Imaging — это совершенно новая технология структурного сканирования сонара, которая обеспечивает невероятно детализированную прорисовку с высоким разрешением вне зависимости от диапазона сканирования. Лучшее качество изображение получено путем улучшение направленности лучей бокового сканирования, а также с помощью новых методов генерации сигналов сонара, что увеличило детализацию изображения и производительность диапазона.
Структурное сканирование осуществляется на частоте 800 кГц или 455 кГц с максимальным диапазоном глубины 45 метров (800 кГц) или 91 метр (455 кГц).
Сканирующие элементы в датчике построены из полимера, который более тесно реагирует на звуковые волны с водой. Это гарантирует, что сигнал сонара не будет потерян во время передачи или приема.
Датчик активной обработки изображения включают в себя отдельные элементы сонара для передачи и приема SideScan. Разделение передачи и приема позволяет Active Imaging иметь невероятно быструю скорость пинга (скорость пинга напрямую коррелирует с разрешением изображения). Кроме того, эти отдельные элементы фокусируют сигнал сонара, увеличивая дальность прорисовки по бокам и приводя к лучшей производительности во всем диапазоне сканирования.
*Датчик предназначен для использования с дисплеями Elite FS, HDS LIVE, Elite Ti2, HDS Carbon.
Ключевые особенности Active Imaging 3-в-1
- Active Imaging обеспечивает бескомпромиссную детализацию высокого разрешения для пользователей
- Работа в 800 кГц охватывает множество вариантов использования и диапазонов
- Благодаря максимальному разрешению вне зависимости от частоты не нужно выбирать между высокой детализацией или дальностью сканирования
- Высокое разрешение IPS-экрана HDS Live показывают полное изображение, позволяющее пользователю видеть всю подводную среду
- Датчик Active Imaging 3-IN-1 сочетает в себе ведущий в отрасли CHIRP-сонар с новыми представлениями SideScan и Down Active Imaging, предоставляя максимально полный охват подводной среды
- Датчик не требует каких-либо модулей или дополнительного оборудования для использования с дисплеями нового поколения.
Что в коробке?
- Датчик Active Imaging 3-в-1
- Металлическое крепление на транец
Наличие: В наличии
129 500.00 ₽
Описание
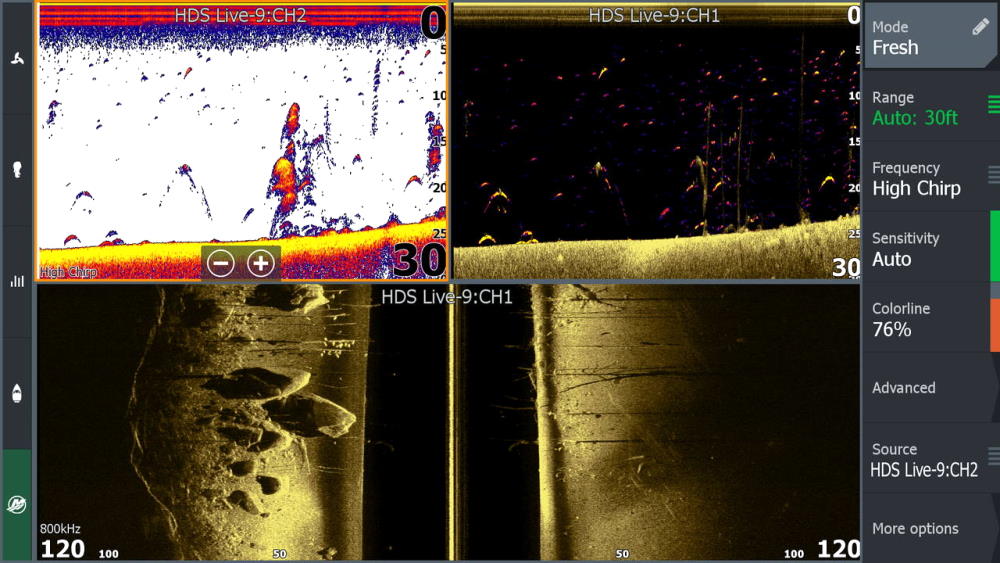
Lowrance HDS-7 LIVE (Русский язык с последней прошивкой 23.3) с датчиком Active Imaging 3-в-1 — многофункциональный дисплей в новом тонком корпусе и с еще более быстрым процессором. Этот эхолот поддерживает широкий спектр технологий эхолокации, а также имеет встроенный набор навигационных инструментов. Этот дисплей поможет Вам еще быстрее находить места скопления рыб благодаря поддержке технологии Active Imaging, так как она отображает структуру еще в более широком диапазоне, чем другая технология формирования изображения дна. Новый датчик LiveSight позволит Вам видеть реакцию рыбу на приманку в режиме реального времени. А с помощью FishReveal Вы сможете просматривать дуги рыб на фоне высококачественной структуры дна в режиме DownScan Imaging.
Создавайте свои собственные карты глубин с помощью С-Map Genesis Live и сохраняйте их на MicroSD. А также пользуйтесь картографией Navionics и С-Map.
• Следите за рыбой и никогда не пропускайте важные сообщения или звонки с уведомлениями смартфона на дисплее HDS Live. Отключайте уведомления на телефоне для непрерывной рыбалки или оставляйте их для получения всплывающих уведомлений на экране вашего дисплея HDS LIVE.
• Высококачественное отображение структуры Active ImagingStructureScan 3D с улучшенным изображением
• Отображение движения рыбы в режиме реального времени с LiveSight
• Уведомления смартфона на дисплее
• Высокопроизводительный двухъядерный процессор
• C-MAP Genesis Live Функция создания картографии
• Функция обнаружения рыбы FishReveal
• Двухканальный CHIRP
• Сетевой эхолот
• Поддержка Bluetooth
• Наложение тепловой карты
• Панель быстрого доступа
• Подключение мультимедийного модуля SonicHub2
• Подключение двигателя по NMEA 2000
Комплектация
Картплоттер HDS 7 LIVE с русским языком и прошивкой 23.3
Датчик Active Imaging 3-в-1
Крышка защитная
Кронштейн крепления
Провод питания
Инструкция
| Модель: | эхолот-lowrance-hds-live-7-датчик-active-imaging-3-в-1 |
Lowrance HDS-7 Live с датчиком Active Imaging 3 в 1
Lowrance HDS-7 LIVE – многофункциональный дисплей в новом тонком корпусе и с еще более быстрым процессором. Этот эхолот поддерживает широкий спектр технологий эхолокации, а также имеет встроенный набор навигационных инструментов. Этот дисплей поможет Вам еще быстрее находить места скопления рыб благодаря поддержке технологии Active Imaging, так как она отображает структуру еще в более широком диапазоне, чем другая технология формирования изображения дна.
Новый датчик LiveSight позволит Вам видеть реакцию рыбу на приманку в режиме реального времени. А с помощью FishReveal Вы сможете просматривать дуги рыб на фоне высококачественной структуры дна в режиме DownScan Imaging.
Создавайте свои собственные карты глубин с помощью С-Map Genesis Live и сохраняйте их на MicroSD. А также пользуйтесь картографией Navionics и С-Map.
Следите за рыбой и никогда не пропускайте важные сообщения или звонки с уведомлениями смартфона на дисплее HDS Live. Отключайте уведомления на телефоне для непрерывной рыбалки или оставляйте их для получения всплывающих уведомлений на экране вашего дисплея HDS LIVE.
Особенности Lowrance HDS-7 LIVE
- Высококачественное отображение структуры Active Imaging
- StructureScan® 3D с улучшенным изображением
- Отображение движения рыбы в режиме реального времени с LiveSight
- Уведомления смартфона на дисплее
- Мощный четырехъядерный процессор
- Высокопроизводительный двухъядерный процессор
- Программируемые клавиши
- C-MAP Genesis Live Функция создания картографии
- Функция обнаружения рыбы FishReveal ™
- Возможность разделения экрана на 6 окон
- Двухканальный CHIRP
- Сетевой эхолот
- Поддержка Bluetooth®
- Наложение тепловой карты
- Панель быстрого доступа
- Подключение мультимедийного модуля SonicHub®2
- Подключение двигателя по NMEA 2000®
Active Imaging 3-в-1
Active Imaging — это совершенно новая технология структурного сканирования сонара, которая обеспечивает невероятно детализированную прорисовку с высоким разрешением вне зависимости от диапазона сканирования. Лучшее качество изображение получено путем улучшение направленности лучей бокового сканирования, а также с помощью новых методов генерации сигналов сонара, что увеличило детализацию изображения и производительность диапазона.
Структурное сканирование осуществляется на частоте 800 кГц или 455 кГц с максимальным диапазоном глубины 45 метров (800 кГц) или 91 метр (455 кГц).
Ключевые особенности Active Imaging 3-в-1
- Active Imaging обеспечивает бескомпромиссную детализацию высокого разрешения для пользователей
- Работа в 800 кГц охватывает множество вариантов использования и диапазонов
- Благодаря максимальному разрешению вне зависимости от частоты не нужно выбирать между высокой детализацией или дальностью сканирования
- Высокое разрешение IPS-экрана HDS Live показывают полное изображение, позволяющее пользователю видеть всю подводную среду
- Датчик Active Imaging 3-IN-1 сочетает в себе ведущий в отрасли CHIRP-сонар с новыми представлениями SideScan и Down Active Imaging, предоставляя максимально полный охват подводной среды
- Датчик не требует каких-либо модулей или дополнительного оборудования для использования с дисплеями нового поколения.
Для покупки товара в нашем интернет-магазине выберите понравившийся товар и добавьте его в корзину. Далее перейдите в Корзину и нажмите на «Оформить заказ» или «Быстрый заказ».
Когда оформляете быстрый заказ, напишите ФИО, телефон и e-mail. Вам перезвонит менеджер и уточнит условия заказа. По результатам разговора вам придет подтверждение оформления товара на почту или через СМС. Теперь останется только ждать доставки и радоваться новой покупке.
Оформление заказа в стандартном режиме выглядит следующим образом. Заполняете полностью форму по последовательным этапам: адрес, способ доставки, оплаты, данные о себе. Советуем в комментарии к заказу написать информацию, которая поможет курьеру вас найти. Нажмите кнопку «Оформить заказ».
Оплачивайте покупки удобным способом. В интернет-магазине доступно 3 варианта оплаты:
- Наличные при самовывозе или доставке курьером. Специалист свяжется с вами в день доставки, чтобы уточнить время и заранее подготовить сдачу с любой купюры. Вы подписываете товаросопроводительные документы, вносите денежные средства, получаете товар и чек.
- Безналичный расчет при самовывозе или оформлении в интернет-магазине: карты Visa и MasterCard. Чтобы оплатить покупку, система перенаправит вас на сервер системы ASSIST. Здесь нужно ввести номер карты, срок действия и имя держателя.
- Электронные системы при онлайн-заказе: PayPal, WebMoney и Яндекс.Деньги. Для совершения покупки система перенаправит вас на страницу платежного сервиса. Здесь необходимо заполнить форму по инструкции.
Экономьте время на получении заказа. В интернет-магазине доступно 4 варианта доставки:
- Курьерская доставка работает с 9.00 до 19.00. Когда товар поступит на склад, курьерская служба свяжется для уточнения деталей. Специалист предложит выбрать удобное время доставки и уточнит адрес. Осмотрите упаковку на целостность и соответствие указанной комплектации.
- Самовывоз из магазина. Список торговых точек для выбора появится в корзине. Когда заказ поступит на склад, вам придет уведомление. Для получения заказа обратитесь к сотруднику в кассовой зоне и назовите номер.
- Постамат. Когда заказ поступит на точку, на ваш телефон или e-mail придет уникальный код. Заказ нужно оплатить в терминале постамата. Срок хранения — 3 дня.
- Почтовая доставка через почту России. Когда заказ придет в отделение, на ваш адрес придет извещение о посылке. Перед оплатой вы можете оценить состояние коробки: вес, целостность. Вскрывать коробку самостоятельно вы можете только после оплаты заказа. Один заказ может содержать не больше 10 позиций и его стоимость не должна превышать 100 000 р.