
Время на прочтение
6 мин
Количество просмотров 41K
В нынешних реалиях много дорогих вещей, таких как квартира, информация, хобби, и так далее. Но всё же самым дорогим является время. Время утекает быстро, а так хочется всё успеть сделать. Практически ежедневно системные администраторы на разворачивание операционных систем для любых нужд в любых количествах, затрачивают колоссальные ресурсы человеко-часов.
Предлагаем к использованию программу, позволяющую не только разворачивать одновременно десятки машин в сети, но и применять персональные параметры к каждой разворачиваемой машине. Простой инструмент Acronis Snap Deploy умеет оперировать десятками и сотнями машин в одной сети, давая все опции по развёртыванию как Windows, так и Linux операционных систем.

Применять персональные настройки не только всем машинам сразу, но и каждой машине по отдельности. Это сетевые настройки, добавление новых пользователей, установка специфичных драйверов в пост деплой операциях в том числе на так называемое Bare Metal железо, и многое другое.
Например, 5 новых сотрудников пришли в первый рабочий день, или требуется в классе информатики восстановить «потрёпанные» учениками машины, или требуется оперативно «пересесть» на новое железо всему офису. В конечном результате получить от одного до сотен ПК с настроенной ОС и нужными тулзами для работы. Многие используют довольно-таки специфичный софт для повседневных обязанностей. Развёртывание осуществляется «по одной» машине. Алгоритм прост, как если бы вы настраивали новый ПК у себя дома: взял «ящик»; проверил работоспособность (настроил BIOS/UEFI); накатил ОС (ещё более затруднительно устанавливать ОС с нуля); добавил в домен; установил нужные драйвера; установил нужные программы (настроил их). Конечно же кто-то автоматизирует процесс как может, кто-то поштучно настраивает, ну а кто-то просто предоставляет пользователям лично заняться увлекательной процедурой (бывает и такое).
Ниже представлены более детально основные возможности и особенности продукта.
Глоссарий
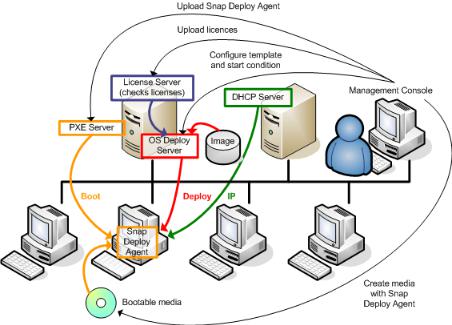
Management Console (MC) – основная консоль управления всеми компонентами Snap Deploy посредством соединения с Deploy Server.
Deploy Server (DS) – компонент, осуществляющий централизованное управление и контроль выполняемых операций.
PXE Server (PXE) – осуществляет возможность загрузки Agents напрямую из сети при наличии DHCP Server внутри сети.
Acronis Agent (Agent) – осуществляет возможность удалённого управления машиной в сети посредством DS.
Bootable Media builder (BMB) – инструмент для создания загрузочных образов на основе Linux.
PE Builder (PEB) – инструмент для создания загрузочных образов на основе Windows PE.
Wake On LAN Server (WOL) – пробуждает машины из выключенного состояния по сети.
License Server (LS) – для управления хранения и проверки лицензий.
Консоль управления
Гибкость интерфейса позволяет устанавливать компоненты программы на разные ПК в сети. Консолью осуществляется коннект к компонентам посредством авторизации локального пользователя, от чьего имени был установлен компонент Агент.
Главная страница содержит кнопки основных операций создать образ и развернуть образ. По сути больше ничего и не нужно, не правда ли?!
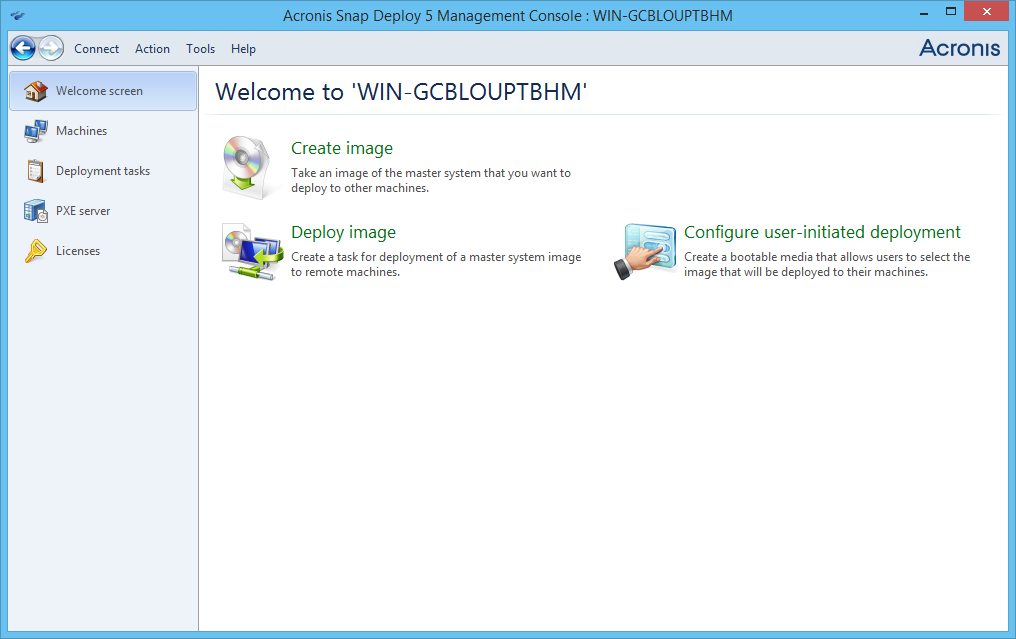
Навигация по вкладкам осуществляется через левое горизонтальное меню. Контекстное меню позволяет осуществлять нужные действия по запуску дополнительных тулзов или действий.
Машины
Представлен список машин, готовых к операциям деплоймента. Тут же можно создать для отдельной машины персональные настройки, группировать и фильтровать машины для более удобного управления. Так же показывается детально информация машины.
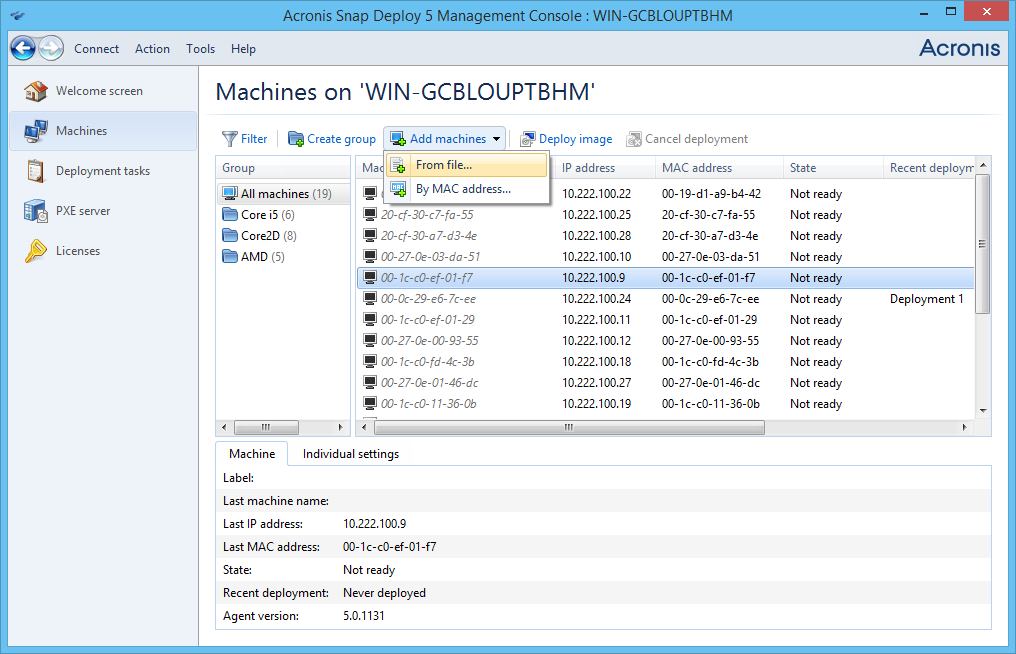
Добавляются машины в список автоматически, если они были загружены в Агента с указанием адреса Деплой Сервера. Добавить клиентов для работы можно так же вручную, зная МАС адреса сетевых интерфейсов.
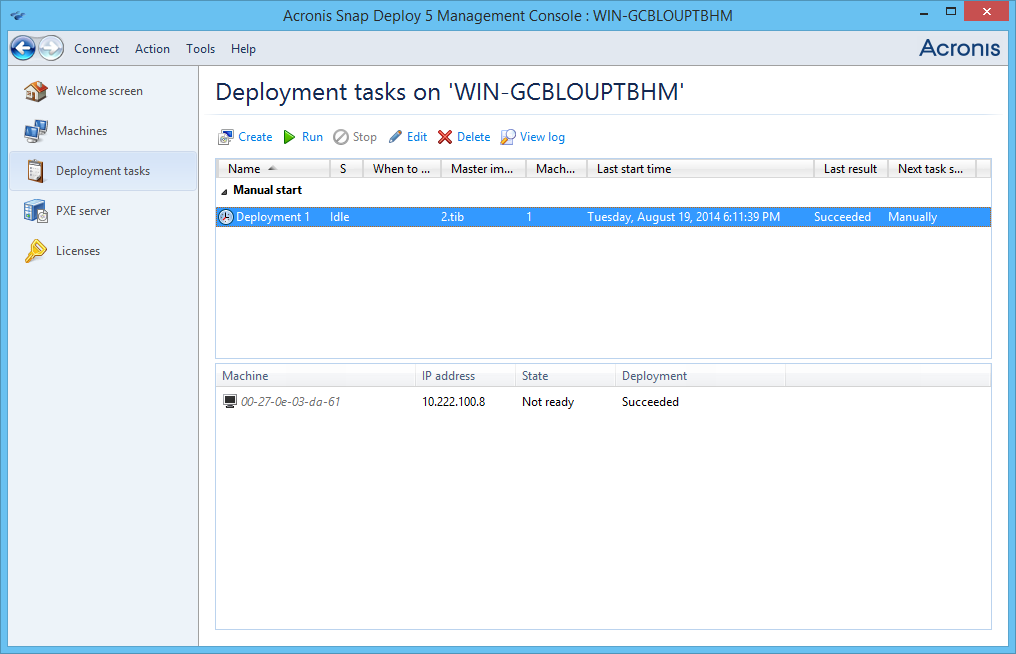
Деплоймент таск
На этой странице будут отображаться созданные деплой таски и список машин, для которых этот таск будет выполнен. Контроль прогресса выполнения и логирование осуществляется тут же.
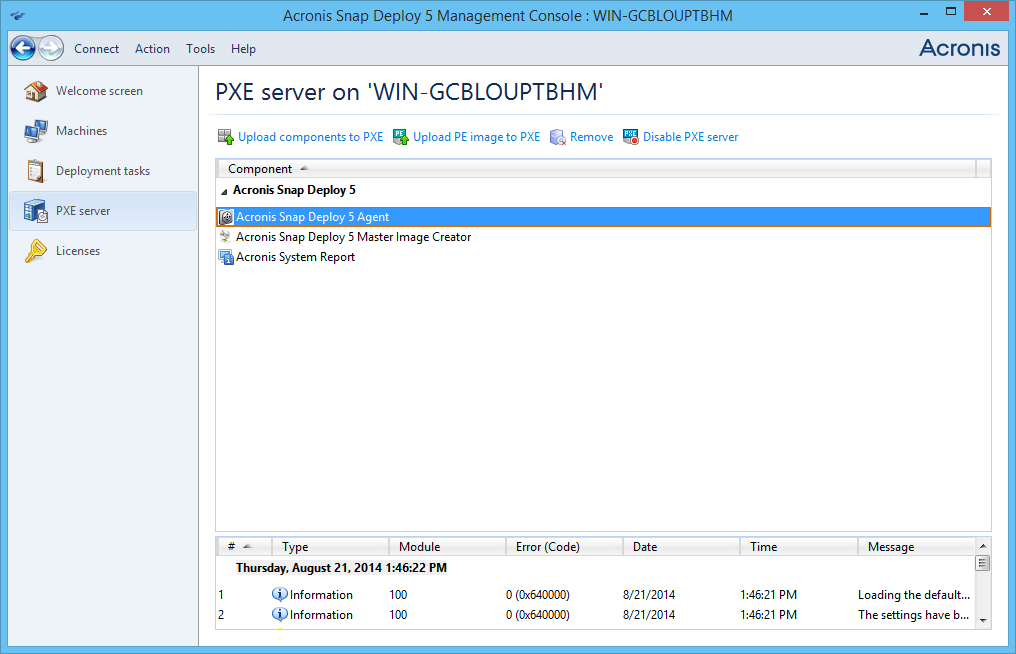
PXE сервер
Управление, загрузка компонентов на PXE, контроль осуществляются ч\з эту страничку. При желании можно отключить PXE Server.
Мастер образ
Итак, первым делом надо создать Мастер образ – это архив, содержащий в себе полностью настроенную ОС под нужды каждого. Кроме того, Sysprep Windows может лежать внутри архива. Операцию можно сделать с помощью визарда создания мастер образов. Архивы TIB совместимы, т.е. можно использовать архив уже созданный любыми другими программами Acronis в роли Мастер образа, что сильно упрощает задачу. В новой версии ASD в качестве разворачиваемой ОС может выступать и Linux, но с небольшими ограничениями.

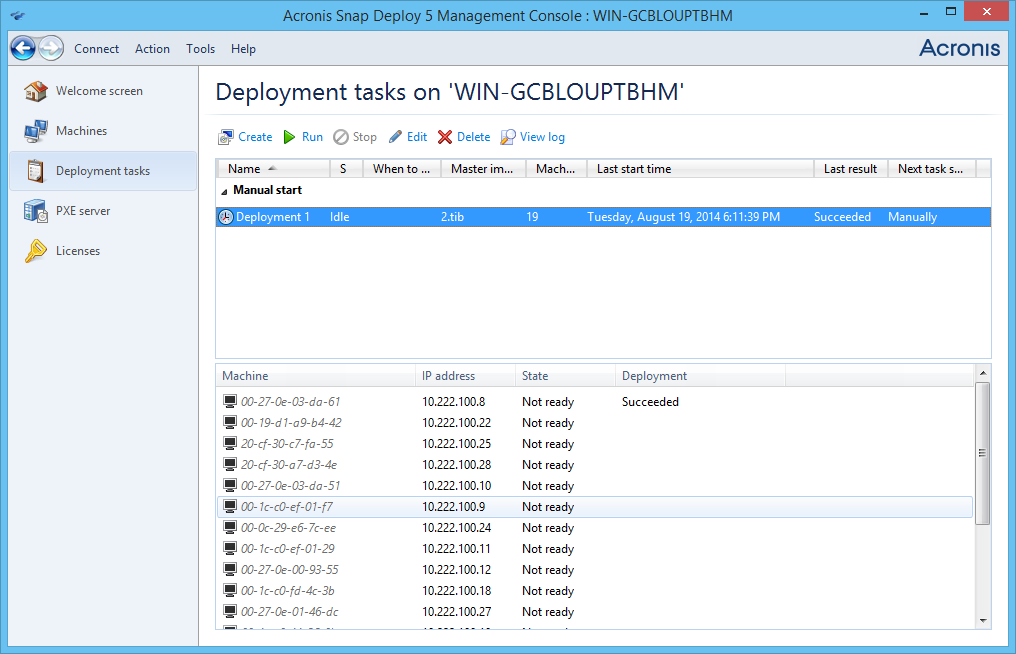
Образовательный класс
Имея на руках Мастер образ, можно приступить к развёртыванию образа на сотни машин одновременно. Сделать Таск Развертывания для конкретных машин довольно просто. Достаточно выбрать нужные из списка Машин и в контекстном меню нажать Развернуть образ. Далее выбрать что деплоить, как деплоить, а самое главное, когда деплоить. Для нужд сетей, обслуживающих Образовательные классы, где деплоить нужно после каждого рабочего дня, или даже после каждого урока, можно запланировать развёртывание в нужное время с нужной частотой.
«Новое железо» (Bare Metal)
Если же необходимо выполнить установку на «новое железо» в кратчайшие сроки, то проще простого использовать инструмент Universal Deploy. Теперь данная фича предоставляется абсолютно бесплатно! Достаточно указать необходимые драйвера под каждую машину при создании таска на деплой и во время развёртывания драйвера установятся автоматически без каких-либо дополнительных действий.
Разворачивание системы локально простым пользователем
Например. Пришёл сотрудник на работу, компьютер не загружается. Админ на работу ещё не пришёл, чтобы помочь или занят более важным делом. Что же делать в этом случае, чтобы не тратить драгоценное время? Ответ прост. Acronis Snap Deploy имеет режим работы, при котором сами пользователи в сети инициируют Разворачивание. Просто переведите ваш PXE Server в User-initiated режим, настройте нужные Шаблоны разворачиваний, и пользователь сам сможет запустить развёртывание своей системы без доступа к Деплой серверу.
Опции разворачивания
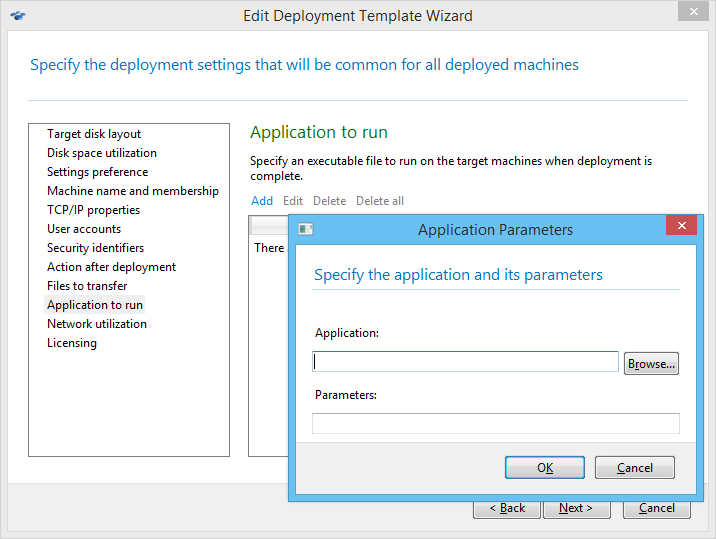
Не всегда бывает достаточным просто развернуть ОС с нужными драйверами, хочется и настроить сеть на каждой машине, и пользователей нужных добавить, и даже запустить выполнение каких-либо других операций. Допустим имеются простаивающие мощности в виде сотни компов в одной сети. Хочется помочь науке, и крупнейшим вычислительным серверам в доказательстве теорем, расчётом постоянной Pi, или в решении прочих крайне сложных уравнений. Проще простого развернуть ОС с настроенной сетью. В настройках указываем какие файлы будут переданы на каждую машину после деплоя, и задаём запустить приложение с нужными параметрами сразу после деплоя. Это важно для автоматического запуска задачи без сторонней помощи. Помогать науке нужно!
Как это работает
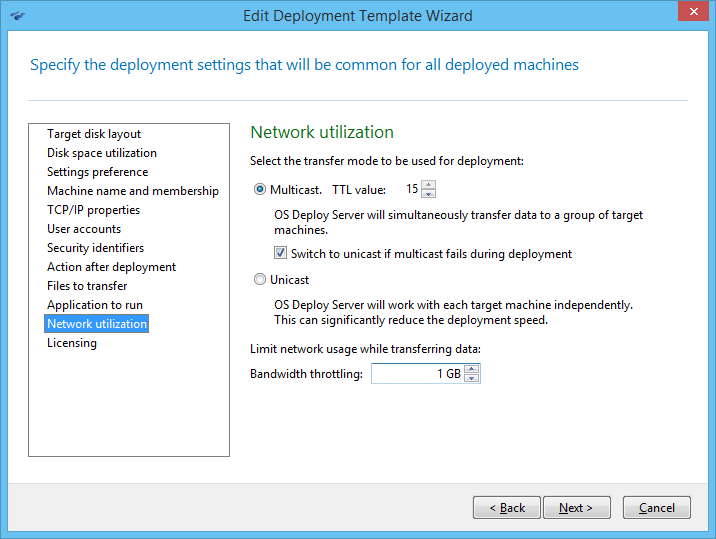
Важно понимать, что любая сеть работает по протоколам передачи данных. Multicast протокол позволяет быстро и синхронно передать всем участникам сети нужную информацию. Для этого всего лишь нужно разрешить протокол для сегмента сети, в котором будет осуществлён Деплой (маршрутизаторы и роутеры, жаль, что по дефолту этот протокол выключен). Unicast протокол используется для «точечного» деплоймента, не нагружая при этом всю сеть. Дабы не мешать работать всем остальным участникам сети, нужно просто выбрать нужный протокол передачи данных в настройках Таска развертывания, при желании выбрать максимальную скорость вещания.
Совместимость
ASD поддерживает почти все семейства Windows и Linux систем в качестве развёртываемой ОС. В новой версии поддерживается как BIOS, так и UEFI загрузчики. Более подробно можно ознакомиться на сайте Acronis на страничке ASD.
Холодный расчет
Время, затрачиваемое на разворачивание 100 машин одним Администратором (а). Допустим время разворачивания одной машины своими силами составляет 30 минут (t):
T1=100t/a
T1 = (100 * 30) / 1 = 3000 [мин] ~ 2, 08 [дней] ~ 6, 25 [рабочих дней из расчёта 8-ми часового рабочего дня]
Используя ASD,
T2=100/a+t+c
, где с – это время, потраченное на установку и настройку ASD, а также создание Master Image со всеми настройками. С занимает ~60 минут.
Получаем:
T2 = (100 / 1) + 30 + 90 = 220 [мин] ~ 3, 66 [часов] ~ 0, 45 [рабочих дней из расчёта 8-ми часового рабочего дня]
Итог: ASD экономит Администратору 5, 8 рабочих дней.
Расчёты примерные, константы t c и a могут быть различными для каждого случая, но даже с учётом различий, очевиден значительный выигрыш по времени.
Если же требуется разворачивать целиком обучающий класс с ПК, то в случае поштучного восстановления затрачивается каждый раз одно и то же время, то есть помножаем на коэффициент количества разворачиваний. Имея на руках ASD, достаточно перезагрузить все машины в классе в Агента, и стартовать уже созданный Таск разворачивания повторно. При этом не требуется каждый раз создавать Мастер образ и настраивать сам ASD.
Т.е. если учесть, что x – количество повторных разворачиваний, имеем:
T1(x)=(100t/a)x
T2(x)=(100/a)+t+c+bx
, где b – время, затрачиваемое на перезагрузку всех машин сети в Acronis Agent. Различия в прогрессиях T1 и T2 очевидны.
Исходя из вычислений, ASD безусловно выигрывает по скорости разворачивания перед аналогичными способами и инструментами. Больше тут и сказать нечего.
Более подробную информацию о продукте можно получить в руководстве пользователя, а в комментариях мы с радостью ответим на любые ваши вопросы.
Музыкальная группа Acronis Safe&Sound презентует новый супер хит — Acronis Snap Deploy!
Ваша девушка когда-нибудь просила помочь починить ее комп? Тогда вы понимаете о чем речь! Смотрите наше новое улетное видео и удачи с вашими вторыми половинками!
QA
Павел Ковальчук
![]()
Acronis Snap Deploy 5
Update 1
USER GUIDE
Copyright Statement
Copyright © Acronis International GmbH, 2002-2014. All rights reserved.
“Acronis” and “Acronis Secure Zone” are registered trademarks of Acronis International GmbH.
«Acronis Compute with Confidence», “Acronis Startup Recovery Manager”, “Acronis Active Restore”, “Acronis Instant Restore” and the Acronis logo are trademarks of Acronis International GmbH.
Linux is a registered trademark of Linus Torvalds.
VMware and VMware Ready are trademarks and/or registered trademarks of VMware, Inc. in the United States and/or other jurisdictions.
Windows and MS-DOS are registered trademarks of Microsoft Corporation.
All other trademarks and copyrights referred to are the property of their respective owners.
Distribution of substantively modified versions of this document is prohibited without the explicit permission of the copyright holder.
Distribution of this work or derivative work in any standard (paper) book form for commercial purposes is prohibited unless prior permission is obtained from the copyright holder.
DOCUMENTATION IS PROVIDED «AS IS» AND ALL EXPRESS OR IMPLIED CONDITIONS, REPRESENTATIONS AND WARRANTIES, INCLUDING ANY IMPLIED WARRANTY OF MERCHANTABILITY, FITNESS FOR A PARTICULAR PURPOSE OR NON-INFRINGEMENT, ARE DISCLAIMED, EXCEPT TO THE EXTENT THAT SUCH DISCLAIMERS ARE HELD TO BE LEGALLY INVALID.
Third party code may be provided with the Software and/or Service. The license terms for such third-parties are detailed in the license.txt file located in the root installation directory. You can always find the latest up-to-date list of the third party code and the associated license terms used with the Software and/or Service at http://kb.acronis.com/content/7696
Acronis patented technologies
Technologies, used in this product, are covered and protected by one or more U.S. Patent Numbers: 7,047,380; 7,275,139; 7,281,104; 7,318,135; 7,353,355; 7,366,859; 7,475,282; 7,603,533; 7,636,824; 7,650,473; 7,721,138; 7,779,221; 7,831,789; 7,886,120; 7,895,403; 7,934,064; 7,937,612; 7,949,635; 7,953,948; 7,979,690; 8,005,797; 8,051,044; 8,069,320; 8,073,815; 8,074,035; 8,145,607; 8,180,984; 8,225,133; 8,261,035; 8,296,264; 8,312,259; 8,347,137; 8,484,427; 8,645,748; 8,732,121 and patent pending applications.
|
2 |
Copyright © Acronis International GmbH, 2002-2014 |
Table of contents
|
1 |
Introducing Acronis Snap Deploy 5 ……………………………………………………………………….. |
7 |
|
|
1.1 |
Overview…………………………………………………………………………………………………………………… |
7 |
|
|
1.1.1 |
What is Acronis Snap Deploy 5……………………………………………………………………………………………………….. |
7 |
|
|
1.1.2 |
Who needs Acronis Snap Deploy 5…………………………………………………………………………………………………. |
7 |
|
|
1.1.3 |
Acronis Snap Deploy 5 infrastructure……………………………………………………………………………………………… |
7 |
|
|
1.2 |
What’s new in Update 1 ……………………………………………………………………………………………… |
7 |
|
|
1.3 |
What’s new in Acronis Snap Deploy 5 …………………………………………………………………………… |
8 |
|
|
1.4 |
What you can do with Acronis Snap Deploy 5………………………………………………………………… |
8 |
|
|
1.4.1 |
Taking an image of the master system……………………………………………………………………………………………. |
8 |
|
|
1.4.2 |
Deployment to specific machines (immediate, manual, and scheduled deployment) ……………………….. |
8 |
|
|
1.4.3 |
Deployment to any ready machines (event-driven deployment)……………………………………………………… |
9 |
|
|
1.4.4 |
Stand-alone deployment ……………………………………………………………………………………………………………….. |
9 |
|
|
1.4.5 |
Deployment with individual deployment settings………………………………………………………………………….. |
10 |
|
|
1.4.6 |
User-initiated deployment (custom deployment)………………………………………………………………………….. |
10 |
|
|
1.4.7 |
Deployment of a disk volume and MBR………………………………………………………………………………………… |
11 |
|
|
1.4.8 |
Command-line mode and scripting under WinPE ………………………………………………………………………….. |
11 |
|
|
1.5 |
Features of Acronis Snap Deploy 5 ……………………………………………………………………………… |
12 |
|
|
1.5.1 |
List of machines…………………………………………………………………………………………………………………………… |
12 |
|
|
1.5.2 |
List of deployment tasks………………………………………………………………………………………………………………. |
12 |
|
|
1.5.3 |
Per-deployment licensing…………………………………………………………………………………………………………….. |
12 |
|
|
1.5.4 |
Support for the VHD format…………………………………………………………………………………………………………. |
13 |
|
|
1.5.5 |
Graphical user interface in WinPE ………………………………………………………………………………………………… |
13 |
|
|
1.5.6 |
E-mail notifications about deployment …………………………………………………………………………………………. |
13 |
|
|
1.5.7 |
Compatibility with images created by other Acronis products ……………………………………………………….. |
13 |
|
|
1.5.8 |
Support for multiple network adapters…………………………………………………………………………………………. |
14 |
|
|
1.5.9 |
Multicast TTL and network bandwidth throttling…………………………………………………………………………… |
14 |
|
|
1.5.10 |
Encrypted communication …………………………………………………………………………………………………………… |
14 |
|
|
1.5.11 |
Password protection……………………………………………………………………………………………………………………. |
14 |
|
|
1.5.12 |
Online deployment ……………………………………………………………………………………………………………………… |
14 |
|
|
1.6 |
Supported operating systems for imaging and deployment …………………………………………… |
15 |
|
|
1.7 |
Licensing policy ………………………………………………………………………………………………………… |
17 |
|
|
1.7.1 |
Machine licenses and deployment licenses…………………………………………………………………………………… |
17 |
|
|
1.7.2 |
Server licenses and workstation licenses ………………………………………………………………………………………. |
17 |
|
|
1.7.3 |
Trial version of Acronis Snap Deploy 5 ………………………………………………………………………………………….. |
17 |
|
|
1.8 |
Upgrading to Acronis Snap Deploy 5 …………………………………………………………………………… |
18 |
|
|
1.8.1 |
Upgrading licenses ………………………………………………………………………………………………………………………. |
18 |
|
|
1.8.2 |
Upgrading components ……………………………………………………………………………………………………………….. |
18 |
|
|
1.9 |
Technical Support …………………………………………………………………………………………………….. |
19 |
|
2 |
Understanding Acronis Snap Deploy 5 …………………………………………………………………. |
20 |
|
|
2.1 |
Terminology…………………………………………………………………………………………………………….. |
20 |
|
|
2.2 |
Components…………………………………………………………………………………………………………….. |
21 |
|
|
2.3 |
Support for file systems and storage media…………………………………………………………………. |
22 |
|
|
2.3.1 |
Supported file systems…………………………………………………………………………………………………………………. |
22 |
|
|
2.3.2 |
Supported media…………………………………………………………………………………………………………………………. |
22 |
|
|
2.4 |
Supported types of disks and firmware interfaces |
…………………………………………………………23 |
|
|
2.5 |
Usage ……………………………………………………………………………………………………………………… |
23 |
|
|
3 |
Copyright © Acronis International GmbH, 2002-2014 |
|
2.5.1 |
Offline imaging ……………………………………………………………………………………………………………………………. |
23 |
|
2.5.2 |
Online imaging…………………………………………………………………………………………………………………………….. |
24 |
|
2.5.3 |
Deployment ………………………………………………………………………………………………………………………………… |
25 |
|
2.6 |
What is Acronis Universal Deploy……………………………………………………………………………….. |
26 |
|
2.6.1 Acronis Universal Deploy purpose………………………………………………………………………………………………… |
26 |
|
|
2.6.2 Acronis Universal Deploy in Windows…………………………………………………………………………………………… |
27 |
|
|
2.6.3 Acronis Universal Deploy in Linux…………………………………………………………………………………………………. |
27 |
|
|
2.6.4 Acronis Universal Deploy and Microsoft Sysprep…………………………………………………………………………… |
28 |
|
|
2.7 |
How to ……………………………………………………………………………………………………………………. |
28 |
|
3 |
Getting started with Acronis Snap Deploy 5………………………………………………………….. |
29 |
|
4 |
Installation of Acronis Snap Deploy 5…………………………………………………………………… |
43 |
|
4.1 |
Supported operating systems…………………………………………………………………………………….. |
43 |
|
4.2 |
System requirements………………………………………………………………………………………………… |
44 |
|
4.3 |
Used ports and IP addresses………………………………………………………………………………………. |
44 |
|
4.4 |
Typical installation ……………………………………………………………………………………………………. |
45 |
|
4.5 |
Custom installation…………………………………………………………………………………………………… |
45 |
|
4.5.1 |
Installation procedure………………………………………………………………………………………………………………….. |
46 |
|
4.5.2 |
Common installation configurations …………………………………………………………………………………………….. |
47 |
|
4.5.3 |
Installation of components…………………………………………………………………………………………………………… |
48 |
|
4.6 |
Other ways of installation………………………………………………………………………………………….. |
52 |
|
4.6.1 |
Installing components remotely …………………………………………………………………………………………………… |
52 |
|
4.6.2 Extracting the components of Acronis Snap Deploy 5 ……………………………………………………………………. |
53 |
|
|
4.7 |
Upgrading Acronis Snap Deploy 5……………………………………………………………………………….. |
53 |
|
4.7.1 Upgrading from a previous product version ………………………………………………………………………………….. |
53 |
|
|
4.7.2 Upgrading from the trial to full product version…………………………………………………………………………….. |
54 |
|
|
4.8 |
Uninstalling Acronis Snap Deploy 5 …………………………………………………………………………….. |
54 |
|
5 |
Using Acronis Snap Deploy 5 Management Console ……………………………………………….. |
56 |
|
5.1 |
Connecting to a machine …………………………………………………………………………………………… |
56 |
|
5.1.1 Connect to a local machine ………………………………………………………………………………………………………….. |
56 |
|
|
5.1.2 Connect to another machine ……………………………………………………………………………………………………….. |
56 |
|
|
5.2 |
Browsing logs…………………………………………………………………………………………………………… |
58 |
|
5.3 |
Checking for software updates…………………………………………………………………………………… |
58 |
|
6 |
Using Acronis Snap Deploy 5 License Server………………………………………………………….. |
59 |
|
6.1 |
Understanding Acronis Snap Deploy 5 License Server …………………………………………………… |
59 |
|
6.2 |
Adding licenses by using Acronis Snap Deploy 5 Management Console…………………………… |
59 |
|
6.3 |
Viewing information about licenses ……………………………………………………………………………. |
60 |
|
6.4 |
Removing licenses…………………………………………………………………………………………………….. |
61 |
|
6.5 |
Adding licenses in the command-line mode…………………………………………………………………. |
61 |
|
6.6 |
Using Acronis Snap Deploy 5 License Server Management Tool……………………………………… |
62 |
|
7 |
Deployment tools ……………………………………………………………………………………………. |
64 |
|
7.1 |
Bootable components……………………………………………………………………………………………….. |
64 |
|
7.2 |
Creating a bootable media ………………………………………………………………………………………… |
64 |
|
7.2.1 |
Acronis bootable media……………………………………………………………………………………………………………….. |
65 |
|
7.2.2 |
WinPE-based bootable media………………………………………………………………………………………………………. |
68 |
|
4 |
Copyright © Acronis International GmbH, 2002-2014 |
|
7.3 |
Configuring Acronis PXE Server ………………………………………………………………………………….. |
71 |
|
|
8 |
Creating a master image …………………………………………………………………………………… |
73 |
|
|
8.1 |
Preparation of the master operating system ……………………………………………………………….. |
73 |
|
|
8.2 |
Online vs. offline imaging ………………………………………………………………………………………….. |
73 |
|
|
8.3 |
Performing online imaging ………………………………………………………………………………………… |
74 |
|
|
8.4 |
Performing offline imaging ………………………………………………………………………………………… |
74 |
|
|
8.5 |
Steps of the Master Image Creator wizard…………………………………………………………………… |
76 |
|
|
8.5.1 |
Disks or volumes to image……………………………………………………………………………………………………………. |
76 |
|
|
8.5.2 |
Image name and location…………………………………………………………………………………………………………….. |
77 |
|
|
8.5.3 |
Options of imaging………………………………………………………………………………………………………………………. |
78 |
|
|
8.5.4 |
Comments and summary …………………………………………………………………………………………………………….. |
81 |
|
|
9 |
Validating a master image…………………………………………………………………………………. |
83 |
|
|
10 |
Deploying a master image ……………………………………………………………………………. |
84 |
|
|
10.1 |
Files supported as master images ………………………………………………………………………………. |
84 |
|
|
10.2 |
Licenses for deployment……………………………………………………………………………………………. |
84 |
|
|
10.3 |
Deployment templates ……………………………………………………………………………………………… |
85 |
|
|
10.3.1 |
Creating a deployment template………………………………………………………………………………………………….. |
85 |
|
|
10.3.2 |
Configuring default deployment settings…………………………………………………………………………………….. |
102 |
|
|
10.3.3 |
Managing deployment templates……………………………………………………………………………………………….. |
103 |
|
|
10.4 |
Deployment through a deployment task……………………………………………………………………. |
103 |
|
|
10.4.1 |
Prerequisites……………………………………………………………………………………………………………………………… |
104 |
|
|
10.4.2 |
Deployment to specific machines……………………………………………………………………………………………….. |
104 |
|
|
10.4.3 |
Deployment to any ready machines……………………………………………………………………………………………. |
110 |
|
|
10.4.4 |
Booting the target machines………………………………………………………………………………………………………. |
112 |
|
|
10.4.5 |
Configuring online deployment ………………………………………………………………………………………………….. |
115 |
|
|
10.4.6 |
Operations with deployment tasks……………………………………………………………………………………………… |
115 |
|
|
10.4.7 |
Deployment behind an NAT device …………………………………………………………………………………………….. |
116 |
|
|
10.5 |
Stand-alone deployment …………………………………………………………………………………………. |
116 |
|
|
10.6 |
User-initiated deployment (custom deployment)……………………………………………………….. |
118 |
|
|
10.6.1 |
Understanding user-initiated deployment…………………………………………………………………………………… |
118 |
|
|
10.6.2 |
Considerations when using a PXE server……………………………………………………………………………………… |
119 |
|
|
10.6.3 |
Setting up the user-initiated deployment mode ………………………………………………………………………….. |
120 |
|
|
10.6.4 |
Changing parameters of the user-initiated deployment mode……………………………………………………… |
123 |
|
|
10.6.5 |
Switching off the user-initiated deployment mode………………………………………………………………………. |
123 |
|
|
10.7 |
Deploying BIOS-based systems to UEFI-based and vice versa ………………………………………. |
124 |
|
|
10.7.1 |
Deploying volumes…………………………………………………………………………………………………………………….. |
124 |
|
|
10.7.2 |
Deploying disks………………………………………………………………………………………………………………………….. |
126 |
|
|
11 |
Managing the list of machines (the Machines view) ………………………………………… |
128 |
|
|
11.1 |
Adding machines…………………………………………………………………………………………………….. |
128 |
|
|
11.2 |
Groups of machines………………………………………………………………………………………………… |
129 |
|
|
11.3 |
Actions on machines……………………………………………………………………………………………….. |
129 |
|
|
11.4 |
States and results for machines………………………………………………………………………………… |
130 |
|
|
12 |
Individual deployment settings……………………………………………………………………. |
131 |
|
|
12.1 |
Enabling, disabling, and resetting individual settings…………………………………………………… |
131 |
|
|
12.2 |
List of individual settings …………………………………………………………………………………………. |
131 |
|
|
5 |
Copyright © Acronis International GmbH, 2002-2014 |
|
13 |
Managing deployment tasks (the Deployment tasks view) ……………………………….. |
133 |
|
13.1 |
List of deployment tasks ………………………………………………………………………………………….. |
133 |
|
13.2 |
Actions on deployment tasks……………………………………………………………………………………. |
133 |
|
13.3 |
States and results for deployment tasks ……………………………………………………………………. |
134 |
|
14 |
Command-line mode and scripting under WinPE…………………………………………….. |
135 |
|
|
14.1 |
Command-line syntax ……………………………………………………………………………………………… |
135 |
|
|
14.1.1 |
Supported commands ……………………………………………………………………………………………………………….. |
135 |
|
|
14.1.2 |
Common parameters (parameters common for most commands) ………………………………………………. |
137 |
|
|
14.1.3 |
Specific parameters (parameters specific for individual commands)…………………………………………….. |
138 |
|
|
14.1.4 |
Usage examples…………………………………………………………………………………………………………………………. |
143 |
|
|
14.2 |
Sample scenarios ……………………………………………………………………………………………………. |
143 |
|
|
14.2.1 |
Deploying images assigned to target machines……………………………………………………………………………. |
143 |
|
|
14.2.2 |
Creating images assigned to target machines ……………………………………………………………………………… |
144 |
|
|
15 |
Collecting system information …………………………………………………………………….. |
146 |
|
6 |
Copyright © Acronis International GmbH, 2002-2014 |
1 Introducing Acronis Snap Deploy 5
1.1Overview
1.1.1What is Acronis Snap Deploy 5
Acronis Snap Deploy 5 is a flexible, efficient software solution for deployment of a fully configured operating system (with or without application software and any other data) to multiple machines. Because the product uses disk imaging technology, it is ideal for rapid bare-metal installations and flexible centralized provisioning.
1.1.2Who needs Acronis Snap Deploy 5
Acronis Snap Deploy 5 is primarily designed to be used by:
Small and medium-size businesses:
IT service providers
Hardware retailers
IT departments of larger corporations
Schools and universities
R&D and software testing labs
The enterprise features of Acronis Snap Deploy 5 (scheduled deployment, support for Preinstallation Environment, command-line interface, and scripting, to name a few) can help automate the tasks of the IT department in large enterprise environments.
1.1.3Acronis Snap Deploy 5 infrastructure
Components of the Acronis infrastructure are installed on Windows machines. Managing the Acronis infrastructure is performed by using Acronis Snap Deploy 5 Management Console.
A reference image, called the master image, can be taken in Windows, in the Acronis environment, or in Windows Preinstallation Environment (WinPE) that contains components of Acronis Snap Deploy 5.
Deployment is performed in the Acronis environment or in WinPE that contains components of Acronis Snap Deploy 5. In either environment, Acronis Snap Deploy 5 provides the graphical user interface (GUI). In addition, command-line mode and scripting are supported in WinPE.
A dedicated bootable utility enables fully-functional deployment with GUI on a stand-alone machine (a machine that is isolated from the network or is included in a network without Acronis Snap Deploy 5 infrastructure).
1.2What’s new in Update 1
Deployment to a machine running Windows can be started while the machine is online.
Support for stand-alone deployment to machines running 32-bit UEFI systems (tablets).
The 32-bit UEFI firmware interface is now supported for master and target machines.
Acronis PXE Server now supports UEFI booting.
|
7 |
Copyright © Acronis International GmbH, 2002-2014 |
Support for WinPE 5.0.
Automatic switch to unicast if multicast fails during deployment is disabled.
1.3What’s new in Acronis Snap Deploy 5
Updated multicast protocol that enables up to 5 times faster deployment (compared to Acronis Snap Deploy 4) to multiple machines across a network.
Support for Windows 8.1 including Update 1 and Windows Server 2012 R2.
Support for stand-alone deployment to Microsoft Surface Pro and Microsoft Surface Pro 2 tablets.
Compatibility with backups created by Acronis Backup 11.5.
Deployment of Linux to UEFI machines (no BIOS <-> UEFI migration).
The Acronis Universal Deploy feature is now included in all Acronis Snap Deploy 5 licenses.
The Acronis Universal Deploy feature is now available for Linux.
New Linux kernel version (3.11.6) in Linux-based bootable media. The new kernel makes for better hardware support.
1.4What you can do with Acronis Snap Deploy 5
This section describes typical usage scenarios for Acronis Snap Deploy 5.
1.4.1Taking an image of the master system
First, you create the desired system configuration and save the image of the system hard disk to a network folder, detachable media (such as a USB hard drive) or removable media (such as a DVD). An image, also called a master image, is a file that contains the system in a packaged form.
Scenarios
Scenario 1
Each department in your organization, such as accounting, sales, and technical support, uses a fixed set of applications for daily work.
You create a library of master images. For example, you create one image for each department. You then deploy these images to new hardware without having to manually configure the operating system and applications.
Scenario 2
You might need to deploy the standard configuration, which is included in the image library, to various hardware.
Acronis Universal Deploy configures Windows or Linux so that the system is able to boot on dissimilar hardware.
1.4.2Deployment to specific machines (immediate, manual, and scheduled deployment)
You can perform deployment to a specific list of machines with known physical addresses (called MAC addresses). The deployment can run immediately after you set it up, on a schedule, or when you start it manually.
|
8 |
Copyright © Acronis International GmbH, 2002-2014 |
These ways of deployment are also known as manual deployment and scheduled deployment.
When the deployment is about to start, the software will turn on the target machines with predefined MAC addresses by using the BIOS Wake-on-LAN (WOL) functionality.
Machines in another subnet can be woken up through a component called Wake-on-LAN Proxy, which is delivered with Acronis Snap Deploy 5. The machines typically boot into the PXE server that is installed in the same subnet.
Machines that do not support Wake-on-LAN can be booted into the bootable environment manually before the deployment starts. Such machines will also be deployed, provided that they are listed for deployment.
Machines that are always turned on before the deployment starts can be configured to reboot automatically into the bootable environment. This feature is called online deployment (p. 115).
Scenarios
Scenario 1. An organization receives a shipment of machines from a manufacturer along with the list of their MAC addresses. The IT department has to deploy the operating system to the new hardware.
Scenario 2. An Internet cafй, school or university lab has 100 machines with known MAC addresses.
The nightly deployment of the initial standard image on these machines is needed.
1.4.3Deployment to any ready machines (event-driven deployment)
You can set up deployment to start when a specific number of any machines become ready. Unlike deployment to specific machines (p. 8), this way of deployment does not require knowing the MAC addresses of the machines.
The software counts how many machines have connected to the deployment server and starts deployment when the number of machines you specified (for example, 10) is connected.
This way of deployment is also called event-driven deployment or deployment upon an event.
You can specify a time-out period. After the time-out, deployment will start on the machines that are ready despite the fact that the predefined number is not reached.
Scenario
Your organization receives 100 machines from a manufacturer. You want to deploy the operating system and programs to all these machines at once.
1.You set up a deployment operation that waits until any 100 machines are ready.
2.You boot each machine into the Acronis environment, by using either Acronis bootable media or Acronis PXE (Preboot Execution Environment) Server.
3.Acronis Snap Deploy 5 uses multicasting to perform the deployment to all machines at once.
1.4.4Stand-alone deployment
The administrator might need to perform deployment to a machine that is isolated from a network or is included in a network without an Acronis Snap Deploy 5 infrastructure (such as the deployment server or the license server). A dedicated bootable utility enables a fully-functional deployment with the graphical user interface on a stand-alone machine.
|
9 |
Copyright © Acronis International GmbH, 2002-2014 |
The master image for deployment can be located in a network folder or on a removable drive (such as a DVD) on the machine you are performing deployment to. The image cannot be located on the local hard disk of the machine, because deployment usually involves overwriting the contents of the disk.
1.4.5Deployment with individual deployment settings
You can set up individual deployment settings (p. 131) for a machine. These settings will override the general settings of the deployment operation (the deployment template).
Scenarios
Scenario 1
You want to perform deployment to several machines. For each machine, you want to assign a specific name, rather than an automatically-generated name.
1.You enter the MAC addresses of the machines so that they all appear in the list of machines.
2.You select each machine in the list and specify an individual setting: the machine name.
3.You set up a deployment operation. Other deployment settings will be the same for all machines.
Scenario 2
You want to perform deployment to a big number of machines. For one of those machines, however, you need to perform deployment to the second hard disk, rather than to the first hard disk.
1.You enter the MAC addresses of all machines so that all machines appear in the list of machines.
2.You specify an individual setting for the corresponding machine: to deploy to the second hard disk.
3.You set up a deployment operation to perform deployment to the first hard disk. Deployment to that specific machine will be performed to the second hard disk.
1.4.6User-initiated deployment (custom deployment)
Acronis Snap Deploy 5 can be configured in such a way that users will be able to deploy and re-deploy their machines with one click on the boot menu.
This way of deployment is also called custom deployment.
Scenarios
Scenario 1
Software testers have to deploy clean operating systems or preconfigured systems on test machines.
A test team leader creates a custom bootable media or a PXE package that provides a fixed set of choices on the target side. A test team member reboots a test machine and selects what to deploy from the boot menu with one click. The deployment starts immediately. The choices can be various operating systems, various editions of the same operating system, the same operating system with various settings or various applications, to name a few. The deployment proceeds independently on each machine.
Scenario 2
In a university or school lab, switching between exercises requires reconfiguring the machine entirely. Students can switch or restart exercises without the teacher’s assistance. If a student
|
10 |
Copyright © Acronis International GmbH, 2002-2014 |
messes up the machine (for example, deletes a file or changes configuration), the student can choose a self-restore option from the boot menu.
1.4.7Deployment of a disk volume and MBR
You do not necessarily have to deploy the entire disk. Provided that the master and the target disks have a similar partitioning scheme, you can image and deploy only the system volume or only the data, depending on your needs.
When deploying a system volume, Acronis Snap Deploy 5 will automatically repair the bootability of the deployed system.
1.4.8Command-line mode and scripting under WinPE
Acronis Snap Deploy 5 provides a command-line utility that can be added to a bootable media based on Windows Preinstallation Environment (WinPE). The administrator can create such media on a physical drive or place it to the PXE server.
Having booted a machine into Windows Preinstallation Environment, the administrator can perform imaging or deployment in the command-line mode or execute scripts.
Scenarios
Scenario 1
The administrator needs to deploy a different image to each machine on the network.
The administrator writes a deployment script that can read the target machine’s MAC address (for example, 01-02-03-04-05-06) and pull an image whose name matches the MAC address (for example, image-01-02-03-04-05-06.tib) The image can be located in any convenient location, such as a network share.
The administrator then runs the script on any number of target machines to deploy the corresponding image to each of them.
Scenario 2
The administrator needs to start imaging or deployment automatically each time a machine boots from the PXE server.
The administrator creates an imaging or deployment script, adds the script to the PE and includes the script in the startnet.cmd file. On booting into the PE, the operation will be performed automatically.
Scenario 3
The administrator needs to automatically execute pre-deployment operations (disk partitioning, for example) on the machines on the network.
The administrator creates a script that performs pre-deployment operations, adds the script along with deployment script to the PE and includes both scripts in the startnet.cmd file. On booting into the PE, both operations will be performed automatically.
|
11 |
Copyright © Acronis International GmbH, 2002-2014 |
1.5Features of Acronis Snap Deploy 5
1.5.1List of machines
Acronis Snap Deploy 5 provides the Machines view (p. 128). This view contains a list of all machines that you added for deployment or that have ever been deployed.
In this view, you can:
View and edit the list of machines.
Check which machines are ready for deployment.
Examine the current state of the deployment operation, and the result of the last deployment.
Add machines for subsequent deployment by specifying the machines’ MAC addresses.
Specify individual deployment settings (p. 10).
Set up deployment for one or more machines.
Organize machines into groups.
1.5.2List of deployment tasks
Centralized deployment is performed by a deployment task. Acronis Snap Deploy 5 provides a list of deployment tasks in the Deployment tasks (p. 133) view.
In this view, you can:
View and edit the list of tasks, including scheduled tasks and tasks that perform deployment when a specified number of machines are ready.
Edit tasks; for example, to change the list of machines to perform deployment to.
Start any task manually; for example, to perform deployment outside the normal schedule.
Examine the current state of the task and the result of the last run of the task.
1.5.3Per-deployment licensing
In addition to per-machine licensing, Acronis Snap Deploy 5 supports per-deployment licensing.
A deployment license enables you a single successful deployment to a particular machine. A machine license enables you an unlimited number of deployments to a particular machine.
For more details, see “Licensing policy” (p. 17).
Scenario
You provision machines to end users by deploying the operating system with the necessary software to a machine and then shipping the machine to the end user. Because you are planning to perform deployment to each machine only once, you want a cheaper license for the machine.
You buy a number of deployment licenses based on the number of machines that you want to provision. A deployment license becomes used only if the deployment to the corresponding machine has been successful.
|
12 |
Copyright © Acronis International GmbH, 2002-2014 |
1.5.4Support for the VHD format
In addition to using its own format for an image, Acronis Snap Deploy 5 can perform deployment from a Virtual Hard Disk (VHD) file. Such file stores contents of one or more disks. It can be created in Windows Server 2008 and Windows 7.
Scenario
You saved the disks of one of your machines to a VHD file by using the Windows Backup program. Now you want to deploy that machine to other machines.
When setting up the deployment, you specify the VHD file as you would specify an image file created by Acronis Snap Deploy 5. When performing the deployment, the software can change the settings for the machines being deployed.
1.5.5Graphical user interface in WinPE
A bootable media based on Windows Preinstallation Environment (WinPE) now provides a graphical user interface (GUI) similar to that in an Acronis bootable media.
By using the GUI, you can take a master image and perform deployment.
You may want to use a WinPE-based media if the Acronis media cannot recognize a specific device, such as an exotic storage device.
A WinPE-based bootable media also provides a command-line utility (p. 11) for performing imaging and deployment.
1.5.6E-mail notifications about deployment
When using the command-line mode (p. 11), you can set up e-mail notifications about the result of each deployment operation.
Scenario
In Scenario 1 or Scenario 2 described in “Command-line mode and scripting under WinPE” (p. 11), the administrator also wants to receive e-mail notifications about deployment.
The administrator includes in the deployment script a command that sets up the parameters of the e-mail notifications, such as the administrator’s e-mail address and the parameters of the mail server.
An e-mail notification is sent after each deployment command. Each notification contains the MAC address and IP address of the corresponding machine and whether the deployment has been successful.
1.5.7Compatibility with images created by other Acronis products
As a master image, Acronis Snap Deploy 5 can use a disk-level backup created by the following products:
Acronis True Image
Acronis Backup & Recovery 10
Acronis Backup & Recovery 11
Acronis Backup 11.5
|
13 |
Copyright © Acronis International GmbH, 2002-2014 |
1.5.8Support for multiple network adapters
A machine license is bound to the machine’s network adapter (also known as network interface card,
NIC).
If the machine has more than one network adapter, Acronis Snap Deploy 5 ensures that only one license is assigned to the machine. No extra license will be consumed if you add or remove a network adapter.
To make sure that only one license is assigned to the machine, do not remove all network adapters at once.
When using the Wake-on-LAN functionality for the machine, the software sends a special packet, called the magic packet, to all network adapters of the machine.
1.5.9Multicast TTL and network bandwidth throttling
Deployment configuration has a parameter that specifies time to live (TTL) for multicast packets. By using this setting, you can limit the distribution of multicast packets via gateways.
By setting the permitted bandwidth, you can limit the network usage during deployment.
1.5.10 Encrypted communication
Components of Acronis Snap Deploy 5 communicate to each other by using the Secure Sockets Layer (SSL) cryptographic protocol. Encryption starts on the first (earliest) stage of the connection attempt, so all data transferred in the next steps (including data required for client authentication) is encrypted.
After the components of Acronis Snap Deploy 5 are installed, encrypted communication between the components is enabled automatically.
The contents of the master image are transferred unencrypted.
1.5.11 Password protection
Master images taken with Acronis Snap Deploy 5 can be protected with a password to prevent unauthorized deployment.
Acronis Snap Deploy 5 also supports password-protected backups created by Acronis True Image, Acronis Backup & Recovery 10, Acronis Backup & Recovery 11, or Acronis Backup 11.5.
To prevent Acronis bootable components from unauthorized execution, the bootable components in the Acronis boot menu can also be protected with a password. The user will be asked for the password when selecting a bootable component. No password is required to start the operating system on the machine.
1.5.12 Online deployment
You can configure (p. 115) Acronis Snap Deploy 5 to automatically make turned-on target machines (running Windows) ready for deployment every time the deployment starts. Thereby, manual rebooting of the target machines into the bootable environment is not required.
|
14 |
Copyright © Acronis International GmbH, 2002-2014 |
1.6Supported operating systems for imaging and
deployment
Acronis Snap Deploy 5 provides full-featured imaging and deployment of the operating systems listed in the table that follows.
For most operating systems, you can change settings such as the network name that the machines will have after the deployment.
Deploying an operating system requires a license. Depending on the type of an operating system, you need a server license or a workstation license. For details about licensing, see “Licensing policy” (p. 17).
|
Operating system |
Imaging and |
Changing |
License type |
|
|
deployment |
settings |
|||
|
Windows Server 2012 Foundation |
Yes |
Yes |
Server |
|
|
Windows Server 2012 R2 Foundation |
Yes |
Yes |
Server |
|
|
Windows Server 2012 Essentials |
Yes |
Yes |
Server |
|
|
Windows Server 2012 R2 Essentials |
Yes |
Yes |
Server |
|
|
Windows Server 2012 Standard |
Yes |
Yes |
Server |
|
|
Windows Server 2012 R2 Standard |
Yes |
Yes |
Server |
|
|
Windows Server 2012 Datacenter |
Yes |
Yes |
Server |
|
|
Windows Server 2012 R2 Datacenter |
Yes |
Yes |
Server |
|
|
Windows Server 2008 R2 |
Yes |
Yes |
Server |
|
|
(No Service Pack or Service Pack 1) |
||||
|
Windows Server 2008 (x86, x64) |
Yes |
Yes |
Server |
|
|
(No Service Pack, Service Pack 1, or Service Pack 2) |
||||
|
Windows Server 2003 (x86, x64) |
Yes |
Yes |
Server |
|
|
(No Service Pack, Service Pack 1, or Service Pack 2) |
||||
|
Windows Server 2003 R2 (x86, x64) |
Yes |
Yes |
Server |
|
|
(No Service Pack, Service Pack 1, or Service Pack 2) |
||||
|
Windows Small Business Server 2011 |
Yes |
Yes |
Server |
|
|
(No Service Pack) |
||||
|
Windows Small Business Server 2003 |
Yes |
Yes |
Server |
|
|
(No Service Pack, Service Pack 1, or Service Pack 2) |
||||
|
Windows Storage Server 2003 R2 |
Yes |
Yes |
Server |
|
|
(No Service Pack, Service Pack 1, or Service Pack 2) |
||||
|
Windows Server 2003 x64 Edition |
Yes |
Yes |
Server |
|
|
(No Service Pack, Service Pack 1, or Service Pack 2) |
||||
|
Windows 8 (x86, x64) |
Yes |
Yes |
Workstation |
|
|
Windows 8.1 (x86, x64) (including Update 1) |
Yes |
Yes |
Workstation |
|
|
Windows 8 Pro (x86, x64) |
Yes |
Yes |
Workstation |
|
|
Windows 8.1 Pro (x86, x64) (including Update 1) |
Yes |
Yes |
Workstation |
|
|
Windows 8 Enterprise (x86, x64) |
Yes |
Yes |
Workstation |
|
|
15 |
Copyright © Acronis International GmbH, 2002-2014 |
|
Operating system |
Imaging and |
Changing |
License type |
|
deployment |
settings |
||
|
Windows 8.1 Enterprise (x86, x64) (including Update 1) |
Yes |
Yes |
Workstation |
|
Windows 7 Home Basic (x86, x64) |
Yes |
Yes |
Workstation |
|
(No Service Pack or Service Pack 1) |
|||
|
Windows 7 Home Premium (x86, x64) |
Yes |
Yes |
Workstation |
|
(No Service Pack or Service Pack 1) |
|||
|
Windows 7 Professional (x86, x64) |
Yes |
Yes |
Workstation |
|
(No Service Pack or Service Pack 1) |
|||
|
Windows 7 Ultimate (x86, x64) |
Yes |
Yes |
Workstation |
|
(No Service Pack or Service Pack 1) |
|||
|
Windows Vista Home Basic (x86, x64) |
Yes |
Yes |
Workstation |
|
(No Service Pack, Service Pack 1, or Service Pack 2) |
|||
|
Windows Vista Home Premium (x86, x64) |
Yes |
Yes |
Workstation |
|
(No Service Pack, Service Pack 1, or Service Pack 2) |
|||
|
Windows Vista Business (x86, x64) |
Yes |
Yes |
Workstation |
|
(No Service Pack, Service Pack 1, or Service Pack 2) |
|||
|
Windows Vista Ultimate (x86, x64) |
Yes |
Yes |
Workstation |
|
(No Service Pack, Service Pack 1, or Service Pack 2) |
|||
|
Windows XP Home |
Yes |
Yes |
Workstation |
|
(Any Service Pack or no Service Pack) |
|||
|
Windows XP Professional |
Yes |
Yes |
Workstation |
|
(No Service Pack, Service Pack 1, Service Pack 2, or Service |
|||
|
Pack 3) |
|||
|
Windows XP Professional x64 Edition |
Yes |
Yes |
Workstation |
|
(No Service Pack, Service Pack 1, or Service Pack 2) |
|||
|
Windows 2000 Server |
Yes |
No |
Server |
|
(Any Service Pack or no Service Pack) |
|||
|
Windows 2000 Advanced Server |
Yes |
No |
Server |
|
(Any Service Pack or no Service Pack) |
|||
|
Windows 2000 Professional |
Yes |
No |
Workstation |
|
(Any Service Pack or no Service Pack) |
|||
|
Windows NT/4.0 Server |
Yes |
No |
Server |
|
Windows 98/Me |
Yes |
No |
Workstation |
|
Linux (kernel 2.4.9 and later) |
Yes |
No |
Workstation |
Acronis Snap Deploy 5 enables imaging and deployment of any PC-based operating system. However, for certain operating systems, some operations or options will not be available. For example, Windows 98/NT/ME, NT/4.0 Server, Windows 2000, and Linux (kernel 2.4.9 and later) can be deployed only as is; on-the-fly settings adjustment is not performed.
Deploying an unrecognized operating system or a disk without an operating system requires a workstation license.
Acronis Universal Deploy is not applicable to the Windows 2000, Windows 98/NT/ME, and Windows NT/4.0 Server operating systems.
|
16 |
Copyright © Acronis International GmbH, 2002-2014 |
1.7Licensing policy
Acronis Snap Deploy 5 licensing is based on the number of machines (servers or workstations) that you deploy. For example, to deploy a system on 100 machines, you need 100 licenses.
1.7.1Machine licenses and deployment licenses
In terms of the number of allowed deployments, a license can be one of two types:
A machine license enables an unlimited number of deployments to a particular machine. You may want to use this type of license if you perform deployment to the same machine on a regular basis.
A deployment license enables a single successful deployment to a machine. You may want to use this type of license if you perform deployment to the same machine once or infrequently. If deployment under a deployment license fails, you can perform another deployment under the same license.
You can obtain a license key that corresponds to a number of deployment licenses.
When setting up a deployment operation, you can choose (p. 98) whether a deployment license can be automatically used instead of a machine license, or conversely.
1.7.2Server licenses and workstation licenses
In terms of the operating system you can deploy, a license can be one of two types:
A server license enables deploying a server operating system.
A workstation license enables deploying a workstation operating system. A workstation license is needed to deploy a disk or volume that does not contain an operating system, if the target machine has not been assigned a machine license before.
Linux is considered as a workstation operating system. See also the complete list of supported server and workstation operating systems (p. 15).
If Acronis Snap Deploy 5 fails to identify the type of operating system, the operating system is considered as a workstation operating system.
When setting up a deployment operation, you can choose (p. 98) whether a server license can be automatically used instead of a workstation license for deploying a workstation operating system.
1.7.3Trial version of Acronis Snap Deploy 5
The Acronis Snap Deploy 5 trial version has all the functionality of the full version.
To use the trial version, you need to obtain a trial license. You can obtain a server or workstation trial license.
A trial license enables you an unlimited number of deployments on up to five machines for 15 days.
To upgrade from the trial to full version you do not need to re-download the software. Simply buy the full licenses and import them to the license server. Acronis Snap Deploy 5 will start using a full license as soon as the corresponding trial license expires.
|
17 |
Copyright © Acronis International GmbH, 2002-2014 |

1.8Upgrading to Acronis Snap Deploy 5
To upgrade from Acronis Snap Deploy 4 to Acronis Snap Deploy 5, upgrade both the licenses and the software components.
1.8.1Upgrading licenses
To upgrade the licenses of Acronis Snap Deploy 4, obtain the necessary number of upgrade licenses and import them to the license server.
You should obtain one upgrade license for Acronis Snap Deploy 5 (ASD5) per each license for Acronis Snap Deploy 4 (ASD4) that you have. After you import the upgrade licenses to the license server, you will be able to perform deployment to any machine by using Acronis Snap Deploy 5.
It does not matter whether the ASD4 license is itself an upgrade license for an even earlier version.
The following table illustrates how the various combinations of licenses will be upgraded. Use this table to calculate the number of upgrade licenses that you need.
|
You have |
You obtain and import |
You now can |
|
ASD4 full license |
ASD5 upgrade license |
Perform deployment to any target machine |
|
Available |
||
|
ASD4 full license |
ASD5 upgrade license |
Perform deployment to Machine1 |
|
Assigned to Machine1 |
||
|
ASD4 upgrade license |
ASD5 upgrade license |
Perform deployment to any target machine |
|
License(s) for an earlier version |
||
|
Available |
||
|
ASD4 upgrade license |
ASD5 upgrade license |
Perform deployment to Machine1 |
|
License(s) for an earlier version |
||
|
Assigned to Machine1 |
||
|
No license |
ASD5 full license |
Perform deployment to any target machine |
1.8.2Upgrading components
Install the components of Acronis Snap Deploy 5 over those of Acronis Snap Deploy 4.
If all components of Acronis Snap Deploy 4 are installed on the same machine, simply run the setup program of Acronis Snap Deploy 5 on that machine. During installation, you can add the upgrade licenses.
If components are installed on different machines, upgrade the license server first, by running the setup program of Acronis Snap Deploy 5. When upgrading the license server, import the upgrade licenses. Then, upgrade other components on the machines.
Upgrading Acronis PXE Server removes any components of Acronis Snap Deploy 4 that are uploaded to the PXE server. To continue using the PXE server, you need to upload the new components (p. 71) to it.
Components of versions of Acronis Snap Deploy earlier than 4 are incompatible with Acronis Snap Deploy 5. You need to remove those components before installing Acronis Snap Deploy 5.
|
18 |
Copyright © Acronis International GmbH, 2002-2014 |
1.9Technical Support
Maintenance and Support Program
If you need assistance with your Acronis product, please go to http://www.acronis.com/support/
Product Updates
You can download the latest updates for all your registered Acronis software products from our website at any time after logging into your Account (http://www.acronis.com/my) and registering the product. See Registering Acronis Products at the Website (http://kb.acronis.com/content/4834) and Acronis Website User Guide (http://kb.acronis.com/content/8128).
|
19 |
Copyright © Acronis International GmbH, 2002-2014 |
2 Understanding Acronis Snap Deploy 5
This section describes the components of the Acronis Snap Deploy 5 infrastructure and their interaction.
2.1Terminology
The following table lists the common terms and descriptions used in this document.
|
Master system |
The system to be deployed. |
|
Master image (Image) |
A file that contains the master system in a packaged form. The file has the .tib |
|
extension. |
|
|
Online imaging |
Taking a master image while the master system is in a production state (the operating |
|
system is running on the master machine). |
|
|
Offline imaging |
Taking an image while the master machine is booted into the Acronis environment or |
|
Windows Preinstallation Environment. |
|
|
Deployment |
Transferring the operating system, applications, and data from the master image file to |
|
a physical hard disk (see “Target disk”). In most cases, deployment is performed by |
|
|
multicasting the master image through the network. |
|
|
Stand-alone |
Deployment to a machine isolated from a network or included in a network without |
|
deployment |
Acronis Snap Deploy 5 infrastructure. Stand-alone deployment is performed locally by |
|
using a bootable component of Acronis Snap Deploy 5. |
|
|
Target disk |
The physical disk to be deployed to (an internal hard disk of the target machine). |
|
Target machine |
The hardware to perform deployment to. |
|
(Target) |
|
|
Deployment template |
Configuration parameters of the deployment operation: |
|
(Template) |
Path to the master image |
|
The operation mode, such as whether to use multicast or unicast and how to handle |
|
|
the target disk free space |
|
|
Settings to be applied to the deployed systems, such as machine names and user |
|
|
accounts |
|
|
Operations to be performed on the deployed systems, such as transferring files, |
|
|
running applications, shutting down, or restarting |
|
|
Once you save a deployment template, you can use it in the future. |
|
|
20 |
Copyright © Acronis International GmbH, 2002-2014 |
|
Administrator |
The person who has rights to manage the Acronis Snap Deploy 5 infrastructure. |
|
User-initiated |
The mode when deployment can be initiated on the side of the target machine. |
|
deployment mode |
|
|
User |
The person on the side of the target machine who starts the user-initiated deployment. |
|
This term relates to the user-initiated deployment mode only. |
2.2Components
Acronis Snap Deploy 5 includes the following components:
Components for Windows
These are components that are installed on machines running Windows and provide Acronis Snap Deploy 5 infrastructure.
Acronis Snap Deploy 5 Management Console is an administrative tool for remote access to Acronis servers and Acronis Snap Deploy 5 Management Agent.
When disconnected from the Acronis components, the console allows only for the installation of product components on remote machines and for the creation of bootable media.
Acronis Snap Deploy 5 OS Deploy Server (the deployment server) is a component that performs centralized hardware-independent deployment through the network with the help of Acronis Snap Deploy 5 Agents.
Acronis Snap Deploy 5 Management Agent takes an image of a machine running Windows or enables Acronis Snap Deploy 5 OS Deploy Server to start deployment on the machine while it is online.
Acronis PXE Server allows booting machines over the network into Acronis Snap Deploy 5 Agent, Acronis Snap Deploy 5 Master Image Creator, or Windows Preinstallation Environment. The machines must support PXE. Using Acronis PXE Server considerably reduces the time required for booting multiple machines as compared to using bootable media. It also eliminates the need to have a technician onsite to install the bootable media into the system that must be booted.
Acronis Wake-on-LAN Proxy is a component that enables Acronis Snap Deploy 5 OS Deploy Server to wake up the target machines located in another subnet.
Acronis Snap Deploy 5 License Server is a component that tracks licenses of Acronis products.
Bootable components
These are components that are available in the Acronis environment or Windows Preinstallation Environment. A machine must boot into the corresponding component when you need to perform imaging or deployment.
Acronis Snap Deploy 5 Agent is a bootable component that performs deployment to a target machine under the control of Acronis Snap Deploy 5 OS Deploy Server.
There are two ways to load Acronis Snap Deploy 5 Agent on target machines: locally from bootable media or remotely by using Acronis PXE Server.
Acronis Snap Deploy 5 Master Image Creator is a bootable, locally controlled component that creates an image of the master system.
There are two ways to load Acronis Snap Deploy 5 Master Image Creator on a master machine: directly from bootable media or remotely by using Acronis PXE Server.
|
21 |
Copyright © Acronis International GmbH, 2002-2014 |
Acronis Snap Deploy 5 Standalone Utility is a bootable component that enables fully-functional deployment with a GUI on a stand-alone machine (a machine isolated from the network or included in a network without Acronis Snap Deploy 5 infrastructure).
The only way to load Acronis Snap Deploy 5 Standalone Utility is from an Acronis bootable media.
Acronis System Report is a bootable component that collects information about the machine and saves this information to a locally-attached USB drive.
There are two ways to load Acronis System Report: directly from an Acronis bootable media or remotely by using Acronis PXE Server.
2.3Support for file systems and storage media
2.3.1Supported file systems
Acronis Snap Deploy 5 provides full-featured imaging and deployment of the following file systems:
FAT16
FAT32
NTFS
Ext2
Ext3
Ext4
ReiserFS
Reiser4
Linux SWAP
XFS
JFS
Acronis Snap Deploy 5 can perform imaging and deployment of corrupted or unsupported file systems by using a sector-by-sector approach. This approach usually leads to a bigger size of the master image and makes the imaging or deployment process longer. A volume with an unsupported file system cannot be resized during deployment.
2.3.2Supported media
Acronis Snap Deploy 5 Master Image Creator and Acronis Snap Deploy 5 Management Agent can save an image:
In a network folder.
On an internal hard disk of the master machine.
On USB and FireWire (IEEE-1394) storage devices (hard drives, flash drives) attached to the master machine.
On DVD+R/RW, DVD-R/RW, CD-R/RW, or recordable Blu-ray Discs (BD-R, BD-RE) loaded in the media drive of the master machine.
A sizeable image can be split between multiple media automatically.
Acronis Snap Deploy 5 OS Deploy Server can deploy images located:
In network folders.
On an internal hard disk of the deployment server.
|
22 |
Copyright © Acronis International GmbH, 2002-2014 |

On USB and FireWire (IEEE-1394) storage devices (hard drives, flash drives) attached to the deployment server.
On DVD+R/RW, DVD-R/RW, CD-R/RW, or recordable Blu-ray Discs (BD-R, BD-RE) loaded in the media drive of the deployment server.
The best practice is keeping images on the deployment server’s hard disk. This minimizes network traffic during deployment.
The image created on removable media has to fit into one media disk. To deploy an image spread over two or more CDs, DVDs or other media, copy all parts of the image to the same folder on the deployment server or to a network folder.
Acronis Snap Deploy 5 Standalone Utility can deploy images located:
In network folders.
On USB and FireWire (IEEE-1394) storage devices (hard drives, flash drives) attached to the managed machine.
On DVD+R/RW, DVD-R/RW, CD-R/RW, or recordable Blu-ray Discs (BD-R, BD-RE) loaded in the media drive of the managed machine.
The image created on removable media has to fit into one media disk. To deploy an image spread over two or more CDs, DVDs or other media, copy all parts of the image to the same folder on an external drive or to a network folder.
2.4Supported types of disks and firmware interfaces
Acronis Snap Deploy 5 can image and deploy basic disks that use the master boot record (MBR) or GUID Partition Table (GPT) partitioning scheme. Deployment to uninitialized disks is also supported.
Dynamic volumes (in Windows) can be deployed as basic volumes only. MD devices and logical volumes (in Linux) are not supported for imaging and deployment.
Tip: To perform imaging and deployment of disks and volumes that are not supported by Acronis Snap Deploy 5, use the Acronis Backup products.
Both basic input/output system (BIOS) and Unified Extensible Firmware Interface (UEFI) firmware interfaces are supported for master and target machines.
2.5Usage
This section gives a general idea of using the product and does not contain the detailed instructions on how to perform operations. Nevertheless, advanced users are welcome to use this section as a step-by-step quick start guide. The details can be found in the further sections.
2.5.1Offline imaging
Offline imaging means that the master system is stopped and the master machine boots into the Acronis environment or into Windows Preinstallation Environment (WinPE).
To perform offline imaging
1.Configure the master system.
2.Install Acronis Snap Deploy 5 Management Console.
3.Do one of the following:
|
23 |
Copyright © Acronis International GmbH, 2002-2014 |

Create a bootable media (either an Acronis media or a WinPE-based media) with Acronis Snap Deploy 5 Master Image Creator.
OR
Install Acronis PXE Server, connect the console to the PXE server and upload Acronis Snap Deploy 5 Master Image Creator.
4.Depending on your choice in the previous step, boot the machine into Acronis Snap Deploy 5 Master Image Creator from the bootable media or from the PXE server.
5.On the master machine, follow the instructions of the Master Image Creator wizard to configure and launch the imaging operation. The image can be saved in a network folder, on detachable media (such as a USB drive), or removable media (such as a DVD). To access the network from the bootable environment, you must have a DHCP server or configure the network settings of the master machine manually.
Offline imaging
2.5.2Online imaging
Online imaging means that the master system is imaged live (without restarting the machine or suspending operations). Online imaging can be performed remotely whenever you need. The disadvantage is that you have to install imaging software that is included in the master image. This is not always rational.
To perform online imaging
1.Configure the master system.
2.Install Acronis Snap Deploy 5 Management Console.
3.Install Acronis Snap Deploy 5 Management Agent on the master system either locally by using the setup program, or remotely by using Acronis Snap Deploy 5 Management Console.
After Acronis Snap Deploy 5 Management Agent is installed, you can image the master system online (without restarting the machine) at any time.
|
24 |
Copyright © Acronis International GmbH, 2002-2014 |

4.Connect the console to the master system, click Create image -> Next -> A master image. Follow the instructions of the Master Image Creator wizard to configure and launch the imaging operation. The image can be saved in a network folder, on detachable media (such as an USB drive) or on removable media (such as a DVD).
Online imaging
2.5.3Deployment
This section illustrates the Acronis components functionality by the example of deployment that you start manually. For details about the ways of deployment, see “Deploying a master image” (p. 84).
This procedure presumes that you have installed Acronis Snap Deploy 5 Management Console and created a master image.
To perform deployment
1.Install Acronis Snap Deploy 5 License Server. Import licenses to the license server. Install Acronis Snap Deploy 5 OS Deploy Server.
2.Do one of the following:
Create bootable media (either Acronis media or WinPE-based media) with Acronis Snap Deploy 5 Agent.
OR
Install Acronis PXE Server, connect the console to the PXE server, and then upload Acronis Snap Deploy 5 Agent.
3.Depending on your choice in the previous step, boot the target machines into Acronis Snap Deploy 5 Agent from the bootable media or from the PXE server.
You must have a DHCP server or configure the network settings of the target machines manually to enable the target machines to connect to Acronis Snap Deploy 5 OS Deploy Server.
4.Connect the console to Acronis Snap Deploy 5 OS Deploy Server. Go to the Machines view.
5.Make sure that the target machines are displayed in the list and have the Ready state. This means that the machines are connected and ready for deployment.
|
25 |
Copyright © Acronis International GmbH, 2002-2014 |
6.Select the machines, click Deploy image on the toolbar, and then follow the Create Deployment Task Wizard instructions to configure and launch the deployment operation. When prompted about when you want to run the deployment, select Now.
Deployment that starts manually
2.6What is Acronis Universal Deploy
Acronis Universal Deploy is the Acronis proprietary technology that helps deploy and boot up a Windows or a Linux operating system on dissimilar hardware. Acronis Universal Deploy saves you from configuring a new master system for each make of hardware you need to perform deployment to.
If you plan to deploy an operating system to multiple machines that are identical to each other but differ from the master machine hardware, deploy the master image to one of the identical machines by using Acronis Universal Deploy. This will adjust the operating system to the dissimilar hardware. Then, create a master image of the adjusted system and deploy that image to the identical machines.
2.6.1Acronis Universal Deploy purpose
An image of a system can be deployed easily on the hardware where it was created or to identical hardware. However, if you change a motherboard or use another processor version, the deployed system could be unbootable. An attempt to transfer the system to a new, much more powerful machine will usually produce the same result. This is because the new hardware is usually incompatible with the most critical drivers included in the image.
Using Microsoft System Preparation Tool (Sysprep) does not solve this problem, because Sysprep permits adding drivers only for Plug and Play devices (such as sound cards, network adapters, and video cards). As for the system Hardware Abstraction Layer (HAL) and mass-storage device drivers, they must be identical on the source and the target machines; see Microsoft Knowledge Base, articles 302577 and 216915.
Acronis Universal Deploy technology provides an efficient solution for hardware-independent system deployment by adding the crucial Hardware Abstraction Layer (HAL) and mass-storage device drivers.
|
26 |
Copyright © Acronis International GmbH, 2002-2014 |

2.6.2Acronis Universal Deploy in Windows
Automatic HAL and mass-storage drivers selection
Acronis Universal Deploy searches the Windows default driver storage folders (in the master image being deployed) for HAL and mass-storage device drivers and installs drivers that better fit the target hardware. You can specify a custom driver repository (a network folder or a CD) which will also be used for driver searches.
Tip: The Windows default driver storage folder is determined by the DevicePath value in the
HKEY_LOCAL_MACHINE\SOFTWARE\Microsoft\Windows\CurrentVersion registry key. This storage folder is usually WINDOWS\inf.
Manual selection of mass-storage device driver
If the target hardware has a specific mass-storage controller (such as a SCSI, RAID, or Fibre Channel adapter) for the hard disk, you can install the appropriate driver manually, bypassing the automatic driver search-and-install procedure.
Installing drivers for Plug and Play devices
Acronis Universal Deploy relies on built-in Plug and Play discovery and configuration process to handle hardware differences in devices that are not critical for the deployed system startup, such as video, audio and USB. Windows takes control over this process during the logon phase, and if some of the new hardware is not detected, you will have a chance to install drivers for it later manually.
2.6.3Acronis Universal Deploy in Linux
Acronis Universal Deploy can be applied to Linux operating systems with a kernel version of 2.6.8 or later.
When Acronis Universal Deploy is applied to a Linux operating system, it updates a temporary file system known as the initial RAM disk (initrd). This ensures that the operating system can boot on the new hardware.
Acronis Universal Deploy adds modules for the new hardware (including device drivers) to the initial RAM disk. As a rule, it finds the necessary modules in the /lib/modules directory of the operating system you are deploying. If Acronis Universal Deploy cannot find a module it needs, it logs the module’s file name.
Acronis Universal Deploy may modify the configuration of the GRUB boot loader. This may be required, for example, to ensure the system bootability when the new machine has a different volume layout than the original machine.
Acronis Universal Deploy never modifies the Linux kernel.
Reverting to the original initial RAM disk
You can revert to the original initial RAM disk if necessary.
The initial RAM disk is stored on the machine in a file. Before updating the initial RAM disk for the first time, Acronis Universal Deploy saves a copy of it to the same directory. The name of the copy is the name of the file, followed by the _acronis_backup.img suffix. This copy will not be overwritten if you run Acronis Universal Deploy more than once (for example, after you have added missing drivers).
|
27 |
Copyright © Acronis International GmbH, 2002-2014 |

To revert to the original initial RAM disk, do any of the following:
Rename the copy accordingly. For example, run a command similar to the following:
mv initrd-2.6.16.60-0.21-default_acronis_backup.img initrd-2.6.16.60-0.21-default
Specify the copy in the initrd line of the GRUB boot loader configuration.
2.6.4Acronis Universal Deploy and Microsoft Sysprep
Acronis Universal Deploy is not a system preparation tool. You can apply it to any system image created by Acronis products, but you cannot apply it to images of systems prepared with Microsoft System Preparation Tool (Sysprep).
2.7How to
How to image a machine without installing additional software to it?
Perform offline imaging (p. 74).
How to image a machine without restarting it?
Perform online imaging (p. 74).
How to prepare deployment tools?
Create bootable media (p. 64) with Acronis Snap Deploy 5 Agent. The machines will boot from these media.
How to deploy an image to a list of specific machines?
Use the The machines listed below option in the Create Deployment Task wizard (p. 107). Specify the list of machines to perform deployment to.
How to deploy an image to a number of any machines?
Use the Any machines ready for deployment option in the Create Deployment Task wizard (p. 110). Specify the number of machines to wait for.
How to deploy an image in the absence of a network connection?
Use Acronis Snap Deploy 5 Standalone Utility (p. 116).
How to enable users to start deployment on their own?
Set up user-initiated deployment (p. 118).
How to view the status of mass deployment?
Open the Deployment tasks view (p. 133).
How to view the list of machines?
Open the Machines view (p. 128).
How to add or remove licenses for deployment?
Open the Licenses view (p. 59).
|
28 |
Copyright © Acronis International GmbH, 2002-2014 |
3 Getting started with Acronis Snap Deploy 5
This section describes how to install Acronis Snap Deploy 5 and perform a simple deployment.
By following the procedures in this section, you will:
a)Install and start Acronis Snap Deploy 5.
b)Create a master image of a machine.
c)Deploy the master image to the same or a different machine.
Step 1. Installing Acronis Snap Deploy 5
In this step, you will install Acronis Snap Deploy 5 in a typical configuration. For the complete description of installation methods and procedures, see the installation section (p. 43).
Before installation, make sure that:
You have a machine running a modern version of Windows, such as Windows 7 Professional. For the list of operating systems where you can install Acronis Snap Deploy 5, see “Supported operating systems” (p. 43).
You have the setup program. You can download the setup program from the Acronis product download Web page.
You have one or more license keys for Acronis Snap Deploy 5. You can buy full license keys or obtain trial ones by going to the Acronis Snap Deploy 5 Web page. The type of license (“for Server” or “for Workstation”) determines the type of operating system that you can deploy.
On the machine where you want to install Acronis Snap Deploy 5, do the following:
1.Log on as an administrator and start the setup program.
2.Click Install Acronis Snap Deploy 5.
3.Accept the terms of the license agreement, and then click Next.
|
29 |
Copyright © Acronis International GmbH, 2002-2014 |
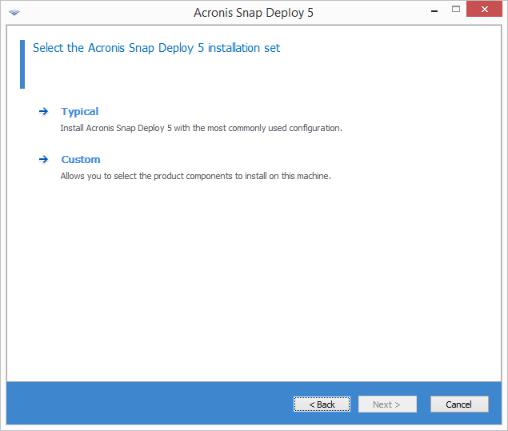
4. Click Typical.
|
30 |
Copyright © Acronis International GmbH, 2002-2014 |
![]()
5.Click Add license, and then specify the license keys. You can type the license keys manually or import them from a text file.
6.Specify whether the machine will participate in the Customer Experience Program (CEP).
7.Click Install.
Step 2. Starting Acronis Snap Deploy 5
On the machine where you installed Acronis Snap Deploy 5:
On the desktop, click Acronis Snap Deploy 5.
|
31 |
Copyright © Acronis International GmbH, 2002-2014 |

When Acronis Snap Deploy 5 starts, the welcome screen appears.
Step 3. Creating a bootable media
In this step, you will create a bootable media that enables creating master images and performing deployment.
On the machine where you installed and started Acronis Snap Deploy 5, do the following: 1. On the Tools menu, click Create bootable media.
|
32 |
Copyright © Acronis International GmbH, 2002-2014 |

2.In the list of components, select Acronis Snap Deploy 5 Agent and Acronis Snap Deploy 5 Master Image Creator.
3.In Network settings, in Server name/IP, specify the name of the machine where you installed Acronis Snap Deploy 5.
4.Choose to create the media on a CD or DVD. Insert a blank CD-R/RW or DVD-R/RW.
Tip. If no CD-RW, DVD-RW, or a similar optical disc drive is present on the machine, you can choose to create an ISO file that you can later burn to an optical disc on another machine. You can also create the media on a USB drive. For details, see “Creating a bootable media” (p. 64).
5.Click Create.
Step 4. Creating a master image
In this step, you will create an image of a machine and save the image to a USB hard disk.
Choose a machine whose image you want to create. No license is required for imaging the machine. However, a server or a workstation license will be used for deploying the machine, depending on whether the machine is running a server operating system (such as Windows 2008 Server or Linux) or a workstation operating system (such as Windows 7). For the list of server and workstation operating systems, see “Supported operating systems for imaging and deployment” (p. 15).
On the machine whose image you want to create, do the following:
|
33 |
Copyright © Acronis International GmbH, 2002-2014 |

1.Make sure that the CD or DVD drive has a higher boot priority than the hard disk drive. You may need to open the BIOS setup utility of the machine and adjust the boot priority setting, similarly to what is shown in the following picture.
2.Attach the USB hard disk drive to the machine.
Tip. Alternatively, you will be able to save the image to a network folder, as described later in this procedure.
3.Boot the machine from the bootable media you created.
4.On the boot menu, click Acronis Snap Deploy 5 Master Image Creator.
|
34 |
Copyright © Acronis International GmbH, 2002-2014 |

5. In the pop-up window, click Cancel or wait until that window closes.
6.Select the volumes that you want to include in the master image. You can leave the default selection, which normally includes the volumes that contain the operating system.
7.Specify a folder on the USB hard disk where you want to save the image.
Alternatively, specify a network folder, and the user name and password to access that folder.
8.Keep clicking Next until the summary screen appears. Click Create in that screen.
|
35 |
Copyright © Acronis International GmbH, 2002-2014 |

Acronis Snap Deploy 5 starts creating the image.
After the image is created, the machine will restart.
Step 5. Performing deployment
In this step, you will deploy the created master image to a single machine (the target machine).
Tip: For getting started, we recommend performing deployment to the same machine from which you created the image, or to a machine with identical hardware. This way, no extra steps, such as using the Universal Deploy option, are required.
Preparing the target machine
On the target machine, do the following:
1.Make sure that the CD or DVD drive has a higher boot priority than the hard disk drive. You may need to open the BIOS setup utility of the machine and adjust the boot priority setting.
2.Boot the machine from the bootable media you created.
|
36 |
Copyright © Acronis International GmbH, 2002-2014 |

3. On the boot menu, click Acronis Snap Deploy 5 Agent.
4.In the pop-up window, click Cancel or wait until that window closes.
5.Make sure that the machine is ready for deployment. The window should look similar to the following picture.
Details. The target machine becomes ready for deployment when it connects to Acronis Snap Deploy 5 OS Deploy Server. This server is part of Acronis Snap Deploy 5. If the machine does not
|
37 |
Copyright © Acronis International GmbH, 2002-2014 |

connect to the server, you may need to adjust network settings, as described in “Booting the target machines” (p. 112).
After the target machine is ready, you can deploy the master image to it.
Deploying the master image
On the machine where you installed Acronis Snap Deploy 5, do the following:
1.Attach the USB hard disk drive with the master image to the machine. Optionally, copy the image to the local hard disk of the machine.
2.Click the Machines view. Make sure that the target machine you prepared is shown in the list and has the Ready state.
3.Right-click the target machine, and then click Deploy image.
4.Keep clicking Next until the template selection window appears. Click Create new in that window.
5.Click Create a new template, and then click Next.
6.Select the master image (the .tib file) that you created, and then click Next.
7.In the deployment settings window, click Next.
|
38 |
Copyright © Acronis International GmbH, 2002-2014 |

Note. If you imaged a machine running a workstation operating system (such as Windows 7) but you only have server licenses (such as Acronis Snap Deploy 5 for Server – Trial License), you may want to allow the software to use this type of license to deploy the machine. To do so, click Licensing in the deployment settings window, and then click Use a server license automatically.
Alternatively, you can add a workstation license before starting the deployment, by opening the Licenses view and clicking Add license on the toolbar.
8.Keep clicking Next until the summary window appears. Click Save in that window.
Details. You have created a deployment template. It determines how to perform deployment. You can reuse this template in other deployment tasks.
|
39 |
Copyright © Acronis International GmbH, 2002-2014 |

9. Select the deployment template you created, and then click Next.
10.When asked about when to run the deployment, select Now and type the user name and password that you use to log on to Windows.
11. Keep clicking Next until the summary window appears. Click Create in that window.
|
40 |
Copyright © Acronis International GmbH, 2002-2014 |
![]()
You can view the progress of the deployment both on the machine where you installed Acronis Snap Deploy 5 and on the target machine.
Viewing the deployment progress on the machine with Acronis Snap Deploy 5
Viewing the deployment progress on the target machine
What you can do next
In the navigation pane, you can open the corresponding views to navigate across the software.
|
41 |
Copyright © Acronis International GmbH, 2002-2014 |
To run the deployment again, open the Deployment tasks view, select the task you created, and then click Run on the toolbar.
For details about the Deployment tasks view, see “Managing deployment tasks” (p. 133).
To add more machines, open the Machines view and then click Add machines. You can add machines by their physical addresses, known as MAC addresses.
Another way to add a machine to this view is to boot the machine so that it becomes ready for deployment, as described in “Preparing the target machine” earlier in this section. You can then turn off or restart the machine without performing deployment. The machine remains in the view.
For details about the Machines view, see “Managing the list of machines” (p. 128).
To add more licenses for deployment, open the Licenses view and then click Add license on the toolbar. Clicking Obtain license opens the Acronis Snap Deploy 5 Purchasing Web page.
For details about managing licenses, see “Using Acronis Snap Deploy 5 License Server” (p. 59). For information about license types, see “Licensing policy” (p. 17).
To set up network booting of machines (instead of booting them from a media), open the PXE server view, click Upload components to PXE, and then follow the steps similar to those described in “Creating a bootable media” earlier in this section.
For details about setting up the network booting, see “Configuring Acronis PXE Server” (p. 71).
|
42 |
Copyright © Acronis International GmbH, 2002-2014 |
4 Installation of Acronis Snap Deploy 5
4.1Supported operating systems
This section lists the operating systems where components of Acronis Snap Deploy 5 can be installed.
It does not matter which Service Pack (if any) is installed in the operating system.
Any components for Windows can be installed in the following operating systems:
Windows Server 2012 Foundation
Windows Server 2012 R2 Foundation
Windows Server 2012 Essentials
Windows Server 2012 R2 Essentials
Windows Server 2012 Standard
Windows Server 2012 R2 Standard
Windows Server 2012 Datacenter
Windows Server 2012 R2 Datacenter
Windows Server 2008 R2
Windows Server 2008 (x86, x64)
Windows Server 2003 (x86, x64)
Windows Server 2003 R2 (x86, x64)
Windows Small Business Server 2011
Windows Small Business Server 2003
Windows Server 2003 x64 Edition
Windows 8 Pro (x86, x64)
Windows 8.1 Pro (x86, x64)
Windows 8 Enterprise (x86, x64)
Windows 8.1 Enterprise (x86, x64)
Windows 7 Professional (x86, x64)
Windows 7 Ultimate (x86, x64)
Windows Vista Business (x86, x64)
Windows Vista Ultimate (x86, x64)
Windows XP Professional
Windows XP Professional x64 Edition
For local management only, Acronis Snap Deploy 5 Management Console and Acronis Snap Deploy 5 Management Agent can be installed on a machine running any of the following operating systems:
Windows 8 (x86, x64)
Windows 8.1 (x86, x64)
Windows 7 Home Basic, Windows 7 Home Premium
Windows Vista Home Basic, Windows Vista Home Premium
Windows XP Home
|
43 |
Copyright © Acronis International GmbH, 2002-2014 |
4.2System requirements
Components for Windows
|
Component |
Disk space required |
Disk space occupied |
Additional |
|
during installation or |
by the component(s) |
||
|
update |
|||
|
Complete installation |
1554 MB |
777 MB |
|
|
Management Console |
1326 MB |
663 MB |
CD-R/RW, |
|
DVD-R/RW, or |
|||
|
BD-R/RE for |
|||
|
creating bootable |
|||
|
media |
|||
|
1024×768 screen |
|||
|
resolution |
|||
|
Mouse (required) |
|||
|
OS Deploy Server |
66 MB |
33 MB |
|
|
Management Agent |
66 MB |
33 MB |
|
|
PXE Server |
38 MB |
19 MB |
|
|
Wake-on-LAN Proxy |
18 MB |
9 MB |
|
|
License Server |
40 MB |
20 MB |
|
Minimum memory requirements for a component are the same as for the Windows operating system where it is installed.
Network interface card is a common requirement for all the components.
Bootable media
|
Media type |
Memory |
ISO image size |
|
Based on Windows PE 3/4 |
512/1024 MB |
163 MB |
|
Linux-based |
256 MB |
545 MB |
4.3Used ports and IP addresses
The Acronis Snap Deploy 5 OS Deploy Server and Acronis Snap Deploy 5 Management Console components use the following ports and IP addresses for remote operation:
UDP port: 9876
TCP port: 9876. If this port is busy, the deployment server and the management console choose a port at random
IPv4 multicast address: 239.255.219.45
Acronis Snap Deploy 5 Management Console UDP port: 9877. If this port is busy, the management console chooses a port at random
Acronis PXE Server uses the following ports and IP addresses:
|
44 |
Copyright © Acronis International GmbH, 2002-2014 |
 Loading…
Привет друзья, в этой статье мы отвечаем на Ваш вопрос о том, для чего нужна программа Acronis Snap Deploy 5 и как в ней работать. Acronis Snap Deploy принадлежит знаменитому разработчику Acronis, чей конёк резервное копирование данных и целых операционных систем. Автор статьи Ro8, написавший нам вот этот интереснейший раздел.
Acronis Snap Deploy 5 — это гибкое и эффективное программное решение, предназначенное для одновременного развертывания полностью сконфигурированной операционной системы Windows или Linux (с прикладным ПО и другими данными или без них) на нескольких машинах. Также, образ сделанный в программе на одном компьютере можно развернуть с помощью Acronis Snap Deploy 5 на компьютер с отличающимся железом.
- Примечание: Простыми словами. Чем отличается всем известная программа Acronis True Image от Acronis Snap Deploy 5? Тем, что программа Acronis True Image, используя один свой образ, может развернуть его только на один компьютер. В случае, если этот образ нужно развернуть одновременно на множестве компьютеров по сети, используют программу Acronis Snap Deploy 5.
- Принцип работы программы Acronis Snap Deploy 5 весьма прост: выбираем ПК и устанавливаем на него Windows и все нужные программы, затем создаём резервную копию операционной системы в Acronis Snap Deploy 5 и размножаем её на остальные персональные компьютеры. Последний раз я использовал эту программу, когда наша организация закупила одновременно 15 компьютеров и на них срочно нужно было устанавливать винду, с помощью Acronis Snap Deploy 5 я уложился в несколько часов.
- В качестве эталона можно использовать образ, созданный в программе Acronis True Image или Acronis Backup & Recovery.
В основном приложение Acronis Snap Deploy 5 предназначено для следующих категорий пользователей:
- Малые и средние предприятия,
- Поставщики ИТ-услуг,
- Поставщики оборудования,
- ИТ-отделы больших корпораций,
- Школы и университеты,
- Лаборатории для разработки и тестирования ПО.
Развертывание Windows 7 при помощи Acronis Snap Deploy 5
Для скачивания Acronis Snap Deploy 5 переходим на официальный сайт программы по адресу
www.acronis.com/ru-ru/business/enterprise-solutions/image-deployment, выбираем Попробовать,

заполняем форму для получения ссылки для загрузки программы. Нажимаем Отправить

Скачанный установочный файл программы

Запускаем установочный файл. Откроется окно в котором выбираем Установка Acronis Snap Deploy 5

Принимаем лицензионное соглашение

Выбираем Обычную установку

Добавляем лицензию на сервер лицензий. Лицензионный ключ высылается на электронную почту после заполнения формы на сайте программы. Вводим его

ОК

Далее

Далее

Соглашаемся или отказываемся от участия в программе улучшения качества Acronis. Далее

Нажимаем Установка

Идет установка Acronis Snap Deploy 5

Установка завершена

Главное окно программы Acronis Snap Deploy 5
Мы можем нажать кнопку Создать образ и произойдёт создание образа эталонной системы для последующего разворачивания его на другие компьютеры,

но сегодня мы этого делать не будем, так как у нас на компьютере есть предварительно созданный при помощи программы Acronis True Image образ операционной системы с установленным программным обеспечением

Переходим в главное окно Acronis Snap Deploy 5, Выбираем Задания развертывания и нажимаем Создать

Далее

Далее

Ставим галочку Использовать PXE-сервер для загрузки агента

Создаем новый шаблон развертывания

Далее

Выбираем нашу резервную копию операционной системы, Далее

Выбираем тома, которые хотим развернуть

В данном окне выбираем Носитель Acronis

Ставим переключатель на пункте Использовать Acronis Universal Deploy
Acronis Universal Deploy — это запатентованная технология Acronis, которая используется для развертывания и загрузки операционной системы Windows или Linux на отличающееся оборудование. Технология Acronis Universal Deploy позволяет избежать конфигурирования эталонной системы заново для каждого набора аппаратных средств, на котором необходимо развернуть эту систему.

Можно добавить драйверы для устройств во время развертывания, мы этого делать не будем. Далее

В этом окне можно добавить драйверы для контроллеров запоминающих устройств. Далее

Нажимаем Сохранить

Шаблон развертывания создан. Далее

Выбираем запуск задания вручную

Устанавливаем длительность ожидания готовности машины на которую будет разворачиваться образ заданием.

Вводим имя задания. Создать

Задание развертывания создано

Создаем загрузочный носитель. Для этого идем в Средства, далее Создать загрузочный носитель

Откроется мастер создания загрузочных носителей

Выбираем компоненты, которые будут входить в состав загрузочного носителя

Прописываем ip-адрес сервера, к которому будет подключаться машина, на которую будет разворачиваться образ операционной системы

Выбираем тип создаваемого носителя. В нашем случае это iso образ

Выбираем место сохранения нашего iso образа

Создать

Загрузочный носитель создан успешно

Записываем созданный iso образ на диск/флешку, и загружаем с нее компьютер. После полной загрузки появится вот такое окно, в котором выбираем Агент Acronis Snap Deploy 5


Удаленная машина готова к развертыванию

Переходим в консоль управления Acronis Snap Deploy 5 и запускаем наше задание развертывания Deploy Windows 7 Home X86

Как только задание будет запущено на выполнение, начнется процесс развертывания операционной системы на удаленный компьютер

Развертывание на удаленном компьютере

На удаленном компьютере работает Acronis Universal Deploy

После того, как развертывание будет завершено, компьютер выключится.
Снова включаем компьютер, происходит загрузка операционной системы

Обновление идентификатора безопасности SID

После обновления идентификатора безопасности компьютер пойдет на перезагрузку

Запуск Windows

Система развернута на удаленный компьютер

-
Страница 1
A c r o n i s S n a p D e p l o y 5 Update 1 USER GUIDE[…]
-
Страница 2
2 Copyright © Acronis International GmbH, 2002- 2014 Copyright Statement Copyright © Acr onis Intern ational GmbH, 2002- 2014. All righ ts reserved. “Acronis” and “Acr onis Sec ure Zone” are r egistered trad emarks of Acr onis International G mbH. «Acronis Compute with Confid ence», “Acronis Startup Recovery Manag er”, “Ac[…]
-
Страница 3
3 Copyright © Acronis International GmbH, 2002- 2014 Table of contents 1 Introducing Acroni s Snap Dep loy 5 ……………………………………………………………………….. 7 1.1 Overview …………………………………………………………………………………………………………………… 7 1. 1 .[…]
-
Страница 4
4 Copyright © Acronis International GmbH, 2002- 2014 2. 5 . 1 Of f l i ne i m a gi ng ……………………………………………………………………………………………………………….. ………….. 23 2. 5 . 2 On line im agi ng ………………………………………………………. ……………………[…]
-
Страница 5
5 Copyright © Acronis International GmbH, 2002- 2014 7.3 Configuring Acronis PXE Server ………………………………………………………………………………….. 71 8 Creating a master image …………………………………………………………………………………… 73 8.1 Preparation of th e master opera[…]
-
Страница 6
6 Copyright © Acronis International GmbH, 2002- 2014 13 Managing deplo yment tasks (the Dep loyment tasks view) ……………………………….. 133 13.1 List of deploymen t tasks ………………………………………………………………………………………….. 133 13.2 Actions on deploy ment tasks ………………..[…]
-
Страница 7
7 Copyright © Acronis International GmbH, 2002- 2014 1 I n t r od u ci ng Ac ro n i s S n a p Dep lo y 5 1. 1 O ve rvi ew 1 . 1 . 1 W h a t i s A c r o n i s S n a p D e pl o y 5 Acronis Snap Depl oy 5 is a flexibl e, efficient soft ware solution for deploym ent of a fully c onfigured operating system (with or without applicati on software and any[…]
-
Страница 8
8 Copyright © Acronis International GmbH, 2002- 2014 Support for Win PE 5.0. Automatic switch to unicast if multicast fails durin g deploy ment is disabled. 1. 3 W ha t’s n ew i n A cro nis Sn ap De p l o y 5 Updated multicast protocol that enab les up to 5 times faster d eployment (co mpared to Acr onis Snap Deploy 4) to multiple[…]
-
Страница 9
9 Copyright © Acronis International GmbH, 2002- 2014 These ways of depl oyment are also known a s manual deployment and schedu led deploy ment. When the deploy ment is about t o start, the soft ware will tur n on the target mach ines with predefined MAC add resses by usin g the BIOS Wake- on -LAN (WOL) functionali ty. Machines in anoth er subnet c[…]
-
Страница 10
10 Copyright © Acronis International GmbH, 2002- 2014 The master image f or deployment can be located in a netw ork folder or on a re movable drive (such as a DVD) on the machine you are performing depl oyment t o. The image cann ot be located on the local hard disk of the machine, because deployment u suall y involves overwriting the contents of […]
-
Страница 11
11 Copyright © Acronis International GmbH, 2002- 2014 messes up the machine (for exa mple, deletes a file or chan ges configuration), the student c an choose a self-rest ore option from the boot m enu. 1 . 4 . 7 D e p l o y m e n t o f a d i s k v o l u m e a n d M B R You do not necessaril y have to depl oy the entire disk. Provided that the mast[…]
-
Страница 12
12 Copyright © Acronis International GmbH, 2002- 2014 1. 5 F ea tur e s o f A cro ni s Sn ap D ep l o y 5 1 . 5 . 1 L i s t o f m a c h in e s Acronis Snap Depl oy 5 provid es the Machines view (p. 128). This view c ontains a li st of all machines that you added for d eployment or that have ever bee n deployed. In this view, you can: View and […]
-
Страница 13
13 Copyright © Acronis International GmbH, 2002- 2014 1 . 5 . 4 S u p p o r t f o r t h e V HD f o r m a t In addition to using its own for mat for an imag e, Acro nis Snap Deploy 5 can perform depl oyment from a Virtual Har d Disk (VHD) file. Such file stores c ontents of one or more disks . It can be crea ted in Windows Server 2008 and Windows 7[…]
-
Страница 14
14 Copyright © Acronis International GmbH, 2002- 2014 1 . 5 . 8 S u p p o r t f o r m u l t i p l e n e t wo r k a d a p t e r s A machine license is bound to the machine’s net work adapter (als o known as ne twork interfa ce card, NIC). If the machine has more than one network adap ter, A cronis Snap Depl oy 5 ensures that only one license is a[…]
-
Страница 15
15 Copyright © Acronis International GmbH, 2002- 2014 1. 6 Su p p o rt ed o p er a t i ng s y st e ms fo r i magi ng a nd de plo yme nt Acronis Snap Depl oy 5 provid es full-featured imaging a nd deployment of the operating systems listed in the table that foll ows. For most operating s ystems, you can change settin gs such as the network na me th[…]
-
Страница 16
16 Copyright © Acronis International GmbH, 2002- 2014 Op era ti ng sy ste m Im a gi ng a nd de plo ym e n t C ha ngi ng se tti n gs Li cen se ty pe Windows 8.1 Enterpri se (x86, x64) (including Update 1) Yes Yes Workstation Windows 7 Home Basic (x8 6, x64) (No Service Pack or Serv ice Pack 1) Yes Yes Workstation Windows 7 Home Premium ( x86, x64) […]
-
Страница 17
17 Copyright © Acronis International GmbH, 2002- 2014 1. 7 Li ce ns ing po l icy Acronis Snap Depl oy 5 lice nsing is based on the number of machines (serv ers or workstati ons) that you deploy. For example, t o deploy a syste m on 100 machines, you need 100 lic enses. 1 . 7 . 1 M a c h i n e l i c e n s e s a n d d e p l o y m e n t l ic e n s e […]
-
Страница 18
18 Copyright © Acronis International GmbH, 2002- 2014 1. 8 U p gr a di ng to Ac ro ni s S na p D ep loy 5 To upgrade from Acr onis Snap Deploy 4 to Acronis Sn ap Depl oy 5, upgrade both the licens es and the software comp onents. 1 . 8 . 1 U p g r a d i n g l i c e n s e s To upgrade the lic enses of Acronis Snap Depl oy 4, obtain the necessary nu[…]
-
Страница 19
19 Copyright © Acronis International GmbH, 2002- 2014 1. 9 Te chn ica l Su ppo rt Maintenance and Suppor t Program If you need assistanc e with your Acronis produc t, please go t o http://www.acronis.co m/support/ Product Updates You can download the latest upd ates for all y our registered Acr onis software pro ducts from our website at any ti me[…]
-
Страница 20
20 Copyright © Acronis International GmbH, 2002- 2014 2 Un de r st an di ng Acr oni s S n ap Dep loy 5 This section describes the c omponents of the Acronis Snap Deploy 5 infrastru ctur e and their interaction. 2. 1 Te rmi nol o g y The following table lis ts the c ommon terms and descriptions used in this document. Master system The system to be […]
-
Страница 21
21 Copyright © Acronis International GmbH, 2002- 2014 Administrator The person who has rights t o manage the Acronis Sn ap Deploy 5 infrastructu re. User-initiated deployment m ode The mode when deploym ent can be initiated on t he side of the target machine. User The person on th e side of the target machine who starts th e user -initiated deploy[…]
-
Страница 22
22 Copyright © Acronis International GmbH, 2002- 2014 Acronis Snap Dep loy 5 Stand alone Utility is a bo otable component that enables fu lly-functional deployment with a GUI on a stand-alon e machine (a machine isolat ed from the network or included in a net work without Acr onis Snap Depl oy 5 infrastructure). The only way to load Acronis Sn[…]
-
Страница 23
23 Copyright © Acronis International GmbH, 2002- 2014 On USB and FireWire (I EEE-1394) st orage devices (har d drives, flash d rives) attac hed to the deployment server. On DVD+R/RW, DVD-R/RW, CD-R /RW, or recordable Blu-ray Dis cs (BD-R, BD-RE) l oaded in the media drive of the depl o yment ser ver. The best practice is keeping images on […]
-
Страница 24
24 Copyright © Acronis International GmbH, 2002- 2014 Create a bootable media (eith er an Acronis media or a WinPE-based media) with Acronis Snap Deploy 5 Master Image Crea tor. OR Install Acronis PXE Ser ver, connec t the console to the PXE server and upl oad Acronis Snap Deploy 5 Master Im age Creator. 4. Depending on y our choice in the[…]
-
Страница 25
25 Copyright © Acronis International GmbH, 2002- 2014 4. Connect the cons ole to the master s ystem, click Create image -> Next -> A master image . F ollow the instructions of the Master I mage Creator wizard to config ure and launch the imaging operation. The im age can be saved in a network folder, on detachable media (suc h as an USB driv[…]
-
Страница 26
26 Copyright © Acronis International GmbH, 2002- 2014 6. Select the machines, click Dep loy image on the t oolbar, and then f ollow the Cr eate Deploy ment Task Wizard instructi ons to configure an d launch the deploymen t operation. Whe n prompted about when you want to run the depl oyment, sel ect Now . Deployment that starts ma nually 2. 6 W ha[…]
-
Страница 27
27 Copyright © Acronis International GmbH, 2002- 2014 2 . 6 . 2 A c r o n i s U n i v e r s a l D e pl o y i n W i n d o ws Automatic HAL and m ass-storage drivers selection Acronis Universal Deploy searches the Windows default driver storage folders (in the master image being deployed) f or HAL and mass-storage device drivers and installs drivers[…]
-
Страница 28
28 Copyright © Acronis International GmbH, 2002- 2014 To revert to the original initial RAM disk, do any of the following: Rename the copy a ccordingly. For example, run a command similar to the following: mv initrd -2.6.16.60-0.21-de fault_acronis_backup .img initrd -2.6.16.60- 0.21 — default Specify the copy in the initrd line of the GRU[…]
-
Страница 29
29 Copyright © Acronis International GmbH, 2002- 2014 3 G et ti ng s t ar ted wi th A cr on i s S n a p Dep lo y 5 This section describes how to inst all Acronis Snap Deploy 5 and p erform a simple depl oyment. By following the pr ocedure s in this secti on, you will: a) Install and start Acronis Sn ap Deploy 5. b) Create a master image of a machi[…]
-
Страница 30
30 Copyright © Acronis International GmbH, 2002- 2014 4. Click Typical .[…]
-
Страница 31
31 Copyright © Acronis International GmbH, 2002- 2014 5. Click Add license , and then specify the lic ense keys. Y ou can type the license keys manually or import them fro m a text fil e. 6. Specify whether the machine will p articipate in the Customer Experience Pr ogram (CEP). 7. Click Install . Step 2. Starting Acroni s Snap Deploy 5 On the mac[…]
-
Страница 32
32 Copyright © Acronis International GmbH, 2002- 2014 When Acronis Snap Deploy 5 starts, the welco me screen app ears. Step 3. Creating a bootable m edia In this step, you will c reate a bootable media that enab les creating mast er images an d performing deployment. On the machine wher e you installed and started Acro nis Snap Depl oy 5, do the f[…]
-
Страница 33
33 Copyright © Acronis International GmbH, 2002- 2014 2. In the list of comp onents, select A cronis Snap Deploy 5 Agent and A cronis Snap Deploy 5 Master Image Creator . 3. In Network setting s , in Server name /IP , specify the n ame of the machine wher e you installed Acronis Snap Depl oy 5. 4. Choose to create th e medi a on a CD or DV D. Inse[…]
-
Страница 34
34 Copyright © Acronis International GmbH, 2002- 2014 1. Make sure that th e CD or DVD driv e has a high er boot priority than the hard disk drive. You may need to open th e BIOS setup utility of the machine and adju st the boot priorit y setting, si milarly to what is shown in th e following pictur e. 2. Attach the USB hard dis k drive to the mac[…]
-
Страница 35
35 Copyright © Acronis International GmbH, 2002- 2014 5. In the pop-up wind ow, click Cancel or wait until tha t window closes. 6. Select the volumes that yo u want to include in the master i mage. You can lea ve the defaul t selection, which nor mally inclu des the volumes that contain th e operating s ystem. 7. Specify a folder on the USB hard d[…]
-
Страница 36
36 Copyright © Acronis International GmbH, 2002- 2014 Acronis Snap Depl oy 5 starts creating the image. After the image is cr eated, the machine will rest art. Step 5. Performing depl oyment In this step, you will d eploy the created master image to a single machine ( the targ et machine). Tip: For getting started, we recommend performing de ploym[…]
-
Страница 37
37 Copyright © Acronis International GmbH, 2002- 2014 3. On the boot menu, click Acronis Snap Deploy 5 Agent . 4. In the pop-up wind ow, click Cancel or wait until tha t window closes. 5. Make sure that th e machin e is ready for depl oyment. The window should l ook similar t o the following picture. Details. The target machine bec omes ready f or[…]
-
Страница 38
38 Copyright © Acronis International GmbH, 2002- 2014 connect to the ser ver, you may need to adjust ne twork set tings, as describ ed in “Booting the target machines ” (p. 112). After the targe t machine is ready, you can depl o y the master image to i t. Deploying the master image On the machine wher e you install ed Acronis Snap Deploy 5, d[…]
-
Страница 39
39 Copyright © Acronis International GmbH, 2002- 2014 Note. If you imag ed a machin e running a workstati on operating system (such as Windows 7) but you only have ser ver licenses (such as Acronis Snap Deploy 5 for Server – Trial Li cense), y ou may want to allow the software to use this type of licens e to deploy the machine. T o do so, clic k[…]
-
Страница 40
40 Copyright © Acronis International GmbH, 2002- 2014 9. Select the deploymen t template y ou created, and then click Next . 10. When asked about when t o run the deploy ment, select Now and type the user n ame and password that y ou use to log on to Windows. 11. Keep clicking Next until the sum mary window appear s. Cli ck Create in that wind ow.[…]
-
Страница 41
41 Copyright © Acronis International GmbH, 2002- 2014 You can view the pr ogress of the depl oyment both on the machine where you in stalled Acr onis Snap Deploy 5 and on the target machine. Viewing the deploy ment prog ress on the mach ine with Acronis Snap Deploy 5 Viewing the deploy ment prog ress on the target machin e What you can do next In […]
-
Страница 42
42 Copyright © Acronis International GmbH, 2002- 2014 To run the deploy ment again , open the Deployment tasks view, sele ct the task you created, and then click Run on the toolbar. For details about the Deploymen t tasks view, see “Managing deployment tasks” ( p. 133). To add more ma chines, open the Ma chines view and then click Add […]
-
Страница 43
43 Copyright © Acronis International GmbH, 2002- 2014 4 I n st al l at i o n of A c r on i s Sn ap De pl oy 5 4. 1 Su p p o rt ed o p er a t i ng s y st e ms This section lists th e operating syste ms where comp onents of Acr onis Snap Depl oy 5 can be installed. It does not matter which Service Pack (if any) is install ed in the opera ting syste […]
-
Страница 44
44 Copyright © Acronis International GmbH, 2002- 2014 4. 2 Sy s t e m r equ i re m e nt s Components for Wind ows Co mpo n en t Di sk s pa ce re qui r ed du r i ng ins tal l ati on or up d a t e Di sk s pa ce oc cupi ed by t he c ompo nen t(s ) A dd i ti onal Complete installatio n 1554 MB 777 MB Management Console 1326 MB 663 MB CD -R/RW, DVD -R/[…]
-
Страница 45
45 Copyright © Acronis International GmbH, 2002- 2014 UDP port: 67, 6 8, 69 Broadcast address : 255.25 5.255.255 For a remote installa tion (p. 52 ), the TCP port 25001 is used. If you are using a firewall, you may need to set the appropria te access options. 4. 4 Ty pi ca l in st all ati o n With typical installati on, all comp onents of […]
-
Страница 46
46 Copyright © Acronis International GmbH, 2002- 2014 You may want t o use custom installa tion in the f ollowing cases: Installing Acronis Snap Deploy 5 Management Agent to take a master image of a machin e without restarting it (p. 24 ) or to enable online depl o yment on the machine (p. 115). Installing Acronis Wake- on — LAN Proxy t o […]
-
Страница 47
47 Copyright © Acronis International GmbH, 2002- 2014 4 . 5 . 2 C o m m o n i n s t a l l a t io n c o n f i g u r a t i o n s Acronis Snap Depl oy 5 com ponents can be ins talled in various configurations, to distrib ute various components and f eatures among the machines on the netw ork. a) The minimal configurati on that enables onl y offline i[…]
-
Страница 48
48 Copyright © Acronis International GmbH, 2002- 2014 We recommend tha t you c reate a master imag e by us ing the bootable compone nt called Acronis Snap Deploy 5 Master Image Crea tor. Nevertheles s, having at lea st one manage ment agent on the network (not n ecessarily on the master machin e) makes sens e. You will be able to validat e (check)[…]
-
Страница 49
49 Copyright © Acronis International GmbH, 2002- 2014 Wake- on -LAN Proxy The list of components 4. 5. 3.1 In sta ll at ion of A c r on is Sna p D ep loy 5 Man ag e m e n t C o n s o le Acronis Snap Dep loy 5 Man agement Console is an ad m inistrati ve tool for local a nd remote access to Acronis servers and Acr onis Sn ap Deploy 5 Manag ement[…]
-
Страница 50
50 Copyright © Acronis International GmbH, 2002- 2014 Note: If you have already installed a license server that came with another Acronis product, you will still ne ed to install Acronis Snap De ploy 5 License Server. You ca n install both license servers on t he same machine. The machine will the n act as a common license se rver for all Acronis […]
-
Страница 51
51 Copyright © Acronis International GmbH, 2002- 2014 Acronis PXE Server s tarts runn ing as a service i mmediately a fter installati on. It will automatically launch at each sys tem restart. Y ou can stop and start thi s service in the sa me way as other services. 4. 5. 3.5 In sta ll at ion of A c r on is Wa k e- on — L A N Pr oxy Acronis Wake- o[…]
-
Страница 52
52 Copyright © Acronis International GmbH, 2002- 2014 4. 6 O t he r w ays of i nst all ati o n 4 . 6 . 1 I n s t a ll i n g c o m p o n e n t s r e m o t e ly By using Acronis Sn ap Depl oy 5 Management Console, you can install the foll owing compon ents of Acronis Snap Depl oy 5 remotel y: Acronis Snap Depl oy 5 Man agement Agent Acronis […]
-
Страница 53
53 Copyright © Acronis International GmbH, 2002- 2014 4. 6. 1.2 In sta ll at ion p r oc edu r e To i ns ta ll a c om po ne n t o f Ac ro n is Sn ap Dep l o y 5 r em ot e ly 1. Start Acronis Snap Deploy 5 Manag ement Cons ole. 2. On the Tools menu , click Install components remotely . 3. Select the location fr om which the installa tio n pac kages […]
-
Страница 54
54 Copyright © Acronis International GmbH, 2002- 2014 An upgrade license key enables y ou to continue using a license ke y for the previ ous version (“ old” license key). The old licens e key cannot b e reassigned to a different machine. You need at least on e license key f or Acronis Snap Deploy 5 (n o matter which t ype) to be able to upgrad[…]
-
Страница 55
55 Copyright © Acronis International GmbH, 2002- 2014 2. Click Install Acronis Snap Deplo y 5 . 3. Do one of the foll owing: To uninstall all c omponents, click Remove . To uninstall individu al components, click Mo dify , and then clear the check boxes for th e components that y ou want to uninstall. 4. Proceed with the un installation. D[…]
-
Страница 56
56 Copyright © Acronis International GmbH, 2002- 2014 5 Us i n g Ac ron i s S na p D epl oy 5 M a n ag eme nt C on sol e 5. 1 C o nn e ct ing to a m a c hi ne 5 . 1 . 1 C o n n e c t t o a l o c a l m a c h i n e When started, Acr onis Snap Depl oy 5 Manage ment Consol e connects to th e local machine if there is a manageable c omponent of Acr oni[…]
-
Страница 57
57 Copyright © Acronis International GmbH, 2002- 2014 To c o nn ec t t o a c omp one n t 1. On the Connect menu, clic k Connect . 2. In Machine , specif y the name or IP address of the ma chine where the c omponent is in stalled. To open the list of ma chines on your network, click Browse . 3. In User name and Pa ssword , specify the user na me an[…]
-
Страница 58
58 Copyright © Acronis International GmbH, 2002- 2014 5. 2 B ro wsi ng l og s Acronis Snap Depl oy 5 OS Deploy Server and Acronis PXE Server store the log of the operati ons they have performed. Th e v ie w t he log of Ac r o ni s S na p D epl o y 5 OS D ep lo y S e r ve r 1. Connect the manage ment cons ole to the machine with Acronis Snap Deploy[…]
-
Страница 59
59 Copyright © Acronis International GmbH, 2002- 2014 6 Us i n g Ac ron i s S na p D epl oy 5 Li ce n s e S e rv er This section contain s general infor mation necessary for understandin g Acronis Snap Deploy 5 Licens e Server and covers operation s with licenses. 6. 1 U nd ers tan d i ng Ac ro ni s Sna p De p lo y 5 Li c e ns e S e r ve r Acronis[…]
-
Страница 60
60 Copyright © Acronis International GmbH, 2002- 2014 4. In the Add Licen ses window, type th e license k ey or the path t o a .txt or .eml file containin g the license keys; or, you can br owse to the file. 5. Click Add . Acronis Snap Deploy 5 License Server perf orms the operati on and reports the number of newly-added licenses. The license serv[…]
-
Страница 61
61 Copyright © Acronis International GmbH, 2002- 2014 This will display all licens e keys availab le on Acronis Snap Depl oy 5 License Ser ver. One license key can corresp ond to multip le licenses. The license server contain s 10 server licenses and five workstation license s 3. Right-click the c olumn hea dings bar to cho ose the detail s to dis[…]
-
Страница 62
62 Copyright © Acronis International GmbH, 2002- 2014 LicenseSe rverCmdLi ne — import-f ile <serve r name> <file n ame> In this command: <server n ame> is the name of the machine wher e Acronis Snap Deploy 5 License Server is installed. <file nam e> is the name of the .t xt or .eml fil e with the licens e keys. For[…]
-
Страница 63
63 Copyright © Acronis International GmbH, 2002- 2014 Shows usage infor mation.[…]
-
Страница 64
64 Copyright © Acronis International GmbH, 2002- 2014 7 D ep loy me n t too l s Before deploy ment, each t arget machine must boot in to a dedicated bo otable component of Acr onis Snap Deploy 5. An e xample of such component is Acro nis Snap Deploy 5 Ag ent. The machine can boot into the component in eith er of these ways: From a physical med[…]
-
Страница 65
65 Copyright © Acronis International GmbH, 2002- 2014 7 . 2 . 1 A c r o n i s b o o t a b l e m e di a Acronis bootable media is a ph ysical media (CD , DVD, USB flash dri ve, or other media support ed by the machine’s BIOS as a boot devic e) that contai ns bo otable comp onents of Acron is Snap Deploy 5. Acronis Snap Depl oy 5 bootable media su[…]
-
Страница 66
66 Copyright © Acronis International GmbH, 2002- 2014 No autostart : The A cronis loader will d isplay the b oot menu and wait for some one to select whether to boot the operating syst em or one of the Acronis c omponents. Start operating system : The ope rating system, if pres ent on the b ooting machin e’s hard disk, will start after t[…]
-
Страница 67
67 Copyright © Acronis International GmbH, 2002- 2014 If not configured in either way, the depl oyment ser ver will be found aut omaticall y. The agent will start the search aft er the n umber of second s you specify in Timeou t (sec) . Settings for Acronis Snap Deploy 5 Agent The option to sa ve the agent’ s log to the deployment server is desi[…]
-
Страница 68
68 Copyright © Acronis International GmbH, 2002- 2014 selecting a bootable component. N o password is requ ired to start the operating system on the machine. Protecting the bootable components with a passwo rd 9. Click Cr eate . After you create the disc, mark it and keep it in a saf e place. Note: Componen ts on an Acronis bootable m edia are bas[…]
-
Страница 69
69 Copyright © Acronis International GmbH, 2002- 2014 7. 2. 2.1 C om pon en t s in clu ded i n t he b oot ab l e m e d ia Each WinPE-based b ootable medi a contains the f ollowing bootable co mponents (p. 64 ): Acronis Snap Dep loy 5 Agent Acronis Snap Dep loy 5 Master Image Creator Acronis Snap Dep loy 5 Command-Line Utility 7. 2. 2.2[…]
-
Страница 70
70 Copyright © Acronis International GmbH, 2002- 2014 http://www.micr osoft.com /downloads/details.a spx?F amilyID=94bb6e3 4-d890-4932-81a5-5b50c 657de08&Display Lang=en Automated Installa tion Kit (AIK) for Wind ows 7 (PE 3. 0): http://www.micr osoft.com /downloads/details.a spx?familyid =696DD66 5-9F76-4177-A811-39C26 D3B3B34&displa ylan[…]
-
Страница 71
71 Copyright © Acronis International GmbH, 2002- 2014 6. Select how you wan t to cre ate the bootabl e media. If you want t o create a physical media, select ISO image . The softwar e will creat e an ISO file that you can later burn to a DV D or write to a USB driv e. If you want t o upload the bootabl e components to Acronis PXE server, s[…]
-
Страница 72
72 Copyright © Acronis International GmbH, 2002- 2014 When creating an Acr onis bootabl e media (p. 65 ) or a WinPE-bas ed bootable media (p. 68 ). When creating a b ootable media f or user-initiated d eployment (p. 1 20). Alternatively, you can use direct server c onfiguration, as follows. To p e r fo rm a d irec t c on fig ur ati on of t[…]
-
Страница 73
73 Copyright © Acronis International GmbH, 2002- 2014 8 C r e at ing a m as t e r i m ag e To be able to deplo y a syst em, you need to create the desired system configuration and then to save an image of the syst em’s hard disk or volu me to a network fold er, detachable media (such as a USB drive) or removable media (such as a DVD). This secti[…]
-
Страница 74
74 Copyright © Acronis International GmbH, 2002- 2014 By using a bootabl e media (either Acronis media or W inPE-based media) with Acronis Sn ap Deploy 5 Master Im age Creator, or b y using the c ommand-line utility in a WinPE-based bo otable media. This type of imaging is called offline i maging . This section describes imagin g with Acronis […]
-
Страница 75
75 Copyright © Acronis International GmbH, 2002- 2014 The boot menu app ears on the master machine. The boot menu on the mast er machine 5. In the boot menu, cli ck Acronis Sna p Deploy 5 Master Image Creato r . 6. The master image cr eator establi shes a networ k connection to be able t o save th e image in a network folder. A dial og bo x appear[…]
-
Страница 76
76 Copyright © Acronis International GmbH, 2002- 2014 The manual config uration is needed if automatic c onfiguration is n ot possible (no DHCP server on the network) or d oes not su cceed. To configure the network conne ctions manu ally, click OK in the prompt windo w. Acronis Snap Deploy 5 Master Imag e Creator con figuration : network setting s[…]
-
Страница 77
77 Copyright © Acronis International GmbH, 2002- 2014 Windows 7 and Wind ows Server 2008 R2 place the loader on a hidde n volume called System Reserved . If your operating system an d its loader reside on different volumes , always include both vo lumes in the image. A volume with the loader is usually marked as the a ctive volume and is shown wit[…]
-
Страница 78
78 Copyright © Acronis International GmbH, 2002- 2014 Select the image l ocation in the de vice tree. In File na me , type the file na me of t he image. To generate a file na me that is unique in the s elected l ocation, click Generate a na me for the fi le . Note: Acronis boo table media uses NetBIOS ne tworking protocol to resolve Ac ronis Snap […]
-
Страница 79
79 Copyright © Acronis International GmbH, 2002- 2014 A higher compres sion level may lead to a smaller size of the imag e, but creating t he image will take longer. The defaul t Normal lev el is recommended in most case s. Selecting the data co mpression level Process priority This option is avail able only for online i maging (p. 73 ). The prese[…]
-
Страница 80
80 Copyright © Acronis International GmbH, 2002- 2014 The priority of an y process running in the opera ting syste m determines th e amount of CPU usage and system res ources alloc ated to that pr ocess. Decreasin g the image cr eation pr iority will free more resources f or other p rograms. Increasing the i mage creation pri ority could speed up […]
-
Страница 81
81 Copyright © Acronis International GmbH, 2002- 2014 Alternatively, you can click Always , into the file s of fixed size and type the desired file size or select it from the list. The i mage will then b e split into multiple fil es of the spe cified size. This comes in handy wh en creatin g an image that you plan to burn to multiple discs lat er […]
-
Страница 82
82 Copyright © Acronis International GmbH, 2002- 2014 After you click Next , th e sum mary of the imagin g procedure appears. Ch eck the setting s and then click Proceed . The imaging opera tion starts and its progress is d isplayed. Acronis Snap Deploy 5 is taking the master image[…]
-
Страница 83
83 Copyright © Acronis International GmbH, 2002- 2014 9 Va li d a ti n g a mas ter i m ag e You can ensure that the master i mage is not da maged by valida ting it. To v a li d a t e a ma s te r im ag e 1. Start Acronis Snap Deploy 5 Managem ent Console. 2. Connect the manage ment cons ole to a machine where Acronis Snap Deploy 5 Management Agent […]
-
Страница 84
84 Copyright © Acronis International GmbH, 2002- 2014 10 D ep loy ing a mas ter i m ag e This section describes how to depl oy a master i mage t o one or more machines. Caution: Deployme nt to a machine invo lves deleting some or all data that is currently stored on that mac hine. Make sure that yo u are performing deployment to the correct machin[…]
-
Страница 85
85 Copyright © Acronis International GmbH, 2002- 2014 10 .3 De plo yme nt t em pl at e s A deployment t emplate is a set of configuration para meters of th e deployment operation. Th ese parameters include : A path to the master image . The operation mod e (multicast or unicast, how t o handle the target disk fre e space, and s o on). […]
-
Страница 86
86 Copyright © Acronis International GmbH, 2002- 2014 On DVD+R/RW, DVD-R/RW, CD-R /RW, or recordable Blu-ray Dis cs (BD-R, BD-RE) l oaded in the media drive of the depl o yment ser ver. The best practice is keeping images on the depl oyment server’s hard disk. This minimizes network traffic during deplo yment. The image created on removable […]
-
Страница 87
87 Copyright © Acronis International GmbH, 2002- 2014 10 .3 .1 .2 D is k a nd v ol ume se lec t io n If the image contains more than one disk, sp ecify the disk that you want t o deploy, and then clic k Next . You can selec t only one disk. Selecting a disk fro m the master imag e[…]
-
Страница 88
88 Copyright © Acronis International GmbH, 2002- 2014 If the disk y ou selected con tains more than one volume, specif y the volumes that yo u want to deploy. You can select one or more v olumes. Selecting disk volume s to deploy The further steps will depe nd on how many v olumes you sel ect. If you deploy only o ne volume, it is assu med tha[…]
-
Страница 89
89 Copyright © Acronis International GmbH, 2002- 2014 settings is support ed (p. 15 ). You always can specif y general se ttings such as the disk to perf orm the deployment to. These settings can be overrid den by individual setting s (p. 131) for a machine. On li n e dep loy men t This setting deter mines how to depl oy the mas ter image t o the […]
-
Страница 90
90 Copyright © Acronis International GmbH, 2002- 2014 If selected and Acr onis Snap Depl oy 5 Manage ment Agent is n ot installed in the system that th e master image c ontains, the manag ement agent will be installed on a t arget machi ne after the master image is deployed to it. Having the manage ment ag ent installed on a ma chine enables the o[…]
-
Страница 91
91 Copyright © Acronis International GmbH, 2002- 2014 Replace volume : Only the volume with the select ed number will be deleted. If the target disk contains only on e volume, the entir e disk space (including the currentl y unalloca ted space) will be available for the volume you are deploying. Otherw ise, only th e space that was occupied by[…]
-
Страница 92
92 Copyright © Acronis International GmbH, 2002- 2014 Example 2. You ar e deployin g a single 100-GB volu me. In Target di sk layout , you select ed to replace the second (250-GB) volume on the targe t disk. In this ca se, the size of the deployed volume will be 25 0 GB. The first volume on the targ et disk will re main intact. Example 3. You ar e[…]
-
Страница 93
93 Copyright © Acronis International GmbH, 2002- 2014 The preset is: Th e same name and membership as those of the machine in the m aster image By default, all depl oyed machines will ha ve the sa me name as th e machine in the master i mage. Alternatively, you can speci fy a name pattern for the machines. Specify whether the machine will b e a me[…]
-
Страница 94
94 Copyright © Acronis International GmbH, 2002- 2014 For example, the pattern {1,5} generates the names 1 , 2 , 3 , 4 , and 5 . Similarly, th e pattern {8,5} generates the na mes 8 , 9 , 10 , 11 , and 12 . Make sure that th e value of count is big en ough. If the nu mber of target ma chines exc eeds count , deployment to the remainin g machines w[…]
-
Страница 95
95 Copyright © Acronis International GmbH, 2002- 2014 Each machine will b e assigned an IP addr ess fro m the range. Make sure that the range is big enough. If there are more targ et machines than IP addresses in the range, depl oyment t o the remaining machin es will fail. TCP/IP properties If you have not sel ected to p reserve the net work sett[…]
-
Страница 96
96 Copyright © Acronis International GmbH, 2002- 2014 S ec ur i ty id ent if i er s This setting determin es whether Acr onis Snap Deploy 5 will gen erate unique secu rity identifiers (SIDs) for the targ et machin es. The preset is: Gen erate a un ique SID for each targ et m achine Generating unique SID s should nor mally be enabled. We recom mend[…]
-
Страница 97
97 Copyright © Acronis International GmbH, 2002- 2014 Each file must be l ocated in a network f older. When ad ding the file, sp ecify the credentia ls to the network folder. The destination of each file must be on one of the volu mes you are deplo ying. To run the file after it is tran sferred, select the Run the file on tar get machines c heck b[…]
-
Страница 98
98 Copyright © Acronis International GmbH, 2002- 2014 Multicast configu ration has a parameter that specifie s the time to live (TTL) for multicast packets. Use this parameter to limit multicas t packets dis tribution via gate ways. The default value is 15. In practice, this enables the packets to pass up to 1 5 hops which may be treated as an unl[…]
-
Страница 99
99 Copyright © Acronis International GmbH, 2002- 2014 Stop deployment o therwise Specifying licensing settings Based on your selecti on, the softwar e will use a deployment licens e (which enabl es a single successful deploym ent) or a machine license (which enables an un limited numb er of depl oyments to a machine). Based on the operating sy[…]
-
Страница 100
100 Copyright © Acronis International GmbH, 2002- 2014 c) Deployment ser ver license d) Machine server licens e If you change th e second setting fr om Use a machine license automati cally to Stop de ployment , the software will use only deploy ment licenses. The software will use the following priority : a) Deployment workstation li cense b) Depl[…]
-
Страница 101
101 Copyright © Acronis International GmbH, 2002- 2014 The software will fin d the most suit able drivers of all available drivers and install them into the deployed system. H owever, the dri ver defined by the user will ha ve the priority. I t will be installed, with app ropriate warni ngs, even if the s oftware finds a be tter driver. In Linux, […]
-
Страница 102
102 Copyright © Acronis International GmbH, 2002- 2014 10 .3 .1 .5 S u m ma ry w in do w Check your settin gs in the s ummary window , and then click Save . The summary window 1 0. 3 . 2 C o n f i g u r i n g d e f a u l t d e p l o y m e n t s e t t in g s In the Default Dep loyment Settings wind ow, you can specify the valu es that will be used […]
-
Страница 103
103 Copyright © Acronis International GmbH, 2002- 2014 The preset is: Extend or re duce the volum es being deployed, according t o the available space on the target disk Machine name an d membe rship (p. 92 ) The preset is: Th e same as of the master sy stem TCP/IP properties (p. 94 ) The preset is: Th e network setting s of the master sys[…]
-
Страница 104
104 Copyright © Acronis International GmbH, 2002- 2014 In addition, you can run any deplo yment task manuall y from the Dep loyment tas ks view (p. 133). A deployment tas k runs ac cording to a deploym ent template (p. 85 ). When cr eating the task, you can create a deployment templ ate or specify an existing on e. 1 0. 4 . 1 P r e r e q u i si t […]
-
Страница 105
105 Copyright © Acronis International GmbH, 2002- 2014 MAC addresses for bar e metal are usually supplied b y the hard ware manufactur er. You can ge t the MAC address of any PC-compatible hard ware by en tering the network configuration menu of any Acronis bootable c ompone nt, such as Acronis Snap De ploy 5 Master Im age Creat or. An administrat[…]
-
Страница 106
106 Copyright © Acronis International GmbH, 2002- 2014 Upload a Preinstall ation En vironment (PE) i mage to th e PXE server by clicking Upload PE image to PXE . For information abou t creating a PE image (a WI M file), see “Adding Ac ronis Snap Deploy 5 c omponents to WinPE” (p. 70 ). When uploading th e agent or the P E image: Set St[…]
-
Страница 107
107 Copyright © Acronis International GmbH, 2002- 2014 10 .4 .2 .2 C r ea tin g t h e dep l o y m en t ta sk When the deploy ment is about t o start, Acronis Snap Deplo y 5 OS Depl oy Server wakes up the turned-off target machines in the list you spe cify. The machines turn on, boot int o Acronis Snap Deploy 5 Agent fro m the PXE ser ver, and c on[…]
-
Страница 108
108 Copyright © Acronis International GmbH, 2002- 2014 (p. 70 ). This is beca use choosing a default boot m enu option is not available in this case. You need to create a PE image first (u sing the WIM image sett ing), and then upload the PE image to the PXE server (p. 71 ). 7. If the machines are l ocated in a different subnet than the deploym en[…]
-
Страница 109
109 Copyright © Acronis International GmbH, 2002- 2014 Stop without perf orming deploy ment to any machine. The t ask will start at its next scheduled time and will again begin waitin g for the readine ss of all machines. Start condition for deployment 12. Review the task summary, and then click Create to create and save the tas k. The task ap[…]
-
Страница 110
110 Copyright © Acronis International GmbH, 2002- 2014 Install the PXE ser ver in Subnet 1. Enab le this PXE ser ver to also work in Sub net 2 by configuring the ne twork switch t o relay the PXE traffic. The PXE server’s IP addresses are configured on a per-int erface basis using IP helper fun ctionality in th e same way as DHCP server addr[…]
-
Страница 111
111 Copyright © Acronis International GmbH, 2002- 2014 3. In the welcome scr een, click Deploy ima ge . If prompted, specif y the machin e where Acronis Sn ap Deploy 5 OS Depl oy server is installed. 4. In Deploy to , select Any machines read y for deploy ment . 5. Select the conditi on that trig gers the deploym ent: Specify the numb er of ma[…]
-
Страница 112
112 Copyright © Acronis International GmbH, 2002- 2014 As soon as the trig gering condition ari ses, the a vailable ma chines become engaged in the deployment, and their state changes to Running . 1 0. 4 . 4 B o o t i n g t h e t a r g e t m a c h i n e s You need to manuall y boot the targ et machines into Acronis Sn ap Depl oy 5 Agent in the f o[…]
-
Страница 113
113 Copyright © Acronis International GmbH, 2002- 2014 4. [Optional.] Choos e whether you want to config ure the agent. The agent configura tion includes the network setting s and t he address of Acronis Sn ap Deploy 5 OS Deploy Ser ver. A dialog b ox comes up suggestin g that you c onfigure the agent. To load the agent with the defaul t configura[…]
-
Страница 114
114 Copyright © Acronis International GmbH, 2002- 2014 Note: Acronis boota ble media uses Ne tBIOS networking protocol t o resolve Acronis Snap Deploy 5 OS Deploy Server in a n etwork. NetBIOS protocol u ses ANSI characters for host names. So , machines that have non -English characters in th eir names cann ot be accessed from Acronis boo table me[…]
-
Страница 115
115 Copyright © Acronis International GmbH, 2002- 2014 Acronis Snap Deploy 5 Agent: read y for deployment 1 0. 4 . 5 C o n f i g u r i n g o n l i n e d e p l o y m e n t Online deployment is possible only t o a specified list of machines (p. 104) that ru n Windows and are turned on before a d eploy ment task starts. To c o nf igu re o nli ne de p[…]
-
Страница 116
116 Copyright © Acronis International GmbH, 2002- 2014 1 0. 4 . 7 D e p l o y m e n t b e h i n d a n N A T d e v i c e Successful depl oyment is not guaran teed if A cronis Snap Depl oy 5 OS Deplo y Server and the ta rget machines are separ ated by a Netw ork Address Tr anslation (NAT) de vice. A typical router usually acts as an NAT device. All […]
-
Страница 117
117 Copyright © Acronis International GmbH, 2002- 2014 Note: Acronis Snap De ploy 5 Standalone Utility ca n be placed on a physical media only. This component is not designed to boot from a PXE server or from a WinPE -based b ootable media. The Acronis stand-a lone compon ents to be placed on the bootable medi a 3. Configure the master system. 4. […]
-
Страница 118
118 Copyright © Acronis International GmbH, 2002- 2014 10 .6 U s er — i ni tia ted de plo yme nt ( c us t om d ep l o ym e nt ) Acronis Snap Depl oy 5 can be configured in such a way that users will be abl e to depl oy and re -deploy their ma chines with one click on the boot menu. User-initiated deplo yment is also call ed custom d eployment. 1 0[…]
-
Страница 119
119 Copyright © Acronis International GmbH, 2002- 2014 In software testing labs , the choi ces can be vari ous operating sys tems, vari ous editions of th e same operating system, or the sa me operating sys tem with various setting s or applicati ons. In a universit y or school lab, the ch oices can be various exer cises that students have t o exp[…]
-
Страница 120
120 Copyright © Acronis International GmbH, 2002- 2014 If you need to perfor m both user-initiated d eployment and deployment throug h a deplo yment task, you can use the PX E server for the former an d bootable m edia for the latt er. Alternatively, you can use another Acronis Sn ap Deploy 5 OS D eploy Server to perform depl oyment through deploy[…]
-
Страница 121
121 Copyright © Acronis International GmbH, 2002- 2014 3. Create the deploy ment templates (p. 85 ) acc ording to your organization’ s needs. Assign to each template a name that can be easily understood by the users. Select one or mor e templates to be added to the bo ot menu. Adding templates to the boot menu 4. Select how to display the boot m[…]
-
Страница 122
122 Copyright © Acronis International GmbH, 2002- 2014 6. Review the operati on summary and then click S witch on to proceed. The softwar e creates the media with the cust om boot menu. Acronis Snap Deploy 5 OS Deploy Ser ver switches to th e user-initiated depl oyment mod e. Acronis Snap Deploy 5 OS Deploy Se rver in the user-init iated deploymen[…]
-
Страница 123
123 Copyright © Acronis International GmbH, 2002- 2014 The user who reques ted deployment sees the foll owing screen whil e the depl oyment is in pr ogress. User-initiated deplo yment i n progress: view on the target mach ine ’s side 1 0. 6 . 4 C h a n gi n g p a r a m e t e r s o f t h e u s e r — i n i t i a t e d d e p l o y m e n t m o d e T[…]
-
Страница 124
124 Copyright © Acronis International GmbH, 2002- 2014 10 .7 De plo yin g B IOS- ba se d s ys t em s t o U EFI — b a s ed a nd vi ce ver s a Acronis Snap Depl oy 5 supports transferring 64-bit Windows opera ting systems b etween BIOS-based hardware and hardw are that support s Unified Extensi ble Firmware Int erface (UEFI ). How it works Depending[…]
-
Страница 125
125 Copyright © Acronis International GmbH, 2002- 2014 All other operating systems are n on-convertible. Source and ta rget disk partition s tyle : MBR or GP T. System and b oot volume s of BIOS platf orms use MBR disks. Syst em and boot volumes of UEFI platforms use GPT disks. When selecting a n on-initializ ed target disk for deplo yment, th[…]
-
Страница 126
126 Copyright © Acronis International GmbH, 2002- 2014 Or igi nal s ys tem Ta rge t h ar dwa re BIOS Disk: MBR BIOS Disk: GPT UEFI Disk: MBR UEFI Disk: GPT UEFI OS: non- convertible Solution Deploy the operating system to a GPT disk or to an un initialized disk. mode in BIOS. 2. Perfor m the deployment under the bootable media. or After deployment[…]
-
Страница 127
127 Copyright © Acronis International GmbH, 2002- 2014 Or igi nal s ys tem Ta rge t h ar dwa re BIOS UEFI BIOS OS: non- convertible The target disk will b e initialized as the source on e (MBR). The target mach ine must support BIOS. Additional steps 1. Turn o ff the UEFI mode in BIOS. 2. Boot from a bootable media, an d perform the deployment. UE[…]
-
Страница 128
12 8 Copyright © Acronis International GmbH, 2002- 2014 11 Ma nag in g th e l i s t of m ac hi nes ( t h e M a ch i n es v i ew ) The Machines vi ew shows a list of machines for which you can set up deployment by usin g Acronis Snap Deploy 5 OS Deploy S erver. A machine is deter mined by the MAC address of its network adap ter. A MAC add ress is a[…]
-
Страница 129
129 Copyright © Acronis International GmbH, 2002- 2014 Tip: Make sure that yo u specify the MAC address correctly. Any set of six hexadecimal n umbers is recognized as a valid MAC address of a machine, e ven if a network adapter with that a ddress does not actually exist. 11 .2 G ro ups of ma ch ine s Using groups helps you to organiz e the list o[…]
-
Страница 130
130 Copyright © Acronis International GmbH, 2002- 2014 Set label : Sets th e label that is sh own in the Machine c olumn. For exa mple, you c an use the network name of the machin e as the label. If no label is provided, the Machine c olumn shows the MAC address of the machi ne. 11 .4 St at es a nd re sul t s for ma c hi ne s The State column […]
-
Страница 131
131 Copyright © Acronis International GmbH, 2002- 2014 12 I n di vid u a l d ep l oy me n t set ti ng s By using individual se ttings for a machine, you can ove rride one or more deployment setting s (p. 88 ) of a deployment t emplate. Example. You creat ed a dep loyment template to perform deplo yment to 1 00 machines. For one of those machines, […]
-
Страница 132
132 Copyright © Acronis International GmbH, 2002- 2014 User accounts (p. 95 ) Security identif iers (p. 96 ) Action after deploy ment (p. 96 ) Online deployment (p. 89 ) Licensing (p. 98 ) By selecting the Use machi ne license check box, you force usin g a machine licens e for the machine, even if th e template pres cribes usin[…]
-
Страница 133
133 Copyright © Acronis International GmbH, 2002- 2014 13 Ma nag in g d epl oy m e n t tas ks (t h e De pl oym en t ta sks v i e w) The Deployment task s view c ontains the list of deployment tasks (p. 1 03) that you pre viously created on Acronis Snap Deploy 5 OS Depl oy Server. To o pe n t he D e p lo yme nt ta sks v ie w 1. Start Acronis Snap D[…]
-
Страница 134
134 Copyright © Acronis International GmbH, 2002- 2014 Run : Starts the selec ted task. The task will wai t for ma chines to become r eady and then will perform deploy ment to them. Stop : Stops the s elected task. The machines wh ose deployment finished by the ti me you stop th e task remain depl oyed (the last result (p. 130 ) for such m[…]
-
Страница 135
135 Copyright © Acronis International GmbH, 2002- 2014 14 C om ma nd -li ne mo d e an d scr i p ti ng u nde r W in P E Having booted a machine in Win dows Preinstallati on Environ ment (WinPE), the administrator c an perform imaging or deploy ment in the com mand-line mode or execute scripts. Acronis Snap Depl oy 5 Com mand-Line Utility is includ […]
-
Страница 136
136 Copyright © Acronis International GmbH, 2002- 2014 deploy Deploys disks and volumes, including the master boot record (MBR), from an image /filename: <file name> /password: <password> /net_user: <user name> /net_password: <password> /oss_numbers /reboot /shutdown /log: <file name> /log_net_user: <remote user>[…]
-
Страница 137
137 Copyright © Acronis International GmbH, 2002- 2014 1 4. 1 . 2 C o m m o n p a r a m e t e rs ( p a r a me t e r s c o mm o n f o r m o s t c o m m a n d s ) Pa ram e te r De scr i pt i o n Im a ge lo cat io n Access to images /filename: <file name> Specifies the full path t o the image, including the file name Any /password: <password[…]
-
Страница 138
138 Copyright © Acronis International GmbH, 2002- 2014 Ge ner al o pt i on s /oss_numbers If this parameter is speci fied, the numbers of the volumes in the /partition parameter are adjusted for the MBR part ition table. This means that primary volu mes have numbers 1-1, 1-2, 1-3, and 1-4 (a disk can not have more than fou r primary volumes); logi[…]
-
Страница 139
139 Copyright © Acronis International GmbH, 2002- 2014 /partition: <disk number> — <volume number> Specifies the volume s to include into the image file. Volume numbers are speci fied as < disk number> — <vol ume number> , for example: /partition:1 -1,1- 2,3 -1 See also the /oss_numbers parameter. To view the list of a vail[…]
-
Страница 140
140 Copyright © Acronis International GmbH, 2002- 2014 /restore_bootable: < au to | on | off > Sets the rule of deploym ent for the master boot record (M BR) when deploying a volume (when d eploying a disk, MBR is alway s deployed): auto : Deploy the MBR only when d eploying an a ctive volume that contains an op erating system. Use this […]
-
Страница 141
141 Copyright © Acronis International GmbH, 2002- 2014 /patching_sid Generates a unique s ecurity identifier (SID) for the target machin e. Without this parameter, th e target machine will ha ve the same SID as the master machine. /ud_path: <path to driver storage> /ud_username: <user name> /ud_password: <password> Specifies usin[…]
-
Страница 142
142 Copyright © Acronis International GmbH, 2002- 2014 /filename: <file name> Displays the image con tent. When listing image content, volume numbers may not coin cide with those in the list of disks and volumes if the image does not con tain all the volumes. For example, if the image con tains only volumes 2 -3 and 2-5, th ey will be listed[…]
-
Страница 143
143 Copyright © Acronis International GmbH, 2002- 2014 1 4. 1 . 4 U s a g e ex a m p l es Example 1. The f ollowing command creates an i mage arc.tib of hard disk 1, and places the im age to the network folder serve r1folder . The operati on log file log 1.log is saved in an other network folder: serve r2dir . Cred entials for both net work[…]
-
Страница 144
144 Copyright © Acronis International GmbH, 2002- 2014 Sample script setlocal SET IMG_PATH= image_serverimages SET TMP_DRV_LETTER=h: net use %TM P_DRV_LETTER% %IMG_PATH% echo off for /f «tokens=1 -13 de lims= » %%a i n (‘ipconfig /all’) do ( IF %%a EQU Physical ( for /f «tokens=1 -3 del ims= » %%a in (‘echo %%[…]
-
Страница 145
145 Copyright © Acronis International GmbH, 2002- 2014 Sample script setlocal SET IMG_PATH= image_serverimages SET TMP_DRV_LETTER=h: net use %TMP_DRV_LETT ER% %IMG_P ATH% echo off for /f «tokens=1 -13 de lims= » %%a in (‘ipconfig /all’) do ( IF %%a EQU Physical ( for /f «tokens=1 -3 del ims= » %%a in (‘echo %%[…]
-
Страница 146
146 Copyright © Acronis International GmbH, 2002- 2014 15 C ol lec ti ng s y st e m in fo rm ati o n The Acronis Syste m Report to ol collects informa tion about a machin e and sa ves this infor mation to a file. You may want t o provi de this file when contacting Acronis technical supp ort. The tool is available: On a machine where Acronis Sn[…]

Acronis Snap Deploy 5
Update 1
USER GUIDE
Backup for VMware 9 — User Guide

Acronis Backup for VMware 9 — User Guide User Manual,
123 pages
True Image for Mac — User Guide
Acronis True Image for Mac — User Guide User Manual,
16 pages
Snap Deploy 4 — User Guide
Acronis Snap Deploy 4 — User Guide User Manual,
145 pages
Disk Director Server 10.0 — User Guide
Acronis Disk Director Server 10.0 — User Guide User Manual,
97 pages
True Image 9.1 Server for Windows — User Guide
Acronis True Image 9.1 Server for Windows — User Guide User Manual,
91 pages
True Image Echo Server for Windows — User Guide
Acronis True Image Echo Server for Windows — User Guide User Manual,
117 pages
True Image Echo Server for Linux — User Guide
Acronis True Image Echo Server for Linux — User Guide User Manual,
87 pages
True Image 9.1 Server for Linux — User Guide
Acronis True Image 9.1 Server for Linux — User Guide User Manual,
82 pages
Recovery for Microsoft Exchange — User Guide
Acronis Recovery for Microsoft Exchange — User Guide User Manual,
88 pages
True Image for MS SBS Server — User Guide
Acronis True Image for MS SBS Server — User Guide User Manual,
157 pages
True Image 9.1 Enterprise Server — User Guide
Acronis True Image 9.1 Enterprise Server — User Guide User Manual,
115 pages
True Image 2017 NG

Инструкция по эксплуатации Acronis True Image 2017 NG,
50 pages
True Image 2017 NG
Инструкция по эксплуатации Acronis True Image 2017 NG,
201 pages
True Image 2017 NG

Acronis True Image 2017 NG Manuale d’uso,
47 pages
True Image 2017 NG
Acronis True Image 2017 NG Manuale d’uso,
193 pages
Work Light 9.1
Acronis Work Light 9.1 User’s Manual,
110 pages
TRUE IMAGE 9.0 — HOME
How to Create an Acronis Bootable USB Hard Disk,
53 pages
BACKUP RECOVERY 10 ADVANCED SERVER VIRTUAL EDITION — COMMAND LINE
ACRONIS BACKUP RECOVERY 10 ADVANCED SERVER VIRTUAL EDITION — COMMAND LINE User guide,
250 pages
BACKUP RECOVERY 10 ADVANCED SERVER SBS EDITION
Acronis Backup & Recovery 11 Advanced Editions,
10 pages
TRUE IMAGE 8.0
ACRONIS TRUE IMAGE 8.0 User`s guide,
162 pages