
![]()
FlashForge Corporation
FlashForge Guider 3D Printer
User Guide
|
Guider User Guide | www.flashforge.com |
0086- 0579-82273989 |

Content |
||
|
Content |
……………………………………………………………………………………………………………. |
2 |
|
Preface…………………………………………………………………………………………………………….. |
3 |
|
|
Introduction……………………………………………………………………………………………………… |
4 |
|
|
Notice……………………………………………………………………………………………………………… |
5 |
|
|
Chapter ……………………………………………………………………..1: 3D Printing Technology |
9 |
|
|
Chapter …………………………………………………………………………………2: About Guider |
11 |
|
|
2.1 …………………………………………………………………………….About Your Guider |
11 |
|
|
Chapter ………………………………………………………………………………………3: Unpacking |
22 |
|
|
Chapter …………………………………………………………………………4: Hardware Assembly |
26 |
|
|
4.1 ……………………………………………………………………………. |
Filament Installation |
26 |
|
4.2 ……………………………………………………………………………………. |
Printer Start — up |
27 |
|
4.3 ………………………………………………………………………………… |
Loading Filament |
27 |
|
4.4 ……………………………………………………………………………..Unloading Filament |
29 |
|
|
Chapter …………………………………………………………………………5: Build Plate Leveling |
31 |
|
|
Chapter ………………………………………………………………………………..6: About Software |
33 |
|
|
6.1 ……………………………………………………………………………. |
Software Installation |
33 |
|
6.2 ……………………………………………………………………………. |
Exploring FlashPrint |
34 |
|
Chapter ………………………………………………………………………………….7: Basic Printing |
56 |
|
|
7.1 ………………………………………………………………………………… |
Generate a Gcode |
56 |
|
7.2 ……………………………………………………………………………………… |
Print Methods |
58 |
|
Chapter ………………………………………………………………………..8: Supports and Service |
66 |
|
Guider User Guide | www.flashforge.com |
2 |
400-699-1063 |

Preface
Note: Each device must be tested before leaving factory. If there are some residues in extruder or some tiny scratches on the build tape, it is normal and won’t affect the printing quality.
On the completion of this User Guide, thanks all FlashForge engineers and the FlashForge 3D printer users for their unremitting efforts and sincere assistance.
The FlashForge Guider User Guide is designed for the Guider users to start their printing journey with FlashForge Guider . Even if you are familiar with earlier FlashForge machines or 3D printing technology, we still recommend that please read this guide, as there is lots of important information about the Guider for you to get a better 3D experience.
For a better and more successful printing experience, you can refer to the following materials:
(1) Quick Start Guide
Users will find the Quick Start Guide together with the printer accessories. The Quick Start Guide will help you start your print journey as soon as possible.
(2) Official FlashForge Website: http://www.FlashForge.com
The official FlashForge website contains the up-to-date information concerning FlashForge software, firmware, device maintenance and so on. Users are also able to get the contact information from there.
|
Guider User Guide | www.flashforge.com |
3 |
400-699-1063 |

Introduction
Notes
·Please read FlashForge Guider 3D Printer User Guide carefully before use. ·The User Guide is written based on Windows 7 OS.
·The version of the FlashPrint is latest.
The FlashForge Guider 3D Printer User Guide contains the information needed for you to set up and use this device.
This User Guide including the following parts: Preface, Introduction and After-sale service.
The Preface section includes resource acquisition channel, the overall framework of the manual, and the problems that should be paid attention to while printing.
The introduction section contains the overview of 3D printing technology, equipment introduction, unpacking and installation of equipment, software installation and use.
After-sale section contains the user how to get the support and help.
|
Guider User Guide | www.flashforge.com |
4 |
400-699-1063 |

Notice
Safety Notice
! Notices: Read all the instructions in the manual and familiarize yourself with the FlashForge Guider User Guide before setting-up and using. Failure to comply with the warning and instructions may result in individual injury, fire, equipment damage or property damage.
PLEASE STRICTLY FOLLOW ALL THE SAFETY WARNINGS AND NOTICE BELOW ALL THE TIME.
· Work Environment Safety
Keep your work place tidy.
Do not operate Guider in the presence of flammable liquids, gases or dust.
Keep Guider out of children and untrained people’ reach.
· Electrical Safety
Always use the Guider with a properly grounded outlet. Do not refit Guider plug.
Do not use Guider in damp or wet locations. Do not expose Guider to burning sun.
In case of device damage, please use the power supply provided by FlashForge.
Avoid using the device during an thunderstorm.
In case of uncertain accident, please unplug the device if you do not use it for long.
·Personal Safety
Do not touch the nozzle and build plate during printing.
|
Guider User Guide | www.flashforge.com |
5 |
400-699-1063 |

Do not touch the nozzle after finishing printing.
Dress properly. Do not wear loose clothing or jewelry. Keep your hair, clothing and gloves away from moving parts.
Do not operate the device while you are tired or under the influence of drugs, alcohol or medication.
· Cautions
Do not leave the device unattended for long.
Do not make any modifications to the device.
To lower the build plate before loading/unloading filament. (The distance between the nozzle and build plate should be kept for at least 50mm)
Operate the device in a well-ventilated environment.
Never use the device for illegal activities.
Never use the device to make any food storage vessels.
Never use the device to make any electrical appliance.
Never put the model into your mouth.
Do not remove the models with force.
Never connect the device with network cable longer than 3m.
· Environment Requirements
Temperature: RT 15-30
Moisture: 20%-70%
· Place Requirements
The device must be placed in a dry and ventilated environment. The distances of the left, right and back side space should be at least 20cm, and the distance of the front side space should be at least 35cm.
|
Guider User Guide | www.flashforge.com |
6 |
400-699-1063 |

· Filament Requirements
Do not abuse the filament. Please make sure you use the FlashForge filament or the filament from the brands accepted by FlashForge.
· Filament Storage
All polymers degrade with time. Do not unpack until filament is needed. Filament should be stored at clean and dry conditions.
Legal Notice
All the information in this document is subject to any amendment or change without the official authorization from FlashForge.
FLASHFORGE CORPORATION MAKES NO WARRANTY OF ANY KIND WITH REGARD TO THIS DOCUMENT, INCLUDING, BUT NOT LIMITED TO, THE IMPLIED WARRATIES OF MERCHANTABILITY AND FITNESS FOR A PARTICULAR PURPOSE.
FlashForge shall not be liable for errors contained herein for incidental consequential damages in connection with furnishing, performance or use of this material
FCC STATEMENT:
This device complies with Part 15 of the FCC Rules. Operation is subject to the following two conditions:
(1)This device may not cause harmful interference,
(2)This device must accept any interference received, including interference that may cause undesired operation.
Warning: Changes or modifications not expressly approved by the party responsible
|
Guider User Guide | www.flashforge.com |
7 |
400-699-1063 |

for compliance could void the user’s authority to operate the equipment.
This equipment has been tested and found to comply with the limits for a Class B digital device, pursuant to Part 15 of the FCC Rules. These limits are designed to provide reasonable protection against harmful interference in a residential installation. This equipment generates uses and can radiate radio frequency energy and, if not installed and used in accordance with the instructions, may cause harmful interference to radio communications. However, there is no guarantee that interference will not occur in a particular installation. If this equipment does cause harmful interference to radio or television reception, which can be determined by turning the equipment off and on, the user is encouraged to try to correct the interference by one or more of the following measures:
Reorient or relocate the receiving antenna.
Increase the separation between the equipment and receiver.
Connect the equipment into an outlet on a circuit different from that to which the receiver is connected.
Consult the dealer or an experienced radio/TV technician for help.
This document contains proprietary information protected by copyright.
Copyright © 2017 FlashForge Corp. All Rights Reserved
|
Guider User Guide | www.flashforge.com |
8 |
400-699-1063 |

Chapter 1: 3D Printing Technology
3D printing refers to transforming three-dimensional models into physical objects that you can hold and touch. It is also called additive manufacturing because the 3D model is created by “adding” layers upon layers of material until the object is fully formed.
Fused Filament Fabrication (FFF) is the most common method of 3D printing. It is also the method that the Guider uses. It works by melting plastic material called filament onto a print surface in high temperature. The filament solidifies after it cools down, which happens instantaneously after it is extruded from the nozzle. 3D objects are formed with the filament laying down multiple layers.
1.1 Process
3D printing involves three steps:
1.) Make or download a 3D model
2.) Slice and export the 3D model
3.) Build the 3D model
1.1.1 Make a 3D Model:
Currently, there are three ways to creating a 3D model.
·Designing From Scratch You can use free CAD (computer-aided design) software such as 3DTADA, AutoCAD, SolidWorks, Pro-E, and our own software Happy 3D to design your own 3D model.
·3D Scanners An alternative method to creating a 3D model is to scan an object. 3D scanners work by digitizing a physical object, collecting its geometric data, and saving it to a file on your PC. There are also apps that can turn a mobile device into a 3D
|
Guider User Guide | www.flashforge.com |
9 |
400-699-1063 |

scanner.
·From the Cloud The most popular way of obtaining a 3D model is to download it from websites that allow users to upload 3D models that they designed.
E.g. : www. thingiverse.com
1.1.2 Slice and Export the 3D Model:
Slice software is the software that prepares 3D models for printing and turns them into instructions for the 3D printers. FlashPrint is the slicing software used for the FlashForge Guider .
Using FlashPrint, you can turn .stl files into .g or .gx files for printing. Then the files can be transferred to your Guider via USB cable, USB stick or Wi-Fi.
Guider support Simplify3D software, software not developed by FlashForge may need register or charge extra fee, please choose to use(or not) according to your needs.
1.1.3 Build the 3D Model:
Once the output file has been transferred to your Guider , it will start to turn the 3D model into a physical object by laying down layers of filament.
|
Guider User Guide | www.flashforge.com |
10 |
400-699-1063 |
![]()
Chapter 2: About Guider
2.1 About Your Guider
2.1.1 Views
Right Back
|
1. |
Touch screen |
6. Leveling knob |
11. Ethernet input |
||
|
2. |
Touch screen button |
7. Extruder |
12. |
USB cable input |
|
|
3. |
Nozzle |
8. X-axis guide rod |
13. USB stick input |
||
|
4. |
Z-axis guide rod |
9. Filament intake |
14. |
Filament detector |
|
|
15. |
Power switch |
||||
|
5. |
Build plate |
10. Spring presser |
|||
|
16. |
Power input |
||||
|
Guider User Guide | www.flashforge.com |
11 |
400-699-1063 |

2.1.2 Terms
|
Build Plate |
The surface on which the Guider builds an object. |
|
|
Build Tape |
The blue tape that covers Guider ’s build plate so that |
|
|
the object can stick to the build plate well. |
||
|
The three dimensional amount of space that an object |
||
|
Build Volume |
will use once it is completed. The largest build volume |
|
|
of Guider is 280*250*300 mm. |
||
|
Knobs under the build platform that are used for |
||
|
Leveling Knobs |
adjusting the distance between the nozzle and build |
|
|
plate. |
||
|
The device that draws the filament from the spool, |
||
|
Extruder |
melts it and pushes it through a nozzle into the build |
|
|
plate. |
||
|
Nozzle |
Also called “print head”, which located at the bottom |
|
|
of the extruder where heated filament is squeezed out. |
||
|
Cooling Fan |
To cool the outer assembly of the extruder and gear |
|
|
motor. |
||
|
Filament Intake |
An opening located at the top of the extruder. |
|
|
Filament Guide Tube |
A black plastic piece that guides the filament from the |
|
|
filament box to the filament intake. |
||
|
Filament Cartridge |
A specific box for placing FlashForge filament. |
|
|
Solid Glue Stick |
A solid adhesive used for making the model stick to the |
|
|
build plate firmly. |
||
|
Unclogging Pin Tool |
A tool that used for cleaning and unclogging the |
|
|
extruder. |
||
|
Stamping Wrench |
A tool that used for seizing the nozzle’s metal cube. |
|
Guider User Guide | www.flashforge.com |
12 |
400-699-1063 |

2.1.3 Reference
|
Name |
Guider |
|
|
Number of Extruder |
1 |
|
|
Print Technology |
Fused Filament Fabrication(FFF) |
|
|
Screen Size |
5.0’’ color IPS Touch Screen |
|
|
Build Volume |
280*250*300mm |
|
|
Layer Resolution |
0.05 — 0.4mm |
|
|
Build Accuracy |
±0.2mm |
|
|
Positioning Accuracy |
Z axis 0.0025mm; XY axis 0.011mm |
|
|
Filament Diameter |
1.75mm ±0.07 |
|
|
Nozzle Diameter |
0.4mm |
|
|
Print Speed |
10~200 mm/s |
|
|
Software |
FlashPrint Support Simplify3D |
|
|
Support Formats |
Input:3MF/ STL/OBJ/FPP/BMP/PNG/JPG/JPEG |
|
|
Output:GX/G |
||
|
OS |
Win xp/Vista/7/8/10 Mac OS Linux |
|
|
Device Size |
490*550*560mm |
|
|
Net Weight |
30Kg |
|
|
AC Input |
Input: 100V-240VAC, 47-63Hz Power: 500W |
|
|
Connectivity |
USB cable, USB stick, WiFi, Ethernet, Polar Cloud |
|
|
Guider User Guide | www.flashforge.com |
13 |
400-699-1063 |
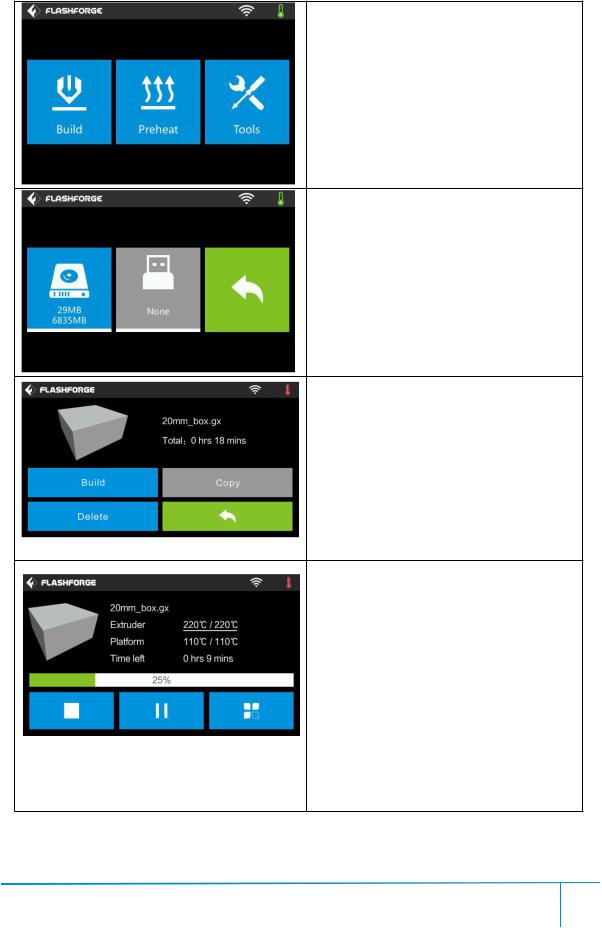
2.1.4 Interface Menus
Build
Read the print file from The local memory card The USB stick
Back
Select the target print file among the list Build: To begin printing.
Copy: To copy the files to the local memory card from the USB stick.(The button is not available while printing from local memory card )
Delete: To delete the print file. Back
Print interface
Abort: To abort the print job.
Pause/Resume: To suspend or resume the print job.
Tools:To check status or modify settings during printing: build time, Z axis, filament used, printing speed, light status, change filament.
Extruder temperature: Can be changed during printing.
|
Guider User Guide | www.flashforge.com |
14 |
400-699-1063 |

To set extruder temperature during printing: After extruder temperature has reached target temperature, temperature figure will be underlined in print interface,
Tap [Yes] to save the setting while tap [No] to cancel the setting.
Tools in print interface
Printing speed: To change printing speed during printing by tapping the underlined speed figure.
Light bulb: To turn on/off the light.
Filament: To change filament during printing. (Note: You need to suspend the printing operation first)
Cancel: To end the tool orders and return to the print interface.
To set the printing speed during printing Tap [Yes] to save the setting while tap [No] to cancel the setting.
Preheat
|
Guider User Guide | www.flashforge.com |
15 |
400-699-1063 |

Tap the [Preheat] button to enter the preheat interface. Tap the [Start] button to heat up to the setting temperature.
The default temperature is 220 .
Tap the temperature display bar to set the temperature.
To set the preheat temperature.
Tap [Yes] to save the setting while tap [No] to cancel the setting.
The picture displays the preheat interface. It shows the actual temperature and the target temperature. Tap the [Abort] button to abort the preheat job.
Tools
Tap [Tools] to enter tool options.
Filament: To load/unload the filament.
Level: To adjust the build plate.
Home: To make the X, Y and Z axes back to the zero point.
Manual: To manually adjust the positions of X, Y and Z axes.
Setting: To implement relevant function setups.
Status: The check the real-time status of the printer.
About: Information about the printer.
Back
|
Guider User Guide | www.flashforge.com |
16 |
400-699-1063 |

Manual adjustment
Y+: The extruder moves to the zero point, that is, the back of the machine
Y-: The extruder moves to the direction opposite to the Y+.
X+: The extruder moves to the zero points, that is, to the right direction
X-: The extruder moves to the direction opposite to the X+.
Z+: The build plate elevates.
Z-: The build plate descends.
Back
Tap [Setting] to enter the setting interface
Language: To set the display language
Resume Print: Resume print after restarting Guider II
WiFi: To turn on/off the WiFi
WLan hotspot: To turn on/off the WLan hotspot.
Polar Cloud Connection: To turn on/off the Polar Cloud Connection.
Extruder Calibration: To adjust the initial distance between the extruder and the build plate.
Startup Sound: To turn on/off the Startup Sound.
Filament Check: To turn on/off the filament check
Light Bar Control: To turn on/off the light bar control.
Factory Reset: Return to factory setting Update: To update the firmware version. Back
|
Guider User Guide | www.flashforge.com |
17 |
400-699-1063 |

Turn on [Resume Print]
Left picture showed is the [Resume Print] turned on status. If the printer is turned off when current print job has not finished yet, printer will continue and resume previous printing job after restarted.
(Note: If [Resume Print] is turned off, this function will not apply. )
WiFi:
Turn on WiFi: Turn on the WiFi, release the WiFi hotspot and set the WiFi on
computer Back
WLan hotspot
OFF/On: To turn on/off the Wlan hotspot. Setup Wlan hotspot: To set the SSID and password.
SSID: The name of hotspot. Password: The password of hotspot. Save: To save the setting.
Back
|
Guider User Guide | www.flashforge.com |
18 |
400-699-1063 |

Polar Cloud Connection:
Cloud Connection: To turn on/off the polar cloud connection.
Setup Cloud Connection: To set cloud connection ID and PIN which have already been registered on:
https://pc2.polar3d.com/login
ID: The name of Cloud Connection.
PIN: The password of Cloud Connection. Save: To save the setting.
Back
(Note: You need to connect the printer to internet with WiFi or Ethernet Cable first)
Extruder Calibration:
(not recommended for customers to operate) To adjust the initial distance between the extruder and the build plate by tapping [-]and[+]. The proper distance may be one ordinary paper’s thickness.
Turn on [Filament Check]:
Left picture showed is the [Filament Check] turned on status.
Filament abnormal status will be detected when filament is used up or suspended. [Filament Check] function should be used with filament in the filament cartridge.This function is invalid if using filament out of the cartridge.
|
Guider User Guide | www.flashforge.com |
19 |
400-699-1063 |

Turn off [Filament Check]:
Left picture showed is the [Filament Check] turned off status.
Filament abnormal status won’t be detected when filament is used up or suspended.
Turn on/off [Startup Sound]:
Tap to turn on/off the sound when restart the printer.
Status:
It displays the real-time status of the extruder temperature and other details.
About:
It displays the basic information about the device.
|
Guider User Guide | www.flashforge.com |
20 |
400-699-1063 |
 Loading…
Specifications:944/944893-guider_ii.pdf file (10 May 2023) |
Accompanying Data:
Flashforge Guider II 3D Printers PDF Quick Start Manual (Updated: Wednesday 10th of May 2023 01:16:04 AM)
Rating: 4.9 (rated by 53 users)
Compatible devices: Creator, Creator3, Creator Pro 2, DREAMER, Invertor II, Guinder II, Hunter, ADVENTURER 3.
Recommended Documentation:
Quick Start Manual (Text Version):
(Ocr-Read Summary of Contents of some pages of the Flashforge Guider II Document (Main Content), UPD: 10 May 2023)
-
1, This guide is only applicable to FLASHFORGE Guider II 3D printer The User Guide is in the USB stick. 1. Hot! Avoid touching the heating nozzle in operation. 2. Moving parts in printer may cause injury. Do not wear gloves or other sources of entanglement in operation. WARNING USERGUIDE GUIDER II Quick Start Guide SZ11-EN-A02
… -
2, Flashforge Guider II 01 Kit Contents 3D Printer Filament Spool Quick Start Guide After-sales Service Card USB Stick Lid Power Cable USB Cable Filament Guide Tube Screwdriver Unclogging Pin Tool Wrench Allen Wrench Solid Glue Spool Holder GREASE Grease
… -
3, Getting to Know Your Guider II 02 1 2 3 4 5 6 7 8 9 10 11 12 1. Z-Axis Guide Rod 17. Power Switch 15. USB Cable Input 8. Leveling Knob 3. Y-Axis Guide Rod 7. Build Plate 5. Touch Screen 9. Servo 10. Turbo Fan 12. Turbo Fan Baffle 18. Power Input 2. Filament Inlet 4. X-Axis Guide Rod 6. Touch Screen Button 13. Network Interface 11. Nozzle 16. Spool Holder Slot 17 18 16 13 15 14 14. USB Stick Input
… -
4, Unpacking 03 1. Open the box and remove both top foam sheets. 2. Take your Guider II out of the box and remove the bubble wrap. 3. The bottom PE foam should contain: filament, spool holder, solid glue, USB cable, grease and accessories bag. 4. Remove bubble wrap. 5. Remove the top PE foam piece,which contains a power cable, a Quick start guide and a After-sales service card. 6. Use scissors to cut th…
-
5, Flashforge Guider II 04 Print Preheat Tool HOME Filament Level Home Manual Setting Status About X: 87.00 Y: 70.50 Z: 140.00 X+X- Y+ Y- Z- Z+ 7. Open the door and take out the lid. 8. Take out power cable and plug the power cable into the input on the back and turn on the power switch. 9. Press the touch screen button and tap [Tools] . 10. Tap [Manual]. 11. Tap [Z-] to partially elevate the build plate. 12. Remove both bottom foam pieces. Congratulations! You’ve unpacked…
-
6, Hardware Assembly 05 1. Locate the spool holders.Install the spool holders in the two quadrangular openings on the back.To install a spool holder, level it and insert the end into one of the openings. 2. Turn down the spool holder to make the holder bottom cleave to the printer back. 3. Squeeze the spool holder top and mount the filament spool to the holder. 4. Secure the filament guide tube with R-shaped buckles and thread the filament through the tube. The filament spoo…
-
7, Flashforge Guider II 06 Leveling Build Platform Print Preheat Tools English 繁體中文 日本語 HOME Filament Level Home Manual Setting Status About 简体中文 Language Resume Print WiFi WLan hotspot English How to change language Raise the build plate to reduce the distance between the nozzle and build plate. Rotate the knob clockwise Rotate the knob Anticlockwise Lower the build plate to increase the distance between the nozzle and build plate. How to use the leveling kno…
-
8, 07 Yes No Confirm Are you sure you can’t finger tighten these three knobs any more? Wait Verifying the distance between nozzle and plate… Distance Too Big Unscrew corresponding knob under platform clockwise until hearing a steady beep. 2. Tap [Yes] if you can’t tighten all the nuts any more, or tap [No] to continue tightening. After selecting [Yes], the extruder will move towards the first point and the plate will move up and down to verify the distance between noz…
-
9, 08 Loading / Changing Filament HOME 220℃ / 220℃ 100% 220℃ Build Preheat Tools Filament Level Home Manual Setting Status About Load Unload Cancel Extruder I’m heating up… Changing Filament Do not pull out the filament with force as it will damage the gears. If the melted filament has cooled down in the extruder, please repeat the steps above. Build Preheat Tools Extruder Start 1. Tap [Tools] and then tap [Filament] and [Load] to load filament. 2. The extruder will automatically heat up. Once heated, filament will…
-
10, 09 First Print Build Preheat Tools 1. Please insert the USB stick into Finder. In the print interface, tap [Print]-[USB Stick]. Suggestions Ensure that the build plate has been leveled before printing. Ensure that the filament has been loaded in an appropriate approach. Load the filament for a while to extrude all the melted filament you printed last time out of the extruder. Do not leave the Guider II unattended during operation. Build Copy Delete Total: 0 hr 54 min Extruder 50℃/220℃ Time left 0 hr 54 min 40m…
-
11, Scan QR to Get More After-Sales Support Tel: +86 579 82273989 Web: www.flashforge.com Add: 2/F, No.518, Xianyuan Road, Jinhua, Zhejiang, China After-Sales Service: [email protected]
…
-
Flashforge Guider II User Manual
-
Flashforge Guider II User Guide
-
Flashforge Guider II PDF Manual
-
Flashforge Guider II Owner’s Manuals
Recommended:
2060 D, SR2016 — Cisco — 10/100/1000 Gigabit Switch, RF117HD-Series, DS6.2
-
!»!#»$%&&'()*&$&+,&!#&&&&Steps&for&assembly&of&a&Bukito.&Beta&version&5.1,&February&28,&2014&Table&of&contents&&Table&of&contents&………………………………………………………………………………………………… …
Bukito 28
-
Dongguan Ortur Intelligent Technologies Co., Ltd.www.ortur3d.com www.ortur3dprinter.comNo.27, Second Industrial Park, Heshi Road, Qiaotou Town, Dongguan 523527, Guandong Province, China1Ortur-4 User Manual …
Ortur-4 29
-
Read the Dremel 3D45 manual and these instructions before replacing a cloggedheatsink tube in your Dremel 3D45. Failure to comply with thewarnings and instructions may result in fire, equipment damage,property damage, or personal injury. Always unplug Dremel 3D45 from its power before performingany service procedures. Failure to do so may result in pers …
3D45 4
-
LulzbotTAZ6OperationsTutorialAllinstructionsinthistutorialareforusingandcontrollingaLulzbotTAZ63dprinter AccordingtoyourOperatingSystem,downloadthesoftwarefrom‐https://www.lulzbot.com/curaRefertoinstructionssheet“CuraTutori al”onhowtoinstallan …
TAZ 6 3
-
LCD Control Panel Test Printer Functionality Turn on print engine by pressing . Amber light will turn off. When green light is solid, print engine is powered on and ready. With print engine at max height, test basic functions of printer movement Press and hold to move media table all the way to the right. Media table will stop once it has reached the right limit of printer. Press and hold …
DJ1024UVMVP 2
-
Manual for: Builder Extreme 1000 PRO Builder Extreme 1500 PRO Builder Extreme 2000 PRO 2020 models only Version: 1 Get to know the Builder Extreme better by reading the manual carefully. The manual also informs you about the maintenance of the machine. …
Extreme 1000 PRO 44
Product Types by Flashforge:
- Printer
- Scanner
- 3D Printers
Popular Right Now:
Operating Impressions, Questions and Answers:
Table of Contents: Flashforge Guider II 3D Printers Owner’s Manual
-
Flashforge Guider II 09 First Print Build Preheat Tools 1. Please insert the USB stick into Finder. In the print interface, tap [Print]-[USB Stick]. Suggestions Ensure that the build plate has been leveled before printing. Ensure that the filament has been loaded in an appropriate approach. Load the filament for a while to extrude all the melted filament you printed last time out of the extruder. Do not leave the Guider II unattended during operation. Build Copy Delete Total: 0 hr 54 min Extruder 50℃/220℃ Time left 0 hr 54 min 40mm_Box-PLA.gx 40mm_Box-ABS.gx System Volume Information flashprint�
-
Flashforge Guider II Scan QR to Get More After-Sales Support Tel: +86 579 82273989 Web: www.flashforge.com Add: 2/F, No.518, Xianyuan Road, Jinhua, Zhejiang, China After-Sales Service: [email protected]
-
Flashforge Guider II This guide is only applicable to FLASHFORGE Guider II 3D printer The User Guide is in the USB stick. 1. Hot! Avoid touching the heating nozzle in operation. 2. Moving parts in printer may cause injury. Do not wear gloves or other sources of entanglement in operation. WARNING USERGUIDE GUIDER II Quick Start Guide SZ11-EN-A02
-
Flashforge Guider II Unpacking 03 1. Open the box and remove both top foam sheets. 2. Take your Guider II out of the box and remove the bubble wrap. 3. The bottom PE foam should contain: filament, spool holder, solid glue, USB cable, grease and accessories bag. 4. Remove bubble wrap. 5. Remove the top PE foam piece,which contains a power cable, a Quick start guide and a After-sales service card. 6. Use scissors to cut the buckles that hold the rods in the place.
-
04 Print Preheat Tool HOME Filament Level Home Manual Setting Status About X: 87.00 Y: 70.50 Z: 140.00 X+X- Y+ Y- Z- Z+ 7. Open the door and take out the lid. 8. Take out power cable and plug the power cable into the input on the back and turn on the power switch. 9. Press the touch screen button and tap [Tools] . 10. Tap [Manual]. 11. Tap [Z-] to partially elevate the build plate. 12. Remove both bottom foam pieces. Congratulations! You’ve unpacked your Guider II.
-
Getting to Know Your Guider II 02 1 2 3 4 5 6 7 8 9 10 11 12 1. Z-Axis Guide Rod 17. Power Switch 15. USB Cable Input 8. Leveling Knob 3. Y-Axis Guide Rod 7. Build Plate 5. Touch Screen 9. Servo 10. Turbo Fan 12. Turbo Fan Baffle 18. Power Input 2. Filament Inlet 4. X-Axis Guide Rod 6. Touch Screen Button 13. Network Interface 11. Nozzle 16. Spool Holder Slot 17 18 16 13 15 14 14. USB Stick Input
-
Flashforge Guider II Hardware Assembly 05 1. Locate the spool holders.Install the spool holders in the two quadrangular openings on the back.To install a spool holder, level it and insert the end into one of the openings. 2. Turn down the spool holder to make the holder bottom cleave to the printer back. 3. Squeeze the spool holder top and mount the filament spool to the holder. 4. Secure the filament guide tube with R-shaped buckles and thread the filament through the tube. The filament spool must be oriented correctly (see above), and should feed filament from bottom to top.
-
Flashforge Guider II 01 Kit Contents 3D Printer Filament Spool Quick Start Guide After-sales Service Card USB Stick Lid Power Cable USB Cable Filament Guide Tube Screwdriver Unclogging Pin Tool Wrench Allen Wrench Solid Glue Spool Holder GREASE Grease
-
Flashforge Guider II 07 Yes No Confirm Are you sure you can’t finger tighten these three knobs any more? Wait Verifying the distance between nozzle and plate… Distance Too Big Unscrew corresponding knob under platform clockwise until hearing a steady beep. 2. Tap [Yes] if you can’t tighten all the nuts any more, or tap [No] to continue tightening. After selecting [Yes], the extruder will move towards the first point and the plate will move up and down to verify the distance between nozzle and plate. 3. If the distance between the nozzle and plate is too large, rotate the knob underneath the plat
-
08 Loading / Changing Filament HOME 220℃ / 220℃ 100% 220℃ Build Preheat Tools Filament Level Home Manual Setting Status About Load Unload Cancel Extruder I’m heating up… Changing Filament Do not pull out the filament with force as it will damage the gears. If the melted filament has cooled down in the extruder, please repeat the steps above. Build Preheat Tools Extruder Start 1. Tap [Tools] and then tap [Filament] and [Load] to load filament. 2. The extruder will automatically heat up. Once heated, filament will be drawn through the extruder
Questions, Opinions and Exploitation Impressions:
You can ask a question, express your opinion or share our experience of Flashforge Guider II device using right now.
Посмотреть инструкция для Flashforge Guider II бесплатно. Руководство относится к категории 3D-принтеры, 3 человек(а) дали ему среднюю оценку 8. Руководство доступно на следующих языках: английский. У вас есть вопрос о Flashforge Guider II или вам нужна помощь? Задайте свой вопрос здесь
3D принтер FlashForge Guider II — это высокоточное устройство, способное создавать трехмерные модели с использованием различных материалов. Он оснащен 5-дюймовым сенсорным дисплеем, обеспечивающим удобство управления. Принтер имеет встроенный дисплей, который дополнительно облегчает процесс настройки и контроля печати.
Устройство обладает подогреваемой печатной платформой, что позволяет достичь оптимального прилипания материала к поверхности. Благодаря включенному в комплект поставки программному обеспечению FlashPrint пользователь может создавать и настраивать трехмерные модели с удобством.
Размеры принтера составляют 490 мм в ширину, 549 мм в глубину и 561 мм в высоту. Максимальный размер печати составляет 250 x 280 x 300 мм, а точность печати равна 0,2 мм. Принтер работает от переменного напряжения 100/240 В и имеет средний уровень потребления энергии в 500 Вт.
Для связи с другими устройствами и передачи файлов для печати доступны USB-порт, Wi-Fi и Ethernet LAN. Это обеспечивает гибкость в использовании принтера и удобство подключения к сети.
Корпус принтера выполнен из надежных и прочных материалов, обеспечивая надежность и долговечность устройства. В целом, FlashForge Guider II — это принтер, который позволяет создавать высококачественные трехмерные модели с высокой точностью и удобством в использовании.

Главная
| Flashforge | |
| Guider II | 10000090001 | |
| 3D-принтер | |
| английский | |
| Руководство пользователя (PDF), Краткое руководство пользователя (PDF) |
Производительность
| Диагональ экрана | 5 « |
| Сенсорный экран | Да |
| Встроенный экран | Да |
| Нагреваемая платформа для печати | Да |
| Смотровое окно | Да |
Содержимое упаковки
| Поставляемое ПО | FlashPrint |
Вес и размеры
| Ширина | 490 mm |
| Глубина | 549 mm |
| Высота | 561 mm |
Печать
| Максимальные размеры печати (ШхГхВ) | 250 x 280 x 300 mm |
| Точность | 0.2 mm |
| Материал печати | ABS, Polylactic acid (PLA) |
| Толщина слоя (мин.) | — mm |
| Толщина слоя (макс.) | — mm |
| Технология печати | — |
| Количество цветов печати | — |
Энергопитание
| Входящее напряжение сети | 100/240 V |
| Потребляемая мощность (в обычном режиме) | 500 W |
Порты и интерфейсы
| USB порт | Да |
| Wi-Fi | Да |
| Подключение Ethernet | Да |
| Встроенный кардридер | — |
Сканирование
Гравирование
показать больше
Не можете найти ответ на свой вопрос в руководстве? Вы можете найти ответ на свой вопрос ниже, в разделе часто задаваемых вопросов о Flashforge Guider II.
Какой размер экрана Flashforge Guider II?
Размер экрана Flashforge Guider II составляет 5 «.
Какая высота Flashforge Guider II?
Flashforge Guider II имеет высоту 561 mm.
Какая ширина Flashforge Guider II?
Flashforge Guider II имеет ширину 490 mm.
Какая толщина Flashforge Guider II?
Flashforge Guider II имеет толщину 549 mm.
Инструкция Flashforge Guider II доступно в русский?
К сожалению, у нас нет руководства для Flashforge Guider II, доступного в русский. Это руководство доступно в английский.
Не нашли свой вопрос? Задайте свой вопрос здесь

- Manuals
- Brands
- Flashforge Manuals
- 3D Printers
- Guider II
- User manual
-
Contents
-
Table of Contents
-
Bookmarks
Quick Links
FlashForge Corporation
FlashFor ge Guider Ⅱ 3D Pr inter
User Guide
!NOTE Please read FlashForge GuideII 3D Printer User Guide carefully before use. Please
well keep this User Guide for future reference.
GuiderⅡ User Guide | www.flashforge.com
Related Manuals for Flashforge Guider II
Summary of Contents for Flashforge Guider II
-
Page 1
FlashForge Corporation FlashFor ge Guider Ⅱ 3D Pr inter User Guide !NOTE Please read FlashForge GuideII 3D Printer User Guide carefully before use. Please well keep this User Guide for future reference. GuiderⅡ User Guide | www.flashforge.com… -
Page 2
Modify: Print from Polar Cloud connection Apr 8th, 2018 Chapter 7 7.2.5 ( Polar cloud printing instructions & website address.) Apr 8th, 2018 Chapter 9 Add: Chapter9 GuiderII Basic Questions and Answers GuiderⅡ User Guide | www.flashforge.com… -
Page 3: Table Of Contents
Chapter 6: About Software………………. 33 6.1 Software Installation………………33 6.2 Exploring FlashPrint………………34 Chapter 7: Basic Printing………………..56 7.1 Generate a Gcode…………………56 7.2 Print Methods………………..58 Chapter 8: Supports and Service………………. 70 Chapter 9: Basic Questions and Answers…………..70 GuiderⅡ User Guide | www.flashforge.com…
-
Page 4: Preface
On the completion of this User Guide, thanks all FlashForge engineers and the FlashForge 3D printer users for their unremitting efforts and sincere assistance. The FlashForge GuiderⅡ User Guide is designed for the GuiderⅡ users to start their printing journey with FlashForge GuiderⅡ. Even if you are familiar with earlier FlashForge machines or 3D printing technology, we still recommend that please read this guide, as there is lots of important information about the GuiderⅡ…
-
Page 5: Introduction
Intr oduction Notes: ·Please read FlashForge Guider Ⅱ 3D Printer User Guide carefully before use. ·The User Guide is written based on Windows 7 OS. ·The version of the FlashPrint is latest. The FlashForge Guider Ⅱ 3D Printer User Guide contains the information needed for you to set up and use this device.
-
Page 6: Notice
② Do not use Guider Ⅱ in damp or wet locations. Do not expose Guider Ⅱ to burning sun. ③ In case of device damage, please use the power supply provided by FlashForge. ④ Avoid using the device during an thunderstorm.
-
Page 7
The device must be placed in a dry and ventilated environment. The distances of the left, right and back side space should be at least 20cm, and the distance of the front side space should be at least 35cm. GuiderⅡ User Guide | www.flashforge.com… -
Page 8
· Filament Requir ements Do not abuse the filament. Please make sure you use the FlashForge filament or the filament from the brands accepted by FlashForge. · Filament Stor age All polymers degrade with time. Do not unpack until filament is needed. Filament should be stored at clean and dry conditions. -
Page 9
Connect the equipment into an outlet on a circuit different from that to which the receiver is connected. Consult the dealer or an experienced radio/TV technician for help. This document contains proprietary information protected by copyright. Copyright © 2018 FlashForge Corp. All Rights Reserved GuiderⅡ User Guide | www.flashforge.com… -
Page 10: Chapter 1: 3D Printing Technology
·3D Scanner s An alternative method to creating a 3D model is to scan an object. 3D scanners work by digitizing a physical object, collecting its geometric data, and saving it to a file on your PC. There are also apps that can turn a mobile device into a 3D scanner. GuiderⅡ User Guide | www.flashforge.com…
-
Page 11
Using FlashPrint, you can turn .stl files into .g or .gx files for printing. Then the files can be transferred to your GuiderⅡ via USB cable, USB stick or Wi-Fi. Guider Ⅱ support Simplify3D software, software not developed by FlashForge may need register or charge extra fee, please choose to use(or not) according to your needs. -
Page 12: Chapter 2: About Guiderⅱ
2. Touch screen button 13. USB stick input 8. X-axis guide rod 3. Nozzle 14. Filament detector 9. Filament intake 4. Z-axis guide rod 15. Power switch Spring presser 5. Build plate 16. Power input GuiderⅡ User Guide | www.flashforge.com…
-
Page 13
A black plastic piece that guides the filament from the Filament Guide Tube filament box to the filament intake. Filament Cartridge A specific box for placing FlashForge filament. A solid adhesive used for making the model stick to the Solid Glue Stick build plate firmly. -
Page 14
FlashPrint、Support Simplify3D Software Input:3MF/ STL/OBJ/FPP/BMP/PNG/JPG/JPEG Support Formats Output:GX/G Win xp/Vista/7/8/10、Mac OS、Linux Device Size 490*550*560mm Net Weight 30Kg AC Input Input: 100V-240VAC, 47-63Hz Power: 500W USB cable, USB stick, WiFi, Ethernet, Connectivity Flash Cloud, Polar Cloud GuiderⅡ User Guide | www.flashforge.com… -
Page 15
Pause/Resume: To suspend or resume the print job. Tools:To check status or modify settings during printing: build time, Z axis, filament used, printing speed, light status, change filament. Extruder temperature: Can be changed during printing. GuiderⅡ User Guide | www.flashforge.com… -
Page 16
Cancel: To end the tool orders and return to the print interface. To set the printing speed during printing Tap [Yes] to save the setting while tap [No] to cancel the setting. Pr eheat GuiderⅡ User Guide | www.flashforge.com… -
Page 17
Manual: To manually adjust the positions of X, Y and Z axes. Setting: To implement relevant function setups. Status: The check the real-time status of the printer. About: Information about the printer. Back GuiderⅡ User Guide | www.flashforge.com… -
Page 18
Light Bar Control: To turn on/off the light bar control. Light Bar Brightness: To adjust the light bar brightness. Factory Reset: Return to factory setting Update: To update the firmware version. Back GuiderⅡ User Guide | www.flashforge.com… -
Page 19
WLan hotspot OFF/On: To turn on/off the Wlan hotspot. Setup Wlan hotspot: To set the SSID and password. SSID: The name of hotspot. Password: The password of hotspot. Save: To save the setting. Back GuiderⅡ User Guide | www.flashforge.com… -
Page 20
Filament abnormal status will be detected when filament is used up or suspended. [Filament Check] function should be used with filament in the filament cartridge.This function is invalid if using filament out of the cartridge. GuiderⅡ User Guide | www.flashforge.com… -
Page 21
Back Light Bar Brightness: To click and select different light bar brightness. Status: It displays the real-time status of the extruder temperature and other details. About: It displays the basic information about the device. GuiderⅡ User Guide | www.flashforge.com… -
Page 22
Accessor ies Filament*1 Power Cable USB Cable Filament Guide Tube Quick Start Guide USB stick Screwdriver Allen Wrench (M2.0/2.5) Solid Glue Stamping Wrench Unclogging Pin Tool After-sales service card Spool holder Grease GuiderⅡ User Guide | www.flashforge.com… -
Page 23: Chapter 3: Unpacking
Make sur e you r ead the whole unpacking guide) (3-1) Place the packaging box on a clean work surface Open the box, take out the two foams and then lift your Guider Ⅱ out of the (3-2) box. GuiderⅡ User Guide | www.flashforge.com…
-
Page 24
(3-4) In the bottom of the carton , you can see a spool of filament, a spool holder, Power Cable, a USB Cable, one Filament Guide Tube, a glue stick and a tool bag( USB stick*1, Allen wrenches*2, stamping wrench*1, unclogging pin tool*1, grease*1 and screwdriver*1). GuiderⅡ User Guide | www.flashforge.com… -
Page 25
Remove the side protective foam sheets. (3-5) Remove the bag to unveil the Guider Ⅱ. (3-6)Take out the top foam from the printer, on the top foam sheet, you can see one Quick Start Guide and a After-sales service card. GuiderⅡ User Guide | www.flashforge.com… -
Page 26
(3-7)Remove the three buckles which are in the circled area showed in the picture. (3-8) Take the top cover out of the printer. Congratulations! You have unpacked your GuiderⅡ. Next, let’s move on to hardware assembly of GuiderⅡ. GuiderⅡ User Guide | www.flashforge.com… -
Page 27: Chapter 4: Hardware Assembly
Filament Detecting Equipment in the black. (4-2) Take out the filament and thread it through the filament detecting equipment. (Note: The filament should feeds fr om the bottom of the spool towar ds the top ) GuiderⅡ User Guide | www.flashforge.com…
-
Page 28: Printer Start-Up
4.3 Loading Filament For stable filament loading and proper device protection, you need to install the filament guide tube properly. (4-4) Take out the filament guide tube, thread the filament from Filament Detecting Equipment GuiderⅡ User Guide | www.flashforge.com…
-
Page 29
(4-6) Insert the filament from the filament guide tube into the filament intake. Next, we will load the FlashForge filament.(Note: Please lower the build plate to incr ease the distance between the nozzle and build plate to 50mm at least for avoiding nozzle jam.) -
Page 30: Unloading Filament
(4-10) Insert the filament into the extruder at an upright angle. Then the filament will be drawn through the extruder. Do not tap [Cancel] until the filament load the extruder steadily. 4.4 Unloading Filament 4-11 GuiderⅡ User Guide | www.flashforge.com…
-
Page 31
Note: Do not pull out the filament with for ce as it will damage the gear s. If the melted filament has cooled down in the extr uder , please r epeat the steps above. GuiderⅡ User Guide | www.flashforge.com… -
Page 32: Chapter 5: Build Plate Leveling
After that, operate according to the guide on the touch screen. (5-2) After tapping [Yes], the extruder starts to move towards the first point and the plate moves up and down to verify the distance between nozzle and plate. GuiderⅡ User Guide | www.flashforge.com…
-
Page 33
[OK] button. (5-5) Repeat steps according to the prompts on the touch screen to complete second and third points leveling and then finally Tap [Finish] to exit. Leveling operating has completed! GuiderⅡ User Guide | www.flashforge.com… -
Page 34: Chapter 6: About Software
Chapter 6: About Softwar e This chapter talks about the basic function of FlashPrint. For more information about advanced function, you can browse our website www.FlashForge.com. 6.1 Softwar e Installation 6.1.1 Softwar e Acquisition Method 1: To get the installation package from the USB stick in the toolkit.
-
Page 35: Exploring Flashprint
! After starting FlashPrint, you need to select the target machine type first. When you start FlashPrint, a dialog box will pop up. Just select FlashForge Guider Ⅱ in the machine type list and click [OK]. You can also change the machine type via…
-
Page 36
File]. Then select the object file for loading. Method 4: Click [File]—[Examples] to load the example files Method 5: Click [File]—[Recent Files] to load the files opened recently. Method 6: Select and drag the target file to the icon of FlashPrint. GuiderⅡ User Guide | www.flashforge.com… -
Page 37
Bottom thickness: For tube, canister and lamp to set up bottom thickness Top diameter: For tube, canister lamp and seal to set up the top diameter Bottom diameter: For tube, canister, lamp and seal to set up the bottom diameter GuiderⅡ User Guide | www.flashforge.com… -
Page 38
Plane (6-5) Tube(6-6) Canister (6-7) GuiderⅡ User Guide | www.flashforge.com… -
Page 39
Change model views by moving, rotating, scaling. ● Dr ag Click the [View] icon and then you can move the object by the following three methods: Method 1: Hold down the left mouse button and drag. GuiderⅡ User Guide | www.flashforge.com… -
Page 40
[View] button on the left, click it again and you will see the viewing options, you can click [Reset]. ④Show Model Outline Click [View]—[Show Model Outline], it will highlight the yellow border of the object GuiderⅡ User Guide | www.flashforge.com… -
Page 41
In this way, you could make the model rotate on X/Y/Z axis. Method 2: Click the [Rotate] icon on the left, and then enter into rotating angel values in X/Y/Z axes positioning. Click [Reset] to reset rotating angel values. GuiderⅡ User Guide | www.flashforge.com… -
Page 42
6.2.8 Left-click on the model to select it and double-click on the [Cut] icon to set the cut plane. The direction and position are available for setting. ①Draw with Mouse ②X Plane GuiderⅡ User Guide | www.flashforge.com… -
Page 43
After loading the model, click [Edit]—[Suppor ts] or click the Suppor ts icon directly, then you will enter the support edit mode (as shown in the picture below). Click [Back] to exit when you finish editing. 6-10 GuiderⅡ User Guide | www.flashforge.com… -
Page 44
(if support surface doesn’t need support or the support column angle is too large, will GuiderⅡ User Guide | www.flashforge.com… -
Page 45
②Pr int when slice done: Print or not when slice done ③Mater ial type: Choose according to the type of model ④ Suppor ts: When print suspended structure models, support is necessary. Click [suppor ts] to create support part for the printing. GuiderⅡ User Guide | www.flashforge.com… -
Page 46
Top Solid Layer : Maximum is 30, minimum is 1. b. Bottom Solid Layer : Maximum is 30, minimum is 1. ● Infill a. Fill Density means fill rate. b. Fill Patter n is the pattern of filling shape which effects printing duration. GuiderⅡ User Guide | www.flashforge.com… -
Page 47
Pause At Heights: Allows users to pre-set a height in which the print will suspend automatically. The function usually applied when you want to change the filament at a certain point. (6-14) Click [Edit], then you can add or remove a height. GuiderⅡ User Guide | www.flashforge.com… -
Page 48
For .stl and .boj, models are integrated as one(include support part). If load it again, only the position of the model was saved, not included the printing parameters. Pr efer ences ③ Click [File]—[Pr efer ences], you can choose language and if needs detecting update GuiderⅡ User Guide | www.flashforge.com… -
Page 49
Allows users to undo the recent edits by the following two methods: Method 1: Click [Edit]—[Undo]. Method 2: Press the shortcut l+Z. Redo ② Allows users to redo the most recent edit you have undone to your model file by the following two methods GuiderⅡ User Guide | www.flashforge.com… -
Page 50
⑦ Click [Edit]—[Auto Layout All] after loading one or more than one models, all models will be placed automatically as automatic placement rule. Repair Models ⑧ Click [Edit]—[Repair Models] to repair models. Suppor ts ⑨ GuiderⅡ User Guide | www.flashforge.com… -
Page 51
Finally click [Connect] button to connect to the printer. If you still can not find your machine after rescan, it means you haven’t installed the driver in the software. GuiderⅡ User Guide | www.flashforge.com… -
Page 52
②Connect Guider Ⅱ with your PC under STA mode a. Tap [Tools]-[Setting]-[WiFi]-[WiFi ON] to turn on the WiFi of Guider II and connect your computer and Guider II with the same WiFi signal. b. Click [Pr int]-[Connect Machine] on FlashPrint. Then the following dialog box pops up. -
Page 53
(Specified distance refers to the move distance you set in Jog Mode. Stop: Click the [Stop] button to abort the current movement. d. XYZ coor dinate fr ame on the r ight side: Show the current position of GuiderⅡ User Guide | www.flashforge.com… -
Page 54
For PLA filament, the extruder temperature should reach 200℃, after reaching the extruder temperature, click the [For war d]/[Rever se] rotation button to control filament load GuiderⅡ User Guide | www.flashforge.com… -
Page 55
Step 3:Reboot you Guider Ⅱ and wait for 4-5 seconds, then you can see the update process bar. When the update finishes, it will go back to the main interface. Step 4:Tap [Tools]—[About] to check whether the updated version is right. GuiderⅡ User Guide | www.flashforge.com… -
Page 56
[Help]—[Check for Update] to detect the available updates online. ④ About FlashPr int : Click [Help]—[About FlashPr int], the software information box will pop up. The contents include the current software version and copyright information. GuiderⅡ User Guide | www.flashforge.com… -
Page 57: Chapter 7: Basic Printing
[Pr int]—[Machine Type] to select (7-3)Click the [Load] icon to load a .stl model file and the object will display on the build area. [Edit]—[Sur face to Platfor m] to make your model perfectly positioned (7-4)Click GuiderⅡ User Guide | www.flashforge.com…
-
Page 58
(7-5) Click the [Pr int] icon on the top, you should make some setups for your print job. Pr eview: If you check the [Pr eview] box, you can preview your model after slicing is GuiderⅡ User Guide | www.flashforge.com… -
Page 59: Print Methods
Pr int When Slice Done: If you print via USB cable, you can check the box, while if you print via USB, you should not check the box. Machine Type: FlashForge Guider Ⅱ Suppor ts: If you print a model with supports, you should click the inverted triangle and select [Enable].
-
Page 60
7.2.2 Pr int fr om Computer (WiFi connection) ① Connect your Guider Ⅱ with your PC via WiFi. (Please refer to 6.2.13 ) Enter into the IP Address shown on your GuiderII interface and then click [Connect]. GuiderⅡ User Guide | www.flashforge.com… -
Page 61
FlashPrint at the status of USB connection or WiFi connection, then click the [Pr int] button on the top-right. ● Load the target Gcode file into FlashPrint. ● Click the [Pr int] button, the PC will transfer the Gcode file to the printer. 7-10 GuiderⅡ User Guide | www.flashforge.com… -
Page 62
Abor t: To stop heating and printing. Once you tap [Abor t], the process is irreversible. Pause:To suspend the print job, you can tap it again to resume it. You can use this function when you want to change the filament halfway. GuiderⅡ User Guide | www.flashforge.com… -
Page 63
1)Register a Polar Cloud account with your computer, on website: https://polar3d.com/ Register your account using one of the four following options, take the third microsoft live option as an example, create your new Polar Cloud account. GuiderⅡ User Guide | www.flashforge.com… -
Page 64
2) Enter the Polar Cloud homepage after you create your Polar Cloud account. Tap the red icon(on the right upper corner showed in the picture below), then Tap [settings], drag down the page to bottom, copy down your Email address and your PIN Code. GuiderⅡ User Guide | www.flashforge.com… -
Page 65
Input your polar 3D cloud account’s Email address(as ID) and PIN Code, Tap[save] . 3)Enter the Polar Cloud homepage with your computer again. Tap [Explore] on the left upper corner showed in the picture below, then Tap [Objects] GuiderⅡ User Guide | www.flashforge.com… -
Page 66
Enter the objects page, choose a model you are going to print. Tap【3D PRINT】button Tap【PRINT】button GuiderⅡ User Guide | www.flashforge.com… -
Page 67
Change Filament, Pause, Stop etc. 4) More than one of the Flashforge printers can be added to a Polar 3D Cloud account, Flashforge GuiderIIS/GuiderII, Finder, InventorIIS/InventorII, Adventurer3 printers all support Polar 3D Cloud connection. -
Page 68
6)Delete a printer from a polar cloud account.(If someone else wants to use the same printer under another polar cloud account, please make sure you’v delete the printer from your current-using polar cloud account, or others can not use the printer.) GuiderⅡ User Guide | www.flashforge.com… -
Page 69
Click the printer you want to delete. Click [MANAGE] button on the right upper position of this printer’s details webpage. Then click [SETTINGS] button on the right upper position of the next webpage. GuiderⅡ User Guide | www.flashforge.com… -
Page 70
Finally, drag the next page to bottom down, click [DELETE PRINTER] button. After you’v completed the above delete steps, this printer can now be used by others under his own polar cloud account. GuiderⅡ User Guide | www.flashforge.com… -
Page 71: Chapter 8: Supports And Service
Chapter 8: Suppor ts and Ser vice FlashForge team is on standby and ready to help you with any challenges you may have with your Guider Ⅱ. If the issues or questions are not covered in this User Guide, you can seek for solutions on our official website or contact us via telephone.
-
Page 72
Weld the heating pipe joint back if you are experienced in welding, or please replace with new exchange board. 9.4 Extr uder is moving to the r ight side without stop when pr inting. Step 1. X-Axis sensor wire has loose contact or has problem: Reconnect the X-Axis GuiderⅡ User Guide | www.flashforge.com… -
Page 73
, and new filament can not be loaded into extr uder or squeezed out. 1.Other brands filament is used in printer,inferior filament has impurities or bubbles inside: Please use Flashforge filament and make sure filament be stored at clean and GuiderⅡ User Guide | www.flashforge.com… -
Page 74
Replace with new teflon tube or new nozzle. Referring operating video: https://www.youtube.com/watch?v=sPYaoRWAp2o&t=28s FlashForge-Guider II- Replacement of Nozzle and teflon Tube 9.9 Wave-like lines appear on the sur face of models. 1. Apply some lubricate grease on the Z-Axis. -
Page 75
3. X-Axis driver board is broken down(step1 and step2 is gradually shifting, step3 and step4 is whole-part shifting together with abnormal noise): Replace the new X-Axis driver board. 4.Printing speed is too fast: Lower the printing speed.(Recommended basic printing GuiderⅡ User Guide | www.flashforge.com… -
Page 76
“Please tighten knobs under the platfor m” when the knobs have alr eady been mostly tightened: Re-do the pr inter ’s extr uder calibr ation and then do the build plate leveling again. Referring operating video: Extruder calibration https://www.youtube.com/watch?v=VvjT3Y31IAw GuiderⅡ User Guide | www.flashforge.com…
инструкцияFlashforge Guider II

GuiderⅡ User Guide | www.flashforge.com 400-699-1063
!NOTE Please read FlashForge GuideII 3D Printer User Guide carefully before use. Please
well keep this User Guide for future reference.
FlashForge GuiderⅡ 3D Printer
User Guide
Посмотреть инструкция для Flashforge Guider II бесплатно. Руководство относится к категории 3D-принтеры, 3 человек(а) дали ему среднюю оценку 8. Руководство доступно на следующих языках: английский. У вас есть вопрос о Flashforge Guider II или вам нужна помощь? Задайте свой вопрос здесь
Главная
| Flashforge | |
| Guider II | 10000090001 | |
| 3D-принтер | |
| английский | |
| Руководство пользователя (PDF), Краткое руководство пользователя (PDF) |
Производительность
| Диагональ экрана | 5 « |
| Сенсорный экран | Да |
| Встроенный экран | Да |
| Нагреваемая платформа для печати | Да |
| Смотровое окно | Да |
Содержимое упаковки
| Поставляемое ПО | FlashPrint |
Вес и размеры
| Ширина | 490 mm |
| Глубина | 549 mm |
| Высота | 561 mm |
Печать
| Максимальные размеры печати (ШхГхВ) | 250 x 280 x 300 mm |
| Точность | 0.2 mm |
| Материал печати | ABS, Polylactic acid (PLA) |
| Толщина слоя (мин.) | — mm |
| Толщина слоя (макс.) | — mm |
| Технология печати | — |
| Количество цветов печати | — |
Энергопитание
| Входящее напряжение сети | 100/240 V |
| Потребляемая мощность (в обычном режиме) | 500 W |
Порты и интерфейсы
| USB порт | Да |
| Wi-Fi | Да |
| Подключение Ethernet | Да |
| Встроенный кардридер | — |
Сканирование
Гравирование
показать больше
Не можете найти ответ на свой вопрос в руководстве? Вы можете найти ответ на свой вопрос ниже, в разделе часто задаваемых вопросов о Flashforge Guider II.
Какой размер экрана Flashforge Guider II?
Какая высота Flashforge Guider II?
Какая ширина Flashforge Guider II?
Какая толщина Flashforge Guider II?
Инструкция Flashforge Guider II доступно в русский?
Не нашли свой вопрос? Задайте свой вопрос здесь
Всем привет!
Сегодня расскажем вам о новом FDM-принтере от компании FlashForge — Guider II.
- FLASHFORGE — это китайская компания Zhejiang Flashforge 3D Technology Co., Ltd., созданная в 2011 году и на сегодняшний день являющаяся одним из крупнейших производителей 3D-принтеров в мире.
- Принтеры FlashForge неизменно входят в 10ку лучших на сайте энтузиастов 3D-печати 3DHUBS. Их очень ценят за надежность и прекрасное соотношение цены и качества.

Внешний вид.
На фото Guider хоть и выглядит не маленьким, но в живую его размер поражает. На фото он почему то казался меньше=)
Дизайн принтера очень лаконичный — черный матовый закрытый корпус из ударопрочного ABS пластика с отверстиями для удобной переноски принтера. В верхней части находится большой 5 дюймовый сенсорный дисплей. Большому принтеру — большой дисплей и это очень классно! Некоторые производители экономят и ставят совсем небольшие дисплеи на огромные принтеры. Это конечно не влияет на функционал, но смотрится немного некрасиво. Guider несмотря на свои размеры выглядит очень гармонично.
Вот он красавец на выставке 3D PrintExpo 2017=)

Видно что разработчики постарались сделать принтер максимально компактным при максимально большой области печати и по максимуму использовали внутреннее пространство.
Принтер получился очень добротным и надежным. Даже в мелочах Guider приятно удивляет. Чего только стоят ‘петли’ на дверце=)

Характеристики.
- Диаметр нити: 1.75 мм
- Размер области построения: 280*250*300 мм
- Количество экструдеров: 1
- Толщина слоя: 0,05-0,4 мм
- Диаметр сопла: 0.4 мм
- Рабочая температура экструдера: 0 — 240С
- Рабочая температура стола: 0 – 120С
- Дисплей: 5” LCD touchscreen
- Интерфейс подключения: USB, USB накопитель, Wi-Fi
- Вес принтера: 11 кг
- Размеры принтера: 549*490*561 мм
- Стоимость принтера: 115 000 рублей
Кинематика.
Первое что удивило после включения принтера — это то что ноль по оси z находится внизу. Это немного необычно.
Вместо обычных «концевиков» по всем осям стоят оптические датчики. Это должно повысить точность печати.
По оси z установлен трапецеидальный винт. При таких размерах принтера конечно привычнее видеть более массивный ШВП, но на практике оказалось, что трапеции и 2х направляющих вполне достаточно. Никаких проблем по оси z у принтера нет=)

Экструдер упакован в симпатичный кожух.

Добавили датчик для калибровки стола. И сделали обдув сразу с 4х сторон. Поэтому несмотря на внушительную область печати принтер может очень качественно печатать даже небольшие детали.

Есть еще несколько приятных нововведений. Это в первую очередь датчик наличия филамента. При печати больших моделей это становится незаменимой функцией.
И конечно очень приятно что была добавлена функция возобновления печати после отключения электричества.
Очень обидно, когда приходится целиком перепечатывать или склеивать большую деталь из-за недолгого отключения света или скачка напряжения.
Слайсер.
Слайсер остался прежним – FlashPrint.

Помимо таких удобных функций как ручное редактирование поддержек и возможность нарезки моделей была добавлена очень интересная функция компенсации усадки.

Можно задать компенсацию внешнюю и внутреннюю (например, для печати трубчатой детали).
Сначала печатается пробная деталь. Измеряется. И вносятся значения компенсации, которые в дальнейшем будут использоваться для слайсинга модели.

Для того что бы воспользоваться функцией компенсации нужно в настройках включить Expert mode.

Также с принтером можно связаться по Wi-Fi с телефона через новое приложение Happy 3D.

Happy 3D – это приложение для простого моделирования с телефона или планшета, с возможностью сразу отправить модель на печать по Wi-Fi. Вполне подойдет для не очень сложных моделей, интересная и главное актуальная разработка.
Подготовка к печати.
Для управления принтером используется цветной 5 дюймовый сенсорный дисплей. Сенсор очень удобный и отзывчивый.
Благодаря датчику на печатающей голове калибровка упрощена до максимума. Нужно всего лишь следовать указаниям на дисплее.

Принтер сам подскажет в какую сторону нужно крутить гайку под столом. И проконтролирует расстояние от сопла до стола.
Это будет очень полезно новичкам в 3D печати. По статистике самая большая проблема для начинающего 3D печатника – это выравнивание плоскости стола и выставление зазора между столом и соплом.

Готовим модель к печати.
Из-за тефлоновой трубки в экструдере производитель ограничил температуру сопла 240 градусами. Из-за этого могут возникнуть проблемы при печати ABS и невозможность печати высокотемпературными пластиками несмотря на наличие подогреваемого стола. Стол кстати можно нагреть до 120 градусов.
Результаты печати.
Ну и конечно обзор не был бы полным без результатов печати.
Слой 0,18, PLA пластик.

На удивление все лепестки легко и плотно встали в пазы.

Прозрачный PLA фирмы ESUN, слой 0,18.


Слой 0,30, прозрачный PLA фирмы ESUN.


Во время печати мы проверили функцию возобновления после отключения электричества. При выключении питания принтер успевает сделать ‘подскок’ (немного опустить стол). Скорее всего это сделано что бы на модели не оставалось соплей которые могут натечь пока сопло будет остывать.

По умолчанию функция возобновления печати отключена. Ее нужно включить в настройках принтера.
Итоги.
Принтер оказался очень достойным. Очень приятно видеть что производители стараются максимально упростить работу с принтером для начинающего пользователя.
Основные плюсы:
- Простая калибровка стола.
- Датчик окончания филамента.
- Закрытый корпус.
- Возможность продолжить печать после отключения электричества.
- Компенсация усадки.
Но конечно не обошлось без ложки дегтя. Самые существенные недостатки на наш взгляд:
- Ограничение температуры экструдера 240 градусами.
- Невозможно поменять параметры во время печати.
Подписывайтесь на наши группы в Facebook, VK и YouTube, чтобы быть в курсе последних событий =)
[IMG]https://vk.com/cvetmir3d[/IMG]


Команда компании Цветной Мир
www.cvetmir3d.ru
Смотреть руководство для Flashforge Guider II ниже. Все руководства на ManualsCat.com могут просматриваться абсолютно бесплатно. Нажав кнопку «Выбор языка» вы можете изменить язык руководства, которое хотите просмотреть.

MANUALSCAT | RU
Вопросы и ответы
У вас есть вопрос о Flashforge Guider II, но вы не можете найти ответ в пользовательском руководстве? Возможно, пользователи ManualsCat.com смогут помочь вам и ответят на ваш вопрос. Заполните форму ниже — и ваш вопрос будет отображаться под руководством для Flashforge Guider II. Пожалуйста, убедитесь, что вы опишите свои трудности с Flashforge Guider II как можно более детально. Чем более детальным является ваш вопрос, тем более высоки шансы, что другой пользователь быстро ответит на него. Вам будет автоматически отправлено электронное письмо, чтобы проинформировать вас, когда кто-то из пользователей ответит на ваш вопрос.
Задать вопрос о Flashforge Guider II
- Бренд:
- Flashforge
- Продукт:
- 3D-принтеры
- Модель/название:
- Guider II
- Тип файла:
- Доступные языки:
- английский
Сопутствующие товары Flashforge Guider II
3D принтер FlashForge Guider II — одна из самых удачных моделей устройств китайского производителя. Созданный на базе Creator Pro, Guider II вобрал в себя все самое лучшее и получил достойные изменения, которые повысили качество принтера. 3D принтер подойдет для личного использования, применения в образовательных учреждениях, а также для небольшого производства.
Одним из преимуществ Guider II является довольно большая область построения 280х250х300 мм. Несмотря на это размеры оборудования позволяют разместить его на рабочем столе. Максимально рациональное использование внутреннего пространства принтера позволило сделать его аккуратным и лаконичным. Жесткий корпус из пластика и акриловые прозрачные крышки для наблюдения за печатью защищают устройство от механических повреждений и влияния внешней среды на печать.
Улучшенная механика с цельнометаллическими каретками и направляющими в виде валов обеспечивают максимальную точность печати. Качественная электроника и ставшие классикой функция автоматического возобновления печати, датчик окончания нити делают работу максимально комфортной.
Guider II оснащен экструдером с температурой нагрева 300°, который позволяет расширить спектр используемых материалов. Принтер совместим не только со стандартными пластиками типа PLA и ABS, но также может работать с PETG, Carbon и другими нитями. Благодаря подогреву рабочего стола до 120°С и стабильной температуре камеры, качество печати любыми совместимыми пластиками всегда остается на высоте.
Настройками и параметрами принтера можно управлять с помощью сенсорного экрана 5 дюймов. В экспертном режиме пользователям доступны продвинутые настройки, например, компенсация усадки, которые делают печать еще более точной.
Устройство легко подключается к ПК с помощью USB или Ethernet соединения, а также имеет возможность принимать файлы для печати через Wi-Fi. Производитель предлагает пользователям все возможности облачного сервиса FlashCloud для удобного обмена данными. А с приложением для смартфонов и планшетов Happy 3D можно быстро создавать простые модели и отправлять их в печать через Wi-Fi.
FlashForge Guider II — отличный выбор для тех, кто устал от ограничений бюджетных моделей и хочет в полной мере использовать преимущества FDM печати в работе и хобби.
Вы можете купить 3D принтер FlashForge Guider II в нашем офисе в Москве, с гарантией и доставкой по России от официального дилера.