
Suggest us how to improve StudyLib
(For complaints, use
another form
)
Your e-mail
Input it if you want to receive answer
Rate us
1
2
3
4
5
-
OVR 4100S/8100S/6100SN v1.0 User Guide Omnivision Pty Ltd Page 66 of 98 Step 4: Connect your iPhone to the computer, you will find your Device displayed on the left sidebar. Select the DEVICES ID, and then click “Applications” option. Then select “Sync Applications” & “Scdvr” and click “Sync” button. The device ID differs from iPhone to iPhone Step 5: After finishing the sync, you will find the Scdvr Icon on your iPhone . Select that to launch the application.
-
Omnivision 16CH H264 DVR OVR 4100S/8100S/6100SN v1.0 User Guide Omnivision Pty Ltd Page 60 of 98 and «password”). Press “ok” to save. 7-3.2.2 Log in onto the DVR Multiple DVR information can be saved with the software, therefore, please choose the DVR which you want to connect to then Press “Option” → “Login” to log in to the DVR for live monitoring. Before connecting to the DVR, there might be a packet download confirmation message which appears on some mobile devices. Press �
-
Omnivision 16CH H264 DVR OVR 4100S/8100S/6100SN v1.0 User Guide Omnivision Pty Ltd Page 68 of 98 7-5 Mobile Application Installation and Operation for Android Phones 7-5.1 Software Installation System requirements: Google Android 2.1 System Internet needed for Mobile device operation platform (GPRS/ 3G/ Wifi…etc.) Follow the following instructions to install the mobile application on your android devise. Step 1. Open App market in your phone. Step 2. Search for the mobile application “Bubo Budo”.
-
OVR 4100S/8100S/6100SN v1.0 User Guide Omnivision Pty Ltd Page 14 of 98 3-1 RECORD SETUP Item Description HDD FULL Select STOP to stop recording or OVERWRITE to reuse the HDD when HDD is full Stop Stop Recording Overwrite Start to overwrite that begin from the oldest data of HDD, and continue to record. OSD position X Setup OSD X axis OSD position Y Set up OSD y axis OSD position setup Set up OSD axis Video Preservation Setup the video preservation period. Recorded video will be deleted automatically after expir
-
Omnivision 16CH H264 DVR OVR 4100S/8100S/6100SN v1.0 User Guide Omnivision Pty Ltd Page 72 of 98 When in Landscape mode, the toolbar is hidden by default, tap on the screen to get th e tool bar. Taping on the screen again will hide the tool bar again.
-
OVR 4100S/8100S/6100SN v1.0 User Guide Omnivision Pty Ltd Page 46 of 98 CHAPTER 6 SPECIFICAITONS Model OVR — 4100S OVR — 8100S OVR — 6100SN Camera Input 4 CH 8 CH 16 CH Video HDMI 1 (Option) (Video Output [128 0x1024] + Audio Output) 1 (Option) (Video Output [128 0x1024] + Audio Output) 1 (Option) (Video Output [1280 x1024] + Audio Out put) Input 4 8 16 Output 1VGA (1280×1024) + 1BNC for CO-Monitor / 1VGA (1280×10 24) + 1BNC for SPOT Monitor. Audio Input 4
-
─ ── ─ 4/8/16CH H264 DVR ─ ── ─ USER GUIDE Unit 3, 3-5 Gilda Crt Mulgrave VIC 3170 T: 1300 688 788 www.omnivision.net.au [email protected] User Manual OVR 4100S/8100 S/6100S N v 1.0 Information contained in this document is subject to change without notice. Copyright © 2011 Omnivision Pty Ltd
-
Omnivision 16CH H264 DVR OVR 4100S/8100S/6100SN v1.0 User Guide Omnivision Pty Ltd Page 13 of 98 Table 3-0.2 Functionality of the remote control in setup mode Item Description Switch to different options under one item Switch to different items MENU Save setup and back to LIVE mode ESC Back to Upper level of menu without saving ENTER Enter the menu, or display virtual keyboard PS. All new HDD’s needs to be initialized before recording can be started please refer to “3-9 UTILITY SETUP” for detail.
-
Omnivision 16CH H264 DVR OVR 4100S/8100S/6100SN v1.0 User Guide Omnivision Pty Ltd Page 29 of 98 Item Description Enable PTZ Click the box to Enable/Disable PTZ function for each channel. Protocol Set up the protocol of PTZ cam. The supported protocols are PELCO-P, PELCO-D, KND, LI-LIN, SAMSUNG, LG, AVTECH. PTZ ID Click or press ◀ ◀ to set up PTZ ID. The valid ID value is from 1 to 64. Baud Rate Select Baud Rate for PTZ from 2400, 4800, 9600,19200 RS-485 ID Select RS-485 ID from 1 to 64 RS-485 Baud Rate Select RS-485 Baud Rate from 2400. 4800, 9600,19200 Keyboard Select Keyboard. (Li
-
Omnivision 16CH H264 DVR OVR 4100S/8100S/6100SN v1.0 User Guide Omnivision Pty Ltd Page 75 of 98 8-2 CMS LOGIN AND ENVIRONMENT You need to login to the system before you can start using the CMS system. The defaults are ‘admin’ and ‘123456’. After successful login, the following image will be shown on your screen: 1 DVRs, Groups & Events Information about DVRs, groups and events. See “8-3 Information List” for more detail. 2 P
-
OVR 4100S/8100S/6100SN v1.0 User Guide Omnivision Pty Ltd Page 5 of 98 CHAPTER 2 LIVE, PLAYBACK AND PTZ OPERATIONS The IR remote control and the mouse operate differently under each mode; this chapter describes the functions of them under the three different modes: LIVE, PLAYBACK and PTZ. 2-1 LIVE Mode You can monitor all the channels, listen to audio signal and have some related operations under LIVE mode. This paragraph describes the IR remote control, mouse operation
-
OVR 4100S/8100S/6100SN v1.0 User Guide Omnivision Pty Ltd Page 91 of 98 4. After installation, IE remote monitoring image appears. 5. If message, “Your security Settings do not allow web sites to use ActiveX controls installed on your computer.” pops on when logging in, please follow the next instruction. 6. First select “Tools” on the tool bar and then select “Internet Options”
-
Omnivision 16CH H264 DVR OVR 4100S/8100S/6100SN v1.0 User Guide Omnivision Pty Ltd Page 21 of 98 3-4 CAMERA SETUP Item Description 1~16 You can setup independently for each channel. Mask Check the box to Enable/Disable mask function for LIVE mode Sharpness Drag the bar or press ◀ ◀ to adjust Sharpness of your camera from value 1 to 255. The default value is 1. Brightness Drag the bar or press ◀ ◀ to adjust Brightness of your camera from value 1 to 255. The default value is 128. Contrast Drag the bar or
-
Omnivision 16CH H264 DVR OVR 4100S/8100S/6100SN v1.0 User Guide Omnivision Pty Ltd Page 45 of 98 5-3 Remote Desktop Software Operation Open the file “DVRemoteDesktop.exe”; enter the information of the DVR (“IP address”, “Port” “Username” and “Password”) and click “OK”. You should be able to login to the DVR successfully and start using the remote desktop software. The default username and password is “admin / 123456” “DVRemoteDesktop.exe” AP software provides some extra functions for remote users. Please check Table 5-3.1 for minimum system requir
-
Omnivision 16CH H264 DVR OVR 4100S/8100S/6100SN v1.0 User Guide Omnivision Pty Ltd Page 44 of 98 Step Three: Click on “Internet Explorer 6, 7, and 8” login to the system using IE. When accessing the system for the first time using IE a security warning will be displayed seeking authority to install an ActiveX component. Please refer to Appendix I for Remote Monitoring IE ActiveX Control Installation Instruction. Step Four: DVR images appear. Note 4CH DVR will display 4 channels and 8CH DVR will display 8 channels.
-
Omnivision 16CH H264 DVR OVR 4100S/8100S/6100SN v1.0 User Guide Omnivision Pty Ltd Page 18 of 98 3-2.2 SENSOR SETUP Item Description Sensor Popup Check the box to Enable/Disable popup screen function for all channels. When Sensor is detected in LIVE mode, the detected channel image will pop up in full screen display. All Off Set all sensor off All Low Set all sensor polarity low All High Set all sensor polarity high Sensor Polarity Click or press ▼ to select between HIGH, LOW voltage for triggering sensor detection or OFF to turn
-
Omnivision 16CH H264 DVR OVR 4100S/8100S/6100SN v1.0 User Guide Omnivision Pty Ltd Page 48 of 98 Alarm Hold Time 1 ~ 60 SEC Search ( Event Cr iterion ) YES Event Log Up to the 10000 events (Sensor, Motion, video Loss, power on, remote login, logout, HDD error, HDD full) OSD & DVR Control GUI 16-bit True Color Multi — Language English, Traditional Chinese, Others Camera Title Multi-Language USB Mouse YES Touch Panel Touch Panel LCD Monitor (USB Interfac
-
Omnivision 16CH H264 DVR OVR 4100S/8100S/6100SN v1.0 User Guide Omnivision Pty Ltd Page 81 of 98 8-5.3 PTZ Control In the main display, right clicking on a live image will bring up the PTZ controls for the selected channel. PTZ communication protocols differs from manufacturer to manufacturer and not all PT Z
-
Omnivision 16CH H264 DVR This symbol is intended to alert the user to the presence of unprotected “Dangerous voltage» within the product’s enclosure that may be strong enough to cause a risk of electric shock. This symbol is intended to alert the user to the presence of important operating and maintenance (servicing) instructions in the literature accompanying the appliance. WARNING TO REDUCE THE RISK OF FIRE OR ELECTRIC SHOCK, DO NOT EXPOSE THIS APPLIANCE TO RAIN OR MOISTURE. NOTE: This equipment has been tested and found to comply
-
Omnivision 16CH H264 DVR OVR 4100S/8100S/6100SN v1.0 User Guide Omnivision Pty Ltd Page 71 of 98 When the configuration of the DVR connection is completed depress the Edit button (Edit button turns white) go to the connection mode. Select the new button to add a new DVR configuration. To establish a DVR connection select the desired DVR configuration. This will initiate a DVR remote connection. If h264 has been selected as the image type the connection wi ll take loner time to display th
-
Omnivision 16CH H264 DVR OVR 4100S/8100S/6100SN v1.0 User Guide Omnivision Pty Ltd Page 65 of 98 7-4 Mobile Application Installation and Operation for Apple iPhone 7-4.1 Software Installation Follow the following instructions to install the iPhone mobile application in your phone. Step 1: Login to iTunes Store/ App store using your devise or a PC, and then input “scdvr” into the search bar to search for the mobile application. . Step 2: You will find the Scdvr icon displayed as below. Click on the icon and it will take you to the download page. Click the “FREE APP” butt
-
OVR 4100S/8100S/6100SN v1.0 User Guide Omnivision Pty Ltd Page 22 of 98 3-5 ACCOUNT SETUP The Account Setup menu is used to provide role-based permissions independently for each user (maximum of 4 users) to access the DVR over the network. The default admin account and password is “admin” and “123456” The default password remains the same after firmware upgrade, however, when changing the default password the length of the new password needs to be minimum 8-digits. Item Description No. Check to activate the user’s
-
OVR 4100S/8100S/6100SN v1.0 User Guide Omnivision Pty Ltd Page 85 of 98 8-6.4 eMap Administration If geographical locations are relevant, or if it is desired to use a picture as the background, eMap can be used for this purpose. With eMap, a background picture can be picked by the user and channels from multiple DVRs can be placed and dragged around on the picture. Steps to follow: 1. Click to select the path of the eMap image. 2. S
-
Omnivision 16CH H264 DVR OVR 4100S/8100S/6100SN v1.0 User Guide Omnivision Pty Ltd Page 62 of 98 7-3.2.3 Modify the Login Information of DVR If log-in information for a given system wished to be modified, please select that DVR. Enter “Option” → “Modify” for editing the existing data. Press “OK” when it’s finished. 7-3.2.4 Delete Existing DVR Record (Connection Information) If connection information for a DVR is no longer needed, please select the DVR. Press “Option” → “Delete” to delete the DVR connection information.
-
Omnivision 16CH H264 DVR OVR 4100S/8100S/6100SN v1.0 User Guide Omnivision Pty Ltd Page 76 of 98 Instruction for Log-in Failure to CMS after CMS Upgrade When trying to login to the CMS using the default account and password after a CMS upgrade an error message will be displayed. If an error message occurs as shown in the image, please follow the instructions below to rectify the error. Step 1: When in Windows go to the “Windows” folder and then the folder “Systme32” (Eg:C:\Windows\System32) Step 2: Locate file, “iCMS.dat” and delete it. Step 3: Re
-
Omnivision 16CH H264 DVR OVR 4100S/8100S/6100SN v1.0 User Guide Omnivision Pty Ltd Page 74 of 98 5.”Confirm Installation” window shows. Select ‘Next’ then the installation starts. 6. Select ‘Close’ to finish installation when the “Installation Complete” window is show n.
-
OVR 4100S/8100S/6100SN v1.0 User Guide Omnivision Pty Ltd Page 89 of 98 8-6.10 Recording Data This function is used to playback all the recording files you’ve recorded using the CMS. You can play or delete them here. Steps to follow: 1. Choose the desired recording from the left plane of the window to playback recording on the main display. 2. You can choose the display mode. 3. Time bar will be shown at right lower corner; please drag the time bar to navigate to a
-
Omnivision 16CH H264 DVR OVR 4100S/8100S/6100SN v1.0 User Guide Omnivision Pty Ltd Page 80 of 98 8-5.2 eMAP Display In Live mode, pressing will show the e-MAP menu. If the channel has been set u to use e-MAP, the menu will show all the e-MAP titles that have been assigned to this channel; otherwise, “No eMaps” will be shown. Please check “8-6.4 eMAP administratio n” for setup information.
-
Omnivision 16CH H264 DVR OVR 4100S/8100S/6100SN v1.0 User Guide Omnivision Pty Ltd Page 90 of 98 APPENDIX I Remote Monitoring IE ActiveX Control Installation Instruction When using IE for remote monitoring for the first time, IE ActiveX Control is needed to be downloaded. 1. When remote monitoring on IE for the first time, an alert message occurs “Install ActiveX control” on the tool bar. 2. Click at this alert message and select “Install ActiveX Control” 3. “Do you want to install this so
-
Omnivision 16CH H264 DVR OVR 4100S/8100S/6100SN v1.0 User Guide Omnivision Pty Ltd Page 59 of 98 Step 6: Using the Blackberry Desktop Manager go to the location where the “codname.alx” is stored and select he file to execute mobile application installer and install the mobile application on your Blackberry devise. 7-3.2 Mobile Software operation After the software is installed completely, go to the “Download” menu in the mobile device and execute program, “H.264Midlet” 7-3.2.1 Adding new DVR connection In order to connect to a DVR, the DVR information needs to be loaded o
-
Omnivision 16CH H264 DVR OVR 4100S/8100S/6100SN v1.0 User Guide Omnivision Pty Ltd Page 23 of 98 3-5.1 Permission Setup In this section you an setup role-based permissions for each individual user (maximum of 4 users) , including access to Setup menu, Network operation, PTZ function, Playback, Utility, Backup, Password expiry date and Mask on specific channels while playing back. 3-5.2 User Picture Setup Here the user icon for the user can be changed. Select the desired picture from the HD D and select OK to change the
-
OVR 4100S/8100S/6100SN v1.0 User Guide Omnivision Pty Ltd Page 25 of 98 3-6.1.2 LAN Select LAN to assign a static IP address for the system, the following information is required. Item Description IP Address Enter IP address provided by ISP / Network Administrator Subnet Mask Enter IP address of Subnet Mask provided by ISP / Network Administrator Gateway Enter IP address of Gate way provided by ISP/ Network Administrator DNS Enter
-
Omnivision 16CH H264 DVR Omnivision Pty Ltd Page 1 of 98 CHAPTER 1 PANEL LOCATION 1-1 FRONT PANEL CONTROLS Control Keys Description DVD Writer Optional DVD-RW backup device. / In SETUP mode, press to move cursor down. In PLAYBACK mode, press to stop playing back. / SLOW In SETUP mode, press to move cursor up. In PLAYBACK mode, press to slow down. / In SETUP mode, press to increase value. In PLAYBACK mode press to play forwards
-
5-1 I NSTALLING AND USING THE REMOTE DESKTOP CLIENT ………………………………….. 41 5-2 R EMOTE MONITORING THROUGH IE ………………………………………………………………… 43 5-3 R EMOTE D ESKTOP S OFTWARE O PERATION ………………………………………………………… 45 CHAPTER 6 SPECIFICAITONS ……………………………………………………………………………. 46 CHAPTER 7 MOB
-
Omnivision 16CH H264 DVR OVR 4100S/8100S/6100SN v1.0 User Guide Omnivision Pty Ltd Page 54 of 98 7-2 Mobile Application Installation and Operation for Windows Mobile System Windows mobile application “h264pocket” can be transferred to your mobile using a Bluetooth connection or by using the USB cable. System Requirements: Mobile device OS Windows mobile system 5.0 above Mobile device needs to have an active data connection such as GPRS 3G Wi-Fi… etc. 7-2.1 Mobile Application Installation Please follow the following step
-
Omnivision 16CH H264 DVR OVR 4100S/8100S/6100SN v1.0 User Guide Omnivision Pty Ltd Page 4 of 98 1-4 4CH REAR PANEL CONNECTORS SPOT monitor BNC port to display full screen image of all installed cameras in sequence. (depends on model) VIDEO IN BNC input ports for cameras, 4 in total. AUDIO IN RCA input port for audio signal. There are 4 ports available. (corresponding to channel 1 to 4) AUDIO OUT RCA output port for audio signal. LAN
-
Omnivision 16CH H264 DVR OVR 4100S/8100S/6100SN v1.0 User Guide Omnivision Pty Ltd Page 47 of 98 Mode Manual, Motion, S ensor, Schedule Manual, Motion, Sensor, Schedule Sp eed NTSC D1 120 fps(704 x 480) HD1 120 fps(704 x 240) CIF 120 fps(352 x 240) D1 120 fps(704 x 480) HD1 240 fps(704 x 240) CIF 240 fps(352 x 240) D1 120 fps(704 x 4 80) HD1 240 fps(704 x 240) CIF 480 fps(352 x 240) PAL D1 100 fps(704 x 576) HD1 100 fps(704 x 288) CIF 100 fps(352 x 288
-
Omnivision 16CH H264 DVR OVR 4100S/8100S/6100SN v1.0 User Guide Omnivision Pty Ltd Page 50 of 98 7-1.2 Mobile Application Operation After the installation, enter the Program Files menu in your mobile device to run the application “DVRH264”. Select “Menu” at the bottom right hand corner of your mobile screen, 4 commands, Login Add Modify and Delete, will show up. 7-1.2.1 Add New Login DVR To log into the DVR, you need to enter the logging-in information for the DVR. Find “Add” under the “Menu” then en
-
OVR 4100S/8100S/6100SN v1.0 User Guide Omnivision Pty Ltd Page 20 of 98 3-3.1 Schedule Record Setup The recording schedule window is displayed when the time shown on the corresponding schedule is selected. You can modify the criteria for the selected recording schedule in this window. Different recording methods based on the time and/or date of the week ca n be selected. If you require a separate recording schedule for holidays select holidays f or
-
Omnivision 16CH H264 DVR OVR 4100S/8100S/6100SN v1.0 User Guide Omnivision Pty Ltd Page 55 of 98 7-2.2 Mobile Application Operation After the installation, enter the start menu your mobile device and select “H264Pocket” to run the mobile application. This application allows you to remotely logon and monitor DVR. Press “OK” to bring up the operations menu, refer to the following table for further description of the factions. Item Function
-
OVR 4100S/8100S/6100SN v1.0 User Guide Omnivision Pty Ltd Page 88 of 98 8-6.8 Event Playback Event recordings on the DVR can be played back in CMS. Steps to follow: 1. Select a DVR and a display mode. 2. Select a date. 3. Double click an event and play back the event on the right hand display panel. Use buttons at the bottom to control the playback. 8-6.9 Snapshot Data This function will display all the snapshots you’ve taken using the CMS. You can review, delete or save the im
-
Omnivision 16CH H264 DVR OVR 4100S/8100S/6100SN v1.0 User Guide Omnivision Pty Ltd Page 3 of 98 1-3 8CH REAR PANEL CONNECTORS SPOT monitor BNC port to display full screen image of all installed cameras in sequence. (depends on model) VIDEO IN BNC input ports for cameras, 8 in total. AUDIO IN RCA input port for audio signal. There are 4 ports
-
Omnivision 16CH H264 DVR OVR 4100S/8100S/6100SN v1.0 User Guide Omnivision Pty Ltd Page 31 of 98 3-8.2 DATE/TIME SETUP Item Description Hour Format 12HOURS/ 24HOURS Date Format MM-DD-YY/DD-MM-YY/YY-MM-DD Date/Time Position Choose the position of Time and Date display Change Date & Time Setup time and date of DVR Time Zone Setup Set up GMT and Daylight Saving Time. Internet Time Setup Setup automatic synchronization with internet time server 3-8.2.1 CHANGE DATE & TIME Setup date and time of the DVR
-
OVR 4100S/8100S/6100SN v1.0 User Guide Omnivision Pty Ltd Page 37 of 98 CHAPTER 4 BACKUP & SEARCH 4-1 BACKUP MENU User can backup any segment of the recorded data stored on the system. To do so, either a CD/DVD or storage device, like USB, must be connected to the DVR. Recorded data can also be backed up into a remote PC through our remote access software: DVRemoteDesktop.exe and be saved in your assigned path. The format of backup file is IRF (proprietary) which can be played by using “iFilePlaypack”, “DVRemoteDesktop.exe” or “CMS�
-
OVR 4100S/8100S/6100SN v1.0 User Guide Omnivision Pty Ltd Page 6 of 98 Table 2-1.2 Graphical icons that will display after right-clicking your mouse under LIVE mode Icon Description Resting the cursor on this icon will bring up the following four menu icons. Main menu. Search menu. Backup menu. PTZ mode. Turn on/off recording. Playback. Resting the cursor on this icon will bring up the following five display icons. FREEZE. PIP, picture in picture ZOOM, double
-
Omnivision 16CH H264 DVR OVR 4100S/8100S/6100SN v1.0 User Guide Omnivision Pty Ltd Page 41 of 98 CHAPTER 5 Remote Software Installation and Setup 5-1 Installing and using the remote desktop client Remote Desktop Client software: DVR Remote Desktop.exe allows you to remotely access and control the DVR from a remote PC. p.s. Operating systems currently supported includes Windows XP SP2 and above Windows Vista and Windows 7 To install the Remote Desktop application please follow the following guidelines. Step One Enter th
-
OVR 4100S/8100S/6100SN v1.0 User Guide Omnivision Pty Ltd Page 15 of 98 3-1.1 Quality & Frame Rate Setup Note 4CH DVR will display 4 channels and 8CH DVR will display 8 channels. Item Description Normal setup/ event setup Select recording mode Resolution Select recording resolution: NTSC:352×240, 704×240, 704×480 PAL:352X288,704X288,720X576 Record Type You can setup quality and FPS separately for record type. No. Check/unc
-
Omnivision 16CH H264 DVR OVR 4100S/8100S/6100SN v1.0 User Guide Omnivision Pty Ltd Page 69 of 98 Step 4. Choose “BuboBubo” and click “Install” button. When the installation is complete tap on the icon to launch the application. 7-5.2 Mobile Software Operation When the application is opened for the first time, there will be a empty record (dvr1) by default.
-
Omnivision 16CH H264 DVR OVR 4100S/8100S/6100SN v1.0 User Guide Omnivision Pty Ltd Page 58 of 98 Step 3 Execute “Application Loader” Step 4: Execute “Add/Remove Applications” Step 5: Copy «codname.alx” and “codname.cod” which can be found on the User Manual CD (packed with the DVR) to the PC.
-
OVR 4100S/8100S/6100SN v1.0 User Guide Omnivision Pty Ltd Page 39 of 98 Item Description Criteria Setup conditions of event search Page Switch between pages of events Date/Time Date/time when event occurred. Event Type Event type, defined as following MOTION Motion Detected SENSOR Sensor Detected Video Loss Video Loss Remote Login user log-in over the network Remote Logout user log-out over the network Power On DVR Power on HDD Full HDD Space FULL HDD Error Detect H
-
Omnivision 16CH H264 DVR OVR 4100S/8100S/6100SN v1.0 User Guide Omnivision Pty Ltd Page 87 of 98 8-6.6 HDD Playback You can use the CMS to play back the recorded data captured by the CMS to the local HDD in the remote PC. The left part of screen shows recorded data in a list separated by every hour. You can change the display modes and play files in normal fast forward or rewind. Pausing of playback is also available. 8-6.7 File Playback You can play backed up .irf files using the “File P
-
Omnivision 16CH H264 DVR OVR 4100S/8100S/6100SN v1.0 User Guide Omnivision Pty Ltd Page 8 of 98 2-2 PLAYBACK Mode Switch to PLAYBACK mode by pressing “PLAY” under the LIVE mode, the graphical icon will show up on the upper center of the screen and the operation panel (see below picture) will show up at right lower corner of the screen. You can drag the panel by mouse to place it on any location of your screen. Table 2-2.1 Remote control functions under the PLAYBACK mode Button Description ENTER / MODE Switch to full screen, quad, 9-channel or 16-channel display. MENU / Turn on/off PAUSE. PLA
-
TABLE OF CONTENTS CHAPTER 1 PANEL LOCATION ……………………………………………………………………………. 1 1-1 FRONT PANEL CONTROLS …………………………………………………………………………… 1 1-2 16CH REAR PANEL CONNECTORS ………………………………………………………………. 2 1-4 8CH REAR PANEL CONNECTORS …………………………………………………………………. 3 1-5 4CH REAR PANEL CONNECTORS .
-
Omnivision 16CH H264 DVR OVR 4100S/8100S/6100SN v1.0 User Guide Omnivision Pty Ltd Page 63 of 98 7-3.3 Live Image Operation After successfully connecting to a DVR a live camera feed will be displayed on the screen. You can change channel displayed, perform image quality adjustments; receive alarms using the mobile application. 7-3.3.1 Live Image Display The displayed live feed can be changed by selecting “Single” then selecting the channel which needs to be viewed. Note If recording function is turned off for any channel in from the DVR, that channel will not be available for
-
Omnivision 16CH H264 DVR OVR 4100S/8100S/6100SN v1.0 User Guide Omnivision Pty Ltd Page 24 of 98 3-6 NETWORKING SETUP 3-6.1 NETWORKING SETUP There are three ways to connect to the network as follows. 3-6.1.1 DHCP When DHCP is selected, IP address will be assigned by the DHCP server automatically. Item Description Connect type Setup mode for network connection: (DHCP LAN ADSL). HTTP Setup Enter to set up HTTP DDNS Setup Enter to set up DDNS Mail Setup Enter to set up mail
-
Omnivision 16CH H264 DVR OVR 4100S/8100S/6100SN v1.0 User Guide Omnivision Pty Ltd Page 36 of 98 3-10 DIAGNOSTIC Item Description Version The current firmware version of DVR IP The connected IP address of DVR. If disconnected from network, the screen will display” NETWORK DISCONNECT”. MAC MAC Address of DVR HDD Status No. HDD number Volume HDD Capacity Used Rate Percentage of space used on HDD. Status Shows HDD status. USING means the HDD is being used for recording now GOOD/BAD means the HDD has a known/unknown format for the DVR. (Note: Please initialize your newly-installed HDD before
-
NSTRUCTION ………………………………………………………………………………………………………. 90
-
Omnivision 16CH H264 DVR OVR 4100S/8100S/6100SN v1.0 User Guide Omnivision Pty Ltd Page 79 of 98 8-5 Main Display The main display area is where the live image of the DVR is shown. You can drag to change the location of screen for each channel and turn on/off audio signal with mouse-click. 8-5.1 Audio Control In live mode, you can turn on/off the audio signal for Ch1~Ch4: Audio signal is On Audio signal is Off Turn on/off by clicking on the graphical icon, please note that the application can only h andle one
-
Omnivision 16CH H264 DVR OVR 4100S/8100S/6100SN v1.0 User Guide Omnivision Pty Ltd Page 93 of 98 9. Newly added website will appear under the trusted web sites list. Press close. 10. Go back to IE window, press refresh button or F5.
-
OVR 4100S/8100S/6100SN v1.0 User Guide Omnivision Pty Ltd Page 32 of 98 3-8.2.2 TIME ZONE AND DAYLIGHT SAVING TIME SETUP Set up time zone and activate Daylight Saving Time function according to user’s DVR location. Item Description Select Time Zone Enter to modify GMT from GMT- 13 to GMT+ 13 Daylight Saving Time Turn on/ off Daylight Saving Time 3-8.2.3 INTERNET TIME SETUP Synchronize your DVR time with internet time server. Item De
-
OVR 4100S/8100S/6100SN v1.0 User Guide Omnivision Pty Ltd Page 34 of 98 3-8.4 SPOT SETUP The DVR has one BNC video output port which can be configured as the main monitor or the spot monitor. When the SPOT mode is not enabled the video output port can be used to output the main monitor image. To enable the SPOT monitor tick the “Enable Spot” tick box in the spot setup and restart the DVR. SPOT setup is for controlling the order of channels the system cycles through in SPOT mode. User can monitor every chann
-
OVR 4100S/8100S/6100SN v1.0 User Guide Omnivision Pty Ltd Page 12 of 98 CHAPTER 3 MAIN MENU SETUP To enter the main menu and set up of the DVR a user id and a password is required. The default password for the administrator is “123456”. Please check the “Account Setup” for related setup of other log-in users. Table 3-0.1 Onscreen virtual keyboard functions. Item Description Switch between capital and small letters. / Switch between numbers and letters. Press to cancel the setup, and re-choose the login accou
-
OVR 4100S/8100S/6100SN v1.0 User Guide Omnivision Pty Ltd Page 67 of 98 7-4.2 Mobile Software Operation 7-4.2.1 Adding a New DVR Connection In the UiDvr screen select Add button located on the top right hand side corner to add a new DVR connection for remote monitoring. In the Logon Info screen enter a DVR name, the IP address of the DVR, Port number off the DVR (the default is 100), user name and the password for the system. Then select «Go» to initiate the login process. 7-4.2.2 Mod
-
OVR 4100S/8100S/6100SN v1.0 User Guide Omnivision Pty Ltd Page 26 of 98 Item Description User Name Enter user name provided by ISP Password Enter password provided by ISP 3-6.2 HTTP Setup Item Description Enable HTTP Server Check to enable HTTP server. Users can remotely access into the DVR over the network if the HTTP function is activated. Port Enter a valid port value from 1 up to 65000. The default value is 80. Auto Assign each channel with its maximum accessible fps No. Chanel number Quality Setup
-
OVR 4100S/8100S/6100SN v1.0 User Guide Omnivision Pty Ltd Page 17 of 98 Item Description Alarm Duration(Seconds) When motion detect the number of seconds continuous alarm Motion Popup Check the box to Enable/Disable popup screen function for all channels. When motion is detected in LIVE mode, the detected channel image will pop up in full screen display. 1~16 You can setup independently for each channel.
-
OVR 4100S/8100S/6100SN v1.0 User Guide Omnivision Pty Ltd Page 28 of 98 Item Description Enable E-mail Notification Check the box to enable/disable E-mal Notification function. SMTP Server Enter to set up SMTP Server name. (Varies according to the user) User Name Enter the User Name for the SMTP server. Password Enter the Password for the SMTP server. Sender E-mail Enter to set up e-mail address of receivers. Trigger Event Select the events you need the send out E-mail notifications sent for (Motion, Sen
-
Omnivision 16CH H264 DVR OVR 4100S/8100S/6100SN v1.0 User Guide Omnivision Pty Ltd Page 10 of 98 2-3 PTZ Mode Switch to the PTZ mode by pressing “PTZ” button under the LIVE mode. The PTZ icon will appear on upper left side of the screen and the control panel will appear on the bottom right side of screen. Table 2-3.1 Remote Control functions under the PTZ mode Button Description / SLOW Move PTZ up. / Move PTZ down. / Move PTZ to the left. / Move PTZ to the right. ZOOM + PTZ zoom-in. ZOOM — PTZ zo
-
OVR 4100S/8100S/6100SN v1.0 User Guide Omnivision Pty Ltd Page 84 of 98 8-6.3 Group Administration A ‘Group’ means a set of video channels from one or many DVRs, which means, users can organize channels from different DVRs to be set in a group. This function allows you to monitor and manager channels from multiple DVRs easily and flexibly. Steps: 1. Add a new group and name the group with a name and a description. 2. Click ‘Select’ which will bring up a new window. 3. Check the specif
-
OVR 4100S/8100S/6100SN v1.0 User Guide Omnivision Pty Ltd Page 40 of 98 4-2.2 TIME SEARCH TIME SEARCH can be used to playback recordings from a given time. Press “Enter” or left click on the desired date to playback (Note that dates for which the system has got stored data are marked with a red square “ □ “). System will start playing back according for the date you selected. The calendar will be shown by using mouse to click on “year” and “month”. Select the “date” t
-
OVR 4100S/8100S/6100SN v1.0 User Guide Omnivision Pty Ltd Page 30 of 98 Spot Setup Enter to set up the Spot monitor Default ID is ID1. If remote control malfunctions, please press, “DVR1” button to renew corresponding DVR ID. 3-8.1 DISPLAY SETUP Item Description Auto-Seq Interval Set up duration time in seconds for the interval between channels under Auto-Seq mode. Show OSD Turn On / Off OSD display Show DVR Status Turn On / Off DVR illustration and record status display Sho
-
Omnivision 16CH H264 DVR OVR 4100S/8100S/6100SN v1.0 User Guide Omnivision Pty Ltd Page 27 of 98 3-6.3 DDNS Setup Item Description Enable DDNS Enable/disable DDNS function. DDNS Server Select the desired DDND service provider: ez-dn I-DVR.NET DYNDNS.ORG NO-IP.ORG 3322.ORG SMTP Server Enter the registered host name. User Name Enter user name. Password Enter password. 3-6.4 Mail Setup When an event occurs (VLOSS, MOTION, SENSOR) an email can be sent to an email address or a group of email addresses automatically.
-
OVR 4100S/8100S/6100SN v1.0 User Guide Omnivision Pty Ltd Page 38 of 98 4-2 SEARCH MENU Item Description Event Search Event search menu Time Search Enter time search menu 4-2.1 EVENT SEARCH The DVR maintains a log based on all the activities which occur. Each record in the log includes events type, time and channel information. If a recording for a specific event is stored in the system, a yellow signal will be shown on to the left side of time information. Rest your cursor under
-
Omnivision 16CH H264 DVR OVR 4100S/8100S/6100SN v1.0 User Guide Omnivision Pty Ltd Page 73 of 98 CHAPTER 8 CMS INSTALLATION AND USAGE GUIDE 8-1 CMS Installation System Requirement: Intel Pentium 4 processor or equivalent. Microsoft Windows Vista Windows XP Windows 7, Windows 2003 Server. 512MB minimum system memory.(500M requested for group DVR connection and 180M for single DVR) 20MB HDD space. Recording and image capturing require extra space for storage. VGA capable of handling DirectX9 and
-
Omnivision 16CH H264 DVR OVR 4100S/8100S/6100SN v1.0 User Guide Omnivision Pty Ltd Page 77 of 98 8-3 DVRs, Groups & Events Icon Description View the list of logged in DVR/s AND/OR DVR Group. View Logs: lists all the event information of a DVR 8-3.1 View DVR Group List Single left click on ‘DVR’ or ‘Group’ will expand/collapse the entire DVRs and groups list. On the DVR list, double left clicking on a connected DVR will show its images in main display. See “8-6.2 DVR Administration” for further information. On the Group
-
Omnivision 16CH H264 DVR OVR 4100S/8100S/6100SN v1.0 User Guide Omnivision Pty Ltd Page 78 of 98 8-3.2 View Event Logs In this window, all the events of a DVR can be expanded/collapsed in the order of Rem ote in /Remote out, Video Loss, Motion, Sensor, Others (Power Reset, Key Lock, Key U nlock, and HDD Full). 8-4 Local PC Information and Control This section is Located at the left lower corner of the screen, please see the chart belo w for a detailed description of the information available. Icon Function Description HDD info
-
Omnivision 16CH H264 DVR OVR 4100S/8100S/6100SN v1.0 User Guide Omnivision Pty Ltd Page 7 of 98 Table 2-1.3 Description of onscreen icons in LIVE mode Icon Description Recording is on Schedule Recording is on 1~4 Live Audio is on Live Audio is off Motion detected on the channel Sensor triggered on the channel Video loss detected on the channel USB device detected DVD burner is detected Connected to the LAN cable. AUTO-seq is on Freeze is on, screen is frozen LOCK is on
-
OVR 4100S/8100S/6100SN v1.0 User Guide Omnivision Pty Ltd Page 51 of 98 7-1.2.3 Modify the Login Information of DVR You can use the “Modify” command to change the login information for a DVR. The steps are identical to that of the “Add” command. 7-1.2.4 Delete the Login Information of DVR “Delete” command can be used to remove the DVR information if it is no longer useful. Select the DVR
-
Omnivision 16CH H264 DVR OVR 4100S/8100S/6100SN v1.0 User Guide Omnivision Pty Ltd Page 64 of 98 the image by 90 degrees. Press “Rotate” in menu and there will be options, “Normal” and “Rotate” available to choose from. 7-3.3.4 Alarm Besides DVR live monitoring, you can receive system alarms through this software. If events like, Motion Detection, Sensor Detection, Video Loss …etc. occurs, there will be alarm sound and alarm images appear on the status. Icon Description Motion Detection Sensor Detection Video Loss Press “Alarm” in menu, there will be options, “Alarm OFF”
-
Omnivision 16CH H264 DVR OVR 4100S/8100S/6100SN v1.0 User Guide Omnivision Pty Ltd Page 53 of 98 7-1.3.4 Size of Image The screen size varies from mobile to mobile. You can select “Size” under the “Menu” to choose from “Original” or “Fit Screen” to resize the displayed image. Item Description Original The image will be shown in original size. Fit Screen The image will be shown to fit the screen. 7-1.3.5 Rotate the image The Live image can be displayed in normal or rotate 90 de
-
Omnivision 16CH H264 DVR OVR 4100S/8100S/6100SN v1.0 User Guide Omnivision Pty Ltd Page 9 of 98 Icon Description / Fast rewind / Fast forward Play/pause ▲ / SLOW slow playback ▼ / ■ stop playback Frame by frame playback Full screen display Quad display 9-channel display 16-channel display Zoom-in display Note 4CH will show quad display; 8 CH will show quad display and 9-channel display.
(Ocr-Read Summary of Contents of some pages of the Omnivision 16CH H264 DVR Document (Main Content), UPD: 15 July 2023)
-
79, Omnivision 16CH H264 DVR OVR 4100S/8100S/6100SN v1.0 User Guide Omnivision Pty Ltd Page 74 of 98 5.”Confirm Installation” window shows. Select ‘Next’ then the installation starts. 6. Select ‘Close’ to finish installation when the “Installation Complete” window is show n.
… -
10, OVR 4100S/8100S/6100SN v1.0 User Guide Omnivision Pty Ltd Page 5 of 98 CHAPTER 2 LIVE, PLAYBACK AND PTZ OPERATIONS The IR remote control and the mouse operate differently under each mode; this chapter describes the functions of them under the three different modes: LIVE, PLAYBACK and PTZ. 2-1 LIVE Mode You can monitor all the channels, listen to audio signal and have some related operations under LIVE mode. This paragraph de…
-
7, OVR 4100S/8100S/6100SN v1.0 User Guide Omnivision Pty Ltd Page 2 of 98 1-2 16CH REAR PANEL CONNECTORS MAIN monitor BNC port for the main monitor. You can switch to SPOT monitor by GUI setting. VIDEO IN BNC input ports for cameras, 16 in total. AUDIO OUT RCA output port for audio signal. EXTERNAL I/O EXTERNAL I/O …
-
1, ─ ── ─ 4/8/16CH H264 DVR ─ ── ─ USER GUIDE Unit 3, 3-5 Gilda Crt Mulgrave VIC 3170 T: 1300 688 788 www.omnivision.net.au [email protected] User Manual OVR 4100S/8100 S/6100S N v 1.0 Information contained in this document is subject to change without notice. Copyright © 2011 Omnivision Pty Ltd
… -
62, OVR 4100S/8100S/6100SN v1.0 User Guide Omnivision Pty Ltd Page 57 of 98 7-3 Mobile Application Installation and Operation for Blackberry System System requirements Mobile Device operation platform Blackberry 9000 Mobile device needs to have an active data connection such as Blackberry data pack or GPRS 3G Wi-Fi… etc. 7-3.1 Software installation Follow the following instructions to install the mobile applicati…
-
38, OVR 4100S/8100S/6100SN v1.0 User Guide Omnivision Pty Ltd Page 33 of 98 Update Now Immediately updates the date and the time with the NTP server. 3-8.3 BUZZER & RELAY SETUP Item Description Key Tone Enable/Disable keystrokes. Buzzer Enable/Disable buzzer operation when the alarm is triggered for sensor, motion and vloss (Video Loss). Relay Enable/Disable the sig…
-
30, OVR 4100S/8100S/6100SN v1.0 User Guide Omnivision Pty Ltd Page 25 of 98 3-6.1.2 LAN Select LAN to assign a static IP address for the system, the following information is required. Item Description IP Address Enter IP address provided by ISP / Network Administrator Subnet Mask Enter IP address of Subnet Mask provided by ISP / Network Administrator Gateway Enter IP address of Gate way provid…
-
6, Omnivision 16CH H264 DVR Omnivision Pty Ltd Page 1 of 98 CHAPTER 1 PANEL LOCATION 1-1 FRONT PANEL CONTROLS Control Keys Description DVD Writer Optional DVD-RW backup device. / In SETUP mode, press to move cursor down. In PLAYBACK mode, press to stop playing back. / SLOW In SETUP mode, press to move cursor up. In PLAYBACK mode, press to slow down. /…
-
87, OVR 4100S/8100S/6100SN v1.0 User Guide Omnivision Pty Ltd Page 82 of 98 8-6 Operation Bar 10 Operations to be listed as below: Table 8-6.1 description of the functions in the operations bar Icon Description User Administration. Please see “8-6.1 User administration” DVR Administration. Please see “8-6.2 DVR Administration” Group Administration. Please see “8-6.3 Group Administration” eMap Administrati…
-
70, OVR 4100S/8100S/6100SN v1.0 User Guide Omnivision Pty Ltd Page 65 of 98 7-4 Mobile Application Installation and Operation for Apple iPhone 7-4.1 Software Installation Follow the following instructions to install the iPhone mobile application in your phone. Step 1: Login to iTunes Store/ App store using your devise or a PC, and then input “scdvr” into the search bar to search for the mobile application. . Step 2: You will find the Scdvr icon displayed as below. Click on the icon and it will take…
-
37, Omnivision 16CH H264 DVR OVR 4100S/8100S/6100SN v1.0 User Guide Omnivision Pty Ltd Page 32 of 98 3-8.2.2 TIME ZONE AND DAYLIGHT SAVING TIME SETUP Set up time zone and activate Daylight Saving Time function according to user’s DVR location. Item Description Select Time Zone Enter to modify GMT from GMT- 13 to GMT+ 13 Daylight Saving Time Turn on/ off Daylight Saving Time 3-8.2.3 INTERNET TIME SETUP Synchronize your DVR time with internet time server. Item Description Automatic Synchronization Tick to enab…
-
46, Omnivision 16CH H264 DVR OVR 4100S/8100S/6100SN v1.0 User Guide Omnivision Pty Ltd Page 41 of 98 CHAPTER 5 Remote Software Installation and Setup 5-1 Installing and using the remote desktop client Remote Desktop Client software: DVR Remote Desktop.exe allows you to remotely access and control the DVR from a remote PC. p.s. Operating systems currently supported includes Windows XP SP2 and above Windows Vista and Windows 7 To install the Remote Desktop application please fo…
-
67, Omnivision 16CH H264 DVR OVR 4100S/8100S/6100SN v1.0 User Guide Omnivision Pty Ltd Page 62 of 98 7-3.2.3 Modify the Login Information of DVR If log-in information for a given system wished to be modified, please select that DVR. Enter “Option” → “Modify” for editing the existing data. Press “OK” when it’s finished. 7-3.2.4 Delete Existing DVR Record (Connection Information) If connec…
-
44, Omnivision 16CH H264 DVR OVR 4100S/8100S/6100SN v1.0 User Guide Omnivision Pty Ltd Page 39 of 98 Item Description Criteria Setup conditions of event search Page Switch between pages of events Date/Time Date/time when event occurred. Event Type Event type, defined as following MOTION Motion Detected SENSOR Sensor Detected Video Loss Video Loss Remote Login user log-in over the network Remote Logout user log-out over the network Power On DVR Power on HDD Full HDD …
-
31, OVR 4100S/8100S/6100SN v1.0 User Guide Omnivision Pty Ltd Page 26 of 98 Item Description User Name Enter user name provided by ISP Password Enter password provided by ISP 3-6.2 HTTP Setup Item Description Enable HTTP Server Check to enable HTTP server. Users can remotely access into the DVR over the network if the HTTP function is activated. Port Enter a valid port value from 1 up to 65000. The default value is 80. Auto Assign each channel wit…
-
98, OVR 4100S/8100S/6100SN v1.0 User Guide Omnivision Pty Ltd Page 93 of 98 9. Newly added website will appear under the trusted web sites list. Press close. 10. Go back to IE window, press refresh button or F5.
… -
63, OVR 4100S/8100S/6100SN v1.0 User Guide Omnivision Pty Ltd Page 58 of 98 Step 3 Execute “Application Loader” Step 4: Execute “Add/Remove Applications” Step 5: Copy «codname.alx” and “codname.cod” which can be found on the User Manual CD (packed with the DVR) to the PC.
… -
55, Omnivision 16CH H264 DVR OVR 4100S/8100S/6100SN v1.0 User Guide Omnivision Pty Ltd Page 50 of 98 7-1.2 Mobile Application Operation After the installation, enter the Program Files menu in your mobile device to run the application “DVRH264”. Select “Menu” at the bottom right hand corner of your mobile screen, 4 commands, Login Add Modify and Delete, will show up. 7-1.2.1 Add New Login DVR To log into the DVR, you need to enter the loggin…
-
23, OVR 4100S/8100S/6100SN v1.0 User Guide Omnivision Pty Ltd Page 18 of 98 3-2.2 SENSOR SETUP Item Description Sensor Popup Check the box to Enable/Disable popup screen function for all channels. When Sensor is detected in LIVE mode, the detected channel image will pop up in full screen display. All Off Set all sensor off All Low Set all sensor polarity low All High Set all sensor polarity high Sensor Polarity Click or press ▼ to select between HIGH, LOW voltag…
-
34, Omnivision 16CH H264 DVR OVR 4100S/8100S/6100SN v1.0 User Guide Omnivision Pty Ltd Page 29 of 98 Item Description Enable PTZ Click the box to Enable/Disable PTZ function for each channel. Protocol Set up the protocol of PTZ cam. The supported protocols are PELCO-P, PELCO-D, KND, LI-LIN, SAMSUNG, LG, AVTECH. PTZ ID Click or press ◀ ◀ to set up PTZ ID. The valid ID value is from 1 to 64. Baud Rate Select Baud Rat…
-
84, OVR 4100S/8100S/6100SN v1.0 User Guide Omnivision Pty Ltd Page 79 of 98 8-5 Main Display The main display area is where the live image of the DVR is shown. You can drag to change the location of screen for each channel and turn on/off audio signal with mouse-click. 8-5.1 Audio Control In live mode, you can turn on/off the audio signal for Ch1~Ch4: Audio signal is On Audio signal is Off Turn on/off by clicking on …
-
85, Omnivision 16CH H264 DVR OVR 4100S/8100S/6100SN v1.0 User Guide Omnivision Pty Ltd Page 80 of 98 8-5.2 eMAP Display In Live mode, pressing will show the e-MAP menu. If the channel has been set u to use e-MAP, the menu will show all the e-MAP titles that have been assigned to this channel; otherwise, “No eMaps” will be shown. Please check “8-6.4 eMAP administratio n�…
-
88, OVR 4100S/8100S/6100SN v1.0 User Guide Omnivision Pty Ltd Page 83 of 98 8-6.1 User administration Before the CMS can be used on a PC, user accounts should be added with proper authority. Each user should also be assigned a password and optionally a description. If a user does not have certain authority assigned, he/she will not be able to operate the corresponding functions on the Operations Bar. By the default no authority is assigned. The administrator s…
-
74, OVR 4100S/8100S/6100SN v1.0 User Guide Omnivision Pty Ltd Page 69 of 98 Step 4. Choose “BuboBubo” and click “Install” button. When the installation is complete tap on the icon to launch the application. 7-5.2 Mobile Software Operation When the application is opened for the first time, there will be a empty record (dvr1) by default.
… -
91, OVR 4100S/8100S/6100SN v1.0 User Guide Omnivision Pty Ltd Page 86 of 98 8-6.5 Remote Play Video images recorded on a DVR can be displayed on remote CMS using the Remote Play function. Select a DVR from dropdown menu and a display mode from the top of the screen. After the recorded segments are listed below, double click on one to show that segment on the right display panel. Icon Description Start playing. Pause. Fast …
-
89, OVR 4100S/8100S/6100SN v1.0 User Guide Omnivision Pty Ltd Page 84 of 98 8-6.3 Group Administration A ‘Group’ means a set of video channels from one or many DVRs, which means, users can organize channels from different DVRs to be set in a group. This function allows you to monitor and manager channels from multiple DVRs easily and flexibly. Steps: 1. Add a new group and name the group with a name and a description. 2. Click ‘Select’ which will bring up a new window. 3. …
-
53, OVR 4100S/8100S/6100SN v1.0 User Guide Omnivision Pty Ltd Page 48 of 98 Alarm Hold Time 1 ~ 60 SEC Search ( Event Cr iterion ) YES Event Log Up to the 10000 events (Sensor, Motion, video Loss, power on, remote login, logout, HDD error, HDD full) OSD & DVR Control GUI 16-bit True Color Multi — Language English, Traditional Chinese, Others Camera Title Multi-Language USB Mouse YES Touch Panel Touch Panel LCD Monitor (USB …
-
90, OVR 4100S/8100S/6100SN v1.0 User Guide Omnivision Pty Ltd Page 85 of 98 8-6.4 eMap Administration If geographical locations are relevant, or if it is desired to use a picture as the background, eMap can be used for this purpose. With eMap, a background picture can be picked by the user and channels from multiple DVRs can be placed and dragged around on the picture. Steps to follow: …
-
43, OVR 4100S/8100S/6100SN v1.0 User Guide Omnivision Pty Ltd Page 38 of 98 4-2 SEARCH MENU Item Description Event Search Event search menu Time Search Enter time search menu 4-2.1 EVENT SEARCH The DVR maintains a log based on all the activities which occur. Each record in the log includes events type, time and channel information. If a recording for a specific event is stored in the system, a yellow signal will be shown on to the left side of …

H.264 Standalone DVR
16 CH
User Manual
DVR User Manual
For further help, please visit
kb.zmodo.com

16-Channel H.264 DVR User Manual
Chapter 1: Overview ………………………………………………………………………… 1
1.1 Introduction …………………………………………………………………………. 1
1.2 Packaging and Accessories ………………………………………………….. 1
1.3 Main Features ……………………………………………………………………… 1
1.5 Product Appearance and Interface Definition …………………………... 3
1.5.1 Front Panel ……………………………………………………………….. 3
1.5.2 Back Panel ………………………………………………………………… 3
1.5.3 Setup Diagram …………………………………………………………… 4
1.6 Remote Controller ……………………………………………………………….. 4
1.7 Mouse ………………………………………………………………………………… 5
Chapter 2: Quick Installation …………………………………………………………….. 6
2.1 HDD Installation …………………………………………………………………… 6
2.2 Boot …………………………………………………………………………………… 6
2.3 System Login ………………………………………………………………………. 6
2.4 Shortcut Menu …………………………………………………………………….. 7
2.4.1 Main menu ………………………………………………………………… 7
2.4.2 Key Lock …………………………………………………………………… 7
2.4.3 Channel Switch ………………………………………………………….. 7
2.4.4 Video Search …………………………………………………………….. 7
2.4.5 Start Sequence ………………………………………………………….. 7
2.4.6 Start Cruise ……………………………………………………………….. 7
2.4.7 PTZ Control……………………………………………………………….. 7
2.4.8 Mute …………………………………………………………………………. 8
2.4.9 Manual Recording /Stop Recording ………………………………. 8
2.4.10 Zoom ………………………………………………………………………. 8
2.4.11 PIP……………………………………………….…………...10
Chapter 3: Menu Settings ………………………………………………………………. 10
3.1 Main Menu ……………………………………………………………………….. 10
3.2 Recording Mode ……………………………………………………………….. 11
3.3 Video Search ……………………………………………………………………. 12
3.4 Backup …………………………………………………………………………….. 13
3.5 Hard Disk Management ……………………………………………………… 14
3.6 Basic Setup ………………………………………………………………………. 14
3.6.1 System Language ……………………………………………………. 15
i

16-Channel H.264 DVR User Manual
3.6.2 Time setup ……………………………………………………………… 15
3.6.3 User Password ……………………………………………………….. 16
3.6.4 Cameras ………………………………………………………………… 16
3.6.5 Video / Audio …………………………………………………………… 17
3.7 : Advanced ……………………………………………………………………….. 18
3.7.1 Alarm ……………………………………………………………………… 18
3.7.2 System Info …………………………………………………………….. 19
3.7.3 Motion Detection ……………………………………………………… 20
3.7.4 Mobile Phone Monitoring ………………………………………….. 21
3.7.5 System Maintenance …………………………..…………………… 21
3.7.6 Zoom ………………………………………………………………………. 22
3.7.7 Network Setup ………………………………………………………… 22
Chapter 4: DVR Network ……………………………………………………………….. 24
4.1 Functional Characteristics ………………………………………………….. 24
4.2 Installation and Download of Controls ………………………………….. 24
4.3 IE Login ……………………………………………………………………………. 24
4.4 Real-Time Preview ……………………………………………………………. 25
4.5 Record Playback ………………………………………………………………. 25
4.6 Recording Mode ……………………………………………………………….. 26
4.7 Alarm Setup ……………………………………………………………………… 27
4.8 PTZ Control ……………………………………………………………………… 27
4.9 Network Setup ………………………………………………………………….. 27
4.10 System Setup ………………………………………………………………….. 28
4.11 Host Info …………………………………………………………………………. 28
Appendix A: Android Setup ………………………………………………………. 29
Appendix B: iOS Setup………………………………………………….30
Appendix C: FAQ ………………………………………………………..31

16-Channel H.264 DVR User Manual
Thank you for buying our DVR
Dear Customer,
Thank you for choosing to purchase and use our product! If while using this product you
encounter any technical problems or problems with quality, please contact us. We are ready to
serve you. Before using this product, please carefully review the warranty information.
1. Service Contract
This device may be returned for a refund from the seller within 30 days. Outside the return
policy and within 90 days of the purchase a defective device will qualify for a replacement at the
discretion of Zmodo. This device otherwise comes with a 1 year limited parts and labor
warranty.
2. Requirements for Return or Replacement
The products outward appearance should have no scratches, dirt, dents, blemishes, or
alterations of any kind. A copy of the purchase invoice and warranty certificate will be
required.
3. Warranty Restrictions
In the event of the following situations, regardless of expiration Date, location, repair or part
replacement, our company must receive payment, and is not liable for any payment to the
consumer. All resulting losses will be the consumer’s responsibility:
• In cases of use causing the product’s malfunction or damage, or if the environment is
not suitable for the product’s usage and causes malfunction or damage;
• In cases of natural disasters, as defined by law, or unavoidable circumstances that are
not related to the product’s quality that cause the product’s malfunction or damage;
• In cases that the consumer’s purchase receipt and the product ID number/model number
written on the warranty card are inconsistent;
• In cases that the consumer’s use, care, or protection inadvertently cause the machine’s
malfunction or damage;
• In cases that the product’s up-to-standard certificate is damaged;
In cases that there is no purchase receipt or warranty card;
• In cases that the repair warranty has already expired.
4. No other warranties, other than Zmodo’s repair warranty rules are acknowledged by Zmodo.
5. In order to ensure consumer’s rights, please carefully read the repair warranty content.
6. Zmodo reserves the right to update and change product software at any time without notice.
This manual may not directly reflect all aspects of your DVR or your DVR version. Software
updates (when available) can be found on kb.zmodo.com.
Best regards,
Zmodo Customer Care

16-Channel H.264 DVR User Manual
1
1.1 Introduction
Chapter 1: Overview
This SFN Series DVR is 16-channel standalone digital video record that uses H.264
video compression for playback main profile with multiplex functions: record, playback,
live preview, remote preview, and backup supported.
It is a professional, high performance, intelligent, audio & video solution with a
user-friendly GUI, and practical industrial design. This series DVR is suitable for use at
home, office, small business and most common security and surveillance applications.
1.2 Packaging and Accessories
Following parts are included in the package:
(1)ZMD-DR-SFN6 CCTV Safety DVR
(2) AA Batteries
(1)IR Remote Control & Mouse
(1)DVR Manual
(1) DC12V3A power adapter(12V5A is required if two HDDs are installed in DVR)
All relevant software can be downloaded at http://files.zmodo.com
1.3 Main Features
◎ Standard H.264 video compression format
◎ 16-bit true-color semi-transparent graphical menu interface, menu option tips
◎ Variety of recording modes including manual, timed, motion detected, and alarm
recording
◎ Optimized 4-channel simultaneous playback
◎ Multiple Backup Options (USB flash drive and network)
◎ One USB 2.0 for data backup and one USB1.1 for the mouse operation
◎ Multi-function operation, recording, playback, monitor, backup, and network
transmission can be realized at the same time
◎ Dual stream technology
◎ Supports network multi-screen, real-time viewing, parameter settings,
backup, or playback
◎ Supports mobile phone monitoring
◎ Supports event classification and precise time search and playback
◎ Default settings recovery

16-Channel H.264 DVR User Manual
2
1.4 Technical Parameters
8 channel input 1 channel output (switch)
Live, recording, network, mobile
phone, surveillance simultaneously
Timer/Manual/Motion Detection/Alarm
4 channels playback simultaneously
(The playback channel is optional. Supports
remote playback)
Supports USB drive backup, network backup,
backup files by time
Supports 2 SATA HDD, max capacity 2TB(ea.)
16 channels with CIF resolution
Send notification to the designated Email
1 RJ-45 10/100M via Ethernet , support
TCP/IP,DHCP,DNS,DDNS,SMTP,NTP, etc.
Supported, max 5 users on line
Supported, max 5 users on line
Mobile Phone Surveillance
Supports iPhone and Android; max 3 users on
line
Support multi-level user authority distribution
DC12V/5A(2 HDD) or 12V/3A(one HDD)
16-Channel H.264 DVR User Manual
3
1.5 Product Appearance and Interface Definitions
1.5.1 Front Panel
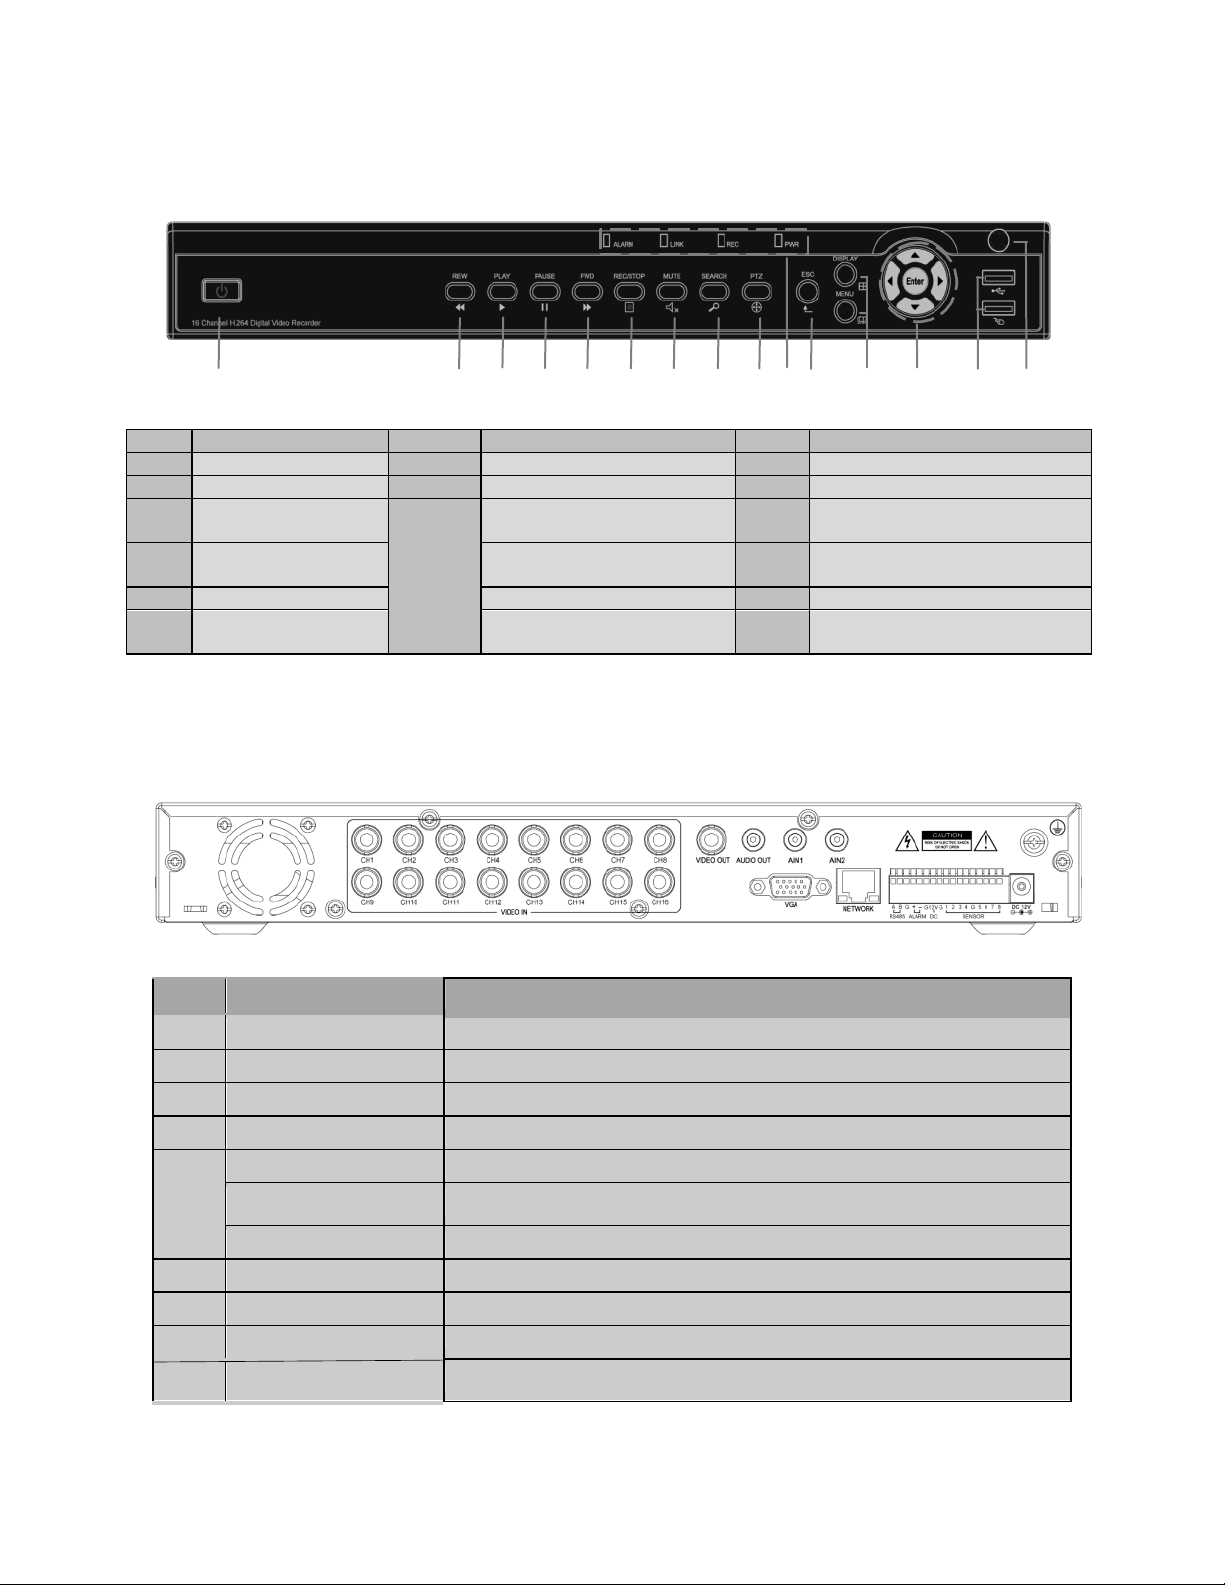
1 2 3 4 5 6 7 8 9 10 11 12 13 14 15
10
(Refers
to LED
Lights)
Display: Display Mode
Menu: Main Menu
ALARM: Network
Connection Indicator
Up, Down, Left, Right, and
Enter
Manual Start/Stop
Recording
Remote Control Infrared
Receiver
Connect analog video(camera) signal input, standard BNC
Connect to BNC video output
Connect active audio signals, such as pickup
Connect VGA monitor, such as computer monitor
PTZ control, alarm switch output, DC 12V output for assistance
Connect alarm switch input
Connect alarm switch output
Power input: DC 12V/5A or 12V/3A(one HDD)
16-Channel H.264 DVR User Manual
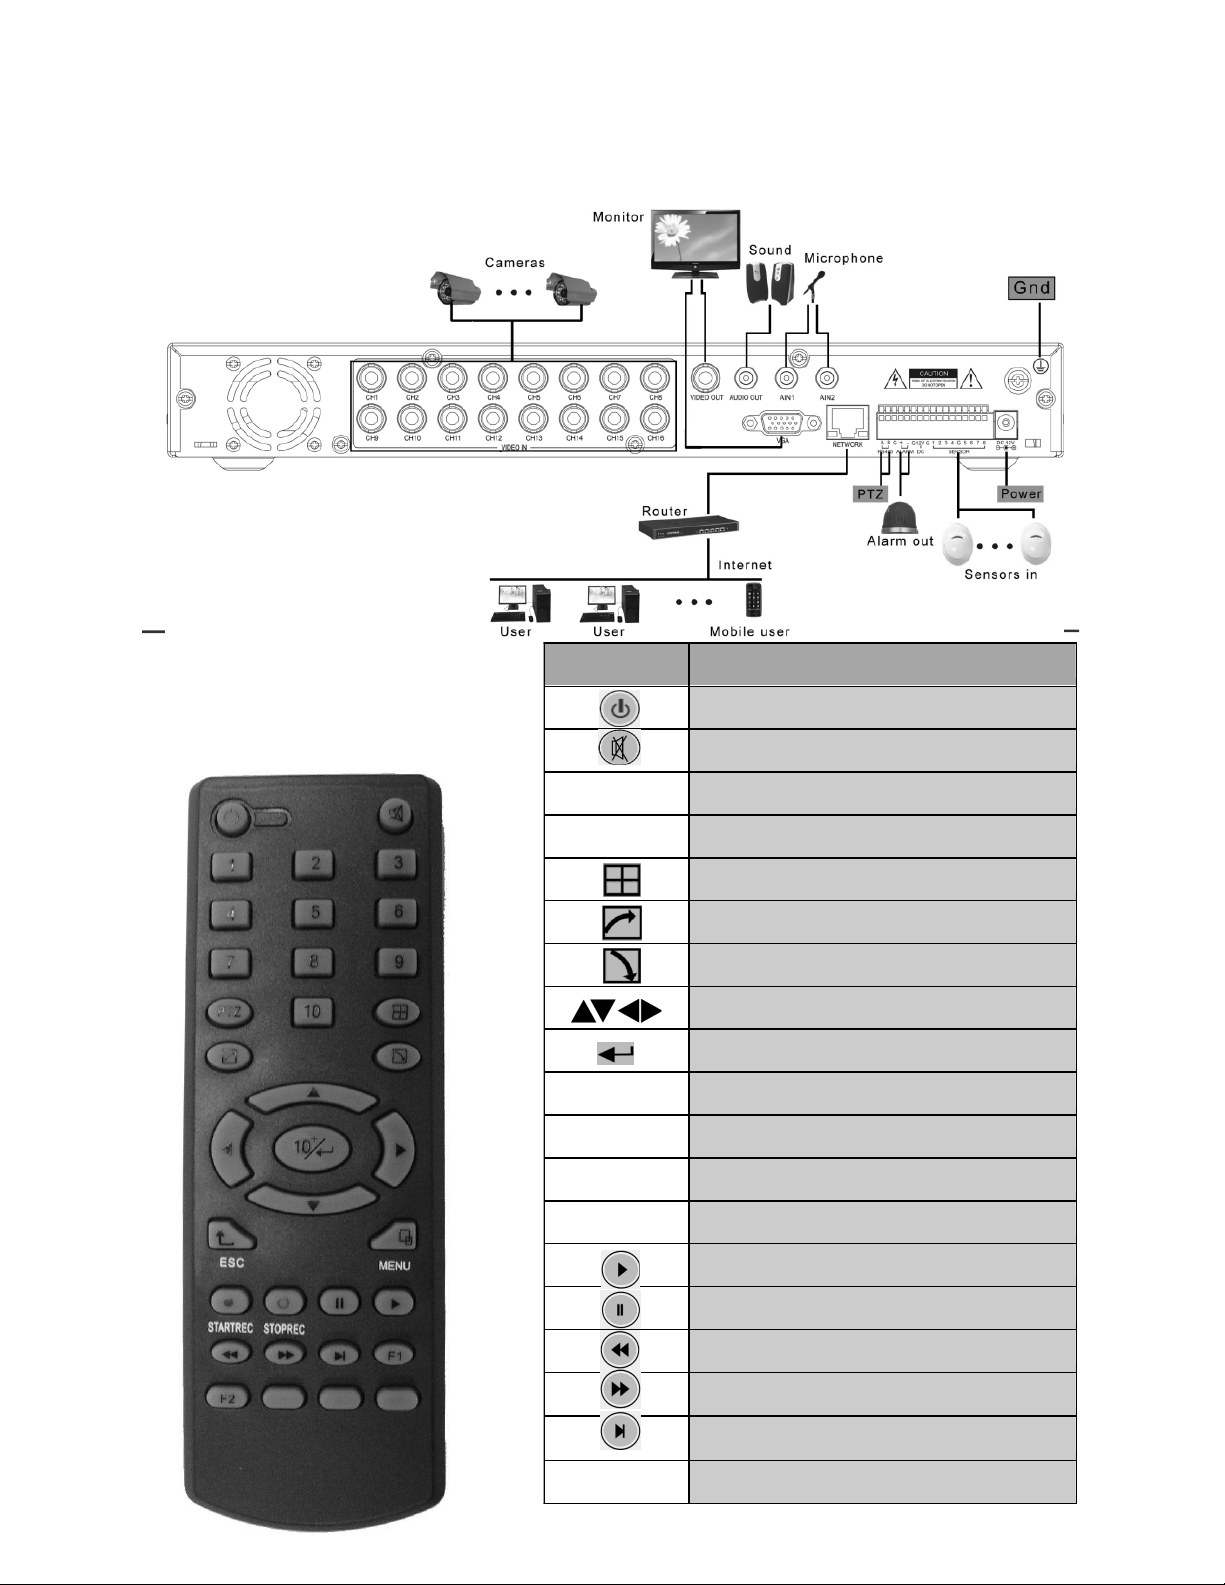
Channel Selection; Number Keys
Single and Multi-Split Screen
OK or 10+x Channel(x=1-6)
1.5.3 Setup Diagram
1.6 Remote controller
For reference only

16-Channel H.264 DVR User Manual
5
1.7 Mouse
This equipment supports a wired USB mouse that is used to navigate the DVR’s
menus. Insert the USB plug directly into the USB port. Mouse operation is similar to
WINDOWS operations.
Mouse
Action
Function
Right Button:
Enter System Main Menu. From the Main Menu, pressing the Right
Mouse Button will return to the previous page.
Double-clicking will apply to both live preview and playback.
Double
Left-Click
Left-Click
Click and
Drag
Double-click on a desired channel to zoom the selected channel to
full screen. Double click the zoomed-in screen again to return the
viewing method to multi-channel viewing.
Channel Selection: Left clicking on a desired active video channel
will move the highlight to that channel and cause any commands from
the PTZ menu to affect that channel
Menu Use: Left clicking on any icon on the menu will cause the DVR
to act upon that selection.
Drop down boxes can be opened by clicking the downward facing
arrow on the box.
Functions as Enter/Select button in all purposes
Left clicking in a blank field in the menu will bring up the virtual
keyboard allowing. Left-click to select letters, numbers, and symbols
to insert in to the field.
Click and drag in certain screens to select an area. In motion
detection, this will block off an area that will not be used. In playback
this will create a digital zoom in to the selected area.

16-Channel H.264 DVR User Manual
6
Chapter 2: Quick Installation
2.1 HDD Installation
The manufacturer recommends that the hard disk be installed by a technician t o
avoid damage to the equipment and hard disk. The DVR must be powered off
before installation. This equipment supports a hard disk with a SATA interface. Please
see http://kb.zmodo.com for recommended hard drives and hard drive
requirements.
Installation procedures are as follows:
A. Unscrew the screws that secure the DVR cover and remove the cover. There will
be a bracket or an empty space where the hard drive will sit.
B. Connect the red data cable and multicolored power cable firmly.
C. Put the HDD into the bracket or open area above directly over the four screw
holes.
D. Affix the HDD onto the bracket or DVR base with screws and replace the DVR
housing.
Note: The new hard disk drive must be formatted to function with the DVR.
2.2 Boot
Connect the power adapter to the power cord socket in back panel, and press the
power button on front panel. The DVR will turn on, the power indicator POWER will light
up, and the monitor will display a 16-channel split image. If a non-formatted hard
disk exists in the DVR, it is required to format the HDD before recording video footage.
By default the DVR is set to begin immediately recording when turned on with a
working and formatted hard drive installed. The red REC LED light will confirm that the
DVR is recording.
Notes:
1. If hard disk is not installed when the DVR is powered on, or the newly installed hard
disk is not formatted on the DVR, the red H logo will be shown in video preview picture.
2.The newly installed hard disk cannot be used until formatted in the DVR as follows:
Main Menu → HDD → HDD Format. The system will be restarted after completion of
formatting.
2.3 System Login
The DVR Device ID is 000000 without any
password. The user can log in to the main
menu directly. The administrator can change
the DEVICE ID and PASSWORD in the Basic Settings – User Password menu. The
user can set an ordinary user password and administrator password. The
administrator has all the operating privileges, and an ordinary user can only monitor
video, search, and playback.
Note: Admin and User are differentiated solely by the password. Do NOT set them to
the same password as the system will default to the user and the DVR will be locked.

16-channel H.264 DVR User Manual
7
2.4 Shortcut Menu
Click the right button on the DVR interface or right-click on the mouse after system
startup to open the Quick Operations popup menu. This menu has the following setting
options: MAIN MENU, KEYLOCK, CHANNEL SWITCH, VIDEO SEARCH, START
SEQUENCE, START CRUISE, PTZ CONTROL, MUTE, MANUAL RECORD, STOP
RECORD and PIP MODE.
2.4.1 Main Menu
Click MAIN MENU to enter the main menu interface. See 3.1 for more information about
the main menu.
2.4.2 Key Lock
When the password function is enabled (please see 2.3), click the right button in
live preview and select KEYLOCK in the pop-up menu. The system interface
will be locked immediately, and the password is required to log in to access the
menus.
2.4.3 Channel Switch
Allows the user to select a specific channel.
2.4.4 Video Search
Please see Chapter 3.
2.4.5 Start Sequence
Start video channel automatic sequence function. Right-click to exit this feature.
2.4.6 Start Cruise
Begin the PTZ cruise set by the user. This will be replaced with Stop
Cruise when this function is enabled.
Note: This feature can only be used after the user sets up PTZ control
parameters and preset points.
2.4.7 PTZ Control
Click right button in main interface and select PTZ Control. The following interface
will appear:
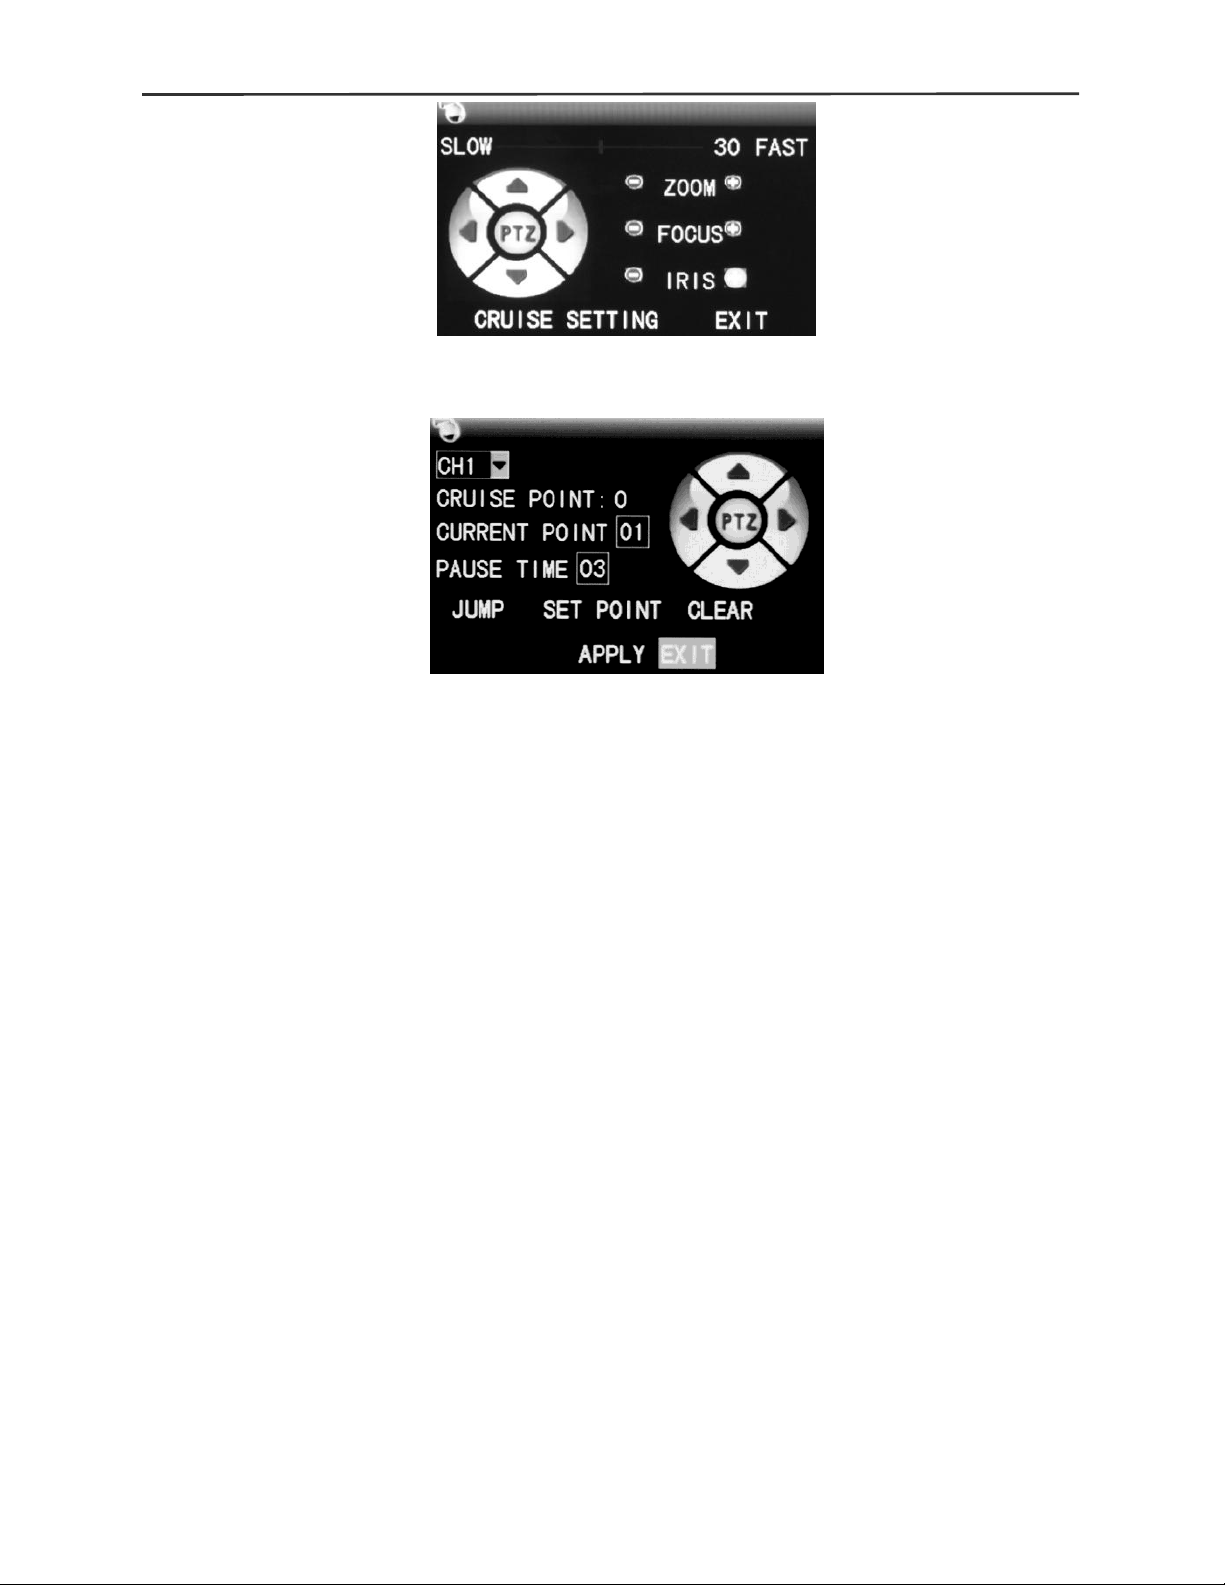
16-channel H.264 DVR User Manual
8
PTZ speed (fast or slow) can be controlled in this interface. Zoom, focus, and aperture
are also adjustable in this menu.
Cruise Setting:
1. Select the PTZ channel.
2. Set the pause time(s).
3. Adjust the arrow keys to the position which needs to be monitored.
4. Select SET POINT. Repeat steps 2–4 to set additional presets.
5. Select the APPLY button to save the settings.
6. Exit to live screen and select START CRUISE.
Notes:
1. To set up more points, repeat steps 2-5.
2. To view the current points already set position press JUMP.
3. To delete the point has been set, enter the point number and select CLEAR.
2.4.8 Mute
Turn on / off sound.
2.4.9 Manual Recording / Stop Recording
If timed recording is on (please see Chapter 3), and manual record is enabled
manual record will override any timed recording schedule. If “Record When powered
On Mode” is enabled, then this function is not available.
2.4.10 Zoom
In single-channel full—screen mode, this function can be done by dragging the
mouse to marquee area to enlarge
 Loading…